Supply User Manual ENG -> 1. General Supply -> LU-GE 0104: System Help and Suggestions.
How to Use the UniField Helps and Suggestions?
Searching Tools
Many options are given to users to optimize searches. The system facilitates filtering and searching for groups of important documents using the relevant buttons.
 Supplier Invoice search options
- Filter buttons: when a filter is active the button turns dark grey; click again to deselect. It is important to note that the system’s searching options are based on “and” not “or”, so in this example pressing the filter buttons {Draft} and {Paid} will look for documents with status Draft AND Paid and therefore it will return zero documents as an invoice can only have one status at a time.
In some search views there is a filter button selected by default. Normally it is the button that shows all open documents to avoid seeing cancelled and closed documents.

Sometimes the filter buttons are gathered by sub-group so you can filter on one of the criteria by group. Therefore you can select several filters from different group but keep in mind that the selection order of these filters is important to display the result of your search
- In all search views, there are also default search fields. These fields are usually chosen according to the importance of the object (related to the list view column) and provide a quick way to search without building a query. They can be text fields, look-up fields or drop-down menus.
- {Group By} button filters show the search results by group according to the selections made
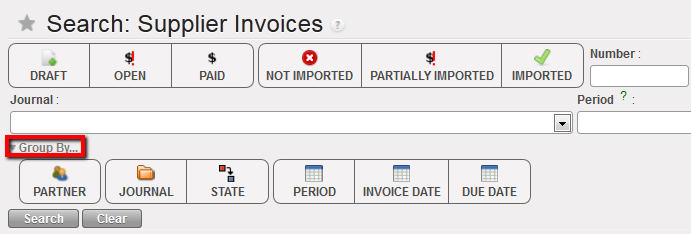
Group by filters
- {Search} button executes the search, while the {Clear} button clears all filters so all records are returned
Printing
Printing in UniField is always generated via a pdf, xls or csv file; printing options are located in the {Action Menu} on the right-hand side of the screen. All the options under {Reports} are usually printable; this will work on views, search and form.
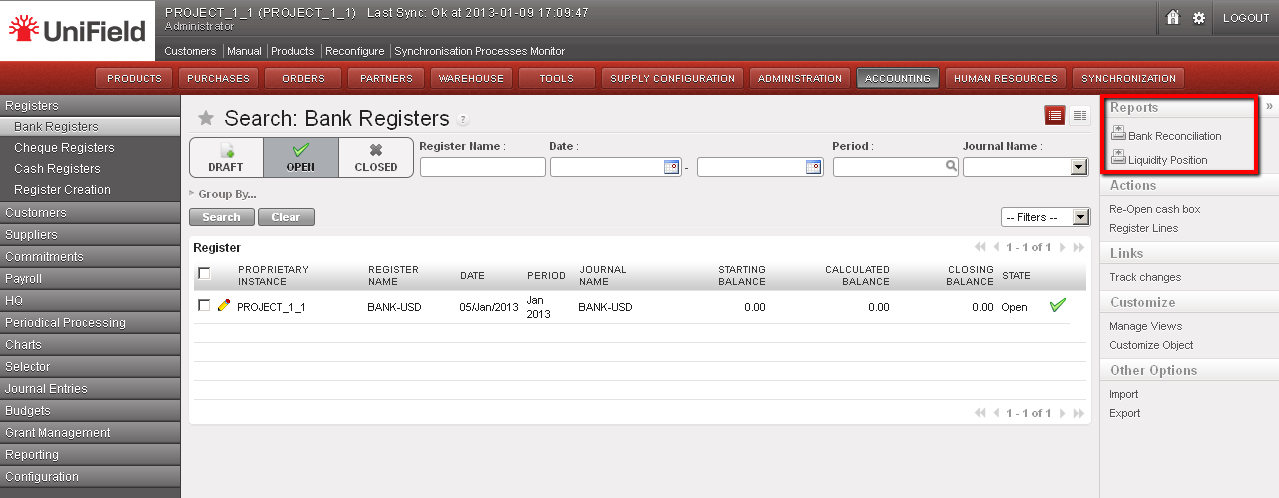
Printing report options in the {Bank registers} sub-module
Exporting and Importing Documents
- Exporting
Exporting capabilities in UniField are various. An export can be in PDF, Excel, XML or CSV formats. If the task allows exporting the option is located in the {Action} menu on the right. The user must have the appropriate user rights to perform an export. The user should select the columns to export as well as the format.
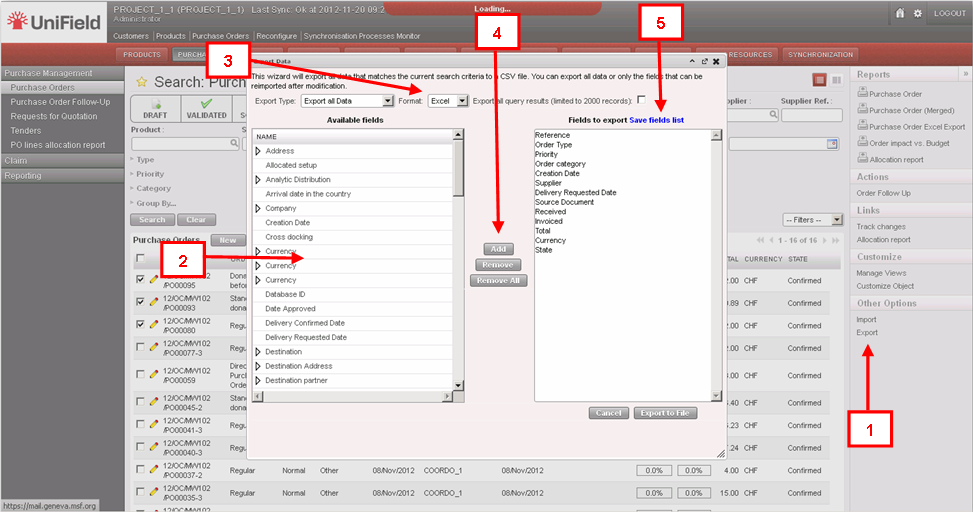
Export file or data
Exporting step:
- Select the line/ product/partner or other transaction, display the {Action menu} on the right and click on {Export}.
- The export wizard will appear, the user will need to choose the fields to export
- The most common format is xls or csv.
- Once the fields to export have been selected, use the {Add} button to display the content to export in the right column and click on the {Export to file} button
- If this type of export is performed regularly, the system offers the possibility to save the list to use repeatedly. The exported file will contain the default fields listed. It is possible to add to the default data which will be exported by selecting from the Available fields (2) and clicking on the {Add} button (4).
- Importing
The UniField importable file types are XML, XLS or CSV. The format depends on the business application, module and transaction (most often is in XML).
There are four different import types:
- Those related to the data migration when installing and configuring an instance (e.g. initial stock level import)
- This type of import will be seen in the module 02 – Configurations
- Specific imports from another software for accounting matters (e.g. HQ entries, Payroll)
- Those related to transfer of data from one object to another inside UniField to avoid retyping them (e.g. importing a Supplier Invoice into a register to pay it)
- Those related to the creation of some documents or entries, in order to ease and make the job quicker (e.g. import of product lines into IR or FO, Tender or PO, import of journal items or register lines).
It is extremely important to have the exact right import format with exact column descriptions.
The import functionality can be found directly from inside a specific transaction (by clicking on the {Import} button) or from the {Action menu} on the right hand side of the screen.
Please note: The import functionality is linked to specific business applications and modules, so please refer to the relevant user manual for specific actions. In many UF modules the import option is available.
Opening the Application in a Second Tab
At times, it may be useful to open more than one screen at a time. It is possible to do this by right clicking on the button (on top) of the application you wish to see. A drop down menu will appear and if you click on the option “Open Link in New Tab” the application selected will be opened in the next tab. It is also possible to drag the application button in to the browser header to open it in a new tab. In some cases, UniField will automatically open a new tab to display search results.
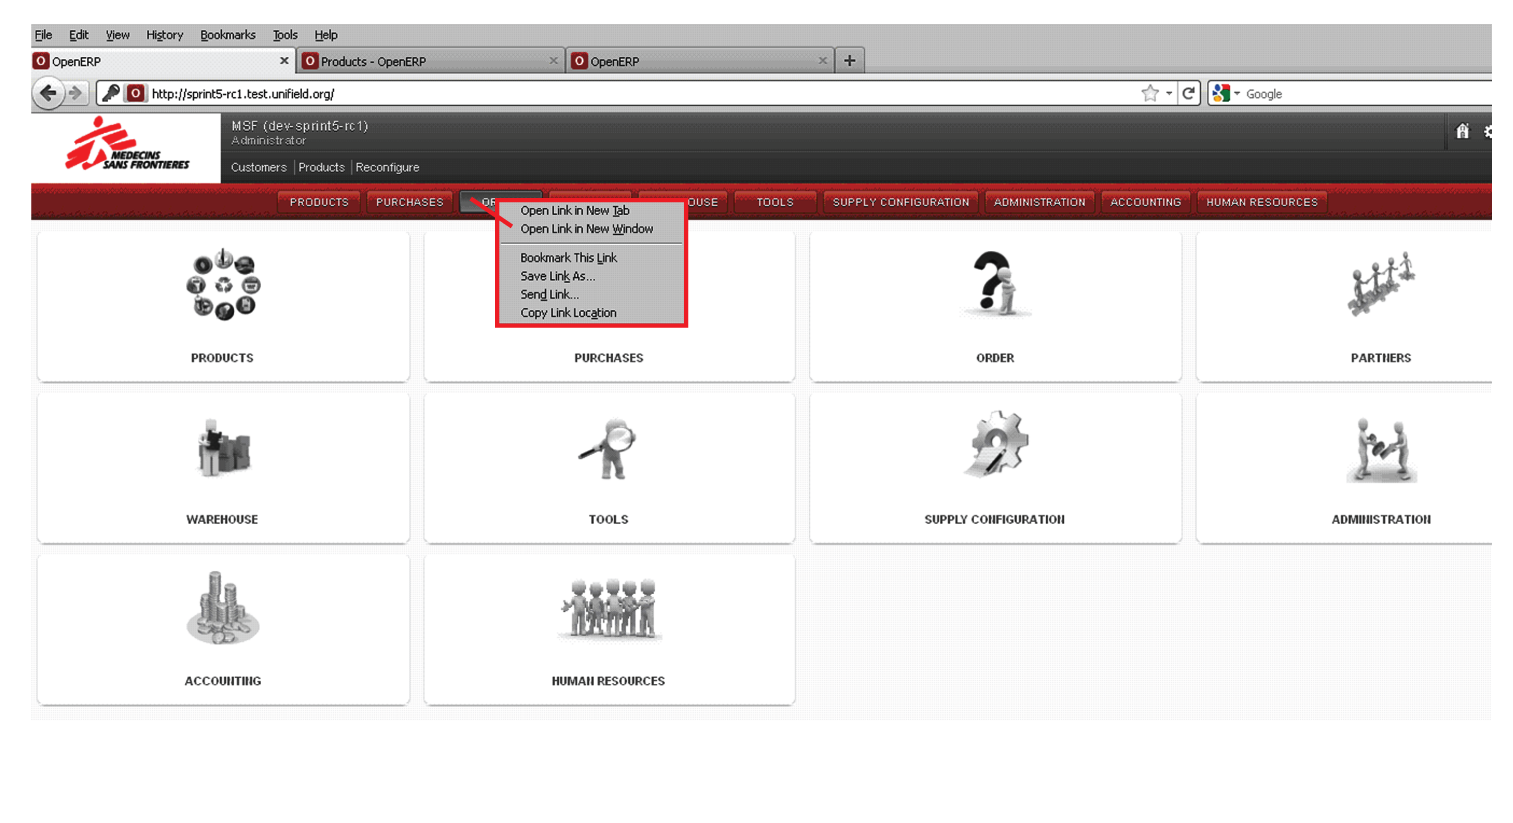
Opening a second tab
Viewing Track Changes
UniField offers visibility of how and by whom some documents have been modified. For example, for a Purchase Order, click on Track Changes on the right hand side {Action menu}. This will take you to a new screen where you will see any changes for this document (e.g. modifications, approvals, etc.) displayed together with the date this change was made and the user who made these changes.
Track changes for Supply can be viewed for Field Orders, Purchase Orders, Incoming Shipments, Internal Request, and Supplier Invoices. For Finance, track changes are available for example in Registers, Supplier Invoices and Journal Entries.
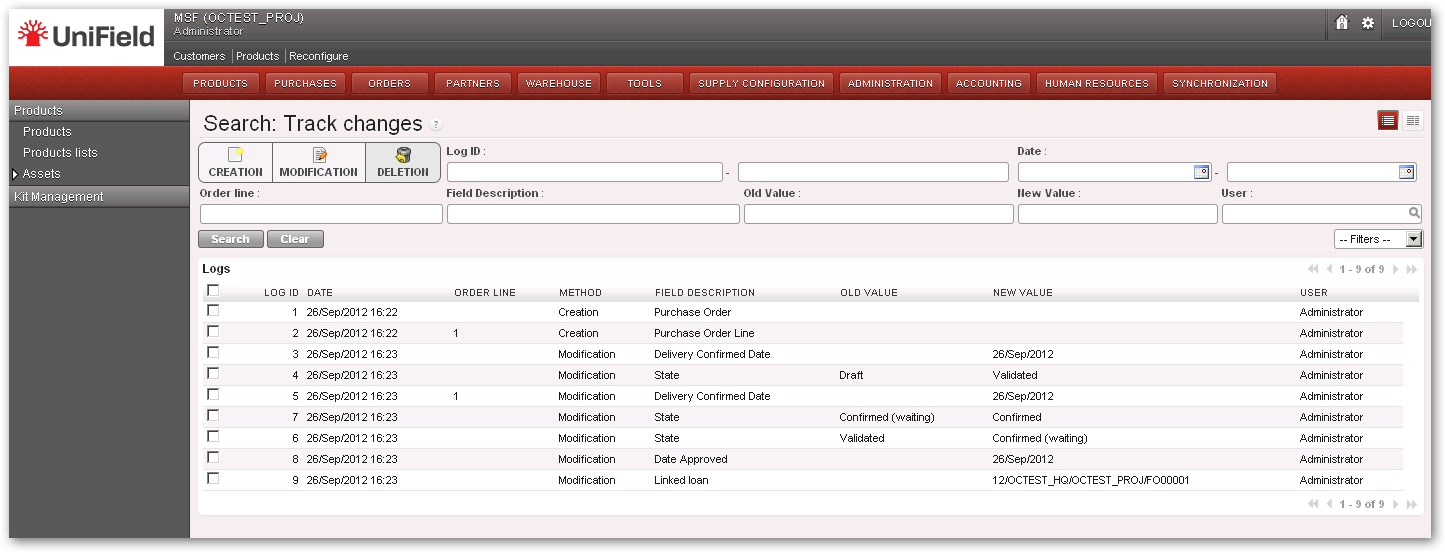
Track changes
Item Resources
Throughout the system, the resources icon will be on the right side of some fields. This icon is a short cut to the main data of the field. For example, if in a PO you click on the resources icon of a supplier, the system will open the master data form regarding that supplier. The resources panel is divided into the following sections:
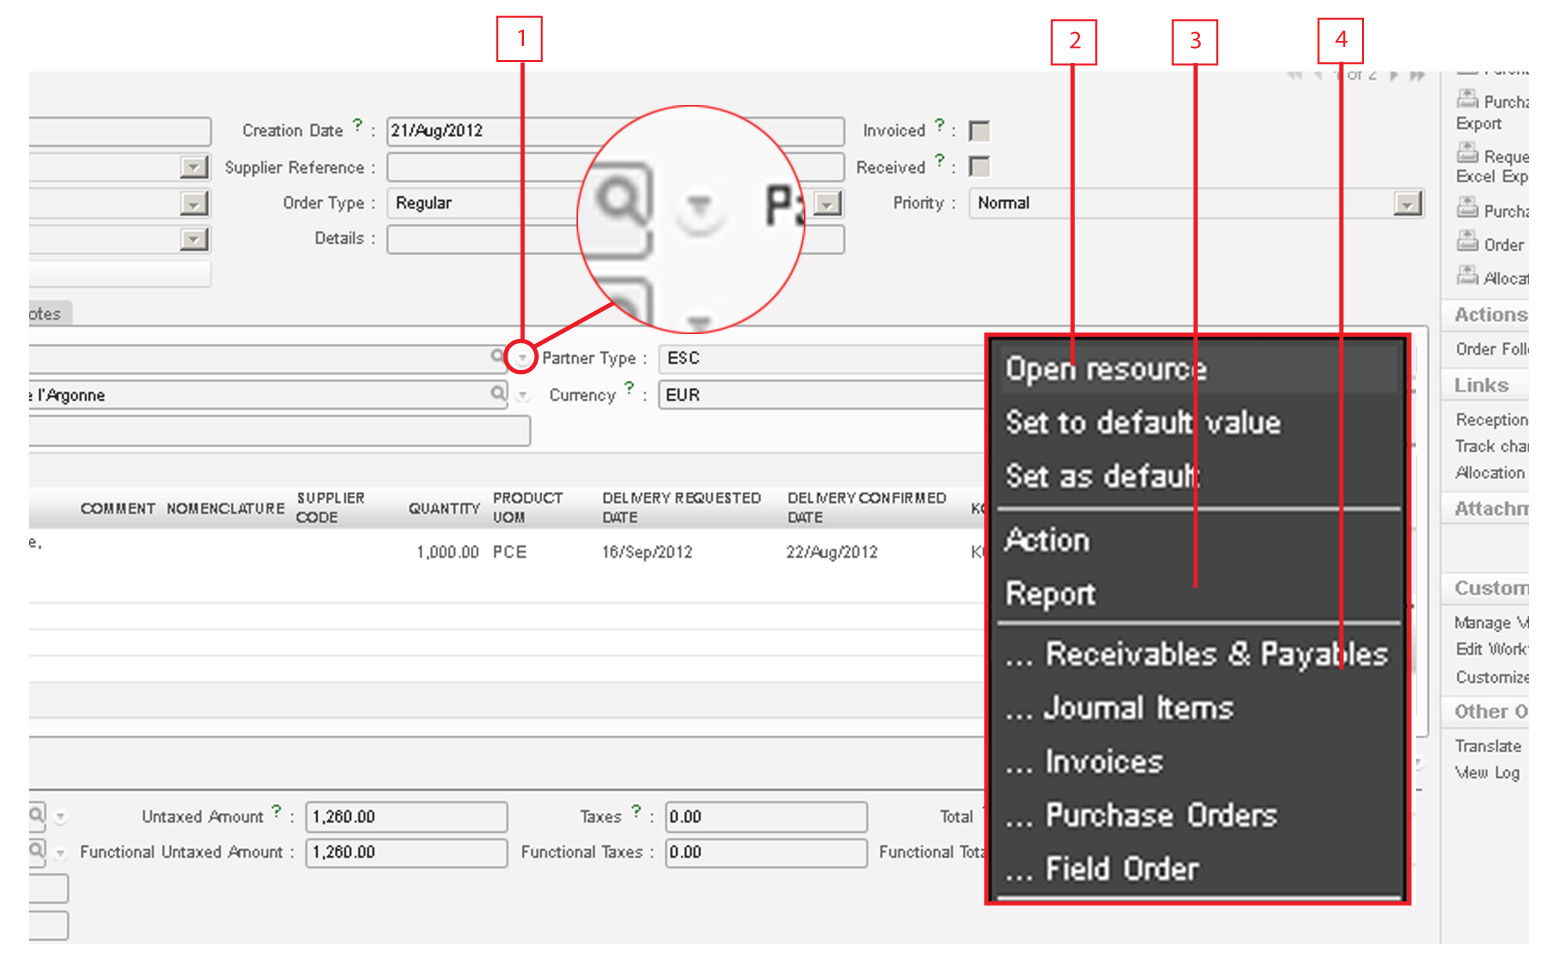
Resources menu
- Icon to access resources panel
- Links to open and settings, only available to administrator of the instance
- Open Resource: will open the related resource such partner, product, invoice, etc.
- Set as default: choose this option to make the resource the default value. When you create a new entry, automatically this field will be set to the default value. If other value is required click on the magnifying glass or overwrite the text field.
- Set to default value: choose this option to retrieve the previously set default value by right click or clicking on the icon.
- Actions or reports, only available to administrator of the instance
- Different documents where these particular resources may appear
Note! In some views parts of the sections are hidden in order to prevent using the default values where they are not supposed to be used (e.g. setting up a wrong journal for accounting entries).
System Process Workflows
UniField has integrated process work flows to view most of the order types in a graph showing the process and status. The workflows can be viewed by clicking on the question mark in the dashboard view, as per figure below. This is a practical way to view and understand the full process and all the related documents.
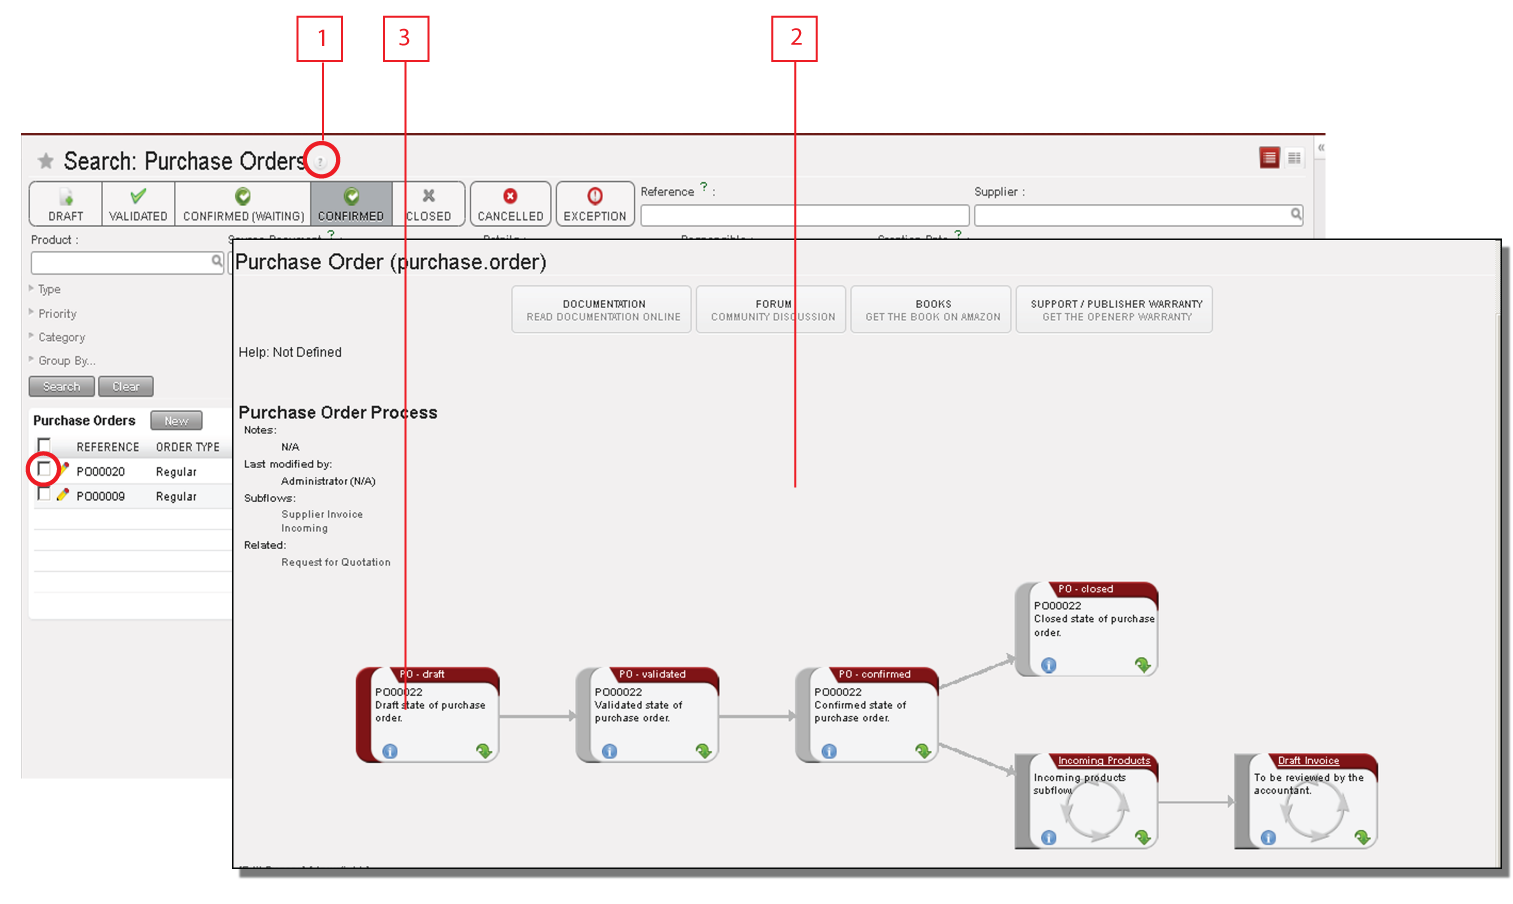
System process workflows
UniField has the capacity to show users the workflow of different transactions. It can show the default work flow. For example, if an order is selected, it will display the specific workflow of the order and the steps completed.
- Click on the question mark and select from the menu the type of order in the {Select process} field.
- A new window will display a graph with the full work flow of the selected type of orders.
- If an order is selected it will display the steps already completed in red and the steps which are pending in grey.

The Green arrow will show that specific step in the system.
Warning Messages
The system displays warning messages when some parameters are missing or incorrect, or to alert the user of something they may not be aware.
The key points to remember when a warning message is displayed are:
- The message displays descriptive information about the error
- Any incomplete or incorrect information is displayed in red
- The system displays all incorrect fields in red in all of the relevant tabs

Warning message
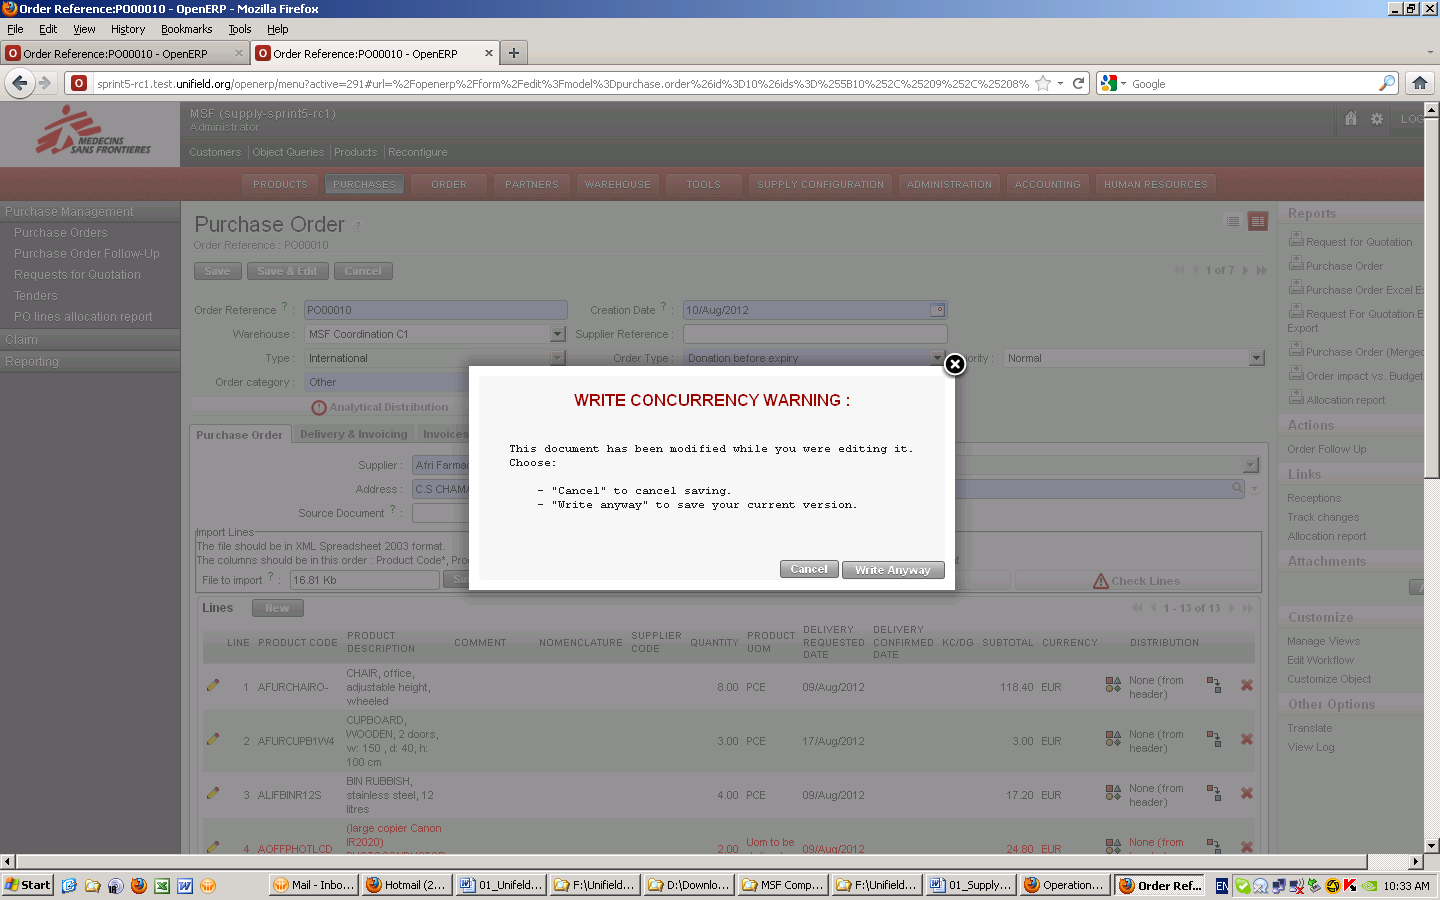
Write concurrency warning
The system may display this type of warning message after the user has tried to save a transaction. This warning message indicates that while the user has been viewing and editing this transaction, another user has modified and resaved the document during this time. The warning message will offer 2 options:
- Cancel: cancels the transaction so that the user can reopen it and view the changes made by the other user, and if necessary modify again
- Write Anyway: cancels any changes made by the other user, and will only save changes made by the user who is currently clicking on this option.
Wizards
Wizards in UniField present a user with a pop-up window or series of dialog boxes in which parameters are entered. Upon clicking {Ok}, the system executes pre-defined action instead of requiring the user to perform multiple steps. Wizards are intended to simplify tasks that are complex, infrequently performed, or unfamiliar.
Examples of financial wizards include:
- Accounting Corrections Wizard: Entries in Journal Items are automatically corrected with the values entered in the wizard.
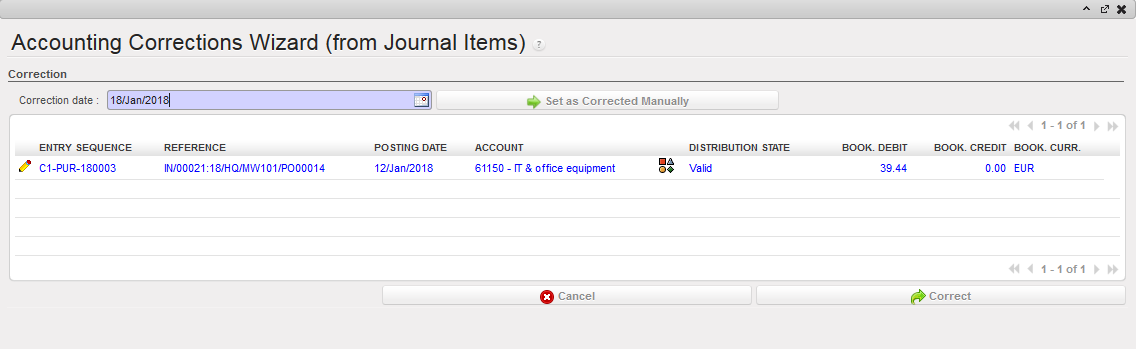
Accounting Corrections Wizard
- Register Opening Wizard: in cash, cheque and bank registers, user checks the tick boxes to confirm the correct period and the correct opening balance
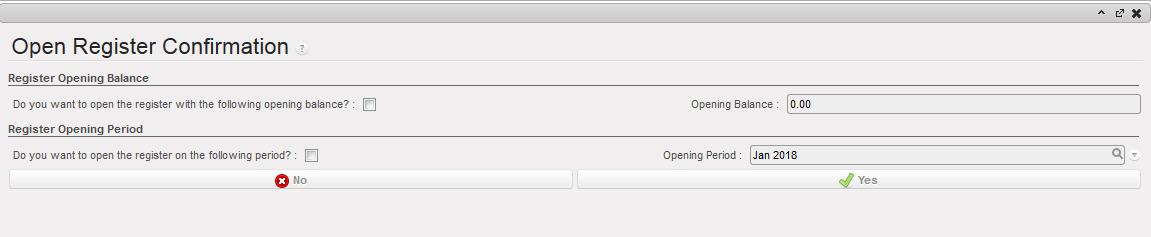 Register Opening Wizard
- Bank Confirmation Wizard: user clicks {Yes} which changes the status of the Bank Register from {Open} to {Closed}
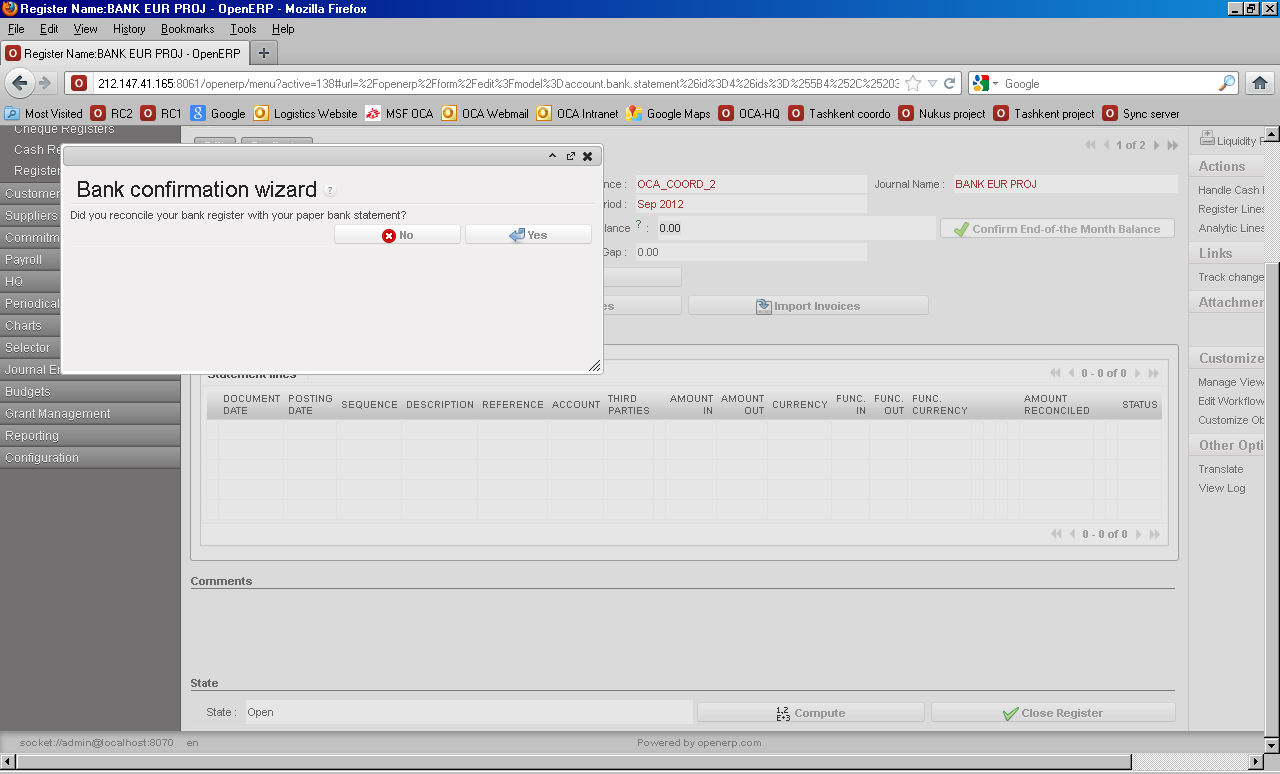
Bank confirmation wizard Advance Return Wizard: user enters expenses regarding the Operational Advance, the system verifies expense amounts and returned cash matched the advance given, and expenses as well as advance return entries are automatically created in the Cash or Bank Register.
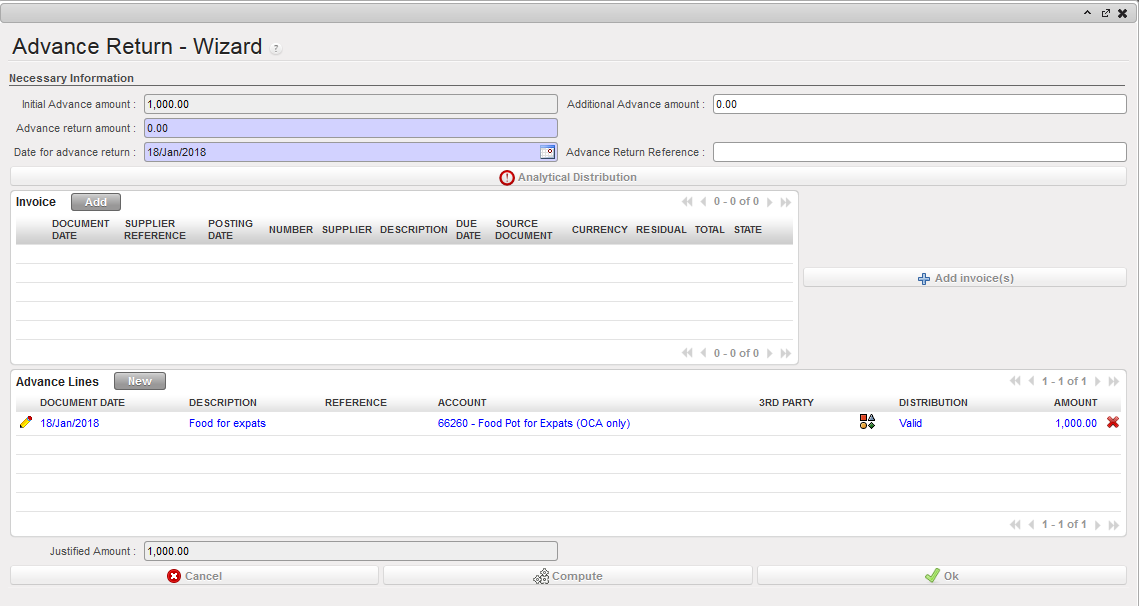
Advance Return wizard
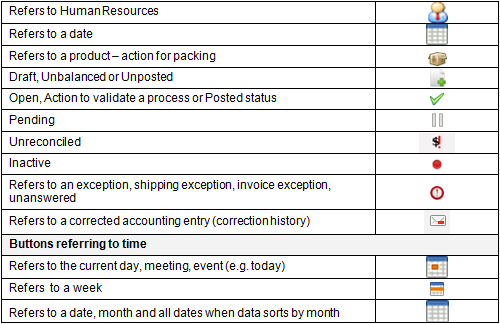
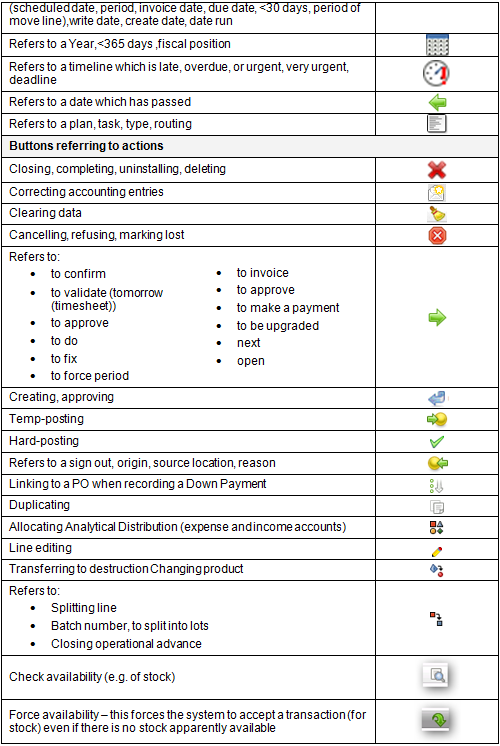
UniField Icons
Most of the icons are in search view. All of the buttons have an icon relevant to the function. UniField uses a range of predefined icons.
Below are the most common icons: