Supply User Manual ENG -> 5. Warehouse -> 5.2 LU-SU4101: Incoming Shipments -> B. How to receive an Incoming Shipment
B. How to receive an Incoming Shipment
By default, when an Incoming Shipment is created following the confirmation of a PO (or PO-line if the PO was partially confirmed), you will always see on the IN the expected products and quantities (corresponding to what was confirmed on the PO). However, you will have to encode the quantities that you are actually receiving when you will process the Incoming Shipment (i.e. when you will actually receive the goods).
Note that if an IN is created following the partial confirmation of a PO, this IN (in state “Available”) will contain the lines which have been confirmed on the PO. If later on, additional lines are confirmed on the PO, they will be added on the “Available” IN. As long as the IN has not been fully received, it will stay open (in state “Available”) and subsequent confirmations on the corresponding PO will be added on this IN. If the IN is fully received, it will turn to the state “Closed” and a subsequent confirmation on the PO will trigger the creation of a new IN (in state “Available”).
Unifield also enables to the user to split lines at project level on Incoming Shipments from an “Internal Partner”. Feasible for IN Available Shipped (from Synched flows) flow, enabling the possibility of splitting lines and adding different batches.
Go to: Warehouse / Warehouse Management / Incoming Shipments
- You reach the screen “Search: Incoming Shipments“. By default, the system only shows INs which have the state “Available” (filter activated). Incoming Shipments appearing in black are still within the agreed lead time while the ones appearing in red are not on time (delivery confirmed date from the PO is already passed).
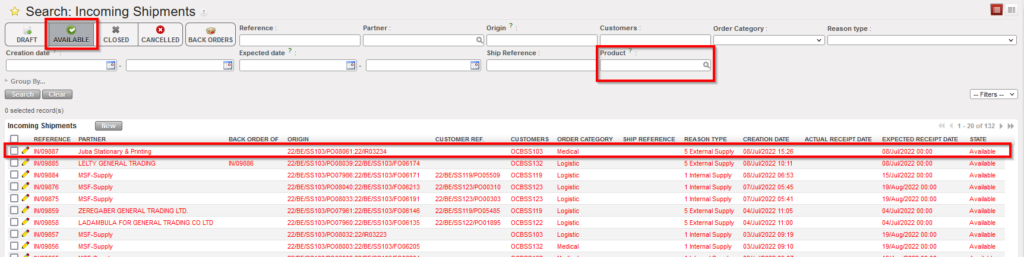
Available Incoming Shipments
2. Click on the line corresponding to the Incoming Shipment (in “Available” state) that you wish to receive.
3. The IN is opened. Check if the products and the quantities match with what you are actually receiving.
|
|
|
Available Incoming Shipment |
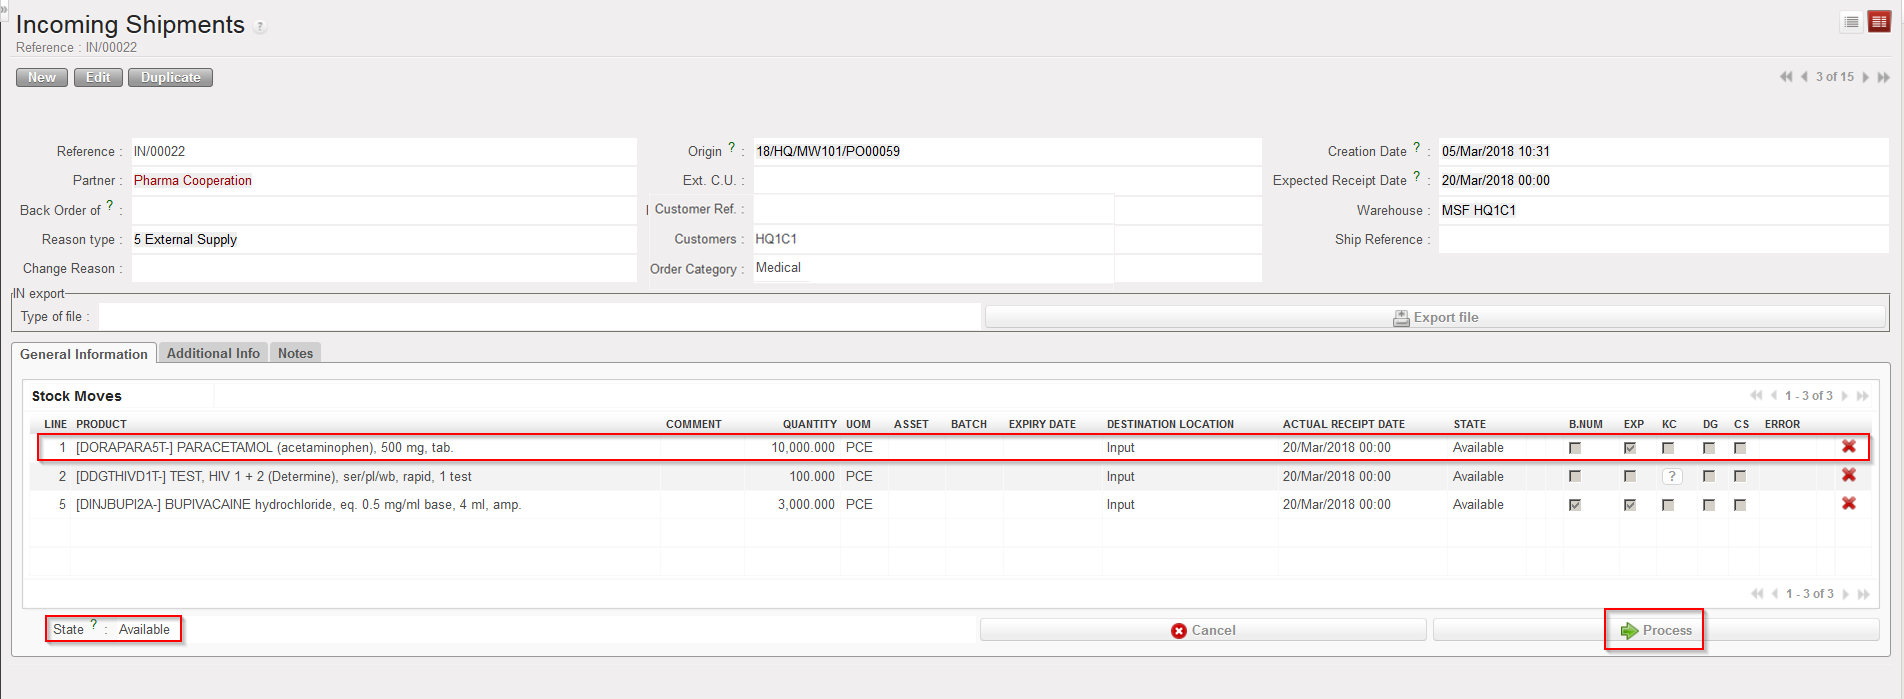
On the IN header you find, among others, the reference of the Incoming Shipment in the field “Reference“, the delivering Partner (the supplier) in the field “Partner“, the reference of the PO and origin document (IR or FO) in the field “Origin” (if any), the Customer in the field “Customer”/ “Customer ref”.
On each line of the IN, you can see the product code and description, the quantity, the UoM, the destination location, the state (which should be “Available” until processed). Some checkboxes indicating if the product is managed by batch numbers, by expiry dates, should be kept cool (KC), is a dangerous goods (DG) or is a controlled substance (CS) are also available. The “Error” column indicates if the product has been deactivated (the checkbox should be blank in order to process the product).
4. Click on the “Process” button at the bottom of the screen to register the reception.
|
|
|
Processing an Incoming Shipment |
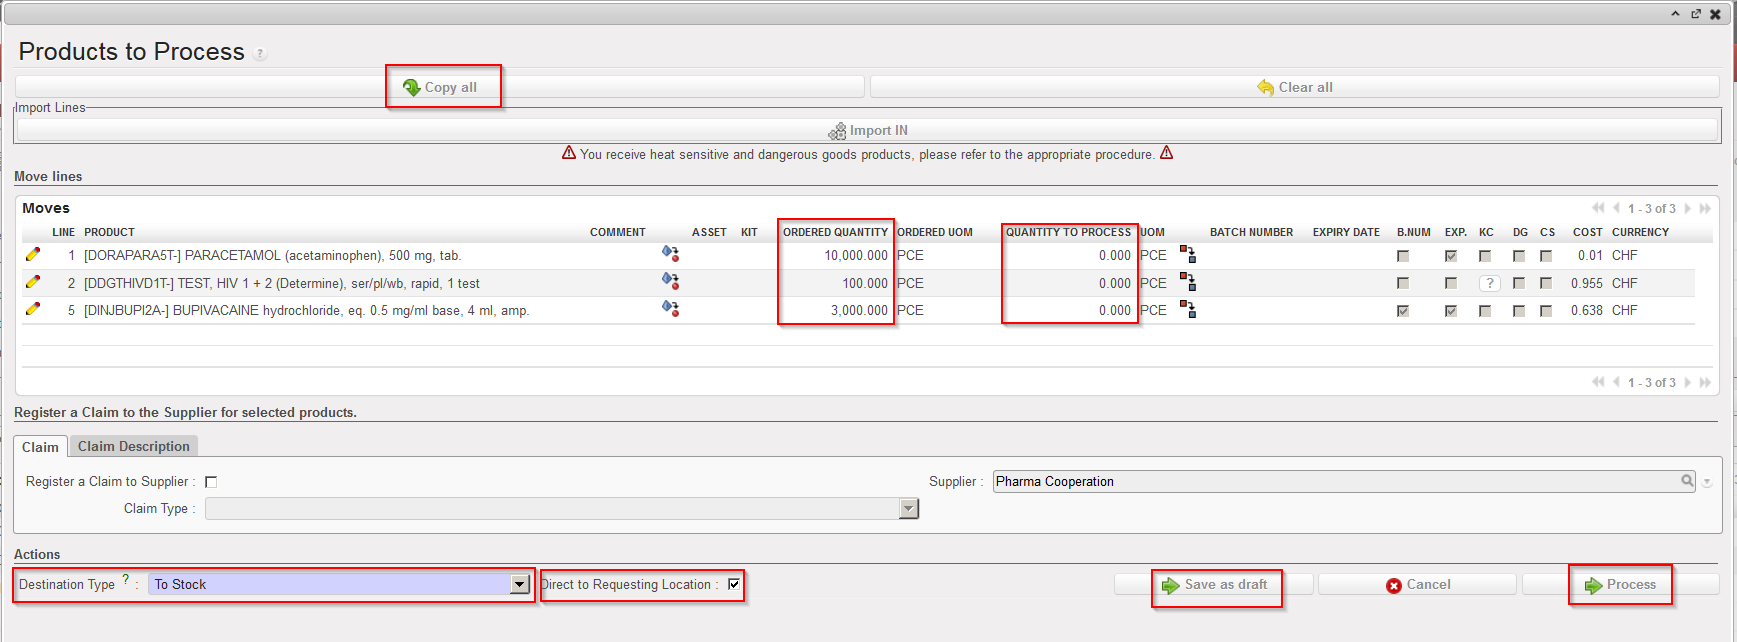
5. When you process an Incoming Shipment, you have two main options:
- If you received exactly what is on the “Available” IN (i.e. no back-order), click on the “Copy all” button located on top of the screen to process the full quantities for all items of the reception.
- If you received only partly what is on the “Available” IN, click on the pencil
 for each line that you are receiving, enter the received quantity in the “Quantity to process” field and save the line by clicking on the floppy disk icon
  on its far right (sometimes hidden!) or by pressing “Enter” on your keyboard. Repeat the operation for each received item.
If you are processing an IN created by the confirmation of a PO (or PO-line) which was either created from scratch either created following the sourcing of an IR (with Location requestor = Stock, Intermediate Stock or Internal Consumption Unit) on order, the checkbox “Direct to Requesting Location” will appear on this screen and be ticked by default. This means that goods will not stay in the “Input” location but will be moved directly to their final destination. For POs created from scratch, products will be moved directly to the stock (MED or LOG depending on their nomenclature). For POs created from an Internal Request (via OST) the goods will be sent automatically to the “Location Requestor” entered on the IR (if this Location Requestor is an Intermediate Stock or an Internal Consumption Unit). In both cases, an internal move is automatically processed, moving the goods from the “Input” location to their final destination.
Note that if you untick the “Direct to Requesting Location” checkbox, goods will be received in the “Input” location and you will have to process manually an Internal Move (created automatically) to move the received goods from the “Input” location to their final destination.
If you are processing an IN for goods which should be sent to a customer (related to a PO created by the sourcing of an FO on order, or related to a PO created by the sourcing of an IR whose Location Requestor = External Consumption Unit), the checkbox “Direct to Requesting Location” won’t appear and goods will be received in the “Cross docking” location, ready for dispatch.
6. Click on the “Process” button to actually receive the goods (in the system) and close the Incoming Shipment or on the “Save as draft” button in case you haven’t finished updating all your lines but wish to save what has already been encoded without processing.
Note that the “Cancel” button (with the red cross, located at the bottom of the “Products to Process” window) will simply close this window and return to the main IN screen. A “Reset” button may also appear at the bottom of the “Products to Process” window. It resets all data encoded so far on this window.
Note that on this “Products to Process” window, you may always decide to change the destination of the goods. This can be done by ticking/unticking the check box “Direct to Requesting Location” or changing the “Destination Type“. As such changes can have important consequences, the system will warn you accordingly.
|
|
|
Changing the destination of the goods when processing an Incoming Shipment |
|
|
|
Warning given by the system if you try to receive goods in cross docking while stock was planned |
|
|
|
Warning given by the system if you try to receive goods in stock while cross docking was planned |


7. Once the Incoming Shipment is processed, it turns to the state “Closed“.
|
|
|
Incoming Shipment with the state “Closed“ |
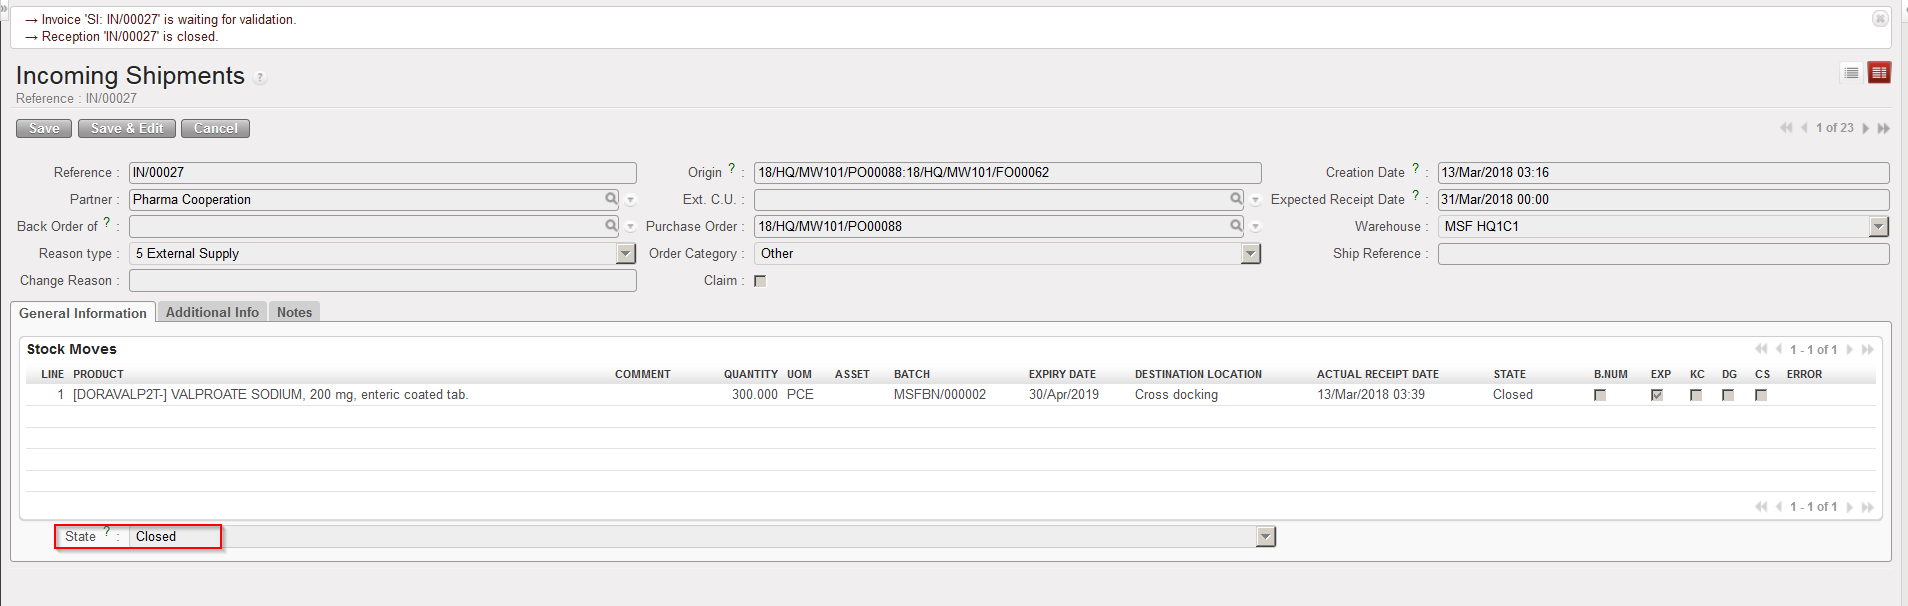
As we will see later, if an Incoming Shipment is only partially processed (i.e. partially received, with some items in back order), a new IN will be created in state “Closed” to register the received products while the current IN will be updated and will stay open (“Available“) to receive the back order in the future.
We will also see later that if products managed by batch numbers (BN) and/or expiry date (ED) are received, the user will have to encode the BN/ED details at this stage (i.e. when processing the IN).
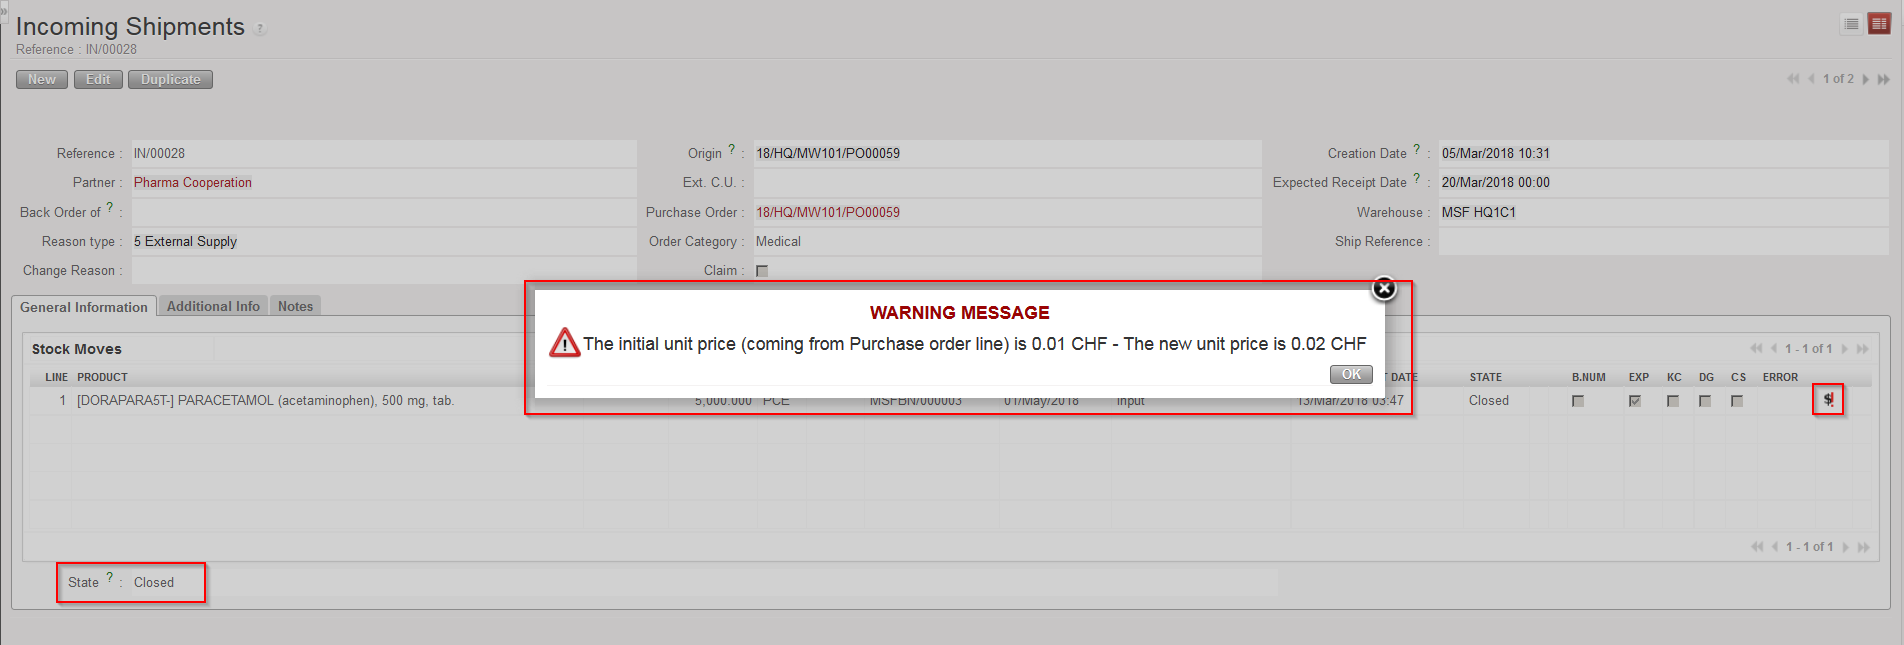
Note as well that the product cost can be changed when processing an Incoming Shipment. However, this change will only affect the average price of the product (on the PMD sheet) but it will have no impact on the PO or on the supplier invoice (if any). This feature was developed in order to be able to answer to situations when a supplier is delivering the products but also informs you at this point that prices have changed.
Please also note that change of price will not be possible for IN with status “Available shipped” (except via Import).
In case the product price is changed when processing the IN, a ![]() icon will be displayed on the “Closed” IN and the details of the change will be visible if you click on the icon.
icon will be displayed on the “Closed” IN and the details of the change will be visible if you click on the icon.
|
|
|
Closed Incoming Shipment with details of the price changed during reception |
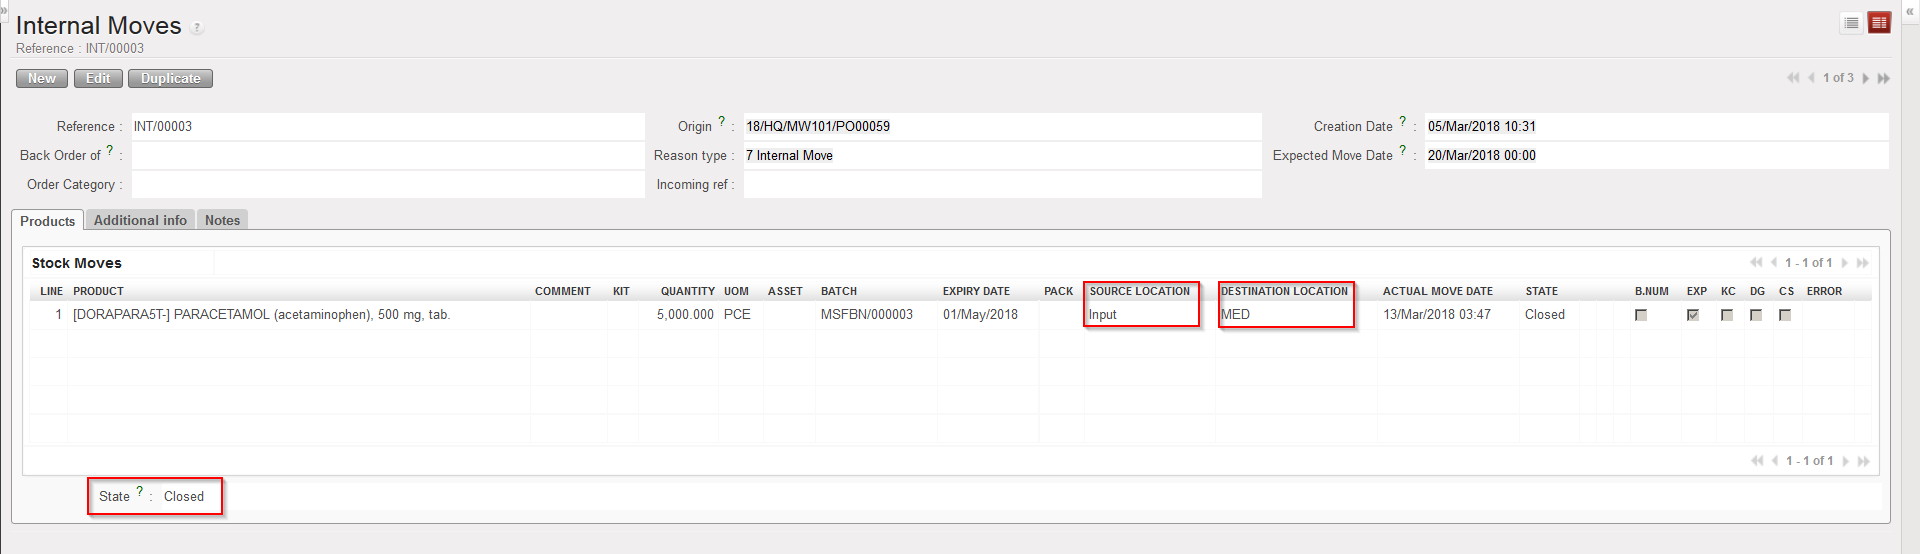
If the “Direct to Requesting Location” checkbox was left ticked, the products are now stored in their final destination. An Internal Move between the reception location (“Input“) and the final destination of the goods was automatically created, processed and closed.
|
|
|
Internal Move from “Input” to “MED“ |
If the “Direct to Requesting Location” checkbox was unticked, goods are now stored in a transitional location called “Input“. They should be moved manually to their final destination (after quality check) via the processing of an Internal Move (created by the system) from “Input” to this final destination.
See LU-SU4101 “T. How to move received products from the Input location to a stock (destination location)”.
Let’s assume that an IR was sourced on order (PO).
a) If the “Location Requestor” field from the IR is a stock, an Intermediate Stock or an Internal Consumption Unit, the goods will be sent automatically (or manually if you untick the check box “Direct to Requesting Location“) to the “Location Requestor” indicated on the IR (via the automatic/manual processing of an Internal Move from “Input” to this “Location Requestor“) after processing the Incoming Shipment.
b) If the “Location Requestor” field from the IR is an External Consumption Unit, a Delivery Order (OUT) in state “Confirmed” will be generated (together with the Incoming Shipment) when the PO (or one of its line) will be confirmed in order to prepare the delivery to the customer. The state of this OUT will turn to “Available” once the IN is processed and goods are received in cross docking. The OUT will finally be processed to deliver the goods from the source location (“Cross docking“) to the destination location (ECU indicated as Location Requestor on the IR). The OUT will never be processed automatically.
In short, Internal Moves (INT) are used when delivering goods to internal locations while Delivery Orders (OUT) are used when delivering goods to external locations (also called partner locations).
At this stage, the below table can already help to understand how INs are created when a PO is confirmed and what are the consequences when INs are processed. Note that we will come back in details on this when the related topics will be introduced.
|
PO |
Destination location on IN |
Final destination location |
Document for second step |
|
PO created from scratch |
Input |
LOG/MED (according to product’s main type) |
INT (1) |
|
PO created from IR sourcing (with Location Requestor = stock, intermediate stock or ICU) |
Input |
Location Requestor from IR |
INT (1) |
|
PO created from FO sourcing |
Cross docking |
Partner |
PICK (2) |
|
PO created from IR sourcing (with Location requestor = ECU) |
Cross docking |
Location Requestor from IR |
OUT (2) |
(1) Automatically processed if checkbox “Direct to Requesting Location” is left ticked.
(2) Must be manually processed.
If your IN is related to a PO addressed to an internal supplier (another instance) there is an extra state possible for Incoming Shipments: “Available Shipped“. Incoming Shipments whose partner is another instance should not be processed in state “Available” but only when they are in state “Available Shipped“.
This state means that the supplying/sending instance has validated/sent the shipment (i.e. it is in “Closed” state) and synchronization has been done on both sides.
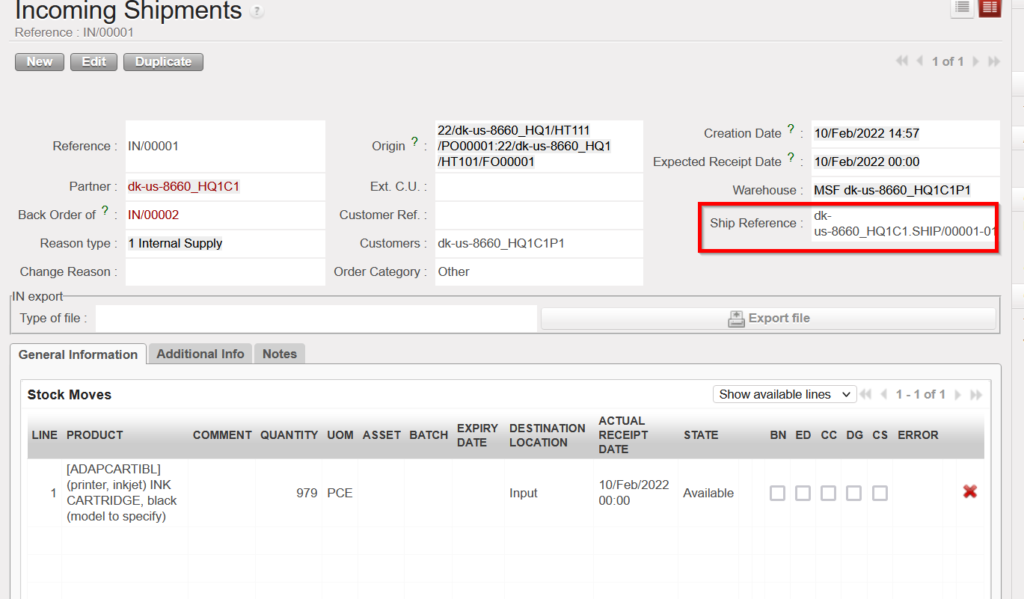
After synchronization, the state of your Incoming Shipment has changed from “Available” to “Available shipped” and the information of your Incoming Shipment (quantities, batch numbers, expiry dates, packing list…) have been updated according to what was shipped. Also, the field “Ship reference” will be automatically populated with the reference of the shipment from the sending instance (SHIP or OUT document).
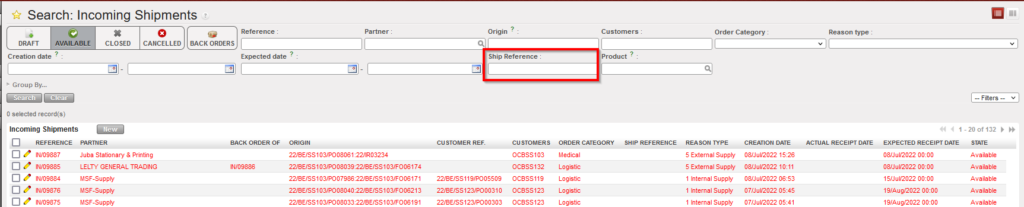
“Ship Reference” Field will be updated also when this value is filled in IN/EPacking Vertical Integration (VI) file. This will not impact how this field displays for INs which are updated by synch. there is also a filter on “Ship Reference” at header level for the IN list view.
If you try to process such an IN while it is still in state “Available“, you will get the below warning.
|
|
|
Warning when processing an IN which is not yet in state “Available Shipped“ |

Note for DPOs:
- if the incoming shipment is linked to a direct purchase order (DPO) (in another instance), despite product lines not being updated (sent) from supplying instance, INs related to a DPO from a coordination will have their state updated to “Available shipped” once the DPO is confirmed on the coordination side and synchronization is performed on both sides.
- If user decides to receive or cancel the related IN with status of (available shipped) in project, Status changes will be updated in the DPO in coordo level after synchro, and that will trigger changes for Finance in both commitment voucher and supplier invoice.
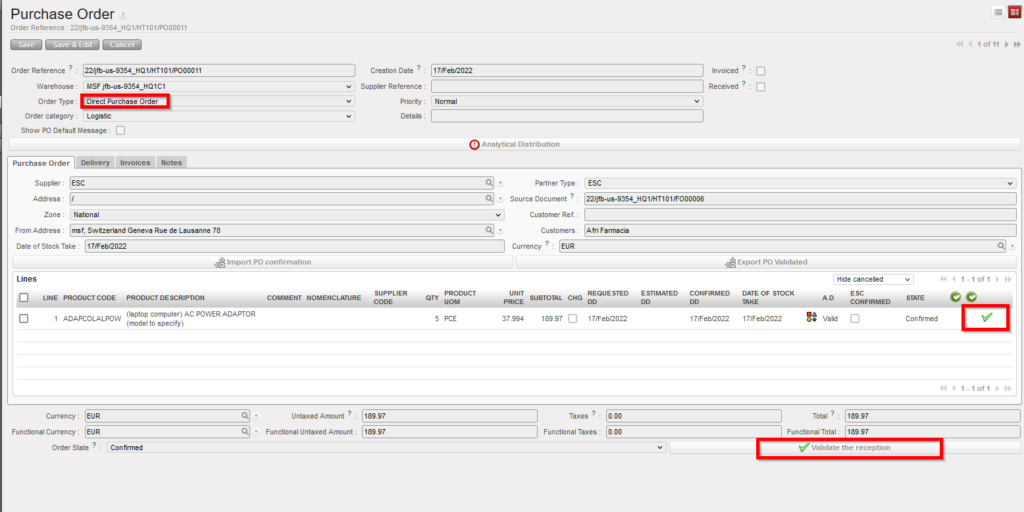
- In the case that the customer of the FO is an External Partner, and if this (FO) is sourced to an external supplier through (DPO), there will not be an (IN) to receive, in this case the button to “Validate the reception” in the Confirmed (DPO) should be accessible. If this button is used, this action of confirming the (DPO) will confirm the goods have been received and close the supply flow.
- For the DPO Flow coming from FO from external customer is source to an ESC or external supplier, it’s possible to confirm the reception at line level (and so close the line)
- The Cancel & Resource functionality is not available for this specific case, but warning message is displayed to explain this.
An overview of changes done on Incoming Shipments by the synchronization is available in Synchronization / Monitoring / PO/FO/Shipment Logs.
Destination locations of INs have already be explained in details. If an IN is created following a PO (or PO-line) confirmation, the source location will be “Other Supplier” if the PO was addressed to an external supplier or an ESC; it will be “MSF Supplier” if the PO was addressed to another UniField instance.
