Supply User Manual ENG -> 5. Warehouse -> 5.2 LU-SU4101: Incoming Shipments -> G. How to import Vertical Integration files on Incoming Shipments
G. How to import Vertical Integration files on Incoming Shipments
Most of the times, POs sent to ESCs are large POs which may include several hundreds of lines. As a consequence, INs created by the confirmation of these POs will also be large. In the Procurement chapter, you will find how Purchase Orders can be updated using VI files. The objective of this section is to explain how VI files generated by ESCs can be imported on Incoming Shipments to facilitate their processing. Note that OCs are using VI in different ways according to the ESC they work with. Please refer to the specific OC/ESC documentation to understand how VI files should be used in your section.
The general objective of vertical integration on INs is to decrease the amount of work needed in encoding and limit possibilities of errors when freights are received from ESCs. This is done by allowing importing files on “Available” INs. Files which should be imported on INs are actually the electronic packing lists (freights) provided by the ESCs. These files will include, on top of the shipped products and quantities, information on BN and ED of the shipped products if relevant.
Further development of this feature now enables the user to import as well packing information from the ESC supplier e- Packing list. At the same time as product reception, PICK and PACK process can be automatically processed as well. Note that this functionality has mainly been developed to ease the reception process at Coordination before sending the ESC goods to the projects.
Note that vertical integrations have been developed to enable exchange of information with ESCs but could also be used to exchange information with other suppliers as long as the developed solution can be used as such.
Go to: Warehouse > Warehouse Management > Incoming Shipments
- Select an Incoming Shipment you wish to update and/or process. The partner of this IN should be an ESC and the IN should be in state “Available“.
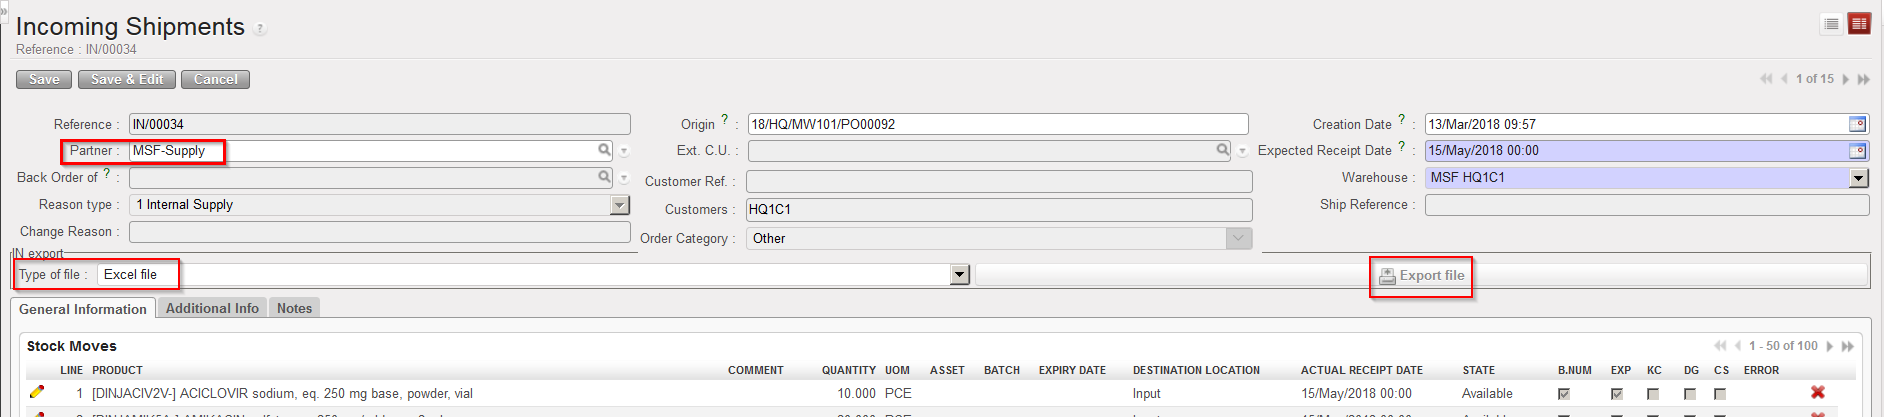
Note that on the main IN screen, the “Export file” button together with the “Type of file” drop-down list allows you to generate a file with the current content of the IN in the format used for VI (Excel or XML).
|
|
||
|
Export file button and Type of file drop-down list on an Incoming Shipment |
||
|

2. Make sure you have the e-packing list corresponding to this IN which has been provided by your ESC.
3. Click on the “Process” button located at the bottom of the main IN screen.
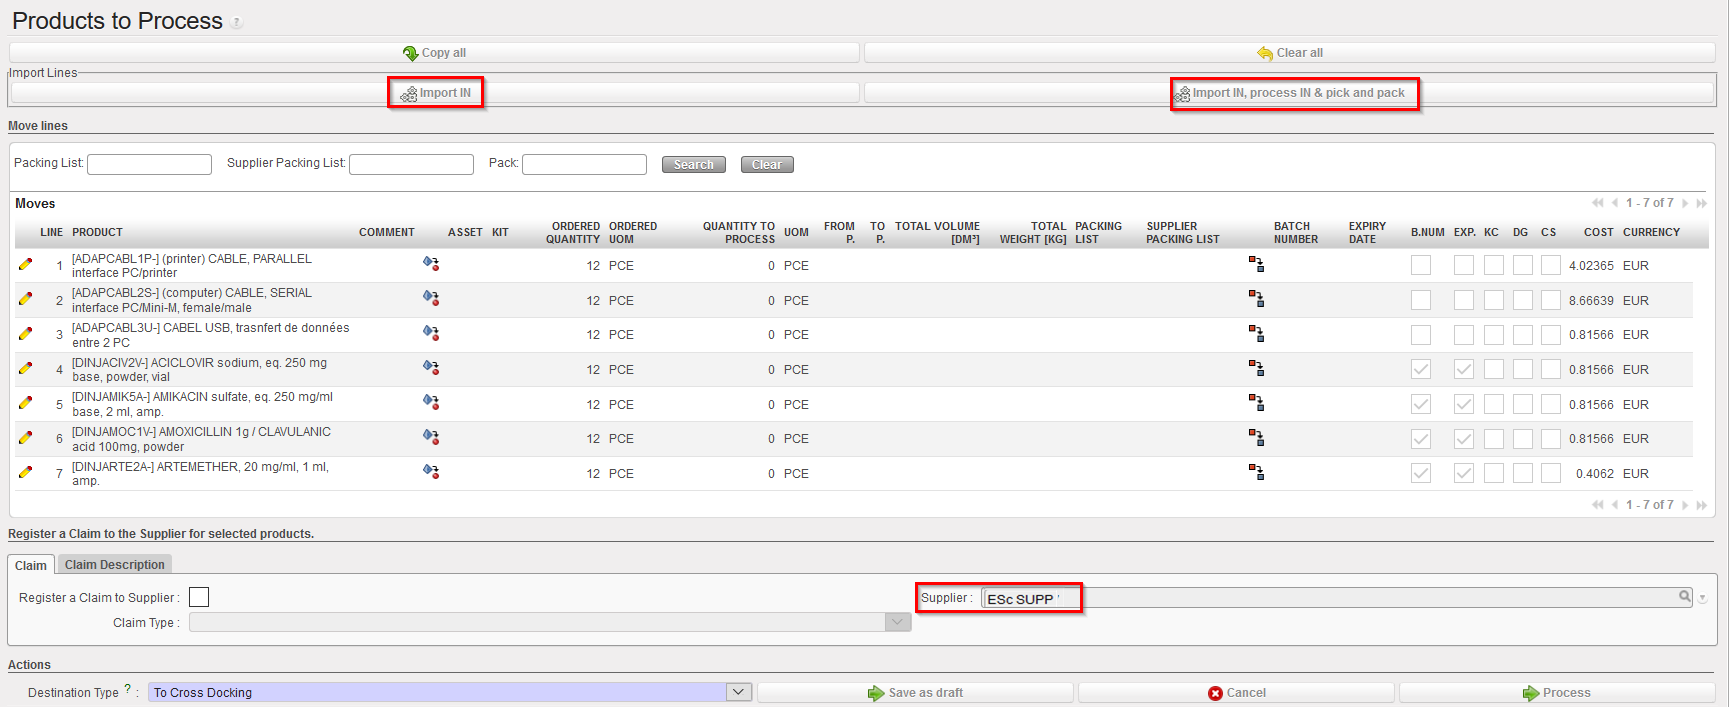
4. On the “Products to Process” screen, you will have 2 options for import:
-
- click on “Import IN” if you want to only receive the goods.
- click on “Import IN, process IN & pick and pack” ( this button will only be displayed for IN sourced from FO) if you want to process the e-packing list till Draft Shipment (IN; PICK and PACK document will be Closed straight after import)
Please note that for both options, the import file is the same, the only thing that will differ is the amount of information you provide in the file. The Packing information will have to be filled in your import file if you chose to “Import IN, process IN…” whereas it could be left empty if you chose the other option.
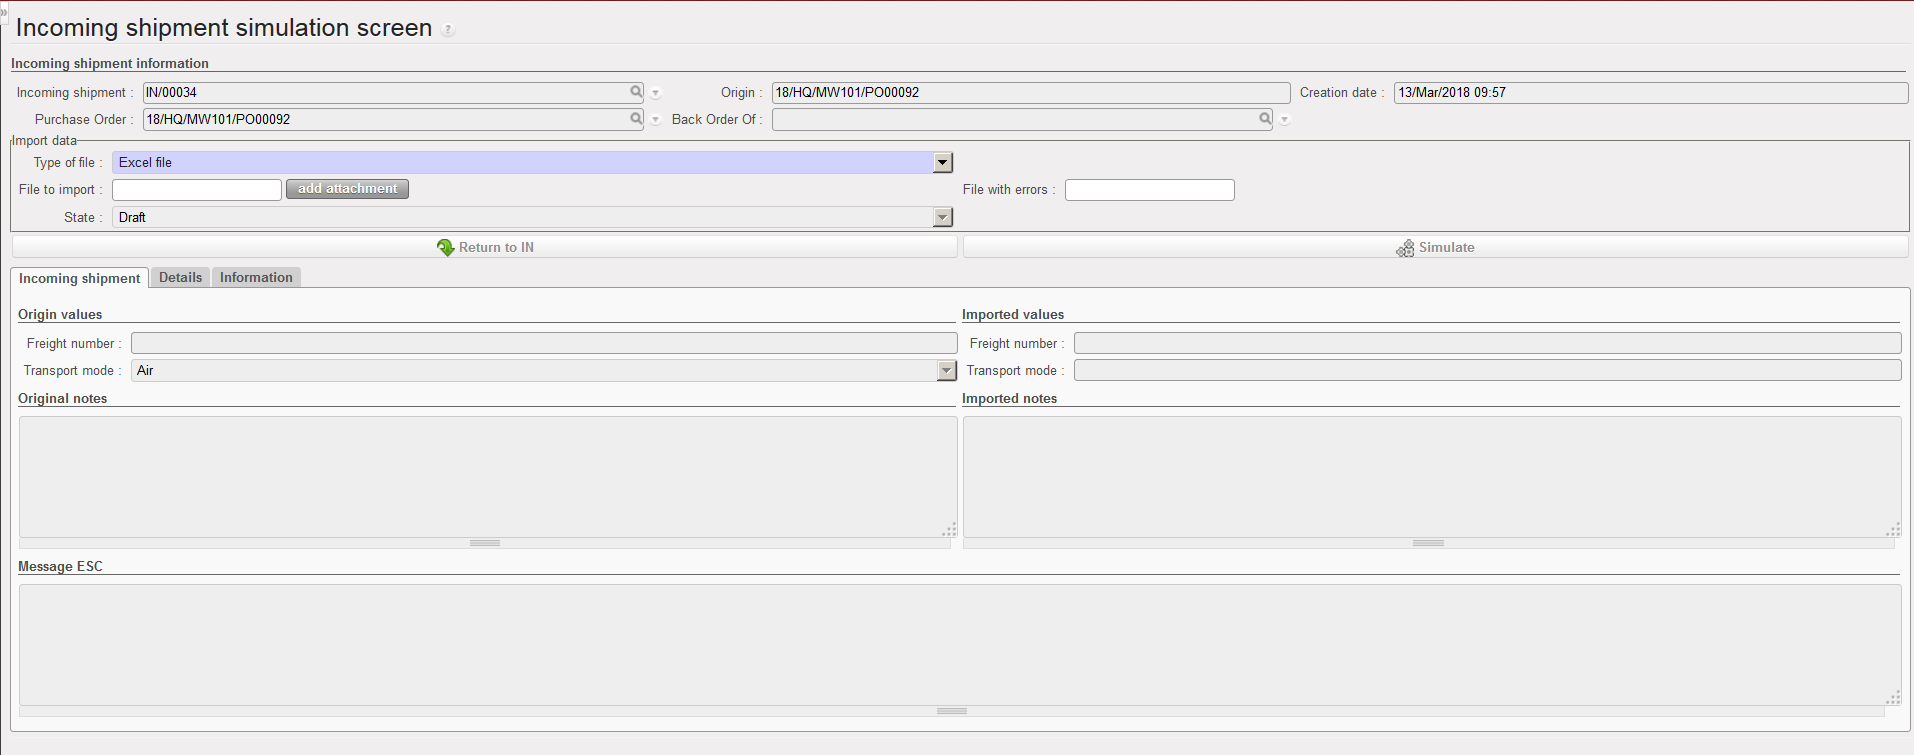
The system opens the Incoming shipment simulation screen.
|
|
|
Importing an e-packing list on an Incoming Shipment |
|
|
|
Incoming shipment simulation screen before import (same for both options) |
5. In the “Type of file” field, select the type of file used by your ESC. Two formats are possible: Excel file (which is actually an XML format readable under Excel) or XML file (which is a pure XML format).
6. Click on the “add attachment” button.
7. Click “Browse“.
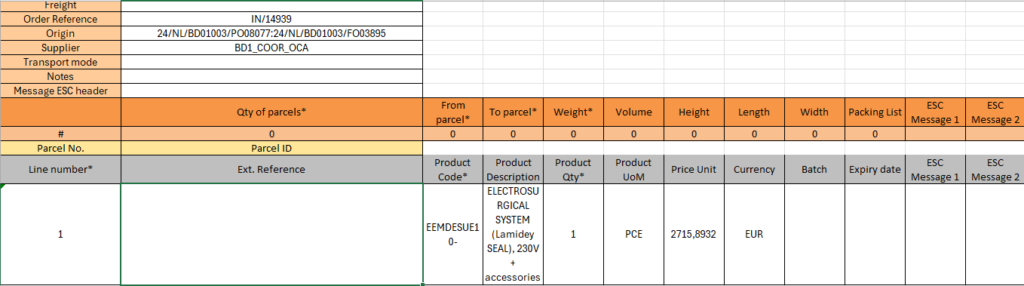
8. Select on the computer the VI file you wish to import on the IN. Remember that if you clicked on “Import IN, process IN & pick and pack” you will have to fill the information regarding the packing. These information are: “ Qty of parcels”, “from parcel”, “to parcel”, “weight” “Parcel ID“. These information will have to respect the same rules as the one from the PPL screen (LU-SU-4103 Packing). Note that several PPL per IN can be created by copying the orange and grey header columns for packing list (see below). Also the “Packing list” field can be filled with the information from the ESC.
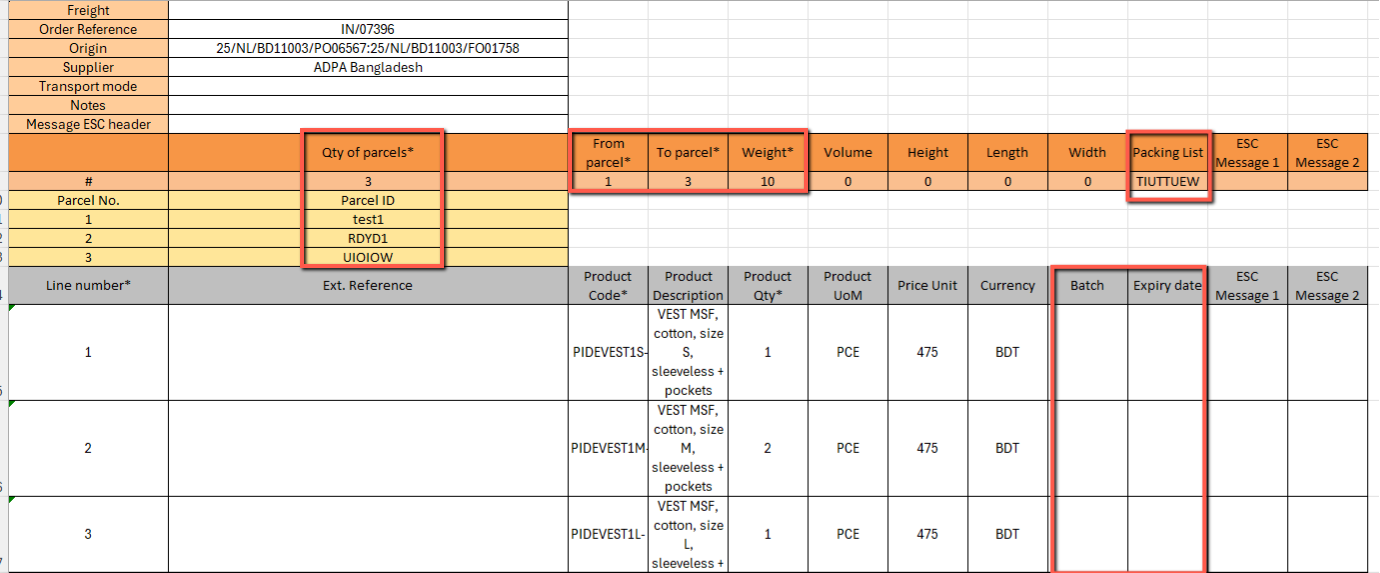
Import file filled to process IN, Pick and Pack – fill the packing information
9. Click “Open“.
10. Click on the “Simulate” button.
|
|
|
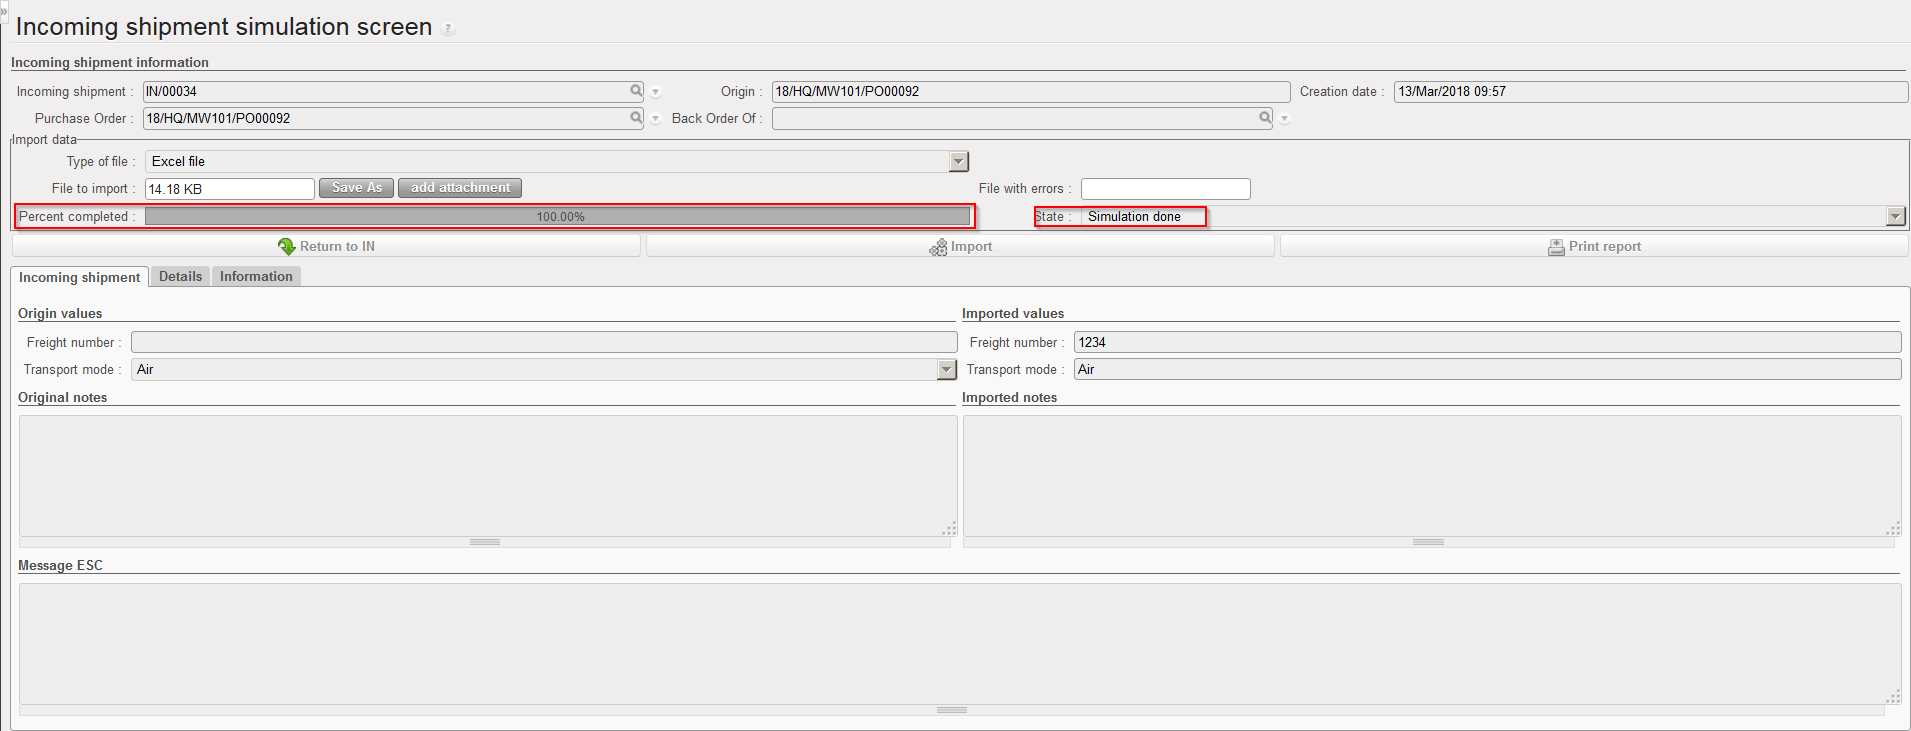
Incoming shipment simulation screen after import (Incoming shipment tab) |
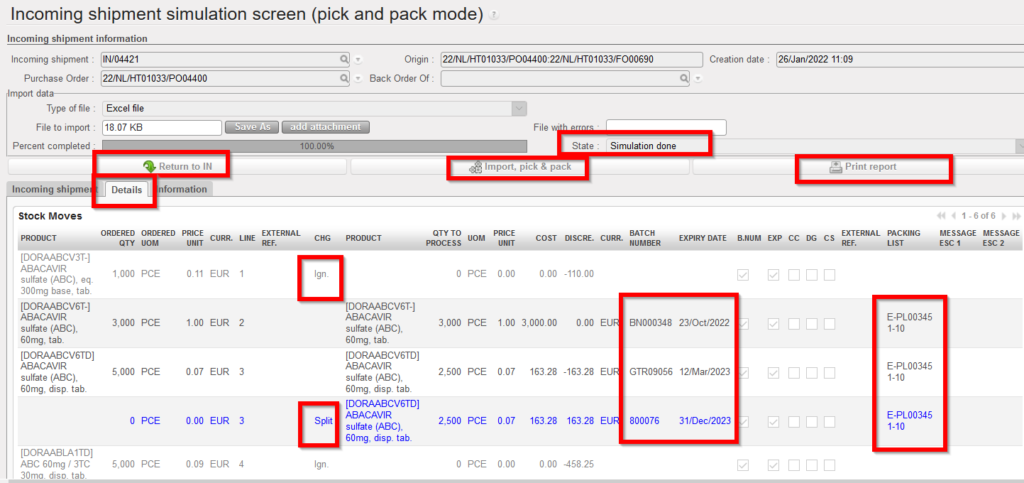
Incoming shipment simulation screen after import of “Import IN, process IN &pick and pack” (Details tab)

Incoming shipment simulation screen after import (Information tab)
The simulation screen shows the progress of the import in the “Percent completed” bar. Note that importing a file can last quite a long time if the e-packing list contains many lines.
The “State” field shows the state of the import.
On the “Incoming shipment” tab, you see on the left the current content of the IN header and on the right how the IN header will be updated if you confirm the importation with a click on “Import“. Updated/ imported header information such as “Freight”, “Transport mode”, “Notes” and “Messages ESC header” will be displayed here.
The “Details” tab show how lines will be updated if you confirm the import. (please check the above screen shot)The column CHG of the “Details tab” includes explanation on what is going to happen if you confirm the import.
“Ign.” means that the line is not included in the import file. As a consequence, this line is not processed and will ends-up in back order.
“Split” means that a line has been exploded in several parts, usually because different BN or ED are sent for a same product (but it could also be for other reasons such as different prices for a same product, a same product present on several packing lists from ESC,…)
Note that no new line can be added on the e-packing list. All items received through VI should have been confirmed on the PO. The “Ext.reference” field present in the XML file does not allow to add an extra line but only to receive a line which was added on the PO before its confirmation.
The “Information” tab shows additional information such as the number of updated lines and will give more information on the Packing import options (see screenshot above)
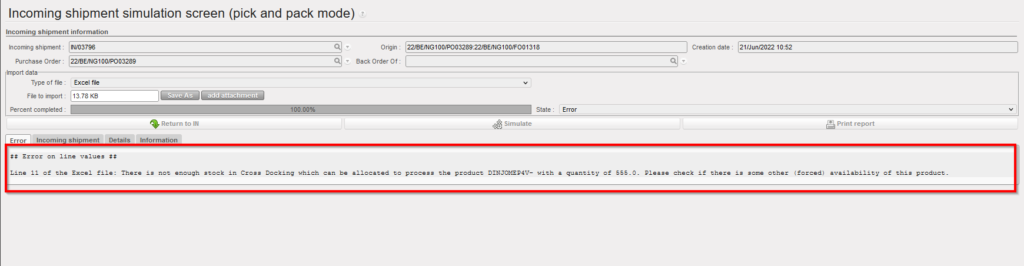
An “Error” tab could appear after simulation if the system detects problems in the e-packing list.
*** System will check the availability for all types of VI IN import, for example, In case of Incoming shipment for a destination location “Crossdocking”, and the user “Forced” one of the products as “Available” in an unrelated “OUT” from the same location “Crossdocking”, the import could not be processed. system will check at IN import (if IN>P/P/S) that products do not have a negative available stock in CD location, and if so, the import will be blocked and product code / qty displayed in warning message.
11. Divided to section a) and b):
a) If you agree with the changes proposed by the simulation screen, click on the “Import” button if you used “Import IN” option or on “Import, pick & pack” if you chose the “Import IN, process IN & pick and pack” option.
b) If you don’t want to validate the simulation yet or if you cannot because it is a blocking error (for instance you cannot use the “Import, pick & pack” in case the related PICK document has been converted to an OUT – you will get a clear message) , you can either go back to the IN main screen with no change and click on “Return to IN” button OR you might need more time to analyze the import file and changes and then you have the option to export the results of the simulation via Excel by clicking on “Print report”.
|
|
|
IN VI Simulation – Print report |
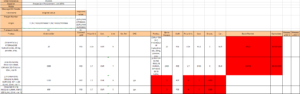
Please note that all the differences between the IN main screen and the import file are highlighted in red (see above).
- Note where import file contains a value in “Freight” field, this will be imported in to the “Ship Reference” on the screen of Incoming shipment.
12. Divided to section a) and b):
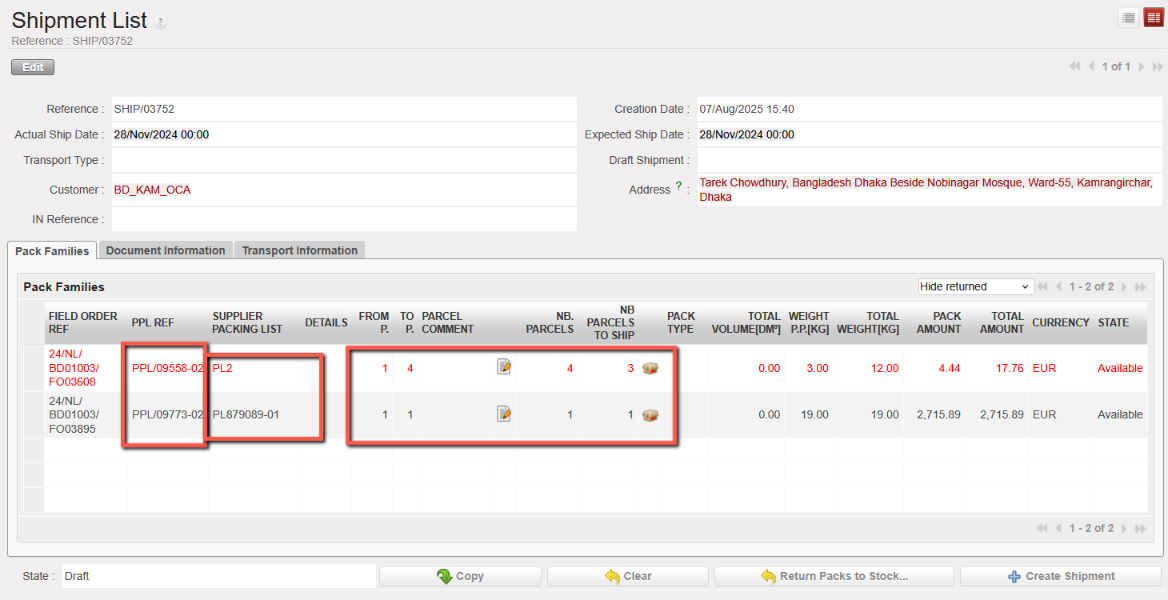
a) Following “Import IN, process IN & pick and pack” a Draft Ship will be created while Pick, sub-PICK and PPL document will be automatically created and Closed. Please note that there will be as many sub-Pick and PPL as they were Packing list on the import file ( on the screen below you can see the information form the imported file.
Note that you are directly directed to that screen only in case all lines have been processed, otherwise you will be redirected to the Back Order IN and you will have to check the creation of the SHIP document under Warehouse > Warehouse management> Deliveries> Shipment.
|
|
|
Draft Ship created after “Import IN, process IN & pick and pack” |
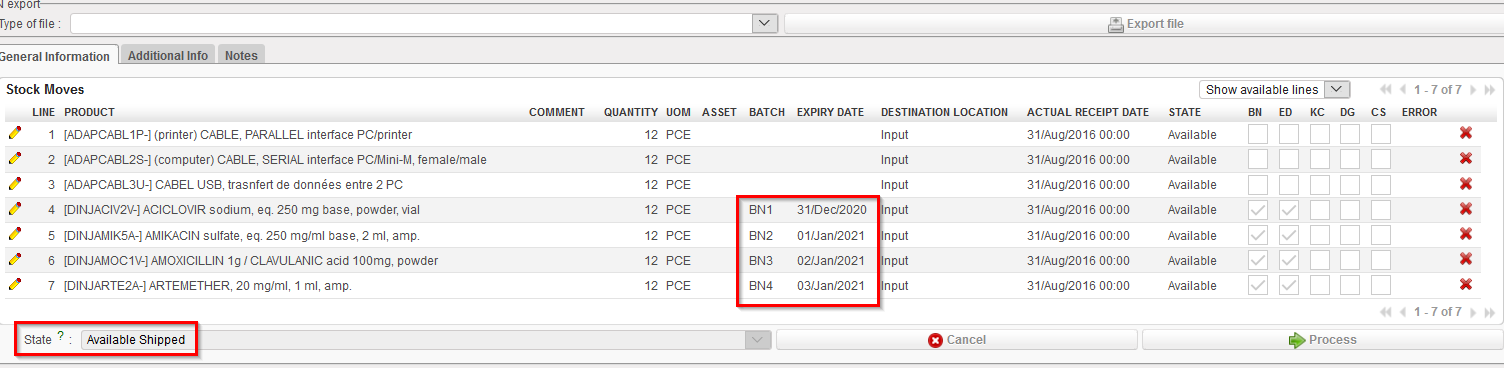
NB: please note that in case there is a related synchronised IN at project it will be updated to “Available shipped” and all packing information will be displayed on the IN along with Qty and BN/ED (these data can be filtered if necessary). However, packing information will not be editable on this IN.
|
|
|
Available Shipped IN at project after synchronization |
|
|
|
Available shipped IN process screen created at project – All packing info have been updated |
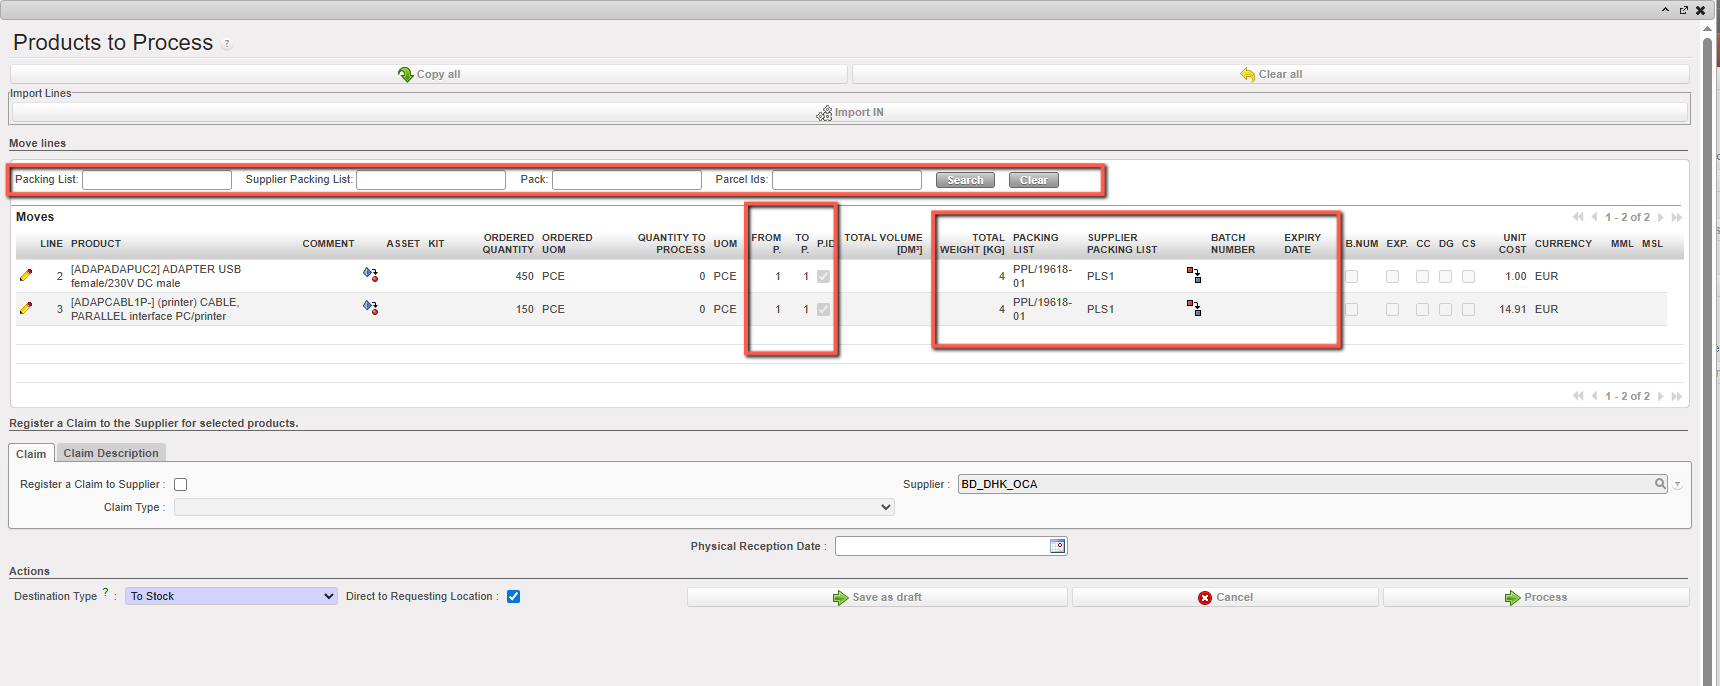
b) Following “Import IN”, the system brings you back to the “Products to Process” screen where the data have been imported from the VI file. Note that you still have the possibility to do manual modifications on this screen.
|
|
|
“Products to Process” screen after import |
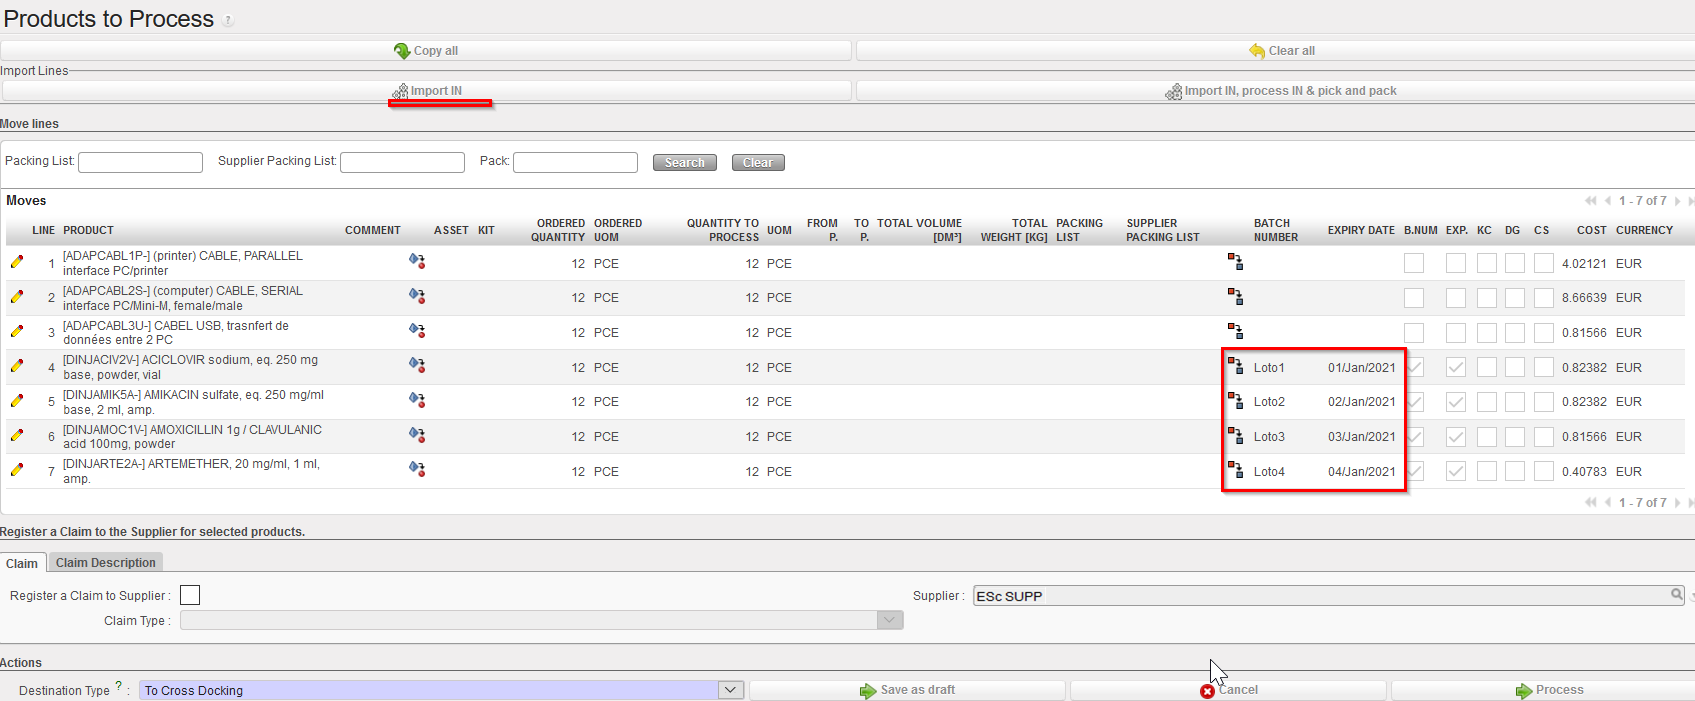
13. If you agree with the changes done, click on “Process” to actually register the reception. You may also click on “Save as draft” to save the IN with the updates but without processing it. You may also click on “Cancel” if you want to discard the updates.
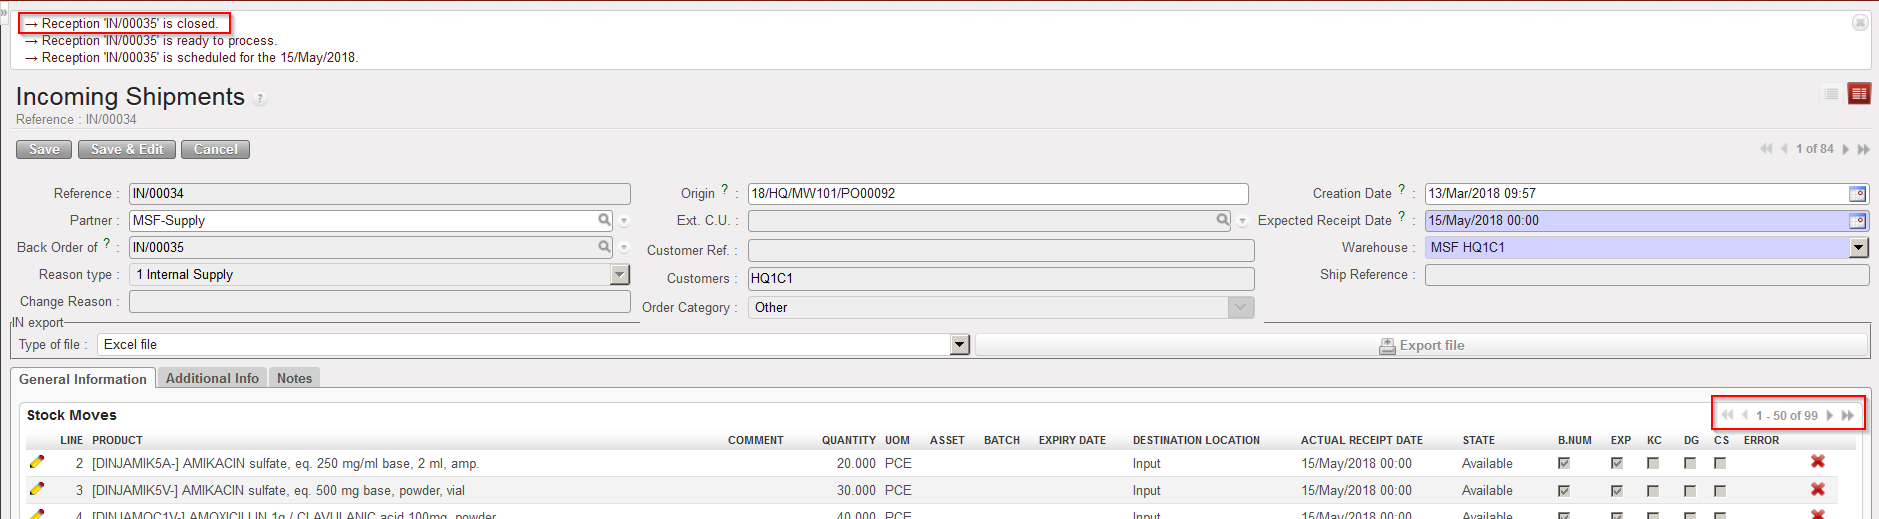
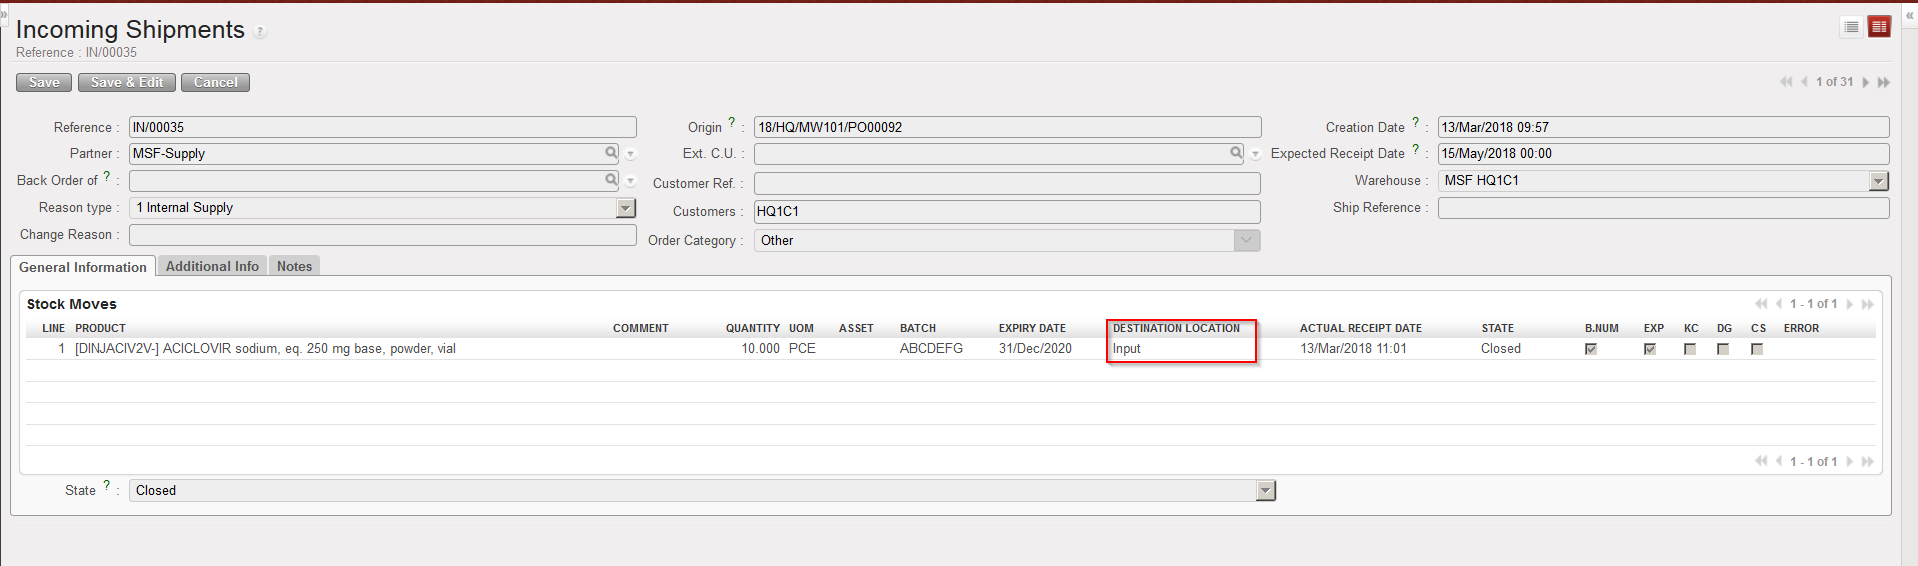
14. Observe what is done by the system (the received line has been registered on a new “Closed” IN while the 99 lines in back-order stay on the original “Available” IN).
|
|
|
Incoming Shipment after partial reception done through VI file |
|
|
|
New Incoming Shipment created, processed and closed to receive the partial reception |
|
|
|
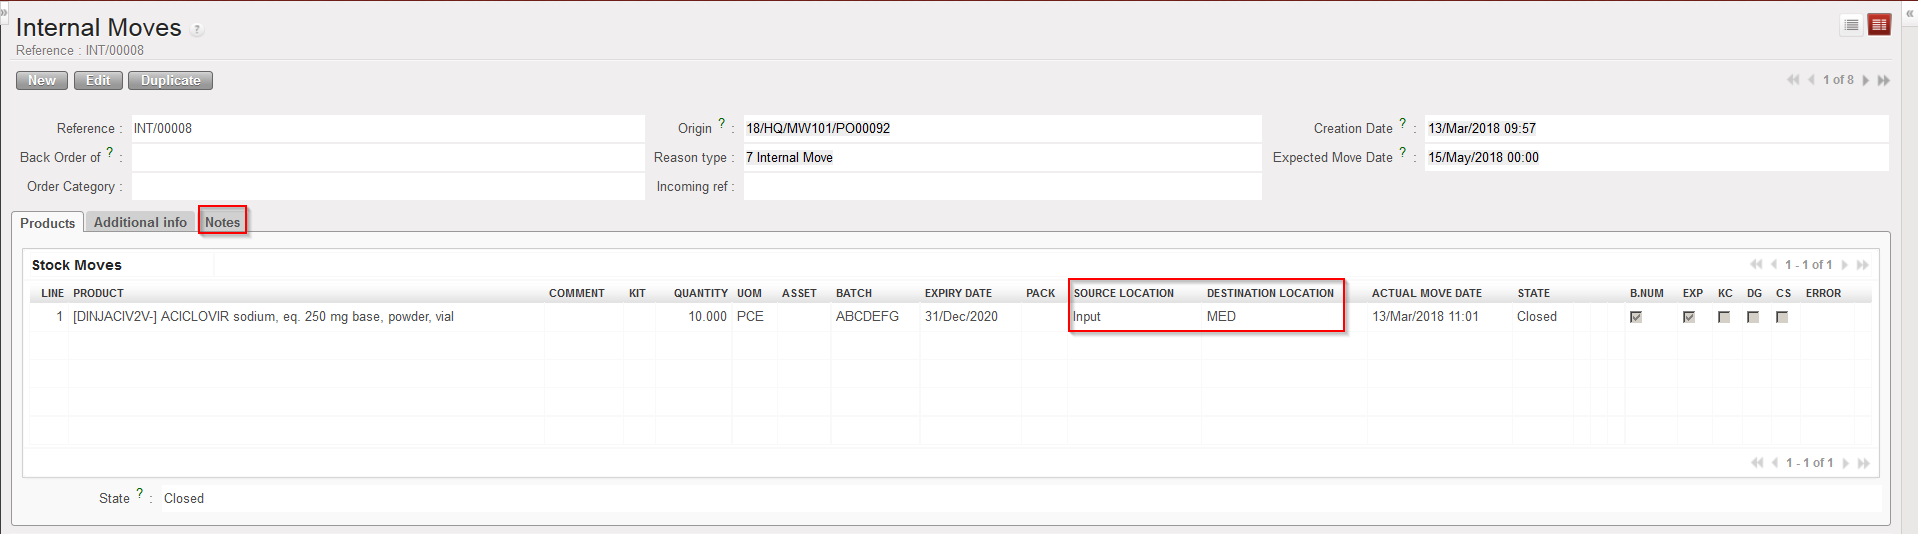
Internal Move created, processed and closed to send the goods to the requesting location |
Note that usually, if a freight is sent by an ESC, this freight will include the content of several POs. As each PO will correspond to one Incoming Shipment, several INs will be concerned by each freight. This is the reason why, for each freight, you will find several e-packing lists (several XML files). Each e-packing list will have to be imported on the corresponding IN, following the steps described above. In the “Notes” tab, the imported file name is registered. This will help user track the imported files per IN.
In case of partial shipments, this tab “Notes” will be blank for the back order INs without direct VI import.
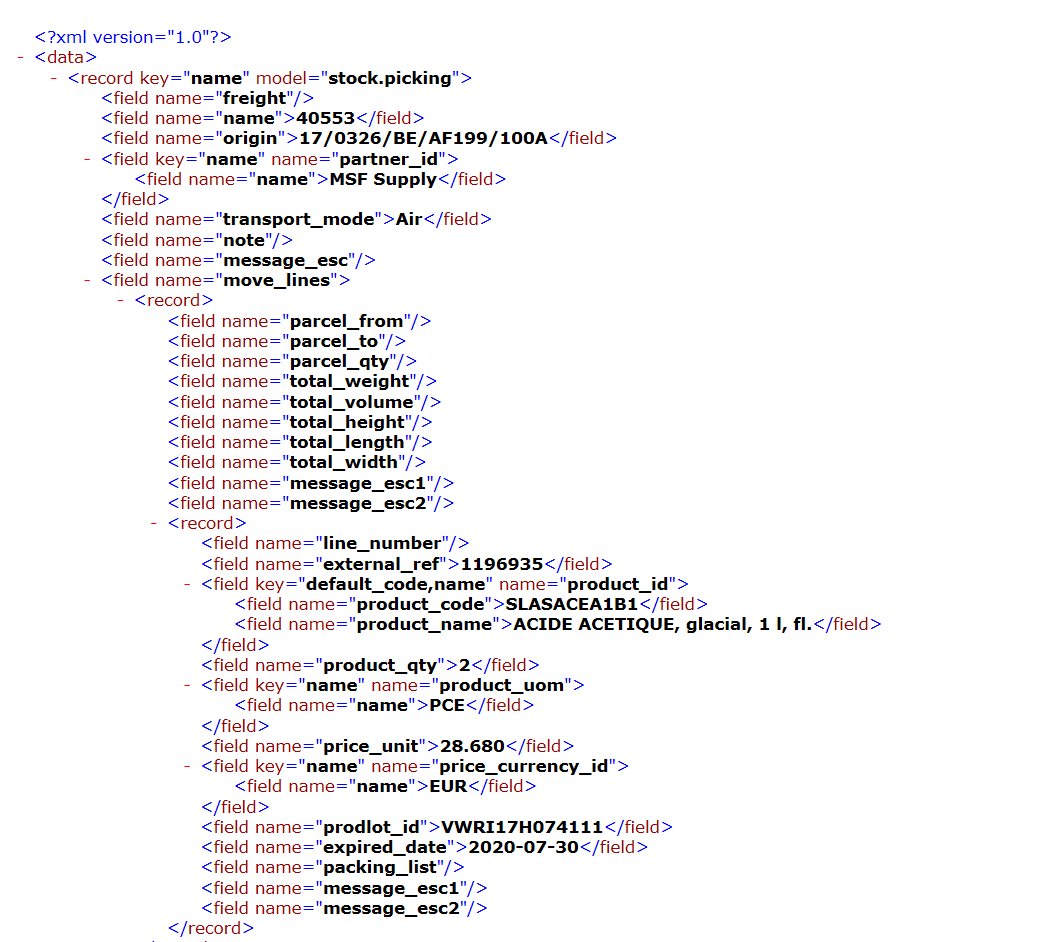
Note that in addition to the Excel format import file, the system offers the option to use another bit more technical format, XML (this format can suit better your ESC system – see with your OC).
|
|
|
Example of file which can be imported on an IN (Pure XML format) |
Please note that depending on your OC ESC’s development, automatic import of INs can be done via VI with UF. You need to refer to your OCs referent in order to get more information on this.
However, note that this automatic import introduces a new status: “Available updated”. This status means that after import the IN is not processed automatically and still need to be processed manually but information such as BN, ED, Qty, Cost, Packing list, Supplier packing list, Parcels “From P” “TO P”, Volume and Weight have been updated (only BN, ED and Qty can still be edited after import). Please note that new confirmed lines cannot be added to INs with this status.
