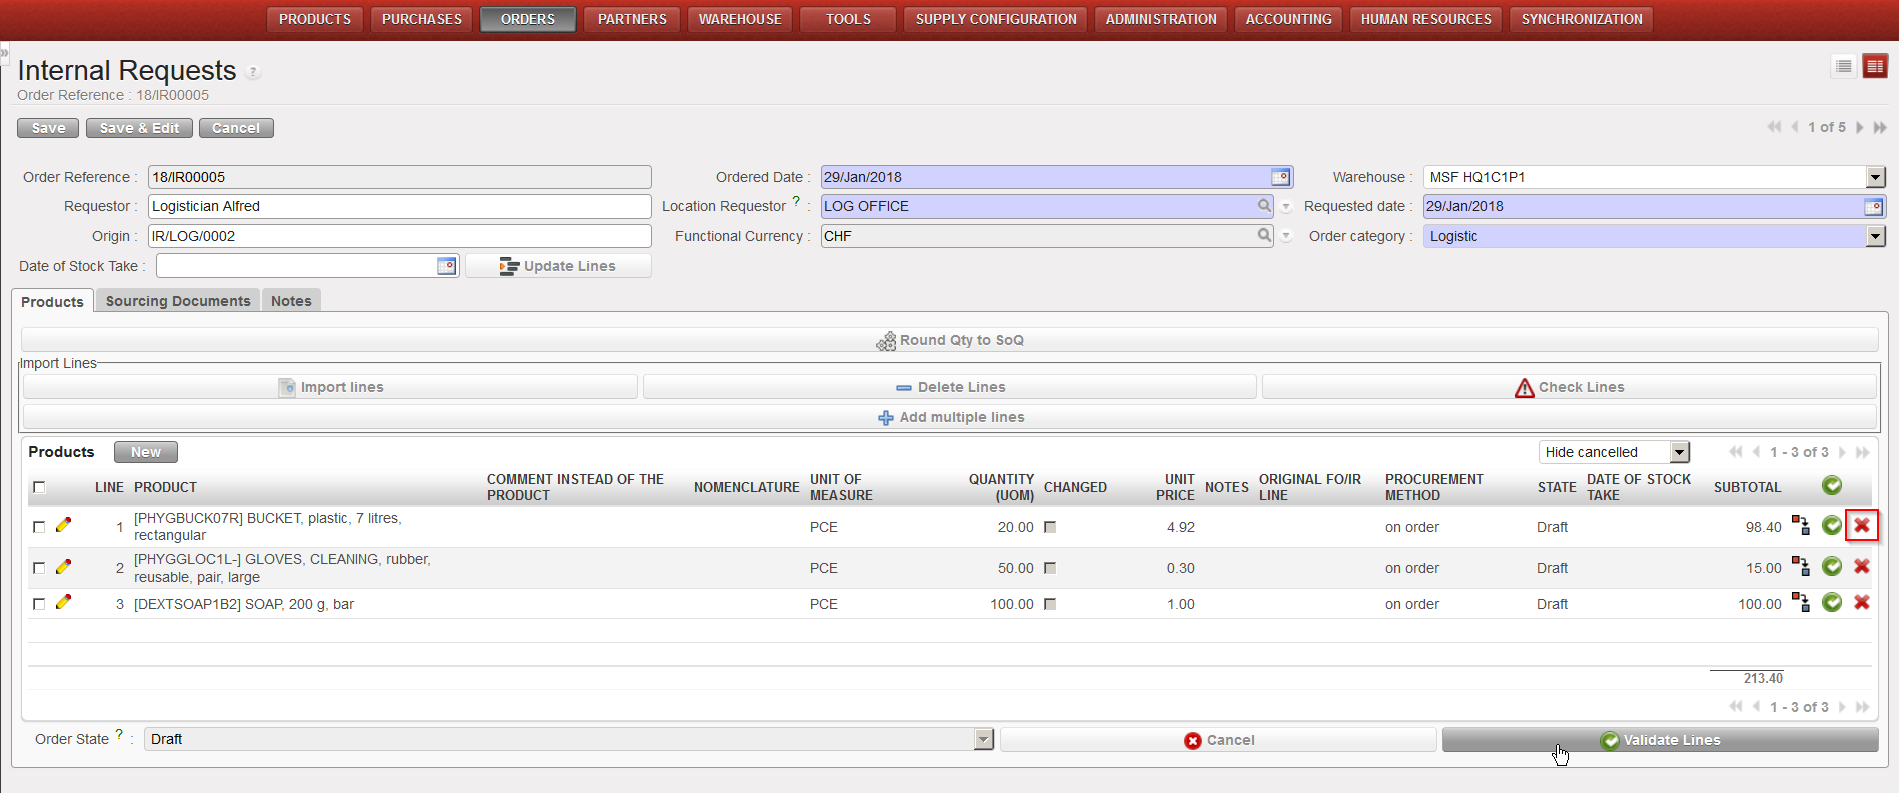
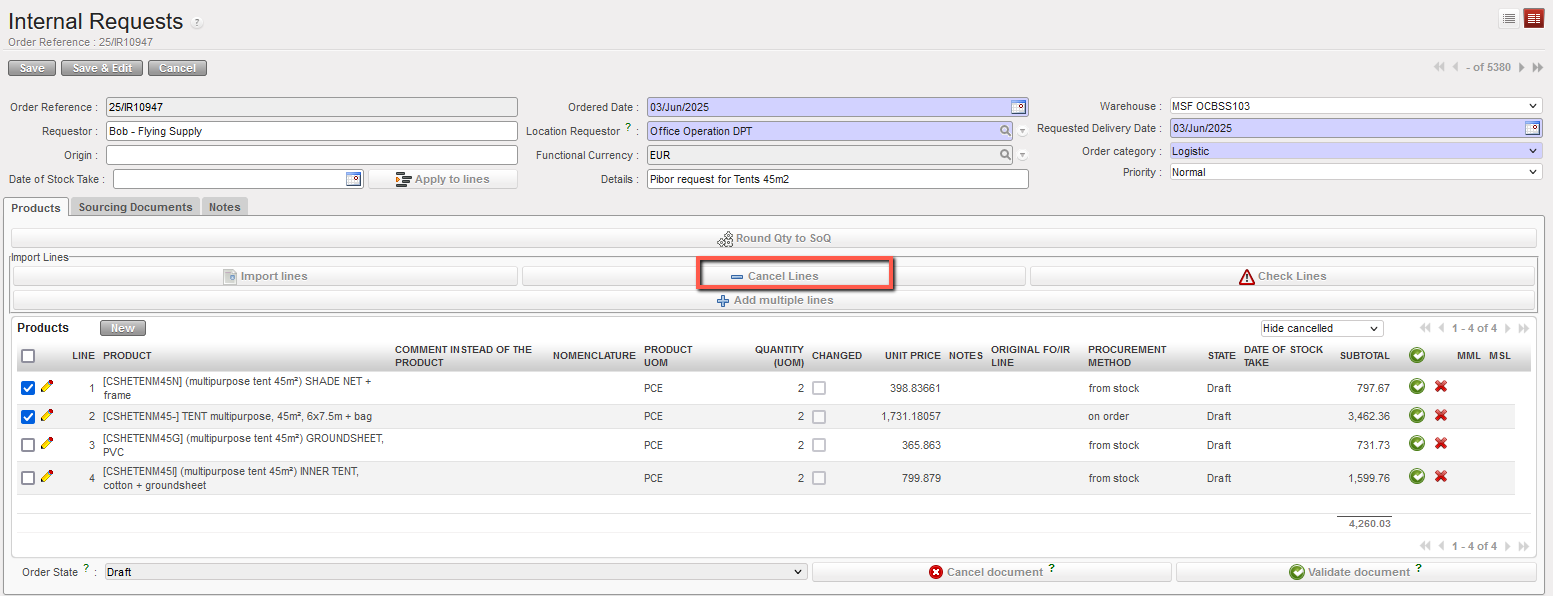
I. How to cancel a line or Multiple lines from an Internal Request.
At the right of each line of an IR, a red cross is available. Clicking this red cross will cancel the corresponding line.
cancelling an IR line
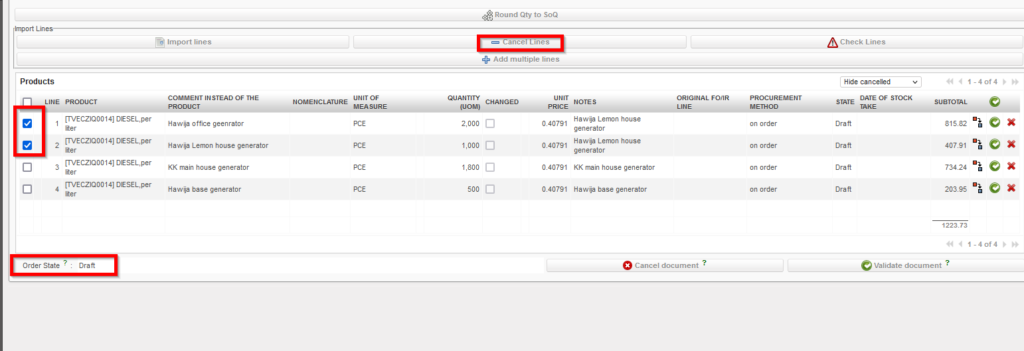
Only “Draft” or “Validated” lines can be “cancelled”. If you wish to cancel several lines at once, you may select them via the check boxes available on the left of the lines and click on the button “Cancel Lines” at the top of the Products table.
cancelling IR lines
Note that draft and validated IR-lines can be cancelled in Draft-p / Validated/ Validated-P IR. but an IR-line which has already been sourced cannot. At this stage you will have to do the cancellation on the next document (e.g. PO or OUT).
Type the requestor’s name in the “Requestor” field.
Enter the “Location Requestor“. This is actually the destination location, where the goods should be delivered. You may enter a regular stock location (LOG/MED), an intermediate stock, an internal consumption unit or an external consumption unit.
NB: These different locations types are explained in details in the Warehouse chapter It is important to determine correctly from the beginning where the goods are expected to be received since this information will follow through the whole procurement process till delivery and it will impact on other transactions such as IN or OUT (see LU-SU4101 Incoming Shipments and LU-SU4105 Delivery Orders in the Warehouse chapter).
4. Enter the requested (delivery) date in the “Requested date” field using the calendar button (i.e. when the goods are expected to be received by the requestor).
5. As “Origin”, you may type an information explaining what triggered the creation of the IR (paper request form reference, e-mail reference, …).
6. Select an order category available from the drop-down list next to the “Order category” field. Encoding the proper category will help you to better classify your Internal Requests. Note that if you try to include in an IR a product whose main type does not comply with the order category (i.e. if you try to include a LOG product on a MED IR), you will get a -non blocking- warning message.
Warning message on IR
7. If the IR is created following an inventory that was done before, you may enter as “Date of Stock Take” the date at which this inventory was done. This information will be useful to measure key performance indicators (KPIs) in a later stage.
8. In the “Details” field, you can enter the order name or any details of the Internal Request and will be transferred to following documents including OUT (or Pick if converted).
9. On the “Notes” tab you may enter a description of the IR if needed. This text will appear on the PDF file if you decide to print the IR (but won’t be transferred to subsequent documents).
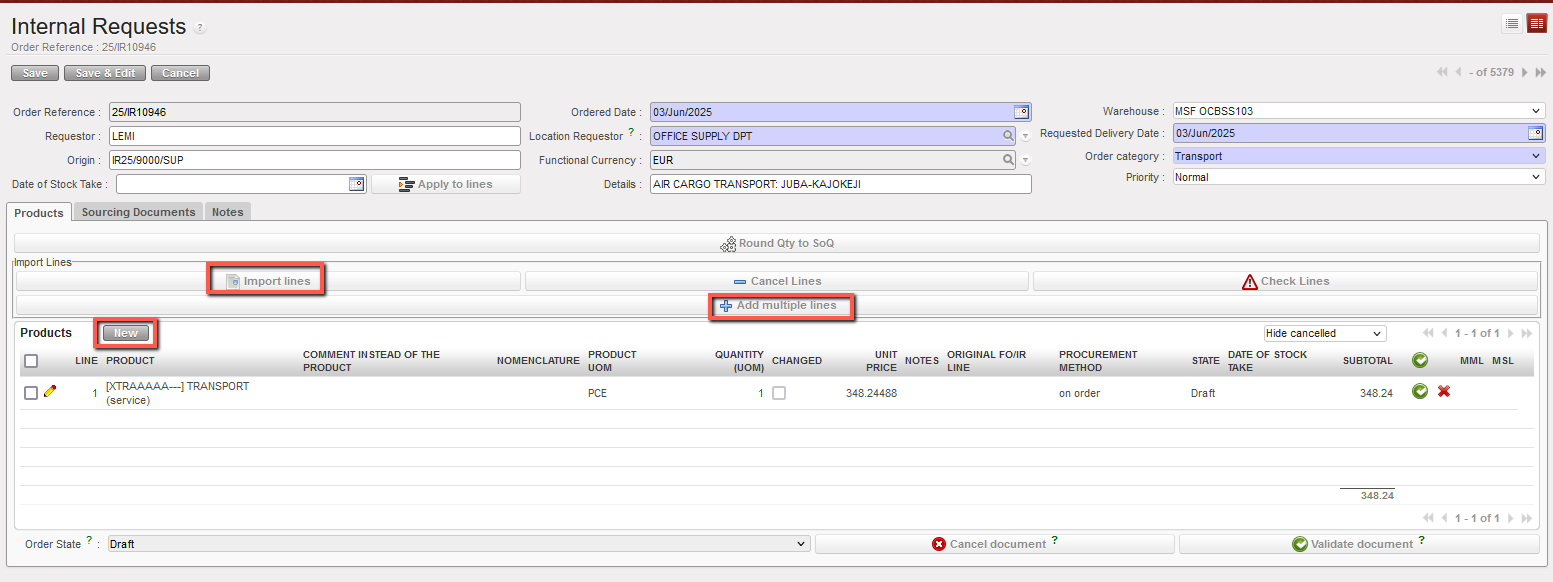
10. Insert product lines manually by clicking on the “New” button in the “Products” tab to add products one by one or on the “Add multiple lines” button to add several products at once.
10.1 “New” button: enter (part of) the product’s code or (part of) the description in the “Product” field and select the product you need or click on the magnifying glass icon to open the “Search Products” screen. Search and select the product you need by its name, nomenclature or any other filter available.
10.2 “Add multiple lines” button: click “Add” on the pop-up screen and search for the products you want to add from the “Search Products” screen. Use the relevant filters: Nomenclature, Description, Code, Lists, Catalogues,… Select the products you need by ticking the boxes at the left of the corresponding products lines and click on “Select” to add them in the list of products you want to include in your IR. Once you have all the products you need click on “Add products”. Note that quantities can already be entered on the “Add multiple products” pop-up screen.
NB: We will see later that it is also possible to import product lines from an Excel file (via the “Import lines” button). This may highly facilitate the encoding as requestors often transfer their requests to the supply department via Excel file.
Adding lines on an Internal Request
11. If you want to enter in the IR a generic (non-codified) product to be specified (codified) later, encode its description in the “Comment instead of the product” field (see below for more details on this). This comment will be carried out through all the documents of the supply flow from the ordering process till the final stock movement (and will be transmitted via synchronization). Note that this field is also available if you have entered a regular (codified) product and can be used to further clarify your request. This comment will be printed on the IR (PDF) if no codified product has been entered but won’t appear on the print-out (PDF) if a codified product has been entered.
12. On the product line, check and change the UoM (Unit of Measure) if necessary. This is usually not needed as most of the products are managed in pieces (PCE).
13. Enter the required quantity in the “Quantity” field.
Note: Note that “Quantity” and “Unit Price” can not exceed a certain number of digits (but still quite large numbers are allowed and a warning message will be displayed in case you reach that maximal capacity).
14. Enter a price or modify the price proposed by the system if needed. The price proposed by the system is coming from the PMD sheet. Note that the price which appears on IR will not be pulled through to any following document (so is for visibility within IR document only).
15. In the “Notes” field you may enter additional information if required. This information will appear if you print the IR (PDF) but will not be transferred to subsequent supply documents.
16. If you wish to change the procurement method (from stock/on order) proposed by the system (and coming from the PMD sheet), modify it in the “Procurement Method” field. Note that this method will be decided definitively at a later stage in the Orders Sourcing Tool.
17. The date of stock take can be specified at line level as inventories may have been done at different dates according to the products.
18. Save the line by clicking on the floppy disk at the right of the line or via a click on “Enter”.
19. For multiple items, repeat for as many lines as needed.
20. Click on the “Save” button at the top of the screen to save the Internal Request.
21. Optionally, you can click on “Round qty to SoQ” (see LU-SU3401 for further details on this feature).
22. The Internal Request is saved in “Draft” status and all the lines of the IR are in “Draft” status.
Adding a product line on an IR
In case you made a mistake and need to delete some lines you can delete them either by clicking on the red cross at the end of the product line or by clicking on the “Delete lines” button if you want to delete several lines in one click .
Products lists and sub lists are very useful to automate tasks. They are useful when the same products are regularly ordered in different quantities. A product list (and sublist) means that we already have an outline of the products needed as a template, which will speed up the process for creating the order.
A product list can be used to define the products required by a mission, project or a particular activity; they can also be used to list products that a supplier may be able to provide. Lists are always related to a warehouse and a location optionally can be linked to a supplier or customer.
A sub-list has to be linked to a list, therefore at the time of choosing products for a sub-list, only those products appearing in the parent list will be available. For example: let’s imagine that an MSF project (project 01) contains 3 activities (OPD, Vaccination and Nutrition). By creating a list for project 01 and 3 sub-lists for each of the activities, the user will be able to benefit from using UniField tools such replenishment, forecasting, re-ordering and more.
In the following section, the Learning Unit will detail each of the tabs, sections and fields included in the Product record as well as describing any relevant conceptual background.
Information tab
Go to: Products / Products
Open a Product record by clicking on the line or on the pencil icon (to open it in edit mode) or click on “New” to view these fields in an empty product record
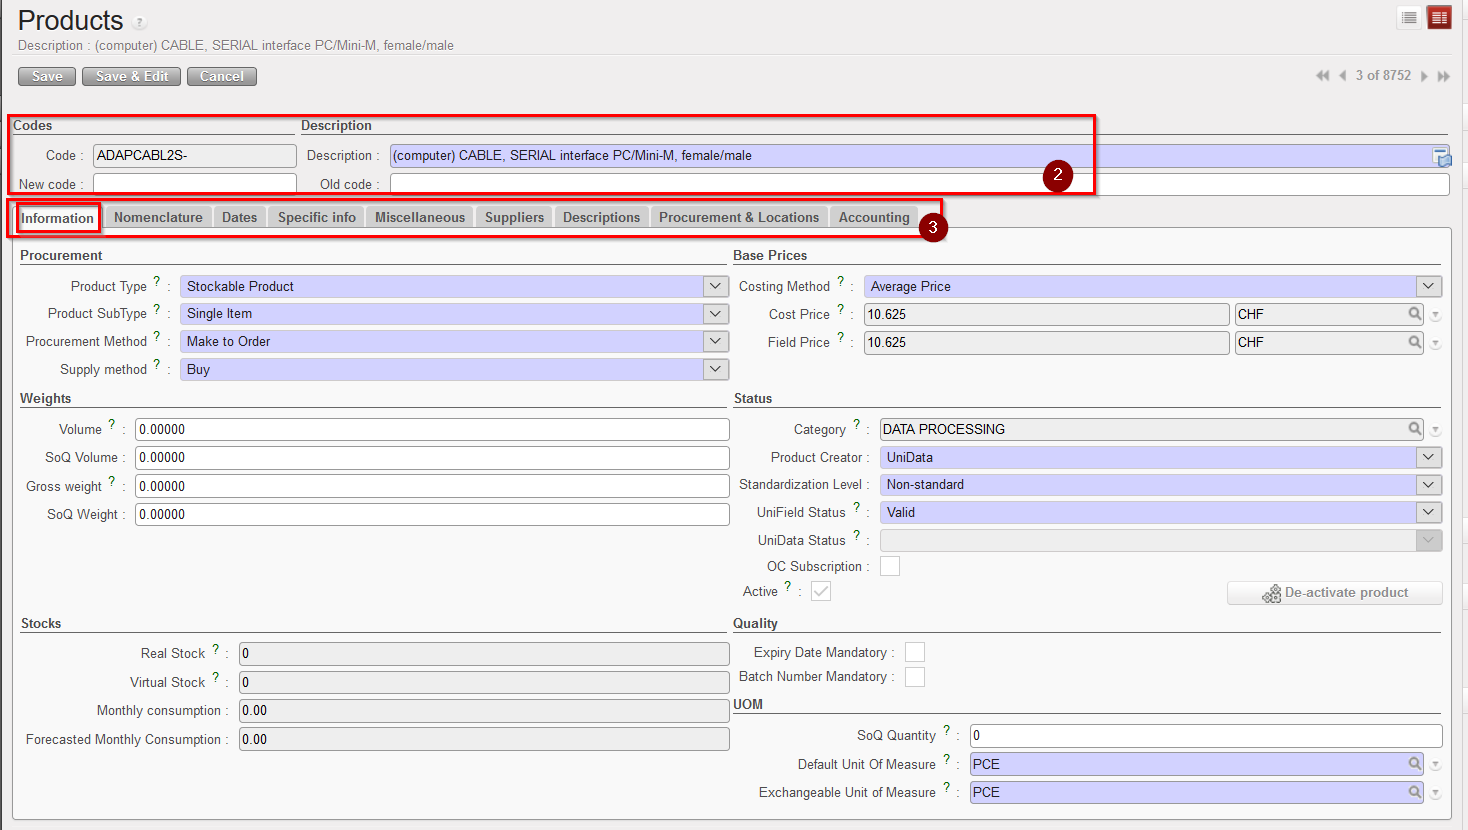
In the header of the Product record, there are fields for the product’s Code and Description
Code refers to the UniField product code – Please refer to the MSF Logistic Catalogue/UniData Guidelines for more details of code composition. The composition of the code is not enforced by the system, but a string of recognised characters can be added freely, so users should ensure this is correct before the code is created.
The only added constraint is that UF requires that the locally created product contain a “Z” in their naming.
Description, refers to the UniField description – Please refer to the MSF Logistic Catalogue / UniData Guidelines for more details of description composition
Old Code, refers to previous code (depending on codification and system) this code will have be replaced by the current one.
New Code, refers to the new code (e.g. if current code is now obsolete and there is a new code/product which should be used/ordered in its place)
3. Under the Code and Description fields, there is a set of tabs; Information, Nomenclature, Dates, Specific info, Miscellaneous, Suppliers, Descriptions, Procurement & Locations and Accounting.
In each tab, there are different sections. In the information tab there are sections on Procurement, Prices, Dates, and in each of these contains one or more fields.
The system will trigger different alerts, processes and tools according to the type of product and attributes entered in these fields.
Information tab
4. Procurement section
This section covers the different elements which the system needs to know in order for a product to be purchased, as different products will trigger different procurement processes within the system. A product could be stocked in large quantities or not be stocked because the requester may not need the product, but has simply ordered it for another project, or because the product was only needed once and no regular consumption is foreseen.
The information needed in order to procure the product is as follows:
Product procurement types
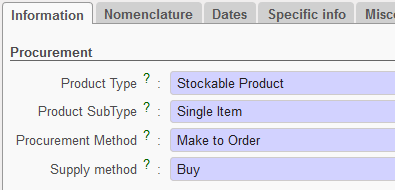
Product Type:
Stockable product, for products which are usually in stock and can be stocked
Non-stockable, for products that we will not be managed in the storage and dispatch stages of the system (e.g. stationery, expat food etc). Non-stockable products should be received in the “Cross docking” location if they have been requested by another project as explained above. Otherwise, they will be received by default, directly in the virtual location “non stockable”. They will remain in the temporary locations and be transferred from there to the requester (no Internal Moves or movements to another location within the same instance).
Service with reception, for products which are services, such as construction, transport and electricity services, etc. This option is explained in more detail later in this chapter. We need to receive a product as a service for the system to generate a reception document which finance department need to verify before clearing and paying any invoice.
If this Product type (Service with reception) has been selected, a checkbox called “Transport product” will appear. This should be ticked if the service is a form of transport – e.g. freight, as this will allow the user to generate reports on transport costs. Services with reception will by default be received into the virtual location “Service”. These products should never be received into a Cross-Docking location, as they should be ordered on a Direct Purchase Order if ordered for another instance.
Product Type
Product Sub Type (will appear if Product type has been selected as stockable)
Single item, this is used for almost all the products which can be measured as a countable unit (e.g. a blanket, oral drugs etc).
Kit/Module, this option is used for kits (containing more than one product and/or module in the package or box).
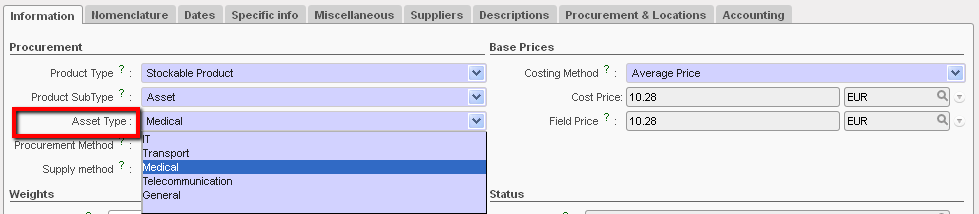
Asset Should be selected when the product is an asset. This will trigger other fields/processes to become mandatory in the system in order to facilitate sufficient tracking of assets. If a product is an asset, it must be recorded in the system as such, as assets require special attention. Assets need to be identified, tracked, repaired and disposed of with a greater level of detail than other products. Please refer to your OC procedures to understand which products should be classified as assets. If the asset checkbox is ticked in the product record, the system will require further information relevant to the asset (e.g. brand, model etc) to be entered into the system at certain points (e.g. at point of reception).
Product Sub-Type
Asset Type
It is mandatory to select the asset type if Product Subtype is an “Asset”. The options are:
IT
Transport
Medical
Telecommunication
General
Asset type
Procurement Method
Make to order, is the option for products which are not consumed on a regular basis, so no replenishment rules are applicable and any request for these products would be raised manually according to a specific need. Therefore, a request for one these products would be made via an Internal Request (if it can be sourced within the same instance) or via a Field Order (if ordered to a parent instance).
Make to stock, is the option for products which are regularly used, so generally this should be selected where the replenishment rules have been set (see Chapters on Inventory Management and Configuration) which will lead to the system automatically creating draft
POs for these products.
Product Procurement Method
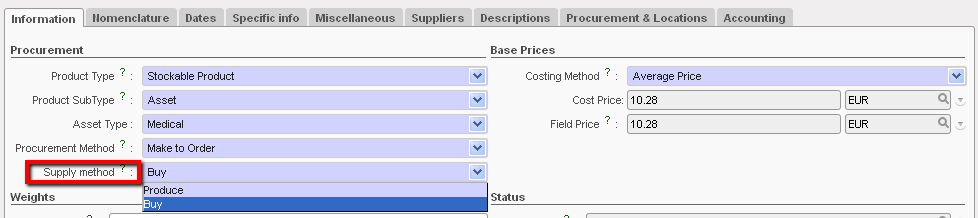
Supply Method
Buy: most products in MSF will be bought so we will often use “Buy”. All services will have “Buy” as the Supply Method.
Produce: this option should be used when MSF needs to create a product (most likely to produce a kit)
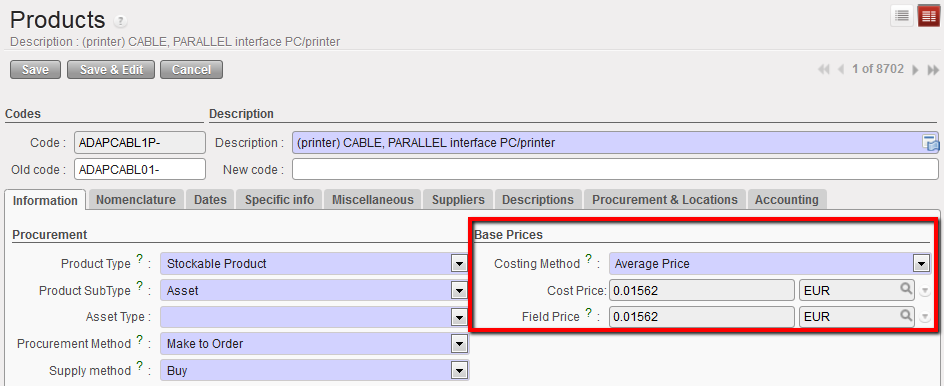
Base Price Section
Product Supply Method
5. Rubrique « Prix de base »
Product Base Price
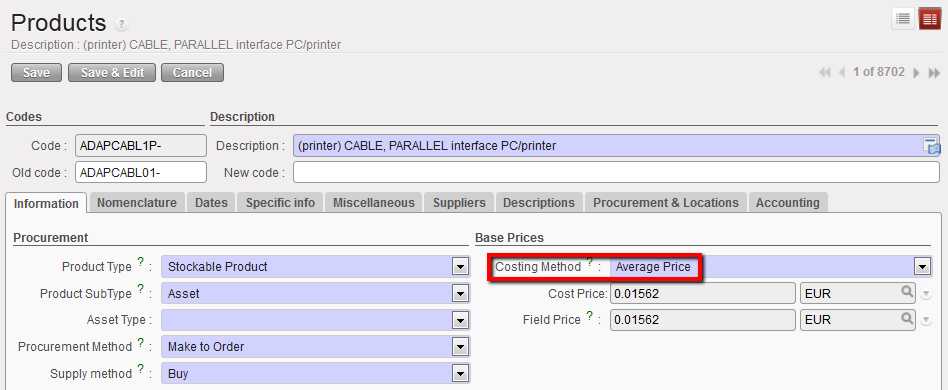
Costing Method
Average Price: this option should always be chosen. It is calculated according the Moving Average Cost (MAC) principal and uses the average value of the product in stock and takes account of all recent prices paid for this product within the instance. When an Internal Request is created for a product, the system will automatically pull this price for the product, although this default price can of course be edited/changed. The same is true for a Purchase Order where there is no active Catalogue for the Supplier.
Standard Price: this option indicates that the price of the product is fixed and doesn’t change (some products procured from ESCs). However, this option should NOT be used.
Costing Method
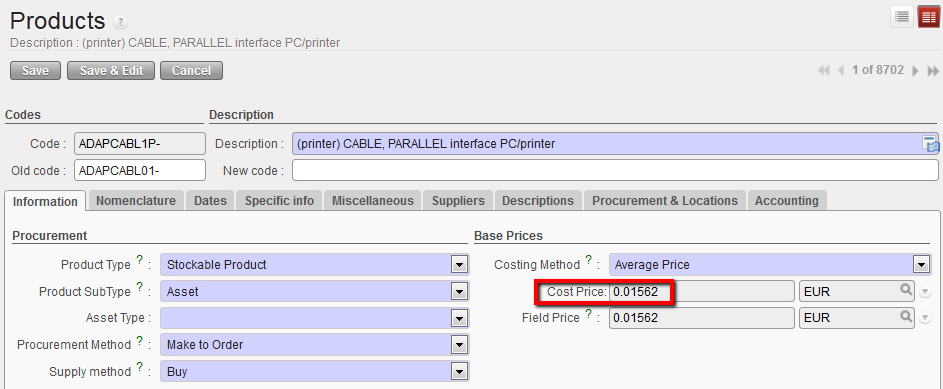
Cost Price
This is the price of the product based on the costing method selected above (i.e. Average price).
Cost Price of a Product based on the Costing Method chosen
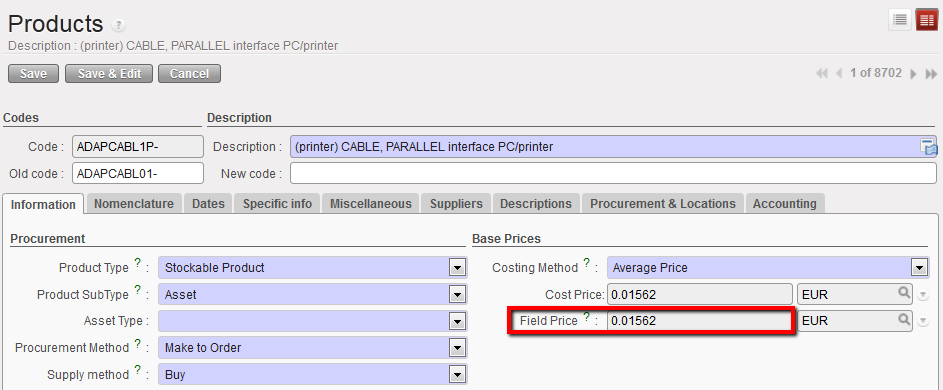
Field Price
In the situation where a product is sourced from an RSC (Regional Supply Centre), the field price will equal the cost price plus a percentage (e.g. +2%) to cover the service that RSC provide in sourcing the product.
Field Price
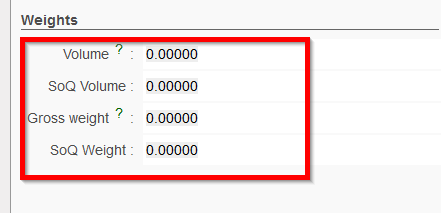
6. Weights Section
It is useful to fill in as much of this information about the product (Volume, SoQ Volume, Gross Weight, SoQWeight) as possible in order to help the system calculate cargo volume, which will have an impact on transport, storage and therefore on the cost. The SoQ Volume and Weight figures should be based on the quantity as designated in the UoM section “SoQ Quantity” if one exists. See below for further explanation of this.
Product Weights section
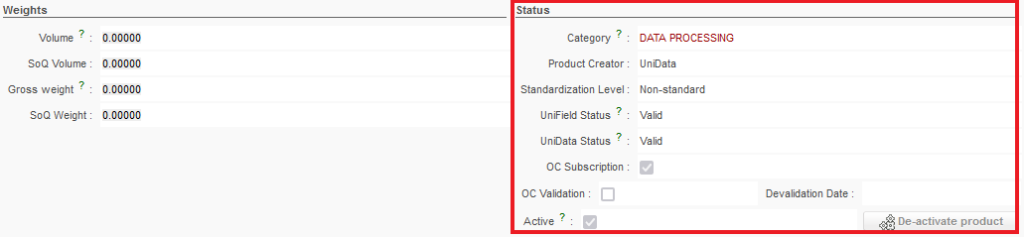
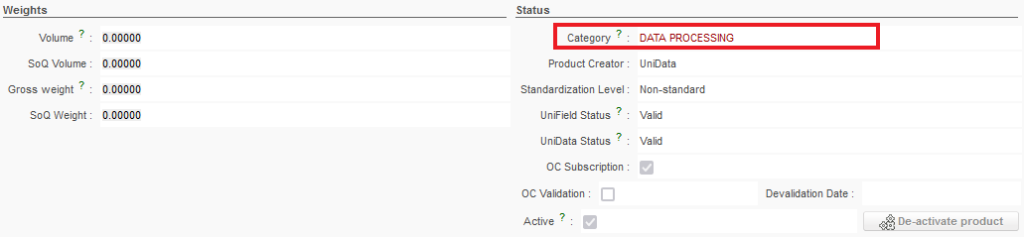
7. Status Section
Status Section
Product Status section
Category
This is an important field and it relates to the Product family. The option displayed is selected by default and will impact the Expense and/or Income accounts in Finance. You will not be able to modify the option in this field as it will be generated according to the Family selected (in the Nomenclature tab), but if you need to change the Family of the product then this may change the default Category.
Product Category
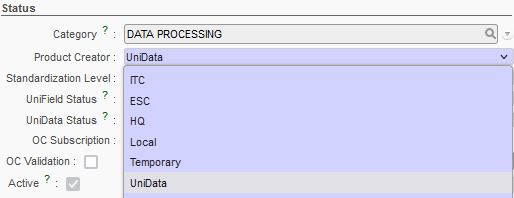
Product Creator
This indicates who created the product. If it is a standard product (it is recognised by UniData / the MSF Logistics Catalogue) then it will be created by UniData and there will be complete visibility of it across all instances via the synchronisation process.
UniData – synchronised (if all OCs have subscribed in UniData then it will be common to all HQs & missions). The majority of products in instances are UniData.
ITC – synchronised (common to all HQs & missions) – these are being cleaned and replaced by UniData codes
ESC – synchronised (common to all HQs and missions who use the ESC) – these are being cleaned and replaced by UniData codes
HQ – synchronised across the OC
Local – Created in coordination instance and will be synchronised within the mission (being cleaned as well and to be replaced by UD products)
Temporary – to be considered only as a “draft” status for newly created products – not synchronised and should not be added to any orders.
Product Creator
Standardization Level, this is a specific property linked to the Unidata / Codification document. Please refer to Unidata Documentation for more details.
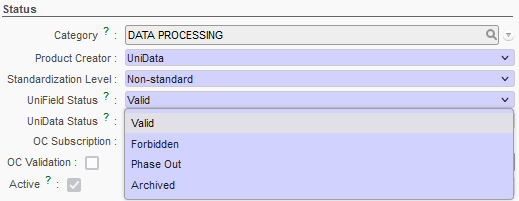
UniField Status
Linked to the product life cycle and to projects (This is linked to the UD / codification project and should be used only in accordance with agreed procedures). UniField Status updated following synchronisation from HQ which is itself stemming from UD linkage ( following agreed mapping – see internal procedures).
Therefore, “UniField status” is now dependent on “UniData Status” (see next paragraph) however, only “UniField Status” will still have a functional impact in the system.
Valid – Can be used as a normal product; can be ordered, stocked and consumed (Active)
Phase Out – Can be stocked and consumed normally, but ordering is limited to only internal partners (i.e: excluding as well ESCs) (Active)
Archived – cannot be ordered, stocked or consumed (Inactive)
Forbidden – cannot be ordered, stocked or consumed in the field. To move to quarantine/Destruction (or Internal FO from Stock) (Active)
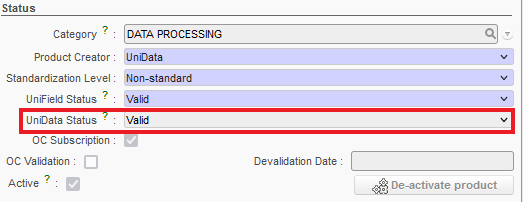
UniData Status
This value is filled only for UniData products and is added via the linkage from UniData at HQ level which is then synchronized to the fields. It is a read only field, it cannot be changed/updated by UF users or OCs. A mapping document enables to match the UniData Status to the UniField Status. Please refer to UniData guidelines for how this can be used and the impact on the “UniField Status” field (UF UD Product lifecycle mapping).
As a reminder, the “UniData Status” has no direct functional impact on the system but its impact on the “UniField Status” will functionally impact the system.
NB: UniField is responsible to cross-check and follow the mapping according to the received “UniData Status” and “OC Subscription” and then to update the “UniField Status” and “Active” checkbox fields where relevant (see below points “Active” and “OC Subscription”)
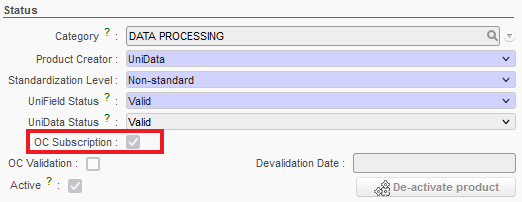
As soon as a product on a UF HQ instance has its field “OC Subscription” unticked or “UniData Status” = “Archived”, a UF mechanism will aim to deactivate it and may update the UniField Status. If the product has stock or pipe or is in a Product list, the product is kept active and its UniField Status is set to “Phase Out”( temporary status). If the product is not in pipe nor in stock nor in a product list, an automatic batch will inactivate the product and set its “UniField Status” to “Archived”.
Product Status
OC Subscription (checkbox)
This information is read only as well and linked only to UniData products. It will indicate whether the product has been subscribed by the OC in the UniData interface ( see your OC UniData guidelines for more details).
To note that Unsubscribed UD product should be updated in UF either as Inactive- Archived (if no more product in the instance) or Active-Phased Out (in case products are still in Stock or Pipeline).
OC Subscription checkbox
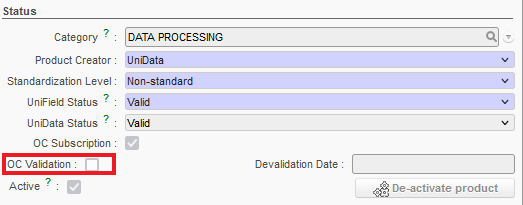
OC Validation (checkbox)
This information is read only as well and linked only to UniData products. It will indicate whether the item is Validated by the OC (included in the OC’s MML).
OC Validation Checkbox
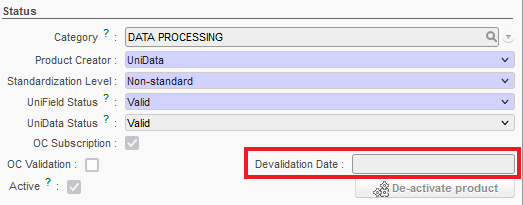
Devalidation Date
If a product is devalidated (removed from the MML), the devalidation date will be shown here.
Devalidation Date
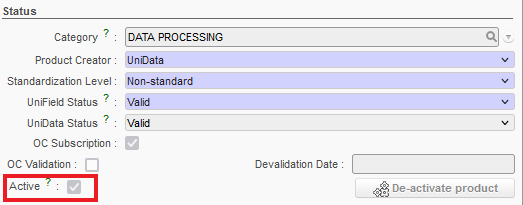
Active (checkbox)
This is very important, as it should be ticked for the product to be active (i.e. be recognised and visible) in the system. If this box is not checked, the product cannot be ordered, viewed in stock, dispatched, etc. (this box is automatically checked when a product is created except for UD non standard local product at mission level)
Product Active checkbox
Please note that in the Products Search View the default filter is on Active products.
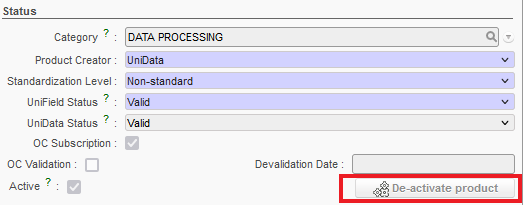
De-Activate Product
This button allows the product to be de-activated when it is not being used in the system (in an open Supply document) or when it is present as stock in an internal stock location (see later on in this chapter for How to de-activate a product for more details).
De-activate product button
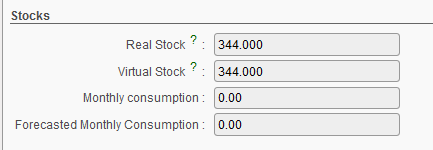
8. Stocks section
Product stocks section
Stocks will be calculated by the system, the user cannot edit these fields.
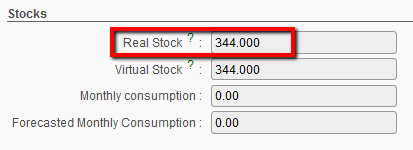
Real Stock: quantity computed in real stock, this includes products in locations: LOG/MED in main stock AND all configured Internal locations (Intermediate stock and Internal consumption units). AND E-Prep internal locations.
Real Stock
Virtual Stock: quantity computed in virtual stock (same locations as for Real stock above) i.e. as soon as a product was received in the Input location and before it was assigned to a stock location.
Virtual Stock
Monthly consumption: view of stock consumed (or which has left the system) for one month during the past 3 months
Monthly Consumption
Forecasted Monthly Consumption: estimation of the quantity of the product which will be consumed over a month. This information is calculated according to the monthly consumption report and comes from what has been entered (manually) for this report
Forecasted Monthly Consumption
9. Quality section
Quality section : Expiry Date and Batch Number
Expiry Date Mandatory:
Most medical products will come with a batch number and expiry date. UniField has very good tools to analyze and manage these products. This information must be recorded manually in the system at the time of arrival of the products to ensure full system capability. Many UniData/ITC/ESC/HQ products will have this option enabled. See Unidata / OC guidelines for how this attribute should be managed.
The checkbox “Expiry Date Mandatory” should be ticked for all medical products and perishable products with an expiry date, For UniData products, this attribute will be set according to the OC’s stated preferences (please refer to UniData / OC guidelines).
This checkbox is only editable at HQ (for UniData/ITC/ESC/HQ products) and at Coordination with specific user rights (for Local products).
Whenever this attribute is changed/ updated, information will be synchronised down to children instances and stock/ transaction with this product will be updated (i.e: if ED attribute removed then the existing ED will be deleted; if ED attributes added then new ED will be automatically added “ED = 31/12/2999 and will need to be changed later by the user). Please note that there is a way to update this attribute in mass if necessary (see below).
Please note: Expiry dates are a very important detail of a product, it’s crucial that this information is accurate.
Batch numbers
Batch numbers are necessary for some products to indicate production batches, or the manufacturer’s batch reference number. Similarly to expiry dates, it is very important that batch numbers are accurately recorded and that we have good visibility on them. This information must be recorded manually in the system at the time of reception. This number will be used throughout the product life until it has been used / consumed.
The checkbox “Batch Number Mandatory” should be ticked for most medical products as well as many other types of products for which it is useful to differentiate between batches in order for products to be managed efficiently. As with Expiry Dates (see previous description) for UniData products, this attribute will be set according to OCs’ stated preferences.
This checkbox is only editable at HQ (for UniData/ITC/ESC/HQ products) and at Coordination with specific user rights (for Local products).
Whenever this attribute is changed/ updated, information will be synchronised down to children instances and stock/ transaction with this product will be updated (i.e: if BN attribute removed then the existing BN will be deleted; if BN attributes added then new BN will be automatically added “BN = TO-BE-REPLACED” and will need to be changed later by the user). Please note that there is a way to update this attribute in mass if necessary (see below).
10. UoM section
Product UoM section
SoQ Quantity
This is for the Standard Ordered Quantity which represents the quantity in which this product is usually ordered, this could be based on packaging or grouping of the product. When the field is filled with a value, this figure can be used by the system, on command, to round up the quantity in Internal Requests or in POs and FOs (see Procurement Chapter for more information on this)
Default Unit Of Measure
UniField supports several Units of Measure (UoM). The same product can be expressed in different units of measure. For example, you can buy grain by ton and distribute it by kg. To do this, it is important to ensure that all the units of measure used for a product are in the same UoM category. It is not possible to convert something which has a UoM of Kg into cm as these 2 UoMs belong to different categories. If a product has a UoM which belongs to a weight category, it can only be converted into another weight category UoM. Kg could then be converted into tons or grams for example.
Default UoM
Please note: All units of measure in the same category are convertible from one unit to another
Some examples of Units of Measurement in the system:
UoM
The table below shows some examples of units of measure and their category. It is possible to convert from one unit of measure to another as long as they are in the same category.
Sample of Units of Measure (UoM)
UoM
Category
Ratio
UoM Type
Kg
Weight
1
Reference
Gram
Weight
1000
Smaller
Tonne
Weight
1000
Bigger
Hour
Working time
8
Smaller
Day
Working time
1
Reference
Half-day
Working time
4
Smaller
Item (PCE)
Unit
1
100 Items
Unit
0.01
Product Units of,Measure
In the table above you can see 1Kg = 1000g = 0.001 Tonnes. A product in the Weight category could be expressed in Kg, Tons or Grams. You cannot express it in hours or pieces.
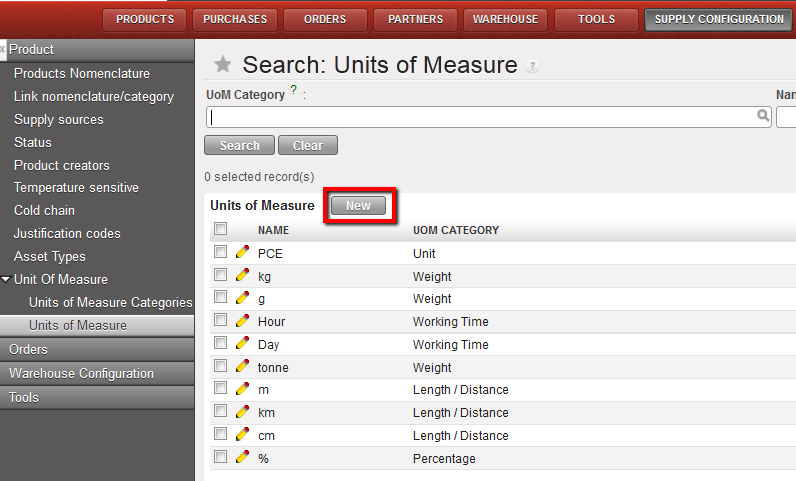
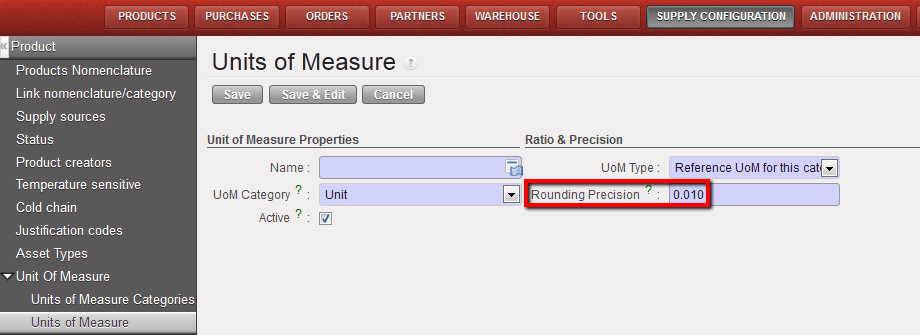
To define a new unit of measure, go to: Supply Configuration/ Products / Unit of measure /Units of Measure and Select New.
New button to create a UoM
In the definition of a Unit of Measure, there is a “rounding precision factor” which shows how amounts are rounded up or down after the conversion. A value of 1 would be rounded to the level of one unit. 0.01 means the product would be rounded to one hundredth of a unit.
UoM Rouding Precision
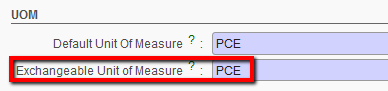
Exchangeable Unit Of Measure
While the “Default Unit of Measure” is mandatory for all products, the “Exchangeable Unit of Measure” is optional, and should be convertible from and to the default unit of measure. This means that if, in most cases you will buy, store and deliver grain in tons, then tons will be your default UoM, and if you need to sometimes deliver the grain in smaller quantities measurable in Kg, then this should be set as the Exchangeable Unit of Measure.
Exchangeable UoM
Please note: For services, the UoM could be set as Working time or Distance or Percentage. At PO creation, when “service” is selected, the “Unit of Measure” may be set to percentage and the unit 100%. This is because it is common to pay for services in quotas, and this way, a percentage of the total can be paid when required.
When deciding on the UoM, it is important to think about the units in which the item would usually be requested (i.e. on the PO/FO), the units in which it will be stored, and the units in which it will be delivered..
Detailed information on ITC product UoM is available in the MSF Logistic Catalogue.
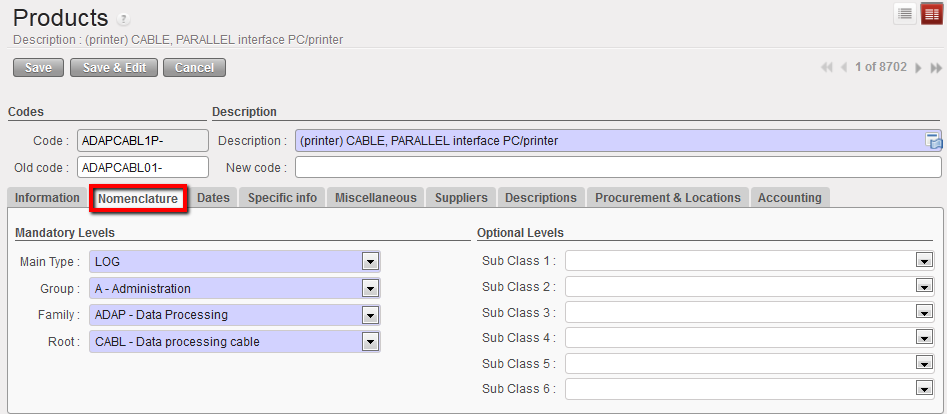
2. Nomenclature tab
Nomenclature tab of a Product form
Nomenclature is the structure of the name of a product. It is used to classify and describe products per type, group, family and root. These attributes will categorise the product. As you can see in the picture below, the system also provides optional levels as such as sub classes. We recommend entering as much information as possible about the product in order for the system to provide as much accurate information as possible.
a. Mandatory Levels section
The mandatory levels can only be created or edited by the instance owner (coordination or higher); in most cases, users won’t need to make changes to these. Please see the MSF Logistics Catalogue/ UniData guidelines for more details on Main Type, Group, Family and Root.
Please note that the selection of the family value will be visible in the Category field in the Information Tab, and this has an impact on the expense / income accounts in Finance.
b. Optional Levels Section
If additional classification is needed in the future, there are six Sub Classes which can be added (refer to specific OC guidelines for more details).
Product Nomenclature tab
Please note: The nomenclature tab can also be used to order a product at field level if the product isn’t listed in the UniField database.
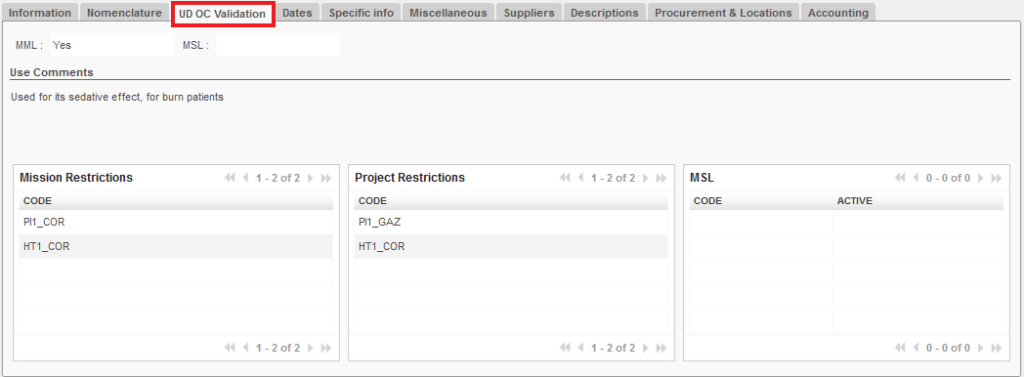
3. UD OC Validation Tab The information in this tab provides a summary of MML/MSL information linked to this product.
UD OC Validation tab
MML & MSL:
The two boxes at the top of this section indicates whether or not an item is included in the Medical Master List (MML) and/or Medical Standard List (MSL).
MML/MSL
The MMLfield will always be filled for medical products. “Yes” will be shown as long as the product is included in the MML, even if it’s restricted to specific projects/countries.
The MSL field will show a value (Yes / No) only if the MSL is activated. If there is no active MSL linked to that instance, the MSL field will be blank (like in the image above).
Use Comments:
Use comments are taken directly from the UniData MSL Tool. This field contains a variety of information, from details about when/how to use of this product to procurement information (for example, if an item is Local Purchase only) to ranking and product alternatives. As this information is pulled directly from an external tool, this information is not translated.
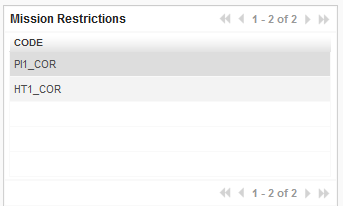
Mission Restrictions:
If a product is limited to a specific mission for an OC, the mission code to which this item is restricted will be listed in this section.
Project Restrictions:
If a product is limited to a specific project, the instance code of the project to which this item is restricted will be listed in this section.
Note: Project restrictions are encoded separately from the MSL, so it is possible for a product to be restricted to a specific project without being in that product’s MSL.
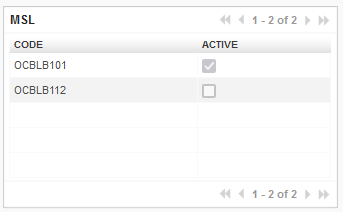
MSL:
This section will list the code of any projects in the same mission that include this product in their MSL. If the MSL is active, there will be a check in the checkbox for that project. If not, the checkbox will be empty.
4. Dates Tab
This information is useful when a product has a finite or recommended limited life, which may be longer than an expiry limit, but can be used for calculations relating to replenishment, storage or even budget preparation.
Product Dates tab
All appropriate fields should be completed:
Product Life Time, this field will be active if the Short Shelf life is set to Yes
Product Use Time, to indicate the time period within which the product should be used (should be smaller than the Product Life time).
Short Shelf Life (check box), if this is ticked in a product, when this product is ordered, an alert will warn the user that due to its short self-life, it should be ordered quarterly and to take care with transport mode and lead time.
Product Alert time, period of time set for product when, if it is in stock, system will alert user about this batch / group of products.
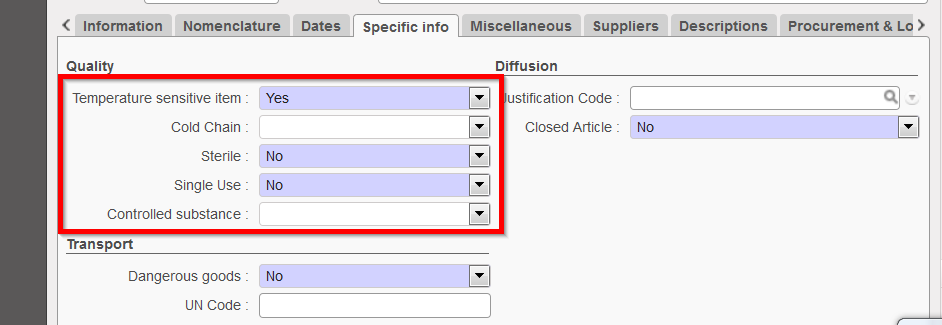
5. Specific Information tab
a. Quality Section
Temperature Sensitive items
Please refer to UniData Guidelines / MSF Logistics Catalogue for more information on these attributes. The options selected regarding temperature will have an impact on the picking / transport and storage transactions. (e.g. when receiving an incoming shipment of products which have these qualities, the system will display alert that this status should be considered when storing / transporting products).
The following information should be selected if it is relevant to the product. Most of the time, this information can be found in the product documentation. If “Yes” is selected for Temperature Sensitive Item, then the field “Thermosensitivity” becomes visible and active.
Thermosensitivity: Current values
0208
0208 Cold Chain / Refrigerated 2-8°C
1525
1525 – Controlled Room Temperature 15-25°C
CT25
CT25 – Controlled Temperature 2-25°C
CT30
CT30 – Controlled Temperature 2-30°C
F-20
F-20 – Frozen <-20°C
FSRT
FSRT – Frozen for Storage, Refrigerated for Transport
Below: Old Thermosensitivity values which are still present in UniField (most products have had old values migrated to the values above):
* – Keep Cool: used for a kit or article containing cold chain module or item(s)
*0 – Problem if any window blue
*0F – Problem if any window blue or Freeze-tag = ALARM
*25 – Must be kept below 25°C (but not necessarily in cold chain)
*25F – Must be kept below 25°C and cannot be frozen: check FreezeWatch
*A – Problem if A, B, C and/or D blue = ALARM
*AF – Problem if A, B, C and/or D blue or Freeze-tag = ALARM
*B – Problem if B, C and/or D blue = ALARM
*BF – Problem if B, C and/or D blue or Freeze-tag = ALARM
*C – Problem if C and D blue
*CF – Problem if C and/or D blue or Freeze-tag = ALARM
*D – Store and transport at -25°C (store in deepfreezer, transport with dry-ice)
*F – Cannot be frozen: check FreezeWatch.
Products with Thermosensitivity value 0208 * are tagged as “Cold Chain” and when they are received (via an Incoming Shipment) there will be a warning message on screen that user is receiving a heat sensitive product and should refer to the appropriate procedure. Additionally on all stock moves, any product with this Cold Chain attribute will have the checkbox “CC” ticked.
*There may be some products not yet migrated to the new Thermosensitivity values, but if they have the equivalent old value of 0208 they will also be flagged as Cold Chain with warning on IN and CC checkbox ticked.
Sterile, as per details of products
Single Use as per details of products
Controlled Substance as per details of products. Box needs to be checked for products of this category since it will have an impact on customs and documents to be produced.
One of the following attributes should be selected according to the product:
The following fields are to be entered according to the product procedures (refer to OC for more guidance).
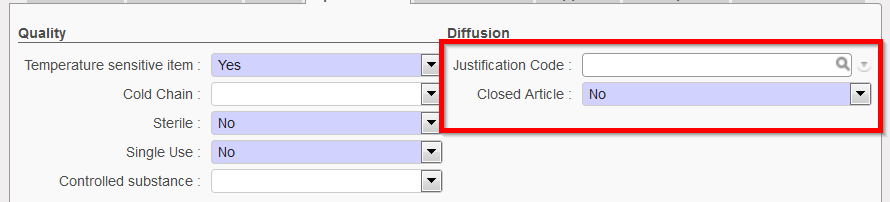
Justification Code, as used as in previous system in place. This is used in case a product has to be justified. It displays justification codes A, E, F, M. These codes give the reason why the order has to be justified.
Closed Article, Yes/No. If yes, it indicates that there is a mandatory manufacturer. This will be implemented with the new ITC database.
Diffusion section
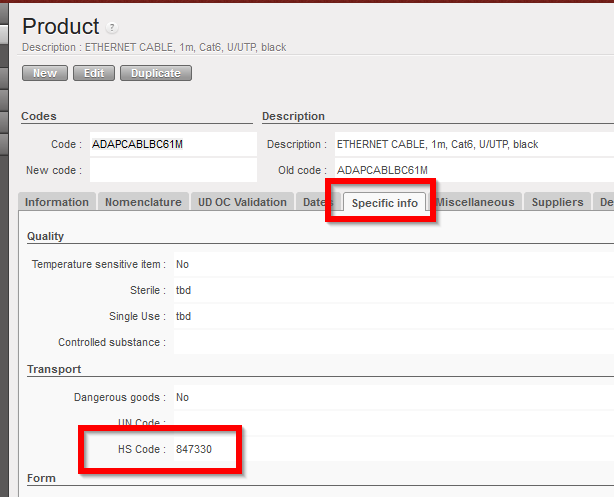
b. Transport section
Dangerous Goods (Checkbox), as with the temperature status, the activation of this checkbox will lead to an alert being displayed on all picking / transport & storage transactions.
UN Code, can be added if known.
HS Code, this harmonized system code will be pulled from UniData and synced down to all instances below.
Transport section
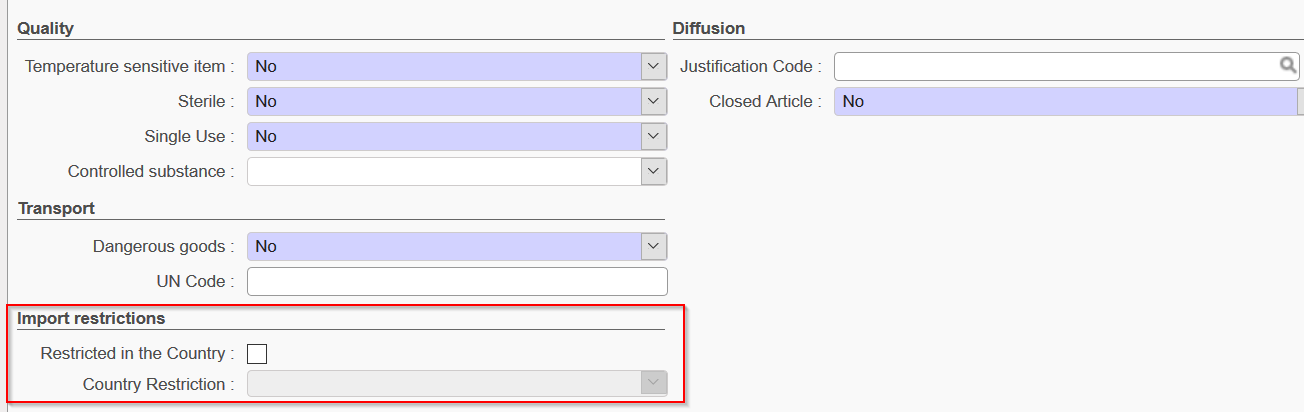
Import Restrictions section
The check box Restricted in the Country and the field County Restriction can be activated if the instance has been configured with one or more restrictions (See Configuration Chapter for more details). Once this has been configured, it will be possible to activate and select the restrictions relevant to the Product.
Import restrictions sectio
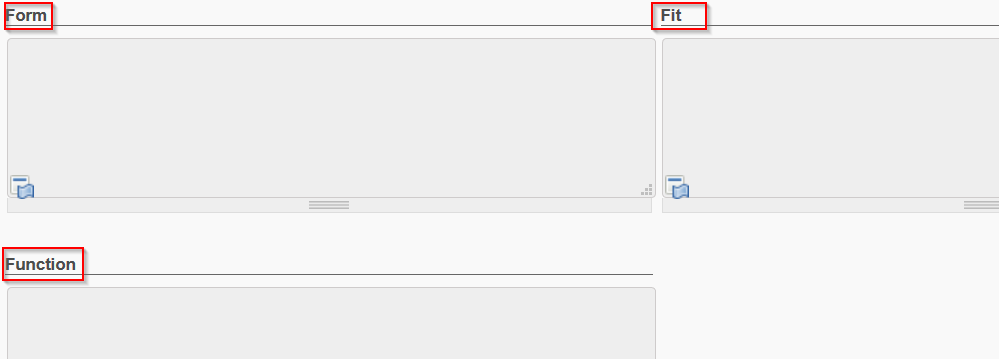
Form, Fit & Function section
These fields are product properties related to the Unidata /Codification project. Please see Unidata documentation for further details. The original value will be synched with the product as will any update made to these fields.
Form, Fit & Function fields
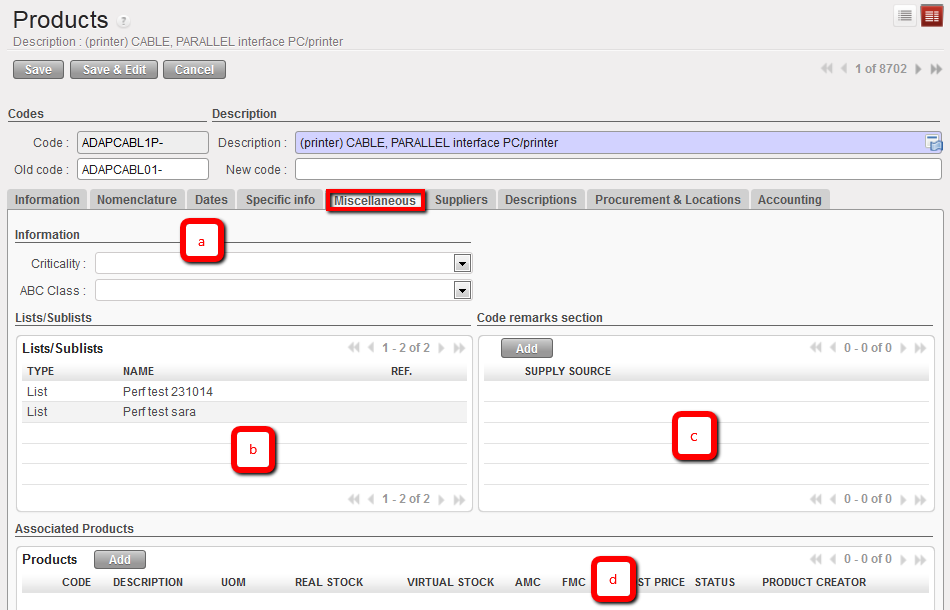
Miscellaneous tab
Information section
Criticality, as per guidelines this gives the level of attention required to manage (supply) a product. (1 Exceptional, 5 Common etc)
ABC Class, as per standard item classification
3. Lists/Sublists section
This field will indicate all lists and sublists where the product appears
4. Code remarks section
Supply source , the system will display three types of sources:
International
Local
Non local
6. Miscellaneous / Associated Products Section
This should list any products which are associated with the main product, e.g. products part of a same kit composition list, etc.
Product Miscellaneous tab
7. Suppliers tab
This tab will display the details of any qualified and approved Suppliers which are linked to this product because: 1) they have listed the product in their catalogue price list, 2) they have been used previously for supplying this product, or 3) because we know the price they have quoted for this product. The Sequence number indicates a quality rating: the lower the choice number, the better the rating, so “1st Choice” is considered a better supplier than “2nd choice”. This field can also be entered manually. The lead times which the supplier requires to supply the product should also be here.
Product supplier information
Please note: Listing the supplier in this section will give an impact on the system’s ability to facilitate autonomous processes such as PO creation for this product. If the replenishment rules have been set and PO creation (batch configuration) settings have been configured for this product, it is necessary for the product to have a lead time, either that of an associated supplier, or, if no supplier has been associated with it, then a general lead time should be entered for the product in the Procurement & Locations tab.
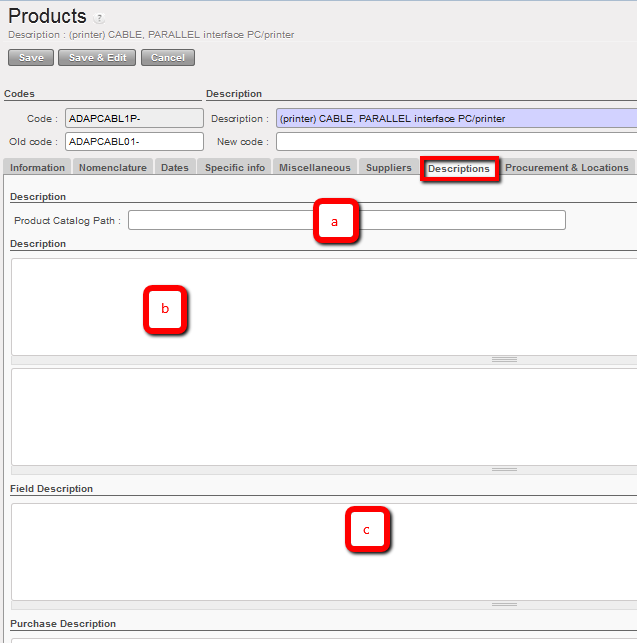
8. Descriptions tab
Product Description
Product catalogue page: to indicate if there is a technical sheet in the catalogue for this product.
Product Catalogue Path: to indicate pathway to any specific documents.
3. Field Description
Description, for product description (this will partially be added by ITC, it can be added locally).
4. Purchase Description
Any text here will appear on the Purchase Order
Product Descriptions
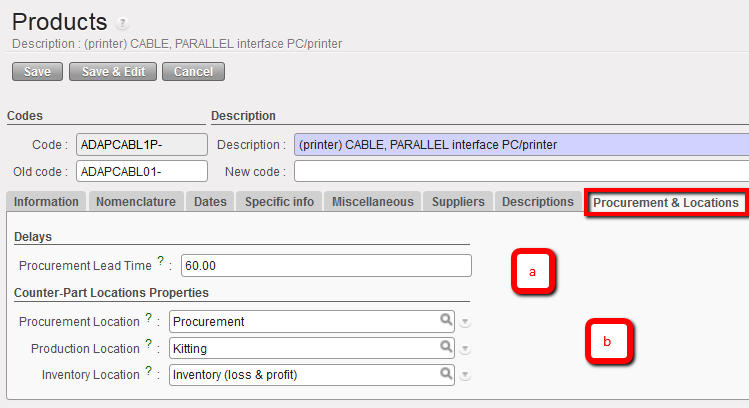
9. Procurement & Locations tab
Delays / Lead times Section
Procurement Lead Time is 60 days by default. If there is no supplier associated to this product, then the system will use the value here to calculate any replenishment orders if this setting has been used, so please adjust accordingly.
3. Counter-Part Locations Properties Section
Procurement Location, the source location generated for a procurement stock move (the system will create this)
Production Location, as per Procurement Location but for Production
Inventory Location, as above but when you carry out a physical stock inventory (count).
Product procurement & locations tab
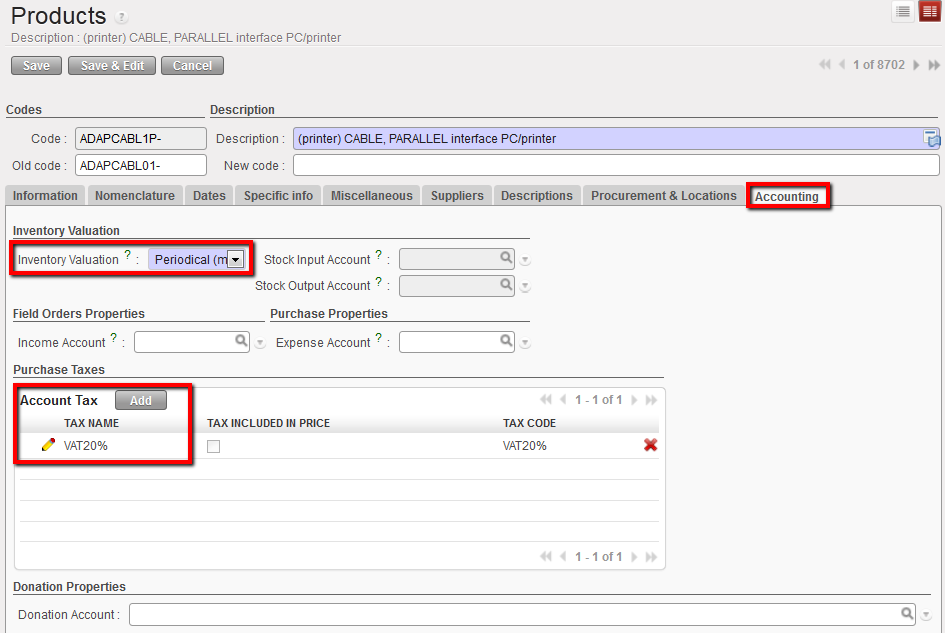
10. Accounting tab
The Accounting tab is completed by Finance to tie up a product to a VAT code if the mission is based in a country where VAT can be recovered.
The only mandatory field Supply must fill in is “Inventory Valuation”, for which the option Periodical (Manual) should always be set. All the other fields in the Product form’s Accounting tab are optional as most of finance information will be set by default according to the Product category.
All information entered in the Product form Accounts tab will take precedence over the information in the Product Category (this is in the Information tab, which pulls from the Family classification selected in the Nomenclature tab).
Stock Input Account = NA for the time being (will be the stock variation account when unallocated stocks option is available)
Stock Output Account = NA for the time being (will be the stock variation account when unallocated stocks option is available).
Product linked to a VAT code displayed in the Accounting tab
Products are the central axis in UniField. Every single operation pivot around products. From the point at which an order is created in the system until the same product is consumed by a customer or beneficiary, a variety of documents will be generated in UniField in order to facilitate the movement and help trace products along the supply chain.
A product requires parameters, classification, and attributes in order to trigger different processes throughout the product’s life cycle and as it passes along the supply chain. This information is key master data; its structure and composition within UniField will assist in improving efficiency and visibility within the MSF Supply Chain.
The right to create and modify products in UniField is restricted according to user rights at different levels as it should be done with great care to ensure full functionality of the system. The majority of products will be created/updated via the UniData interface, but some products may still need to be created/updated by OCs (to check with UniData and OC procedures).
This chapter is essential to understand and manage the supply chain efficiently.
Products are the central element of UniField, and all the other aspects of UniField revolve around them. The Supply Chain process is triggered when a product is requested by a requestor e.g. in a project. The system will draw information about the product from the UniField database including specific details such as expiry dates, batch numbers and any other data related to that product. It is very important to keep the product information up to date as this is a key source of data for the whole system.
The system will display the mandatory fields for the product in blue, depending on the characteristics of the product (category, nomenclature, etc).
Each of the different types of product and characteristics are described in detail in this chapter; users should familiarize themselves fully with this Chapter before progressing to other Supply Chapters.
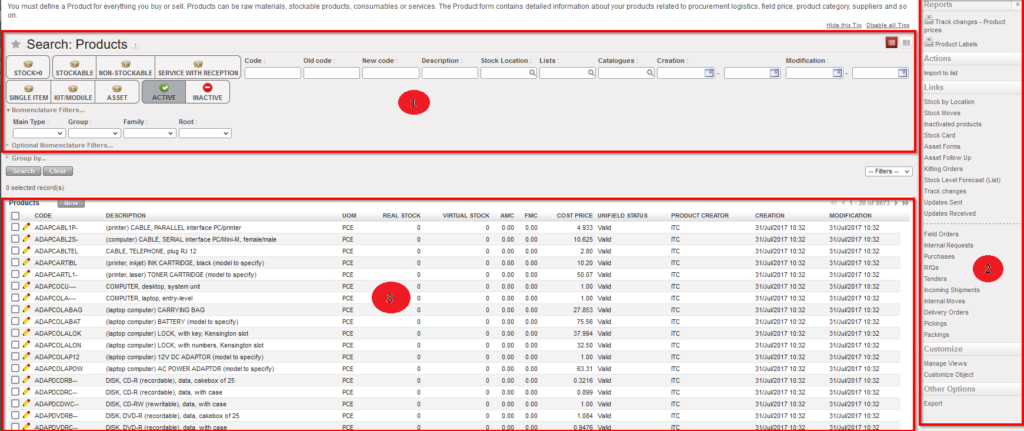
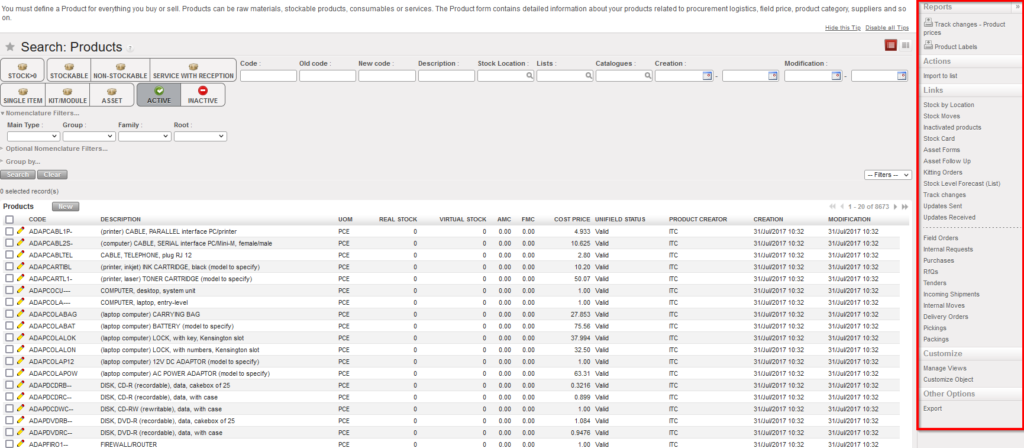
Products dashboard view
The product dashboard view is divided into three main areas as shown in the image above:
1.Search area
This has several search fields to filter for one or more specific products. The search can be generated by entering the values of the product you wish to see either by clicking on the relevant filter buttons (e.g. by clicking on the “Service with Reception” button), or by entering information in the relevant filter fields (e.g. Code, Description etc) then clicking Search.
2. List view of selected products
Under the Search Area, the system will display a list of products. The list of products displayed will correspond to the values which were entered as search criteria in the Search Area. If no search has been generated, a complete list of all the database items will be available, in the alphabetical order of their code. Only 20 product lines are displayed by default on the screen, but users can view the next page of products by clicking on the next arrow in the top right hand corner of the search list results, or increase the limit of products to display per page (see image below). The search list displays basic information about each of the products – code, description, unit of measure, real stock, virtual stock, AMC (average monthly consumption), FMC (foretasted monthly consumption), cost price and status. You can also see whether a product is Unidata or local.
Controls to view next page
3. The “Actions” and “Links” menu
They are located at the right hand side panel and will be displayed automatically when a product has been selected (e.g: its checkbox has been ticked); it can also be displayed by clicking on the arrow icon at the top right hand side of the screen. In this menu, the system will display a set of complementary tools, actions and links to facilitate analysis of the product selected, such as stock views, stock level forecasts and any other various documents.
Print screen of how Unifield allows sourcing a Field Order to an inter-section or intermission partner.
Print screen with DPO (Direct Purchase Order) scenario. The final instance involved in the flow can place a DPO to a supplier. Delivery is then to the instance, which is a customer of the last FO.
Diagrams for Re-synch flows
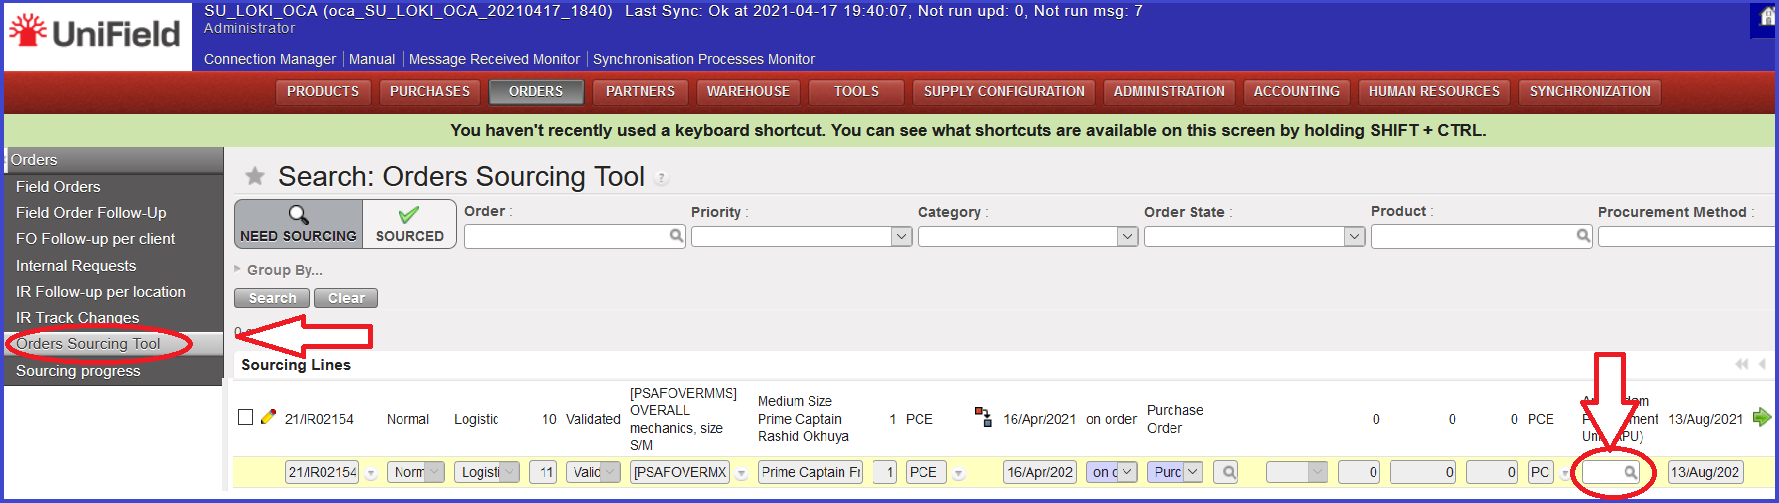
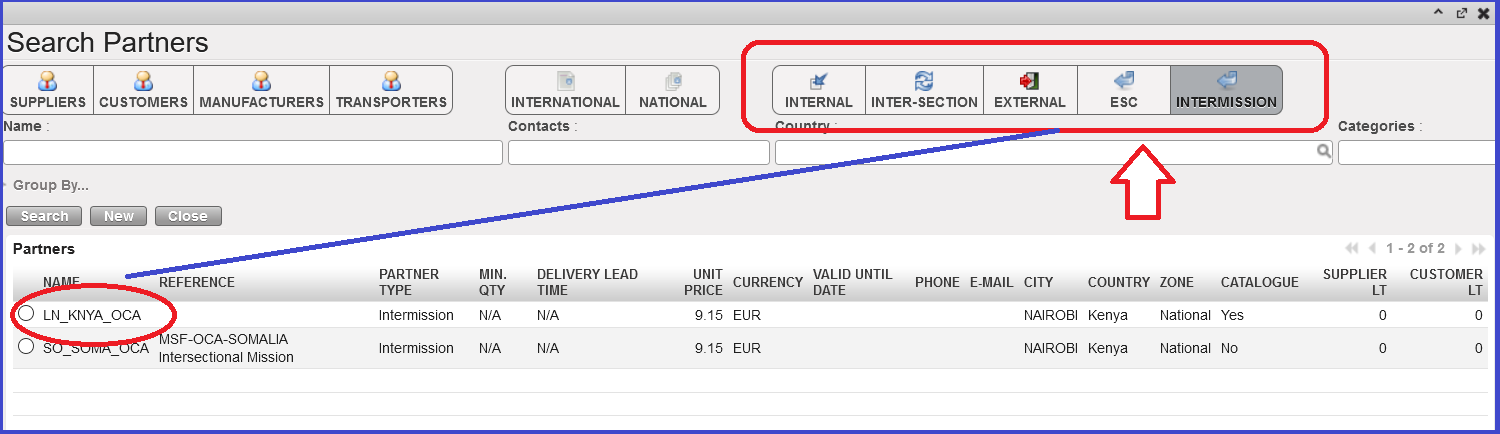
Screenshots describes options of sourcing FO to the 3rd partner (original IR on the project level, sourced through “Coordination” to the 3rd partner based in different country) , shows OST (Order Sourcing Tool) line with an already synched lined to be sourced.
Go to: Order Sourcing Tool > Edit line > Select the 3rd partner where to source FO through magnifier
New “Search Partners” window pops up where there are different Partners options to be toggled: Internal, Inter-Section, External, ESC and Intermission. Select the one and source the FO.
There are certain restrictions on the “re-synch” mechanism, including the following:
The main aim of the re-synch is to facilitate multiple sync instances flows. So an example of an expected flow would be OC1C1P1>OC1C1>OC2C1 (project internal>Coordo internal>Coordo Intermission or Intersection). or OC1P1>OC1C1>OC1P2, (project internal>Coordo internal>2nd project internal).
The same flow can be between a maximum of 3 UniField synced partners (see diagrams in “Diagrams chapter”). It is not expected for the synch to support a 4th UniField synced partner in the flow.
Flows where the delivery is sent via a fourth partner/instance which is not included in the ordering flow are not intended to be covered by the re-synch mechanism. E.g. if order flow is P1.1 > P1.2 >C1 then delivery flow cannot be C1>C2>P1.1 as C2 was not included in the ordering flow.
The type of flows for the re-synch mechanism are restricted to Regular and Direct Purchase Order (DPO).
Loans, In-Kind-Donation, Donations and Donations before Expiry type flows should not be used with the re-synch mechanism
“Push flow” is not an expected trigger for the re-synch unless it is initiated by the “middle” partner(e.g. for the case of flow P1 > C1 > C2, if there is a Push flow this could be initiated only by C1, creating the mirror PO at P1, and C1 can then source their FO to C2)
For “Pull” flows (standard flow direction) the flow can be initiated by either an IR, PO, or FO from external partner.
As with the previous “standard” (2 partner) synch mechanism, the flow of information and updates is to be sent according to status change at line / document level. The same level of detail in information is expected for the re-synched flows as for the standard (2 internal partner) flows, including addition of lines, cancellation or cancel & resource of lines, and split of lines.
The Vertical Integration mechanism basically works in the same way as in the 2 partner flow.
Finance concepts for Supplier Invoices and Stock Transfer Vouchers are the same as per the “standard” synched flow.
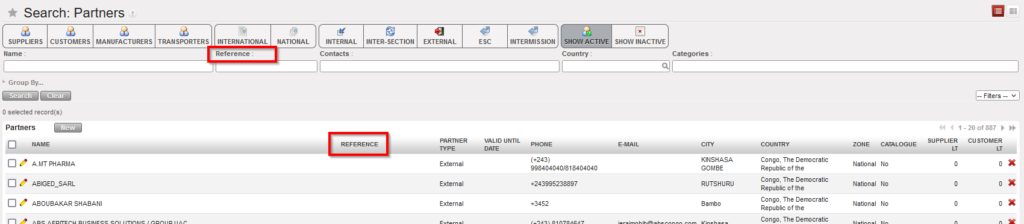
Go to:Partners / Suppliers / Suppliers or Customers / Customers
The Supplier and Customer main screens contain filters to refine your search and grouping options. The lower part of the search screen shows existing partners and displays information such as name, reference, partner type, phone number, e-mail address, city, country, …
“Search: Suppliers” screen
Click on the pencil next to the partner which you want to modify.
The Supplier or Customer page opens in edit mode. Make the necessary changes.
Once complete, click on the “Save” button at the top of the screen.
F. LU-SU1101: Movements to/from the different type of locations.
How the different types of locations can be used can also be explained by listing the possibilities of movements to (destination) and from (source) these locations. This is what we try to do below. Note that the list of movements is not exhaustive. We only list the most commonly used movements. Additional information may be found in the Procurement chapter and in the Warehouse chapter.
1. Main stock (“Stock/MED/LOG”) as destination
If a PO is created from scratch, goods are received in the main stock “Stock/MED/LOG” (location selected according to the main type of the products) via the “Input” location after manual/automatic processing of the INT.
If a PO is created following the sourcing on order of an IR whose Location Requestor is a location of the main stock (“Stock/MED/LOG”), goods are received in the main stock “Stock/MED/LOG” (location selected according to the Location Requestor of the IR) via the “Input” location after manual/automatic processing of the INT.
Goods can be transferred to the main stock (locations “Stock/MED/LOG”) via an INT created from scratch.
Goods can be transferred to the main stock (locations “Stock/MED/LOG”) via an INT created following the sourcing from stock of an IR whose Location Requestor is a location from the main stock (“Stock/MED/LOG”).
Goods can be integrated into the main stock (locations “Stock/MED/LOG”) via an IN created from scratch.
2. Main stock (“Stock/MED/LOG”) as source
The main stock (“Stock/MED/LOG”) can be used as Source Location on a RCR.
The main stock (“Stock/MED/LOG”) can be used as Source Location in the OST when sourcing IR and FO.
The main stock (“Stock/MED/LOG”) can be used as Source Location on an INT created from scratch.
The main stock (“Stock/MED/LOG”) can be used as Source Location on an OUT created from scratch.
3. Intermediate Stock (IS) as destination
If a PO is created following the sourcing on order of an IR whose Location Requestor is an IS, goods are received in this IS via the “Input” location after manual/automatic processing of the INT.
Goods can be transferred to an IS via an INT created from scratch.
Goods can be transferred to an IS via an INT created following the sourcing from stock of an IR whose Location Requestor is this IS.
Goods can be integrated in an IS via an IN created from scratch.
4. Intermediate Stock (IS) as source
An IS can be used as Source Location on a RCR.
An IS can be used as Source Location in the OST when sourcing IR and FO.
An IS can be used as Source Location on an INT created from scratch.
An IS can be used as Source Location on an OUT created from scratch.
5. Internal Consumption Unit (ICU) as destination
If a PO is created following the sourcing on order of an IR whose Location Requestor is an ICU, goods are received in this ICU via the “Input” location after manual/automatic processing of the INT.
Goods can be transferred to an ICU via an INT created from scratch.
Goods can be transferred to an ICU via an INT created following the sourcing from stock of an IR whose Location Requestor is this ICU.
Goods can be integrated in an ICU via an IN created from scratch.
6. Internal Consumption Unit (ICU) as source
An ICU can be used as Source Location on a RCR.
An ICU can be used as Source Location in the OST when sourcing IR and FO.
An ICU can be used as Source Location on an INT created from scratch.
An ICU can be used as Source Location on an OUT created from scratch.
7. External Consumption Unit (ECU) as destination
If a PO is created following the sourcing on order of an IR whose Location Requestor is an ECU, goods are received in this ECU via the “Cross docking” location after manual processing of the OUT.
An ECU can be used as Destination Location on a RCR.
Goods can be transferred to an ECU via an OUT (or pick/pack/ship) created following the sourcing from stock of an IR whose Location Requestor is this ECU.
8. External Consumption Unit (ECU) as source
An ECU can be used as Source Location on an IN created from scratch in order to register a return to stock from a unit.
PO from scratch
PO < IR
RCR
Sourcing IR/FO in OST
INT from scratch
INT <IR sourced
IN from scratch
OUT from scratch
OUT <IR sourced
Stock/MED/LOG
Destination
YES (1)
YES (1)
NO
–
YES
YES
YES
NO
NO
Stock/MED/LOG
Source
–
–
YES
YES
YES
–
NO
YES
–
IS
Destination
NO
YES (1)
NO
–
YES
YES
YES
NO
NO
IS
Source
–
–
YES
YES
YES
–
NO
YES
–
ICU
Destination
NO
YES (1)
NO
–
YES
YES
YES
NO
NO
ICU
Source
–
–
YES
YES
YES
–
NO
YES
–
ECU
Destination
NO
YES (2)
YES
–
NO
NO
NO
NO
YES
ECU
Source
–
–
NO
NO
NO
–
YES (3)
NO
–
The destination is actually the destination of the INT linked to the IN (whose destination is “Input”) linked to the PO
The destination is actually the destination of the OUT linked to the IN (whose destination is “Cross docking”) linked to the PO
Used to return goods to stock from an ECU
The analysis could be pushed further by listing the possibilities of movements from/to:
Use cases for these locations are explained in the chapter Warehouse and in the chapter Procurement.
We use cookies to ensure that we give you the best experience on our website. If you continue to use this site we will assume that you are happy with it.


 Real Stock
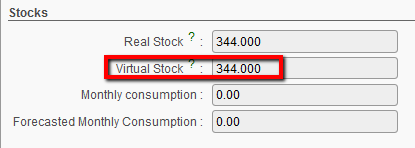 Virtual Stock
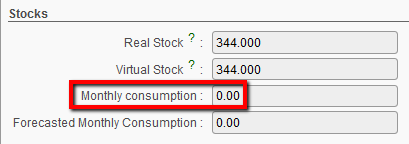

 Please note: Expiry dates are a very important detail of a product, it’s crucial that this information is accurate.
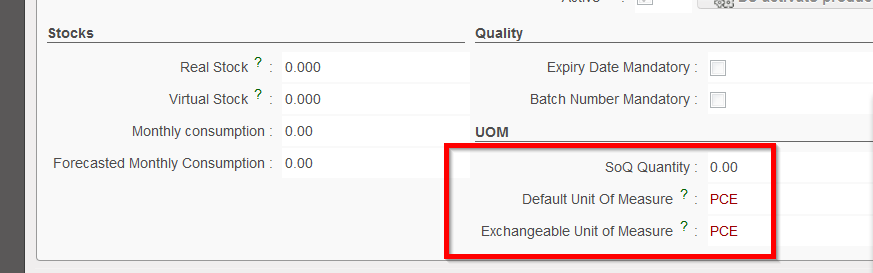


 Please note: Listing the supplier in this section will give an impact on the system’s ability to facilitate autonomous processes such as PO creation for this product. If the replenishment rules have been set and PO creation (batch configuration) settings have been configured for this product, it is necessary for the product to have a lead time, either that of an associated supplier, or, if no supplier has been associated with it, then a general lead time should be entered for the product in the Procurement & Locations tab.