L. Comment Prélever une Liste de Composition du Kit (KCL)
Le prélèvement/la livraison d’un kit ne diffère pas du prélèvement/de la livraison d’un article unique. Toutefois, lors du traitement des Liste de Composition du Kit (KCL), des Commandes d’assemblage de kit, des Picking, des Colisage, des Expédition, des Bons de Livraison et de la consommation réelle, il y a une colonne “Kit” dans ces documents sortants ; lorsqu’elle est remplie par la “Référence du kit”, le kit de traitement est sélectionné. Il n’est pas obligatoire de spécifier le KCL dans la colonne “Kit”, mais lorsque vous en sélectionnez un, le kit en cours de traitement est lié au KCL. Cette information sera affichée sur les documents concernés.
Lorsqu’un kit est traité dans un livraison (OUT), la Liste de Composition du Kit (KCL) passe automatiquement au statut “Terminé” lorsqu’il est envoyé hors de l’instance. Si une KCL a un kit comme composant, les KCLs composants seront aussi automatiquement mis en statut “Terminé” lorsque le KCL supérieur sera fermé.
R. Comment annuler une ou plusieurs lignes d’un Bon de Commande (PO)
Pour annuler une ligne spécifique d’une Bon de Commande, cliquez sur la croix rouge (annuler) située à droite de la ligne que vous souhaitez annuler et confirmez l’action sur l’écran pop-up.
Annulation d’une ligne d’un Bon de Commande
Confirmation de l’annulation d’une ligne d’un Bon de Commande
La ligne du Bon de Commande annulée passe à l’état “Annulé“. Notez que vous devez utiliser le filtre situé en haut du tableau des lignes pour voir la ligne annulée.
Ligne d’un Bon de Commande Annulé
Pour annuler plusieurs lignes de la commande, sélectionnez les lignes que vous souhaitez annuler dans la partie droite des lignes, puis cliquez sur “Annuler les lignes” et confirmez l’action dans l’écran pop-up.
Annulation de plusieurs lignes d’un Bon de CommandeConfirmer l’annulation des lignes du Bon de Commande
Les lignes du Bon de Commande annulées passent à l’état “Annulé“. Notez que vous devez utiliser le filtre situé en haut du tableau des lignes pour voir les lignes annulées.
Lignes d’un Bon de Commande annulées
Les lignes du Bon de Commande validées peuvent également être annulées une par une ou en tant que document complet, sauf si le fournisseur du Bon de Commande est un fournisseur partenaire interne (une autre instance). Dans ce cas, le bouton d’annulation ne sera pas disponible en bas de l’écran de la commande et l’annulation devra être effectuée sur l’instance du fournisseur.
Il est possible d’annuler / annuler et re-sourcer plusieurs lignes (brouillon/validé) dans les Bons de Commande brouillon-p / validés/ validés-P avec un fournisseur de type ESC ou externe, (il n’est pas possible d’annuler / annuler et re-sourcer des lignes validées dans des bons de commande avec des fournisseurs de type Interne/Intermission/Intersection s’ils ont dépassé le statut “brouillon” car si les lignes du Bon de Commande sont validées, elles peuvent avoir été synchronisées et ne doivent pas être annulées ou annulées et re-sourcées par l’instance demandeuse).
Une capture d’écran montrant comment Unifield permet de sourcer une commande de terrain à un partenaire inter-section ou intermission.
Une capture d’écran avec le scénario Bon de Commande Direct (DPO). La dernière instance impliquée dans le flux peut commander un DPO auprès d’un fournisseur. La livraison se fait directement à l’instance demandeuse, qui est un client de la dernière instance.
Diagrammes pour les flux de resynchronisation
Les captures d’écran décrivent les options de sourcing des Commandes de Terrain (FO) à un troisième partenaire (Demande Interne (IR) originale au niveau du projet, sourcée à travers la “Coordination” au troisième partenaire dans un autre pays), et montre la ligne de l’Outil de Sourcing des Commandes (OST) avec une ligne déjà synchronisée à sourcer.
Allez a: Commandes > Outil de Sourcing des Commandes
Cliquez sur le crayon pour modifier la ligne et utilisez la loupe pour sélectionner le partenaire à qui vous souhaitez fournir l’ordre de mission (FO).
Une fenêtre contextuelle ” Rechercher Partenaires ” permet de basculer entre les différentes options de partenaires : Interne, Inter-Section, Externe, ESC et Intermission. Sélectionnez l’option de votre choix et sourcez la Commande de Terrain (FO).
Il y a certaines restrictions au mécanisme de “resynchronisation”, notamment les suivantes :
L’objectif principal de la resynchronisation est de faciliter les flux de plusieurs instances de synchronisation. Un exemple de flux attendu serait projet >Coordo interne>Coordo Intermission ou Intersection (oc1c1p1>oc1c1>oc2c1) ou projet >Coordo interne>2ème projet interne (oc1p1>oc1c1>oc1p2).
Le même flux peut être entre un maximum de 3 partenaires synchronisés UniField (voir les diagrammes dans le chapitre “Diagrammes de Re-synchronisation”). Il n’est pas prévu que la synchronisation prenne en charge un quatrième partenaire UniField synchronisé dans le flux.
Les flux dans lesquels la livraison est envoyée via un quatrième partenaire/instance non inclus dans le flux de commande ne sont pas couverts par le mécanisme de resynchronisation. Par exemple, si le flux de commande est P1.1 > P1.2 >C1, le flux de livraison ne peut pas être C1>C2>P1.1 car C2 n’était pas inclus dans le flux de commande.
Les types de flux pour le mécanisme de resynchronisation sont limités aux Bons de Commande (PO) Normals et aux Bons de Commande Directs (DPO).
Les flux de type Prêt, Donation, Donation en nature, et Donation Avant Expiration ne doivent pas être utilisés avec le mécanisme de resynchronisation.
Le “Flux Poussé” n’est pas un déclencheur prévu pour la resynchronisation à moins qu’il ne soit initié par le “deuxième” partenaire (par exemple, dans le cas du flux P1 > C1 > C2, un flux poussé peux être initié uniquement par C1, créant le PO miroir à P1, et C1 peut alors envoyer son FO à C2).
Pour les Flux “Tirés” (direction de flux standard), le flux peut être initié par une Demande Interne (IR), un Bon de Commande (PO) ou un Commande de Terrain (FO) d’un partenaire externe.
Comme pour le mécanisme de synchronisation “standard” précédent (2 partenaires), le flux d’informations et de mises à jour doit être envoyé en fonction du changement d’état au niveau de la ligne ou du document. Le même niveau de détail des informations est attendu pour les flux resynchronisés que pour les flux standard (2 partenaires internes), y compris l’ajout de lignes, l’annulation ou l’annulation et la ressource de lignes, et le fractionnement de lignes.
Le mécanisme d’Intégration verticale fonctionne essentiellement de la même manière que dans le cas d’un flux à deux partenaires.
Les concepts de finance pour les Factures des Fournisseurs et les bons de transfert de stock sont les mêmes que pour le flux synchronisé “standard”..
Le mécanisme de “resynchronisation” permet à un flux synchronisé entre deux instances de synchronisation MSF de continuer et d’être acheminé vers un autre (troisième) partenaire synchronisé UniField.
Auparavant, le mécanisme de synchronisation ne permettait à un flux de relier que deux partenaires synchronisés d’UniField, par exemple un projet peut commander à un coordo (par exemple P1 > C1). Le mécanisme de resynchronisation permet d’étendre ce flux à un troisième partenaire synchronisé avec UniField. Cela permet, par exemple, un flux dans lequel un projet envoie une commande à un Coordo, et ce Coordo envoie une commande à un autre Coordo, le troisième partenaire (P1 > C1 > C2).
I. LU-SU1101: Comment créer ou convertir une zone EPREP
Pour créer un nouvelle zone configurable de type “EPREP“,
Allez a: Configuration Approvisionnement > Configuration de l’Entrepôt > Gestion Normale d’Entrepôts > Créer une nouvelle zone de stock
Celle-ci sera automatiquement marquée comme étant de type “EPREP.”
La “Zone – Utilisation” doit être “EPREP”
Le “Zone – Nom” doit contenir le mot “EPREP“.
Une vérification automatique sera effectuée pour que le nom contienne le mot “Eprep” lors de la Sélection de “Zone – Utilisation“
La vérification que le nom contienne le mot “Eprep”
Pour convertir une zone intermédiaire existante en une zone de type “EPREP”, allez a :
Configuration Approvisionnement > Configuration de l’Entrepôt > Gestion Normale d’Entrepôts > Convertir un Stock Intermédiaire vers Eprep
Convertir une zone intermédiaire existante en une zone de type “EPREP”
Une fois qu’une zone a été créée en tant que type Eprep ou convertie en ce type, il n’est plus possible de revenir en arrière. La zone de type Eprep est désormais considérée comme un sous-type de zone sous les zones configurables dans “Zone – Structure” sous Entrepôt > Gestion Inventaire et apparaît en rose. Le rapport MSR a une colonne supplémentaire qui montre les quantités de stocks Eprep.
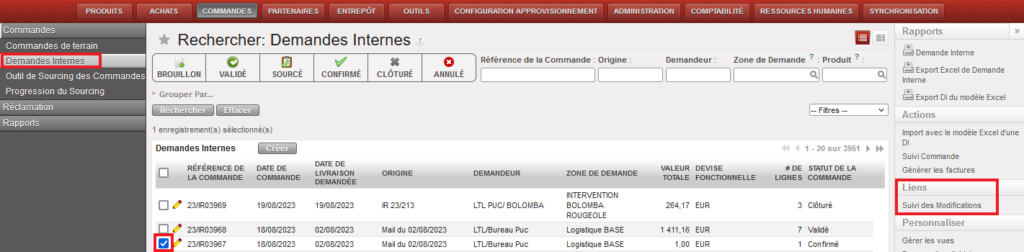
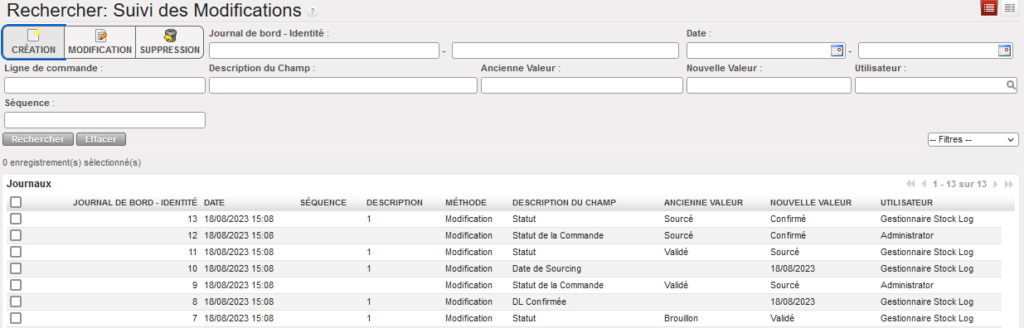
Pour faciliter le suivi de l’historique des modifications des objets de supply/finance, les utilisateurs peuvent utiliser “Suivi des modifications” dans le menu d’action de droite pour afficher des informations sur les modifications de nombreux objets de supply/finance :
Exemple d’un des objets – Suivi des modificationsInformations affichées dans le rapport de suivi des modifications
Cette option est disponible pour les objets de supply/finance ci-dessous :
Since the release of UniField v33.0, the UniData Push linkage has been replaced with Unidata pull.
Therefore, both UniData and MSL data are obtained via a pull architecture, where data is obtained by making API calls from UniField.
In the UniField tool, there are two available APIs for integration purposes. One API is specifically designed for UniData, while the other API is meant for MSL, which is a component of the UniData tool.
These API calls can be configured within the UniField interface, allowing users to customize and establish the necessary API calls for data integration. However, it is recommended to maintain the current setup unless there is a specific requirement or need to modify the existing configuration.
14.1.1. How to configure the API Sync
Menu Mapping: Tool > UniData > API Sync Config
The API Sync can be configured only on HQ level. The data are then synchronized down to coordo and project instances.
In the Scheduler section, you can activate the sync by clicking on the Active checkbox.
There are 2 Execution Sync Types:
Based on the last modification date – the API returns only records updated within the last sync date minus 24 hours
Full – the API returns all records
You can also start the synchronization process manually by clicking on MSL Start manually/UD Start manually.
Data in UniData returned by UniData API are real-time, so each change should be seen immediately after the synchronization process in UniField is completed.
MSL/UniData Sync report
Menu Mapping: Tool > UniData > MSL/UniData Sync report
You will see all the previous and current runs in the report. In the log file, you can see the logs of each run.
14.1.2. MML/MSL sync
MSL project mapping with UniField instances
Menu Mapping: Tool > UniData > MSL Projects with no link to UF
The mapping is done via the MSL tool. Each MSL project is mapped to max. one instance and multiple projects can be mapped to a specific instance.
14.1.3. UniData Product Sync
How to sync products individually
Apart from running the sync for all products, you can run the sync for each product individually. To do so, you need to go on the product level and click on the “Pull UD product”.
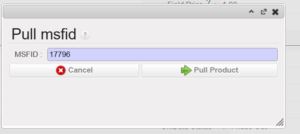
You can also run the pull for another MSFID:
Please note that if you change the MSFID, the pull will run for another product, therefore, the product on which you run the pull won´t be impacted.
How products are matched between UniData and UniField
Products are matched on MSFID (=unique product ID generated by UniData).
However, to update/create in product in UniField, the OC subscription for a given OC must be checked in UniData OR, in case of an already existing product in UniField, the OC subscription must be checked in UniField. In case the OC subscription is checked only on the UnIField side, one last update will be performed. Products for which OC subscription is not checked in UniData nor UniField will be ignored completely.
Product codes are no longer taken into account. Therefore, the multiple truth issues should no longer occur.
UniData Linkage errors
Tools -> UniData -> UniData linkage errors
In case the data pull was not successful for a specific product, the product will be displayed in this sub-menu table. Here, you can also find the MSFID of the product and the text taken from the log explaining the cause of the error.
OC Default Values
Tools -> UniData -> OC Default Values
Some of the attributes pulled from UniData have default values set and they are not returned by the UniData API. The default values are based on Nomenclature.
Each OC can however set their OC-specific value in Unidata as well, such as Procurement Method or Expire Date Mandatory.
The table displays all OC default values received from UniData. Please note that OC default values in UniField are static. If a new OC default value is created, it will not be automatically created in UniField. This is a known limitation, that is planned to be adjusted with the next UniField releases and also once the values are available via UniData API.
UD Products incompatible with OC values
Tools -> UniData -> UD Products incompatible with OC values
The submenu lists all products for which the value of attributes differs from the OC default value.
OC default values (see above) are set in UniData and they are not directly returned by the API. Thus, if a new product is created the OC default value is taken instead and never updated afterwards. However, the OC default values can be later changed (which is rare) or created afterward but the product won´t be updated anymore.
Therefore, the table in the submenu lists all products, where there is a discrepancy between the actual value and the current OC default value.
List of values updated by Unidata Pull
The list contains only those values that can be visible on the Product Object. Technical fields are omitted.
You can find the list of Default values and OC Default Values in Unidata. You can also see the OC default values in UniField: Tools -> UniData -> OC Default Values. OC Default Values and Default Values are not updated automatically in UniField.
The picking/delivering of a kit doesn’t differ from the picking/delivering of a simple product. however, when processing the KCL, Kitting Orders, PICK, Pack, Ship, Delivery Orders and Real Consumption, there is a “Kit” column in these outgoing documents, when it is filled with “Kit Reference”, the processing kit will be selected, it is not mandatory to specify KCL in “Kit” column, but when you select one, the kit being processed will be linked with the KCL. This information will be displayed on the relevant documents.
When a Kit is processed in an OUT, the KCL will automatically be set to Status “Closed” when it is sent out of the instance. If a KCL has kit as a component, the component KCLs will also automatically be set to Closed status when the top KCL is closed.
In the HQ instance, it is possible to merge 2 UniData products (Products with Product creator “UniData”). This is possible for any 2 UniData type products, even if they are in stock or in open transactions in any instances. The selected product is de-activated and when synched, all previous stock / closed transactions with this product are transferred so that they now show the Active (kept) product in its place.
UniData is then able to update the sole “Active” product and this product can be used as normal for all missions / instances. The merge of UniData products can only be performed at HQ, and both products must be “Active” at point of merging.
If user tries to de-activate a single product (not via this merge functionality) which has open transactions / stock, this is (still) blocked.
Once the merge action has been performed for the 2 UniData products, the selected product will be de-activated in HQ. After synch, this product will be de-activated in all Coordo & Project instances, and any quantities in stock or open or closed transactions will be updated so that the “kept” product will appear in its place. For any case where there is a conflict at a lower instance after product has been merged and synched, a Not Run message will appear in receiving instance.
The merge functionality will be available on the product data sheet at HQ level as a button that will be displayed only for UniData type products. The display of this button will also be conditioned by User Rights.
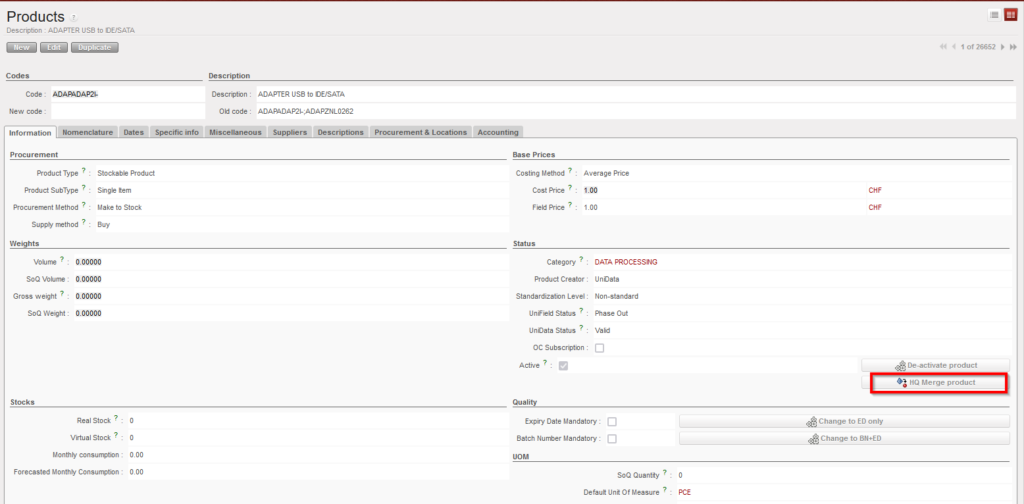
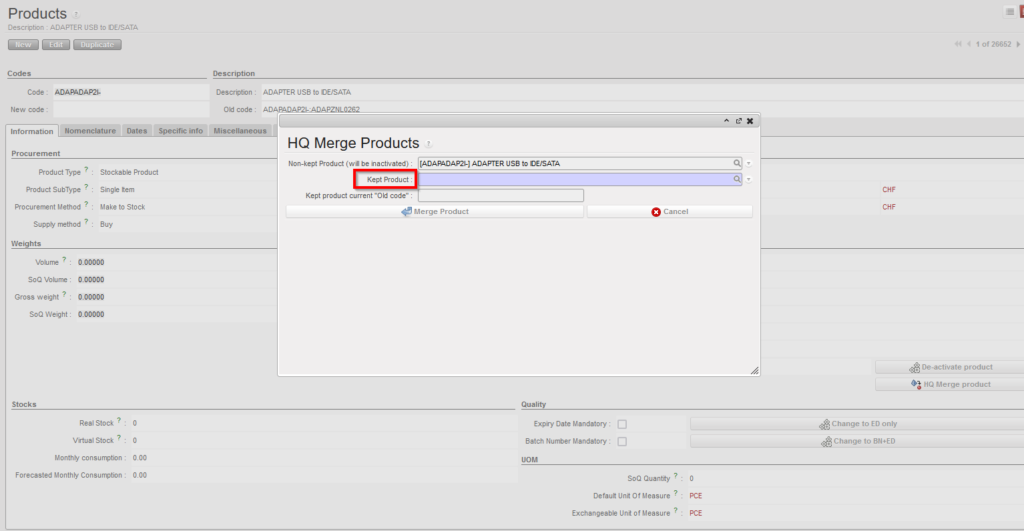
To merge a Unidata product, go to: Products/ Products:
1- Use the search tools to filter values to find the product you want to merge/deactivate. 2- Click on the product line to open it 3- Click on the “HQ Merge product” button
4- Select the “Kept product” (the product that will remain active) from the list of all the Active UniData type products of the instance. When clicking on the magnifying glass, you can search using filter fields “Code”, “Description”, “Old code”, “New code”, and the 4 main nomenclature types.
5-Click on “Merge Product” on the pop up.
The de-activated UniData product will be replaced by the “kept” UniData product on all open or closed documents (including Stock locations and movements) containing the product (similar to the original Local products merge functionality where Activated product replaces Deactivated product).
The “HQ Merge Product” button will still be active on the “Kept” product after merge. This means the kept product can be merged again with another UniData product. However the limit to the number of times the same product can be merged is supported for up to 2 merge actions (up to 3 products merged to one).
After merge, the deactivated product cannot be reactivated and the merging cannot be undone.
When merging, there are several checks performed on compatibility of attributes of both UniData products to ensure consistency after merge. In case of a discrepancy, a message (in certain cases blocking) should be displayed urging the user to align the inconsistent attributes before merging can be done.
The warning blocking message for the above attributes should be: “Warning: There is an inconsistency between the selected products: <attributename> need to be the same. Please update (one of) your UniData product’s <attributename> and then proceed with the merge.” (applied to Main Type, Product Type, Expiry Date Mandatory, Batch Number Mandatory, Default Unit of Measure,)
The non-blocking warning message should be: “Warning: There is an inconsistency between the selected products’ <attributename> . Do you still want to proceed with the merge?” (applied to Nomenclatures: Group, Family & Root and Temperature sensitive)
In general, attributes of the “kept” product will prevail over those of the de-activated product.
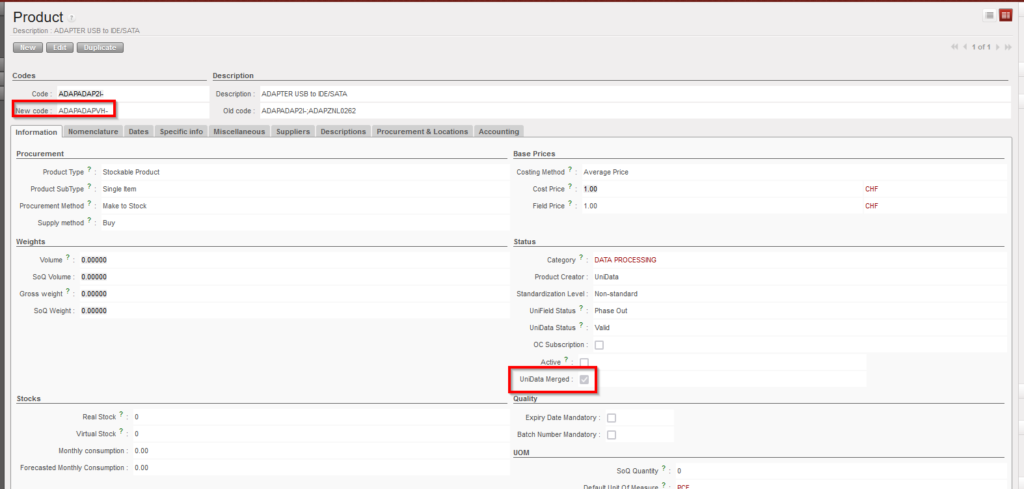
The deactivated UniData products will have a checkbox named “UniData merged” which will be ticked automatically once it is deactivated via merging process.
The reference of the de-activated product will be populated in the “Old code” field of the newly merged UniData product data sheet. In the non-kept product’s data sheet, the “New code” will be filled with kept product’s code.
Non-Kept Product after Merge
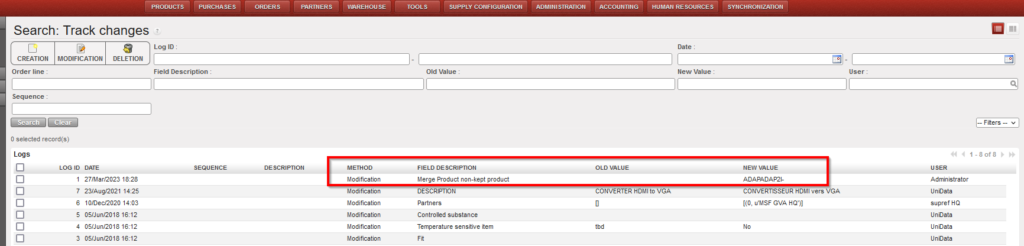
In the Track Changes of both products, there will be an indication of the other product code/product ID with which it was merged.
Track Changes after Merge
N.B. It is recognized that the sync rules for Non-Standard and Standard products differ from those for Non-standard Local products. The decision to merge any product should be in agreement and in line with processes of HQ & UniData
*N.B.: The recalculation of average cost price done in the case that both kept and non-kept products stock should result in a accurate result based on current working of weight average cost price mechanism.
We use cookies to ensure that we give you the best experience on our website. If you continue to use this site we will assume that you are happy with it.