E. HOW TO CREATE A REPLENISHMENT SEGMENT

Supply User Manual ENG -> 5. Warehouse -> 5.12 LU-SU4205 Replenishment Rules -> E. HOW TO CREATE A REPLENISHMENT SEGMENT

E. HOW TO CREATE A REPLENISHMENT SEGMENT

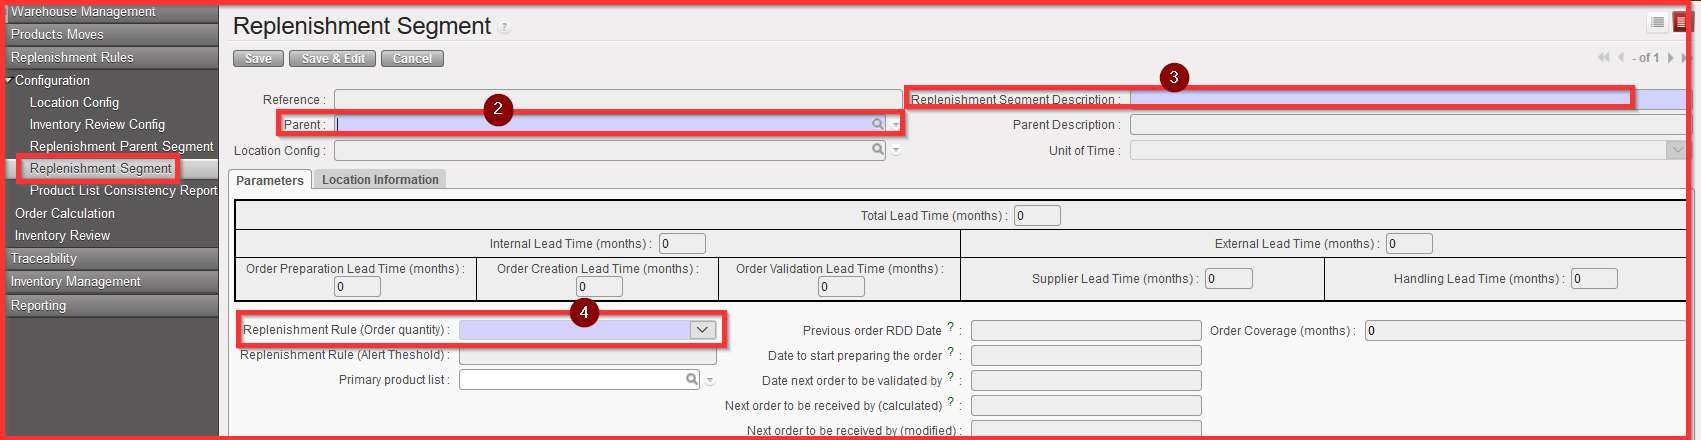
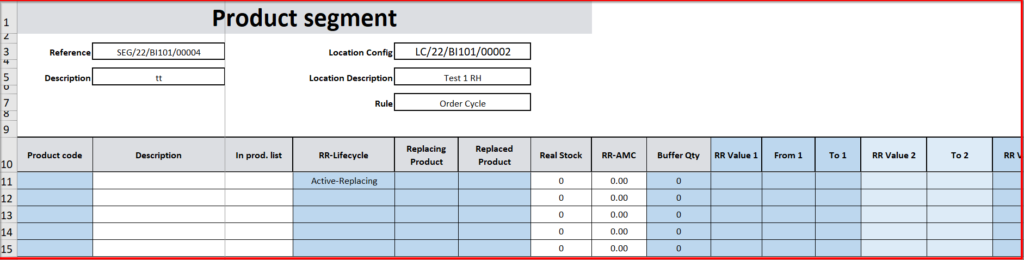
Go to: Warehouse / Replenishment Rules / Configuration / Replenishment Segment

  1. Click on “New” and open the window

At this level you cannot change Unit of Time section which shows “days” as default value. By choosing the “Parent” system automatically change Unit of Time value based on the Replenishment Parent Segment configuration.

2. Select the “Parent”: from already preconfigured Parent Segment Reference

3. Fill in the “Replenishment Segment Description” field with your own created description / name of Replenishment Segment

4. Select a “Replenishment Rule (Order Quantity)” out of three available options: Order Cycle, Min/Max, Automatic Supply

  • If user chose “Order Cycle” then a “Safety Stock” option appears on UF screen where we must select our value based on Unit of Time configuration. “Safety stock” in months of consumption. For the safety stock as for the other product statuses, the Lead time is not considered in this averaged calculation, only the Order Coverage time.

There is also an option of using either Safety Stock (SS) or buffer (e.g. SS as quantity). Buffer is used more on line level.

Order Cycle including Safety Stock (months) print screen.

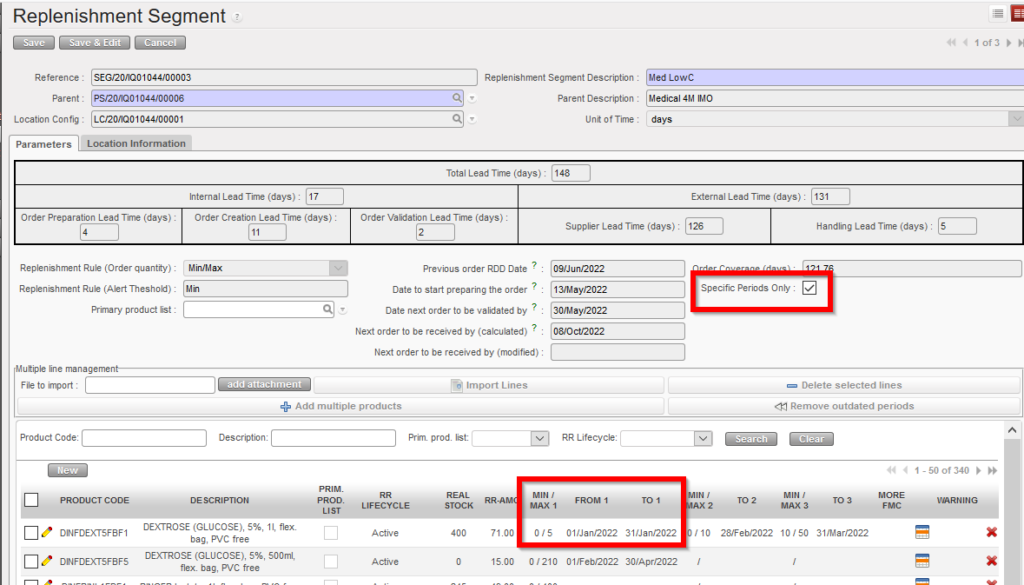
  • If user chose “Min/Max” or “Automatic Supply” as“Replenishment Rule(Order Quantity)”, then a “Specific Periods Only” option will appear on UF screen, if user select it a new button appears under the “Delete selected lines” called “Remove outdated periods”

    The RR types  Min / Max & AutoSupply can be applied with specific validity dates, in the same way as is the case for RR type Order Cycle. 

    The default is that validity periods are not applied for Min/Max & AutoSupply but they can be applied by ticking onscreen checkbox “Specific periods only” or changing value in import/export of Segment. If un-selected, values other than 1st column cannot be filled / are not accepted at import. 

    Import/export of Segment has multiple columns to allow for these values: “Min / Max 1” “From” “To”, Min / Max 2″, “To” etc. 

    This image has an empty alt attribute; its file name is RR-MIN-MAX-1024x585.png

5. Click on “Add multiple products” Then click on “Add” and select multiple products which you want to work with.

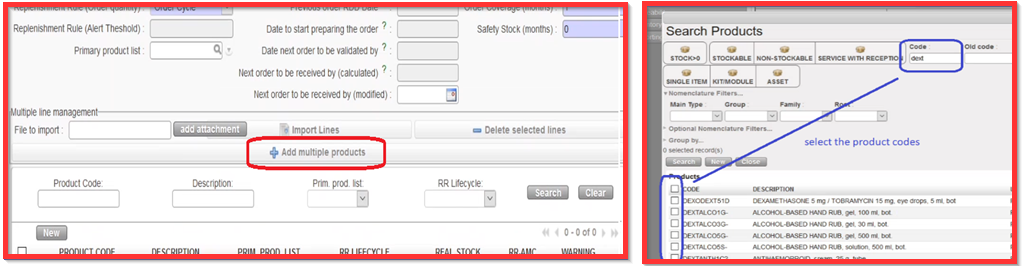
You still have the option to add products via Import by clicking on “add attachment” and “Import lines”, you can use the export excel of “Segment” (via Action menu) from an empty Replenishment Segment, the export template has 5 empty lines. you can fill lines the normal way to import lines onto the Segment.

This image has an empty alt attribute; its file name is segment-2-Excel.png
Export excel of “Segment”

OR you can click on “New” and add lines one at a time.

6. Click on the icon pencil icon in order to edit the specific product line.

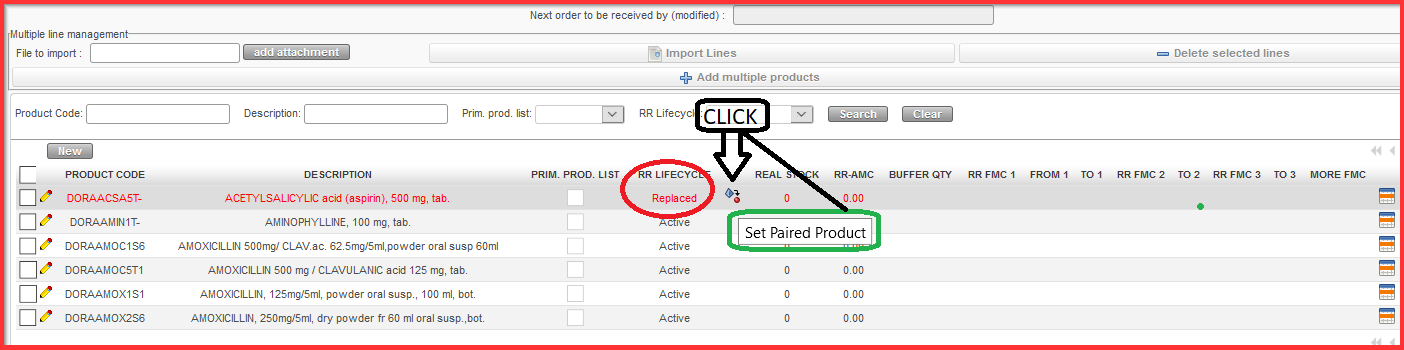
7. Select the filter option for “RR LIFECYCLE “which is specific for Replenishment Rules among the following options:

           a) “Active”: for the active existing product

           b)New”: for the new product for the specific activities (which is part of on-boarding without                 existing pipeline)
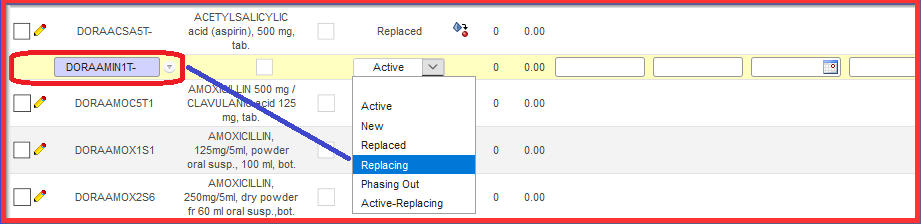
           c)Replaced”/ “Replacing”: we can also replace one product by another one (decision made based  on project strategic decisions, decisions is outside UF system). Within the segment if we have a                “Replaced” product, we must have set out a “Replacing” product which is linked to the replaced                 product. The system cannot guess which the pair of the “Replacing”/”Replaced” product is so the opposite must be added for each. Edit the line with the product which needs to be replaced.

                i.) Select “Replaced” and save the line
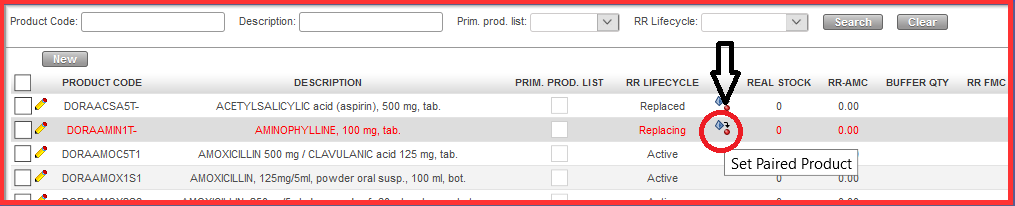
                ii.) Click on the icon below in order to set paired product

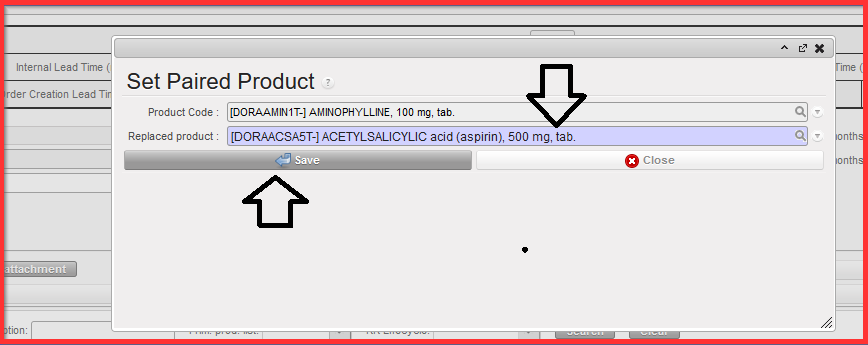
                iii.) Select the “Replacing product” from the “Set Paired Product” pop up screen below

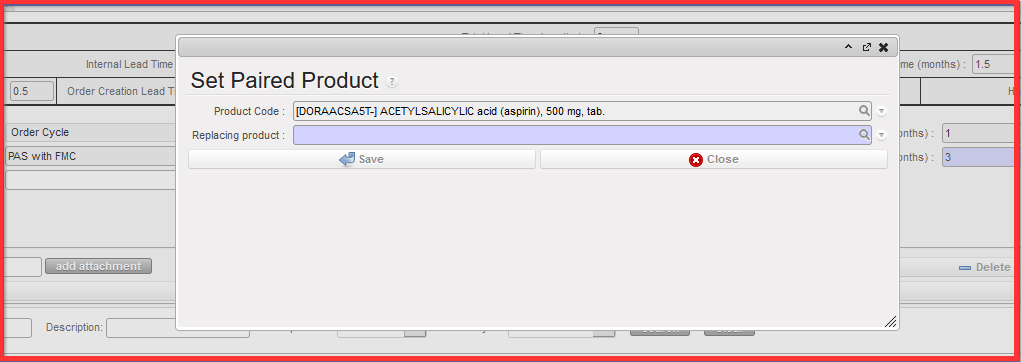
                iv.) Click on “Save”. Window is closed, desired replacing product is selected.

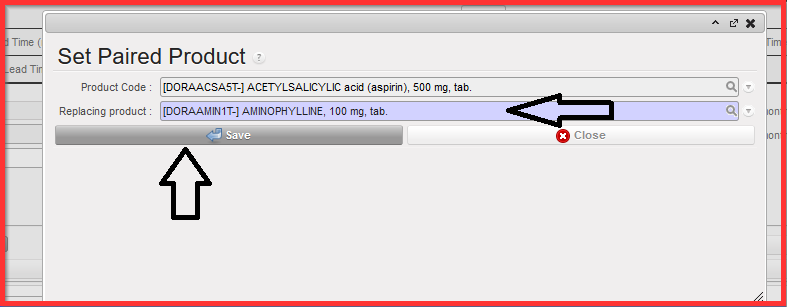
               v.) Then you edit the product line which is replacing the replaced product and select                                          “REPLACING” and save the line

                      vi.) You must go back to Replacing product and click on “Set Paired Product” icon

                   vii.) Click on “Save” button and close the window.

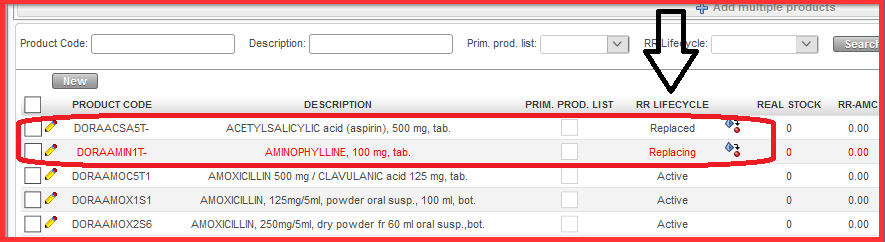
RR Lifecycle “Replaced” and “Replacing” are set up. The second product line is not red highlighted anymore.

d)Phasing out”: it is possible but not mandatory to fill in the field “Replacing product”. However this link to replacing product is informative only and no calculations are linked to this second product. In other ways behaves the same as an “Active” product.

If a Product has “Phasing out” as its RR Lifecycle, no Order proposal quantity is calculated. When Order calculation is generated, product with this status will always have “0” as proposed value.

NB: There should be a warning in Replenishment segment Warning column: one word “Phased out?”, with complete warning “Product has pipeline – check status!””. Warning purely informative.

e) “Active Replacing”: This is to behave in exactly the same way as the current “Active” status. However this must be linked to another product in status “Replaced(i.e.: a product with “Replaced” status must be linked with either a “Replacing” product or an “Active-Replacing” product)

For the Order Calculation, as per before, there is never an order qty proposed for the “Replaced” product.

But the quantities for the “Active-Replacing” product are not changed by the system and are exactly as if the product had a normal “Active” status (it does not take account of any stock of the “Replaced” product. The only difference is that there is a warning for the Active-Replacing product which flags the Stock out date of the linked “Replaced product” “Warning, SO Date of linked product is XXXXX” This should appear in the Inventory Review and Order Calculation.

8. Fill in the “BUFFER QTY” field: can remain blank if you do not want to have any buffer qty.

9. Fill in the “RR FMC1” in PCE (SOQ) which is the unit measure of selected product. “RR FMC” columns/fields are only displayed when RR “Order Cycle” has been previously selected.

10. Select the period “FROM1” (first date of the month) and “TO 1” (last date of the month – You can fill up to 18 “RR-FMC” using the “Edit 18 FMC” icon .

11. Save the link by clicking on the Save icon .

12. Click on “Completed” button once you think you are done with entering the data.

You can click on “Compute Data” button to go back in order to check what is present in “REAL STOCK”. “Compute Data” is very important also for synchronization among the projects / coordination instances (multiple levels).

N.B. It is possible for the same product to be in up to 3 different Replenishment Segments at the same time. A product can be in 3 Replenishment segments belonging to the same Location Configuration, and the RR type of each of the 3 can be different (Order Cycle, Min/Max, Auto Supply) or all 3 can have the same RR type. The only condition is that the product must not have an active value (>0) in the same time period in more than one Replenishment Segment. For example, this means that if Product A has an FMC value of 2,000 in period 01 Jan 2022 > 28 Feb 2022, the same product cannot have a value other than 0 for this period in any other segment belonging to the same Location Configuration.

D. HOW TO CREATE A KITTING ORDER (Kitting process)

Supply User Manual ENG -> 5. Warehouse -> 5.11 LU-SU4204: Kits Management -> D. HOW TO CREATE A KITTING ORDER (Kitting process)

D. HOW TO CREATE A KITTING ORDER (Kitting process)

Rather than buying a complete kit directly from a supplier, you can also create a kit using components available in stock. The kitting process can be seen as a kind of “manufacturing order” or more precisely an “assembly order“.

Note that before kitting can be carried out, all the kit components / products should be available in your warehouse and a Theoretical Kit Composition List should exist for the kit to be produced.

Go to: Products/ Kit Management / Kitting Order

  1. Click on the “New” button to create a new kitting order.
  2. On the “Kitting Order” screen

a) As “Product“, enter the code of the kit to be produced (for which at least 1 “Active” and “Completed” TKCL version must exist).

b) Enter the “Qty” of kits you wish to be produced (entering a qty > 1 will avoid repeating the same process over and over if you are producing several kits).

c) The “Reference” and “Creation Date” are auto-populated. Leave them as they are.

d) Use the “Version” field to select the appropriate TKCL version (which must be “Active” and “Completed”).

Kitting Order

3. On the “Components” tab, select as “Default Source Location” the location from where the components will be taken.

4. On the “Kits” tab, select as “Destination Location” the location were the produced kit(s) will be stored.

Kitting Order

5. On the “Notes” tab, you may enter any additional information related to the kit(s) production.

6. Click on the “Display Items from Version” button .

Kitting Order

The “Components to consume” section of the “Components” tab is filled with the components of the selected TKCL version (including quantities). The “available qty” column indicates quantities available in the source location for the components.

7. Click on the “Save” button to save your kitting order.

8. When you are ready to launch the kit(s) production, click on the “Update Available Qty” button to check that the requested quantities are available in stock (as things may have changed between the creation of the kitting order and the actual production of the kit(s)).

9. Click on the “Start Production” button.

The system informs you on the creation of KCL(s) (2 in this case) and an Internal Move KIT/INT. The state of the kitting order switches from “Draft” to “In Production

10. To process the production of your kit(s), Click on the “Process All lines” button.

11. It’s possible to choose between the check for the availability according to FEFO or LEFO for Kit production as below snapshot,  if you chose LEFO,  the availability of products/batches with longest expiry dates will be shown, and if you check FEFO, (First Expired First Out)  which is the default rule for all other stock movements, then the products/batches which will expire the soonest will be selected and displayed 

FEFO / LEFO


11. To process the production of your kit(s), Click on the “Process All lines” button.

Kitting Order

Components now appear in the “Consumed Components” section.

12. Click on the “Check Availability” button, to check that all components are available.

This image has an empty alt attribute; its file name is kitting-2-1024x449.png

Kitting Order

If all components are available, their state switches to “Available“.

13. Click on the “Validate all ‘Available’ Lines” button to validate the consumption of these components/quantities by the production of the kit(s).

Kitting Order

The state of the components switches to “Closed“.

14. To confirm the kitting, click on the “Confirm Kitting” button.

This image has an empty alt attribute; its file name is confirm-kitting-closed-order-1024x485.png

Kitting Order

The state of the kitting order switches to “Closed“. The kit is now present in the destination location and the components have been consumed (i.e. they are no longer present in the source location).

In case a physical output document is need, please note that a Kitting Order PDF can be generated from the right side action menu.

The Internal Move INT/KIT which had been created before is processed and closed.

Internal Move created by a Kitting Order

Kit Composition List created by a Kitting Order

Note that the “Warehouse” business application doesn’t provide any information on kits content. To have the details on the kits content and to manage the content of a kit, go to the dedicated sub-menu called “Kit Management” under the business application “Products“.

Kits content are managed via Kit Composition Lists (KCL). Kit Composition List is a transaction that displays the actual content of a kit present in stock. When the KCL is created after receiving a kit from a supplier or from a kitting order, it reflects the content of the received or produced kit in the warehouse.

If a module (that you may also see as a “bundle of products” from a kit) appears in the warehouse inventory, it will be seen just as a product, which means that it is an independent module (i.e. not part of a kit), considered purely as a single product and not as a kit’s content. When a module is inside a kit, it doesn’t appear in the warehouse inventory.

To display the content of a kit, just open the Kit Composition List of that kit. If the Kit Composition List was not created when the kit was received/added to stock inventory, then it will not be possible to see its content in UniField.

As you have probably noticed, the virtual location “Kitting” is used in kits management. This location enables following the double-entry system briefly explained in the introduction of this chapter as kit managements will trigger movements and that all movements need source and destination locations.

B. HOW TO SUBSTITUTE COMPONENTS OF A KIT WITH ALTERNATIVE PRODUCTS AVAILABLE IN STOCK

Supply User Manual ENG -> 5. Warehouse -> 5.11 LU-SU4204: Kits Management -> B. HOW TO SUBSTITUTE COMPONENTS OF A KIT WITH ALTERNATIVE PRODUCTS AVAILABLE IN STOCK

B. HOW TO SUBSTITUTE COMPONENTS OF A KIT WITH ALTERNATIVE PRODUCTS AVAILABLE IN STOCK

When a kit is in stock, it may sometimes be necessary to remove one item out of this kit and replace it with another item, for example, because a product in the kit will expire soon and you would like to replace it with another product with a longer expiry date, so that the kit does not expire and can be stored as a kit for a longer period. When substituting a product in a kit, it is always necessary to replace the product which you are removing, so as not to have an incomplete kit.

In order for this substitution to be reflected in the system, there should be a Kit Composition List already created for the kit (see LU-SU2105 in the Products chapter and LU-SU4101 “How to receive a kit and create a kit composition list” in the current chapter). The kit and the substitutions products should all be in stock.

Go to: Products/ Kit Management / Composition List / Kit Composition List

  1. Find and open the relevant kit for which you will exchange the products by clicking on the pencil icon.
  2. In the “Kit Composition List” screen, click on the “Substitute Items” button.

Kit items substitution

3. In the “Substitute Kit Items” screen, as “Destination Location of Items“, select the name of the location where you would like the products which you are removing from your kit to be sent.

4. In the section “Products to remove from the Kit“, click on the “Add” button and select the product(s) (multiple selection is possible) which you would like to take out of your kit. If there is one product with multiple expiry dates or batch numbers, make sure you select the correct one(s), it is possible also to to remove (substitute) a partial quantity of an existing line .

5. In the section “Products from the stock to the Kit” Click on the “New” button and enter the product name, source location (i.e. where it is currently located), BN/ED/Asset (if relevant), quantity, then click on the floppy disk icon to save this line. Do this for each product which needs to be added. You should be able to see if the product is available in stock thanks to the “Availability” column.

Kit items substitution

6. Click on the “Check Availability” button to make sure that the needed products are well available in stock.

In case of products with BN/ED attributes which have changed. there is a button “Update products whose BN/ED attributes have changed” which appears in KCL processing window. When button is used, any affected products will have their BN/ED info removed, or have default BN/ED info added, Action only updates products in this KCL window.

Substitute Kit item with BN/ED attributes which have changed

7. Once your substitution is completed, click on the “Process Substitute” button.

Kit items substitution

Items substituted in kit

8. The systems informs you on the creation of an Internal Move (INT/KIT) which has been created, processed and closed in order to move the items from kit to stock and from stock to kit. You may click on the message to see the INT/KIT. The system also requires an ED for the kit. If the kit is not perishable, you may enter the date 01/01/9999.

Internal Move INT/KIT created following substitution

Kit Composition List after substitution

The Kit Composition List is updated with the new products. On the stock level side, items which were in the kit have now been transferred to stock (“LOG” location in this case) while items which were in stock have now been transferred to the “Kitting (virtual) location.

E. HISTORICAL CONSUMPTION REPORTS

Supply User Manual ENG -> 5. Warehouse -> 5.10 LU-SU4203: Consumption Reports -> E. HISTORICAL CONSUMPTION REPORTS

E. HISTORICAL CONSUMPTION REPORTS

Although Monthly Consumption Reports allow you to see the AMC of the selected products, they are more actually existing to allow the introduction of FMCs for these products. AMC is mostly there to indicate what has been the consumption in order to help you to enter a good FMC.

Historical Consumption Reports are designed to analyze Average Monthly Consumptions (AMC),  Real Average Consumption (RAC) and RR-AMC, as described below. It displays the consumption rates but also the actual consumptions month by month, allowing you to analyze variations.

As already mentioned, the AMC value is based on the total quantity of the product which has left the instance via a consumption report or outgoing deliveries (both quick and full shipment processes). Any quantities of the product which have left the instance due to loan, donation, loss or discrepancy will not be included in this calculation. If any of the products have been received (returned) back in (via IN – except IN from Scratch) to this instance within this period, this quantity will be deducted from the total consumption figure.

RAC is computed based on Real Consumption Reports only and is specific to one source location. Real Average Consumption is calculated using the total quantities which left one specific source location due to a Real Consumption Report. Unlike AMC it does not consider any other picking/transport documents which take products out of this location.

Go to: Warehouse / Reporting / Consumption Reports/ Historical Consumptions

1. In the “From date“, enter the day from which you want the system to consider the data. This must be the first day of a month.

2. The “To date” field displays the last day of the current month, change it if necessary to the last day of another month, but it should obviously not be in the future.    

Depending on the dates you entered, the system will display all relevant months in the “Months”   table.

3. In the “Consumption type” field, the default type will be “Real Average Consumption” (RAC), but you can change this to the 2nd option “Average Monthly Consumption” (AMC) or to the 3rd option Replenishment Rules “RR-AMC” according to what you want to see.

4. As “Source Location“, enter the location for which you want to do the analysis. Note that the location is only available (and mandatory) for the RAC. It is not available for the AMC because AMC is always calculated for the full instance.

5. As “Destination Location”, enter the location for which you want to do the analysis. Note that the location is only available (and NOT mandatory) for the RAC. It is not available for the AMC because AMC is always calculated for the full instance.

Destination Location can be used to select any one External Consumption Unit. If an ECU is selected then report is generated and displays RAC for selected Source Location and Selected Destination Location only.

Historical Consumption Report

6. For Consumption Report Average Monthly Consumption (AMC), The checkbox “Remove Negative AMCs” has a fuller explanation below it and when ticked, the “Historical Data report” can be generated without showing any negative AMCs at the month level, and the “Entire Period AMC” is based on the figures shown for each month. When the checkbox is not ticked, a similar report can be generated showing the figures as per the regular calculation for AMC (including negatives), and it is still possible to view the (original) onscreen version for this via the View Historical Data button, and this checkbox could be used also for RR-AMC.   

Go to: Warehouse>Reporting>Consumption Reports>Historical Consumption/History consumptions

7. Click on the “Save” button on top of the screen.

8. Click on the “View historical data” button. If the report is heavy to generate, it may be launched in the background, otherwise you will see results directly.

Historical Consumption Report – RAC

Historical Consumption Report – AMC

In the above examples, reports have been launched on 2 months only (February and March 2018), the system gives the RAC/AMC over these 2 months and the actual consumption’s month by month (here February and March 2018).

9. For Consumption Report Replenishment Rules – Average Monthly Consumption RR-AMC, When the 3rd option is selected, it is possible to select one or multiple Source Locations and/or one / multiple Destination locations and/or one/multiple External Partner. This means it will be possible to see consumption for a specific location or group of locations or see consumption to a specific destination location or set of destinations. Source location(s) must be internal but destination location(s) can be internal or external. 

When 3rd option (RR-AMC) is selected, there is a checkbox named “Adjusted RR-AMC”. When selected, the report  will take into account and show the adjusted AMC based on any stock outs / substitution for products via a recorded “Stock Out” with selected period. When the 3rd option RR-AMC is selected, it is still possible to see and use the “Remove negative AMCs” meaning no negative AMC figures (due to returns) will be displayed.

– If an External Partner (Type: Customer) is selected as the destination location, the source location must be either Internal Locations or Cross-Docking

– The source location can also be left empty, in which case only movements from Internal Locations and Cross-Docking will be included in the RR-AMC calculation. 

An External Partner can be combined with an External Consumption Unit as the destination location. 

– If “Other Customer” is selected as the destination and you attempt to select one or more External Customers, a warning message will block this action. 

– Similarly, if “External Customer” is selected as the destination and you attempt to select “Other Customer” a warning message will also block this action.

B. REAL CONSUMPTION REPORTS

Supply User Manual ENG -> 5. Warehouse -> 5.10 LU-SU4203: Consumption Reports -> B. REAL CONSUMPTION REPORTS

B. REAL CONSUMPTION REPORTS

The objective of a Real Consumption Report (RCR) is to register the consumption of goods (i.e. a movement) which would not have been yet recorded. This may typically happen if goods are consumed from a stock but nothing is recorded “in live” in the system. You may decide to record consumptions from this stock once a day, once a week, once a month, …

A good example is a stationaries cupboard from where staffs take items, noting on a paper what they take. This paper (and probably an inventory of the cupboard) can be used at the end of the month to register in the system stationaries consumption from this cupboard before replenishing it. Typically, this cupboard would be declared as an ICU in the system.

Another example is the mechanical spare parts stock. A mechanic can take parts in this stock according to the needs, writing what he takes on a register. This register is then used at the end of the week to register in the system what was consumed from this stock. Typically, this stock would be declared as an intermediate stock in the system.

The objective of a RCR is actually to regularize in the system, a stock situation following consumption which was not registered.

The source location of a RCR will be an internal location (typically an intermediate stock or an ICU) while the destination location will be a customer location (typically an ECU, “MSF Customer” or “Other Customer”).

It is important to understand that this report is actually triggering a stock move from the source location to the destination location. A Delivery Order (OUT-conso) will be created and processed once the RCR is saved and processed.

Note that if you want to avoid the use of Internal Requests, RCRs are an alternative way of registering your consumptions.

Go to: Warehouse / Warehouse Management / Real consumption

  1. Click on the “New” button to create a new report.

Creating a Real Consumption Report

2. The “Creation date” is generated by the system.

3. As “Source Location” enter the name of the location from which the goods have been consumed (it must be an internal location, click on the magnifying glass to choose and select from the listed options).

4. The “Destination Location” enables you to only select External Consumption Units ( “MSF Customer or “Other Customer” can not be selected any more). This “Destination Location” is actually the “who” consumed the goods. You need to create different clients (as ECU) so that you will be able to indicate who consumed each items.

5. As “Category“, enter the category of the products for which you are registering the consumption.

6. In the “Period from” field, enter the date at which the recorded consumption started.

7. The “Period to” date will default to today’s date, as we cannot enter what has been consumed beyond this date. If the end date when the goods were consumed has already passed, it is possible to edit this field and enter a previous date. You should enter here the date at which the recorded consumption ended.

Note that this period may be more or less long. You could decide to record consumption on a daily basis. In this case the “Period from” and “Period to” dates will be the same.

8. Add the products which have been consumed. This can be done with the “New” button located on top of the “Products” table. It can also be done with the “Add multiple lines” button. This allows entering several products at once.

The “Import a file” button allows you to import an Excel file into a RCR (see next section for details).

The “Copy all” button can be used to include all products/batches/quantities currently present in the source location. It should be use with care as it will empty completely the source location. To help avoid any mistake, the “Qty Consumed” is now automatically filled with 0 when this button is used. User will have to fill the “Qty consumed” either manually or via Import.

Header of a Real Consumption Report

a.  To add products manually one by one:

i. Click on the “New” button on top of the “Products” table.

ii. Enter a product in the “Product” field.

iii. Check that the UoM is correct; you will see that the indicative stock quantity (i.e. the actual level of stock currently in the source location/real stock) is displayed.

iv. If relevant, select the batch number and expiry date for your product. If different batch numbers or expiry dates of the same product have been consumed, these should each have a separate line. Note that the FEFO principle is not applied here. The system does not select BN/ED itself. Note that when selecting a batch, the indicative stock is changing and indicates the real stock level for the selected batch in the specified source location.

v. Enter the quantity consumed within the dates specified above (Period from, Period to).

vi. Enter a comment if needed.

vii. Click on the floppy disk icon at the end of the line.

viii. Enter all other products in the same way.

Inserting a product line on a RCR

b. To add several products at once:

i. Click on the “Add multiple lines” button.

ii. Click on the “Add” button in the “Add multiple products” window.

iii. Search for the products you need to add using the relevant filter on the “Search Products” window.

iv. Select your products by ticking the product lines check-boxes.

v. After selecting all your products click on “Select(you may always add additional products after if you click again on “Add“).

vi. Click on “Add products“.

vii. Your products are inserted in the Real Consumption Report.

viii. Update each line with the consumed quantities (and BN/ED if needed).

ix. Click on the floppy disk icon at the end of the line.

x. Enter additional products if needed.

If you did a mistake and need to delete some lines you can use the “red cross” icon located at the end of the product line.

The “Delete Lines” button allows deleting several lines of the RCR in one step.

Note that if a product is managed by BN/ED, the selection of a batch will be mandatory. You will only be able to select a batch whose “available stock” is positive in the source location (you may analyze stock availability of batch managed products through Warehouse / Traceability / Batch numbers or through Warehouse / Traceability / Batch Location) .The selection of a batch updates the “indicative stock” of the line and indicates the “real stock” for this batch in the source location.

The “Update Indicative Stock” button allows refreshing a RCR and updates the indicative stock column.

The “Cancel” button allows cancelling the whole RCR. Its state will switch to “Cancelled” but you will be able to reset it to “Draft” if needed.

9. When you have added all products for which you want to record the consumption, click on the “Save” button on top of the main RCR screen.

The report is saved in the “Draft” state. This means you can modify, save, cancel or even delete it if necessary. Once it has been processed (i.e. after you have clicked on the “Save & Process” button), the Consumption Report will switch to the state “Closed“, the products will be moved (through an OUT-conso), and you will no longer be able to update, cancel or edit the RCR.

10. When it is confirmed that the entered consumption data are correct (check with your OC guidelines if you need specific validation), you can process your RCR. However, if a significant amount of time has passed between when you created the Real Consumption Report and when you are processing it, situation may have changed in term of products availability. You can click on the “Update Indicative Stock” button to update this indicative stock quantities displayed.

11. Click on the “Save & Process” button. This will create, process and close a Delivery Order (OUT-conso) with these products/batches/quantities. This OUT will have the “Reason type” “3 Consumption Report”. The system will display a confirmation message for this, which means that these products are now no longer in the source location.

A RCR can be exported and printed via the “Consumption Report” option available in the action menu.

A RCR can be exported to Excel via the “Export lines” button available in the main RCR screen.

Exporting a Real Consumption Report

You can check the stock levels of the involved product in the different locations thanks to the “Stock by Location” functionality. The “Traceability” menu may also be useful to check if the products are batch managed.

If a Physical (Stock) Inventory is to be carried on a location, it is important for all RCRs to have been created and processed before this is started so that the figures in the system are up to date and reflect (as much as possible) the physical stock levels in this location.

It is possible to use a RCR to send goods to an external partner. However, you will have to configure the partner in a proper way and link it to an ECU on its partner master data sheet.

D. HOW TO EXPORT AN INTERNAL MOVE

Supply User Manual ENG -> 5. Warehouse -> 5.8 LU-SU4201: Internal Moves -> D. HOW TO EXPORT AN INTERNAL MOVE

D. HOW TO EXPORT AN INTERNAL MOVE

An Internal Move can be exported to PDF or Excel. This may be useful if you want to communicate about a planned transfer or to get a needed validation (signature).

Go to: Warehouse / Warehouse Management / Internal Moves

  1. Using a checkbox, select the Internal Move you wish to export.
  2. In the action menu, select the option “Internal Move” to export the INT to PDF or the option “Internal Move Excel Export” to export the INT to Excel.

Exporting an Internal Move to PDF or Excel

Internal Move in PDF format

Internal Move in Excel format

Note that these export options are also available in the action menu from within the INT.

If you tick several check-boxes in the “Search: Internal Moves” screen, you may export several INTs in one step. In PDF, you will get one page per INT. In Excel, you will get one sheet per INT.

C. HOW TO CREATE AND PROCESS AN INTERNAL MOVE

Supply User Manual ENG -> 5. Warehouse -> 5.8 LU-SU4201: Internal Moves -> C.HOW TO CREATE AND PROCESS AN INTERNAL MOVE

C. HOW TO CREATE AND PROCESS AN INTERNAL MOVE

An Internal Move can be created manually to transfer products from one location to another. You will have to specify source and destination locations. Note that all locations cannot be used as sourced or destination on an INT as this document should only be used to transfer goods internally within the warehouse (e.g. you will not be able to put an ECU as destination location on an INT).

Go to: Warehouse / Warehouse Management / Internal Moves

  1. Click on the “New” button to create a new Internal Move.
Creating a new Internal Move

2. Enter the appropriate reason for the movement in the “Reason type” field and the “Expected Move Date“. In addition, you may add information in the “Details” field, on the “Additional info” tab or on the “Notes” tab.

Completing the Internal Move header
  • “Reason type” drop list includes “Internal Return” this is for products which have been returned from another internal location and this will be used in RR-AMC calculations in the same way as INs with RT “Return from Unit”.
  • Select Order Category .The default value is empty, and the user can select one of the following options: Logistic, Medical, Service, Transport, or Other.

3. Click on the “New” button at the top of the “Stock Moves” table to insert a product line on the INT. Note that product lines may also be inserted via the “Add multiple lines” button or the “Import lines” button.

4. Enter a product code, a quantity and a unit of measure if needed. Note that if the product entered is managed by BN/ED, the system will warn you about this.

Inserting a line on the Internal Move

If a product does not correspond to the selected category, the user will receive a non-blocking warning message.

5. Select the “Source Location” (from where the product has to be taken) as follows:

  • “Input” to transfer a received product (this stock move should be automatically created)
  • “Stock” to transfer the product out of the stock
  • “MED” / “LOG” or another stock location to transfer the product out of this specific location
  • An Intermediate Stock to transfer the product out of this specific location
  • An Internal Consumption Unit to transfer the product out of this ICU
  • “Cross docking” to transfer the product out of the “Cross docking” location. This can be used to transfer a product to a client other than the one who ordered it (e.g. product initially purchased for a project but finally delivered to an Internal Consumption Unit)

6. Select the “Destination Location” (where the product has to be delivered) as follows:

  • “Stock” to transfer the product to the stock – it will be transferred to the “MED” / “LOG” location according to the product main type
  • An Intermediate Stock to deliver the goods to an intermediate stock location
  • An Internal Consumption Unit to deliver the product to an ICU
  • “Cross docking” if you need to transfer received products (from the “Input” location) to the “Cross docking” location to reimburse an exchange

Please note that “Input” location can never be used as a “Destination location” for INT from scratch.

7. If the product is managed by BN/ED, you may already select the batch master data on this screen.

8. Click on the “Save & Close” button to save your line and return to the main INT screen. Another option is to click on the “Save & New” button to save your line and add another one or on the “Cancel” button to discard your changes.

9. Once all lines have been inserted, click on the “Confirm” button located at the bottom of the main INT screen.

Confirming the Internal Move

10. The INT switches from “Draft” to ”Not Available”. Click on the “Check Availability” button located at the bottom of the main INT screen.

Checking the availability of the products on the Internal Move

11. The availability check has been done. Batches have been selected if needed. The INT switches from ”Not Available” to “Available“. Click on the “Process” button located at the bottom of the main INT screen.

Internal Move ready to be processed

12. On the “Products to Process” screen, click on the “Copy all” button and on the “Process” button.

Processing the Internal Move

Please note that all the encoded information can be saved in case you need to process the INT at a later stage using the “Save as draft” button.

13. The INT is now “Closed” all products/batches have been transferred from source to destination location(s).

Internal Move in state “Closed”

Note that INT can be confirmed at line level. However, you should not do this as it will block the process.

Some product lines could be in the state “Not Available” following the availability check. These product lines won’t be transferred to the “Products to Process” screen when you will process the INT.

An INT can be partially processed. In this case, processed product lines will be registered on a new “Closed” INT while product lines left behind (back-order) will stay on the initial INT, ready to be processed. That’s what will happen if some lines of an INT are “Available” while others are “Not Available“.

An INT takes the state “Available” if at least one of its lines is in the state “Available“.

If a product line is “Not Available“, its availability may be forced (and this action can be done at line or header level). However, if you force the availability of a product which is managed by BN/ED, you could be blocked at the next step. If the product is not managed by BN/ED, you will be able to proceed but could create negative stocks. In any case, forcing the availability should only be done with great care.

The button “Change All destinations” which is located at the bottom of the main INT screen (if the INT is “Draft“, ”Not Available” or “Available“) allows changing all the destination locations in one step.

If you want to update an INT-line on a ”Not Available” or “Available” INT, you may only do this if the line has the state “Not Available“. Therefore, if the line is “Available” but you still want to change it, click on the yellow arrow 
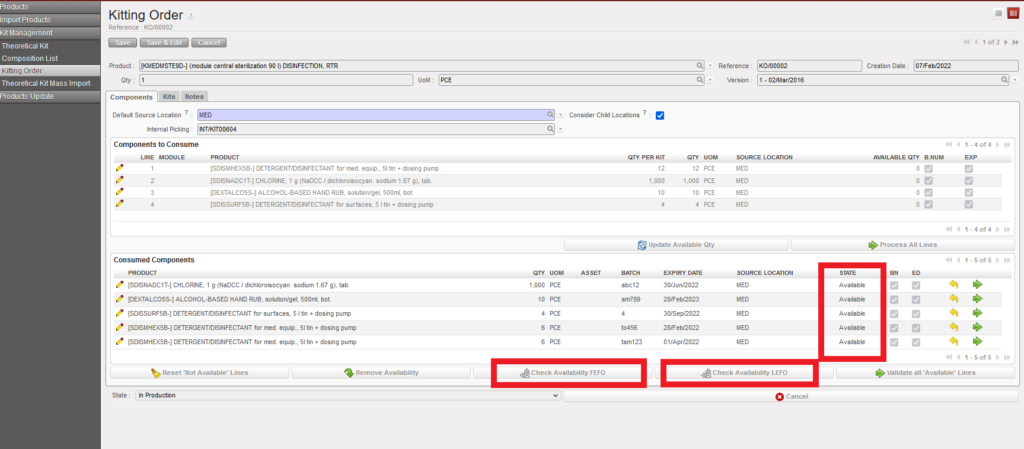
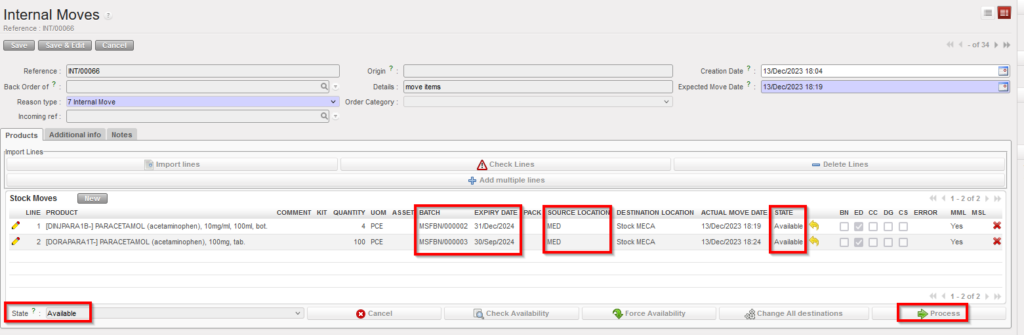
to cancel the availability of the line and update the line as needed. After this you may recheck its availability.

C. DOCUMENTATION FROM DELIVERY ORDER

Supply User Manual ENG -> 5. Warehouse -> 5.7 LU-SU4106:Shipment Documentation -> C. DOCUMENTATION FROM DELIVERY ORDER

C. DOCUMENTATION FROM DELIVERY ORDER

If you decide to ship a freight to a customer using a simple out process, a documentation may also be generated. However, you will not have all the details which are available with the full process.

Go to: Warehouse / Warehouse Management / Deliveries / Delivery Orders

  1. Using the check boxes, select the Delivery Order you wish to print.
  2. In the action menu, select the option “Delivery Order”.

Exporting a Delivery Order to PDF

This image has an empty alt attribute; its file name is DO-1024x527.png

Delivery Order in PDF

This documentation can also be used for internal deliveries (to ECU) and signature boxes may be useful to authorize shipment and acknowledge receptions.

Information such as “Origin”, “Destination location”, “Requestor” ( same field coming from IR; “Contact name” if from FO) and “Your Ref(PO from other instance) can be automatically populated from preceding documents (IR, FO…).

B. DOCUMENTATION FROM SHIPMENT

Supply User Manual ENG -> 5. Warehouse -> 5.7 LU-SU4106:Shipment Documentation -> B. DOCUMENTATION FROM SHIPMENT

B. DOCUMENTATION FROM SHIPMENT

All needed shipping documentation can be generated from the shipment (freight manifest, invoice, free gift certificate and packing lists). Depending on the information entered in the different steps (pick/pack/ship), the generated documentation could include more or less information. Ensure that the “Document Information” and “Transport Information” tabs of the shipment are filled in so that the documentation will include all the necessary information (otherwise, this part of the documentation will be blank). Logically, as only sub SHIPS will be sent to customers, the generation of the documentation should be done from a sub SHIP in the state “Dispatched“.

Go to: Warehouse / Warehouse Management / Deliveries / Shipment

  1. Using the check boxes, select the shipment (sub SHIP in state “Dispatched”) for which you want to generate the documentation.
  2. In the control panel, 5 options allow you to export 5 different documents.

This image has an empty alt attribute; its file name is ship-doc-1-1024x232.png

Generating shipment documentation

        3. The “Freight Manifest” option allows exporting a freight manifest in PDF and in Excel.

Freight Manifest in PDF

Freight Manifest in Excel

Shipper, carrier and consignee information appear on the manifest. Involved packing lists, number of parcels, weight, volume and value also appear. “Our ref” is for the FO reference at sending instance while “your ref” will be for the PO at the receiving instance.

   4. The “Invoice” option allows exporting proforma invoices to PDF.

Proforma invoice in PDF

One proforma invoice is generated for each involved PPL and includes quantities and prices for each product.

  5. “Donation Certificate” option allows exporting the Certificate of Donation in PDF, it is available for all SHIPs and OUTs for all Reason Types.

This image has an empty alt attribute; its file name is donation-1024x465.png

Certificate of Donation in PDF

6. The “Free Gift Certificate” option allows exporting a free gift certificate to PDF, it is available in the action menu for all SHIPs and OUTs.  

Free gift certificate in PDF

The free gift certificate includes information such as the total number of parcels, total weight, total volume and total value

7. The “Packing List” option allows exporting to PDF all the packing lists (including parcels details) included in the shipment.

Packing List in PDF

8. The “Packing List (xls)” option allows exporting to Excel all the packing lists (including parcels details) included in the shipment.

Packing List in Excel

9. “Loan Certificate Export” option allows exporting to pdf the Loan certificate, it is available in the Action Menu for all INs and OUTs (not draft Ships and Delivery Orders) if there is a line or more linked with “Loan” or “Loan Return” reason type.

This image has an empty alt attribute; its file name is loan-pdf.png

If there is a Loan and a Loan Return in the same SHIP, it is possible to select the document you want to view.

This image has an empty alt attribute; its file name is Picture2.png

It is optional to show the total value of the loan in the pdf.  

Note that the generation of these documents may also be done from within the shipment as the 8 options are available in the action menu.

Note that the generation of these documents may also be done from main SHIPs if needed. It can also be done if the state of the shipment is different than “Shipped“. However, some documents (invoices and freight certificates) cannot be generated if the state of the “Shipment” is “Draft“.

D. HOW TO PROCESS A DELIVERY ORDER

Supply User Manual ENG -> 5. Warehouse -> 5.6 LU-SU4105: Delivery Orders -> D. HOW TO PROCESS A DELIVERY ORDER

D. HOW TO PROCESS A DELIVERY ORDER

A Delivery Order can only be processed if its state is “Available“, meaning that at least one product line of the OUT is “Available“.

If the OUT is created following the sourcing of an IR from stock, its state will be “Available” if at least one of the product lines is “Available” in stock. Otherwise, the OUT will have the state Not Available. The source location of the product lines will be the stock.

If the OUT is created following the sourcing of an IR on order (PO), it will only be created when the PO (or a PO-line) will be confirmed and it will have the state Not Available. Its lines will have the state “Not available” and their source location will be “Cross docking”. The state of the OUT-lines will switch to “Available” as soon as their corresponding IN-line will be received in cross-docking. As a consequence, the state of the OUT will also switch to “Available“.

If the OUT is created following the conversion from an “Available” PICK, it will be created with the state “Available“.

Other situations are also possible involving mixed sourcing (request partly sourced from stock and partly sourced on order), mixed availability (some lines of the OUT “Available” and some “Not Available”, partial confirmations of POs, partial reception of POs,)

Note that in all cases, you may force the availability. This will have consequences on the states of the OUT-lines and/or on the state of the OUT.

If the Delivery order has been created from an IR, the “Reason type” will be “Deliver unit”, if the Delivery Out has been created from a FO, (See below how to convert Pick to OUT), the “Reason type” will be “Deliver Partner”

Go to: Warehouse / Warehouse Management / Deliveries / Delivery Orders

By default, the “Available” filter is activated, and the “Available” Delivery Orders are shown. Note that in the below example, an IR with Location requestor = ECU was sourced on order (PO). This PO was confirmed and the related IN partially processed.

  1. Open the Delivery Order you wish to process. Its state should be “Available“.

“Available” Delivery Order

        2. Click on the “Process” button.

Processing an “Available” Delivery Order

The source location is “Cross docking“. Quantities already received in CD are “Available” (line 2) while quantities not yet received are “Not Available(lines 1 and 3). Note the yellow message in the above screen.

3.  In the “Products to Process” screen, select products and quantities you wish to process by clicking on the “Copy all” button or by using the pencil icons. If necessary, update the asset references, batch numbers and/or expiry dates by editing the lines and clicking on the “floppy disk” icon .

Processing an “Available” Delivery Order

Note that all products and quantities which were available in the “Delivery Order” screen have been transferred to the “Products to Process” screen. This is the meaning of the yellow message on the previous screen.

The “Save as Draft” button can be used to save the information encoded in case you need to process it later.

4. Click on the “Process” button.

Processing an “Available” Delivery Order

Delivery Order after processing (back order)

Delivery Order after processing (processed products/quantities)

If the OUT was fully processed, it will simply be Dispatched.

If the OUT was only partially processed (as it is the case in the above example), a back-order will be created. The processed products/quantities are registered on a new OUT with the state “Dispatched“, while the old OUT stays open (“Confirmed” in this case) in order to process products and quantities which will be received in CD in the future.

Again, one scenario among many was selected to illustrate the processing of a Delivery Order. Alternatives involve sourcing from stock, conversion from PICK to OUT, situations in which no back-orders are left behind, …

Note that if you need to change the source location before processing an “Available” OUT-line, it is possible to first make the line “Not Available” (by clicking on the yellow arrow to cancel the availability) then click on the pencil icon to edit the OUT-line and change the source location to the required one. After that you should re-check the availability of the OUT by clicking on the “Check Availability” button