T. How to use the Purchase Order lines allocation report.
This report can be used to check the cost centers and expense accounting codes allocated to PO lines. It can be generated on the instance and exported.
Filters allow restricting the analysis to one or several POs. The selection can be exported to PDF or Excel. Use the check boxes to decide what you want to export to PDF. If you export the data to Excel, select which columns you want to in the export.
To generate a PO lines allocation report in Excel
Go to: Purchases / Purchase management / PO lines allocation report
Use the filters to restrict the orders selected if needed.
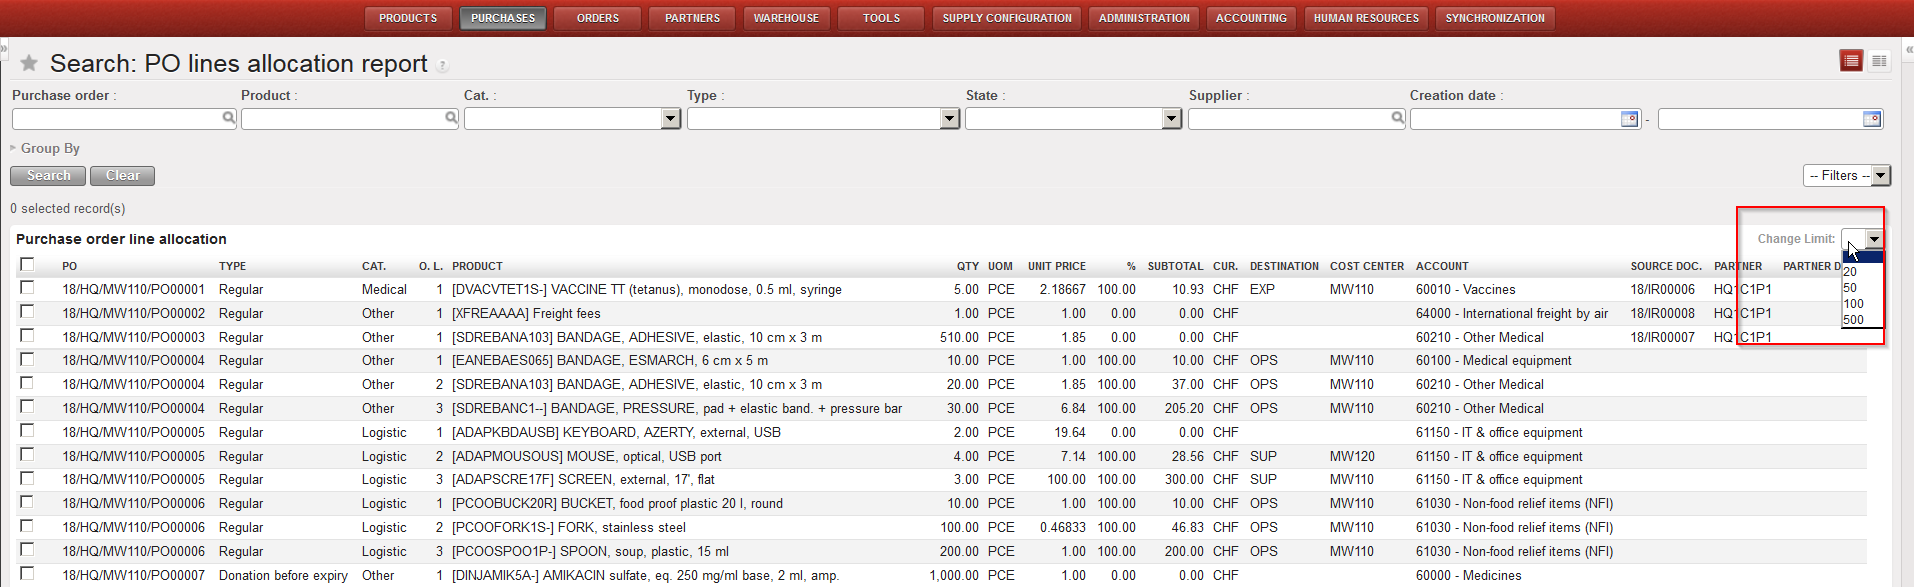
By default, only the first 20 lines appear on the screen. Use the filter located on the top of the “Purchase order line allocation” table if you want to show more rows. Note that the check boxes on the left are only useful for export to PDF.
PO lines allocation report
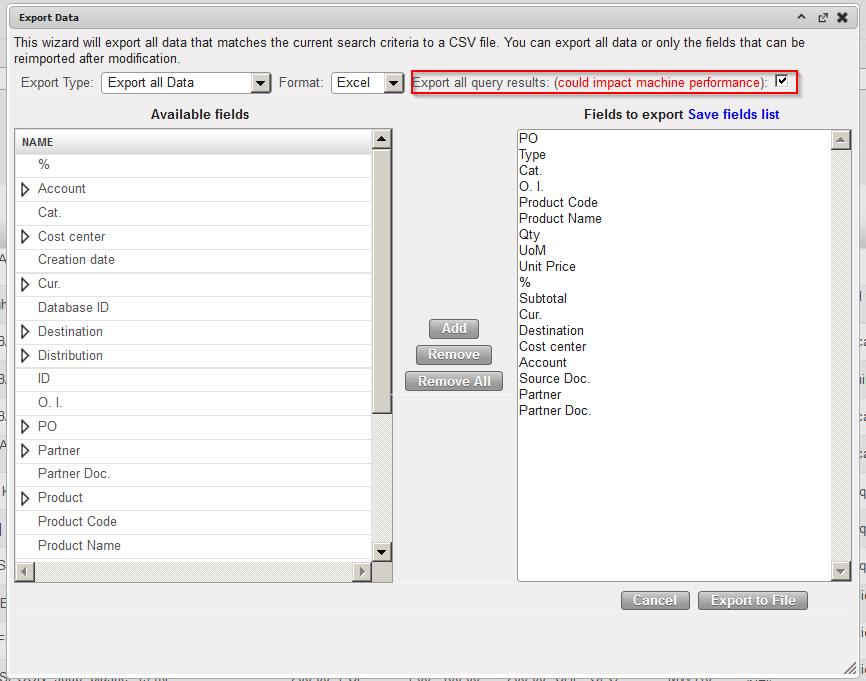
3. Click “Export” in the action menu and select what should be exported. Make sure the “Export all query results” is ticked.
PO lines allocation report – Export to Excel
4. Click “Export to file” to generate the file.
PO lines allocation report – Excel export
To generate a PO lines allocation report in PDF
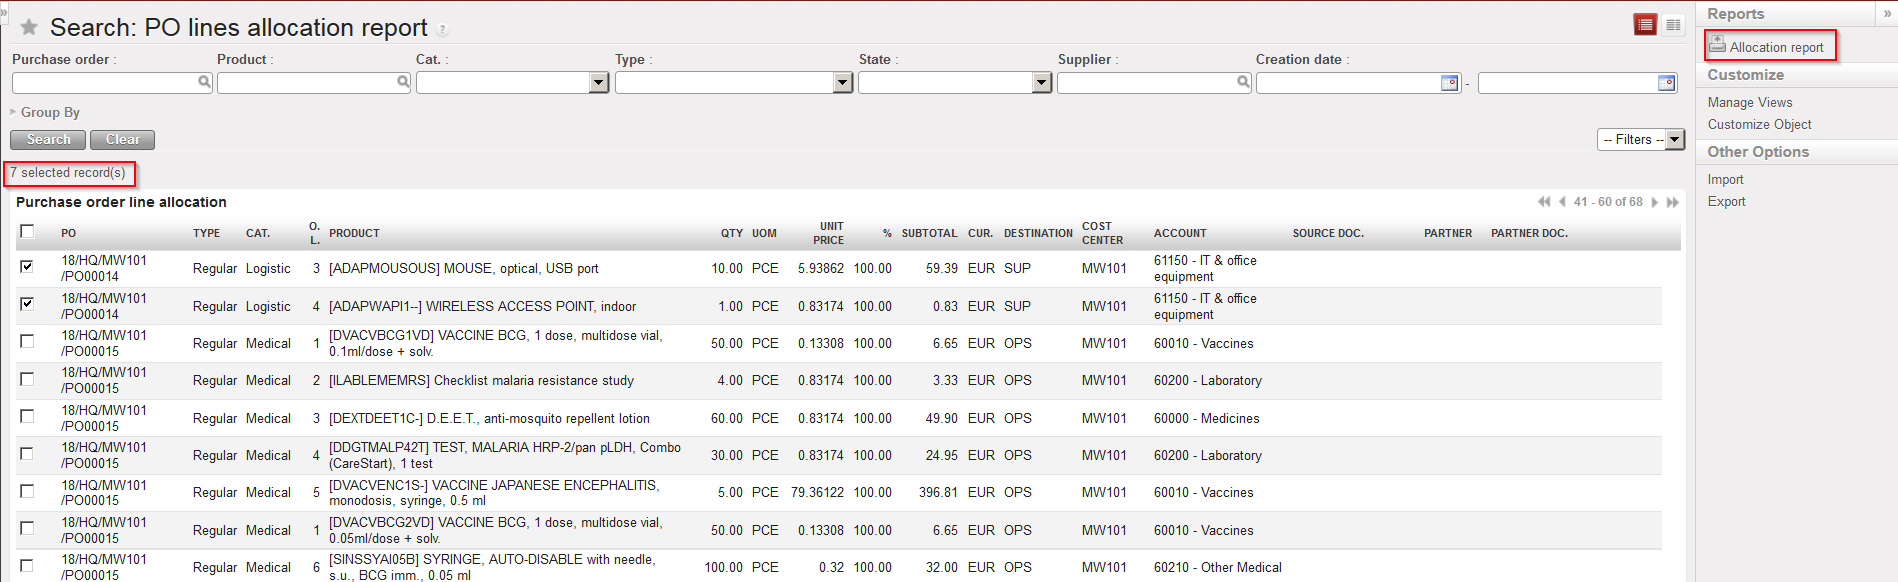
Go to:Purchases / Purchase management / Purchase Orders
Use the filters to restrict the orders selected if needed.
Click the check boxes located in front of the PO-lines you want to export in the PDF.
In the action menu on the right hand side, click on “Allocation report” (under Reports) to generate the file.
PO lines allocation report – Export to PDF
PO lines allocation report – PDF export
To see the global view of data of a purchase order lines allocation report:
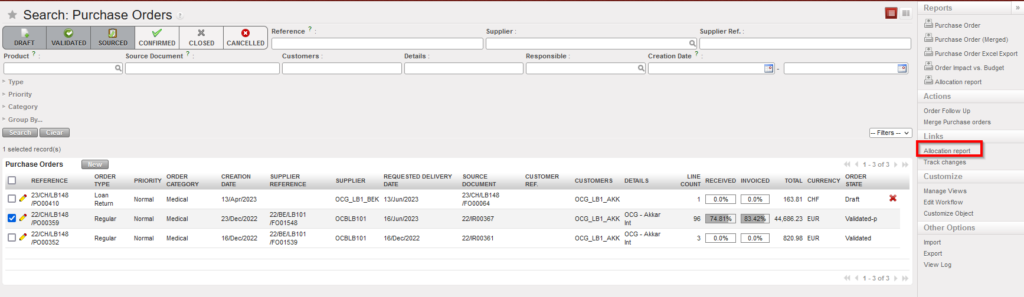
Go to:Purchases / Purchase management / Purchase Orders
Click the check box located in front of the PO you want to see the Allocation report of its lines .
In the action menu on the right hand side, click on “Allocation report” (under Links) to view the data.
Purchase Orders should be followed-up on a regular basis to ensure that procurement is done within the requested time limits and to avoid having any pending or “forgotten” orders.
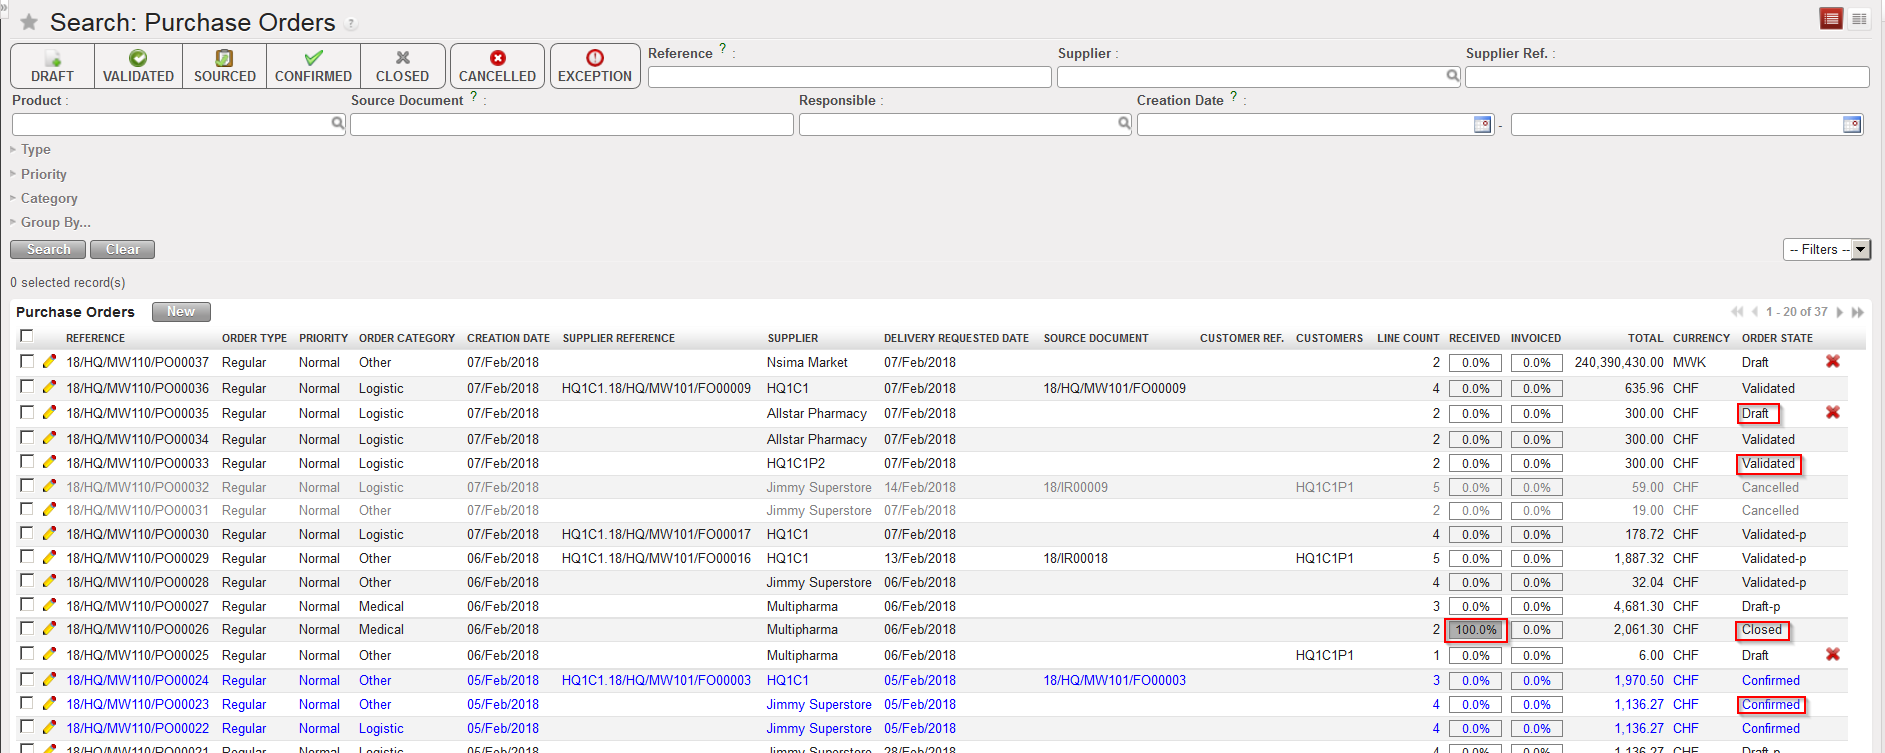
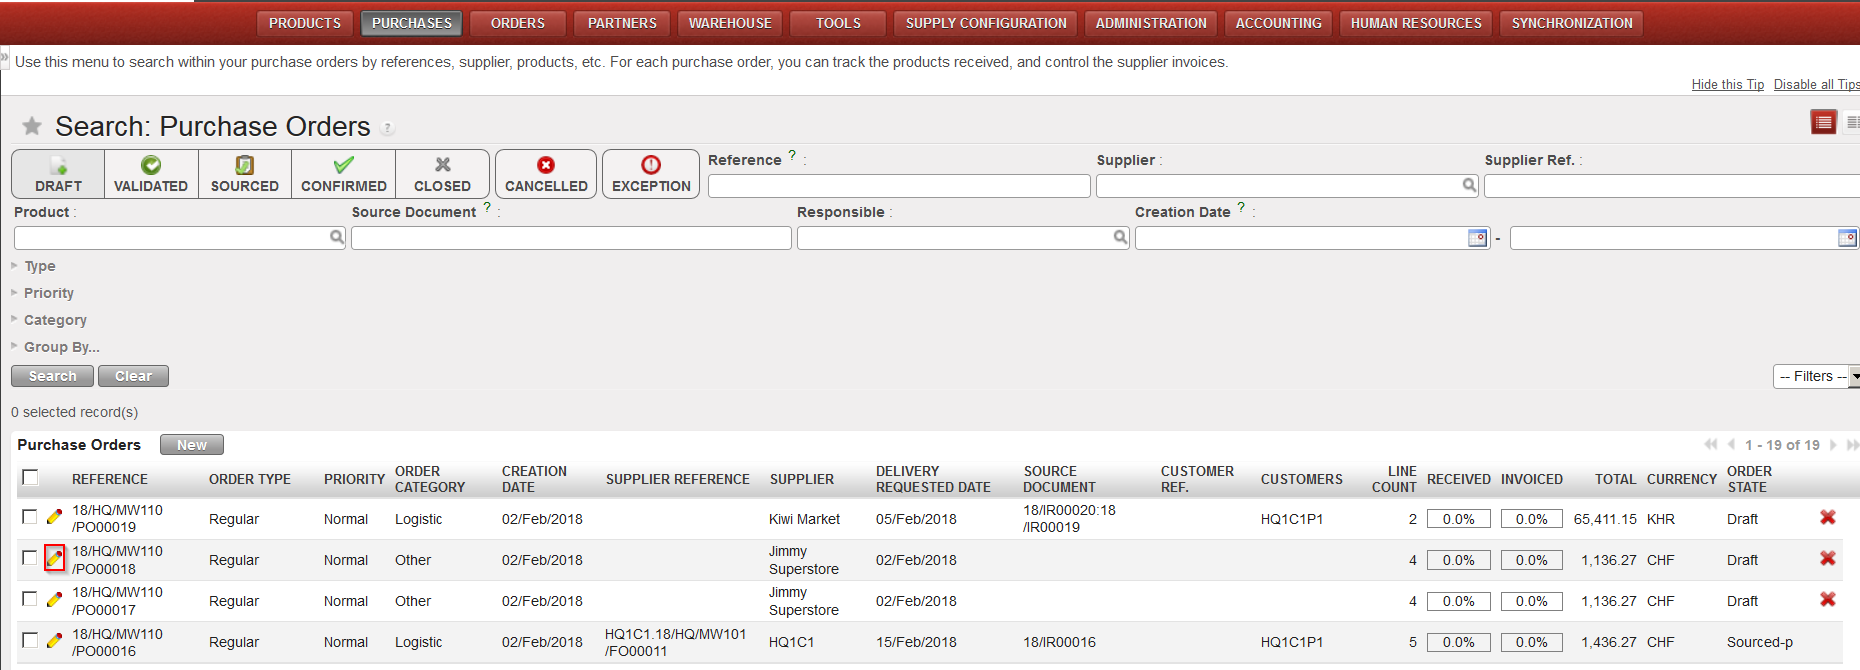
The Purchase Dashboard (accessible via a click on the “PURCHASES” button) and the general list view of POs, also called “Search: PurchaseOrders” screen (accessible via Purchases / Purchase Management / Purchase Orders) already give some basic information on POs: the state (“Closed” means that all items have been received), the percentage of reception, the percentage of the invoice paid, the customer reference, the number of lines,…
General list view of POs (“Search: Purchase Orders” screen)
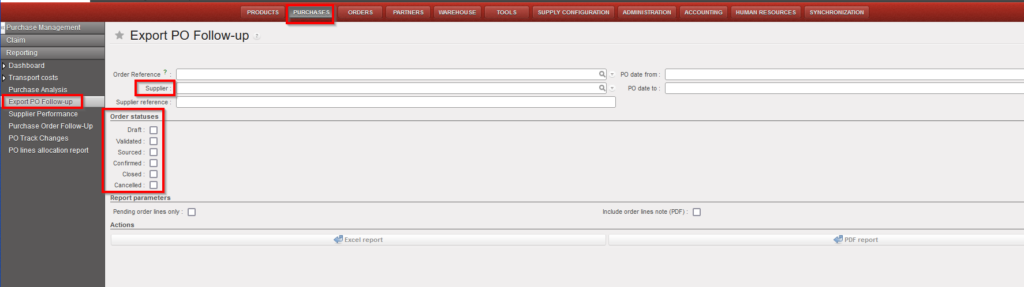
In addition to this information, the “Export PO Follow-up” gives additional information on POs.
Note that the functionality “Export PO Follow-up” should not be used as it is not maintained. In theory you should not be able to access this functionality.
Go to: Purchases / Reporting / Export PO Follow-up
Restrict the orders selection using selection criteria (filters) if needed.
Select the wished exported format (Excel or PDF).
Selection criteria of the Export PO Follow-up
3. Click on “Generate report“.
4. A file is generated by the system. This file allows to follow-up Purchase Orders.
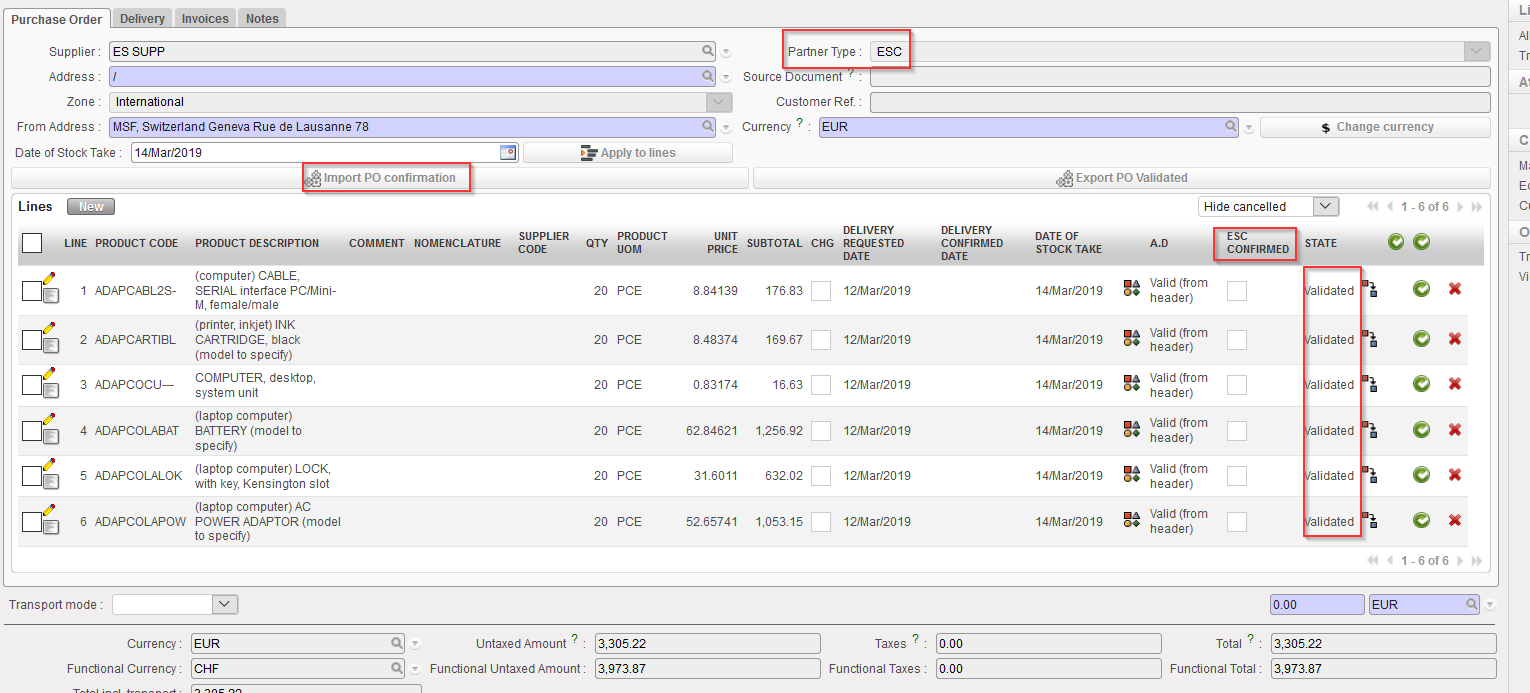
The import will be possible when the ESC will confirm (part of) the PO.
Go to:Purchases / Purchase Management / Purchase Orders
Open the Purchase Order that you wish to update via file VI file import.
Click on the “Import PO confirmation” button. Once again, this button will only appear if your PO is in the state “Validated” or “Validated-p” but not if your PO is “Draft“, “Draft-p” or “Confirmed” status.
Importing a PO confirmation via VI file
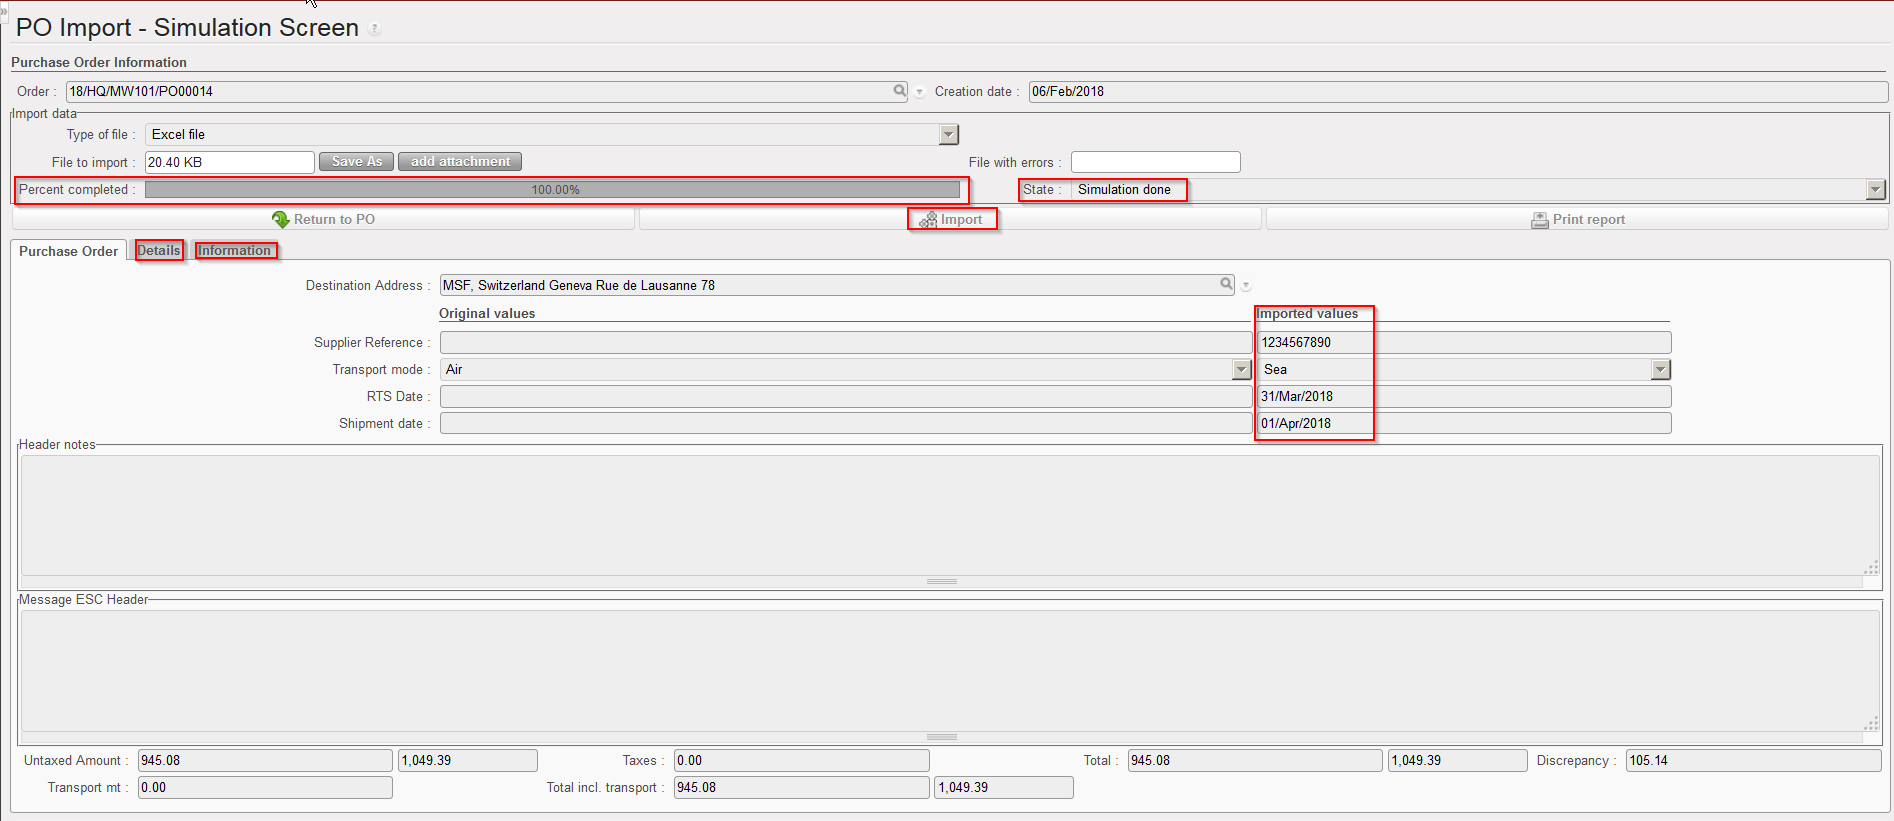
3. Select the “Type of file” corresponding to the one used by your ESC.
Importing a PO confirmation via VI file
4. Click on “add attachment“.
5. Click on “Browse” and select the file you want to import.
6. Click on “Simulate“.
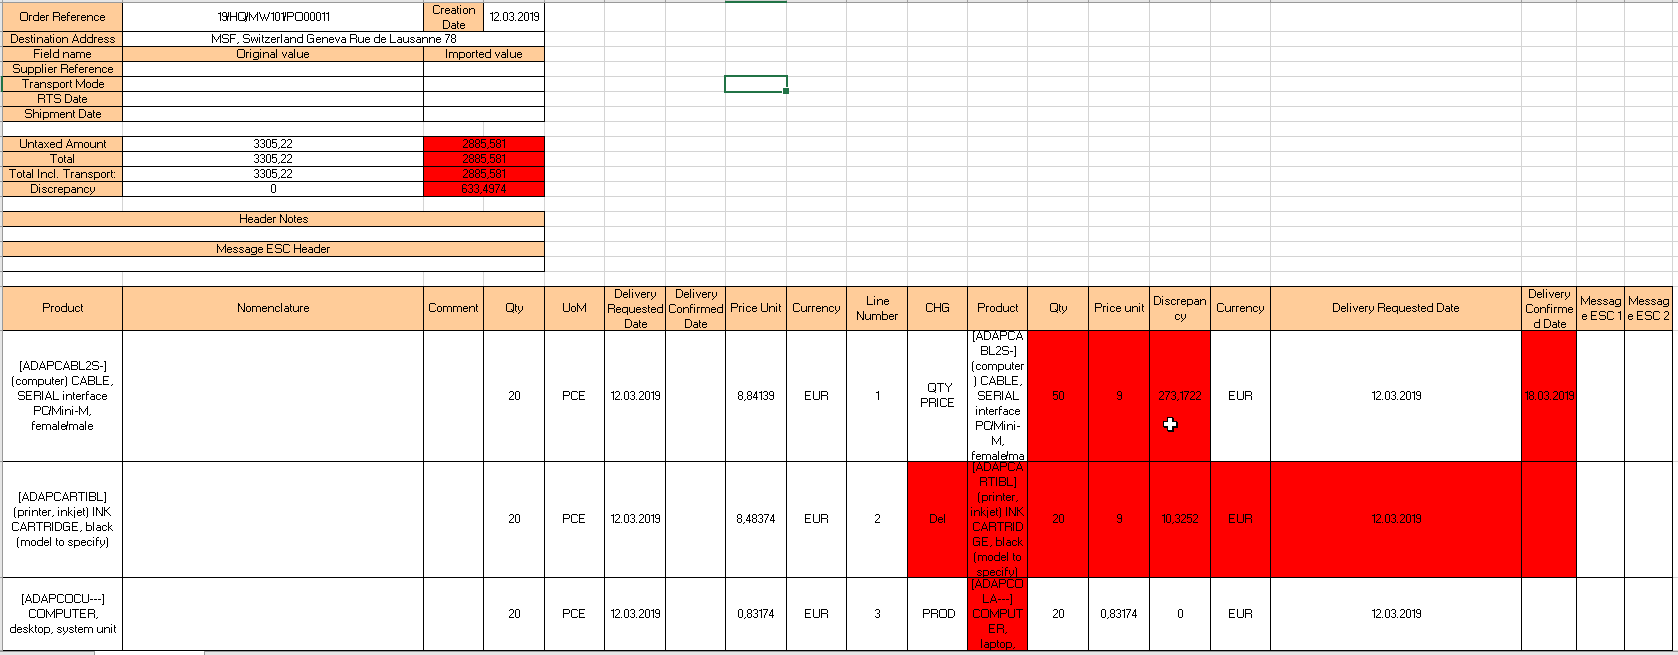
7. The simulation screen is showing how the PO will be updated if you confirm the import (via a click on “Import“).
VI PO import simulation screen
In the “Percent completed” field, you can check the progress of the importation (which can take long if you import a file with many lines).
The “Original values” show (some) of the current content of the PO header. The “Imported values” show the update which will be done on the PO header if you confirm the importation.
In the “State” field you can check the status of the import; it will indicate “Simulationdone” if the import has been successful, otherwise it will indicate “Error“. In this last case, you should check the “Information” tab to get more explanations on the issue.
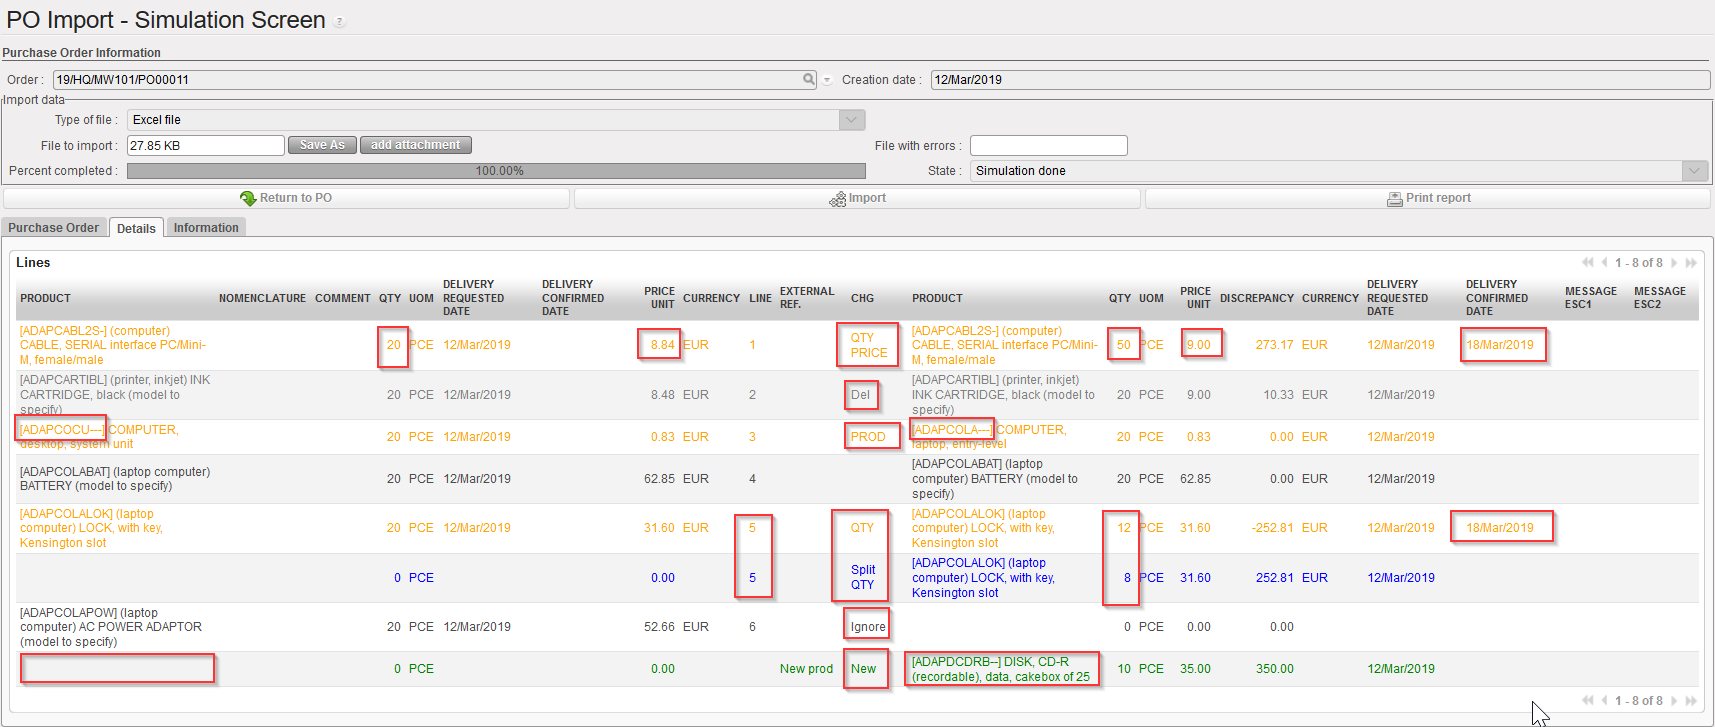
The information tab gives information of what has been uploaded on the simulation screen.
In order to check the results of the import simulation, you have 2 options:
i) Option 1: Click on the “Details” tab. All changes are highlighted in colors. On the left part of the screen, you see the original PO lines as they are currently in the system. On the right side of the screen, you see how the PO lines will look like if you confirm the importation.
Changes on prices, products or quantities highlighted in yellow (see lines1, and 3 in the print screen below).
Any line which does not change appears in black (see line 4 in the print screen below).
Any Split line will be highlighted in blue and will appear as “Split” in the “CHG” column” (see lines 5 in the print screen below, note that we have 2 lines 5).
Any cancelled line is highlighted in faded grey and will appear as “Del.” in the “CHG” column (see line 2 in the print screen below)
Any line which is not imported (i.e. not present in the import file from the ESC) but which is not deleted will appear in black with “Ignore” in the “CHG” column (see line 6 in the print screen below).
Any new line added by the VI import will be highlighted in green and will appear as “New” in the “CHG” column. New product lines must have a reference in the column “External Ref.” (see last line in print screen below). Also for sourced PO, the field “Origin” should be filled with a “Source document” reference otherwise a warning message will be displayed to complete this field manually.
Please note that Analytical Distribution can also be imported for new line (even though it is not mandatory).
7. Lines filled with “Delivery Confirmed Date” will update the “ESC Confirmed” checkbox in the PO screen
VI PO import simulation screen with all cases
ii) Option 2: Click on the “Print report” button available on the simulation screen. This will generate an Excel file highlighting all the changes in red cells. This file can be saved and kept for history purpose if needed.
Excel reported exported from the simulation screen
8. Click on “Import” to actually import the file and update the PO. Note that if you do not want to import the changes, you may click on “Return to PO” instead.
9. After import the system goes back to the PO main screen where the updates are visible.
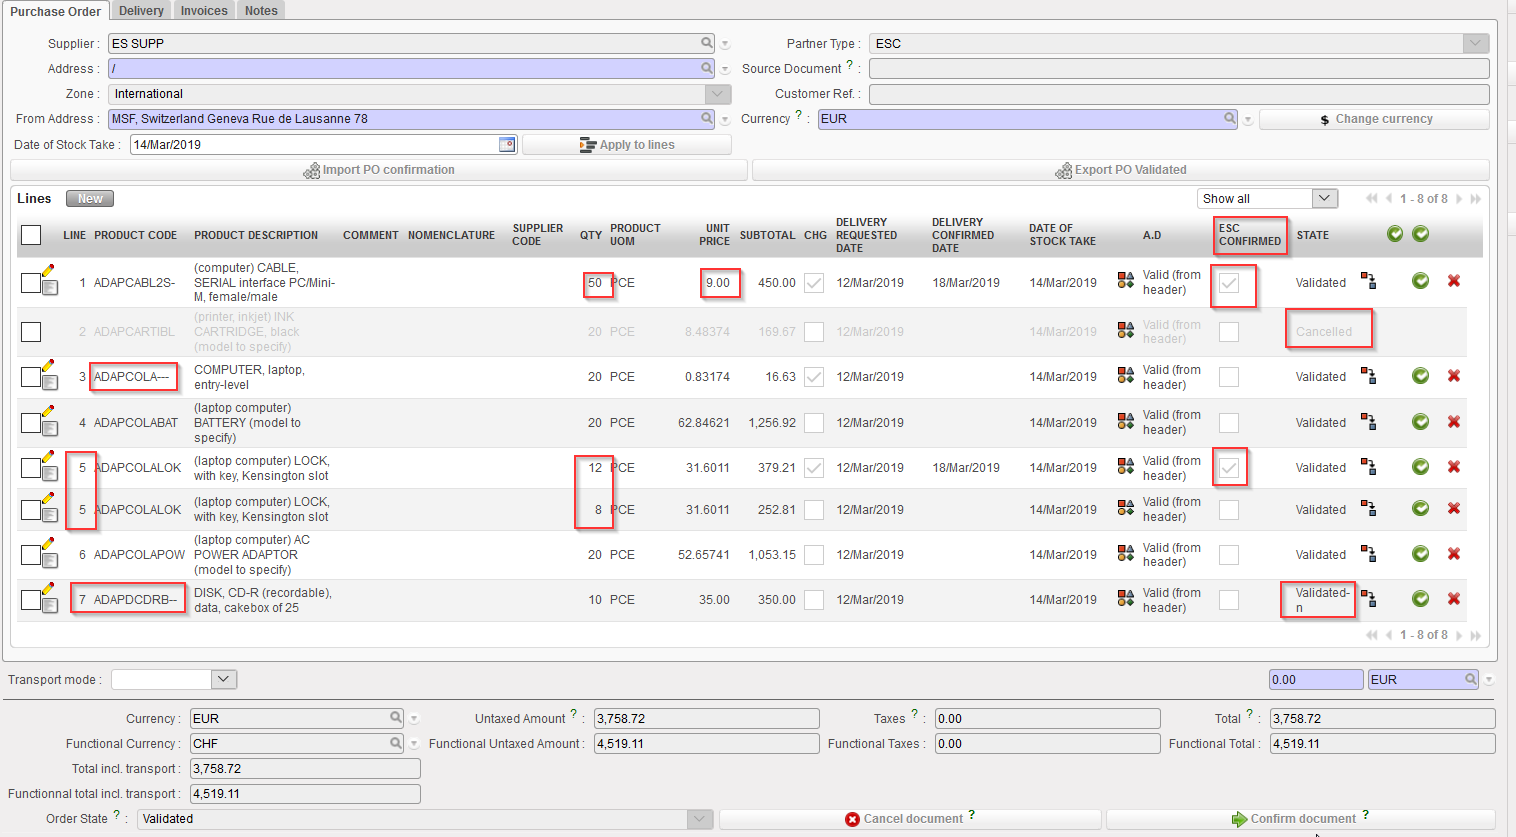
Split lines keep the same line number as the original line. Note that the status new lines following split is “Validated“. See lines 5 below.
New lines which have been added take a new line number (and their external reference is visible on the “Notes” tab of the PO-line). Note that the status of added lines is “Validated–n“. See line 7 below.
Lines Ignored at simulation are still in the original PO with no change. See line 4 below.
By default, cancelled lines do not appear on the updated PO (unless you change the filter to make them appear). Note the status of line 2.
Lines with populated “Delivery requested date” at import have the “ESC Confirmed” checkbox ticked. This checkbox is only available for PO with ESC supplier. Please note that for manual import any confirmation (line or document level) will have to be done manually. For automated import the “ESC Confirmed” checkbox will trigger the automatic confirmation of the line (if not “validated-n”).
PO after VI import
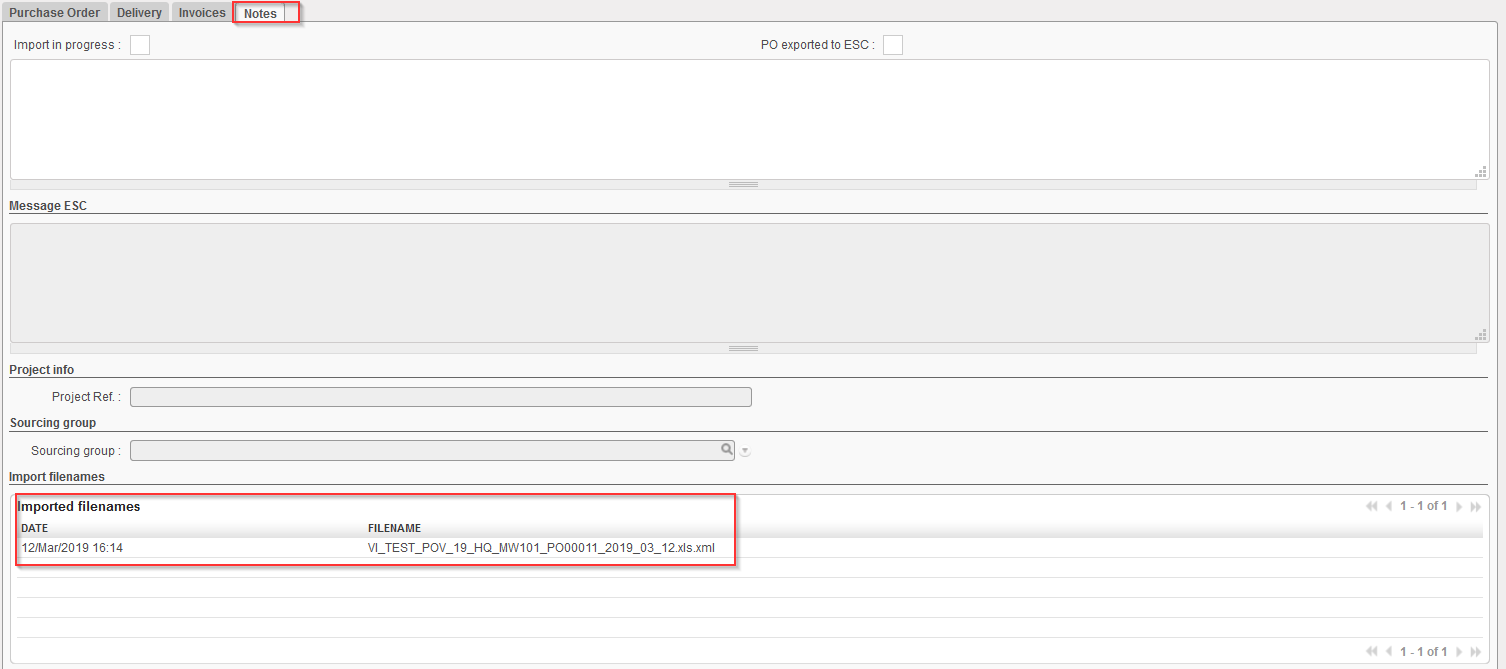
History of VI files imported on a PO can be seen on the tab “Notes” of the PO, under “imported filenames“.
History of imported VI file on a PO
Note that the actual confirmation of the PO or PO-line(s) should be done manually. However, for OCs where automated VI has been developed, confirmation can be done automatically after import confirmation.
Keep in mind that when a line has been ignored, it means that the ESC hasn’t confirmed it yet. Therefore, it is wise to ask the ESC whether some more updates are expected before confirming manually the PO at header level. Another option is to confirm the PO at line level, for the lines which have actually been confirmed by the ESC. You will be able to identify them thanks to the “ESC Confirmed” checkbox and you can use the drop down filter on the top right of the lines, to display the ESC Confirmed, ESC Unconfirmed and default show All lines.
ESC Confirmed lines filter
A deleted line from the import file will cancel any line with the same line number; meaning that if the line has been split before, the whole product line will be cancelled.
When import file adds new lines or splits or updates existing lines, system crosschecks any existing line number and also any external ref. on the line and against lines already existing in the UF PO, . This also means that split lines which keep the same line number can have different External References applied to assist specific split to be identified and if necessary further updated.
From this point you have the option to confirm the Purchase Order at header level or at line level. Remember that the PO-lines you wish to confirm should always have a delivery confirmed date and the “ESC Confirmed” checkbox ticked.
A Purchase Order may need to be updated, if the products, quantities, prices, supplier or any other information has changed after the PO has been created. Please note, if a PO-line has been validated and then synchronized to a supplier instance, it should not be changed after this at the point of origin. Similarly, once a PO-line has been confirmed by the supplier, any change on products, quantity, price,… should be made at the point of reception, not on a confirmed PO-line.
Purchase orders which have been addressed to an internal partner will usually be updated automatically via synchronization, when the supplier (internal partner) will update the corresponding FO.
You will often update manually Purchase Orders addressed to external partners (or ESC). After validation, the PO will be sent to the supplier. The supplier should then send you his order confirmation which should include correct prices, correct product codes, correct quantities, confirmed delivery date,… The PO should then be updated with this information before confirmation in the system.
If details of what needs to be ordered change significantly after confirmation, a new PO should be created, and the original PO should be cancelled (after communication with the supplier and when agreement has been reached on these cancellation terms).
PO sent to ESC can be updated (after validation, upon reception of the order confirmation from the ESC) via vertical integration. See specific paragraph on vertical integration in PO specifics.
Go to: Purchases / Purchase Management / Purchase Orders
Select the Purchase Order to be updated by clicking on the pencil at the left of the appropriate row
Make the appropriate changes
Change the supplier, enter the confirmed delivery date or update any information in the header of the order if needed.
Change a product, a quantity or a unit price if needed. (note that a change of quantity can impact a price change when in Draft and product is linked to a supplier catalogue)
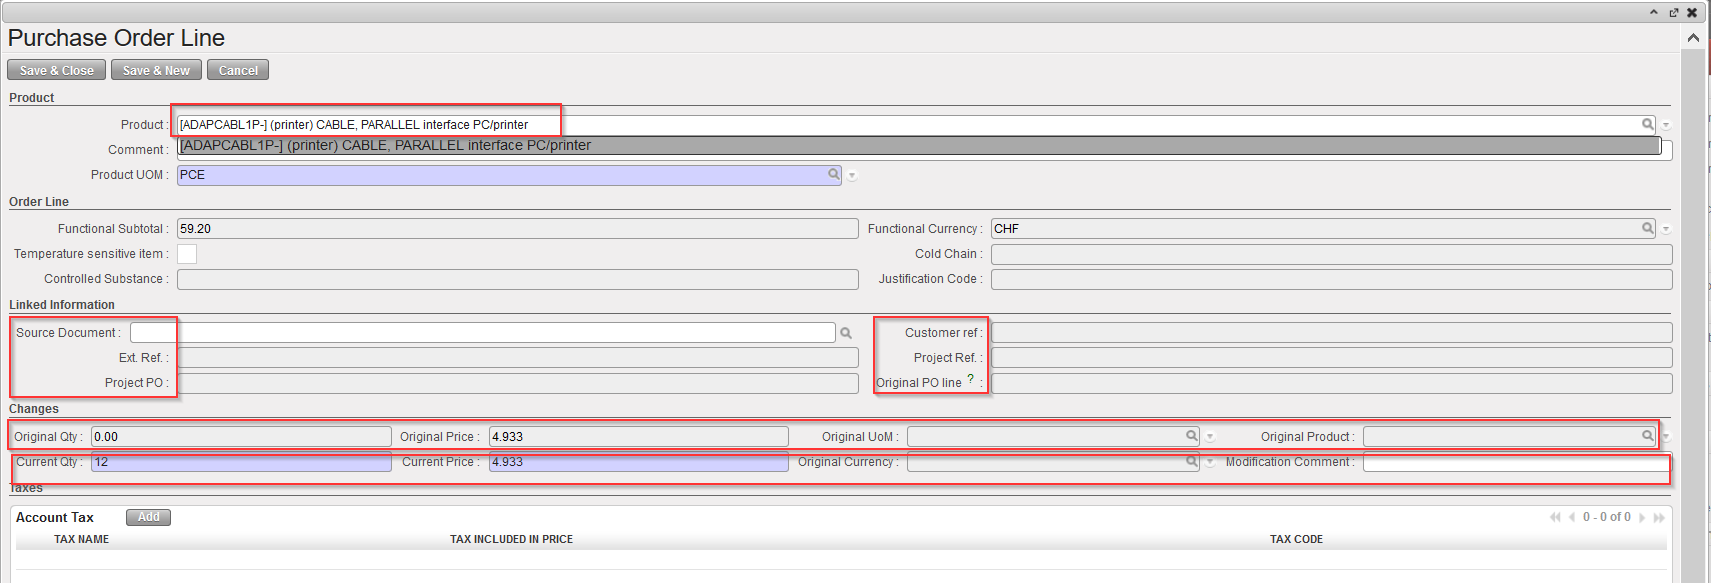
Please note that there are now 2 options to “Edit” a PO product line: user can either click the pencil icon to update product directly on line or use the sheet icon which will open a product line pop up with a bit more information.
Updating a Purchase Order
Among the additional information that can be found on the pop up are the one regarding the change, “CHG”, checkbox. This feature enables to track any change done on the PO line by comparing “current value” vs “original value” (Qty,Price,UoM or Product).
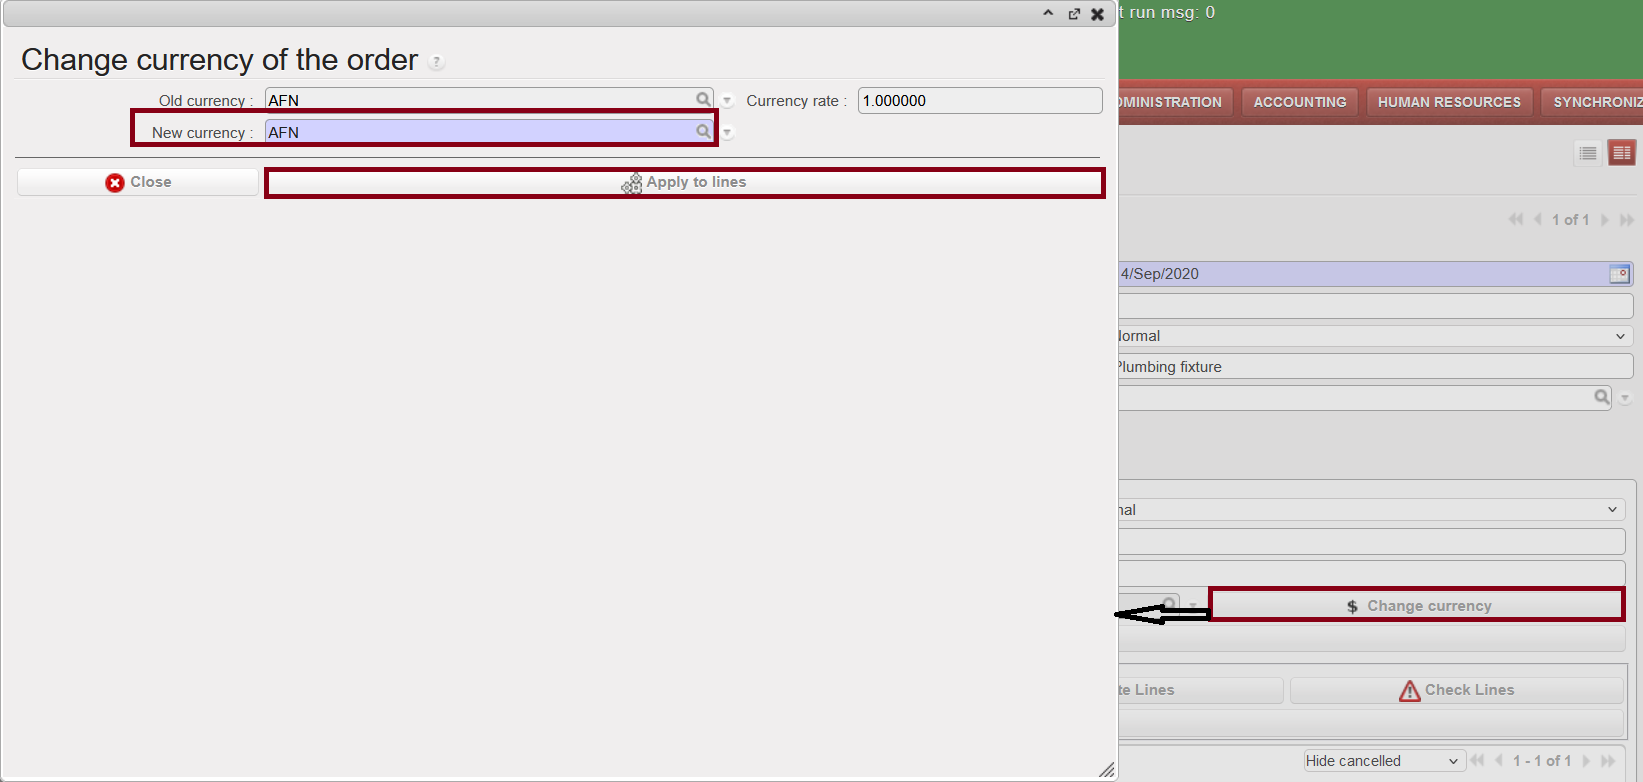
Optional to update currency if needed as below:
Updating a Purchase Order
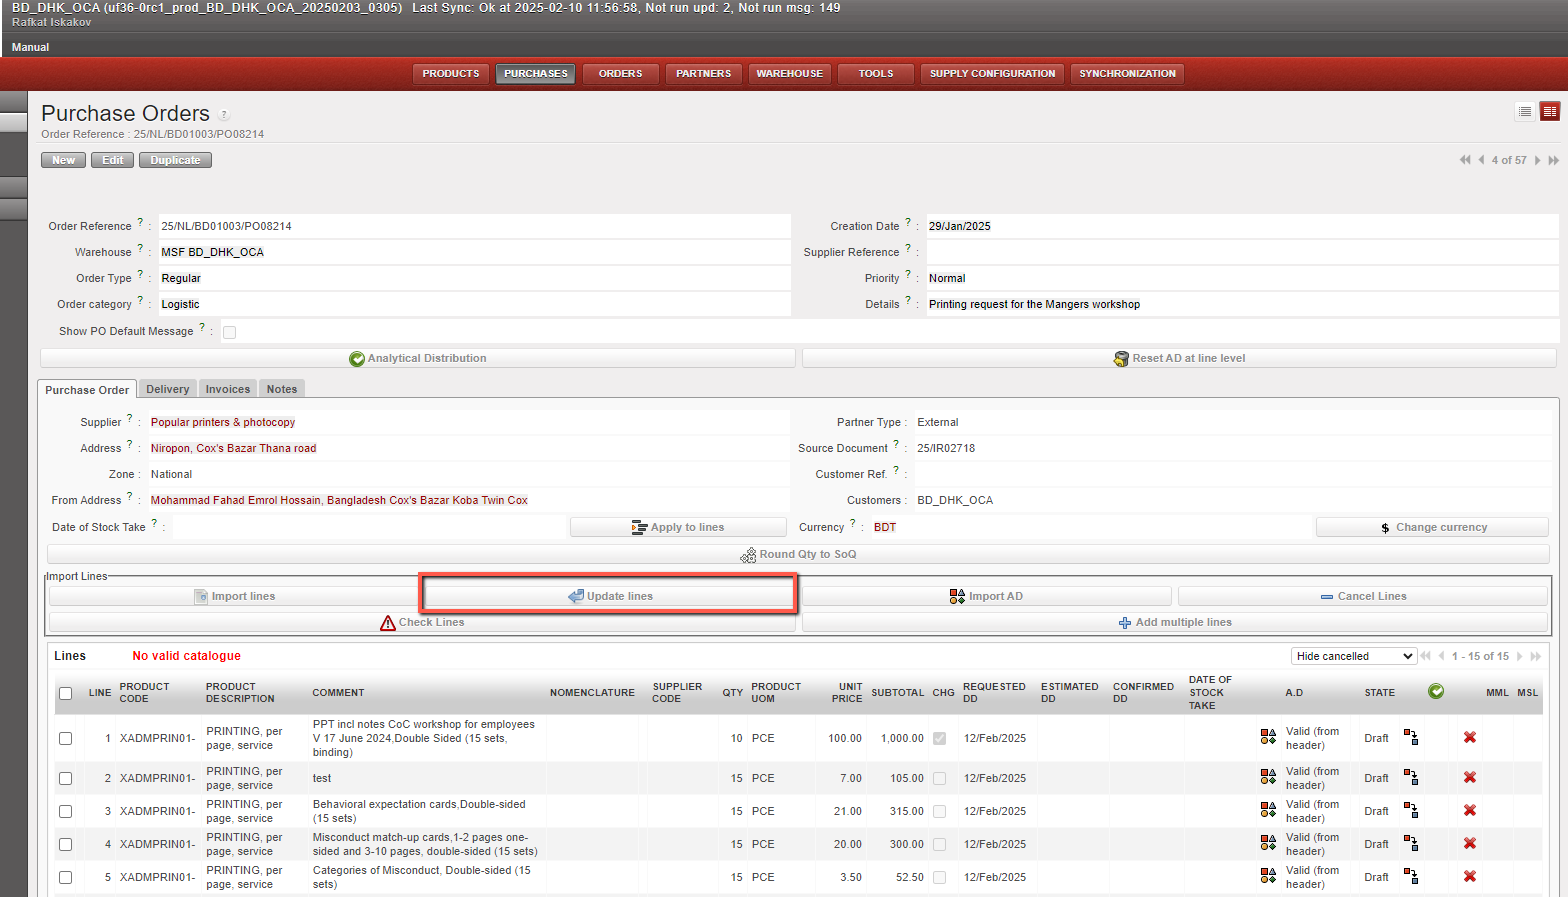
PO can be updated by Using Import functionality.
Button, “Update Line,” allows users to update the price, quantity, and comments of a line via import. The “Update Line” functionality is available in Draft (-p) status for all supplier types (Internal, External, ESC, IM, and IS). Import can also be performed in Validated (-p) status, but only if the supplier is External. Lines updated via import must correspond to respective statuses.
If a line item is Confirmed, Canceled, Closed, or Validated (for ESC, Internal, IS, and IM partners), the import will ignore that line. If any lines are ignored, UniField provides a clear message explaining which lines were not updated and why.
A user can use the “Update Line” function multiple times while the PO is in Draft (-p) status (or, in specific cases, in Validated (-p) status for external suppliers).
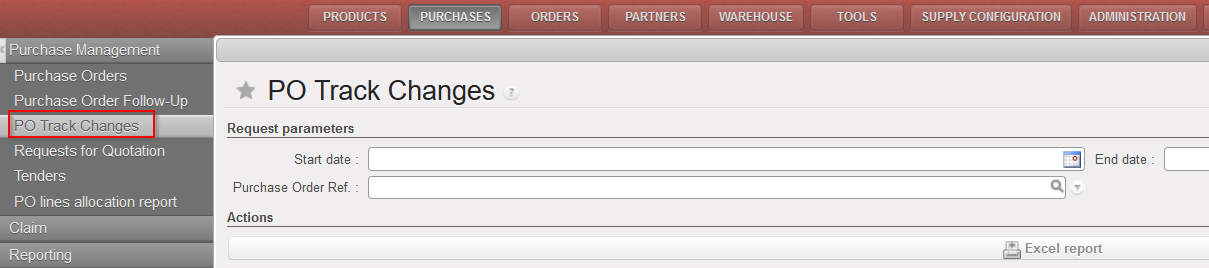
It is also possible to track the changes of Pos by using the report under “Purchases> Purchase Management > PO Track Changes“
PO Track changes
PO Track changes -Excel export
Cancel a whole order line if needed by clicking on the red cross on the right side of the appropriate order line.
Adding a new line (only for “Draft” or “Validated” PO): addition of a new line to a sourced PO will require to fill the “Source document” field at line level with a non-Confirmed, non-Closed nor Cancelled IR/FO (of regular Order Type). If the Source document reference is different from the one existing at PO header, then the new reference will be added as well a the “Source document” header level.
3. Click the “Save” button on the top of the screen.
Updating a Purchase Order
Please note:
It is important that the most recent (updated) version of your PO is printed and signed before it is validated in the system – please refer to your OC guidelines.
It is not possible to add lines in requesting instance once a synchronized PO is validated, any change must be in the supplier instance.
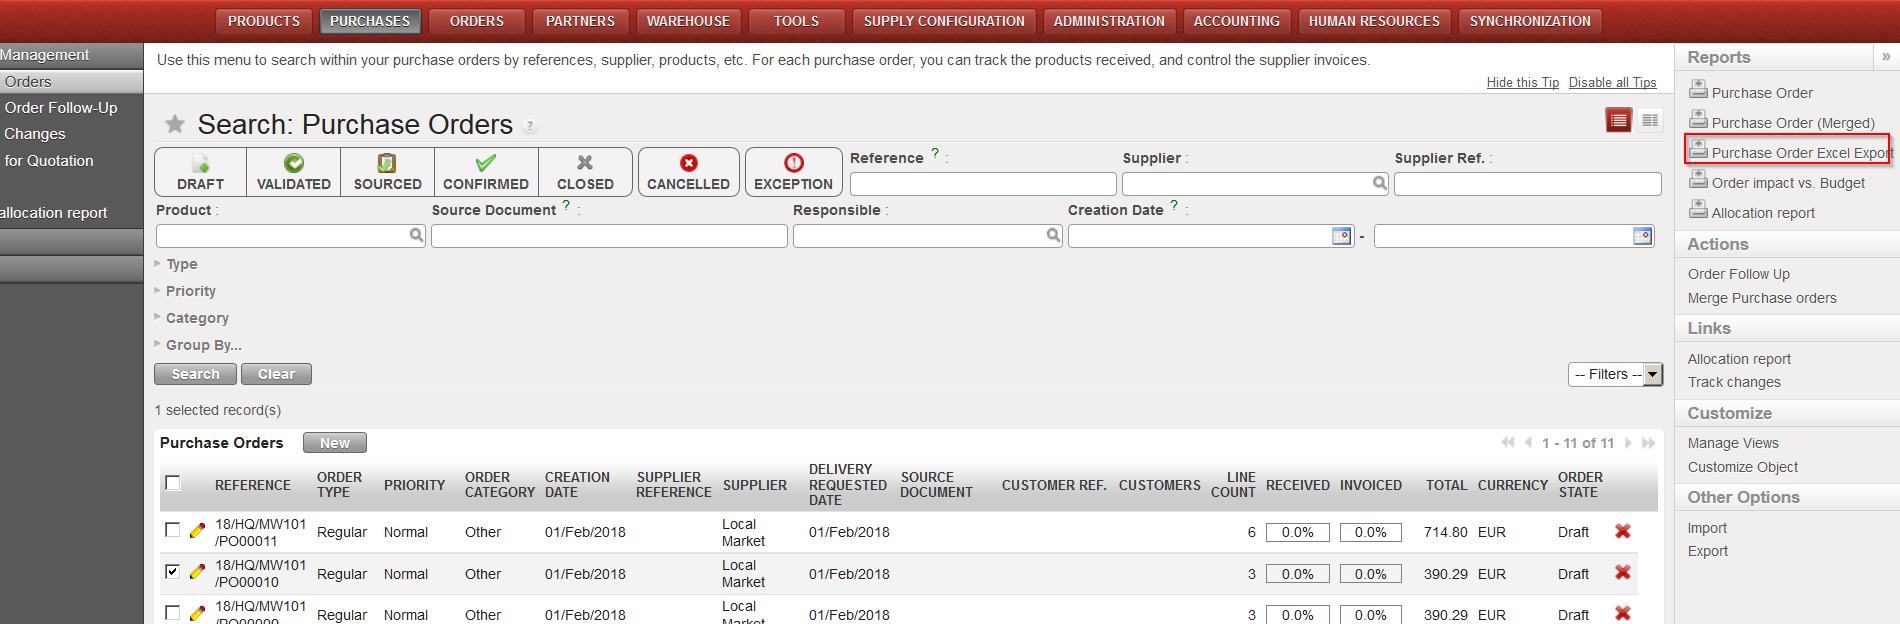
A PO can be exported to Excel (XML 2003 format) or to PDF
Go to:Purchases / Purchase Management / Purchase Orders
Click on the check box at the left of the line of the Purchase Order to export.
The Action Menu is displayed to the right of the screen.
Click on the “Purchase Order Excel Export” option.
The PO will be exported to Excel (in a similar format than the one used to import lines).
Export a PO to Excel
PO Exported to Excel
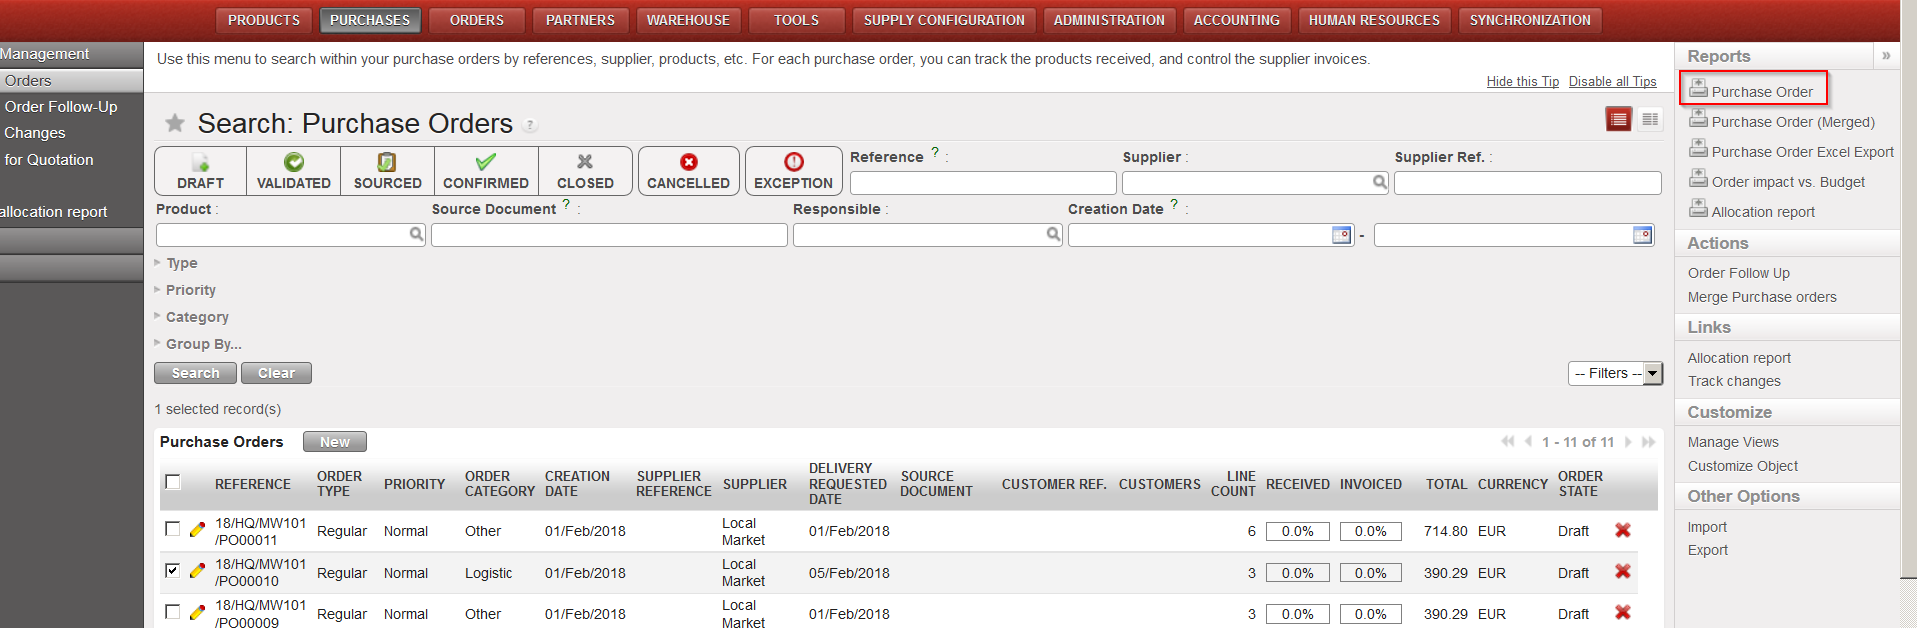
If you need to create a PDF version of a PO for validation purpose, select “Purchase Order” in the action menu, under “Reports“.
Export a PO to PDF
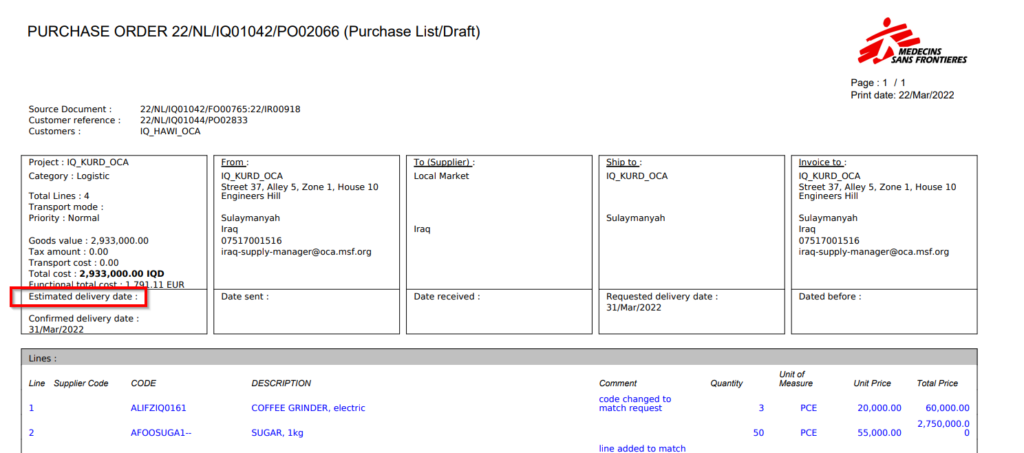
PO in PDF
Note 1: You have the possibility to export several POs to Excel in one click. You just need to select several POs via the check boxes on the “Search: Purchase Orders” screen and click “Purchase order Excel Export” in the action menu. You will have an Excel file containing several sheets with 1 PO per Excel sheet. Note that the export to PDF of several POs in one click is not possible (not working).
Note 2: The export to Excel and PDF is also possible from within the PO as the options “Purchase order Excel Export” and “Purchase Order” are also available in the action menu. If the export is done from within the PO, only one PO is exported.
Note 3: On the Excel, the comment included on the “Nomenclature Selection” tab of the PO-line will appear in the column “Comment“. Note that the notes included in the “Notes” tab of the PO-line column are not exported to excel.
Note 4: On the PDF, at header level, the notes included on the “Notes” tab of the PO will appear. Note that the “Details” field does not appear. Still on the PDF, at line level, the “Comment” included on each PO- line will appear. This is particularly useful for “products by nomenclature” lines. Note that the notes included on the “Notes” tab of the PO-line do not appear on the PDF.
If a default customized message is configure and “Show PO default message” is ticket, a default message will be displayed at the bottom of the “Notes” frame (seeLUSU3401 Procurement Advanced Features -J.How to configure a PO customized default text)
Note 5: Cancelled lines of the PO are not displayed in the PDF print out
A Purchase Order can be created from scratch (i.e. not by the OST). This is the scenario that we are introducing here.
Go to: Purchases / Purchase Management / Purchase Orders
1.Click on the “New” button.
2. Complete the header of the PO (Order Type, Order category, Priority, Details).The “Show PO Default Message” can be ticked only in Draft or Validated mode. If ticked a default message will be displayed on the PO PDF print out (see details to configure this message in LUSU3401 Procurement Advanced Features -J.How to configure a PO customized default text)
3. Enter a supplier on the “Purchase Order” tab. This can be done by typing directly in the “Supplier” field or by using the magnifying glass next to this field. The Address, Partner Type, Zone and Currency are automatically populated from the partner master data form. Note that for Internal Partner, currency cannot be changed manually once partner selected.
Purchase order header
Supplier selection
If the PO was created by the OST:
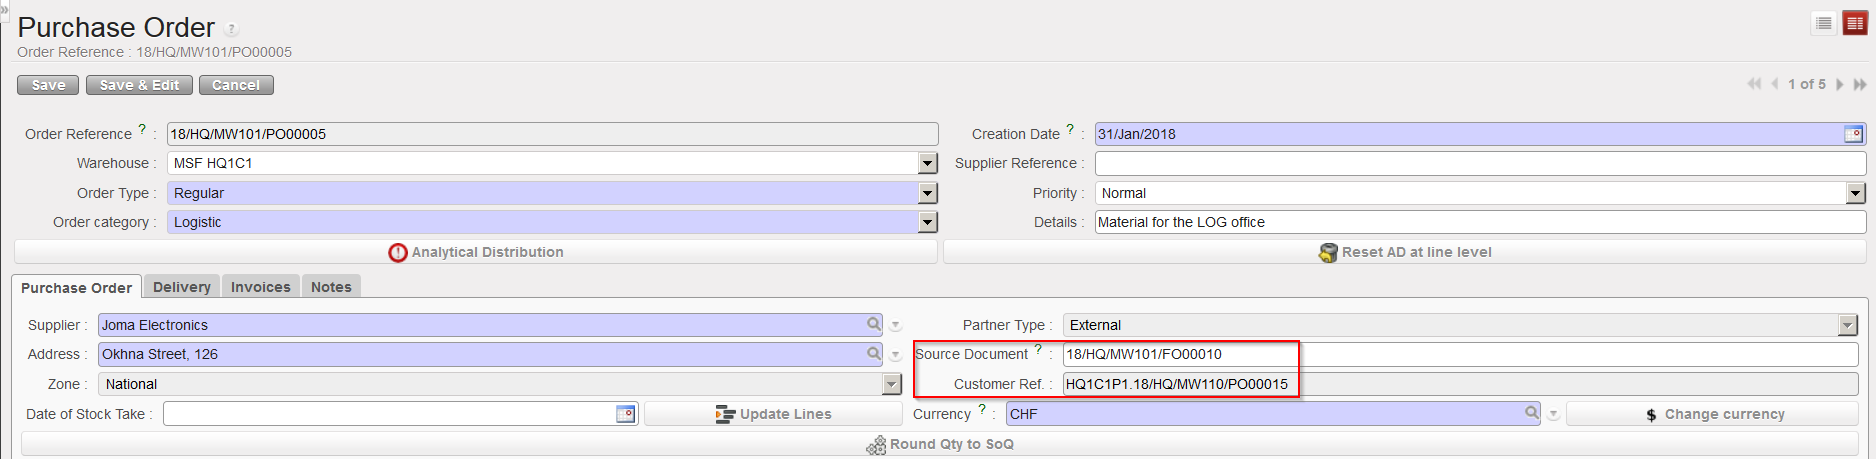
The “Source Document” will indicate the reference of the order that has been sourced (automatically populated when PO created by OST.
The Destination location at line level will be pulled from the destination in the IR or FO (Input, Crossdocking, Service, Non Stockable)
The “Customer Ref.” will indicate the reference of the document originating from the requesting instance (auto populated when PO created by OST via pulled-FO sourcing).
The “Details” will be pulled from the info filled in the source documents (IRs, FOs).
PO created by OST, after sourcing of FO which was created by synchronization
4. On the “PurchaseOrder” tab, click on the “New” button located on top of the “Lines” table to enter a product line manually. Note that you may also insert several lines in a few clicks if you use the “Addmultiplelines” button or import a file via the “Importlinesbutton“.
a) “New” button: enter (part of) the product’s code or (part of) the description in the “Product” field or click on the magnifying glass icon to open the “Search Products” screen. Search the product using the filters such as the description or by the nomenclature.
b) “Add multiple lines” button: click “Add” on the “Add multiple products” pop up screen and search for the products you want to add on the “Search Products” screen. Use the relevant filters: Nomenclature, Description, Code, Lists, Catalogues,… Select the products you need by ticking the box at the beginning of the product line and click on “Select“. Once you have all your products click on the button “Add products” on the “Add multiple products” pop up.
3 options to insert product lines on a PO
5) If you have selected the “New” option (to add product lines one by one on the PO), on the Purchase Order product Line , enter a product, a quantity and adjust the unit price if needed. Note that “Quantity” and “Unit Price” can not exceed a certain number of digits (but still quite large numbers are allowed and a warning message will be displayed in case you reach that maximal capacity).
Inserting a line on a PO
Note that the fields “Supplier Code” and “QTY” seemed to be merged, however only the “Qty” should be entered.
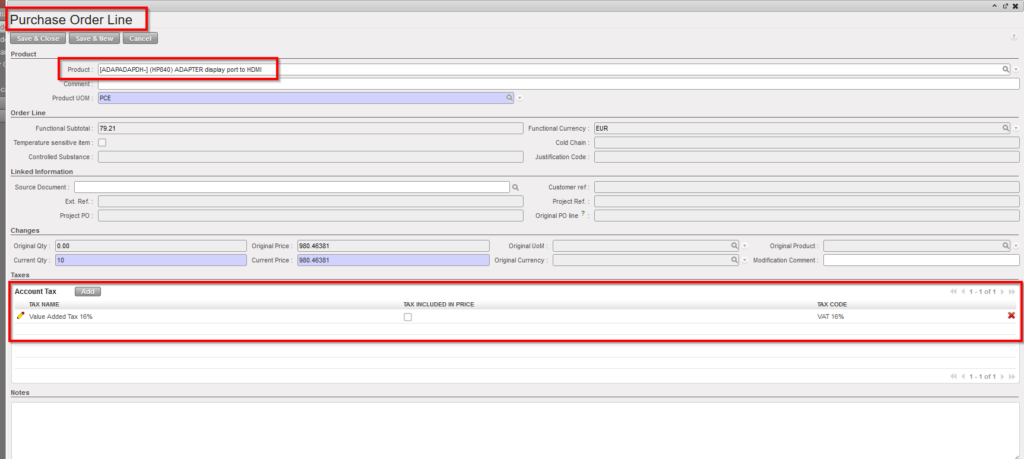
If Taxes needs to be added for any particular line, you can add them when the line pop-up is open, in the “Account Tax” section, see below explanation for adding Taxes for the whole document/all lines.
Add Tax on Line level
6) Click on the floppy disk if you want to save your line and enter another one.
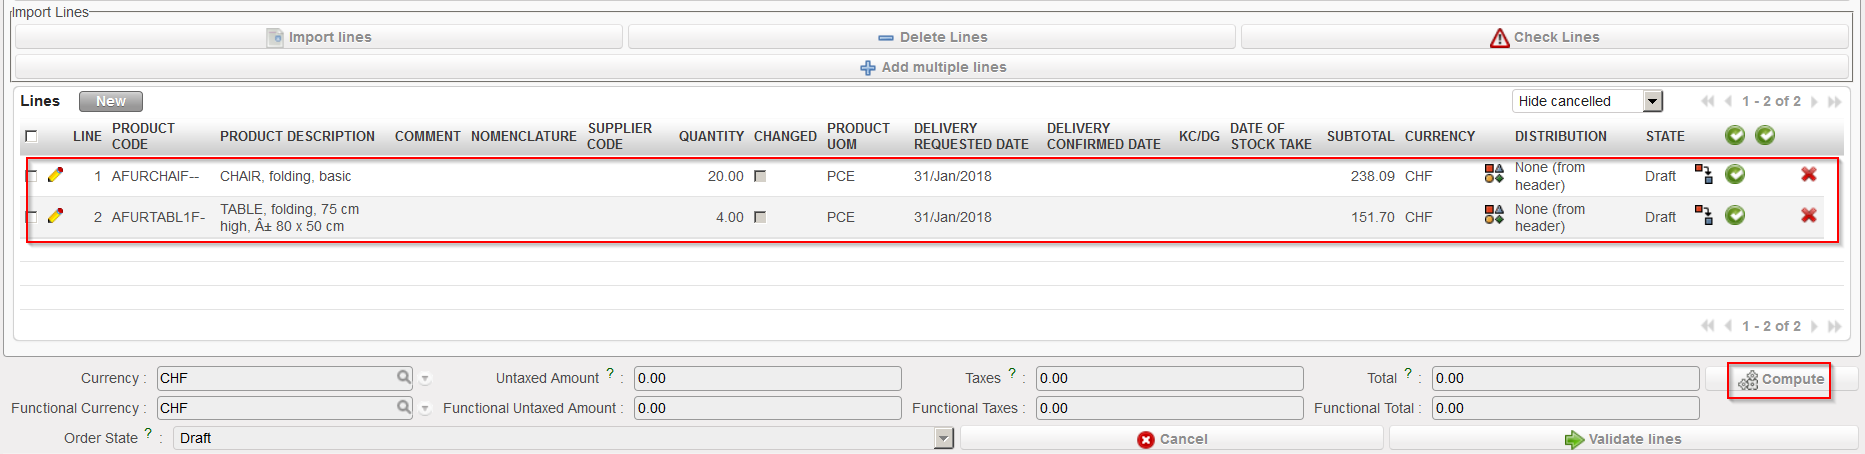
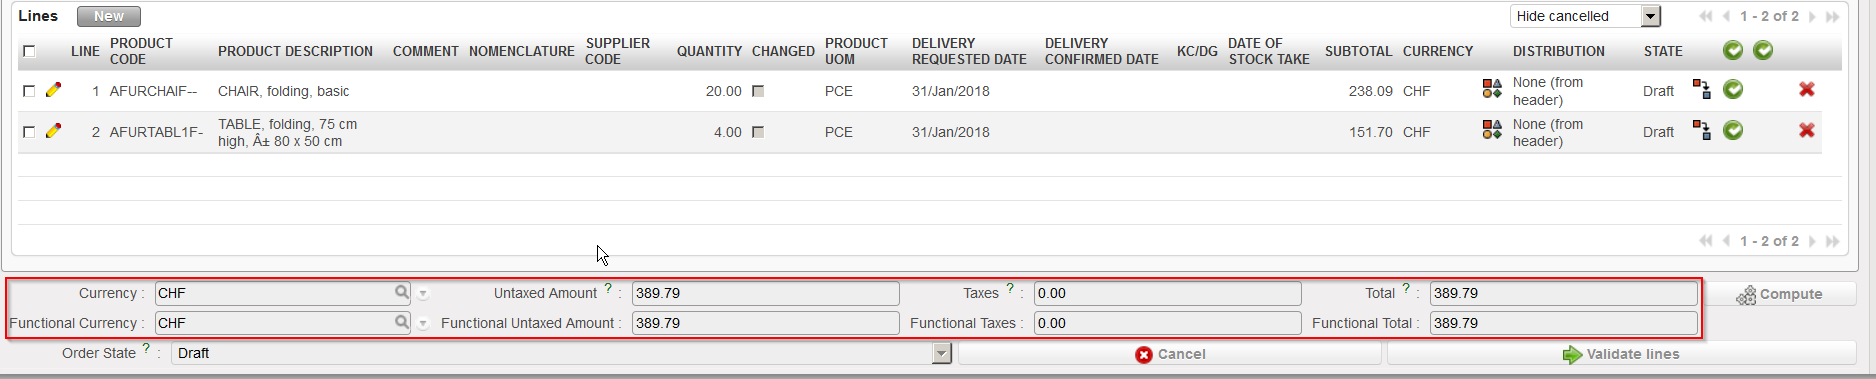
7) Click on “Compute” if you want to update the total fields.
PO lines inserted on PO, click “Compute“
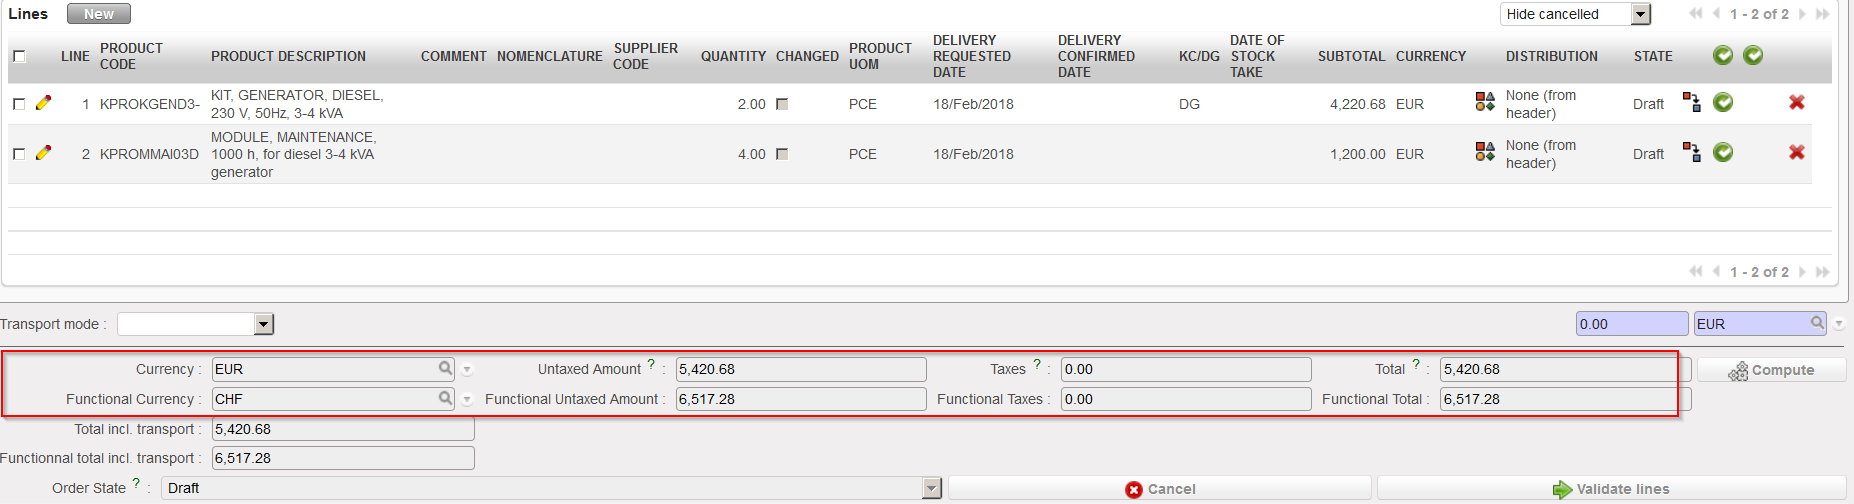
The total costs related to the PO have been recomputed. Note that total costs always appear in the currency of your supplier and in the currency of your OC (also called functional currency).
Total costs updated – supplier currency and functional currency are the same
Total costs updated – supplier currency and functional currency are not the same
On the “Delivery” tab, you may include information such as the requested delivery date or the transport mode. Please note that the Delivery Requested Date can also be populated at line level and can be updated from the header to all lines using the « Apply to lines » button.
PO – “Delivery” tab
Please note that in order to facilitate the management of pipeline there are now 2 DRD. The pipeline used to be taken into account when PO line was confirmed and now it is done at after line validation. The first DRD is active until the PO lines are validated. After this the second DRD field “Delivery Requested Date (modified)” becomes active and can be used to push the RDD value down to the lines.
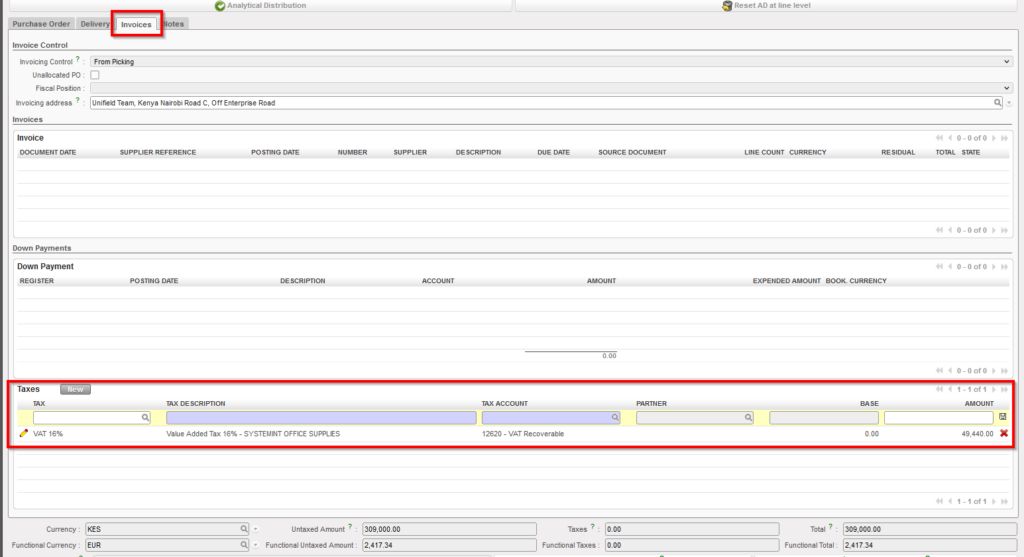
The “invoice” tab will be used to store financial (payment) information, and to add “Taxes” to the whole document/all lines for POs to external partners only. (ESC POs cannot have taxes applied).
In the “Taxes” section, you can add one or more types of taxes, and any type of added tax will be applied to all lines of the PO.
PO – “Invoices” tab – “Taxes” sectionAdd Tax line
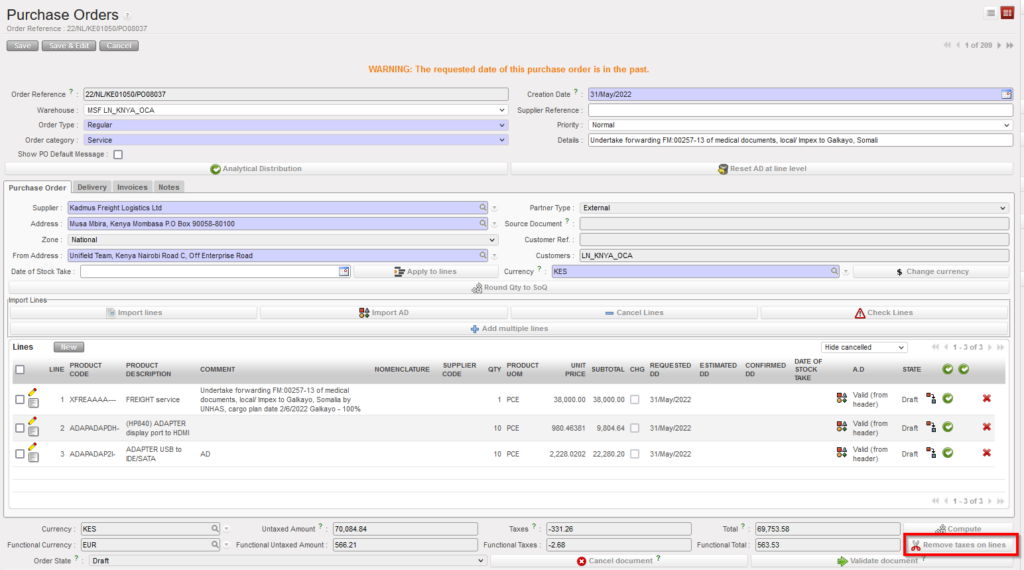
You can add/cancel the “Taxes” on whole document or on line level while the PO status “Draft” or ‘Validated“, Deletion of taxes can be done via red “X” or for line level taxes via the button “Remove taxes on lines”
To consider below points:
Adding tax line or removing will affect in the total amount of PO.
SI Tax corner is populated from PO Tax box.
After adding or removing taxes, “Compute” button should be used to insure the totals fields are up to date.
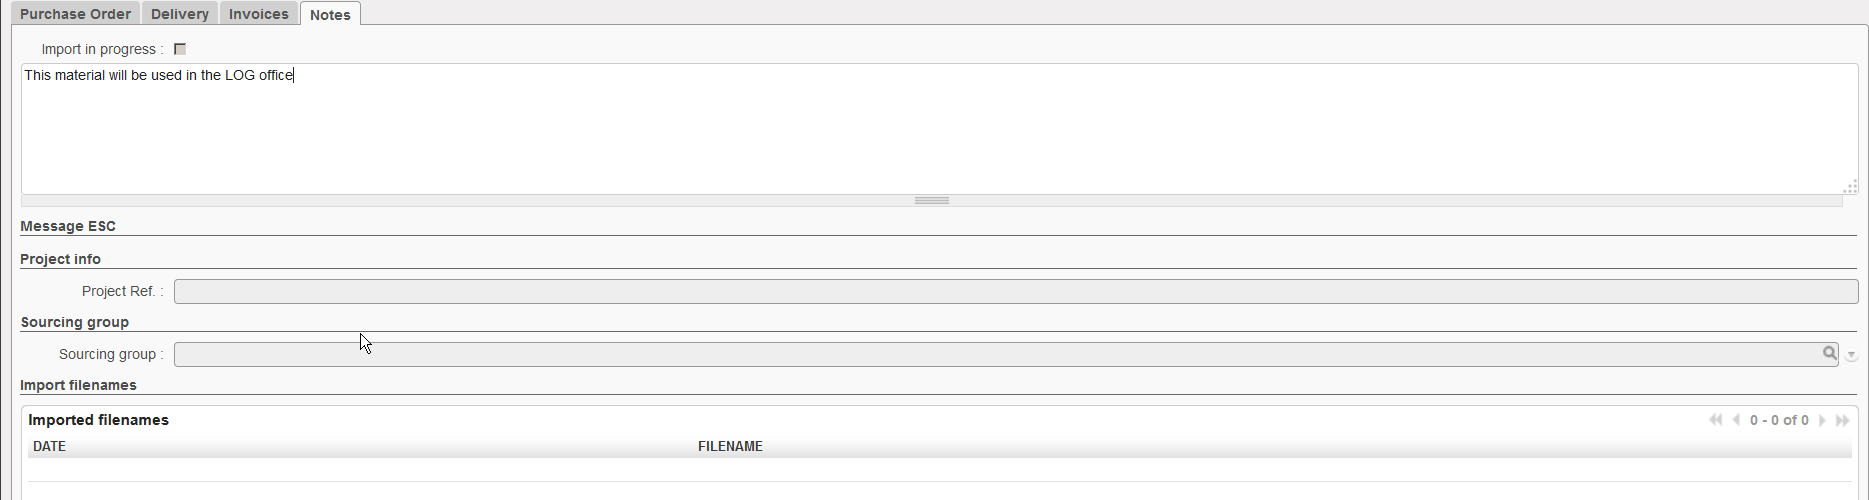
You may use the “Notes” tab if you want to insert additional information about the PO.
PO – “Notes” tab
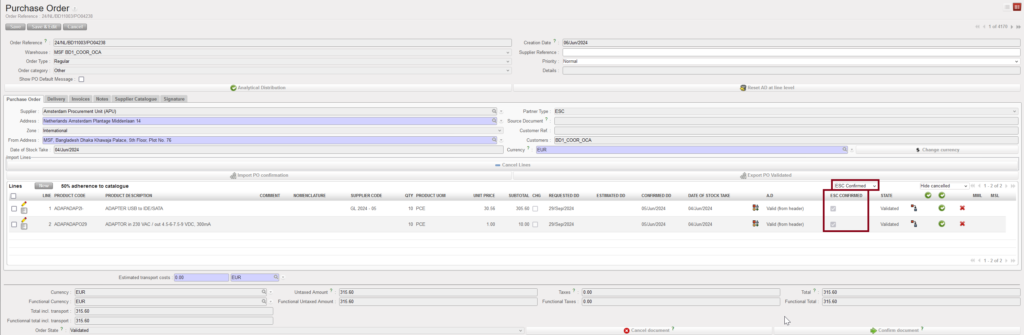
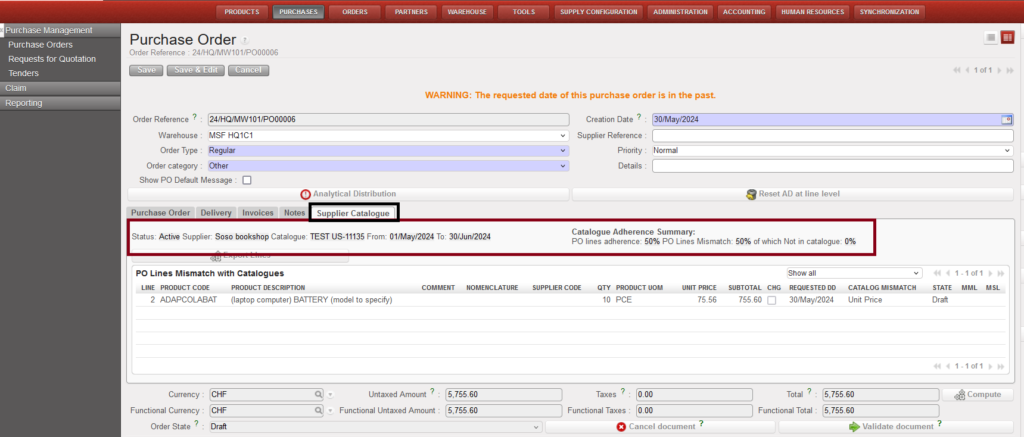
On the “Supplier Catalogue” tab, when the PO’s supplier has valid and confirmed catalogue, you will have immediate information about the conformity of the PO lines with the supplier catalogue, in the case that there are lines which do not conform (so adherence is less than 100%), adherence for lines which do not match and lines (Products) which do not exist in the catalogue will be displayed in this tab, as well as information for each of the lines which has a mismatch, and the reason for the mismatch (Unit price / Order Qty).
PO – Supplier Catalogue tab.
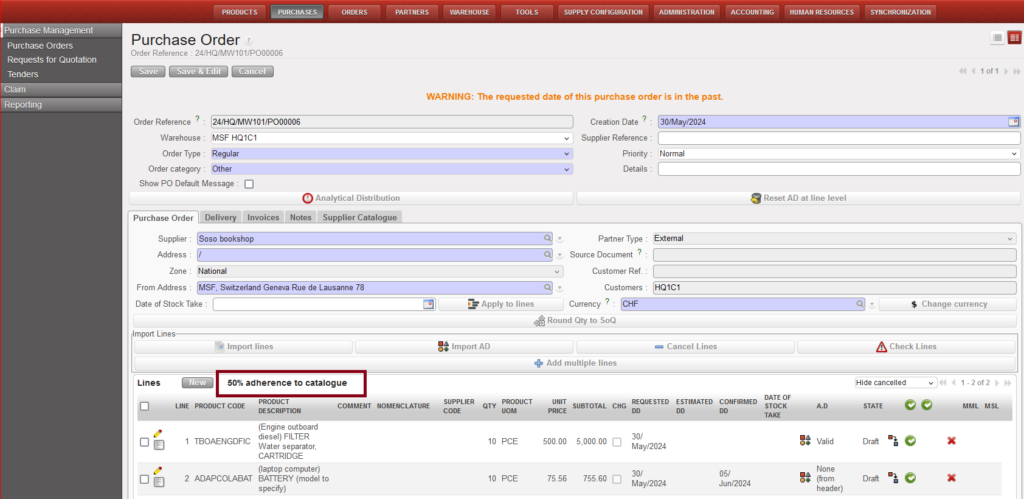
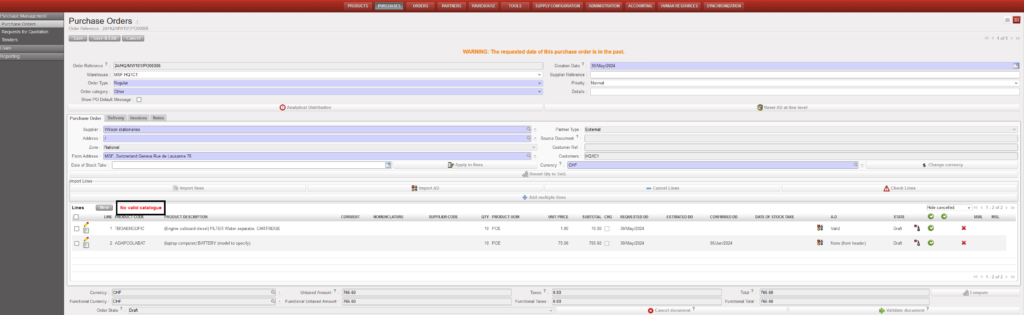
the percentage of the adherence lines to catalogue will be shown in the first tab “Purchase Order” on the top of the Lines section, if PO’s supplier doesn’t have valid/confirmed catalogue, “No valid catalogue” will be displayed.
The Percentage of the adherence lines to catalogue in the first tab “Purchase Order”PO Supplier with no valid Catalogue
The adherence information on the PO is automatically refreshed (rechecked) each time the PO is viewed or the new tab is clicked on.
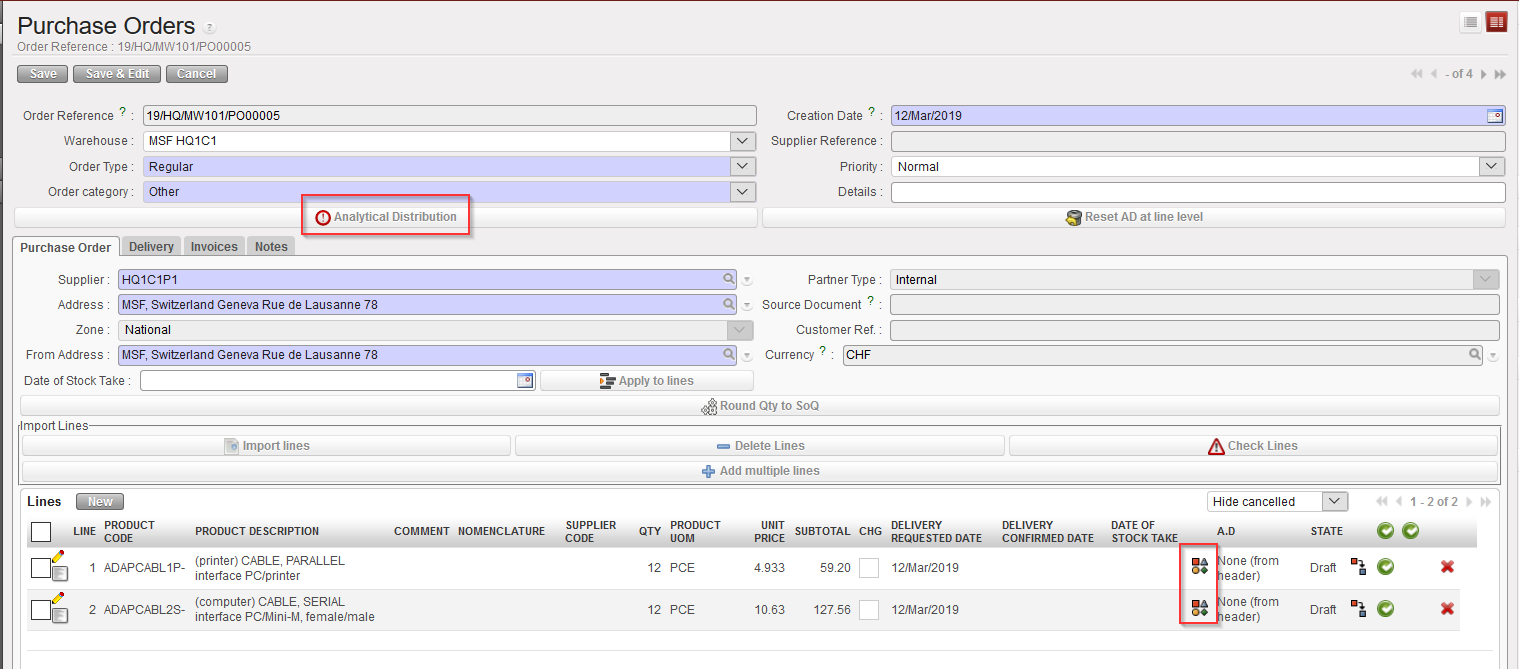
8. Add the analytical distribution
In the header if all lines have the same analytical distribution.
At line level if the AD is different according to the line, click the icon.
Entering the Analytical Distribution on a PO
9. Save the PO by clicking on the “Save” button at the top of the screen.
10. The PO should be printed and signed for approval by the person responsible as per OC procedures. It can be printed by clicking on “Purchase Order” in the action menu.
Purchase Orders will usually be automatically created in “Draft” status through the Orders Sourcing Tool when the purchase will follow an expression of a need (through an Internal Request for example).
A Draft PO can also be automatically generated by the Replenishment Rules functionality (see Replenishment Rules LU in the Warehouse chapter).
However, a Purchase Order might also be created manually (from scratch) to replenish the stock or depending on the OC procedures.
Please note: A PO will be printed in the language specified in the Supplier master data form.
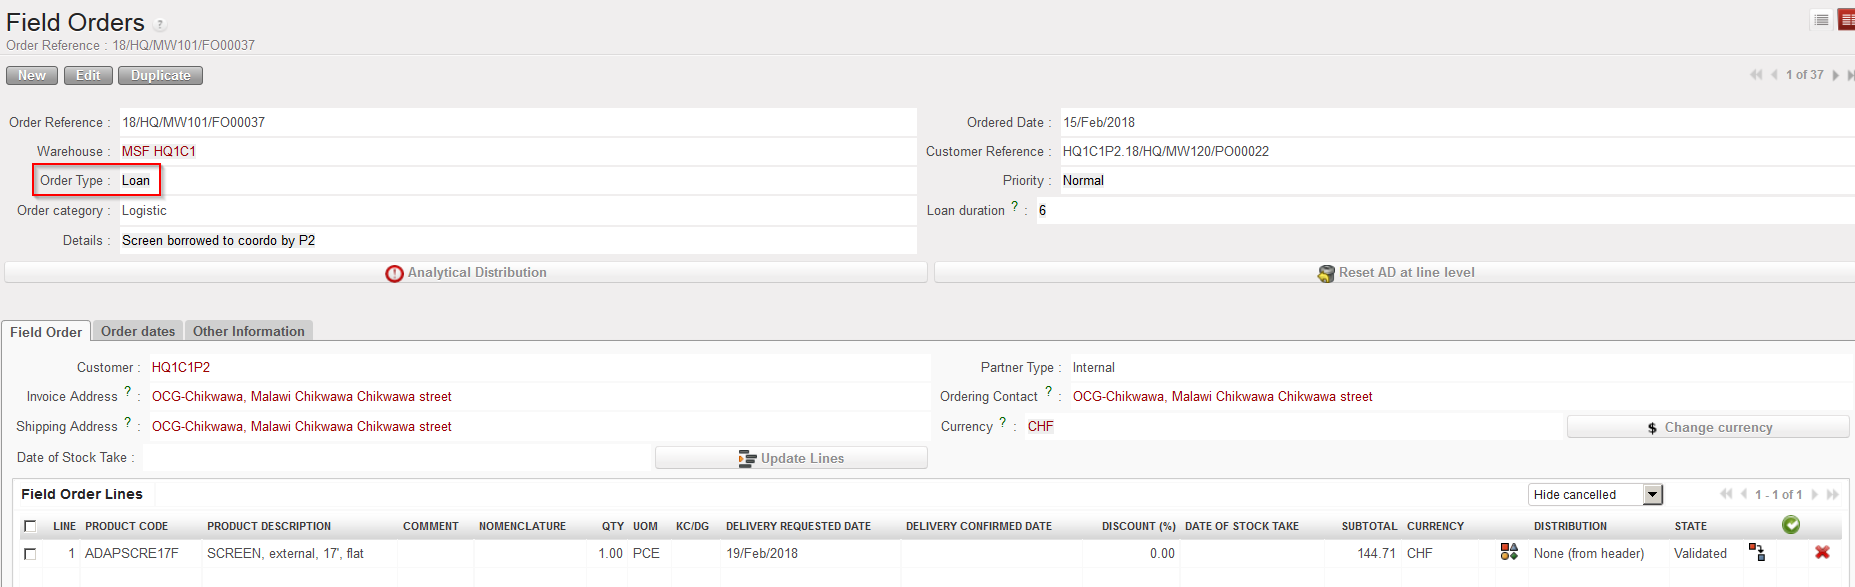
When an instance needs to borrow stock from another instance (e.g. to cover a shortfall while more stock is ordered, or to fulfill a temporary need), the requesting (borrowing) instance creates a “Loan” Purchase Order. Like other standard POs, when validated and synchronized, this PO will create an FO on the supplying (lending) instance. However, to act as a reminder to both sides, the system will also create a “Loan” PO on the side of the lender, to express their need to have the product returned by the agreed date, and the corresponding “Loan” FO will be created on the borrower’s side.
To learn more about How to create a Purchase Order for receiving a loan, see LU-SU3202 PO SPECIFICS.
Go to: Orders / Orders / Field Orders (we assume that the “Loan” FO has been created by the synchronization)
Enter the relevant criteria to find the “Loan” FO that you are looking for.
Open the FO in edit mode by clicking on the pencil at the left of the appropriate row.
Analyze the FO and change some information if needed.
Click on the “Save” button to save the FO.
Click on the button “ValidateDocument” to validate the loan FO (in this example the validation is done at header level, but validation at line level is also an option).
The FO is ready to be sourced (note that no analytical distribution is needed in this case).
When the FO line/lines is/are sourced, a “reminder” document will be automatically generated by the system (PO in this case), the system will add the reason type “Loan Return” to this document and all transport documents that follow.
Note that the FO needs to be sourced “from stock” as we can only lend something we have in stock.
After the sourcing of the FO a picking ticket is created to prepare the goods for shipping to the requesting (borrowing) instance. After shipment of the goods, you will have to synchronize in the supplying (lending) instance then in the requesting (borrowing) instance to confirm that the goods have been sent to and received by the requesting (borrowing) instance.
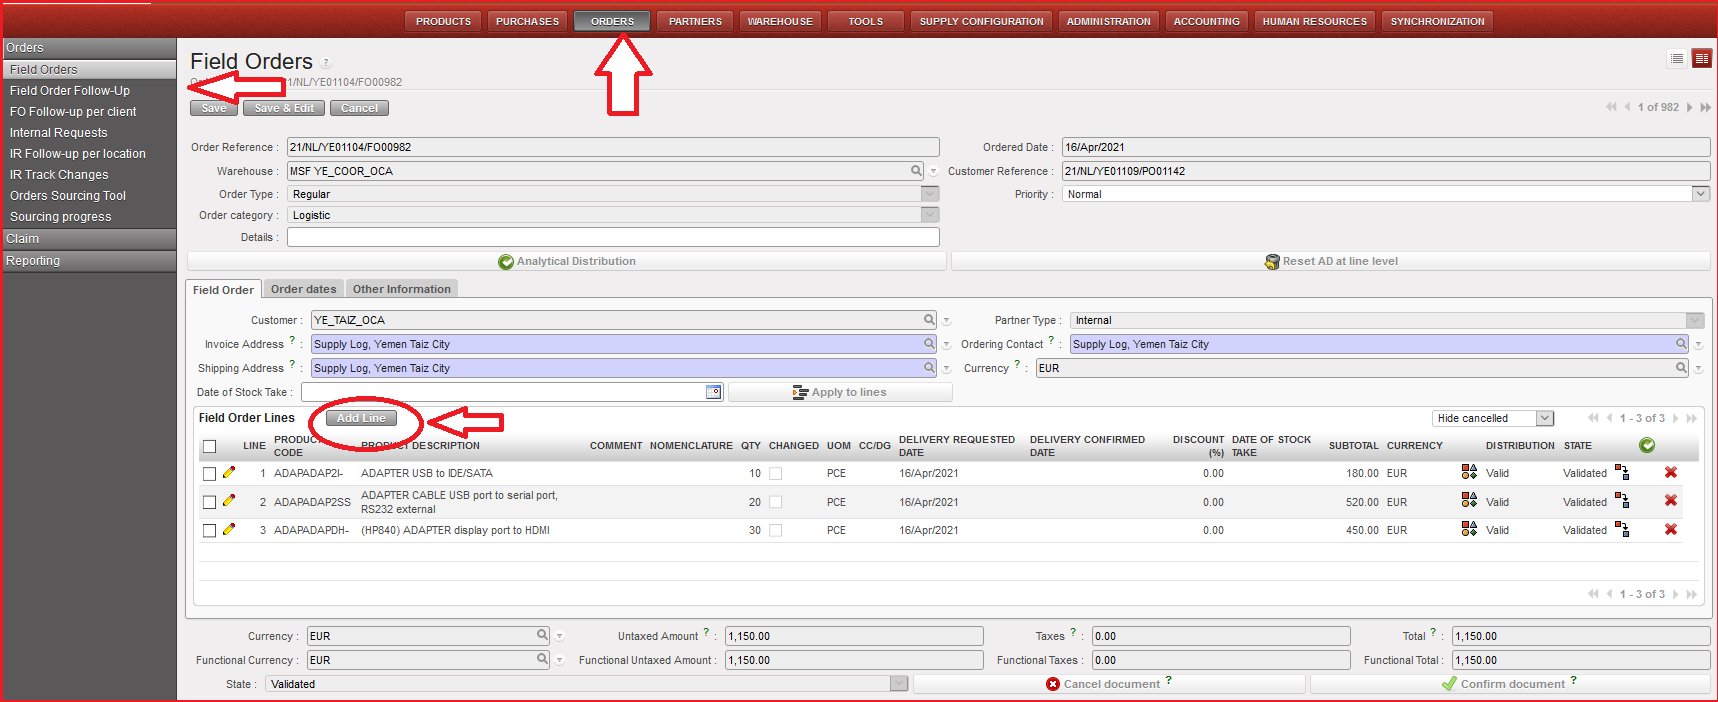
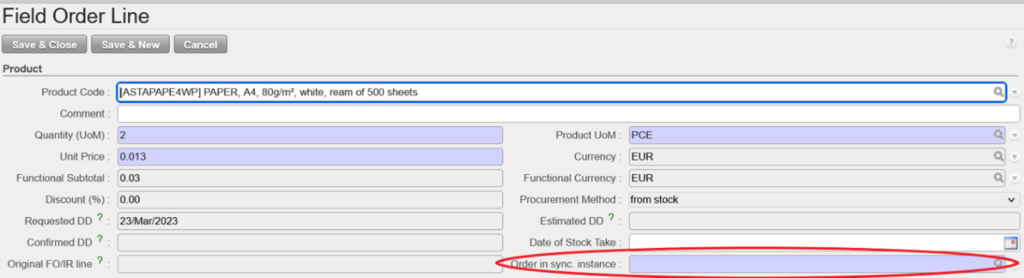
When adding new lines directly to an FO, which was created via SYNCH to add the reference to the project IR. This functionality is like what already exists when adding new lines to a PO which was created from an FO and PO/IR in another instance.
The functionality enables to add project IR reference after SYNCH, you can see the line at the project level on IR and PO reference. The Field “Order in Sync. Instance” is added at coordination level:
Go to:Orders > Field Orders > Add Line
Field Order Lines window is opened with form view “doc” icon for the new added line, click on the magnifying glass in “order in sync. instance” to link the line to original IR/FO. (IR/FO should not be closed or cancelled).
It should only be possible to select an IR/FO which is not in status Closed or Cancelled. Line can then be saved & closed. At the next status change / synch, the project PO and IR will be updated with this line. At the next status change / Synch, the project PO and IR/FO will be updated with this line.
For an FO created from scratch, it is not expected to be able to use this field, so it can stay greyed out as per currently. For extra lines to be added to FO, FO must be in status other than Closed, Cancelled or Confirmed (+-p).
Please make sure that you always select the correct Source document because once the line is saved you will not be able to edit this field anymore. In case of mistake, the only option will be to Cancel the line and Create a new one with the correct Source.
Field Orders should be followed-up on a regular basis to ensure that all requests from the field are answered to within the requested time limits, and to avoid having any pending or “forgotten” orders.
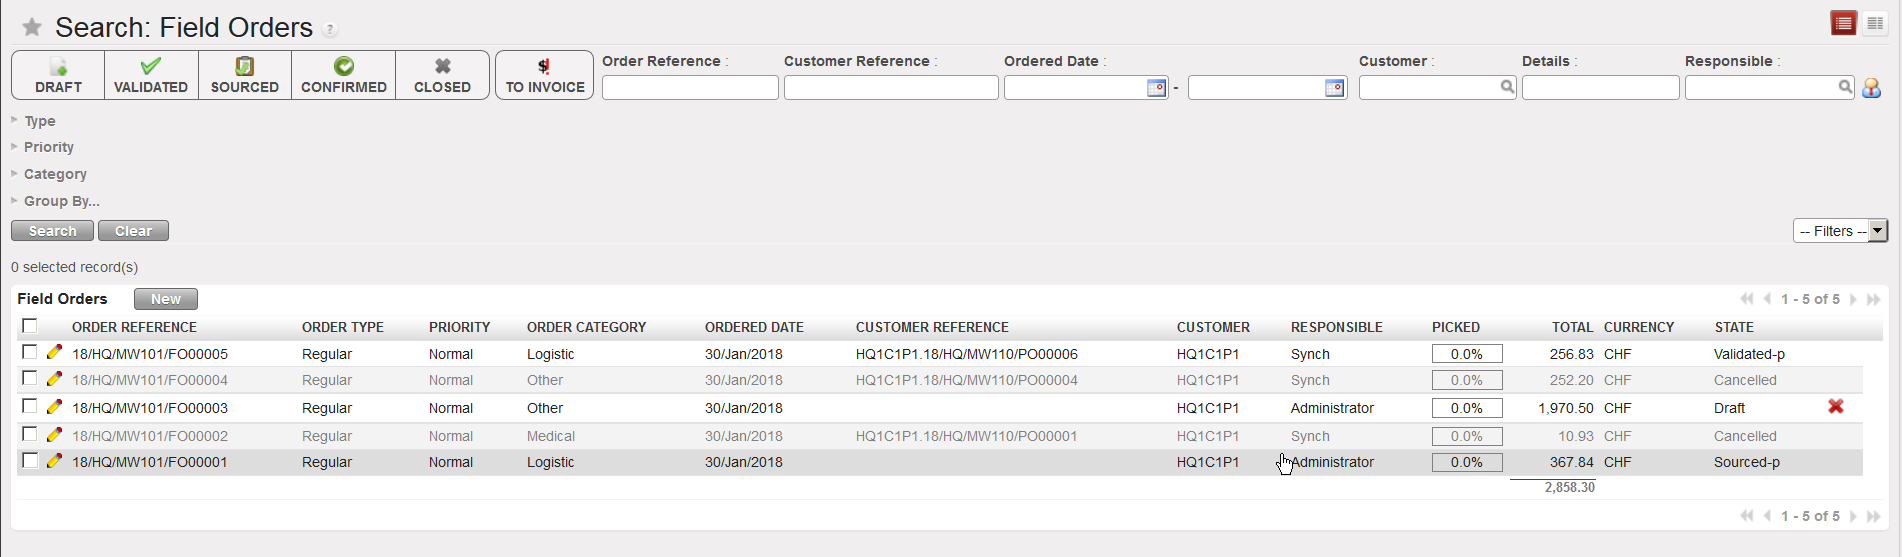
The “Field Manager Dashboard” (Orders/Orders) and the general list view of FOs also called “Search: Field Orders” screen (Orders/Orders/Field Orders) already give some basic information: state, percentage picked, customer, customer reference, responsible,…
General list view of FOs also called “Search: Field Orders” screen
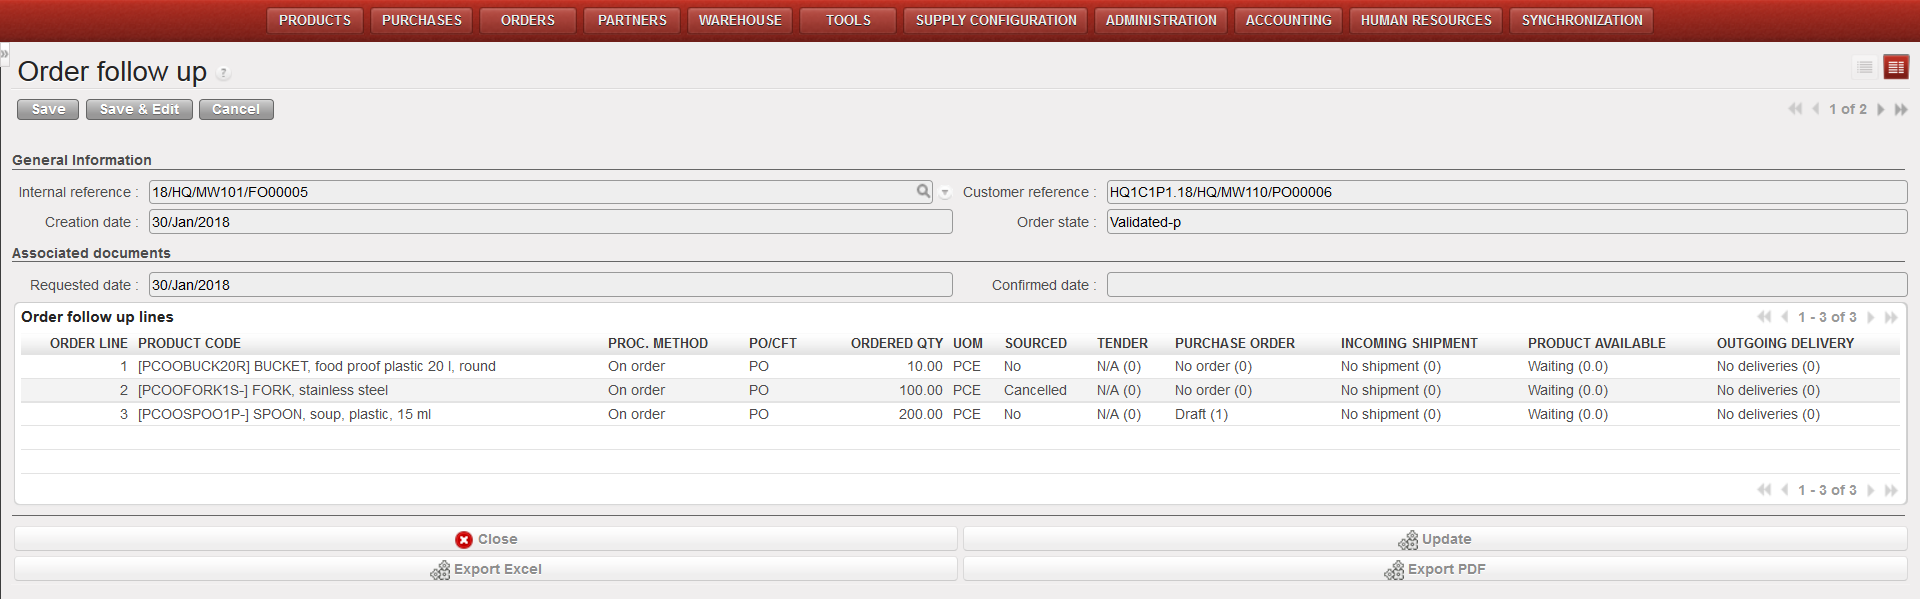
The Field Order Follow-Up gives more details of the situation of a specific FO. Note that this report has not been maintained. If available, it is better to avoid using it.
Go to:Orders / Orders/ Reporting / Field Order Follow-Up
In the pop-up window user can search by “Internal reference” or by “Customer reference“. Search and select the required Field Order.
Click on “Go to: follow up” button.
The system will display all the information of the selected order including sourcing and incoming shipment information.
Field Order follow-up
The report can be refreshed anytime via the “Update” button. It can also be exported to Excel (via the “Export Excel” button) or PDF (via the “Export PDF” button).
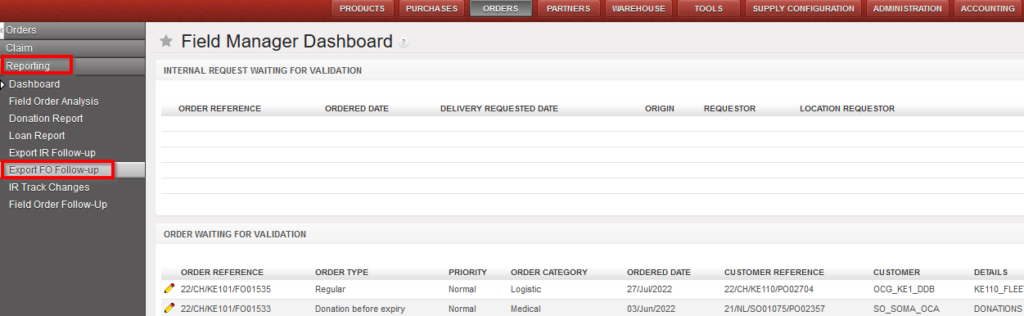
In some case, you will want to check the state of several FOs for a given partner. In this case, you will use the report named “Export FO Follow-up” available in Orders / Orders. The report can be generated in XLS or PDF. This functionality will allow you to follow back-orders towards your clients.
Go to:Orders / Orders / Reporting / Export FO Follow-up
Export PO Follow-up
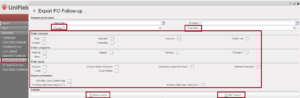
Complete the fields Start and End date to restrict the output to a time frame.
Select a “Partner” and/or an “Order Ref.”.
Check one or multiple “Order statuses” boxes if needed.
Check one or multiple “Order Categories” boxes if needed.
Check one or multiple “Order Types” boxes if needed.
Check the “MSL/MML Non Conforming” box if you only need to see lines not conforming to the MSL/MML
Check the “pending order lines only (PDF)” if you only need to see the lines which have not been delivered yet to the requestor if needed (please note that this parameter only works for the PDF format).
Check the “Include order lines note (PDF)” if you want the comment from the FO to be displayed on the PDF export.
Set of parameters to define in the Export FO Follow-up window
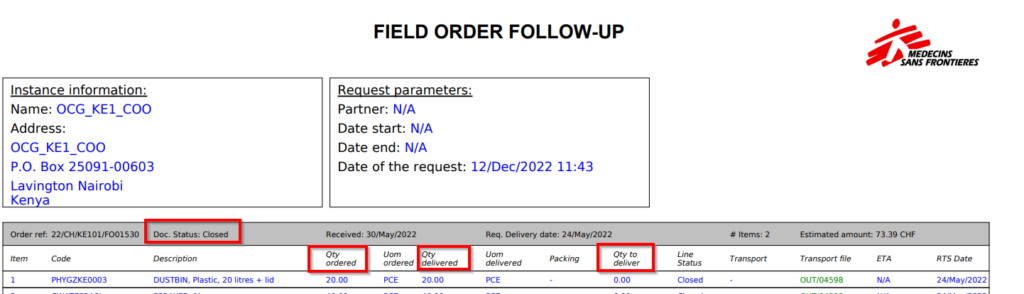
Export FO Follow-up in excelExport FO Follow-up in PDF
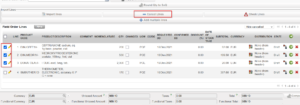
K. How to cancel one specific Field Order line or multiple lines.
There are 2 different ways for cancelling lines in the Filed order:
1- For canceling multiple lines, you can select the lines, click cancel lines, cancel lines window will open to confirm the cancellation and lines will be cancelled.
In a draft FO, Select the lines you want to cancel, then click on the “Cancel Lines” button, the cancel lines window will appears, confirm your choice and click on “Cancel selected lines” button.
2- For cancelling one specific Line, using the red cross on the line level as below
In a draft FO, use the red cross located at the right of the line item.
Cancelling an FO line of a draft FO
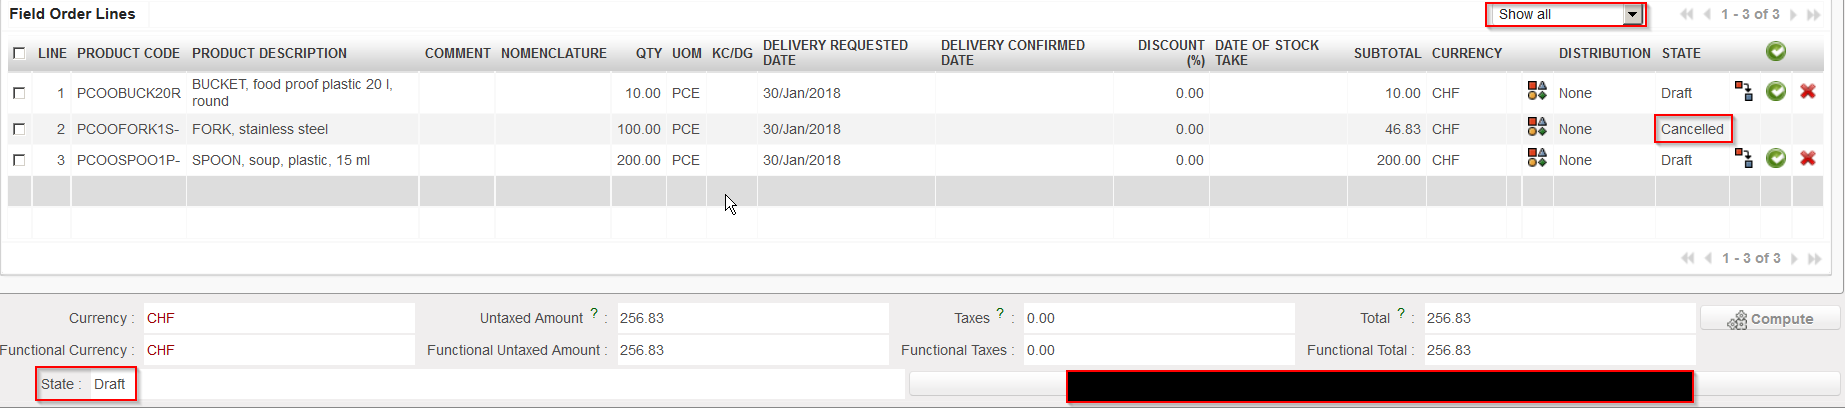
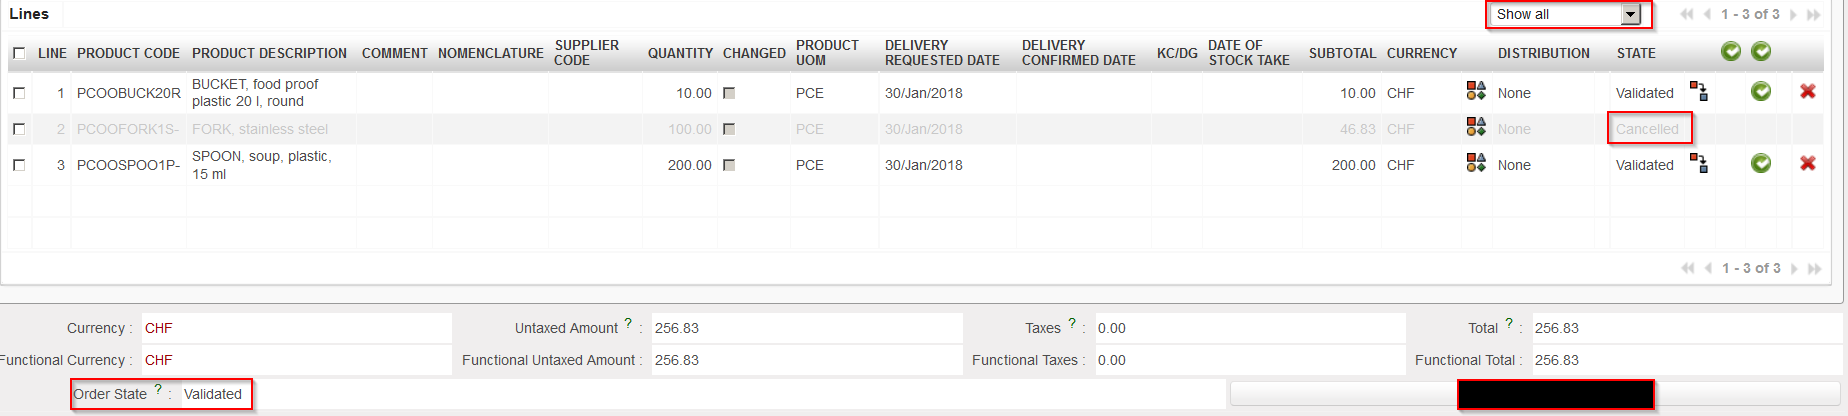
The FO will stay in status “Draft” but the cancelled line will switch to state “Cancelled“.
FO with a cancelled line
If the FO was created by the synchro, from a PO created (and validated) on another instance, this PO will keep the state “Validated” but the line which was cancelled on the FO will turn to state “Cancelled” on the PO.
PO with a cancelled line on the customer instance
Note that draft and validated FO-lines can be cancelled in Draft-p / Validated/ Validated-P FO. but an FO-line which has already been sourced cannot. At this stage you will have to do the cancellation on the next document (e.g. PO or PICK).
We use cookies to ensure that we give you the best experience on our website. If you continue to use this site we will assume that you are happy with it.


 PO in PDF


 Export FO Follow-up in PDF