Supply User Manual ENG -> 5. Warehouse -> 5.5 LU-SU4104: Shipment -> B. HOW TO CREATE AN OUTGOING DELIVERY
B. HOW TO CREATE AN OUTGOING DELIVERY
All parcels from processed Pre-Packing Lists are automatically added on a draft (main) Shipment. It is possible to either validate the full shipment (i.e. select all the parcels), or to proceed with a partial shipment (i.e. select only some parcels). In the case of a partial shipment, parcels left behind will remain on the (main) Shipment, ready to be shipped with a future shipment. Products can also be returned to stock, should they not need to be shipped anymore.
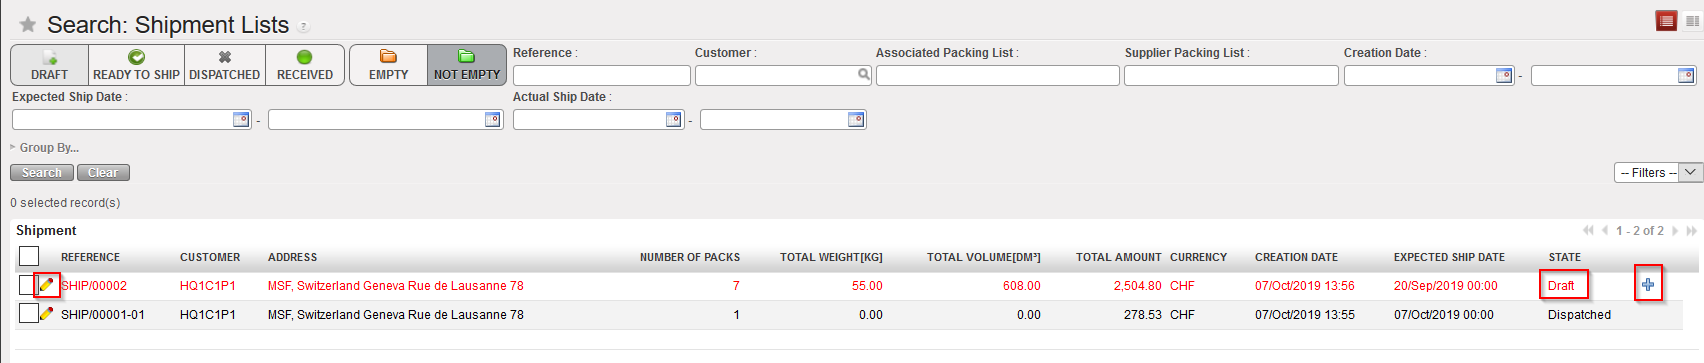
Go to: Warehouse / Warehouse Management / Deliveries / Shipment
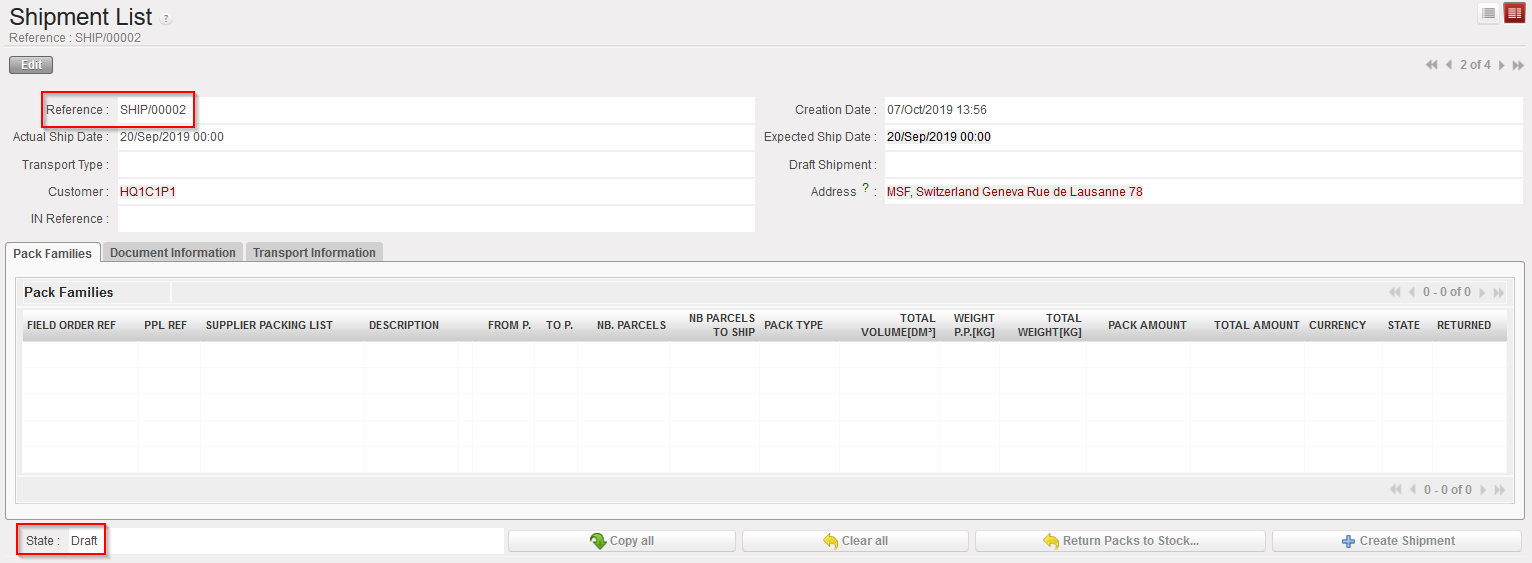
- Locate the (main) Shipment you wish to ship to a project/customer. It should be in “Draft” state.
- Click on the
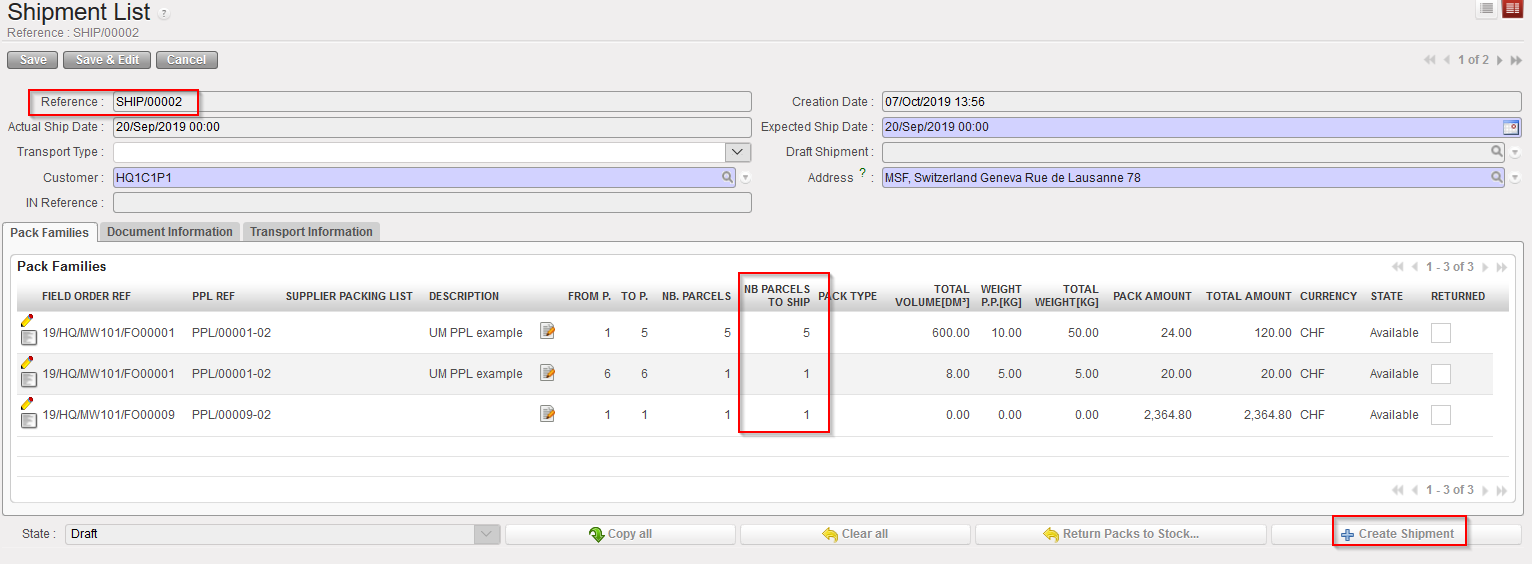
 icon located at the right side of the appropriate line. Another option is to open the Shipment and click on the “Create Shipment” button at the bottom of the screen.
|
|
|
Processing a Shipment |
|
|
|
Processing a Shipment |
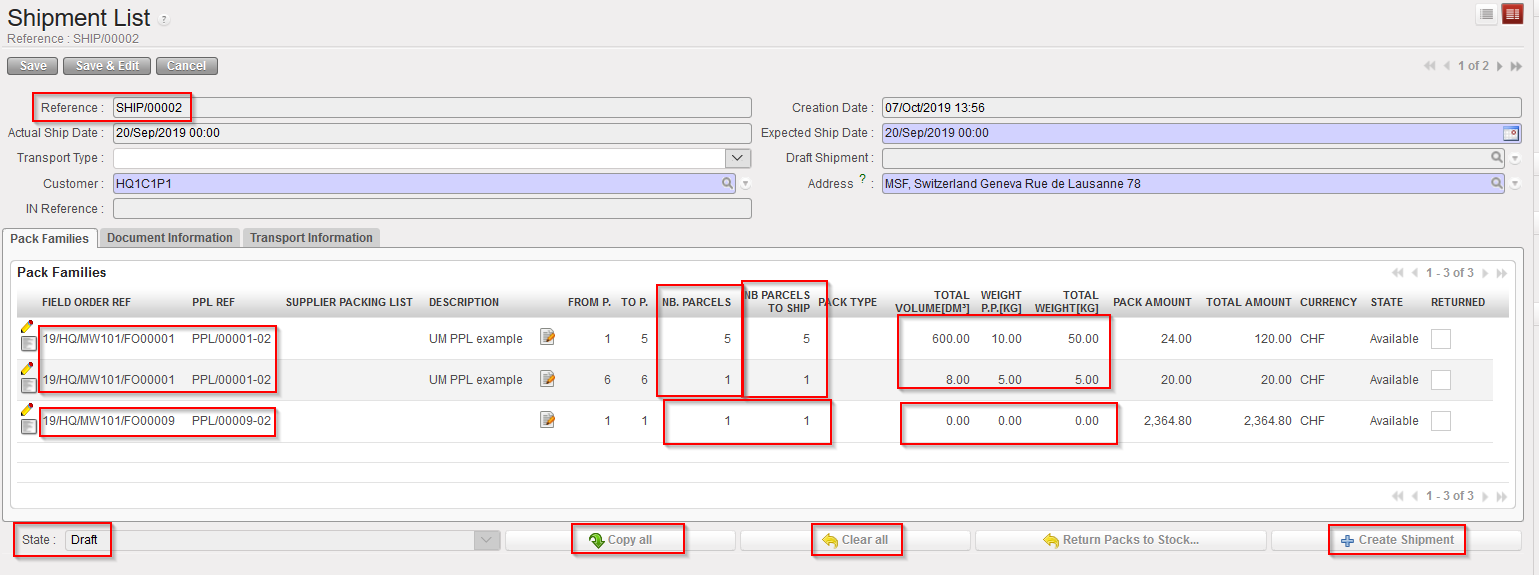
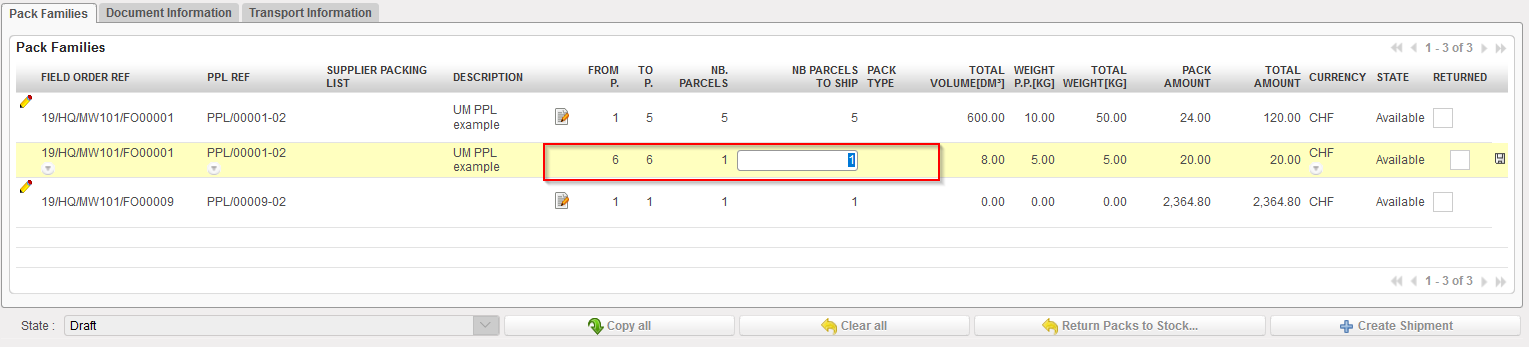
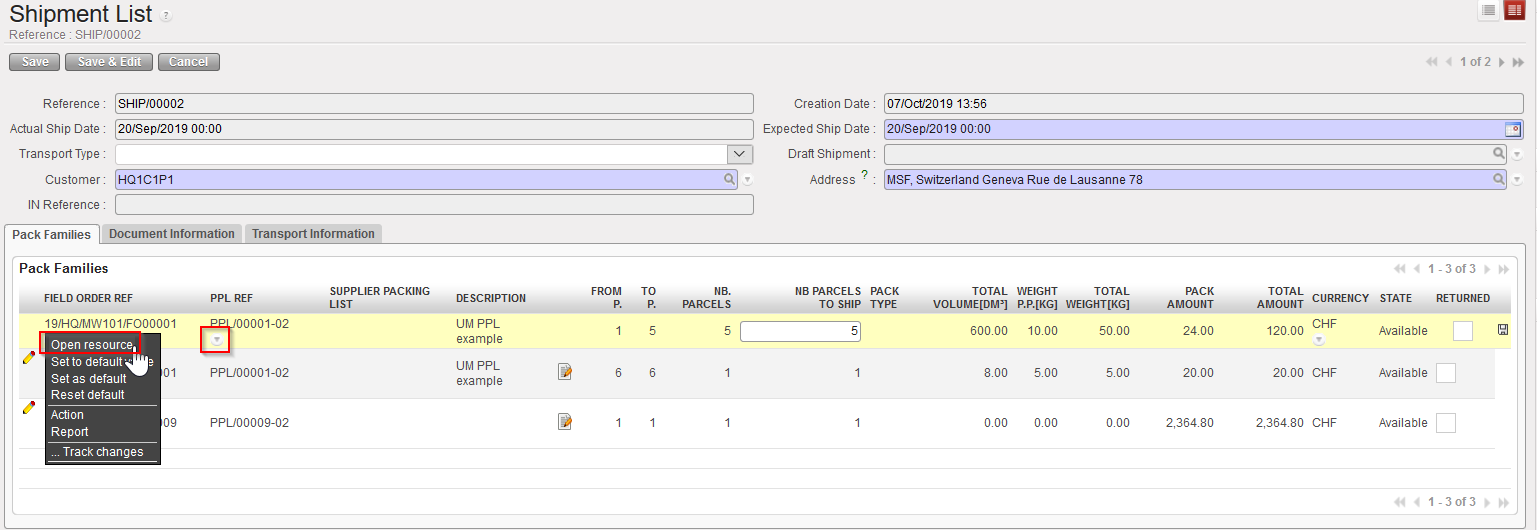
3. The “NB Parcels to Ship” is by default set to the same as “Nb Parcels” however, this can be edited/updated in case you need to ship only some parcels (using the pencil icon ![]() ).
).
Note that buttons “Copy all “ and “Clear all” are related to this field “Nb Parcels to Ship”.
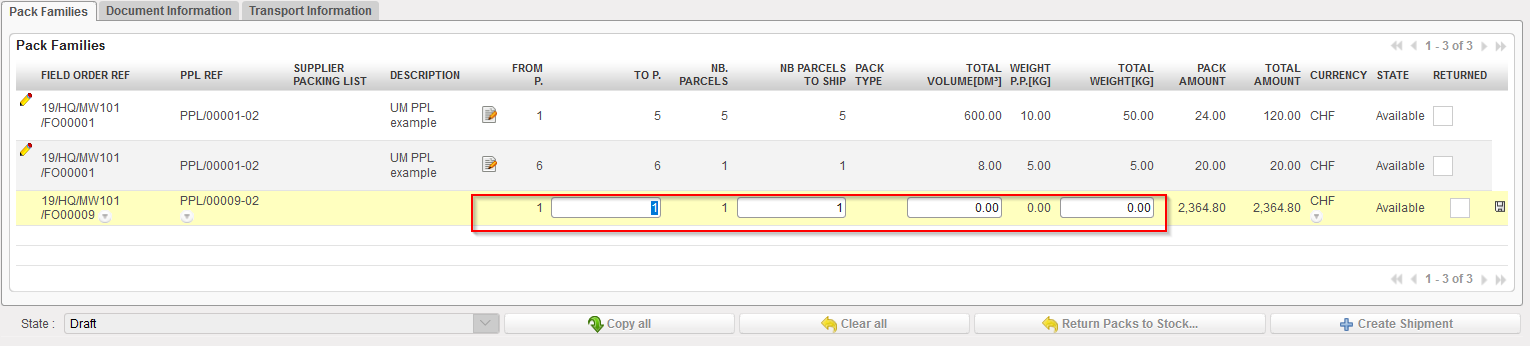
4. The “Total volume” and “Total weight [KG]” are retrieved from the PPL processed before. These fields can only be edited here in case the information has not been updated in the PPL (remember that these are not mandatory fields in the PPL) – in the example above only line from “PPL/00009-02” can be updated for Weight and Volume since their value is at “0”. Edition can be done using the pencil icon ![]()
5. The “To P.” is also retrieved from the PPL processed before.
However, when the “Quick flow” (2 steps – PICK to SHIP with no PPL) is used, the default value is “From P. =1” and “To P. =1”. In this specific case user still has the possibility to edit/update the “To P.” to set the number of parcels needed. User needs to click on the pencil icon ![]() (in case the PPL comes from the Full flow, the field “To P.” will not be editable anyway).
(in case the PPL comes from the Full flow, the field “To P.” will not be editable anyway).
|
|
|
Editing line from Full flow (3 steps) – with all PPL info registered (including Volume and weight) – only “Nb parcels to ship” editable |
|
|
|
Editing line from Quick flow (2 steps) – “To P.”, “Nb Parcels to ship”, “Total Volume” and “Total weight” editable |
Note that you may choose the number of parcels to ship for each line. One line represents a certain number of identical parcels (same content, same dimensions, and same weight). The detail of a FO or PPL can be viewed by clicking on the “Open a resource” icon (down arrow) located at the right of the FO/PPL and by clicking on the “Open resource” option in the drop-down list.
|
|
|
Looking at the details of a FO or PPL |
6. Once the parcels have been selected, click on the “Create shipment” button to create a sub SHIP. In the below example, all parcels available on the main SHIP are selected.
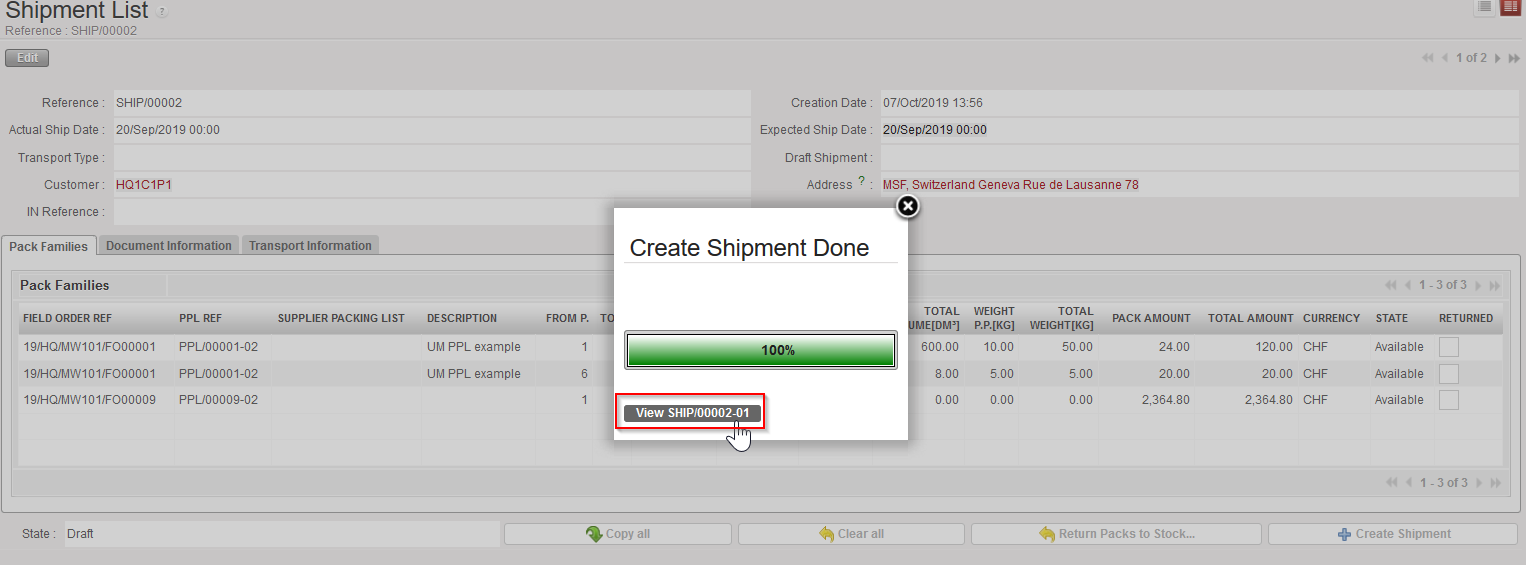
7. Then click on the button“View SHIP/000XY-AB” from the pop up “Create Shipment Done”
|
|
|
Creation of sub SHIP |
|
|
|
Intermediate pop up to reach the newly created Sub-SHIP |
|
|
|
Sub SHIP created by the system |
|
|
|
Main SHIP after creation of the sub SHIP |
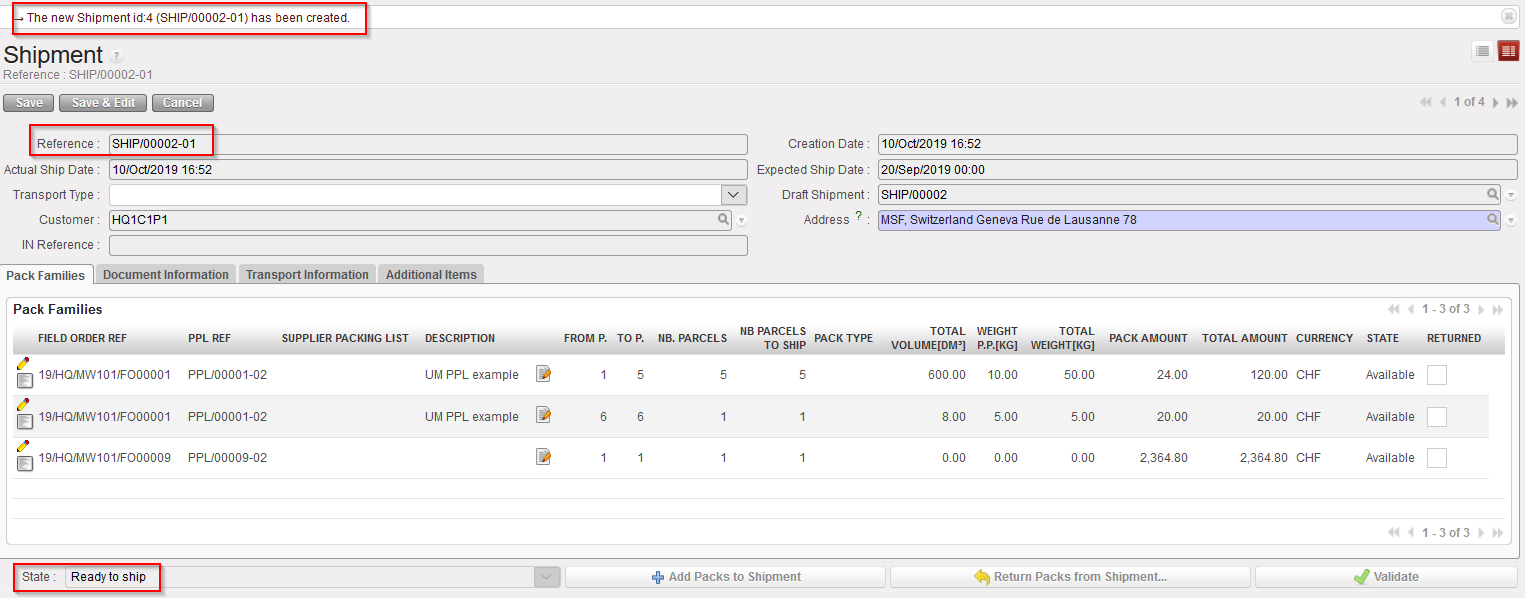
A sub SHIP (reference SHIP/000XY-AB) is created by the system and includes all parcels selected from the main SHIP (reference SHIP/000XY). The state of the sub SHIP is “Ready to ship“.
As all parcels have been selected from the main SHIP, this one is now empty. Note that the main SHIP stays in “Draft” to allow returns of products and welcome other parcels from PPLs for the same customer which could be processed.
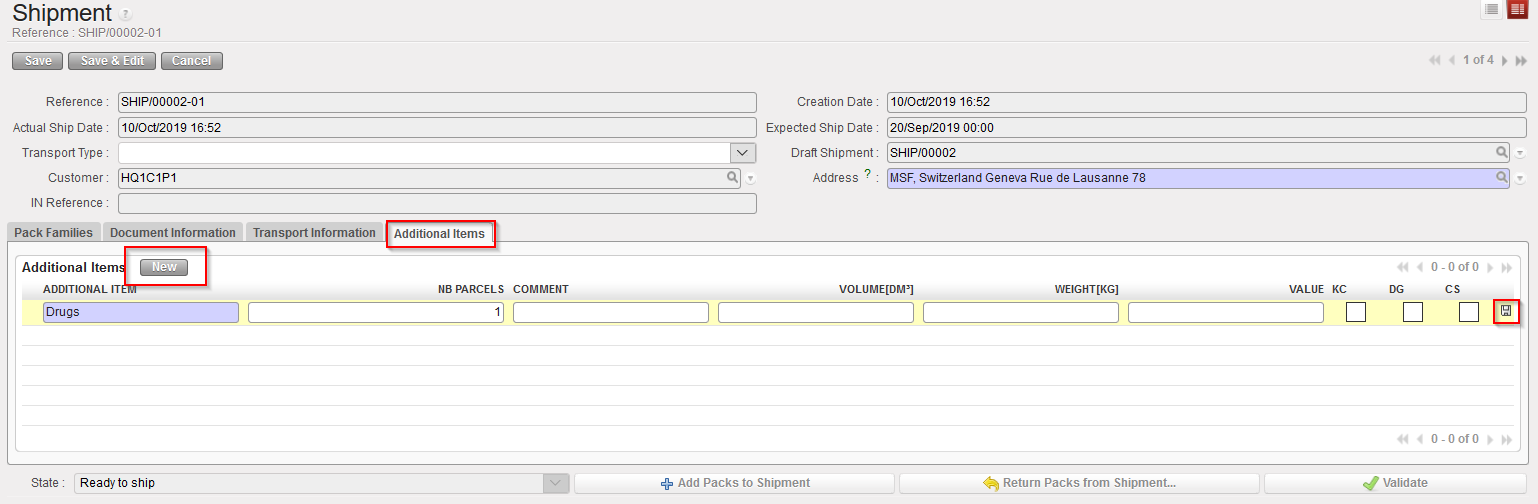
8. Note that the “Additional Items” tab can be used to indicate items which should have been added to the Shipment but were not part of the previously processed documents (PPLs, PICKs, FOs). This tab is only editable in “Ready to ship” Status.
|
|
|
Adding new items to the shipment |
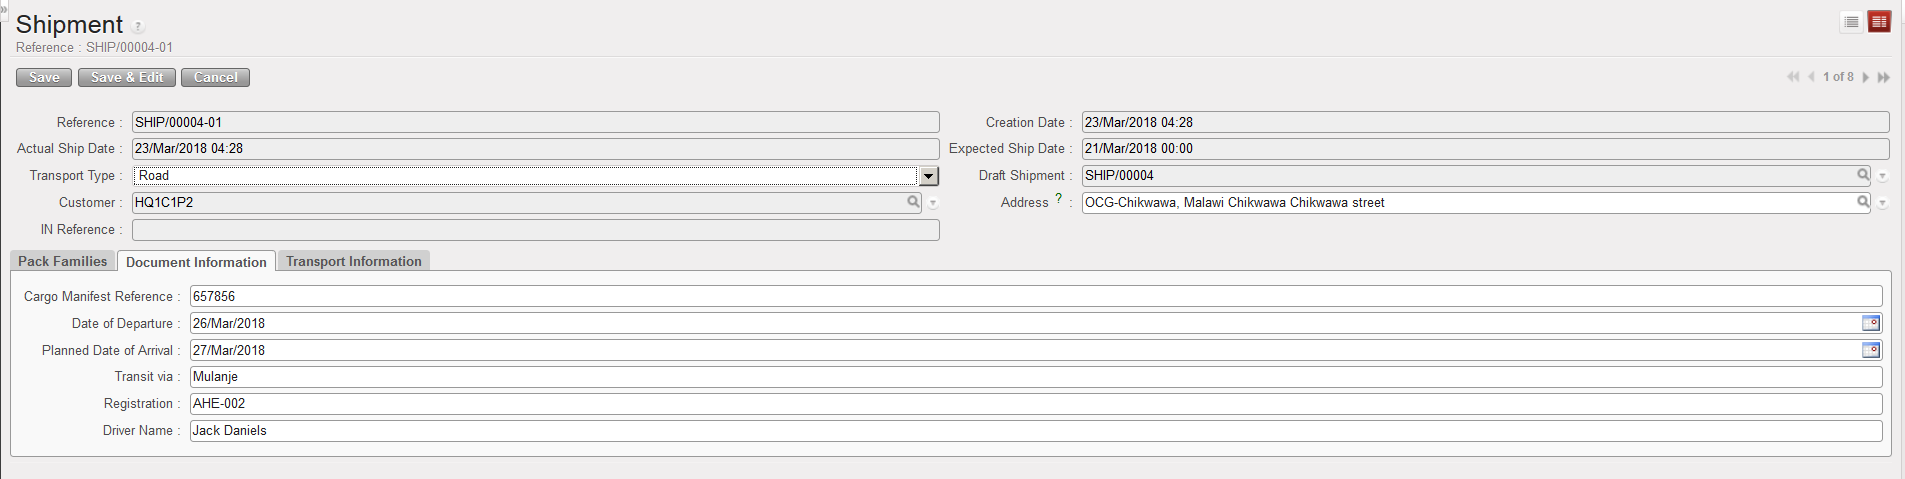
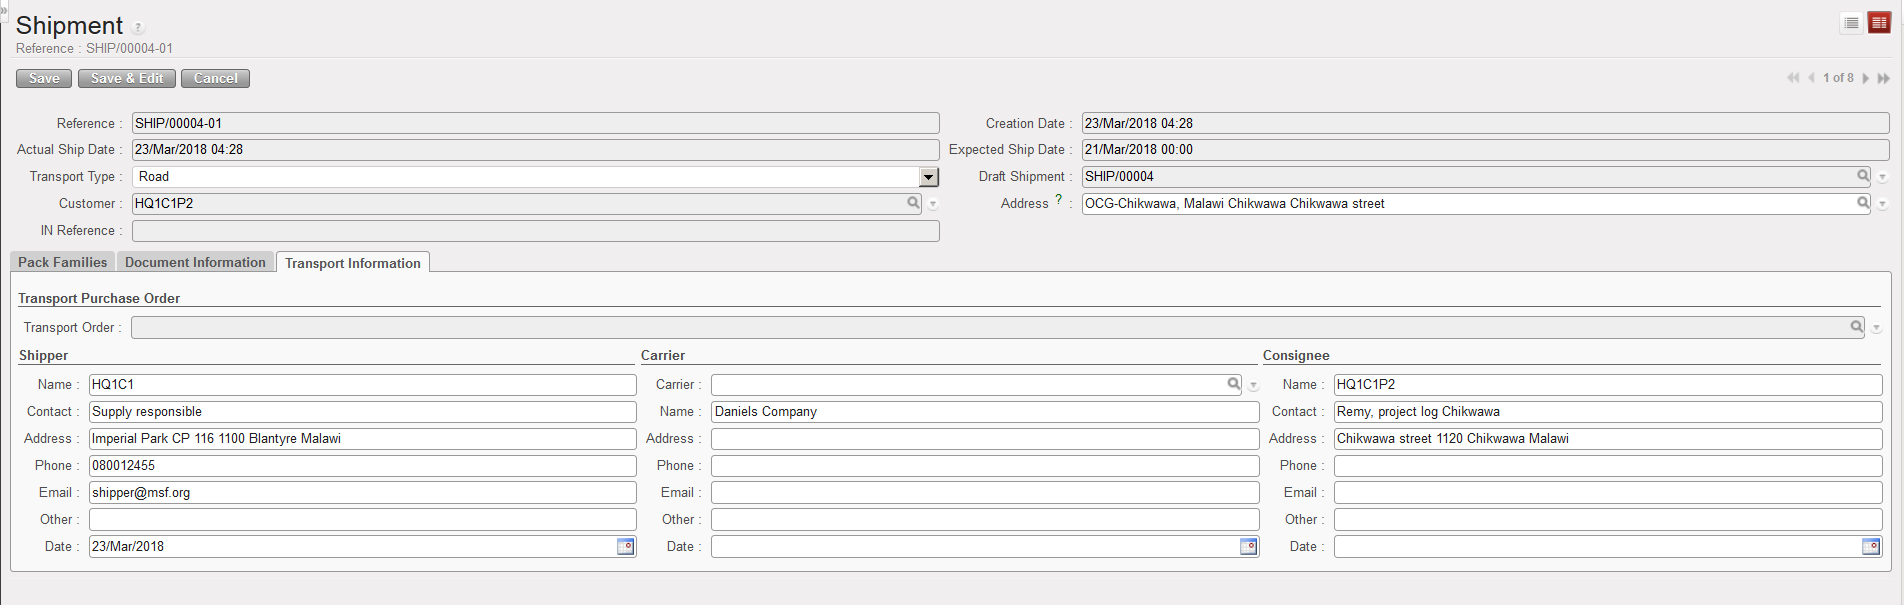
9. On the sub SHIP, you should complete the “Document Information” tab and the “Transport Information” tab with all necessary information needed such as reference of the cargo manifest, departure and arrival dates, driver and vehicle information, shipper information, carrier information and consignee information. Please note that Transport Order can be linked to the sub-Ship.
|
|
|
“Document Information” tab on a Shipment |
|
|
|
“Transport Information” tab on a Shipment |
10. The “Add Packs to Shipment” button enables to add existing Packs to the Sub-Ship in “Ready to ship” status (button not displayed for other statuses).
All Packs for this customer from the Draft main Shipment are listed and can be selected.
By default the “Selected Number” field is set to “0” and can be updated line by line or by using the “Copy all” button (“Clear all “ button will be used to clear this field in case you need to correct the entered information).
Click on the “Add Packs to Shipment” button to add the selected PPLs.
|
|
|
Add Packs to the Shipment – Sub-SHIP |
|
|
|
Add Packs to Shipment – List of PPL from the Main PICK |
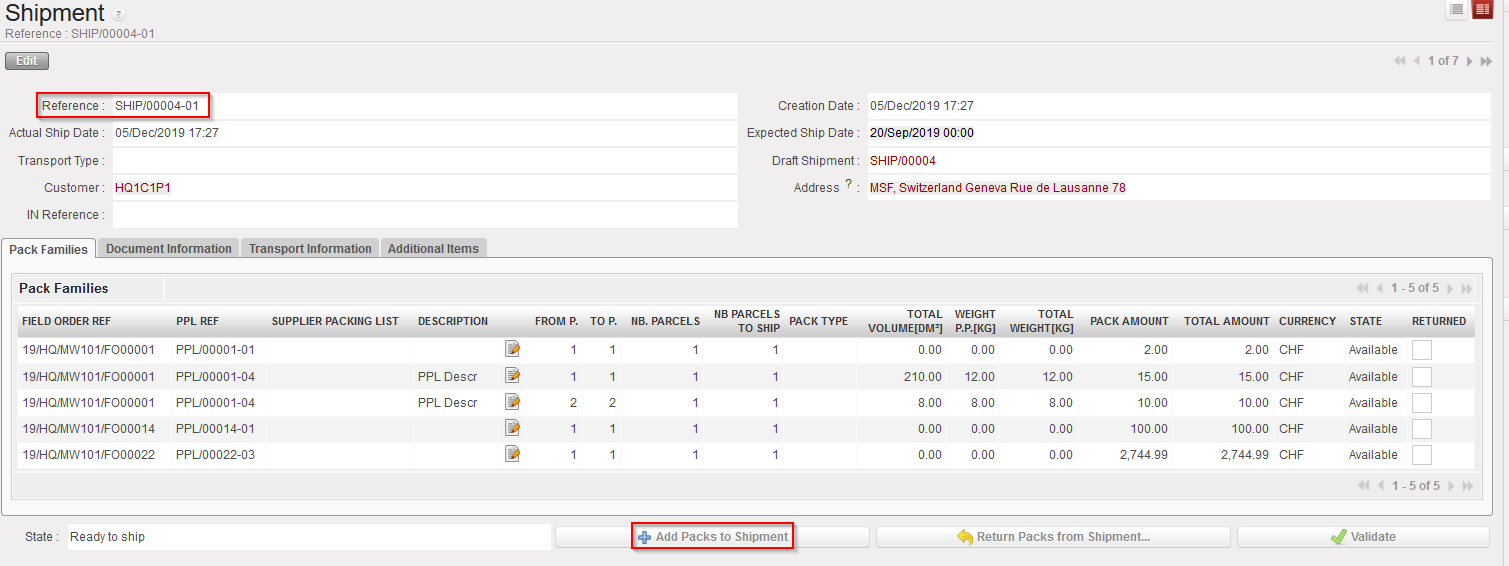

The sub-Ship main screen will be updated with these new additional Packs.
11. Click on the “Validate” button.
12. Click on the pop up “View SHIP/XXXX-AB”
|
|
|
Closed sub SHIP – Dispatched |
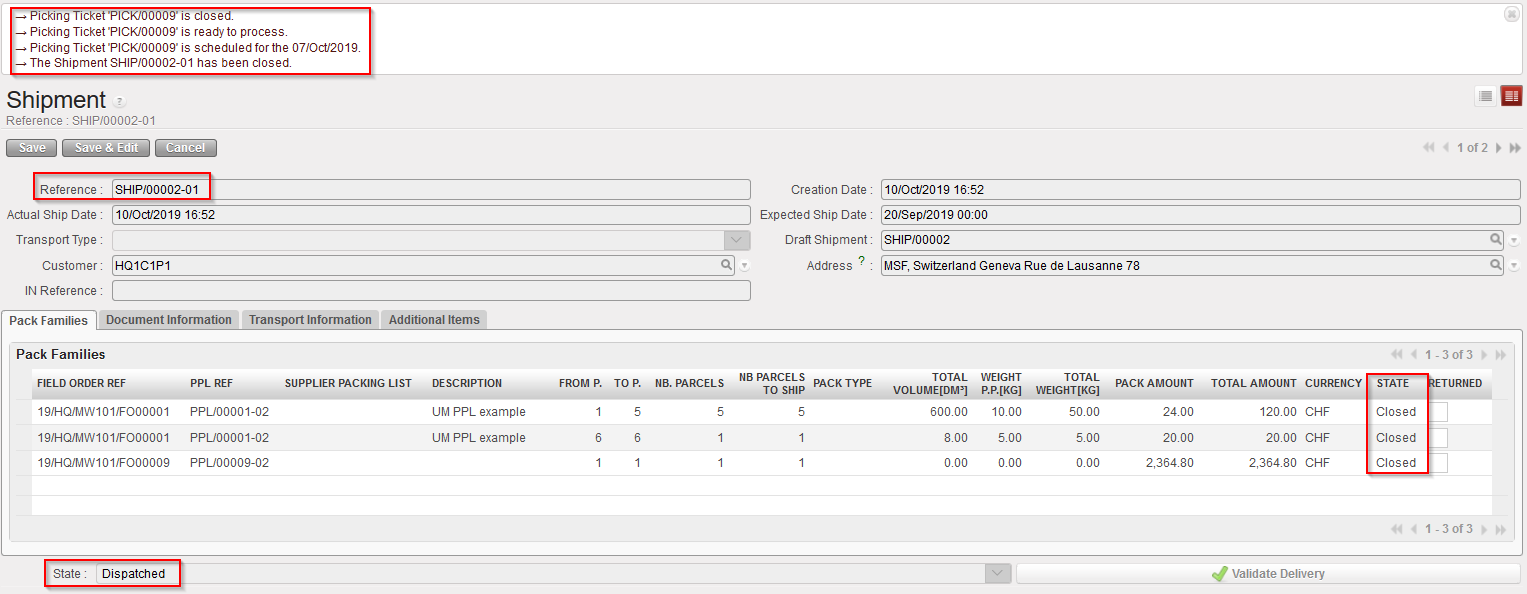
The sub SHIP switches to “Dispatched”.
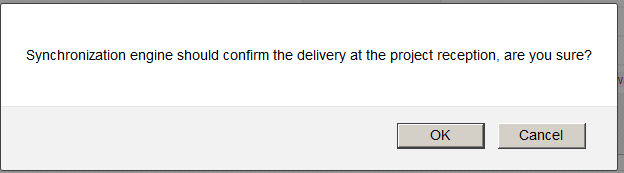
Note that for shipments sent to other UniField instances, the validation of the sub SHIP will be automatically done by the synchronization, when the reception will be done on the receiving instance. This means that you should not click on the “Validate Delivery” button for those ones. If you click on it, you will get the below (non-blocking) message.
Please also note that the Validation of the sub-Pick (when status turns to Dispatched) closes the related picked lines.
|
|
|
Warning message when trying to “Validate Delivery” which is for a UniField instance |
For shipments sent to External customer, you will have to validate the shipment manually once the customer confirms reception of the goods by clicking the “Validate Delivery” button.
