Supply User Manual ENG->Supply Configurations->2.1 LU-SU1101: Instance set-up->B. LU-SU1101: How to reconfigure an instance
B. LU-SU1101: How to reconfigure an instance
When an instance is created for a coordination or a project, a first configuration is done (usually by IT team from HQ in collaboration with the UniField core team). This first configuration is performed on the synchronization instance, on the HQ instance and on the coordination/project instance which is created. This first configuration is key for UniField global consistency and consists of steps such as:
- Groups creation.
- Proprietary instance declaration.
- Accounting set-up.
- Functional currency declaration.
- Initial synchronization.
These steps (and others) are described in detail in the UniField IT configuration manual.
Once this first configuration has been done by the HQ/core team, an instance can be reconfigured whenever needed at coordination or project level. A reconfiguration consists of 7 steps which are detailed below. Note that only steps 4, 5 and 7 are directly impacting supply.
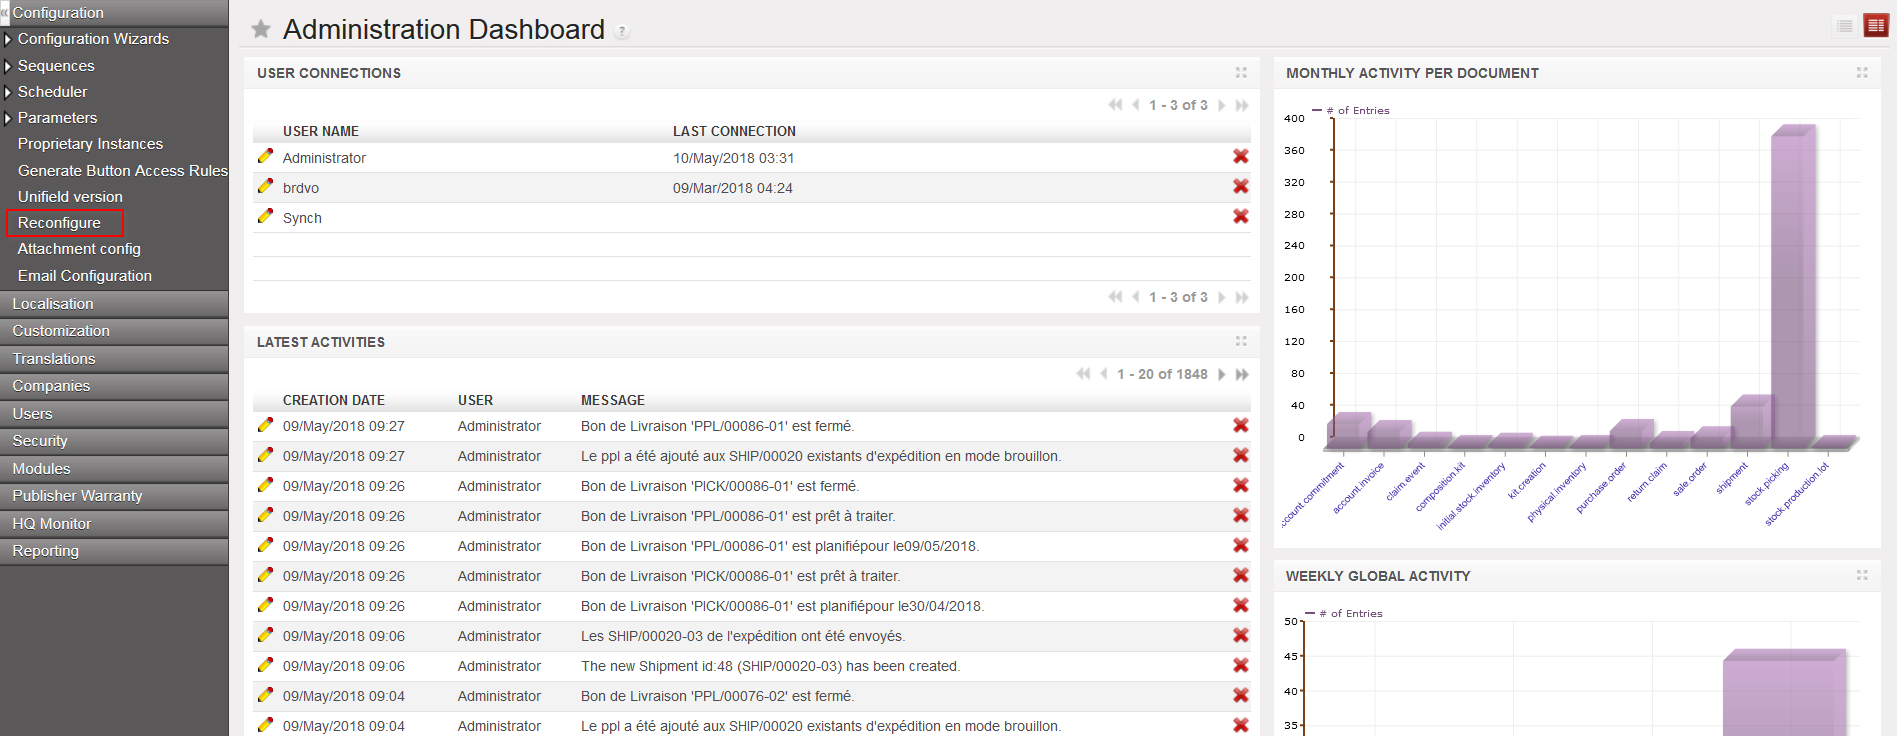
Go to: Administration / Configuration / Reconfigure
Most of the configuration windows have the same format. They include a progress bar on the bottom left (percentage completed) and progress buttons on the bottom right.
- Previous, to return to the preceding screen.
- Skip, to skip the step and continue to the next configuration step.
- Next, after filling in the configuration fields, to save this information and continue to the next step.
- Finish, to finish the configuration.
 |
| Instance Reconfiguration |
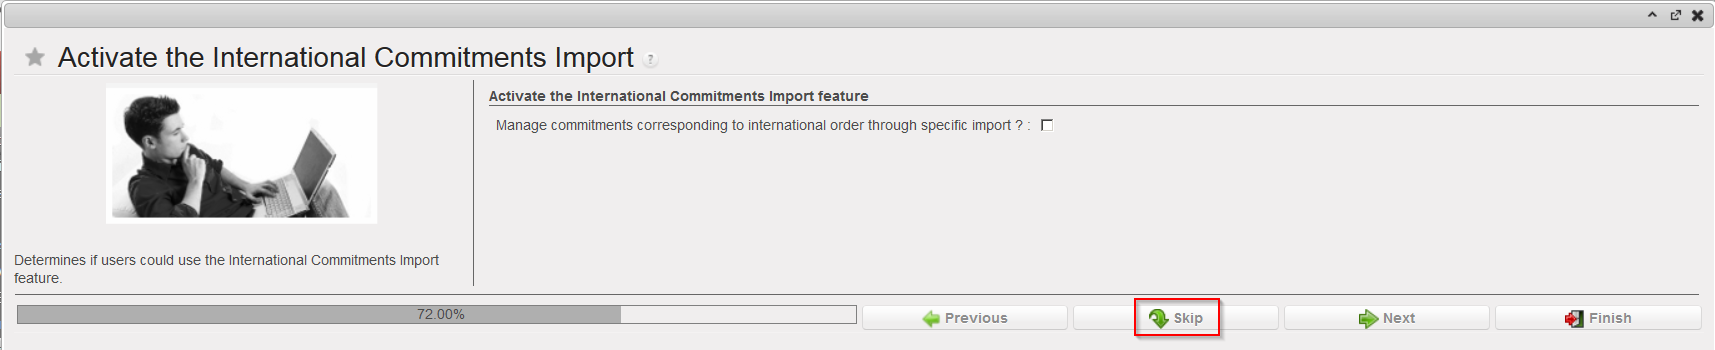
- The first step “Activate the International Commitments Import” is to be completed by finance. Select “Skip” to skip this step and continue the configuration.
 |
| Activate the International Commitments Import |
2. In the second step, you see a window asking you to activate the fixed asset. This step is to be completed by finance. Select “Skip” to skip this step and continue the configuration.
 |
| Activate the Fixed asset configuration |
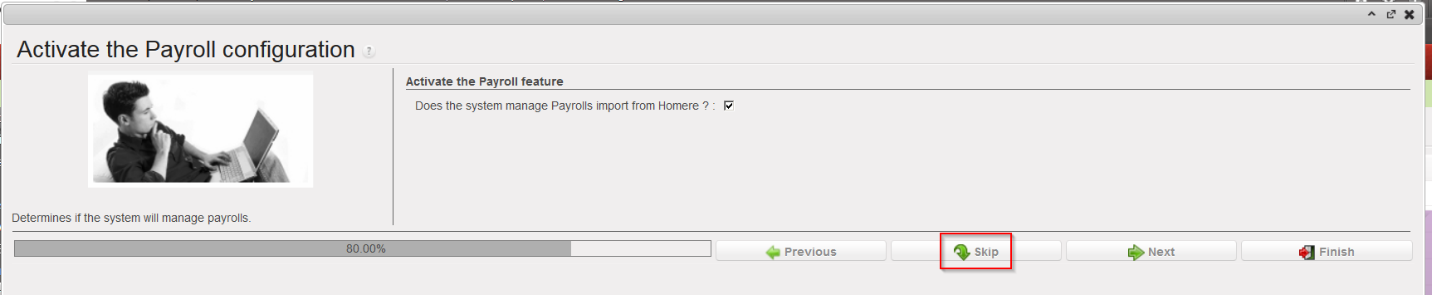
3. Activate the Payroll configuration, to be completed by finance. Select “Skip” to skip this step and continue the configuration.
 |
| Activate the Payroll configuration |
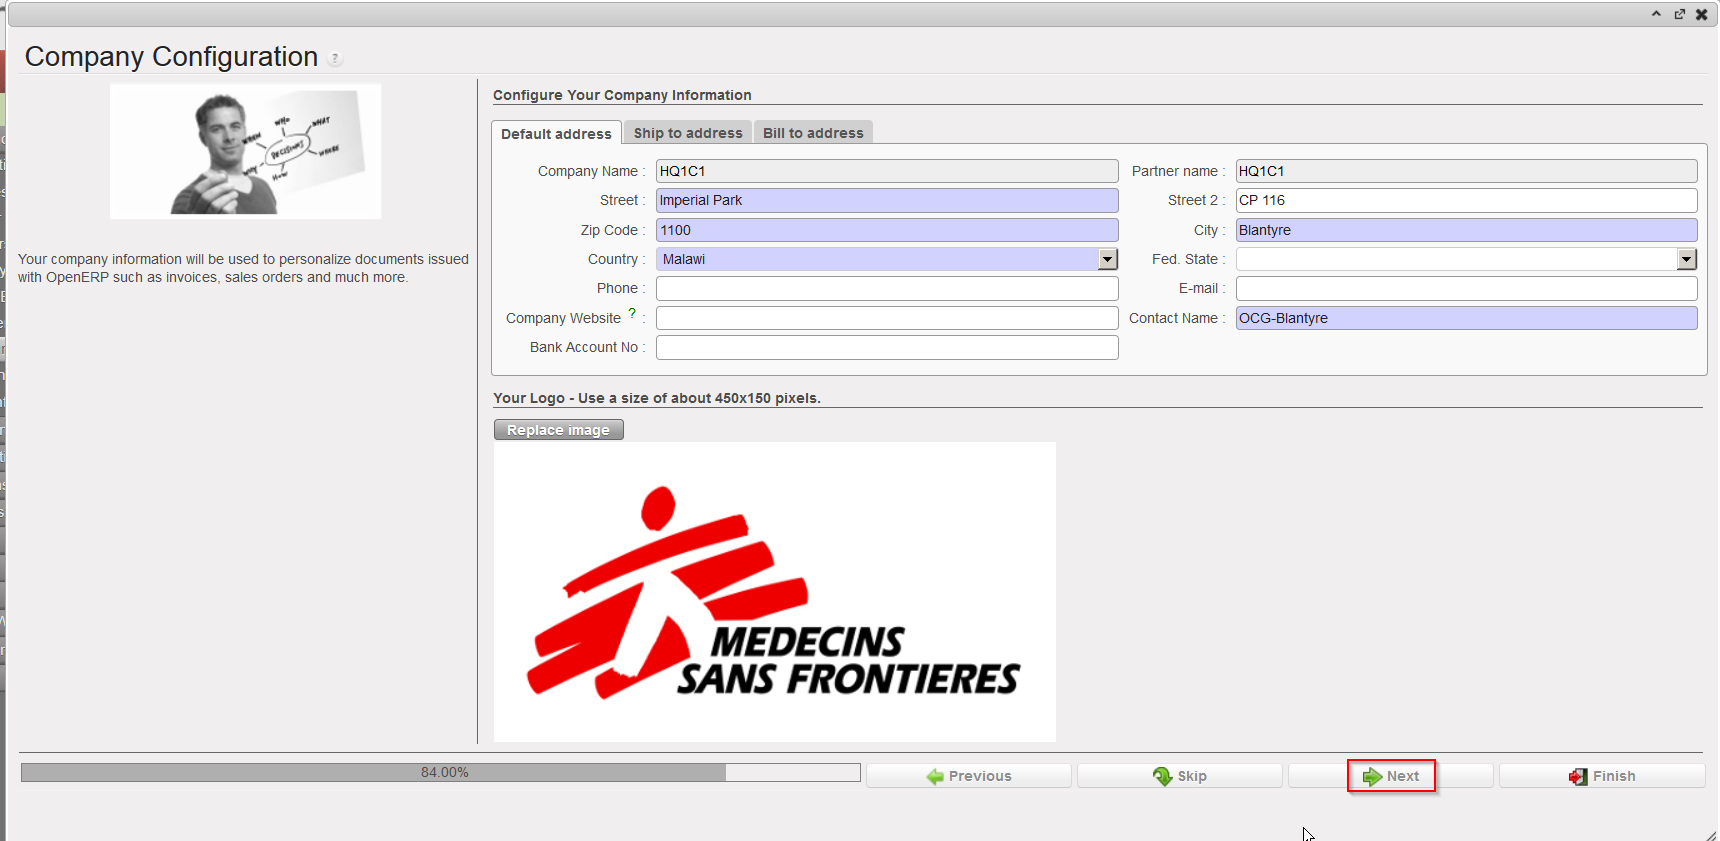
4. Company Configuration
The company matches with your instance and with the internal partner bearing the name of your instance. This step allows defining a default address, a delivery address and an invoicing address for your instance. These addresses are automatically copied on the internal partner bearing the name of your instance.
 |
| Company Configuration |
a) Enter the details of the Default address:
The “Company Name” and the “Partner name” are already filled and cannot be modified.
You may enter/modify the content of the other fields. You can leave some fields blank such as “Company website”, “Fed state”, “E-mail” and “Bank Account No.” but need to fill in the address fields highlighted in blue.
b) Enter the details of the Ship to/Bill to addresses:
Click on the “Ship to address” tab and enter the usual address where goods will need to be delivered. If this is not filled in, the Default address will be used.
Click on the “Bill to address” tab and enter the address where you would like to receive supplier invoices. If this is not filled in, the Default address will be used.
Click on the green “Next” arrow to progress to the next step.
- Delivery Process Configuration
 |
| Delivery Process Configuration |
This step enables to choose what sort of delivery process is appropriate for the instance. It may be that the “Simple Out” process (meaning the simple delivery process) is sufficient, or the more complex process which was developed for UniField (pick/pack/ship) may be more appropriate. Delivery workflows can be changed according to the need and context.
Select:
- Simple Out, if you don’t need to use picking and packing processes on your instance
- PICK/PACK/SHIP, if you decide to use the full shipment process on your instance
Click on the green “Next” arrow to progress to the next step.
- Allocation Stock Configuration.
 |
| Allocation Stock Configuration |
For Allocated Stocks, the option “Allocated” is pre-selected, as currently all MSF stock should be allocated to the relevant cost center.
The field “System will use unallocated moves on finance side” is not relevant since all stock will be allocated for the time being.
Click “Skip”.
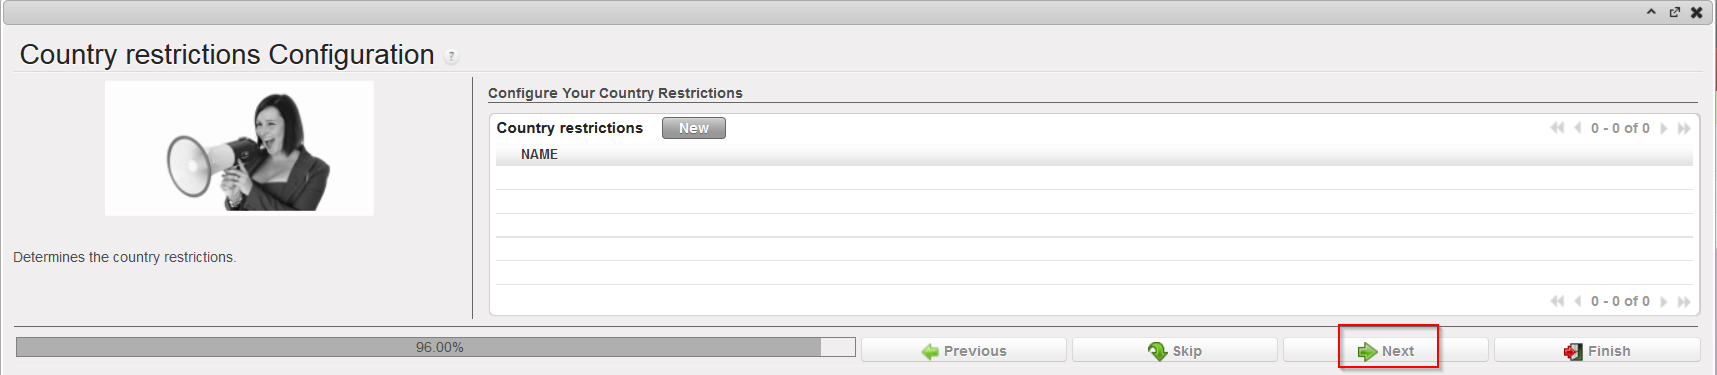
2. Country restrictions Configuration.
In certain contexts, there may be restrictions on some kind of products or on the provenance of products. (See Chapter on Products for further information on product specific settings).
 |
| Country restrictions Configuration |
To add a country restriction:
Click on the “New” button and encode the Name of the restrictions.
Click on the floppy disk icon to save the restriction.
Click on the “Next” button to progress to the next screen if finished or repeat the steps above to add further restrictions.
When an instance is created for a coordination or a project, a first configuration is done (usually by IT team from HQ in collaboration with the UniField core team). This first configuration is performed on the synchronization instance, on the HQ instance and on the coordination/project instance which is created. This first configuration is key for UniField global consistency and consists of steps such as:
- Groups creation.
- Proprietary instance declaration.
- Accounting set-up.
- Functional currency declaration.
- Initial synchronization.
These steps (and others) are described in detail in the UniField IT configuration manual.
Once this first configuration has been done by the HQ/core team, an instance can be reconfigured whenever needed at coordination or project level. A reconfiguration consists of 7 steps which are detailed below. Note that only steps 4, 5 and 7 are directly impacting supply.
Go to: Administration / Configuration / Reconfigure
Most of the configuration windows have the same format. They include a progress bar on the bottom left (percentage completed) and progress buttons on the bottom right.
- Previous, to return to the preceding screen.
- Skip, to skip the step and continue to the next configuration step.
- Next, after filling in the configuration fields, to save this information and continue to the next step.
- Finish, to finish the configuration.
 |
| Instance Reconfiguration |
- The first step “Activate the International Commitments Import” is to be completed by finance. Select “Skip” to skip this step and continue the configuration.
 |
| Activate the International Commitments Import |
2. In the second step, you see a window asking you to activate the fixed asset. This step is to be completed by finance. Select “Skip” to skip this step and continue the configuration.
 |
| Activate the Fixed asset configuration |
3. Activate the Payroll configuration, to be completed by finance. Select “Skip” to skip this step and continue the configuration.
 |
| Activate the Payroll configuration |
4. Company Configuration
The company matches with your instance and with the internal partner bearing the name of your instance. This step allows defining a default address, a delivery address and an invoicing address for your instance. These addresses are automatically copied on the internal partner bearing the name of your instance.
 |
| Company Configuration |
a) Enter the details of the Default address:
The “Company Name” and the “Partner name” are already filled and cannot be modified.
You may enter/modify the content of the other fields. You can leave some fields blank such as “Company website”, “Fed state”, “E-mail” and “Bank Account No.” but need to fill in the address fields highlighted in blue.
b) Enter the details of the Ship to/Bill to addresses:
Click on the “Ship to address” tab and enter the usual address where goods will need to be delivered. If this is not filled in, the Default address will be used.
Click on the “Bill to address” tab and enter the address where you would like to receive supplier invoices. If this is not filled in, the Default address will be used.
Click on the green “Next” arrow to progress to the next step.
- Delivery Process Configuration
 |
| Delivery Process Configuration |
This step enables to choose what sort of delivery process is appropriate for the instance. It may be that the “Simple Out” process (meaning the simple delivery process) is sufficient, or the more complex process which was developed for UniField (pick/pack/ship) may be more appropriate. Delivery workflows can be changed according to the need and context.
Select:
- Simple Out, if you don’t need to use picking and packing processes on your instance
- PICK/PACK/SHIP, if you decide to use the full shipment process on your instance
Click on the green “Next” arrow to progress to the next step.
2. Allocation Stock Configuration.
 |
| Allocation Stock Configuration |
For Allocated Stocks, the option “Allocated” is pre-selected, as currently all MSF stock should be allocated to the relevant cost center.
The field “System will use unallocated moves on finance side” is not relevant since all stock will be allocated for the time being.
Click “Skip“.
3. Country restrictions Configuration.
In certain contexts, there may be restrictions on some kind of products or on the provenance of products. (See Chapter on Products for further information on product specific settings).
 |
| Country restrictions Configuration |
To add a country restriction:
Click on the “New” button and encode the Name of the restrictions.
Click on the floppy disk icon to save the restriction.
Click on the “Next” button to progress to the next screen if finished or repeat the steps above to add further restrictions.
