There is a report that will show all products which are in stock which do not belong to the MML. The report only displays products which have “MED” as main type. To view this list of items that do not conform to the MML,
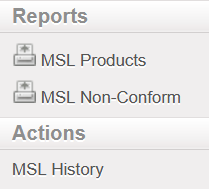
Go to: Products / MML / MML Products and click on MML Non-Conform in the action menu:
Action Menu
B. MSL Non-Conformity Report
The Action Menu of MSL Products also has a non conformity report. This report will show all items that are in stock that are not included on the MSL as long as there is an active MSL for that instance. To generate the MSL Non Conform report,
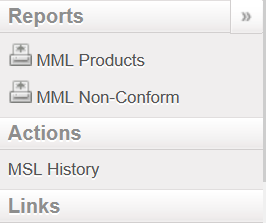
Go to: Products / MML / MSL Products and click on MSL Non-Conform in the action menu:
MSL Products Action Menu
Some instances process orders that will be delivered to another instance. As MSL lists are unique, it is possible for an purchasing instance (such as a coordination) to have items in the pipeline that do not conform to their MSL. By default, products in the pipeline are not included in the Non-Conform report. When generating the Non-Conform report, it is possible to include in-pipe quantities by clicking the checkbox next to “Include in-pipe quantity”.
In-Pipe Quantity Option
When this box is ticked, items that are stocked and in the pipeline will appear on the report, even if the products being purchased are on the valid MSL of the requesting project.
The MSL Products menu shows a list of all products in active MSL lists. A Medical Standard List (MSL) is managed outside of UniField in the MSL tool and the data synchronizes into UniField as an inactive list. The MSL Products list will be empty until an MSL is activated. To view the products in an active MSL:
Go to: Products / MML / MSL Products
Once there is at least one MSL Project activated, all products in an active MSL will be shown on the MSL Products page. To view products from a specific MSL, use the “MSL Valid for instance” to specify which MSL’s products should be shown on the list.
When Medical Standard Lists (MSL) are added to the MSL Tool, the lists synchronize down to the Coordination and all projects in a specific mission. It is only synched to instances in that mission, and is not synched to any other mission. Each published MSL is identifiable by a reference to its instance (project code). To view active MSLs or to activate/deactivate an MSL,
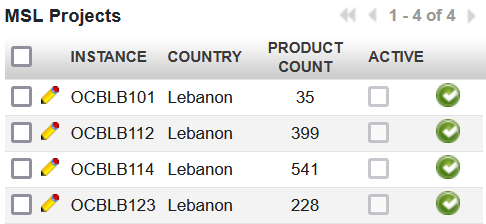
Go to: Products / MML / MSL Projects
Inactive MSL projects
Each MSL is synchronized as Inactive but can be manually activated by the Coordo/Project by clicking on the green check icon. Once activated, a checkmark will appear in the Active column and a red X icon will appear to allow the MSL to be deactivated in that instance. Once activated, the MSL is automatically updated by any change made to it in the MSL tool.
Activated MSL
To deactivate an MSL, click the red icon in the line of the instance you would like to deactivate and the check in the Active box will be removed.
If no instances are activated, alerts in documents will only show whether an item is in the MML and the MSL column will be blank.
The MML Products menu shows a list of all products that are in an OC’s Medical Master List (MML) (the list of all OC Valiated products). This list is managed at HQ level in the MSL Tool outside of UniField and the data synchronizes to every UniField instance.
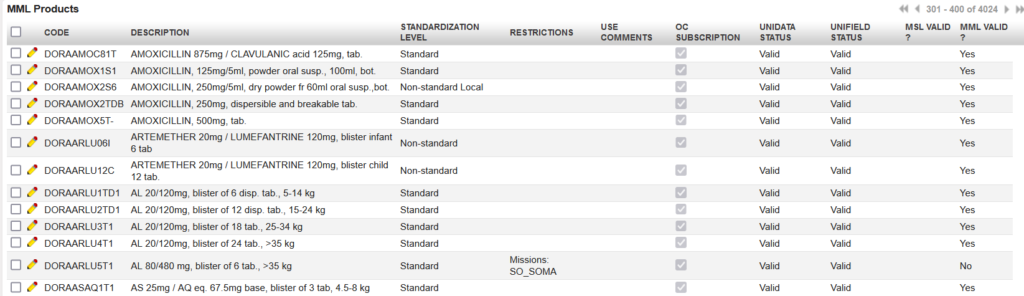
Go to: Products / MML / MML Products
In addition to listing all validated products, the MML product list shows country/project specific restrictions, Use Comments and the product’s statuses.
Any product which is added to the OC’s MML list (validated) or which is removed from it (devalidated) is added to / removed from the visible MML in UniField at HQ and synched down to all instances below. Any changes to the list will also be updated and synch down automatically.
The Medical Standard List (MSL) and Medical Master List (MML) are a critical part of MSF’s medical item management, including order management and stock management. Although there are rare cases of products belonging to Main type “LOG” being in MSL/MML, these lists are primarily made up of medical items and show the products which are OC Validated.
All levels of stakeholders (Activities, Projects, Missions & HQ) may be involved in the creation of an MSL. However, the MSL and MML data shown in UniField are managed in an MSL tool which is managed at HQ level. This tool was developed and is managed by the SPINCO team.
The list of products in a project MSL is made up of “ALPAs” (Standard list per each activity). The ALPAs of each project are consolidated to make an MSL. The level of “ALPAs” will not be visible in UniField. MSLs are the lowest level of detail which will be visible in UniField.
An MSL is always specific for one project (UniField instance) or Coordination. There is only 1 MSL version which is “published” (active) per project/instance. When all MSLs of a Mission are consolidated, this is referred to as a “Mission MSL”. The MML represents all products which have been “Validated” by the OC.
If a product is “de-validated” it will be removed from the OC MML and reflected in the updated published MSLs, although there may be a time lag in this meaning MSL will still contain it until next published MSL.
Restrictions
Certain products are considered “Validated” for the OC but are allowed to be used by certain restricted projects / missions only. They exist in the OC MML (and project MSL) but have “Restrictions” assigned. These can be “Mission restrictions” (product is considered as validated for all projects/instances belonging to specific mission) or “Project restrictions” (product is considered as validated only for the project/instance specified).
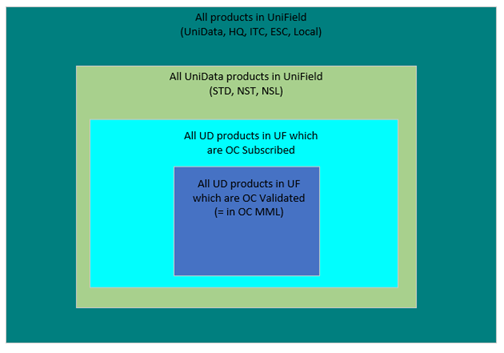
In one instance, it is possible for a product to be in both the MSL and also MML. It is possible for a product to be in an MML but not the MSL. It is possible for a product to be in neither MSL nor MML. Technically it is possible for a product to be in MSL but not MML, if an MSL has been published but the MML has de-validated the product.
MMLs can contain all types of UniData type products; Standard, Non-Standard and Non-Standard Local. They cannot contain products which are HQ, ITC or ESC or (non-UniData) Local products.
The picking/delivering of a kit doesn’t differ from the picking/delivering of a simple product. however, when processing the KCL, Kitting Orders, PICK, Pack, Ship, Delivery Orders and Real Consumption, there is a “Kit” column in these outgoing documents, when it is filled with “Kit Reference”, the processing kit will be selected, it is not mandatory to specify KCL in “Kit” column, but when you select one, the kit being processed will be linked with the KCL. This information will be displayed on the relevant documents.
When a Kit is processed in an OUT, the KCL will automatically be set to Status “Closed” when it is sent out of the instance. If a KCL has kit as a component, the component KCLs will also automatically be set to Closed status when the top KCL is closed.
N. How to merge 2 Local products (Coordination only)
In the Coordination instance, it is possible to merge 2 Local products. This is possible for any 2 Local products, even if they are in stock or in open transactions in any country instance. The selected product is de-activated and when synched, all previous stock / closed transactions with this product are transferred so that they now show the Active (kept) product in its place.
The merge of Local products can only be performed at Coordination instance level, and both products must be “Active” at point of merging.
Once the merge action has been performed for the 2 Local products, the selected product will be de-activated in Coordination. After synch, this product will be de-activated in all lower country instances, and any quantities in stock or open or closed transactions will be updated so that the “kept” product will appear in its place. For any case where there is a conflict at a lower instance after product has been merged and synched, a Not Run message will appear in receiving instance.
The merge functionality is available on the product data sheet at Coordination level as a button that will be displayed only for Local ( Non-MED) type products. The display of this button will also be conditioned by User Rights.
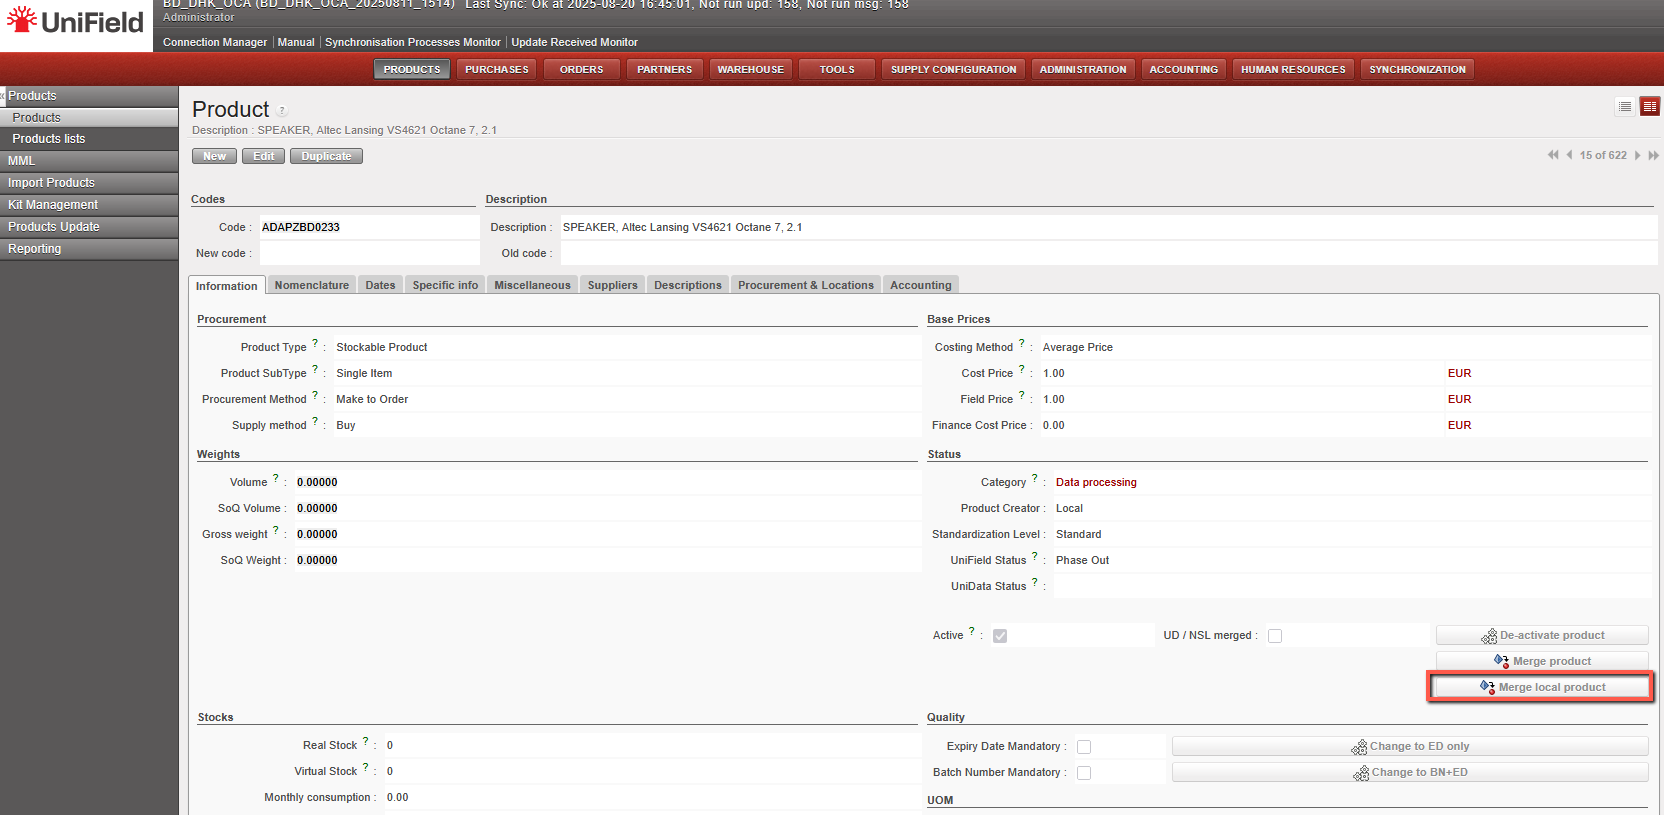
To merge a Local product, go to: Products/ Products:
1- Use the search tools to filter values to find the product you want to merge/deactivate. 2- Click on the product line to open it 3- Click on the “Merge Local product” button
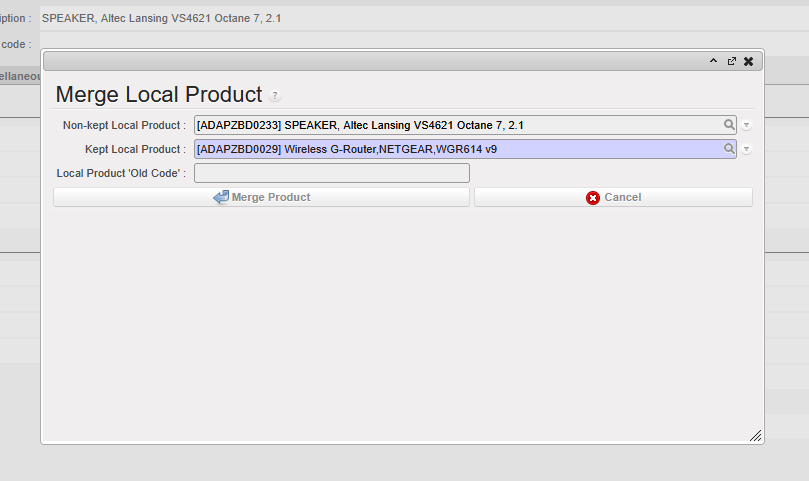
4- Select the “Kept product” (the product that will remain active) from the list of all the Active type products of the instance. When clicking on the magnifying glass, you can search using filter fields “Code”, “Description”, “Old code”, “New code”, and the 4 main nomenclature types.
5-Click on “Merge Product” on the pop up.
The de-activated Local product will be replaced by the “kept” Local product on all open or closed documents (including Stock locations and movements) containing the product.
The “Merge local product” button will still be active on the “Kept” product after merge. This means the kept product can be merged again with another Local product.
After merge, the deactivated product cannot be reactivated and the merging cannot be undone.
When merging, there are several checks performed on compatibility of attributes of both Local products to ensure consistency after merge. In case of a discrepancy, a message (in certain cases blocking) should be displayed urging the user to align the inconsistent attributes before merging can be done.
The warning blocking message for the above attributes should be: “Warning: There is an inconsistency between the selected products: <attributename> need to be the same. Please update (one of) your Local product’s <attributename> and then proceed with the merge.” (applied to Main Type, Product Type, Expiry Date Mandatory, Batch Number Mandatory, Default Unit of Measure,)
The non-blocking warning message should be: “Warning: There is an inconsistency between the selected products’ <attributename> . Do you still want to proceed with the merge?” (applied to Nomenclatures: Group, Family & Root and Temperature sensitive)
In general, attributes of the “kept” product will prevail over those of the de-activated product.
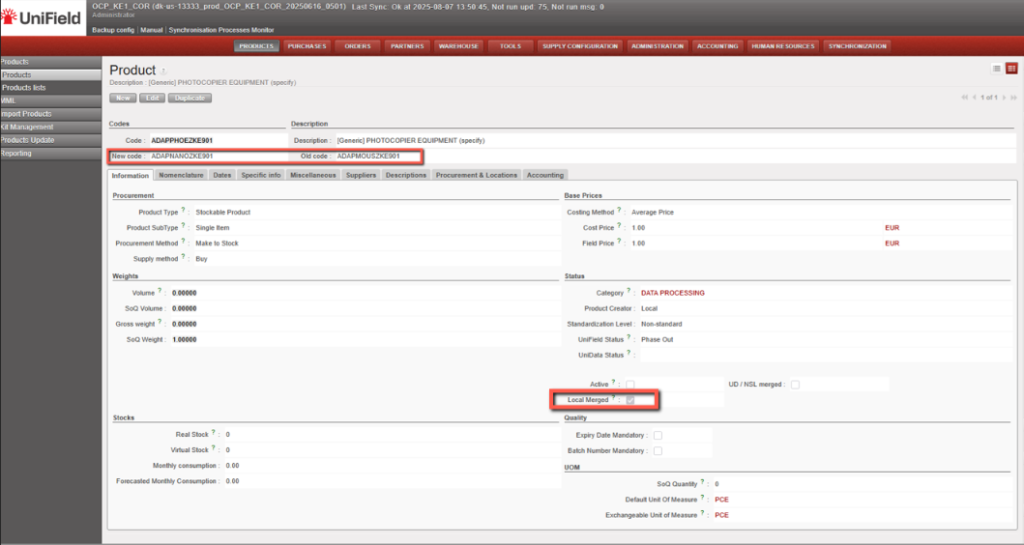
The deactivated Local products will have a checkbox named “Local merged” which will be ticked automatically once it is deactivated via merging process.
The reference of the de-activated product will be populated in the “Old code” field of the newly merged UniData product data sheet. In the non-kept product’s data sheet, the “New code” will be filled with kept product’s code.
Non-Kept Product after Merge
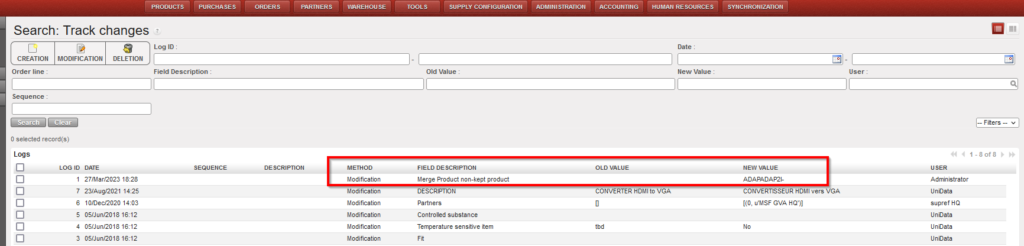
In the Track Changes of both products, there will be an indication of the other product code/product ID with which it was merged.
N.B. It is recognized that the sync rules for Non-Standard and Standard products differ from those for Non-standard Local products. The decision to merge any product should be in agreement and in line with local processes
*N.B.: The recalculation of average cost price done in the case that both kept and non-kept products stock should result in a accurate result based on current working of weight average cost price mechanism.
In the HQ instance, it is possible to merge 2 UniData products (Products with Product creator “UniData”). This is possible for any 2 UniData type products, even if they are in stock or in open transactions in any instances. The selected product is de-activated and when synched, all previous stock / closed transactions with this product are transferred so that they now show the Active (kept) product in its place.
UniData is then able to update the sole “Active” product and this product can be used as normal for all missions / instances. The merge of UniData products can only be performed at HQ, and both products must be “Active” at point of merging.
If user tries to de-activate a single product (not via this merge functionality) which has open transactions / stock, this is (still) blocked.
Once the merge action has been performed for the 2 UniData products, the selected product will be de-activated in HQ. After synch, this product will be de-activated in all Coordo & Project instances, and any quantities in stock or open or closed transactions will be updated so that the “kept” product will appear in its place. For any case where there is a conflict at a lower instance after product has been merged and synched, a Not Run message will appear in receiving instance.
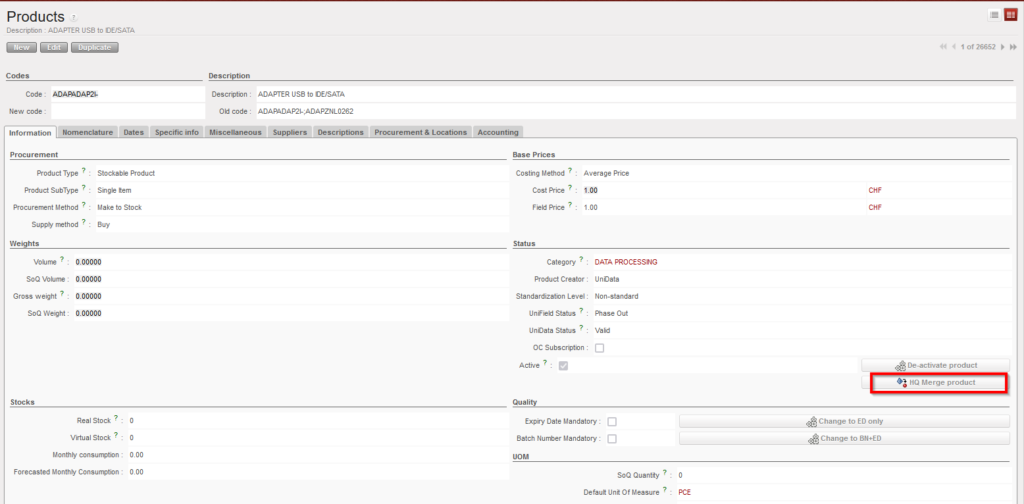
The merge functionality will be available on the product data sheet at HQ level as a button that will be displayed only for UniData type products. The display of this button will also be conditioned by User Rights.
To merge a Unidata product, go to: Products/ Products:
1- Use the search tools to filter values to find the product you want to merge/deactivate. 2- Click on the product line to open it 3- Click on the “HQ Merge product” button
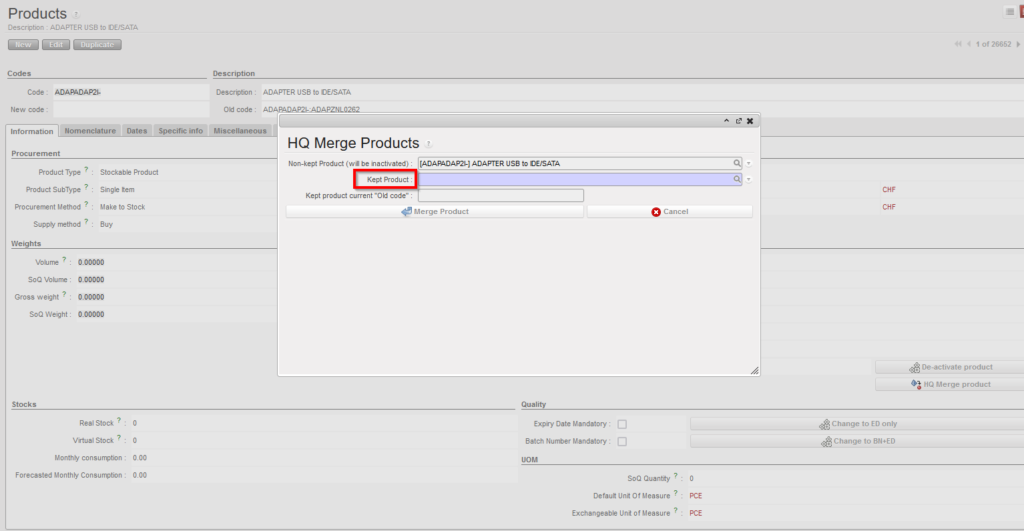
4- Select the “Kept product” (the product that will remain active) from the list of all the Active UniData type products of the instance. When clicking on the magnifying glass, you can search using filter fields “Code”, “Description”, “Old code”, “New code”, and the 4 main nomenclature types.
5-Click on “Merge Product” on the pop up.
The de-activated UniData product will be replaced by the “kept” UniData product on all open or closed documents (including Stock locations and movements) containing the product (similar to the original Local products merge functionality where Activated product replaces Deactivated product).
The “HQ Merge Product” button will still be active on the “Kept” product after merge. This means the kept product can be merged again with another UniData product. However the limit to the number of times the same product can be merged is supported for up to 2 merge actions (up to 3 products merged to one).
After merge, the deactivated product cannot be reactivated and the merging cannot be undone.
When merging, there are several checks performed on compatibility of attributes of both UniData products to ensure consistency after merge. In case of a discrepancy, a message (in certain cases blocking) should be displayed urging the user to align the inconsistent attributes before merging can be done.
The warning blocking message for the above attributes should be: “Warning: There is an inconsistency between the selected products: <attributename> need to be the same. Please update (one of) your UniData product’s <attributename> and then proceed with the merge.” (applied to Main Type, Product Type, Expiry Date Mandatory, Batch Number Mandatory, Default Unit of Measure,)
The non-blocking warning message should be: “Warning: There is an inconsistency between the selected products’ <attributename> . Do you still want to proceed with the merge?” (applied to Nomenclatures: Group, Family & Root and Temperature sensitive)
In general, attributes of the “kept” product will prevail over those of the de-activated product.
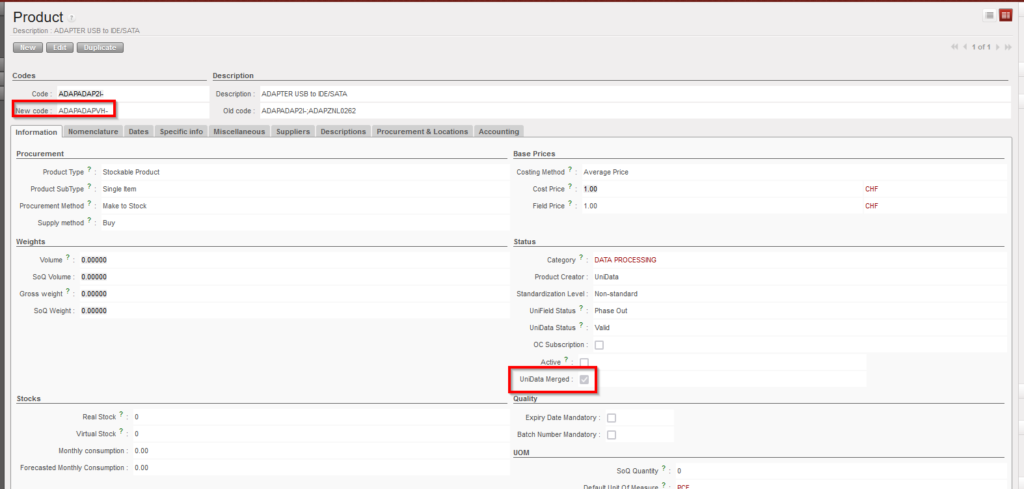
The deactivated UniData products will have a checkbox named “UniData merged” which will be ticked automatically once it is deactivated via merging process.
The reference of the de-activated product will be populated in the “Old code” field of the newly merged UniData product data sheet. In the non-kept product’s data sheet, the “New code” will be filled with kept product’s code.
Non-Kept Product after Merge
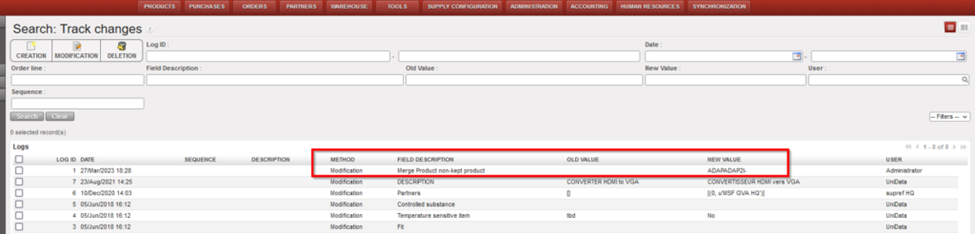
In the Track Changes of both products, there will be an indication of the other product code/product ID with which it was merged.
Track Changes after Merge
N.B. It is recognized that the sync rules for Non-Standard and Standard products differ from those for Non-standard Local products. The decision to merge any product should be in agreement and in line with processes of HQ & UniData
*N.B.: The recalculation of average cost price done in the case that both kept and non-kept products stock should result in a accurate result based on current working of weight average cost price mechanism.
H. How to add one or multiple Analytical Distribution (AD) to Purchase orders Line/lines
This functionality enables users to add or update the Analytical distributions (ADs), (Cost Centers and Destinations) the Draft PO lines, users have 3 options to use for adding or updating the ADs:
1- Adding AD/ADs at the header level:
Go to:PURCHASES > Purchase Orders > Analytical Distribution
PO AD at header level
by clicking on the “Analytical distribution”, new screen will be opened, and then by clicking on “New” user can add one AD or more to be applied on all PO lines the same way “Global analytic distribution”
AD at header level
2- Adding AD/ADs at line level manually:
User can add the AD to the line manually by clicking on AD icon on the line level, new screen will be opened, and then by clicking on “New” user can add the AD to the line:
AD at line level
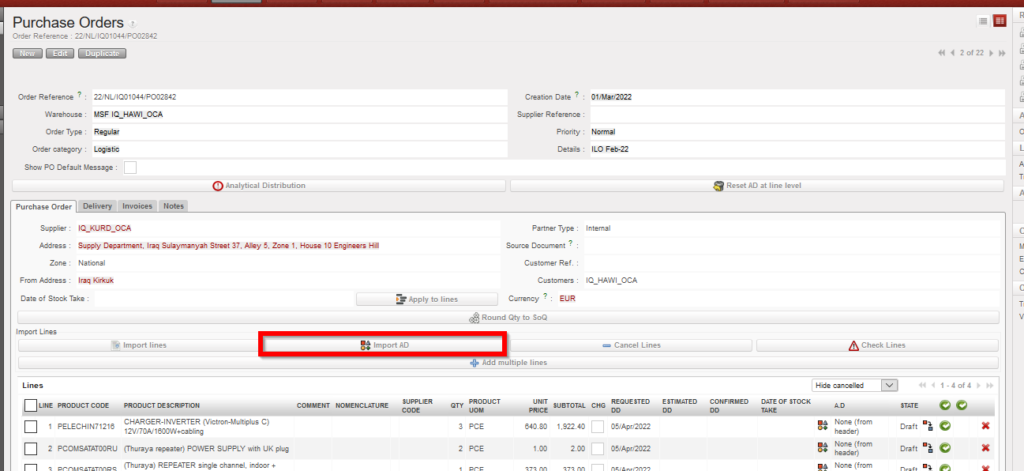
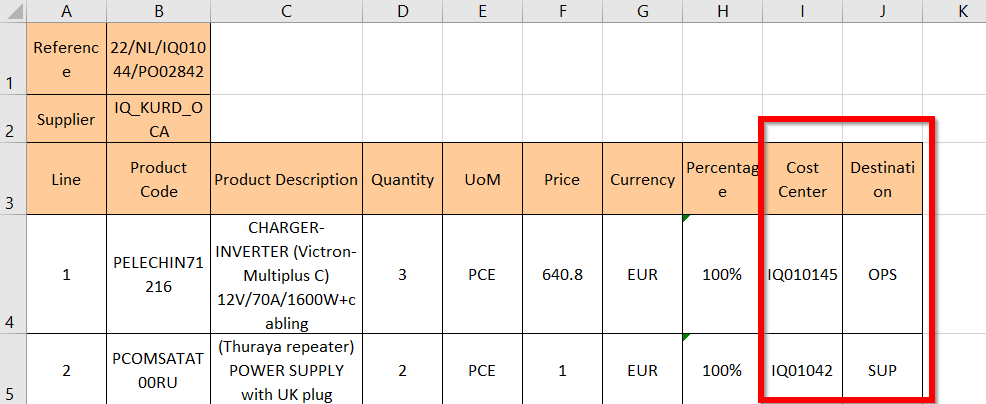
3- Adding AD/ADs by importing, this third option makes it easier for users to add 1 AD or multiple ADs to single line or to add different ADs to multiple lines in the same Draft PO, in case user wants to add different ADs to Different lines, Which means that not all lines have the same ADs, unlike the first option (adding AD at header level), this functionality could be done by using “Import ADs” button, 1 AD or multiple ADs (Cost Centre/s and Destination/s) can be added onto each line and must be separated by semicolon (;). The action to export / import templates are both via the “Import AD” button.
In case of splitted lines, when importing one or multiple ADs to the first line, the values entered in the first line will be used to fill all lines split from the same line number.
In the import file, only the AD values will be imported. No other information can be modified or added via the import file. Percentage must add up to “100%” and the total number of semicolons in the Percentage, Cost Center and Destination columns must be the same, and system will check that Line number and Product Code match those of onscreen PO.
If there is already an AD added in onscreen PO, exported template will show this. If at header level there are multiple ADs added, the exported template will show percentage values and ADs data. In the case that there are already ADs in the onscreen PO, it is possible to remove (delete) them by importing the file with blank AD values. At import, there is a check that AD values exist, but the main/secondary check will remain after import, when line/PO is validated.
Adding multiple ADs
*** Same options are available for Draft FO.
We use cookies to ensure that we give you the best experience on our website. If you continue to use this site we will assume that you are happy with it.