D. LU-SU1101: Configurable locations.

Supply User Manual ENG-> Supply Configurations-> 2.1 LU-SU1101: Instance set-up-> D. LU-SU1101: Configurable locations

D. LU-SU1101: Configurable locations.

UniField has been designed to be “scalable” in order to fit various contexts in the field where it is implemented (from small projects to coordination). Additional locations can be created on an instance: Intermediate Stocks (IS), Internal Consumption Units (ICU) and External Consumption Units (ECU).

The decision on whether to create and how to configure these additional locations should be taken considering the following factors:

  • Resources available to maintain records (on or offline)
  • Need for online visibility of stock and stock movements
  • Volume and value of supplies
  • Connectivity of other locations
  • Consumption rate of goods
  • Supply chain flow of goods following their dispatch from warehouse
  1. Intermediate Stocks

Intermediate Stocks are stocks which need to be managed separately from the main stock. Their management is usually done by the supply team.

Intermediate Stocks are not considered as final consumers. These stocks are “integrated” (they are part of the internal inventory and valued) and must be issued regularly.

2. Consumption Units (Internal vs External)

In UniField, a Consumption Unit is a location where goods are dispatched to be used or consumed. Consumption Units can either be internal or external locations. How the consumption units are configured depends on the situation and should be decided on a case by case basis.

Internal: If it is internal, we have full visibility on the stock level and its value in the location. Someone (probably based in that location) must update the system regularly with all stock movements when goods are consumed, and therefore the availability of resources and time to maintain the data for an Internal Consumption Unit should be a prime consideration before deciding on this option.

Internal Consumption Units are not considered as “last customers”.

External: If the destination is external, as soon as the stock has been dispatched, the stock leaves the UniField system, and other than knowing that it has been delivered to the consignee, we do not know any further details about it. Of course the location can continue to track movements using whatever system (e.g. excel or paper based), which may be a more flexible option for instances where there are time, resource or connectivity constraints.

External Consumption Units are considered as “last customers” (when goods are delivered to an ECU, they are assumed to be consumed).

The difference between an Intermediate Stock and an Internal Consumption Unit is tiny. An Intermediate Stock is used when a stock should be managed separately from the main stock (and this is usually done by the supply team). An Internal Consumption Unit is used when goods have already been sent to a unit but have not been used (consumed) yet. Their consumption can be recorded by the staff working in this unit (e.g. medical staff) if they have access to the system.

As we will see below, UniField allows creating locations for EPREP usage. Technically, there is no difference with the Intermediate Stocks. Functionally, these locations are used to keep emergency preparedness stocks.

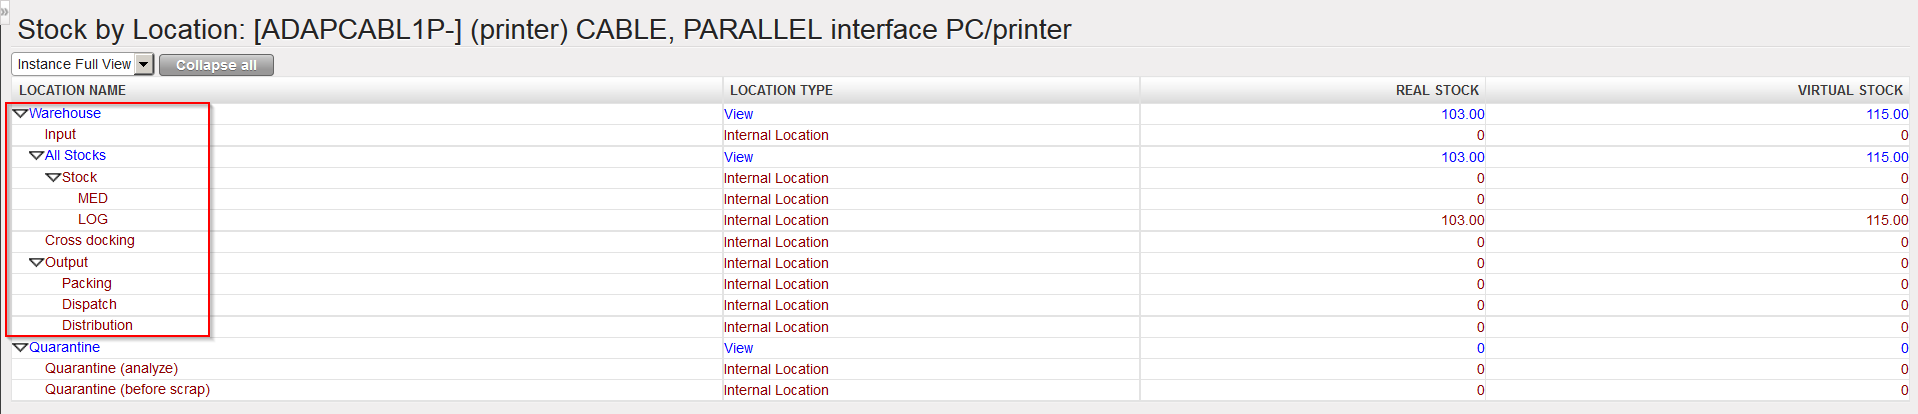
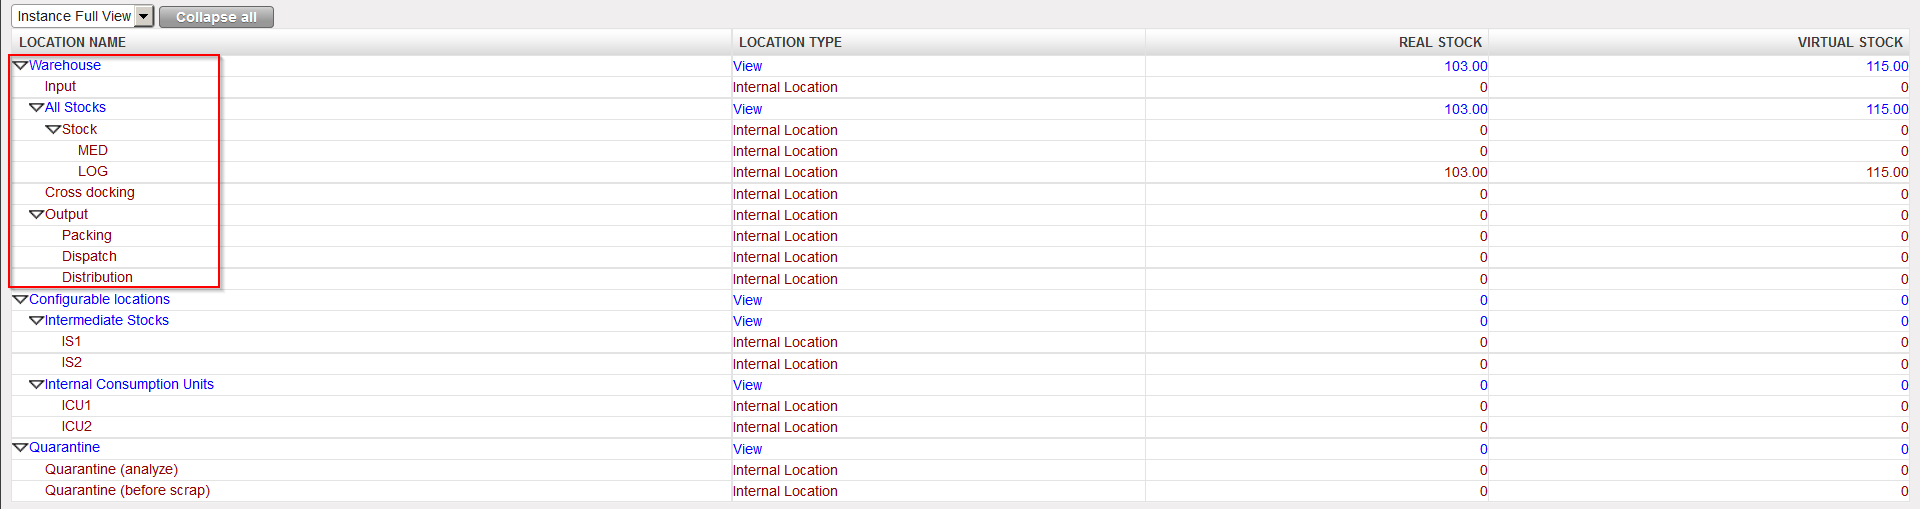
How to set-up configurable locations

Intermediate Stock locations and Internal/External Consumptions Units can be created on an instance in order to reflect the physical stocks organization of a project/coordination office and support the physical flows which occur on the ground.

6 possible set-ups (from basic to complex) are illustrated below. These 6 set-ups focus on a consumption done from stock (i.e. not on order). Note that hybrid set-ups are also possible.

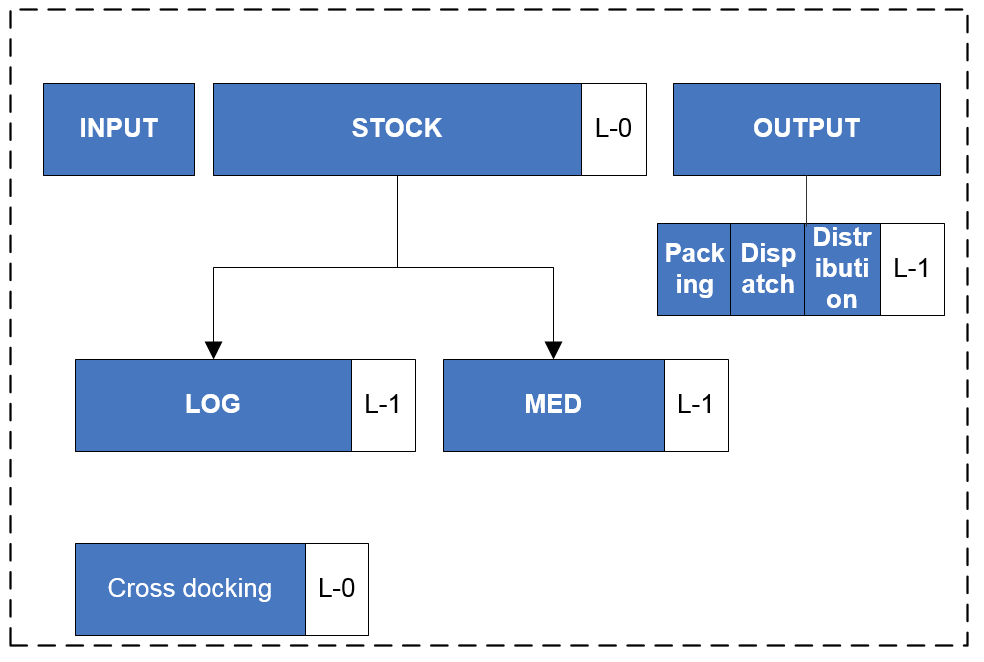
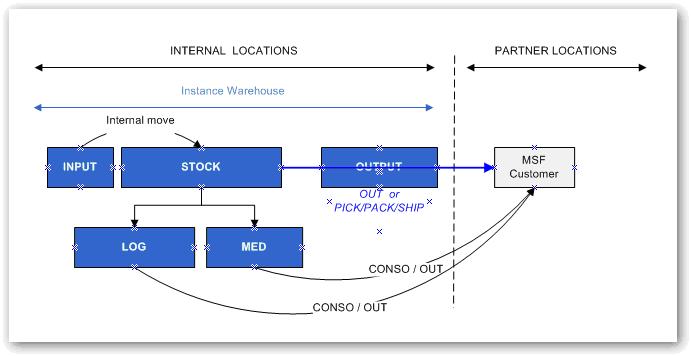
  1. Minimal set-up (no additional configurable locations)

Goods are received and kept in the main stock (Stock/MED/LOG).

If goods are consumed locally (on the instance) by an MSF requestor, the consumption is recorded via a Real Consumption Report with the main stock (Stock/MED/LOG) as Source Location and the generic partner location “MSF Customer” as Destination Location. If goods are consumed by a non-MSF requestor, the generic partner location “Other Customer” can be used as Destination Location. Internal Requests are not used to register local consumptions with this set-up.

If goods are dispatched to a partner (a customer, via the sourcing of an FO), the consumption is recorded via a Delivery Order (OUT) or via PICK/PACK/SHIP. The Source Location of the OUT or the PICK is the main stock (Stock/MED/LOG). The Destination Location of the OUT or the SHIP is the partner location “MSF Customer” (or “Other Customer” if the customer is an external partner).

Minimal set-up

Advantages Disadvantages Constraint/Effort
Quick and easy to manage and understand.


Minimal resources required.

Stock visibility on warehouse (quantity, value, expiry dates).

Goods delivered from the WH are considered consumed.


General follow up: no online details on intermediate stocks or consumptions/activities.

Minimum

2. Intermediate Stocks (IS)

When purchased, goods are:

  • Either received in the main stock (Stock/MED/LOG) but transferred to an Intermediate Stock (with an Internal Move created from scratch or with an Internal Move created from IR sourcing) from where they’ll be consumed.
  • Either received directly in an Intermediate Stock. This is possible if the replenishment of this IS starts with an IR which has the IS as Location Requestor.

If goods are consumed locally (on the instance) by an MSF requestor, the consumption is recorded via a Real Consumption Report with an IS as Source Location and the generic partner location “MSF Customer” as Destination Location. If goods are consumed by a non-MSF requestor, the generic partner location “Other Customer” can be used as Destination Location. Internal Requests are not used to register local consumptions with this set-up.

If goods are dispatched to a partner (a customer, via the sourcing of an FO), the consumption is recorded via a Delivery Order (OUT) or via PICK/PACK/SHIP. The Source Location of the OUT or the PICK is an IS. The Destination Location of the OUT or the SHIP is the partner location “MSF Customer” (or “Other Customer” if the customer is an external partner).

Intermediate Stocks

Advantages Disadvantages Constraint/Effort
Fairly simple to manage.


Good visibility of stock after it has left Warehouse until it reaches intermediate stocks (quantity, value, expiry dates).

Goods delivered from Intermediate stocks are considered consumed.


More demanding in terms of input (transactions & updates) required for system.

Average

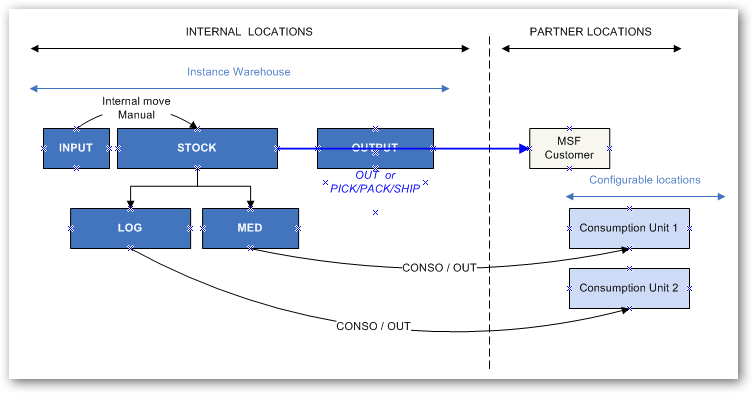
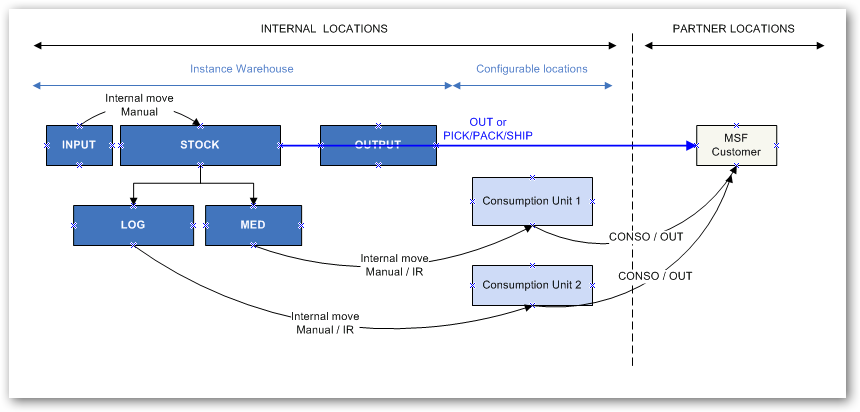
3. External Consumption Units (ECU)

This configuration is similar to the minimal set-up but with further details on the destination of the goods.

Goods are received and kept in the main stock (Stock/MED/LOG).

If goods are consumed locally (on the instance) by an MSF requestor, the consumption is recorded via a Real Consumption Report with the main stock (Stock/MED/LOG) as Source Location and a specific ECU as Destination Location. Note that the partner locations “MSF Customer” and “Other customer” can also be used as Destination Location if needed.

As an alternative to the RCR, local consumption can also be recorded through Internal Requests with an ECU as Location Requestor. Their sourcing generates a Delivery Order with the ECU as Destination Location.

If goods are dispatched to a partner (a customer, via the sourcing of an FO), the consumption is recorded via a Delivery Order (OUT) or via PICK/PACK/SHIP. The Source Location of the OUT or the PICK is the main stock (Stock/MED/LOG). The Destination Location of the OUT or the SHIP is the partner location “MSF Customer” (or “Other Customer” if the customer is an external partner).

An alternative is to link a partner (customer) to an ECU (thanks to the field “Customer Location” available on the “Field orders & Purchases” tab of the partner sheet). In this case, all goods shipped to this partner have this ECU as Destination Location of the OUT or the SHIP.

Note that the stocks of the ECUs are not integrated (no visibility) as these locations are considered as “end customers”.

External Consumption Units

Advantages Disadvantages Constraint/Effort
Quick and easy to manage.


Quite low volume of transactions.

Minimal resources required.

Stock visibility on warehouse (quantity, value, expiry dates)

Goods delivered from the WH are considered as consumed*.


General follow up and consumption information only on destinations (consumption units = end consumers)

Average low

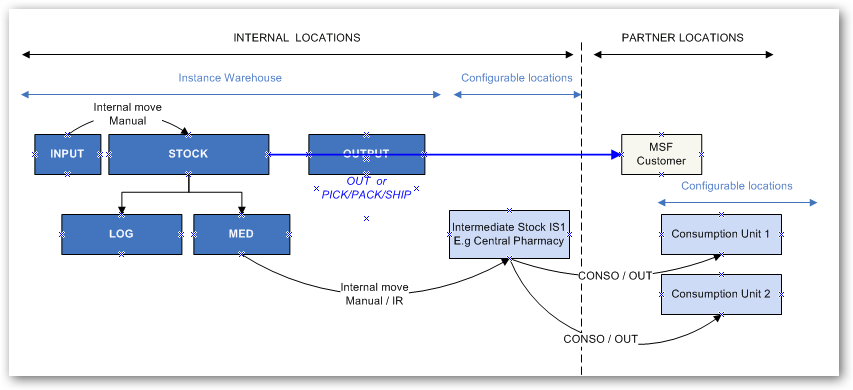
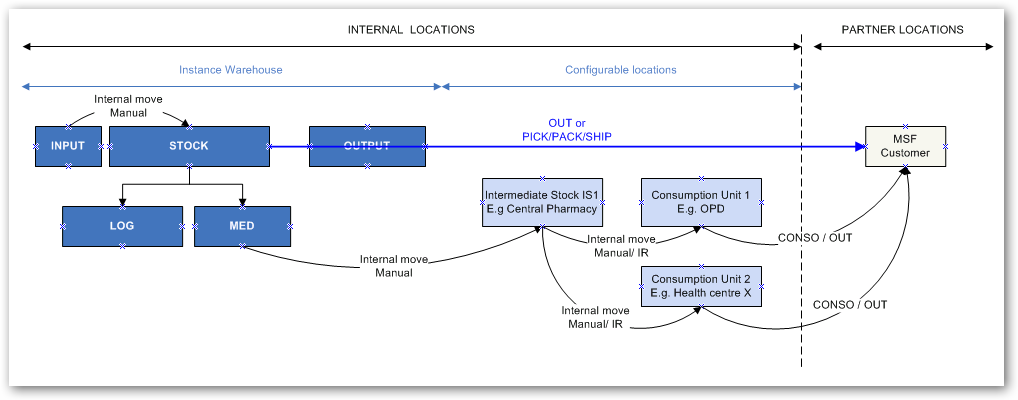
4. Intermediate Stocks (IS) and External Consumption Units (ECU)

This configuration is a mixture of set-ups 2 and 3.

When purchased, goods are:

  • Either received in the main stock (Stock/MED/LOG) but transferred to an Intermediate Stock (with an Internal Move created from scratch or with an Internal Move created from IR sourcing) from where they’ll be consumed.
  • Either received directly in an Intermediate Stock. This is possible if the replenishment of this IS starts with an IR which has the IS as Location Requestor.

If goods are consumed locally (on the instance) by an MSF requestor, the consumption is recorded via a Real Consumption Report with an IS as Source Location and a specific ECU as Destination Location. Note that the partner locations “MSF Customer” and “Other customer” can also be used as Destination Location if needed.

As an alternative to the RCR, local consumption can also be recorded through Internal Requests with an ECU as Location Requestor. Their sourcing generates a Delivery Order with the ECU as Destination Location.

If goods are dispatched to a partner (a customer, via the sourcing of an FO), the consumption is recorded via a Delivery Order (OUT) or via PICK/PACK/SHIP. The Source Location of the OUT or the PICK is an IS. The Destination Location of the OUT or the SHIP is the partner location “MSF Customer” (or “Other Customer” if the customer is an external partner).

An alternative is to link a partner (customer) to an ECU (thanks to the field “Customer Location” available on the “Field orders & Purchases” tab of the partner sheet). In this case, all goods shipped to this partner have this ECU as Destination Location of the OUT or the SHIP.

Note that the stocks of the ECUs are not integrated (no visibility) as these locations are considered as “end customers”.

Intermediate Stocks and External Consumption Units

Advantages Disadvantages Constraint/Effort
Good overview of stock management and general follow up for Intermediate Stocks (quantity, value, expiry dates).


Consumption information by destination/consumer.

More complex.


Needs more input to manage: Moves from stock to intermediate stocks plus one consumption report by destination (consumer).

Stock of consumption units is not integrated (no visibility).

Average

5. Internal Consumption Units (ICU)

This configuration is very close to set-up 2.

When purchased, goods are:

  • Either received in the main stock (Stock/MED/LOG) but transferred to an Internal Consumption Unit (with an Internal Move created from scratch or with an Internal Move created from IR sourcing) from where they’ll be consumed.
  • Either received directly in an Internal Consumption Unit. This is possible if the replenishment of this ICU starts with an IR which has the ICU as Location Requestor.

If goods are consumed locally (on the instance) by an MSF requestor, the consumption is recorded via a Real Consumption Report with an ICU as Source Location and the generic partner location “MSF Customer” as Destination Location. If goods are consumed by a non-MSF requestor, the generic partner location “Other Customer” can be used as Destination Location. Internal Requests are not used to register local consumptions with this set-up.

If goods are dispatched to a partner (a customer, via the sourcing of an FO), the consumption is recorded via a Delivery Order (OUT) or via PICK/PACK/SHIP. The Source Location of the OUT or the PICK is an ICU. The Destination Location of the OUT or the SHIP is the partner location “MSF Customer” (or “Other Customer” if the customer is an external partner).

Internal Consumption Units

Advantages Disadvantages Constraint/Effort
Fairly good overview of consumption of stocks.


Visibility of consumption units’ stock (quantity, value, expiry dates)

Some resources needed to ensure system is up to date (frequent consumption of consumption unit). Average

6. Full set-up

In this configuration, Intermediate Stocks, Internal Consumption Units and External Consumption Units are used. This set-up is more complex and requires much more transactions, meaning resources, to maintain the system.

When purchased, goods are:

  • Either received in the main stock Stock/MED/LOG (via the Input location and the manual/automatic processing of an INT)
  • Either received in an Intermediate Stock (via the Input location and the manual/automatic processing of an INT)
  • Either received in an Internal Consumption Units (via the Input location and the manual/automatic processing of an INT)

Goods can be moved between these 3 types of locations using Internal Move created from scratch or Internal Moves created from IR sourcing.

Local consumption is registered via RCR. The 3 types of locations can be used as Source Location. The Destination Location can be an ECU, “MSF Customer” or “Other Customer”.

As an alternative to the RCR, local consumption can also be recorded through Internal Requests with an ECU as Location Requestor. Their sourcing (from one of the 3 types of locations) generates a Delivery Order with the ECU as Destination Location.

If goods are dispatched to a partner (a customer, via the sourcing of an FO), the consumption is recorded via a Delivery Order (OUT) or via PICK/PACK/SHIP. The 3 types of locations can be used as Source Location on the OUT or the PICK. The Destination Location of the OUT or the SHIP is the partner location “MSF Customer” (or “Other Customer” if the customer is an external partner).

An alternative is to link a partner (customer) to an ECU (thanks to the field “Customer Location” available on the “Field orders & Purchases” tab of the partner sheet). In this case, all goods shipped to this partner have this ECU as Destination Location of the OUT or the SHIP.

Full set-up

Advantages Disadvantages Constraint/Effort
Very precise follow up of goods at the different stages (quantity, value, expiry dates,) of the supply chain until they’re consumed by the end consumer.


Closer to real consumption.

Complex to understand.


Increased number of transactions (meaning also of resources needed to maintain the system).

Delay in the timeframe when goods are considered “consumed”.

Maximal

In general, goods are considered consumed once they have left internal locations for external (partner) locations. Consumption in the system reflects either consumption reports or outgoing delivery of shipments (we exclude loans, donations, loss and discrepancies as consumption and we also deduct returns). The Warehouse Chapter details how consumptions (real by location or monthly average for the instance) are calculated.

Configurable Stock Locations can be created at Coordination and Project instance levels but the decision should be taken on case by case basis according to Mission/OC decision.

C. LU-SU1101: Default Locations

Supply User Manual ENG-> Supply Configurations-> 2.1 LU-SU1101: Instance set-up-> C. LU-SU1101: Default Locations

C. LU-SU1101: Default Locations

The structure of locations within UniField facilitates the organization of stocks and also supports the double entry principle, which is explained in details in the Warehouse chapter. Any stackable products received will be part of the internal inventory until they are issued to an external party at which point, they will be removed from any internal locations and will exit UniField. Products which are non-stockable or services with reception will not figure in internal locations but will be received in specific virtual locations. The exception is where non-stockable products are in transit to another internal partner (e.g. project), in which case they will transit through the (coordination) Cross docking location before to be dispatched.

A warehouse in UniField is an entity which represents one or more physical storage locations from a project/coordination office. This warehouse includes a “point of entry” of goods (destination of most of POs) and a “point of exit” of goods intended for a customer (through an FO). Each instance has a warehouse created by default at the instance creation. The warehouse is divided into 4 main parts: Input, Stock (with children locations), Cross docking and Output (also with children locations).

Instance Warehouse
Instance Warehouse (minimal set-up)
Instance warehouse (including examples of configurable locations)

Input is a transition location through which received products transit (and where a quantitative/qualitative check can be performed) before being available in stock. It is the destination location of an Incoming Shipment/Purchase Order which is not received in cross-docking.

Stock reflects the main stock from a coordination/project. This location has 2 children location, MED for the storage of medical items and LOG for the storage of logistical items. MED products are stored in the MED location. LOG products are stored in the LOG location. LIB products are stored directly in the Stock location (if they are declared as stockable products).

When an Incoming Shipment (IN) is processed and goods are received in the Input location, the system creates an Internal Move (INT) to transfer the goods from the Input location to the stock. This Internal Move is processed automatically if the goods are received directly in the requesting location (checkbox “Direct to Requesting location” ticked when IN processed) or manually if the goods actually transit through Input for quantitative/qualitative control (checkbox “Direct to Requesting Location” unticked when IN processed).

Goods present in Stock or children (MED/LOG) are considered as available (unless reserved) for any request.

Output is a transition location through which products being distributed to customers transit when the full shipment process (pick/pack/ship) is used. The Output location itself is not used but goods transit through its children locations (Packing/Dispatch/Distribution) during picking/packing/shipment.

Cross docking is a transition location through which received products transit when they are received on an instance but should be dispatched to a customer. An Incoming Shipment/Purchase Order linked to a Field Order has Cross docking as default destination location. An Incoming Shipment/Purchase Order linked to an Internal Request (whose Location Requestor is an External Consumption Unit) has Cross docking as destination location.

B. LU-SU1101: How to reconfigure an instance

Supply User Manual ENG->Supply Configurations->2.1 LU-SU1101: Instance set-up->B. LU-SU1101: How to reconfigure an instance

B. LU-SU1101: How to reconfigure an instance

When an instance is created for a coordination or a project, a first configuration is done (usually by IT team from HQ in collaboration with the UniField core team). This first configuration is performed on the synchronization instance, on the HQ instance and on the coordination/project instance which is created. This first configuration is key for UniField global consistency and consists of steps such as:

  1. Groups creation.
  2. Proprietary instance declaration.
  3. Accounting set-up.
  4. Functional currency declaration.
  5. Initial synchronization.

These steps (and others) are described in detail in the UniField IT configuration manual.

Once this first configuration has been done by the HQ/core team, an instance can be reconfigured whenever needed at coordination or project level. A reconfiguration consists of 7 steps which are detailed below. Note that only steps 4, 5 and 7 are directly impacting supply.

Go to: Administration / Configuration / Reconfigure

Most of the configuration windows have the same format. They include a progress bar on the bottom left (percentage completed) and progress buttons on the bottom right.

  • Previous, to return to the preceding screen.
  • Skip, to skip the step and continue to the next configuration step.
  • Next, after filling in the configuration fields, to save this information and continue to the next step.
  • Finish, to finish the configuration.
Instance Reconfiguration
  1. The first step “Activate the International Commitments Import” is to be completed by finance. Select “Skip” to skip this step and continue the configuration.
Activate the International Commitments Import

2. In the second step, you see a window asking you to activate the fixed asset. This step is to be completed by finance. Select “Skip” to skip this step and continue the configuration.

Activate the Fixed asset configuration

3. Activate the Payroll configuration, to be completed by finance. Select “Skip” to skip this step and continue the configuration.

Activate the Payroll configuration

4. Company Configuration

The company matches with your instance and with the internal partner bearing the name of your instance. This step allows defining a default address, a delivery address and an invoicing address for your instance. These addresses are automatically copied on the internal partner bearing the name of your instance.

Company Configuration

a) Enter the details of the Default address:

The “Company Name” and the “Partner name” are already filled and cannot be modified.

You may enter/modify the content of the other fields. You can leave some fields blank such as “Company website”, “Fed state”, “E-mail” and “Bank Account No.” but need to fill in the address fields highlighted in blue.

b) Enter the details of the Ship to/Bill to addresses:

Click on the “Ship to address” tab and enter the usual address where goods will need to be delivered. If this is not filled in, the Default address will be used.

Click on the “Bill to address” tab and enter the address where you would like to receive supplier invoices. If this is not filled in, the Default address will be used.

Click on the green “Next” arrow to progress to the next step.

  1. Delivery Process Configuration
Delivery Process Configuration

This step enables to choose what sort of delivery process is appropriate for the instance. It may be that the “Simple Out” process (meaning the simple delivery process) is sufficient, or the more complex process which was developed for UniField (pick/pack/ship) may be more appropriate. Delivery workflows can be changed according to the need and context.

Select:

  • Simple Out, if you don’t need to use picking and packing processes on your instance
  • PICK/PACK/SHIP, if you decide to use the full shipment process on your instance

Click on the green “Next” arrow to progress to the next step.

  1. Allocation Stock Configuration.
Allocation Stock Configuration

For Allocated Stocks, the option “Allocated” is pre-selected, as currently all MSF stock should be allocated to the relevant cost center.

The field “System will use unallocated moves on finance side” is not relevant since all stock will be allocated for the time being.

Click “Skip”.

2. Country restrictions Configuration.

In certain contexts, there may be restrictions on some kind of products or on the provenance of products. (See Chapter on Products for further information on product specific settings).

Country restrictions Configuration

To add a country restriction:

Click on the “New” button and encode the Name of the restrictions.

Click on the floppy disk icon to save the restriction.

Click on the “Next” button to progress to the next screen if finished or repeat the steps above to add further restrictions.

When an instance is created for a coordination or a project, a first configuration is done (usually by IT team from HQ in collaboration with the UniField core team). This first configuration is performed on the synchronization instance, on the HQ instance and on the coordination/project instance which is created. This first configuration is key for UniField global consistency and consists of steps such as:

  1. Groups creation.
  2. Proprietary instance declaration.
  3. Accounting set-up.
  4. Functional currency declaration.
  5. Initial synchronization.

These steps (and others) are described in detail in the UniField IT configuration manual.

Once this first configuration has been done by the HQ/core team, an instance can be reconfigured whenever needed at coordination or project level. A reconfiguration consists of 7 steps which are detailed below. Note that only steps 4, 5 and 7 are directly impacting supply.

Go to: Administration / Configuration / Reconfigure

Most of the configuration windows have the same format. They include a progress bar on the bottom left (percentage completed) and progress buttons on the bottom right.

  • Previous, to return to the preceding screen.
  • Skip, to skip the step and continue to the next configuration step.
  • Next, after filling in the configuration fields, to save this information and continue to the next step.
  • Finish, to finish the configuration.
Instance Reconfiguration
  1. The first step “Activate the International Commitments Import” is to be completed by finance. Select “Skip” to skip this step and continue the configuration.
Activate the International Commitments Import

2. In the second step, you see a window asking you to activate the fixed asset. This step is to be completed by finance. Select “Skip” to skip this step and continue the configuration.

Activate the Fixed asset configuration

3. Activate the Payroll configuration, to be completed by finance. Select “Skip” to skip this step and continue the configuration.

Activate the Payroll configuration

4. Company Configuration

The company matches with your instance and with the internal partner bearing the name of your instance. This step allows defining a default address, a delivery address and an invoicing address for your instance. These addresses are automatically copied on the internal partner bearing the name of your instance.

Company Configuration

a) Enter the details of the Default address:

The “Company Name” and the “Partner name” are already filled and cannot be modified.

You may enter/modify the content of the other fields. You can leave some fields blank such as “Company website”, “Fed state”, “E-mail” and “Bank Account No.” but need to fill in the address fields highlighted in blue.

b) Enter the details of the Ship to/Bill to addresses:

Click on the “Ship to address” tab and enter the usual address where goods will need to be delivered. If this is not filled in, the Default address will be used.

Click on the “Bill to address” tab and enter the address where you would like to receive supplier invoices. If this is not filled in, the Default address will be used.

Click on the green “Next” arrow to progress to the next step.

  1. Delivery Process Configuration
Delivery Process Configuration

This step enables to choose what sort of delivery process is appropriate for the instance. It may be that the “Simple Out” process (meaning the simple delivery process) is sufficient, or the more complex process which was developed for UniField (pick/pack/ship) may be more appropriate. Delivery workflows can be changed according to the need and context.

Select:

  • Simple Out, if you don’t need to use picking and packing processes on your instance
  • PICK/PACK/SHIP, if you decide to use the full shipment process on your instance

Click on the green “Next” arrow to progress to the next step.

2. Allocation Stock Configuration.

Allocation Stock Configuration

For Allocated Stocks, the option “Allocated” is pre-selected, as currently all MSF stock should be allocated to the relevant cost center.

The field “System will use unallocated moves on finance side” is not relevant since all stock will be allocated for the time being.

Click “Skip“.

3. Country restrictions Configuration.

In certain contexts, there may be restrictions on some kind of products or on the provenance of products. (See Chapter on Products for further information on product specific settings).

Country restrictions Configuration

To add a country restriction:

Click on the “New” button and encode the Name of the restrictions.

Click on the floppy disk icon to save the restriction.

Click on the “Next” button to progress to the next screen if finished or repeat the steps above to add further restrictions.

A. LU-SU1101: What is an instance ?

Supply User Manual ENG->Supply Configurations->2.1 LU-SU1101: Instance set-up->A. LU-SU1101: What is an instance ?

A. LU-SU1101: What is an instance ?

When an MSF office (coordination or project) starts using UniField, an instance is prepared for this office by the HQ OC team in collaboration with the UniField core team. An instance is a server (but it can also be called database) which is usually installed on a computer (a laptop) dedicated to UniField. This computer is physically present in the coordination/project office and is maintained by the local IT staff. No user should work on this computer, but it should be accessible through LAN (and sometimes via other means, e.g. Access to an instance can also be granted via other means than LAN, using internet connection, wimax, nano stations team viewer, if a user is not working from the office but needs access to an instance ) in order to allow users from the office to access (and work on) the database from their own work station. A web browser (Mozilla Firefox) is used to access the database thanks to an IP, a user and a password.

If UniField is deployed on an entire mission (migration from previous systems or mission newly opened), several instances are prepared for the mission: 1 for the coordination and n for the n projects of the mission (if it is decided to use UniField on all projects).

If a new project opens-up on an existing mission already using UniField and if the decision is taken to use UniField on this project, 1 instance is created for this project and added to the existing UniField landscape of the mission.

Note that a mission or a project can be opened and UniField installed later on.

When a project or a whole mission using UniField is closing, several operations must be done on the instance(s) before their inactivation.

Different types of instances exist.

  • Coordination and project instances are the ones which are accessed by mission users (supply and finance) to perform their daily tasks. Coordination instances are used in capital while project instances are used at project level. Per mission, you find 1 coordination instance and n project instances.
  • Each OC has 1 HQ instance which is usually installed and maintained in the HQ of the OC. The HQ instance is accessed by HQ users.
  • Finally, the synchronization instance (also called synchronization server, which can be seen has a pivot) is used to allow exchange of data between instances. The synchronization server is not used to record functional data but only to allow exchange of data between the other instances. There is only 1 synchronization server for the whole MSF movement. Note that project, coordination and HQ instances can be synchronized while the synchronization instance cannot be synchronized.

An order addressed to coordination by a project is pushed to the synchronization server when the project instance is synchronized. It is then pulled from the synchronization server to the coordination instance when the coordination instance is synchronized.

An international product created on a HQ instance is pushed to the synchronization server when this HQ instance is synchronized. It is then pulled to the related coordination/project instances when these related instances are synchronized.

In a supply language, you may say that data exchanged from one instance to another transit through the synchronization server.

The picture below represents the UniField landscape of an OC which would only have 1 mission (with 1 coordination and 2 projects).

Instances landscape of an OC

In order for a coordination or project instance to reflect the working environment of the office which it represents, certain parameters need to be configured and some master data (such as the locations or the partners) need to be created before users connect to the database.