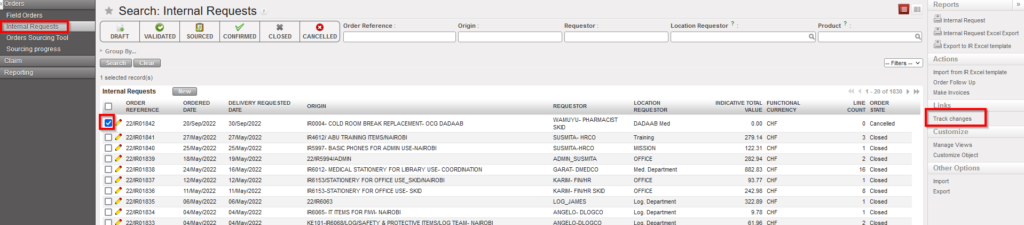
For an easy follow up of the history of changes of supply/finance objects, users can use the Track changes on the right action menu to display information about changes for many objects in supply/finance:
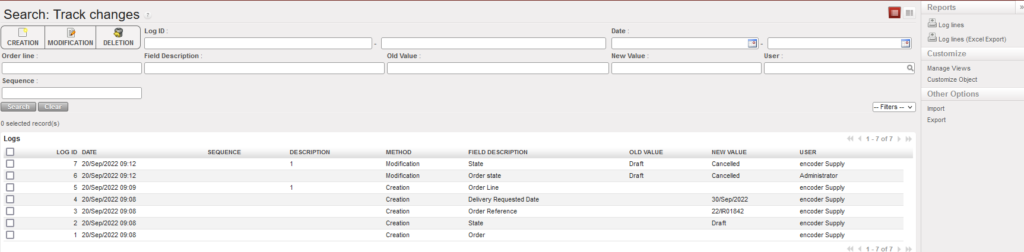
Example of one of the objects – Track changesInformation displayed in Track changes report
This option is available for below supply/finance objects:
Many options are given to users to optimize searches. The system facilitates filtering and searching for groups of important documents using the relevant buttons.
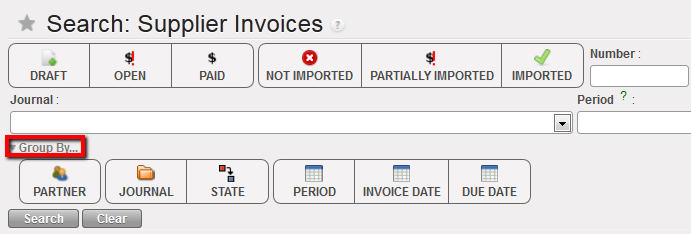
Supplier Invoice search options
Filter buttons: when a filter is active the button turns dark grey; click again to deselect. It is important to note that the system’s searching options are based on “and” not “or”, so in this example pressing the filter buttons {Draft} and {Paid} will look for documents with status Draft AND Paid and therefore it will return zero documents as an invoice can only have one status at a time.
In some search views there is a filter button selected by default. Normally it is the button that shows all open documents to avoid seeing cancelled and closed documents.
Sometimes the filter buttons are gathered by sub-group so you can filter on one of the criteria by group. Therefore you can select several filters from different group but keep in mind that the selection order of these filters is important to display the result of your search
In all search views, there are also default search fields. These fields are usually chosen according to the importance of the object (related to the list view column) and provide a quick way to search without building a query. They can be text fields, look-up fields or drop-down menus.
{Group By} button filters show the search results by group according to the selections made
Group by filters
{Search} button executes the search, while the {Clear} button clears all filters so all records are returned
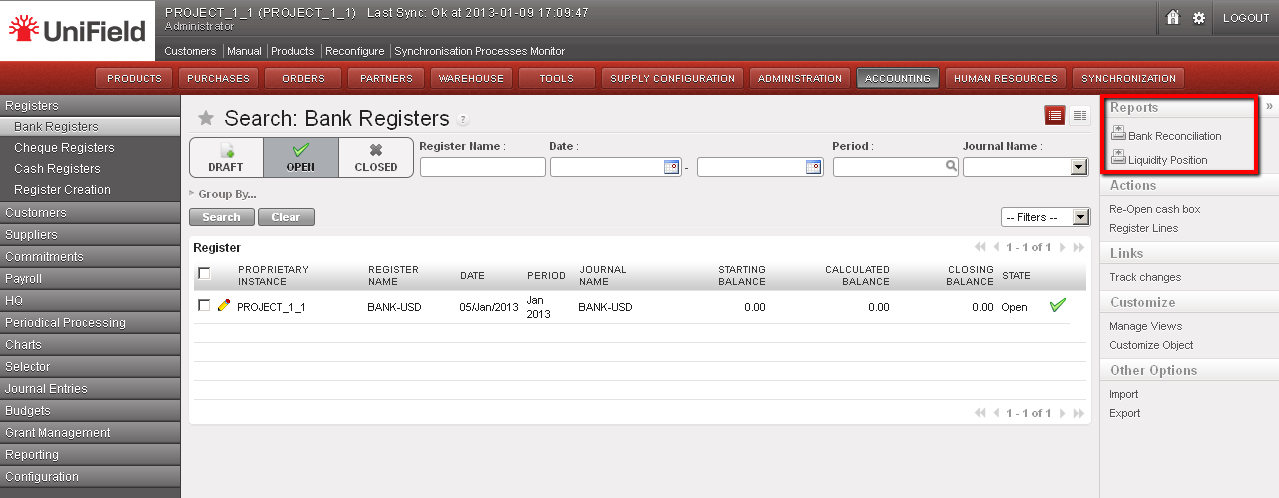
Printing
Printing in UniField is always generated via a pdf, xls or csv file; printing options are located in the {Action Menu} on the right-hand side of the screen. All the options under {Reports} are usually printable; this will work on views, search and form.
Printing report options in the {Bank registers} sub-module
Exporting and Importing Documents
Exporting
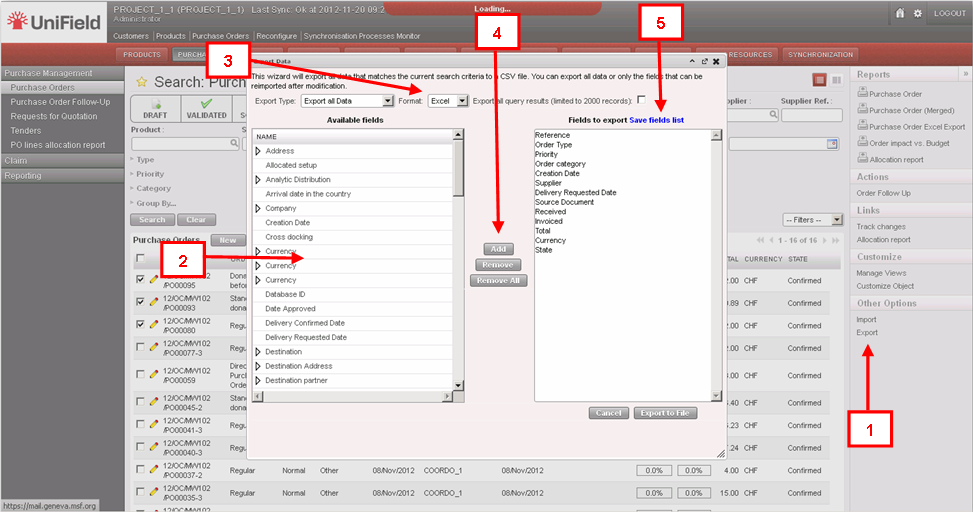
Exporting capabilities in UniField are various. An export can be in PDF, Excel, XML or CSV formats. If the task allows exporting the option is located in the {Action} menu on the right. The user must have the appropriate user rights to perform an export. The user should select the columns to export as well as the format.
Export file or data
Exporting step:
Select the line/ product/partner or other transaction, display the {Action menu} on the right and click on {Export}.
The export wizard will appear, the user will need to choose the fields to export
The most common format is xls or csv.
Once the fields to export have been selected, use the {Add} button to display the content to export in the right column and click on the {Export to file} button
If this type of export is performed regularly, the system offers the possibility to save the list to use repeatedly. The exported file will contain the default fields listed. It is possible to add to the default data which will be exported by selecting from the Available fields (2) and clicking on the {Add} button (4).
Importing
The UniField importable file types are XML, XLS or CSV. The format depends on the business application, module and transaction (most often is in XML).
There are four different import types:
Those related to the data migration when installing and configuring an instance (e.g. initial stock level import)
This type of import will be seen in the module 02 – Configurations
Specific imports from another software for accounting matters (e.g. HQ entries, Payroll)
Those related to transfer of data from one object to another inside UniField to avoid retyping them (e.g. importing a Supplier Invoice into a register to pay it)
Those related to the creation of some documents or entries, in order to ease and make the job quicker (e.g. import of product lines into IR or FO, Tender or PO, import of journal items or register lines).
It is extremely important to have the exact right import format with exact column descriptions.
The import functionality can be found directly from inside a specific transaction (by clicking on the {Import} button) or from the {Action menu} on the right hand side of the screen.
Please note: The import functionality is linked to specific business applications and modules, so please refer to the relevant user manual for specific actions. In many UF modules the import option is available.
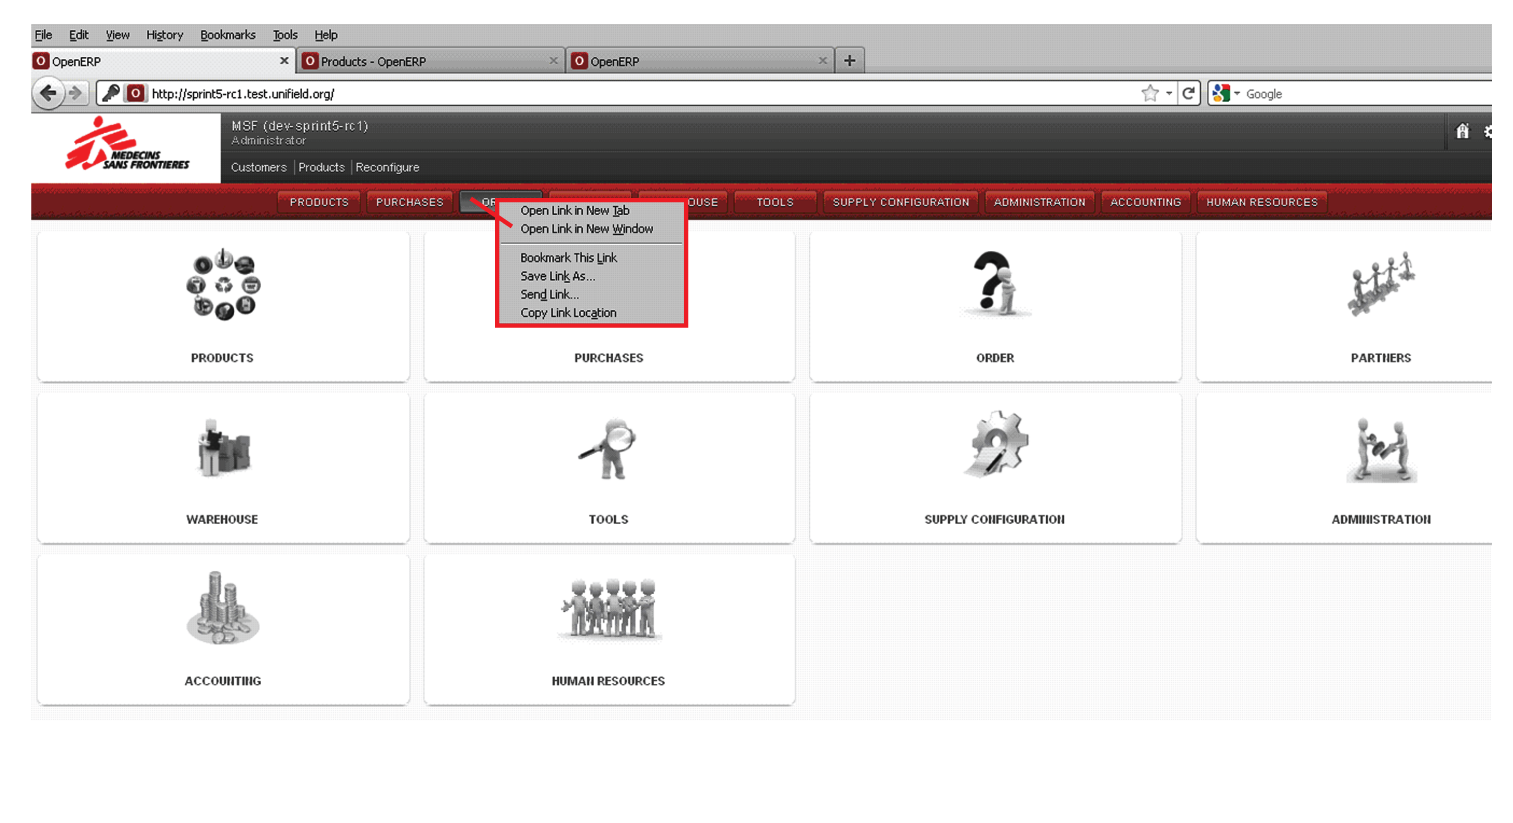
Opening the Application in a Second Tab
At times, it may be useful to open more than one screen at a time. It is possible to do this by right clicking on the button (on top) of the application you wish to see. A drop down menu will appear and if you click on the option “Open Link in New Tab” the application selected will be opened in the next tab. It is also possible to drag the application button in to the browser header to open it in a new tab. In some cases, UniField will automatically open a new tab to display search results.
Opening a second tab
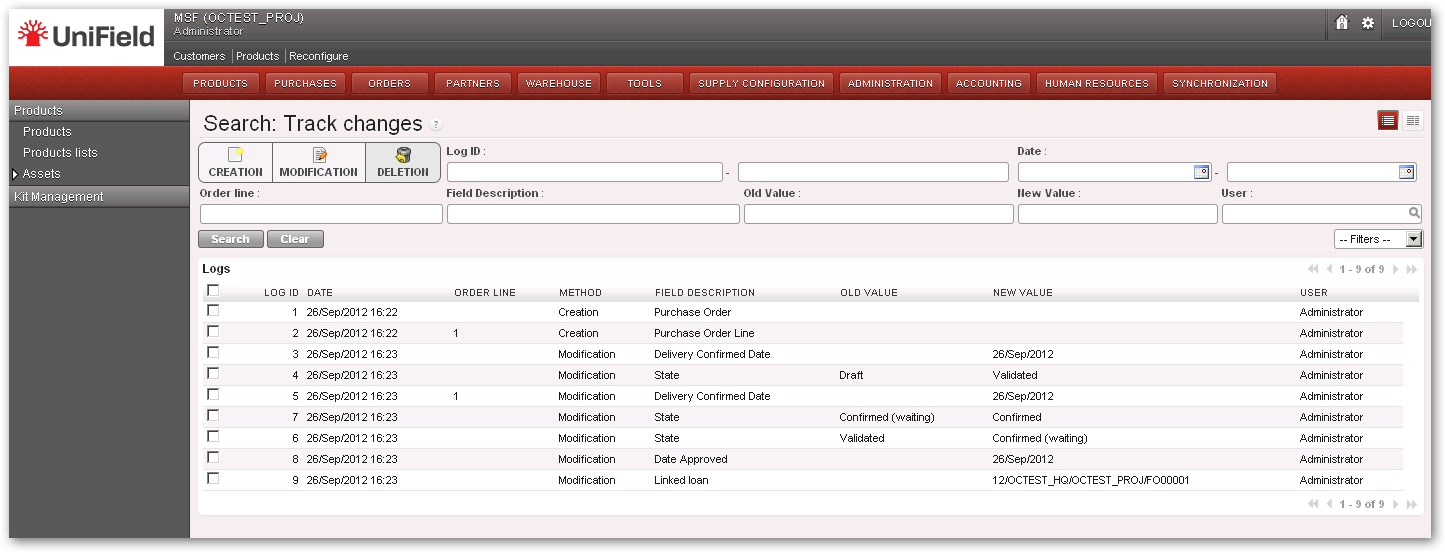
Viewing Track Changes
UniField offers visibility of how and by whom some documents have been modified. For example, for a Purchase Order, click on Track Changes on the right hand side {Action menu}. This will take you to a new screen where you will see any changes for this document (e.g. modifications, approvals, etc.) displayed together with the date this change was made and the user who made these changes.
Track changes for Supply can be viewed for Field Orders, Purchase Orders, Incoming Shipments, Internal Request, and Supplier Invoices. For Finance, track changes are available for example in Registers, Supplier Invoices and Journal Entries.
Track changes
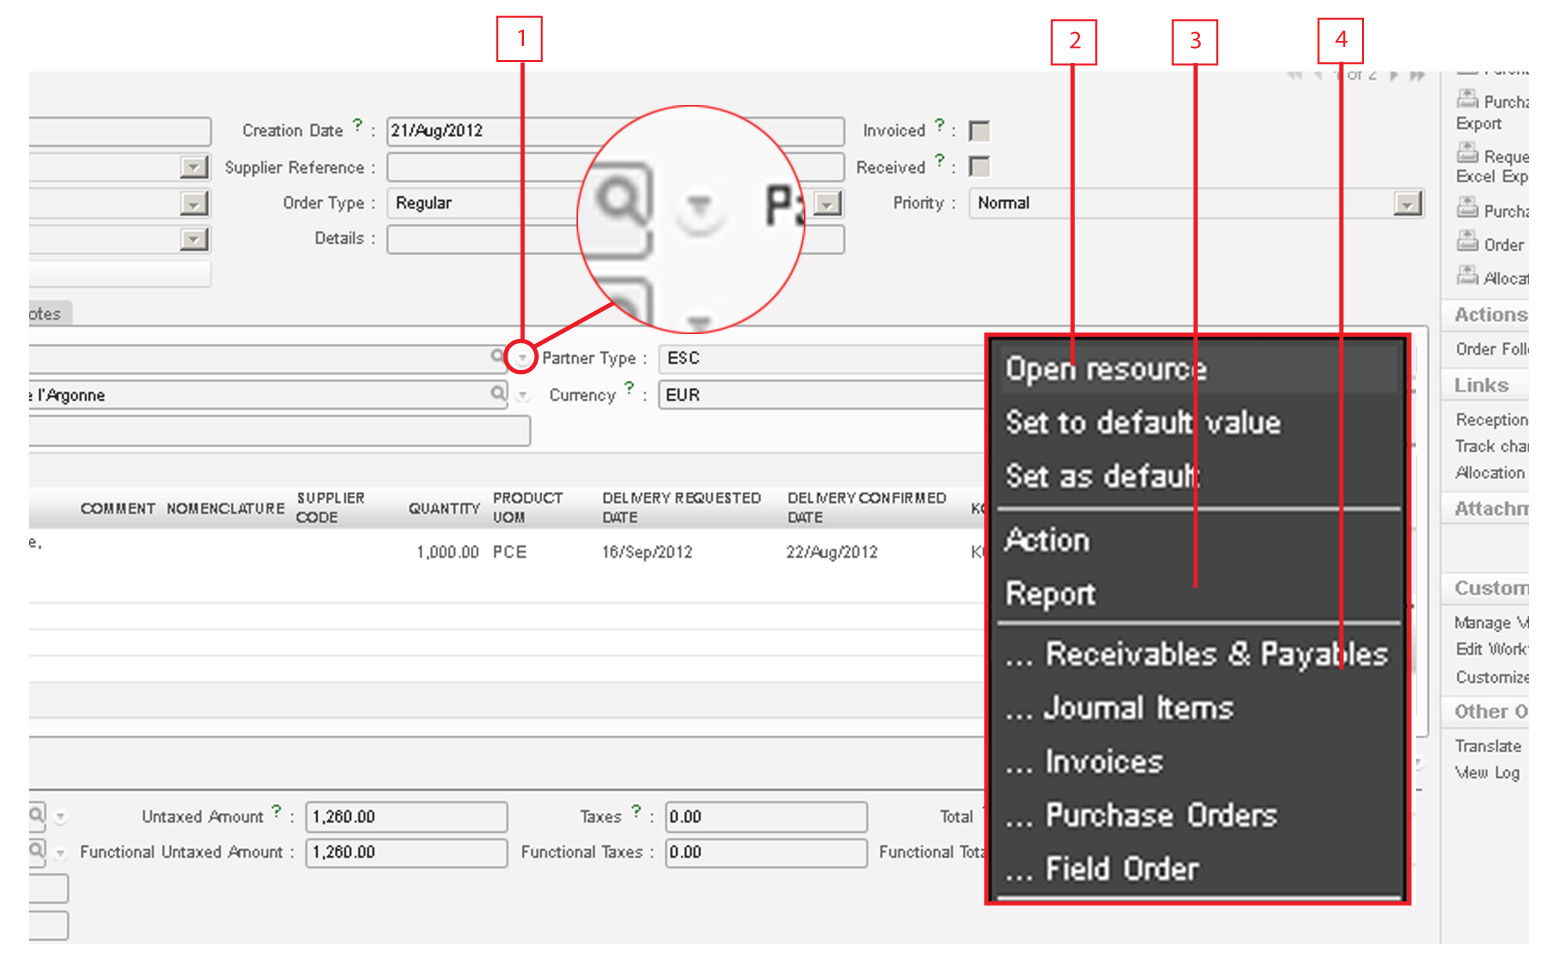
Item Resources
Throughout the system, the resources icon will be on the right side of some fields. This icon is a short cut to the main data of the field. For example, if in a PO you click on the resources icon of a supplier, the system will open the master data form regarding that supplier. The resources panel is divided into the following sections:
Resources menu
Icon to access resources panel
Links to open and settings, only available to administrator of the instance
Open Resource: will open the related resource such partner, product, invoice, etc.
Set as default: choose this option to make the resource the default value. When you create a new entry, automatically this field will be set to the default value. If other value is required click on the magnifying glass or overwrite the text field.
Set to default value: choose this option to retrieve the previously set default value by right click or clicking on the icon.
Actions or reports, only available to administrator of the instance
Different documents where these particular resources may appear
Note! In some views parts of the sections are hidden in order to prevent using the default values where they are not supposed to be used (e.g. setting up a wrong journal for accounting entries).
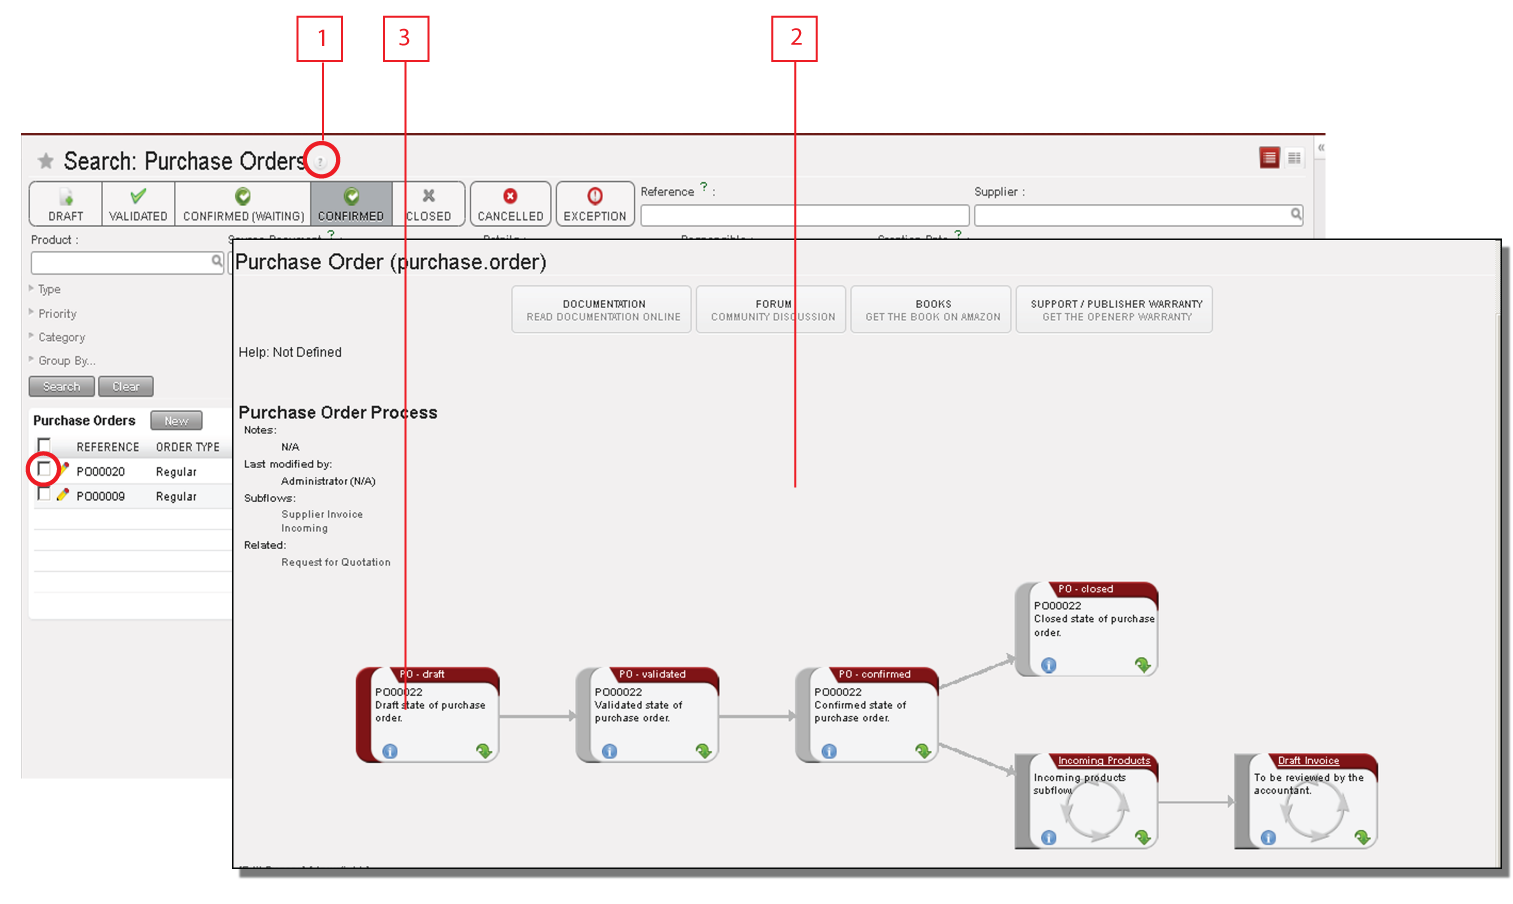
System Process Workflows
UniField has integrated process work flows to view most of the order types in a graph showing the process and status. The workflows can be viewed by clicking on the question mark in the dashboard view, as per figure below. This is a practical way to view and understand the full process and all the related documents.
System process workflows
UniField has the capacity to show users the workflow of different transactions. It can show the default work flow. For example, if an order is selected, it will display the specific workflow of the order and the steps completed.
Click on the question mark and select from the menu the type of order in the {Select process} field.
A new window will display a graph with the full work flow of the selected type of orders.
If an order is selected it will display the steps already completed in red and the steps which are pending in grey.
The Green arrow will show that specific step in the system.
Warning Messages
The system displays warning messages when some parameters are missing or incorrect, or to alert the user of something they may not be aware.
The key points to remember when a warning message is displayed are:
The message displays descriptive information about the error
Any incomplete or incorrect information is displayed in red
The system displays all incorrect fields in red in all of the relevant tabs
Warning message
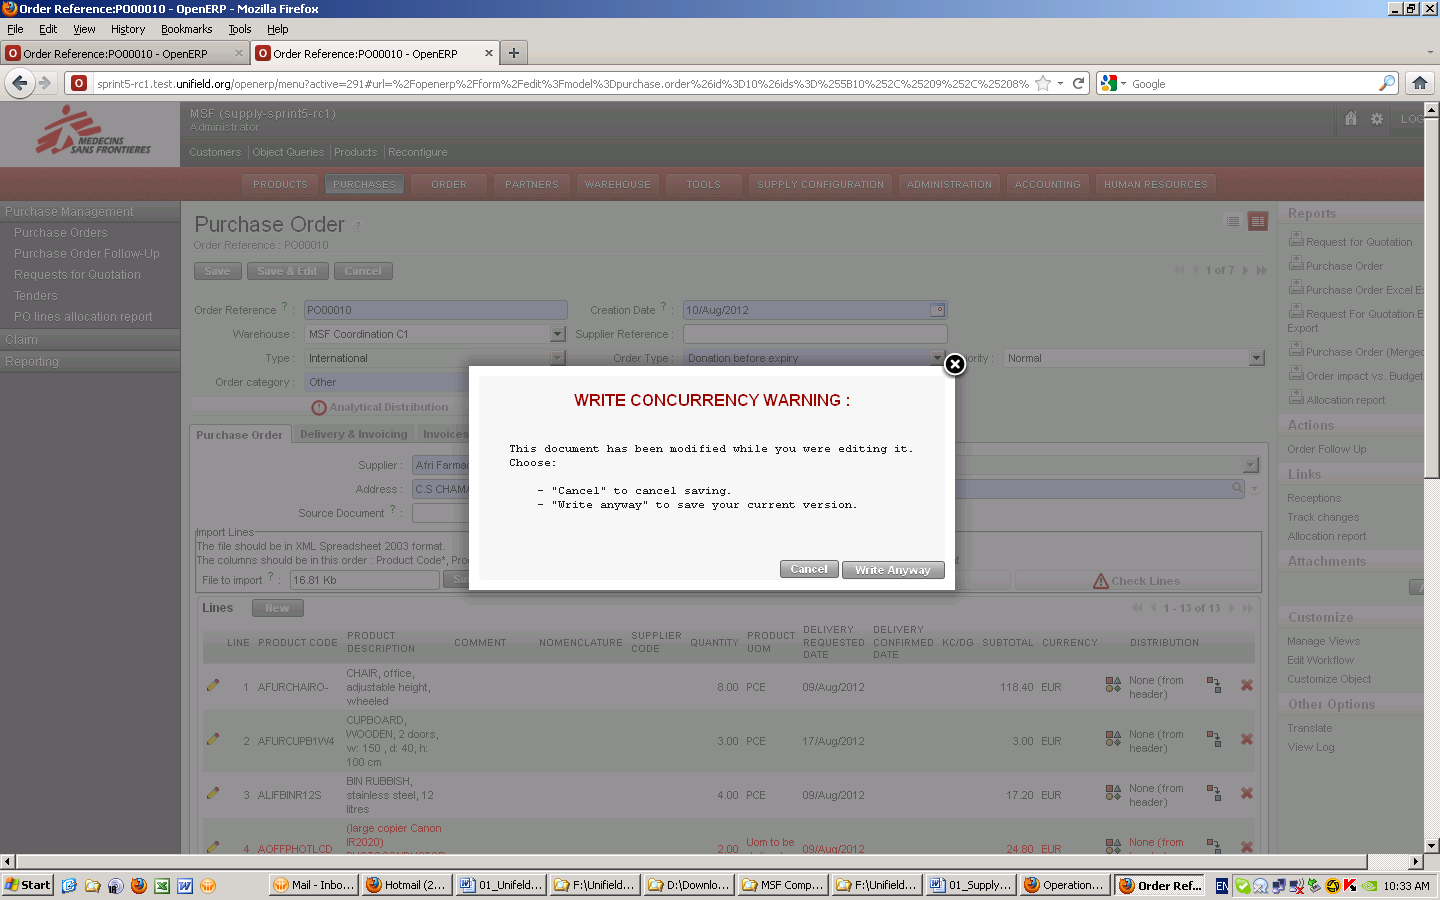
Write concurrency warning
The system may display this type of warning message after the user has tried to save a transaction. This warning message indicates that while the user has been viewing and editing this transaction, another user has modified and resaved the document during this time. The warning message will offer 2 options:
Cancel: cancels the transaction so that the user can reopen it and view the changes made by the other user, and if necessary modify again
Write Anyway: cancels any changes made by the other user, and will only save changes made by the user who is currently clicking on this option.
Wizards
Wizards in UniField present a user with a pop-up window or series of dialog boxes in which parameters are entered. Upon clicking {Ok}, the system executes pre-defined action instead of requiring the user to perform multiple steps. Wizards are intended to simplify tasks that are complex, infrequently performed, or unfamiliar.
Examples of financial wizards include:
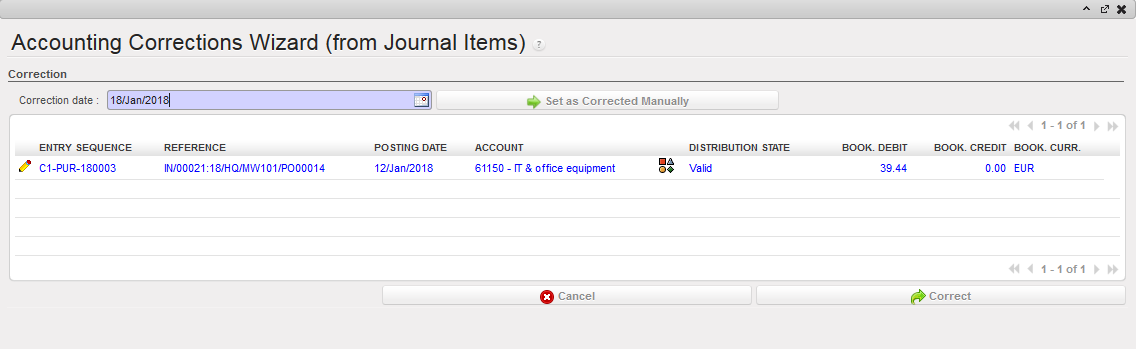
Accounting Corrections Wizard: Entries in Journal Items are automatically corrected with the values entered in the wizard.
Accounting Corrections Wizard
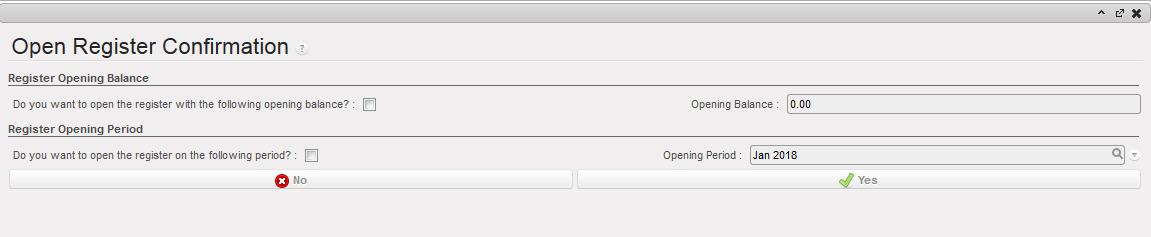
Register Opening Wizard: in cash, cheque and bank registers, user checks the tick boxes to confirm the correct period and the correct opening balance
Register Opening Wizard
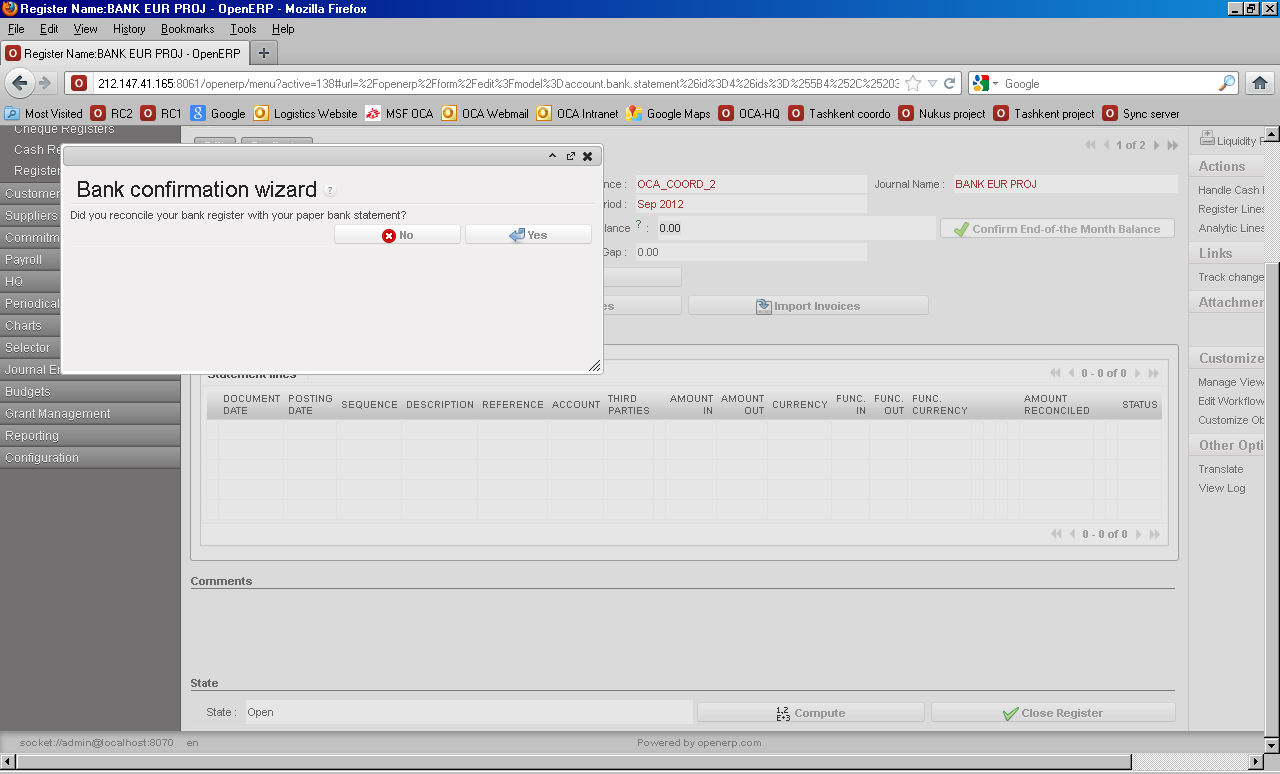
Bank Confirmation Wizard: user clicks {Yes} which changes the status of the Bank Register from {Open} to {Closed}
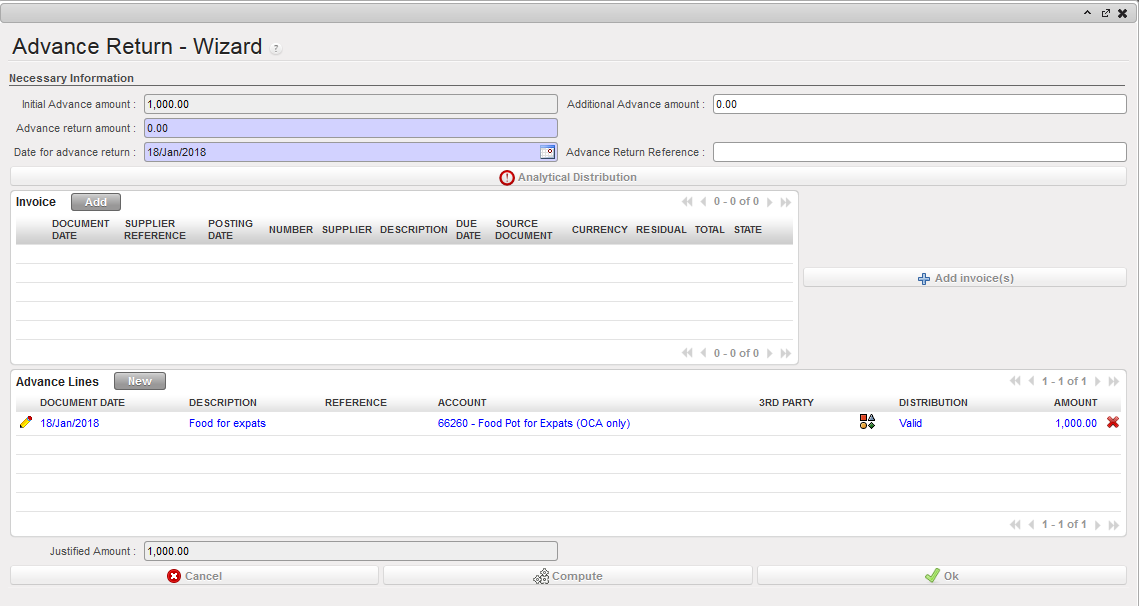
Bank confirmation wizard Advance Return Wizard: user enters expenses regarding the Operational Advance, the system verifies expense amounts and returned cash matched the advance given, and expenses as well as advance return entries are automatically created in the Cash or Bank Register.
Advance Return wizard
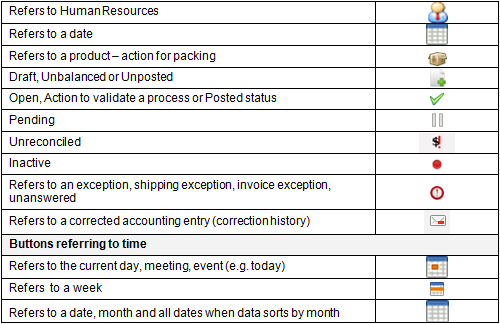
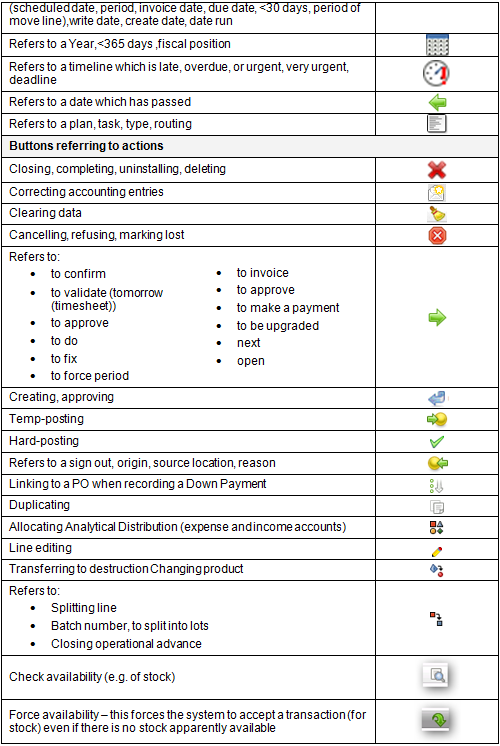
UniField Icons
Most of the icons are in search view. All of the buttons have an icon relevant to the function. UniField uses a range of predefined icons.
UniField is a web based application. To access the application the user must have a previously defined username and password. New usernames (logins) are created in the Coordination data base.
The three parameters required are:
A database (i.e. an instance) to connect the instance.
A username, created in advance and to be linked with the user rights.
UniField contains different integrated Business Applications. Each application contains different modules. The active applications currently are:
Products
Purchases
Orders
Partners
Warehouse
Tools
Supply Configuration
Administration
Accounting
Human Resources
Synchronization
The application contains different view modes to facilitate working procedures; below is a description of each of them. The main areas in the welcome screen in UniField are:
“UniField” in the address bar to connect to the database.
Database/Instance in use and user information.
Shortcuts created by the user.
UniField business applications: there are two ways to reach the different applications: a) with buttons/horizontal menu and b) with icons. Please note, you may only be able to view some of the business applications, according to specified roles and permissions.
List view to view transactions/items in a list mode showing one transaction per line.
Form view,to view all the data related to one single transaction. If no line is selected, the system will display the first line of the list. To return to the List view of search results you can just click on the List view icon.
As previously mentioned, UniField has been developed within a business framework and vision. The main views are listed, and one item/record will be visible per line. UniField will display different options according to the application selected. Together these view options are considered a “dashboard”. Each application will display a dedicated set of tools as shown in the image.
List view will display transactions in a “list” mode i.e. one line per transaction displaying only a selection of all the data related. The dashboard displays different modules and tools according to the application selected. The display remains similar, as only names and values change.
Contents of a business application:
Business application selected.
Modules related to the selected application.
View, search, grouping and filter options: these are discussed in more detail in a later section.
Search view: the system displays only a selection of the data with the most relevant columns and values.
Reports and Action menu: complementary tools related to the module selected are listed on the right-hand side bar, including the option of Track Changes which exist for many objects in Supply and Finance. This menu will only be visible for specific tools or operations.
a) To display, click on the icon « on the top right side of the screen
b) To hide, click on the icon ==>
Let’s continue looking at the options that are available in Search view.
By clicking on the star, the user can create a shortcut to the selected dashboard; the shortcut can be seen above the applications menu.
In many fields, the system displays a question mark sign. By clicking on this icon, you can view the process workflow.
The checkbox in the header row allows the user to (de)select all entries, or individual check-boxes can be checked. Some action is then performed on the selected items such as hard posting or export (not on all screens).
Click on the pencil icon to open and edit the entry. Depending on the type of record, the Form view will open in edit mode (with Save buttons displayed), or the fields that can be edited will show directly in the entry. Otherwise, clicking anywhere on the line will open the specific record of this line in “read only” mode.
5. In some List views, the user can click on a column header to sort in ascending or descending order.
6. At the bottom right of the screen, the user can see the number of entries in the view versus the total number of entries. By default, the system displays 20 entries. The navigation arrows take you to the First, Previous, Next or Last set of records.
The form view displays a more complete view of an individual record. This data is displayed in different tabs as shown in the figure below.
In the form view mode, each transaction, supplier, product or customer record will contain specific tabs. See figure below for detailed explanation. To enter into the transaction data, simply select by clicking on the line or the pencil icon.
This icon is one of the indications of the form view.
These are the different tabs related to the form. In this case, we are viewing a supplier and the information in these tabs must usually be completed by both supply and finance departments, depending on the tab.
All the mandatory fields will be displayed in blue, but it is important to realize that even when the field is not mandatory, the more information is entered, the better the capacity of the system will be to maintain and generate useful and detailed information. Whenever entering further data in this form please ensure each modification is saved.
The header is the top part of the record, document, product or partner. In UniField, this is where primary information about the entity is located, as well as the main editing buttons. The system normally automatically saves it when the document is closed, but it is good practice to save it using the header buttons.
If the document is in {Edit} mode, the following buttons display:
Save: saves the current work done in the document and changes to view mode.
Save & Edit: saves and continues in edit mode.
Cancel: cancels the last changes in the document. Please note: it does not cancel the entire document.
If the document is in view mode, the following buttons display:
New: opens a blank form to create a new document (not on every screen).
Edit: changes to edit mode.
Duplicate: can be used to create a second copy of the document on view, the details of which can then be edited (not on every screen).
Delete: deletes the current document; UniField does not allow deletion if the document has been used in another document, e.g. Supplier has been used in a Purchase Order.
The footer is the bottom part of the record, document, product or partner. Typically, the buttons in the footer are for actions associated with the process flow, e.g. validation, confirmation, closing, cancellation. Once clicked, there is often no way to revert it so it is recommended that the user is careful in selecting this action.
Different buttons will appear depending on the type of document; some of the common buttons are:
Cancel: cancels the document and changes the status to {Cancelled}. The cancelled document will remain in the system, e.g. a supplier invoice is cancelled.
Validate: information has been reviewed/approved; should be used in accordance with agreed procedures and will progress the document to the next stage.
Confirm: information is confirmed on the system after obtaining other counterparts’ confirmation.
Data in UniField are displayed on different field types. Blue fields indicate mandatory fields; white fields are optional; and gray fields are read-only.
Text: can be any combination of alphanumeric characters; maximum character limits will apply.
Drop down list: indicated by a down arrow, the user selects from a default list.
Checkbox: clicking will (de)select the box.
4. Validated list: these fields are similar to drop down fields, but the user selects from a list of other records in UniField, e.g. Suppliers, Accounts, Products. There are various ways for the user to make a selection.
Clicking on the magnifying glass/loop icon the system opens up a search window whereby the user can further refine his search and make a selection.
Entering part of the desired value will display a list of pre-searched values from which the user can make a selection.
The following chart is the global business model, presenting an overview of the main functions and represents the different flows of the functional coverage of the project.
Not all of the variations of flows are represented here, in order for the standard flows to remain readable.
Not all of the functions displayed in this chart will be accessible to all users; this will be according to the user rights management.
· Relationship between Different Operational Levels
Some MSF field processes crosscut over several operational levels. The following charts will show the main functional links between Projects, Co-ordinations, Regional supply centers, European Supply Centres and HQs.
The data flows accompanying these processes will be handled by the synchronization module of UniField. They will also rely on the successive statuses of the transactions, each status corresponding to a specific step in a process to be performed by the defined user at the appropriate operational level.
These flows are of an accounting and supply nature and include master data. Validation workflows across sites, including HQ are also considered as part of these inter-site operations.
A. Integration with External Systems
The UniField solution will provide a full integration with existing systems:
Vertical integration: The first version of the UniField tool will provide each HQ/European supply center (ESC) system with the same degree and format of integration as what is used in the former systems. Future versions of UniField will move towards an automated integration with all HQs/ ESCs, potentially through a unique common integration platform and web service.
Horizontal integration: The UniField tool will integrate with field applications (Homere, EasyMED…) in a similar format as they did with past MSF accounting and supply software. In cases where tools have not yet been standardized and are still based on spreadsheets (e.g. drug forecasting tools based on epidemiological data or medical protocol, activity monitoring tools) the information will not be synchronized with UniField.
B. Inter-Instance Accounting Flows
As described in the following chart, accounting flows correspond to two distinct needs:
Accounting consolidation, aiming at having closed accounting records at HQ on a monthly basis within a reasonable time-frame.
Financial information flows, aiming to make financial data available at any operational level for budget follow-up and financial management purposes. This flow will include records made at HQ level for a mission (called HQ Entries).
Data exchanged includes both general accounting and analytical information.
In the Registers there are three distinct statuses to manage entries:
Draft: created locally and are not synchronized
Temp-posted: synchronized up to coordination – can be edited at creation instance (but not necessarily by all users)
Hard posted: cannot be edited or deleted any more
In the Journals, entries can be:
Unposted: the corresponding entries are not final in the accounting; they can still be modified without generating an accounting correction. For entries created from registers this status is corresponding to {Temp-posted}.
Posted: the corresponding entries are final in the accounting; they cannot be modified anymore. If they need to be corrected, an accounting correction will be generated. For entries created from registers this status is corresponding to {Hard-posted}.
There are four period statuses to manage the closing process:
Open
Field-closed
Mission-closed
HQ-closed
In addition to the first synchronization of a created entry, any correction or posting of accounting entries is synchronized as well.
C. Supply Order Flows
The documents in UniField are linked: whenever a document is confirmed, validated or closed, the following one, corresponding to the expected next step of the supply chain, is automatically generated in {Draft} (snowball effect).
These flows can be grouped in 3 major groups: Internal Flows; Inter-Instance Flows and External Flows.
– Internal Flows
The Internal flow regroups all the flows that are specific to an instance (Coordination; Project) and that are occurring WITHIN the instance.
The starting point of the supply chain process is the requirement which is expressed in UniField by the creation of an Internal Request (IR). Consequently the IR is the starting point of UniField Internal Flows.
Once the IR is validated, the IR will need to be sourced either from “stock” if the goods are in the “Warehouse” or to a “Purchase Order (PO)”. The sourcing will confirm the IR.
Afterwards, the requirement will follow a step by step process where all the documents will be generated automatically in Draft in a logical stream until the delivery of the goods.
– Inter-Instance Flows
As opposed to the Internal Flows, the Inter-Instance flows are between two MSF instances (Coordination and Project). That is to say that there will be a requiring instance which will require goods from another instance (“supplying” instance). The requiring instance will address a PO to a “supplying” instance which will act as an Internal Supplier.
The synchronization engine processing the Validated PO from the “requiring” instance will be sent automatically to the “supplying” instance. The details of this PO will be received in a Draft Field Order (FO) at the “supplying” instance.
The “Supplying” instance will then process the requirement via the sourcing of the FO. Once the FO is confirmed, a new synchronization will happen and the initial PO at the requiring instance will be automatically updated and confirmed.
– External Flows
The External Flows are the ones that happen between an MSF instance and an external Supplier; That is to say when a PO is addressed to a supplier that is not an Internal Partner (not Coo, not Project, not ESC). Confirmed POs will be printed from UniField and sent to the external supplier.
LU-GE 0101 UniField: an Enterprise Resource Planning (ERP) System
How to Explain the Architecture of UniField?
UniField is an Enterprise Resource Planning (ERP) tool which facilitates the integration of the work of the supply and finance departments into one system. It is a complex task to build a single software which meets the needs of each user, whether they are in finance, supply or warehouse. UniField combines these into a single, integrated software. This program runs off a single instance (project database) and allows each department to share information and communicate with each other.
UniField has various business applications which link with a variety of sub modules. It facilitates interaction between users in field offices and the mission and vice versa, and offers benefits in time savings, paper work and efficiency. The application is managed via user access control, so each user has access to a specific part of the process e.g. a supply officer creates an order, this same order is validated by a supply team member, received by a supply logistician and paid for by finance staff. All users interact with the order at different levels in the system.
UniField is a web based application. Provided there is sufficient internet connectivity, users will exchange data via an Internet connection. When not exchanging data with another instance (project database) UniField works via an offline network.
One of the key needs for all MSF Operational Centers is to improve and accelerate the flow of information between the various operational and functional levels. One of UniField’s main benefits is providing a common international tool for Coordination and Projects across all sections. The management of MSF operations requires numerous interactions, especially between Projects and Coordination, and between Supply and Finance departments. Before UniField, the coordination between Supply and Finance was almost exclusively restricted to manual data checking and time-consuming meetings, which can lead to misunderstandings between finance and supply. The operational scope of the UniField project is to provide a common international tool for Coordination and Projects.
In addition, UniField provides automated links between supply and finance operations leading to improved efficiency, consistency, reliability and precision in the management of MSF resources. Integrating Supply and Finance into one tool allows information to be shared and retrieved easily by all departments. UniField will reduce manual data checking and miscommunication between the Supply and Finance departments.
Business Application Model
An Enterprise Resource Planning (ERP) system offers a high number of available features. Most users of the system will only need selected features, depending on their role in the organization. In order to remain easy to use, the different features are split into business applications.
All users will usually work in a particular context (e.g. in a supply warehouse or recording accounting entries). Within this role UniField will provide business applications in which they will be able to directly see all features related to their individual role. The business applications were developed according to user roles in the organisation: coordinators, purchasers, accountants, etc.
These business applications define a context of work and all terminology used in an application are relative to this context e.g. a purchaser sees screens adapted to purchasing operations. An accountant may see the same data, but from an accounting perspective (adapted terminology, adapted menus, adapted default values in each screen).
Transversal Features, Used by All Applications
The user can perform most of their tasks using only one business application. They do not have to switch to another application to perform the tasks of the same role e.g. an accountant is not forced to go to one of the supply applications to see a supplier invoice. They can do it from the accounting application and can also pay the invoice from this application.
Some features are accessible by all users, irrespective of the application they usually work in. The direct menu can be found in the application that uses the feature most regularly. Shortcuts to this feature are found in other applications that need less regular access. For example, many users need access to {Partners} and {Products} modules. The menu is inserted into the applications that need these features most regularly e.g. the address book is in the {Order}, {Purchases} and {Accounting} business applications. However, inside the Accounting Application certain finance team members will have shortcut buttons in order to reach the {Partners} and {Products} modules.
Access Rights
The roles defined in each module are directly related to each business application. This means that for a given application, all roles within this application must be relevant to this process. For example the {Accounting} application will be used by financial staff members: Financial Coordinators, Financial Managers, and Finance Assistants. For supply, the permissions / access rights given will correspond to the tasks of a Warehouse Officer, Logistic Coordinator, Supply Manager, etc. In some cases users will have read only access. For example, a Financial Manager or Supply Manager may be able to access all screens for information purposes but certain actions may only be completed by the Financial Coordinator or the Logistic Coordinator.
Instance Synchronization in UniField
An instance is an installation of UniField. It could be a Project, Coordination or an HQ. In simplified terms, one instance reflects one MSF office. The instances exchange data through the synchronization server, which has been designed to work with bad or unreliable internet connections. However, an internet connection is necessary when sending data between two different instances. Synchronization is performed regularly, either on an automatic or manual basis.
When working within one instance then users can work offline, i.e. not connected to the internet or synchronization server. For example, when coordination supply department adds data, the coordination finance department will automatically see the data without need for synchronization. When the project instance adds data, they will need to connect online via the synchronization server in order for coordination to access the data.
In order to cut down on high internet usage, the synchronization server replicates only the necessary data for sending/pushing data and receiving/pulling data. The synchronization server does this by receiving/sending/routing messages from all other instances. For example, invoices and register lines created at project level are sent to the synchronization server and sync completely to the Coordination, but at the HQ level only the related accounting entries are replicated because this is all the information the HQ database requires. A synchronization rule is defined and applied for each type of data.
We use cookies to ensure that we give you the best experience on our website. If you continue to use this site we will assume that you are happy with it.
 Supplier Invoice search options


 Register Opening Wizard