C. How to create a Purchase Order for (receiving) a standard donation.
Normally a donation process will be initiated by the instance donating (i.e. via an FO). However, the receiving instance might also create a PO from scratch to receive the goods.
Standard donation POs will never be created by the OST; they should be created either by synchronization either from scratch.
If the process starts at the donating instance (i.e. with an FO), the customer must be an internal partner, an inter-mission partner, an, inter-section partner or an external partner (customer). If the process starts at the receiving instance (i.e. with a PO), the supplier must be another instance (i.e. an internal partner, an inter-mission partner or an inter-section partner).
Goods can be donated or received via standard donation because they are no longer needed or because a project or a mission is closing.
Go to:Purchases / Purchase Management / Purchase Orders
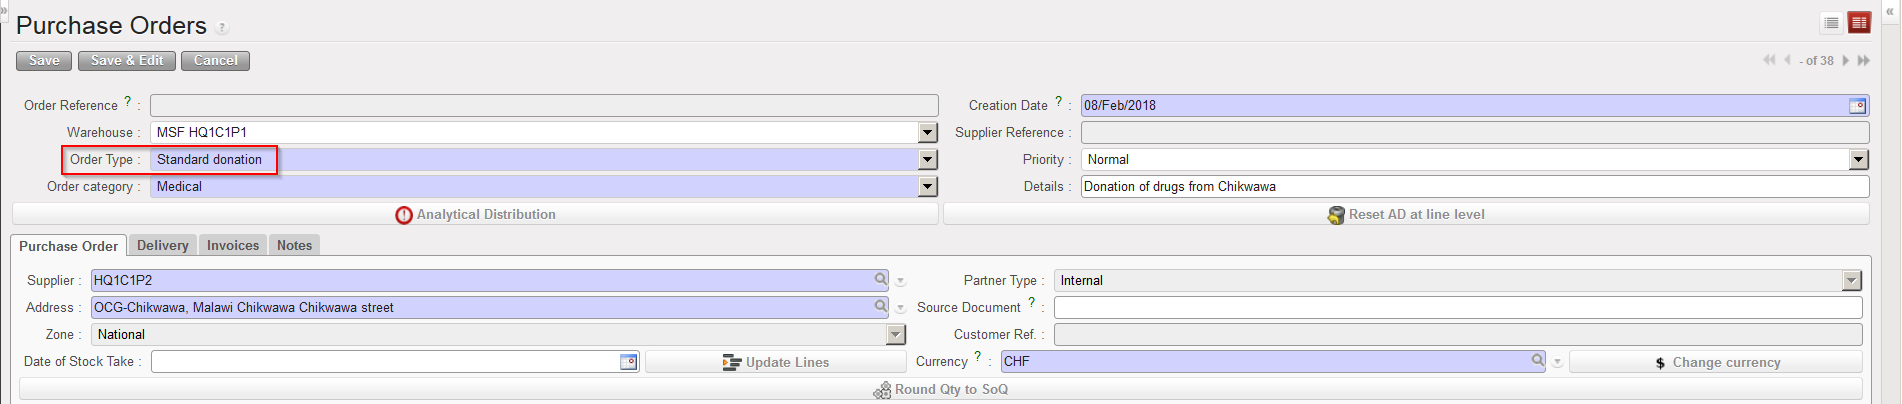
1.Create a new PO by clicking on the “New” button.
2. As “Order Type“, select “Standard donation”.
3. Fill in the rest of the header information (order category, priority, details,...).
4. As “Supplier“, select the instance which will donate the goods (the giver).
Standard donation PO
5. Add product lines manually or via file import (including quantities, delivery requested dates,…).
6. Enter an analytical distribution.
7. On the “Delivery” tab of the PO, check the “Destination Address” (linked to the receiving instance).
8. Save the PO by clicking on the “Save” button on the top of the screen.
9. The PO should be printed and signed for approval by the appropriate responsible person, then validated.
A Direct Purchase Order is a PO for which the goods should not be delivered not to the instance where the DPO was created (usually coordination), but directly to the instance (usually project) which needs the goods (usually requested to coordination via a regular PO). A DPO cannot be created from scratch but must be created by OST. Suppliers allowed on DPO are external suppliers or ESC (but not internal partners). Note that the sender of the DPO and the receiver of the goods should be in the same mission.
When “DPO” is received at project level, Unifield enables to a status update of DPO at coordination level to related IN. The status update is linked to “IN” fully and partially. This means that both the CV (Commitment Voucher) and Supplier invoice is created for DPOs by the same triggers as for (normal) POs. Project creates PO to Coordination level. After the Synch, COO validates “FO” and sources “FO” to “DPO” (external supplier). After the validation and confirmation of DPO, instances are synched. Project level processes “Available Shipped IN” and SYNCH. Supplier Invoice is created, OUT from stock to stock is created and closed. “IN” from the other supplier to other supplier is created and Closed
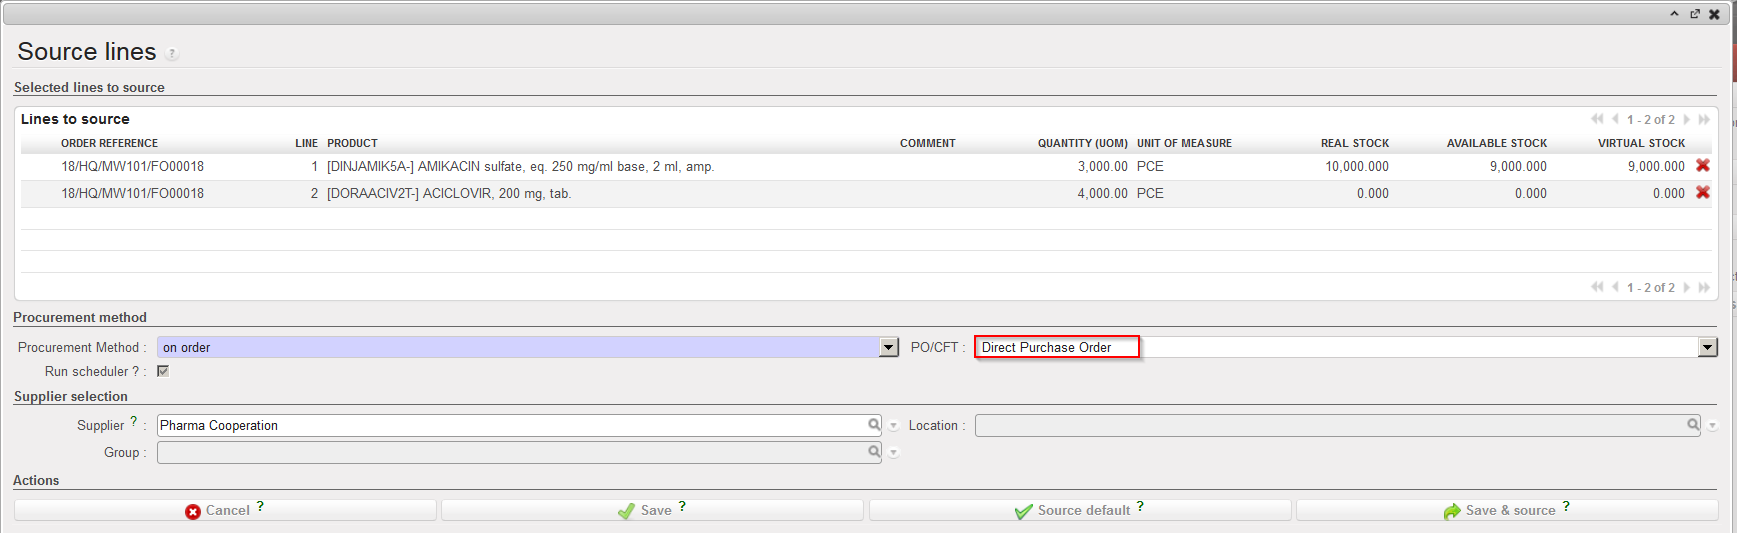
You should start from a situation where you have a validated FO. This FO may have been created from scratch (pushed–FO) or via synchronization (pulled-FO created from a PO synchronized from the requesting instance).
Go to:Orders / Orders / Orders Sourcing Tool
Source the FO on order to a DPO.
Sourcing an FO to a DPO
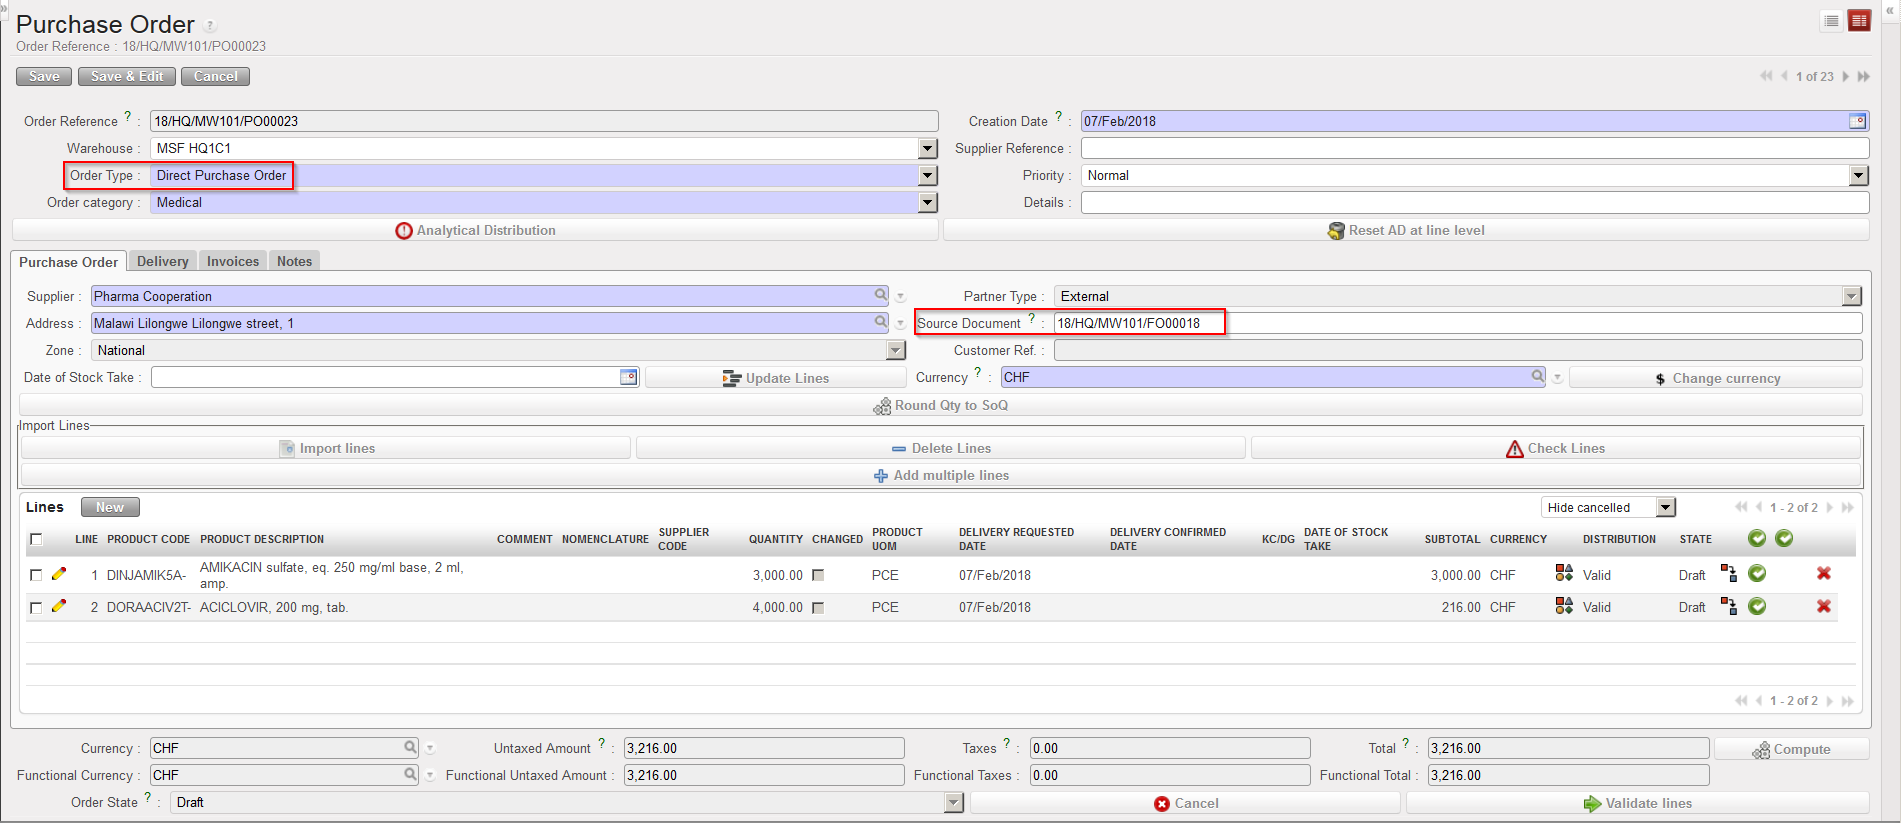
Go to:Purchases / Purchase Management / Purchase Orders
2. Find your Direct PO (it will be in “Draft” status).
3. Check that the order type is “Direct Purchase Order“.
4. Check the other header information and update if needed (order category, priority, details,…).
5. Check that the supplier is correct.
6. Check the FO indicated in the “Source Document” field.
DPO created by the OST
7. Click on the “Delivery” tab and check the details of the “Destinationpartner” (i.e. instance -usually project- where goods should be delivered directly).
DPO – Delivery tab
The next steps are exactly the same than the ones for a regular PO (validation, confirmation,…).
We will see in the Warehouse chapter how DPOs are received.
Note that a draft invoice will be created as soon as the DPO is confirmed on the instance where the DPO was created, but no IN (incoming shipment) will be created on this instance. The incoming shipment will be available at the receiving location in the state “Available shipped“. Following reception of this IN, the DPO should be closed manually.
There will be times when there is need for different types of Purchase Orders, to facilitate receiving donations, loans or to request a supplier to send the goods directly to another instance.
T. How to use the Purchase Order lines allocation report.
This report can be used to check the cost centers and expense accounting codes allocated to PO lines. It can be generated on the instance and exported.
Filters allow restricting the analysis to one or several POs. The selection can be exported to PDF or Excel. Use the check boxes to decide what you want to export to PDF. If you export the data to Excel, select which columns you want to in the export.
To generate a PO lines allocation report in Excel
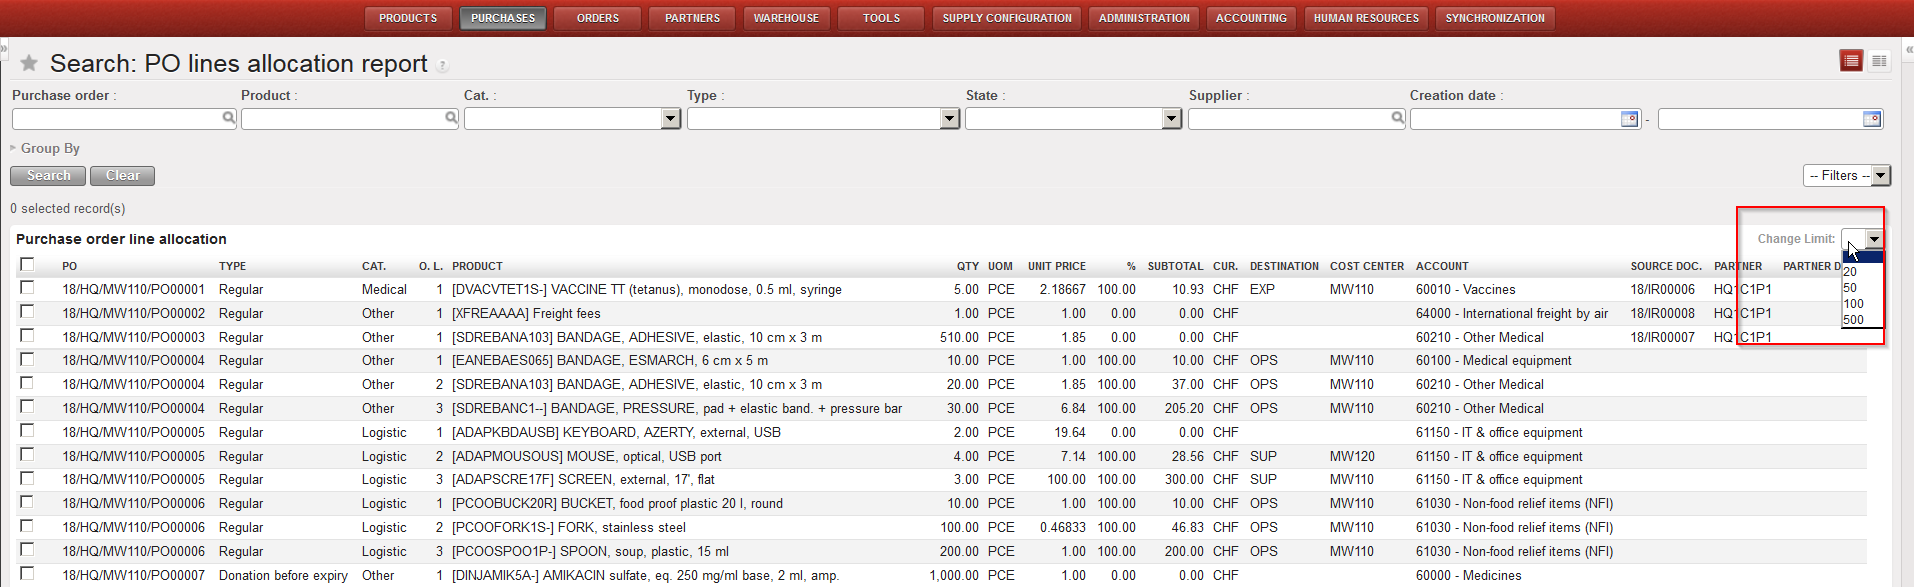
Go to: Purchases / Purchase management / PO lines allocation report
Use the filters to restrict the orders selected if needed.
By default, only the first 20 lines appear on the screen. Use the filter located on the top of the “Purchase order line allocation” table if you want to show more rows. Note that the check boxes on the left are only useful for export to PDF.
PO lines allocation report
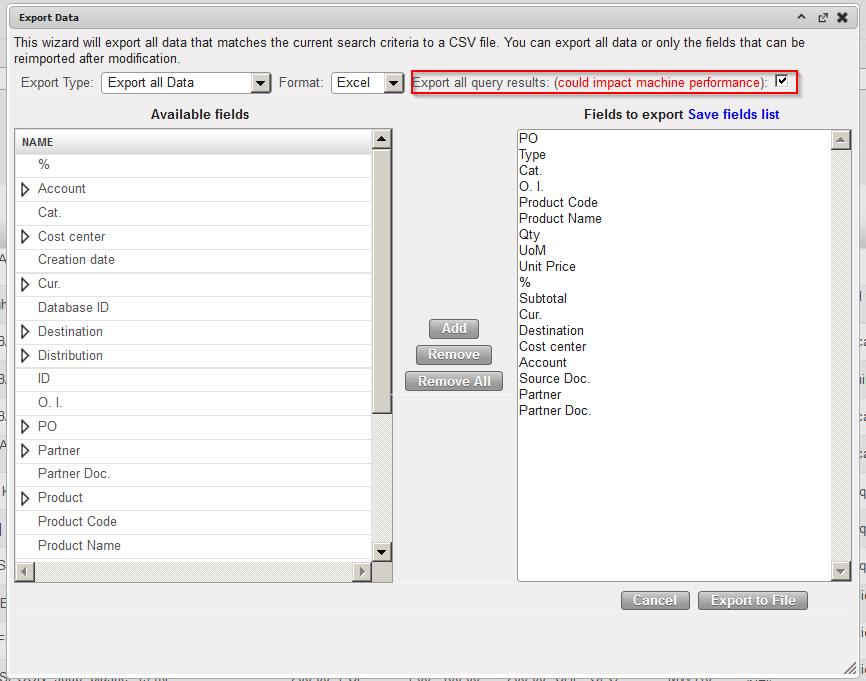
3. Click “Export” in the action menu and select what should be exported. Make sure the “Export all query results” is ticked.
PO lines allocation report – Export to Excel
4. Click “Export to file” to generate the file.
PO lines allocation report – Excel export
To generate a PO lines allocation report in PDF
Go to:Purchases / Purchase management / Purchase Orders
Use the filters to restrict the orders selected if needed.
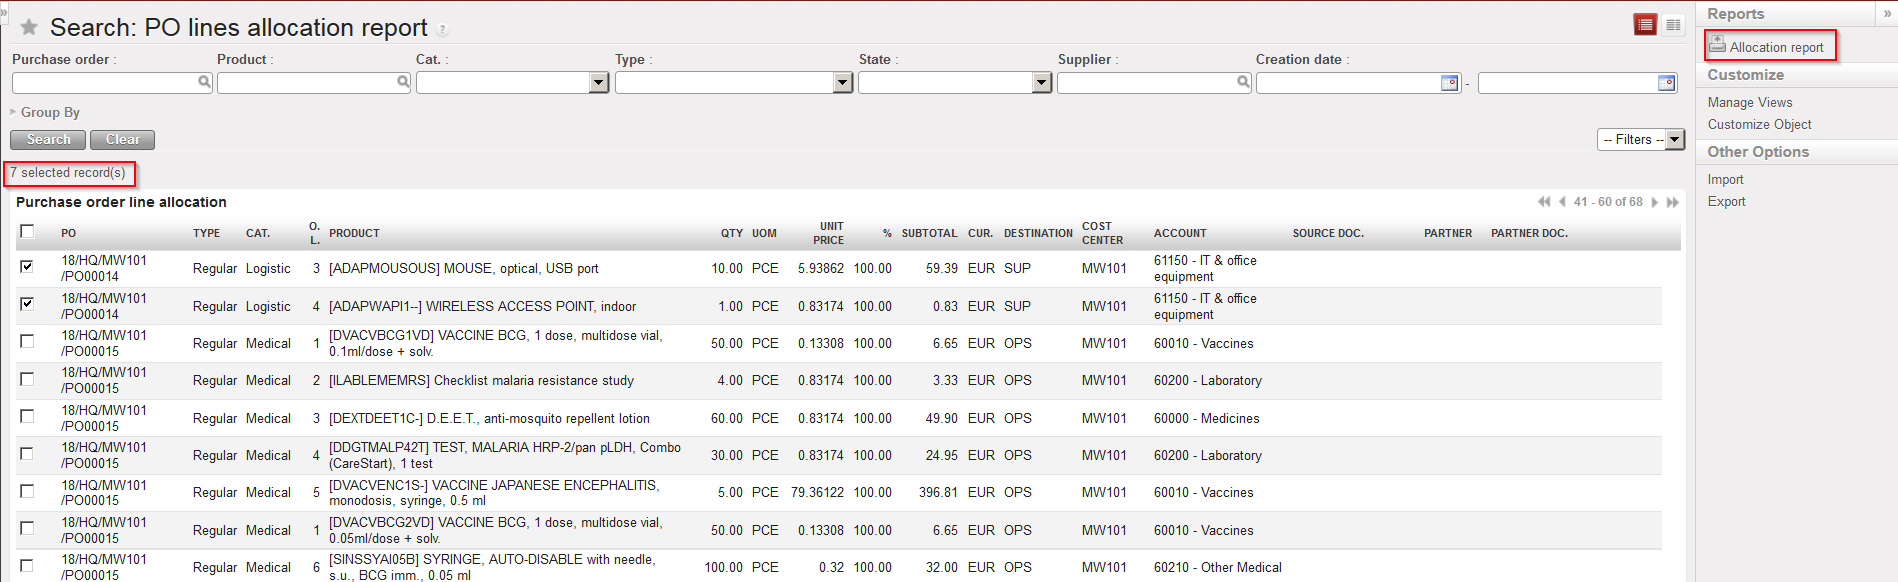
Click the check boxes located in front of the PO-lines you want to export in the PDF.
In the action menu on the right hand side, click on “Allocation report” (under Reports) to generate the file.
PO lines allocation report – Export to PDF
PO lines allocation report – PDF export
To see the global view of data of a purchase order lines allocation report:
Go to:Purchases / Purchase management / Purchase Orders
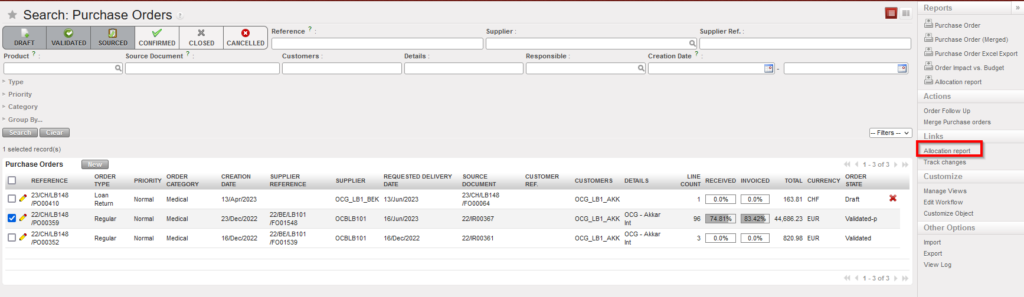
Click the check box located in front of the PO you want to see the Allocation report of its lines .
In the action menu on the right hand side, click on “Allocation report” (under Links) to view the data.
Purchase Orders should be followed-up on a regular basis to ensure that procurement is done within the requested time limits and to avoid having any pending or “forgotten” orders.
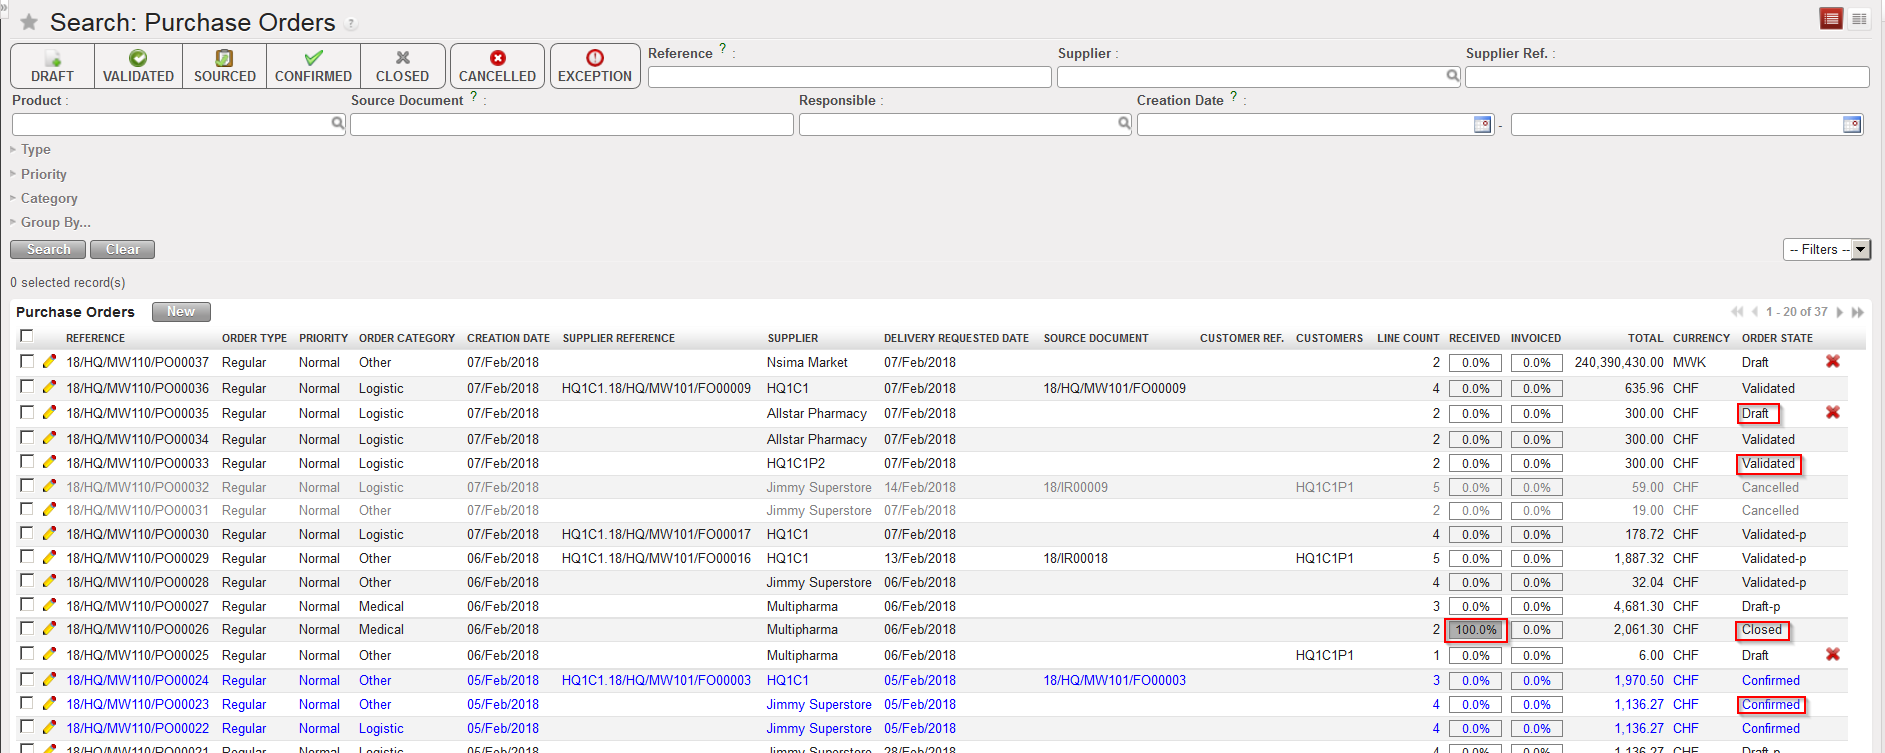
The Purchase Dashboard (accessible via a click on the “PURCHASES” button) and the general list view of POs, also called “Search: PurchaseOrders” screen (accessible via Purchases / Purchase Management / Purchase Orders) already give some basic information on POs: the state (“Closed” means that all items have been received), the percentage of reception, the percentage of the invoice paid, the customer reference, the number of lines,…
General list view of POs (“Search: Purchase Orders” screen)
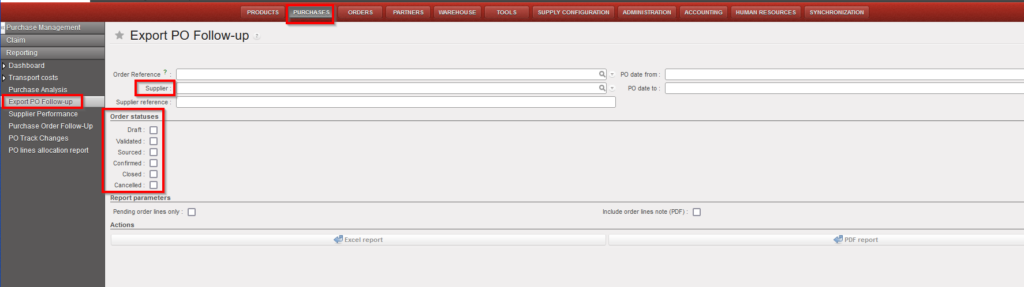
In addition to this information, the “Export PO Follow-up” gives additional information on POs.
Note that the functionality “Export PO Follow-up” should not be used as it is not maintained. In theory you should not be able to access this functionality.
Go to: Purchases / Reporting / Export PO Follow-up
Restrict the orders selection using selection criteria (filters) if needed.
Select the wished exported format (Excel or PDF).
Selection criteria of the Export PO Follow-up
3. Click on “Generate report“.
4. A file is generated by the system. This file allows to follow-up Purchase Orders.
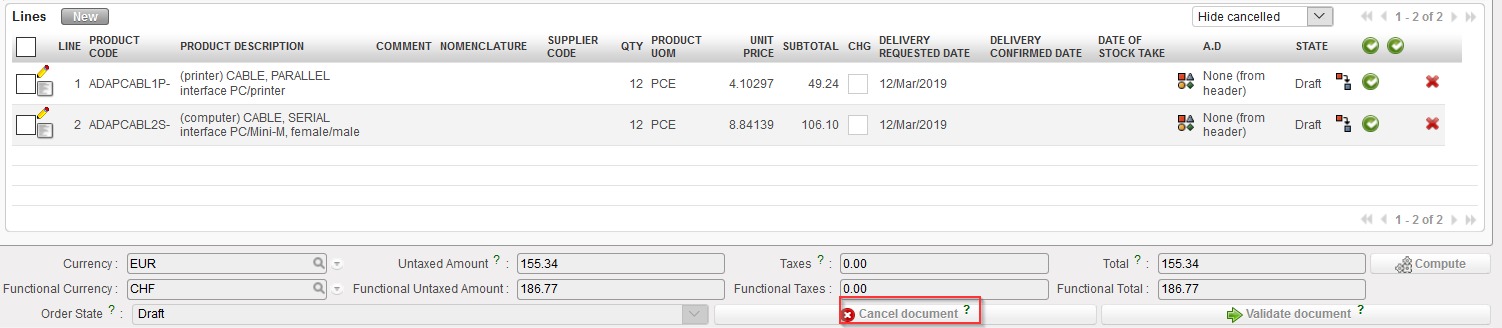
Sometimes, you may need to cancel an entire PO or a specific PO-line. Note that POs created by OST can be cancelled or cancelled & resourced while POs created from scratch can only be cancelled.
To cancel an entire PO, click on the “Cancel” button at the bottom of the PO screen and confirm via a click on “Cancelonly” on the pop-up screen. The example below is for a PO created from scratch.
Cancelling a PO
Confirming the cancellation of a PO
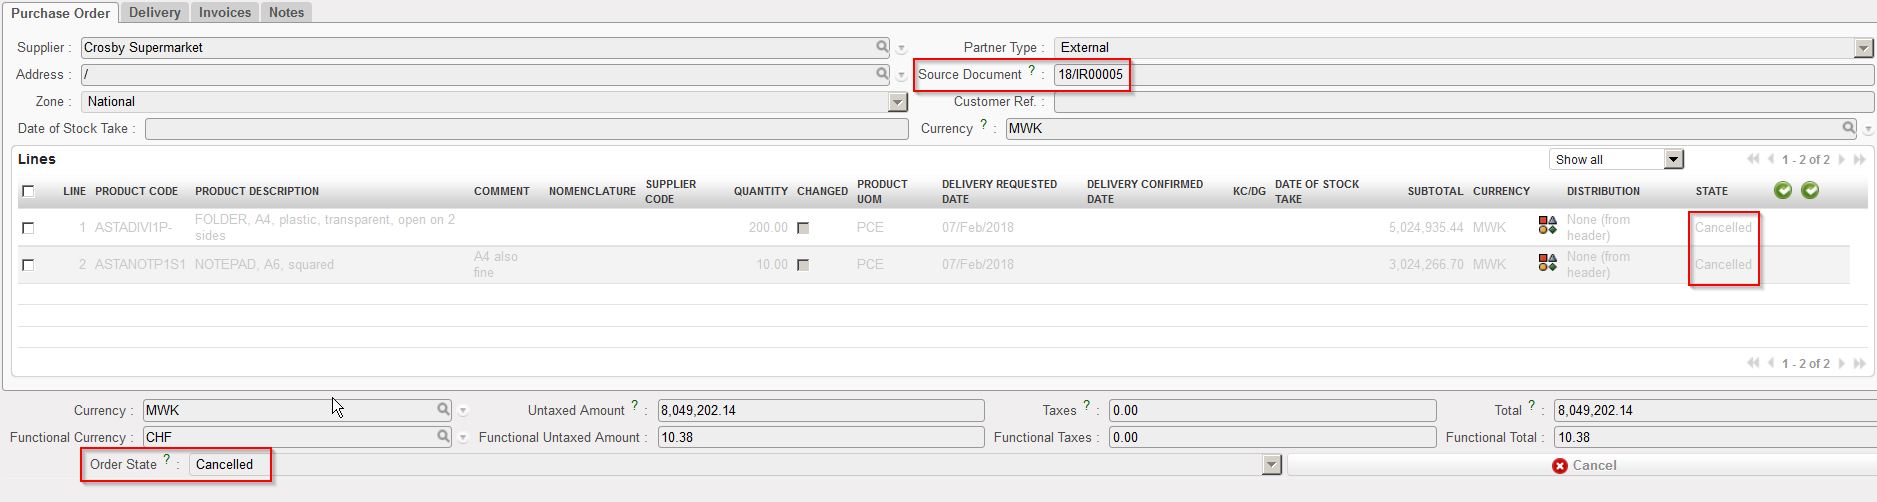
The PO switches to state “Cancelled” and all its line also switch to the state “Cancelled“. You have to use the filter located on the top of the “Linestable” to see them.
Cancelled PO
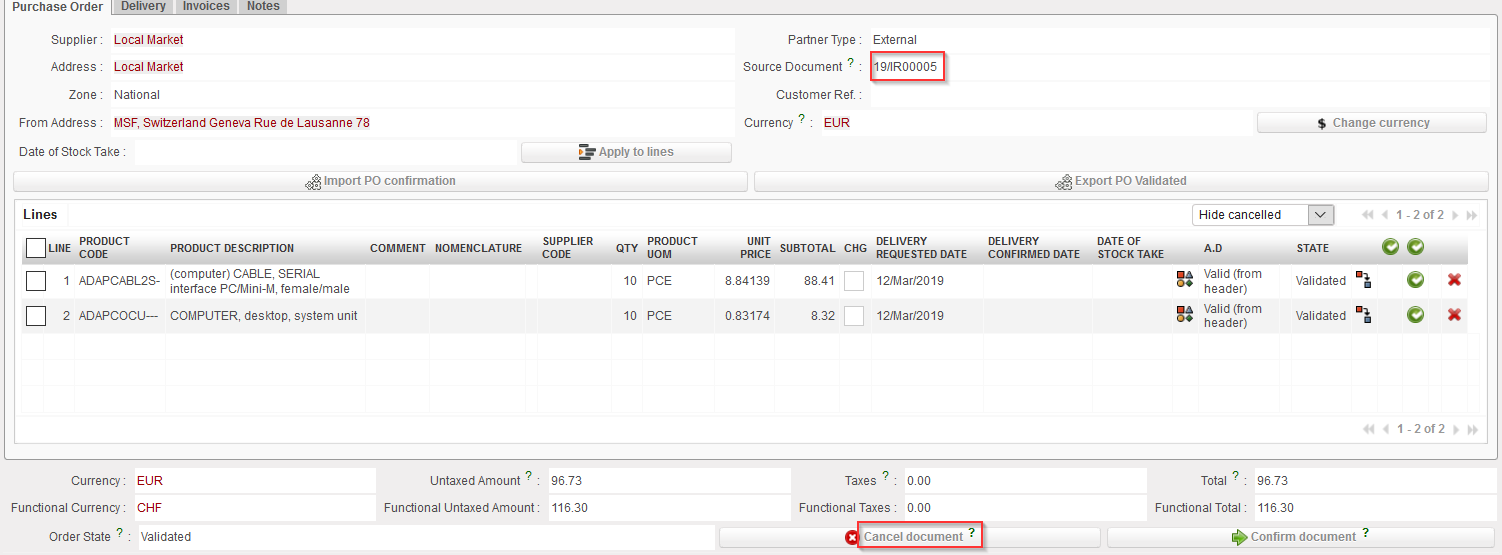
You may also cancel POs created by the OST. The process is the same. Click on the “Canceldocument” button at the bottom of the PO screen and confirm via a click on “Cancel only” on the pop-up screen. The example below is for a PO created by the OST. Note that in this case you have the choice between cancelling or cancelling & resourcing.
Cancelling a PO created by OST
Confirming the cancellation of a PO
The PO switches to state “Cancelled” and all its line also switch to the state “Cancelled“. You have to use the filter located on the top of the “Linestable” to see them.
Cancelled PO
A validated PO can also be cancelled except if the PO supplier is an internal partner supplier (another instance). In this case, the cancel button won’t be available at the bottom of the PO screen and the cancellation should be done on the supplier instance.
You may wish to change the supplier of a PO because he can’t provide (some of) the needed goods.
For these cases, it is possible to cancel & resource some PO-lines or the entire PO if needed.
The resourcing process of a PO (and PO lines) can only be done on POs related to a request such as IR or FO (i.e. POs which have been created by the OST).
Equally the possibility to Cancel / C&R PO lines depends on the status of the lines and type of supplier. Draft and validated lines, in Draft-p / Validated/ Validated-P POs with supplier type ESC or external it is possible to cancel or cancel and resource, It is not possible to Cancel or C&R validated lines in PO with Internal/Intermission/Intersection type suppliers if they are beyond “Draft” status, this is Because if PO lines are validated they may have been synced and should not be cancelled or C&R by the requesting instance.
If you cancel & resource an entire PO, the PO will switch to the state “Cancelled” while all the lines of the cancelled & resourced PO will switch to the state “Cancelled-r” You will have to resource the corresponding lines (in status “Resourced-v” on the original IR/FO) in the OST.
If you cancel & resource 1 line of a PO, the cancelled & resourced line will switch to state “Cancelled-r“. You will have to resource the corresponding line (in status “Resourced-v” on the original IR/FO) in the OST.
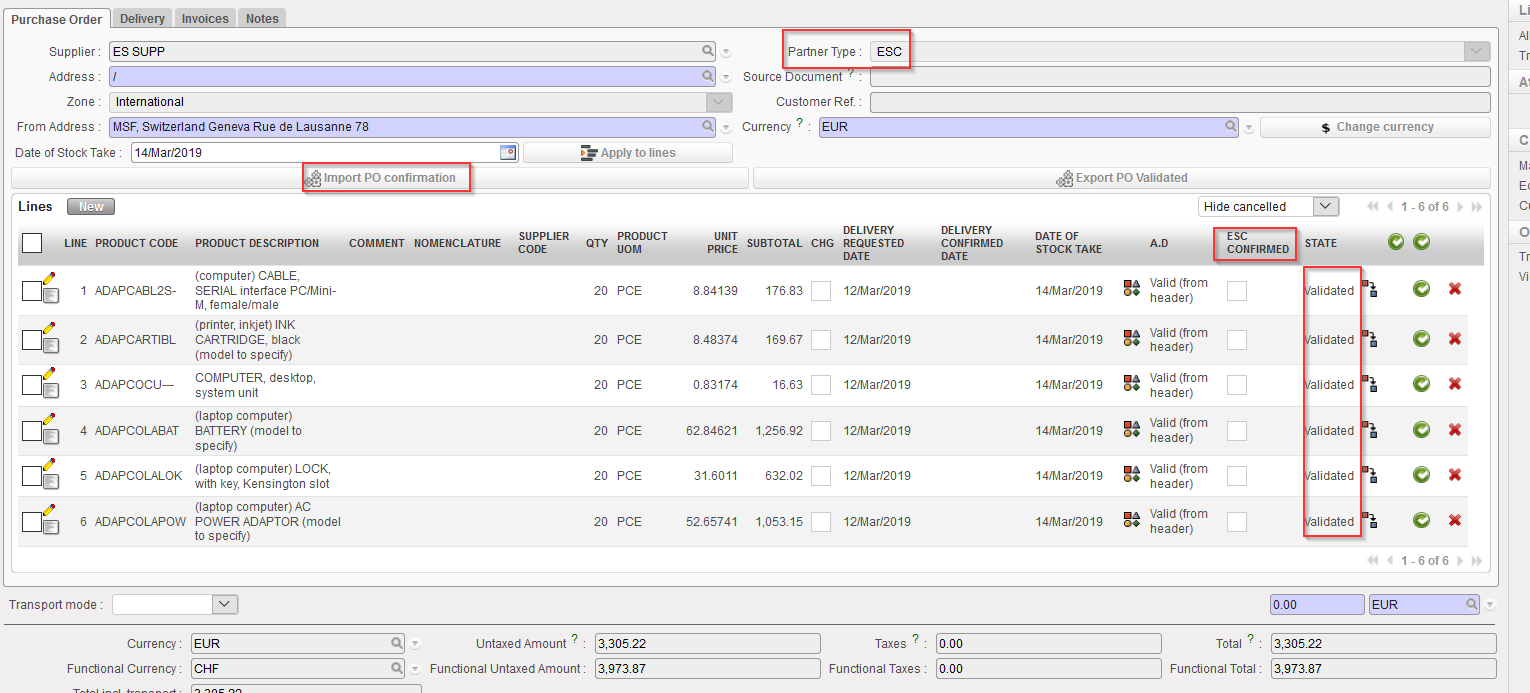
The import will be possible when the ESC will confirm (part of) the PO.
Go to:Purchases / Purchase Management / Purchase Orders
Open the Purchase Order that you wish to update via file VI file import.
Click on the “Import PO confirmation” button. Once again, this button will only appear if your PO is in the state “Validated” or “Validated-p” but not if your PO is “Draft“, “Draft-p” or “Confirmed” status.
Importing a PO confirmation via VI file
3. Select the “Type of file” corresponding to the one used by your ESC.
Importing a PO confirmation via VI file
4. Click on “add attachment“.
5. Click on “Browse” and select the file you want to import.
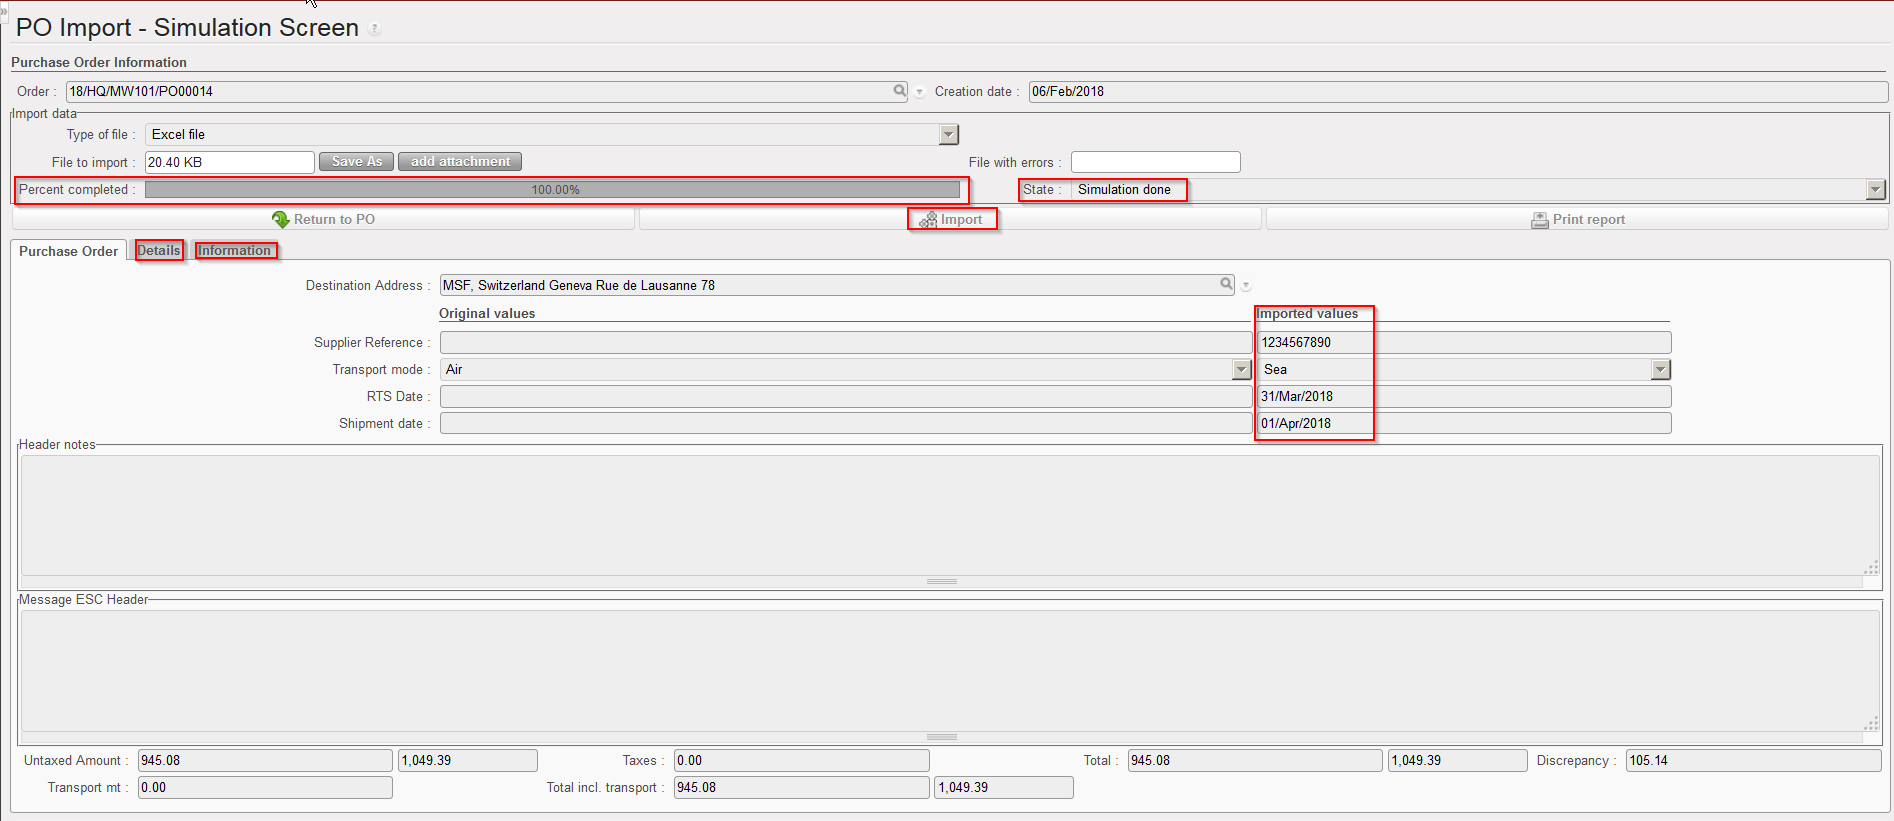
6. Click on “Simulate“.
7. The simulation screen is showing how the PO will be updated if you confirm the import (via a click on “Import“).
VI PO import simulation screen
In the “Percent completed” field, you can check the progress of the importation (which can take long if you import a file with many lines).
The “Original values” show (some) of the current content of the PO header. The “Imported values” show the update which will be done on the PO header if you confirm the importation.
In the “State” field you can check the status of the import; it will indicate “Simulationdone” if the import has been successful, otherwise it will indicate “Error“. In this last case, you should check the “Information” tab to get more explanations on the issue.
The information tab gives information of what has been uploaded on the simulation screen.
In order to check the results of the import simulation, you have 2 options:
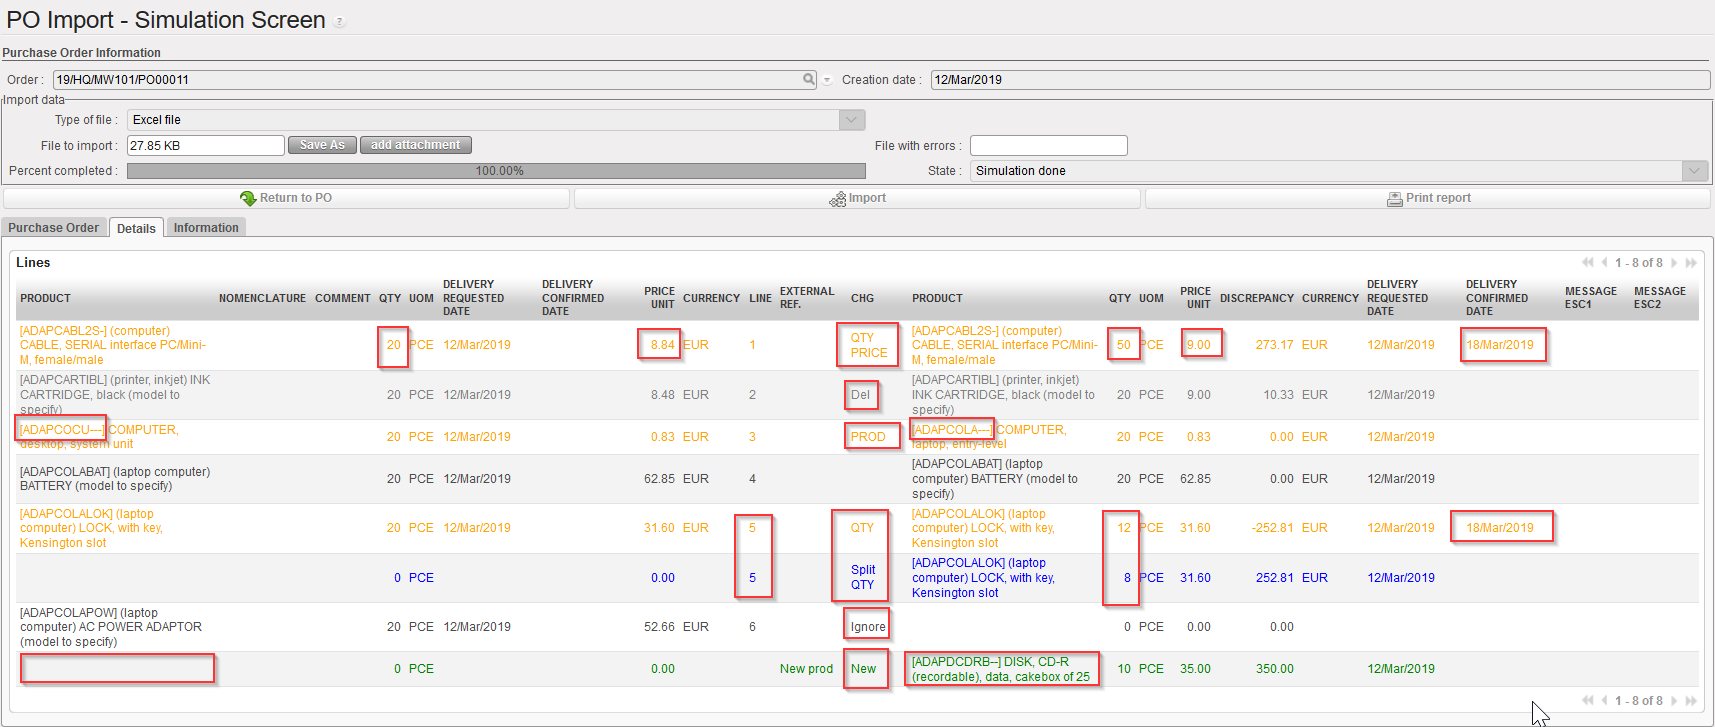
i) Option 1: Click on the “Details” tab. All changes are highlighted in colors. On the left part of the screen, you see the original PO lines as they are currently in the system. On the right side of the screen, you see how the PO lines will look like if you confirm the importation.
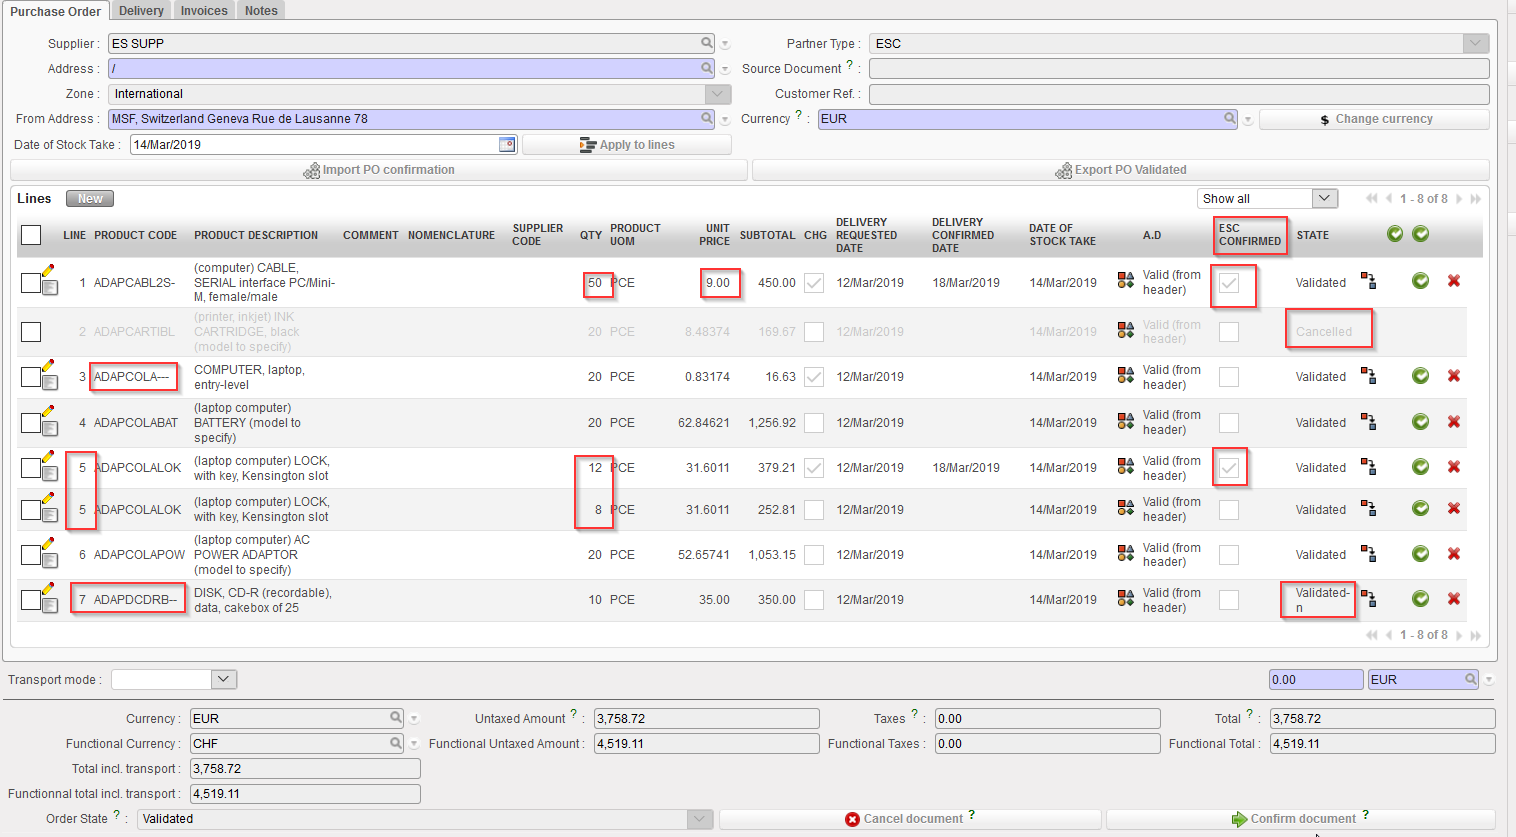
Changes on prices, products or quantities highlighted in yellow (see lines1, and 3 in the print screen below).
Any line which does not change appears in black (see line 4 in the print screen below).
Any Split line will be highlighted in blue and will appear as “Split” in the “CHG” column” (see lines 5 in the print screen below, note that we have 2 lines 5).
Any cancelled line is highlighted in faded grey and will appear as “Del.” in the “CHG” column (see line 2 in the print screen below)
Any line which is not imported (i.e. not present in the import file from the ESC) but which is not deleted will appear in black with “Ignore” in the “CHG” column (see line 6 in the print screen below).
Any new line added by the VI import will be highlighted in green and will appear as “New” in the “CHG” column. New product lines must have a reference in the column “External Ref.” (see last line in print screen below). Also for sourced PO, the field “Origin” should be filled with a “Source document” reference otherwise a warning message will be displayed to complete this field manually.
Please note that Analytical Distribution can also be imported for new line (even though it is not mandatory).
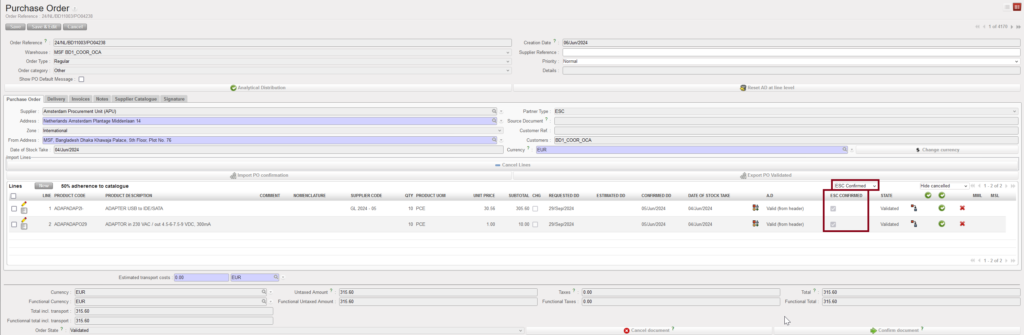
7. Lines filled with “Delivery Confirmed Date” will update the “ESC Confirmed” checkbox in the PO screen
VI PO import simulation screen with all cases
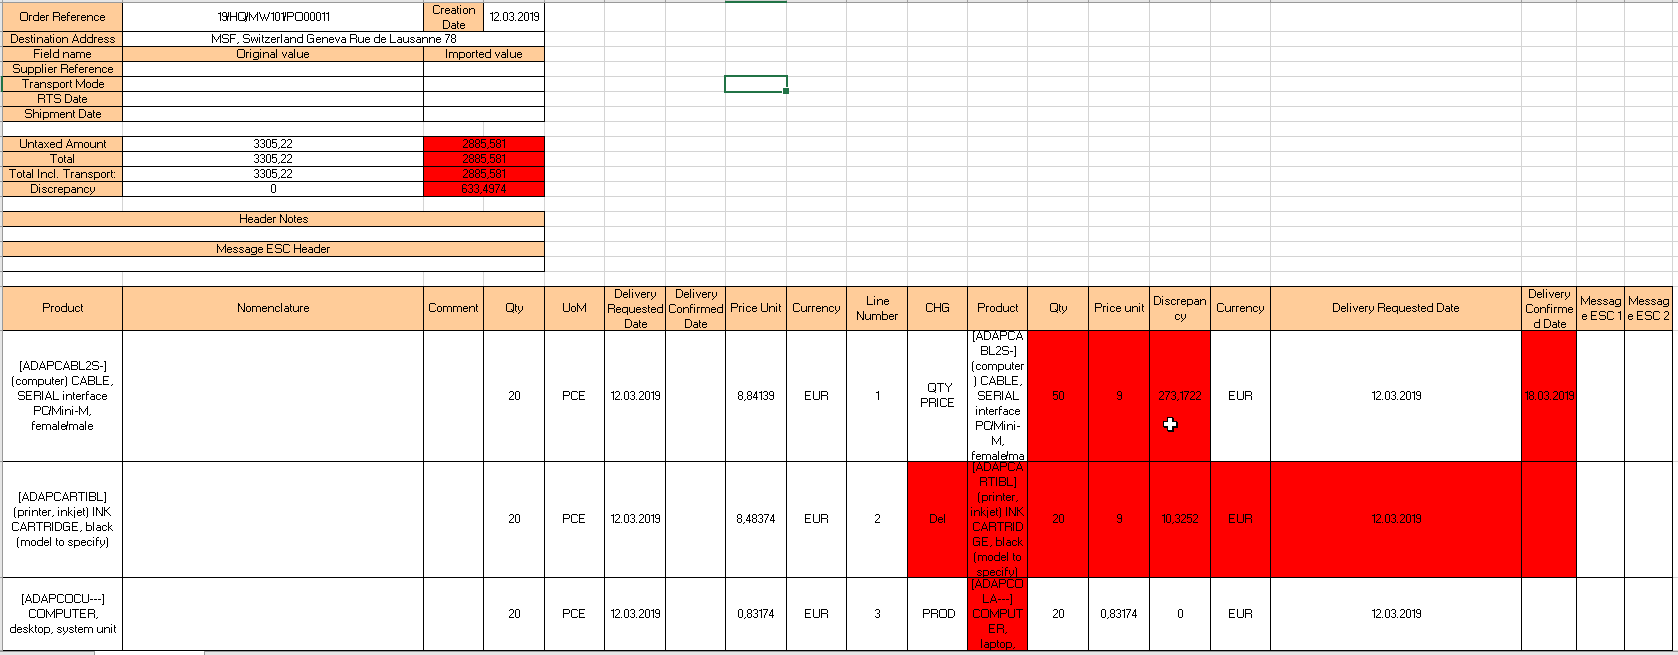
ii) Option 2: Click on the “Print report” button available on the simulation screen. This will generate an Excel file highlighting all the changes in red cells. This file can be saved and kept for history purpose if needed.
Excel reported exported from the simulation screen
8. Click on “Import” to actually import the file and update the PO. Note that if you do not want to import the changes, you may click on “Return to PO” instead.
9. After import the system goes back to the PO main screen where the updates are visible.
Split lines keep the same line number as the original line. Note that the status new lines following split is “Validated“. See lines 5 below.
New lines which have been added take a new line number (and their external reference is visible on the “Notes” tab of the PO-line). Note that the status of added lines is “Validated–n“. See line 7 below.
Lines Ignored at simulation are still in the original PO with no change. See line 4 below.
By default, cancelled lines do not appear on the updated PO (unless you change the filter to make them appear). Note the status of line 2.
Lines with populated “Delivery requested date” at import have the “ESC Confirmed” checkbox ticked. This checkbox is only available for PO with ESC supplier. Please note that for manual import any confirmation (line or document level) will have to be done manually. For automated import the “ESC Confirmed” checkbox will trigger the automatic confirmation of the line (if not “validated-n”).
PO after VI import
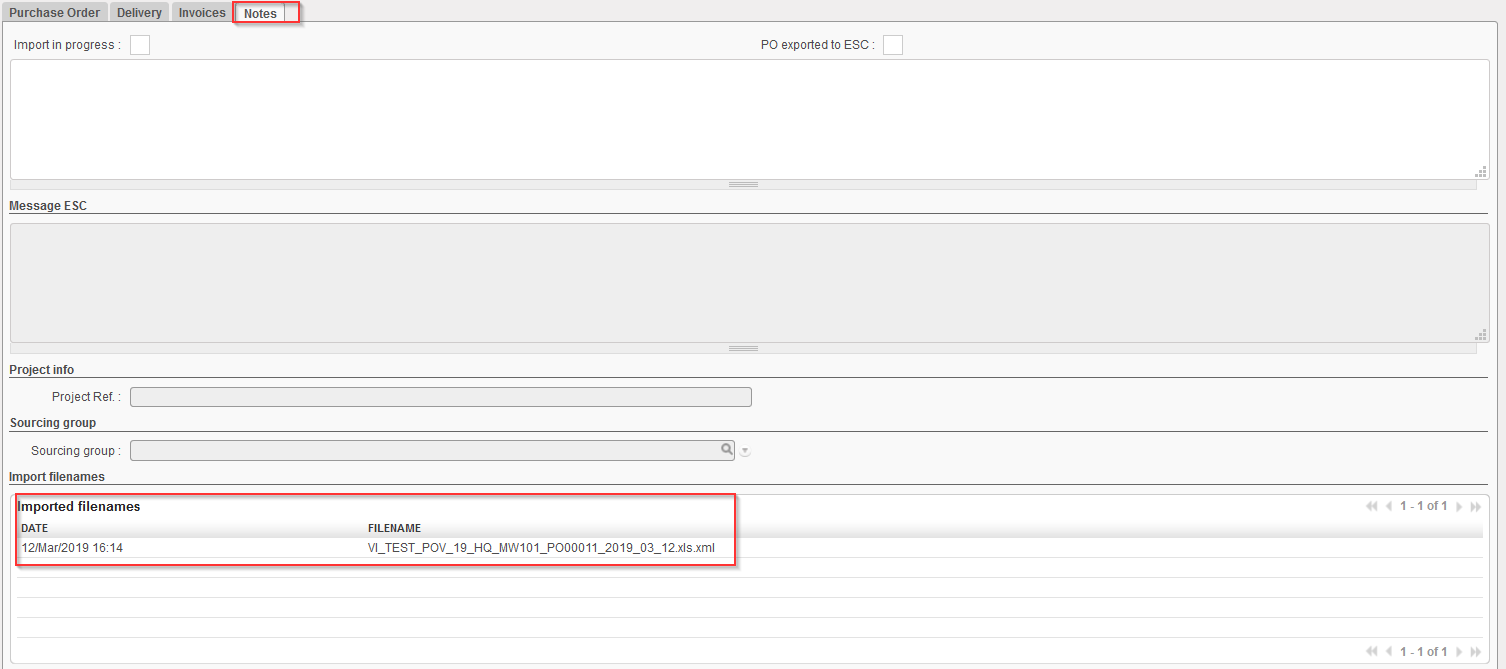
History of VI files imported on a PO can be seen on the tab “Notes” of the PO, under “imported filenames“.
History of imported VI file on a PO
Note that the actual confirmation of the PO or PO-line(s) should be done manually. However, for OCs where automated VI has been developed, confirmation can be done automatically after import confirmation.
Keep in mind that when a line has been ignored, it means that the ESC hasn’t confirmed it yet. Therefore, it is wise to ask the ESC whether some more updates are expected before confirming manually the PO at header level. Another option is to confirm the PO at line level, for the lines which have actually been confirmed by the ESC. You will be able to identify them thanks to the “ESC Confirmed” checkbox and you can use the drop down filter on the top right of the lines, to display the ESC Confirmed, ESC Unconfirmed and default show All lines.
ESC Confirmed lines filter
A deleted line from the import file will cancel any line with the same line number; meaning that if the line has been split before, the whole product line will be cancelled.
When import file adds new lines or splits or updates existing lines, system crosschecks any existing line number and also any external ref. on the line and against lines already existing in the UF PO, . This also means that split lines which keep the same line number can have different External References applied to assist specific split to be identified and if necessary further updated.
From this point you have the option to confirm the Purchase Order at header level or at line level. Remember that the PO-lines you wish to confirm should always have a delivery confirmed date and the “ESC Confirmed” checkbox ticked.
We use cookies to ensure that we give you the best experience on our website. If you continue to use this site we will assume that you are happy with it.