B. How to create a “Donation before expiry” FO
M. How to add new lines to FO created via Synch
Supply User Manual ENG -> 4. Procurement -> 4.4 LU-SU3103: Field Orders (FOs) – General -> M. How to add new lines to FO created via Synch
M. How to add new lines to FO created via Synch
When adding new lines directly to an FO, which was created via SYNCH to add the reference to the project IR. This functionality is like what already exists when adding new lines to a PO which was created from an FO and PO/IR in another instance.
The functionality enables to add project IR reference after SYNCH, you can see the line at the project level on IR and PO reference. The Field “Order in Sync. Instance” is added at coordination level:
Go to: Orders > Field Orders > Add Line
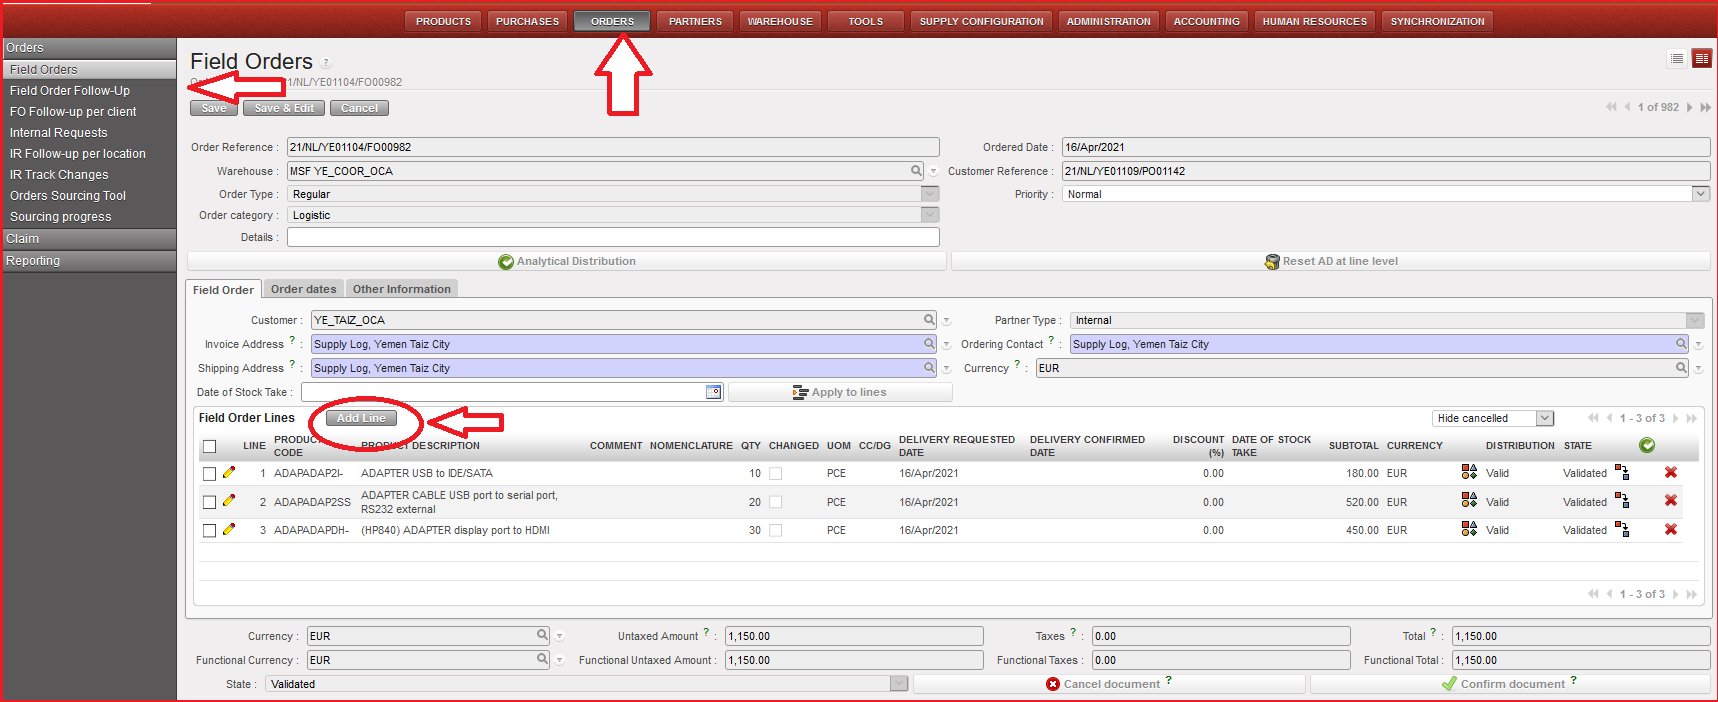
Field Order Lines window is opened with form view “doc” icon for the new added line, click on the magnifying glass in “order in sync. instance” to link the line to original IR/FO. (IR/FO should not be closed or cancelled).
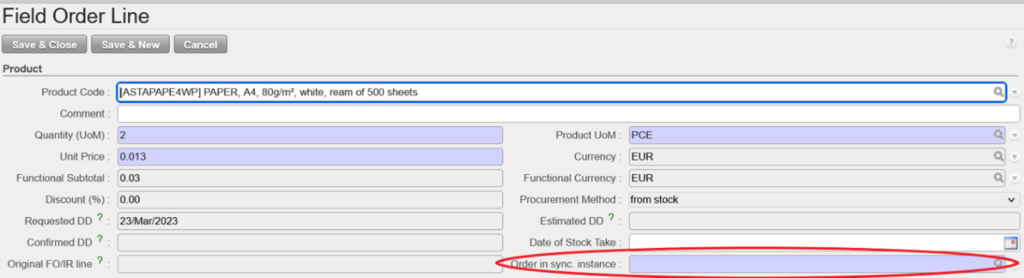
It should only be possible to select an IR/FO which is not in status Closed or Cancelled. Line can then be saved & closed. At the next status change / synch, the project PO and IR will be updated with this line. At the next status change / Synch, the project PO and IR/FO will be updated with this line.
For an FO created from scratch, it is not expected to be able to use this field, so it can stay greyed out as per currently. For extra lines to be added to FO, FO must be in status other than Closed, Cancelled or Confirmed (+-p).
Please make sure that you always select the correct Source document because once the line is saved you will not be able to edit this field anymore. In case of mistake, the only option will be to Cancel the line and Create a new one with the correct Source.
L. How to follow-up Field Orders
Supply User Manual ENG -> 4. Procurement -> 4.4 LU-SU3103: Field Orders (FOs) – General -> L. How to follow-up Field Orders
L. How to follow-up Field Orders
Field Orders should be followed-up on a regular basis to ensure that all requests from the field are answered to within the requested time limits, and to avoid having any pending or “forgotten” orders.
The “Field Manager Dashboard” (Orders/Orders) and the general list view of FOs also called “Search: Field Orders” screen (Orders/Orders/Field Orders) already give some basic information: state, percentage picked, customer, customer reference, responsible,…
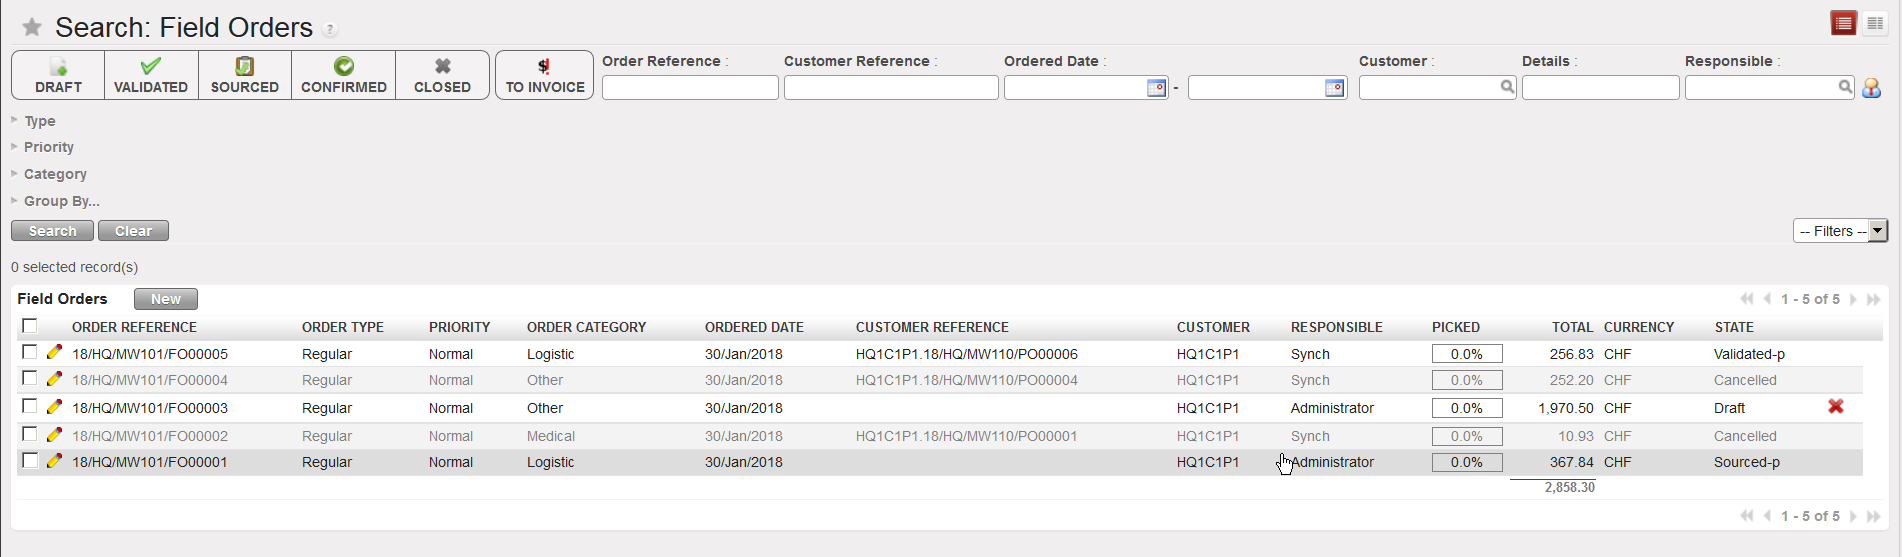 |
| General list view of FOs also called “Search: Field Orders” screen |
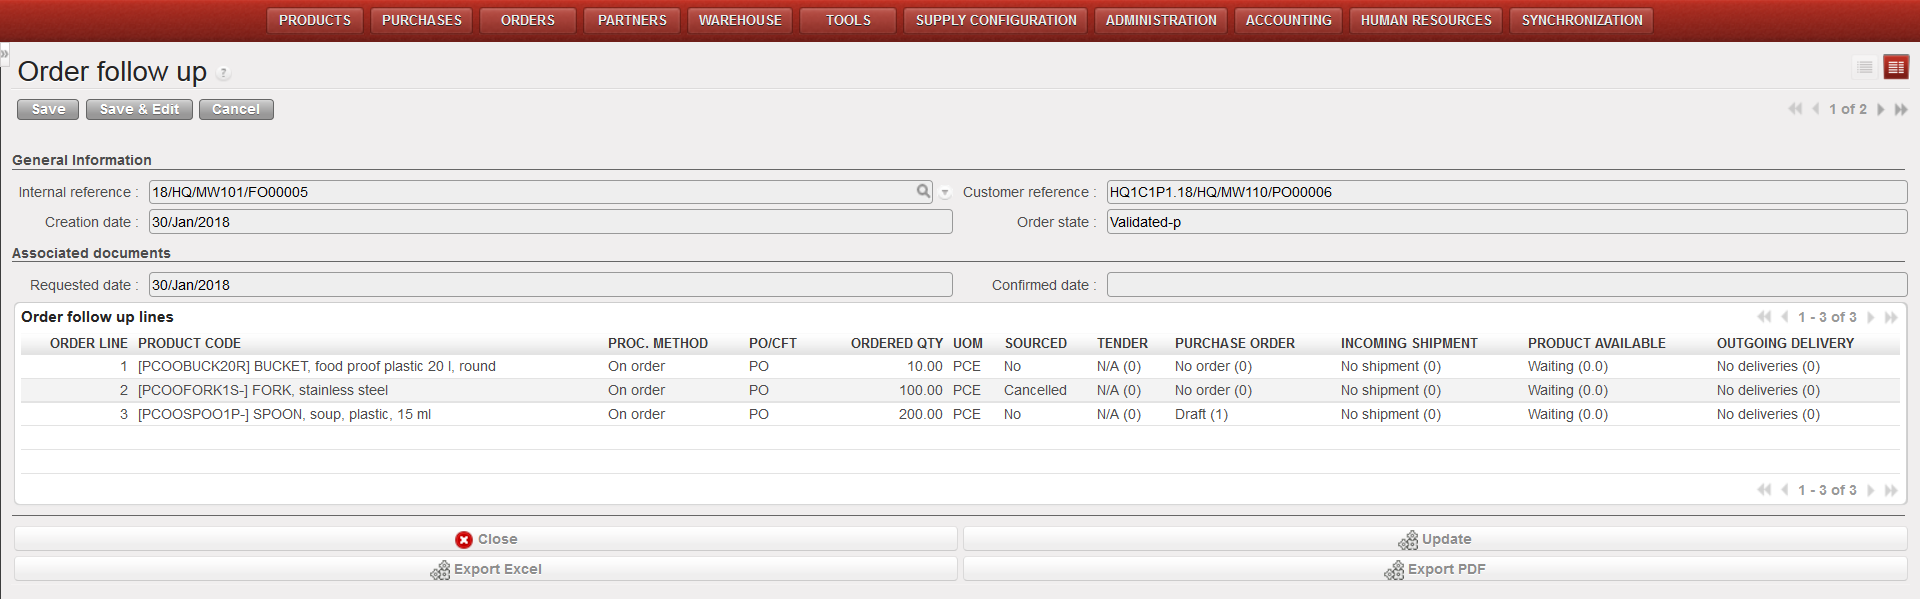
The Field Order Follow-Up gives more details of the situation of a specific FO. Note that this report has not been maintained. If available, it is better to avoid using it.
Go to: Orders / Orders/ Reporting / Field Order Follow-Up
- In the pop-up window user can search by “Internal reference” or by “Customer reference“. Search and select the required Field Order.
- Click on “Go to: follow up” button.
- The system will display all the information of the selected order including sourcing and incoming shipment information.
 |
| Field Order follow-up |
The report can be refreshed anytime via the “Update” button. It can also be exported to Excel (via the “Export Excel” button) or PDF (via the “Export PDF” button).
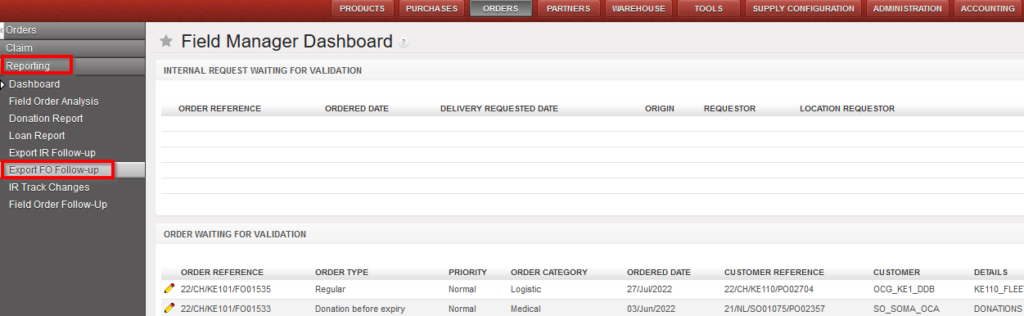
In some case, you will want to check the state of several FOs for a given partner. In this case, you will use the report named “Export FO Follow-up” available in Orders / Orders. The report can be generated in XLS or PDF. This functionality will allow you to follow back-orders towards your clients.
Go to: Orders / Orders / Reporting / Export FO Follow-up
- Complete the fields Start and End date to restrict the output to a time frame.
- Select a “Partner” and/or an “Order Ref.”.
- Check one or multiple “Order statuses” boxes if needed.
- Check one or multiple “Order Categories” boxes if needed.
- Check one or multiple “Order Types” boxes if needed.
- Check the “MSL/MML Non Conforming” box if you only need to see lines not conforming to the MSL/MML
- Check the “pending order lines only (PDF)” if you only need to see the lines which have not been delivered yet to the requestor if needed (please note that this parameter only works for the PDF format).
- Check the “Include order lines note (PDF)” if you want the comment from the FO to be displayed on the PDF export.
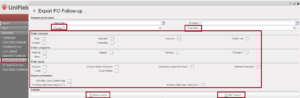
Set of parameters to define in the Export FO Follow-up window

Export FO Follow-up in excel 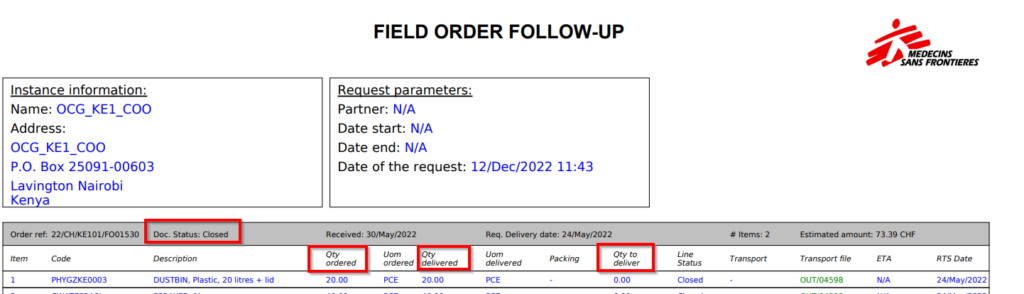 Export FO Follow-up in PDF
K. How to cancel one specific Field Order line or multiple lines.
Supply User Manual ENG -> 4. Procurement -> 4.4 LU-SU3103: Field Orders (FOs) – General -> K. How to cancel one specific Field Order line or multiple lines.
K. How to cancel one specific Field Order line or multiple lines.
There are 2 different ways for cancelling lines in the Filed order:
1- For canceling multiple lines, you can select the lines, click cancel lines, cancel lines window will open to confirm the cancellation and lines will be cancelled.
- In a draft FO, Select the lines you want to cancel, then click on the “Cancel Lines” button, the cancel lines window will appears, confirm your choice and click on “Cancel selected lines” button.

2- For cancelling one specific Line, using the red cross on the line level as below
- In a draft FO, use the red cross located at the right of the line item.
 |
| Cancelling an FO line of a draft FO |
The FO will stay in status “Draft” but the cancelled line will switch to state “Cancelled“.
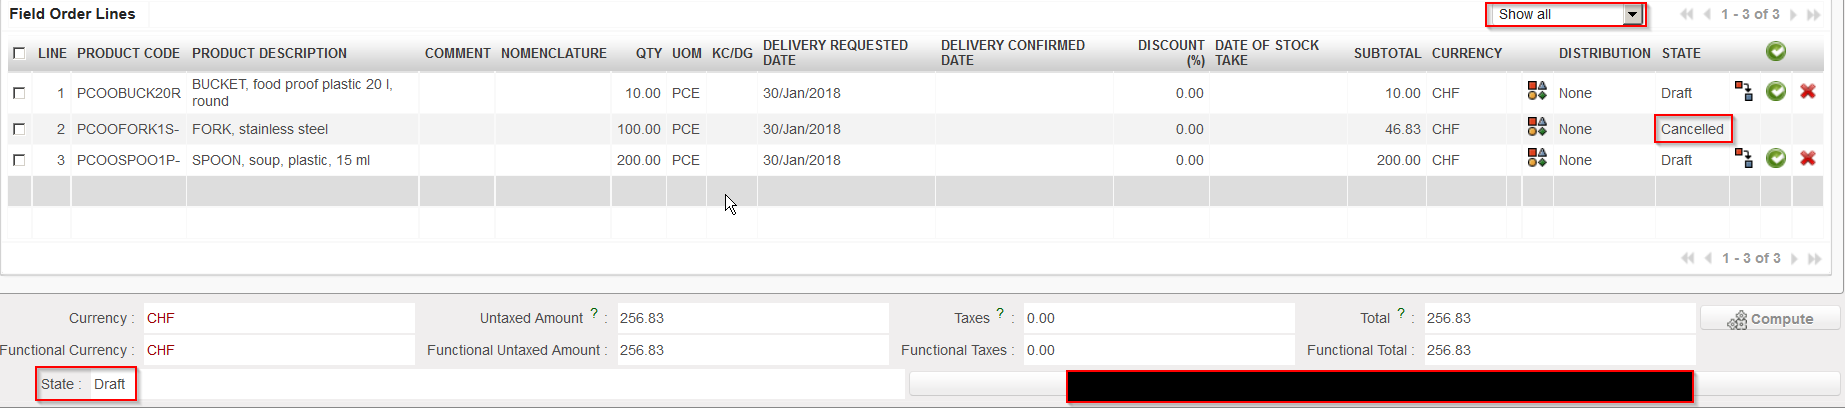 |
| FO with a cancelled line |
If the FO was created by the synchro, from a PO created (and validated) on another instance, this PO will keep the state “Validated” but the line which was cancelled on the FO will turn to state “Cancelled” on the PO.
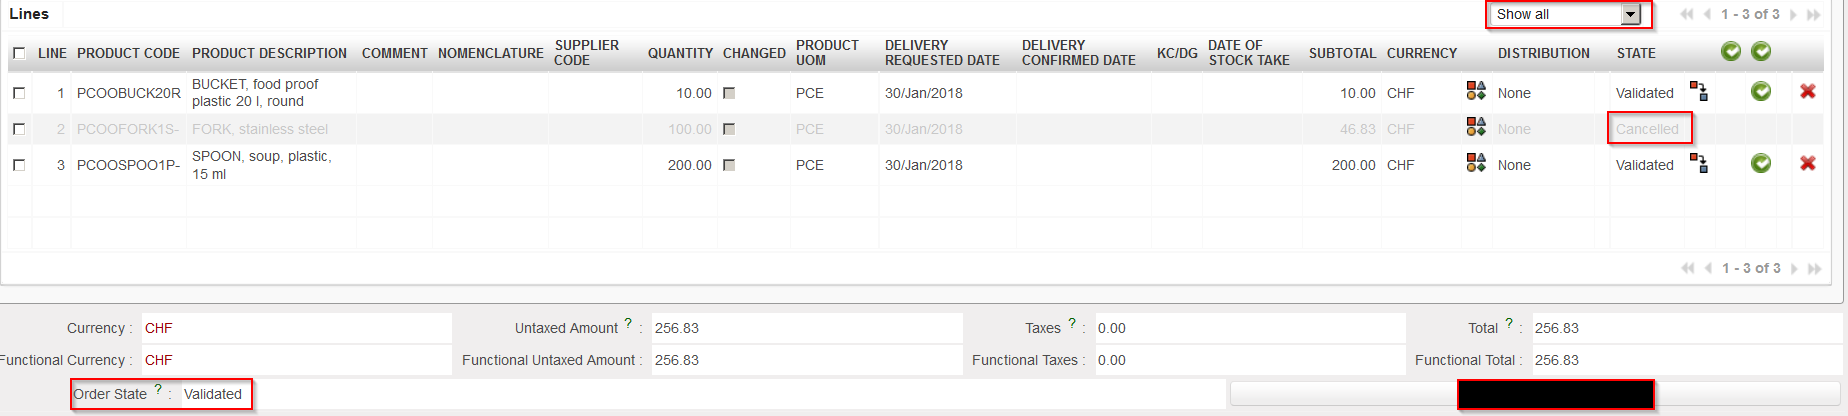 |
| PO with a cancelled line on the customer instance |
Note that draft and validated FO-lines can be cancelled in Draft-p / Validated/ Validated-P FO. but an FO-line which has already been sourced cannot. At this stage you will have to do the cancellation on the next document (e.g. PO or PICK).
J. How to cancel a whole Field Order
Supply User Manual ENG -> 4. Procurement -> 4.4 LU-SU3103: Field Orders (FOs) – General -> J. How to cancel a whole Field Order
J. How to cancel a whole Field Order
In case the Coordination does not agree on the whole order, or if they are unable to meet the demand, the complete order will have to be cancelled. The PO at project level will be cancelled too after synchronization.
Go to: Orders / Orders / Field Orders
- Select the Field Order to be cancelled by clicking on the appropriate Field Order line to open the FO. The FO should be in Draft or Validated. Click on the “Cancel Document” button at the bottom of the screen. The system will warn you that you are about to cancel, confirm if you want to proceed.
|
|
|
Draft Field Order cancellation |

2. The FO will switch to the state “Cancelled”. You will see that the FO lines do not appear anymore. That’s because they are also in the state “Cancelled”. You may see them if you use the drop-down filter at the top of the “Field Order Lines” table which allow you to show the cancelled order lines.
|
|
|
The Draft Field Order state becomes Cancelled |
|
|
|
Cancelled FO-lines can be shown if you use the appropriate filter |


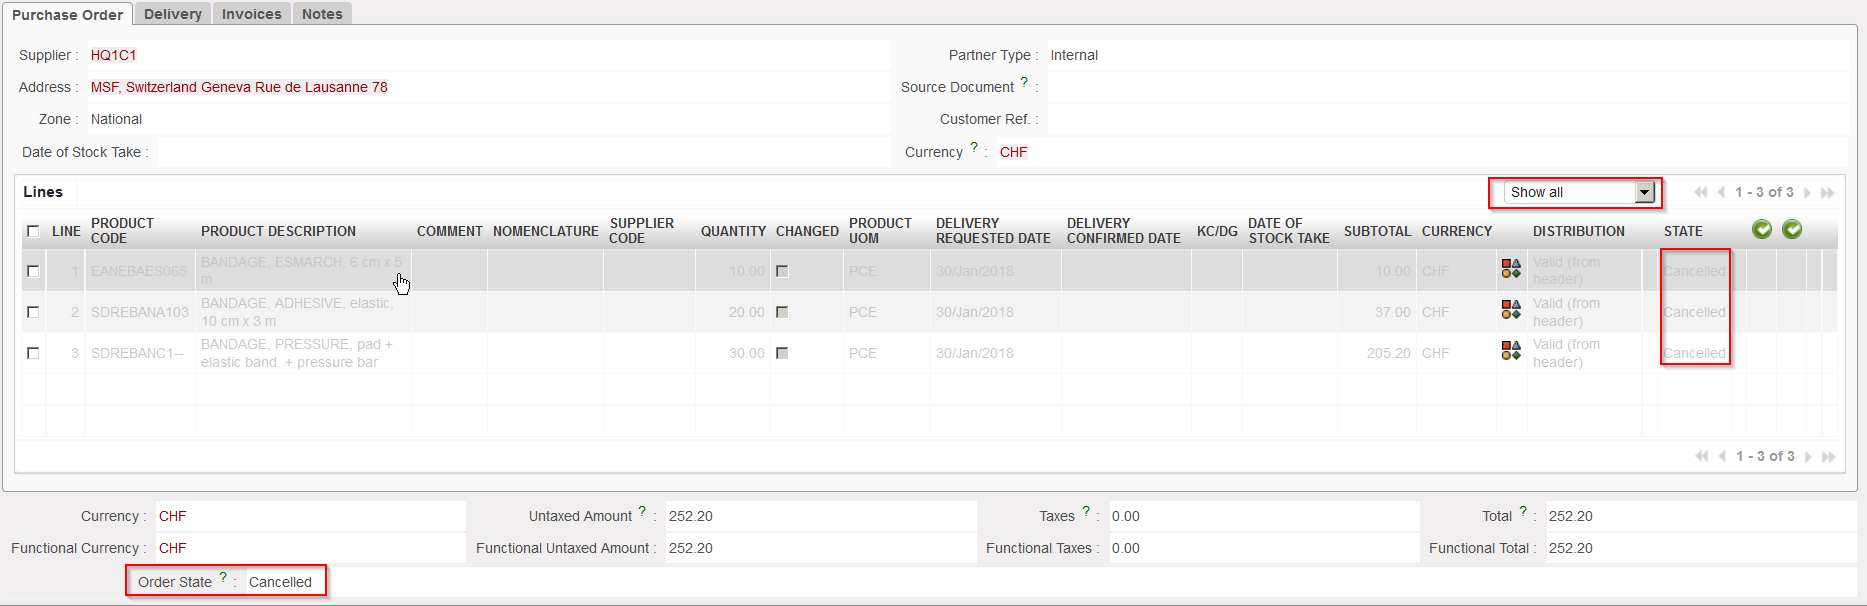
3. If the FO has an internal partner as customer, after synchronization of both instances, the corresponding PO on the customer instance will also switch to the state “Cancelled” with the corresponding PO-lines in state “Cancelled“.
|
|
|
Cancelled PO on the customer instance |
Note that “Draft” and “Validated” FOs can be cancelled but an FO which has already been sourced cannot. At this stage you will have to do the cancellation on the next document (e.g. PO or PICK). Please note that when Cancellation is done at OUT/PICK level, the FO will be “Closed” if FO has been sourced to a PO whereas it will be “Cancelled” should the FO be sourced from Stock.
I. How to confirm a Field Order (line) through the Orders Sourcing Tool.
Supply User Manual ENG -> 4. Procurement -> 4.4 LU-SU3103: Field Orders (FOs) – General -> I. How to confirm a Field Order (line) through the Orders Sourcing Tool.
I. How to confirm a Field Order (line) through the Orders Sourcing Tool.
In most of the cases, FO lines will have to pass through the Orders Sourcing Tool in order to be confirmed. The OST offers the possibility to source FO partially (i.e. source some lines of an FO and leave the other ones pending).
If the FO-line is sourced from stock, a picking ticket will be created, and the FO-line will switch to status “confirmed“.
If the FO-line is sourced on order, a procurement document (Tender, PO,) will be created and the FO-line will switch to status “sourced“.
The FO itself will switch status according to the status of its lines.
H. How to validate a Field Order.
Supply User Manual ENG -> 4. Procurement -> 4.4 LU-SU3103: Field Orders (FOs) – General -> H. How to validate a Field Order.
H. How to validate a Field Order.
Go to: Orders / Orders / Field Orders
- Select the Field Order to validate by clicking on the appropriate order line.
- Click on the button “Analytical Distribution”

to add the analytical distribution if not yet done (the AD process is described in LU-SU3201 PO Generals).
a) if all products have the same analytical distribution, add this in the header.
b) if all products have not the same analytical distribution, add the analytical distribution per order line by clicking on the icon ![]() and entering destination, cost center and percentage if needed. Click on the floppy disk icon to save the AD-line, then click on the “Save” button to save the AD.
and entering destination, cost center and percentage if needed. Click on the floppy disk icon to save the AD-line, then click on the “Save” button to save the AD.
3. If your user has the appropriate user rights, you may either validate the FO at header level, either validate it at line level.
a) To validate an FO at header level, click on the “Validate Document” button at the bottom of the screen.
b) To validate a specific line of an FO, click on the green button at the left of the line you wish to validate.
c) To validate several (but not all) lines of an FO, select the lines you wish to validate using the check box on the left of the lines and click on the green button on the top of the “Field Order Lines” table (next to “STATE“).
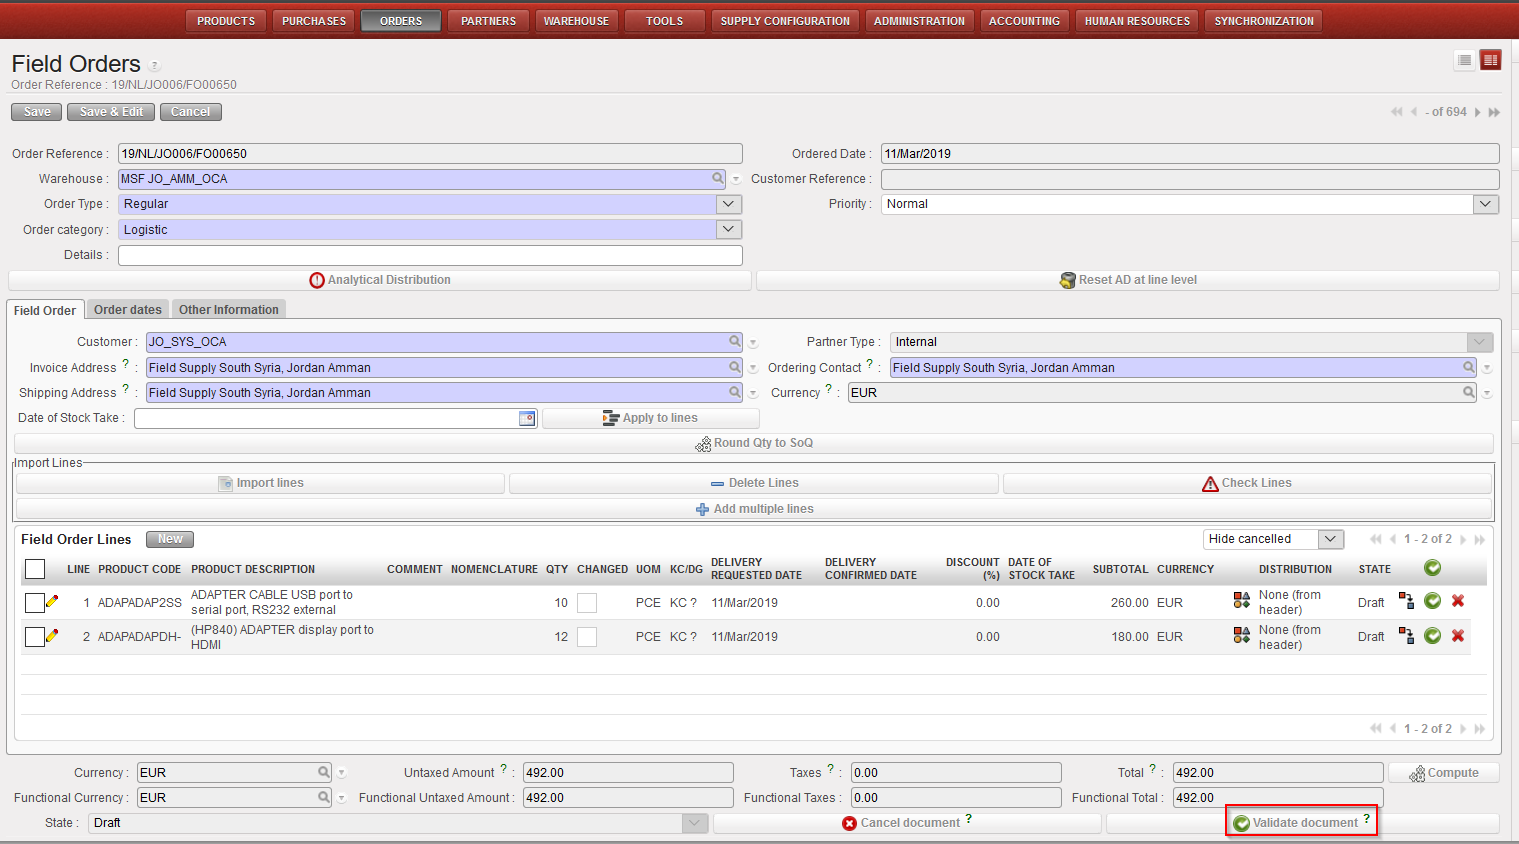 |
| FO validation at header level |
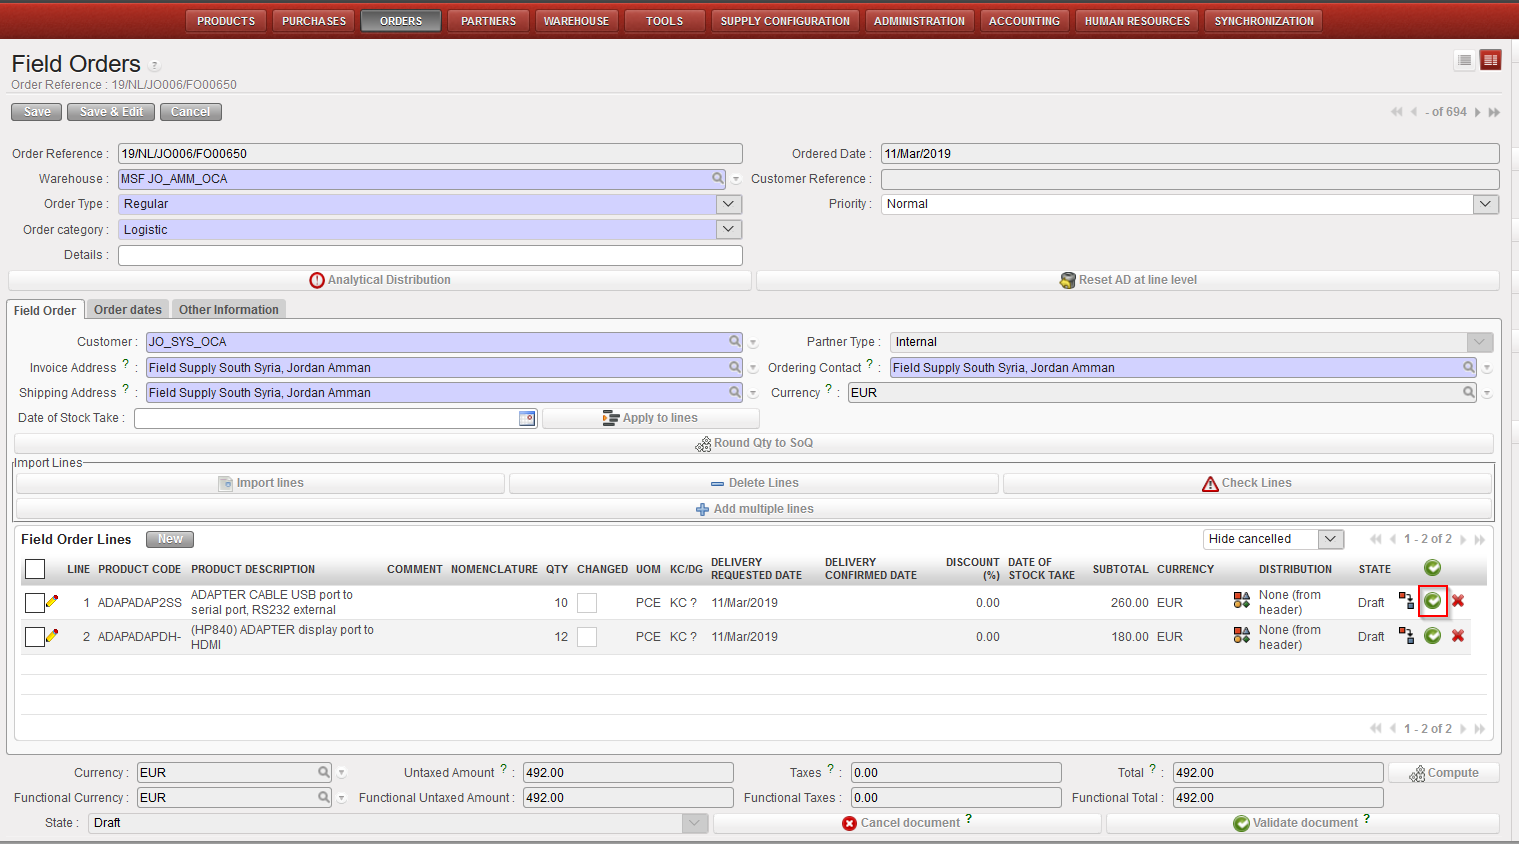 |
| FO validation at single line level |
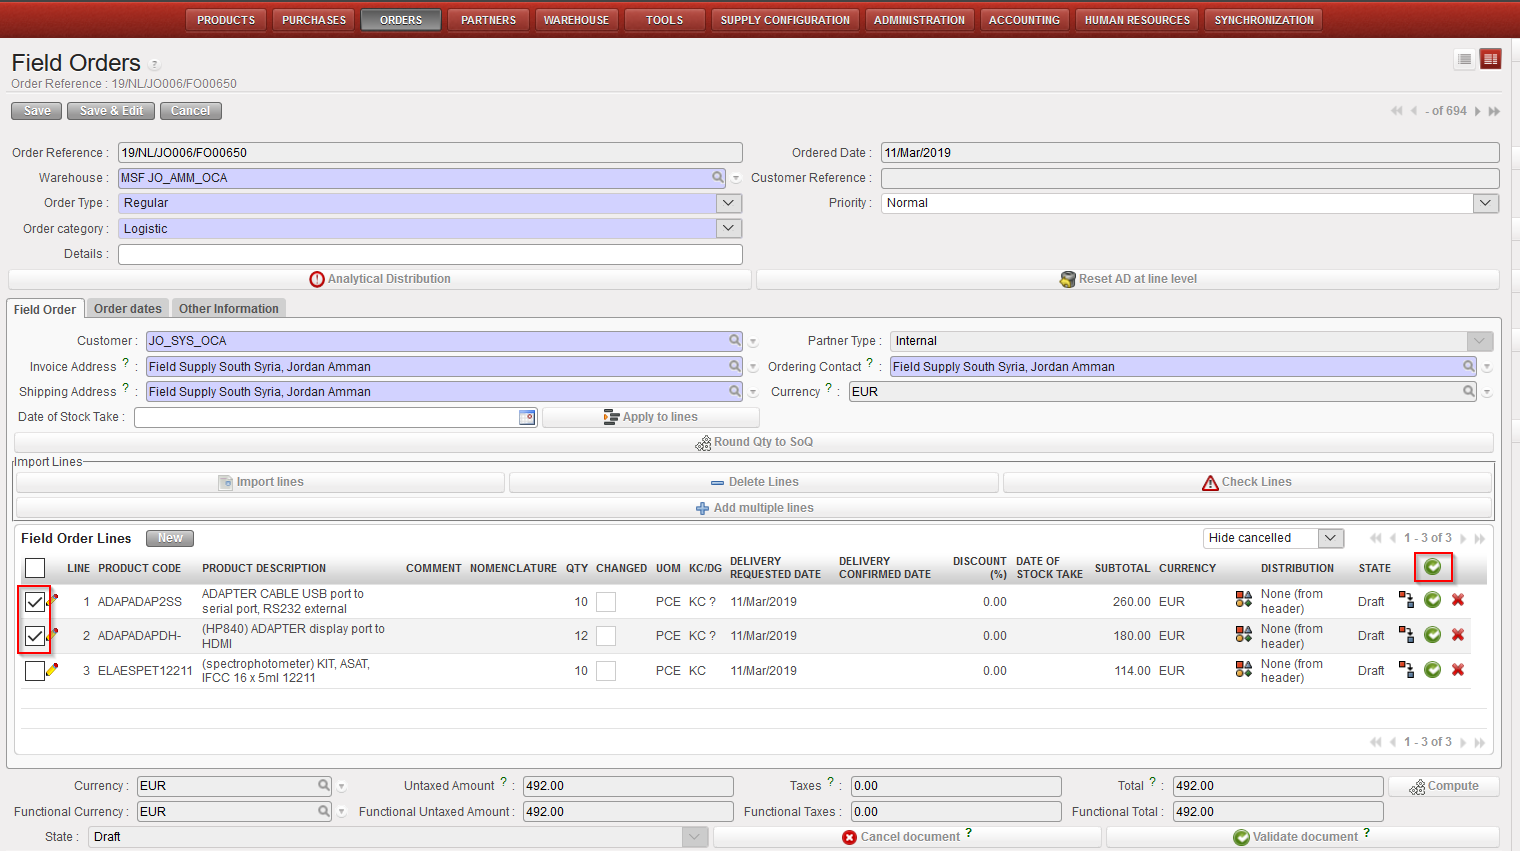 |
| FO validation at multiple lines level |
Note: An FO-line cannot be validated if its unit price is at 0 (except for donations and loans).
G. How to export a Field Order.
Supply User Manual ENG -> 4. Procurement -> 4.4 LU-SU3103: Field Orders (FOs) – General -> G. How to export a Field Order.
G. How to export a Field Order.
Go to: Orders / Orders / Field Orders
- Click on the check box on the left part of the screen of the line of the Field Order to export.
- The action menu is displayed on the right of the screen.
- Click on the “Field Order Excel Export” option.
- The FO will be exported with the following format (XML Spreadheet 2003):
 |
| Export from FO to Excel |
You can also print an FO in PDF for validation purpose by selecting the “Field Order” option in the action menu.
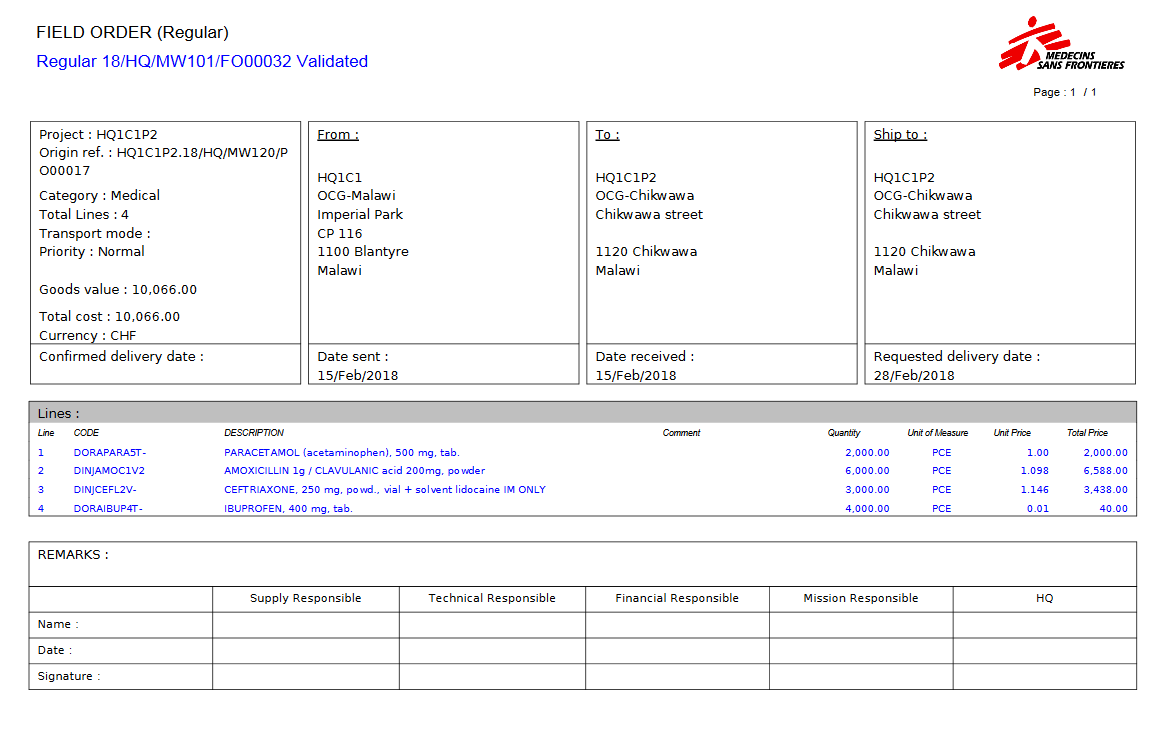 |
| Export from FO to PDF |
Note 1: It is possible to select several FOs at the same time on the “Search: Field Orders” screen (using several check boxes) and export them in one click to Excel. In Excel, you will get one FO per sheet. Note that this option is not possible for export to PDF (which is possible with IRs).
Note 2: The export to excel and PDF can also be done from within the FO as the “Field Order Excel Export” and the “Field Order” options are also available in the action menu (under “Reports”).
Note 3: If you export to Excel, the comment included in the “Comment” column of the FO will appear in the column “Comment” of the Excel. Note that the notes included in the “Notes” tab of the FO-line are not exported to excel.
Note 4: If you export to PDF, at header level, the notes inserted on the “Notes” tab of the FO will appear (at the bottom of the PDF, behind “REMARKS”). At line level, the comment included on the “Nomenclature Selection” tab of the FO-lines will appear (in the column “Comment” of the PDF) but the notes included on the “Notes” tab of the FO-lines won’t appear.
Note 5: Cancelled lines are not displayed in the PDF export.
F. How to import lines on a Field Order.
Supply User Manual ENG -> 4. Procurement -> 4.4 LU-SU3103: Field Orders (FOs) – General -> F. How to import lines on a Field Order.
F. How to import lines on a Field Order.
It is possible to import all order lines at once instead of having to encode each order line manually. The Field Order information (products, quantities, unit price) should be available in an Excel (XML Spreadsheet 2003 format) file to be imported on a Field Order.
The file should be in the exact following format:
 |
| Field Order, Import lines |
Go to: Orders / Orders / Field Orders
- Open an existing FO or create a new one.
- Click on the “Import lines” button.
- Click on the “add attachment” button then “Browse” and search on the computer for the file to import.
- Select the file you want to upload and click on “Open” in the browse window.
- Click on the “Import file” button to import the file, and then click “Update“. A message will indicate if lines have been imported successfully.
- Click on the “Close Window” button.
- Save the FO.
Note that comments can also be imported in the FO if you populate the “Comment” column of the Excel. These comments will then appear in the “Comment” column of the FO and be editable on the “Nomenclature Selection” tab of the FO-line.
Note that “product by nomenclature” lines can also be imported from Excel into an FO. Leave the “Product Code” (and “Product Description“) columns empty and populate the “Comment” column. After importing you will have to complete the lines with “product by nomenclature” and add the mandatory nomenclatures level. This should be done on the “Nomenclature Selection” tab of the FO-line where you will also be able to update the uploaded comment if needed.
To get a template of the correct Excel format needed, you may export an existing FO to Excel as explained below (see: F.How to export lines from a Field Order). Note that you will have to delete the last 4 columns of the Excel generated if you want use it as a template ( “Justification Code“, “Justification Coordination“, “HQ Remarks” and “Justification Y/N“).
Note that the “Status” column values are not imported.
E. How to update / amend a Field Order
Supply User Manual ENG -> 4. Procurement -> 4.4 LU-SU3103: Field Orders (FOs) – General -> E. How to update / amend a Field Order
E. How to update / amend a Field Order
Once a synchronized Field Order has been received from a project, coordination members can amend the order prior to its validation to change the products, the quantities, the unit prices or any other information included in the Field Order. All changes will be reflected in the Project’s Purchase Order as soon as both sides have synchronized their instances.
Go to: Orders / Orders / Field Orders
- Select the Field Order to be updated by clicking on the pencil
 at the left of the appropriate row.
 - Change any information in the header of the order.
- Update any line (product, quantity, unit price,) if needed. Note that the field “Modification Comment” can be used to explain a change and will be synchronized on the corresponding PO of the requesting instance.
- Cancel a whole order line if needed by clicking on the red cross of the appropriate order line (on the right side of the screen).
- Click the “Save” button on the top of the screen.
Note that an FO created by the synchronization will have “Synch” as responsible while and FO created manually will have as responsible the user who created the FO.
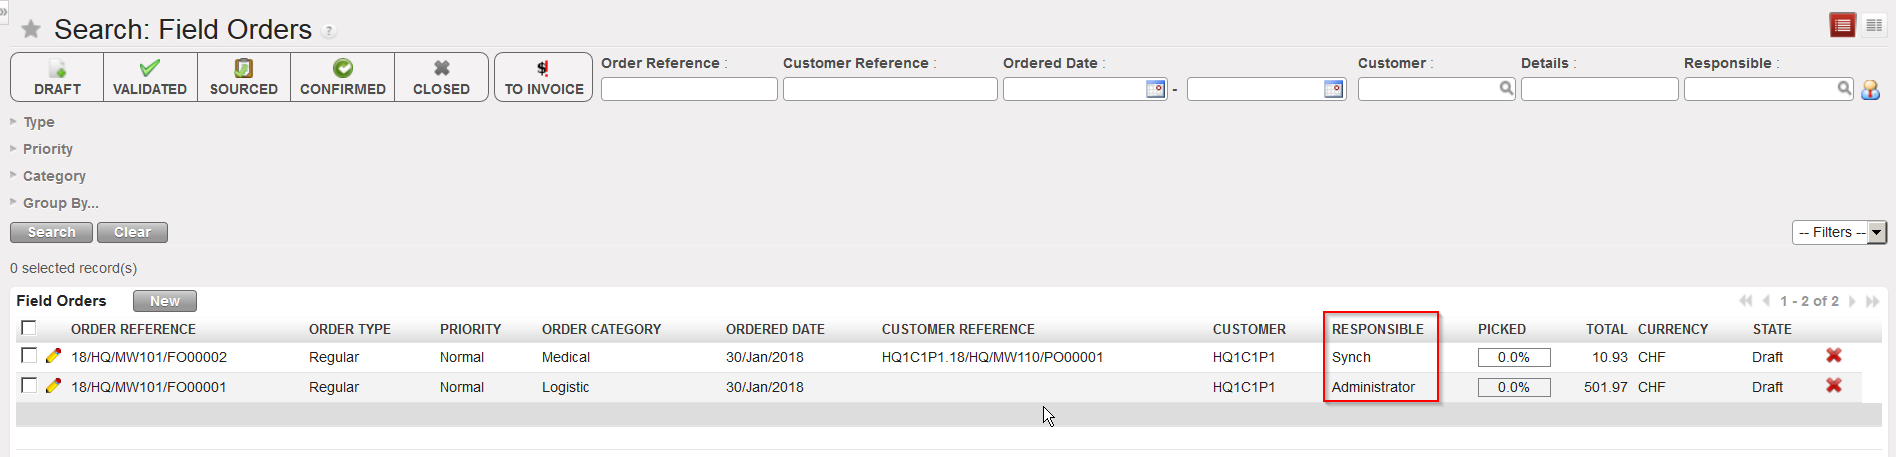 |
| FO created by the synchronization versus FO created manually |
Please note that any change on “Product”, “Quantity”, “Price” and “UoM” to a “Validated” line will trigger the ticking of the “Changed” checkbox. These changes will also trigger the checkbox if the FO is still in Draft but only for FOs created by sync (i.e.: pulled FO).
Changes can be seen by clicking on the updated line; this will open a pop up with the details of the line (the same one as when clicking on “new”). You will see the “Original value” compared to the actual one:
 |
| FO line updated: in this example “Quantity (UoM)” has been updated to 8 vs “Original Qty” of 10 |
As long as the FO is in “Validated” status, it is still possible to add new line to the order however this will trigger the “Changed” checkbox.
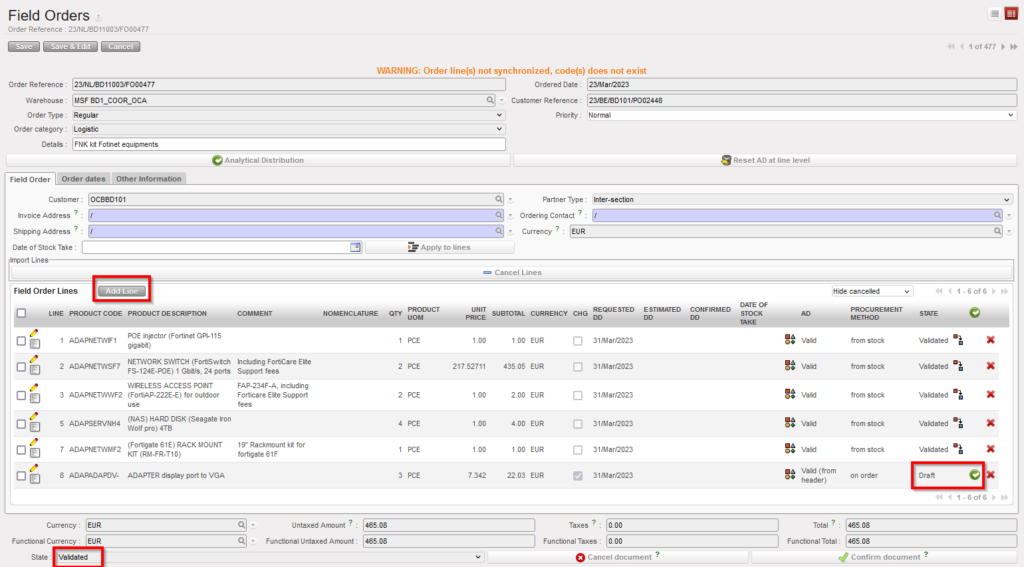
The addition of new lines to a “Validated” FO is conditioned by User rights. A new button named “Add line” will replace the “New” button which is only used for Draft FO. New lines added at “Validated” state will still be created as “Draft” and will need validation from authorized user.
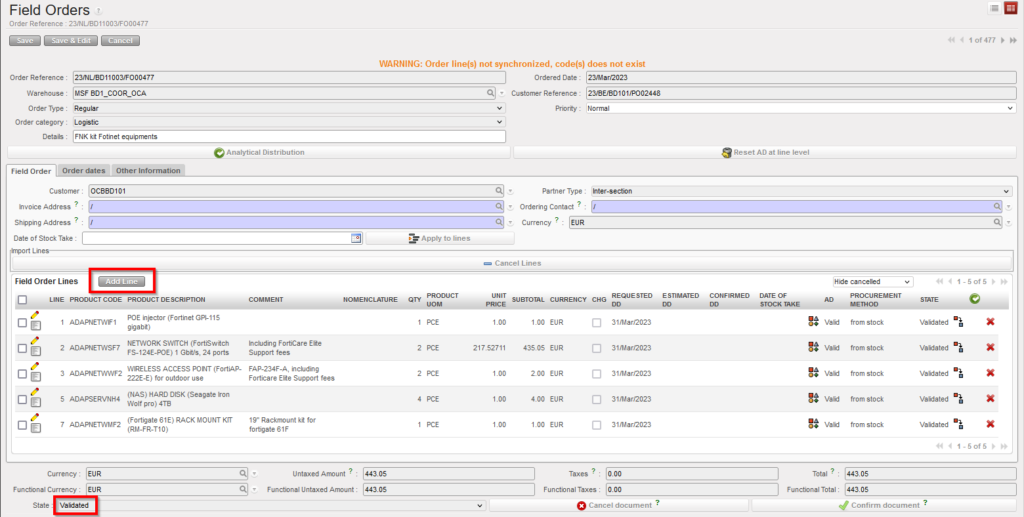
Please note that after adding a new line to a “Validated” FO, the FO remains “Validated” (document status does not “go backward – not to “draft-p”) despite the new Draft line.