M. HOW TO GENERATE A PRODUCT LIST CONSISTENCY REPORT
Go to:Warehouse /Replenishment Rules/ Configuration/ Product List Consistency Report
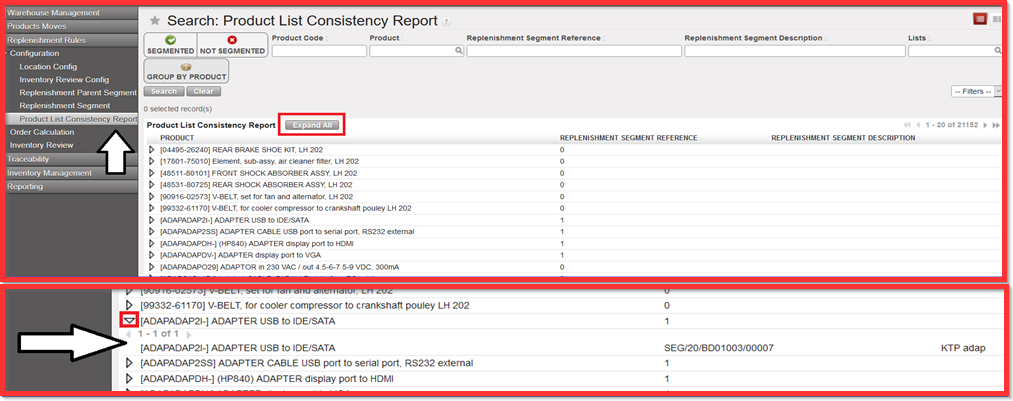
Product List Consistency Report is used for each of the products from RR. The purpose of the report is to cross check products to which segment belong to. It enables to see how many Replenishment Segments each product is in (overview) or whether it is not in any Replenishment segments. It considers only lower level of segments – Replenishment segment (child segments) where the products are added. Thus “Replenishment Parent Segment” is not part of Product List Consistency Report.
Click on sub menu “Product List Consistency Report”
Click on button “Expand All”. You get the detailed breakdown description of each product as depicted on picture below.
If you click on the small arrow at product line level you get the breakdown on clicked product only.
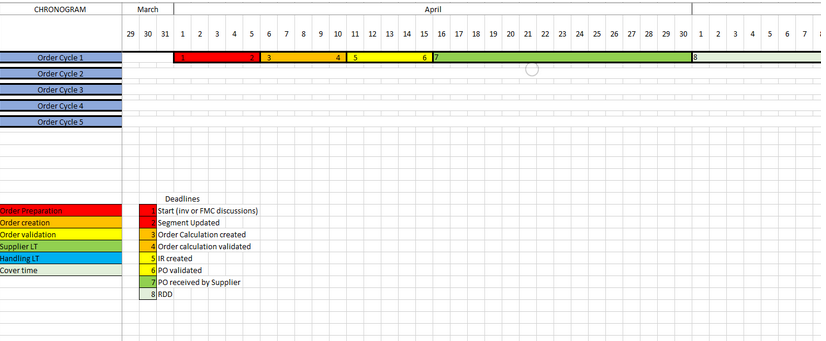
Note: its possible to export the Chronogram diagram in excel format from the Action menu of the Replenishment Parent Segment screen. It gives an overview of a 2 year planning horizon showing up to 5 order cycles based on the dates entered in the Parent segment, with indications of lead times/key dates for order preparation, order creation and order validation, Supplier and Handling lead times as well as the cover time of the order. Chronogram will be generated using Unit of time selected in segment (days/weeks/months). Some restrictions have been added to ensure unit of time selected is pertinent to lead times added along with a warning to indicate these.
Go to: Warehouse / Replenishment Rules / Configuration / Replenishment Parent Segment / Reports
K. HOW TO GENERATE ORDER CALCULATION REPORTS – Exports and on screen
From list view of Order Calculations, it is possible using the check-boxes to select multiple Order calcs and then, using some other options in the Action Menu in order to generate reports in excel files.
These exported reports can still be used as import file in order to update the Order Calc (when not Closed yet).
Go to:Warehouse / Replenishment Rules / Order Calculation
Export files from right end side Action menu
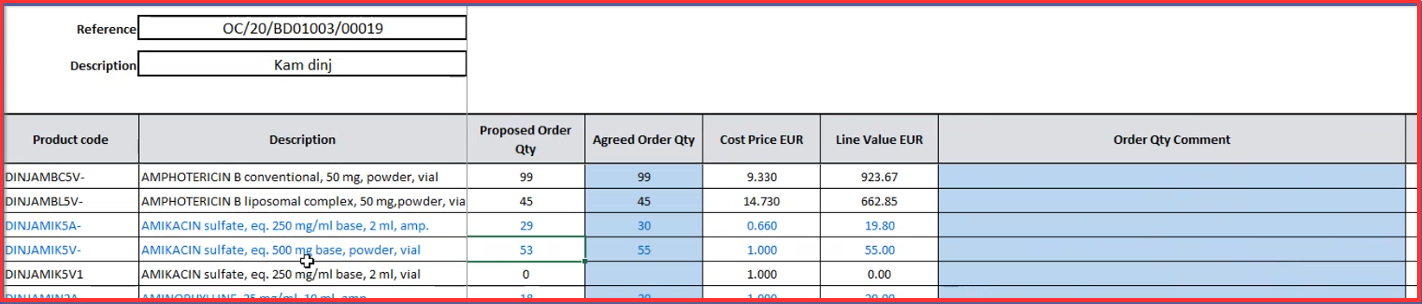
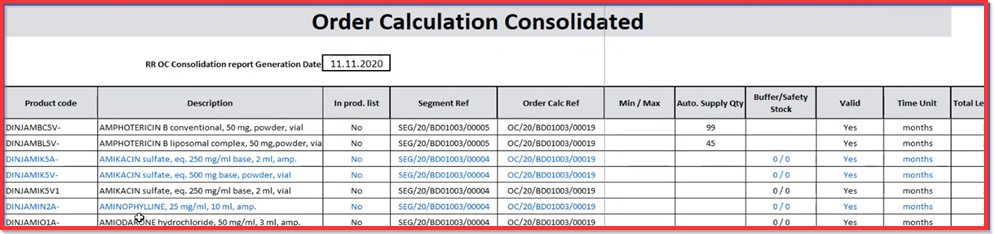
a) Order Calc Excel Export :
This report enables to have a visibility on what is present in our order calc. There is an option to export either a report with all lines or a report with Warning lines. If you export the excel spreadsheet file there are two columns visible (colored in blue) “Agreed Order Qty” and “Order Qty Comment”. These blue highlighted columns can be edited/updated and are accepted by the system when you import the excel spreadsheet back to Unifield system. It is possible to export all lines for selected Order Calcs into one excel file for order calcs which are in Draft Status.
The only check made by system before exporting is that the Order Calcs are in Draft status (the order calcs can have differing OC, LTs, RDDs). The export would have the same format at line level as the current Order Calc export, with 5 additional columns: Order Calc Ref, Time Unit, Total lead time, Order Coverage and Safety Stock.
b) Draft Consolidated OC Lines :
This file (Draft consolidated) can be imported via the Action menu, with the exact same format, and like the existing singular import, this would update the 2 fields “Agreed Order Qty”, and “Order Qty Comment”, for all lines on all Order Calcs. It can be used for as many DRAFT Order Calc as you want without any limitation.
There is a column with reference of the selected Order calc (“Order Calc Ref”).
i) Select the Draft Order Calcs to consolidate
ii) Click on “Draft Consolidated OC Lines” from the right end action menu
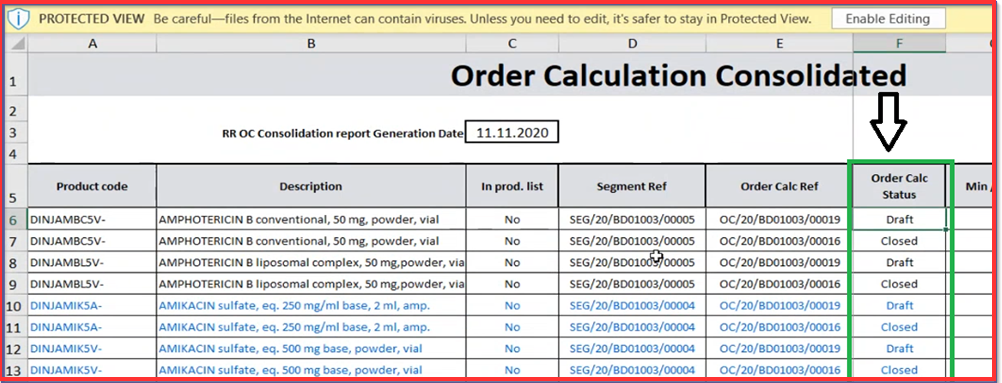
c) Consolidated OC Lines – All Statuses:
Export all lines for selected Order calc into one excel file and Order calcs can be any status (including Closed) this does not need to be importable, same format as above but with extra column for OC status. “Consolidated OC Lines – All Statuses” gives you a better overview from pharma point of view. The report layout is the same, additional column of “Order Calc Status” is visible as depicted on the picture below.
i) Select the Order Calc (any status) to consolidate
ii) Click on “Consolidated OC Lines – All Statuses” from the right end action menu
2. On screen reports available via button on main Order Calc screen
a) “Pipeline (stock moves)”/ “Pipeline (PO)”
The reason why we have two types of Pipeline is that there is an historic pipeline based on Stock moves and created at PO confirmation (i.e.: there is a new stock move with an “IN” already available); this is the “Pipeline (stock moves)”.
The second recently developed Pipeline calculation starts at PO line Validation which gives more visibility and flexibility as regard of ESC PO management processes; this is “Pipeline (PO)”.
b) “Stock by Location”
The ”Stock by Location” button is directly linked to report available in menu: Products> Product in right end action menu. It is a top-level overview which is used in Order Calculation product detailed view. Stock by Location is linked to the product.
c) “Reserved Qty”
Reserved Qty is linked to reserved stock. Basically, as soon as the product line is “Available” in the PICK, it is considered as reserved. The first PICK is reserving the stock as “available” meaning that it is available also for next location/ doc.
Generally, there are two options of Reserved Qty definition as we are sending the goods from stock to the project based on RR cycle needs (consumption wise) or second option that stock is reserved and goods are sent out to someone else (not in charge of RR).
In order to use these buttons, Order Calc view should be in Edit mode in order to be able to select the desired products. Next step is selecting of buttons (as depicted on the pictures below).
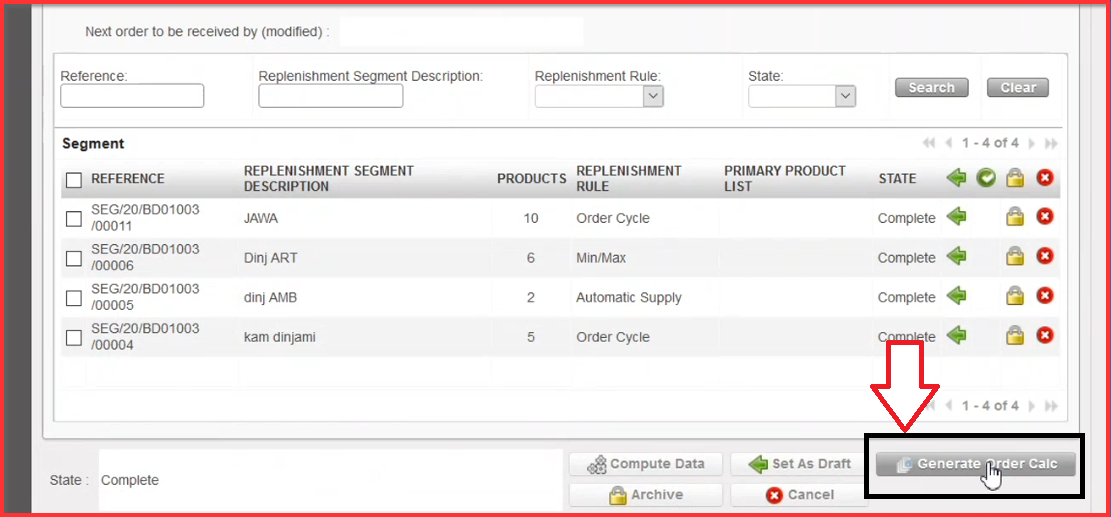
Order Calculation enables to export “IR” and “PO” based on configured “RR” steps before. In order to generate Order Calc go back to “Replenishment Parent Segment” and select Replenishment Parent Segments REFERENCE which exists there and which you need to process.
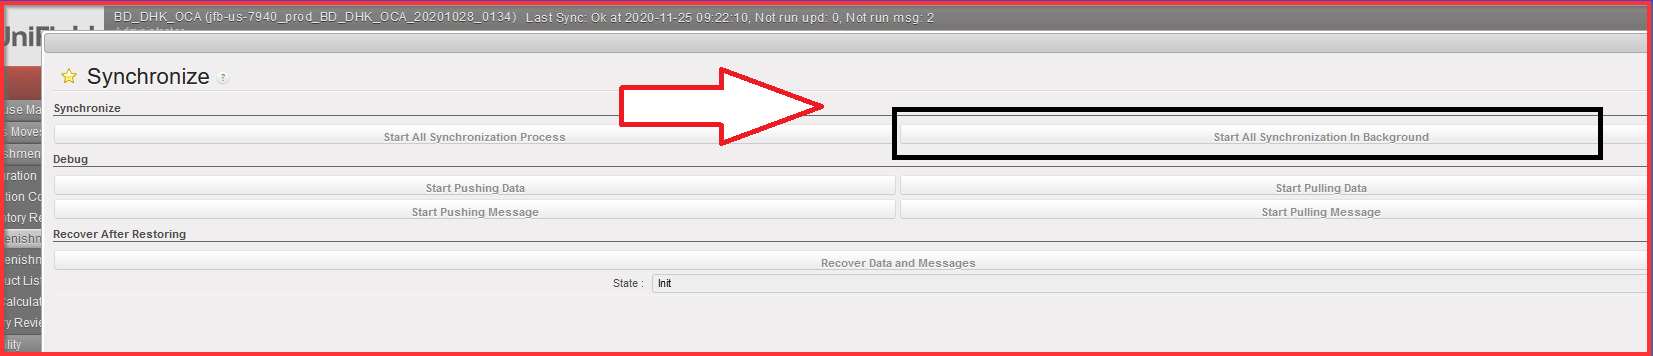
In case you cannot wait until the next automated synchronization, proceed to a manual synchronization (see UM Chapter 2 Configuration> LUSU1103 Synchronization> C.How to Synchronize manually).
Please note that manual synchronization is subject to specific User right; liaise with your IT officer if needed.
Once synched, go back to Replenishment Parent Segment screen.
3. Click on “Generate Order Calc” button.
When button is clicked it will generate and Order calculation for all lines included in all “Complete” state (child segments) belonging to the Parent Segment. When Button is clicked there is a message indicating that Order Calc has been generated for XX YY and ZZ (child) Segments.
The export from the Order Calc will also contain all lines from segments belonging to the Parent Segment. Once attached to a parent segment a child segment cannot switch its parent. If a Child segment is Archived, it is not considered Active.
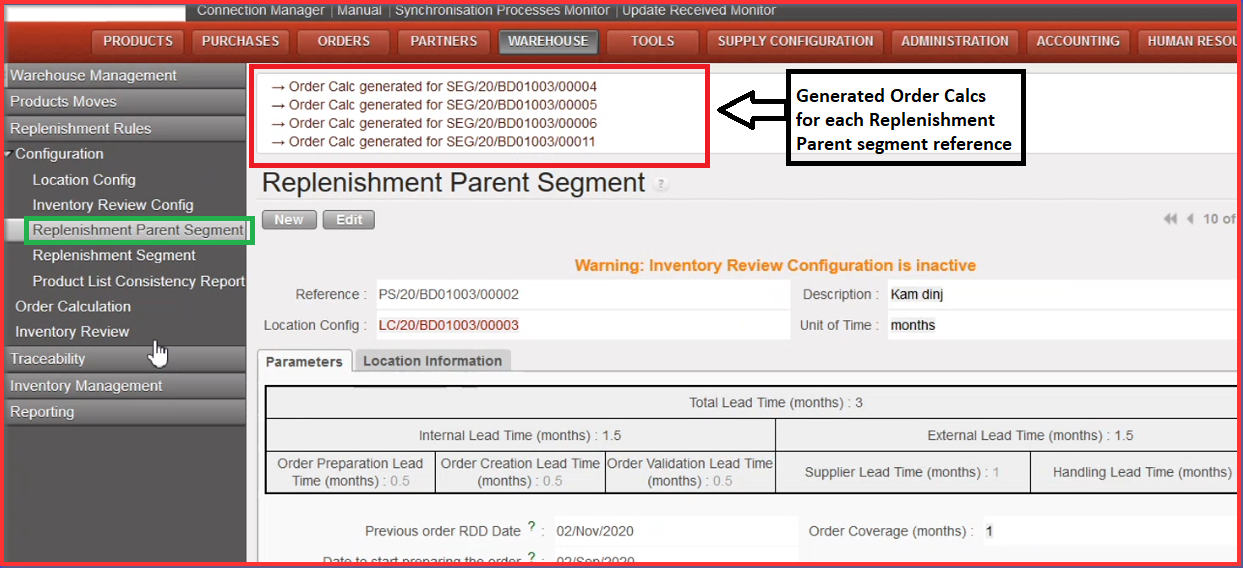
After the clicking on “Generate Order Calc” button you get the notification message on the top of the “Replenishment Parent Segment” screen informing about generated Order Calc. It automatically generates for all Replenishment Segment References (all lines).
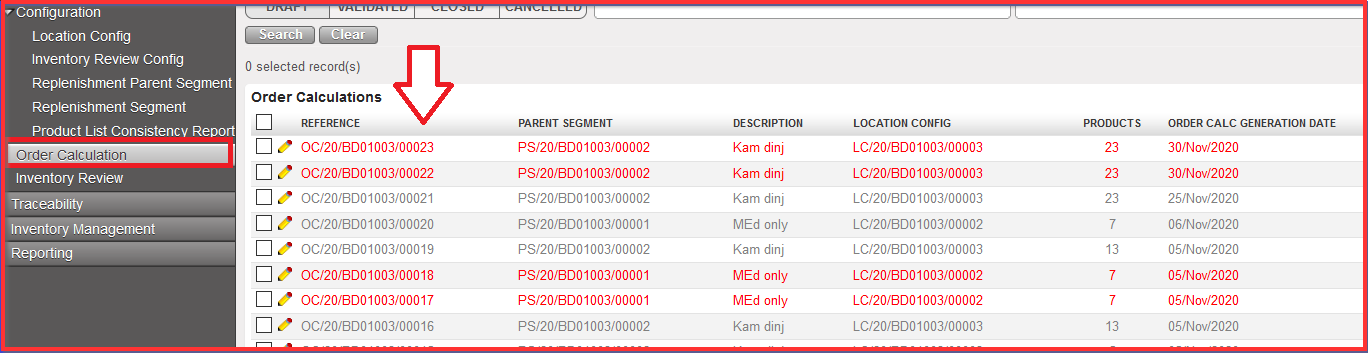
4. Click on “Order Calculation” submenu option. There are created generated Order Calcs on the top of the screen in “draft” status.
5. Click on the “OC” reference which you need to process
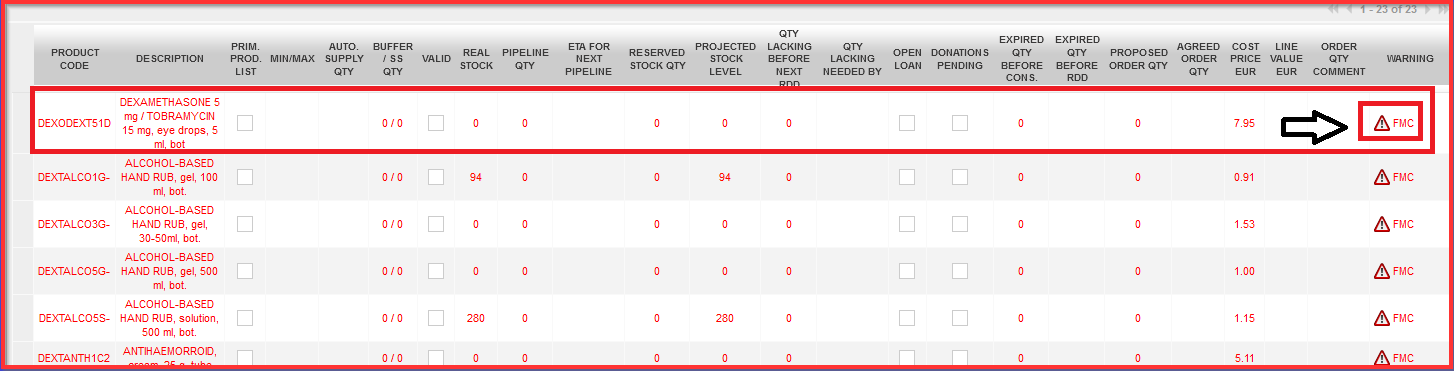
There are multiple product lines visible. If there is invalid “FMC” the product code line is in “red” and there is an exclamation mark depicted in “Warning” column. Invalid FMC goes with wrong data when FMC is not calculated correctly which is a huge blocker in terms of calculating and processing IR to PO. Order Calcs must be processed only with correct FMC.
6. Update the Order Calc (if necessary)
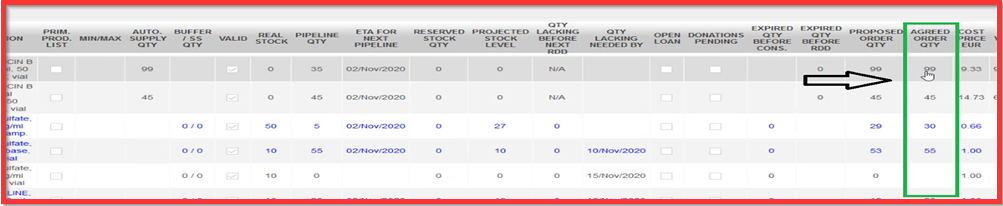
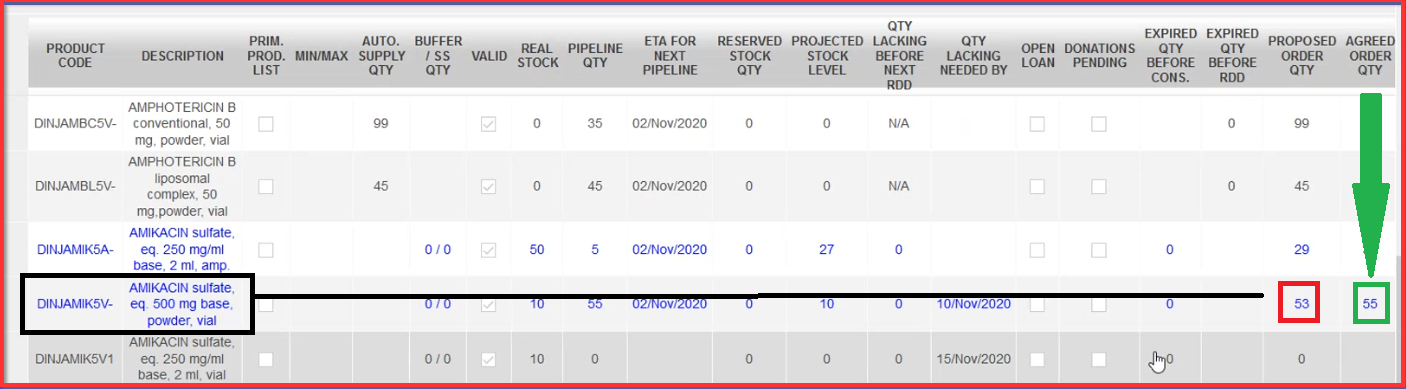
a) Fix FMC correctly by correcting input values in “Agreed Order Qty” column. Column cells for “Agreed Order Qty” must contain at least “zero” value. Blank cells are not allowed.
b) Click on “Round Qty to SoQ” which will round up the quantities in the “Agreed Order Qty” according to any SoQ value found in the Product PMD in main instance.
This “Agreed Order Qty” column is a main pillar for further validation process. The validation process needs to be done at this point which means that cost price is taken from the product PMD (data sheet) e.g. average Cost Price is not computed based on the supplier selection at this stage. Proposed Order Qty. can be changed due to the type of packaging. This is a manual action only. If Product PMD has SoQ of “1” then no rounding to be done. If proposed Qty is “0” then no rounding to be done. “Proposed Qty” value is not impacted by this button and should stay as per original value.
Where this button has been used and the qty has been changed (rounded up), the line should appear in a different color (blue) onscreen and in export report. The Cost price (X) is still based on this “Agreed order Qty” and so will take any rounded up qty into account. Below picture shows the quantity of products in “Proposed Order Qty” column which is rounded up for the quantity set out in “Agreed Order Qty” column.
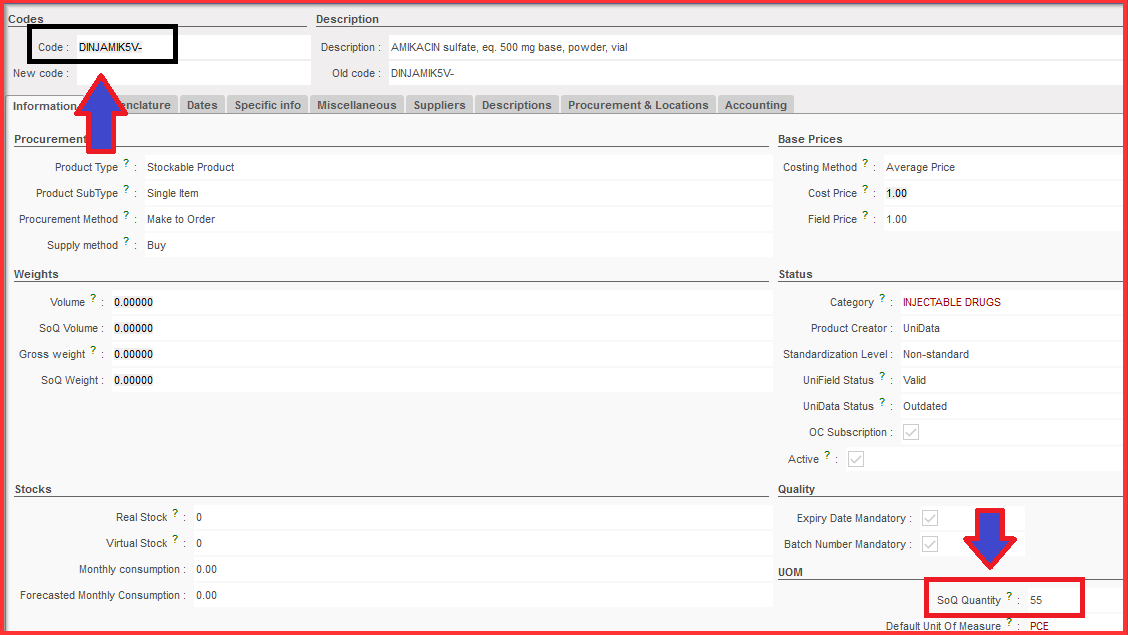
You can go to Products > Products “Search: Products” section and check “SoQ Quantity” for the specific product code in related product data sheet under UOM (Unit of measurement) section.
7. Back to the Order Calc screen, when values are fixed for each product line, click on button “Validate”.
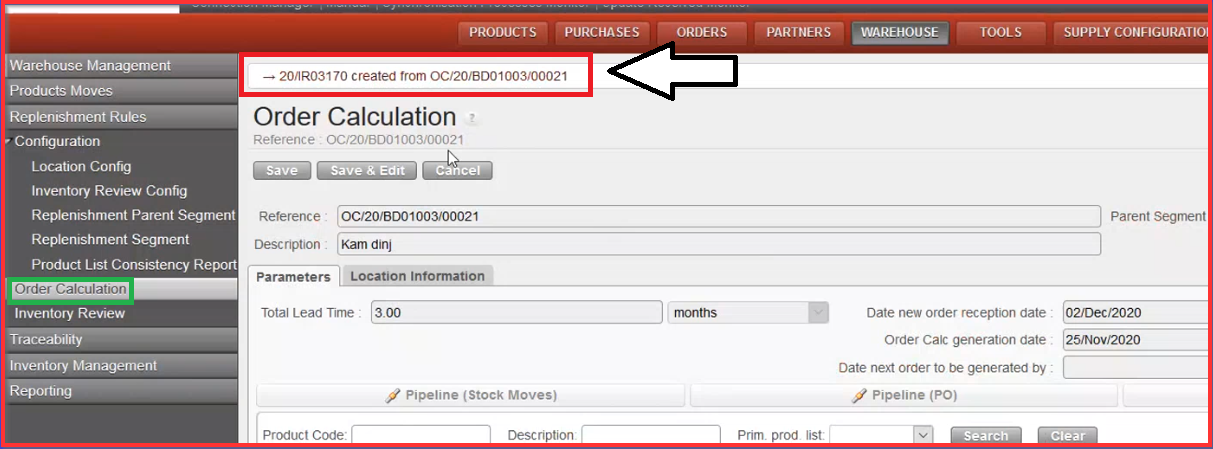
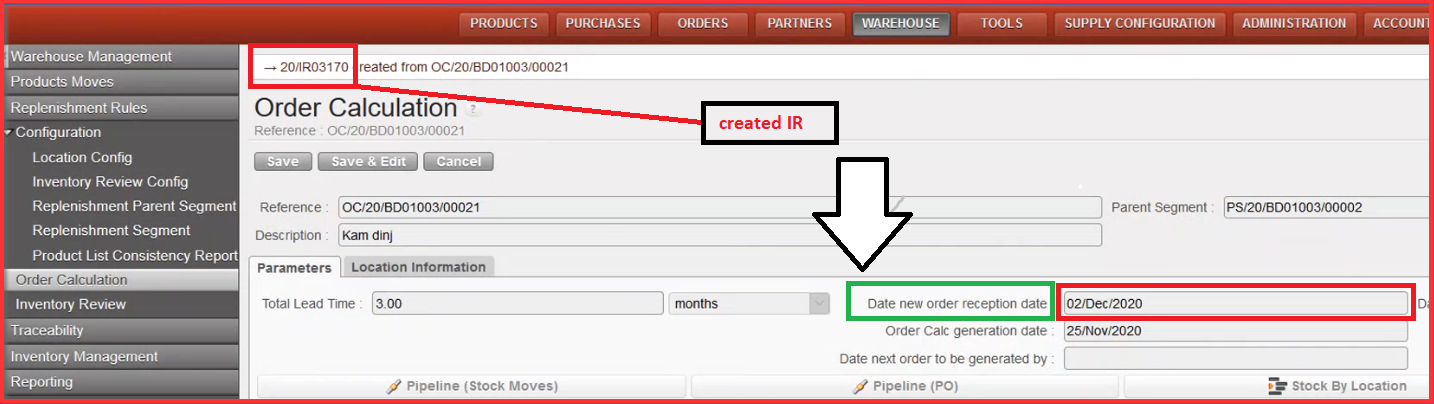
8. Click on button “Generate Requisition & Close”.
When you click on “Generate Requisition & Close”, the Order Calc is Closed. There is a new message on the top of the screen informing us about newly created IR (e.g. 20/IR xxx) reference from specific Order Calc reference (e.g. OC/20/BDO xxxxx) as depicted below on print screen example.
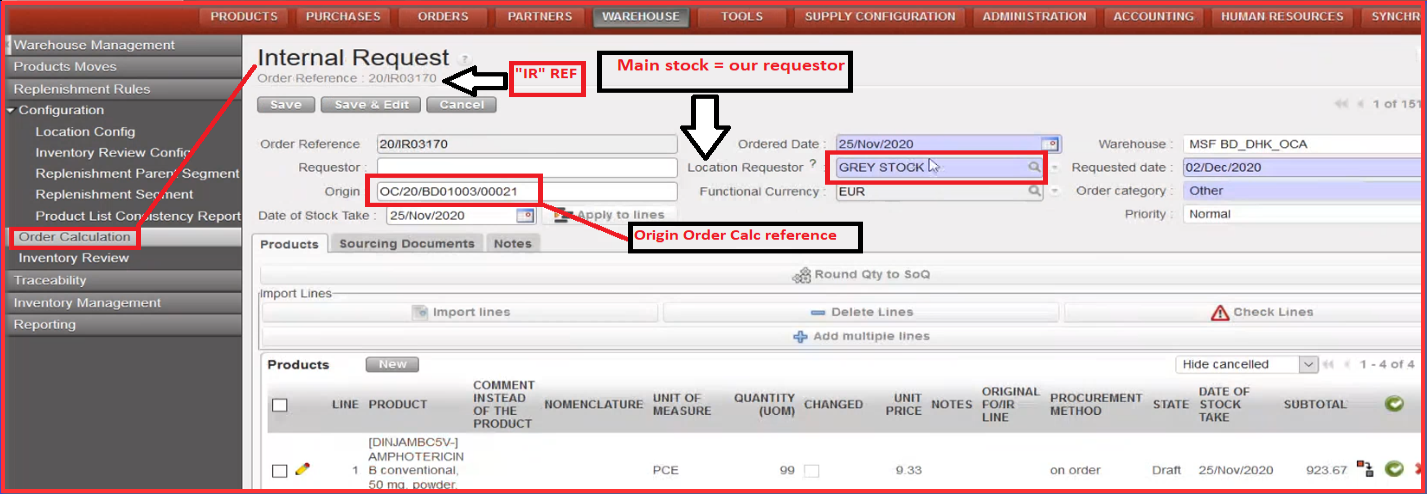
9. Click on created IR reference on the top of the screen to be redirected to the “Internal Request” screen
The “Replenishment Parent Segment” and “Replenishment Segment” are updated based on created “IR”, next order is due by e.g. “Date new order reception date” section depicted below.
See below the description of the sections in opened new Internal Request window.
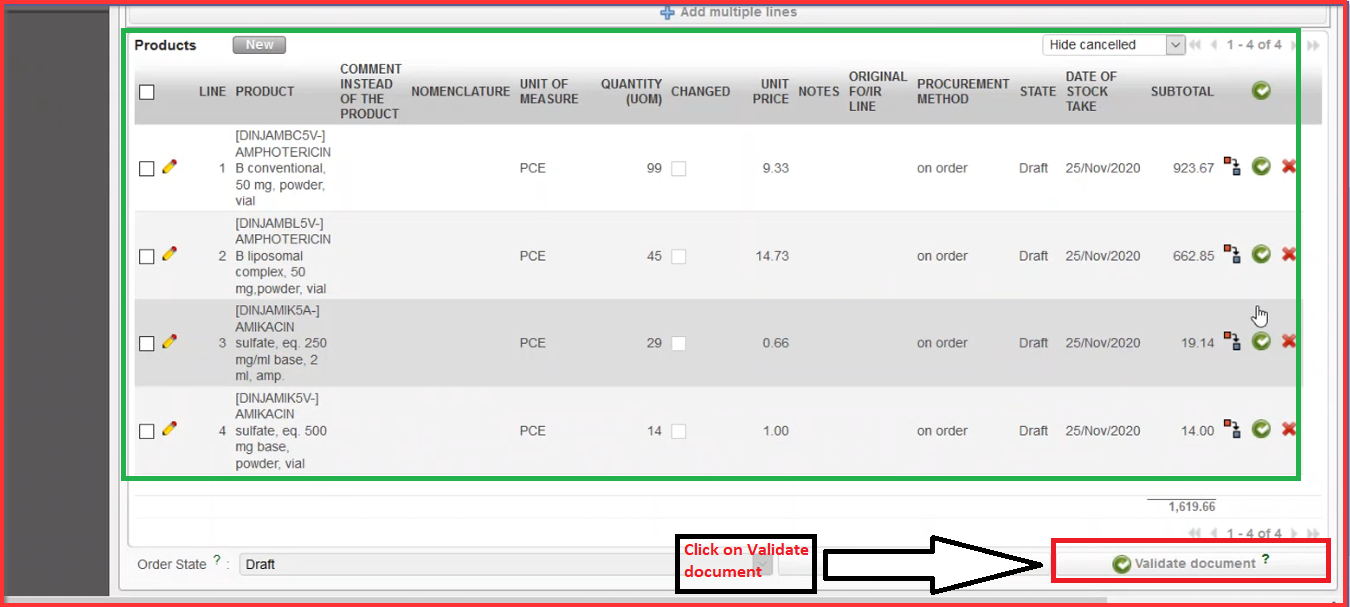
10. Click on “Validate document” on the IR screen.
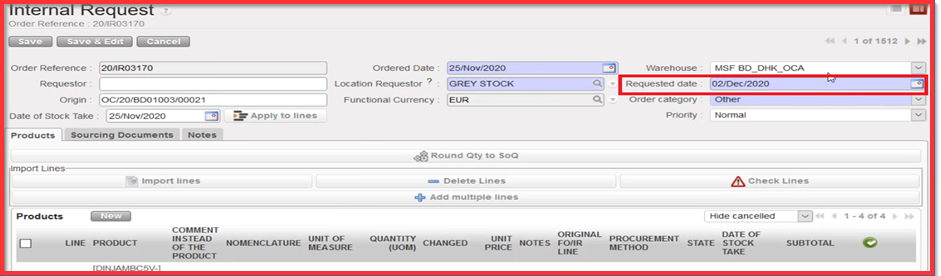
After the validation process, there is still option to change “Requested date”. This date is used in PO phase in order to determine “RDD” date. There is no update backwards but only onwards feasible. When you get to PO stage as soon as you have validated lines, there will be considered as pipeline.
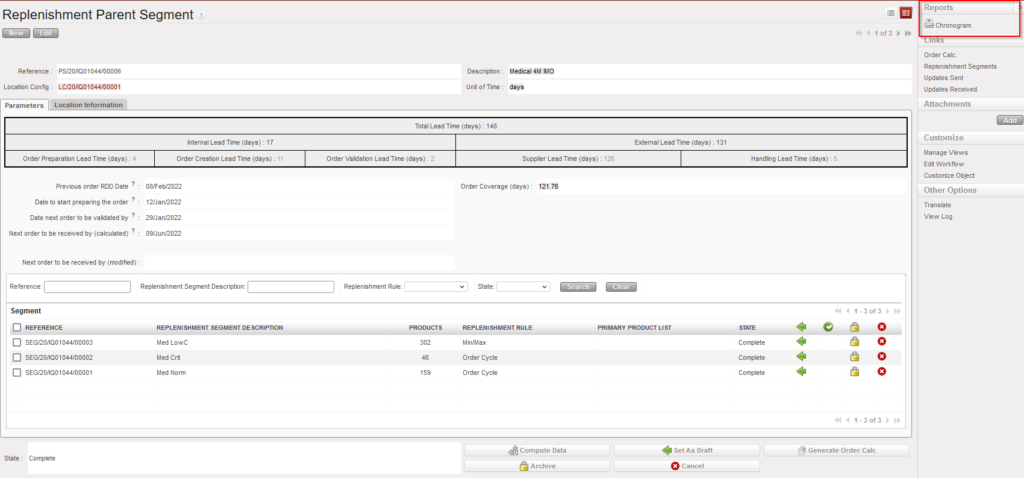
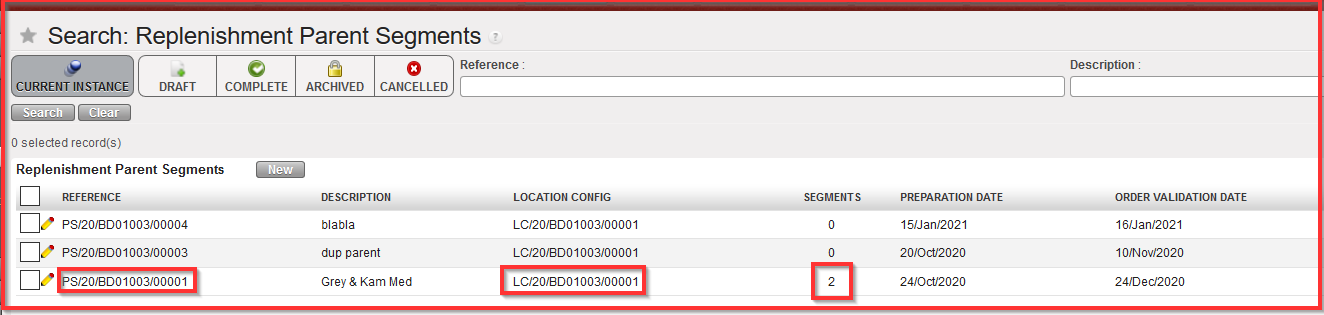
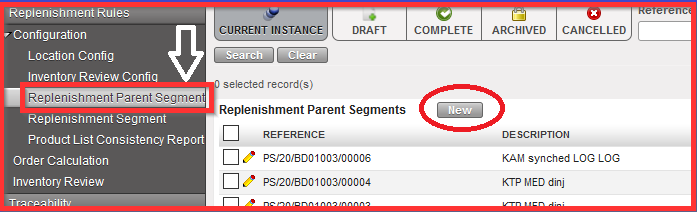
Go to: Warehouse / Replenishment Rules / Configuration / Replenishment Parent Segment
As you can see on the example below, the number “2” in Replenishment Parent Segment column shows how many Segments have been created (i.e.: related to this Parent Replenishment Segment).
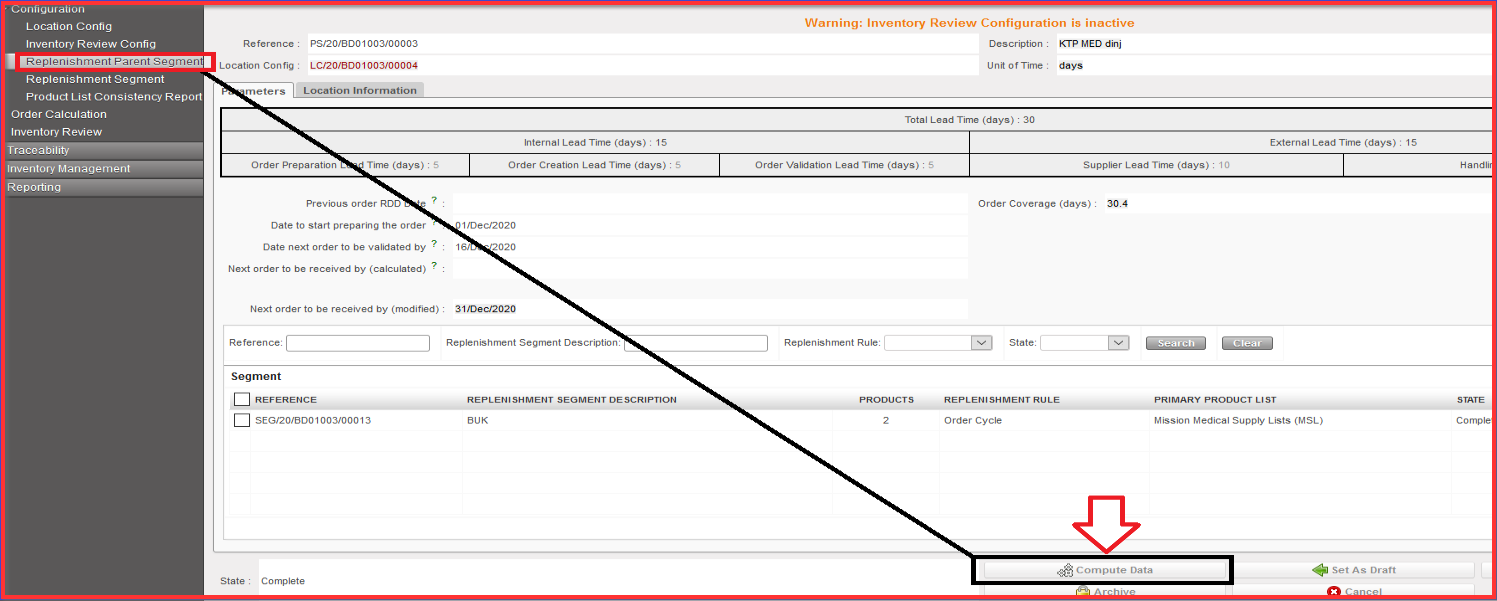
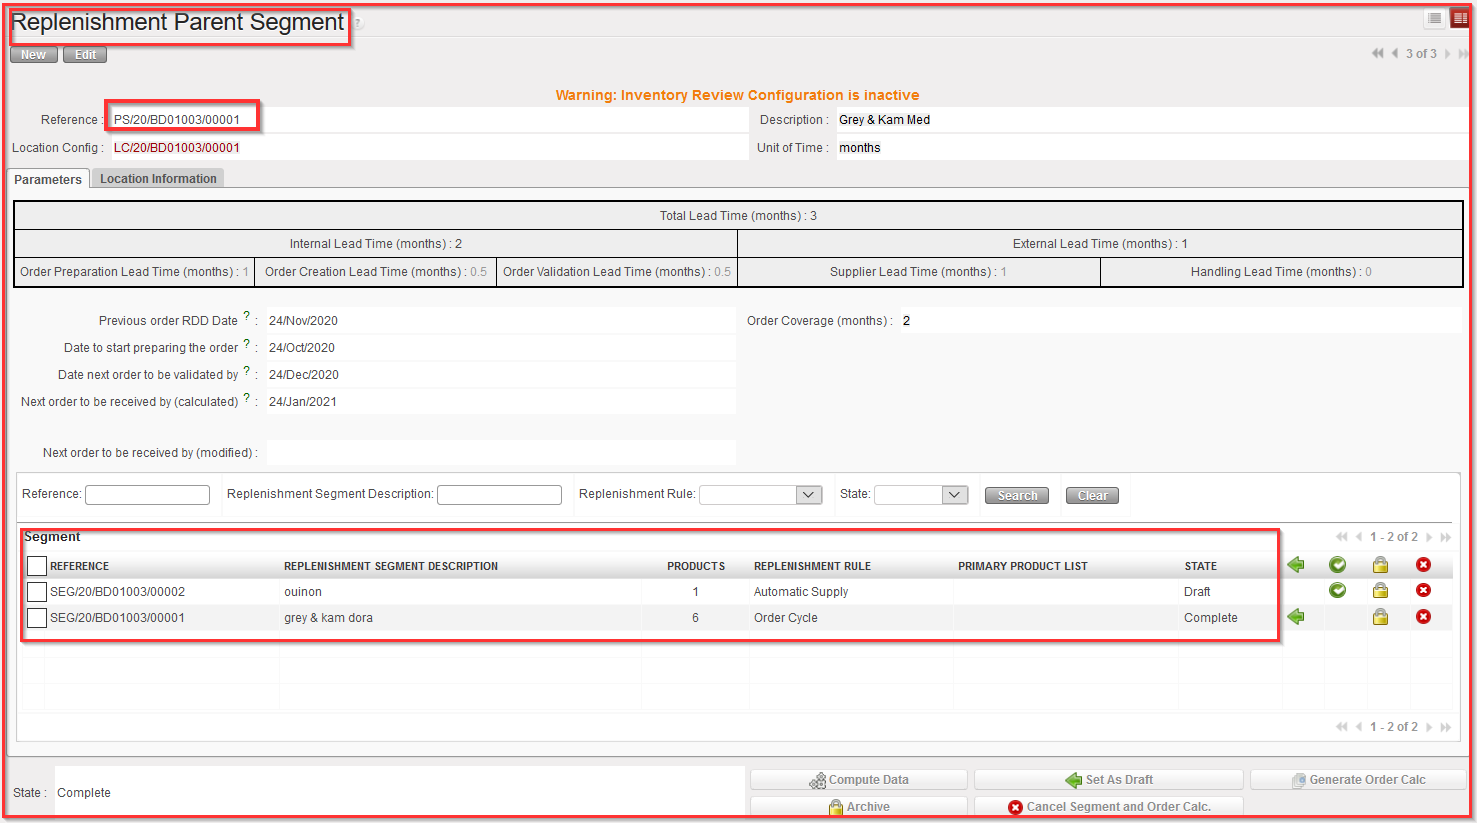
Parameters tab
If you click on Parameters tab, you get following screen (see picture below) where in addition to the information set at creation (see chapter D. How to create a Parent Replenishment Segment) you will be able to see the added “Replenishment Segment” created afterwards.
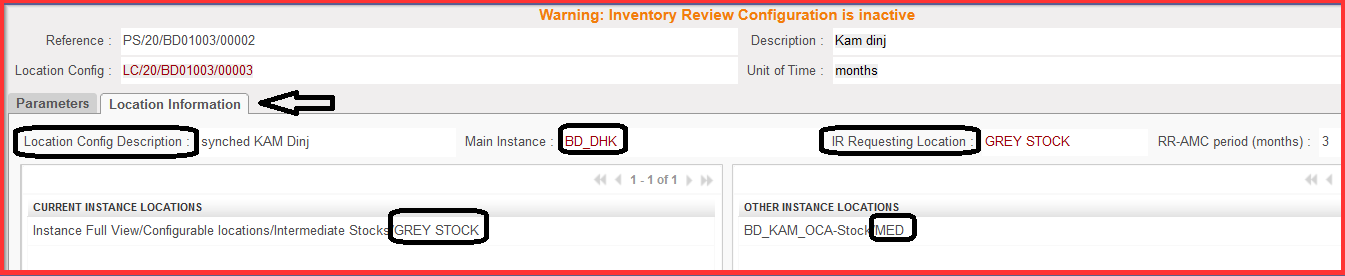
“Location information” tab
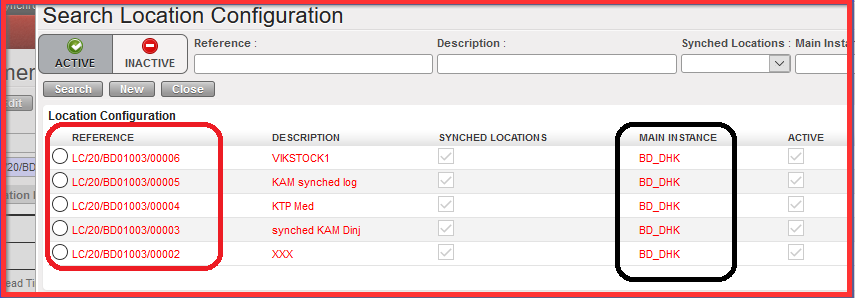
The Replenishment Parent Segment only looks at the same location config. Therefore, all the defined “child” SEGMENTS underneath this Parent Segment will use the same location config.
You can see in the “Location information tab”, as depicted below, that there is GREY STOCK under current instance locations and MED on the project level. We can see also Location Config Description which was setup in Location Config step before. There is also Main Instance BD_DHK and IR Requested Location(Grey Stock), which means that IR will be always generated with the requested location on parent level (i.e.: the goods will be delivered to the “Grey Stock” Location).
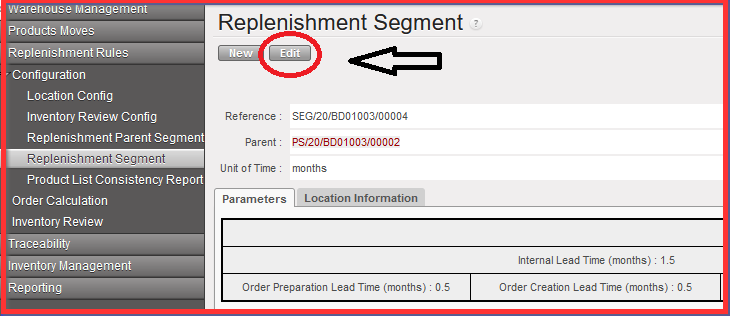
H. HOW TO REVIEW AND UPDATE A REPLENISHMENT SEGMENT
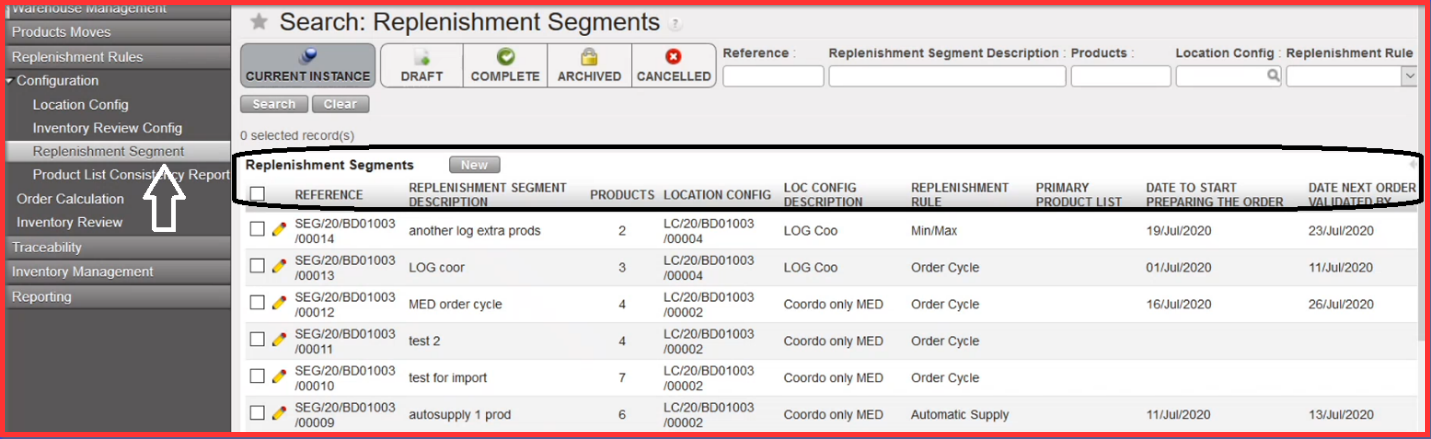
Go to: Warehouse / Replenishment Rules / Configuration / Replenishment Segment
As you can see below, if you click on submenu option “Replenishment Segment” you get the general list of view) where are the created “References” of all replenishment segments, with Replenishment Segment Description, number of Products, Location Config and applied Replenishment Rule (Min/Max, Order Cycle, Automatic Supply).
If you go back to Replenishment Segment main screen you can edit and configure the lines of the products in Replenishment Segment. Not all fields will be editable though but some of them only if Segment is already in status “Complete”. However, please note that the document can still be set back to Draft in case there is a need to edit more information.
Open the Replenishment Segment Reference and click on “Edit” button on the top
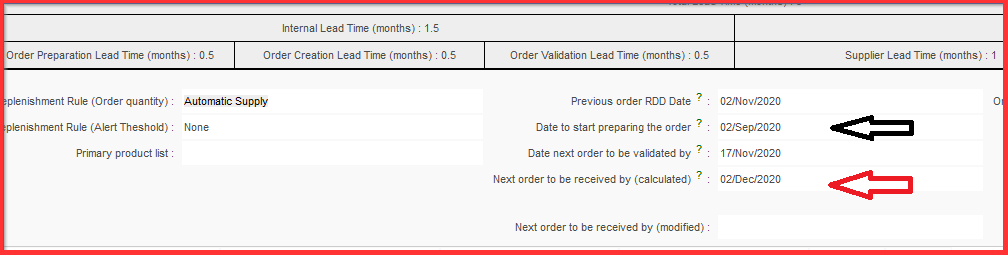
Basically the “Date next order to be validated by” is the date when the “PO” needs to be validated and “Date to start preparing the order” is the specific date when we can generate our order calc. in the system environment.
For the tracking history you can chose the LINKS on the right side action menu with Min/Max, Auto Supply, FMC History and Updates Sent and Updates Received
2. Select the products and click on MinMax, Auto Supply, FMC History
You get screen with “Search: History (Segment reference)” where you can see old and new values. The values per location / product are saved at the end of each month for the latest values present for the month on the last day of the month (if either value has been changed multiple times during the month, only that present on last day (i.e. 30th / 31st ) would be saved). AND/OR: TBC If possible, a Track Changes report would be possible from the Segment
Updating the segment
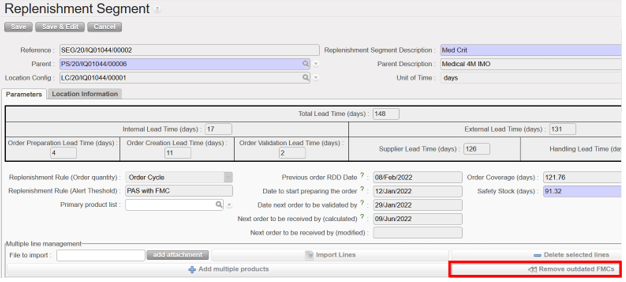
To remove any FMC values and their dates which are wholly in the past, click on “Remove Outdated FMCs” and all FMCs which are valid will be moved to the left to fill any removed ones. this button can only be used when the Replenishment Segment is in Draft status, and the type of RR is “Order Cycle”.
And the name of the file which is exportable from the RR Replenishment Segment will display “SEG_ XXDBXXXXDATE”.
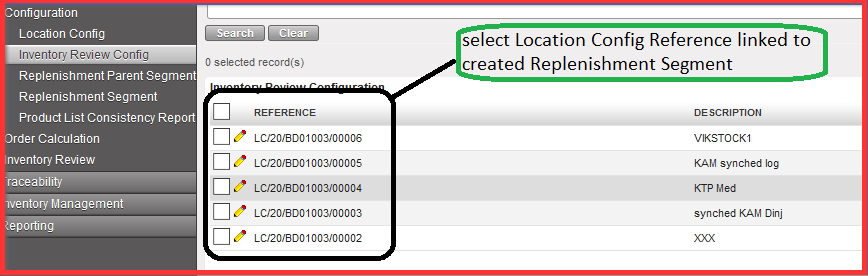
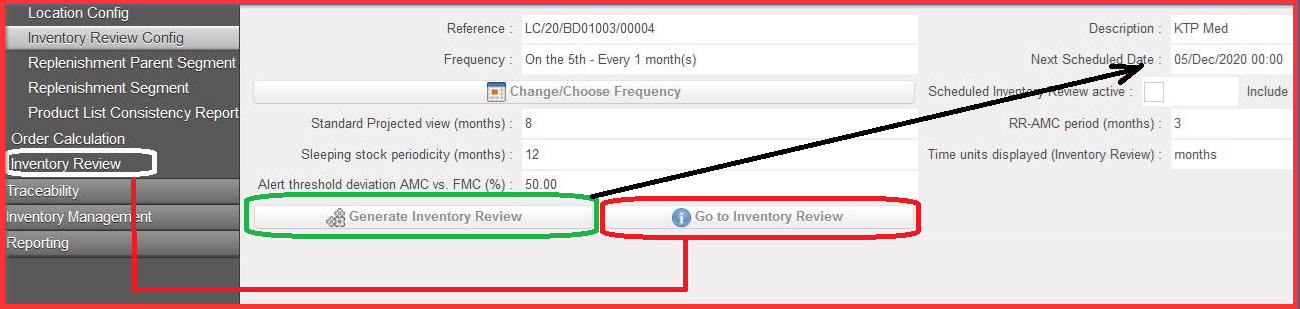
Go to: Warehouse / Replenishment Rules / Configuration / Inventory Review Config
Select Location Config Reference linked to your previously created Replenishment Segment.
2. Click on “Generate Inventory Review”.
Please note that it is the manual version of generating the report but that you can actually wait for configured/ automated “Next Scheduled Date”.
3. Click on the button “Go to inventory Review” or click on Inventory Review in the sub menu on the left-hand side.
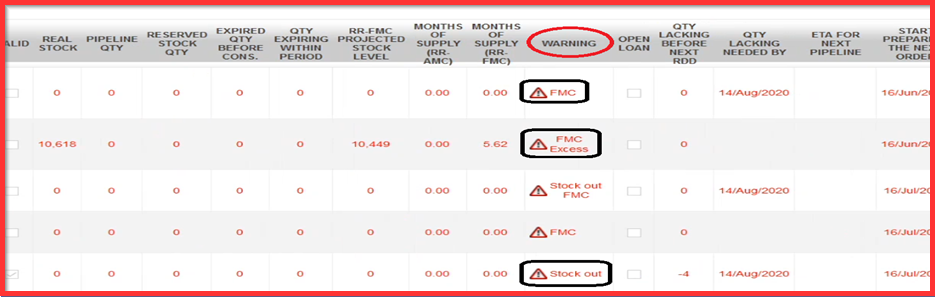
4. Check the value in column “WARNING”:
a) “Product is not in any related segment, only in stock / pipeline of location”
b) “FMC”: linked to Inventory Config review where you set up how many projected months cover the period. FMC alert here means that in the segment does not cover the period.
c) “Excess”: excess stock is linked to the order cycle which is put in. What is calculated beyond that period is considered as extra stock (excess). Excess stock calculation considers “Inventory on hand”, “pipeline arriving” and “expiries arriving before the end of upcoming (next) OC period”, i.e. Projected Available Stock.
d) “Stock Out”: considered before next RDD (Requested Delivery Date) which is the issue. Basically, there are no items available to fill the expected stock need.
e) “Pipeline in the Past“: where a pipeline delivery has its confirmed delivery date in the past
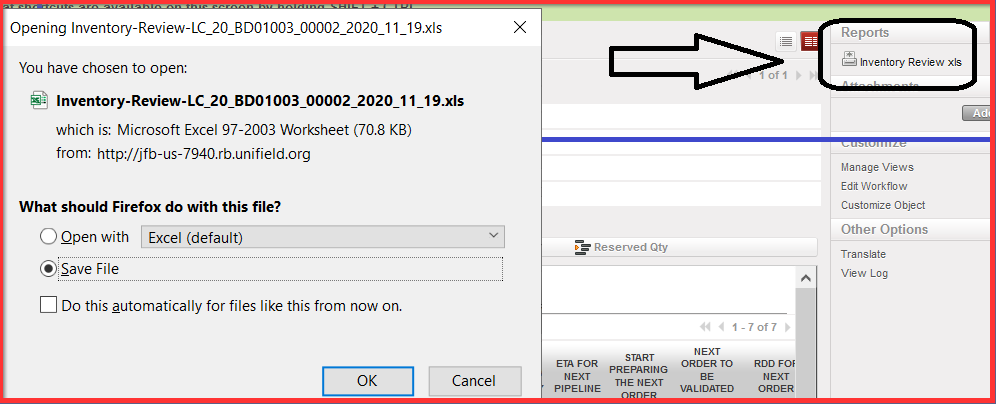
Please note that the Inventory Review can be exported via Excel by clicking on the icon “Inventory Review xls” on the right side of the panel menu.
Note: in this export the values in the months of supply (RR-AMC), months of supply (RR-FMC) & Projected MX (month) are rounded to 2 decimals.
2. You can adjust the excel spreadsheet file, adding inputs and expected updates and import it back through “File to Import” / “Add attachment” button as depicted below.
Go to:Warehouse / Replenishment Rules / Configuration / Replenishment Segment
Click on “New” and open the window
At this level you cannot change Unit of Time section which shows “days” as default value. By choosing the “Parent” system automatically change Unit of Time value based on the Replenishment Parent Segment configuration.
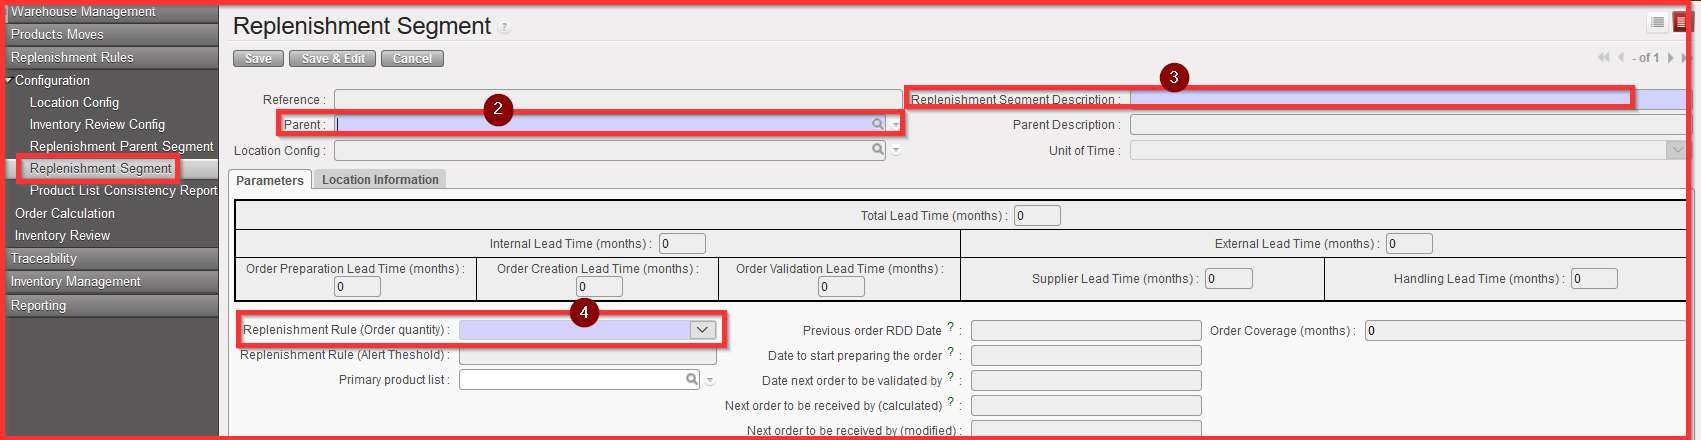
2. Select the “Parent”: from already preconfigured Parent Segment Reference
3. Fill in the “Replenishment Segment Description” field with your own created description / name of Replenishment Segment
4. Select a “Replenishment Rule(Order Quantity)” out of three available options: Order Cycle, Min/Max, Automatic Supply
If user chose “Order Cycle” then a “Safety Stock” option appears on UF screen where we must select our value based on Unit of Time configuration. “Safety stock” in months of consumption. For the safety stock as for the other product statuses, the Lead time is not considered in this averaged calculation, only the Order Coverage time.
There is also an option of using either Safety Stock (SS) or buffer (e.g. SS as quantity). Buffer is used more on line level.
Order Cycle including Safety Stock (months) print screen.
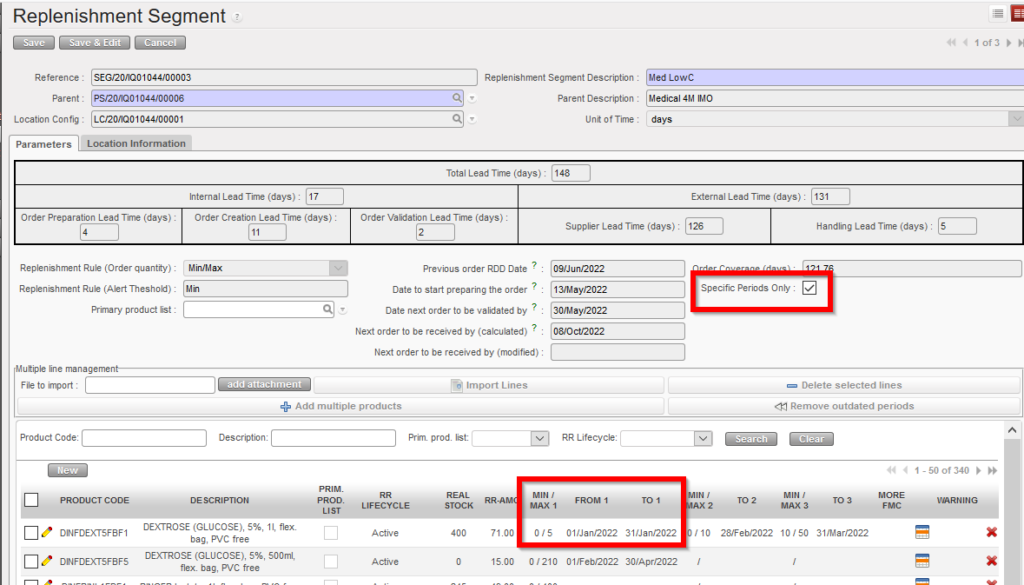
If user chose “Min/Max” or “Automatic Supply” as“Replenishment Rule(Order Quantity)”, then a “Specific Periods Only” option will appear on UF screen, if user select it a new button appears under the “Delete selected lines” called “Remove outdated periods”
The RR types Min / Max & AutoSupply can be applied with specific validity dates, in the same way as is the case for RR type Order Cycle.
The default is that validity periods are not applied for Min/Max & AutoSupply but they can be applied by ticking onscreen checkbox “Specific periods only” or changing value in import/export of Segment. If un-selected, values other than 1st column cannot be filled / are not accepted at import.
Import/export of Segment has multiple columns to allow for these values: “Min / Max 1” “From” “To”, Min / Max 2″, “To” etc.
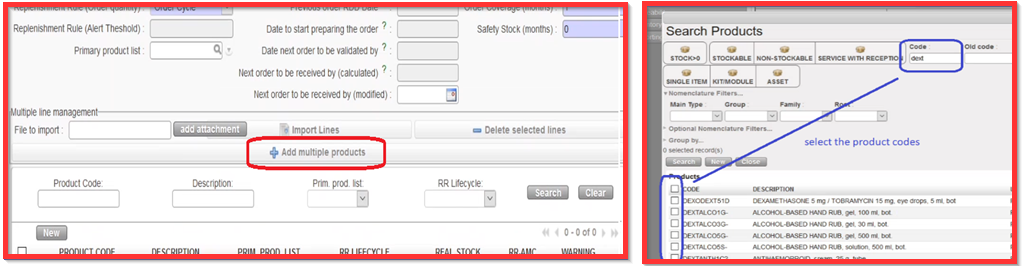
5. Click on “Add multiple products” Then click on “Add” and select multiple products which you want to work with.
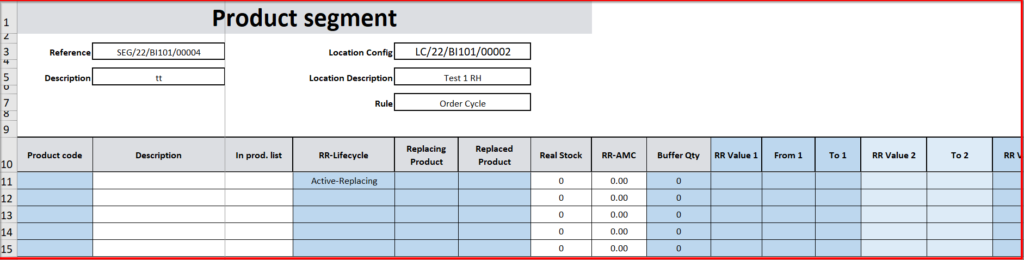
You still have the option to add products via Import by clicking on “add attachment” and “Import lines”, you can use the export excel of “Segment”(via Action menu) from an empty Replenishment Segment, the export template has 5 empty lines. you can fill lines the normal way to import lines onto the Segment.
Export excel of “Segment”
OR you can click on “New” and add lines one at a time.
6. Click on the icon pencil icon in order to edit the specific product line.
7. Select the filter option for “RR LIFECYCLE “which is specific for Replenishment Rules among the following options:
a) “Active”: for the active existing product
b) “New”: for the new product for the specific activities (which is part of on-boarding without existing pipeline)
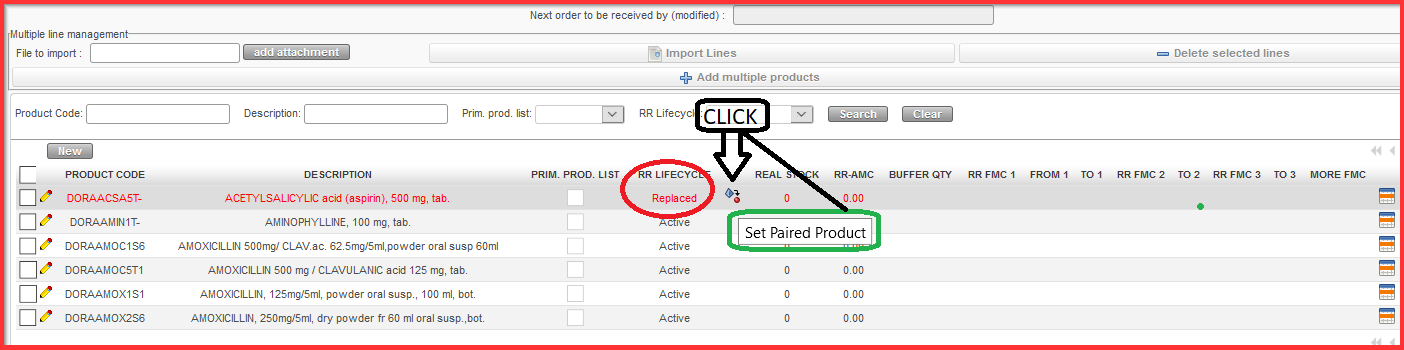
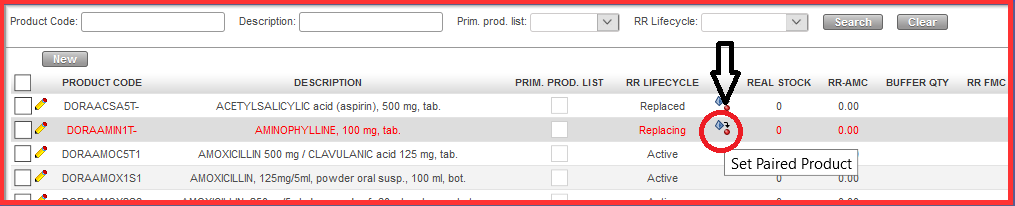
c) “Replaced”/ “Replacing”: we can also replace one product by another one (decision made based on project strategic decisions, decisions is outside UF system). Within the segment if we have a “Replaced” product, we must have set out a “Replacing” product which is linked to the replaced product. The system cannot guess which the pair of the “Replacing”/”Replaced” product is so the opposite must be added for each. Edit the line with the product which needs to be replaced.
i.) Select “Replaced” and save the line
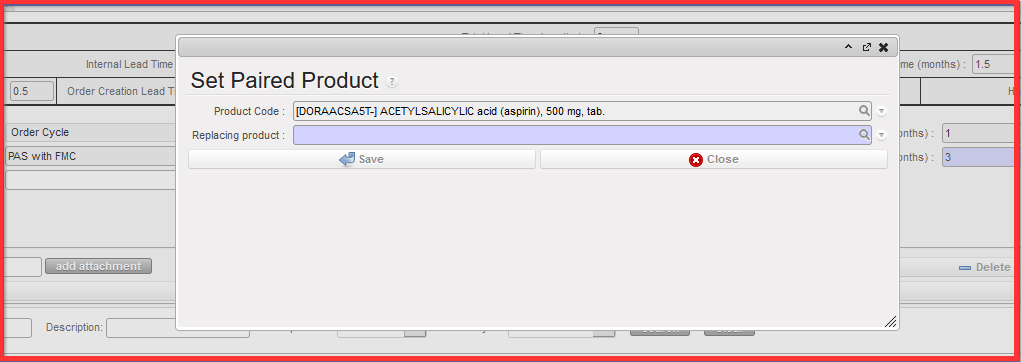
ii.) Click on the icon below in order to set paired product
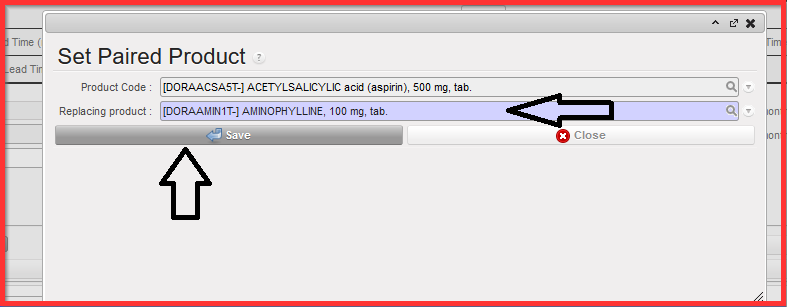
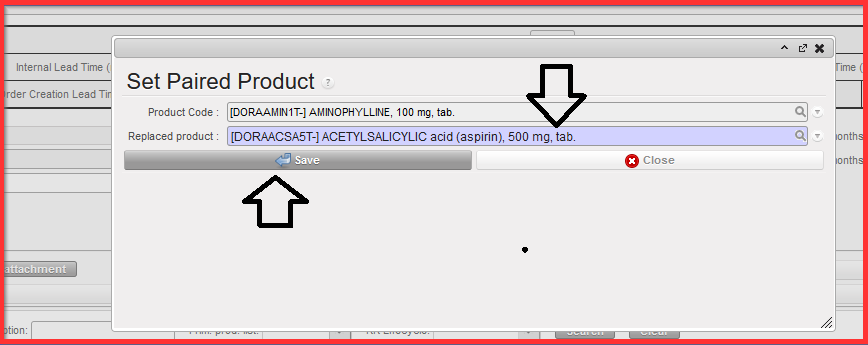
iii.) Select the “Replacing product” from the “Set Paired Product” pop up screen below
iv.) Click on “Save”. Window is closed, desired replacing product is selected.
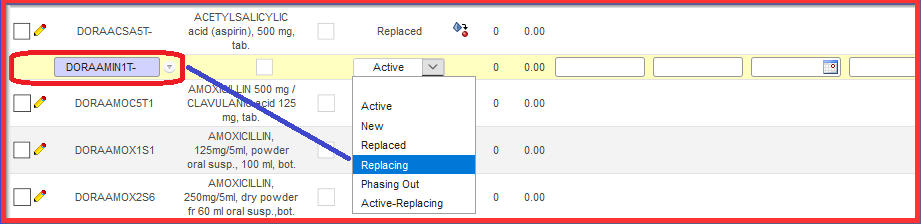
v.) Then you edit the product line which is replacing the replaced product and select “REPLACING” and save the line
vi.) You must go back to Replacing product and click on “Set Paired Product” icon
vii.) Click on “Save” button and close the window.
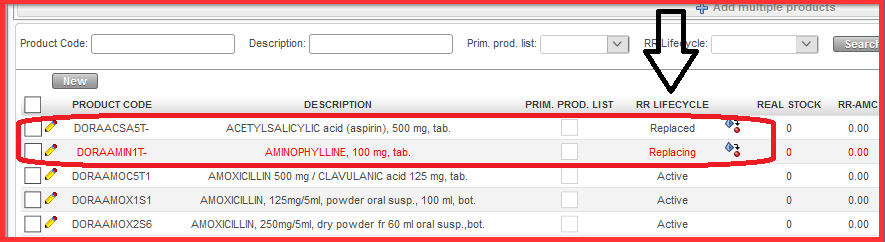
RR Lifecycle “Replaced” and “Replacing” are set up. The second product line is not red highlighted anymore.
d) “Phasing out”: it is possible but not mandatory to fill in the field “Replacing product”. However this link to replacing product is informative only and no calculations are linked to this second product. In other ways behaves the same as an “Active” product.
If a Product has “Phasing out” as its RR Lifecycle, no Order proposal quantity is calculated. When Order calculation is generated, product with this status will always have “0” as proposed value.
NB: There should be a warning in Replenishment segment Warning column: one word “Phased out?”, with complete warning “Product has pipeline – check status!””. Warning purely informative.
e) “Active Replacing”: This is to behave in exactly the same way as the current “Active” status. However this must be linked to another product in status “Replaced” (i.e.: a product with “Replaced” status must be linked with either a “Replacing” product or an “Active-Replacing” product)
For the Order Calculation, as per before, there is never an order qty proposed for the “Replaced” product.
But the quantities for the “Active-Replacing” product are not changed by the system and are exactly as if the product had a normal “Active” status (it does not take account of any stock of the “Replaced” product. The only difference is that there is a warning for the Active-Replacing product which flags the Stock out date of the linked “Replaced product” “Warning, SO Date of linked product is XXXXX” This should appear in the Inventory Review and Order Calculation.
8. Fill in the “BUFFER QTY” field: can remain blank if you do not want to have any buffer qty.
9. Fill in the “RR FMC1” in PCE (SOQ) which is the unit measure of selected product. “RR FMC” columns/fields are only displayed when RR “Order Cycle” has been previously selected.
10. Select the period “FROM1” (first date of the month) and “TO 1” (last date of the month – You can fill up to 18 “RR-FMC” using the “Edit 18 FMC” icon .
11. Save the link by clicking on the Save icon .
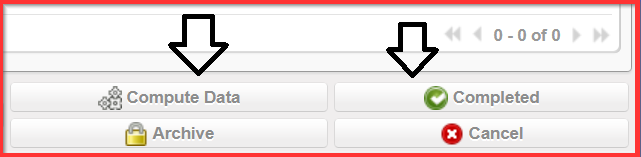
12. Click on “Completed” button once you think you are done with entering the data.
You can click on “Compute Data” button to go back in order to check what is present in “REAL STOCK”. “Compute Data” is very important also for synchronization among the projects / coordination instances (multiple levels).
N.B. It is possible for the same product to be in up to 3 different Replenishment Segments at the same time. A product can be in 3 Replenishment segments belonging to the same Location Configuration, and the RR type of each of the 3 can be different (Order Cycle, Min/Max, Auto Supply) or all 3 can have the same RR type. The only condition is that the product must not have an active value (>0) in the same time period in more than one Replenishment Segment. For example, this means that if Product A has an FMC value of 2,000 in period 01 Jan 2022 > 28 Feb 2022, the same product cannot have a value other than 0 for this period in any other segment belonging to the same Location Configuration.
D. HOW TO CREATE A NEW REPLENISHMENT PARENT SEGMENT
Replenishment Parent Segment section provides an overview of relevant Replenishment segments and products below it, which have defined parameters columns. It is a prerequisite to be processed before the next step which is Replenishment Segment.
New “Parent” segment permits and allows to have an overview of Segments with similar characteristics / conditions. Replenishment Parent Segment is the third step in UF after Inventory Review Config and must be completed before the next step (Replenishment Segment)
2. Select the “Location Config” reference which was created in the first step (Location Config)
3. Fill in your Description
4. Define Unit of Time in days, weeks or months:
It will be automatically projected to all Parameters listed below, i.e. selected option “months” automatically defines “months” value in all following sub categories Lead Time, Internal Lead Time, External Lead Time) and is visible in the brackets (months) as depicted on the screen below.
5. Add your Lead time values(predefined in months in the example below and decimals are accepted):
a) Internal Lead Time:
i) Order Preparation Lead Time: covers the time of pre-work to be done by people in charge of: checking the system to have correct values; physical inventory; possible check or adjustment of FMC…
ii) Order Creation Lead Time: It is the time when order calculation has been generated to when the IR has been created.It starts when the user click on that button in a segment and it is the time they need to look what order calculation has proposed in terms of quantities. Basically, the time when IR is created is the same time when it is validated.
iii) Order Validation Lead Time: time from IR creation until PO validation
b) External Lead Time:
i) Supplier Lead Time: time from validated PO until reception at requested location.
ii ) Handling Lead Time: time for the handling (customs brokerage) e.g. from reception at port/airstrip to reception at Instance Warehouse. Can be zero e.g. for internal suppliers.
After filling these fields, Total Lead Time, Internal Lead Time and External Lead Time will be automatically computed/ populated.
Total Lead Time =Internal Lead Time + External Lead Time
Internal Lead Time = Order Preparation Lead Times + Order Creation Lead Time + Order Validation Lead Time
External Lead Time = Supplier Lead Time + Handling Lead Time
6. Fill out “Order Coverage”: how long we want the ordered products to last for (here preconfigured in months)
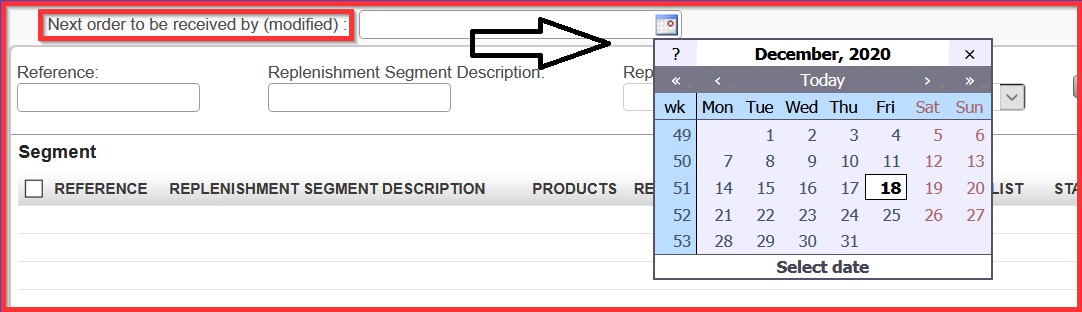
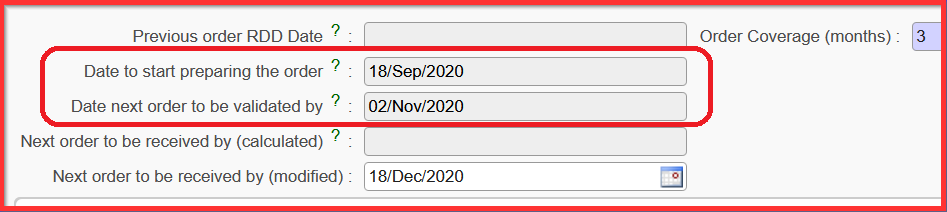
7. Select the date for “Next order to be received by (modified)”. When you select the date, you get automatically computed dates for “Date to start preparing the order” and “Next order to be validated by” e.g. second red highlighted print screen
8. Click on “Completed” and you get created Parent Segment Reference, see print screen below
When Replenishment Segments are created (see next Chapter for Replenishment Segment creation) and are linked to specific Replenishment Parent Segment you can come back to the specific Replenishment Parent Segment reference and click on the button “Generate Order Calc” ( see section J. How to generate an Order Calculation).
We use cookies to ensure that we give you the best experience on our website. If you continue to use this site we will assume that you are happy with it.