E. HISTORICAL CONSUMPTION REPORTS

Supply User Manual ENG -> 5. Warehouse -> 5.10 LU-SU4203: Consumption Reports -> E. HISTORICAL CONSUMPTION REPORTS

E. HISTORICAL CONSUMPTION REPORTS

Although Monthly Consumption Reports allow you to see the AMC of the selected products, they are more actually existing to allow the introduction of FMCs for these products. AMC is mostly there to indicate what has been the consumption in order to help you to enter a good FMC.

Historical Consumption Reports are designed to analyze Average Monthly Consumptions (AMC),  Real Average Consumption (RAC) and RR-AMC, as described below. It displays the consumption rates but also the actual consumptions month by month, allowing you to analyze variations.

As already mentioned, the AMC value is based on the total quantity of the product which has left the instance via a consumption report or outgoing deliveries (both quick and full shipment processes). Any quantities of the product which have left the instance due to loan, donation, loss or discrepancy will not be included in this calculation. If any of the products have been received (returned) back in (via IN – except IN from Scratch) to this instance within this period, this quantity will be deducted from the total consumption figure.

RAC is computed based on Real Consumption Reports only and is specific to one source location. Real Average Consumption is calculated using the total quantities which left one specific source location due to a Real Consumption Report. Unlike AMC it does not consider any other picking/transport documents which take products out of this location.

Go to: Warehouse / Reporting / Consumption Reports/ Historical Consumptions

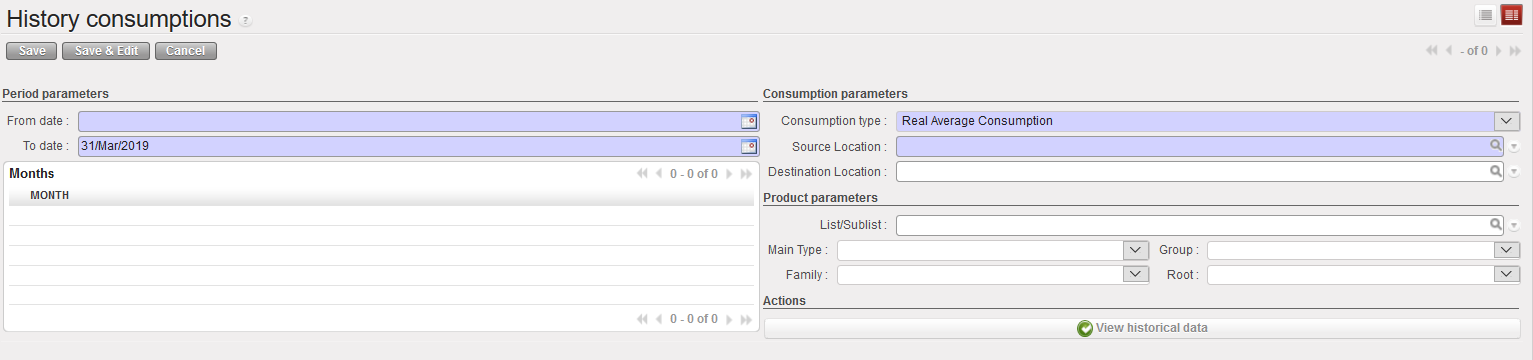
1. In the “From date“, enter the day from which you want the system to consider the data. This must be the first day of a month.

2. The “To date” field displays the last day of the current month, change it if necessary to the last day of another month, but it should obviously not be in the future.    

Depending on the dates you entered, the system will display all relevant months in the “Months”   table.

3. In the “Consumption type” field, the default type will be “Real Average Consumption” (RAC), but you can change this to the 2nd option “Average Monthly Consumption” (AMC) or to the 3rd option Replenishment Rules “RR-AMC” according to what you want to see.

4. As “Source Location“, enter the location for which you want to do the analysis. Note that the location is only available (and mandatory) for the RAC. It is not available for the AMC because AMC is always calculated for the full instance.

5. As “Destination Location”, enter the location for which you want to do the analysis. Note that the location is only available (and NOT mandatory) for the RAC. It is not available for the AMC because AMC is always calculated for the full instance.

Destination Location can be used to select any one External Consumption Unit. If an ECU is selected then report is generated and displays RAC for selected Source Location and Selected Destination Location only.

Historical Consumption Report

6. For Consumption Report Average Monthly Consumption (AMC), The checkbox “Remove Negative AMCs” has a fuller explanation below it and when ticked, the “Historical Data report” can be generated without showing any negative AMCs at the month level, and the “Entire Period AMC” is based on the figures shown for each month. When the checkbox is not ticked, a similar report can be generated showing the figures as per the regular calculation for AMC (including negatives), and it is still possible to view the (original) onscreen version for this via the View Historical Data button, and this checkbox could be used also for RR-AMC.   

Go to: Warehouse>Reporting>Consumption Reports>Historical Consumption/History consumptions
7. Click on the “Save” button on top of the screen.

8. Click on the “View historical data” button. If the report is heavy to generate, it may be launched in the background, otherwise you will see results directly.

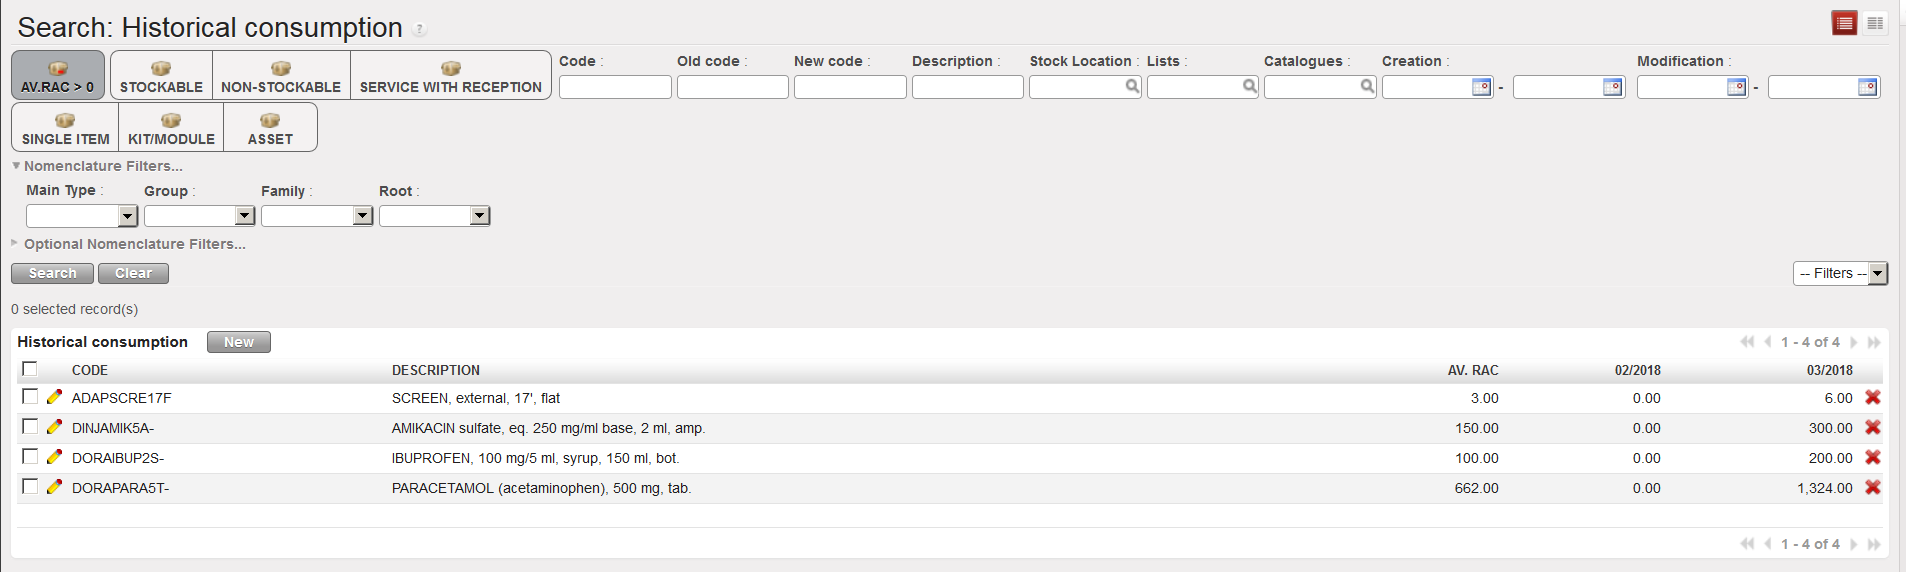
Historical Consumption Report – RAC

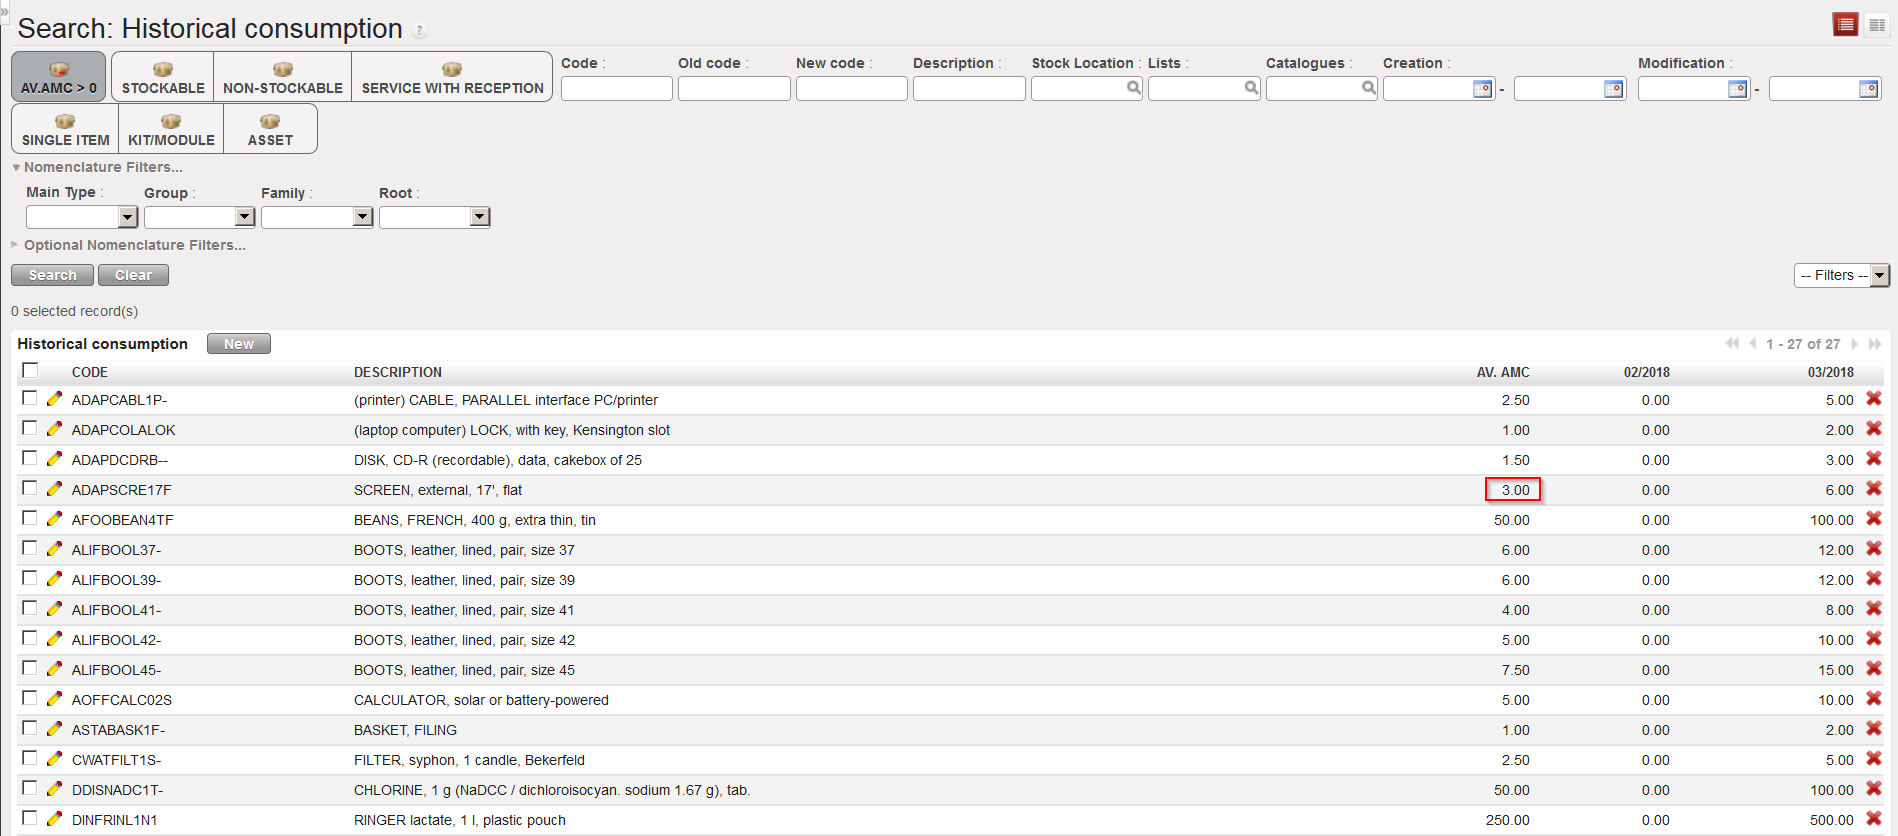
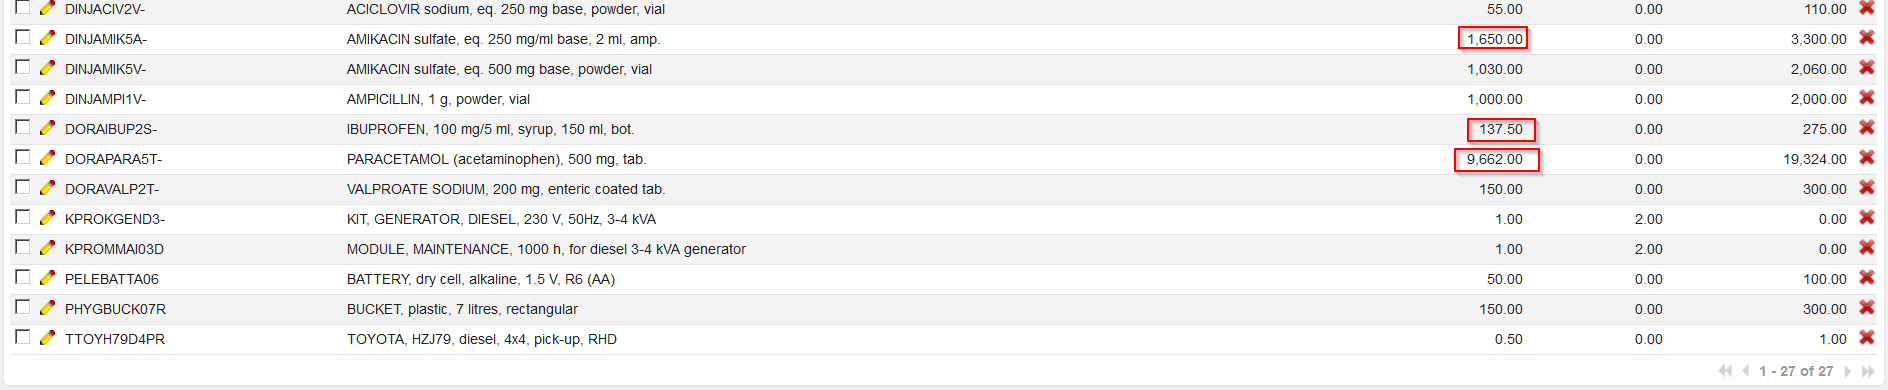
Historical Consumption Report – AMC

In the above examples, reports have been launched on 2 months only (February and March 2018), the system gives the RAC/AMC over these 2 months and the actual consumption’s month by month (here February and March 2018).

9. For Consumption Report Replenishment Rules – Average Monthly Consumption RR-AMC, When the 3rd option is selected, it is possible to select one or multiple Source Locations and/or one / multiple Destination locations and/or one/multiple External Partner. This means it will be possible to see consumption for a specific location or group of locations or see consumption to a specific destination location or set of destinations. Source location(s) must be internal but destination location(s) can be internal or external. 

When 3rd option (RR-AMC) is selected, there is a checkbox named “Adjusted RR-AMC”. When selected, the report  will take into account and show the adjusted AMC based on any stock outs / substitution for products via a recorded “Stock Out” with selected period. When the 3rd option RR-AMC is selected, it is still possible to see and use the “Remove negative AMCs” meaning no negative AMC figures (due to returns) will be displayed.
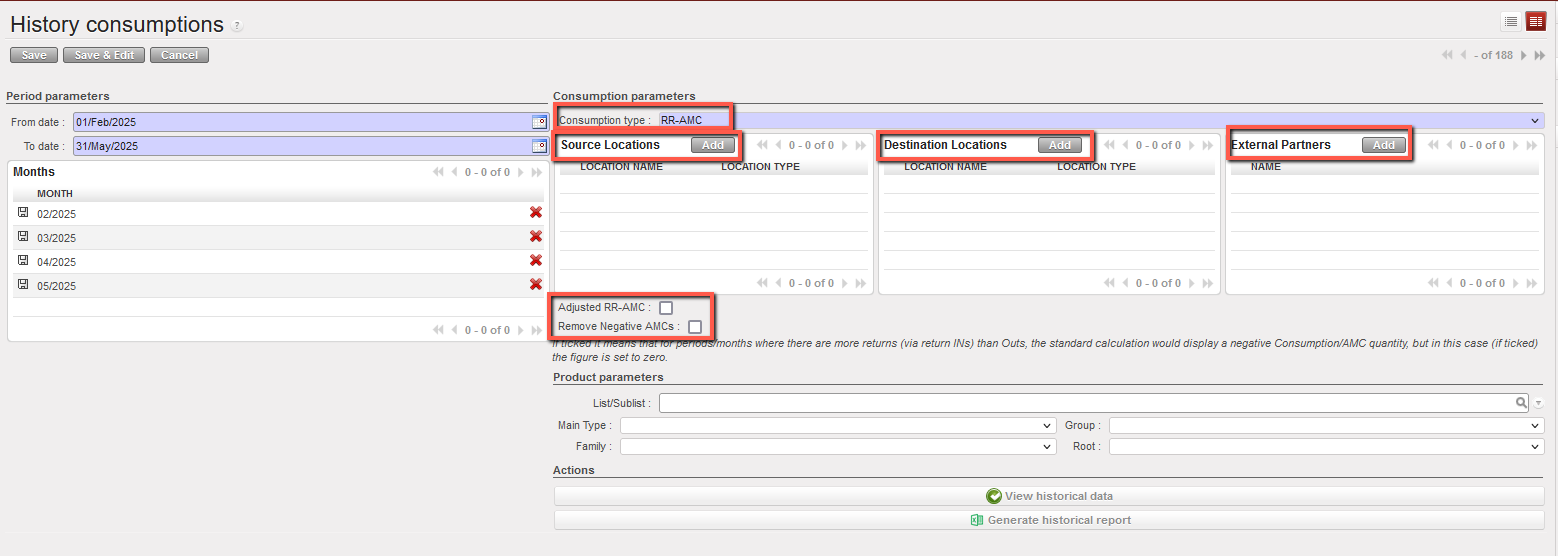
– If an External Partner (Type: Customer) is selected as the destination location, the source location must be either Internal Locations or Cross-Docking

– The source location can also be left empty, in which case only movements from Internal Locations and Cross-Docking will be included in the RR-AMC calculation. 

An External Partner can be combined with an External Consumption Unit as the destination location. 

– If “Other Customer” is selected as the destination and you attempt to select one or more External Customers, a warning message will block this action. 

– Similarly, if “External Customer” is selected as the destination and you attempt to select “Other Customer” a warning message will also block this action.

D. MONTHLY CONSUMPTION REPORTS

Supply User Manual ENG -> 5. Warehouse -> 5.10 LU-SU4203: Consumption Reports -> D. MONTHLY CONSUMPTION REPORTS

D. MONTHLY CONSUMPTION REPORTS

The main objective of a Monthly Consumption report is to encode the Forecasted Monthly Consumption (FMC) for a selection of products. However, the report will also show the Average Monthly Consumption (AMC) for these products over a specific period as the AMC can help to insert a correct FMC.

The (AMC) is a useful indicator as it informs on the average monthly consumption of a product over a specific time span.

The AMC value is based on the total quantity of the product which has left the instance via a consumption report or outgoing deliveries (both quick and full shipment processes). Any quantities of the product which have left the instance due to loan, donation, loss or discrepancy will not be included in this calculation. If any of the products have been received (returned) back in (via IN – except IN from Scratch) to this instance within this period, this quantity will be deducted from the total consumption figure.

AMC and FMC are used by different replenishment functionalities.

Note that in a Monthly Consumption Report, the AMC is given by the system, while the FMC should be introduced by the user.

A Real Consumption Reports is triggering a movement when it is processed. A Monthly Consumption Report does not trigger any movement but simply informs you on the AMC of products and allow you to enter FMC for those products.

Go to: Warehouse / Reporting / Consumption reports/ Monthly consumption

  1. Click on the “New” button.
  2. As “Period from“, enter the date which you want the AMC calculation to start from. This must be the first day of a month.
  3. As “Period to” the system displays as default the last day of the current month. This can be changed to the last day of a different month (but should be in the past).
  4. The “Location” is set to “MSF Instance” as the AMC calculation will always be made for the entire instance including all internal locations.
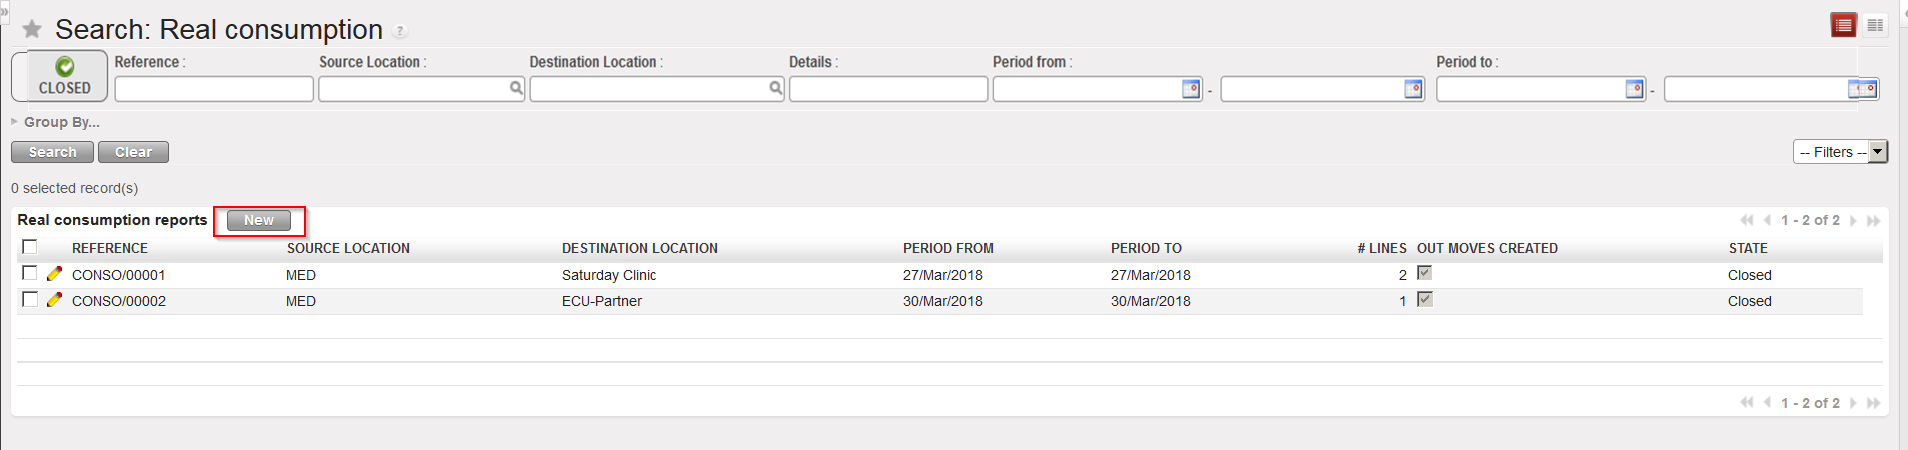
  5. To add the products for which you want to see the AMC, click on “New” then search for and select the products (if you want to add several lines in one step use the “Add multiple lines” button or import a file via the “Import a file” button).
  6. The AMC of the selected products is displayed according to the dates you have entered, and is not editable as it is calculated from the product consumption data available in the system.

Monthly Consumption Report

7. The FMC is also displayed, but this field is editable. Initially, the FMC is set to the same value than the calculated AMC, but it may be updated as needed. In the case that you know the consumption is likely to increase over the coming months, you may wish to insert higher value.

8. The “Last Reviewed on” field will display the date when the AMC and FMC of this product were last calculated and validated or will be blank if this is the first time.

9. In the “Valid until” field, enter the date until which the system should use the entered FMC to calculate consumption and re-order levels (e.g. if you know that the entered FMC is likely to be accurate for the next 6 months, enter the appropriate date here).

10. Click on the floppy disk to save the line and, if necessary, repeat the steps above to add further items.

11. When you have entered and saved all the needed product lines, click on the “Save” button on top of the screen.

12. When the FMC quantities have been validated, click on the “Valid all lines” button to validate these entries.

The “Export lines” button allows you to export a Monthly Consumption Report to Excel.

The “Import a file” button allows you to import an Excel file on a Monthly Consumption Report (FMC and validity). The template to use should be the one you get from the “Export” function.

C. HOW TO IMPORT AN EXCEL FILE ON A REAL CONSUMPTION REPORT

Supply User Manual ENG -> 5. Warehouse -> 5.10 LU-SU4203: Consumption Reports -> C. HOW TO IMPORT AN EXCEL FILE ON A REAL CONSUMPTION REPORT

C. HOW TO IMPORT AN EXCEL FILE ON A REAL CONSUMPTION REPORT

In some cases, consumption may have been recorded on an Excel file. Such a file can be imported on a RCR in order to update the system (i.e. record consumptions in UniField). The import can be done via the “Import a file” button available on the main RCR screen.

The file must have a specific format (XML Spreadsheet 2003) and include the following columns in the following order: Product Code, Product Description, Product UoM, Indicative Stock, Batch Number, Expiry Date, Asset, Consumed Qty, Remark, BN (Y/N); ED (Y/N).

A template of importable file may be obtained if you export an existing RCR using the “Export lines” button.

Following the import some checks are done on BN and product lines so that error messages are raised in case of inconsistencies.

File format for import to RCR

B. REAL CONSUMPTION REPORTS

Supply User Manual ENG -> 5. Warehouse -> 5.10 LU-SU4203: Consumption Reports -> B. REAL CONSUMPTION REPORTS

B. REAL CONSUMPTION REPORTS

The objective of a Real Consumption Report (RCR) is to register the consumption of goods (i.e. a movement) which would not have been yet recorded. This may typically happen if goods are consumed from a stock but nothing is recorded “in live” in the system. You may decide to record consumptions from this stock once a day, once a week, once a month, …

A good example is a stationaries cupboard from where staffs take items, noting on a paper what they take. This paper (and probably an inventory of the cupboard) can be used at the end of the month to register in the system stationaries consumption from this cupboard before replenishing it. Typically, this cupboard would be declared as an ICU in the system.

Another example is the mechanical spare parts stock. A mechanic can take parts in this stock according to the needs, writing what he takes on a register. This register is then used at the end of the week to register in the system what was consumed from this stock. Typically, this stock would be declared as an intermediate stock in the system.

The objective of a RCR is actually to regularize in the system, a stock situation following consumption which was not registered.

The source location of a RCR will be an internal location (typically an intermediate stock or an ICU) while the destination location will be a customer location (typically an ECU, “MSF Customer” or “Other Customer”).

It is important to understand that this report is actually triggering a stock move from the source location to the destination location. A Delivery Order (OUT-conso) will be created and processed once the RCR is saved and processed.

Note that if you want to avoid the use of Internal Requests, RCRs are an alternative way of registering your consumptions.

Go to: Warehouse / Warehouse Management / Real consumption

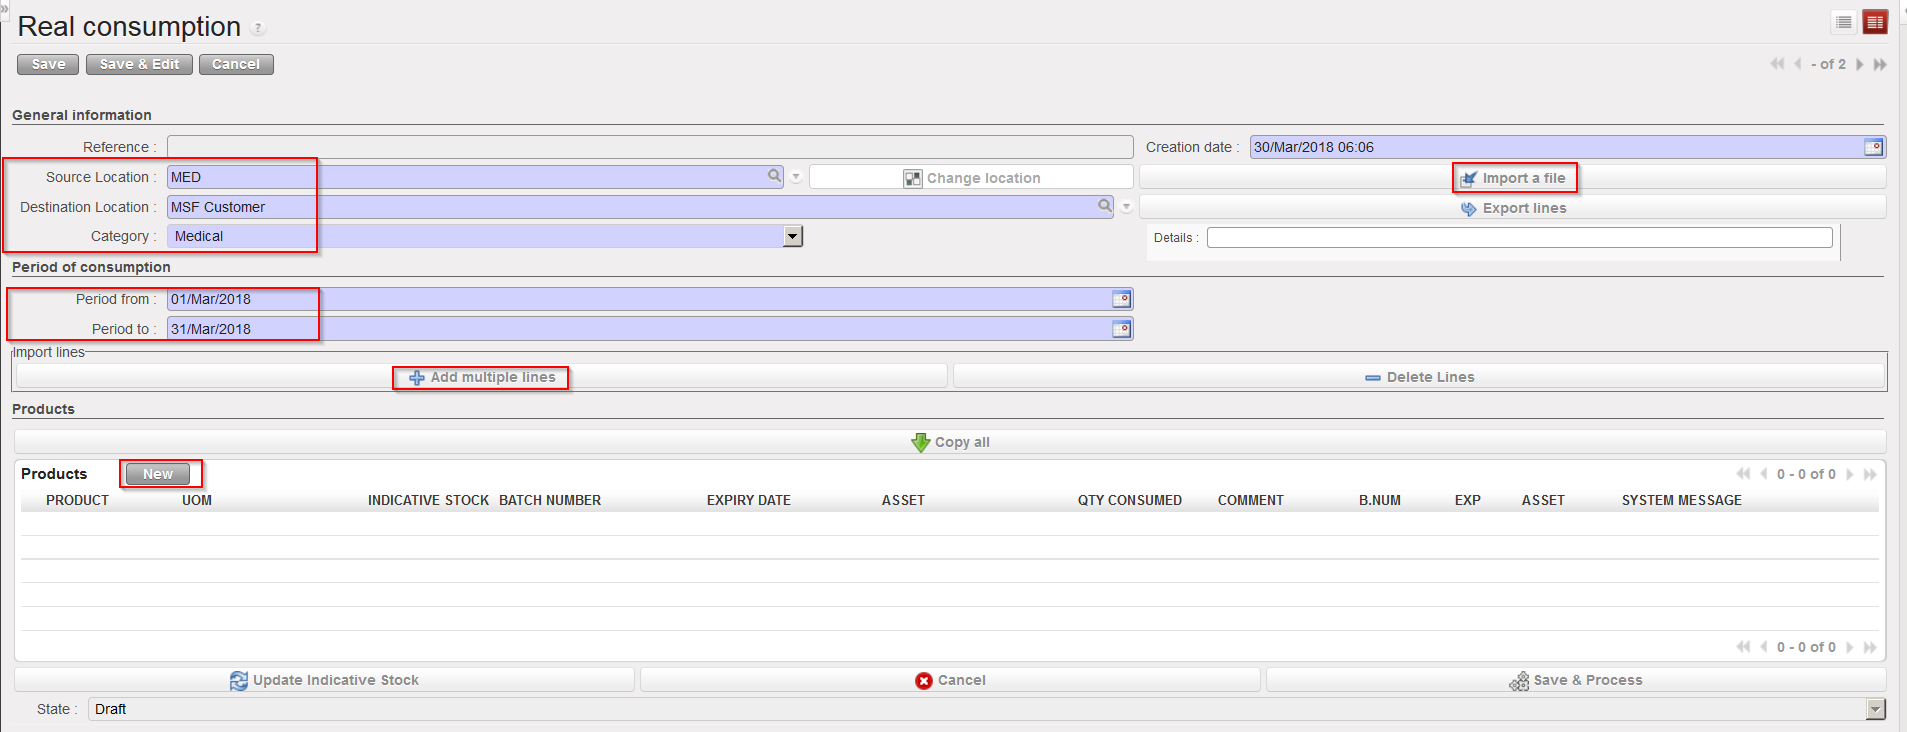
  1. Click on the “New” button to create a new report.

Creating a Real Consumption Report

2. The “Creation date” is generated by the system.

3. As “Source Location” enter the name of the location from which the goods have been consumed (it must be an internal location, click on the magnifying glass to choose and select from the listed options).

4. The “Destination Location” enables you to only select External Consumption Units ( “MSF Customer or “Other Customer” can not be selected any more). This “Destination Location” is actually the “who” consumed the goods. You need to create different clients (as ECU) so that you will be able to indicate who consumed each items.

5. As “Category“, enter the category of the products for which you are registering the consumption.

6. In the “Period from” field, enter the date at which the recorded consumption started.

7. The “Period to” date will default to today’s date, as we cannot enter what has been consumed beyond this date. If the end date when the goods were consumed has already passed, it is possible to edit this field and enter a previous date. You should enter here the date at which the recorded consumption ended.

Note that this period may be more or less long. You could decide to record consumption on a daily basis. In this case the “Period from” and “Period to” dates will be the same.

8. Add the products which have been consumed. This can be done with the “New” button located on top of the “Products” table. It can also be done with the “Add multiple lines” button. This allows entering several products at once.

The “Import a file” button allows you to import an Excel file into a RCR (see next section for details).

The “Copy all” button can be used to include all products/batches/quantities currently present in the source location. It should be use with care as it will empty completely the source location. To help avoid any mistake, the “Qty Consumed” is now automatically filled with 0 when this button is used. User will have to fill the “Qty consumed” either manually or via Import.

Header of a Real Consumption Report

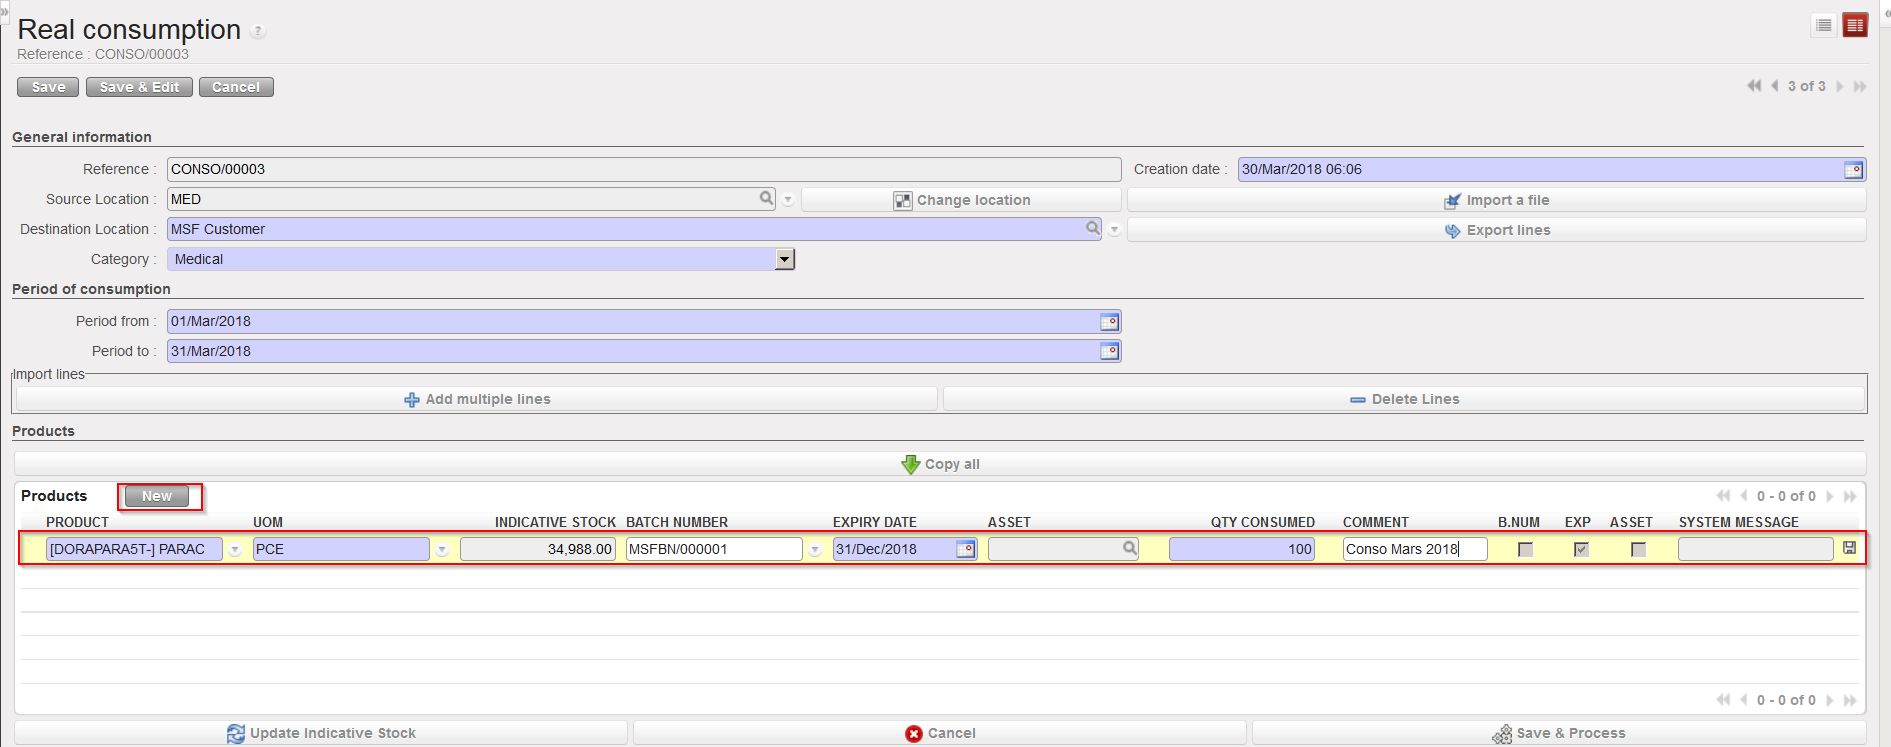
a.  To add products manually one by one:

i. Click on the “New” button on top of the “Products” table.

ii. Enter a product in the “Product” field.

iii. Check that the UoM is correct; you will see that the indicative stock quantity (i.e. the actual level of stock currently in the source location/real stock) is displayed.

iv. If relevant, select the batch number and expiry date for your product. If different batch numbers or expiry dates of the same product have been consumed, these should each have a separate line. Note that the FEFO principle is not applied here. The system does not select BN/ED itself. Note that when selecting a batch, the indicative stock is changing and indicates the real stock level for the selected batch in the specified source location.

v. Enter the quantity consumed within the dates specified above (Period from, Period to).

vi. Enter a comment if needed.

vii. Click on the floppy disk icon at the end of the line.

viii. Enter all other products in the same way.

Inserting a product line on a RCR

b. To add several products at once:

i. Click on the “Add multiple lines” button.

ii. Click on the “Add” button in the “Add multiple products” window.

iii. Search for the products you need to add using the relevant filter on the “Search Products” window.

iv. Select your products by ticking the product lines check-boxes.

v. After selecting all your products click on “Select(you may always add additional products after if you click again on “Add“).

vi. Click on “Add products“.

vii. Your products are inserted in the Real Consumption Report.

viii. Update each line with the consumed quantities (and BN/ED if needed).

ix. Click on the floppy disk icon at the end of the line.

x. Enter additional products if needed.

If you did a mistake and need to delete some lines you can use the “red cross” icon located at the end of the product line.

The “Delete Lines” button allows deleting several lines of the RCR in one step.

Note that if a product is managed by BN/ED, the selection of a batch will be mandatory. You will only be able to select a batch whose “available stock” is positive in the source location (you may analyze stock availability of batch managed products through Warehouse / Traceability / Batch numbers or through Warehouse / Traceability / Batch Location) .The selection of a batch updates the “indicative stock” of the line and indicates the “real stock” for this batch in the source location.

The “Update Indicative Stock” button allows refreshing a RCR and updates the indicative stock column.

The “Cancel” button allows cancelling the whole RCR. Its state will switch to “Cancelled” but you will be able to reset it to “Draft” if needed.

9. When you have added all products for which you want to record the consumption, click on the “Save” button on top of the main RCR screen.

The report is saved in the “Draft” state. This means you can modify, save, cancel or even delete it if necessary. Once it has been processed (i.e. after you have clicked on the “Save & Process” button), the Consumption Report will switch to the state “Closed“, the products will be moved (through an OUT-conso), and you will no longer be able to update, cancel or edit the RCR.

10. When it is confirmed that the entered consumption data are correct (check with your OC guidelines if you need specific validation), you can process your RCR. However, if a significant amount of time has passed between when you created the Real Consumption Report and when you are processing it, situation may have changed in term of products availability. You can click on the “Update Indicative Stock” button to update this indicative stock quantities displayed.

11. Click on the “Save & Process” button. This will create, process and close a Delivery Order (OUT-conso) with these products/batches/quantities. This OUT will have the “Reason type” “3 Consumption Report”. The system will display a confirmation message for this, which means that these products are now no longer in the source location.

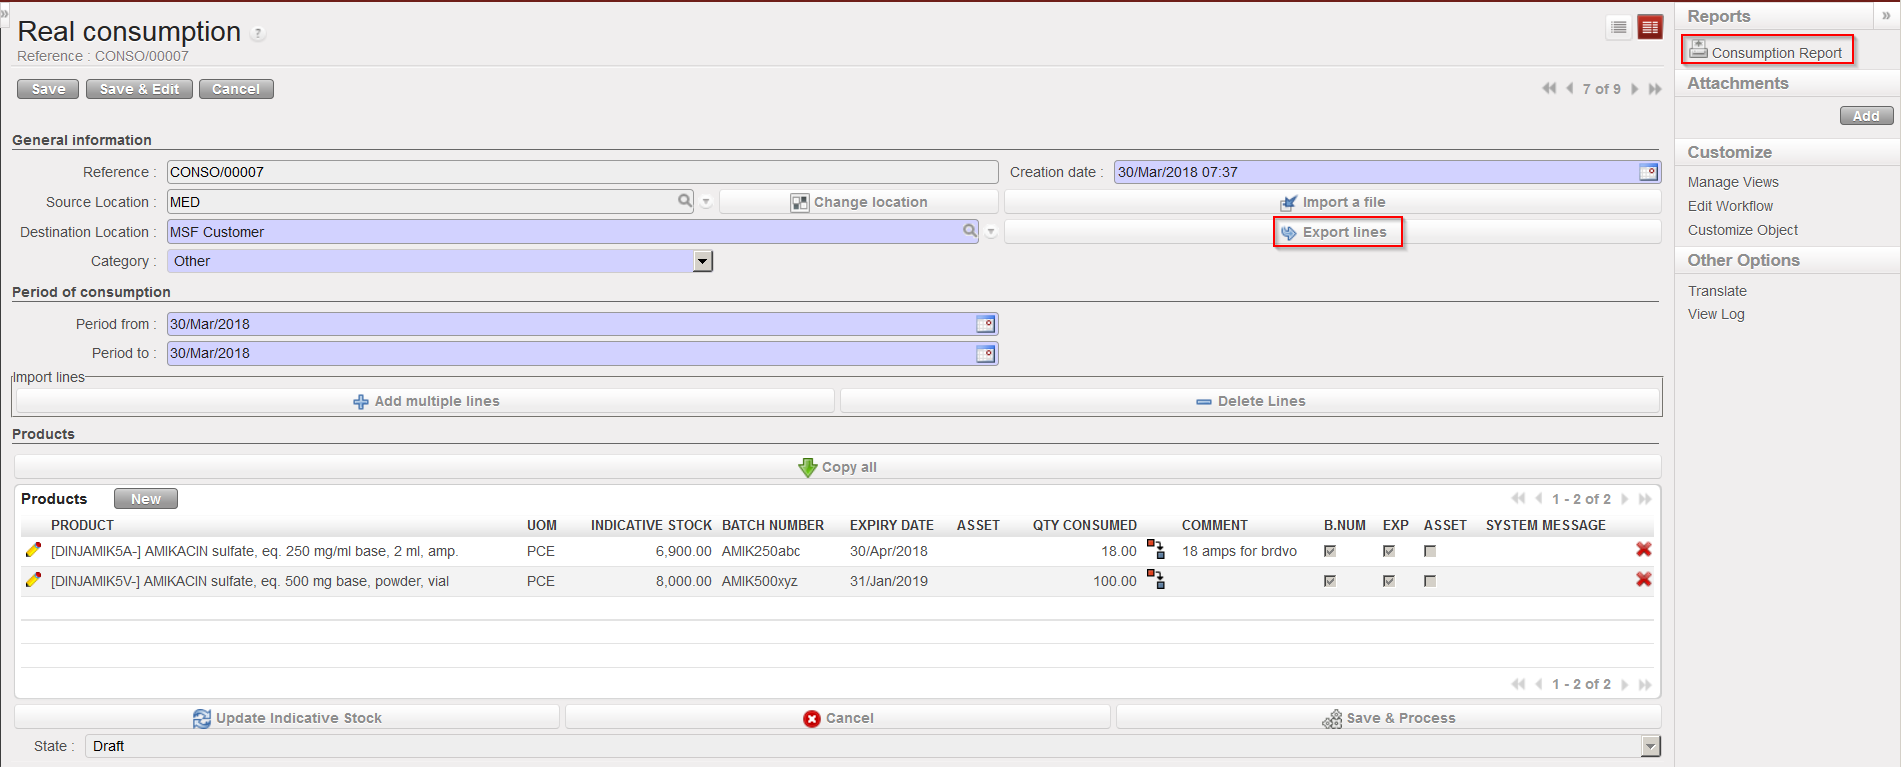
A RCR can be exported and printed via the “Consumption Report” option available in the action menu.

A RCR can be exported to Excel via the “Export lines” button available in the main RCR screen.

Exporting a Real Consumption Report

You can check the stock levels of the involved product in the different locations thanks to the “Stock by Location” functionality. The “Traceability” menu may also be useful to check if the products are batch managed.

If a Physical (Stock) Inventory is to be carried on a location, it is important for all RCRs to have been created and processed before this is started so that the figures in the system are up to date and reflect (as much as possible) the physical stock levels in this location.

It is possible to use a RCR to send goods to an external partner. However, you will have to configure the partner in a proper way and link it to an ECU on its partner master data sheet.

A. LU INTRODUCTION (LU-SU4203)

Supply User Manual ENG -> 5. Warehouse -> 5.10 LU-SU4203: Consumption Reports -> A. LU INTRODUCTION (LU-SU4203)

A. LU INTRODUCTION (LU-SU4203)

The “Consumption reports” menu under Warehouse / Reporting offers various reporting functionalities related to warehousing (except “Real Consumption” which is actually found Under Warehouse> Warehouse Management).

Real Consumption Reports (RCR) allow recording consumptions. Their processing is triggering movements OUT in UniField.

The main objective of the Monthly Consumption Reports is to encode Forecasted Monthly Consumptions, but these reports are also showing Average Monthly Consumption (AMC).

Finally, Historical Consumption Reports allow analyzing Real Average Consumption (RAC) and Average Monthly Consumption (AMC).

These 3 types of reports are explained in details in the below sections. Note that the terminology “reports” could be a bit misleading as some of them are pure reports while others are actually transactions.

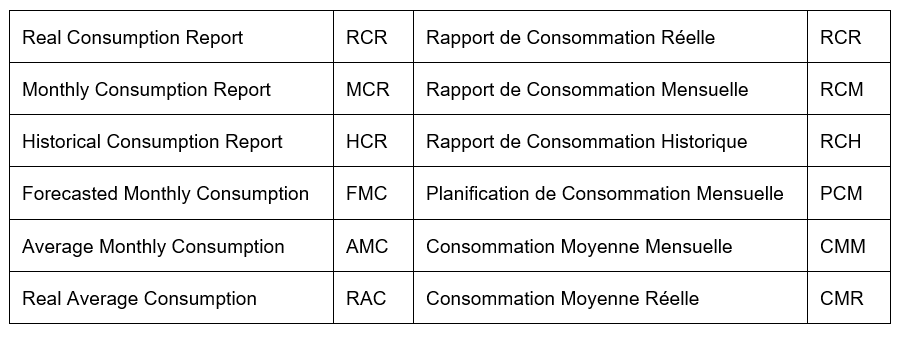
The below table lists the main terminology used in this learning unit.

5.10 CONSUMPTION REPORTS.

Supply User Manual ENG -> 5. Warehouse -> 5.10 LU-SU4203: Consumption Reports.

LU-SU4203: Consumption Reports.

A. LU INTRODUCTION

B. REAL CONSUMPTION REPORTS

C. HOW TO IMPORT AN EXCEL FILE ON A REAL CONSUMPTION REPORT

D. MONTHLY CONSUMPTION REPORTS

E. HISTORICAL CONSUMPTION REPORTS

E. HOW TO RETURN CLAIMED PRODUCTS TO SUPPLIER AND REPLACE THEM

Supply User Manual ENG -> 5. Warehouse -> 5.9 LU-SU4202: Claims-> E. HOW TO RETURN CLAIMED PRODUCTS TO SUPPLIER AND REPLACE THEM

E. HOW TO RETURN CLAIMED PRODUCTS TO SUPPLIER AND REPLACE THEM

If you choose “Return” as claim type, the system will create a Picking Ticket (PICK-return) to send back non conformed goods to the supplier. If you tick the “Replacement expected” checkbox, the system will create an Incoming Shipment (IN-replacement) for the replacement of the goods

The Picking Ticket will be processed to send back the goods to the supplier. Note that you may convert it to an OUT if needed.

The Incoming Shipment will be used to receive goods when the replacement will be sent by the supplier.