A Purchase Order can also be confirmed at line level. The confirmation can be done for 1 single line or for several lines. The line which is confirmed should have a “Delivery Confirmed Date”.
J. a) How to confirm a PO at header level
Assuming a PO can be confirmed,
Go to: Purchases / Purchase Management / Purchase Orders
- Open (in edit mode) the PO that you wish to confirm.
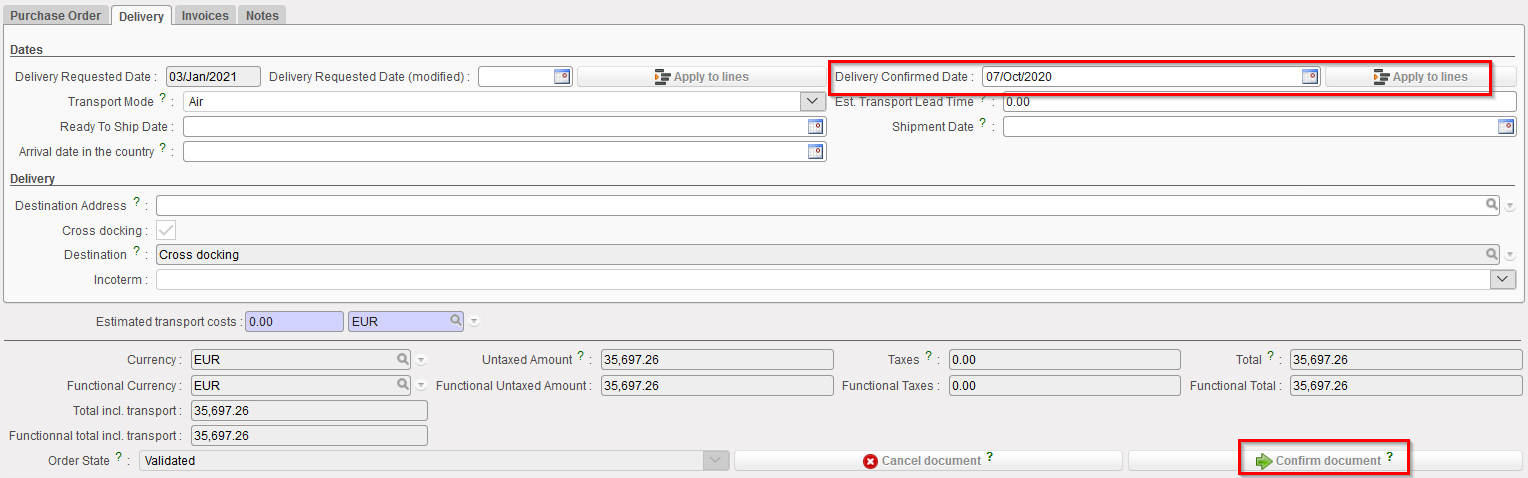
- Click on the “Delivery” tab of the PO and enter the “Delivery Confirmed Date” provided by the supplier.
- Transfer this “Delivery Confirmed Date” to all the lines of the PO via a click on the button “Apply to lines“. Then, on the pop up, click “Yes – all lines” if you wish to update all the PO lines or on “Yes – Selected lines” if you wish to apply it to pre-selected lines. Note that you may also enter a different delivery confirmed delivery date on each line of the PO if needed.
- Click on the “Confirm document” button at the bottom of the PO screen.
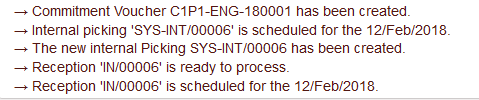
- A message will appear on the top of the screen informing that a Commitment Voucher has been created (except if supplier is ESC) and that the Reception (incoming shipment) is ready to be processed.
 |
| PO – entering the delivery confirmed date and confirming the order |
 |
| Message received after confirmation of the PO |
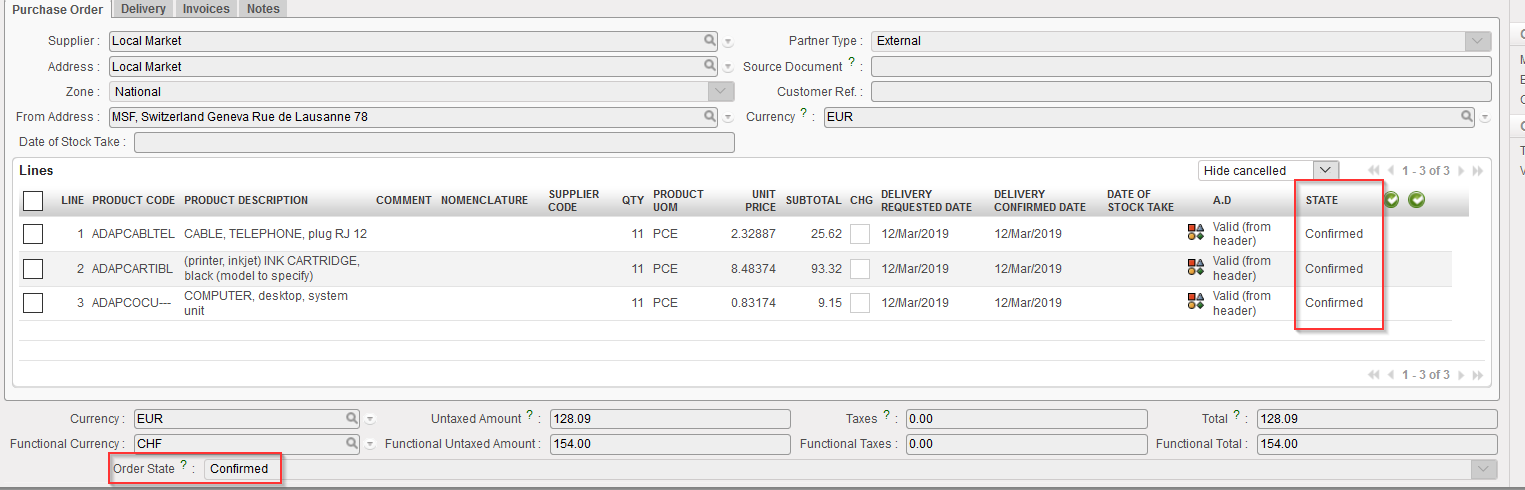 |
| All lines of the PO are confirmed and the PO is confirmed at header level |
Note that if you try to confirm a PO which has been sent to an internal partner, you will receive a (non blocking) warning message. Confirmation should not be done manually but via synchronization. The PO will be confirmed automatically when the corresponding FO on the supplier side will be confirmed.
 |
| Warning message given by system when trying to confirm a PO which should be confirmed via synchronization |
b) i. How to validate several lines of a PO
Go to: Purchases / Purchase Management / Purchase Orders
- Open the PO that you wish to validate (in edit or display mode). This PO should not yet be fully validated but still draft (or draft-p).
- Select the lines that you wish to validate via the check boxes on the left of the PO-lines.
- Click on the green button (Validate) located at the top of the Lines table (next to “STATE”).
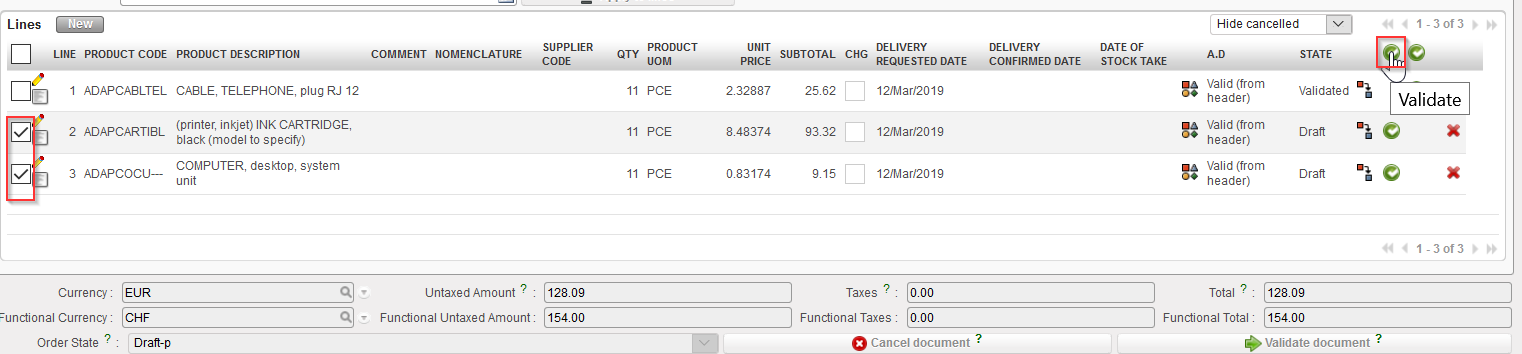 |
| Validating several lines of a PO |
- The PO switches to “Draft-p” (partially validated). The validated PO-lines switch to “Validated” while the other lines stay in status “Draft“.
Note that as long as all the lines of a PO have not been validated, you still have the possibility to validate the PO at header level, to validate 1 (draft) line of the PO or to validate several (draft) lines of the PO.
Once all lines are validated, the status of the PO (at header level) switches to “Validated” and validation at header level or line level is not possible anymore.
Please note that for PO with an ESC supplier:
- the “Stock Take Date” needs to be filled and be earlier than PO creation date, otherwise the PO cannot be Validated.
- If the PO contains NSL products, a message will appear for 2 options: Validation action can be progressed OR it can be canceled.
C. How to create a Purchase Order with Products by Nomenclature.
Supply User Manual ENG -> 4. Procurement -> 4.2 LU-SU3101: Internal Requests (IRs) -> C. How to create a Purchase Order with Products by Nomenclature.
C. How to create a Purchase Order with Products by Nomenclature.
As explained when IRs were introduced (see above: LU-SU3101 Internal request, C), there are situations when it is necessary to create orders containing lines with products not properly codified, called “products by nomenclature”.
These “products by nomenclature” can be present on a PO created from scratch or on a PO created via sourcing and even be synchronized if necessary. However, a PO-line cannot be confirmed with a “product by nomenclature”. The “Validated” state is the last state at which “products by nomenclature” are still allowed on a PO. After that (i.e. to confirm the PO-line), a product correctly codified will be required.
Go to: Purchases / Purchase Management / Purchase Orders
- Create a new PO or edit an existing one
- Click on the “New” button located on top of the “Lines” table (in the “Purchase order” tab) to enter a product line manually.
- On the “Purchase order Line” , fill “comment” with a product description then enter a quantity, a unit of a measure and a unit price if you know it.
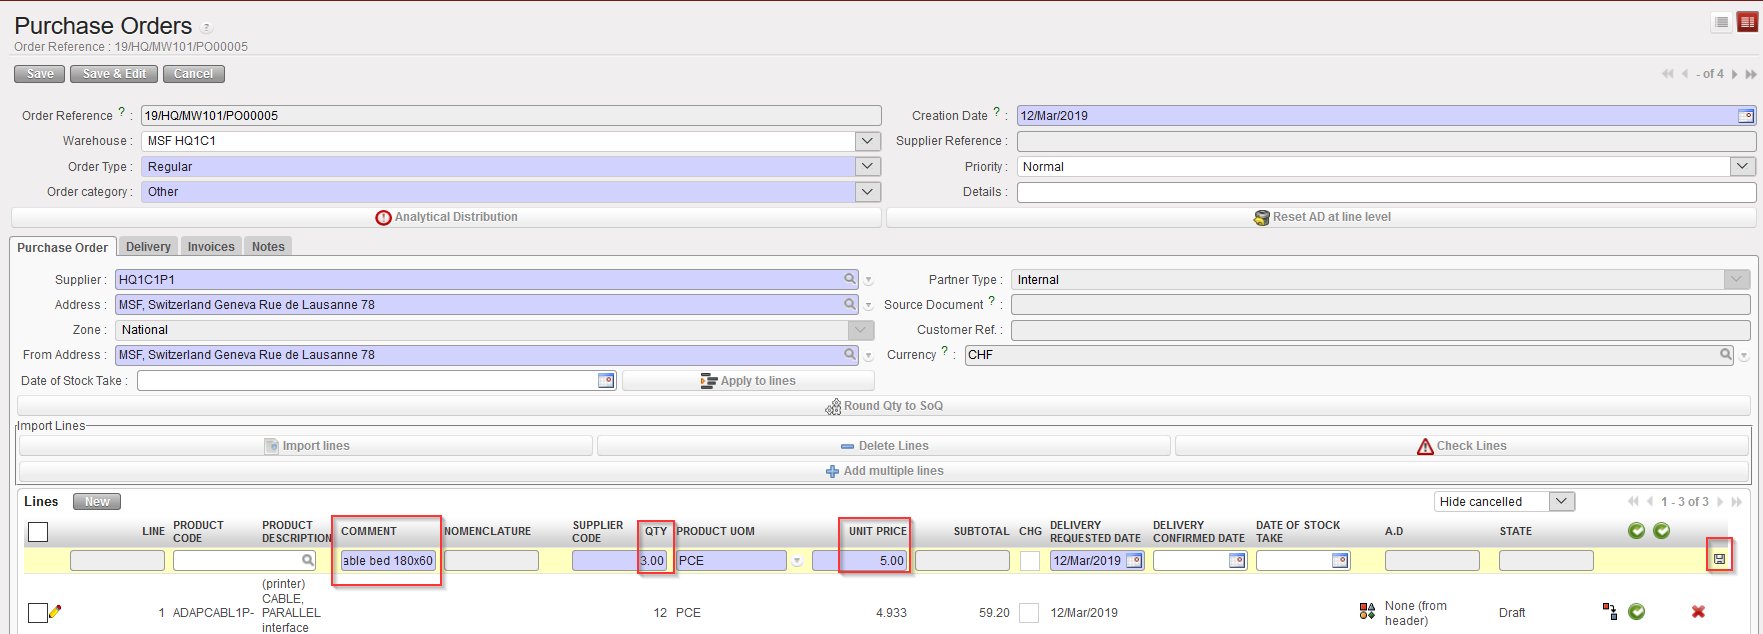 |
| Product by nomenclature on PO – Step 1 |
- Click on the floppy disk or “enter” to save the line
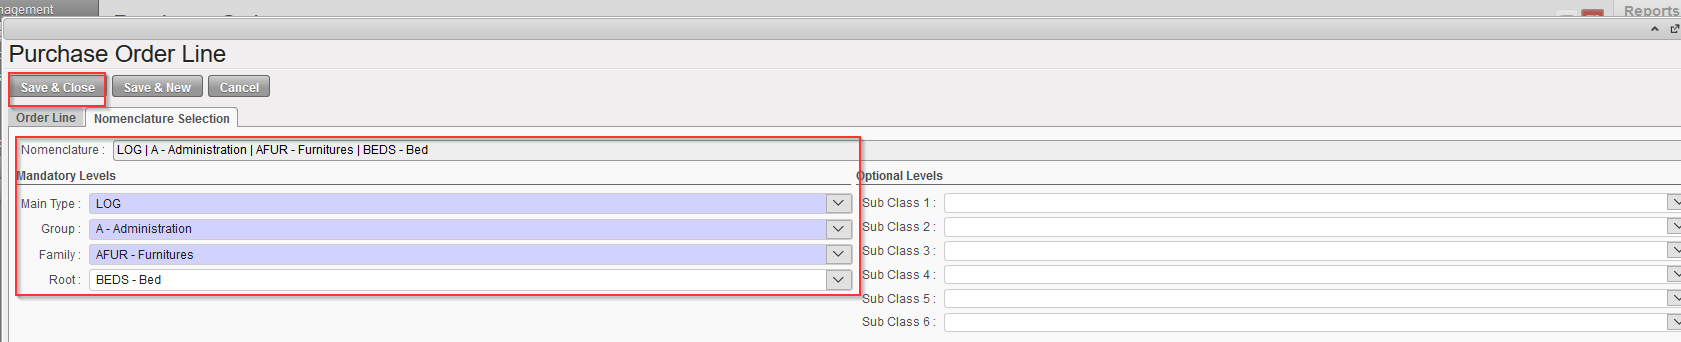
- Click on the “Configurator”
 |
| Product by nomenclature on PO – Step 2 |
- Select the full nomenclature in the “Main Type”, “Group”, “Family” and if possible “Root” fields.
- Click on the “Save & Close” button
 |
| Product by nomenclature on PO – Step 3 |
- On the main PO screen
- The line appears without product code and description.
- The Nomenclature levels together with the comment will help the coordination or the supplier to define the requested product.
 |
| Line with product by nomenclature on a PO |
You will be able to validate this PO-line but you won’t be able to confirm it unless you replace the product by nomenclature with a product correctly codified.
 If the PO supplier is another instance (e.g. the coordination), once the PO is validated, the synchronization will create an FO on this instance, corresponding to your PO. The correct code should replace the nomenclature on this FO before its validation. This could require the creation of a (local) product. This product will be reflected in your PO once the validated FO will be synchronised.
If the PO supplier is an ESC, the correct code should be provided by the ESC. It could require the creation of a new product in UniData which will appear in UniField thanks to the linkage between UD and UF.
J. How to configure a PO customized default text
Supply User Manual ENG -> 4. Procurement -> 4.10 LU-SU3401: Procurement Advanced Features -> J. How to configure a PO customized default text
J. How to configure a PO customized default text
This option enables users to add a customized text/message to be displayed at the end of a PO print out (PDF).
At PO header level a tick box, “Show PO Default Message” should be checked to activate this option. Checkbox can only be ticked when PO is in “Draft” or “Validated” status.
In order to configure this message, user need to go to:
Go to: Supply Configuration / Orders / PO customized text
- Enter a message in the text frame.
2. Click on Save
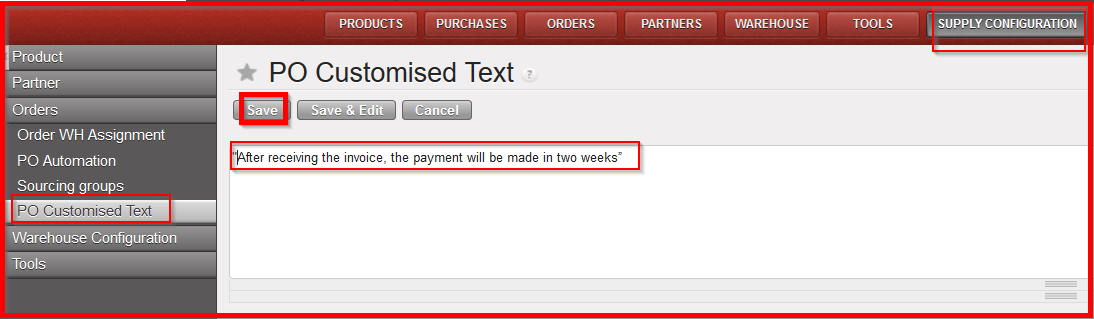 |
| PO customized text |
3. Open a new Draft PO and fill in the basic information
4. Check the box “Show PO default message”
 |
| PO default customized text checkbox |
5. Click on “Purchase Order” on the right hand action menu (to print out the PDF)
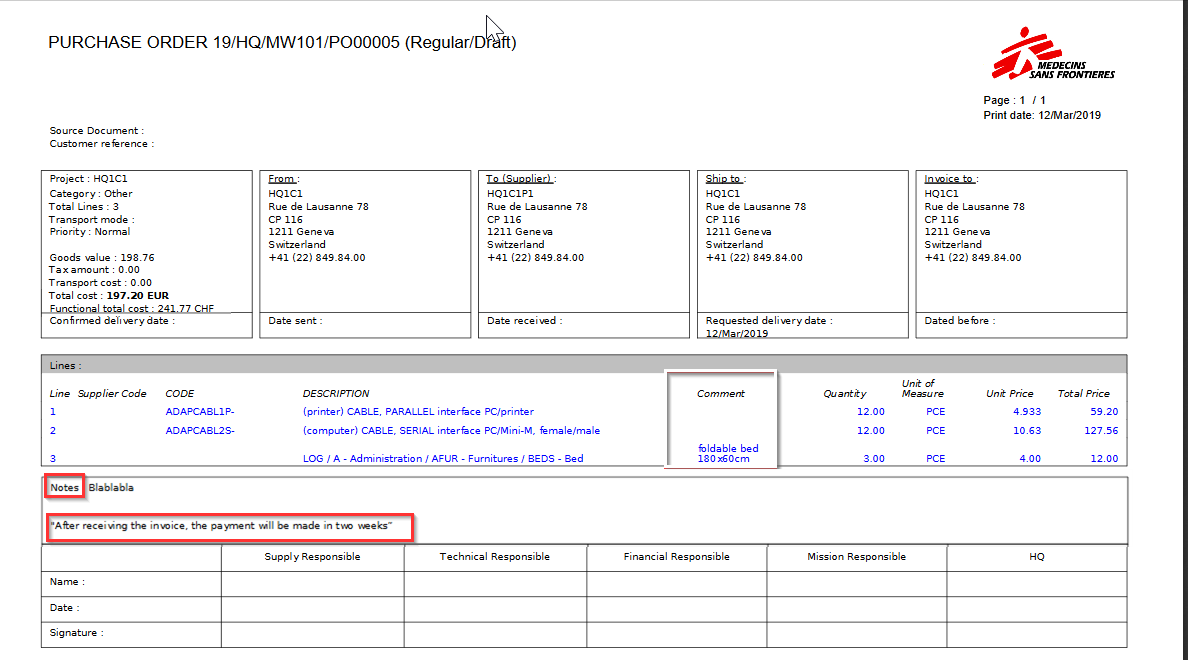 |
| PO PDF Print Out |
I. How to round the ordered quantity to the standard ordering quantity (SoQ)
Supply User Manual ENG -> 4. Procurement -> 4.10 LU-SU3401: Procurement Advanced Features -> I. How to round the ordered quantity to the standard ordering quantity (SoQ)
I. How to round the ordered quantity to the standard ordering quantity (SoQ)
The purpose of this feature is to help the user to include accurate quantities in orders (IRs, FOs or POs). Standard ordering quantity is often related to packaging.
The feature rounds (up) the quantities included in the orders according to the one defined as SoQ.
SoQs can be defined on the product master data sheet and will be used on IRs and FOs.
SoQs may also be defined in supplier catalogues.
On POs, if defined in catalogues, these SoQs from catalogues will be used; otherwise the SoQs defined on the PMD sheet will be used.
The feature is only available on draft IR, FO or PO.
The feature is only available at header level (i.e. if activated, it will impact all lines of the order).
The use of this feature is optional. Even if the button has been pushed and the order has been updated consequently, the user can still change the quantities as desired.
SoQs can be defined on the PMD sheet, on the “Information” tab.
|
|
|
SoQ on PMD sheet |
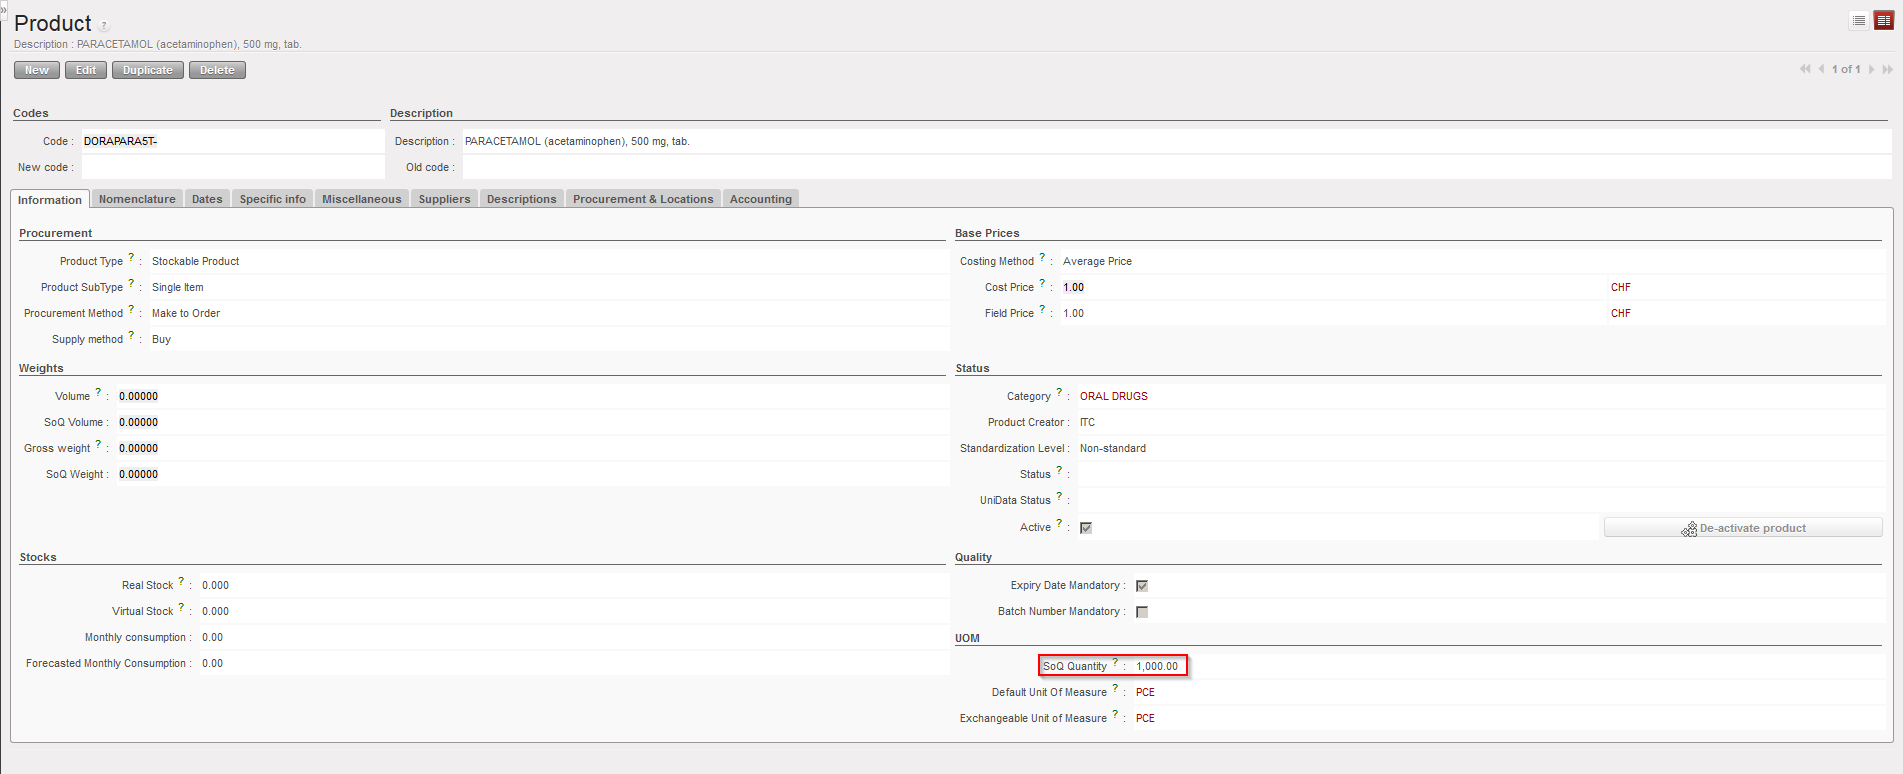
Note that UniData products should only be updated on HQ instances. SoQ should follow this rule. This means that SoQs should be defined at HQ level and be the same on all instances related to this HQ.
For local products, SoQs should be defined at coordination level.
SoQs can also be defined on supplier catalogues. In this case, they will only be valid on POs addressed to this specific supplier.
|
|
|
SoQ on supplier catalogue |
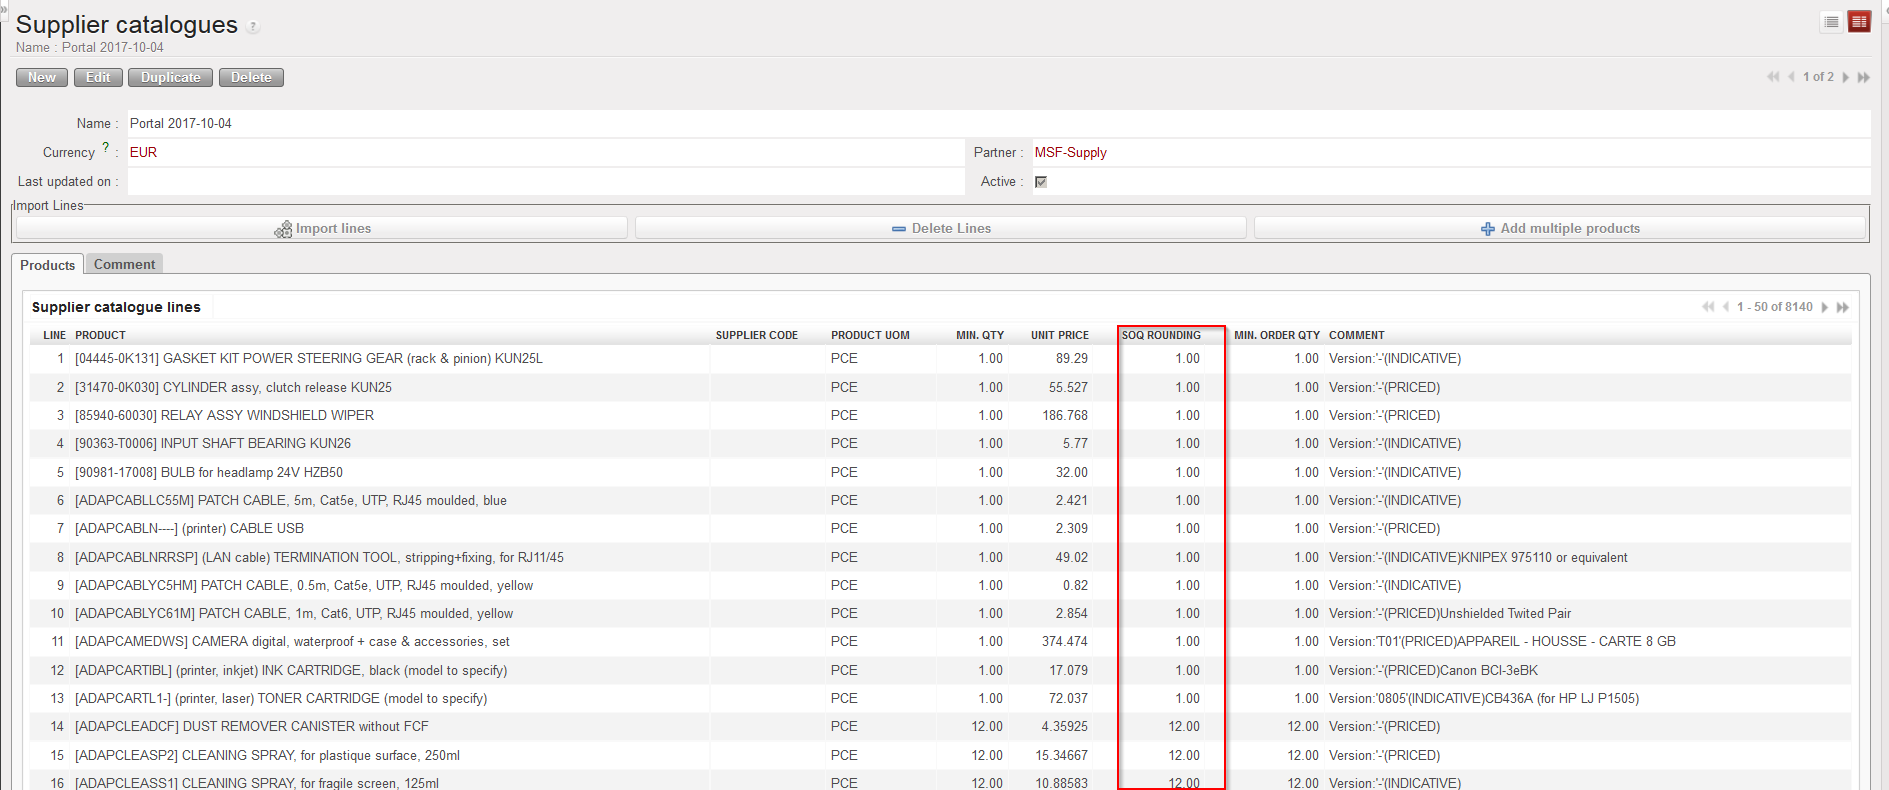
Note that ESC catalogues (including SoQs) are defined at HQ level and are synchronized down to all coordination related to this HQ. Any ESC specific SoQ should be updated on the HQ in the ESC catalogue.
You may define local catalogues (including SoQs) for local suppliers at coordination or project level.
While SoQs defined on PMD sheet can be seen as “typical standard ordering quantities“, SoQs defined on supplier catalogues (SC) are often related to the packaging supplied by this supplier.
To round quantities according to SoQs on orders, simply hit the “Round Qty to SoQ” button.
|
|
|
Draft IR before rounding quantities according to SoQ |
|
|
|
Draft IR after rounding quantities according to SoQ |
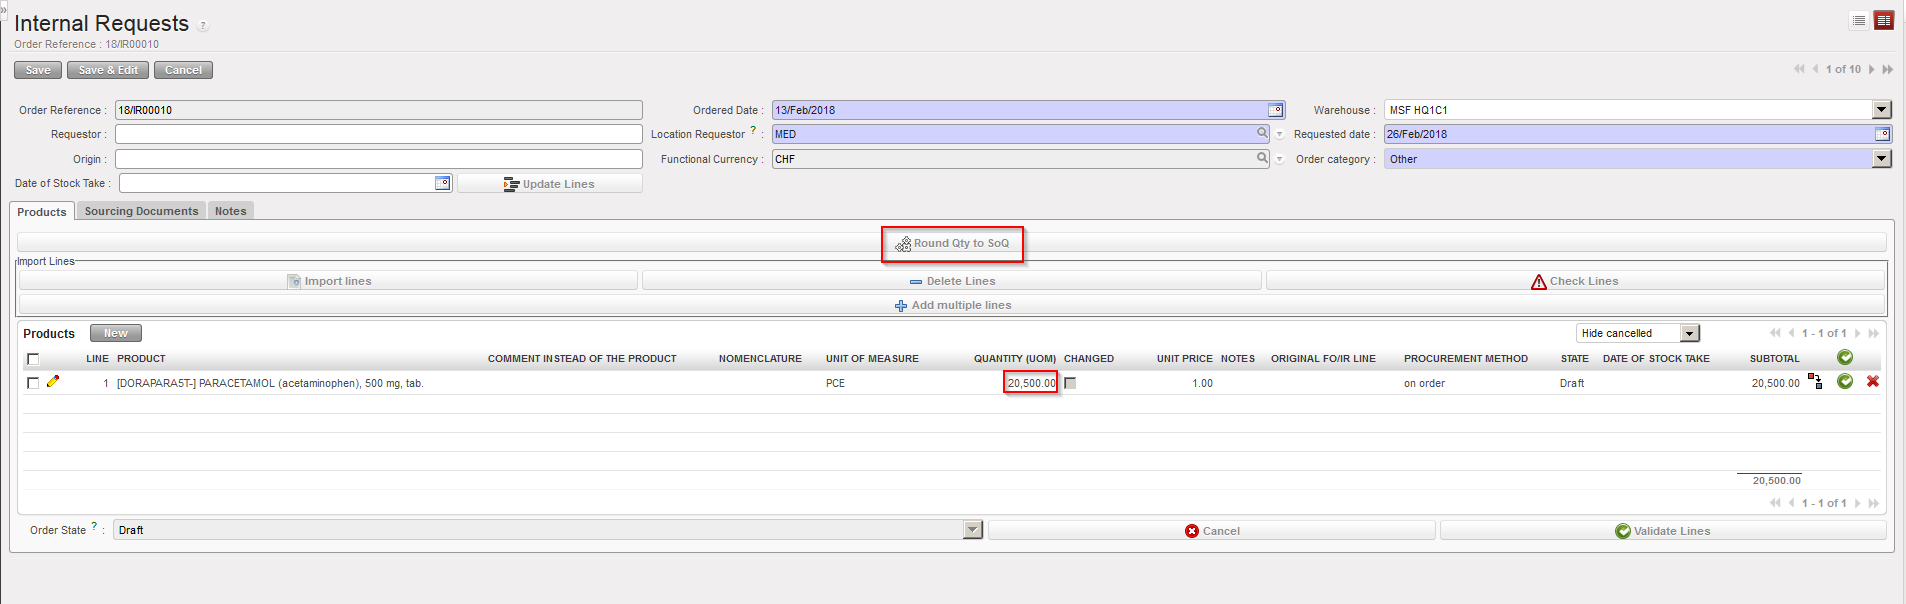
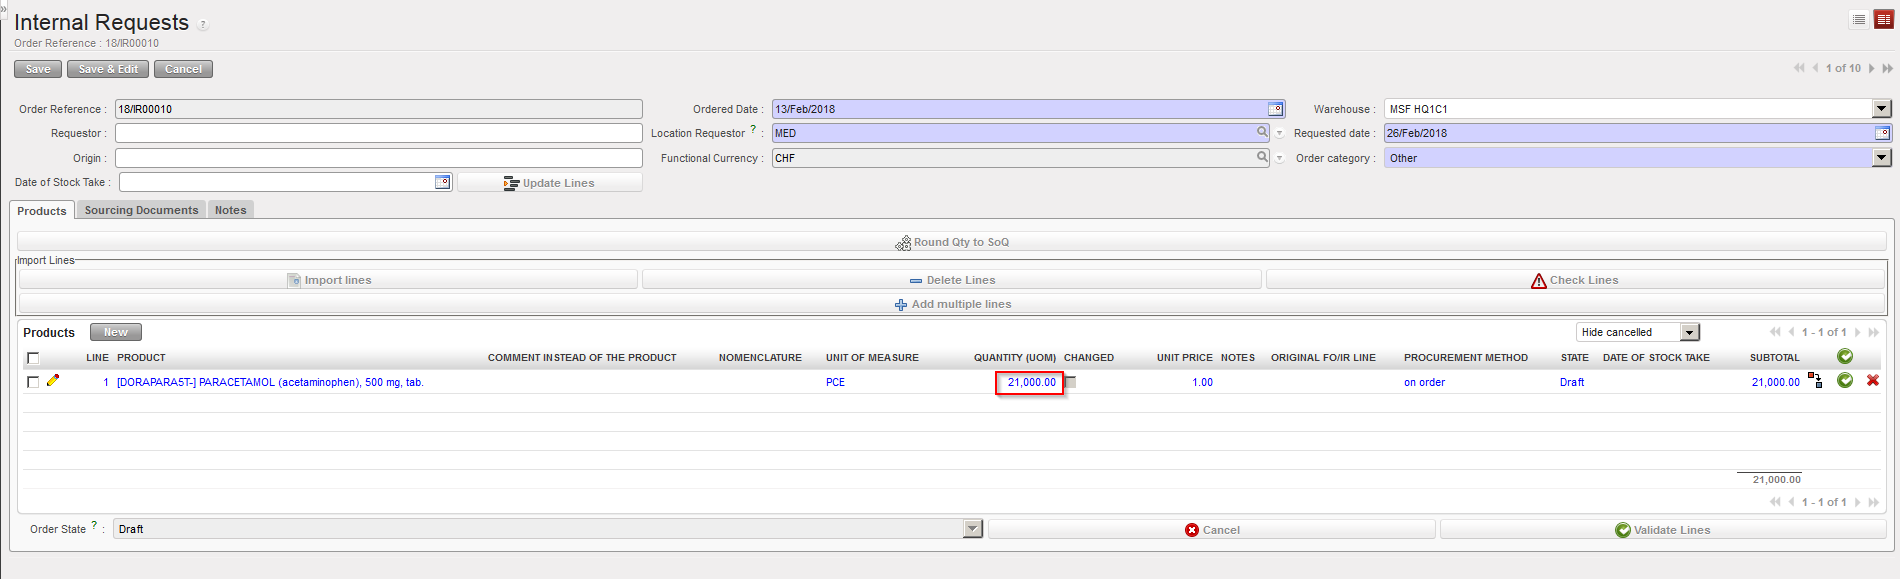
Note that the rounding is always done up (i.e. quantities will never be decreased).
After hitting the button “Round Qty to SoQ“, lines which have been updated will appear in blue.
If no SoQ is defined for a product, quantity won’t be updated.
NB: in the specific case of an ordered quantity in PO lower than the “Minimum order quantity” from a Catalogue, then the rounding will be done to the “Minimum order quantity” of the Catalogue.
H. How to source one order (IR or FO) on several POs for the same ESC (and same RDD)
Supply User Manual ENG -> 4. Procurement -> 4.10 LU-SU3401: Procurement Advanced Features -> H. How to source one order (IR or FO) on several POs for the same ESC (and same RDD)
H. How to source one order (IR or FO) on several POs for the same ESC (and same RDD)
It may happens that there is the need to split 1 request (IR or FO) sourced on order on several POs, even if all the lines of this request are sourced to the same supplier and are requested for the same date.
UniField offers an option to do this type of sourcing but this option is only available for ESC suppliers.
Examples:
In some countries, import taxes are different according to the nature of the products imported. If you group together on the same PO all products which follow different import tax regimes, authorities could decide to tax all products at the same (high) tax rate. Splitting lines on different POs according to the tax regime they follow may help avoiding this and allow substantial economies.
When sourcing on order to an ESC, you might decide at this point how goods will be shipped. As the mode of transport is defined on the PO header, sourcing on different POs will allow you to ship different lines of an order with different modes of transport.
The “order creation mode” field on a partner already allows splitting requests on different POs according to different rules: by project, by category, by category & project or by order. The objective here is to go even further as in this case we want to be able to split 1 single request on different POs, even if all lines are sourced to the same ESC and are requested for the same date.
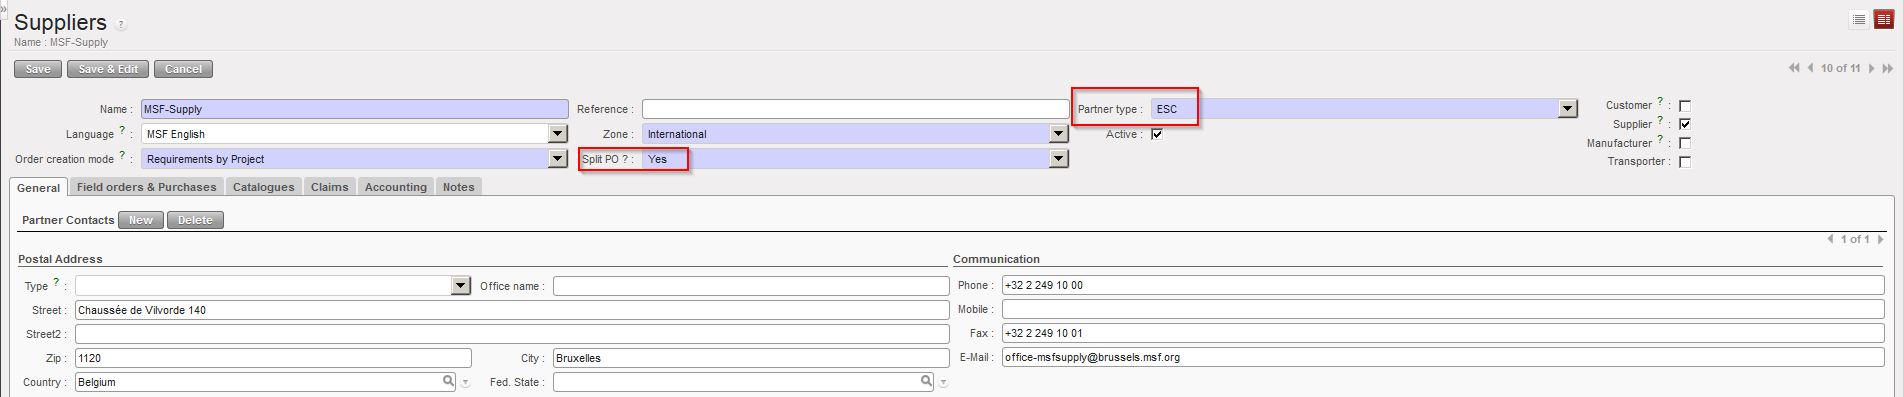
The “Sourcing group” feature allows doing this type of sourcing. It can be activated on the partner form for ESC supplier only. Basically, when “Split PO” is activated (“Yes“), this option will force users to add “sourcing groups” in the OST that will allow the generation of several POs for 1 single request.
To activate the “Split PO” feature on a partner (ESC)
Go to: Partners / Suppliers
- Select a supplier (whose partner type is “ESC“).
- Fill the “Split PO” field with “Yes” (note that this field is only existing on ESC partners).
 |
| Split PO field on partner sheet (ESC only) |
To create the “sourcing groups“
Go to: Supply Configuration / Orders / Sourcing groups
- Click on “New” to create a new sourcing group.
- Enter a name and a description.
- Save the line.
 |
| Creation of sourcing groups |
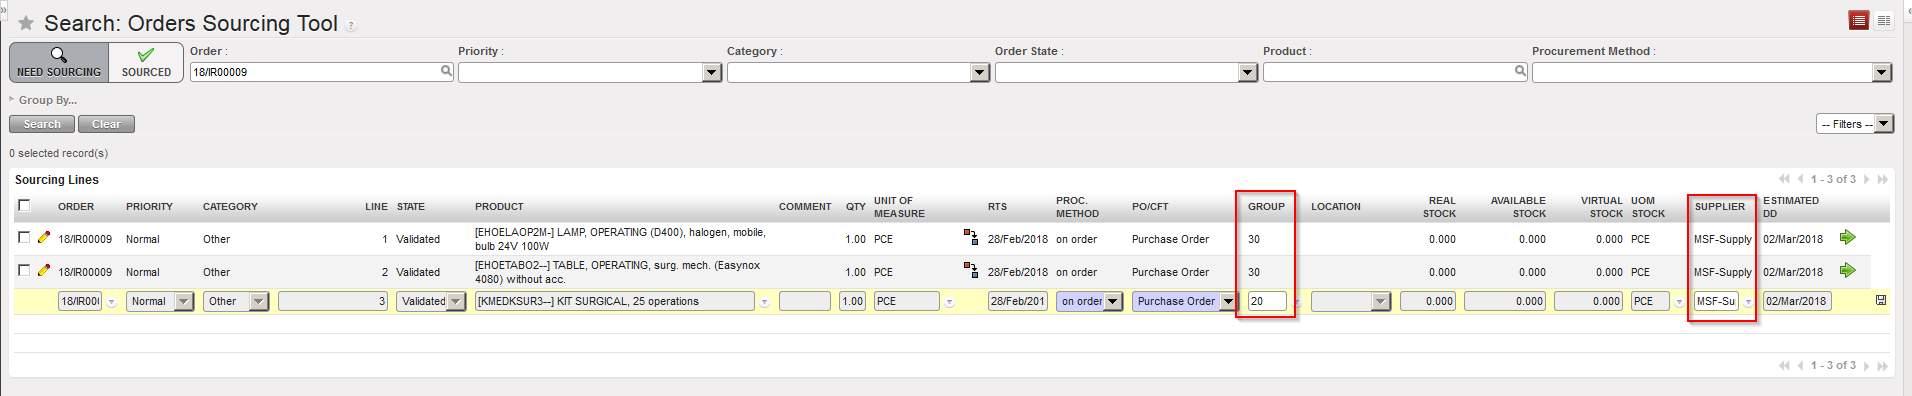
To use the “sourcing groups” in the OST (we assume that you have validated IR or FO).
Go to: Orders / Orders / Orders Sourcing Tool
- Enter a supplier for the lines you want to source (it should be an ESC).
 |
| Using “sourcing groups” in the OST |
- Select a “Group” for each of the lines you wish to source.
- Source the lines.
 |
 |
| Sourcing has been done using “sourcing groups” feature |
G. How to open a Claim to Supplier vs a Claim from Customer.
Supply User Manual ENG -> 4. Procurement -> 4.10 LU-SU3401: Procurement Advanced Features -> G. How to open a Claim to Supplier vs a Claim from Customer.
G. How to open a Claim to Supplier vs a Claim from Customer.
This small section explains briefly why we can find the “Claim” functionality in both business application “Orders” and “Purchases“.
Claims are explained in detail in the Warehouse Chapter, LU-SU4202.
 |
| Claim functionality in the “Orders” menu |
 |
| Claim functionality in the “Purchases” menu |
The only distinction between the claim functionality from the “Orders” menu and the claim functionality from the “Purchases” menu is the nature of the claim. Whereas the claim from “Orders” is a claim from a customer; the claim from “Purchases” is a claim to a supplier.
A claim is raised to a supplier when the goods do not conform to the confirmed PO. The supplier can be external, ESC or internal. Most of the time a claim is generated during the reception process, but supplier claims may also be created from scratch.
A claim from a customer is created by an instance whose client is not satisfied. For example, coordination will open a customer claim if it receives a complaint from a customer who’s dissatisfied with the goods sent by the coordination. Coordination will certainly open an equivalent claim to its supplier if appropriate.
F. How to close a document/transaction and cancel its associated documents
Supply User Manual ENG -> 4. Procurement -> 4.10 LU-SU3401: Procurement Advanced Features -> F. How to close a document/transaction and cancel its associated documents
F. How to close a document/transaction and cancel its associated documents
It may be necessary to close a document and cancel the related documents, so that they are not left pending or mistakenly processed. UniField offers this tool to close IRs, FOs and POs, and cancel their associated documents.
Go to: Tools / Documents “in Progress“
- Find the document / transaction which you want to close by using the search filters at the top, and clicking on “Search“. Note that by default the filter “Creator” is activated. Clear it if needed.
- The system displays attributes of each document, including creation date, partner, document type and state. You can see if there are associated documents thanks to the “associate doc.” checkbox (flagged means there are associated documents).
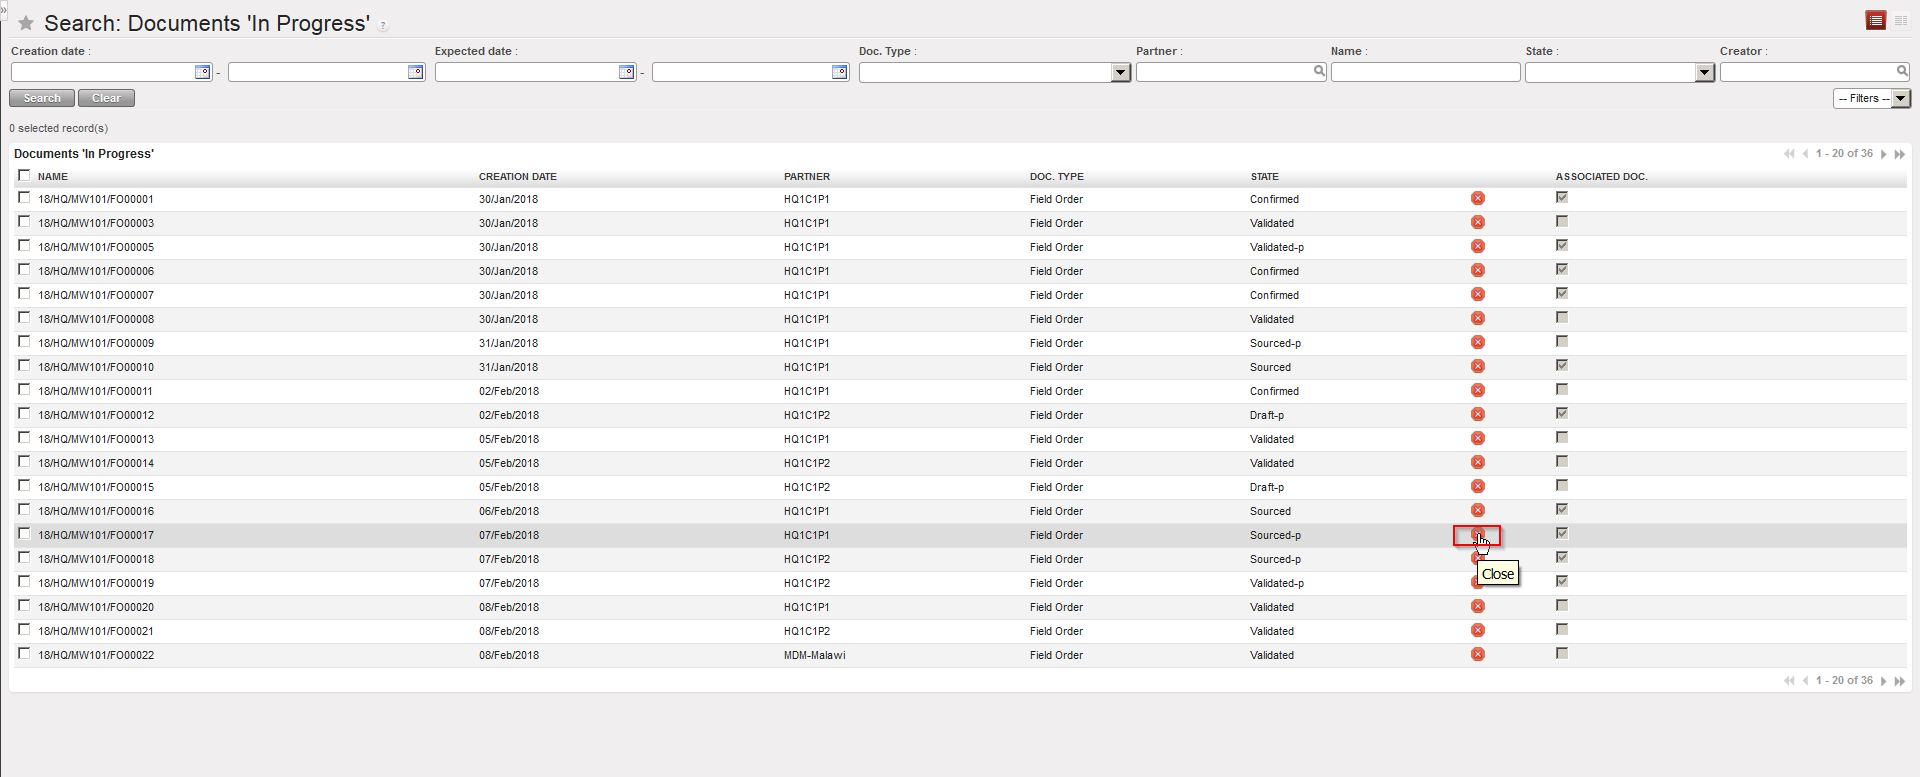 |
| Documents in Progress |
- To close a document, click on the “Close”
 button on the right side of the line.
 - The system displays all associated documents to it. If you wish to open any of these documents, click on the magnifying glass next to it and the system will open this transaction in a new tab.
 |
| Documents in Progress – Associated documents |
3. If you are happy for all the listed associated documents to be cancelled, click on the “Cancel associated documents and close the document” button.
4. The system will display a message confirming that the original document has been closed and that the associated document(s) have been cancelled.
E. How to replace a kit with its components on a Purchase Order (or Field Order)
Supply User Manual ENG -> 4. Procurement -> 4.10 LU-SU3401: Procurement Advanced Features -> E. How to replace a kit with its components on a Purchase Order (or Field Order)
E. How to replace a kit with its components on a Purchase Order (or Field Order)
In some cases, it may be necessary to explode a kit into its components on a PO or an FO. One example of when this would be necessary is if an order is placed to an ESC, and, instead of confirming the kit, ESC confirms they have certain products or modules.
Therefore, after the PO has been validated, but before confirmation, the kit product should be exchanged for the relevant items which the ESC has confirmed they can provide.
For Field Orders, the process is the same, except that the process of replacing the kit with components should be done when the FO is in draft status, before it is validated.
Remember, a Theoretical Kit Composition List in status “completed“, is needed to be able to replace the Kit with its components on the PO or FO.
Go to: Purchases / Purchase Orders (or Orders / Orders / Field Orders)
- Search for and open the relevant (draft or validated) PO or (draft) FO.
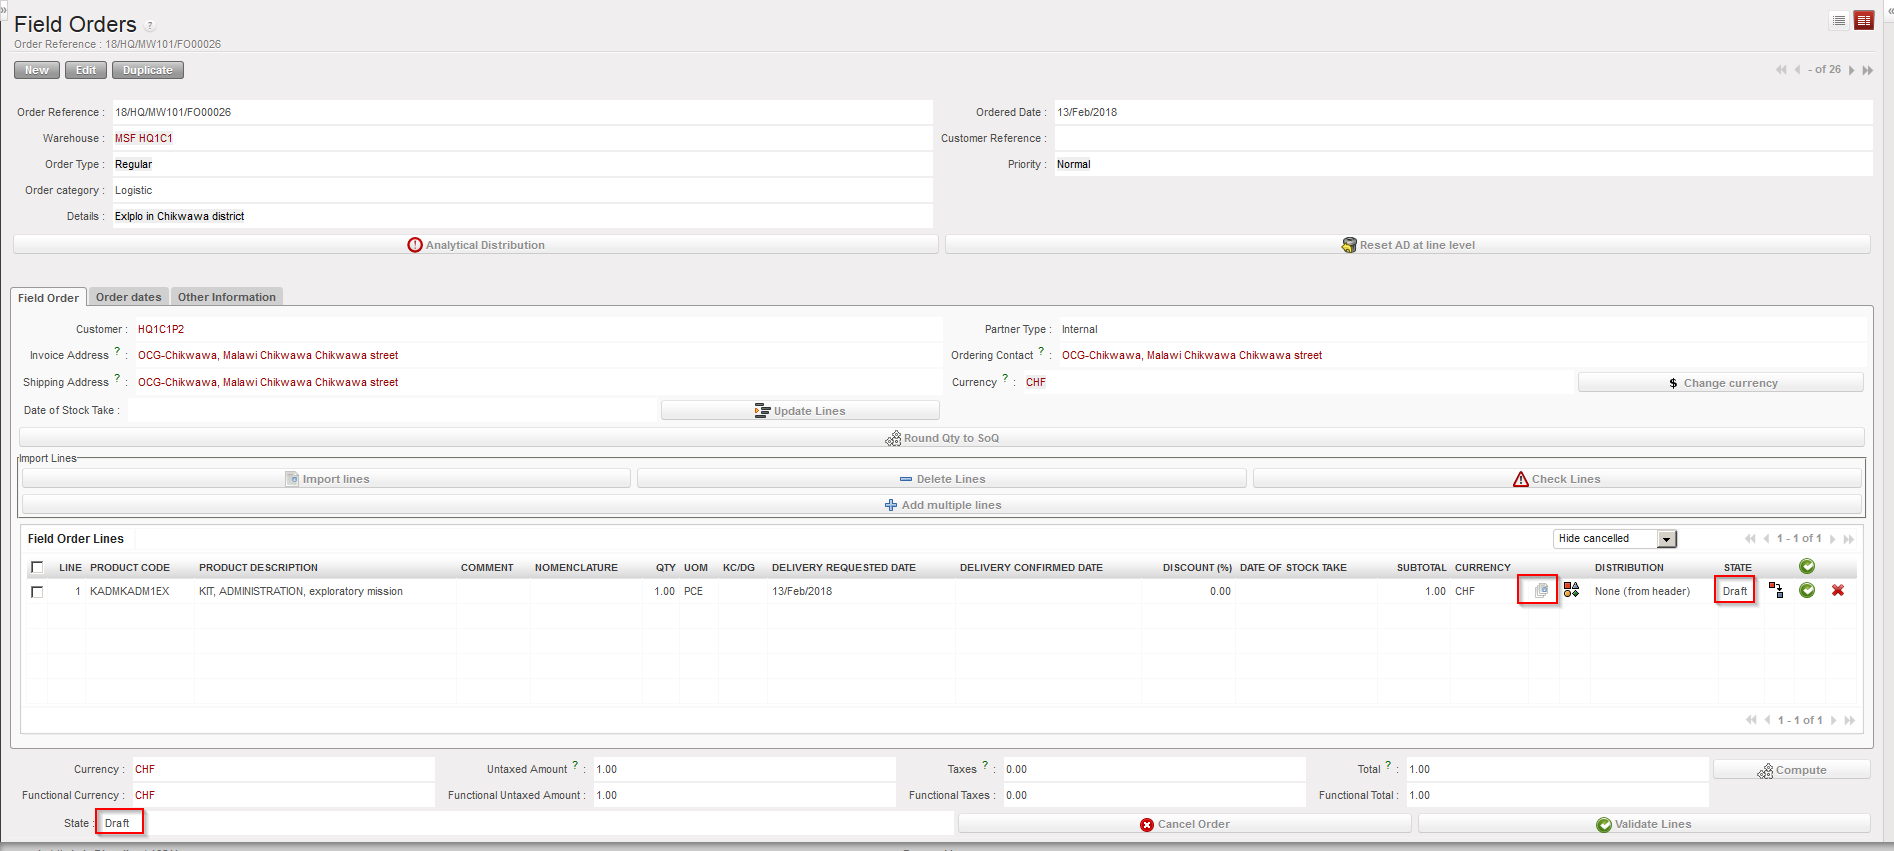
- Identify amongst the product lines, where is the kit which you wish to replace, and click on the
“Replace with kit components” icon:
 |
| Replacing a kit with its components on an FO |
- The “Replacement Items Selection” screen appears. Select a theoretical kit (and version) which will be used as template for the replacement (alternatively you may also enter the replacement items one by one via the “New” button).
- Click on the “Import Items from Theoretical Kit” button, and the components of the selected kit/version will appear as replacement items. Check all the details are correct and modify if necessary.
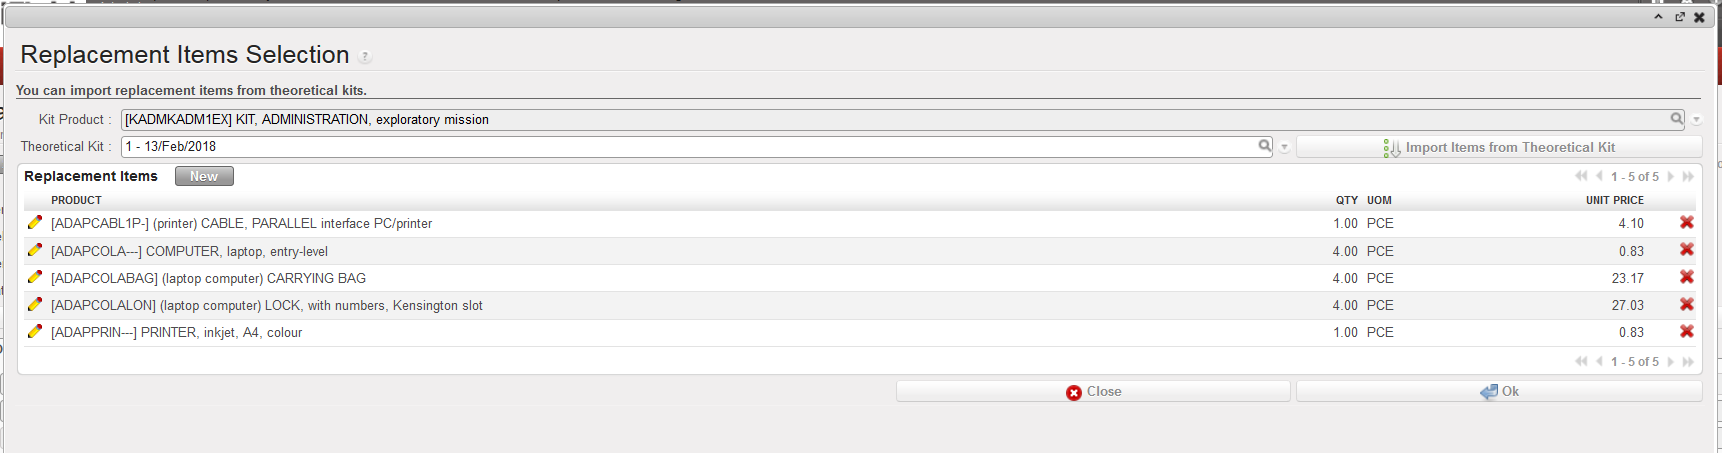 |
| Replacement Items Selection screen |
3. Click on “OK“.
4. The kit has been replaced by its components.
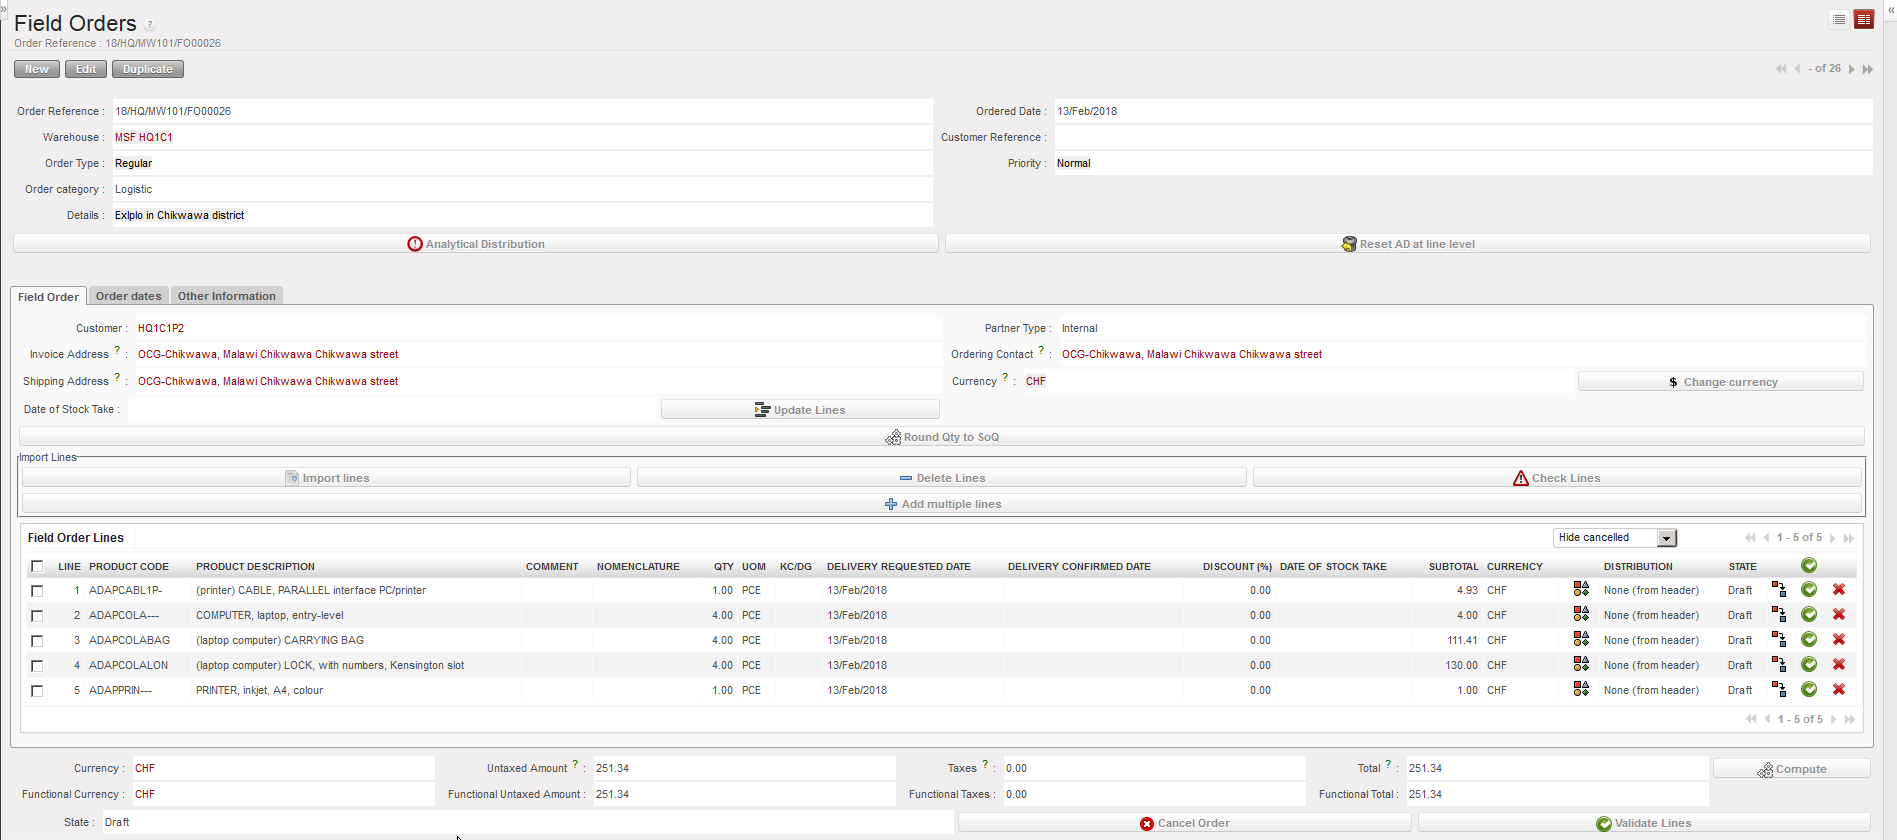 |
| Kit replaced with its components on an FO |