D. How to update the Scheduler Range Days

Supply User Manual ENG -> 4. Procurement -> 4.10 LU-SU3401: Procurement Advanced Features -> D. How to update the Scheduler Range Days

D. How to update the Scheduler Range Days

The planning horizon for which procurement documents will be generated is set to 180 days by default. This means that if the requested delivery date (RDD) on your IR or FO is more than 180 days in the future, the relevant document (e.g. PO or Tender) will not be created until the RDD falls within the planning horizon. If you decide that you would like the planning horizon to be extended so that the scheduler will generate procurement documents even for items requested more than 180 days in advance, you will need to increase the Scheduler Range Days for your instance. Please check with your OC guidelines.

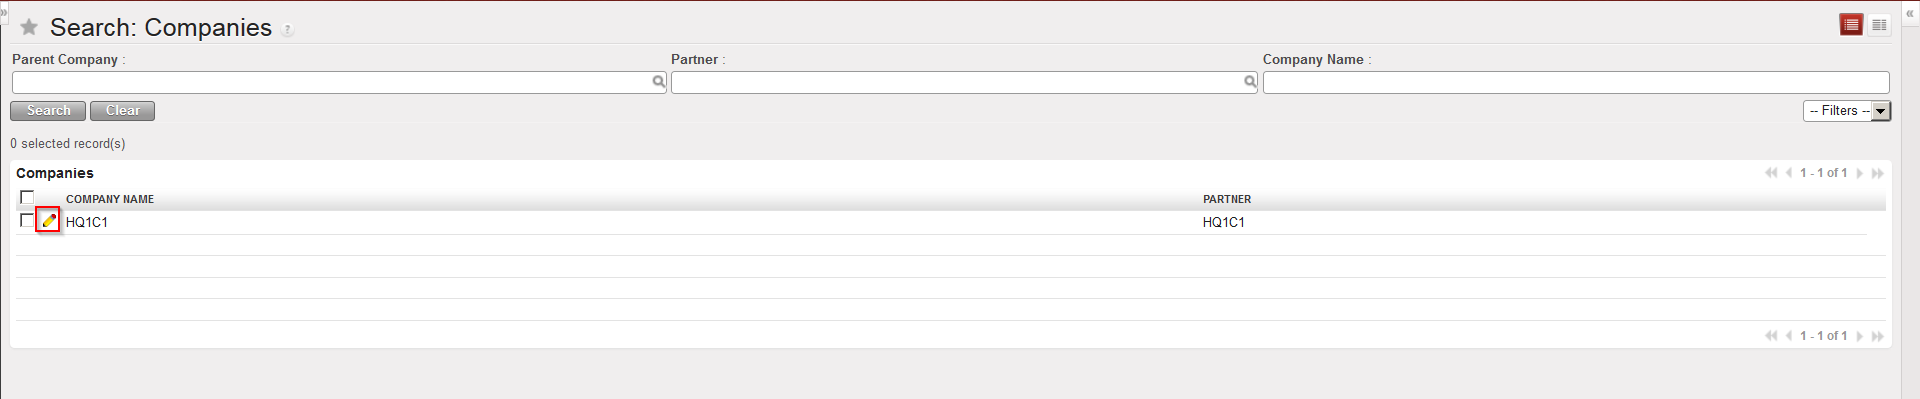
Go to: Administration / Sociétés / Sociétés

Companies configuration
  1. You should see the name of your instance database. Click on the pencil icon next to it to open it in edit mode.
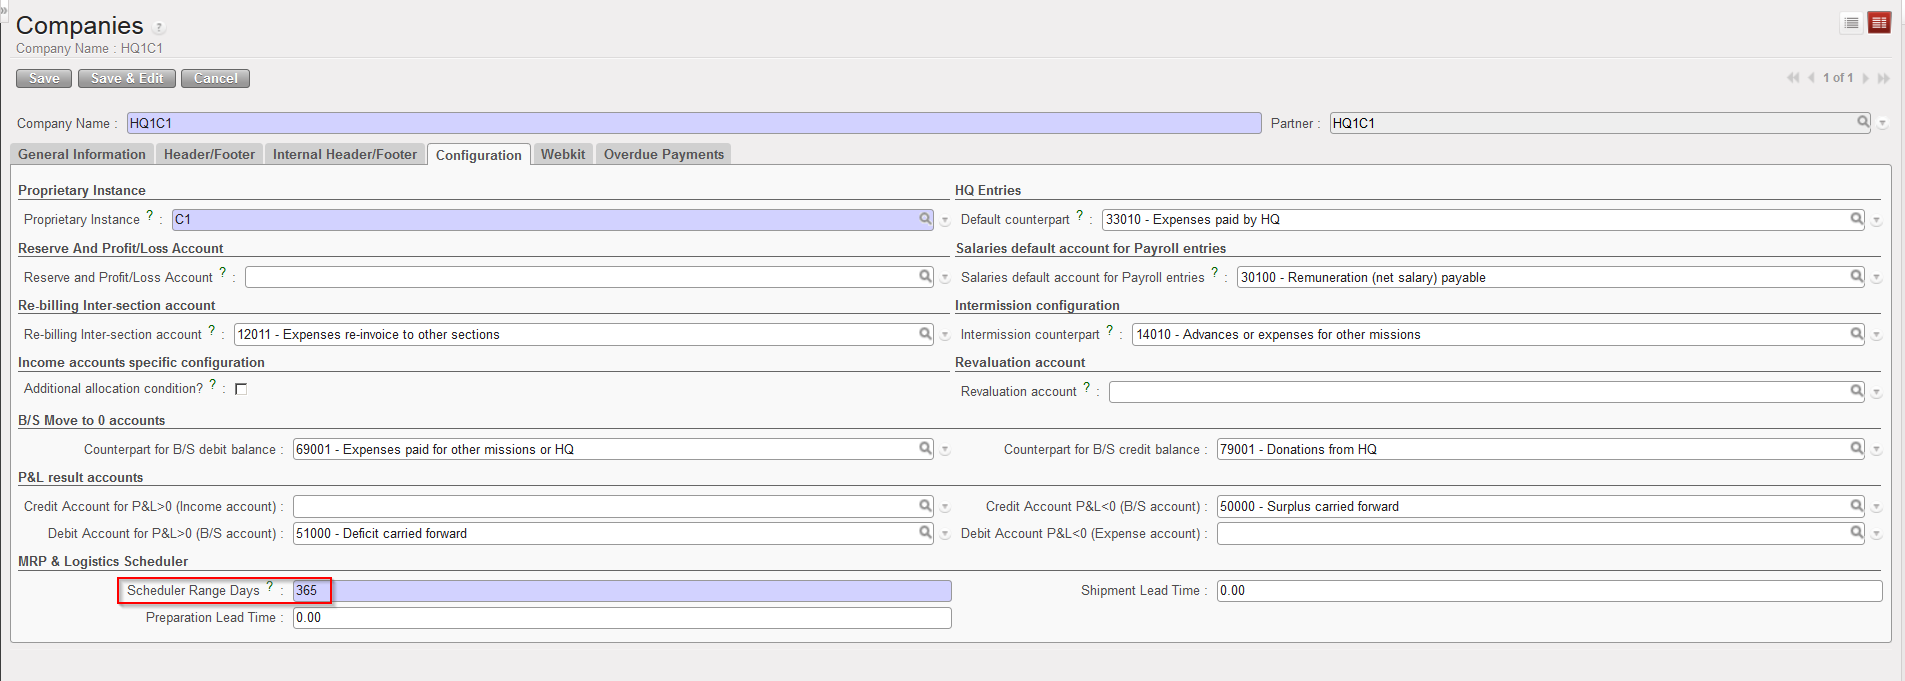
  2. Click on the “Configuration” tab and in the “Scheduler Range Days” field, change the number of days to the one you have decided on.
  3. Click on the Save button to save your changes.
Company configuration

Of course the planning horizon of the scheduler can also be reduced by reducing this number.

C. How to configure the PO creation (Batch Configuration)

Supply User Manual ENG -> 4. Procurement -> 4.10 LU-SU3401: Procurement Advanced Features -> C. How to configure the PO creation (Batch Configuration)

C. How to configure the PO creation (Batch Configuration)

By default, on every UniField instance, when requests (IR/FO) are sourced on order, POs will be directly created by the OST. This is because the “Auto POs creation” runs automatically as soon as a request is sourced on order.

Go to: Supply Configuration / Orders / PO Automation

PO automation in Supply Configuration

The “Run scheduler automatically” is set to “Yes“, meaning POs will be created as soon as a request (order or line order) is sourced on order.

If this setting is set to “No“, POs won’t be created automatically as soon as the requests are sourced but the user will have to launch the “Auto POs creation” manually to trigger the creation of the POs (from the action menu in the OST). There is also the possibility to configure a batch so that the “Auto POs creation” will run automatically every X days or hours.

This feature is actually quite technical, but it is good for advanced users to know its existence. It will also be more relevant for “Replenishment rules” (see LU-SU4205 Replenishment rules) since POs created from replenishment rules will follow the same principle.

It can be good that the purchaser is at least aware of this tool and the frequency established, so that he/she knows when to expect new Draft POs.

Go to: Warehouse / PO Creation / POs Creation (Batch Configuration)

  1. Click on the “New” button to configure a new batch for the POs creation.
  2. Give a name to this batch.
  3. Select the “Type“:
  • POs creation Batch (replenishment rules).
  • PO creation Batch (from orders).

4. Set the “Interval Number” and “Interval Unit“. If you want that the system creates draft POs once per month, set the “Interval Number” as “1” and the “Interval Unit” as “Month”. However, it is recommended to set the frequency to at least once per day for the “from orders” option and at least once per week for the “replenishment rules” option.

5. Ensure that the Active checkbox is ticked.

6. Click on Save to save the setting.

PO creation Batch (from orders)

B. How to launch a manual synchronization

Supply User Manual ENG -> 4. Procurement -> 4.10 LU-SU3401: Procurement Advanced Features -> B. How to launch a manual synchronization

B. How to launch a manual synchronization

As mentioned in the General chapter, the synchronization process enables to exchange automatically information between instances. For example, a validated PO at project level can be sent automatically to the coordination (and trigger the creation of an FO) via the synchronization process.

Most of the time, the synchronization will be set to an automatic parametrization and will run once or twice a day. However, there might be times when the request needs to be treated as soon as possible. In order to accelerate the process and not wait for the automatic synchronization, a manual synchronization can be launched.

The steps to perform this manual synchronization are described below and the synchronization should be done in both instances to get the full result (starting with the requesting instance and followed by the supplier instance).

Be aware that not everyone will have access to this manual synchronization. It is subject to user rights allocation.

Go to: Synchronization / Synchronization / Manual

Launch a manual synchronization
  1. Click on “Start All Synchronization in Background“.
  2. Then, click on “Monitoring” and “Synchronization Processes Monitoring“. This allows you to watch the progress of the synchronization. Once all the lines show “OK“, the synchronization process is finished (if you need to refresh the screen, click on “Clear” – an automatic refresh is also done regularly).
Follow the synchronization process

Note that you can still work on an instance while this instance is synchronizing. That is to say that you don’t need to wait for all the lines to be “OK” to work on the instance (the process will run in the background).

To see which documents have been created and modified due to the synchronization, you may use the “PO/FO/ Shipments Log“. Please see the configuration module for more details on this.

A. LU Introduction (LU-SU3401)

Supply User Manual ENG -> 4. Procurement -> 4.10 LU-SU3401: Procurement Advanced Features -> A. LU Introduction (LU-SU3401)

A. LU Introduction (LU-SU3401)

Procurement being a core function of the supply activities, the previous Learning Units cover all the major functionalities that are regularly needed to manage the daily procurement activities.

However, be aware that all features have not been described yet. UniField offers many other features that can be used for exceptional circumstances or which can help you customize the specific needs of your mission. Some of them are described below.

This last Learning Unit of the Procurement chapter is a melting pot of some advanced functionalities that will probably not be needed on a daily basis but that might prove very useful for particular situations or help understand some technical concepts of the system.

4.10 ADVANCED FEATURES: PROCUREMENT ADVANCED FEATURES.

Supply User Manual ENG -> 4. Procurement -> 4.10 LU-SU3401: Procurement Advanced Features.

LU-SU3401: Procurement Advanced Features.

A. LU Introduction

B. How to launch a manual synchronization

C. How to configure the PO creation (Batch Configuration)

D. How to update the Scheduler Range Days

E. How to replace a kit with its components on a Purchase Order (or Field Order)

F. How to close a document / transaction and cancel its associated documents

G. How to open a Claim to Supplier vs a Claim from Customer

H. How to source one order (IR or FO) on several POs for the same ESC (and same RDD)

I. How to round the ordered quantity to the standard ordering quantity (SoQ)

J. How to configure a PO customized default text

J. How to view the Supplier Performance Report

Supply User Manual ENG -> 4. Procurement -> 4.9 LU-SU3301: Procurement Reporting -> J. How to view the Supplier Performance Report

J. How to view the Supplier Performance Report

A new report named “Supplier performance” (Purchase > Reporting) has been created in order to give users the opportunity to track supplier’s commitments regarding mainly prices and dates. This report presents different basic indicators calculated for Closed/Cancelled POS ( discrepancy between confirmed and invoiced price or between physical delivery and confirmed delivery date…) that enables to evaluate the performance of a specific supplier. Filters have to be added on Dates (base on reception dates) and optional filters enables to narrow down by Supplier type, PO type or to a specific supplier.

Go to: Purchases / Reporting / Supplier Performance

  1. Select a filter to narrow down the need: From (mandatory), To (mandatory); Specific supplier; Supplier type; PO type
  2. Click on “Excel report
Supplier Performance report


I. How to view the Loan Report

Supply User Manual ENG -> 4. Procurement -> 4.9 LU-SU3301: Procurement Reporting -> I. How to view the Loan Report

I. How to view the Loan Report

In order to easily track Loans a report has been developed, this report shows docs and lines with stock movements, if there is no stock movement, no line record in the report.

Go to: Order / Reporting / Loan report

  1. Select a filter to narrow down the need: Start Date, End Date; Partner; Partner Type; Product ref; Product Main Type and Origin
  2. Optional: check the “Only unfinished loans” in case you need to see only outstanding loans (Delivered goods which are pending returns / received goods which have pending deliveries).If you leave it as default “unticked” you will see all loans those opened, closed or cancelled in the report.
  3. Optional: check the “Display BN/ED details” box. This option will add 3 additional columns to the report: 1 for BN, 1 for ED and 1 for the line Status (since partially non sent/received line will be displayed in this case)
  4. Click on “Excel report
Loan report
This image has an empty alt attribute; its file name is loan-report-1024x48.png

H. How to view the Donation Report

Supply User Manual ENG -> 4. Procurement -> 4.9 LU-SU3301: Procurement Reporting -> H. How to view the Donation Report

H. How to view the Donation Report

In order to easily track Donations the following report has been developed.

Go to: Order / Reporting / Donation report

  1. Select a filter to narrow down the need: Start Date, End Date; Partner; Partner Type; Product ref; Product main Type and Move ref.
  2. Optional: check the “Display BN/ED details” box. This option will add 3 additional columns to the report: 1 for BN, 1 for ED and 1 for the line Status (since partially non sent/received line will be displayed in this case)
  3. Click on “Excel report

Donation report


G. How to view Local Transport Cost Follow up

Supply User Manual ENG -> 4. Procurement -> 4.9 LU-SU3301: Procurement Reporting -> G. How to view Local Transport Cost Follow up

G. How to view Local Transport Cost Follow up

For national purchases, there is no possibility to add the transport cost on the PO. For these POs, you should encode transport costs on specific “Transport” POs and use products with type “Service with Reception” flagged as transport products.

Note that transport (services) purchases may be encoded through this category of POs for local and international purchases if preferred.

The system will give an overview of these transport costs in the “Local Transports Costs” report.

Products with type “Service with Reception” flagged as transport product
Transport PO

Go to: Purchases / Reporting / Transport Costs

  1. Click on “Local Transport Costs” under the “Transport costs” sub option.
  2. The system displays a report with information include in “Transports” PO.
  3. To view details of each line, click on the “Expand All“.
Local transport costs report

F. How to view International Transport Cost Follow up

Supply User Manual ENG -> 4. Procurement -> 4.9 LU-SU3301: Procurement Reporting -> F. How to view International Transport Cost Follow up

F. How to view International Transport Cost Follow up

A transport cost may be added on a PO if it is an international PO (International Purchase Orders).

A PO is considered as international if its supplier “Zone” is “International“. In this case an additional field appears on the PO and allows recording the transport cost.

International PO including transport costs

Go to: Purchases / Reporting / Transport Costs

  1. Click on “International Transport Costs” under the “Transport costs” sub option in the left hand menu. The system will display an overview of all transport costs associated with Purchase Orders sent to International Suppliers.
  2. To see more details, click on the Expand All button.
International Transport Costs