E. How to check Supplier Payment

Supply User Manual ENG -> 4. Procurement -> 4.9 LU-SU3301: Procurement Reporting -> E. How to check Supplier Payment

E. How to check Supplier Payment

It may be useful to be able to check if a supplier has been paid, and it is possible to check this from the supply business applications.

Go to: Partners / Suppliers / Suppliers

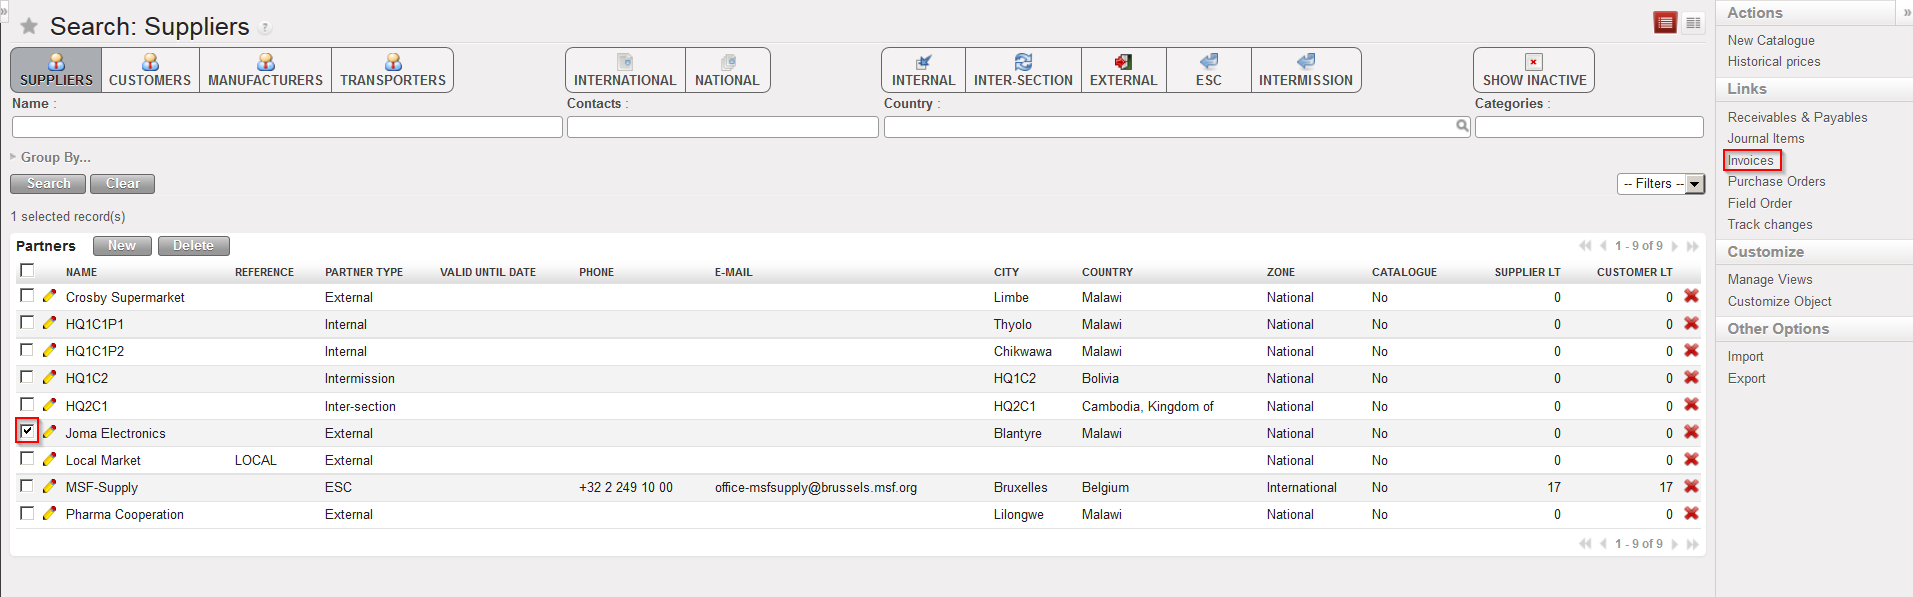
Supplier selection to view related invoices
  1. Enter the relevant criteria to find the Supplier you want to check, using the search buttons and fields and then click on “Search“.
  2. In the search results displayed, tick the check box of the supplier for which you wish to check the payment status. Do not select more than one supplier.
  3. In the action menu on the right hand side, click on the “Invoices” option in the “Links” section.
View of invoices linked to supplier

4. The system will display in the header/search information, the supplier which you selected and in the list section, all invoices related to this supplier, with the date of the document, posting date, purchase invoice number, supplier “customer“, source document, currency, residual amount, total amount and state. Invoices can be either created during the reception process (by the system) either manually by Finance. In this case, the source document field will be empty.

5. Invoices can be “Draft” (validation pending), “Open” (payment pending) or “Paid” (payment done). If a partial payment was done, a residual amount will be displayed.

If you have questions on this functionality, it is best to check with Finance.

D. How to use the Purchase Order Follow Up

Supply User Manual ENG -> 4. Procurement -> 4.9 LU-SU3301: Procurement Reporting -> D. How to use the Purchase Order Follow Up

D. How to use the Purchase Order Follow Up

Another report allows the follow-up of POs. The result can be provided in Excel or PDF.

Go to: Purchases / Reporting / Export PO Follow-Up

This image has an empty alt attribute; its file name is po-follow-up-1024x396.png

This image has an empty alt attribute; its file name is po-follow-up-1024x257.png

Export PO Follow Up
  1. Complete the fields according to the information that you want to fetch. The most relevant is to complete the “Supplier” or the “Order Reference” fields. You can select one, several or no of the following fields  “Order status, Order categories, Order statuses” (for this last default case, all statuses will be displayed). You can also check the “Pending order lines only” box that will display the products in back order
  2. Click on “Excel report” or “PDF report” depending on the format you need.

This image has an empty alt attribute; its file name is po-export-report-1024x246.png

Export PO Follow Up – Excel Export

The Excel Export gives 1 Excel sheet with all lines of the selected POs and their detailed situation.

 
This image has an empty alt attribute; its file name is po-pdf-1024x308.png
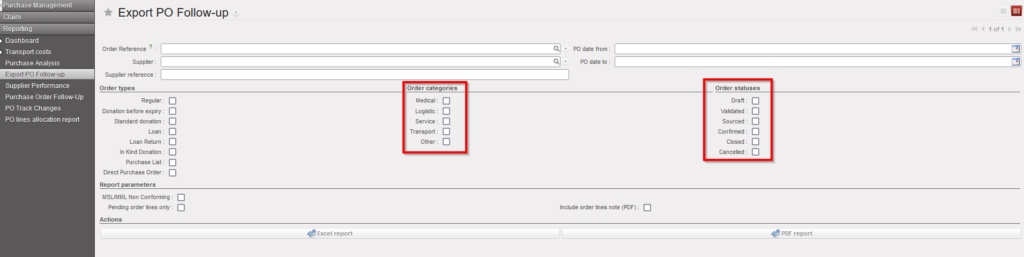
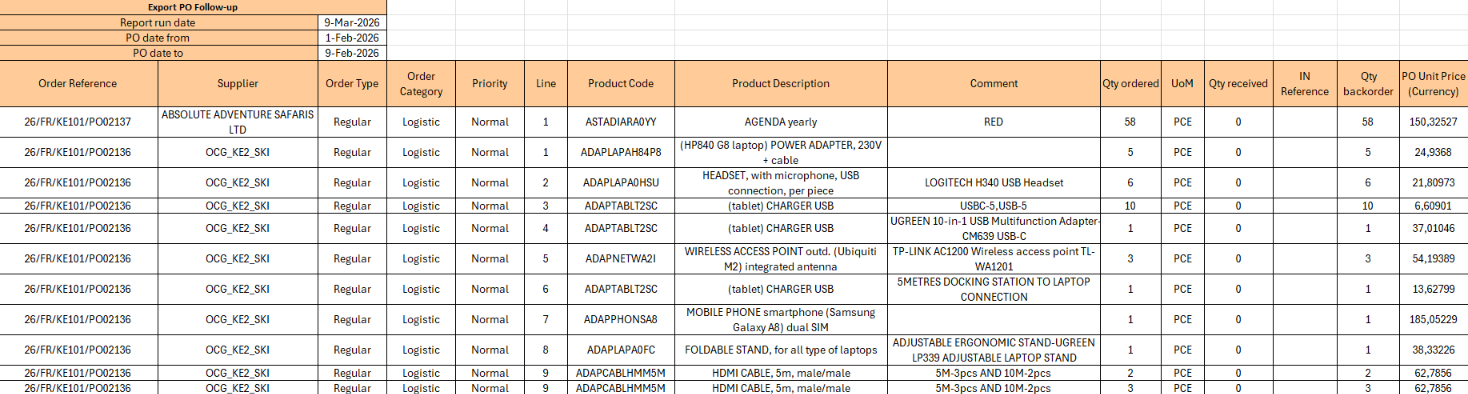
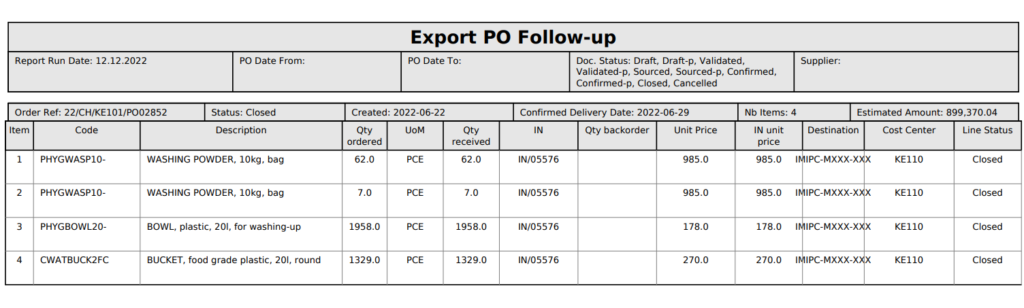
Export PO Follow Up –PDF Export

The PDF Export gives 1 PDF file with 1 PO per page including detailed situation of each PO line.

C. How to use the Purchase Analysis

Supply User Manual ENG -> 4. Procurement -> 4.9 LU-SU3301: Procurement Reporting -> C. How to use the Purchase Analysis

C. How to use the Purchase Analysis

The Purchase Analysis helps to analyze purchases. You can use the report to display and analyze procurement data according to different filters. This information could be useful in managing suppliers by providing information on amounts being spent per supplier, delivery times,….

It could also be useful in providing information on internal elements such as lead times for validation, who is responsible, cost centers,…

Go to: Purchase / Reporting / Purchase analysis

Purchase Analysis
  1. By default, POs created during the current month appear on the screen and are grouped by supplier(1) and product(2). If you want to see the detail per product, click on the “Expand All” button.
  2. Use the buttons if you want to change selection criteria and/or how the data are grouped by (e.g.show all POs created this year and organized them by category(1), order type(2) and supplier(3), see screen below).
Purchase Analysis

The system displays an overview of the selected information and organized it as requested. In the example above the first column displayed is “Order category” and below this (hidden), “Order type” and “Supplier” will follow. The data for these is not currently displayed in this view (but will be if you click on the button “Expand All“). Besides the “grouped by” columns, additional columns will show data: #. of lines, Subtotal, Currency, Days to validate and Days to deliver.

Note that you can also use this tool for a specific Product or a specific Supplier by using the relevant search filters (on top right of the screen).

B. How to use the Field Order Analysis

Supply User Manual ENG -> 4. Procurement -> 4.9 LU-SU3301: Procurement Reporting -> B. How to use the Field Order Analysis

B. How to use the Field Order Analysis

UniField offers a useful tool to analyze Field Orders. You can use this to display and analyze requests for supplies from partners according to different filters.

Field Orders have to be followed-up on a regular basis to ensure that all field requests are answered to within the requested time limits, and to avoid having any pending or “forgotten” requests.

The “Field Manager Dashboard” (first screen your reach if you click on ORDERS in the UF menu bar) and the “Search: Filed Orders” screen (which you reach through Orders/Field Orders) are already offering some information about FOs : state, picking percentage, responsible, customer, customer reference,…

This image has an empty alt attribute; its file name is FO-PICK-Percentage-English-1024x233.png
FO information – Picking Percentage

The “Field Order Analysis” gives additional information.

Go to: Orders / Reporting / Field Order Analysis

Field Order Analysis
  1. By default, FOs created during the current month appear on the screen and are grouped by responsible (user who created the FO). Note that all FOs created by synchronization have user “Synch” as response be.
  2. You may change these default filters and show more (or less) FOs and grouped them according to other criteria (e.g. Show all FOs created this year and group them by order category (1) and customer (2) as show in the screen below).
  3. The details can be viewed by clicking on the “Expand All” button.
Field Order Analysis

Note that the order in which you select the “Group by” buttons directly impacts on the results displayed. For example, if you want to see Field Orders grouped by Partner then by Category, you should click the buttons in this order: Partner, Category.

4.9 REPORTING: PROCUREMENT REPORTING

Supply User Manual ENG -> 4. Procurement -> 4.9 LU-SU3301: Procurement Reporting

LU-SU3301: Procurement Reporting

A. LU Introduction

B. How to use the Field Order Analysis

C. How to use the Purchase Analysis

D. how to use the Purchase Order Follow Up

E. How to check Supplier Payment

F. How to view International Transport Cost Follow up

G. How to view Local Transport Cost Follow up

H. How to view the Donation Report

I. How to view the Loan Report

J. How to view the Supplier Performance Report

N. How to export lines from a Request for Quotation

Supply User Manual ENG -> 4. Procurement -> 4.8 LU-SU3203: Tenders (CFTs) and Requests for Quotations (RFQs) -> N. How to export lines from a Request for Quotation

N. How to export lines from a Request for Quotation

Go to: Purchases/ Purchase Management /Request for Quotations

  1. Click on the check box of the appropriate Request for Quotation.
  2. The Action Menu is displayed.
  3. Click on the “Request For Quotation Excel Export” option in the action menu.
Exporting RFQ lines to Excel

4. Save the file on your computer.

Note that a PDF export of the RFQ is also available from the action menu. This PDF document does not show prices when in Draft/Sent status and can be submitted to the supplier to allow him to quote.

Export RFQ to PDF

M. How to import lines to a Request for Quotation

Supply User Manual ENG -> 4. Procurement -> 4.8 LU-SU3203: Tenders (CFTs) and Requests for Quotations (RFQs) -> M. How to import lines to a Request for Quotation

M. How to import lines to a Request for Quotation

If an RFQ is created from scratch, you may facilitate the creation of its line via file import.

Go to: Purchases / Purchase Management / Request for Quotations

  1. Click on the “New” button to create a new RFQ or select an existing RFQ on which you want to load additional lines.
  2. Complete the header of the RFQ (Order category, Details,…).
  3. Enter a supplier.
  4. Click on the “Import lines” button.
Importing RFQ lines from Excel

5. Click on the “add attachment” button then “Browse” and search in the computer for the xml file to  import.

The XML import file should have the exact following format:

Product Code; Product Description; Quantity; UoM; Price; Delivery Request Date; Currency; Comment; (and optionally Justification Code; Justification Coordination; HQ Remarks; Justification Y/N)

XML format to import lines on an RFQ

6. Click on the “Import file” button to import the file (and click “Update” if needed) A message will indicate if lines have been imported successfully.

7. Click on the “Close window” button.

8. The lines have been added on the RFQ.

9. Save the RFQ.

L. How to export lines from a Tender

Supply User Manual ENG -> 4. Procurement -> 4.8 LU-SU3203: Tenders (CFTs) and Requests for Quotations (RFQs) -> L. How to export lines from a Tender

L. How to export lines from a Tender

Go to: Purchases / Purchase Management / Tender

  1. Click on the check box in front of the Tender you want to export.
  2. The action menu is displayed.
  3. Click on the “Tender Excel Export” option.
  4. Save the file on your computer.
Exporting Tender lines to Excel

Note the option “Tender Excel Export” is also available from within the Tender.

K. How to import lines into a Tender.

Supply User Manual ENG -> 4. Procurement -> 4.8 LU-SU3203: Tenders (CFTs) and Requests for Quotations (RFQs) -> K. How to import lines into a Tender.

K. How to import lines into a Tender.

If a Tender is created from scratch, you may facilitate the creation of its line via file import

Go to: Purchases / Purchase Management / Tender

  1. Click on the “New” button to create a new Tender or select an existing Tender on which you want to load additional lines.
  2. Click on the “Import lines” button.
  3. Click on the “add attachment” button then “Browse” and search in the computer for the xml file to import.

The XML file should follow the exact following format:

Product Code; Product Description; Quantity; UoM; Price and Delivery Requested Date

XML format to import lines on a Tender

4. Click on the “Import file” button to import the file, then click “Update“. A message will indicate if              lines have been imported successfully.

5. Click on the “Close window” button.

6. The lines have been added on the Tender.

7. Save the Tender.