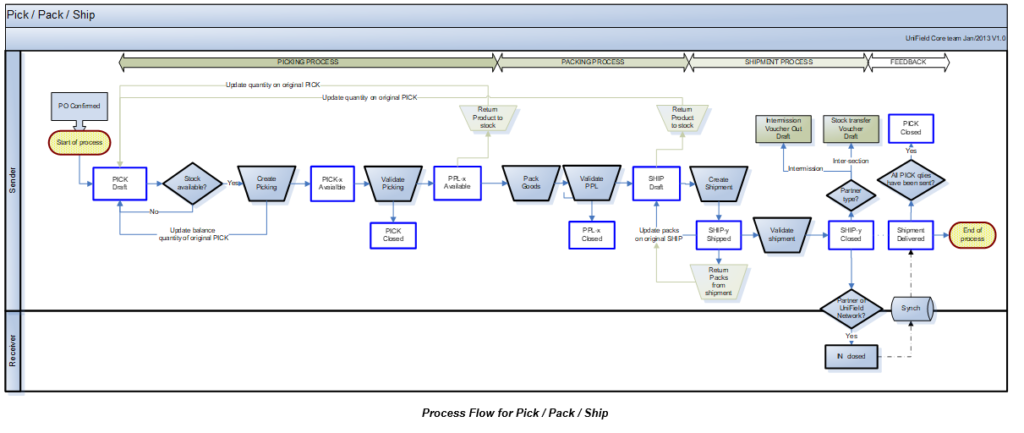
Supply User Manual ENG -> 5. Warehouse -> 5.3 LU-SU4102: Picking -> B. HOW TO PICK PRODUCTS FROM STOCK.
B. HOW TO PICK PRODUCTS FROM STOCK.
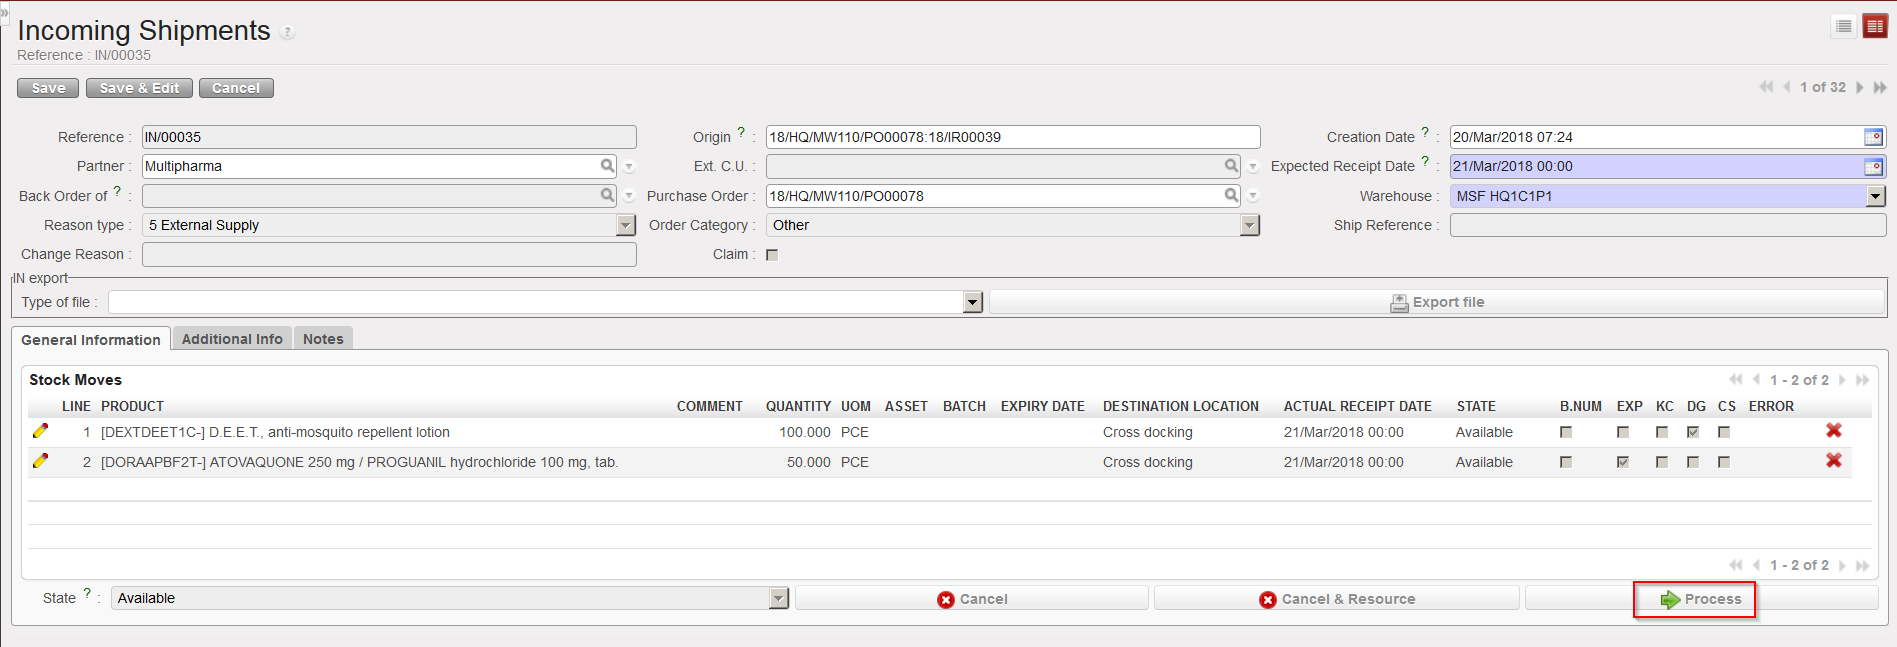
If an FO (or FO-line) is sourced from stock, the system creates a (main) Picking Ticket as by default the system considers that the full shipment process (and not the simple out) will be used to deliver the goods to the customer. This (main) Picking Ticket has the state “Draft“. If all products are available in stock, the (main) Picking Ticket is “Available” and all its lines are in the state “Available“.
If the PICK (or OUT) has been created from a “Regular” type FO, the “Reason type” will be “Deliver Partner”. A PICK (or OUT) will have the Reason type “Donation before Expiry” if it has been created from “Donation before Expiry” FO. A PICK (or OUT) will have Reason type “Standard Donation” if it has been created from “Standard Donation” FO, and a PICK (or OUT) will have the Reason Type “Loan” if it has been created from “Loan” FO.
If the picking has been created from a IR, (See below how to convert OUT to PICK), the “Reason type” will be “Deliver Unit”
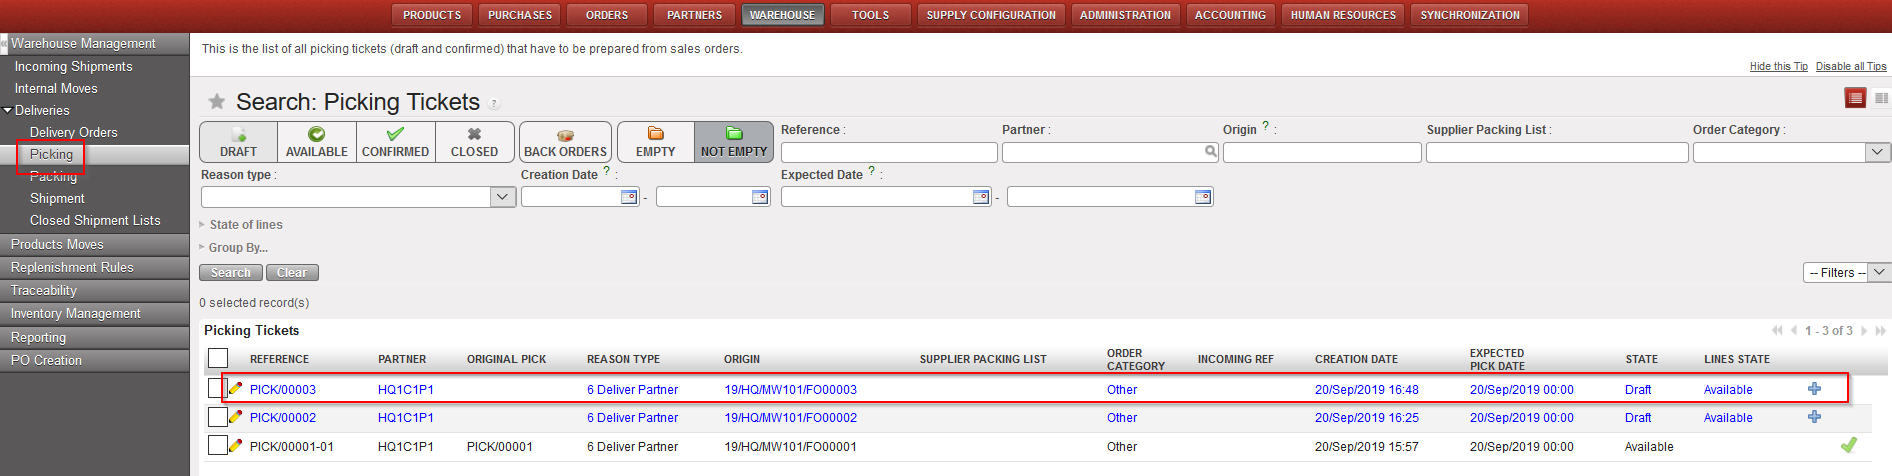
Go to: Warehouse / Warehouse Management / Deliveries / Picking
- Locate the relevant (main) Picking Ticket for the picking you are about to process. You may use the filters to help you. The “Origin” filter can be useful as it helps finding a Picking Ticket from the FO reference. The state of the (main) Picking Ticket should be “Draft“.
- Click on the line corresponding to the (main) Picking Ticket you want to process.
|
|
|
Selecting the main PICK created by the system
|
|
|
|
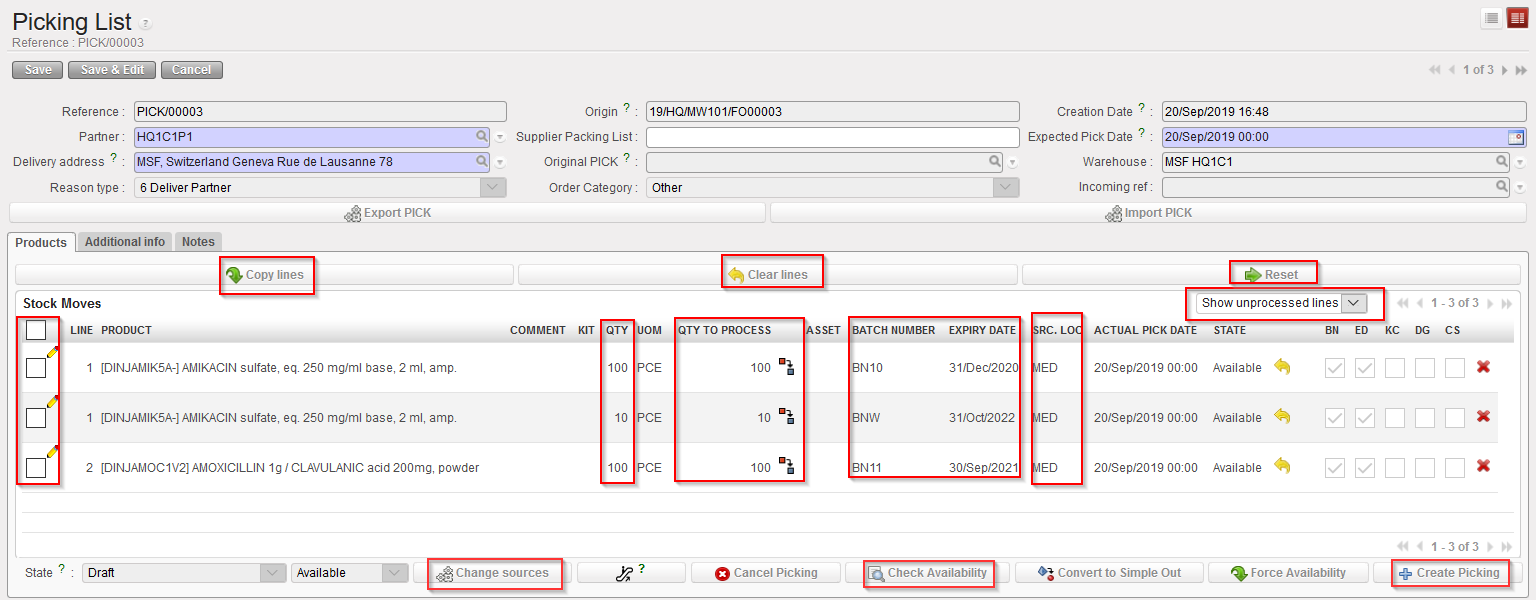
Main PICK created by the system
|
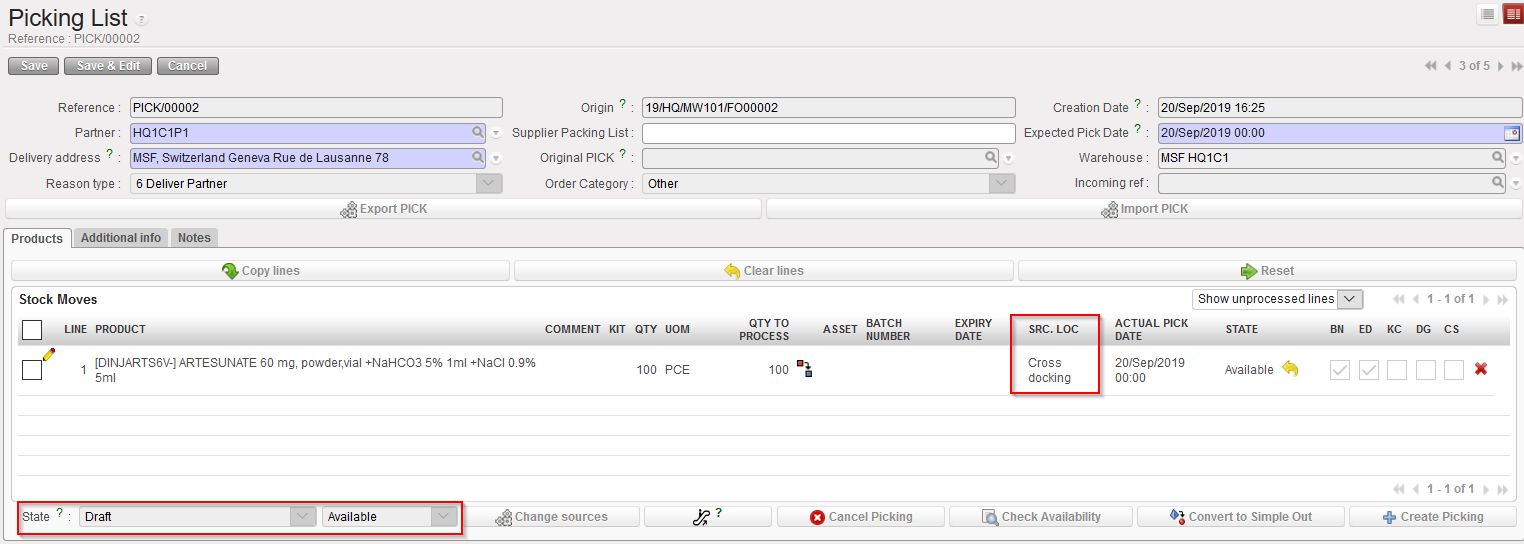
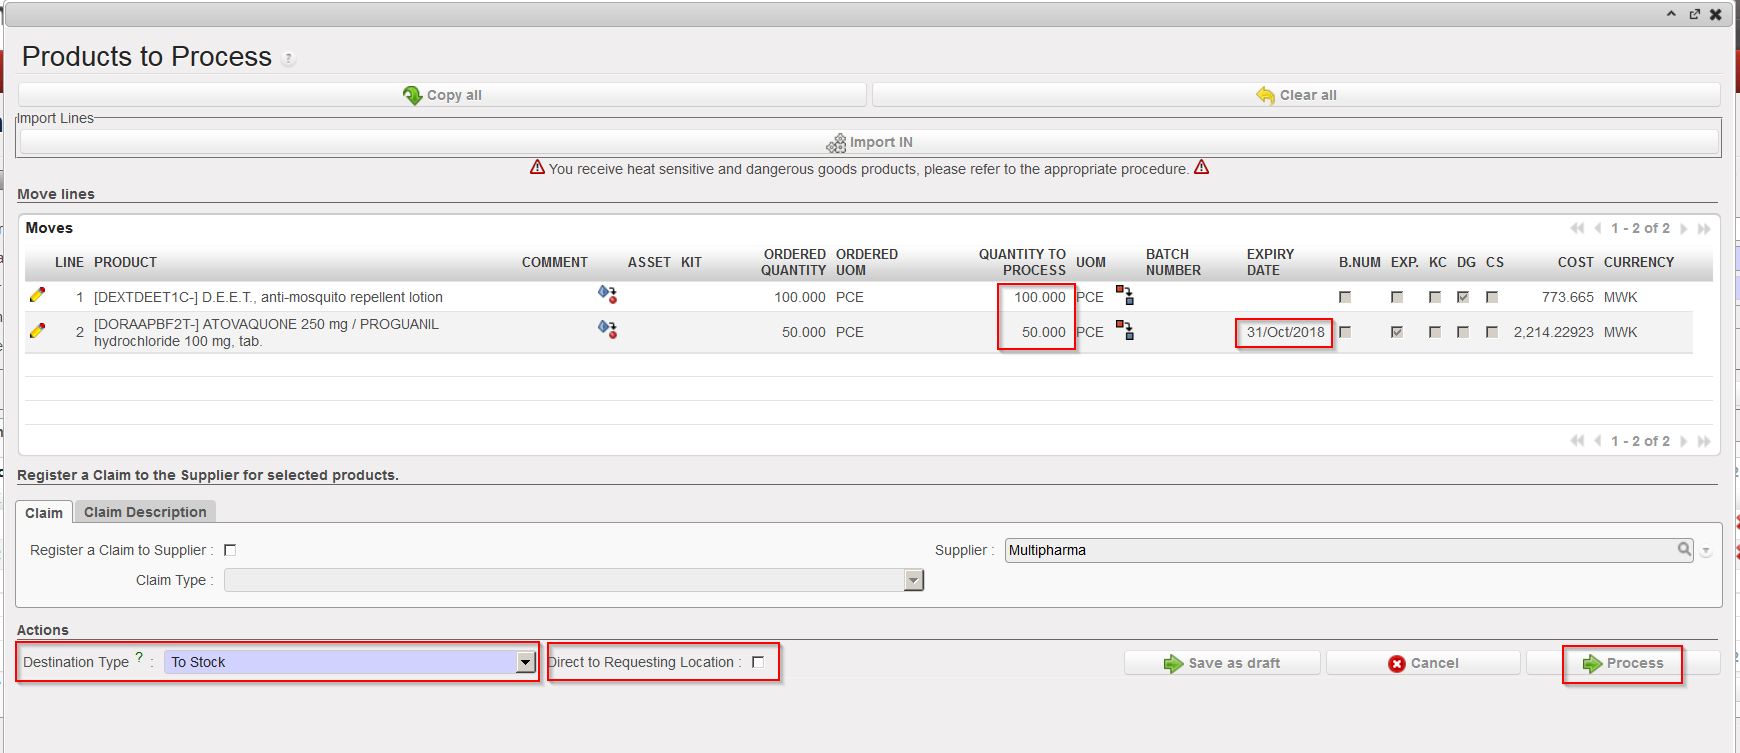
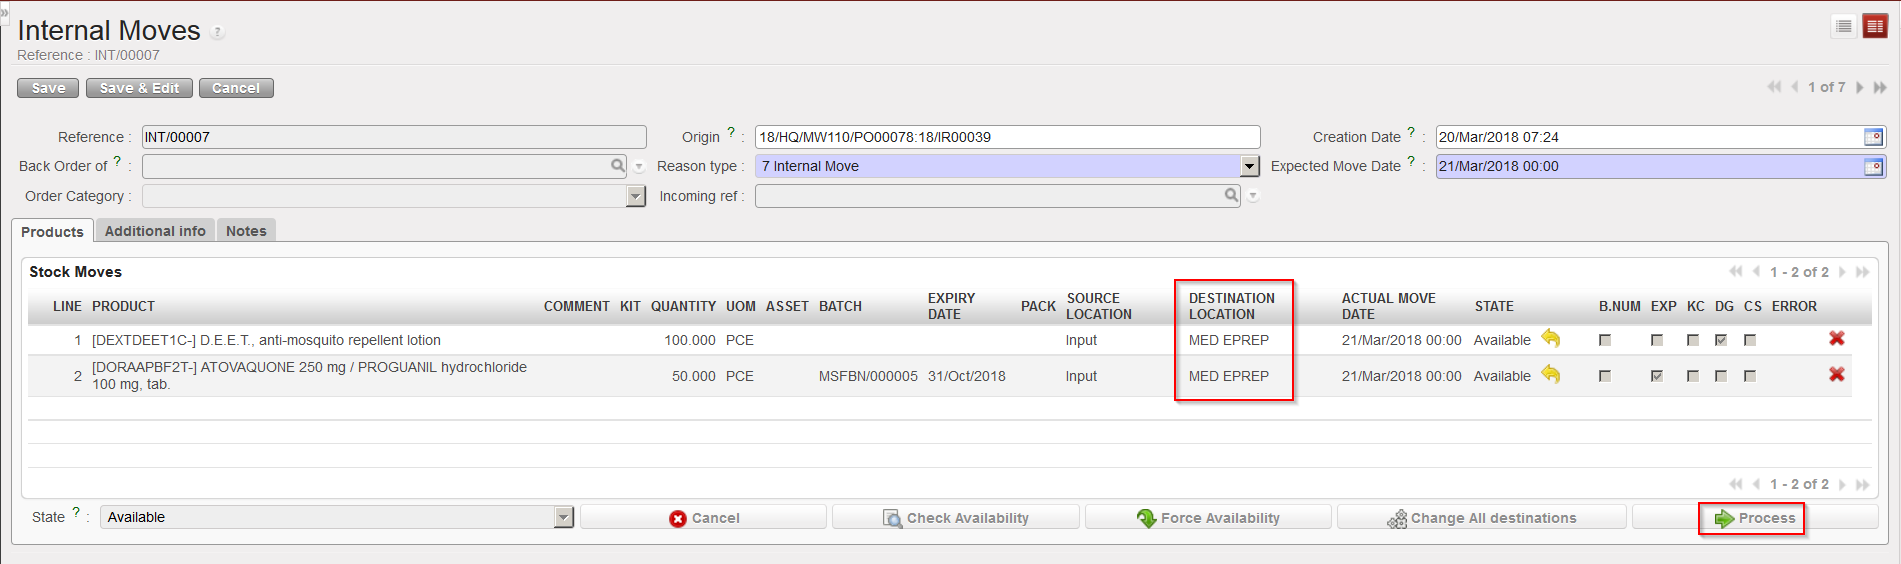
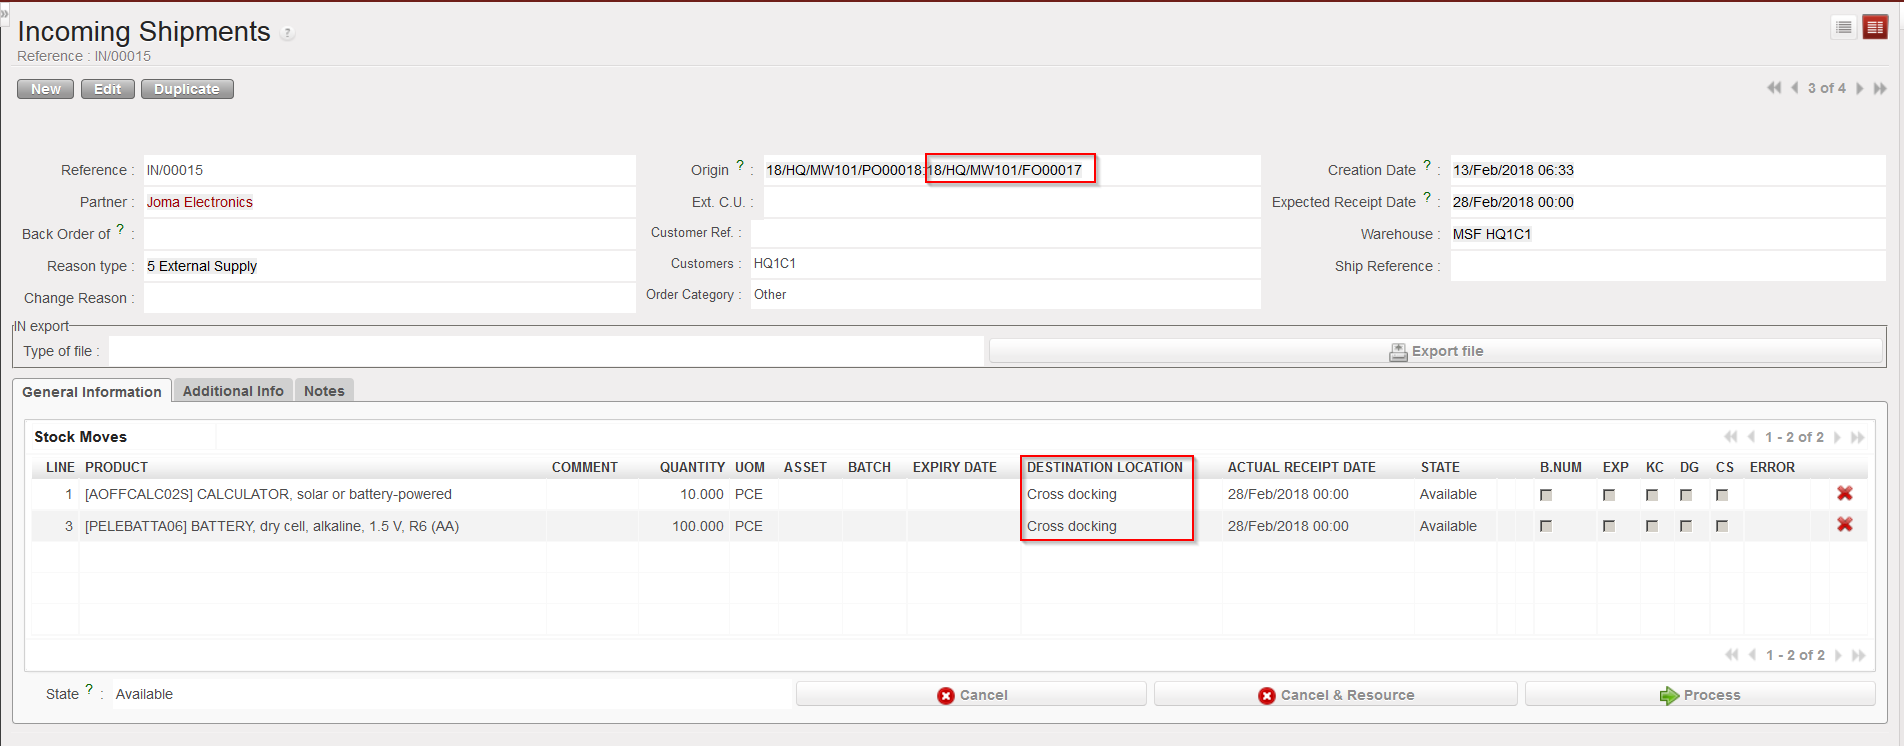
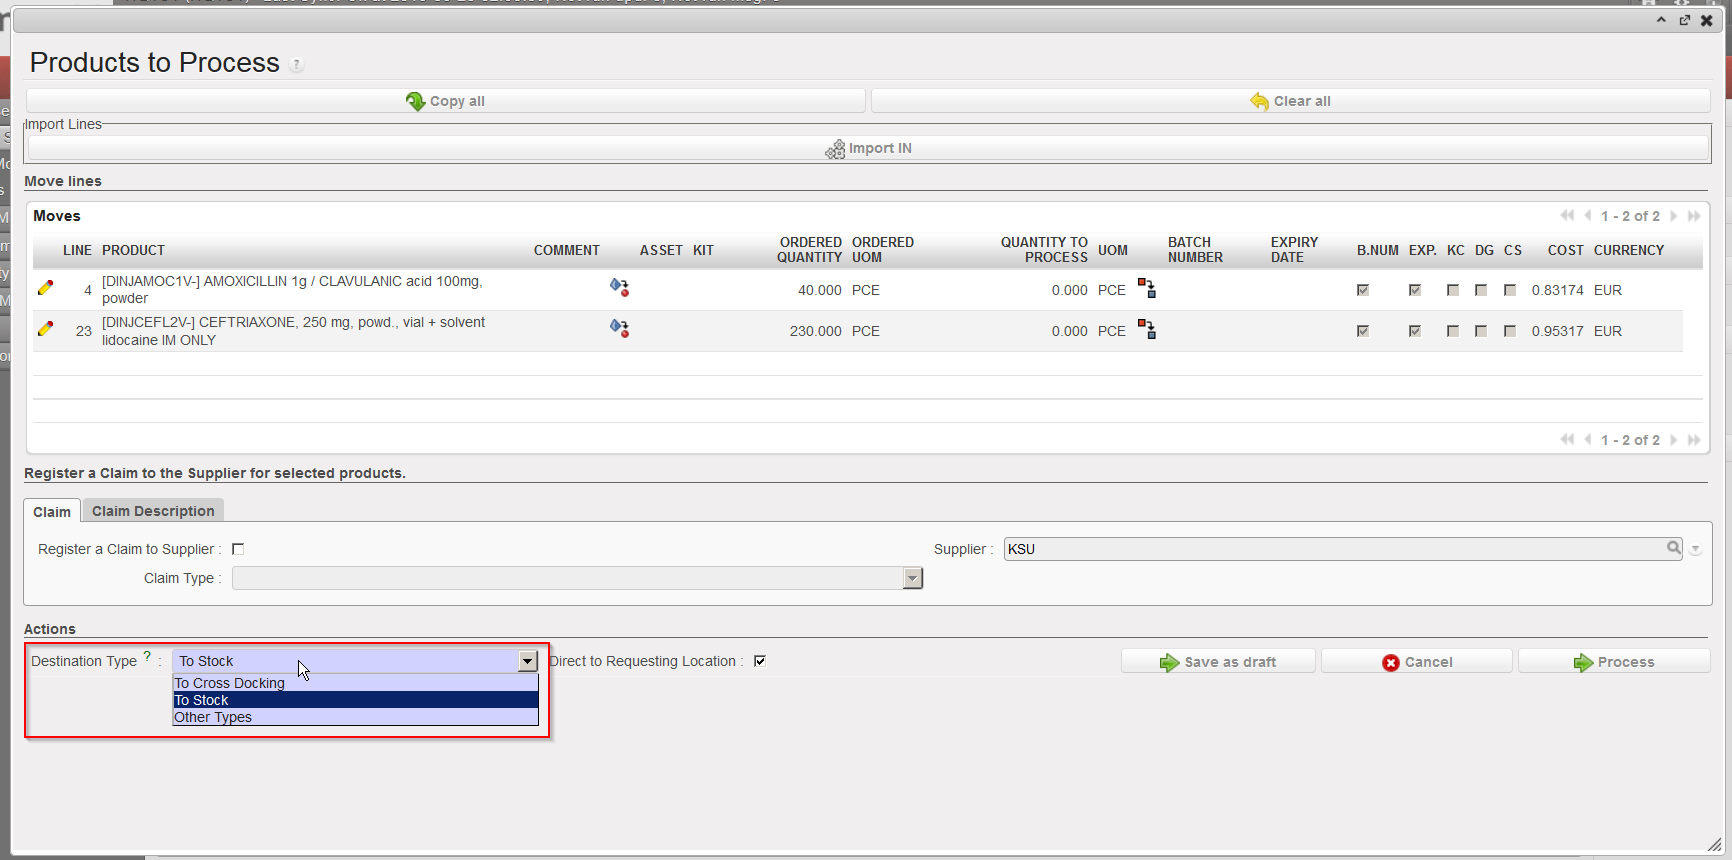
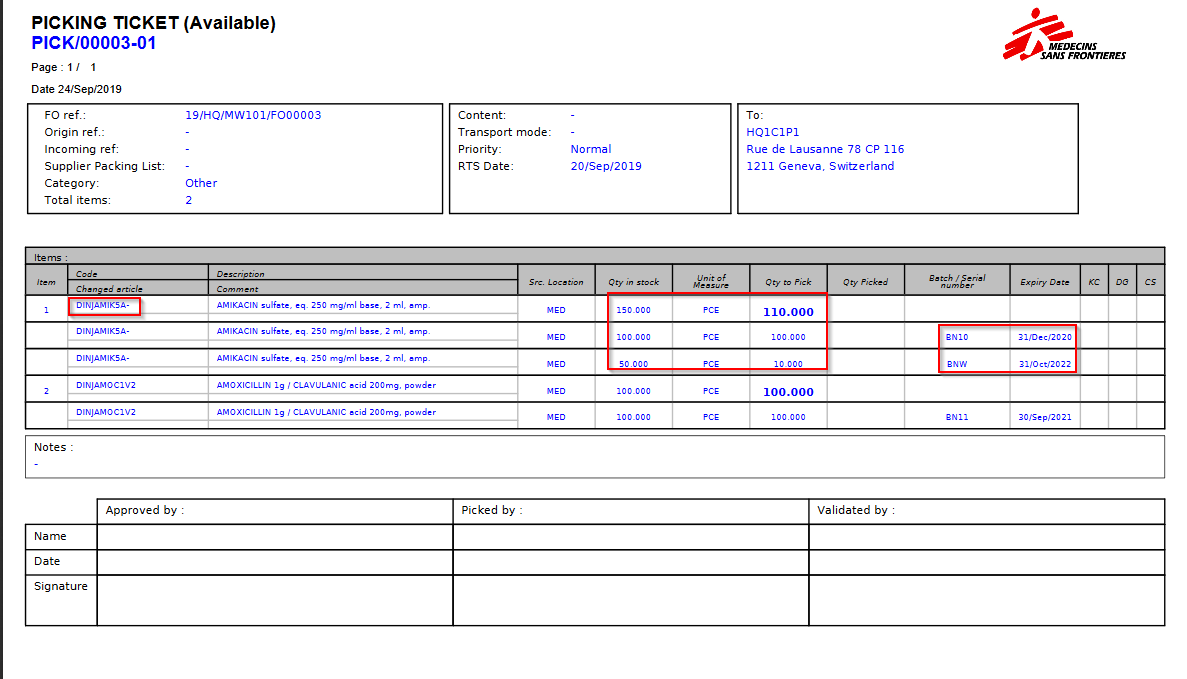
3. In the above example, note that the system selected a BN/ED to pick. This was done according to a FEFO logic. Note that the source location was set to “MED” according to the sourcing done (detail of the Destination location can be seen by opening the line – this destination is always Packing). Finally, note that the line has the state “Available“.
4. When lines are “Available” “QTY” = “QTY TO PROCESS” and BN/ED are automatically filled otherwise (i.e: not available) the QTY TO PROCESS = 0 and BN/ED are blank.
Edition of BN/ED can only be done on Not Available lines using the pencil icon  or the Notepad icon
  (note that this latest icon is only displayed for Not Available lines).
The Search Batch Number popup screen will by default display the Real /Available (depending on filter) batches with quantity > 0 for the selected location only.
However, edition of “QTY TO PROCESS” is possible for both states using the pencil icon  .
.
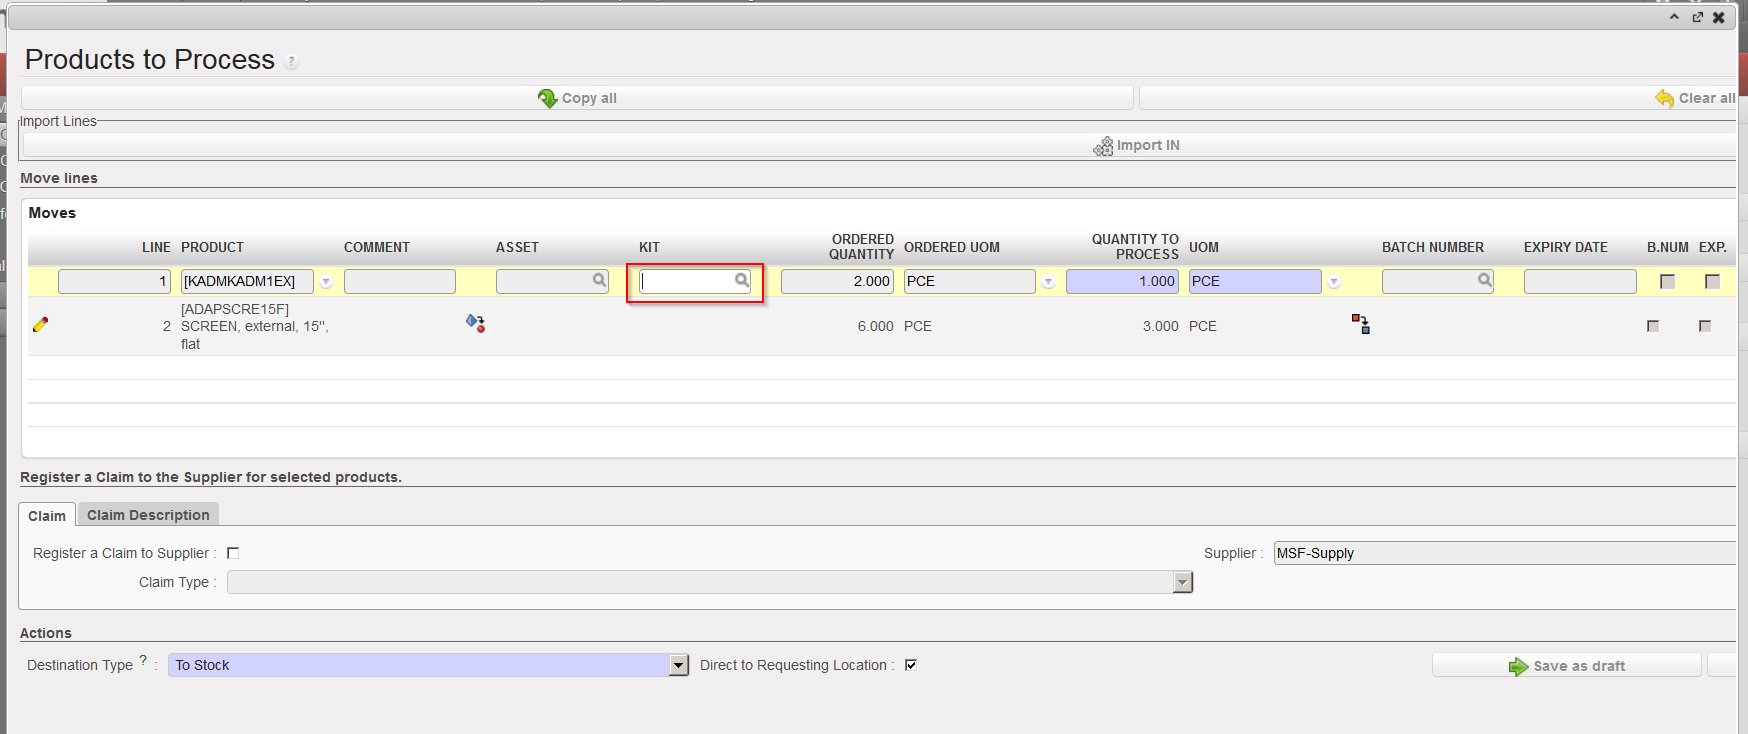
5. The “split” icon  enables to split the lines if necessary (for instance if user wants to select specific batch number per quantity)
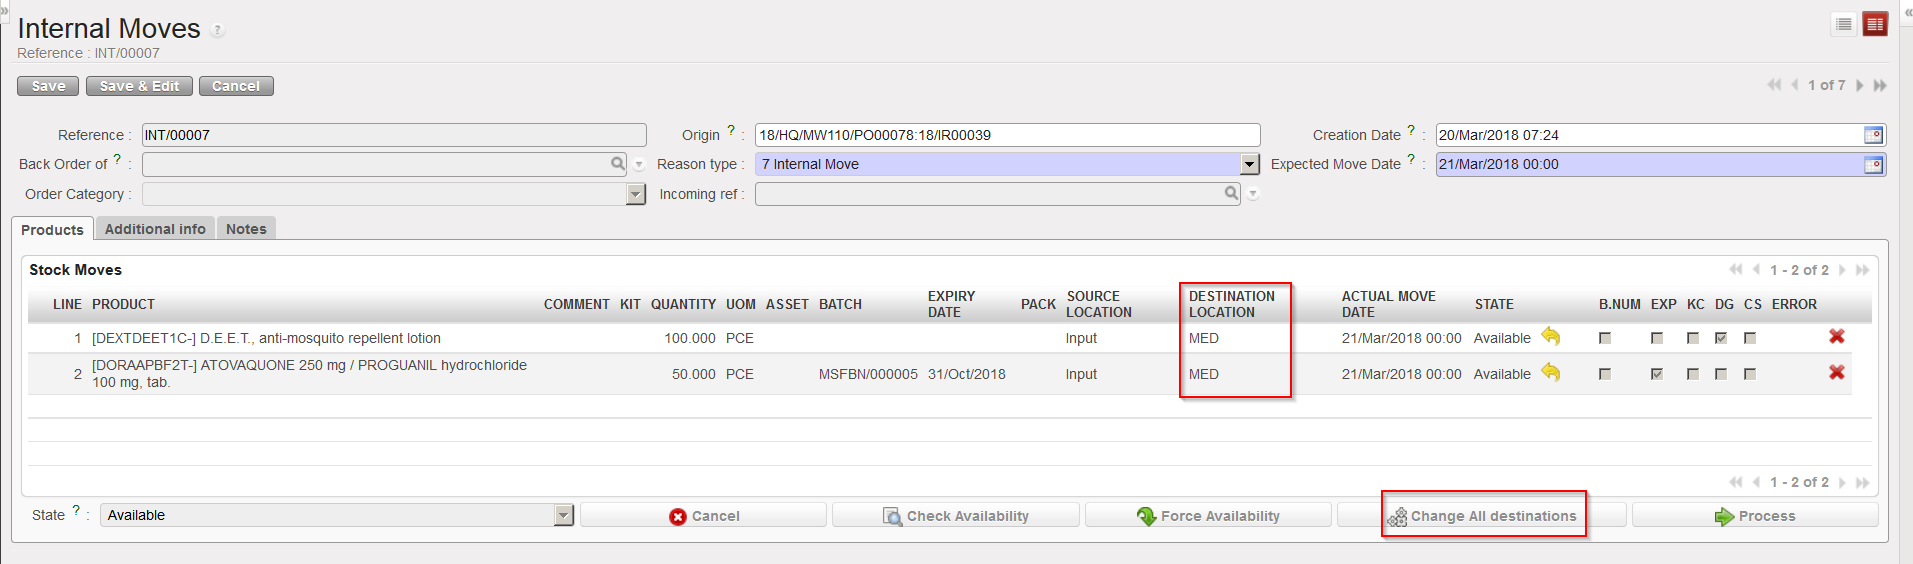
6. “Source location” can be changed by another Internal location by clicking on the “Change sources” button  (at the bottom of the screen – after selecting/checking the requested lines). “Source location” can only be edited for Not available lines. Also, changing source location will not recheck the availability of a line.
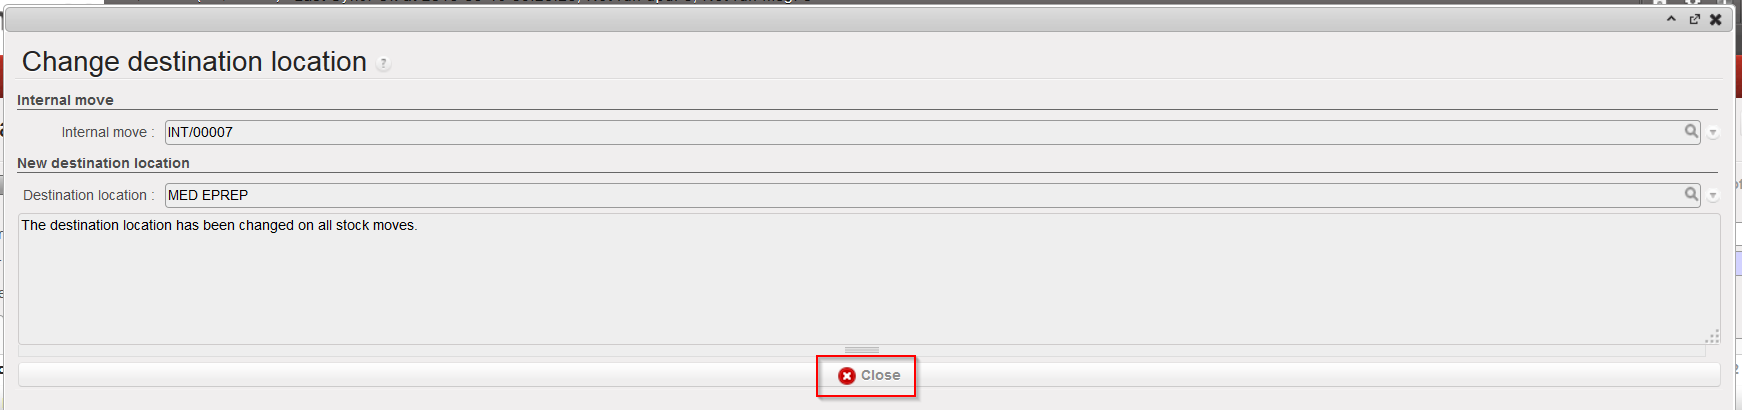
Please note that Destination location is never editable.
7. Click on the “Check Availability” button  to check that you have sufficient quantities in your stock. The “State” column of each product line should be updated to display if the products are “Available” or “Not Available“. Proceed if all products are listed as “Available“. A sub Picking Ticket will be created with all available products. Remember “Available” means actual quantity in stock (real stock), excluding any in pipeline (virtual stock) or stock already earmarked for a different delivery.
Please note: when checking availability, the system will automatically select the BN/ED using a FEFO logic (First Expired First Out) and will also split the lines accordingly depending on quantity available for each batch. If expired batches are available in the source location, and there are no other unexpired batches available, the system will display the line as “Not Available” (the user will have to select manually the expired product if necessary). This process also works for INT and OUT documents.
Also note that the “Check Availability” button will check the Availability of selected on screen BN/ED (in case you changed the FEFO default selected BN/ED).
8. The default filter on the main PICK will only display “Unprocessed lines” (i.e.: Displays lines in status Not Available or Available with qty greater than 0).
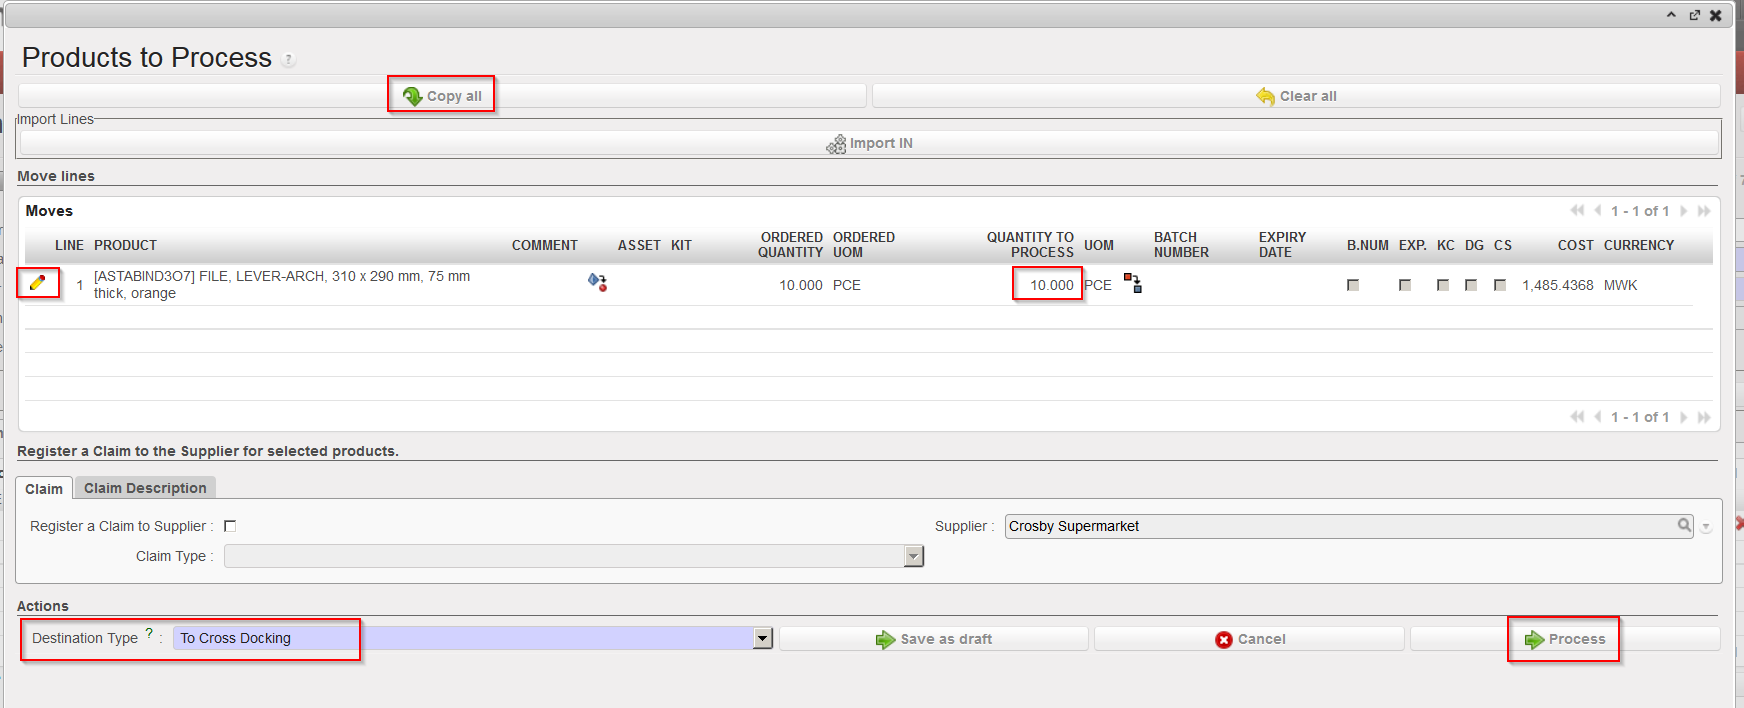
9. The “Copy all” button  will copy the available “QTY” for all Available lines into “QTY TO PROCESS” (based on BN/ED displayed).
The “Clear all” button  will set all “QTY TO PROCESS” to 0.
Finally, the “Reset” button  will reset the Picking List as it was originally. All splits are re-merged, BN allocation is rechecked (i.e cancels availability + checks availability + copy all is done)
10. Click on the “Create Picking” button (with the blue cross) at the bottom of the screen.
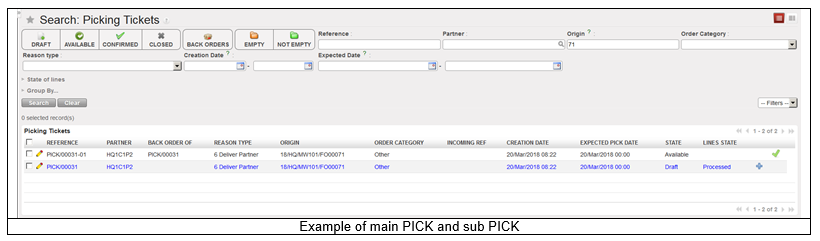
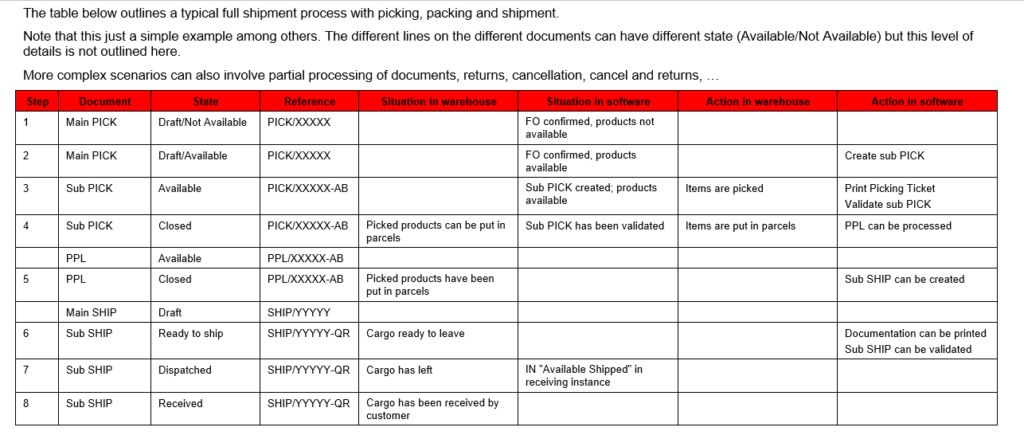
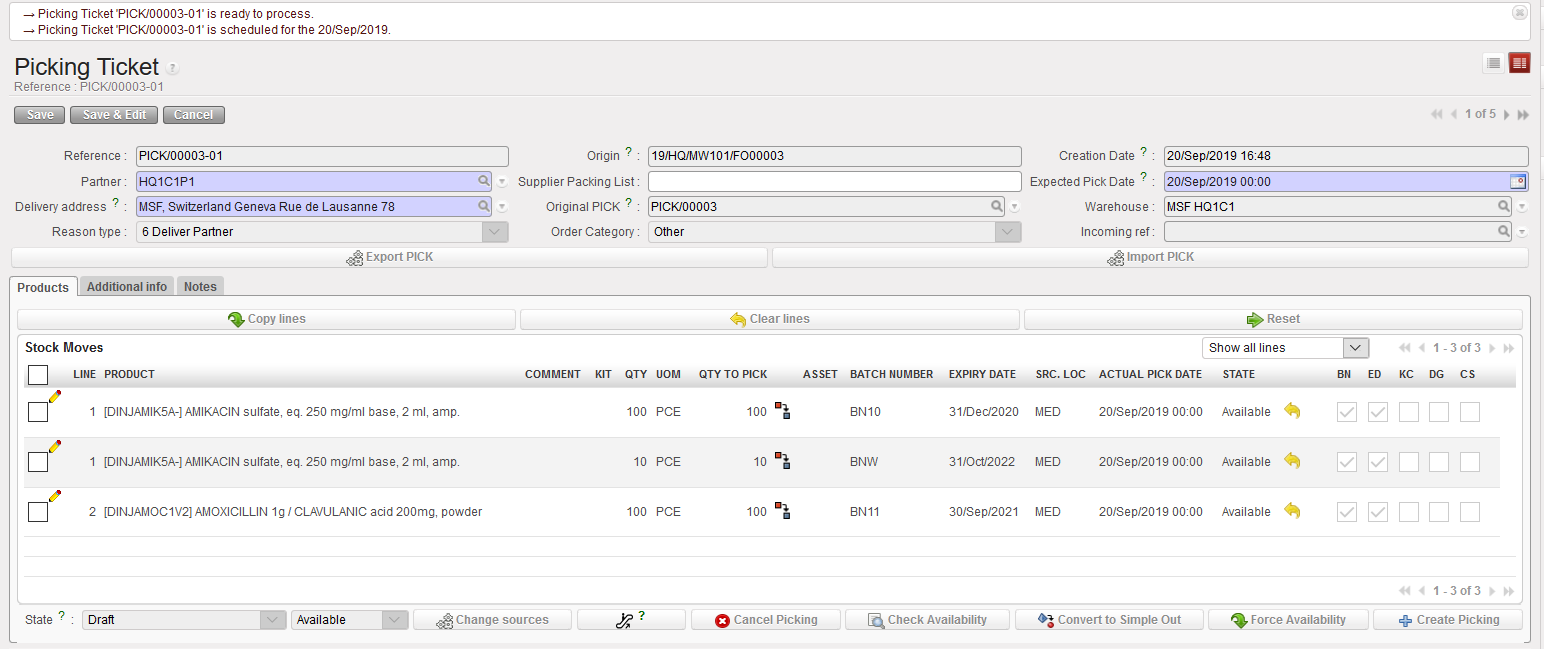
11. A sub PICK has been created by the system and is ready to be processed/validated. UniField opens the sub PICK created. Note that main PICKs have references which look like PICK/00003 while sub PICKs have references which look like PICK/00003-01.At this stage, you may wish to print the Picking Ticket via the “Picking Ticket” option available in the action menu. This printed document may be given to the storekeeper who will use it to pick the items in the warehouse and note on the printed document that has been actually picked (quantity, BN, ED,…).
|
|
|
Sub PICK has been created
|
|
|
|
Sub PICK in PDF
|
In the above example, we can see that DINJAMIK5A- is in stock (stock level = 150 pces in the MED location) and that the system advises us to pick 100 from the batch BN10 expiring on the 21/Dec/2020 for which we have a stock level of 100 pces in the MED location and 10 from BNW for which we have a Stock of 50 expiring in 31/Oct/2022. As a consequence, after picking the quantity of 110 pces from these batches we should remain with a total quantity of 40 pce of BNW (no more stock for BN10).
12. If the suggested quantities and batches have been picked, you may simply click on “Validate picking“. If different quantities/batches have been picked, click on the pencil located at the left of the lines and update the “QTY TO PICK” or “Batch number“/ “Expiry date” fields accordingly (by making the line Not Available first). This may happen if the storekeeper could not pick the full quantity or if another batch has been chosen. Save the updated lines.
You will notice that this sub-PICK screen is the same as the PICK screen; the 3 main visible differences are the “QTY TO PICK” field (replacing the “QTY TO PROCESS”) ; the default filter is “Show all lines” (instead of “Show unprocessed lines”) and the absence of “Convert to simple Out” button which is only available for Main PICK.
Other than these differences all the above-mentioned functions/button (pencil, copy all, reset all…) used in the main PICK can equally be used for the sub-PICK. Meaning that it is still possible to edit the BN/ED/SRC Location. Please note that as for the PICK you will have to make the product lines Not Available in order to edit the lines.
13. Click on the “Validate Picking” button (with the green arrow) to actually register the picked quantities/batches.
|
|
|
Sub PICK has been saved and Pre-Packing List created – Full Flow
|
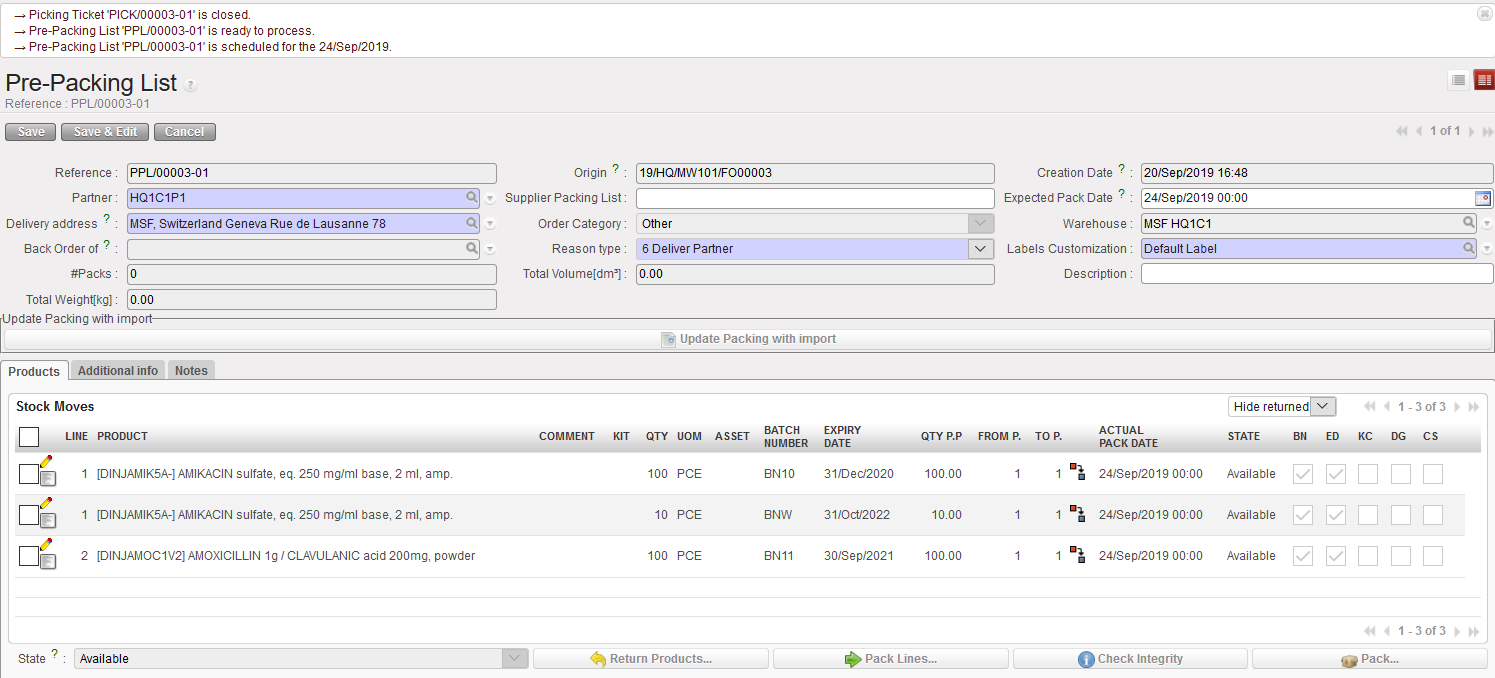
The corresponding Pre-Packing List is created (if the sub PICK which was just validated has reference PICK/000XY-AB, the Pre-Packing List created will have the reference PPL/000XY-AB).
The system brings you to the “Pre-Packing List” screen which is the next step of the process (i.e. after picking the goods from the shelves, you should pack them in a box before to ship them to the customer).
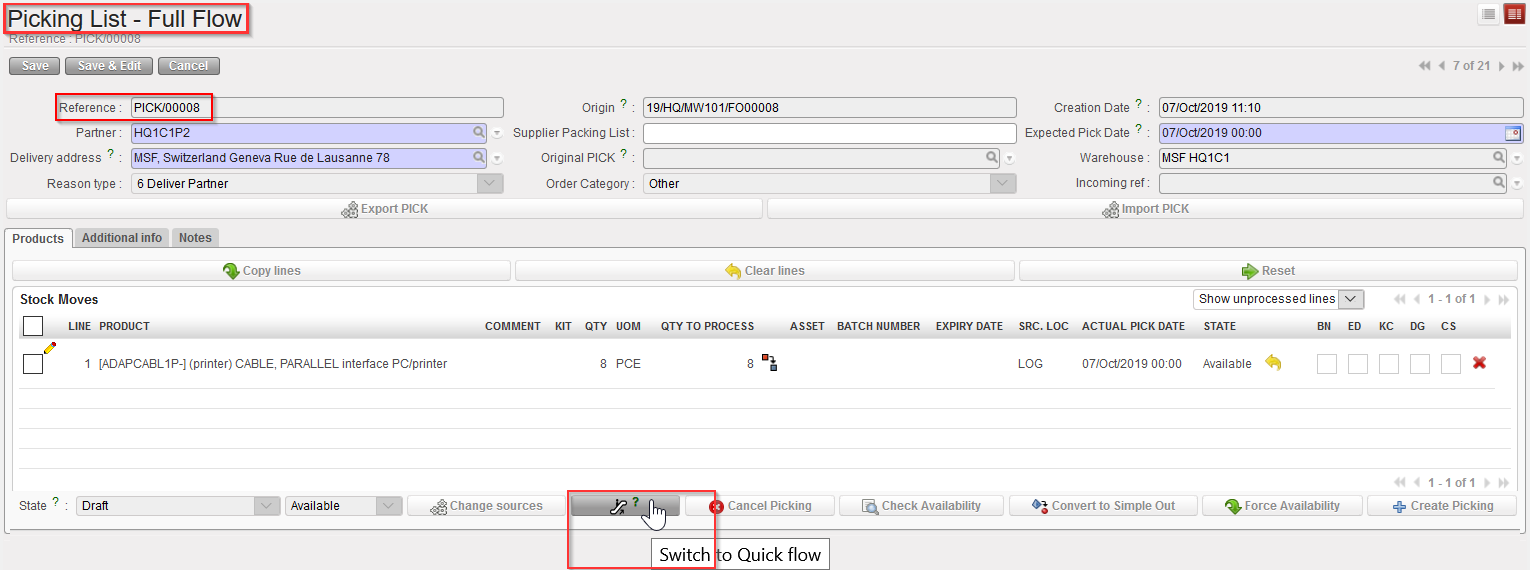
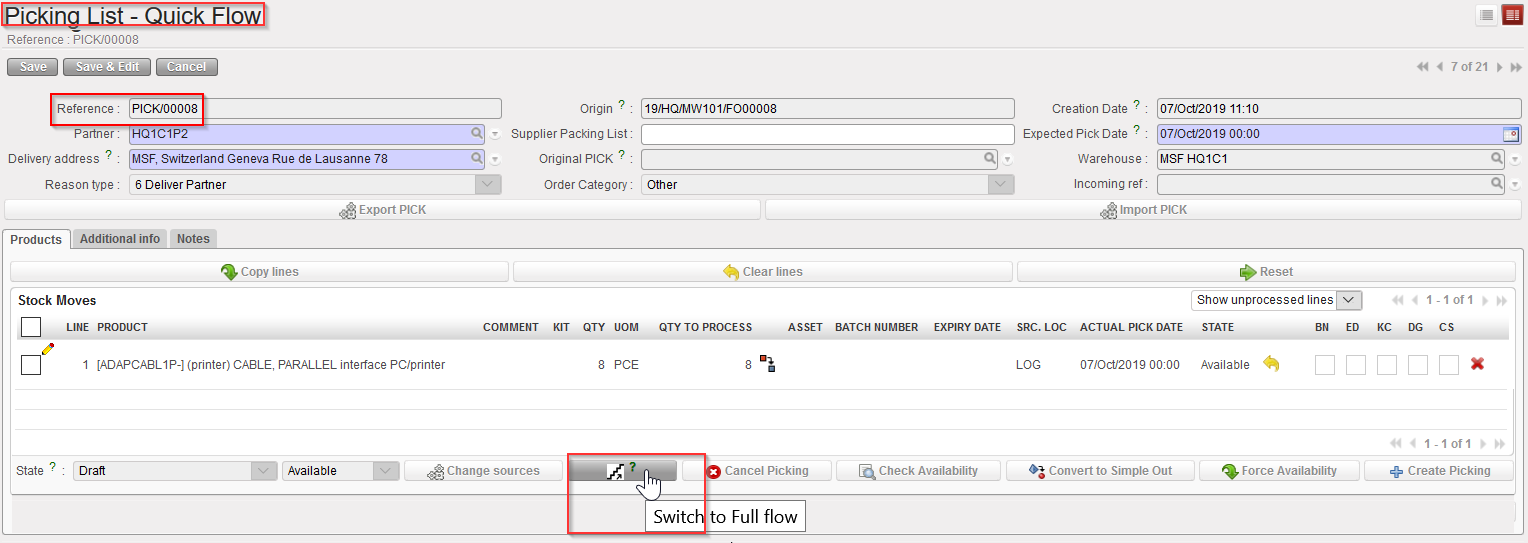
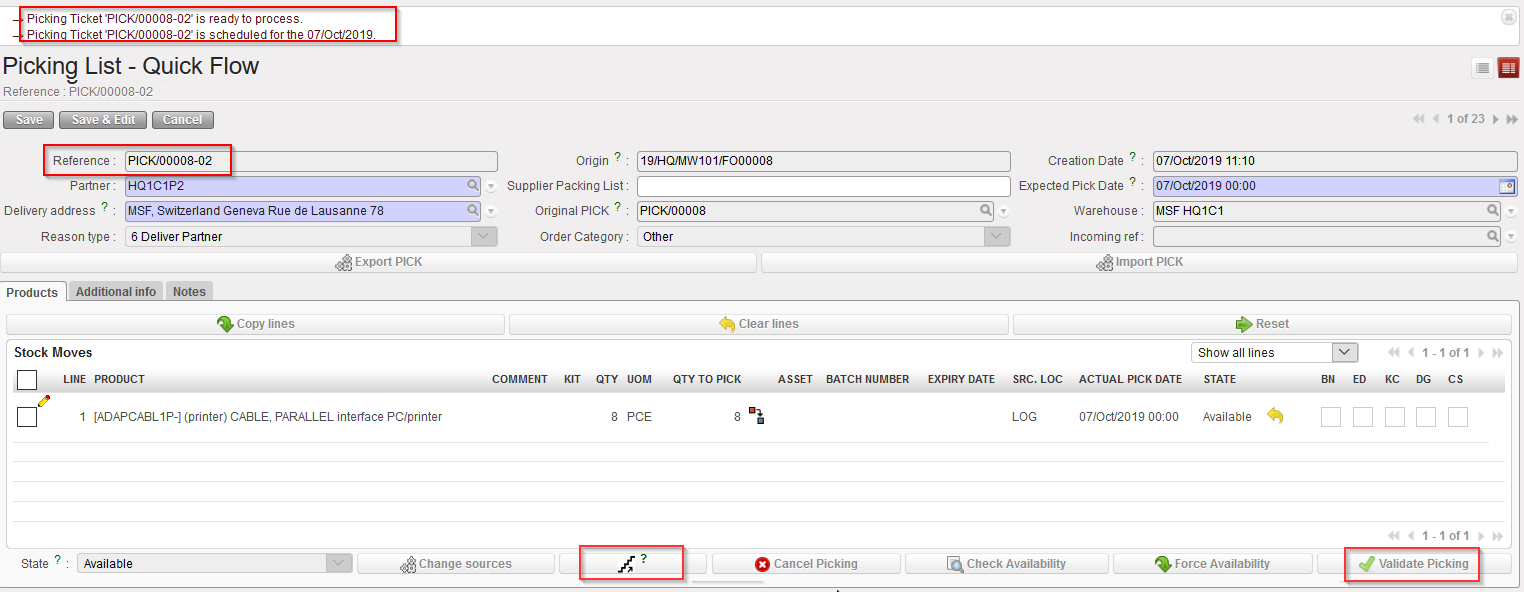
However, if you chose the “Quick flow” by clicking the “Escalator” button  at the bottom of the PICK/ sub-PICK screen the next created document after Validating the sub-PICK will be the Shipment list (with a “Packing details” pop up screen in between).
|
|
|
Main PICK – Full Flow
|
|
|
|
Main PICK –Quick flow
|
|
|
|
Sub-PICK –Quick flow
|
|

|
|
Packing details Pop up after clicking on “Validate Picking” – Quick flow
|
|
|
|
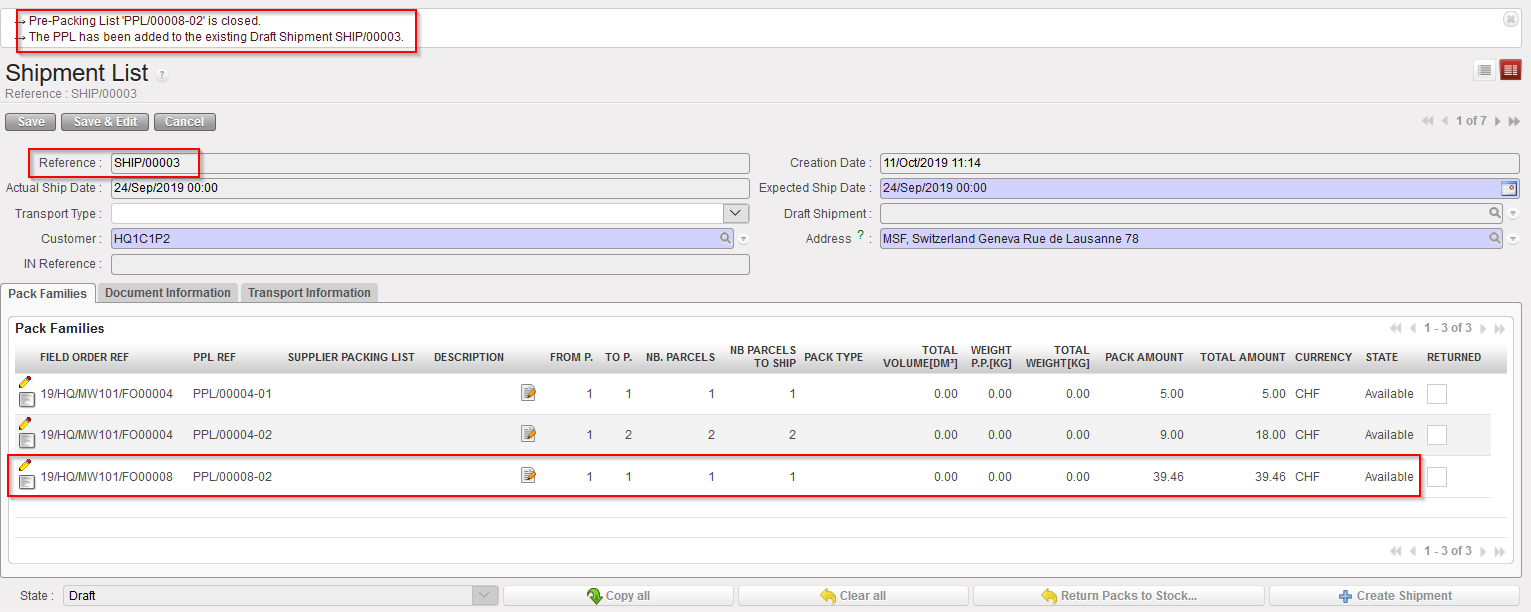
PPL added to an Existing SHIP ( after clicking on “Process”) – Quick flow
|
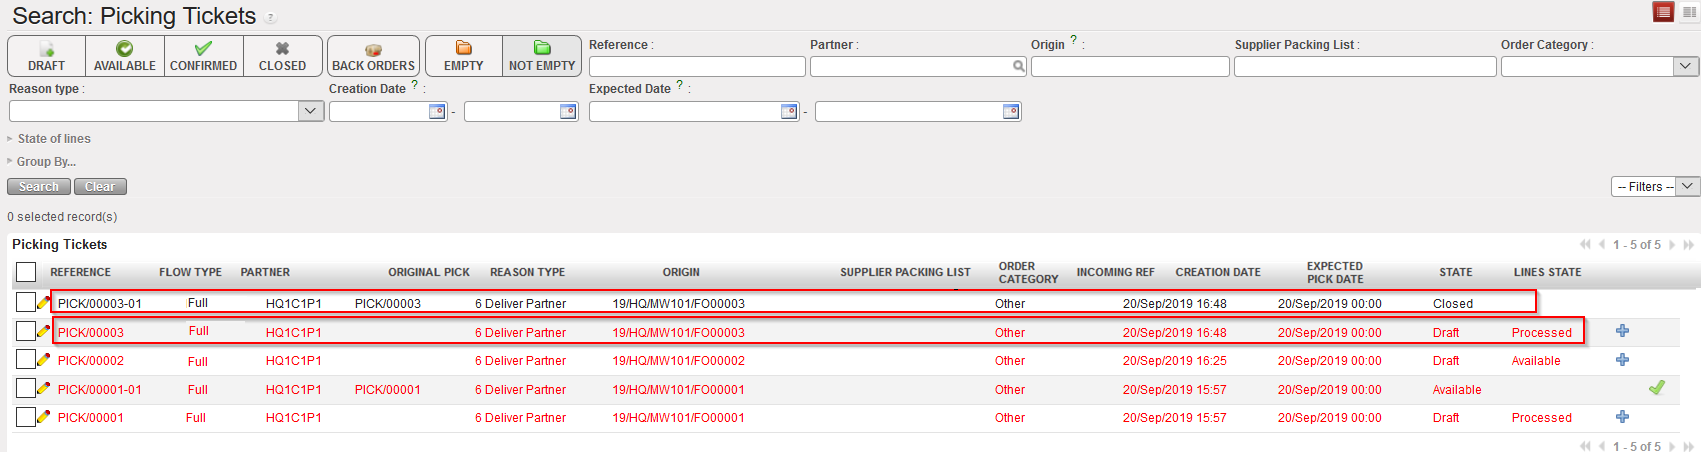
In both cases, “Full flow” or “Quick flow”, the sub PICK is “Closed”.
The main PICK stays “Draft” to allow return of goods if needed. Note that the main PICK is now “Processed”.
|
|
|
Main PICK and sub PICK after full picking of the goods
|
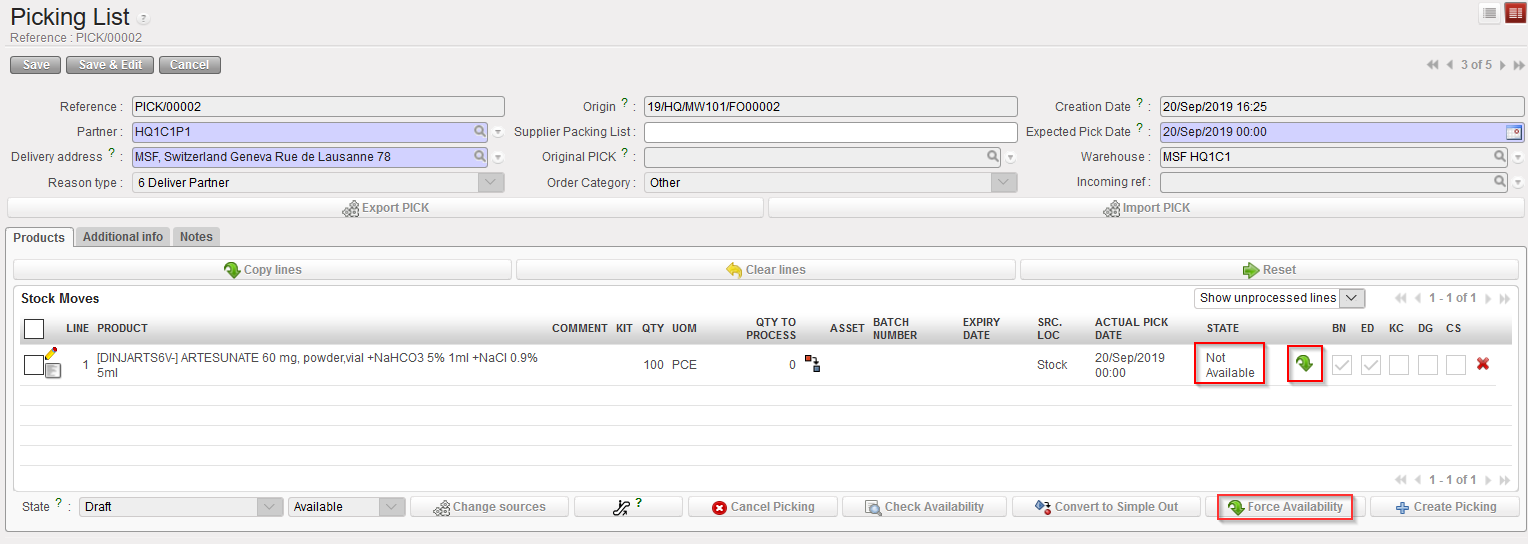
In some cases, for example if there is a physical stock present but the system stock level shows 0, you may choose to force availability. To force the availability of a product, click on the green arrow next to the state of the line or the button  at bottom of the PICK. This action will turn the state to “Available”.
This is only a short-term solution which should be used with caution and only according to OC procedures. In the long run, if the physical quantity of a product does not match the quantity displayed in the system, a physical inventory should be performed as soon as possible to correct this.
|
|
|
Forcing the availability on a Picking Ticket
|
Note that for products which are not BN managed, forcing the availability will allow you to register the picking ticket (but stock level in the system may become negative).
For BN managed products, forcing the availability will not allow you to register the picking as you will be blocked at a further step, when you will have to select the batch.
|

|
|
Forcing the availability on a BN managed product
|
To summarize the picking process, we may say that main PICKs are actually not processed. Actual picking is always registered on the sub PICKs.