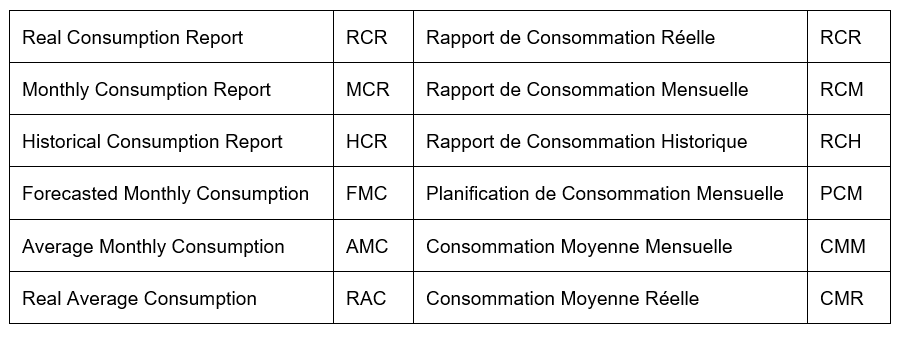
Real Consumption Reports (RCR) allow recording consumptions. Their processing is triggering movements OUT in UniField.
The main objective of the Monthly Consumption Reports is to encode Forecasted Monthly Consumptions, but these reports are also showing Average Monthly Consumption (AMC).
Finally, Historical Consumption Reports allow analyzing Real Average Consumption (RAC) and Average Monthly Consumption (AMC).
These 3 types of reports are explained in details in the below sections. Note that the terminology “reports” could be a bit misleading as some of them are pure reports while others are actually transactions.
The below table lists the main terminology used in this learning unit.
If a supplier claim is raised on a UniField instance and address to a supplier who is using UniField (i.e. another instance, usually Coordination), the corresponding customer claim will be created on the supplier instance via synchronization.
Customer claims can be created by the synchronization (see section on claims synchronization below) or manually. Claims will be manually created if the customer is not using UniField or if the customer did not raise a claim using UniField.
E. HOW TO RETURN CLAIMED PRODUCTS TO SUPPLIER AND REPLACE THEM
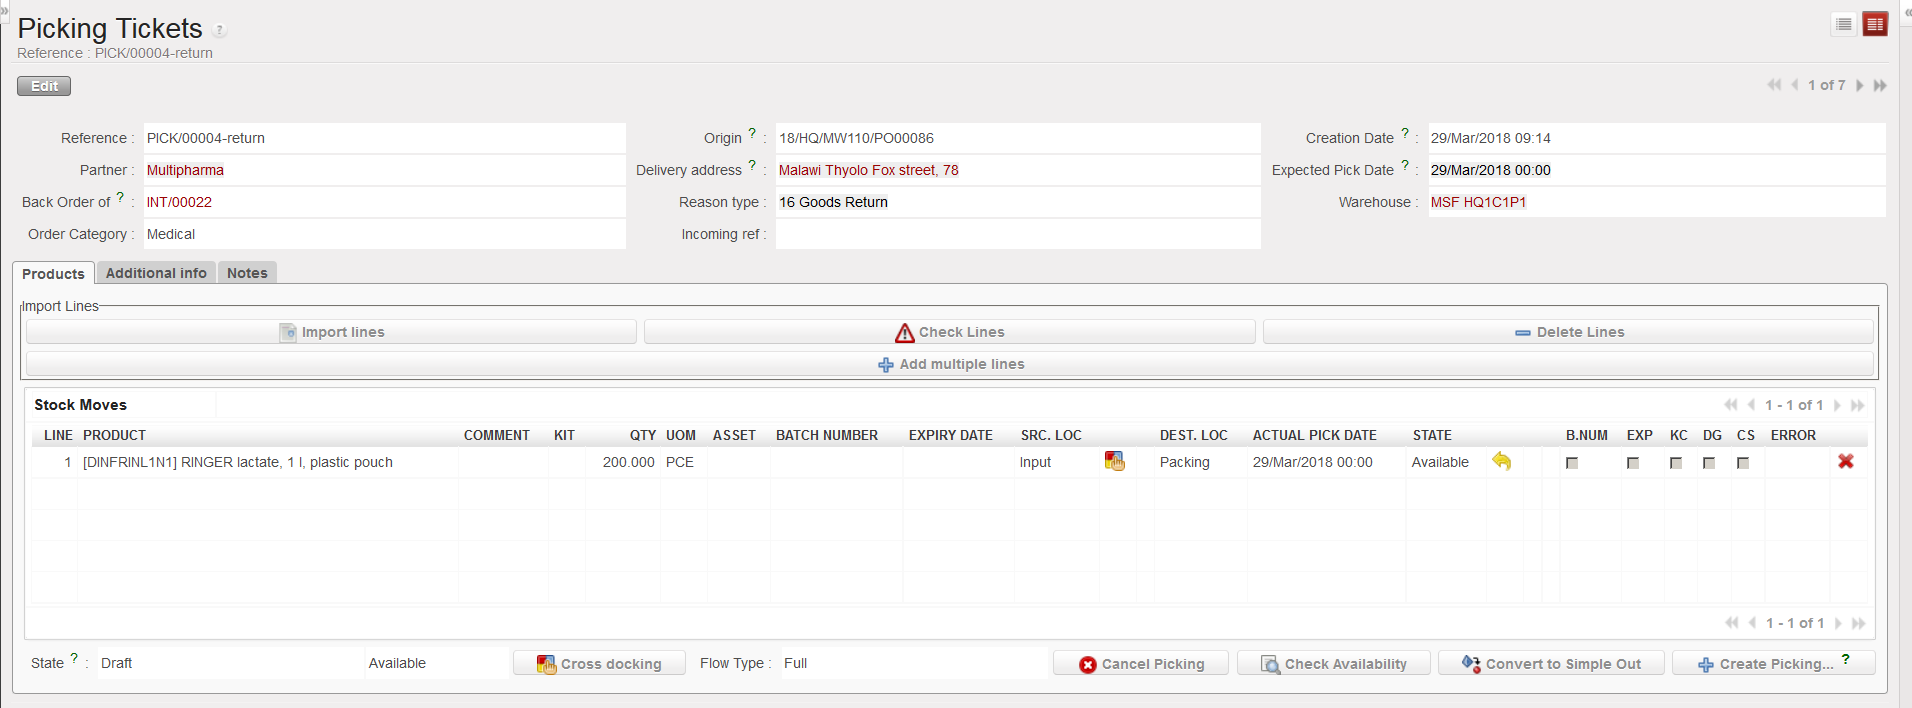
If you choose “Return” as claim type, the system will create a Picking Ticket (PICK-return) to send back non conformed goods to the supplier. If you tick the “Replacement expected” checkbox, the system will create an Incoming Shipment (IN-replacement) for the replacement of the goods
The Picking Ticket will be processed to send back the goods to the supplier. Note that you may convert it to an OUT if needed.
The Incoming Shipment will be used to receive goods when the replacement will be sent by the supplier.
If goods are noticed non-conformed after their reception in stock (or in cross docking), a claim should be created from scratch.
Go to:Purchases / Claim / Claim
Click on the “New” button.
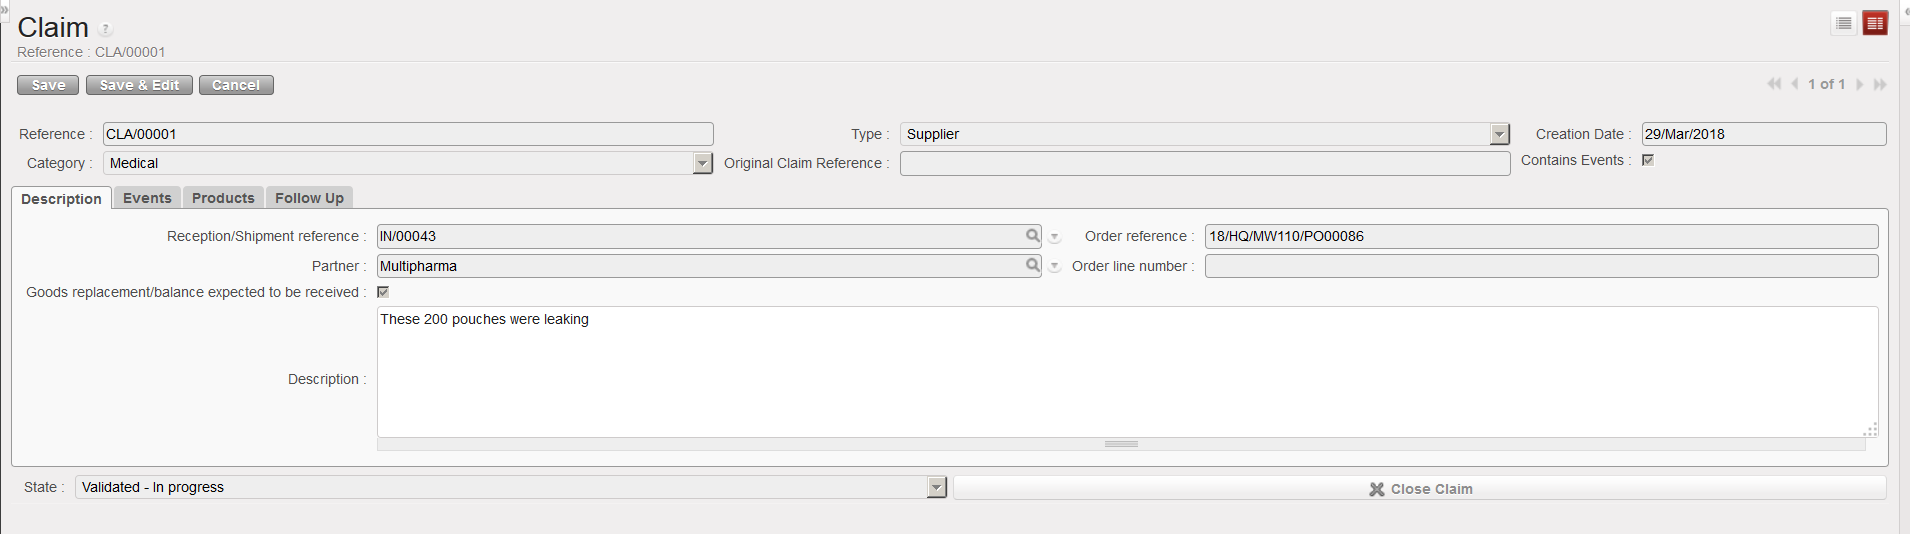
Creating a claim from scratch
2. Check the “Reference“, “Type” and “Creation Date” fields and update them if needed. The “Type” should be set to “Supplier” if you are raising a claim to a supplier regarding goods non-conformity. “Transport” will be used for services transport suppliers. “Customer” will be used to register a claim raised to you by one of your customers.
3. Select a “Category” related to the non-conformed goods.
4. In the “Reception/Shipment reference” field, select the Incoming Shipment (PICK and OUT will be used for customer claims) reference related to the non-conformed goods. The “Partner” and “Order reference” fields are populated.
5. In the “Order line number” field, enter the order line number related to the damaged goods if you know it.
6. In the “Description” field, explain why you are creating this claim.
Creating a claim from scratch
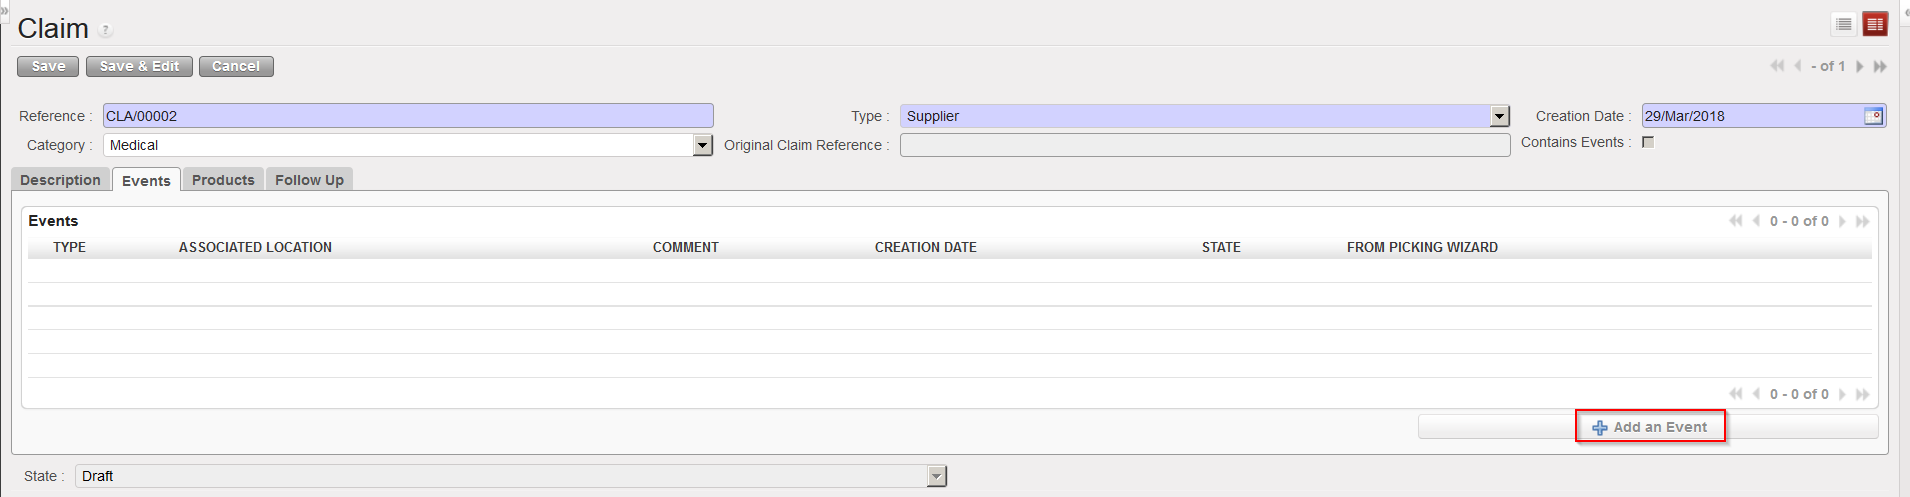
7. On the “Events” tab, click on the “Add an Event” button.
Adding an event to a claim
8. Complete the “Add an Event” screen. For the Event type, choose from the options:
“Accept“, if you have decided to accept the goods.
“Scrap“, if you have decided to destroy the goods.
“Return“, if you are returning the goods to the supplier.
“Return (surplus)“, if you are returning goods because you realized that the supplier delivered an excessive quantity.
Adding an event to a claim
9. Tick the checkbox “Replacement expected” if you wish the goods to be replaced.
10. Click on the “OK” button.
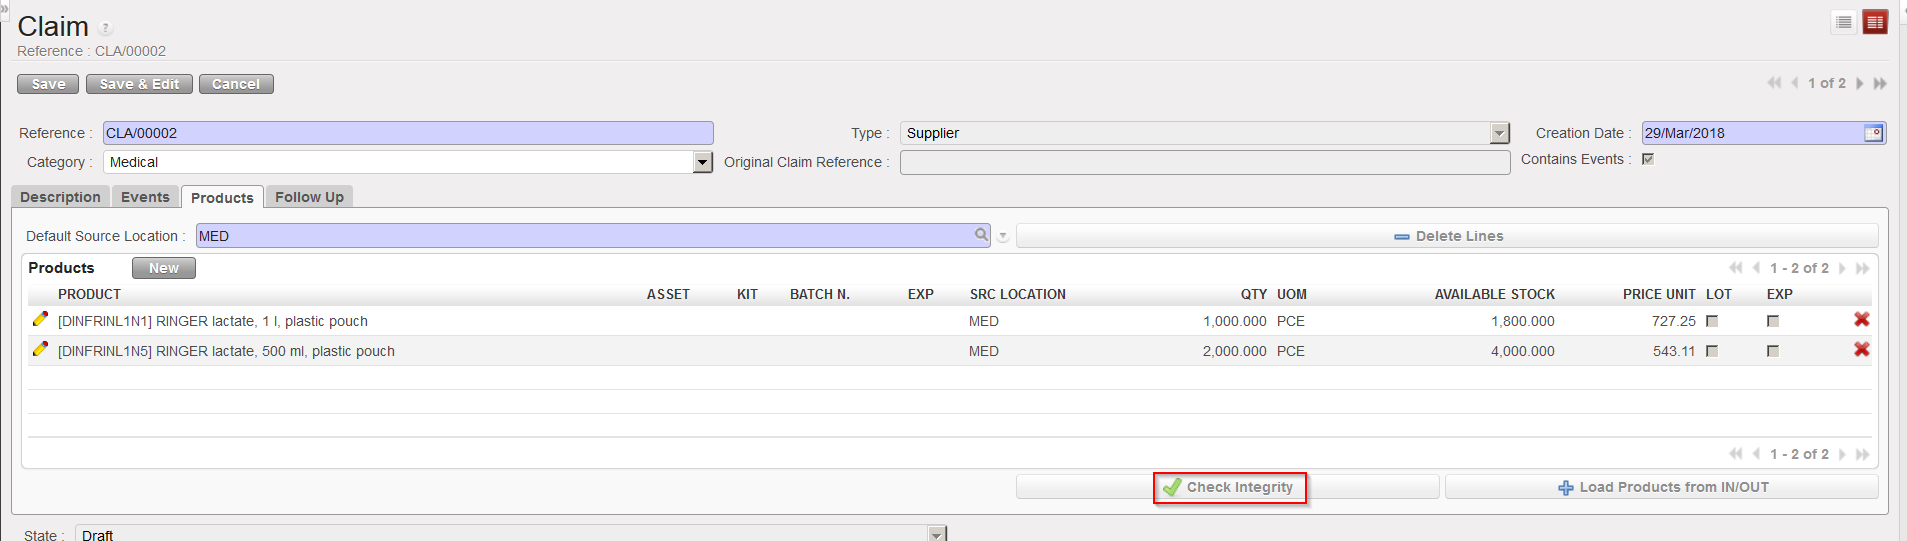
11. On the “Products” tab, update the “Default Source Location” if needed. This is the location where the products for which you are raising a claim are currently stored.
12. On the “Products” tab, add products by:
Clicking on the “Load products from IN/OUT” button to automatically load all products from your reception on the claim.
Clicking on the “New” button to add the products manually. Note that you will only be able to add products which were are on the IN.
Adding products on a claim
13. Check/update/enter the quantities and any other relevant information such as Asset reference, BN/ED, unit price,…
14. Ensure that the “SRC LOCATION” indicates where these products currently are.
15. Click on the “Check Integrity” button to check that these products are available in the source location.
Checking the integrity of the entered products
In the case where the products batches/Expiry Dates don’t exist/not in stock therefor they cant be returned with this claim, Warning message will be displayed: (Prod/BN/ED not available in the IN/OUT).
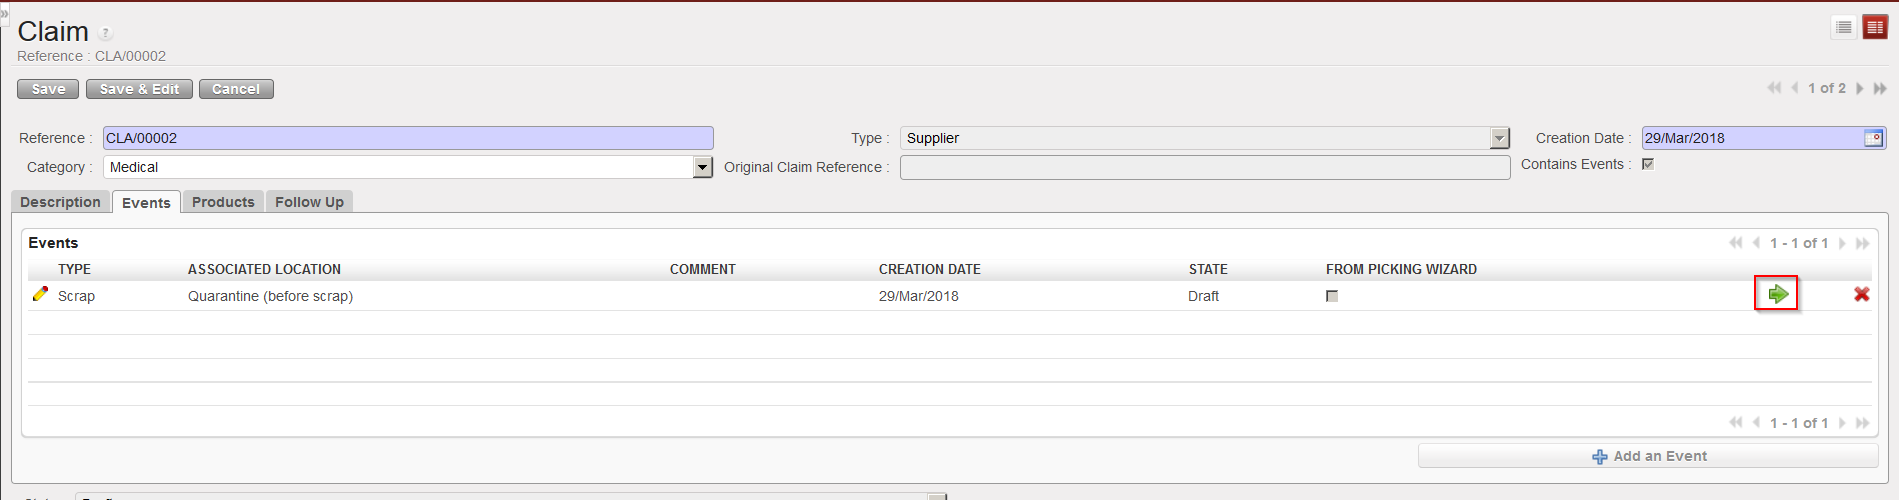
16. Select the “Events” tab.
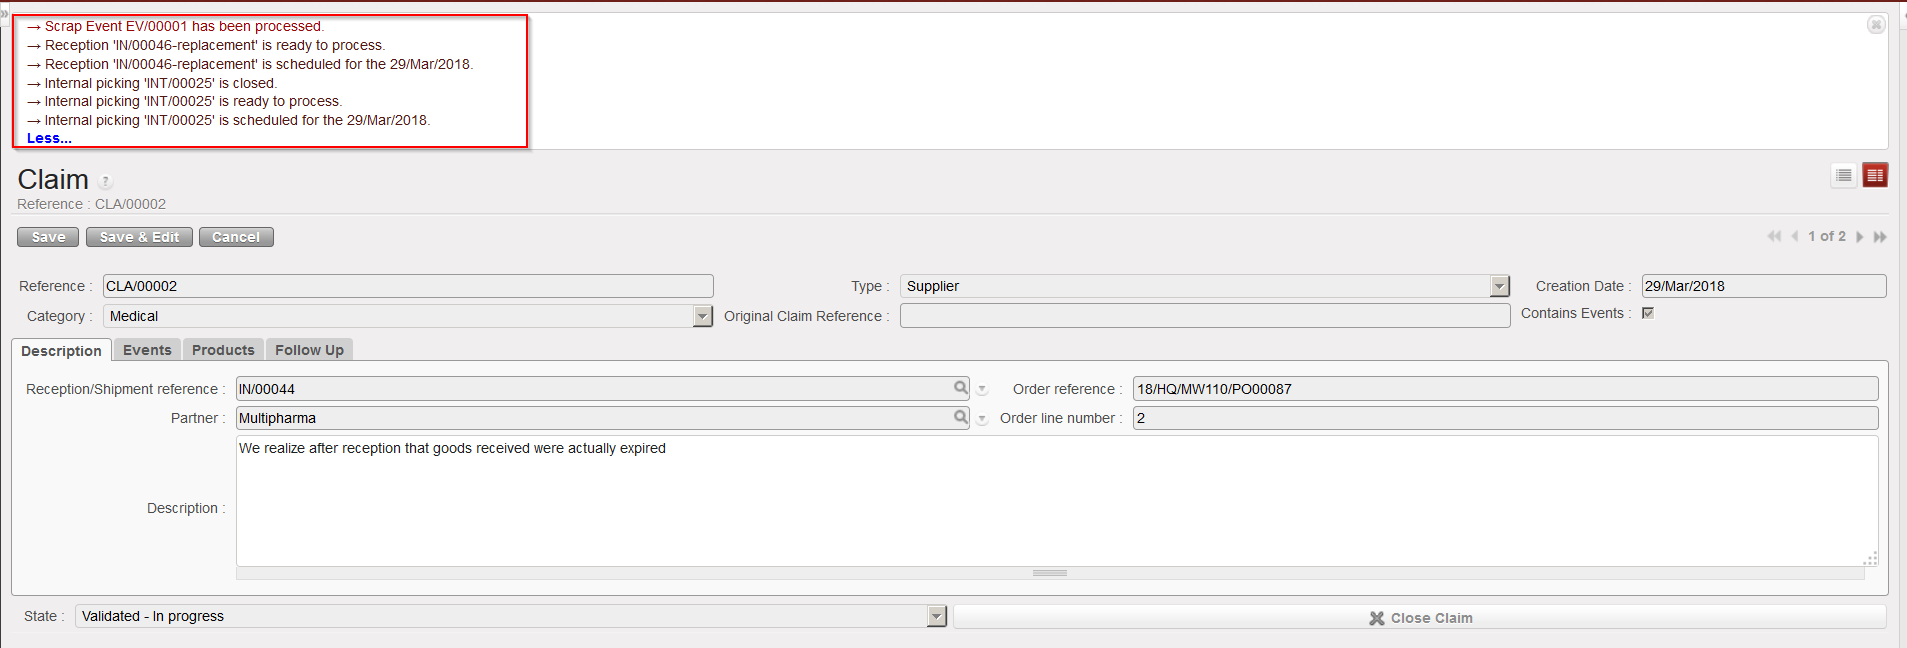
17. Click on the green arrow to process the claim event. A message will appear confirming (according to the event selected) that an internal picking (INT) has been created, processed and closed (if you selected “Scrap” as event type), that a reception IN-replacement is ready to process (if the replacement expected checkbox was ticked) and that the event has been processed.
Processing the claim event
Claim event processed
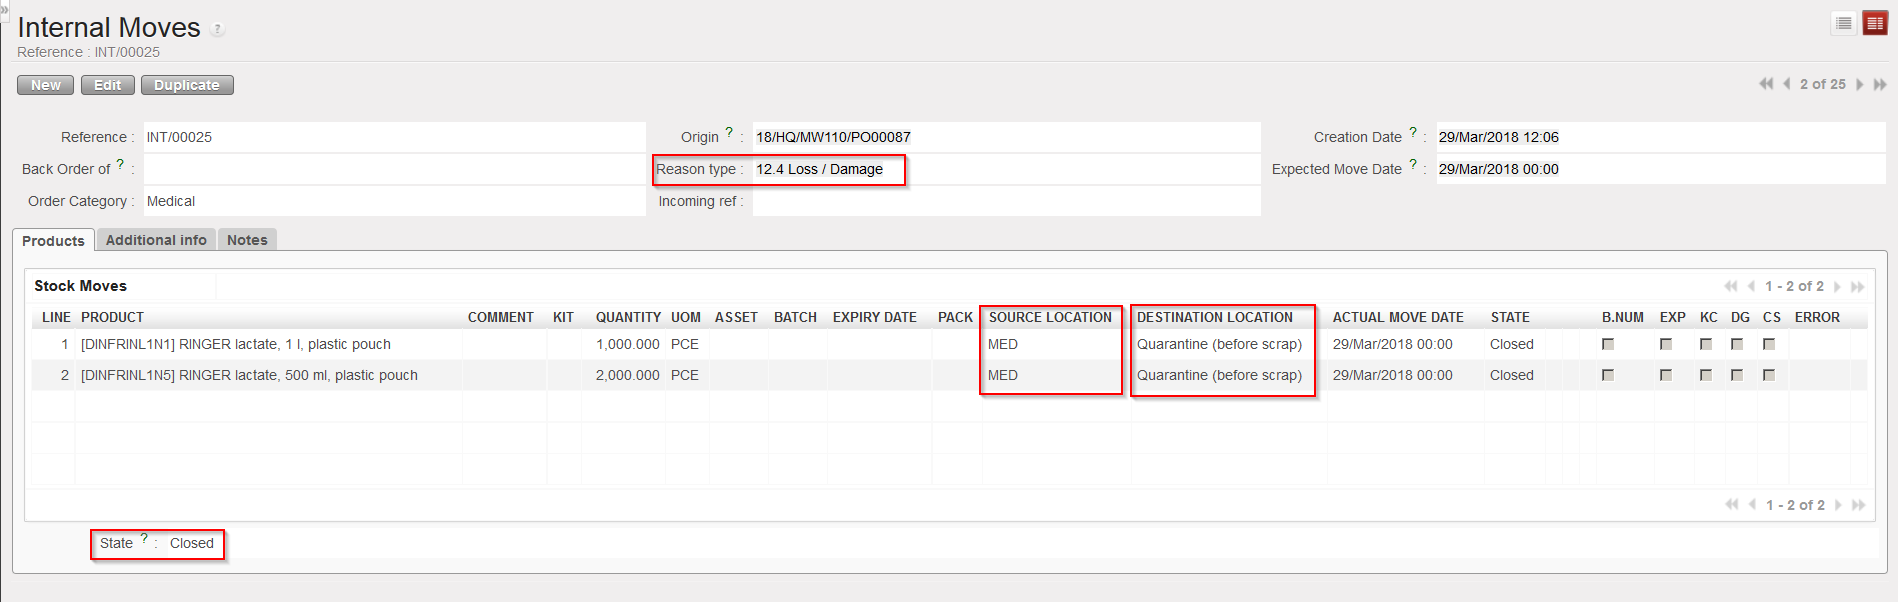
With the above selected options (claim type = Scrap and replacement of goods requested), the system:
Creates and process an Internal Move (INT) to move the goods from their source location to the “Expired/ Damaged /For Scrap” location.
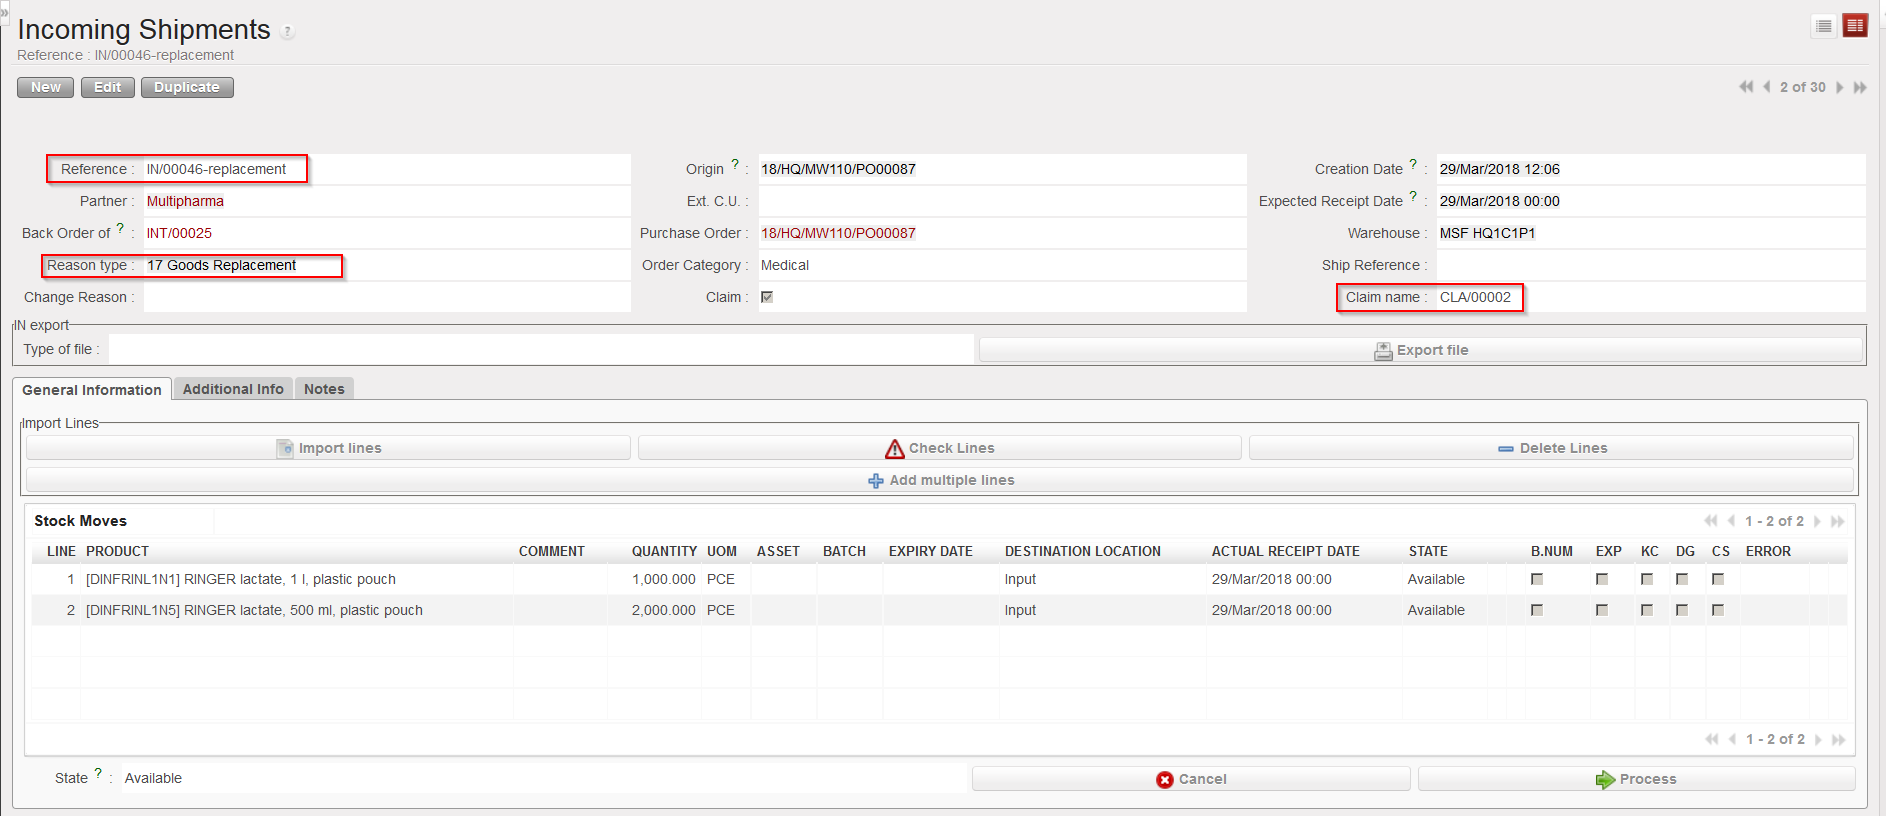
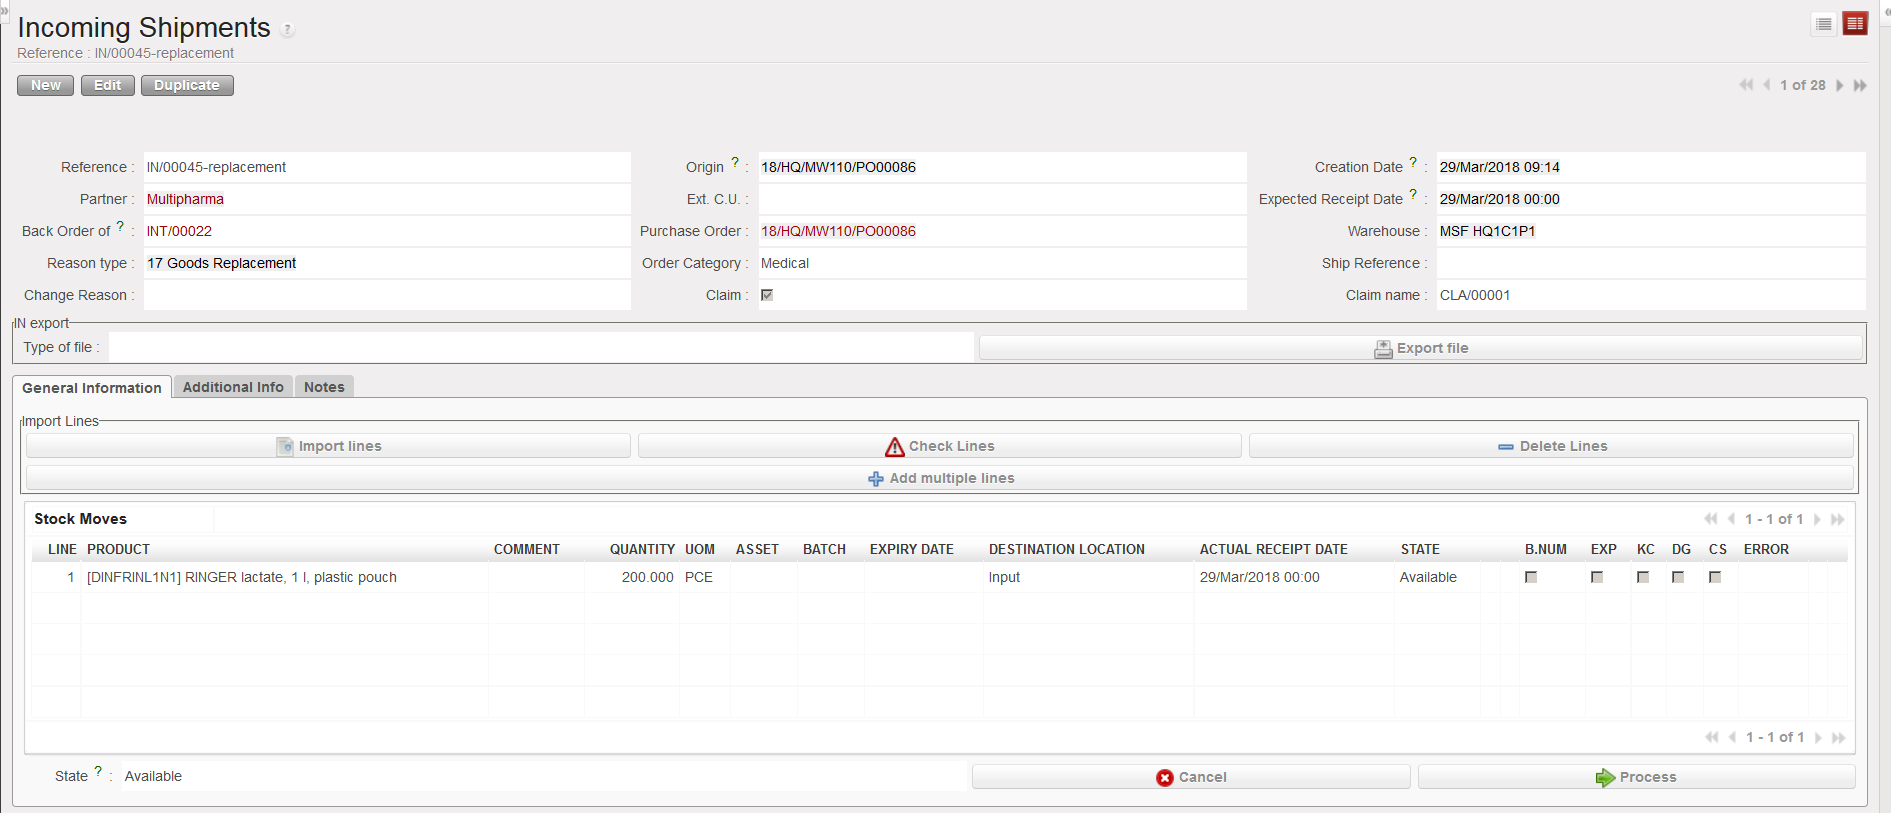
Creates an Incoming Shipment (IN-replacement) for the replacement of the goods.
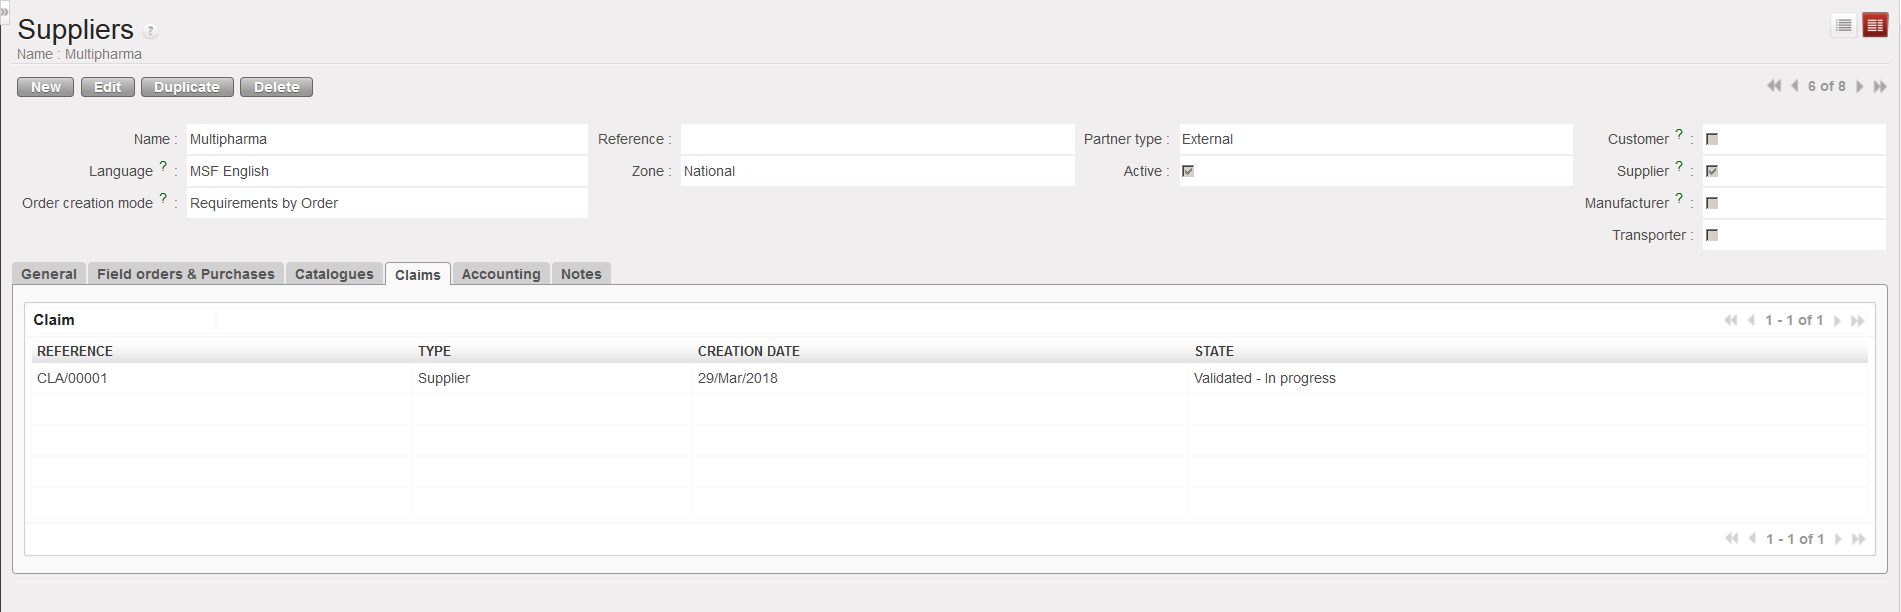
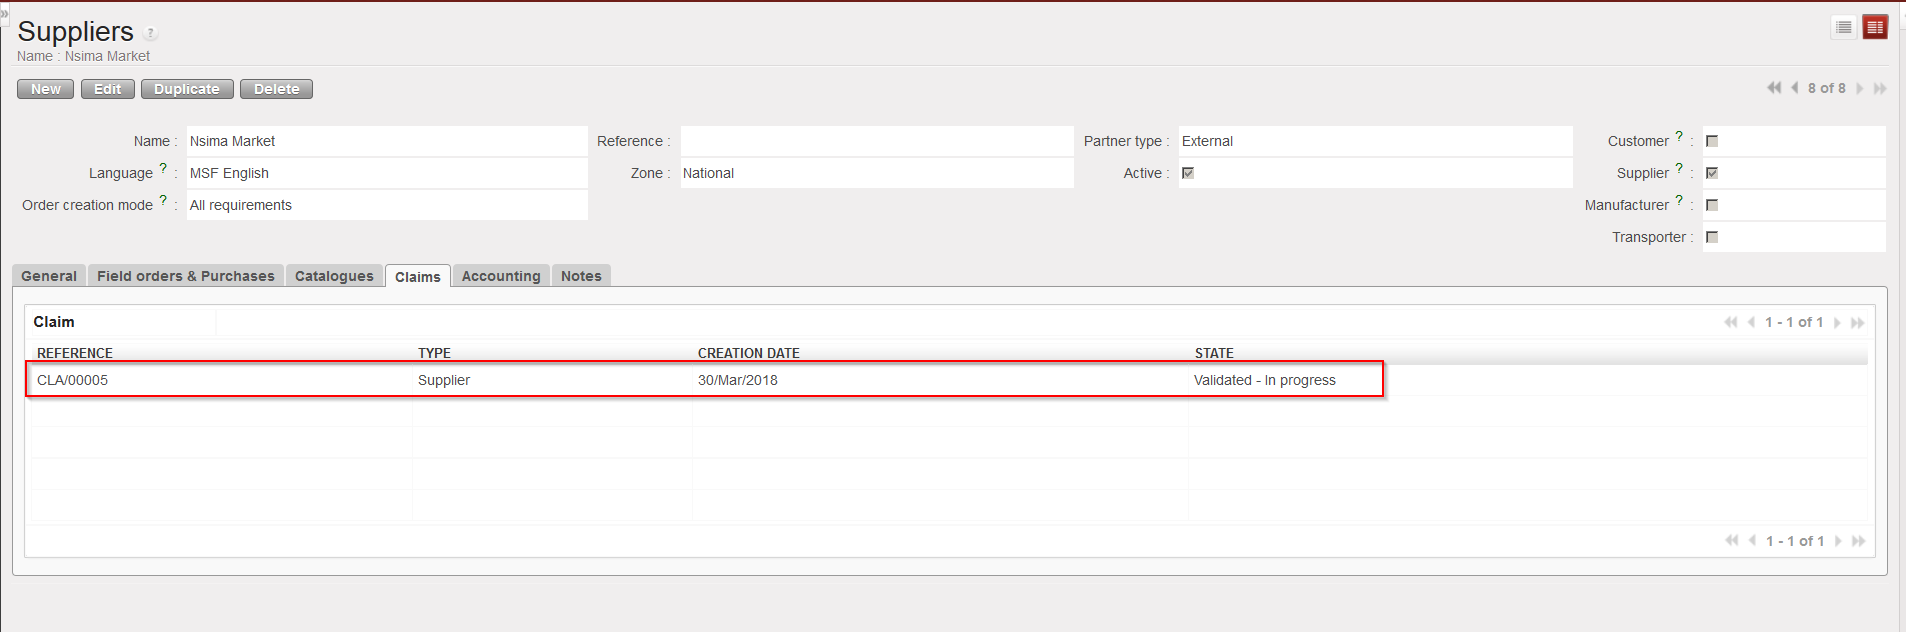
Updates the partner master data sheet of the supplier (“Claims” tab) to show that a claim was raised to this supplier.
INT created by the claim
IN-replacement created by claim
Supplier master data sheet updated by claim
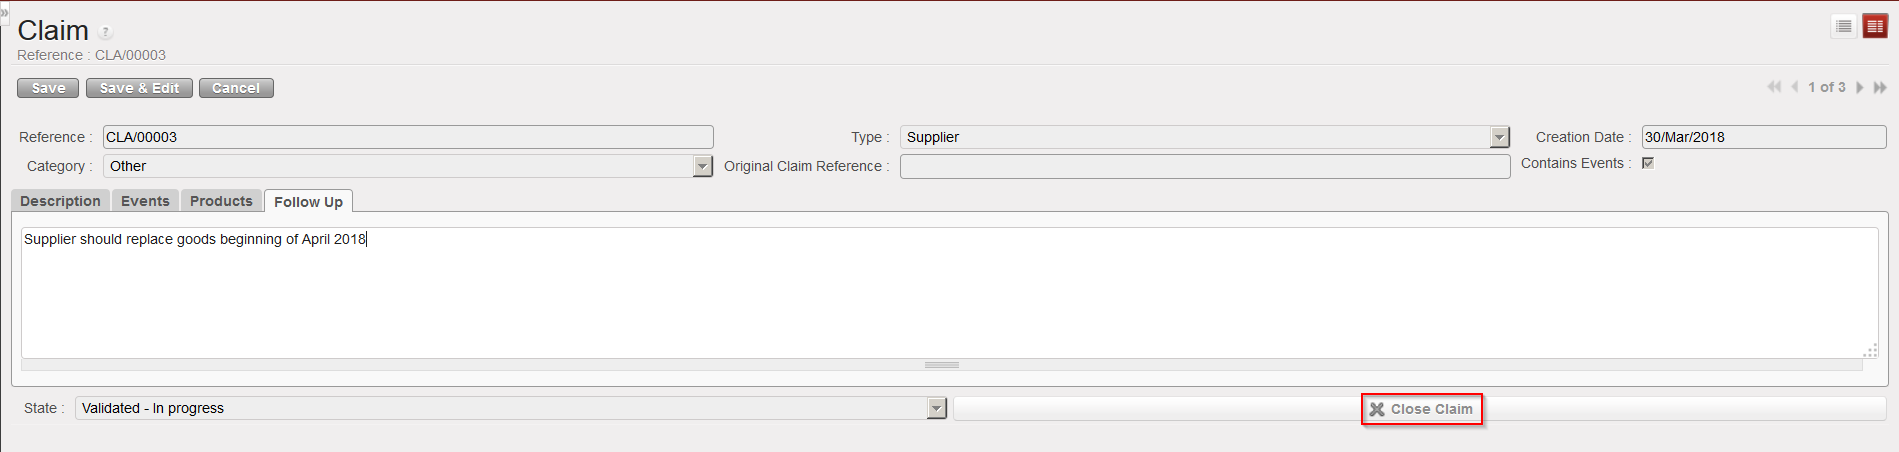
18. Click on the follow up tab. You may add here any additional information related to claim follow-up.
19. When the claim has been closed (e.g. goods have been replaced and all is clear on the invoicing side) you can close the claim by clicking on the “Close Claim” button.
C. HOW TO CREATE A CLAIM FROM AN INTERNAL MOVE (after reception in the “Input” location).
As the “Input” location is used to perform qualitative checks following suppliers deliveries, claims should actually be raised when products transit through this location. This will only happen if the “Direct to Requesting Location” checkbox is unticked during goods reception.
Go to:Warehouse / Warehouse Management / Internal Moves
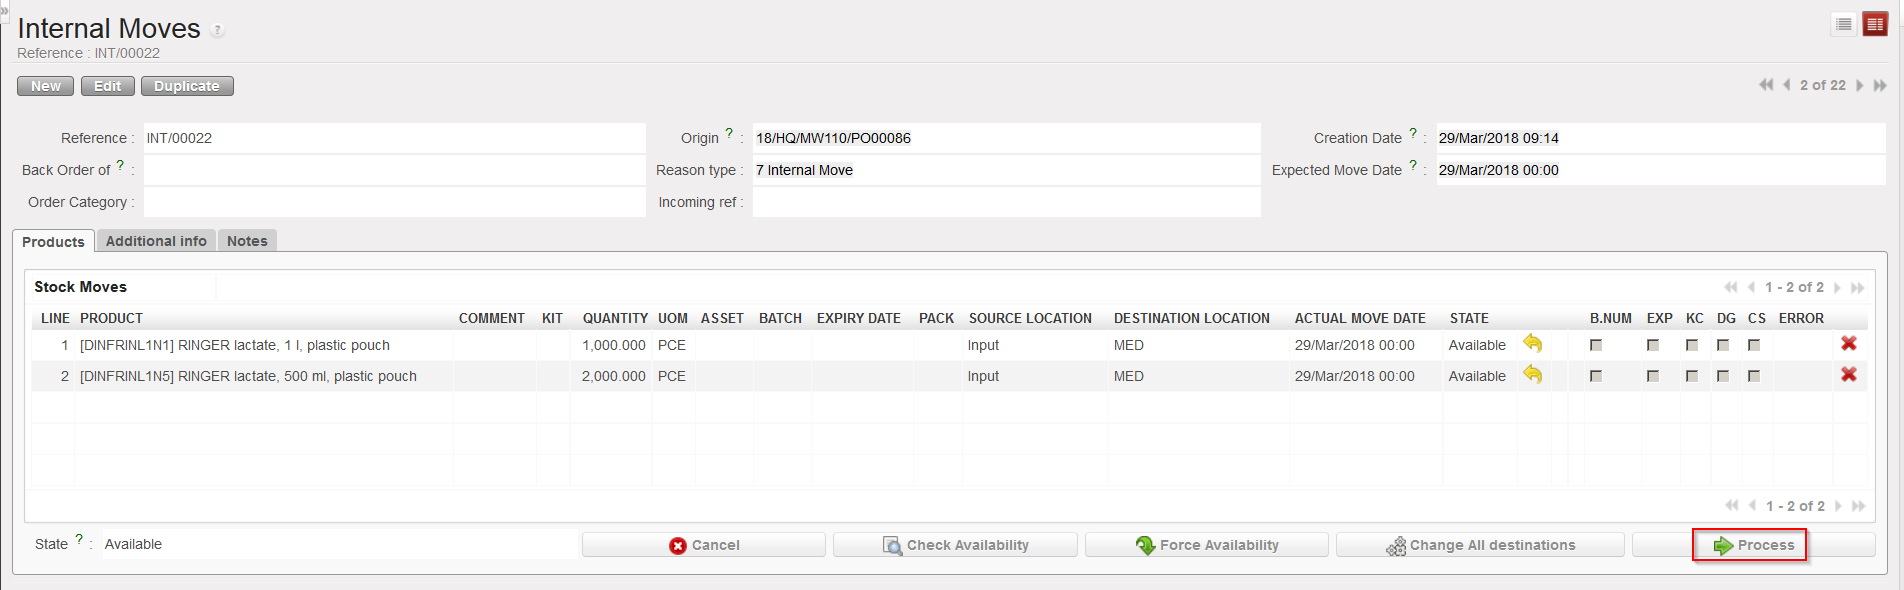
Locate and open the Internal Move which was created when you processed the Incoming Shipment (with the “Direct to Requesting Location” checkbox unticked).
Click on the “Process” button.
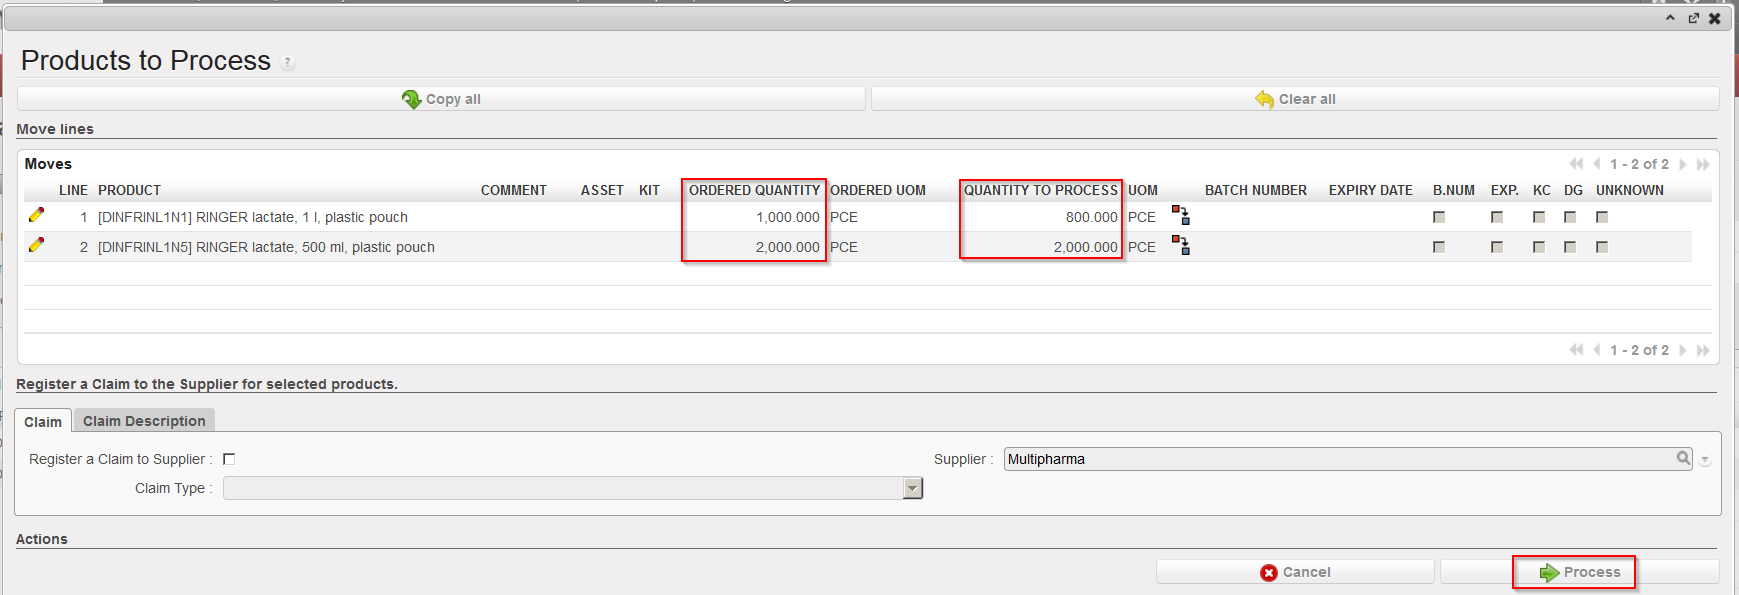
Transfer the goods which are conformed to their final destination but not the ones which are not conformed. The system will create (and process and close) a new INT with the conformed products while the initial INT will stay open as a back-order with the non-conformed products.
Processing the Internal Move
Transferring the conformed goods to their final destination
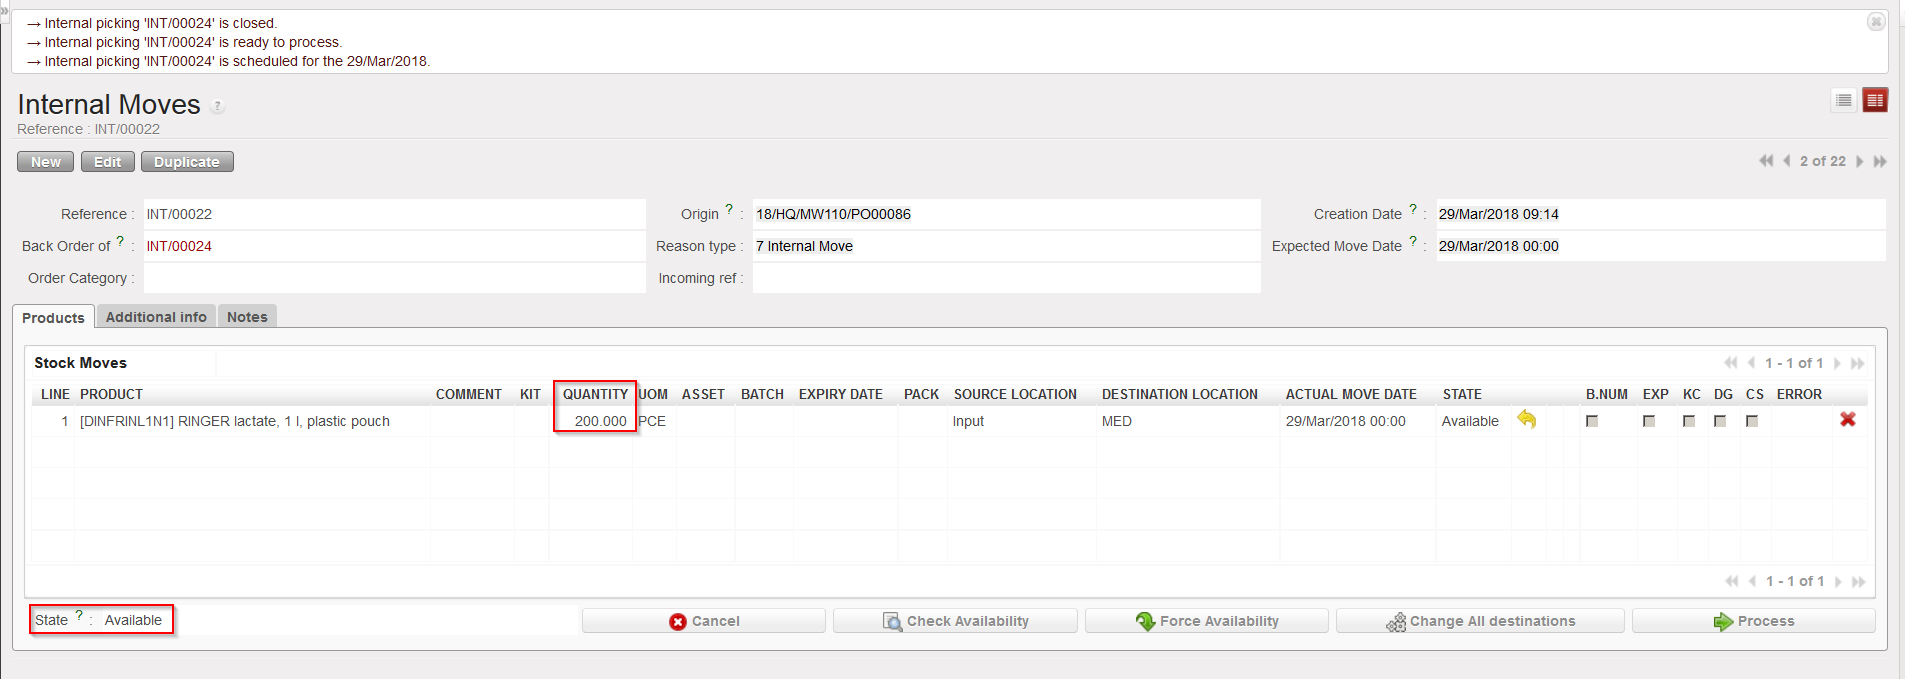
Initial INT with non conformed goods in back-order
New INT with conformed goods in state “Closed“
4. On the initial INT, click again on the “Process” button.
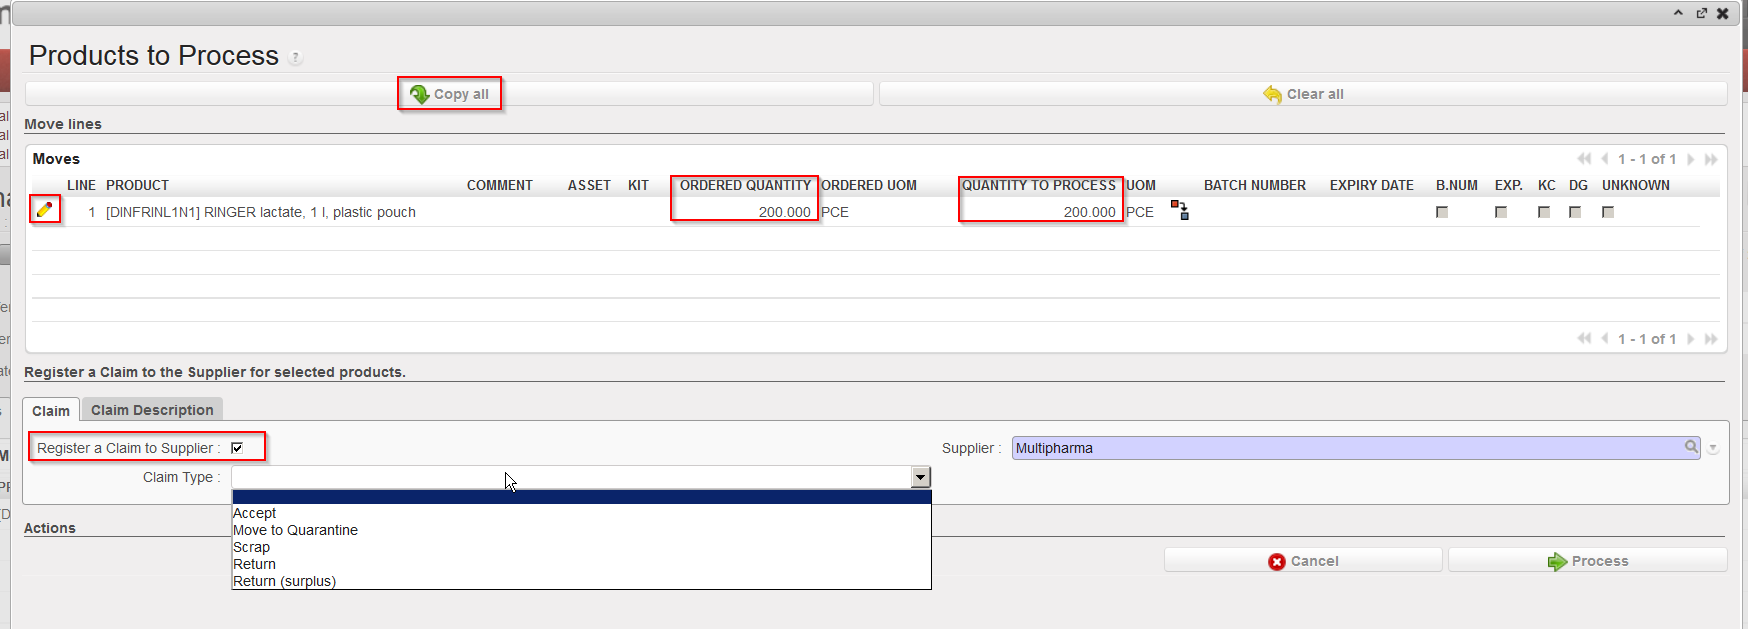
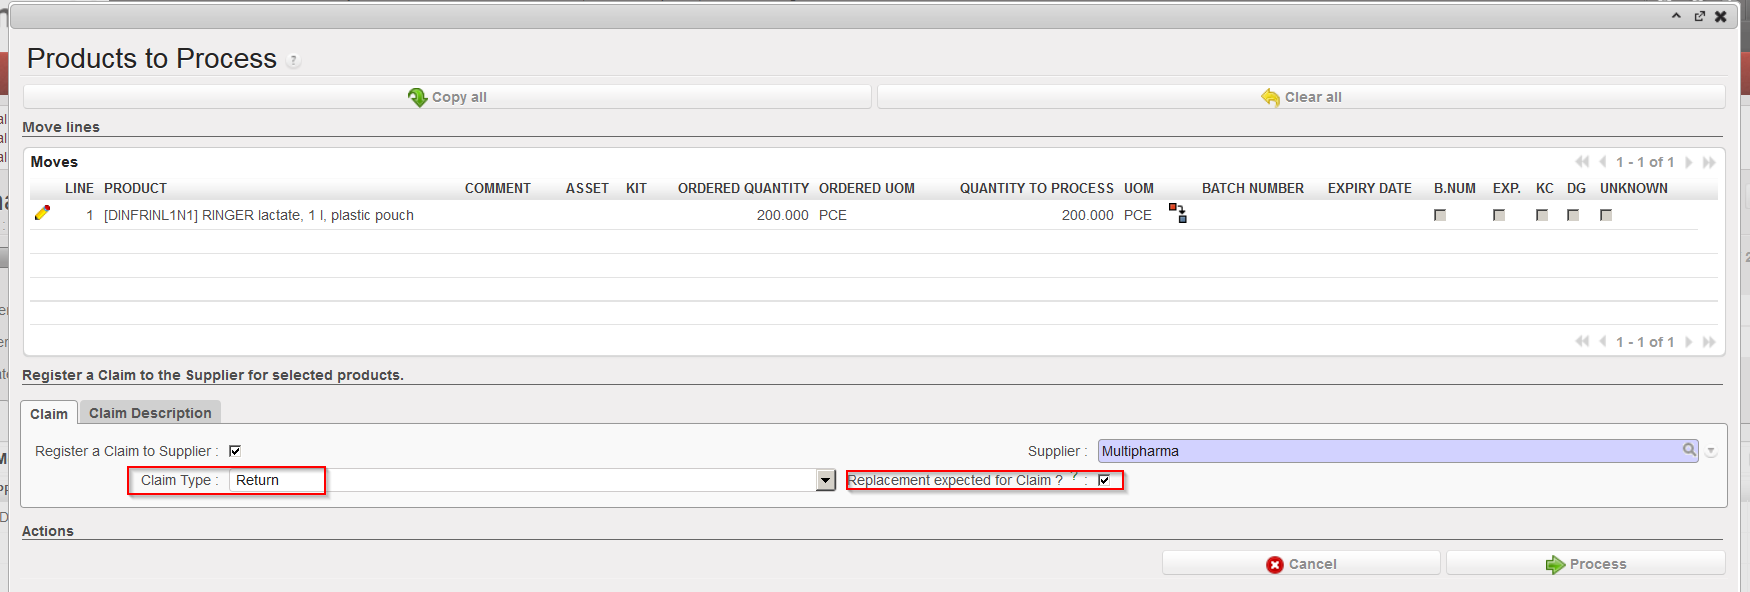
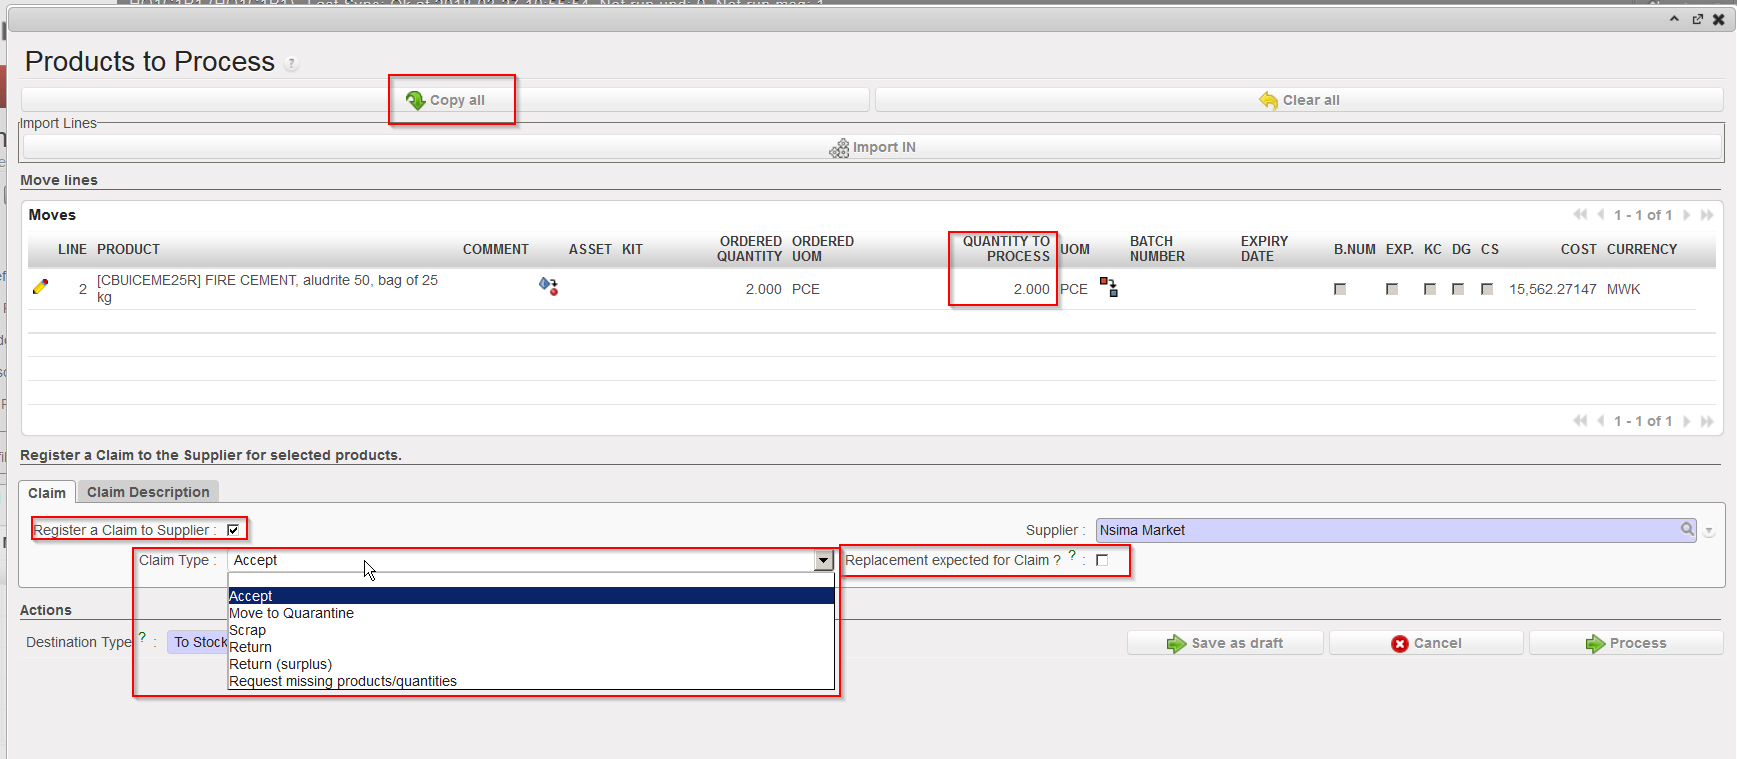
5. On the “Products to Process” screen, click on the “Copy all” button if all remaining product lines and quantities should be included in a claim. Otherwise, use the pencil icons and select products/quantities you want to make a claim for.
6. Tick the checkbox “Register a Claim to Supplier“.
Processing the non conformed goods
7. If empty, enter the supplier.
8. As Claim Type, select from the drop down list one of the following options:
“Accept”, if you have decided to accept the goods.
“Move to Quarantine”, if you are quarantining the goods.
“Scrap”, if you have decided to destroy the goods.
“Return”, if you are returning the goods to the supplier
“Return (surplus)” if you are returning goods because the supplier delivered an excessive quantity.
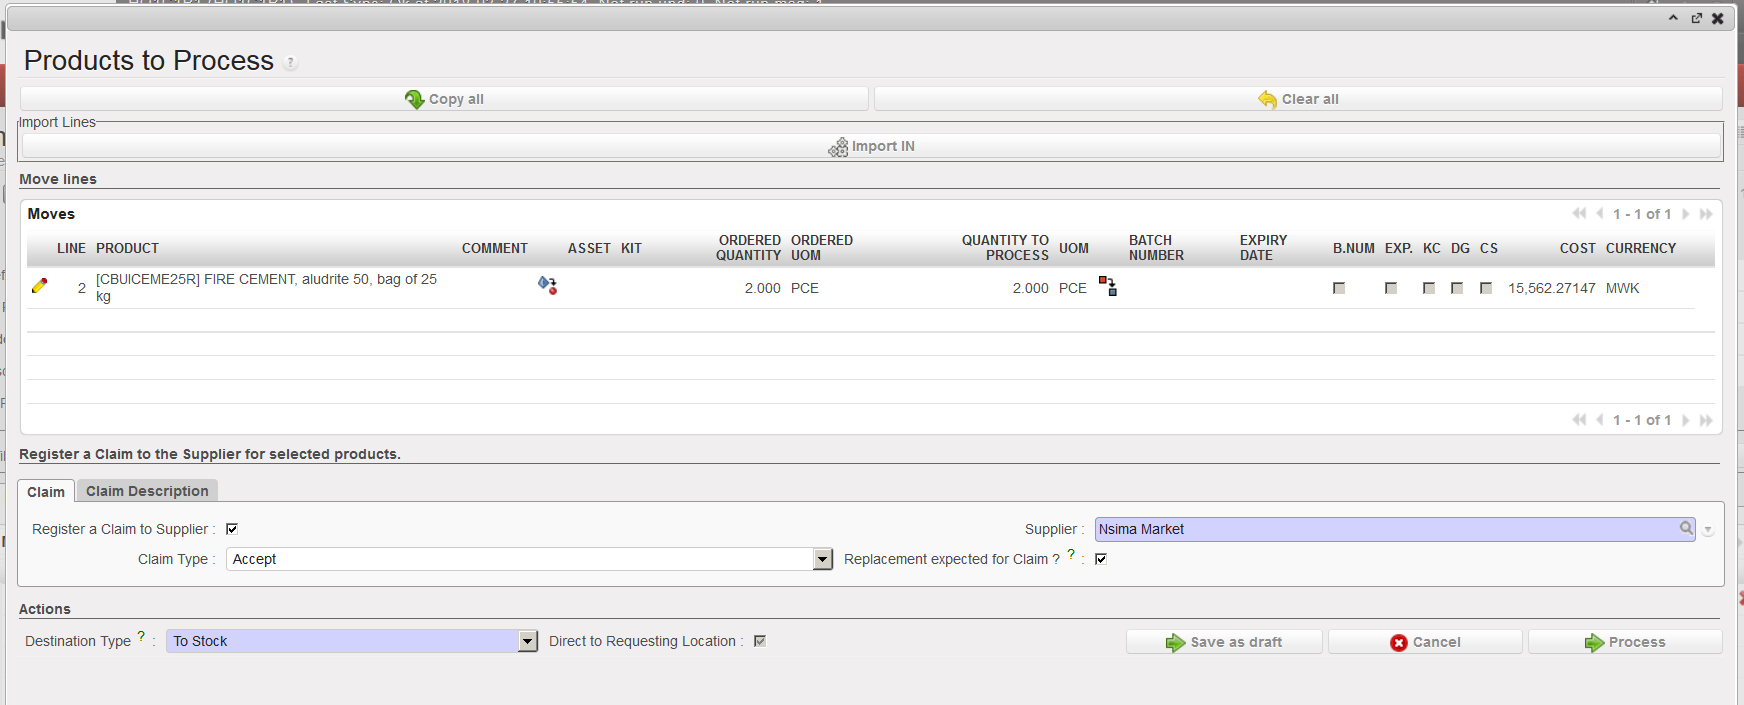
9. Tick the “Replacement expected for Claim” checkbox if you have already agreed with the supplier that the products will be replaced.
10. Use the “Claim Description” tab if you want to enter a description for the claim.
Requesting replacement for non conformed goods
Note that if you want to create different claim types for a same INT(e.g. if you want to return some goods but scrap others) you will have to process the above transaction in several steps (i.e. repeat it).
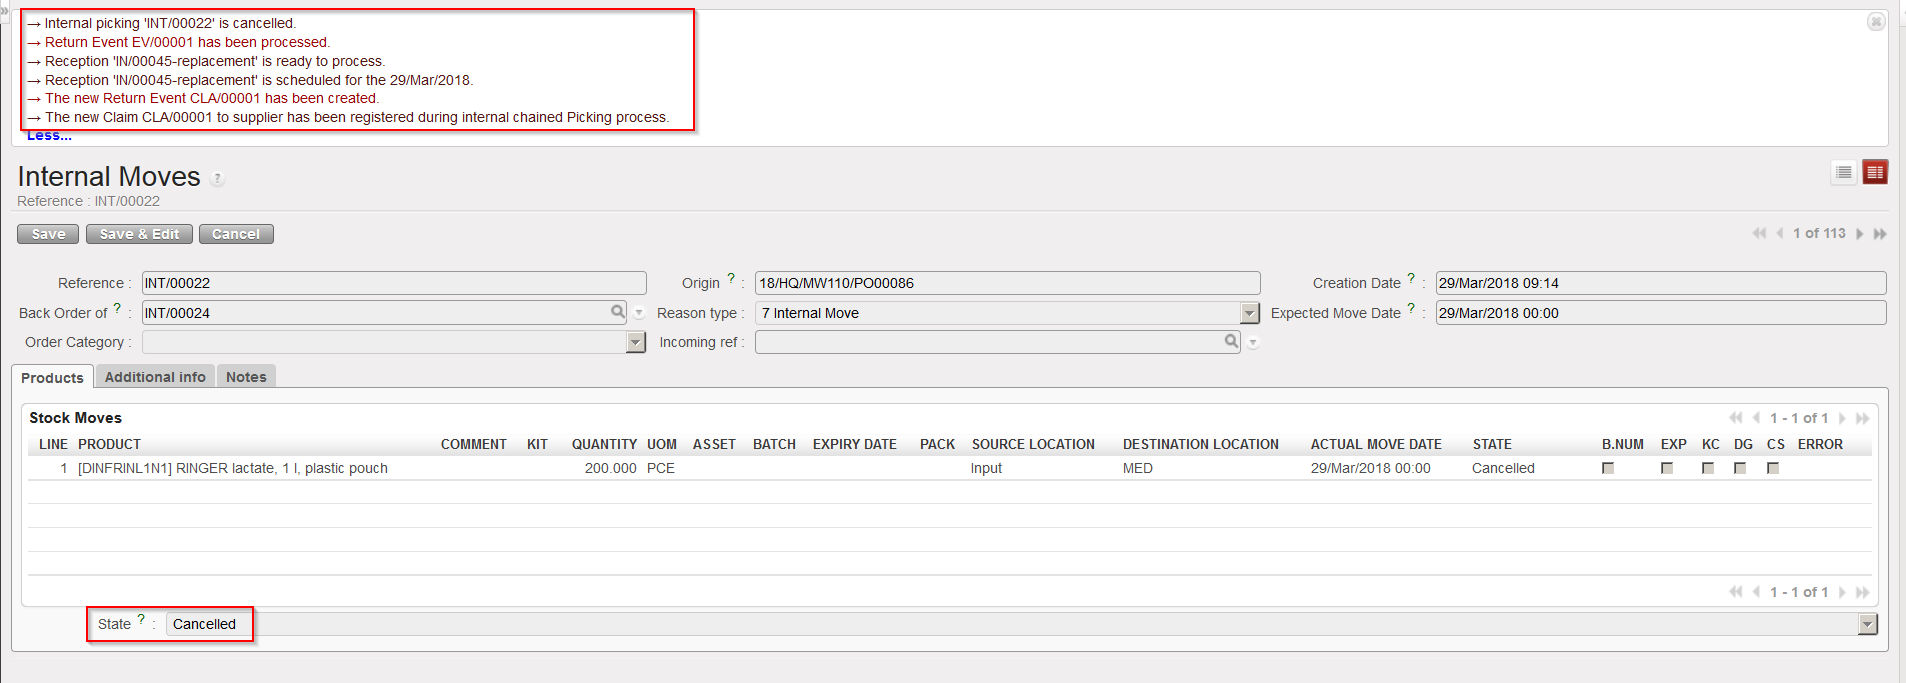
11. Click on the “Process” button.
INT cancelled
With the above selected options (claim type = Return and replacement of goods requested), the system:
Cancels the INT.
Creates a supplier claim with an event and process this event.
Creates a Picking Ticket (PICK-return) to pick the goods from the “Input” location and return them to the supplier.
Creates an Incoming Shipment (IN-replacement) for the replacement of the goods.
Updates the partner master data sheet of the supplier (“Claims” tab) to show that a claim was raised to this supplier.
B. HOW TO CREATE A CLAIM FROM AN INCOMING SHIPMENT
It may happen that you realize that goods delivered by a supplier dot not conform with the confirmed order before any reception is done. In this case you may raise the claim from the IN.
Go to:Warehouse / Warehouse Management / Incoming Shipments
Locate and open the Incoming Shipment corresponding to the supplier delivery.
Click on the “Process” button.
Receive the conformed goods but not the non-conformed goods. The system will create (and process and close) a new IN with the received conformed products while the initial IN will stay open as a back-order with the non-conformed products. Note that conformed goods may be received in the “Input” location, directly in the requesting location or in cross docking according to the situation.
On the initial IN, click again on the “Process” button.
On the “Products to Process” screen, click on the “Copy all” button if all remaining product lines and quantities should be included in a claim. Otherwise, use the pencil icons and select products/quantities you want to make a claim for.
Tick the checkbox “Register a Claim to Supplier“.
Processing the non conformed goods
7. If empty, enter the “Supplier“.
8. As “Claim Type“, select from the drop down list one of the following options:
“Accept“, if you have decided to accept the goods.
“Move to Quarantine“, if you are quarantining the goods.
“Scrap“, if you have decided to destroy the goods.
“Return“, if you are returning the goods to the supplier.
“Return (surplus)” if you are returning goods because the supplier delivered an excessive quantity.
“Request missing products/quantities” if some products or some quantities are missing in the supplier delivery (i.e. do not conform with the supplier packing list)
9. Tick the “Replacement expected for Claim” checkbox if you have already agreed with the supplier that the products will be replaced.( note that this will consequently split the related line in the related PO)
10. Use the “Claim Description” tab if you want to enter a description for the claim.
Requesting replacement for non conformed goods
Note that if you want to create different claim types for a same IN(e.g. if you want to return some goods but scrap others) you will have to process the above transaction in several steps (i.e. repeat it).
11. Click on the “Process” button.
INT cancelled
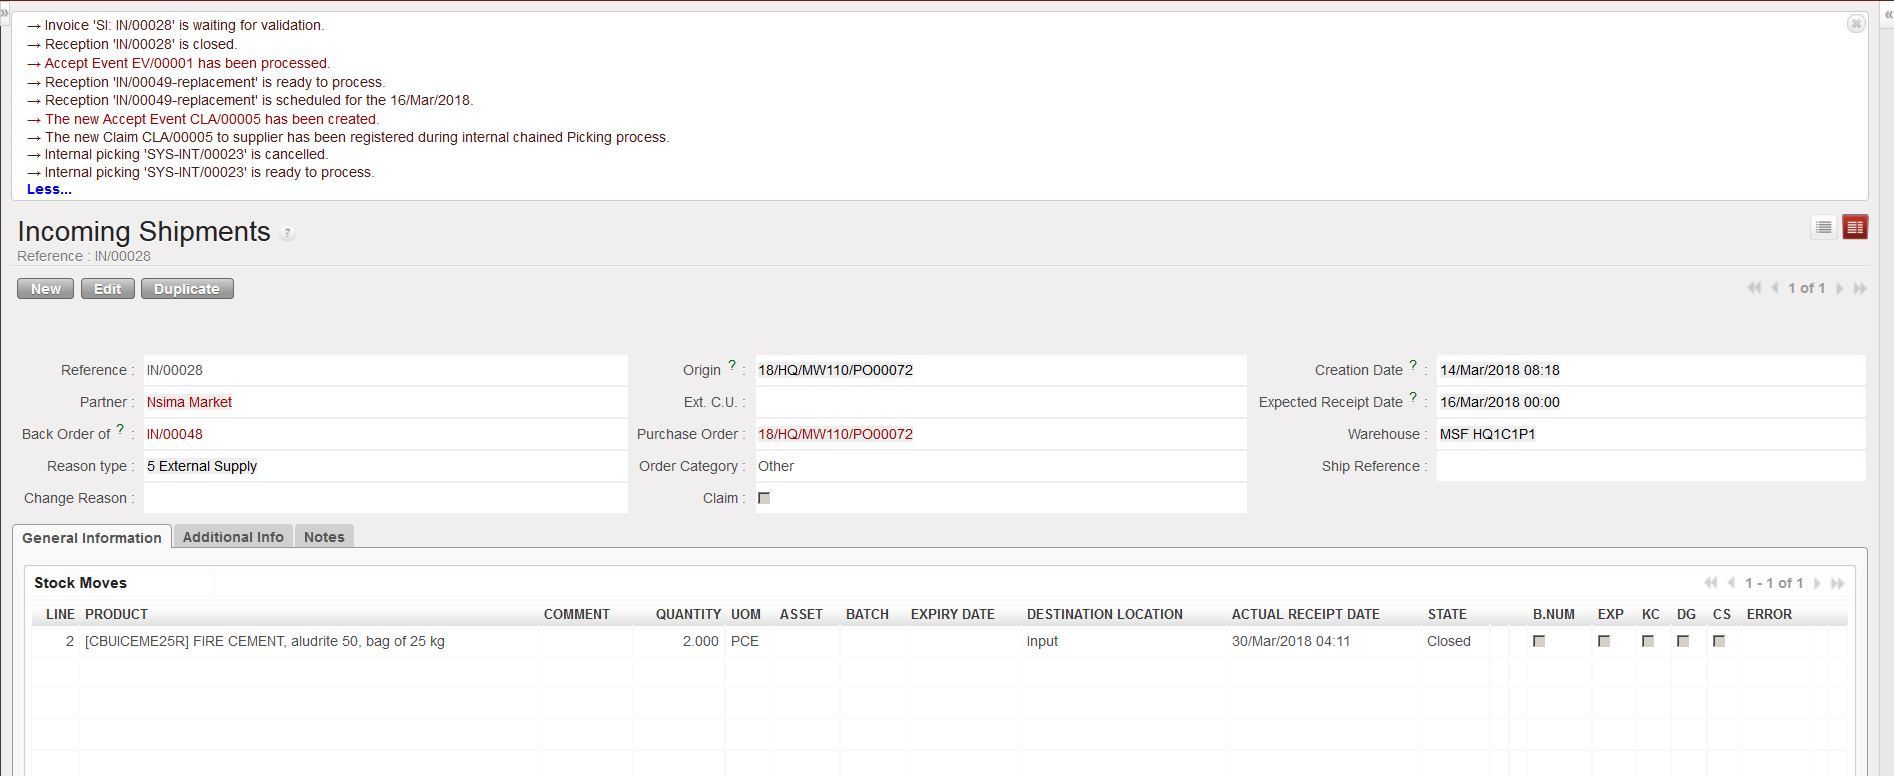
With the above selected options (claim type = Accept and replacement of goods requested), the system:
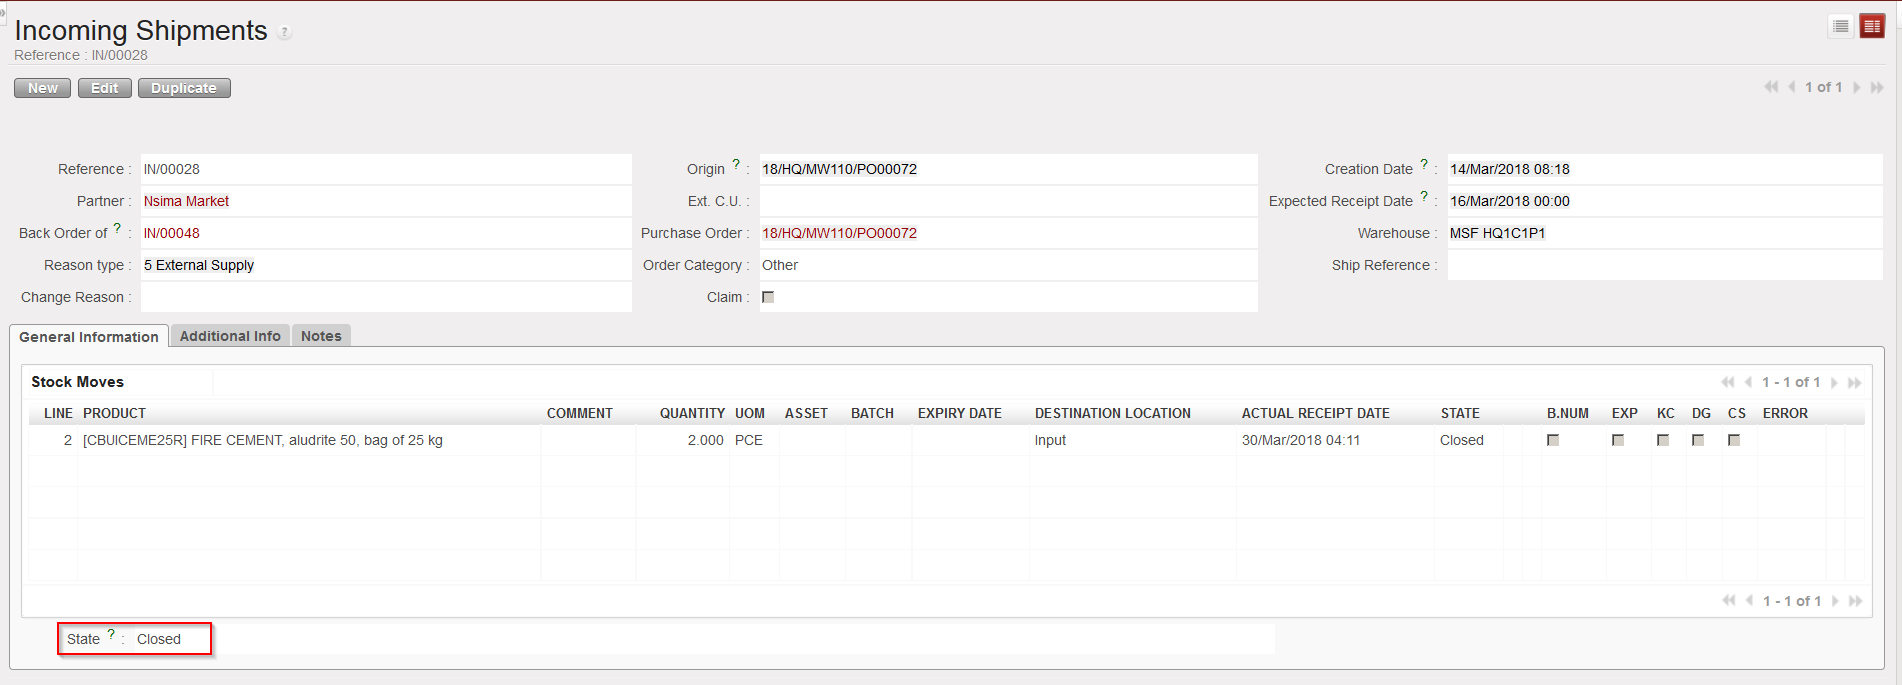
Processes and closes the IN.
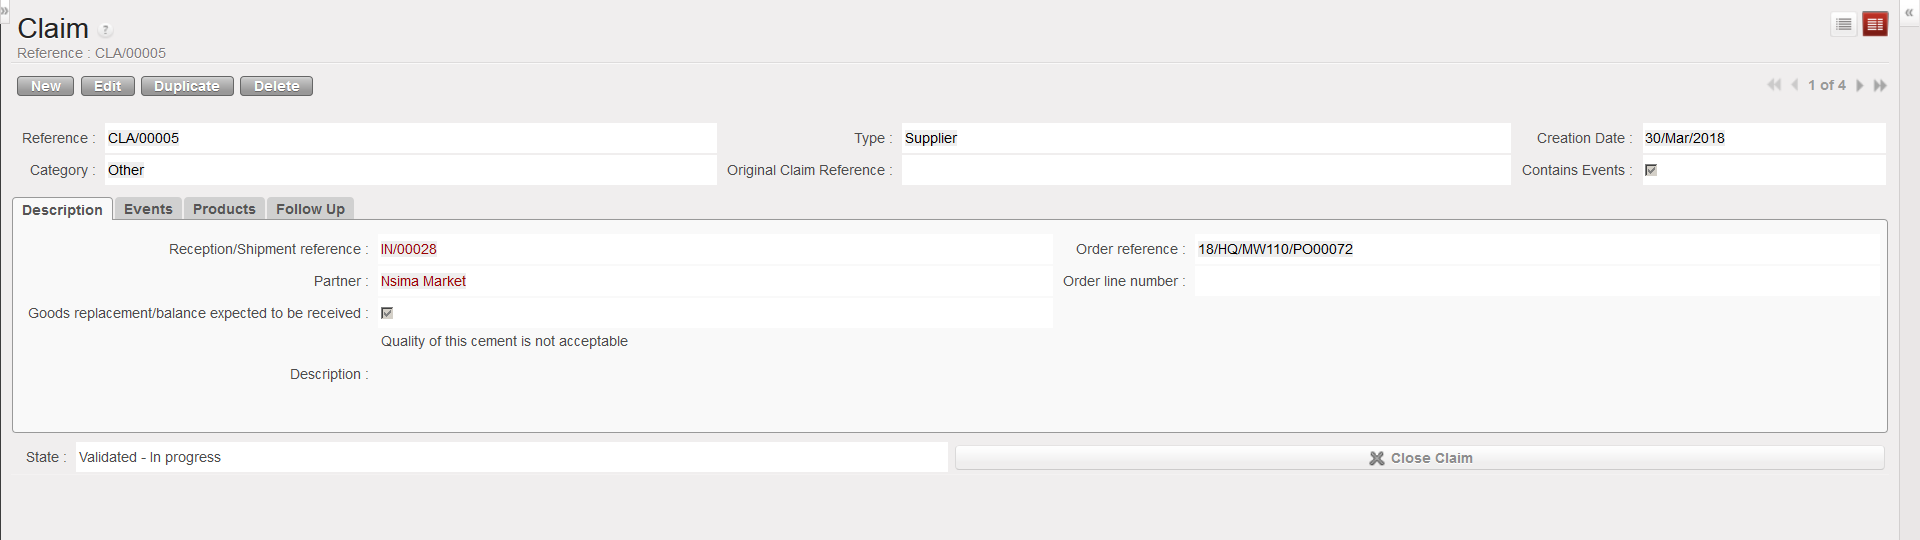
Creates a supplier claim with an event and process this event.
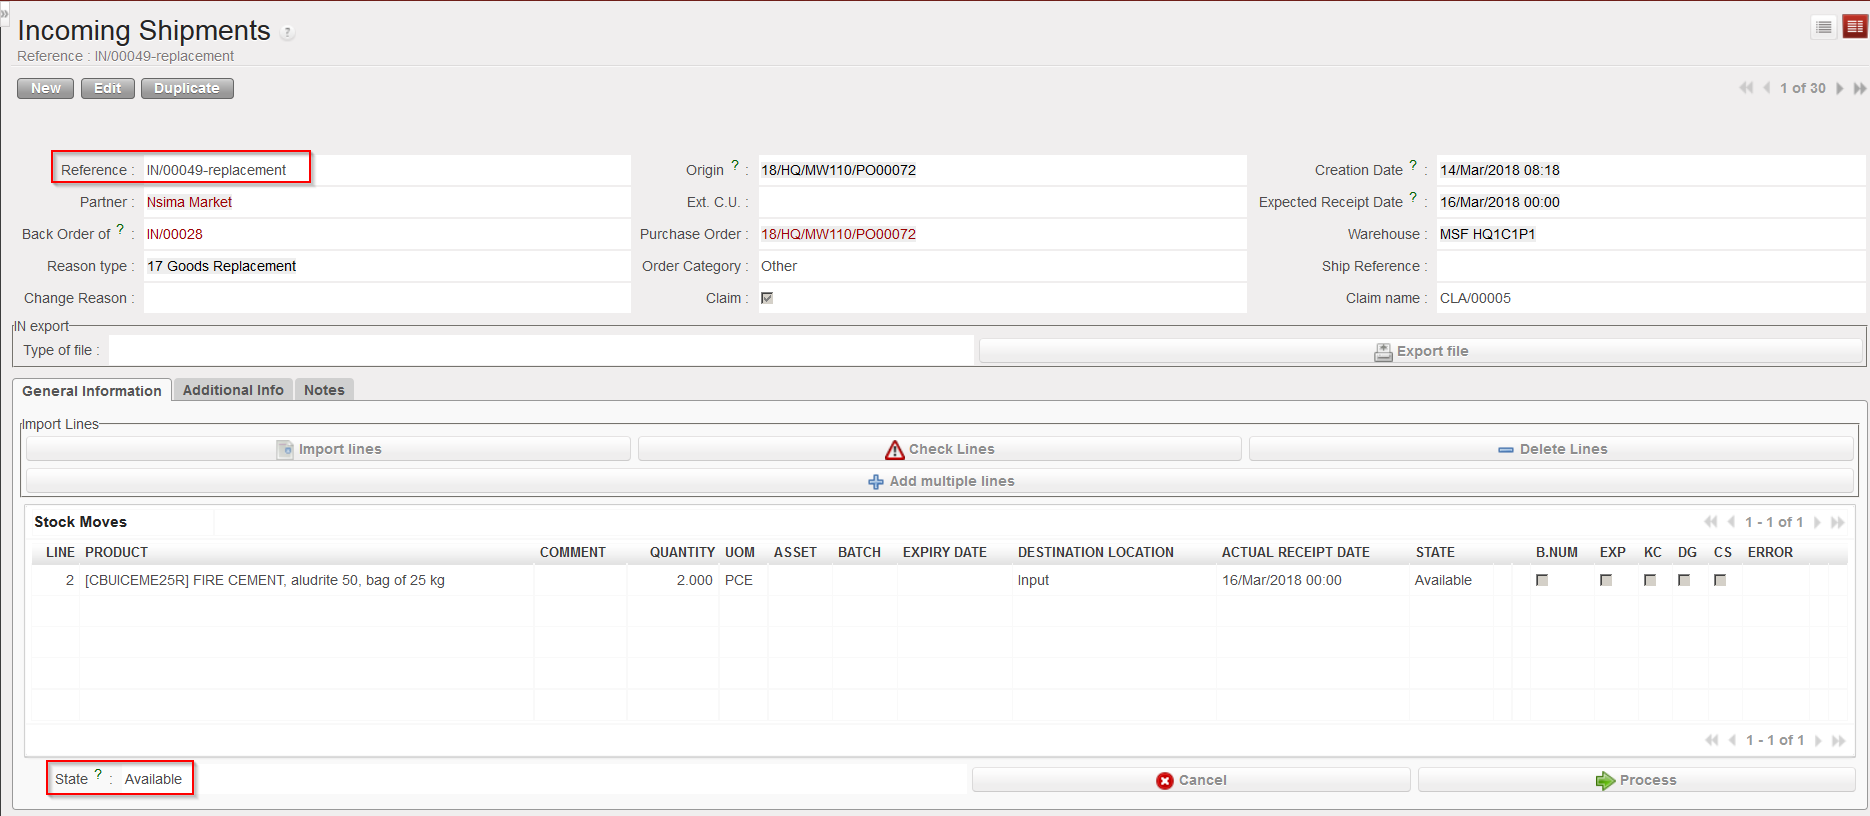
Creates an Incoming Shipment (IN-replacement) for the replacement of the goods. This is actually the consequence of the processing of the event.
Updates the partner master data sheet of the supplier (“Claims” tab) to show that a claim was raised to this supplier.
Quantitative and qualitative analysis of products may happen at different times. In most cases, the products will be counted and nominally checked at the point of reception, and if they do not correspond to the confirmed order at this point, the supplier should be contacted and a claim should be raised.
Claims raised during reception, can be created at two steps: from the Incoming Shipment or from an Internal Move.
An exception to this is the situation where the goods have been delivered directly into the “Cross docking” location or into Stock if the “Direct to Requesting Location” checkbox was left ticked when processing the IN. In these cases the claim should be raised from scratch.
Another situation is the one in which goods have been in stock for a certain period after reception. If there is an issue with these goods and if you realize that this is due to the supplier, a claim from scratch can also be created at this point.
In some cases, you may need to create a claim for the supplier of the transport, for example because the goods were damaged as a result of transportation and this would be a claim type transport.
Creating a claim will allow us to record what is wrong with the delivery received, and what we have decided to do with the products (e.g. return them to supplier, destroy them,…). It may be necessary to contact the supplier before creating the claim. Any claim created will also be recorded in the Supplier’s record. If the products are sent back to the supplier (via a return event being created within the claim), this will impact the final invoice to pay to the supplier to ensure that we do not pay for goods which we have not kept.
Note that if a claim is created by a UniField instance and addressed to another (supplier) UniField instance, the synchronization will create a customer claim on the supplier instance.
We use cookies to ensure that we give you the best experience on our website. If you continue to use this site we will assume that you are happy with it.