Supply User Manual ENG -> 5. Warehouse -> 5.2 LU-SU4101: Incoming Shipments -> M. HOW TO RECEIVE A PRODUCT MANAGED BY EXPIRY DATE
M. HOW TO RECEIVE A PRODUCT MANAGED BY EXPIRY DATE
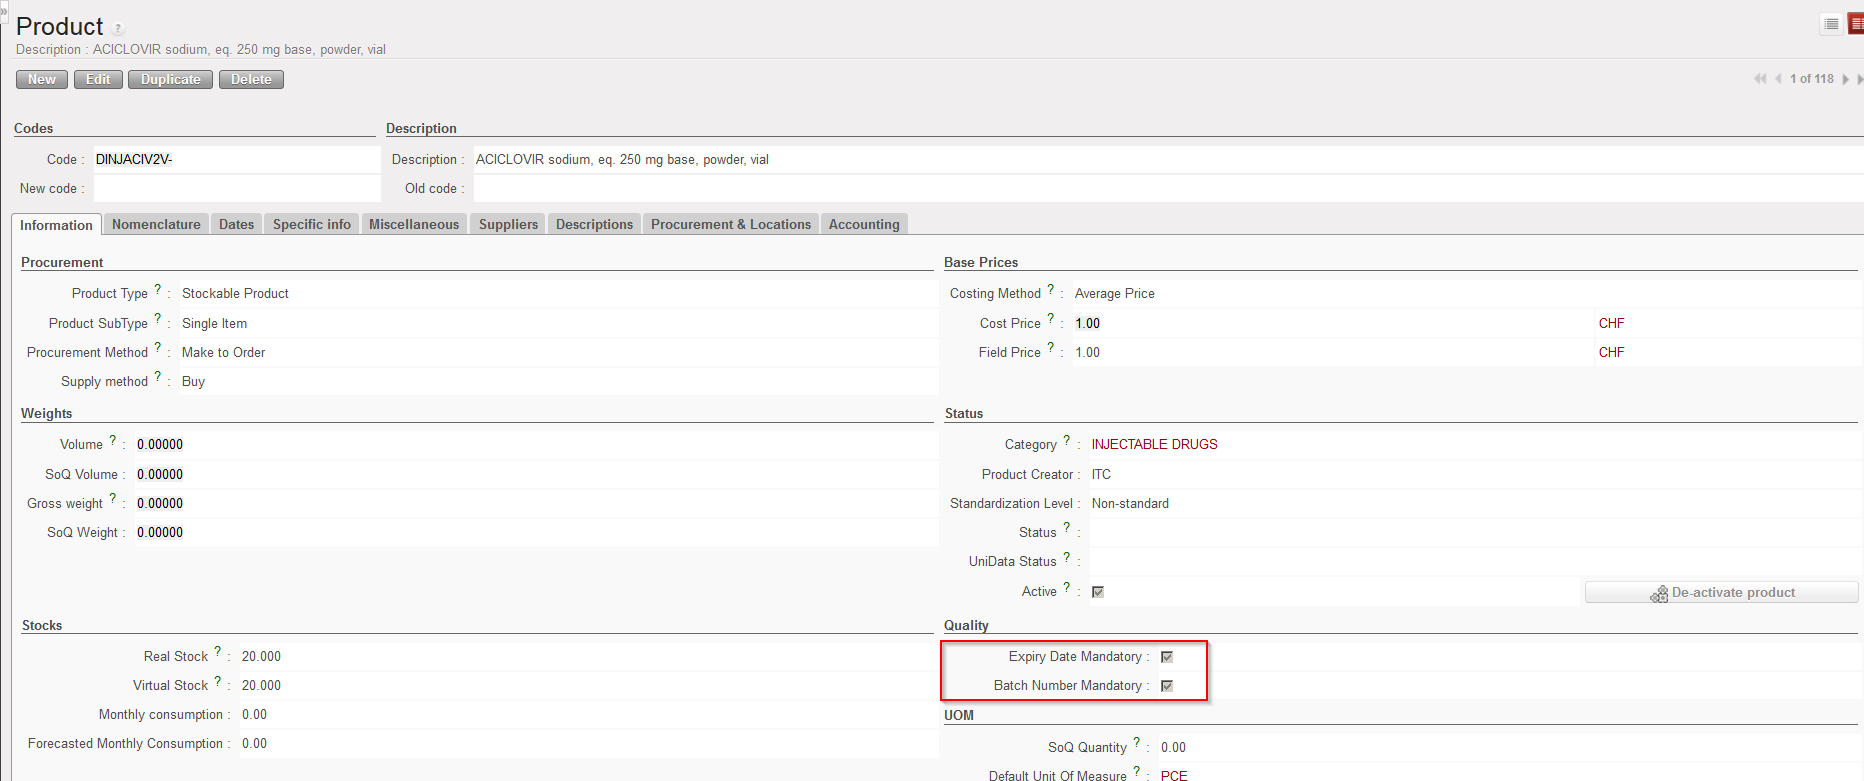
Products can be followed by expiry dates and/or batch numbers according to their settings as defined in their PMD sheet.
|
|
|
PMD sheet – ED/BN settings |
Some products, mostly drugs and other medical items are managed by expiry dates. This expiry date will have to be entered in the system at the first reception so that it can be viewed during the lifespan of the product in the system and will “follow” the product until its delivery to the client (including from one instance to another).
Note that ED/BN are actually master data as these records may be reused in other transactions This means that if a product is received and the ED “DD/MM/YYYY” and BN “X” are declared during its reception, the BN “X” with ED “DD/MM/YYYY” will be created (as master data) during the reception process. If later on, the same product with the same BN and same ED is received once again, you will not have to recreate the BN but you will be able to reuse it.
A product can be followed by BN and ED or by ED only (but not by BN only). If a product followed by BN and ED is received, the system will require the encoding a BN and an ED for this product when the IN will be processed. If a product followed by ED only is received, the system will require the encoding of an ED for this product when the IN will be processed. In both cases a BN (master data) will be created. In the first case (BN&ED mandatory) a BN will be created with the encoded BN and ED. In the second case (ED mandatory), a BN will be created with the encoded ED and a BN like MSFBN/00000X (e.g. MSFBN/000098) will be given to this batch by the system.
If a product is not defined as BN/ED mandatory in its PMD sheet, you will not be able to enter a BN/ED when this product will be received.
Batch numbers (master data) can be viewed through Warehouse / Traceability / Batch numbers.
Note that changing the BN/ED settings of a PMD sheet is not recommended, especially if the product has already been used.
These settings are defined by the OC and may vary from OC to OC (i.e. a product can be managed by BN&ED by an OC but not by the other one). Note that such a situation could have negative impacts if inter-section transactions are done between these OCs.
For UniData products, these settings should be defined a HQ level and should be the same for all instances related to this HQ. For local products, these settings should be defined at coordination level and should be the same for all instances related to this coordination.
In the below example, we receive a product which is followed by ED only. Note that in most of the cases, a product will be followed by BN and ED or not (i.e. both flags will be present in the PMD sheet or none of them). Please refer to your OC procedures to understand which products should be followed by BN and/or ED within your section.
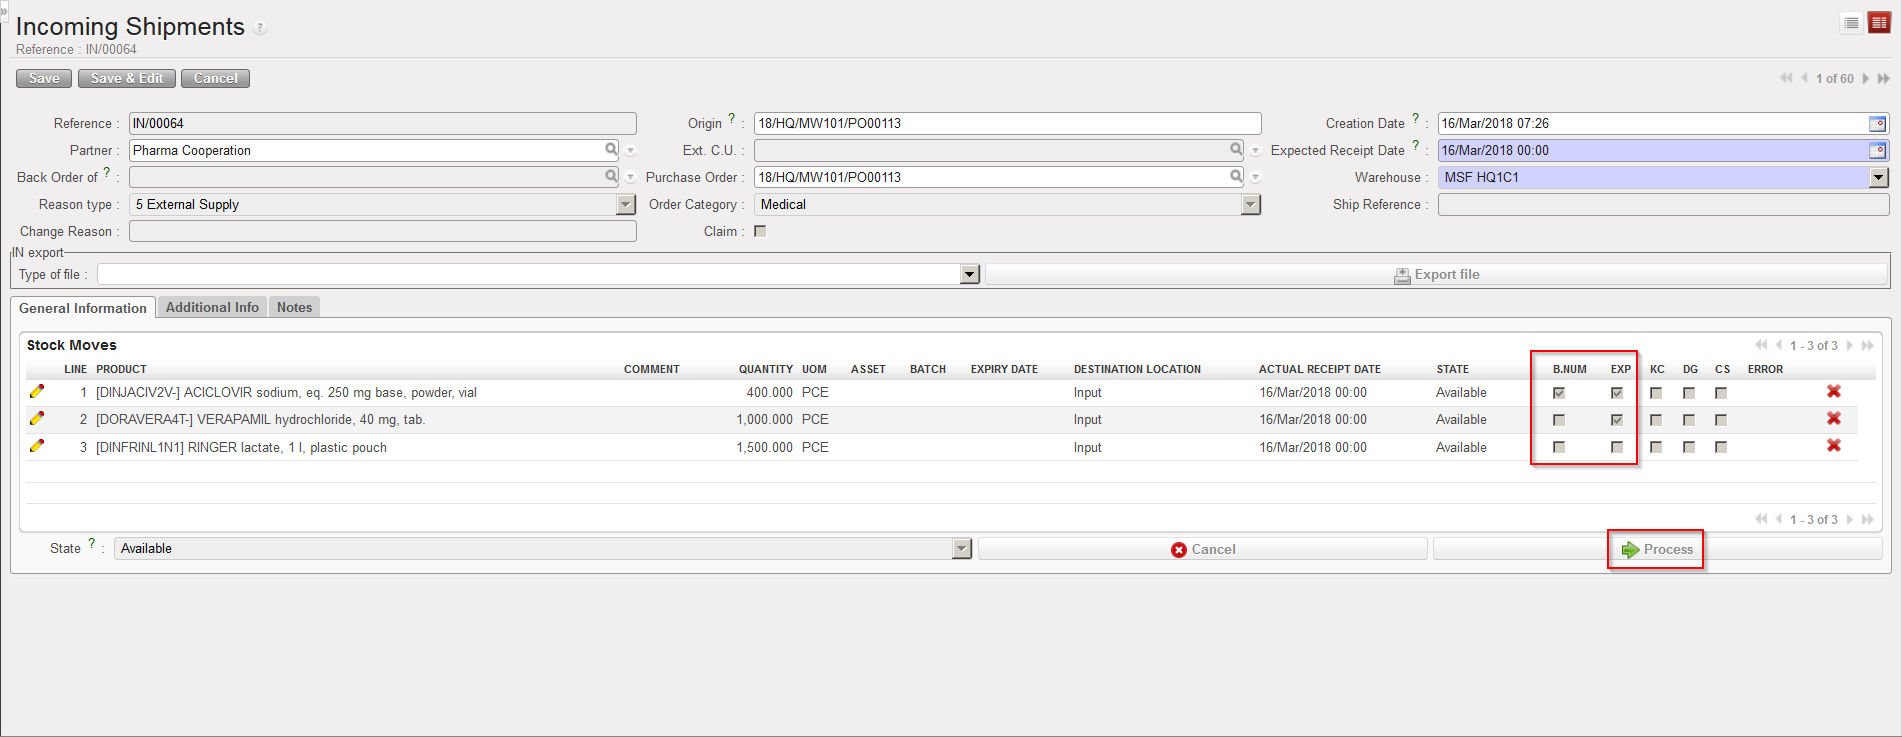
Go to: Warehouse / Warehouse Management / Incoming Shipments
- Open the Incoming Shipment you wish to receive.
- Click on the “Process” button. Note that on the main IN screen, you may already see, thanks to the columns “B.NUM” and “EXP” which products will require a BN and/or an ED.
|
|
|
Incoming Shipment showing BN and ED settings of the products |
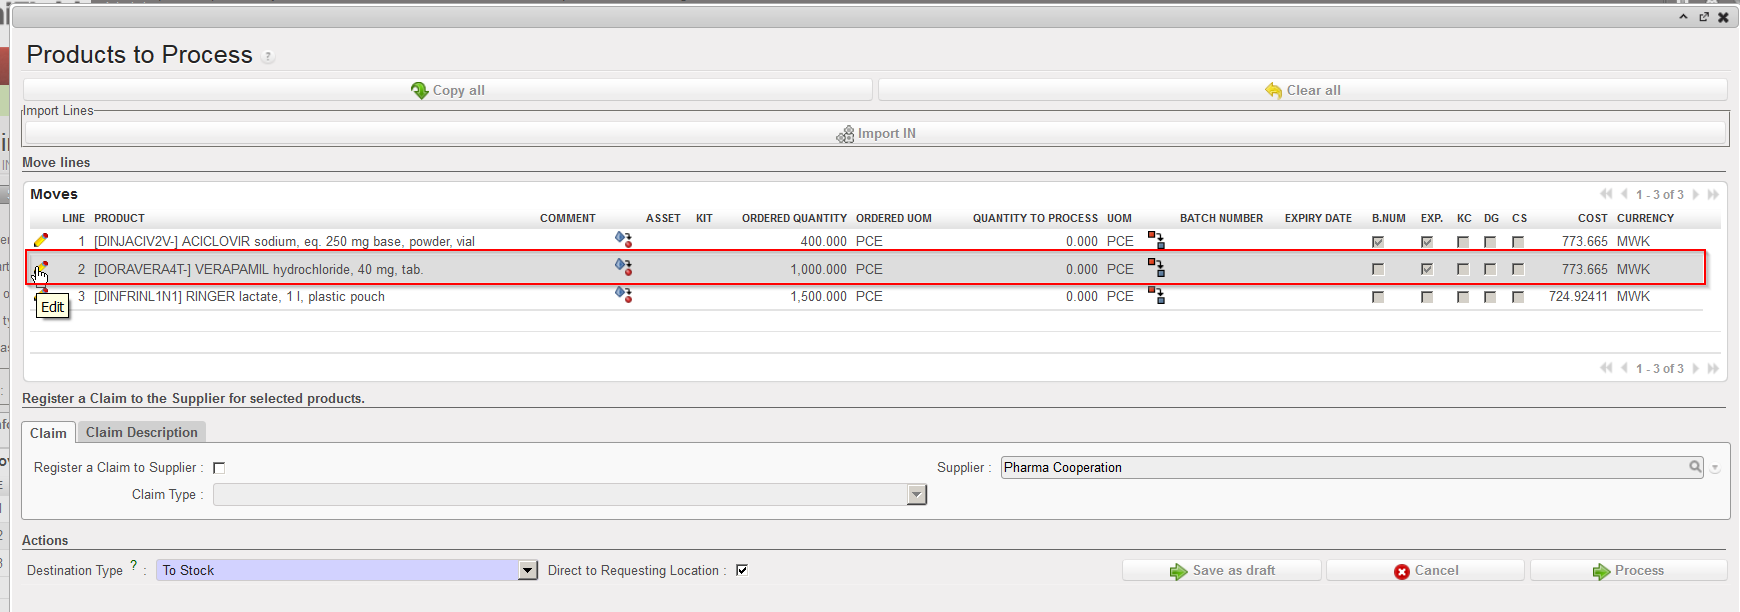
3. On the “Product to Process” screen, select the line you wish to receive via the pencil ![]() located on its left. Note that in this case we are receiving a product which is managed by ED only.
located on its left. Note that in this case we are receiving a product which is managed by ED only.
|
|
|
“Products to Process” screen showing BN and ED settings of the products |
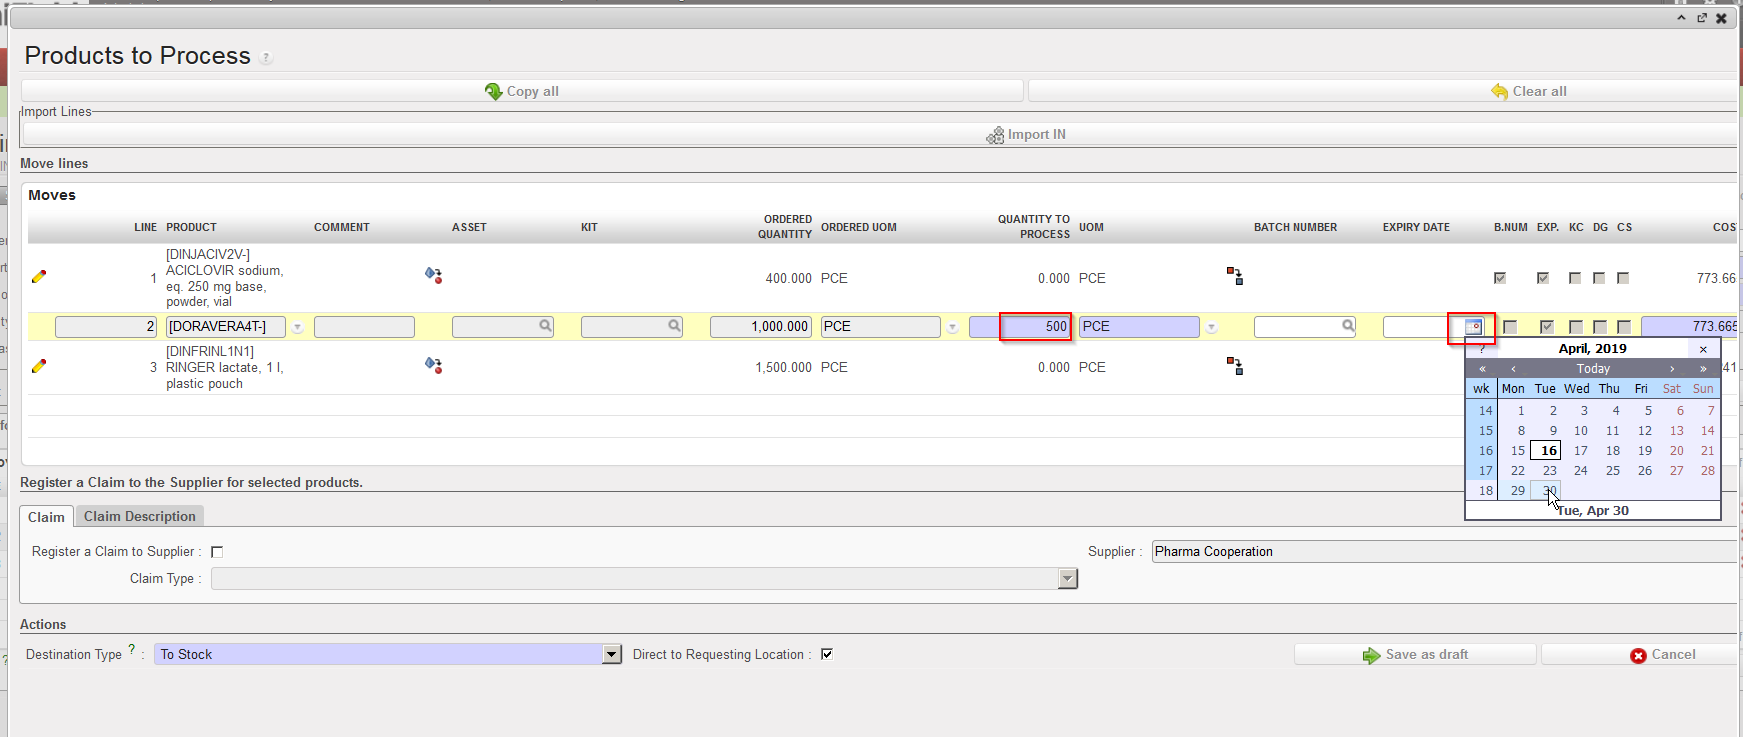
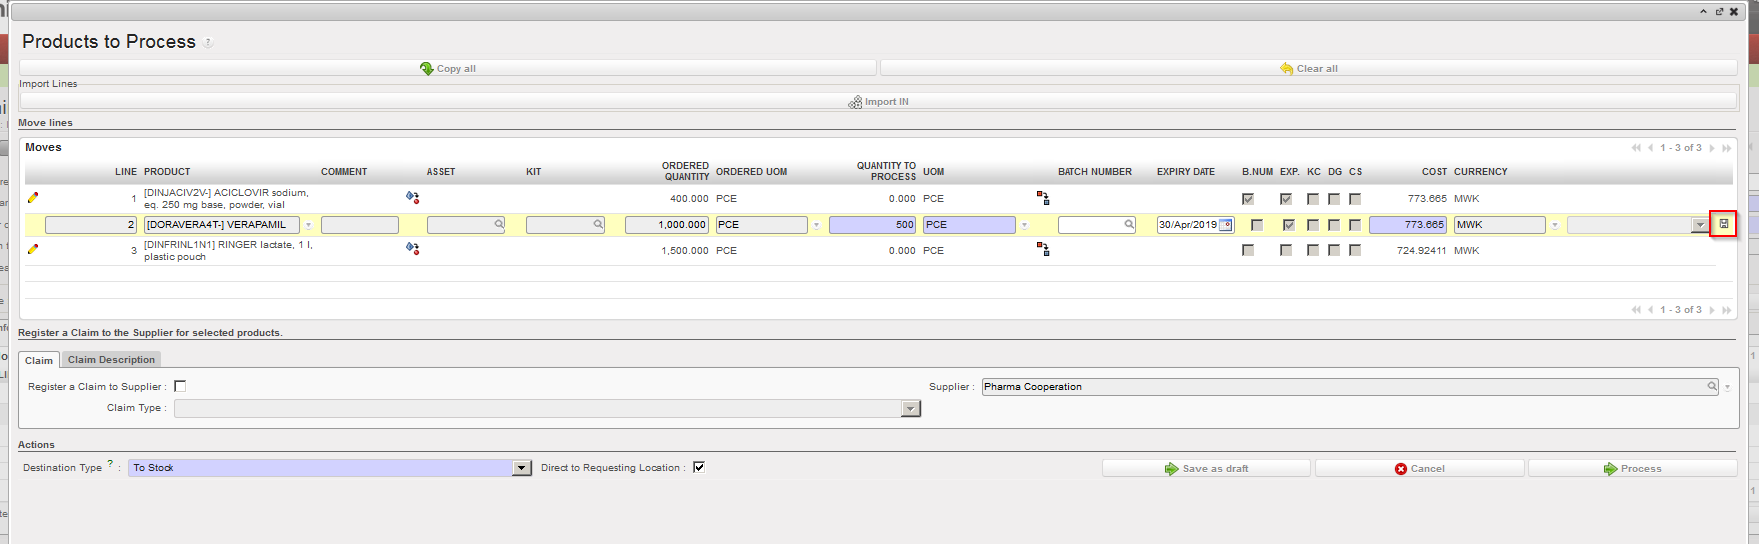
4. Enter in the field “Quantity to process“, the quantity that you are receiving.
5. Click on the calendar icon located on the right of the “Expiry Date” field. Use the calendar to indicate when the received product will expire.
|
|
|
Entering quantity and ED of a product upon reception |
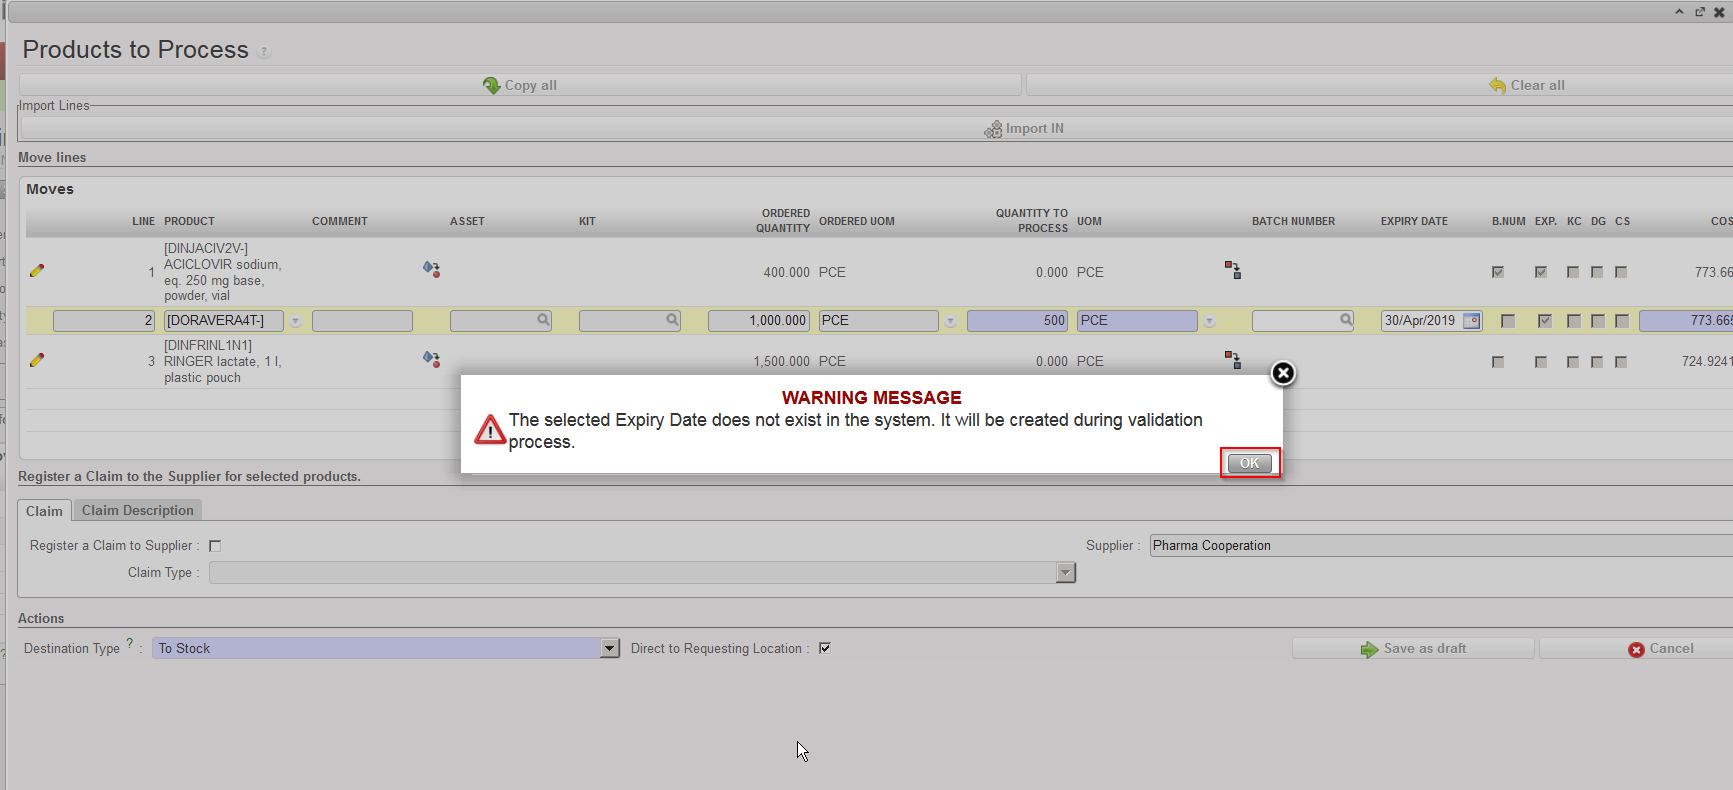
6. If the ED (actually the batch master data) does not exist on the instance, a message informs you that this ED will be created in the system. Click “OK“. Note that if the ED already exists on the instance for this product, UniField will link the entered ED with the batch master data and retrieve it.
|
|
|
Information message for ED creation |
7. Save the line by clicking on the floppy disk icon ![]() located on the right of the line (sometimes hidden).
located on the right of the line (sometimes hidden).
|
|
|
Saving the received line after entering quantity and ED |
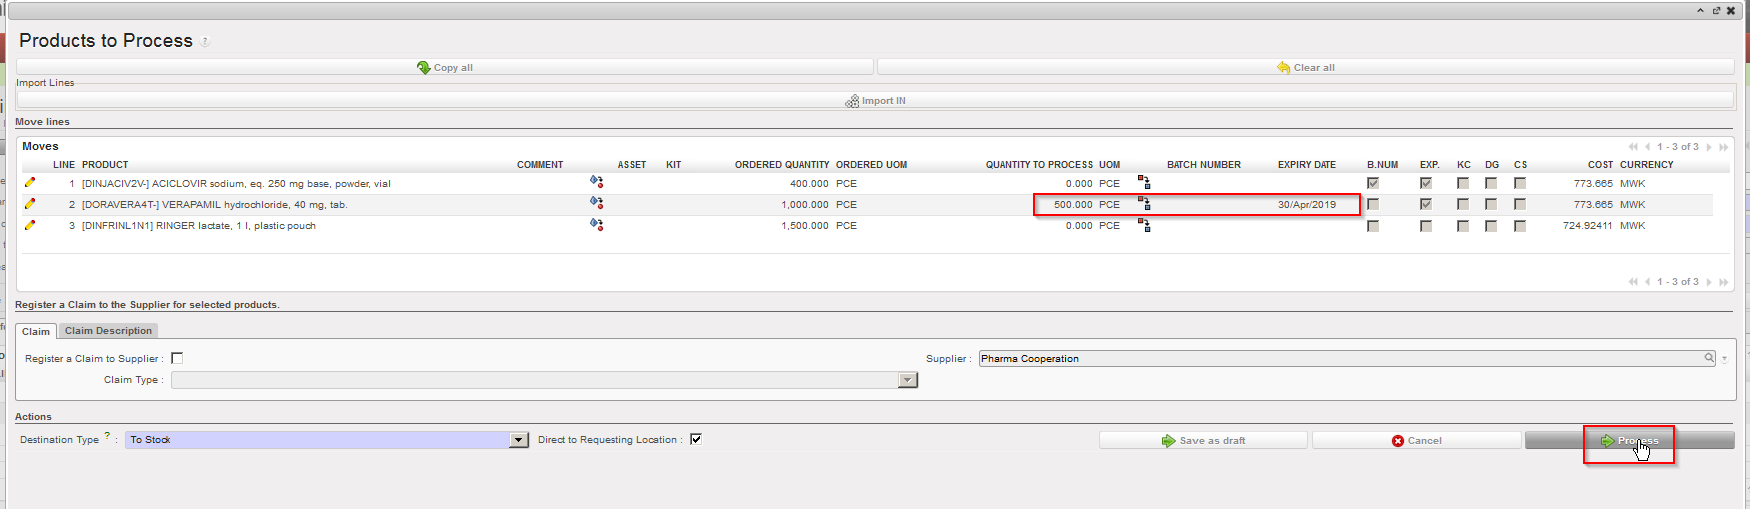
8. If you wish to receive additional products, complete additional lines and save them. Otherwise you may click on the “Process” button.
|
|
|
Processing the Incoming Shipment |
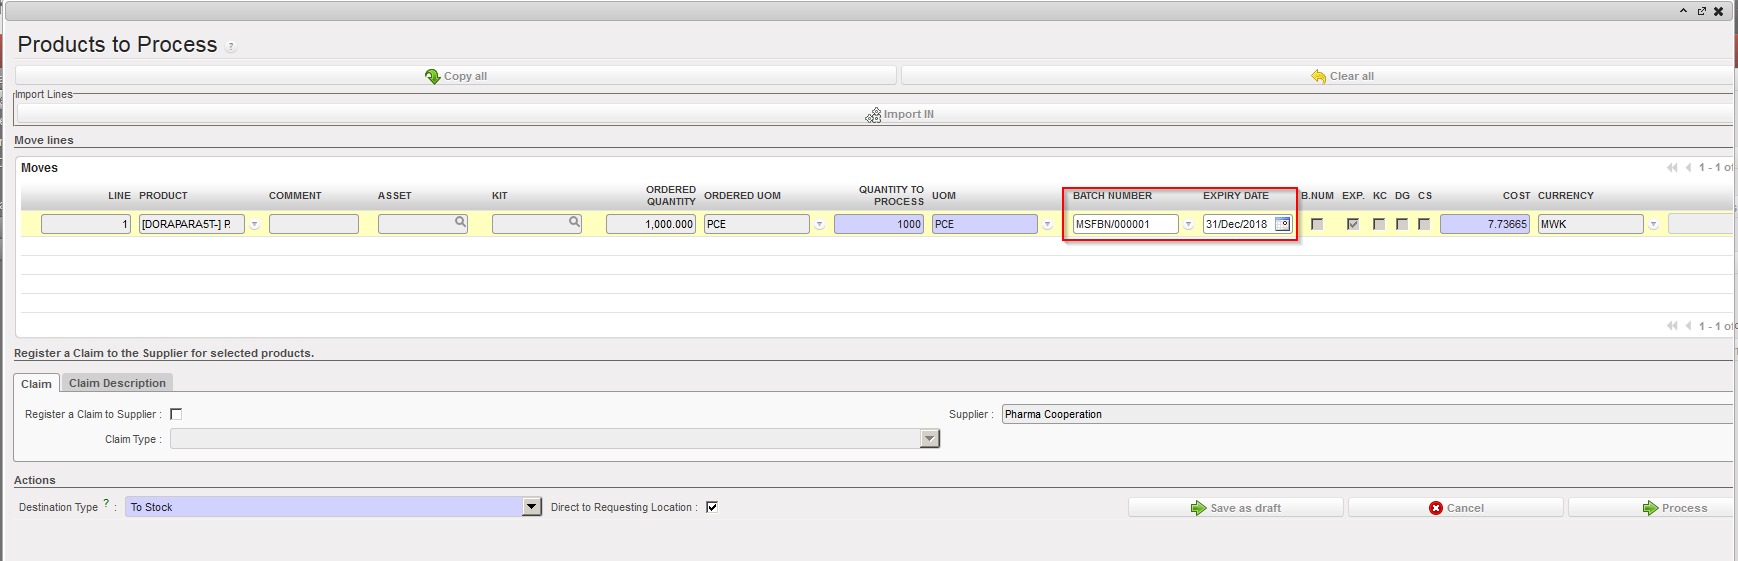
The product(s) reception has now been registered and product(s) are now in the specified location (MED in this example).
The batch master data can be seen through Warehouse / Traceability / Batch numbers. Note that in this example, as the product is ED mandatory only, the BN has been set by the system (to MSFBN/000010).
|
|
|
Batch master data |

During the reception process, if you enter an ED which already matches with a batch master data existing on the instance, UniField will simply link the entered ED with the batch master data and retrieve it.
|
|
|
Entered ED already existing on a batch master data for this product |
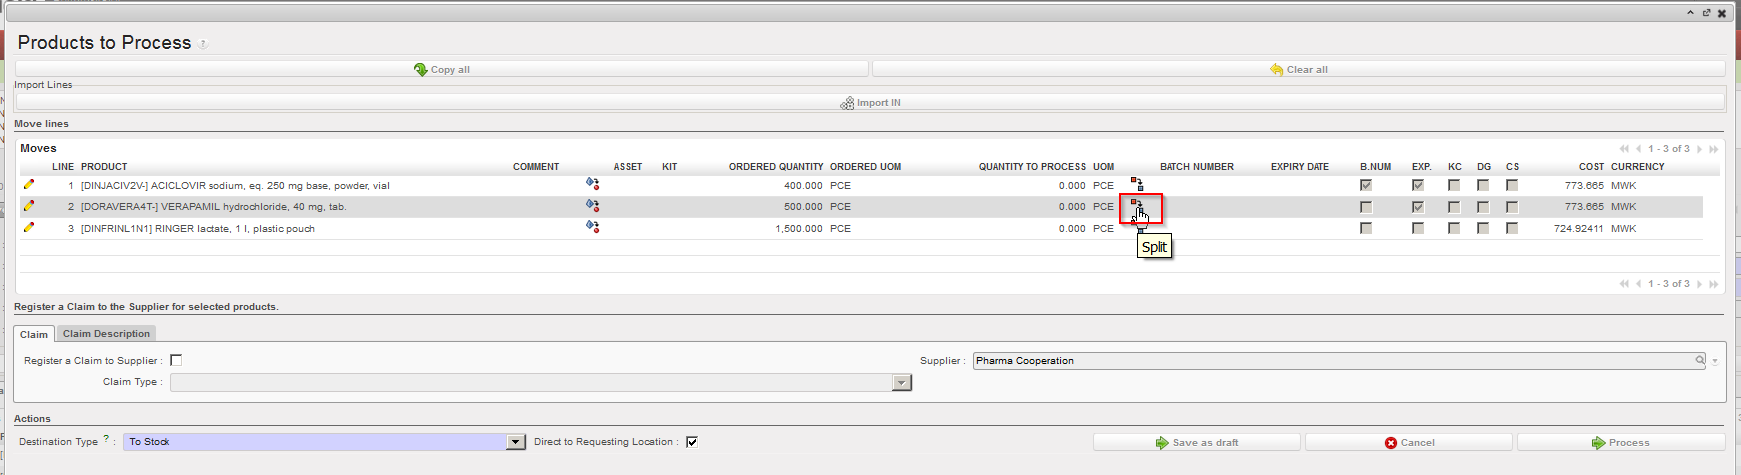
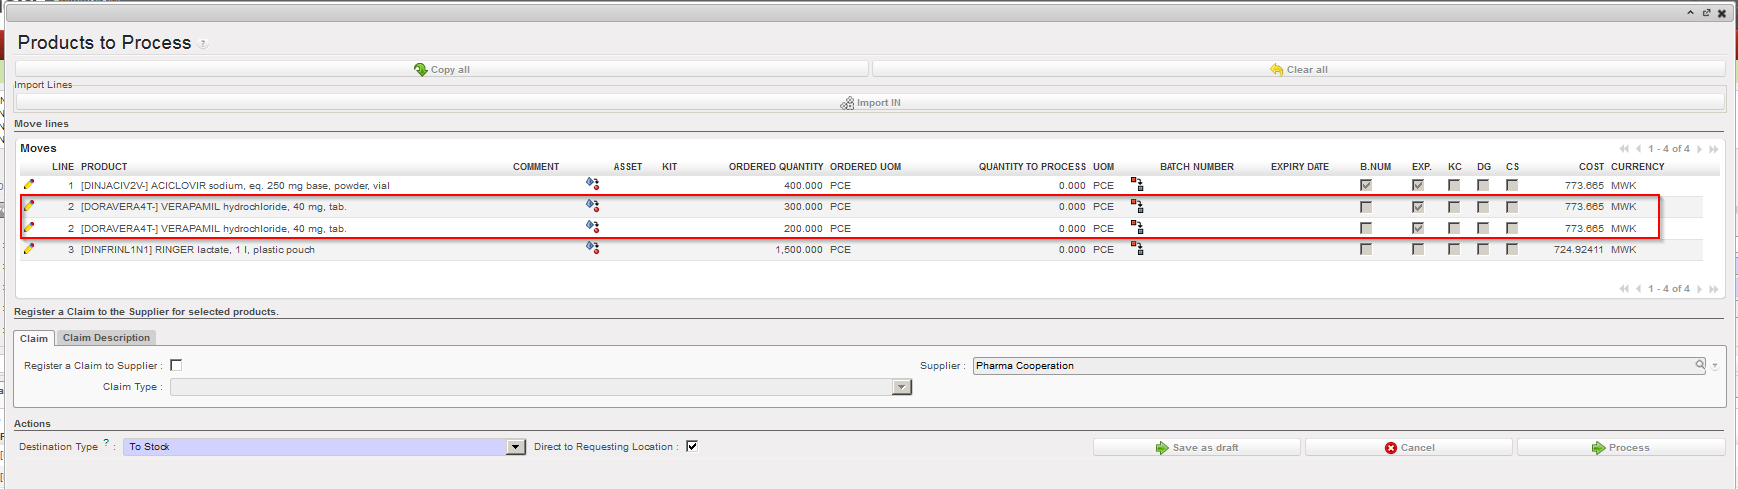
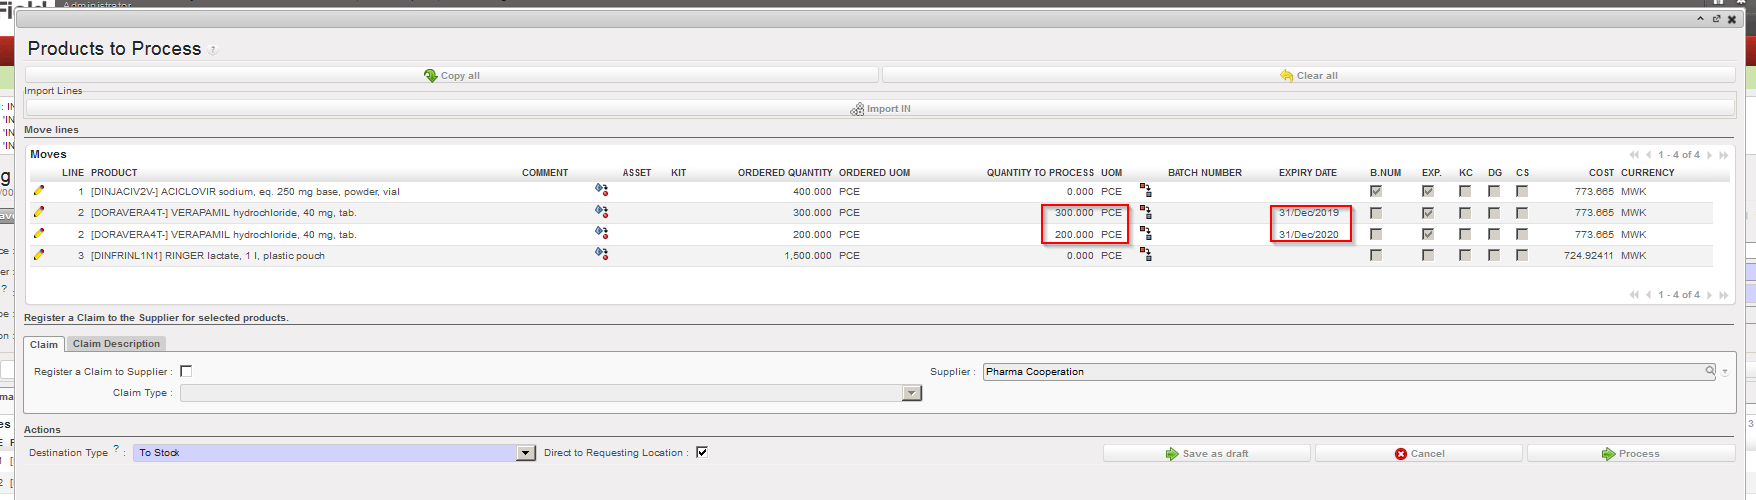
In some situations you may receive a same product with 2 different expiry dates in a single freight sent by the supplier. In this case, you need to split the line in the “Product to Process” screen by clicking on the Split icon ![]() . Specify the quantity to be split and click “OK” on the “Split quantity” window. You can then receive the products and set the appropriate expiry dates.
. Specify the quantity to be split and click “OK” on the “Split quantity” window. You can then receive the products and set the appropriate expiry dates.
|
|
|
Splitting a line on the “Product to Process” screen |
|
|
|
Specifying the quantity to split |
|
|
|
Split line result |
|
|
|
Received quantities and corresponding ED entered |