UNIFIELD DIGITAL SIGNATURE
PREREQUISITES AND CONFIGURATION
D- Activation of the signature functionality in an instance
F- Provide access: User allowed to sign on existing user
G- Provide access: signature access only
H- Provide access: Document creator
I- Closing signature functionality in an instance
J- Creating the signature sample
K- Search the object/report to sign via Signature Follow-Up
L- Applying signature on objects/reports
M- Self-maintenance – edit/inactivate signature
N- Document creator definition
P- Invite users to sign object/report
Q- Remove a user from list of users invited to sign object/report
R- Signature statuses and closing signature
INTRODUCTION
Definition
UniField Digital Signature is a functionality developed in UniField allowing UniField users to sign documents created and produced in UniField. The signature is applied on the object/report in UniField and could be exported/printed out on PDF from UniField anytime as far as the instance is accessible. The functionality is activated on instances and is not synched. It is possible therefore to have it activated in some instances only within a country program.
UniField
Scopes
At the time of pilot, the scope of the functionality is limited to the following objects/reports.
Finance and Supply documents created in UniField.
- Supply objects in following modules (Statuses indicated where Digital Signature is available):
- Orders:
- IR Internal Request (Draft; Validated)
- FO Field Order (Draft; Validated/-p; Confirmed/p)
- Purchases:
- PO Purchase Order (Draft; Validated/-p)
- Warehouse:
- IN Incoming shipment (Draft; Not/Available; Available Shipped; Closed)
- INT Internal Move (Draft, Not Available/Available)
- OUT Delivery Orders (Not Available/Available, Dispatched; Received, Cancelled)
- PICK Picking (Draft; Available; Closed)
- PI Physical Inventory (Validated; Confirmed)
- Orders:
- Finance objects and reports: Cash Reconciliation, Bank Reconciliation, Full Report, Supplier invoice, Donation invoice.
Notes:
- The scope does not include external attachments which were created/generated outside of UniField (hard copy invoice from suppliers, quotations from suppliers, contract, …).
- The signature functionality does not have any impact on object statuses and vice versa. It is possible to sign draft or validated, open, or cancelled object.
- The signature functionality could be closed on object of all statusesA “Closed” signature blocks the digital signature functionality and cannot be modified.
- Any objects with a digital signature available can be signed offline. The “Sign Off line” button is accessible in the “Signature” tab of the object.
Digital Signature functionality does not manage workflow. As consequence, the use of the digital signature needs to be handled in line with the prescriptions of the Authorization Table in regards of who needs to sign on a document, when a document is signed, in which status the signature should be applied, and on which order the signature fields should be filled.
PREREQUISITES AND CONFIGURATION
Prerequisites
Digital signature is an optional functionality which could be turned on and later off in a specific UniField instance. The activation/configuration of the functionality is handled at HQ by UniField support team.
The country programs request the UniField HQ support to activate the functionality
- Request to activate the digital functionality on specific instance
- List of users and their specific “sign” access requested for them. See below the options available.
Activation of the signature functionality in an instance
Digital signature is an optional functionality which could be turned on and later off in a specific UniField instance. The activation/configuration of the functionality is from “Reconfigure” module. This module is accessible by support profiles/admin profile only.
Go to Administration/Configuration/Reconfigure. The screen below is displayed. It allows to navigate to various reconfiguration screens.

Click on [next] ![]() button until you see the “Activate Electronic Validation” screen. The check box is not active.
button until you see the “Activate Electronic Validation” screen. The check box is not active.

Tick the check box and click on [finish] ![]() . There is no specific save button. Finish will save the modification and roll out the digital signature functionality in the system.
. There is no specific save button. Finish will save the modification and roll out the digital signature functionality in the system.
Available Sign Options
There are three access rights related to digital signature:
- Sign_user: allows a user to actually apply signature on an object/report. It does not give access to “document creator” tasks – see below definition of “document creator”. This group is given to user who are due to sign documents as per Authorization Table: e.g. LogCo, FinCo, Supply Manager, MedCo, Pc, HoM.
- Sign_document_creator_supply or finance: it opens the “document creator” functionality, on supply or finance objects/report. A document creator is able to select objects he/she has access and invite people to sign them. This access does not allow to apply signature. Drafting signature sample is not needed for a user with this access. This group is provided to supply users/finance users in order to allow them to invite other users to signing on objects and monitor the progression of the signature. It could be combined with Sign_user – in case the user needs to sign.
- Sign_document_creator_supply :. The user should be experienced inUniField with knowledge of how to search and find objects in UniField with key words like a PO#.
- Sign_document_creator_finance: The user should be experienced inUniField with knowledge of how to search and find objects/reports in UniField like a draft invoice or a register.
Provide access: User allowed to sign on existing user
The country programs define which user in each instance has access to sign. Note that there is only one access group allowing users to sign: “Sign_user “. It is valid to sign on supply or finance objects/report.
Two complementary steps are required to proper activate signature on user profile.
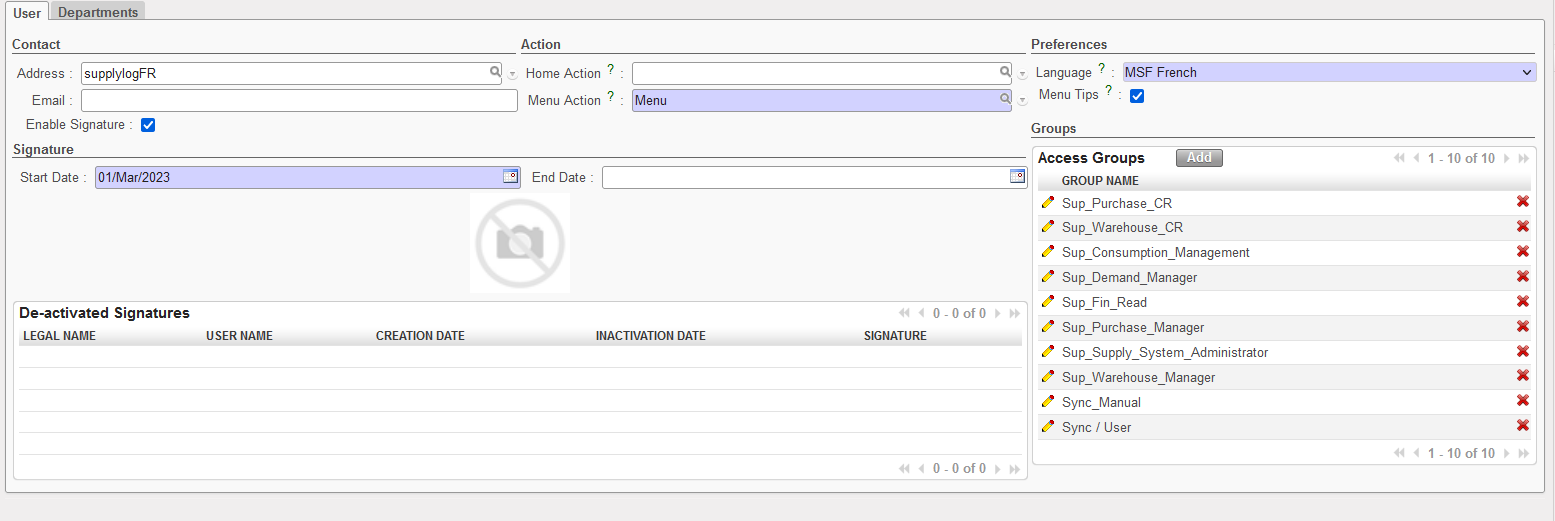
Go to Administration/users/users. Search the user profile to allow to sign.
Tick on check box [Enable signature]
It opens the signature fields of the user form.
-
- Specify the [start date] (could be in the past or in the future): this will be shown on the report of list of valid signatures. The user will be able to apply signature starting that date even on objects created before.
- [End date] could be left empty unless specific request by the country program to close a signature at specific date. The user self could also inactivate the signature at end of the contract.
-
- The user form could not be saved if the next step (add sign_user) is not done. Error message popping up.

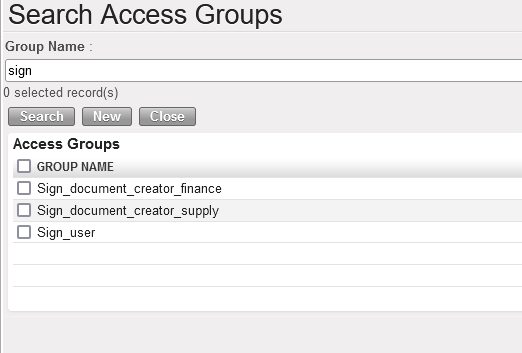
When [enable signature] has been checked, go to group, click on [add] button and search the group [sign_user] and add to the profile.
The profile could then be saved. The user has from now on access to signature.
Notes:
- Adding [sign_user] without activating [enable signature] does not open the signature option for the user. This is why it is good to start by activation.
- If the user is also document creator, the appropriate (supply or finance) document creator group needs also to be added.
Provide access: signature access only
The country programs define which signature access only need to be created for non UniField users (Medical, HR, …). Note that there is only one access group allowing users to sign: “Sign_user “. It is valid to sign on supply or finance objects/report.
Two complementary steps are required to proper activate signature on user profile.
Go to Administration/users/users.
Create the profile
Click on [new] to create new UniField profile. Fill the user header mandatory form and respective department as per Section’s instructions

Tick on check box [Enable signature] and add the access groups
Tick the check box [Enable signature] and add two groups: sync_user and sign_user. Then save the user form.
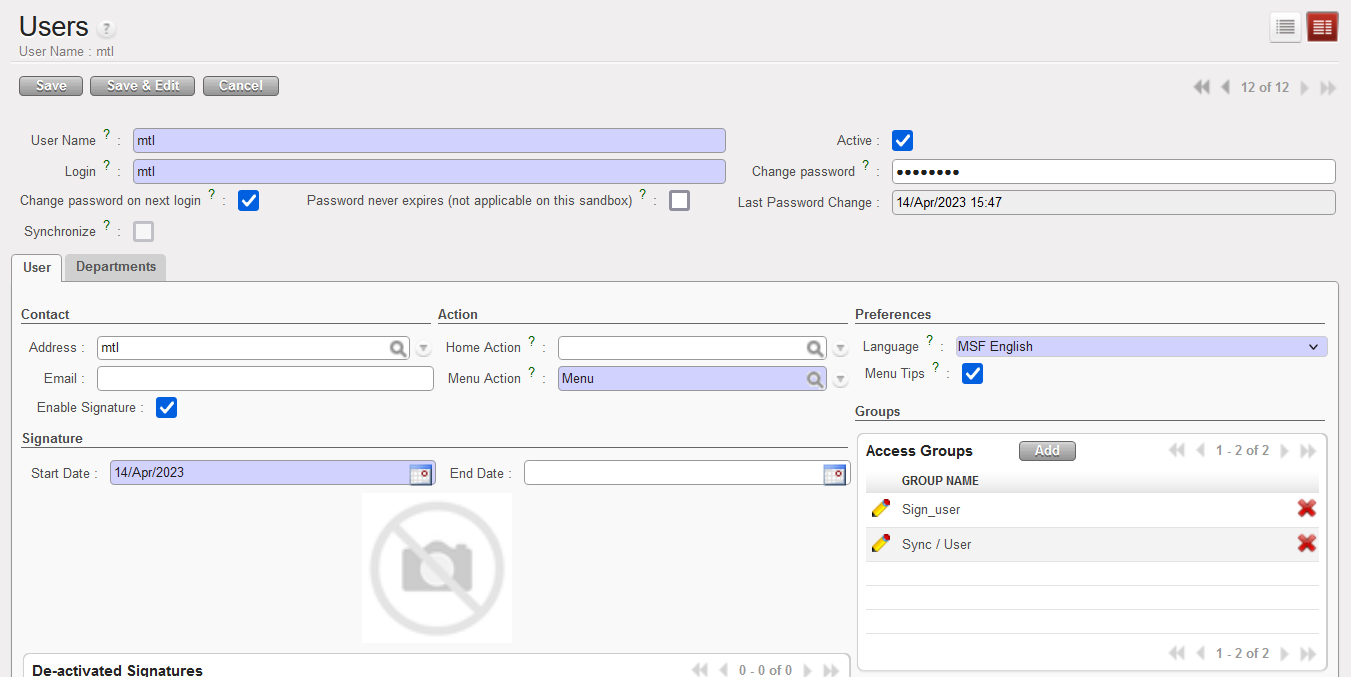
This user will be able to access document he/she has been invited to sign.
Provide access: Document creator
This group is given to experienced/regular UniField users who don’t necessarily need to sign document. They are allowed to draft, edit document and invite users to sign them. If the document creator is also allowed to sign, sign access should be added.
There are two types of document creator access:
- Sign_document_creator_supply to be provided to supply users.
- Sign_document_creator_finance to be provided to finance users.
Add Sign_Document_creator group
Go to Administration/users/users. Search the user profile to add the “document creator” access. Go to group, click on [add] button and search the appropriate group [sign_document_creator] and add to the profile.

The profile could be saved. The user has access to document creator’s role in object he/she has access to.
- Document creator does not open right to sign on objects/reports. It allows the user to invite other users to sign.
- Document creator does not open menus where the user does not have access to. E.g. a supply user with Sign_document_creator_finance will not have access to registers.
- If the user is allowed to sign, Sign_user group needs also to be added.
Closing signature functionality in an instance
When the country program does not need any more to use the digital signature in a given instance, the functionality could be inactivated. Inactivation is from Reconfigure.
Click on [next] ![]() button until you see the “Activate Electronic Validation” screen. The check box is active.
button until you see the “Activate Electronic Validation” screen. The check box is active.

Un-tick the check box “Activate Electronic Validation” and click on [finish] ![]() . There is no specific save button. Finish will save the modification and close the digital signature functionality in the system.
. There is no specific save button. Finish will save the modification and close the digital signature functionality in the system.

- Conditions: all signatures have been inactivated.
- Consequence: All signature menus will be hidden but old signed document will stay signed. Signed PDF could still be exported.
- HQ UniField support proceed to the inactivation after receiving a request from the country program.
- It still could be turned on back later. See above how to activate the functionality.
SIGNATORY USER EXPERIENCE
This chapter is about the experience of users allowed to sign.
Creating the signature sample
When a user has been given right to sign on object/reports in UniField, he/she needs to configurate a signature sample in order to be able to sign documents/reports. When the user is logging in UniField, the system will prompt to draft the signature. The user could postpone it for later and will be able to work without problem – just not able to apply signature on objects.
The signature sample designed will be applied on the objects/reports.
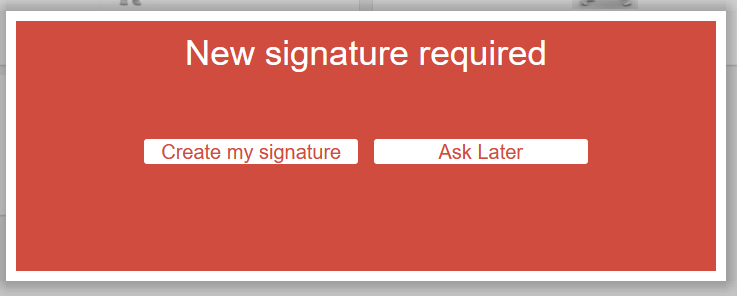
New signature required
This screen is popping up after login screen until the signature is configured. Click on [Ask Later] to postpone or [Create my signature] to proceed.
Ask Later
The user is able to continue to work but not able to apply signature on reports/object.
Create my signature
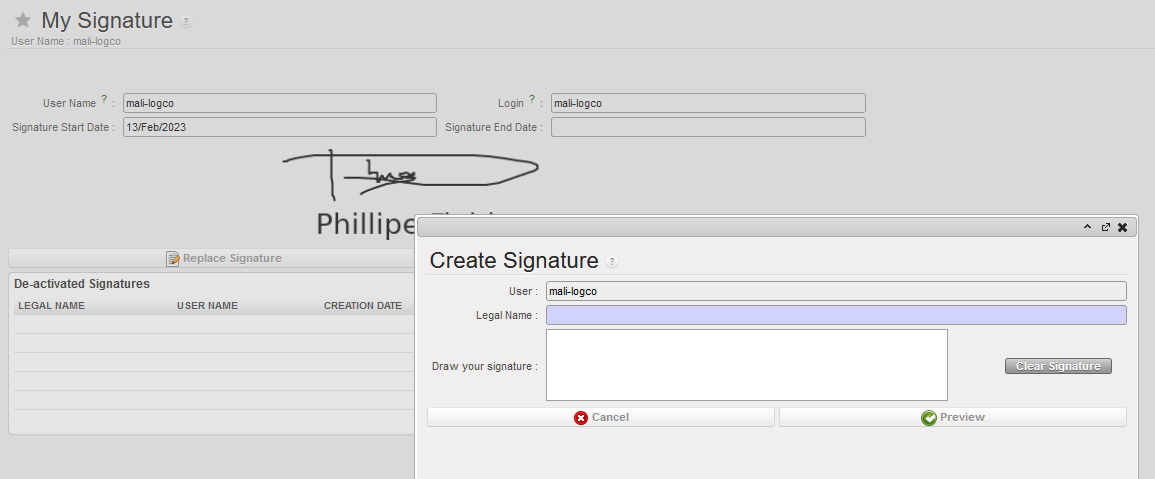
Follow the steps below to create the signature:
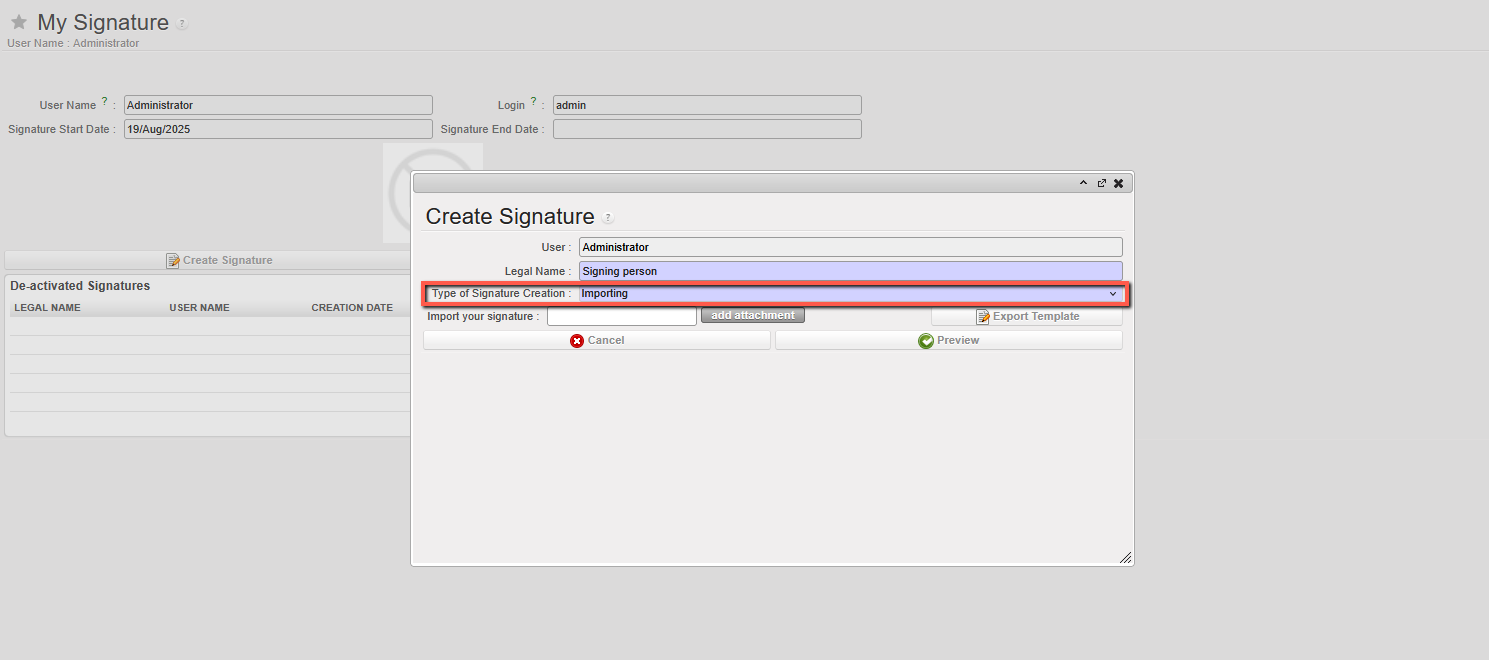
- Type the legal name: actual name of the person. The field user names are role based, this step allows each individual user to specify the person’s name. Do not fill here the job role.
- When adding their signature, user can choose “Type of signature creation” options “importing” (scanned signature) or “drawing” (directly in UniField with mouse etc).
- [For the import option, the template can be exported, and then user must sign in the designated signature zone. This should then be scanned and saved as*.png, *.jpg, *.jpeg or *.pdf file. This can then be added to the field “Import your signature” by clicked to add attachment. ]
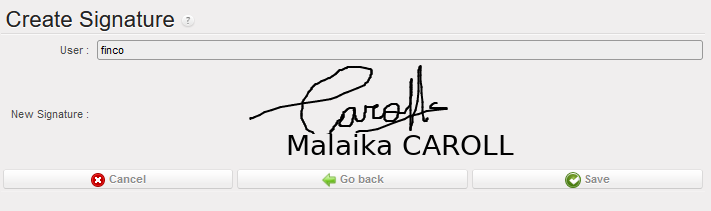
- Draw the signature sample, as it would look on handwritten signature.
- [Clear signature] to remove sample applied and restart.
- [Cancel] the process and go back to UniField screen without finishing the signature sample.
- [Preview] to show how Name and signature go together and progress to next step.
- [Cancel] to go back to UniField screen without finishing the signature sample.
- [Go back] to return to the previous screen and modify the signature
- [Save] to create the signature.
The user is now able to apply signature on objects/reports.
Search the object/report to sign via Signature Follow-Up
This menu gathers the list of objects/reports the user has been requested by document creators to sign. This is a handy tool for non-regular users. It replaces search and filtering of objects to be signed.
Go to Administration/Users/Signature follow-up menu. Click on the green arrow to access the object to be signed.

Then apply the signature on the object/report (see below how to do so). This menu is used to monitor/check the documents to be signed and their respective status.
Applying signature on objects/reports
Retrieve the object to be signed via
- Filtering/searching in UniField (for regular users who are working on the menus and are also document creators)
- Or go to Administration/Users/Signature Follow-Up, and click on the green arrow
Check the details of the object (amount, tax, total, etc.) and go to the [Signature] tab.
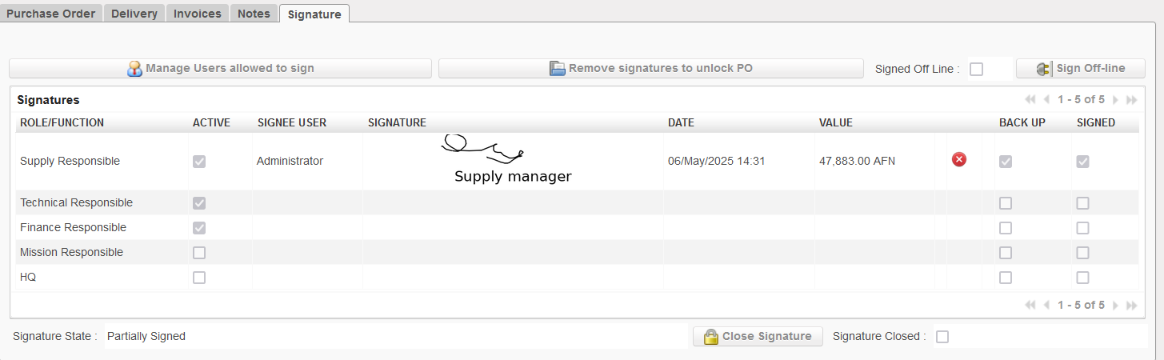
Click on the green check box ![]() related to the applicable signature field to apply the signature. E.g. Logco is the “Technical Responsible” for logistic order.
related to the applicable signature field to apply the signature. E.g. Logco is the “Technical Responsible” for logistic order.
A confirmation screen is shown up, displaying the reference of the object/report to sign, the name of the signature field, in this example “Technical Responsible”, signature sample and legal name.
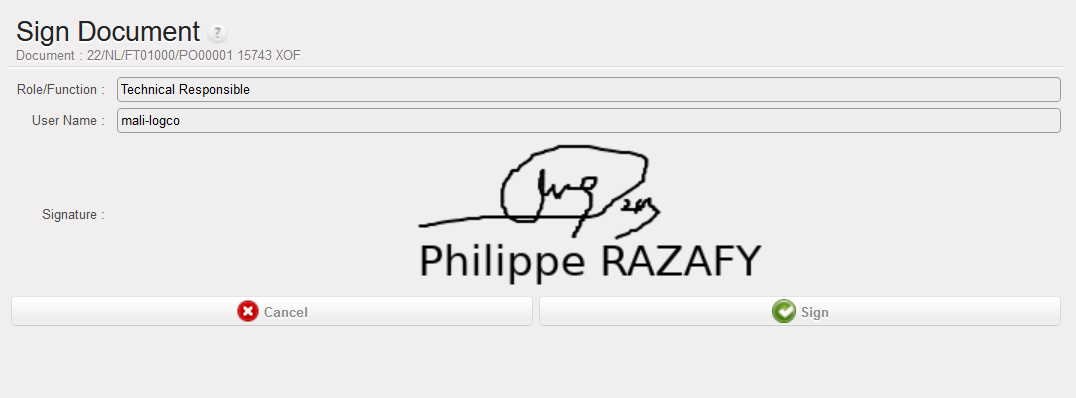
Click on [cancel] to go back to previous screen, or [sign] to apply the signature.
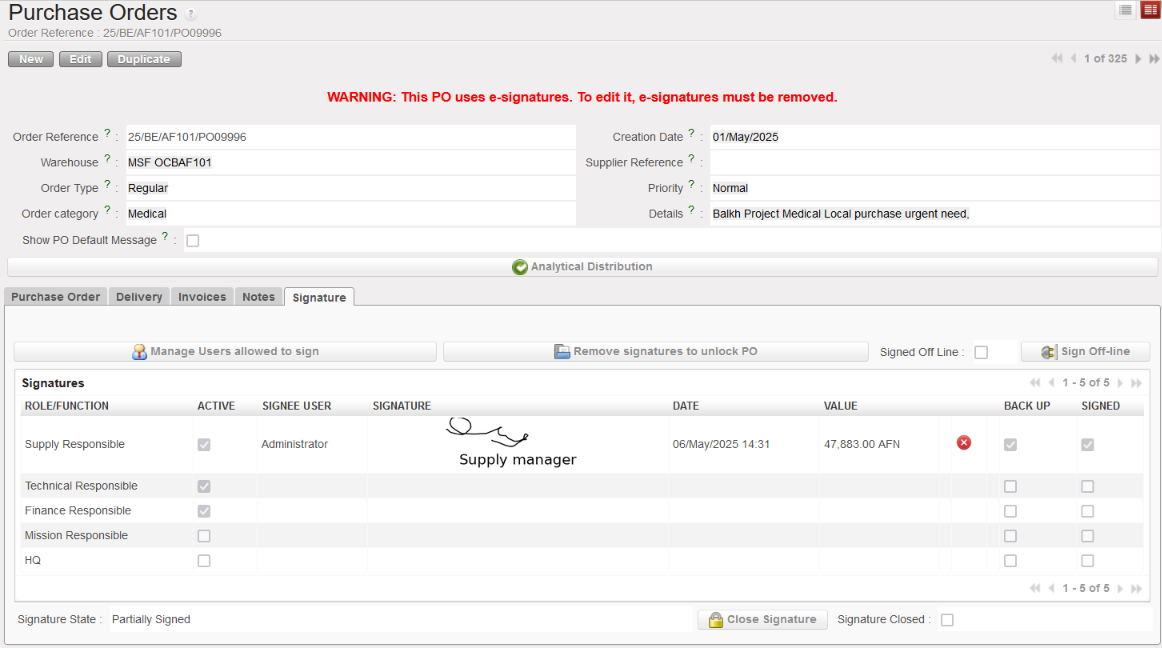
- The signature is displayed on the related signature field with the date of signature, the control info (for PO = amount and currency)
- The signature could be removed with the red X (unsign button) and reapplied/modified if required.
Information control is the amount of report/object at the time of the signature. It cannot be modified manually.
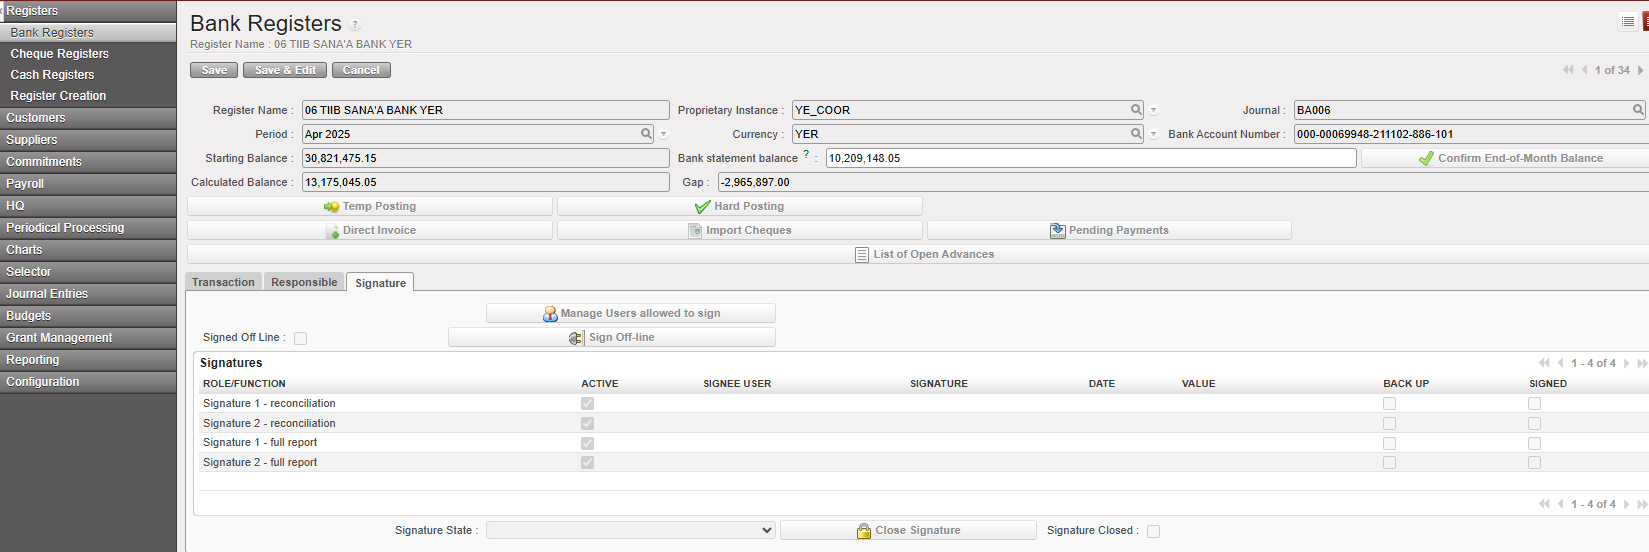
Example of tab signature for a Bank register:
Here you have the tab with the Signatures:
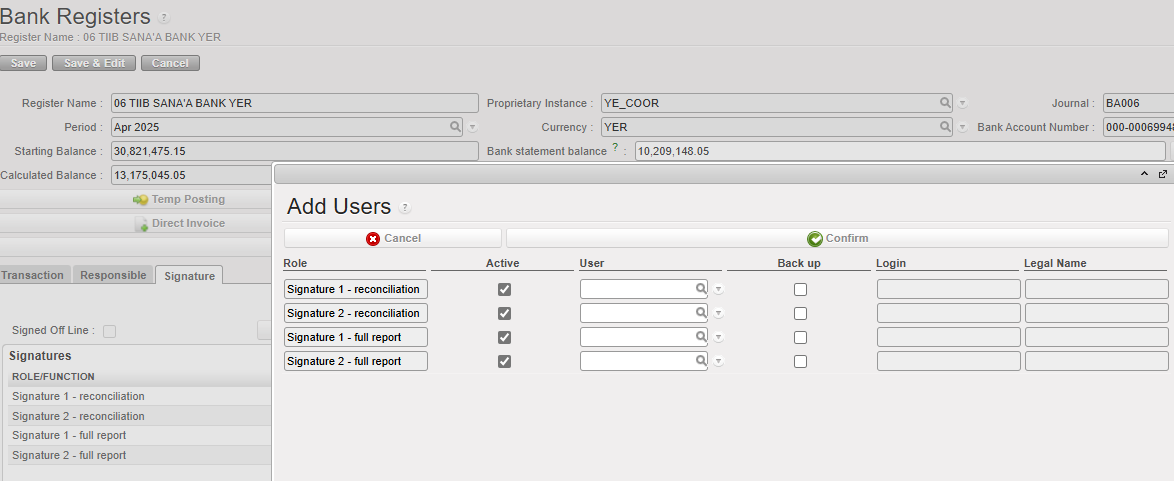
If you click in ![]() you will have a screen where you can add Users as follows:
you will have a screen where you can add Users as follows:
You can sign full reports and reconciliations.
A user can have a backup user
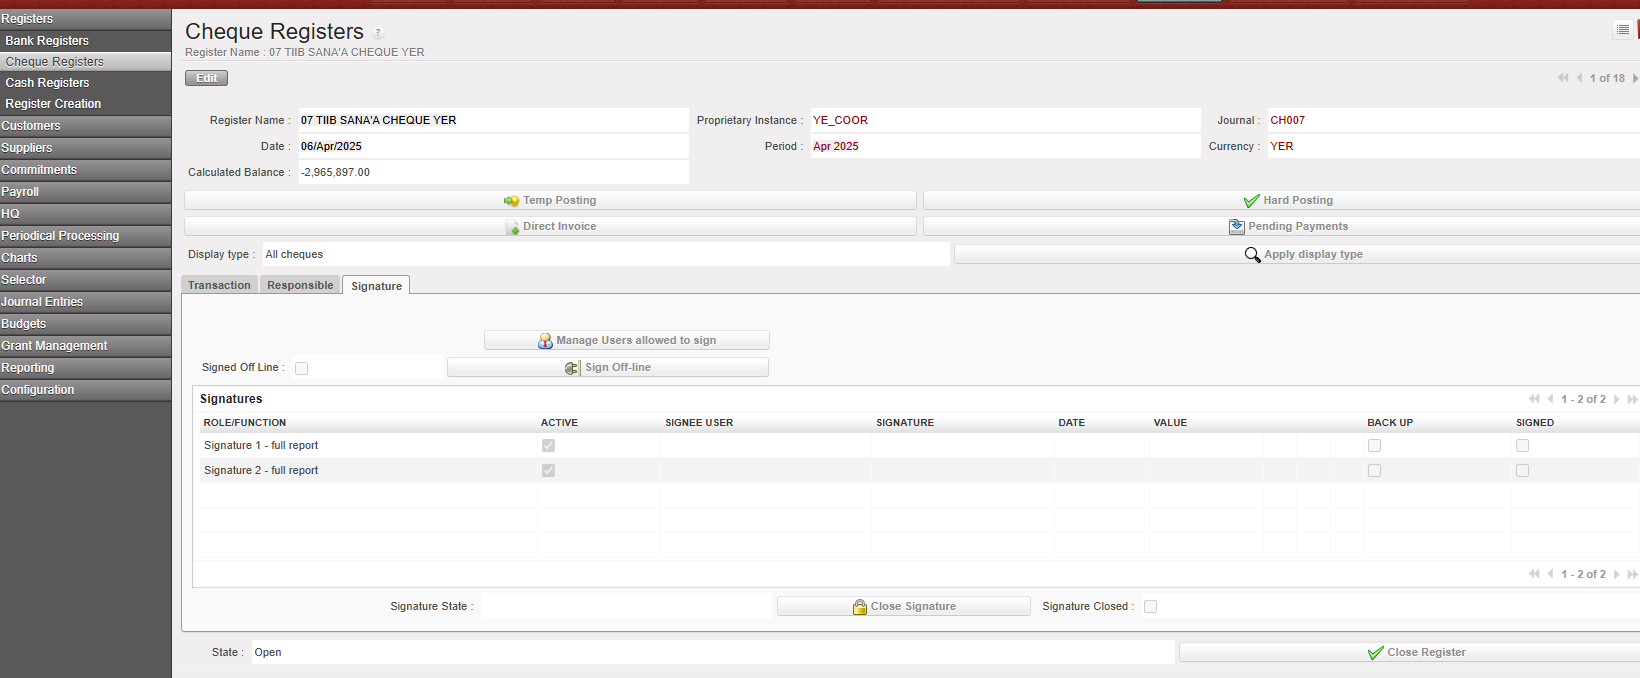
Example of tab signature in a cheque register:
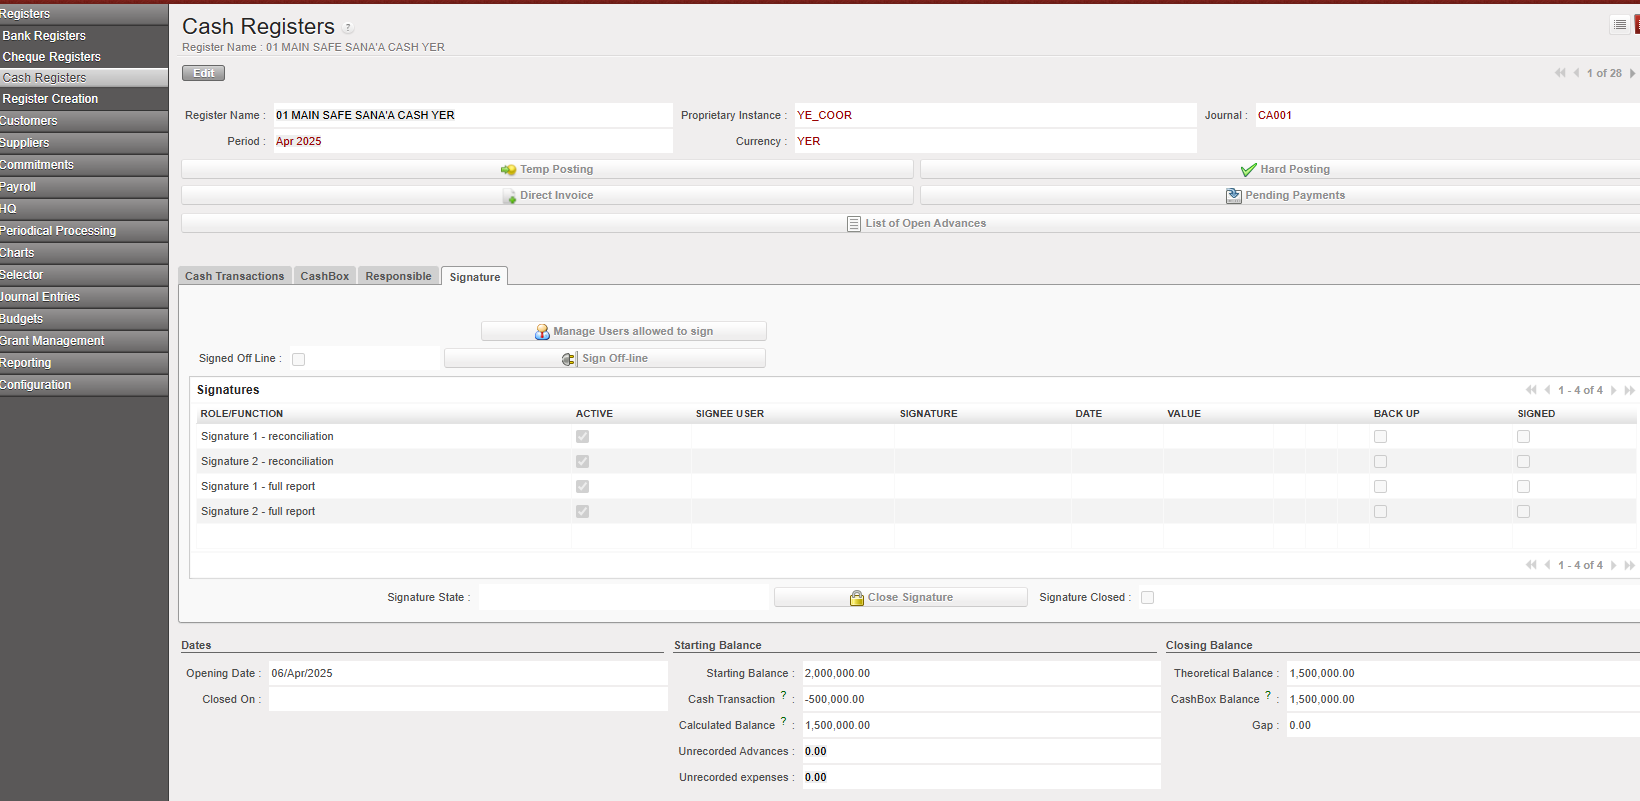
Example of tab signature in a cash register:
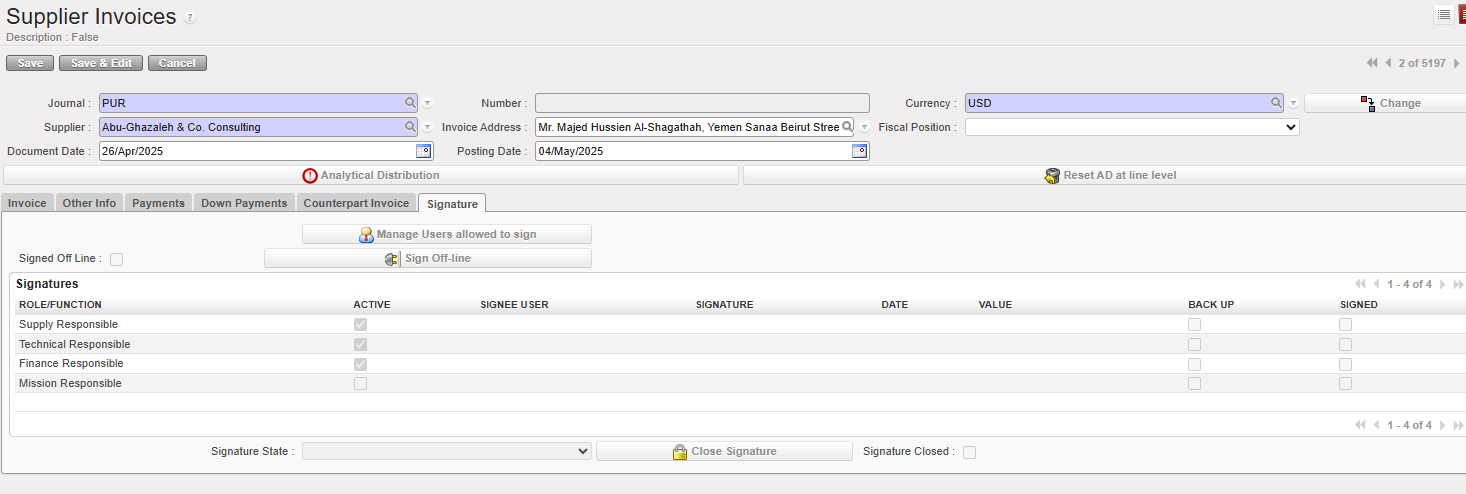
Example of tab signature in a supplier invoice:
Self-maintenance – edit/inactivate signature
Users allowed to sign have self-maintenance menu, to help change signature, inactivate the signature and create new one. This menu is intended to be used during hand-over or any change of legal name or any need of editing the signature sample. No external support is required.
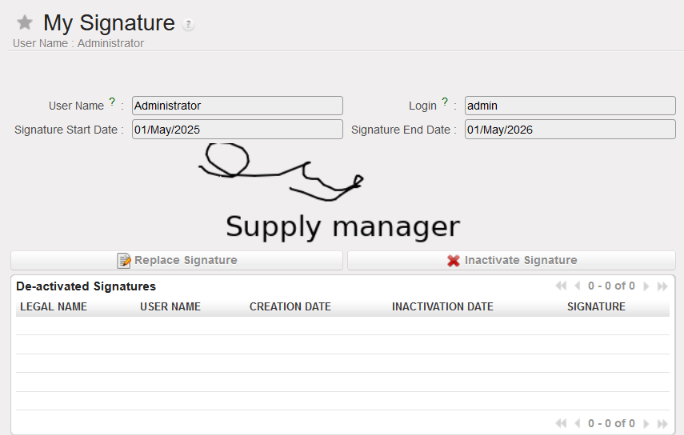
Go to Administration/Users/My signature, user name, status validity date, sample signature and legal name are displayed.
[Replace signature] allows to draft new signature: retype legal name, draft signature.
[Inactivate signature] is inactivating the signature at the date and time of system clock. [Create signature] button allows to draft new one if required.
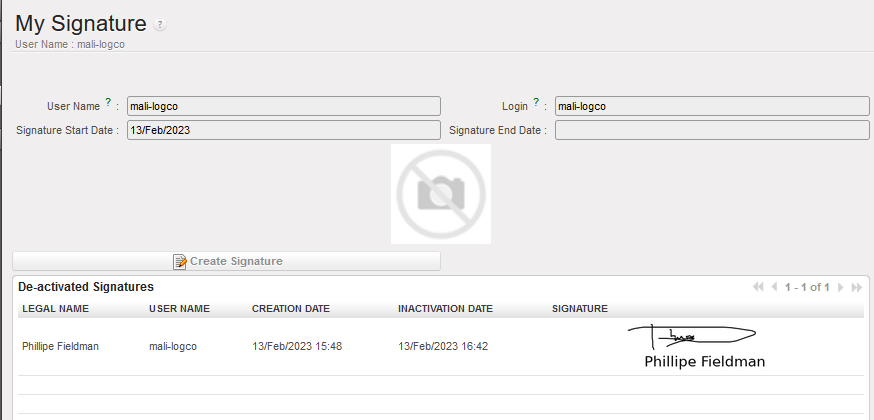
The user could not anymore apply the signature until new signature sample is created.
DOCUMENT CREATOR EXPERIENCE
This chapter is about the experience of the users with document creator access.
Document creator definition
Document creators are experienced/regular UniField users who don’t necessarily need to sign document. They are allowed to draft/edit document and invite users to sign them. If the document creator is also allowed to sign, sign access should be added.
The document creator navigates the modules of the business application (supply or finance) in order to prepare the documents for signature. The document creator is responsible that:
- The documents are ready to be signed (all edit have been applied and quantity/amounts as well as other details are correct).
- The rules defined by the Authorization Table are followed (who to sign, when and what signature field, which amount?)
When a user is given right to be document creator (supply or finance), the following functionalities are available.
About Signature Fields
A document has always multiple signature fields. E.g. on PO, there are “Supply responsible”, “Technical Responsible”, “Finance Responsible”, “Mission Responsible” and “HQ”. On cash reconciliation, there are two signature fields.

- A tick on “active” check box
 means, the signature field is active, and could be digitally signed.
 - Empty on “active” check box
 means that the field is not required. In this example “Finance Responsible” could digitally sign while HQ could not.
 - Backup at the line level indicates that the user is acting as a backup for the main user designated to sign.Signed indicated if the user already signed the document
To activate a field refer to section P-Invite users to sign
[Sign off line] means the document has been signed on paper and digital signature is not required.
[Close signature] is the final step to freeze the signatures applied on the document and prevent further modification. This task is irreversible even with admin profile. It is necessary nevertheless to proper close the signature on documents when it has been reviewed and approved. This is to prevent possibility of tempering with signature in later stage.
Invite users to sign object/report
Invite users to sign on object/report
Navigate the business application (finance or supply) and search for the document to be signed. Check and ensure the object/report is ready to be signed. The Authorization Table defines which field is required on which document. Document creator consults the Authorization Table and makes adjustment when required.
Go to the [signature] tab of the object and click on [Manage Users allowed to sign] in order to invite users having signature access for them to sign the object/report.
Select the users to be added By clicking on magnifying glass. Select the [Active] checkbox if the user’s signature is mandatory. The checkbox in the [Backup] column indicates that the user is serving as a backup for the primary user assigned to sign.
To confirm selection click on Confirm button.
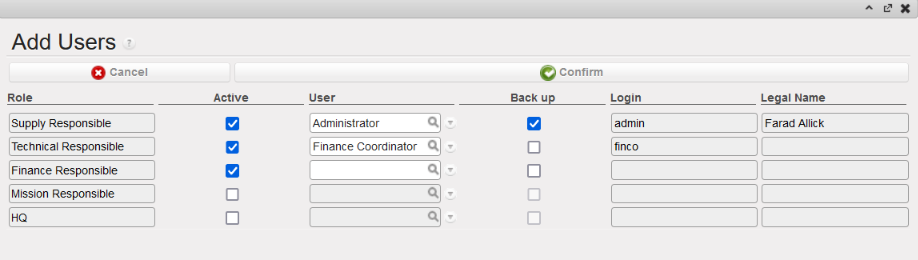
It is the responsibility of the document creator to select the relevant users on a given object. In this example, Supply responsible, Technical Responsible, And Finance responsible are invited to sign the PO.
The object/report will then be listed on the “Signature Follow-up” module of the invited users. UniField does not send automatic notification. Notification is handled outside of UniField.
Specific for bank/cash register reports
There are two reports which could be signed on bank and cash registers: the (bank/cash) reconciliation and the Full Report.
The button [Manage user allowed to sign] offers then the option of selecting signatories for both reports and add specific list of users. Note that the 2 lists could be different.
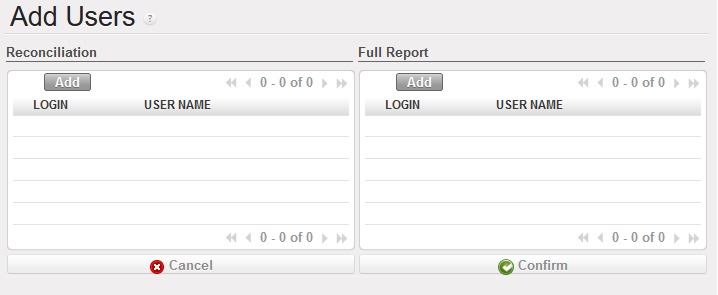
Register signature fields are labelled “Signature 1” and “Signature 2” – without specified role. The signature fields are used in line with the OC’s accounting procedures. There is one report to sign on cheque registers: The Full Report.
Remove a user from list of users invited to sign object/report.
To remove a user from the list of signatories on an object/report, find the document to be signed. Two options are possible:
- Go to Administration/Users/Signature Follow-Up. Click on the green arrow to access the document to be signed.
- Using usual searching and filtering, find de document to be signed.
From the “Signature” tab, click on [Manage Users allowed to sign]. Uncheck the box [Active] to remove a user Click on [Confirm] to save the change.
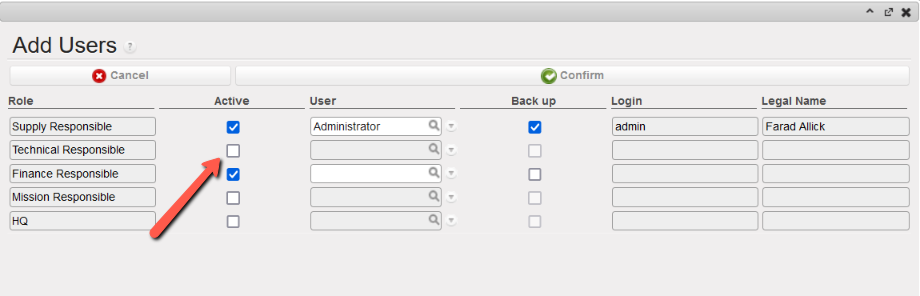
In this example Technical responsible was remouved from the users to sign
Signature statuses and closing signature
Object/Report signature statuses
Objects/reports supporting signature option have the following signature statuses
- Open: users have been invited to sign but none have applied signature.
- Partially signed: users have been invited to sign, some have applied signature. Other did not yet.
- Fully signed: all required signature fields are filled.
- Closed: when a document creator has closed the signature option on the object via [close signature] button.
Notes: Signatory list can be edited (remove a user who has not signed and replace) for all of them except on “closed” signature.
Object/report signature status is completely independent from object/report status.
Closing the signature on an object/report
When all signatures have been applied and control/review done, the signature option on a specific object/report could be closed. This action is carried out on each document.
Click on [Close signature] button. This button will inactivate all possibilities of editing the signature fields on the document. This is irreversible action, even with Admin profile.
- There is no impact on object/report status.
- It is possible to close the signature regardless of number of signatures applied (open, partially signed, fully signed)
It is the responsibility of the document creator to close the signatures when it is required.
For register reports: it is advisable to close the signatures when the scan of BKK has been finished and submitted to HQ.
SIGNATURE REPORTS
From the administration application, there are two modules accessible to all users with “sign” access with nice reporting.
List of signatures
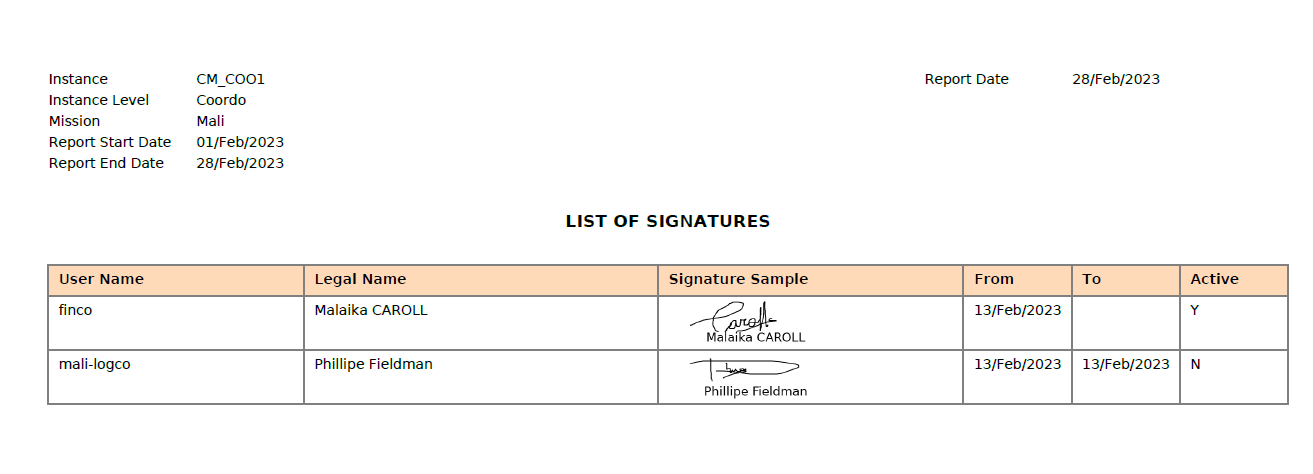
Go to Administration/Users/List of signatures. This menu is displaying the signature samples and their respective validity dates. From right hand [action] menu, click on [List of signatures] in order to extract the list of signatures for a given period. Fill the start and end date. Then click on [Export].

It will export a PDF report with the instance name, mission, level of instance and the period selected + date of the report.
The list shows UniField user names, legal names, signature samples, and respected validity dates and status. This report could be used to replace the hand filled signature sample currently collected manually.
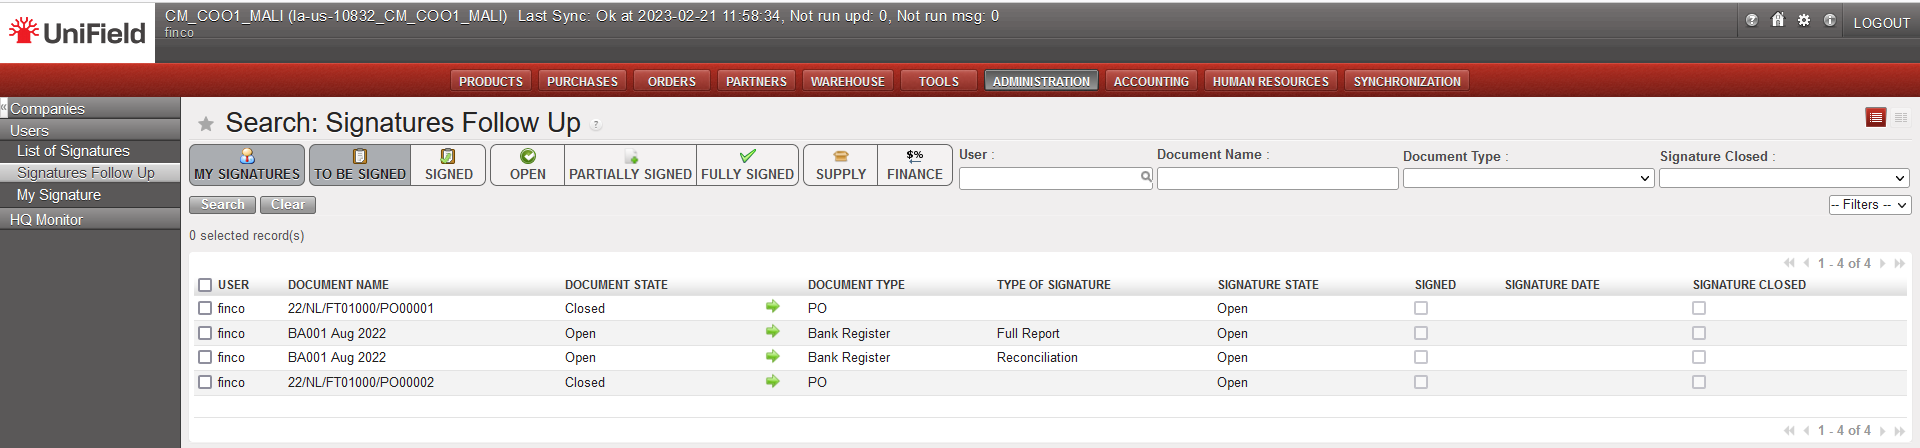
Signature follow up
Go to Administration/Users/Signature Follow-Up. Document creators have access to “Signature Follow-Up” menu from Administration module. This menu is used to follow-up the progression of the signature on documents. It is also used to modify the list of users requested to sign on objects/report. Click on the green arrows to access the documents/reports and make the changes.
Signature follow up allows also signatory users to check doc they are due to sign. From this report, they see only object/report they were invited to sign.