A Chart of Analytic Accounts is a tree view of accounts of category cost center, destination, funding pool, Free1 and Free2. Below we show you where to find the chart of analytical accounts.
B. How to View the Chart of Analytic Accounts
Go to: Accounting/Charts/Charts of Analytic Accounts
The chart of analytic accounts window appears
Select a fiscal year and decide if you want to display inactive account. Once done, click “Open chart”.
Chart of Analytic Accounts window
The chart of accounts appears and defaults to the destination category.
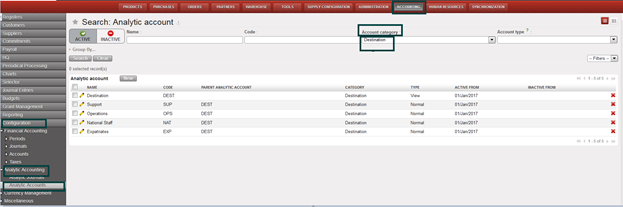
Account category Destination shows the chart of destination accounts
2. Change the category if necessary.
Account category Cost centers shows the chart of cost centers accounts
3. You can also have a complete tree view by clicking on the arrow located next to the account. Clicking on will open all the elements of the analytic tree selected.
Free 1 and Free 2 axis are optional and can be set freely according to the specific needs of a mission. Once expenses have been allocated on these dimensions user can display them through the selector and export the outcome in Excel. Analytic lines booked on “Free1” and “Free2” accounts sync within the mission but do not sync up to HQ.
B. How to Create a Free Analytical Axis
Suppose you pay 2 rental houses’ and you want to split the rental cost allocation per house. You will allocate the rental to the cost center tree of your instance and create 2 additional analytic accounts inside the “Free 1” category. In the below example we show you the creation of Free 1.
Go to: Configuration/Analytic Accounting/Analytic Accounts
Analytic Accounts Search view displaying Active accounts
The Analytic Accounts Search view displays.
Select to open an analytic account form view.
Complete the form. Make sure the Account Category is set to Free 1 and Type is Normal. The account should be linked to the parent Analytic Account FREE 1.
Save the form.
Analytic Account Free 1 is created
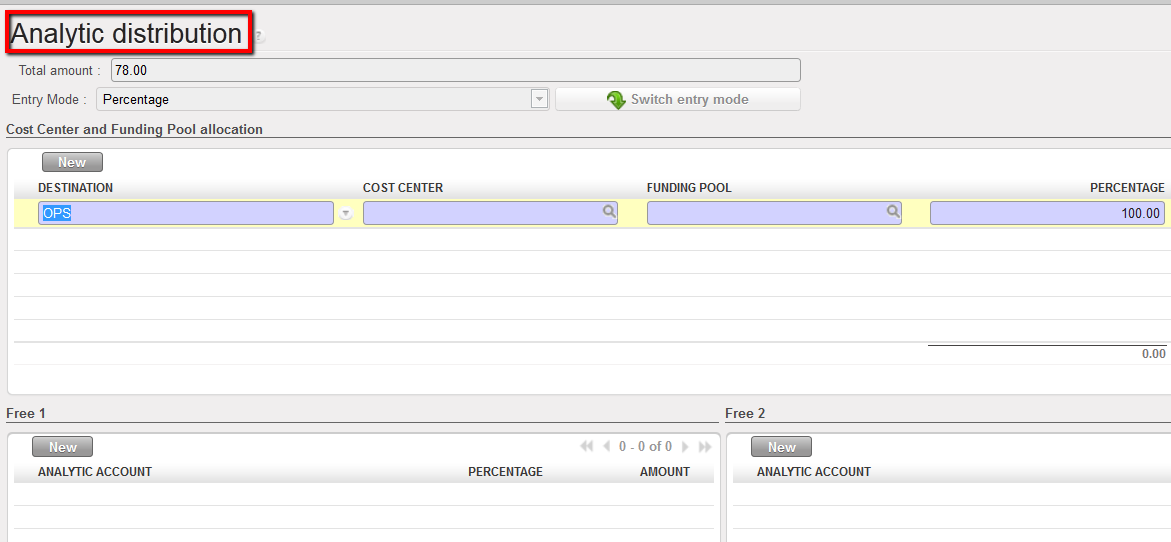
Suppose you want to pay now the houses rental. You record a transaction in the registers and allocate the cost splitting it into 2 additional analytic accounts. The allocation will look like this in the analytic distribution wizard.
More precision on payments will be given in Chapter 3 – Payments.
Analytic distribution wizard used to increase the cost allocation accuracy
The cost centers set-up is done when creating the instances at HQ level by the person in charge of the finance master data creation and maintenance. (See IT User Manual for more information).
The set-up assigns the cost centers to a defined proprietary instance. It enables limiting the selection of cost centers available when booking an entry on an income or expense account. It indicates how budgets should be consolidated within a mission and automates the cost center reference for PO and FO. This is an important task to perform to ensure costs and incomes are properly tracked.
The set-up encompasses:
Linking associated cost centers to a proprietary instance to define which cost centers should be synchronized to a specific proprietary instance (mission or field). In the example below the proprietary instance/mission is Malawi Coordination.
The “Is Target” attribute is used for synchronization purposes and to define which cost center is managed through the concerned proprietary instance. Several target cost centers will be linked to one instance in case coordination or project manages several cost centers, for example a coordination managing an emergency preparedness (EPREP) budget, or, a project managing a hospital and mobile clinic activities. A cost center can be set as {Target} in one and only one proprietary instance.
The top cost center is chosen for budget consolidation attribute definition. In the example below MW1 will group together all Malawi Cost Centers.
The Cost Center Picked for PO/FO Reference must be selected in order to be used as a reference in the supply documents like Purchase Orders or Field Orders. In the example below this would be MW101.
This configuration is created in Administration/Configuration/Proprietary Instances.
In case several projects are managed from a single location (at project level, not from coordination), HQ will need to create an intermediate cost center in order to consolidate budgets at project level. See below an example:
Creation of an intermediate cost center to consolidate budgets at project level.
Proprietary instances form view accessible from Administration/Configuration menu
In the case above budget consolidations can be made for both at ZW00 level and at ZW1 level.
B. How to Configure Cost Centers Linked to a Proprietary Instance
HQ will need to link specific cost centers to the appropriate instance.
Go to: Administration/Configuration/Proprietary Instances
In the proprietary instance Search view, select the instance to link to cost centers
In the proprietary instance Form view, go to the Cost Centers tab
Click on the {Add Cost centers} button
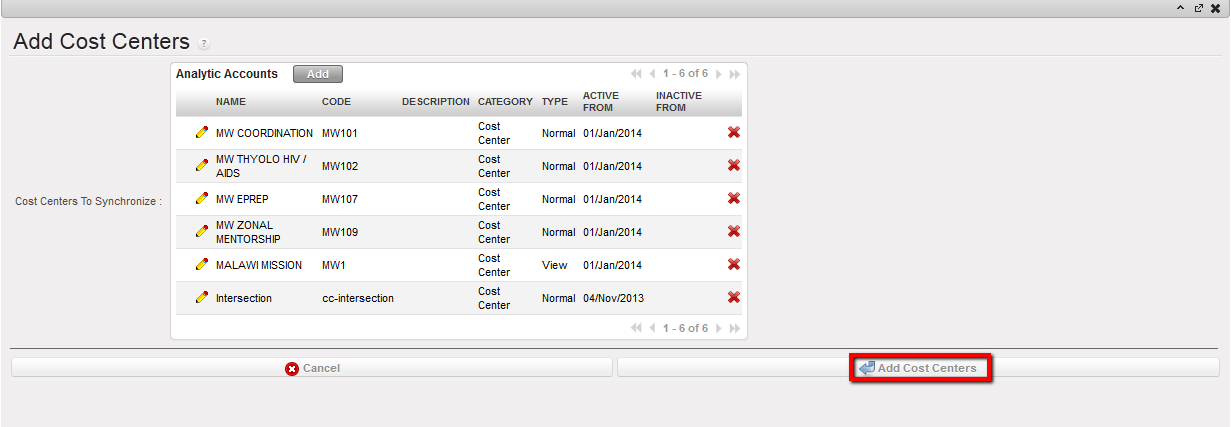
Select all cost centers from the instance and Add Cost Centers to close the window
Adding cost centers to a proprietary instance
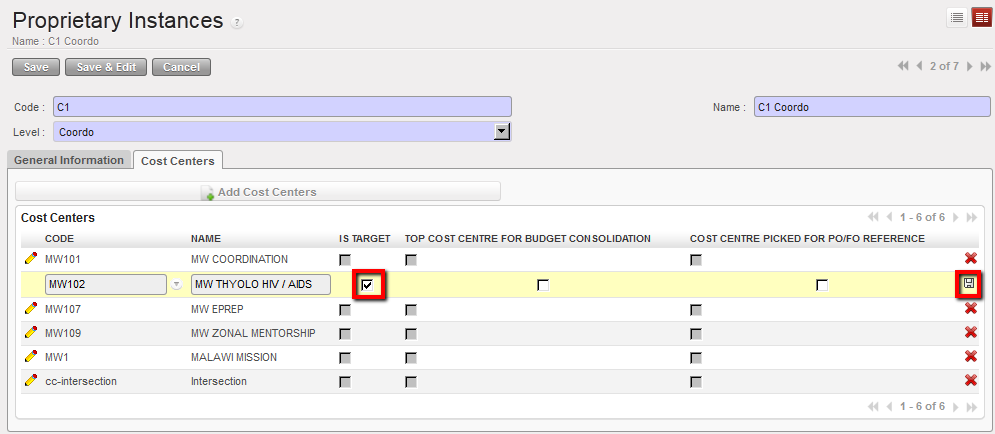
5. Select one {IS Target} cost center representing the instance. A cost center can be set as target in only one instance. Click on to edit the line and save .Selecting IS TARGET
6. You will select the code of the cost center that will determine up to which level the system will automatically create consolidation budgets (the one corresponding to the view cost center). You perform this action by ticking a {Top cost for budget consolidation}.
Selecting Top cost center for budget consolidation
7. Finally you will choose the cost center used in all Purchase Order (PO) / Field Order (FO) identification (i.e.MW101). The system will use this parameter as a reference in all PO/FO codes. It is a key reference on the supply side that could be used for international orders billing (from ESC to HQ).
Selecting Cost center for PO/FO reference
8. Save your selection.
C. How to Remove a Cost Center Linked to a Proprietary Instance
Go to: Administration/Configuration/Proprietary Instances
If you need to remove a cost center from the set of cost centers linked to a proprietary instance, click on the of the cost center line. Usinglocated on the cost center line to remove the cost center from the proprietary’s cost center setting
How to Set Up Cost Centers When Several Projects Are Managed in One Location
In case several projects are managed from a single location (at project level, not from coordination), HQ will need to create an intermediate cost center in order to consolidate budgets at project level. See below an example:
Go to: Administration/Configuration/Proprietary Instances
Follow the steps above
Create an additional cost center and add it to the instance which is managing two projects. In the example below the user would create ZW00 in proprietary instance 2 (Harare Project) as a view account to be used as a top cost center for budget consolidation.
Creation of an intermediate cost center to consolidate budgets at project level.
In the above case, budget consolidations will be in done in ZW00 to cover both ZW007 & ZW020.
How to Manually Create a Cost Center
Go to: Accounting/Configuration/Analytic Accounting/Analytic Accounts
To create a new cost center, select {New} button
In the {Name} field, enter a cost center name.
In the {Code} field enter a cost center code.
In the {Category} field, select {Cost Center}.
In the {Parent Analytic Account} field, select the associated parent analytical account using the magnifying glass . To do so, check your cost center tree.
In the {Type} field, select {Normal}.
In the {Activation period} tab, select a date.
In the {description} tab, add notes if relevant
Click {Save} button.
The cost center is created
Cost center creation
Change account code of FXA entries allocation based on account code involved in the reconciliation
Some FXA entries might be generated when performing the reconciliation, whether the account was internal transfer currency exchange or any other account in case of rounding difference.
You can decide on which FXA account you want the FXA entries generated by reconciliation to be booked. You can define that by changing the setting on any Balance sheet account to be reconciled. If you didn’t specify that, then the FXA entries will take automatically the default FXA account.
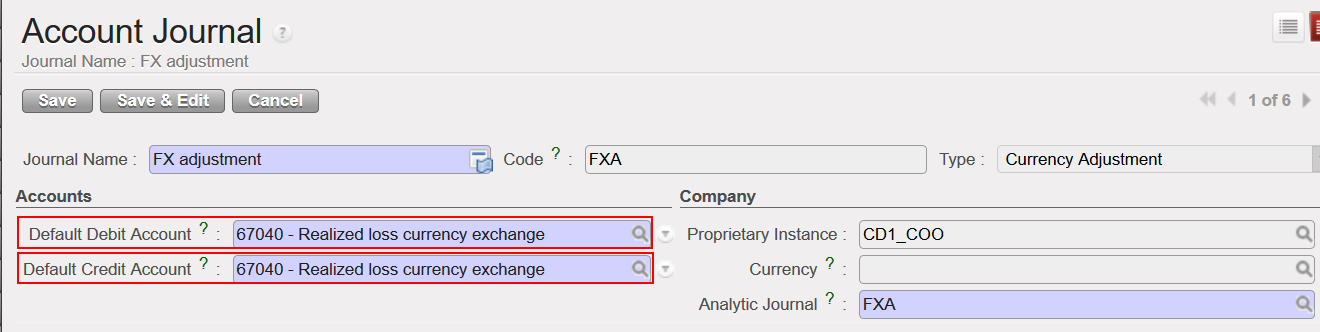
The default account for FXA entries is set in the FXA Journal (usually 67040 and or 71110) and those account codes are used for any FXA entries generated by the system.
In the chart of account, each account code “Reconcilable” have now 2 additional fields (Default Debit / Credit Account for Reconciliation) where account code for FXA can be filled. Those account codes will prevail on the default account code for FXA set in the FXA Journal.
For instance, you can choose to have automatically the account 67050 to be used for any FXA entry related to the account 14130 (internal transfer currency exchange rate) by defining that in the configuration of this account otherwise the system will keep taking automatically the default FXA account set in the FXA Journal (67040).
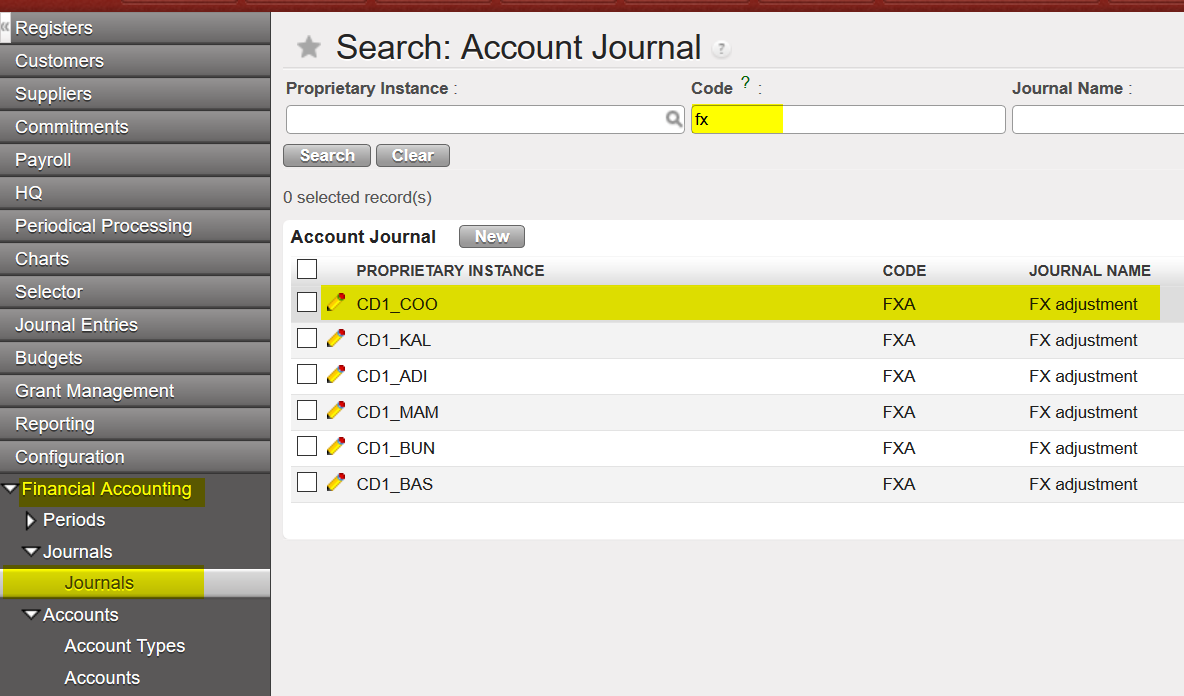
Go to: Configuration/Financial Accounting/Journals
Go to Journals/ Search for the Code {FXA}/ Select
2. The default Debit/Credit account here is 67040. This will be the default account for any FXA entries generated from reconciliation when doing reconciliation for a balance sheet account, unless you set another expense account for FXA reconciliation on specific B/S account.
To do that, you can follow the below steps:
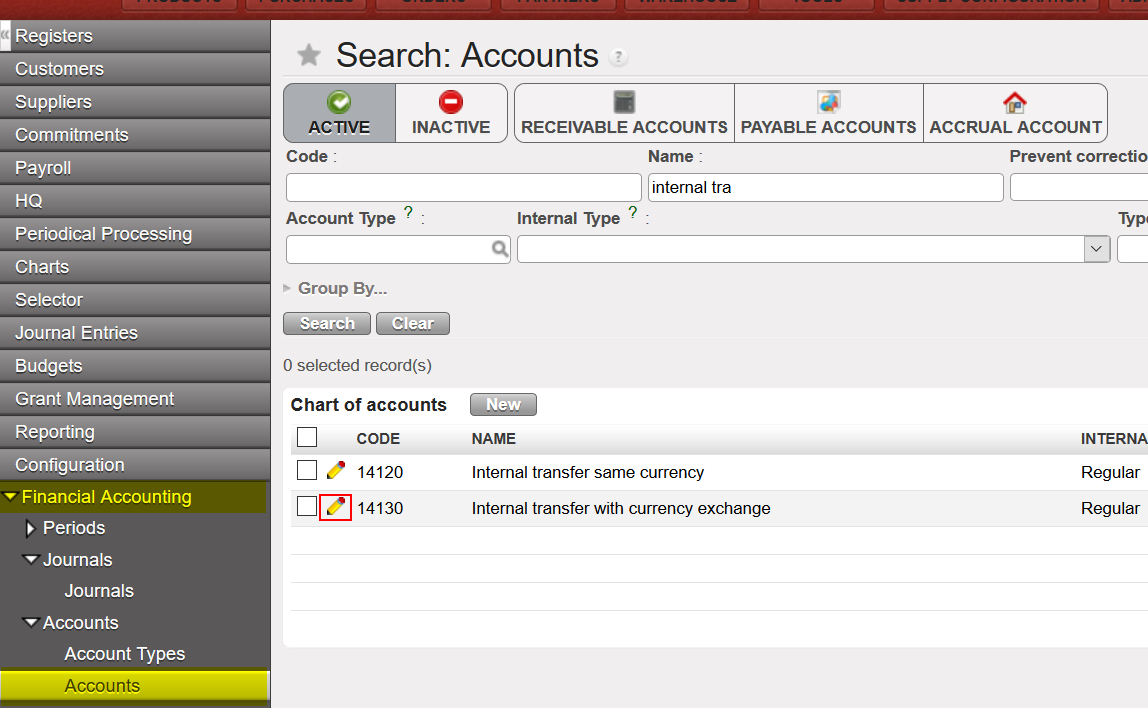
Go to: Configuration/Financial Accounting/Accounts
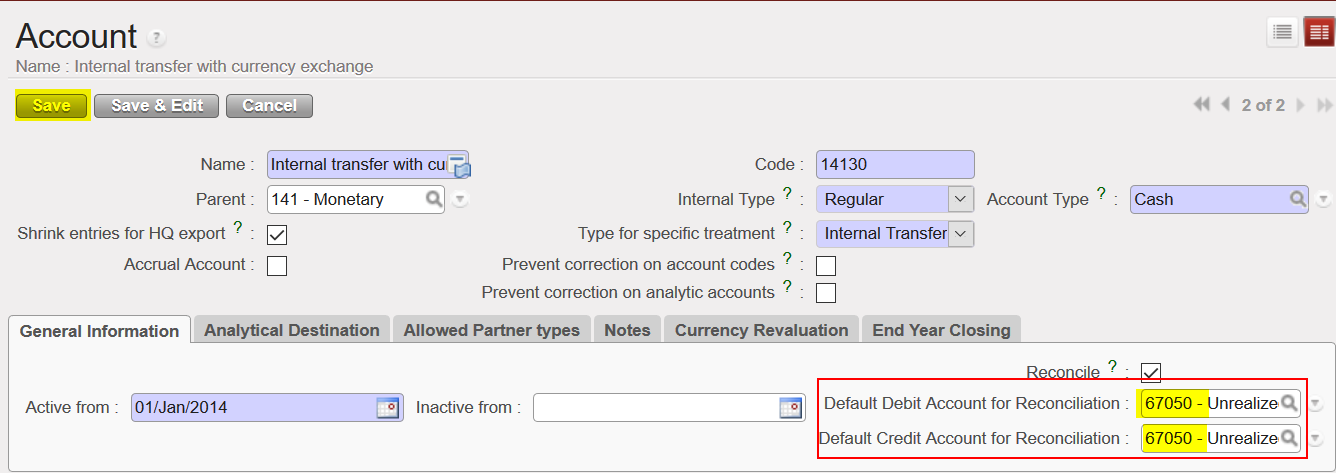
Select the account you want, in our example we will choose (Internal transfer with currency exchange – 14130)
2. The default account for reconciliation for both debit and credit will be empty, you can add 67050 as the default account and then {Save}.
3. When you do any reconciliation for (Internal transfer with currency exchange – 14130), the FXA entries generated from that will be booked under 67050 and not 67040.
You can filter “active” and “inactive” CC through form view of Proprietary Instance, to see follow below:
Go to ADMINISTRATION > Configuration > Proprietary Instance
In “Code” filter by instance code
Click on “Cost centers” tab.
The filter set with default with “Hide inactive”, when click on it will show also “Show all”
When select “Show all” it will show inactive in red color and active in black color.
The Analytical Destination is used to complete the information linked to an expense account (G/L accounts). With UniField you will associate each expense line entry to one of the four (4) analytical destinations (depending on how this expense/cost is going to be used). These destinations are:
Operations
Support (e.g. office cost, evaluation study, training, consultant)
National Staff
Expatriates
The analytical destination is an analytical dimension defined in the {Analytic Accounts} sub-module. When it is set, this dimension is reflected by default in the related expense accounts.
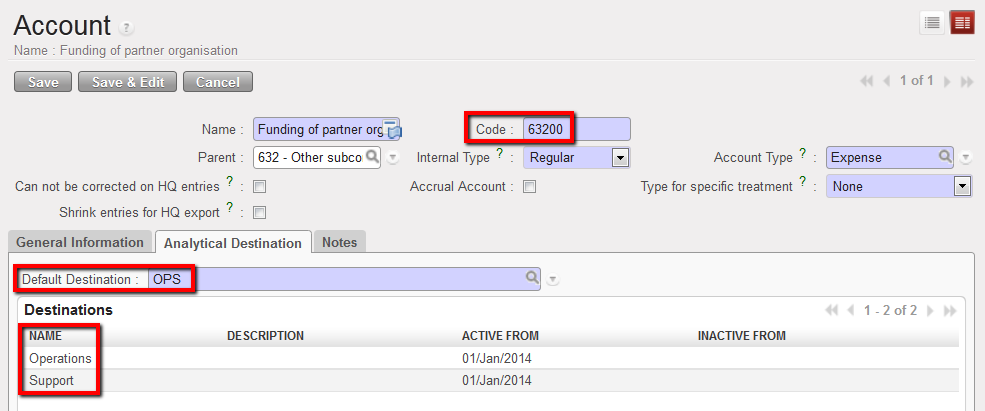
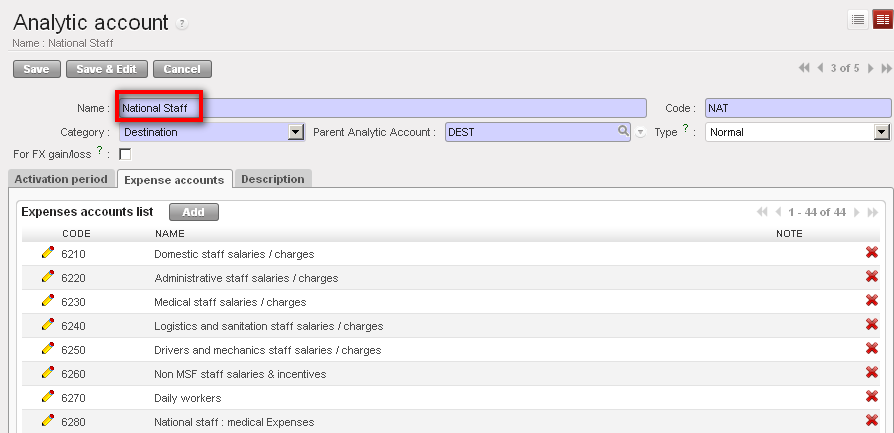
One expense account is linked to at least one default destination and one destination can be used in several expense accounts.
In this example, the account 63200 is associated to 2 destinations and defaults to Operations destination.
{National staff} destination and associated expenses accounts
How to Manually Create a Destination
As mentioned above, destinations are set up at time of the creation of the HQ instance and any modification, update or creation should be done at HQ. Manual creation of a destination should remain exceptional.The user will learn how to create manually destination accounts if for any reason they cannot be uploaded.
Go to: Accounting/Configuration/Analytic Accounting/Analytic Accounts
To create a new destination, select {New} button.
In the {Category} field, select {Destination}.
In the {Name} field, enter a destination name. In the {Code} field, select a destination code.
In the {Parent Analytic Account} field, select the associated parent analytical account using the magnifying glass . To do so, check your destination tree.
In the {Type} field, select {Normal}. You would select {View} if you were creating a Parent account.
In the {Activation period} tab, select a date.
Destination creation. In this example we are creating a destination type Expatriates
7. In the {Expense accounts} tab click {Add} to open the {Search Charts of Accounts} window and check the boxes of the {expense} accounts you want to associate to this destination. Click {Select} to close the Search window.
Expatriate destination and associated {Expense accounts}
8. Save the form
The destination is created
Inactivation Date for the combination “Dest / CC”
Go to Accounting >Configuration >Analytic Accounting>Analytic Accounts > Account category > search by Destinations
Searching destination
How to access new function of “Inactivation combination DEST/CC From”:
Edit from yellow pen
Click on “Cost Centers” tab
You will find new list view “Inactivation combination DEST/CC From”:
How to access “Inactivation combination DEST/CC From”
MSF operational finance consists of following the expenditures per project or per activity meaning that resources mobilized in the field are allocated to a project and directly expensed.
Analytic accounts enable users to track revenues and expenses per project and per expense type to maintain efficient control over MSF resources and report back both internally and to external stakeholders (Associative members, private donors, institutional donors etc.).
Expenses need to be allocated according to an analytical distribution. In UniField, there are several types of analytical distribution. We call them analyticaccount categories which are:
Destination: Operations, Support, National staff, Expatriate staff are the four destinations (See LUFI-20401 Destinations)
Cost Center: Some sections handle cost centers at a project and activity level while others handle them only at a project level (See LUFI-20402 Cost Centers and proprietary instances)
Funding Pool: A group of expenses meeting a donor defined set of conditions (for further details on funding pool, refer to Chapter 6 – Donors, Funding Pools and financing contracts in UniField)
In addition to these 3 main account categories, we have also 2 additional analytical dimensions:
Free 1 and Free 2 (See LUFI-20503 Free Axis )
Destinations, cost centers and funding pools can be found in Accounting/Configuration/Analytical Accounting/Analytic Accounts.
The entries on expense accounts cannot be validated if the expense is not fully allocated to a destination, a cost center and a funding pool. A dedicated wizard helps the user to do it (further details are given in chapter 3 – Payments). Allocation remains optional on Free 1 and Free 2 analytic accounts.
Analytic distribution wizard
There are various ways (functionalities) to execute an analytical allocation:
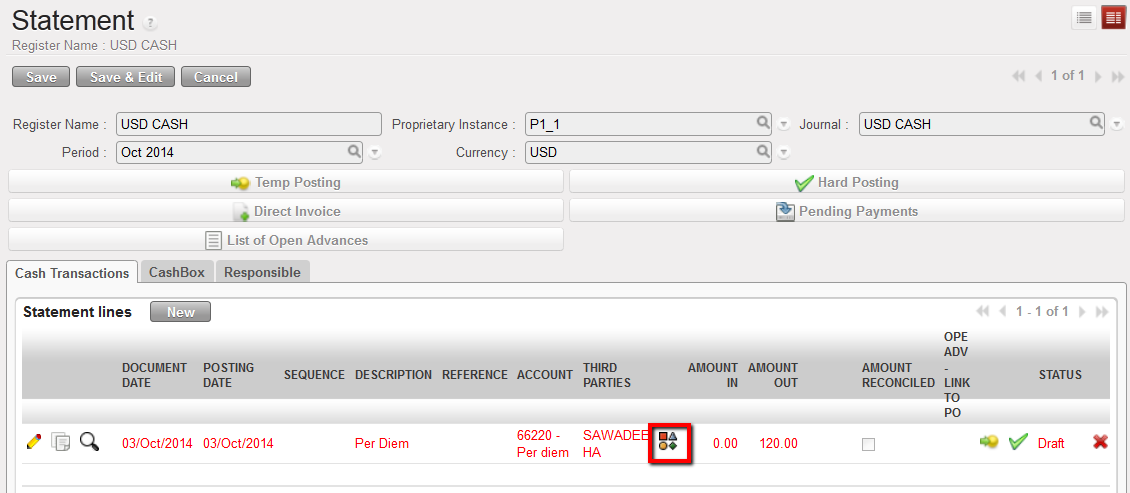
The allocation is done individually through an {allocation button} represented by the icon located on each expense line in a register, manual journal entry or an invoice (direct invoice, supplier invoice, refund invoice, stock transfer voucher and intermission voucher).
Analytical allocation icon to allocate an expense individually on a register entry
Analytical allocation icon to allocate an expense individually on an invoice line
2. The allocation is done for multiple invoice lines through the {Analytical Distribution} button at header level
Analytical Distribution located at invoice header
3. The allocation is done in mass using a dedicated action tied to the Analytical Journal Items
Mass reallocation function to allocate several analytical journal items
If one expense needs to be allocated across multiple cost centers or funding pools, clicking on the {New} button in the analytical distribution wizard creates additional lines. The user can distribute the cost by amount or by percentage by clicking on {Switch entry mode}. Remember that cost centers and funding pools are entered manually while destinations are proposed by default when the allocation is done individually per register or invoice line. The default destination can be modified.
In this example, the total purchase worth USD 50.85, the cost is spread over 3 cost centers by percentage.
Entries on income accounts may require an analytic allocation too if you use income accounts. Please check your OCs procedures.
UniField behaviour is similar to the allocation on expense accounts. You will use the Analytic distribution wizard as well.
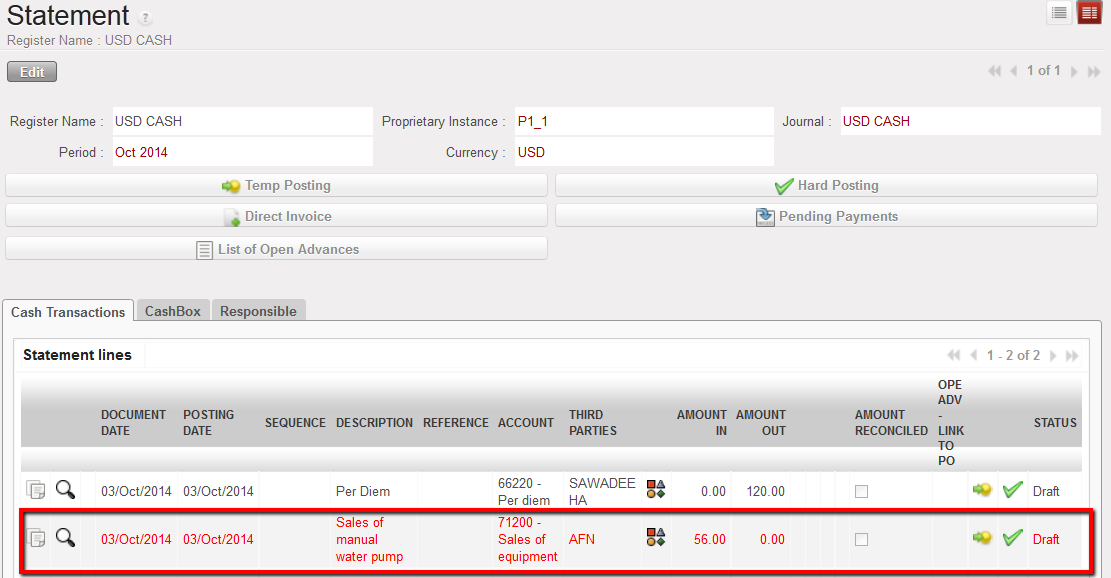
In this example, the sale of a manual water pump is booked on an income account requiring an analytical distribution.
Should the allocation be incorrect, the entry line will remain in red until it is changed.
Analytical distribution button located on a line of a cash register. The register line is red because the analytical allocation was not done or is invalid
In this example, no allocation is requested for income accounts of type 8.
Destinations, cost centers and funding pools can be either {View} type or {Normal} type. This defines the account behavior. {Normal} accounts are the actual accounts assigned to expense entries while {View} accounts consolidate {Normal} type accounts.
The duplication of a register line, supplier invoice and any other financial documents where a cost allocation was set also duplicates the analytical distribution.
OCA specific*:
In order for the system not to consider all income accounts for analytic allocation, a check box has been created in company settings. Checking the box will only require an analytic distribution for the income accounts starting with 7. The other income accounts will not require any allocation.
This means in both cases (unchecked or checked box) accounts starting with 7 will require an allocation.
To change this company setting, Go to: Administration/Company as shown in the below view:
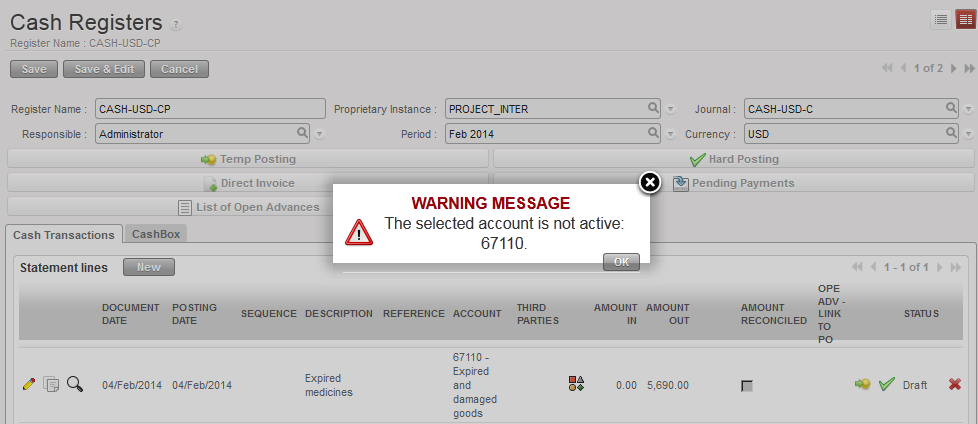
Inactivating accounts is performed at HQ. This action prevents users from booking future entries on an account that is not in use anymore.
Deactivation is synchronized down to all missions and new entries for the inactivated accounts are blocked. The check on entries is based on Posting Date, e.g. the Posting Date of a new entry can’t be on or later than the inactivation date of the account. If the entry’s Posting Date is outside the financial account activation period, you will get the following error message:
System control on an inactive financial account
How to Inactivate a Financial Account
Go to: Accounting/Financial Accounting/Accounts/Accounts
In the field {Code} enter the account code to inactivate and {Search}
Once the system retrieves the account, click on the pencil to edit the account form
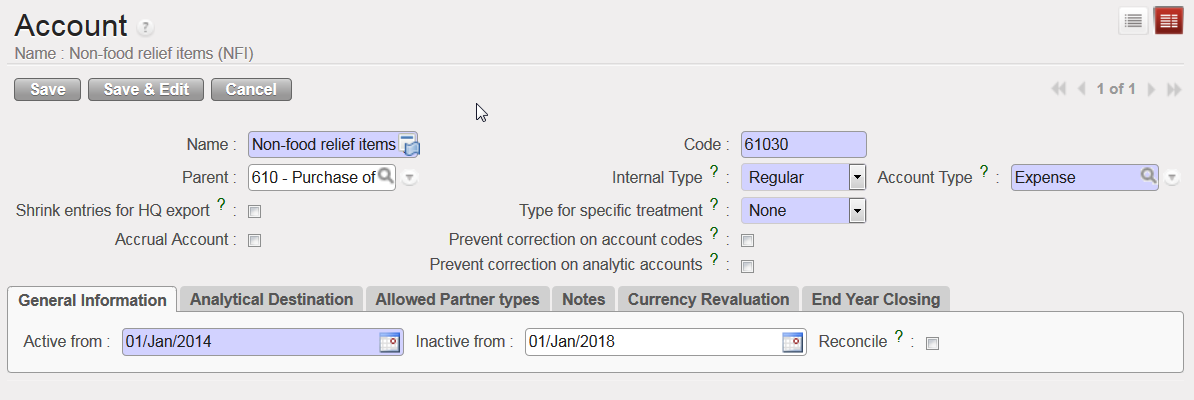
In the {General Information} tab, enter a date to inactivate the account and save
The financial account {Expired and damaged goods} is inactivated
Account {61030} is inactivated since 1st January 2018
It is possible to delete the inactivation date in order to re-activate and to use this account again.
In some cases, you might want to use the same FX rate for a defined currency over several periods. The “FX rate by currency” function will produce a report in xls showing the rates used for given periods.
How to Apply an FX Rate on a Defined Currency over Multiple Periods
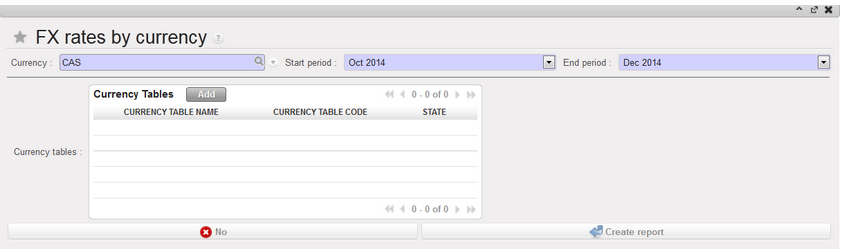
Go to: Accounting/Configuration /Currency Management/FX rate by currency
In the FX rates by currency window, insert a Currency, Start and End period.
Select a currency table if need be
Press on Create report.
FX rates by currency window
4.Confirm (OK)
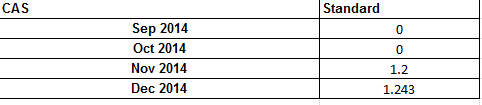
>> An xls report is produced
FX rates by currency report displays the rates applied to the CAS currency from September to December 2014
In UniField, accounting entries are shown in booking currencies in the registers and booking and functional currencies in the financial and analytical journals. This requires setting up currencies with their monthly exchange rates against their functional currency.
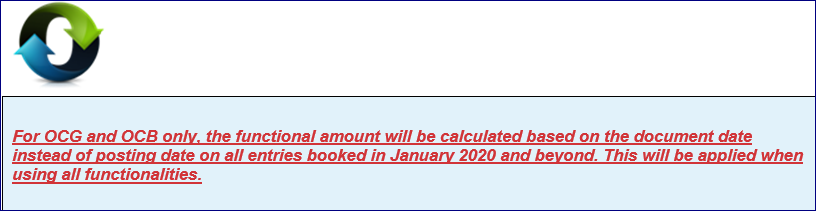
FX rate changes from one period to another. This results in an automatic calculation of a FX rate gain or loss when two entries posted in different periods are reconciled together (i.e. cash disbursed in May 2017 and returned in June 2017). This revaluation is therefore based on the entry posting date.
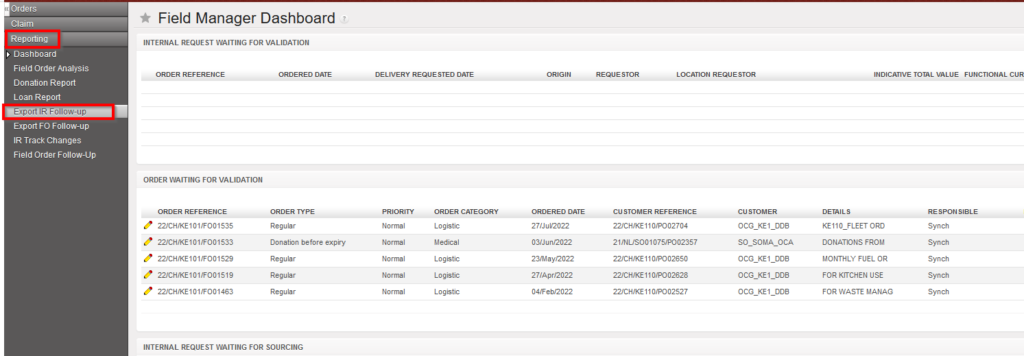
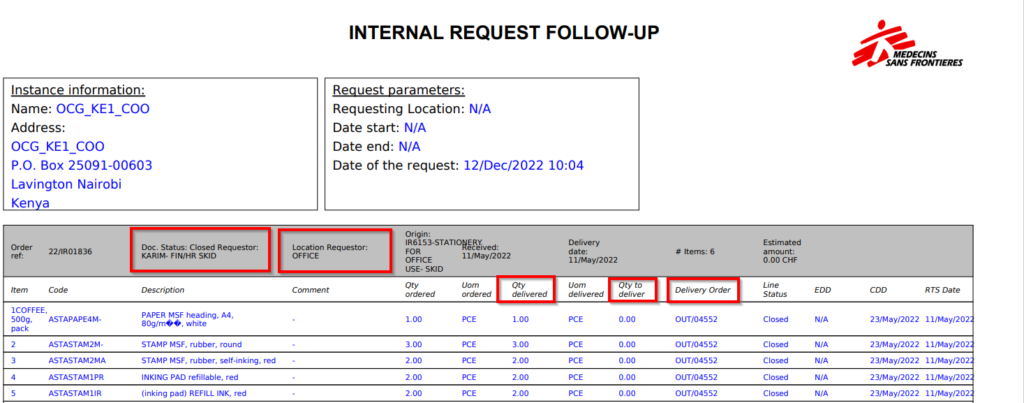
Go to: Orders / Orders / Reporting / Export IR Follow-up
Click on the “Export IR Follow-up” sub menu.
Export IR Follow-up
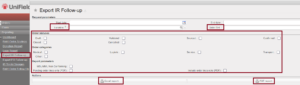
2. A pop up with several filtering option is displayed. User can choose to filter by “Location” (i.e.: Location requestor), “Order reference”, Status of document, order categories and report parameters.
Export IR Follow-up
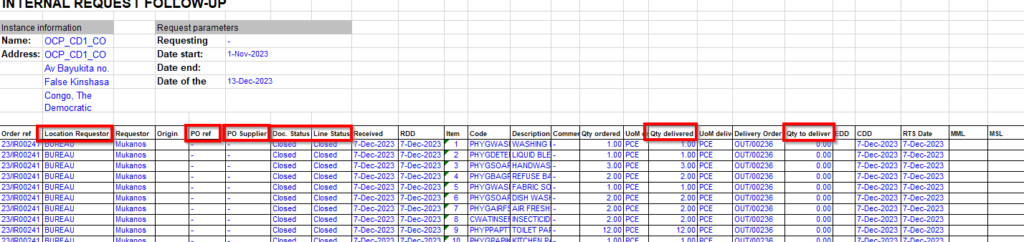
3. The report can be exported in Excel or PDF via the corresponding buttons.
This report provides valuable information such as Document and line status; Qty ordered vs Qt delivered; Reference of sourced documents (PO; OUT)…
Export IR Follow-up to XLS
Export IR Follow-up to PDF
Note that the “Sourcing Documents” tab available on the IR will display the references of the related document following the sourcing of the IR.
Following a development done on UF6, there are now 2 options to follow up on IR, the historical one is the one from the right action menu named “Order follow up” and the other one which offers more filtering options and details is called “IR follow up per location” and can be found on the main left menu.
We use cookies to ensure that we give you the best experience on our website. If you continue to use this site we will assume that you are happy with it.
 Chart of Analytic Accounts window
 Account category Destination shows the chart of destination accounts
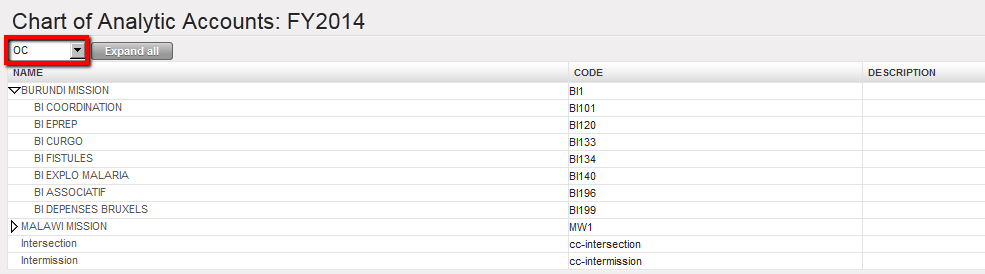 Account category Cost centers shows the chart of cost centers accounts
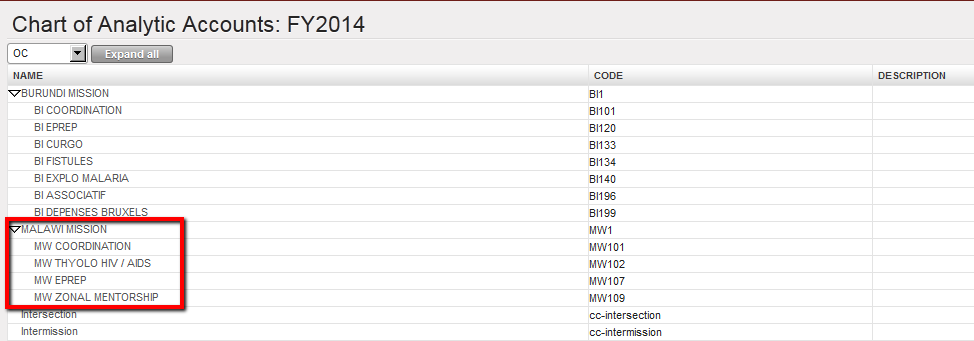 Malawi mission tree view cost centers
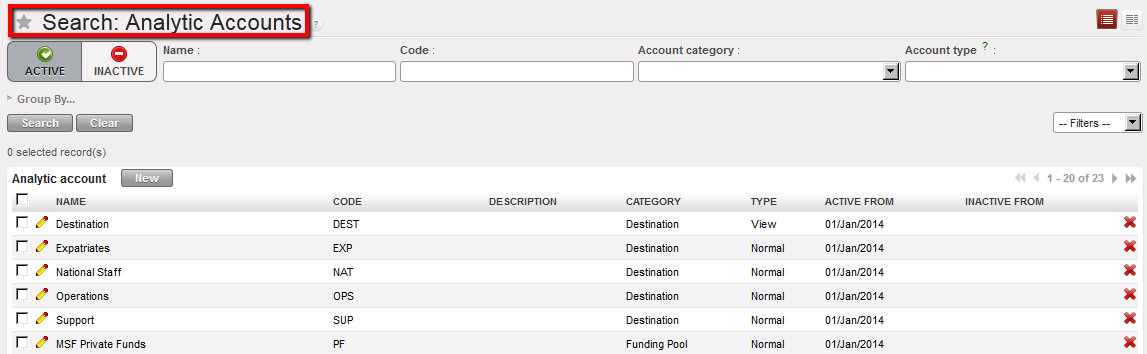 Analytic Accounts Search view displaying Active accounts
 to open an analytic account form view.
 the form.
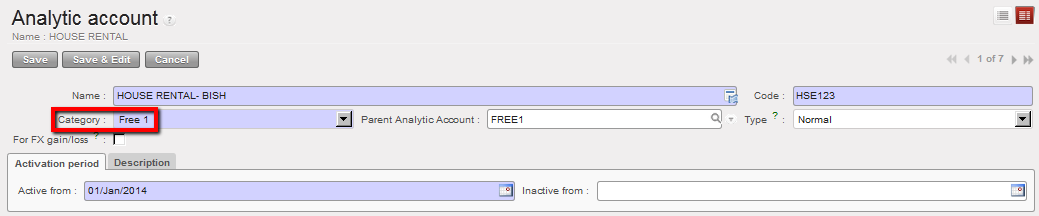 Analytic Account Free 1 is created
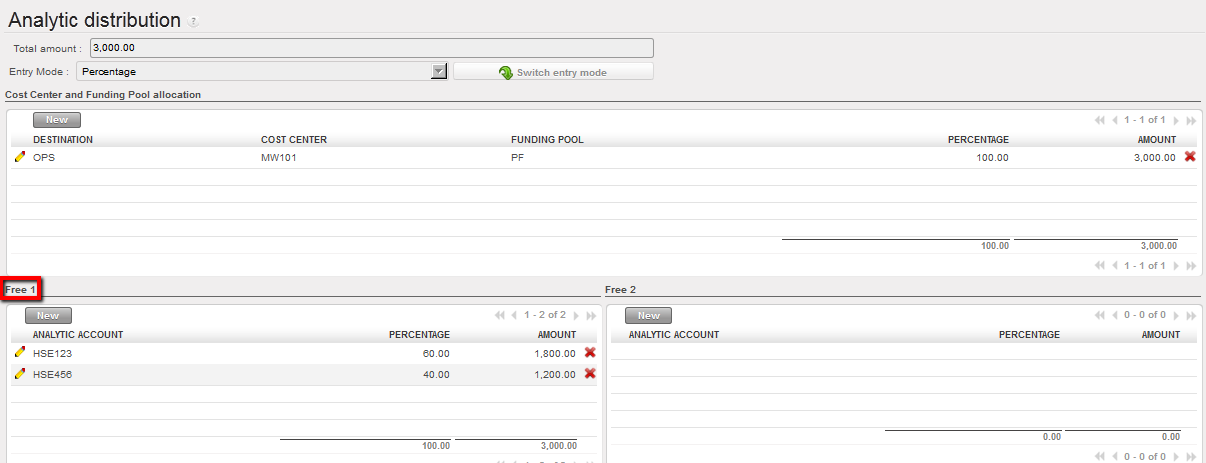 Analytic distribution wizard used to increase the cost allocation accuracy
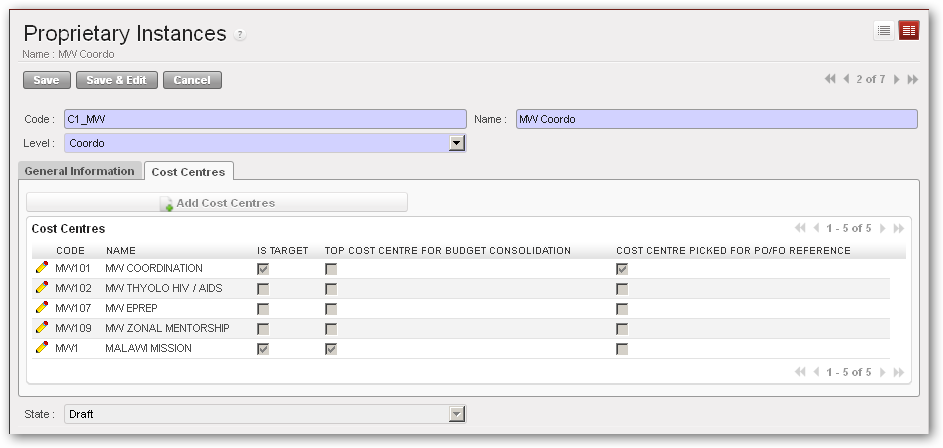

 Adding cost centers to a proprietary instance
 to edit the line and save
  .
. Selecting IS TARGET
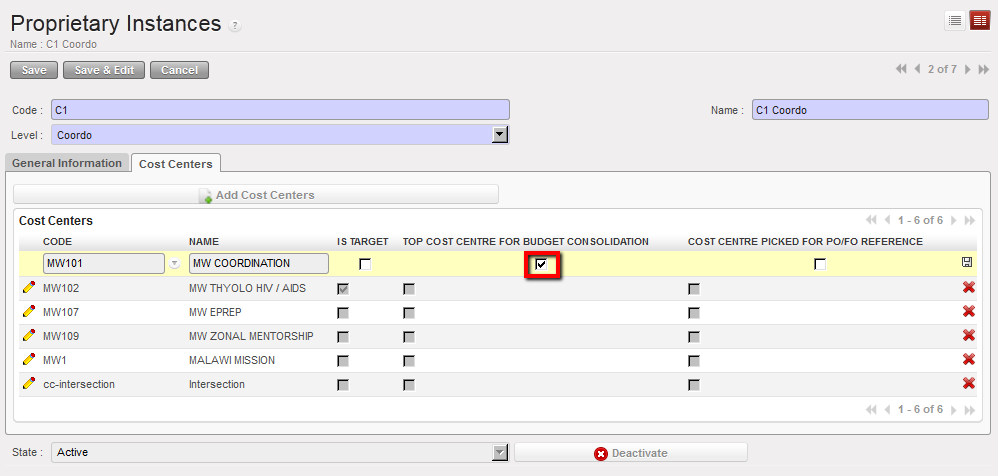 Selecting Top cost center for budget consolidation
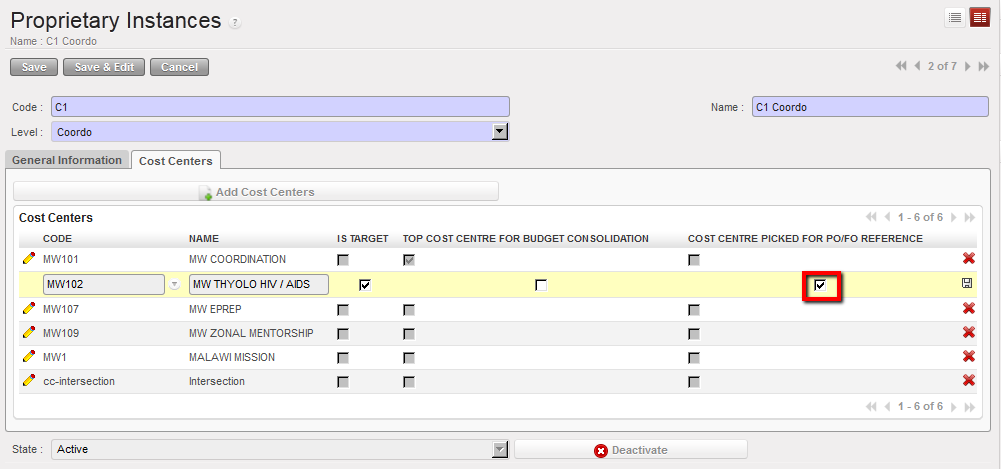 Selecting Cost center for PO/FO reference
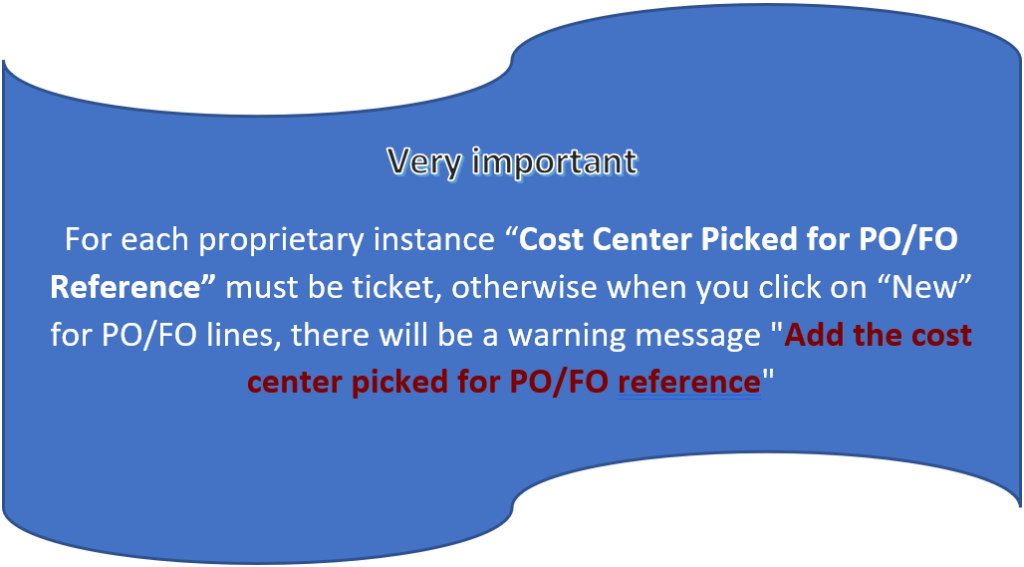
 of the cost center line.
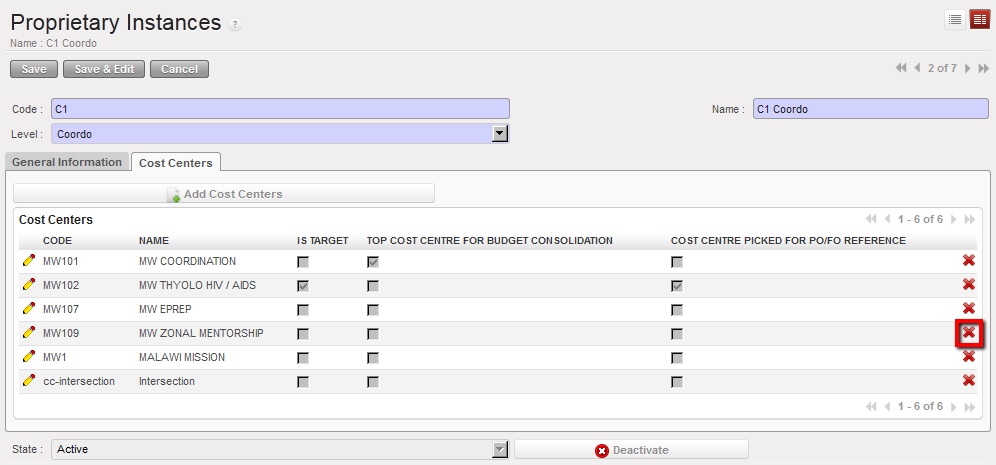 Using located on the cost center line to remove the cost center from the proprietary’s cost center setting
 . To do so, check your cost center tree.
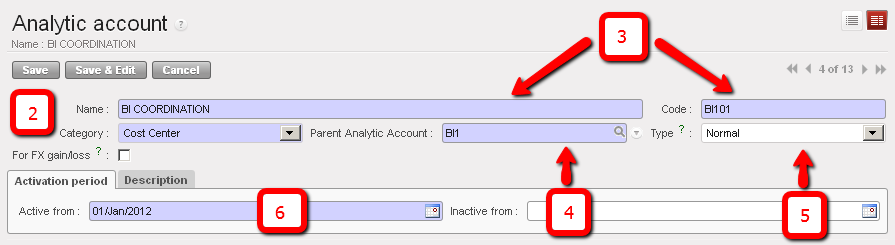


 . To do so, check your destination tree.
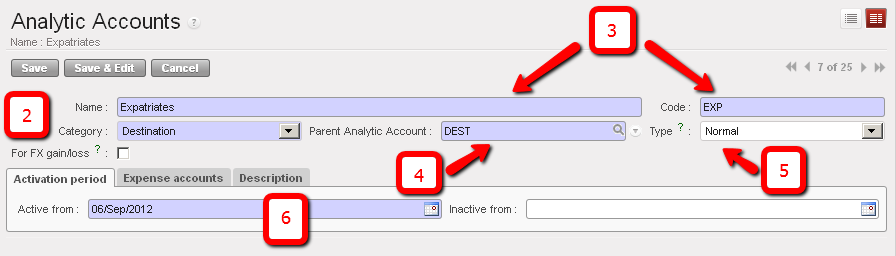 Destination creation. In this example we are creating a destination type Expatriates
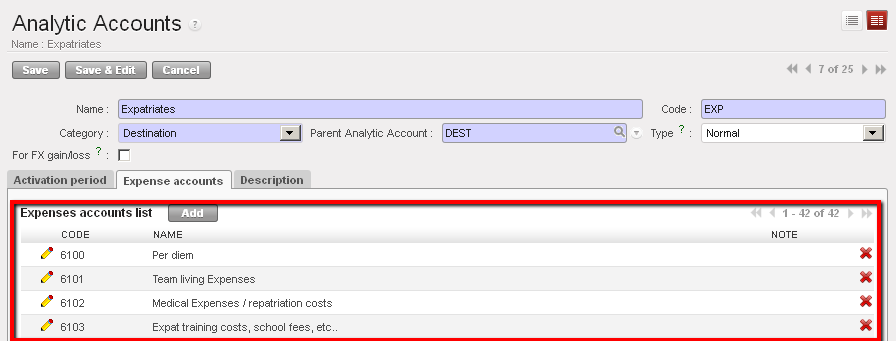 Expatriate destination and associated {Expense accounts}
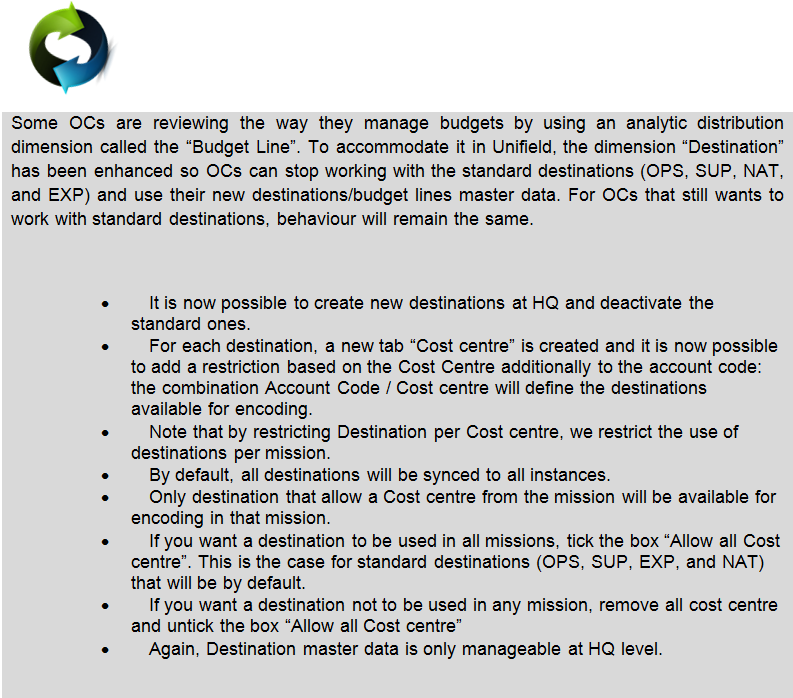


 Analytic distribution wizard
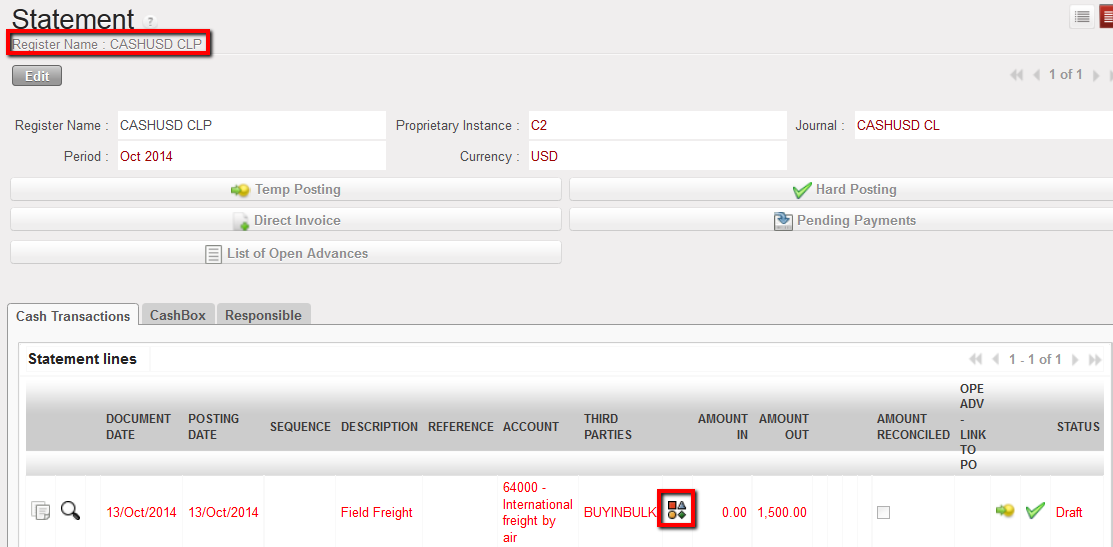 Analytical allocation icon to allocate an expense individually on a register entry
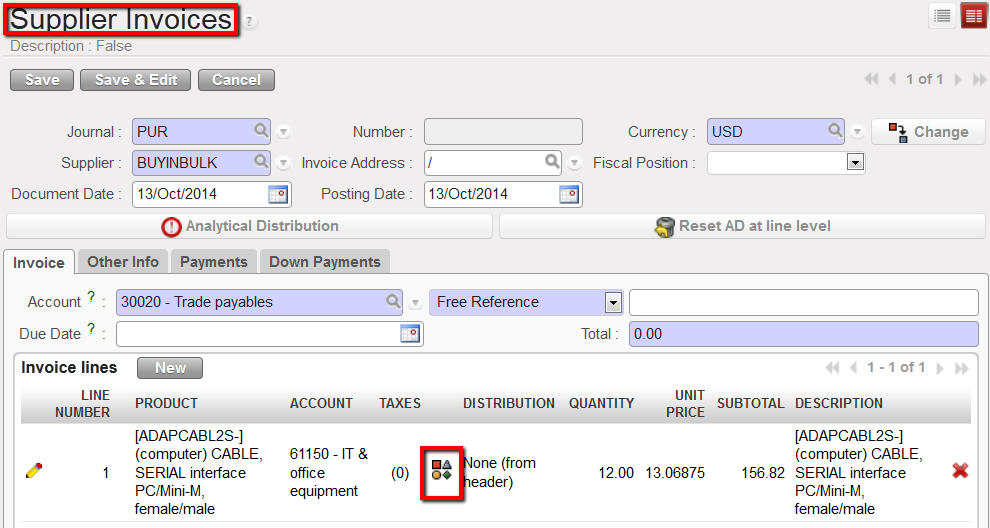 Analytical allocation icon to allocate an expense individually on an invoice line
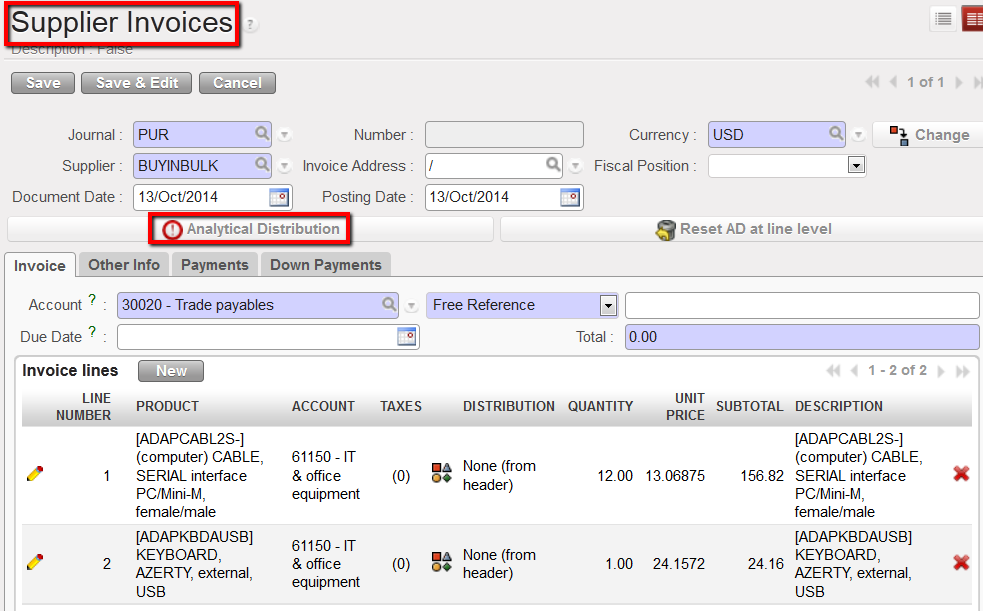 Analytical Distribution located at invoice header
 Mass reallocation function to allocate several analytical journal items
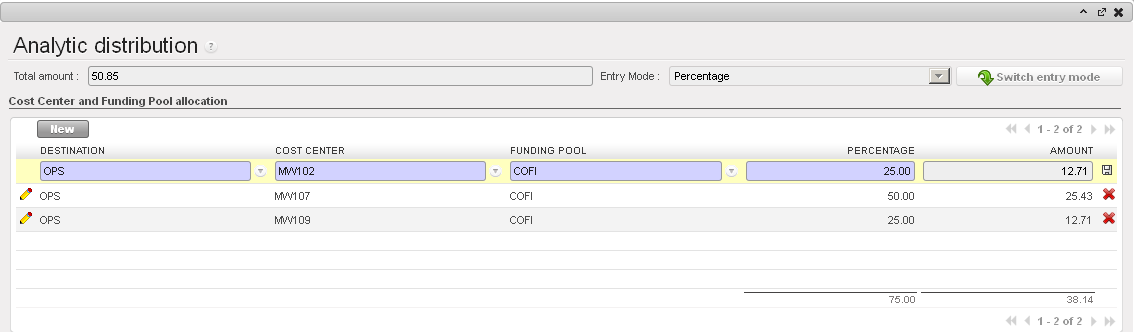
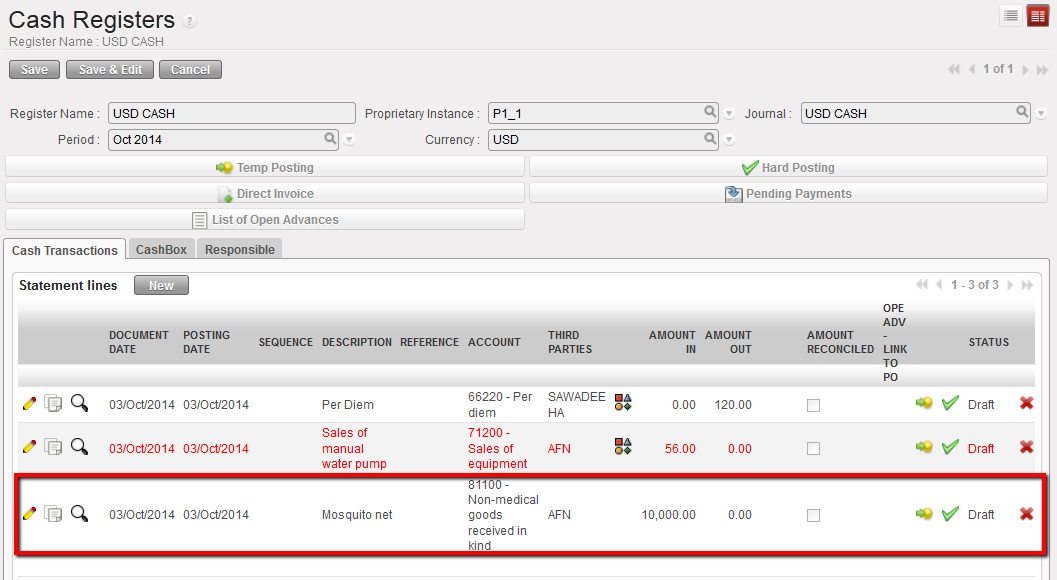 In this example, no allocation is requested for income accounts of type 8.
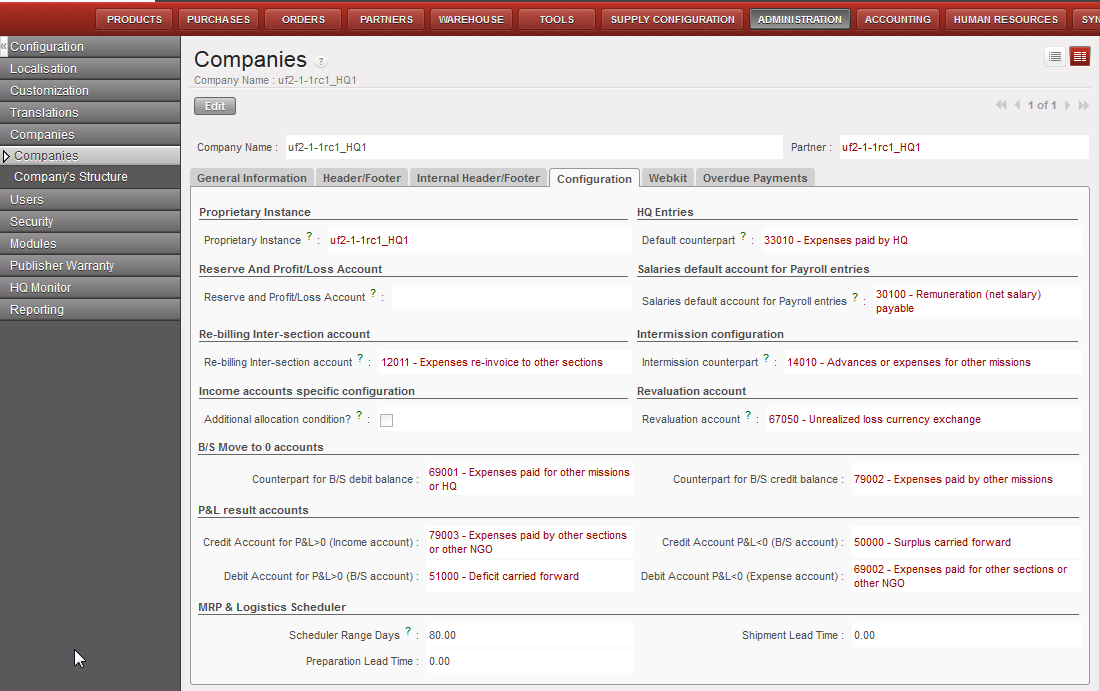
 System control on an inactive financial account
 to edit the account form