B. HOW TO CREATE AN INITIAL STOCK INVENTORY

Supply User Manual ENG -> 5. Warehouse -> 5.13 LU-SU4206: Inventories -> B. HOW TO CREATE AN INITIAL STOCK INVENTORY

B. HOW TO CREATE AN INITIAL STOCK INVENTORY

Initial Stock Inventories are usually used when an instance is created but not after that. They help to transfer stock levels from a legacy system (e.g. LogistiX) to a UniField instance. It is a one shot operation during which accurate stock levels are introduced in UniField.

This is a process which is part of the migration when a new instance is being set up, or if a new stock location is created. This is a tool to initiate the project stocks with the relevant details (stock levels, location where the goods are, cost valuation of each product and, according to the PMD sheet settings the BN/ED if relevant).

The products, quantities and all other relevant information entered should be validated according to OC procedures.

Go to: Warehouse / Inventory Management / Initial stock inventory

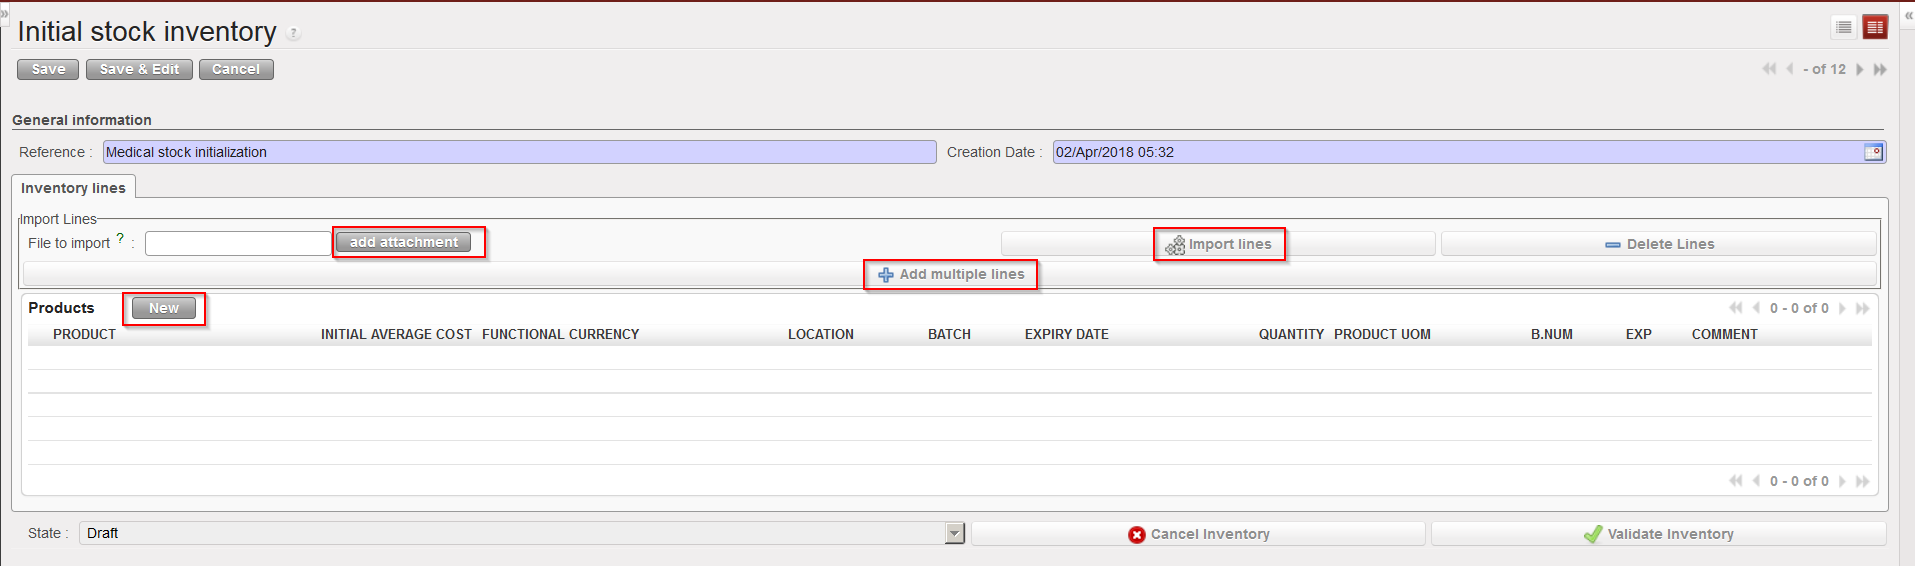
  1. Click on the “New” button to create a new ISI.
  2. Enter a “Reference” (name of the ISI).
  3. The “Creation Date” is set to the current date/time by default. Change it if needed.
  4. Add products using any of the following methods:

a) Adding products individually (by clicking on the “New” button, searching for and selecting the products).

b) Adding multiple lines by selecting .

c) Importing a file (by clicking on the “add attachment” button, browsing and selecting the file, then clicking “Import lines”). BN and ED products can be created at import, however, checks will be done at import and warning/error messages will be raised in case of conflict (existing product with same BN/ED; wrong format, missing information,…).

Methods to insert lines in an Initial Stock Inventory

Note that imported files must have a specific format (XML Spreadsheet 2003). You may get a file template by exporting an existing ISI via the option “Stock Initial Excel Export” available in the action menu. In this file, each separate batch, expiry date or location for a product should have its own line/row.

Excel file format to import on an Initial Stock Inventory

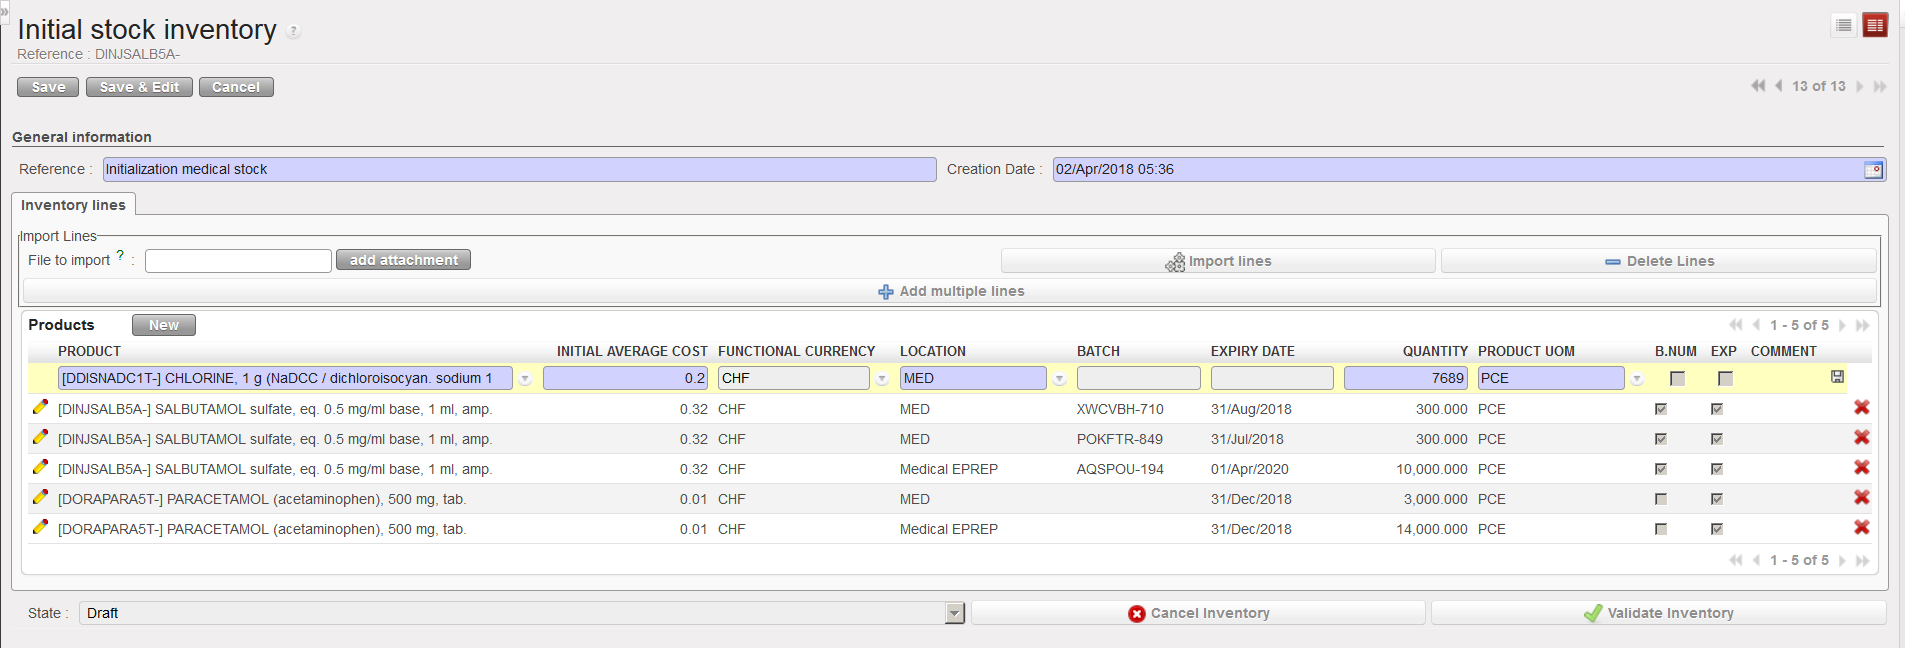
Inserting a line manually on an Initial Stock Inventory

5. Unless you used the import function (“add attachment” button) to add products and all their details, you will need to add these details manually line by line.

I.) Click on the pencil icon next to each product line to edit it.

II.) Add all relevant information (location, batch number, expiry date, quantity,…). Note that location such as Input,Output, Packing, Shipment, Distribution, Stock and Quarantine are not allowed.

III.) Click on the floppy disk icon to save each line.

6. For every product which has more than one batch number or expiry date, or is found in multiple locations, a new line with this product needs to be created.

7. Click on the “Validate Inventory” button to confirm all lines are correct, this will mean no more changes can be made.

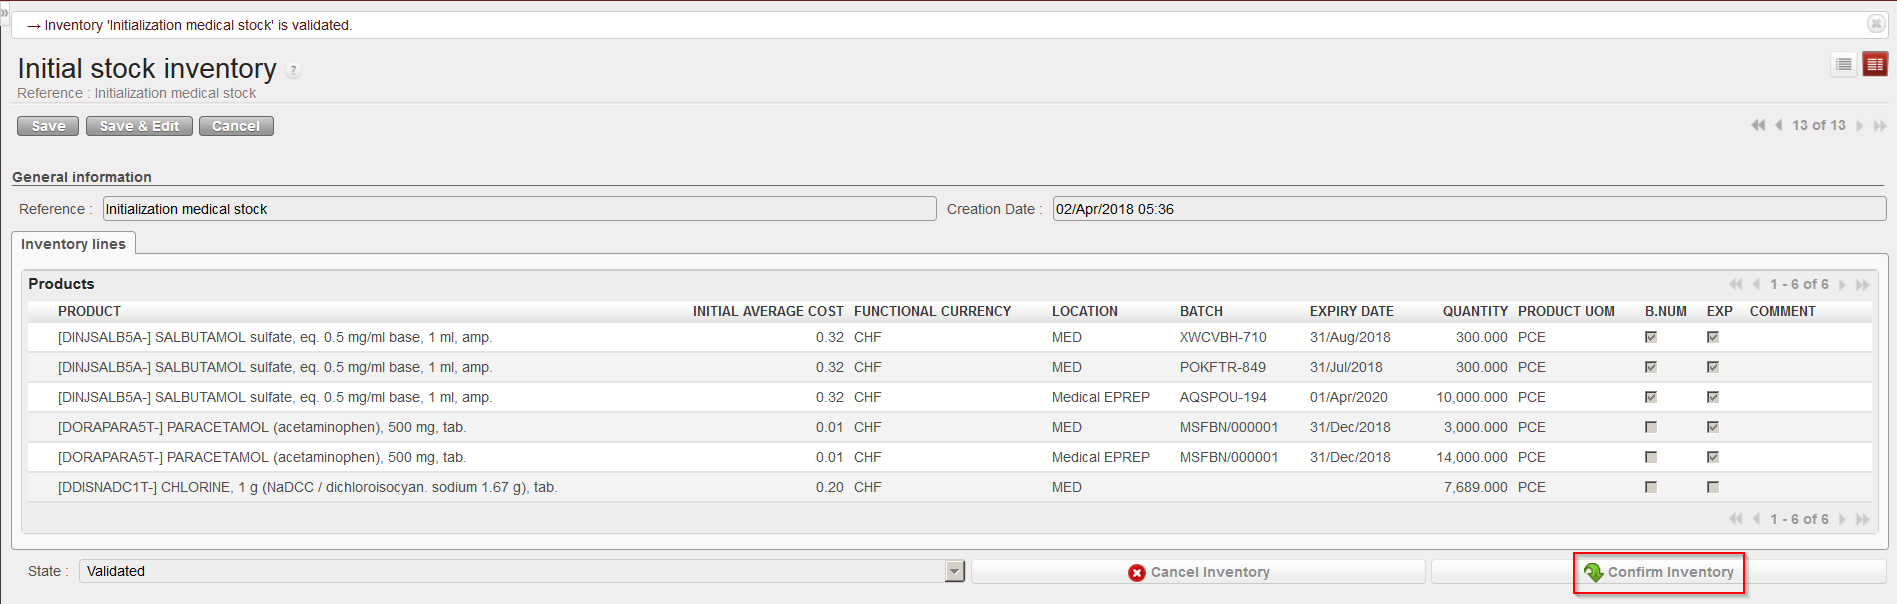
8. Once the inventory has been validated, click on the “Confirm Inventory” button to add these products into the indicated stock locations on the UniField instance.

Confirming an Initial Stock Inventory

Note that the “initial average cost” entered on the ISI will update the cost price of the PMD sheet. This means that the ISI will actually impact how stocks are valued in different reports and how subsequent orders will be valued. If several lines of an ISI relate to the same product, you will be forced to enter and identical unit price on the different lines.

It is not impossible to do Initial Stock Inventories several months after a go live (i.e. after an instance has been used for several months) but this should be done with great care, especially regarding price valuation of products.
5.13 INVENTORIES.

Supply User Manual ENG -> 5. Warehouse -> 5.13 LU-SU4206: Inventories.

LU-SU4206: Inventories.

A. LU INTRODUCTION

B. HOW TO CREATE AN INITIAL STOCK INVENTORY

C. HOW TO CREATE A PHYSICAL INVENTORY

D. HOW TO RE-VALUATE THE COST PRICE/AVERAGE PRICE OF PRODUCTS

N. GLOSSARY SPECIFIC TO REPLENISHMENT RULES

Supply User Manual ENG -> 5. Warehouse -> 5.12 LU-SU4205 Replenishment Rules -> N. GLOSSARY SPECIFIC TO REPLENISHMENT RULES

N. GLOSSARY SPECIFIC TO REPLENISHMENT RULES

RR_FMC: Forecasted Monthly Consumption (the one linked to RR concepts) 

RR_AMC: Average Monthly Consumption (linked to RR concepts) 

RR_HMC: Historical Monthly Consumption (linked to RR concepts), the actual ‘consumption’ of a specific month in the past (unlike the AMC, which is an average consumption of several months in the past) 

Std Dev (xxx): Standard deviation of the value set ‘xxx’, statistical notion which gives an idea of the spread of a data set around the average of this data set. Example: Std Dev (HMC) will be the standard deviation of the HMCs around the AMC.  

Coeff Var (xxx): Standard deviation of the value set ‘xxx’ divided by the average ‘xxx’ value. Example: Coeff Var (HMC) will be the standard deviation of the HMCs around the AMC, divided by the AMC. It enables variability comparison between 2 value sets relatively to one another. 

OC: Order coverage. Quantity of months to cover  

TLT: Total Lead time, Qty of days/weeks/months from date of order calculation (stock take) until availability in requesting stock location. TLT = Internal LT + External LT = Preparation LT + Order Creation LT + Order Validation LT + Supplier LT + Handling LT (see mock-ups) 

Preparation LT: time needed before RR cycle begins to do tasks such as complete physical inventories, update FMCs and other related discussions

Order Creation LT: time from user starting to look at next OC period to when IR has been creation 

Order Validation LT: time from IR creation until PO validation 

Supplier LT: time from validated PO until reception at requested location. 

Handling LT: time for customs clearance (e.g. from reception at port to reception at Instance Warehouse (can be zero e.g. for internal suppliers) 

SS: Safety stock in months of consumption  

TCRP: Time Covered by Replaced Product. When a product replaces an older product, this is the duration before the product to be replaced reaches Stock = 0. 

Buffer: (additional or alternative) Safety stock as quantity  

STDate: Stock take date (most of the time, this is the order calculation date)(this date is a point in time and can be considered as point 0 or starting point/date for calculations below) 

RDD: Requested Delivery Date of the order being currently calculated. The default theoretical RDD in FMC-segments equals ‘STDate + TLT’ 

SODate = Stock Out Date. Date when the estimated projected stock will reach 0 (using RR_FMCs) 

Real Stock: this including all current Qty in stock including reserved stock but not already expired stock: It includes all physical stock (including Buffer and Safety stock) 

Reserved Stock: all AVAILABLE lines in PICKs and OUTs (current definition in Unifield 13) 

PAS: Projected Available Stock. This gives forecast/projection at stock availability at end of TLT, which is the RDD. (reserved stock is not separated out in this calculation)

IOH = Inventory On Hand = Real Stock  

MissQty = Missing Quantity (aka Qty lacking) before order arrival 

M. HOW TO GENERATE A PRODUCT LIST CONSISTENCY REPORT

Supply User Manual ENG -> 5. Warehouse -> 5.12 LU-SU4205 Replenishment Rules -> M. HOW TO GENERATE A PRODUCT LIST CONSISTENCY REPORT

M. HOW TO GENERATE A PRODUCT LIST CONSISTENCY REPORT

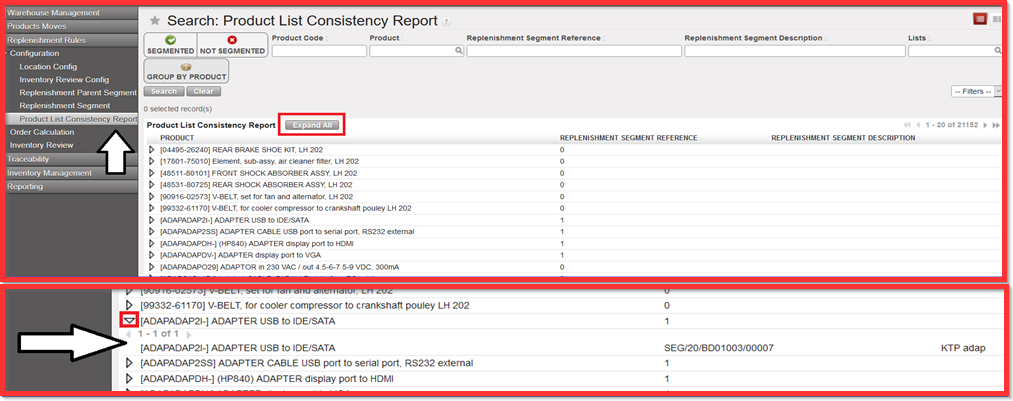
Go to: Warehouse /Replenishment Rules/ Configuration/ Product List Consistency Report

Product List Consistency Report is used for each of the products from RR. The purpose of the report is to cross check products to which segment belong to. It enables to see how many Replenishment Segments each product is in (overview) or whether it is not in any Replenishment segments. It considers only lower level of segments – Replenishment segment (child segments) where the products are added. Thus “Replenishment Parent Segment” is not part of Product List Consistency Report.
  1. Click on sub menu “Product List Consistency Report
  2. Click on button “Expand All”. You get the detailed breakdown description of each product as depicted on picture below.

If you click on the small arrow at product line level you get the breakdown on clicked product only.

J. HOW TO GENERATE AN ORDER CALCULATION

Supply User Manual ENG -> 5. Warehouse -> 5.12 LU-SU4205 Replenishment Rules -> J. HOW TO GENERATE AN ORDER CALCULATION

J. HOW TO GENERATE AN ORDER CALCULATION

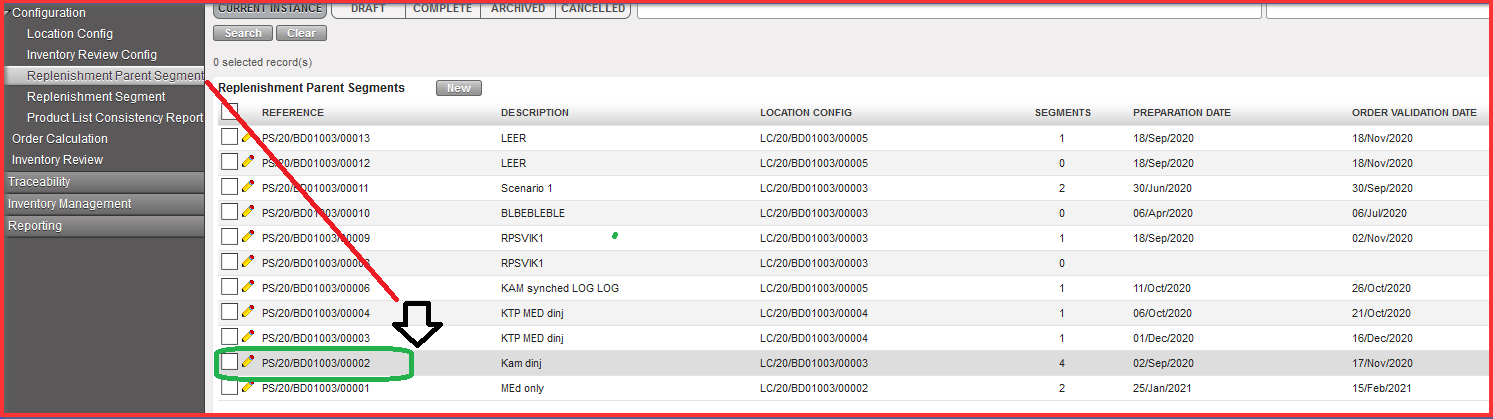
Order Calculation enables to export “IR” and “PO” based on configured “RR” steps before. In order to generate Order Calc go back to “Replenishment Parent Segment” and select Replenishment Parent Segments REFERENCE which exists there and which you need to process.
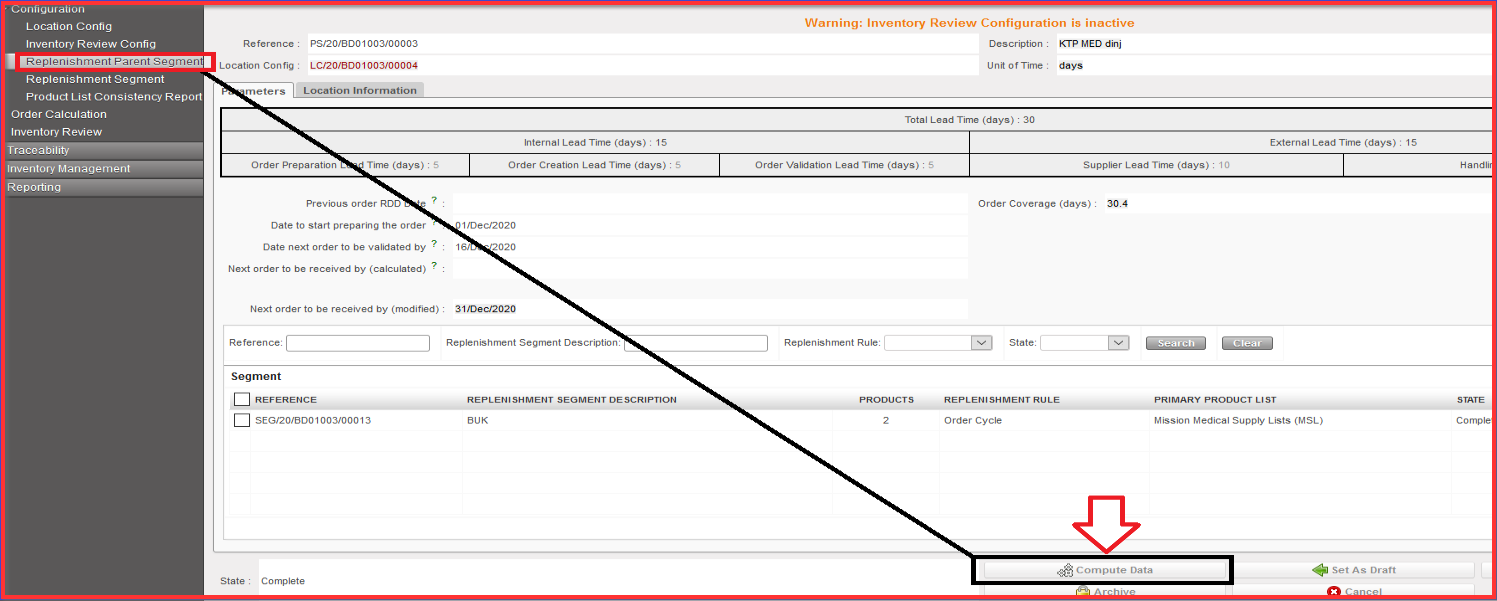
Go to: Warehouse / Replenishment Rules / Configuration / Replenishment Parent Segment

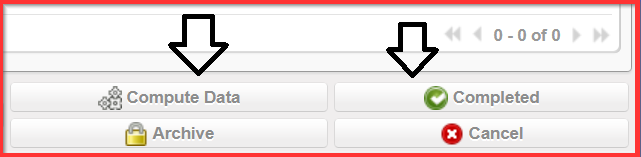
  1. Click on “Compute Data” button.
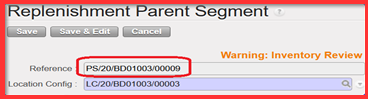
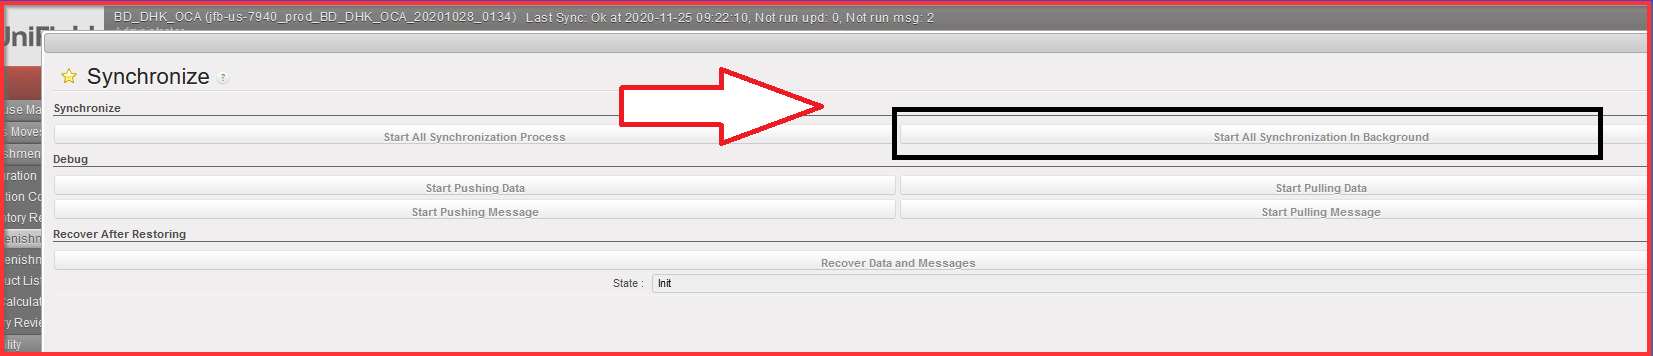
        2. Synchronize the instances.

In case you cannot wait until the next automated synchronization, proceed to a manual synchronization (see UM Chapter 2 Configuration> LUSU1103 Synchronization> C.How to Synchronize manually).

Please note that manual synchronization is subject to specific User right; liaise with your IT officer if needed.

Once synched, go back to Replenishment Parent Segment screen.

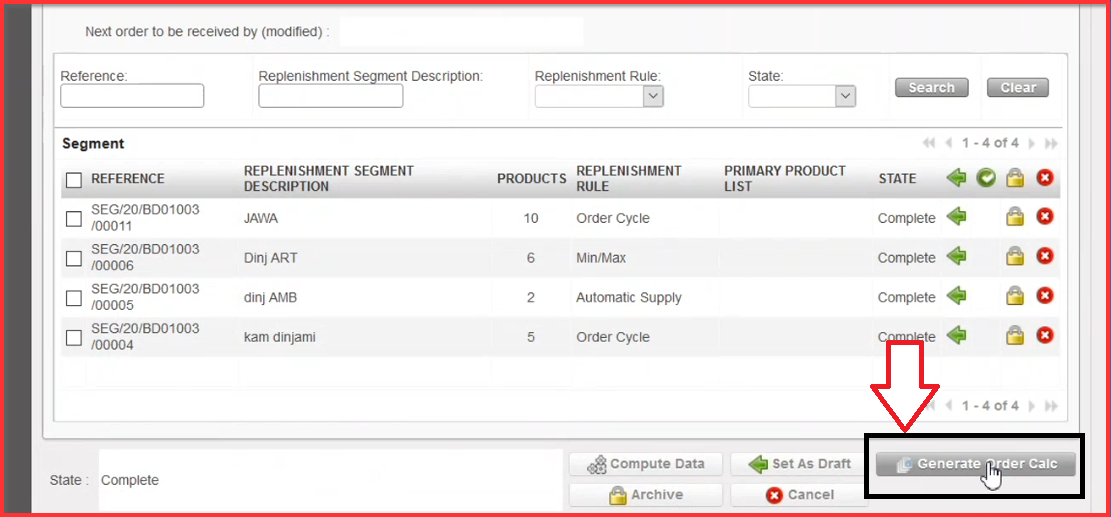
     3. Click on “Generate Order Calc” button.

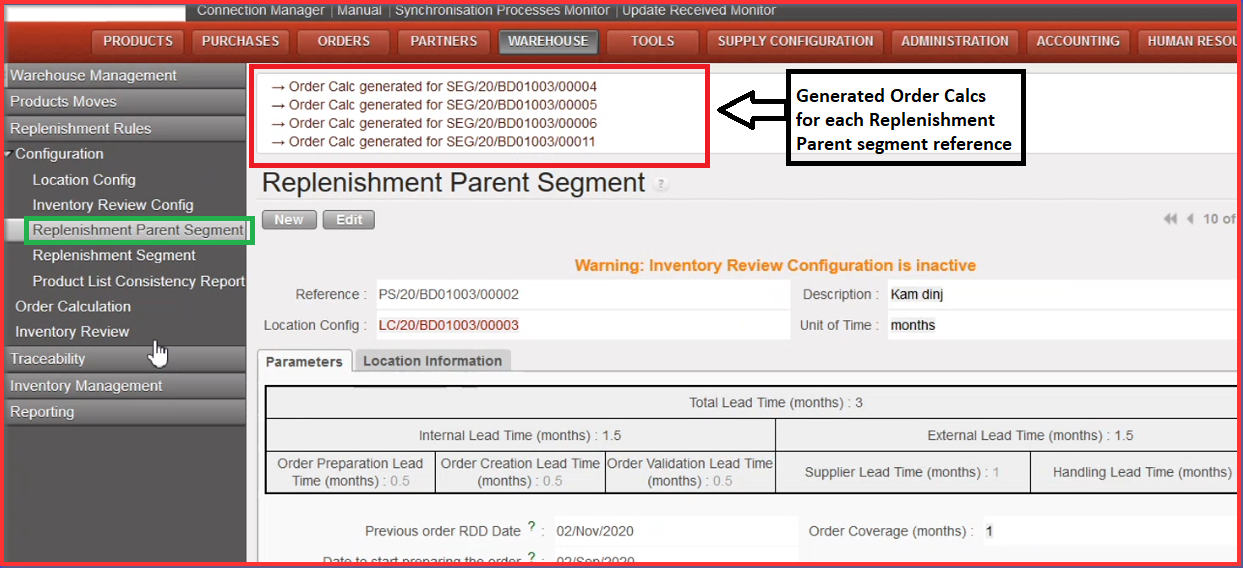
When button is clicked it will generate and Order calculation for all lines included in all “Complete” state (child segments) belonging to the Parent Segment. When Button is clicked there is a message indicating that Order Calc has been generated for XX YY and ZZ (child) Segments.

The export from the Order Calc will also contain all lines from segments belonging to the Parent Segment. Once attached to a parent segment a child segment cannot switch its parent. If a Child segment is Archived, it is not considered Active.

After the clicking on “Generate Order Calc” button you get the notification message on the top of the “Replenishment Parent Segment” screen informing about generated Order Calc. It automatically generates for all Replenishment Segment References (all lines).

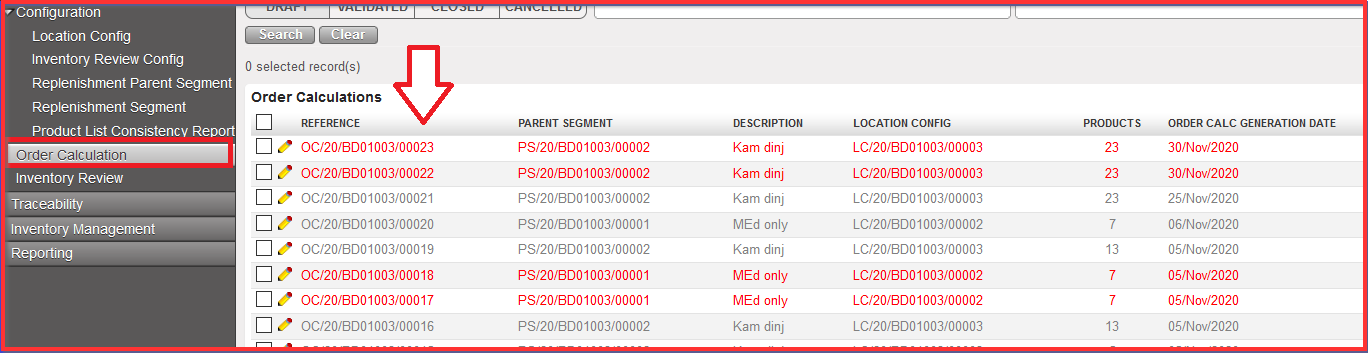
4. Click on “Order Calculation” submenu option. There are created generated Order Calcs on the top of the screen in “draft” status.

5. Click on the “OC” reference which you need to process

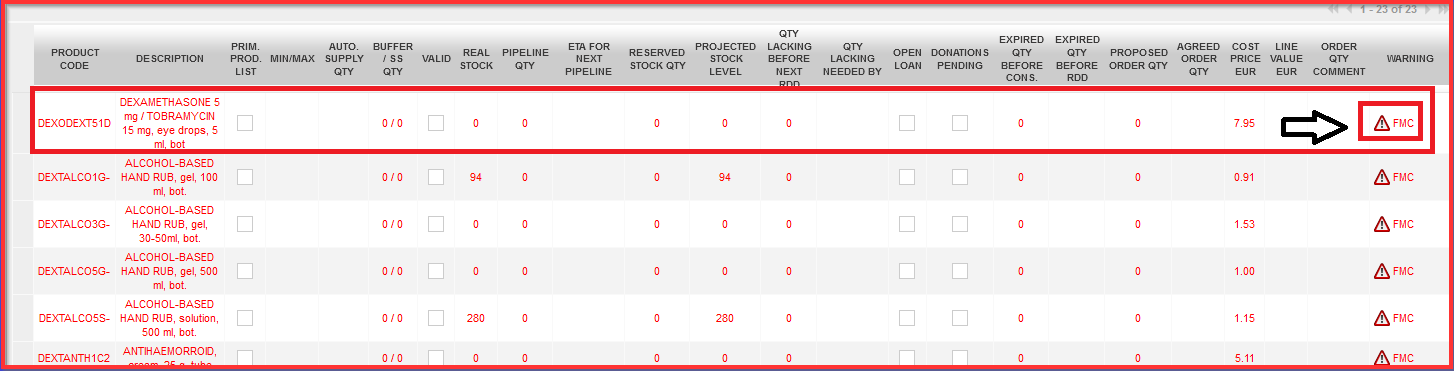
There are multiple product lines visible. If there is invalid “FMC” the product code line is in “red” and there is an exclamation mark depicted in “Warning” column. Invalid FMC goes with wrong data when FMC is not calculated correctly which is a huge blocker in terms of calculating and processing IR to PO. Order Calcs must be processed only with correct FMC.

6. Update the Order Calc (if necessary)

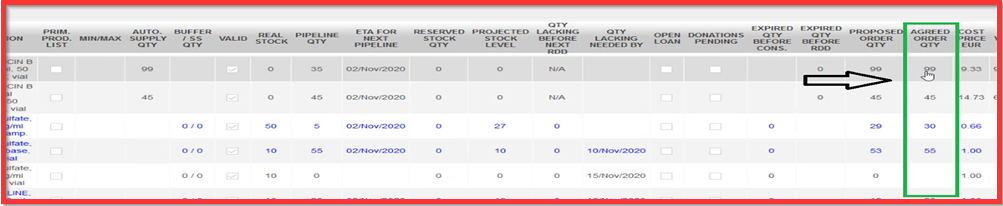
               a) Fix FMC correctly by correcting input values in “Agreed Order Qty” column. Column cells                         for “Agreed Order Qty” must contain at least “zero” value. Blank cells are not allowed.

                b) Click on “Round Qty to SoQ” which will round up the quantities in the “Agreed Order Qty”                     according to any SoQ value found in the Product PMD in main instance.

This “Agreed Order Qty” column is a main pillar for further validation process. The validation process needs to be done at this point which means that cost price is taken from the product PMD (data sheet) e.g. average Cost Price is not computed based on the supplier selection at this stage. Proposed Order Qty. can be changed due to the type of packaging. This is a manual action only. If Product PMD has SoQ of “1” then no rounding to be done. If proposed Qty is “0” then no rounding to be done. “Proposed Qty” value is not impacted by this button and should stay as per original value.

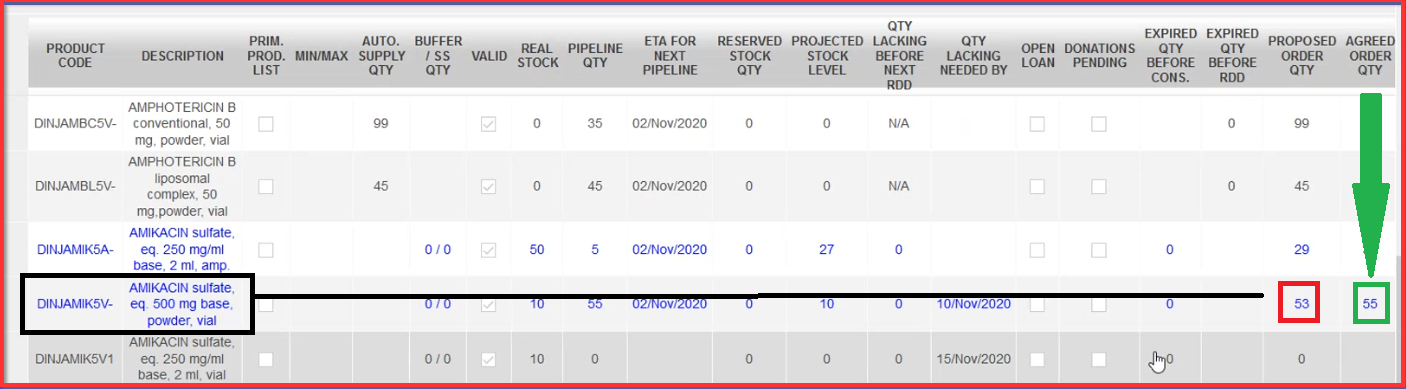
Where this button has been used and the qty has been changed (rounded up), the line should appear in a different color (blue) onscreen and in export report. The Cost price (X) is still based on this “Agreed order Qty” and so will take any rounded up qty into account. Below picture shows the quantity of products in “Proposed Order Qty” column which is rounded up for the quantity set out in “Agreed Order Qty” column.

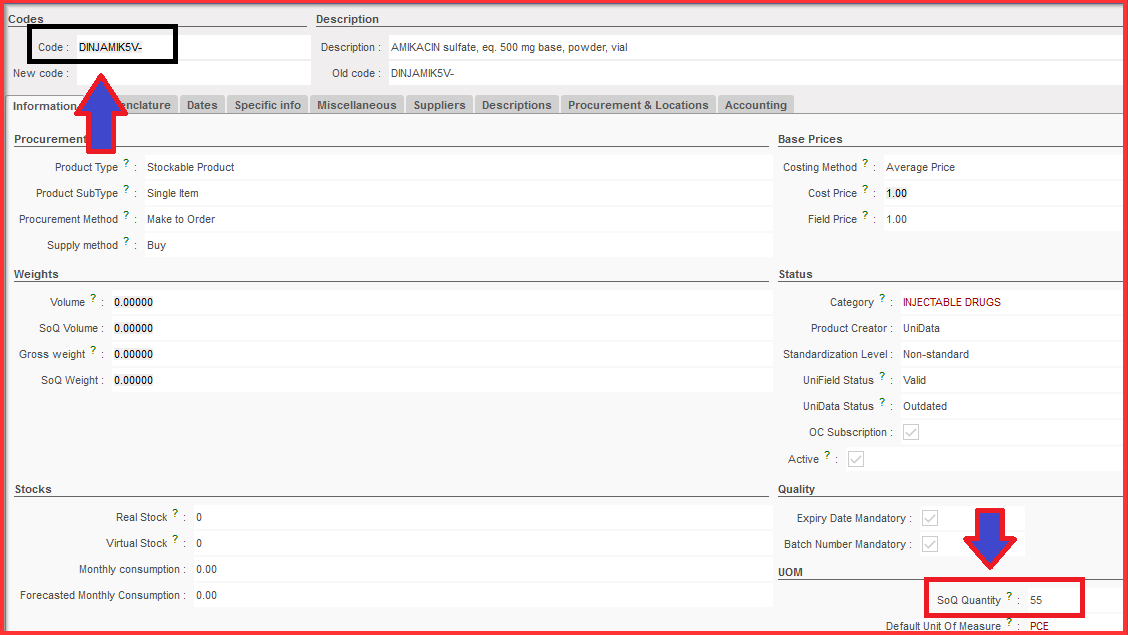
You can go to Products > ProductsSearch: Products” section and check “SoQ Quantity” for the specific product code in related product data sheet under UOM (Unit of measurement) section.

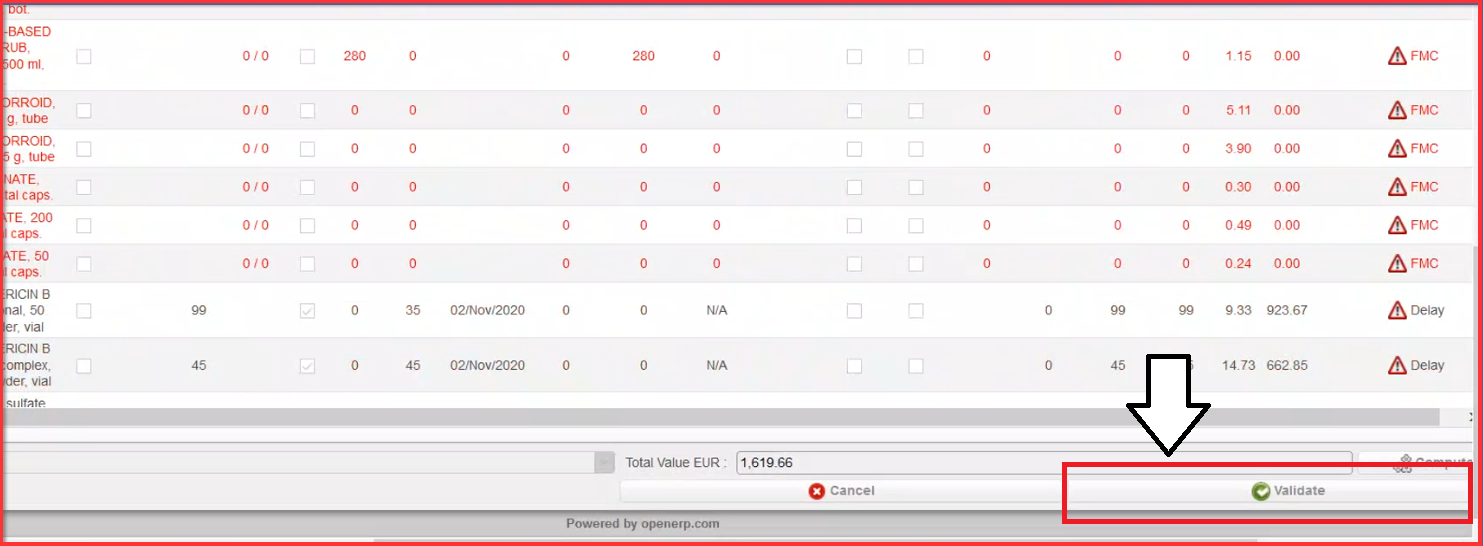
     7. Back to the Order Calc screen, when values are fixed for each product line, click on button “Validate”.

      8. Click on button “Generate Requisition & Close”.

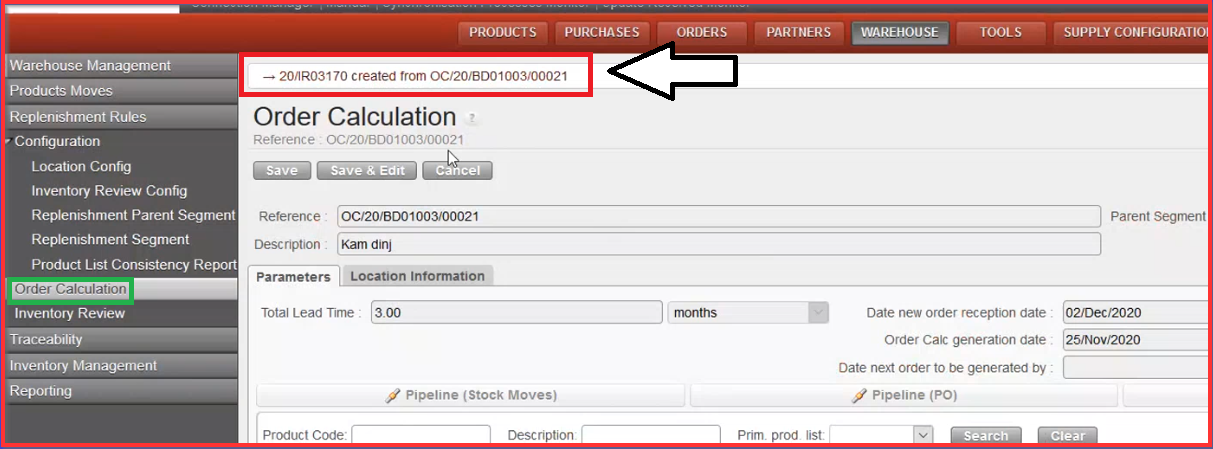
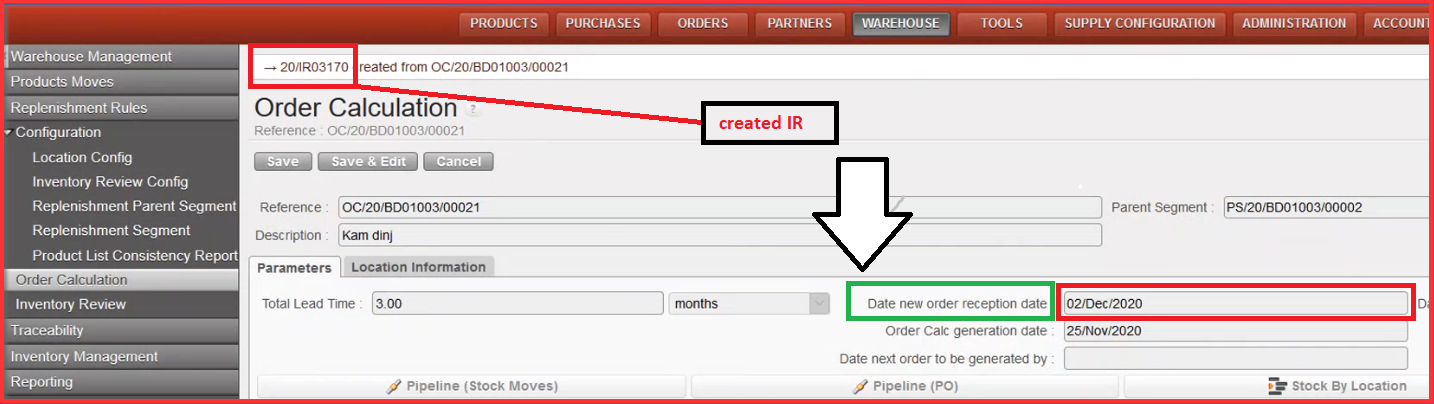
When you click on “Generate Requisition & Close”, the Order Calc is Closed. There is a new message on the top of the screen informing us about newly created IR (e.g. 20/IR xxx) reference from specific Order Calc reference (e.g. OC/20/BDO xxxxx) as depicted below on print screen example.

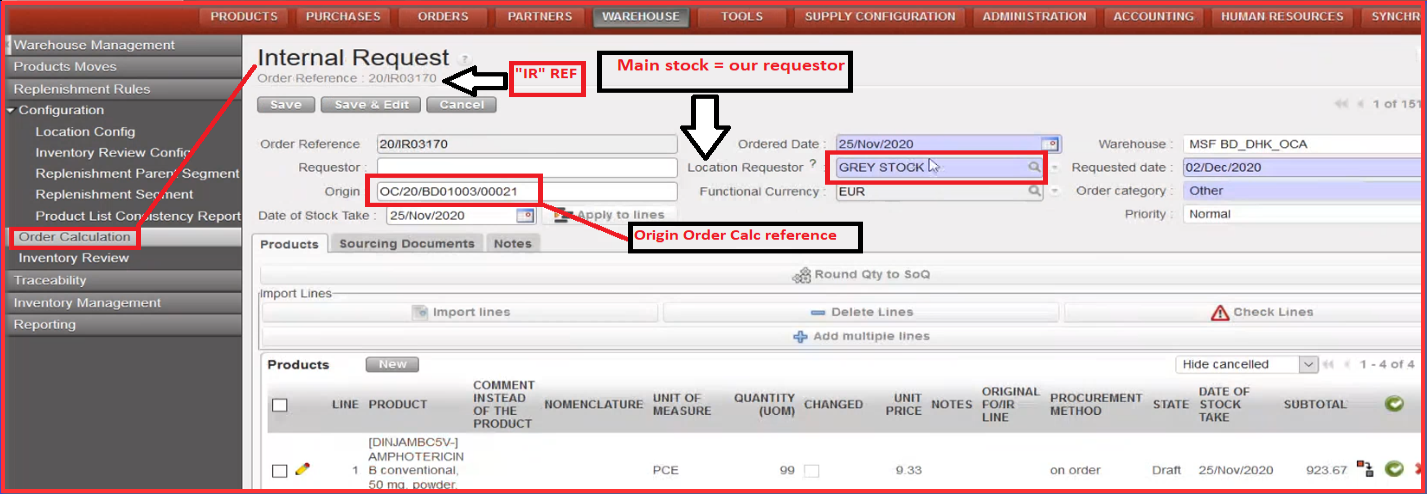
  9. Click on created IR reference on the top of the screen to be redirected to the “Internal Request” screen

The “Replenishment Parent Segment” and “Replenishment Segment” are updated based on created “IR”, next order is due by e.g. “Date new order reception date” section depicted below.

See below the description of the sections in opened new Internal Request window.

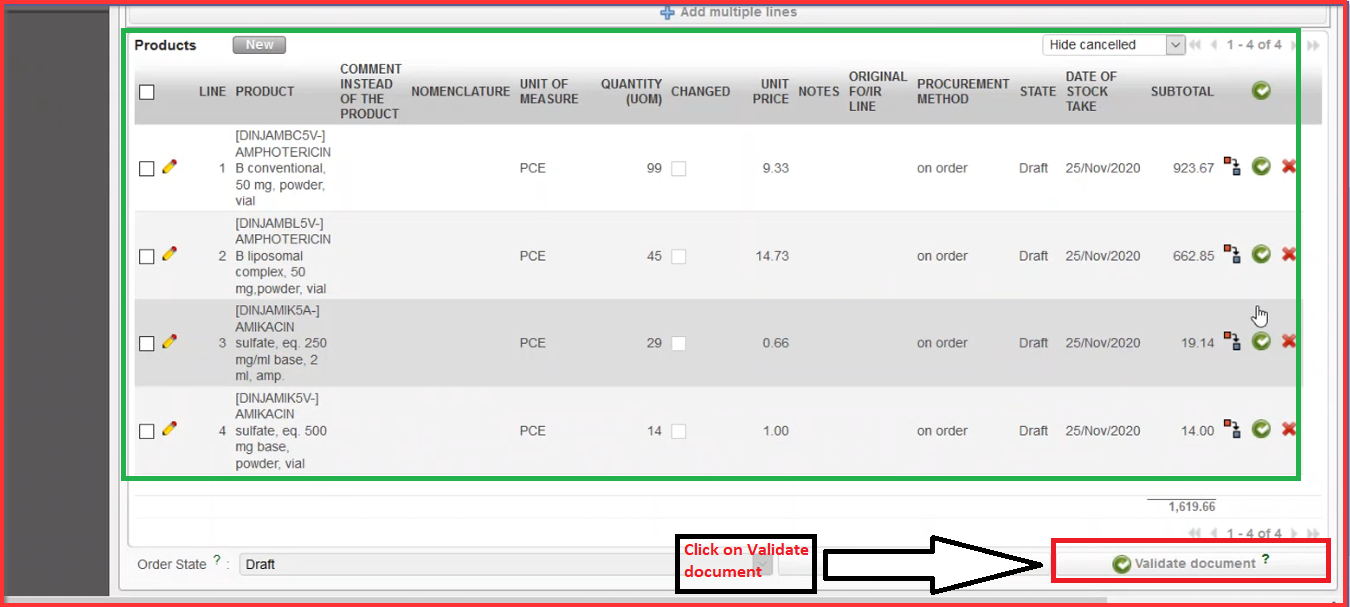
10. Click on “Validate document” on the IR screen.

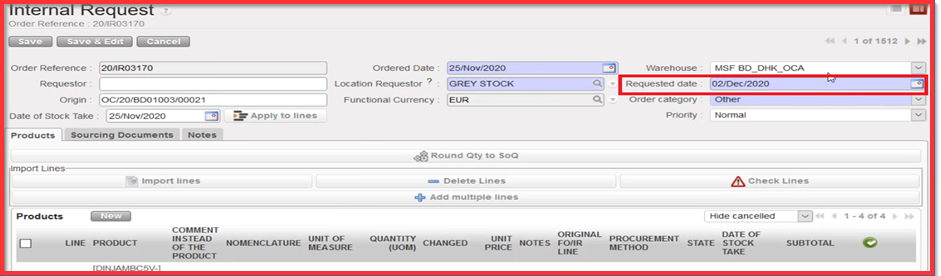
After the validation process, there is still option to change “Requested date”. This date is used in PO phase in order to determine “RDD” date. There is no update backwards but only onwards feasible. When you get to PO stage as soon as you have validated lines, there will be considered as pipeline.

I. HOW TO REVIEW A REPLENISHMENT PARENT SEGMENT

Supply User Manual ENG -> 5. Warehouse -> 5.12 LU-SU4205 Replenishment Rules -> I. HOW TO REVIEW A REPLENISHMENT PARENT SEGMENT

I. HOW TO REVIEW A REPLENISHMENT PARENT SEGMENT

Go to: Warehouse / Replenishment Rules / Configuration / Replenishment Parent Segment

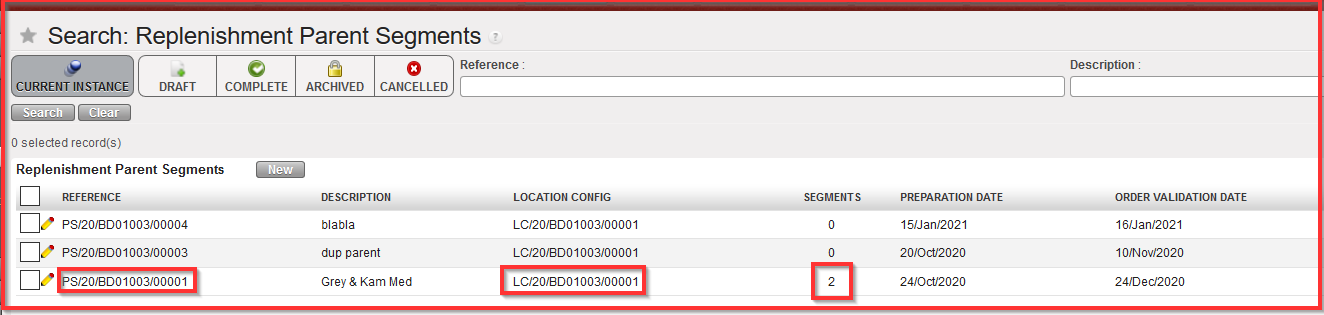
As you can see on the example below, the number “2” in Replenishment Parent Segment column shows how many Segments have been created (i.e.: related to this Parent Replenishment Segment).

Parameters tab

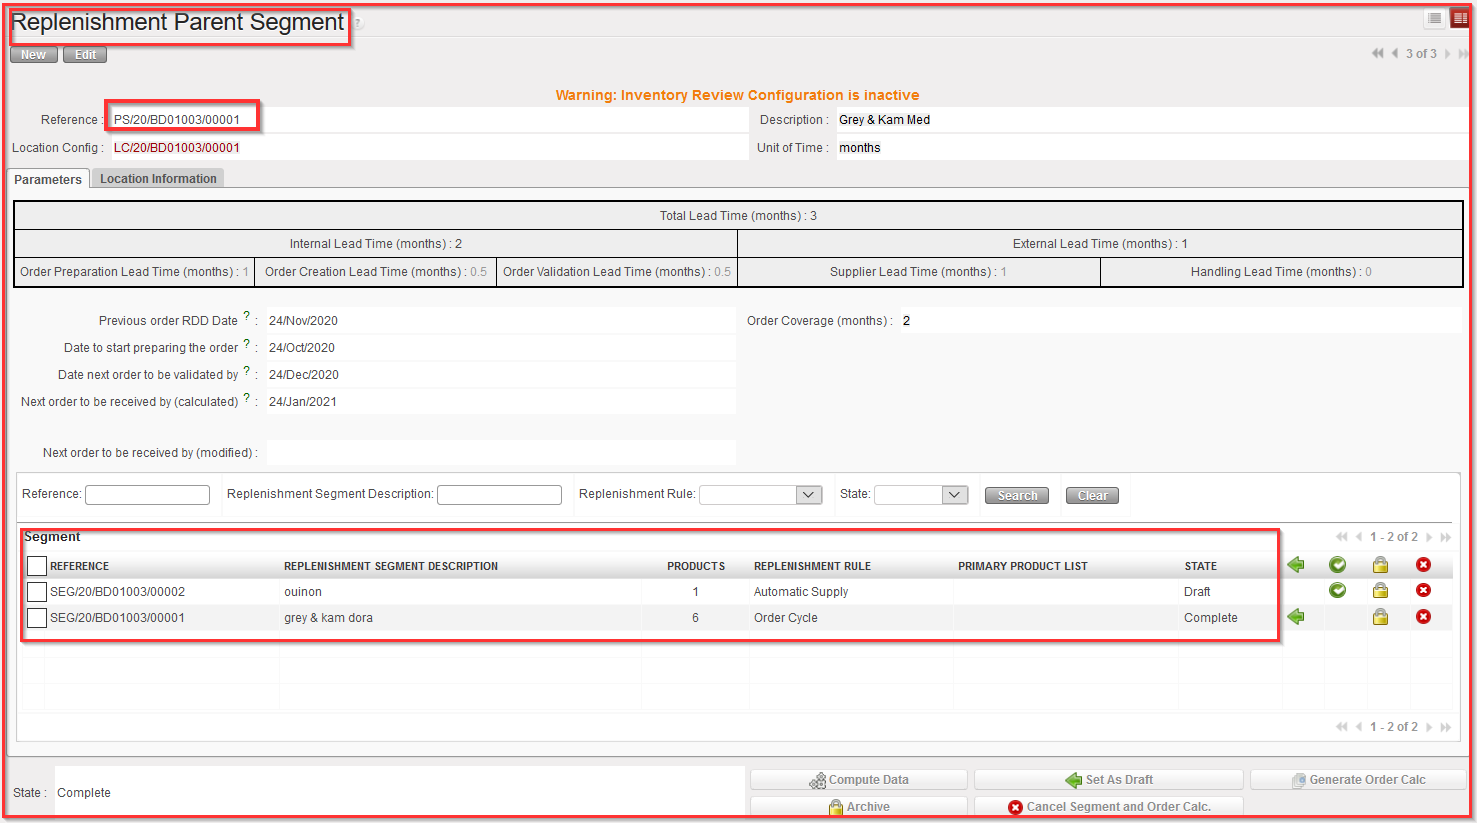
If you click on Parameters tab, you get following screen (see picture below) where in addition to the information set at creation (see chapter D. How to create a Parent Replenishment Segment) you will be able to see the added “Replenishment Segment” created afterwards.

“Location information” tab

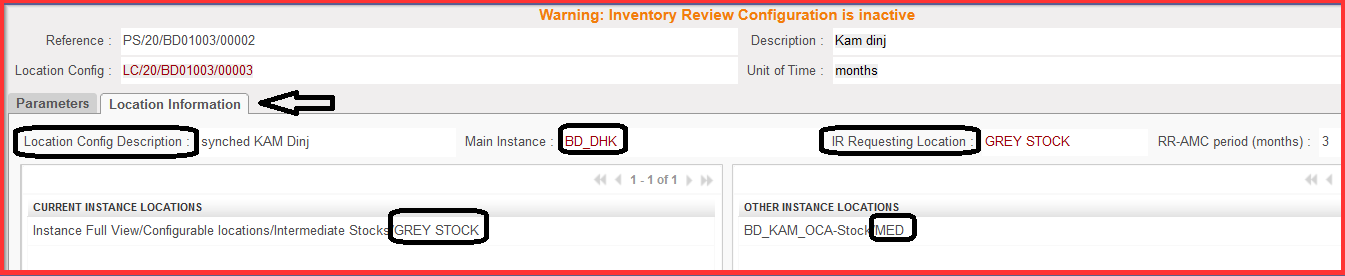
The Replenishment Parent Segment only looks at the same location config. Therefore, all the defined “child” SEGMENTS underneath this Parent Segment will use the same location config.

You can see in the “Location information tab”, as depicted below, that there is GREY STOCK under current instance locations and MED on the project level. We can see also Location Config Description which was setup in Location Config step before. There is also Main Instance BD_DHK and IR Requested Location (Grey Stock), which means that IR will be always generated with the requested location on parent level (i.e.: the goods will be delivered to the “Grey Stock” Location).

G. HOW TO GENERATE THE INVENTORY REVIEW

Supply User Manual ENG -> 5. Warehouse -> 5.12 LU-SU4205 Replenishment Rules -> G. HOW TO GENERATE THE INVENTORY REVIEW

G. HOW TO GENERATE THE INVENTORY REVIEW

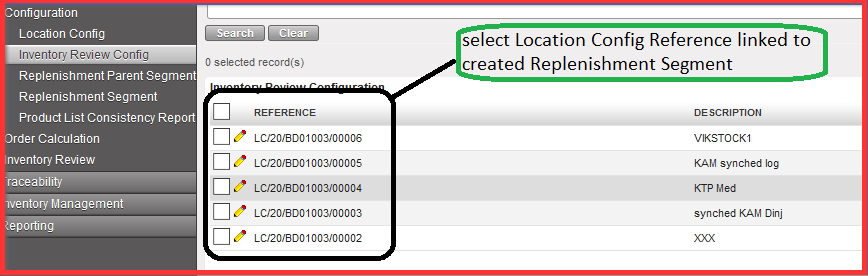
Go to: Warehouse / Replenishment Rules / Configuration / Inventory Review Config

  1. Select Location Config Reference linked to your previously created Replenishment Segment.

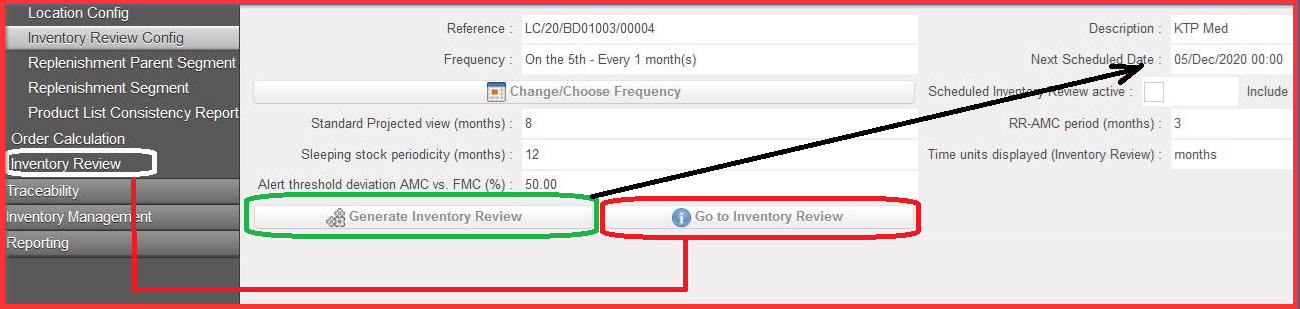
2. Click on “Generate Inventory Review”.

Please note that it is the manual version of generating the report but that you can actually wait for configured/ automated “Next Scheduled Date”.

3. Click on the button “Go to inventory Review” or click on Inventory Review in the sub menu on the left-hand side.

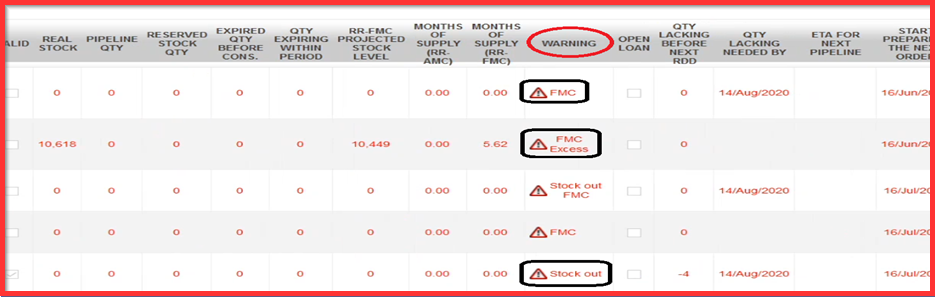
4. Check the value in column “WARNING”:

a) “Product is not in any related segment, only in stock / pipeline of location”

b) “FMC”: linked to Inventory Config review where you set up how many projected months cover the period. FMC alert here means that in the segment does not cover the period.

c) “Excess”: excess stock is linked to the order cycle which is put in. What is calculated beyond that period is considered as extra stock (excess). Excess stock calculation considers “Inventory on hand”, “pipeline arriving” and “expiries arriving before the end of upcoming (next) OC period”, i.e. Projected Available Stock.

d) “Stock Out”: considered before next RDD (Requested Delivery Date) which is the issue. Basically, there are no items available to fill the expected stock need.

e) “Pipeline in the Past“: where a pipeline delivery has its confirmed delivery date in the past

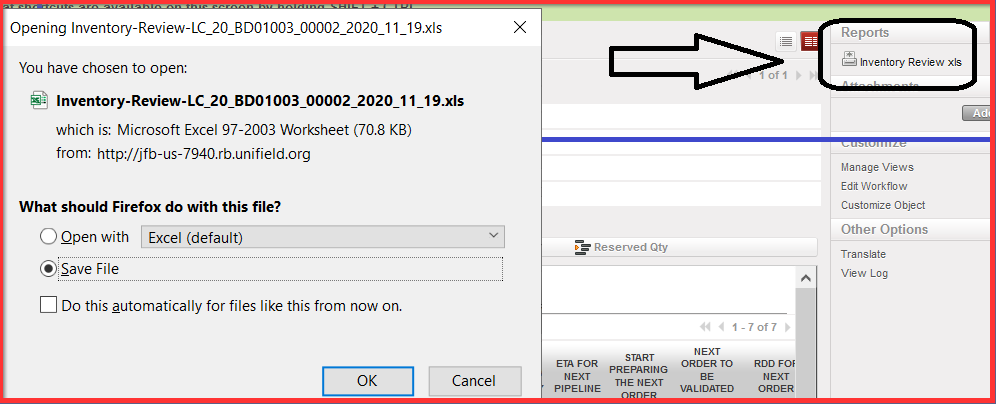
Please note that the Inventory Review can be exported via Excel by clicking on the icon “Inventory Review xls” on the right side of the panel menu.

Note: in this export the values in the months of supply (RR-AMC), months of supply (RR-FMC) & Projected MX (month) are rounded to 2 decimals.

F. HOW TO EXPORT/IMPORT PRODUCT SEGMENT EXCEL SPREADSHEET

Supply User Manual ENG -> 5. Warehouse -> 5.12 LU-SU4205 Replenishment Rules -> F. HOW TO EXPORT/IMPORT PRODUCT SEGMENT EXCEL SPREADSHEET

F. HOW TO EXPORT/IMPORT PRODUCT SEGMENT EXCEL SPREADSHEET

A Product Segment Excel file can be exported also to be re-imported and fill in the data (when Replenishment Segment is in Draft).

Go to: Warehouse / Replenishment Rules / Configuration / Replenishment Parent Segment

  1. Click on “Segment” in right end side panel

Excel spreadsheet Product segment report.

2. You can adjust the excel spreadsheet file, adding inputs and expected updates and import it back through “File to Import” / “Add attachment” button as depicted below.

D. HOW TO CREATE A NEW REPLENISHMENT PARENT SEGMENT

Supply User Manual ENG -> 5. Warehouse -> 5.12 LU-SU4205 Replenishment Rules -> D. HOW TO CREATE A NEW REPLENISHMENT PARENT SEGMENT

D. HOW TO CREATE A NEW REPLENISHMENT PARENT SEGMENT

Replenishment Parent Segment section provides an overview of relevant Replenishment segments and products below it, which have defined parameters columns. It is a prerequisite to be processed before the next step which is Replenishment Segment.

New “Parent” segment permits and allows to have an overview of Segments with similar characteristics / conditions. Replenishment Parent Segment is the third step in UF after Inventory Review Config and must be completed before the next step (Replenishment Segment)

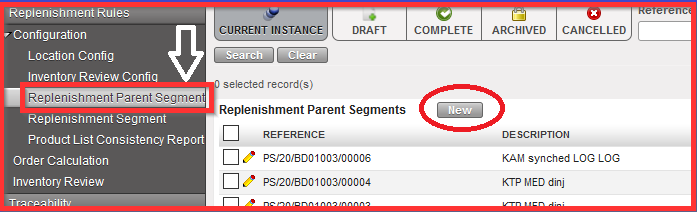
Go to: Warehouse / Replenishment Rules / Configuration / Replenishment Parent Segment

1.Click on “New” and open the window

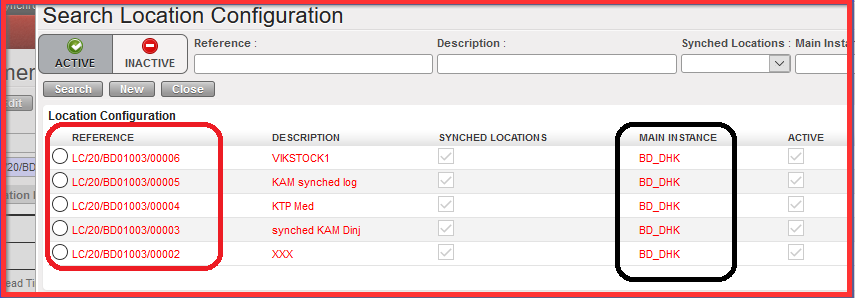
2. Select the “Location Config” reference which was created in the first step (Location Config)

3. Fill in your Description

4. Define Unit of Time in days, weeks or months:

It will be automatically projected to all Parameters listed below, i.e. selected option “months” automatically defines “months” value in all following sub categories Lead Time, Internal Lead Time, External Lead Time) and is visible in the brackets (months) as depicted on the screen below.

5. Add your Lead time values (predefined in months in the example below and decimals are accepted):

           a) Internal Lead Time:

i) Order Preparation Lead Time: covers the time of pre-work to be done by people in charge of: checking the system to have correct values; physical inventory; possible check or adjustment of FMC…

ii) Order Creation Lead Time: It is the time when order calculation has been generated to when the IR has been created. It starts when the user click on that button in a segment and it is the time they need to look what order calculation has proposed in terms of quantities. Basically, the time when IR is created is the same time when it is validated.

iii) Order Validation Lead Time: time from IR creation until PO validation

            b) External Lead Time:

i) Supplier Lead Time: time from validated PO until reception at requested location.

ii ) Handling Lead Time: time for the handling (customs brokerage) e.g. from reception at port/airstrip to reception at Instance Warehouse. Can be zero e.g. for internal suppliers.

After filling these fields, Total Lead Time, Internal Lead Time and External Lead Time will be automatically computed/ populated.

Total Lead Time = Internal Lead Time + External Lead Time

Internal Lead Time = Order Preparation Lead Times + Order Creation Lead Time + Order Validation Lead Time

External Lead Time = Supplier Lead Time + Handling Lead Time

6. Fill out “Order Coverage”: how long we want the ordered products to last for (here preconfigured in months)

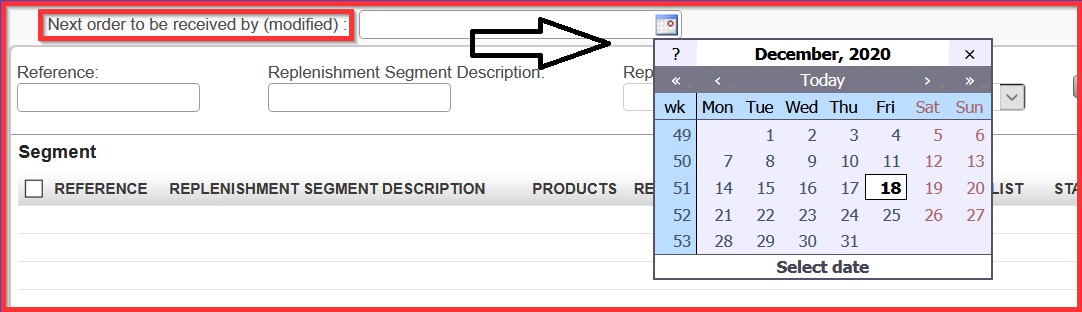
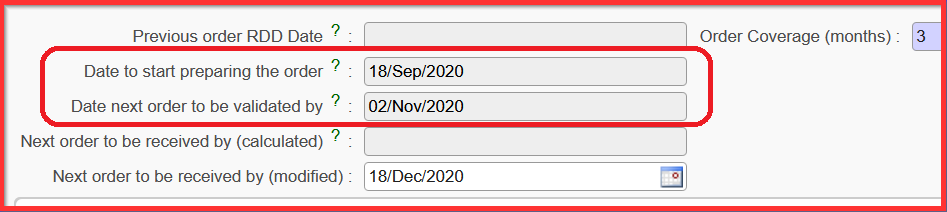
7. Select the date for “Next order to be received by (modified)”. When you select the date, you get automatically computed dates for “Date to start preparing the order” and “Next order to be validated by” e.g. second red highlighted print screen

8. Click on “Completed” and you get created Parent Segment Reference, see print screen below

When Replenishment Segments are created (see next Chapter for Replenishment Segment creation) and are linked to specific Replenishment Parent Segment you can come back to the specific Replenishment Parent Segment reference and click on the button “Generate Order Calc” ( see section J. How to generate an Order Calculation).