If you look at the INT screens, you will find various types of references (document numbers):
INT/XXXXX. This type of reference is generated
a) for movement from the “Input” location to the final destination of the goods. These INT will be automatically/manually processed if the “Direct to Requesting Location” checkbox is ticked/not ticked.
b) for Internal Move created from scratch
2. INT/KITXXXXX. This type of reference is used in case of kit substitution or de-kitting (see the section on kits for details)
3. SYS-INT/XXXXX. This type of reference is used for these very special Internal Moves which have been introduced in the previous section
Explanations in this section are quite technical. Skip them if you do not want to enter into this. The section on virtual stock in LU-SU4302 may help to understand them as these SYS-INTs are used to impact the virtual stock levels. More specifically they are used in order to insure that Replenishment Rules can work. See specific section on RR as well.
In any case, bear in mind that you should not touch these Internal Moves. SYS-INTs should always be created, confirmed updated and cancelled by the system, never touched by a user.
These special Internal Moves are created by the system when a PO (or PO-line) with “Input” as planned destination location is confirmed. This confirmation triggers the creation of an Incoming Shipment with “Input” as destination location.
This means that SYS-INT are created in 2 cases:
When a PO (or PO-line) created from scratch is confirmed.
When a PO (or PO-line) created following the sourcing of an IR with a stock or an ICU as Location Requestor is confirmed.
The lines of the created IN (which is in state “Available” with all its lines “Available”) have “Input” as destination location. This means that the virtual stock level of the “Input” location will be directly impacted by this IN.
However, the virtual stock level of the final destination location (stock or ICU) is not impacted by the IN.
The SYS-INT (created in the state “Confirmed” with its lines “Not available”) is actually simulating a movement between the “Input” location and the final destination location. It decreases the virtual stock level of the “Input” location (which is increased by the IN) and increases the virtual stock level of the final destination location.
With this feature, users are able to have a better view on where the virtual stock levels will be. They can see “further” than the “Input” location.
The processing of the IN will update (in case of partial reception) or cancel the SYS-INT according to the situations. In addition, this will also create the Internal Move as usual, to move goods (manually or automatically) from the “Input” location to the final destination location.
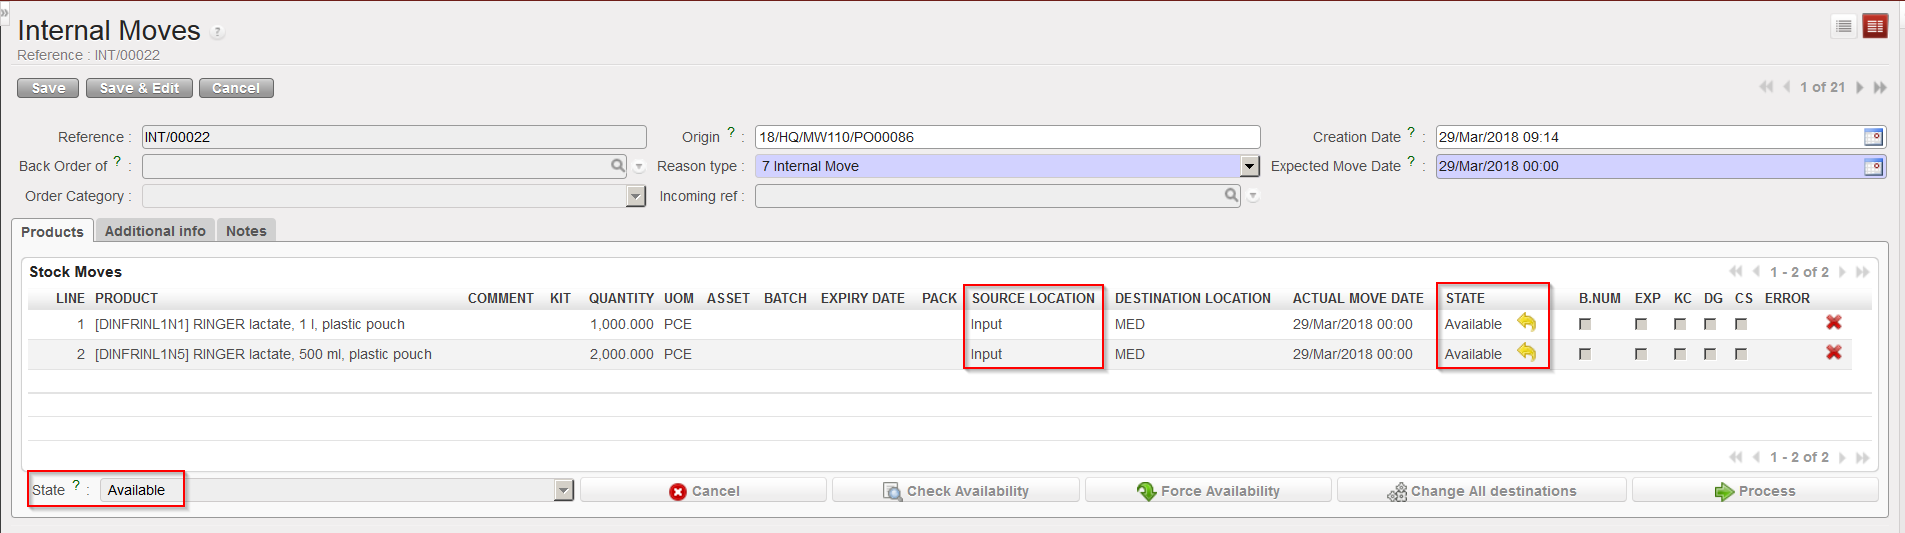
E. INTERNAL MOVES WITH “Input” AS SOURCE LOCATION.
If you source an IR whose Location Requestor is an ICU on order (PO), an INT will be automatically created after the reception of the PO (the processing of the IN). It will have “Input” as source location and the ICU as destination location.
If the “Direct to Requesting Location” checkbox is ticked when the IN is processed, the INT will be processed automatically, and goods will reach directly the ICU. This will be transparent for the user. However, an INT will still exist but will directly appear in the state “Closed“.
If the “Direct to Requesting Location” checkbox is not ticked, goods will be received in “Input”, the same INT will be created but you will need to process it manually. This INT will directly have the state “Available” with all its lines “Available“.
The same principle will apply with POs created from scratch or when the Location Requestor of the IR will be a stock (e.g. “LOG” or “MED”).
Example of INT created automatically by the system
B. HOW PRODUCTS MOVE THROUGH THE UNIFIELD LOCATIONS
For processing day to day transactions, it may not be necessary to know the technical aspects of Internal Moves, but the following table may be useful to understand how each transaction in UniField will move products from one location to another. In the pick/pack/ship full shipment process, products will usually initially be in a stock (e.g. “LOG” or “MED”)or in cross docking.
The picking process will transfer them from this location to the “Packing” location. The packing process will transfer them from the “Packing” location to the “Dispatch” location“. Finally, the shipping process will transfer them from the “Dispatch” location to the “Distribution” location and from the “Distribution” location to a customer (partner) location.
Source location
Destination location
Remark
Picking
Stock or Cross docking
Packing
When sub PICK is “Closed”
Packing
Packing
Dispatch
When PPL is “Closed”
Shipment
Dispatch
Distribution
When shipment is “Shipped”
Shipment
Distribution
MSF Customer/Other Customer
When shipment is “Closed”
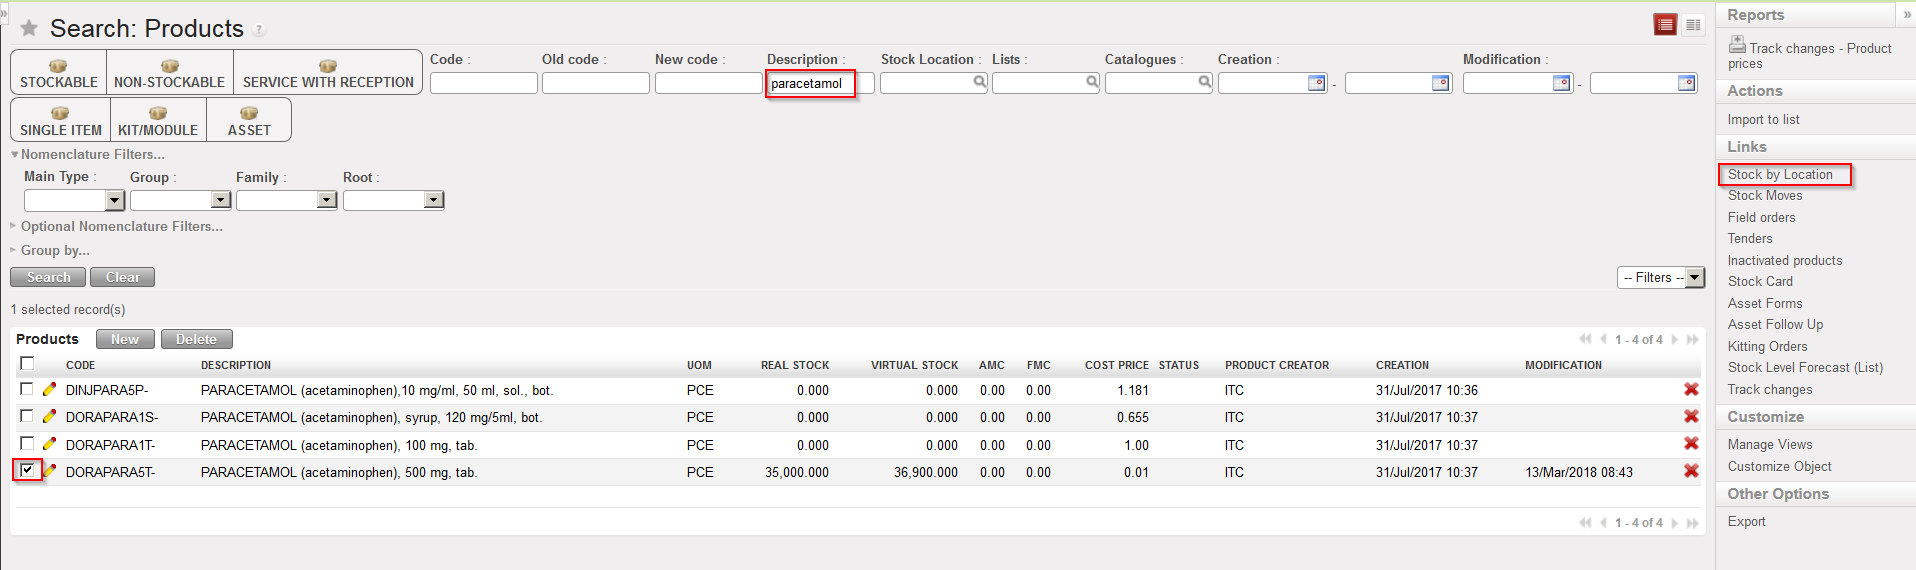
Stock levels of each product in each location can be analyzed thanks to the “Stock by Location” functionality.
Go to:Products / Products / Products
Using the filters and a checkbox, select the product for which you want to see the stock levels.
In the action menu, select the option “Stock by Location”.
Opening the “Stock by Location” screen for a specific product
3. The “Stock by Location” screen appears. The “Instance Full View” is shown. Note that you may see here real and virtual stock levels. Click on the “Expand all” button to see all locations from the “Instance Full View”.
“Stock by Location”, Instance Full View collapsed
4. The “Instance Full View” is expanded. All locations belonging to this view appear and real and virtual stock levels in all these locations are showed.
“Stock by Location”, Instance Full View expanded
During the pick/pack/ship full shipment process, if you check this “Stock by Location” screen step after step, you can see your products moving through these locations as stock levels are changing at each step.
Note that on top of the “Instance Full View“, you may choose to show the “Partners Location” view which will show locations related to supplier and customers.
Another option is to select the “Virtual Locations” view which will show locations related to inventories, services, non-stockable products, …
Internal Moves (INT) are used to transfer products from one location to another within the warehouse.
As we already saw in the previous sections, they are used to move the received products from the “Input” location to the final destination location after having processed an Incoming Shipment. They need to be processed manually if the “Direct to Requesting Location” checkbox is not ticked on the IN, they are processed automatically if the checkbox is ticked.
Internal Moves can be created automatically by the system in some cases. They may also be created manually.
Most Internal Moves will require written approval (in accordance with the OC’s procedures) from the stock owner before to actually move the goods.
As already mentioned, many transactions in UniField (IN, PICK, PACK, SHIP, OUT, INT) are actually moving goods from one location to another.
During the pick/pack/ship process, several documents may be exported to PDF and printed at each step. Remember that the pick/pack/ship process will allow you to export and print all the necessary documentation while the simple OUT process will just allow you to export and print a document from the Delivery Order.
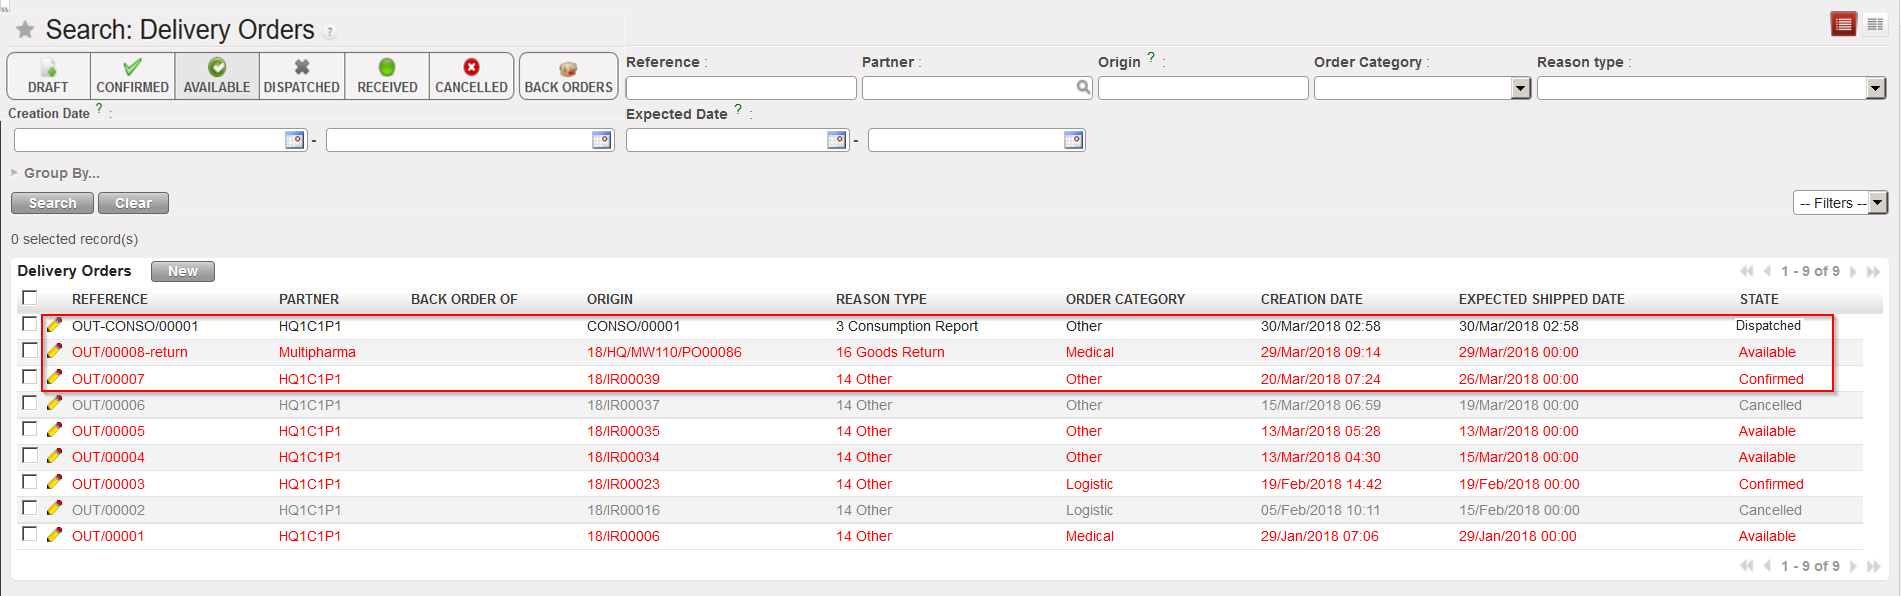
Looking at the Delivery Order Dashboard (“Search: Delivery Orders” screen), it can be confusing to see the different types of references displayed. Hence, you will find below some explanations on how these different Delivery Order references are generated.
These are just overview explanations, exhaustive explanations on how the OUT references are generated will be explained in the relevant sections.
OUT/XXXXX. This type of reference may be generated in the following cases:
a) When a Delivery Order is created directly when an IR with an External Consumption Unit as Location Requestor (or IR-line) is confirmed.
b) When a Delivery Order is created following the conversion of a Picking into a Delivery Order (Simple Out Delivery/OUT).
c) When a Delivery Order is created from scratch.
2. OUT-CONSO/XXXXX. This type of reference will be generated when Real Consumption Reports will be created and processed (see LU-SU4203 – How to report Real Consumption).
3. OUT/XXXXX-return. This type of references could be generated by claims (with type “Return”) raised to supplier following a non-conformed delivery. Actually, the claim will include an event and the processing of this event will generate a Picking Ticket (PICK-return). If this Picking Ticket is converted to an OUT (simple OUT process), a reference OUT-return will be generated (see LU-SU4202 on claims for more details).
As for Picking Ticket, “Cancel & resource” is available only on the OUTs which have been created following the sourcing of an IR from stock (i.e. not on order). This may be useful if, for example, after deciding to source from stock you realize that goods are actually not available in the stock. Cancel & resource will allow you to resource the request to a supplier (PO).
We use cookies to ensure that we give you the best experience on our website. If you continue to use this site we will assume that you are happy with it.