4.7 PURCHASE ORDERS (POs) – SPECIFICS.

Supply User Manual ENG -> 4. Procurement -> 4.7 PURCHASE ORDERS (POs) - SPECIFICS.

LU-SU3202: Purchase Orders (POs) – Specifics

A. LU Introduction

B. How to create a Direct Purchase Order (DPO)

C. How to create a Purchase Order for (receiving) a standard donation

D. How to create a Purchase Order for (receiving) a donation before expiry

E. How to create a Purchase Order for (receiving) and In Kind Donation

F. How to create a Purchase Order for (receiving) a loan

G. How to create a Purchase Order with a Purchase list

Q. How to Cancel a Purchase Order.

Supply User Manual ENG -> 4. Procurement -> 4.6 LU-SU3201: Purchase Orders (POs) - Generals -> Q. How to Cancel a Purchase Order.

Q. How to Cancel a Purchase Order.

Sometimes, you may need to cancel an entire PO or a specific PO-line. Note that POs created by OST can be cancelled or cancelled & resourced while POs created from scratch can only be cancelled.

To cancel an entire PO, click on the “Cancel” button at the bottom of the PO screen and confirm via a click on “Cancel only” on the pop-up screen. The example below is for a PO created from scratch.

Cancelling a PO
Confirming the cancellation of a PO

The PO switches to state “Cancelled” and all its line also switch to the state “Cancelled“. You have to use the filter located on the top of the “Lines table” to see them.

Cancelled PO

You may also cancel POs created by the OST. The process is the same. Click on the “Cancel document” button at the bottom of the PO screen and confirm via a click on “Cancel only” on the pop-up screen. The example below is for a PO created by the OST. Note that in this case you have the choice between cancelling or cancelling & resourcing.

Cancelling a PO created by OST
Confirming the cancellation of a PO

The PO switches to state “Cancelled” and all its line also switch to the state “Cancelled“. You have to use the filter located on the top of the “Lines table” to see them.

Cancelled PO

A validated PO can also be cancelled except if the PO supplier is an internal partner supplier (another instance). In this case, the cancel button won’t be available at the bottom of the PO screen and the cancellation should be done on the supplier instance.

P. How to cancel & resource on a Purchase Order.

Supply User Manual ENG -> 4. Procurement -> 4.6 LU-SU3201: Purchase Orders (POs) - Generals -> P. How to cancel & resource on a Purchase Order

P. How to cancel & resource on a Purchase Order

You may wish to change the supplier of a PO because he can’t provide (some of) the needed goods.

For these cases, it is possible to cancel & resource some PO-lines or the entire PO if needed.

The resourcing process of a PO (and PO lines) can only be done on POs related to a request such as IR or FO (i.e. POs which have been created by the OST).

Equally the possibility to Cancel / C&R PO lines depends on the status of the lines and type of supplier. Draft and validated lines, in Draft-p / Validated/ Validated-P POs with supplier type ESC or external it is possible to cancel or cancel and resource, It is not possible to Cancel or C&R validated lines in PO with Internal/Intermission/Intersection type suppliers if they are beyond “Draft” status, this is Because if PO lines are validated they may have been synced and should not be cancelled or C&R by the requesting instance.

If you cancel & resource an entire PO, the PO will switch to the state “Cancelled” while all the lines of the cancelled & resourced PO will switch to the state “Cancelled-r” You will have to resource the corresponding lines (in status “Resourced-v” on the original IR/FO) in the OST.

If you cancel & resource 1 line of a PO, the cancelled & resourced line will switch to state “Cancelled-r“. You will have to resource the corresponding line (in status “Resourced-v” on the original IR/FO) in the OST.

N. a) How to cancel & resource 1 line of a PO (created by the sourcing of an FO)

N. b) How to cancel & resource 1 line of a PO (created by the sourcing of an IR)

N. c) How to cancel & resource an entire PO (created by the sourcing of an FO)

N. How to export a PO to XML VI file.

Supply User Manual ENG -> 4. Procurement -> 4.6 LU-SU3201: Purchase Orders (POs) - Generals -> N. How to export a PO to XML VI file.

N. How to export a PO to XML VI file.

Go to: Purchases / Purchase Management / Purchase Orders

  1. Open the Purchase Order that you wish to export.
  2. Click on the “Export PO Validated” button. This button will only appear if your PO is in the state “Validated” or “Validated-p” but not if your PO is “Draft“, “Draft-p” or “Confirmed” status.
Exporting a validated PO to an XML VI file

3. Choose the “File type” required by your ESC. 2 file types are available. The “Excel file” format will generate a file in “XML 2003 Spreadsheet” format (easily editable in Excel). The “XML file format” will generate a pure XML file.

4. Click on “Download file“.

Selection of the type of file when exporting a PO to VI file
“Excel file” File type (XML 2003 Spreadsheet)
“XML file” File type (pure XML)

A file has been saved on your computer. From this point, the file should be importable into the ESC system (Portal,…) without any change. Please refer to your OC/ESC documentation for further details.

M. How to update a Purchase Order through Vertical Integration (VI)

Supply User Manual ENG -> 4. Procurement -> 4.6 LU-SU3201: Purchase Orders (POs) - Generals -> M. How to update a Purchase Order through Vertical Integration (VI)

M. How to update a Purchase Order through Vertical Integration (VI)

The main principle of Supply Vertical Integration is to facilitate the exchange of data between the different ESC systems and UniField. When ordering to ESC suppliers, missions need to send their validated POs to these suppliers who will (maybe) update and (hopefully) confirm these orders.

A PO in status “Validated” can be exported to an XML file in a specific format which can then be imported into another (ESC) system. ESCs have made the relevant development to be able to import such an XML file in their systems.

In a second phase, following the confirmation of the order at ESC level, the ESC system will generate an updated file which will then be imported on the PO in UniField and update the PO. The updates can be done on prices, quantities, products – which can be changed, split, added or even deleted –, delivery confirmed dates, … At import of this file, users will be able to see the changes which will be highlighted in a simulation screen.

Note that a UniField PO could correspond to several orders in the ESC system.

Note that the import and export can be automatically done between UF and OCs Supply system since UF9. However, not all OCs have developed the required improvement to use this automated version. The way vertical integrations are used could vary according to your OC or ESC. Please refer to the specific documentation of your OC/ESC to understand how vertical integrations should actually be used on your mission.

Note that this system of files exchange has been developed for POs sent to and confirmed by ESCs but could also be used for other external suppliers if needed.

L. How to confirm a Purchase Order.

Supply User Manual ENG -> 4. Procurement -> 4.6 LU-SU3201: Purchase Orders (POs) - Generals -> L. How to confirm a Purchase Order

L. How to confirm a Purchase Order

Once the supplier has confirmed the PO terms and conditions (products, quantities, unit prices, delivery date,…), the Purchase Order needs to be updated accordingly and will then be “frozen” as a contract.

If changes have to be made after the confirmation of an order (supplier unable to deliver exactly the same item, change of quantities, change of prices,…) those changes will have to be made in the “Incoming Shipment” document while doing the reception.

Confirming an order means that no more editing or changes can be made to that order (except for DCD via VI import).

Purchase Orders sent to the coordination will be automatically confirmed through the synchronization engine once the corresponding Field Order will be confirmed at coordination level. The POs sent to another UniField instance will therefore not have to be confirmed manually.

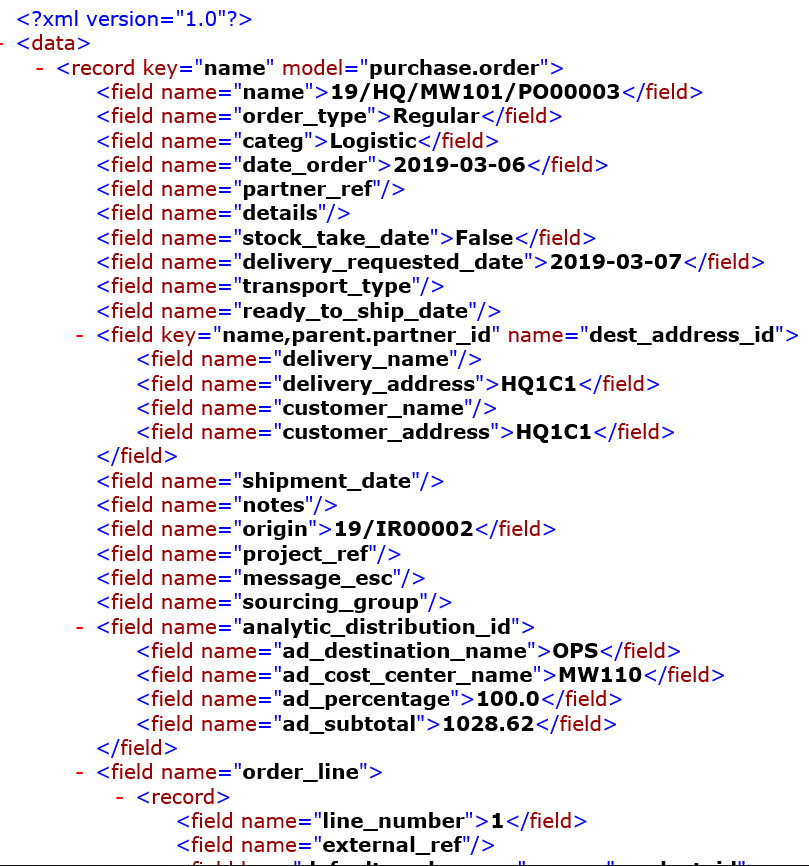
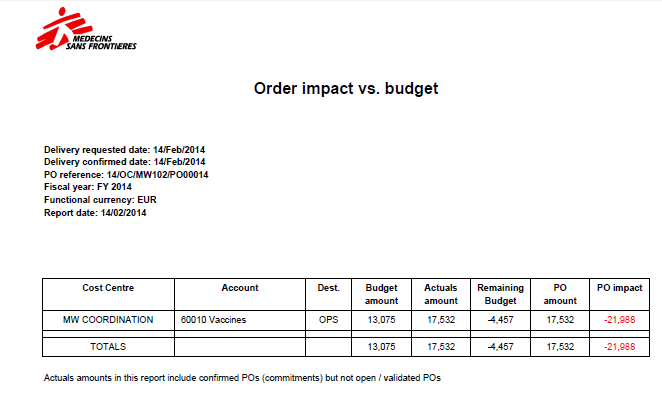
Confirming a Purchase Order has an impact on the budget thanks to the Analytical Distribution encoded on this order.

The confirmation of a Purchase Order to a supplier is a commitment from MSF to purchase the described products from the supplier at the agreed price. Even if the supplier has not yet been paid, that part of the budget will no longer be available to be spent on other purchases. This is why a “Commitment Voucher” (CV) is created during the confirmation process, and this CV will later be replaced by the final invoice paid to the supplier.

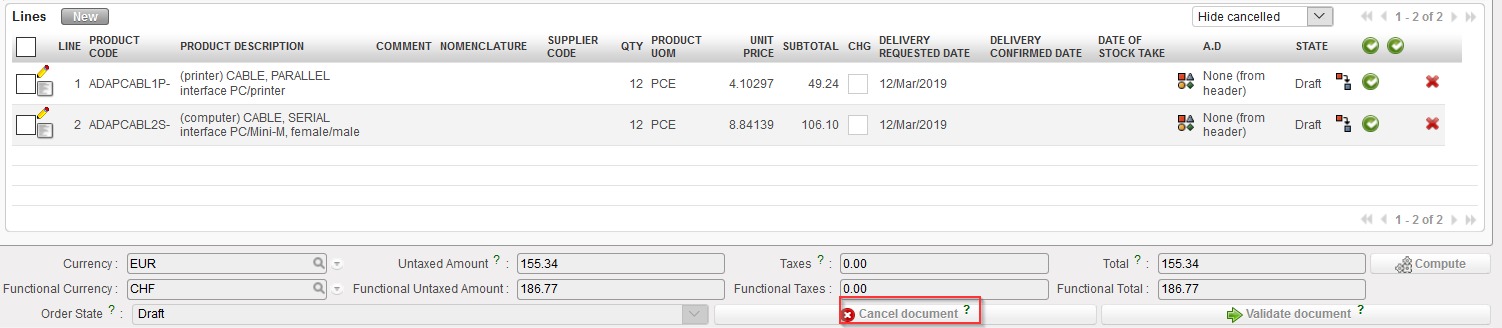
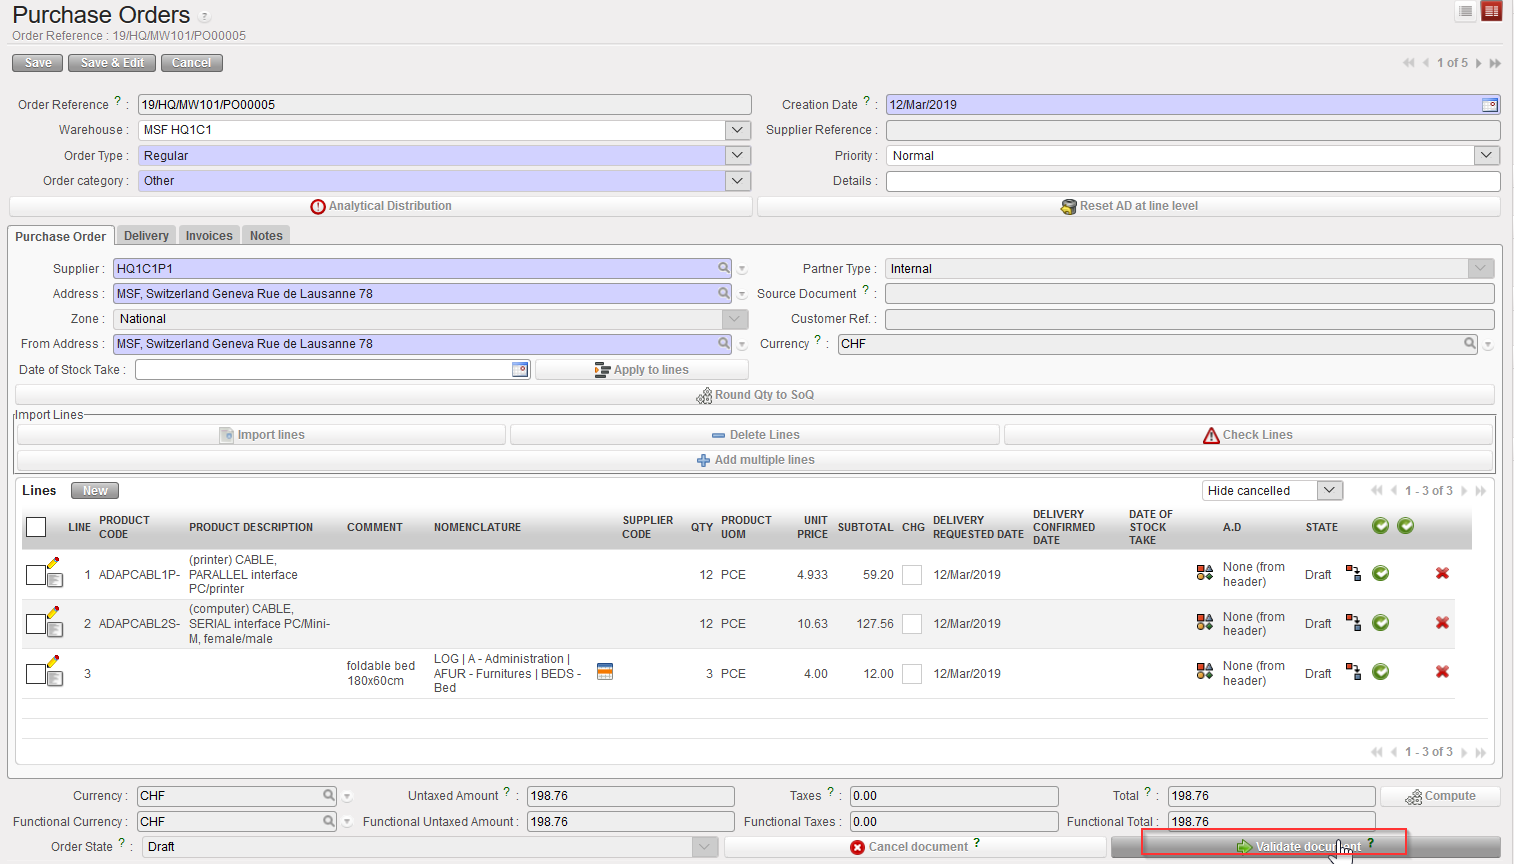
Note that the confirmation of a PO is only possible if a confirmed delivery date has been entered on this PO.

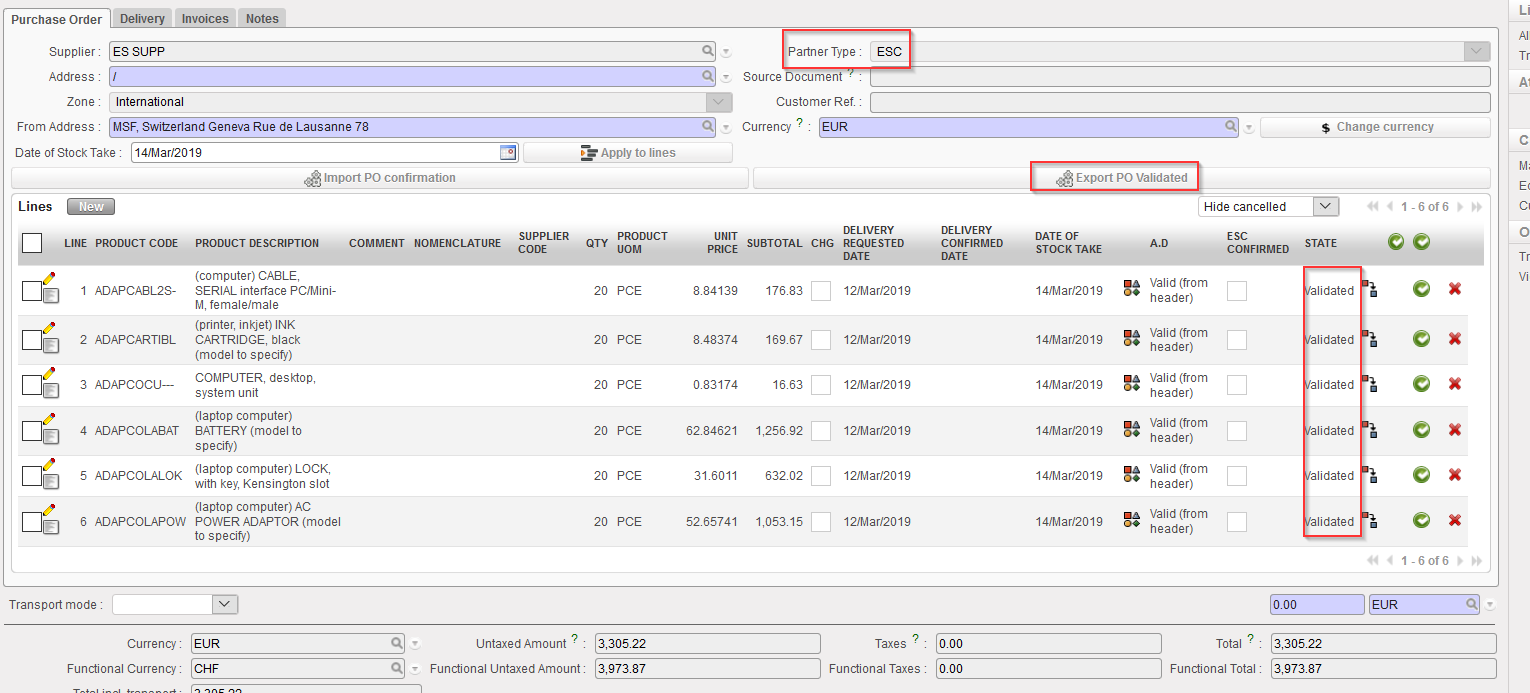
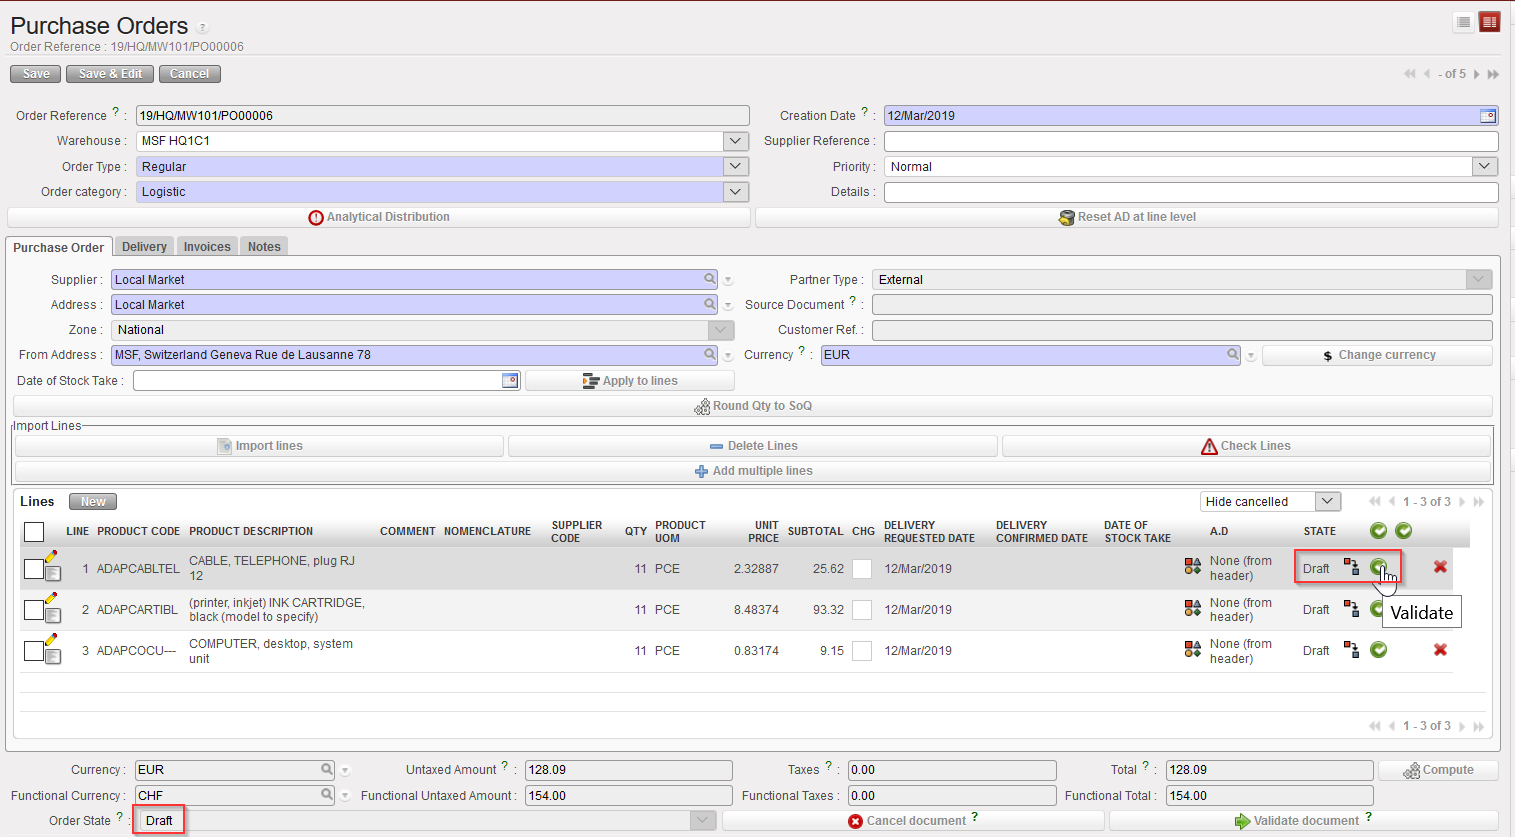
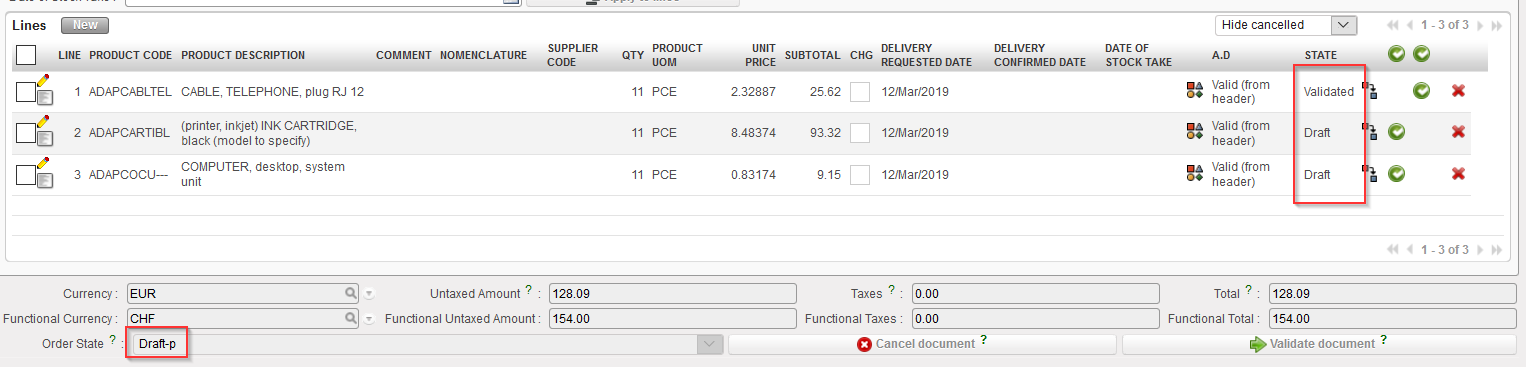
Note that a PO can be confirmed at header level (for the whole PO) or at line level (for 1 specific line or for several lines). Unlike PO validation at line level, PO confirmation at line level does not require any specific user right. Confirmation at line level is extremely useful as it often happens that suppliers confirm (and deliver) part of the goods from a PO. ESCs often do it on large orders.

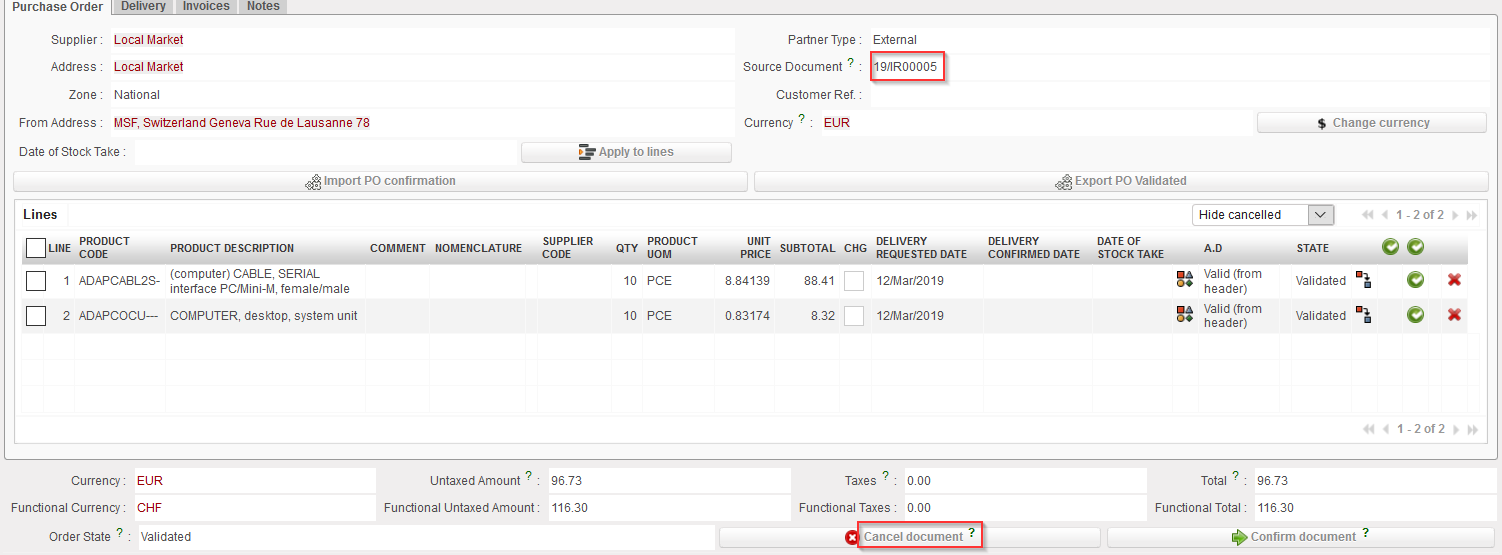
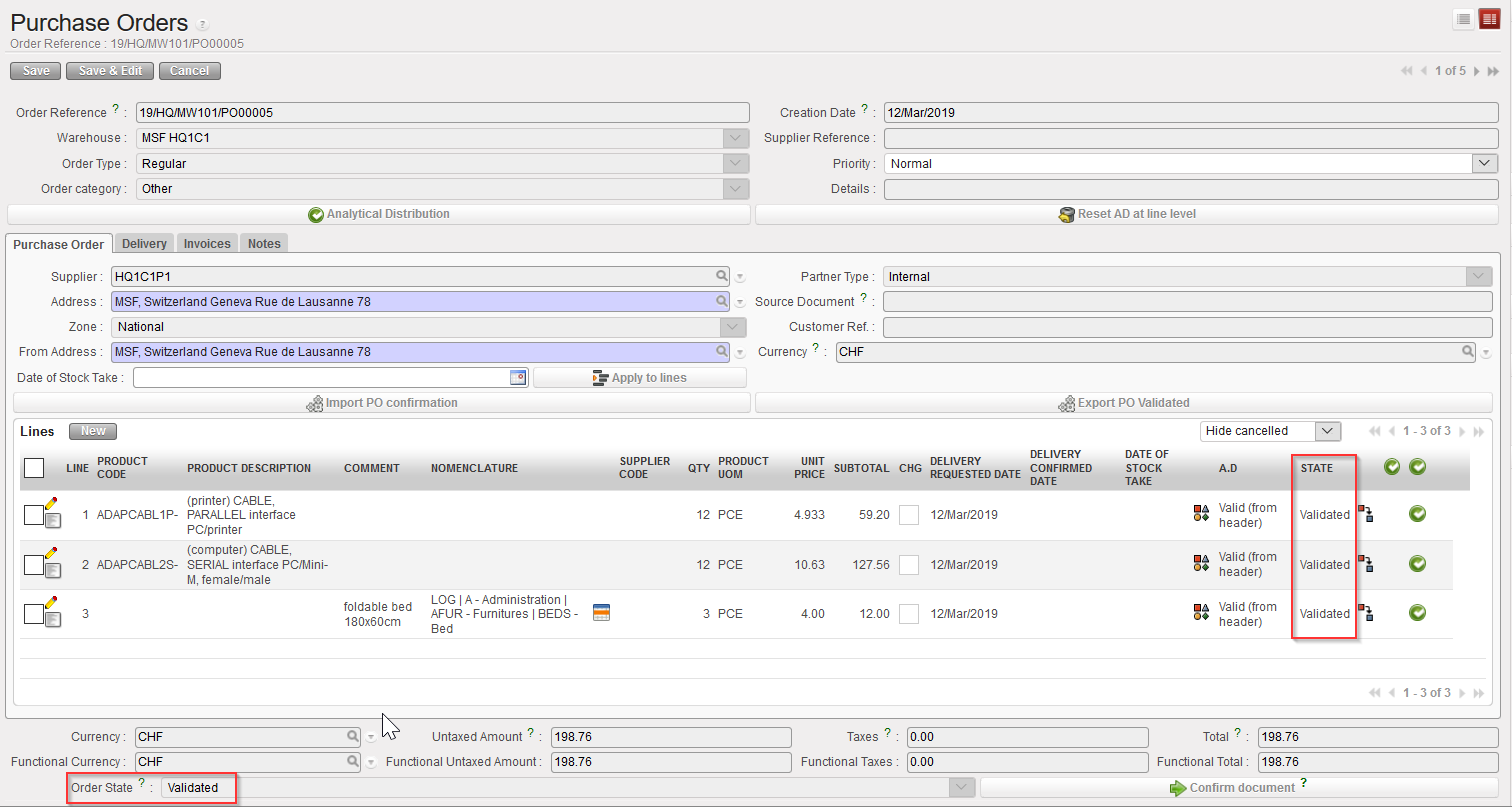
J. a) How to confirm a PO at header level

J. b) How to confirm a PO at line level

K. How to check the impact of a Purchase Order on the budget.

Supply User Manual ENG -> 4. Procurement -> 4.6 LU-SU3201: Purchase Orders (POs) - Generals -> K. How to check the impact of a Purchase Order on the budget.

K. How to check the impact of a Purchase Order on the budget.

Once a PO is validated, before confirming a PO, you may want to check its impact on the budget.

Go to: Purchases / Purchase Management / Purchase Orders

  1. Click on the pencil on the left part of the screen of the line of the relevant Purchase Order.
  2. Open the action menu if needed (right part of the screen via the double arrow).
  3. Select the option “Order impact vs. Budget” in the action menu (under “Reports“).
  4. A PDF document is opened. If a budget was entered for the corresponding AD, you may see the impact of your PO on the budget.
Impact of the PO on the budget


In the above example the PO is worth 17532 EUR and is allocated to one cost center MW COORDINATION.

All amounts presented are in functional currency (HQ consolidation currency vs booking currency used in the field).

  • {Budget amount} is retrieved from the budget uploaded in the system and corresponding to the cost center the PO was assigned to. If several versions of a budget have been uploaded, the report will pick the latest version that is not Draft.
  • {Actuals amount} are expenses already recorded; this column also includes pending commitments which are confirmed but not validated POs.
  • {Remaining budget} is a calculated column equal to “Budget amount – Actuals amount“.
  • {PO amount} is a subtotal by cost centers, expenses accounts and destination. To retrieve these figures the system takes the analytic distributions defined at header/line level of the PO as well as expense accounts linked to each product/product category and destination.
  • {PO impact} is a calculated column equal to Remaining budget – PO amount.

H. b) How to validate a PO at line level

H. b) How to validate a PO at line level

b) i. How to validate several lines of a PO

If the user has the appropriate user rights, he will be able to validate a PO at line level. This can be done for 1 line or for some lines.

According to the OC procedure in place this validation could/could not be allowed (refer to your OC procedures) How to validate 1 line of a PO

Go to: Purchases / Purchase Management / Purchase Orders

  1. Open the PO that you wish to validate (in edit or display mode). This PO should not yet be fully validated but still draft (or draft-p).
  2. Click on the green button (Validate) located at the right of the line you wish to validate.

Validating 1 line of a PO

       3. The PO switches to “Draft-p” (partially validated). The validated PO-line switches to “Validated” while the other lines stay in status “Draft“.

1 line of a PO validated

H. a) How to validate a PO at header level

H. a) How to validate a PO at header level

According to OC procedures, before validating a Purchase Order, the document should be printed and signed (validated) by the content responsible (and the validator should also check the Analytical Distribution before validating).

To print the PO, select the check box corresponding to the PO to be printed and click on the “Purchase Order” option in the action menu. A PDF file ready to be printed will open.

PO print out

Once the PO has been validated (on paper) it can be validated in the system.

Go to: Purchases / Purchase Management / Purchase Orders

  1. Open the PO that you wish to validate (in edit or display mode). This PO should not yet be validated but still draft (or draft-p).
  2. Click on the “Validate document” button at the bottom of the screen.
Purchase Order validation at header level

All the lines of the PO are validated. The PO state changed to “Validated“.

Purchase Order validated at header level

Note that for validated POs addressed to internal partners (i.e. POs which trigger the creation of FOs via synchronization), the system will show a warning message if they are opened (in edit or display mode) to inform the users that modification won’t be considered (as they should be done on the supplier instance). These PO can now be in local currency (if necessary) if all internal partners of the mission have been set accordingly.

Warning message on validated PO sent to internal partner