C. How to activate and deactivate a product

Supply User Manual ENG -> Products -> 3.2 LU-SU2101: General Product Management -> C. How to activate and deactivate a product

C. How to activate and deactivate a product

It may be necessary to de-activate a product in your instance, for example because it should no longer be used or has been replaced. Before the system can deactivate a product, it will check if there is any open Supply document containing the product, and also for some Finance documents, or if it exists in any internal stock location. In that case, the product should not and cannot be de-activated.

Please note that thanks to the UniData linkage, the product de-activation can also been done automatically via synchronization when product is “Unsubscribed” or Archived in UD and that no Stock/ Pipeline are in the instance (otherwise it will be Phased Out).

To de-activate a product –> Go to: Products / Products

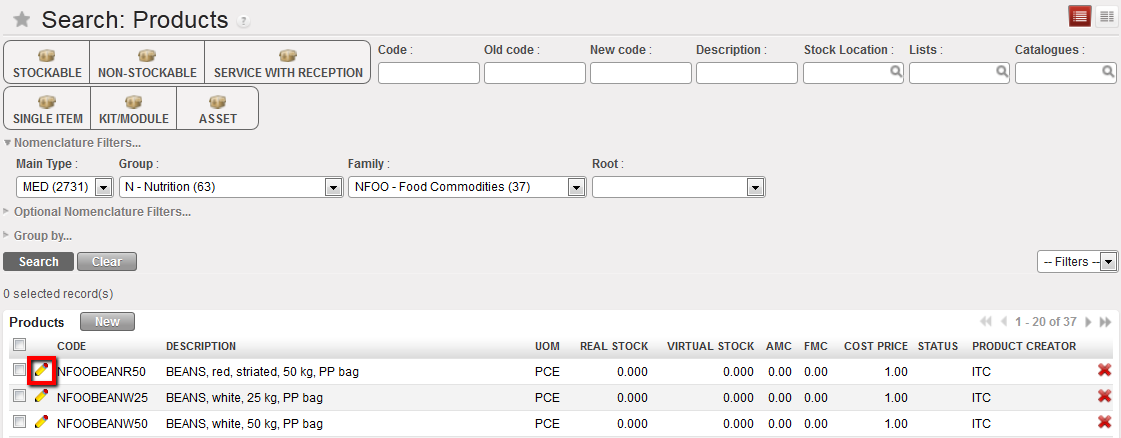
  1. Use the relevant filter values to find the product you want to edit.
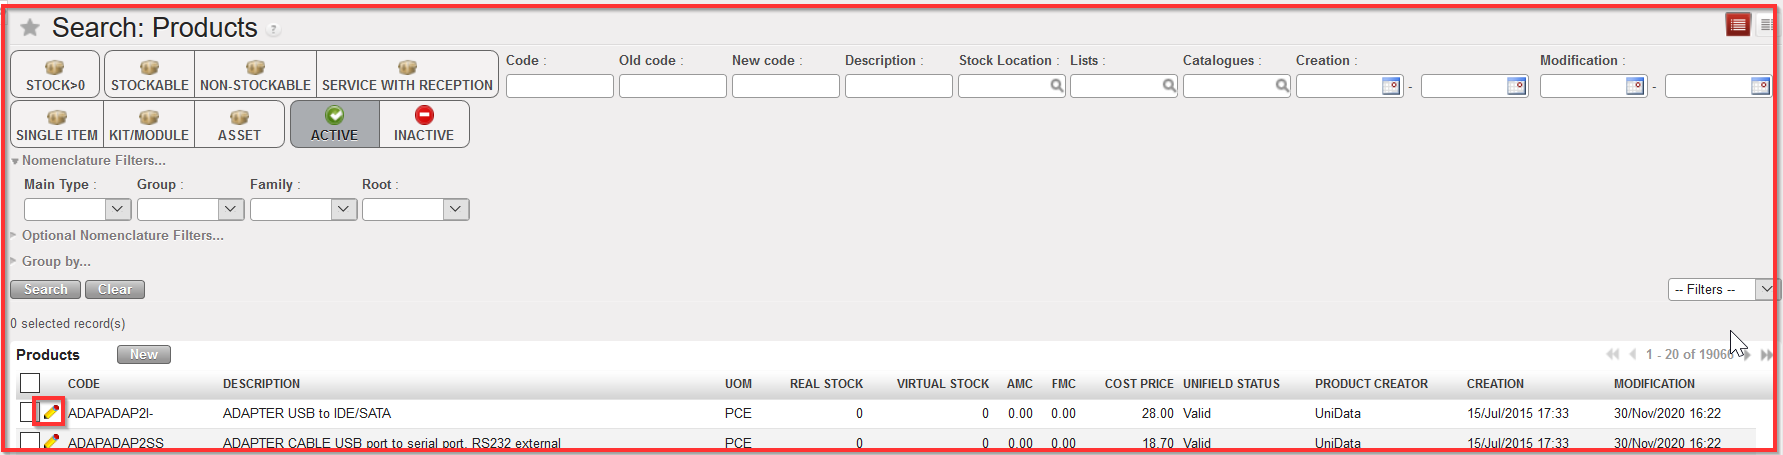
Editing a product form to de-activate it

2. Click on the pencil icon
of the selected product to open it in edit mode.

3. In the Status section in the Information tab, click on the “De-activate product” button.
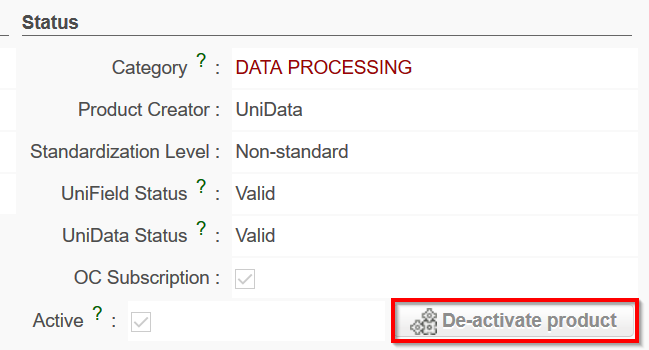
De-activate product

4. If the product is not in any open Supply transaction documents nor in restricted Finance documents, or present in any internal stock location of your instance, the “Active” checkbox will now be empty, and the “De-activate product” button will have been replaced by a “Re-activate product” button (see picture below). This button will leave the option to reactivate the product if needed. Note that this reactivation can also be triggered by a UD update.

Also, after deactivation “UniField status” is set to “Archived”.
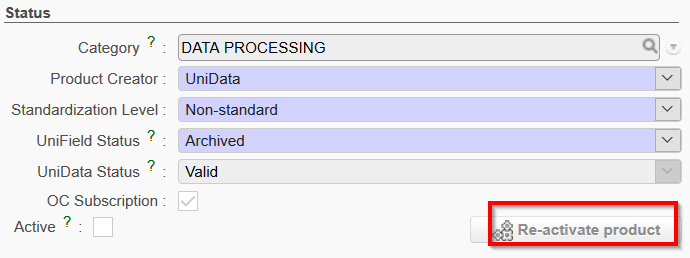
However, if the product happens to be in any open Supply or certain Finance transaction documents and/or is present in any internal stock location of your instance or on an active Product list, a “Product De-activation Error” screen will appear (see next picture).
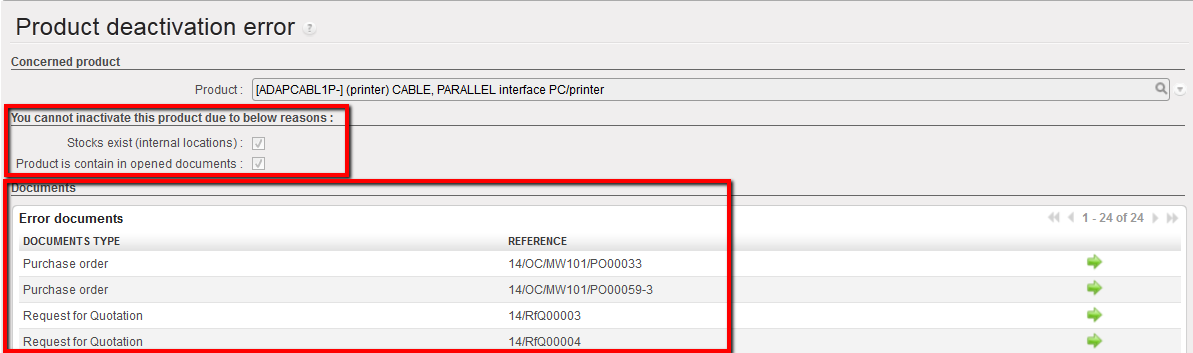
Product de-activation Error

5. This indicates why you cannot de-activate the product via the checkboxes which will show whether the product is present in any internal stock location of your instance “Stocks exist” and / or if the Product is contained in any open (transaction) documents.

6. In the “Documents” section, all documents which contain the product will be displayed, and at the end of each line, there will be a green arrow which opens the document when clicked on.

Please note: When a product has been successfully de-activated, this means it cannot be viewed or selected from the database when creating transaction documents (e.g. Purchase Orders etc), but can still be seen by searching directly in the “Products” business application. If you wish to see all de-activated products, this can be seen from the Products Action Menu Link “Inactivated Products” or filter button “Inactive” (header right hand)

Note: When a product is de-activated in one instance, the status changed from Active to Inactive, will be synched to any below instances, and if their is no stock or transaction open, the product will be set to be Inactive.

In case of synched flows between Instances with different products (e.g. Intermission or Intersection), when PO or FO is created by synch and includes a product which does not exist in the receiving instance, there will be a message onscreen on the relevant document (PO or FO) and a clear Not Run message created, warning the user that (PO/FO) product lines could not be created.
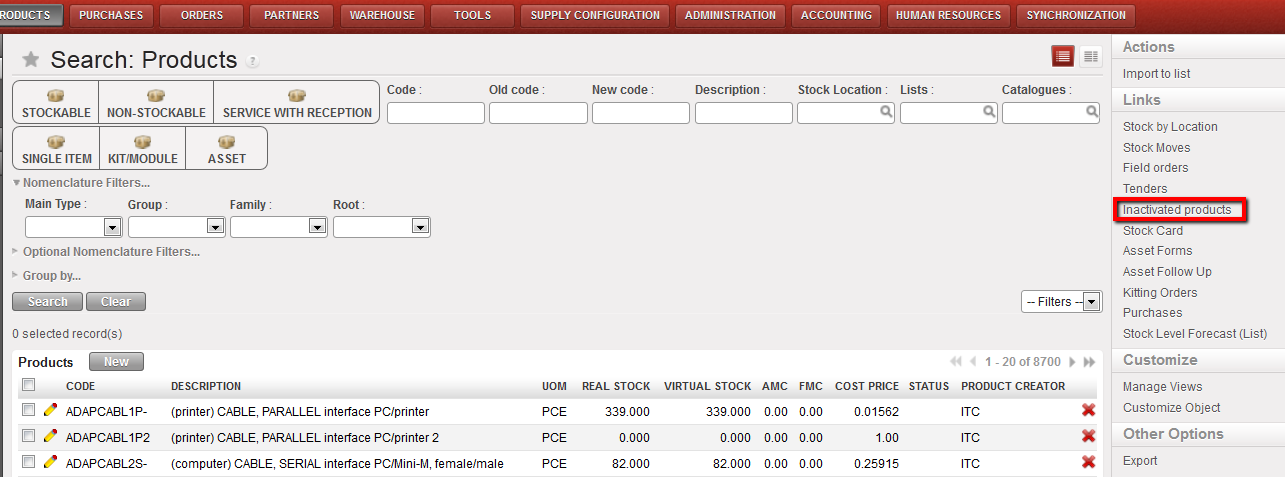
De-activated /Inactivated Products link
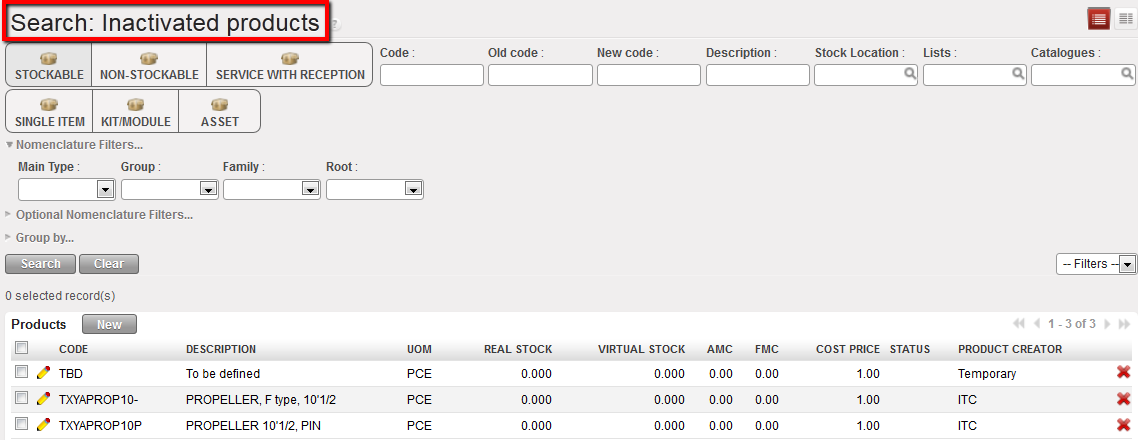
List of Inactivated products

Inactive button filter

Please note: Non-Standard Local UniData product are first synchronized down from HQ to mission (COO/project) as Inactive. They can only be activated at Coordination, in the condition that product is subscribed by the OC, if NSL product has been unsubscribed by the OC, it cannot be activated at mission level unless the product code is resubscribed.

When activating these NSL products, the following warning message is displayed:

Warning!
This is an NSL product, please ensure that there is no duplicate “Local” product with which this product should be merged. If you activate and start to use this product it will no longer be possible to merge it with another.” (see “Merge” feature below in section L).

 

B. How to update and change product attribute

Supply User Manual ENG -> Products -> 3.2 LU-SU2101: General Product Management -> B. How to update and change product attribute

B. How to update and change product attribute

(Specific examples of this will be covered in this Learning Unit)

Update of product attributes can be done directly on the selected product form or via a mass products update.

Product form update:

Go to: Products/ Products / Products

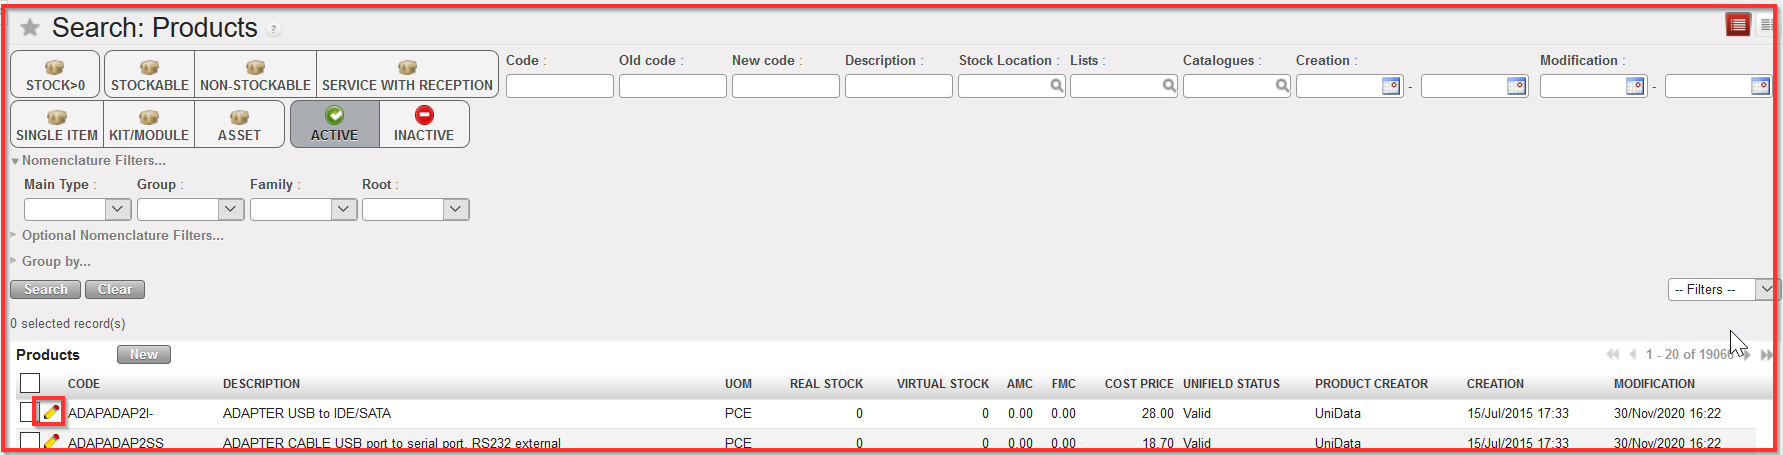
  1. Use the filters at header level to search for and find the product you want to update.
  2. Select the product by clicking on the pencil icon
    of the product to edit
  3. Make the necessary amendments
  4. Save

Editing a product form

Products mass update:

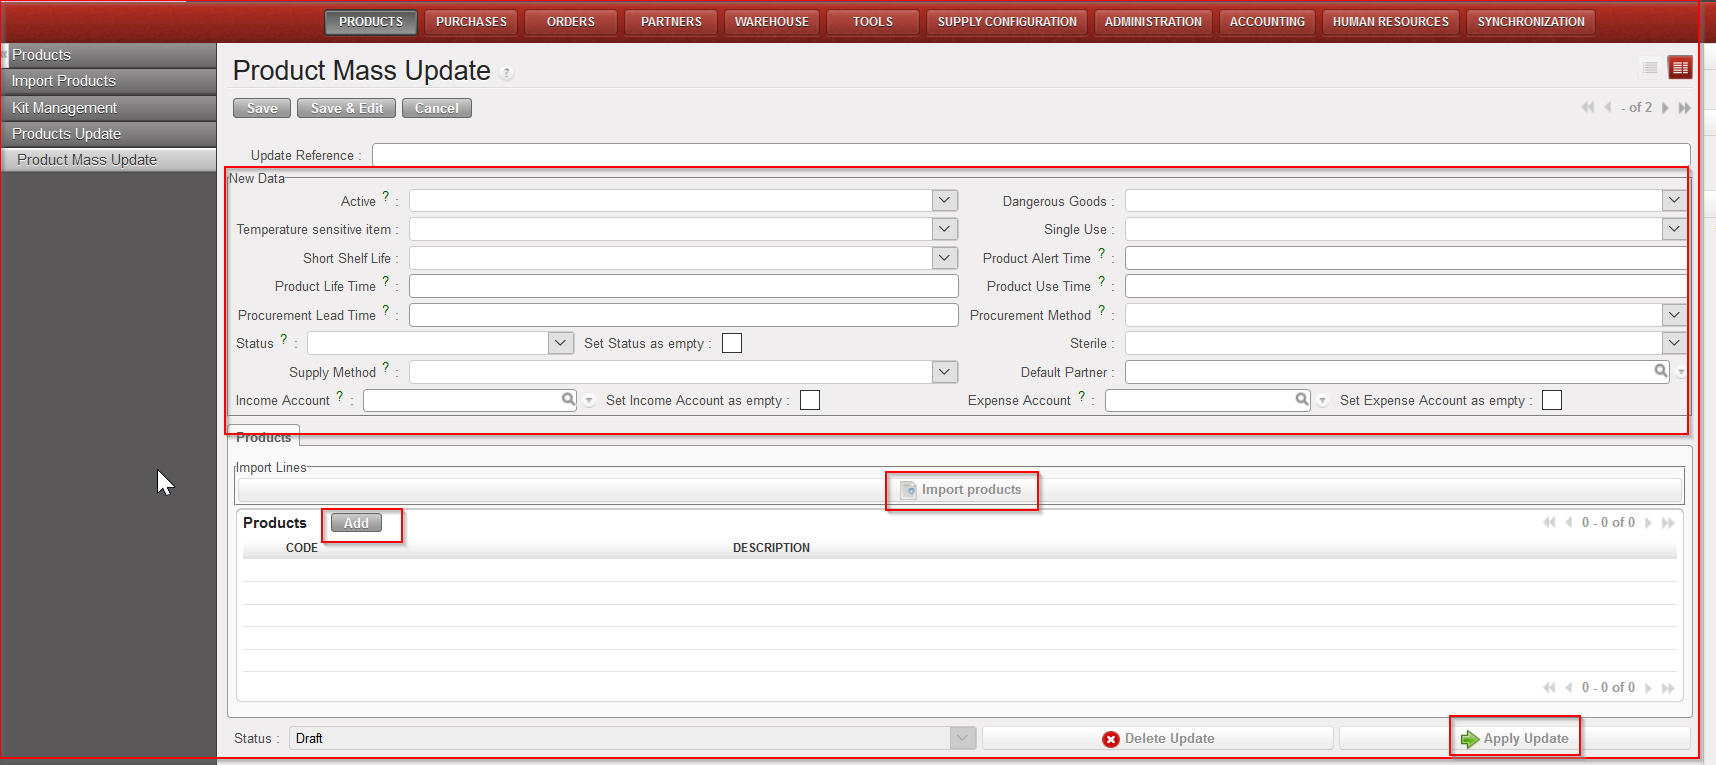
Please note that this mass update can only be done for Local products and HQ, ITC and ESC products. Local products can only be updated from Coordination and HQ, ITC and ESC ones only from HQ.

Go to: Products/ Products update / Product mass update

  1. Click on “New”
  2. Enter an “Update reference” (not mandatory)
  3. Select among the different fields (Active, Dangerous goods, Temperature sensitive, Status, Supply method…) the ones you need to update similarly for several products
  4. Add products
    1. Click on “Add” to select the products to update
    2. Click “Import products” to upload the products via an Excel file
  5. Click on “Apply Update”

A. How to create a new local product

Supply User Manual ENG -> Products -> 3.2 LU-SU2101: General Product Management -> A. How to create a new local product

A. How to create a new local product

Products can only be created at coordination level and above; the process for new products is quite similar for local and international products.

The last developments with UniData and the management of UD Non-Standard Local product should considerably reduce the creation of local product at Coordination level if not suppress it. It should remain exceptional and subject to specific user rights.

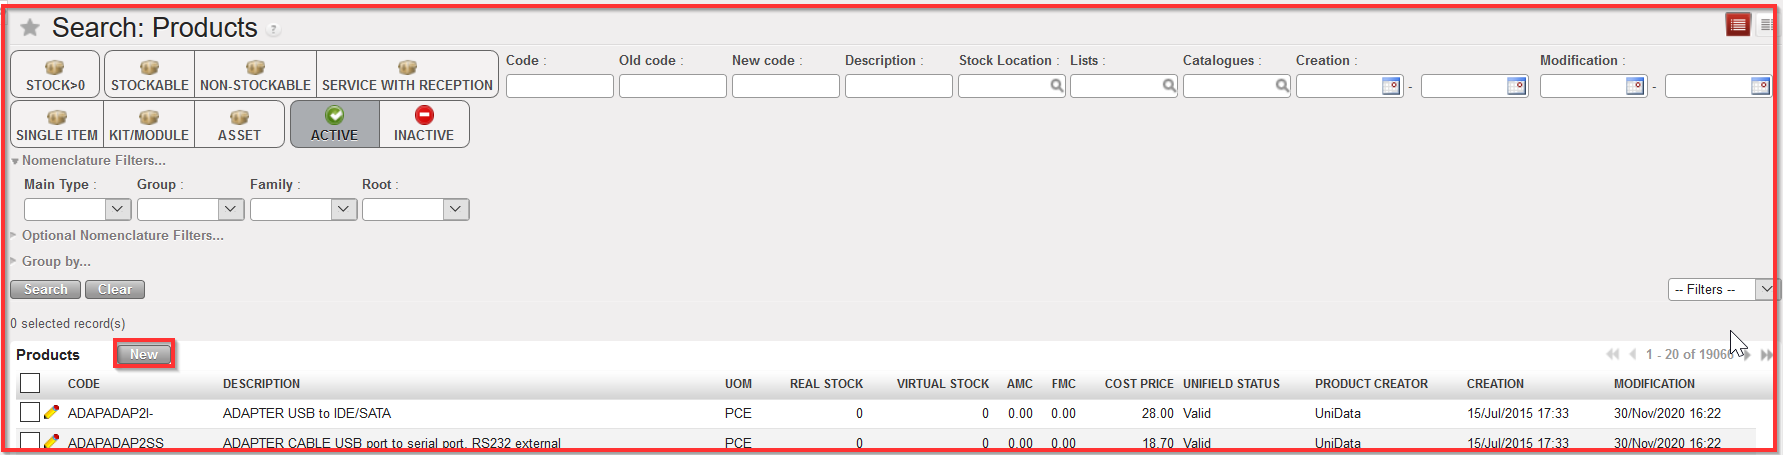
Go to: Products/ Products / Products

  1. Click “New” button to begin the process
  2. Fill in all the blue mandatory fields (see the relevant headings in this Learning Unit for detailed explanations on fields, options etc)
  3. Fill in any additional information
  4. Save

Create a new local product

Please note that Local products can also be managed for intermission and intersection flows.

D. LU-SU1106: Additional information on user rights

Supply User Manual ENG->Supply Configurations-> 2.6 LU-SU1106:Users and user rights -> D. LU-SU1106: Additional information on user rights

D. LU-SU1106: Additional information on user rights

It is possible to create a user on the HQ instance and synchronize it down to all related instances so that this user has access to all instances.

More detailed information on users and user rights is available in the UniField IT configuration manual.

C. LU-SU1106: User groups

Supply User Manual ENG->Supply Configurations-> 2.6 LU-SU1106:Users and user rights -> B. LU-SU1106: Users

C. LU-SU1106: User groups

User groups are maintained at HQ level and synchronized down to all related instances. User groups should never be modified at field level. However, it may be useful to know where they can be viewed as they will give you information on access they can give to users.

Go to: Administration / Users / Groups

The existing user groups appear on the screen

Open one of them in read mode (in the example below, we open the group “Sup_Purchase_Officer)

User group

The most interesting part is the “Access Rights” tab as it lists all the objects to which a group can access. It also details if the object can be accessed in read, write (modify), create or delete.

B. LU-SU1106: Users

Supply User Manual ENG->Supply Configurations-> 2.6 LU-SU1106:Users and user rights -> B. LU-SU1106: Users

B. LU-SU1106: Users

Each user working on UniField should have its own login and password. This allows limiting the number of functionalities to which a user has access. This also allows tracking who created or modified a document or a master data.

Go to: Administration / Users / Users

2 users are existing by default on every instance.

  • Administrator (admin) should not be used to perform the daily operations but could be needed to perform specific operations. Access to this user is usually restricted to HQ staff.
  • Synch (synch) is used by the synchronization in order to create/modify document or master data.

Users

To create additional users:

  1. Click on the “New” button.
  2. Enter a “User name” (name or function of the user).
  3. Enter a “Login” (the login will be needed to connect to UniField).
  4. Make sur the “Active” checkbox is ticked.
  5. Enter a password in the “Change password” field (The password must have at least 6 characters and include at least 1 number. The password will also be needed to connect to UniField).
  6. If the field “Change password on next login” is ticked, the user will have to change his/her password at next login (this allows strict confidentiality).
  7. Use the field “Language” to define which language should be used when the user connects to UniField.
  8. In the “Access Groups” section, select the access groups needed by the user. This pilots which functionalities a user can access.


    • Every user must have the access group “Sync / User”.
    • Access groups related to supply starts with “Sup_”.
    • Access groups related to finance starts with “Fin”.

User creation

A. LU-SU1106: LU Introduction

Supply User Manual ENG->Supply Configurations-> 2.6 LU-SU1106:Users and user rights -> A. LU-SU1106: LU Introduction

A. LU-SU1106: LU Introduction

Users working on UniField do not necessarily need to access all functionalities. Supply users should not have access to finance functionalities. People working in the warehouse should have access to warehouse functionalities only.

Users working in procurement should have access to procurement functionalities only. Some users should have access to a wide range of functionalities while others should have access to a limited number of functionalities.

C. LU-SU1105: Pack Type

Supply User Manual ENG -> Supply Configurations -> 2.5 LU-SU1105: Additional configuration points -> C. LU-SU1105: Pack Type

C. LU-SU1105: Pack Type

If the dimensions of the boxes used for shipping the goods to customers are standard, it may be useful to define pack types in configuration. These pack types can be used when Pre-Packing Lists are processed. Behind a pack type, you find the dimension of a box (length, width, height) in centimeters.

Go to: Supply Configuration / Warehouse Configuration / Regular Warehouse Management / Pack Types

Pack Types

New pack types can be created via the “New” button.

Existing pack types can be edited via the pencil icon.