LUFI-20102 Accounting Period Opening

LUFI-20102 Accounting Period Opening

LU Introduction

After the Headquarters instance has synched the fiscal year downwards, coordinations and projects can change the periods from {Draft} to {Open}.

It is possible to open a period when the previous period is {Draft} or {Open}. This allows you to enter financial transactions for the new period while the closing of the previous period may still be in process.

However you will not be able to close a period if the previous one is {Open} or {Draft}. For instance, if you start using UniField in May, you will open the May period and leave the previous period {Draft}. When you will close May, you will have to open the previous periods and close them before closing May.

How to Open an Accounting Period

Go to Accounting/Configuration/Financial Accounting/Periods/Periods

Click on the green arrow to open the relevant accounting period. In the below example, we want to open January 2017.


Green Arrow to select to open January 2017

Form view of the period January 2017 display the state {Open}

LUFI-21202 Synchronization Monitoring

Finance User Manual ENG -> 2. Finance Configurations -> 2.12 Finance Configurations’ Synchronization -> LUFI-21202 Synchronization Monitoring

LUFI-21202 Synchronization Monitoring

LU Introduction

The Synchronization Process Monitor shows a list of all rounds of synchronization for the instance, with data and time stamp included.


Synchronization Monitor

There are four tasks performed in this order: DATA PULL, MSG PULL, DATA PUSH, MSG PUSH.

Pulling is when the synchronizing instance receives information from the other instances. Pushing involves the synchronizing instance sending information to other instances. Data is all information entered since the last synchronization. For example, if the project created hard posted register entries, they will be sent to Coordination. Message pushing and pulling is mainly for sending and receiving of supply information.

There are three statuses:

  • In progress: the task is currently running.
  • OK: the tasks have been successfully executed.
  • FAILED: Some problems occurred during the execution. An error message explains the failures.

If for some reason the synchronization FAILED, attempt it again. If it FAILS again please check the messages received as explained below.

How to Monitor Synchronization

Go to Synchronization/Monitoring

  1. Select {Synchronization Process Monitoring}

The Synchronization Monitor is open

Go to Synchronization/Monitoring

2.  Expand the {Update} sub module

3. Select {Update Received Monitor}, {Update Sent Monitor}, {Message Received Monitor}, {Message Sent Monitor}


Monitor Screen

4. Select {Not Run}

The lists of entries exchanged but failed to be executed. The lines not successfully executed are shown in red with detailed error messages in the content portion of the line.


Message Received Monitor

Click on the individual line to show all relevant information to the run status and error message.

LUFI-21201 Manual Synchronization

Finance User Manual ENG -> 2. Finance Configurations -> 2.12 Finance Configurations’ Synchronization -> LUFI-21201 Manual Synchronization

LUFI-21201 Manual Synchronization

LU Introduction

In UniField, it is possible to synchronize data manually or automatically. An automatic daily synchronization can be configured by the IT staff. If your section chooses a manual synchronization, someone in each instance should be responsible to launch it on a regular basis. Only this user will have access to the synchronization business application.

How to Synchronize Manually

Go to Synchronization/Synchronization/Manual

  1. Select {Start all synchronization in the background}
Synchronization Menu

2.12 Finance Configurations’ Synchronization.

Finance User Manual ENG -> 2. Finance Configurations -> 2.12 Finance Configurations’ Synchronization.

LUFI-21201 Manual Synchronization
LUFI-21202 Synchronization Monitoring

FINANCE CONFIGURATIONS’ SYNCHRONIZATION

Synchronization is the tool that allows data exchange in UniField. An instance is a UniField installation. It could be a Project, Coordination or an HQ database. In simplified terms, one instance reflects one MSF office and is materialized by a local server that will most often be a dedicated device (laptop or server). The instances exchange data through the synchronization server. Within one instance users can work offline via a local area network, i.e. not connected to the internet or synchronization server. When data is sent from one instance location to another instance location UniField requires the user to log into the synchronization server via an online connection. Synchronization is performed regularly, either on an automatic or manual basis.

User-Instance-Synchronization Server relationship

Some data can synchronize only downwards (e.g.: from HQ to Coordination to Projects), only upwards (e.g. from project to Coordination to HQ) or bi-directionally (from HQ to Coordination to Project or from Project to Coordination to HQ).

Each sub chapter in this manual will provide further information on synchronization rules for specific configuration.

The below table summarises how financial data is synchronized:

Name

Synchronization Group (level)

Direction

Account Move

OC

Bidirectional-Private

Account Move Line

OC

Bidirectional-Private

Account Move Line Correction

OC

Bidirectional-Private

Account Move Line / Register Line

MISSION

Bidirectional-Private

Account Move Reconcile

OC

Bidirectional

Account Move State

OC

Bidirectional

Analytic Accounts (free 1, Free 2, Destination)

OC

Down

Analytic Line

OC

Bidirectional-Private

Analytic Line (Free 1 + Free 2)

MISSION

Up

Analytical Journal

OC

Bidirectional-Private

Analytical Journal (Coordination)

MISSION

Down

Analytical Journal (HQ)

OC

Down

Analytical Journal (Project)

MISSION

Bidirectional

Budget

OC

Up

Cost Center

OC

Bidirectional-Private

Currency

OC

Down

Currency Rate

OC

Down

Currency table rate

OC

Down

Donors

HQ + MISSION

Bidirectional

ESC Partner

COORDINATIONS

Down

Expat Employee

HQ + MISSION

Down

External Partner

HQ + MISSION

Bidirectional

Financing Contract

HQ + MISSION

Bidirectional-Private

Fiscal Year

OC

Down

Funding Pool (linked to a specific coordo)

HQ + MISSION

Bidirectional-Private

GL Accounts

OC

Down

GL Journals – Registers (Coordination)

MISSION

Down

GL Journals – Registers (HQ)

OC

Down

GL Journals – Registers

HQ + MISSION

Bidirectional

GL Journals (Non Register)

OC

Up

HQ Entries

OC

Bidirectional-Private

Intermission Partner

OC

Down

Internal Partner

MISSION

Bidirectional

Intersection Partner

OC

Down

Link Accounts/Destination

OC

Down

Local Employee

HQ + MISSION

Bidirectional

Periods

OC

Down

Product Category

OC

Down

Proprietary Instance

OC

Bidirectional

Register

MISSION

Bidirectional-Private

Tax Code

OC

Down

Synchronization Rules

OC = All instances belonging to one OC

MISSION= Project(s) + Coordination belonging to one mission

COORDINATIONS = all Coordinations + HQ belonging to one OC

HQ+MISSION = HQ + Coordination + Project(s) belonging to one mission

Up = lines synched upwards

Down = lines synched downwards

Bidirectional = Up + Down

Bidirectional-Private = To cost center tied up to the proprietary instance


2.11 Company Set Up.

Finance User Manual ENG -> 2. Finance Configurations -> 2.11 Company Set Up.

COMPANY SET UP

LUFI-21101 Company Set Up

LU Introduction

At the time of creating each instance, the company needs to be set up for each instance level. It is about defining the counterpart accounts for specific functions and transactions. You will need therefore to complete the below boxes:

  • Reserve and Profit/Loss Account: used to book profit, loss and reserve account in a P&L.
  • Intermission counterpart: overrides the accounting configuration of an intermission partner. Choose account 14010- Advances or expenses for other missions. The expense, at the delivery instance will be booked on the credit side and the advance account 14010 on the debit side. The opposite will be booked at the ordering instance. The account 14010 will be reconciled at HQ.
  • Revaluation account: to record revaluation of assets and liabilities. The balance of this account should be later input to profit or loss accounts or transferred to a reserve account.
  • Salaries default account for Payroll entries: 30100 Remuneration (net salary) payable; this account will by-pass the reconciliation rules and can be reconcile regardless the third party. This can be used for payroll entries.
  • Re-billing Inter-section account: use account 12011 Expense re-invoiced to other sections. This will restrict the import into a register of any entries set to this accounting code. The objective is to use the {Debit note} function so all entries will be imported into a Debit note for global rebilling on a periodical basis.
  • Income accounts specific configuration*: to restrict the mandatory allocation to income accounts of type 7.
  • HQ entries Default counterpart: 33010 Expense paid by HQ, payable account type used to balance HQ entries expense accounts booked in the field.
  • Revaluation account: cost account used to book month and year end balance sheet revaluation entries (optional, check own OC procedures)
  • B/S Move to 0 accounts: accounts (5xxxx/69xxx/79xxx) to offset year-end closing entries for accounts that are not reconcilable at mission level (optional, check own OC procedures)
  • P&L result accounts: Income/Expense and Balance sheet accounts for year-end closing entries (optional, check own OC procedures) in order to book the P&L result of the year in the fiscal year to close and to book the Initial Balance of the P&L result in the next fiscal year.
  • A field named “Extra Accounting Behavior” has been added. This field becomes read-only once the instance is created, in order to prevent discrepancies and ensure consistency across instances. 

    The dropdown includes three predefined options, each corresponding to specific booking permissions for periods P13, P14, and P15: 

    • OCB and OCG: No bookings allowed in P13–P15. 
    • OCP and WACA: allow booking of HQ entries MJE for corrections in ODM Accruals + Revaluation + ACW (accounting correction wizard) +FXA + analytic mass reallocation in P13, P14 and P15.
    • OCA: allow booking of +HQ entries + MJE (manual journal entries) + Accruals + Revaluation + IVO+IVI, + ACW (accounting correction wizard) + analytic mass reallocation in P13, P14 and P15 + FXA

    As this field is read-only after instance creation, any future changes (e.g., switching from OCB to OCA behavior) will require a patch script to ensure uniform updates across all relevant instances. 

  • The MRP & Logistics scheduler is defined by Supply. Please check your own OCs procedures.

Depending on your section policy, you will define which accounting code to use.

How to Set Up Companies in UniField

Go to: Administration/Companies/Companies

  1. Select the tab Configuration
  2. Complete the counterpart fields by using the counterpart account codes required by your respective OC’s procedures. The fields to fill in are highlighted in red as showed below.

Setting the default counterpart in Companies


LUFI-21005 How to link a partner to VAT/ Withholding Tax Configuration

Finance User Manual ENG -> 2. Finance Configurations -> 2.10 VAT and Taxes -> LUFI-21005 How to link a partner to VAT/ Withholding Tax Configuration

LUFI-21005 How to link a partner to VAT/ Withholding Tax Configuration

It is possible for the tax attached to a supplier invoice to have another third party (the correct one for which it’s going to be paid).

For that you need to add the required third party (partner) in the tax object.

  1. The Tax partner (mostly a governmental office) should be created first from Partners directly or from Accounting => Suppliers=>Suppliers=> {New}

2. To link the partner to the tax object, go to Accounting=> Configuration => Financial Accounting=> Taxes=> then in the tax object you want to use, add the third party related to this specific tax in the partner field.

3. The tax attached to the supplier invoice will have the partner chosen in the configuration of this tax. When doing the payment of this tax, it will be imported as usual through pending payment and the name of the partner will be the one linked to the tax not the partner of the supplier invoice.

Note: If no third party is added to the tax configuration, tax lines will take the supplier invoice third party.

If you need to check the last modification done in any tax object, you can click on {Track Changes} in the right-side menu.

LUFI-21004 Withholding Tax Configuration

Finance User Manual ENG -> 2. Finance Configurations -> 2.10 VAT and Taxes -> LUFI-21004 Withholding Tax Configuration

LUFI-21004 Withholding Tax Configuration

LU Introduction

Sometimes MSF is requested to pay a tax retained when making payments for goods supplied. This tax is called withholding tax. For instance a 2% withholding tax out of a supplier invoice of 100 CHF is 2.04CHF. You owe to the government 2.04CHF and to your supplier 100CHF. The total cost of your expense is 102.04CHF.

Unlike the VAT recoverable, the withholding tax is booked on a Payable account as it a debt to be paid to the government. It is booked on the credit side as any other Payable accounts. Thus this tax should be excluded from the total price to pay to the supplier. Here below is shown how to proceed.

Withholding tax booked on the credit side as any other payables account

How to Set Up a Withholding Tax

Go to: Accounting/Configurations/Financial Accounting/Taxes/Taxes

  1. In the Search Taxes view, select
  2. Complete the {Tax Name} and {Tax Code} fields.
  3. In the Tax Application field, select the value {Purchase}.
  4. Leave the field {Tax included in Price} empty.
  5. In the {Tax Definition} tab, select the tax type {Percentage}.
  6. Enter an amount as a value between 0 and -1. For instance, for a tax of 2%, enter -0.02. You need to enter a negative value so that this tax (payable) is booked on the credit side as any other payable accounts.
  7. In the Accounting Information section, enter a payable account for both the Invoice Tax Account and Refund Tax Account.

Setting a withholding tax with negative amount

8. Click on {Save} button.

Example: The tax (1.36 USD) is what you owe to the tax office. The Total is your outstanding debt towards your supplier.

Withholding tax applied to a supplier invoice

LUFI-21003 Partner Fiscal Position Configuration

Finance User Manual ENG -> 2. Finance Configurations -> 2.10 VAT and Taxes -> LUFI-21003 Partner Fiscal Position Configuration

LUFI-21003 Partner Fiscal Position Configuration

LU Introduction

Sometimes even though we have an agreement to recover VAT, it does not mean that all local suppliers will have the ability to invoice MSF with VAT. For that reason we would need to attach a specific tax scheme to those suppliers who cannot invoice MSF with VAT. For this exception we use the sub-module Fiscal positions.

How to Configure a Fiscal Position

  1. First you need to configure a tax equal to 0 % in the taxes sub-module for partner not handling VAT.

Go to: Accounting/Configurations/Financial Accounting/Taxes/Taxes

VAT 0% used to set a partner’s fiscal position not handling VAT

2. Second step is to configure the fiscal position.

Go to: Accounting/Configurations/Financial Accounting/Taxes/Fiscal Positions

Select and on the Fiscal Positions form view, enter a fiscal position name.

Fiscal Positions form view

3. In the tax mapping section, select and map a TAX SOURCE with a REPLACEMENT TAX. The REPLACEMENT TAX should be 0%. Save the line . What you are saying to the system here is every time there is a value of 20% tax, it should replace it by 0% tax.

Tax mapping to define a fiscal position

4. Click on {Save} button.

5. Last step is the configure the suppliers – accounting information.

Go to: Accounting/Suppliers/Suppliers

  1. Open the supplier form you want to link to a fiscal position.
  2. Go to {Accounting Tab}, select the created fiscal position.

Fiscal position setting in a supplier form

3. Click on {Save} button.

When an invoice is generated on a partner linked to a fiscal position, the system will override the tax linked to the invoiced products thanks to the tax mapping you recorded before. The invoice will look like this:

Supplier invoice and applied fiscal position

LUFI-21002 VAT and Product Linkage

Finance User Manual ENG -> 2. Finance Configurations -> 2.10 VAT and Taxes -> LUFI-21002 VAT and Product Linkage

LUFI-21002 VAT and Product Linkage

LU Introduction

As the applicable VAT percentage may differ from one product to another, there are 2 ways of proceeding in order for VAT to be applied at invoice level:

  • Assign VAT to each product on the product form itself
  • Assign VAT to the total amount of the invoice

The product is linked to VAT on the product form in the accounting tab.

Purchase Taxes on the product form

How to Apply VAT to a Product

Go to: Products

  1. In the Search Products view, locate in the list the product to link to a VAT and open its form.

Products list in the Search Products list view.

2. On the Product Form view, go to the Accounting tab and select Add in the Purchases Taxes section to Add a tax.

Add button located in the Purchase Taxes section in the Accounting tab of a product form

The Search Taxes window opens

3. Among the tax list, select the one you want to link to the product.

Search Account Tax window and selection of a tax to link to a product

The Search Account Tax window closes. The tax is displayed in the Purchase Taxes section. You can edit or delete it . Please bear in mind that a tax edition from this section will change the tax initial setting of the configuration module.
Tax set in the Purchase Taxes section in the Accounting tab of a product form

LUFI-21001 VAT Configuration

Finance User Manual ENG -> 2. Finance Configurations -> 2.10 VAT and Taxes -> LUFI-21001 VAT Configuration

LUFI-21001 VAT Configuration

LU Introduction

Before setting the taxes in the instance, you must activate the taxes functionality. To activate it, you will follow the below steps.

How to Activate the Taxes Functionality

Go to: Administration/Configuration/Reconfigure

  1. Search for the step “Manage the VAT” by pressing the button

Manage the VAT step

2. On the “Manage the VAT” window, check the box “Manage the VAT locally”

3. Press when the task is completed

If the Step “Manage the VAT” is left blank, the Taxes section is removed from the Configuration sub-module.


The Fiscal Position field in the Accounting tab of a supplier form is hidden


The Account Tax section in the Accounting tab of a product form is taken away


The Taxes section is also removed from any payment documents (supplier invoices, refund invoices, direct invoices)


Now let’s see how Taxes are set in UniField.

Assuming VAT applied on sales is out of UniField scope, 3 cases were identified for purchase:

VAT not recoverable. Purchases are accounted for at price including VAT. No VAT management in this case.

VAT exemption. Purchases are accounted for at price excluding VAT. No VAT management in this case.

VAT recoverable. Purchases are accounted for at price including VAT but VAT is isolated on separate Receivable Accounts for later settlement through a proper VAT declaration. The VAT recoverable is booked on the debit side as any other receivable account as it is expected to be claimed back from the government.

VAT Recoverable booked on the debit side

The different tax percentages applicable in a country are created through the taxes sub-modules.

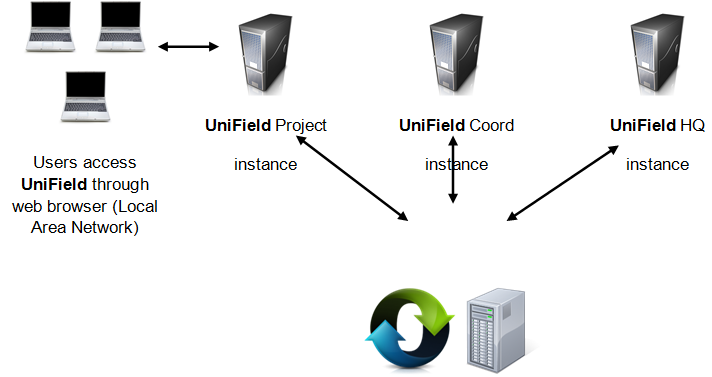
  • If it is done at HQ level, it is synchronized downwards to the mission (coordination and projects). In this case HQ can create a standard form, synchronize it and it is up to the mission to change the percentage according to the local applicable rate.
  • If mission creates VAT, it will not synchronize to HQ.

VAT set at project instance remains in the instance, thus it is not synchronized up to Coordination.

Please check your OC’s procedure.

The lists of taxes are available in the Search taxes view under the configuration sub-module as displayed below:

List of taxes in the taxes sub-module

The tax form view is the object used to define the percentage, calculation, application and accounting code of a tax.

Taxes form view

Once a VAT code is set, you can :

  • Associate a VAT to a product in the product form (See LUFI-20902 VAT and Product Linkage)
  • Associate a VAT directly to a whole invoice before validation (See chapter 03 – Payments)

How to Set Up a VAT

Go to: Accounting/Configurations/Financial Accounting/Taxes/Taxes

  1. In the Search Taxes view, select
  2. Complete the {Tax Name} and {Tax Code} fields.
  3. In the {Tax Application} field, select the value {Purchase}. {Sale} and {All} are not used. The {Active} box is automatically checked.
  4. Leave the box {Tax included in Price} blank if price is to be excluded form price.

Taxes form view header

  1. In the {Tax Definition} tab, select the tax type {Percentage}. The tax type defines the computation method for the tax amount. The values {Fixed amount, None, Python code and Balance} are not used.
  2. Enter an amount as a value between 0 and 1. For instance, for a tax of 20%, enter 0.20. You need to enter a positive value so that this tax (recoverable) is booked on the debit side as any other receivable accounts.
  3. In the Accounting Information section, enter a receivable account for both the Invoice Tax Account and Refund Tax Account.

Tax Definition: computation method and accounting codes setting

4. The remaining sections on the form as well as the Special Computation tab do not have to be completed.

Special Computation and Tax Declaration Invoices are left as such

5. Save the form.

6. In the Taxes Search view list, the tax is displayed. You can always edit or delete it

Search Taxes view

  • You will have these filters in the search view: [active] [inactive] [Tax included in price] [Tax not included in price].
  • For the status [active] or [inactive] filters, the default display will be [active].
  • For the types [Tax included in price] or [Tax not included in price] the display will be both.