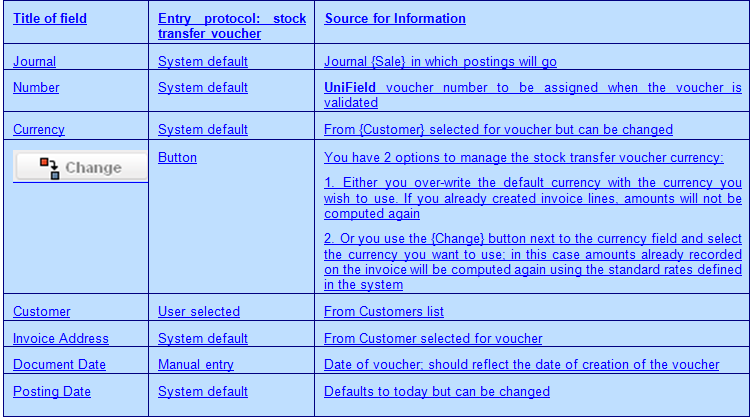
Finance User Manual ENG -> 3. Payments -> 3.5 AUTO REBILLING (INTER-MISSION / INTER-SECTIONAL)
LUFI-30501 Auto Rebilling (inter-mission / inter-sectional)
A. LU Introduction
Intermission and intersection invoices are now synchronized between 2 instances for manual or supply flows so that automatic counterpart invoices are created and match at both sides.
Invoices are created via supply flow or manually by finance at Provider/Invoicer. Once the Provider/Invoicer validates those rebilling invoices, they synchronize from the Provider/Invoicer to the Requester/Invoicee.
Requester/Invoicee can’t change currency, nor prices, nor quantities… This is to ensure amounts and currency matches in both sides.
There are 2 possible cases:
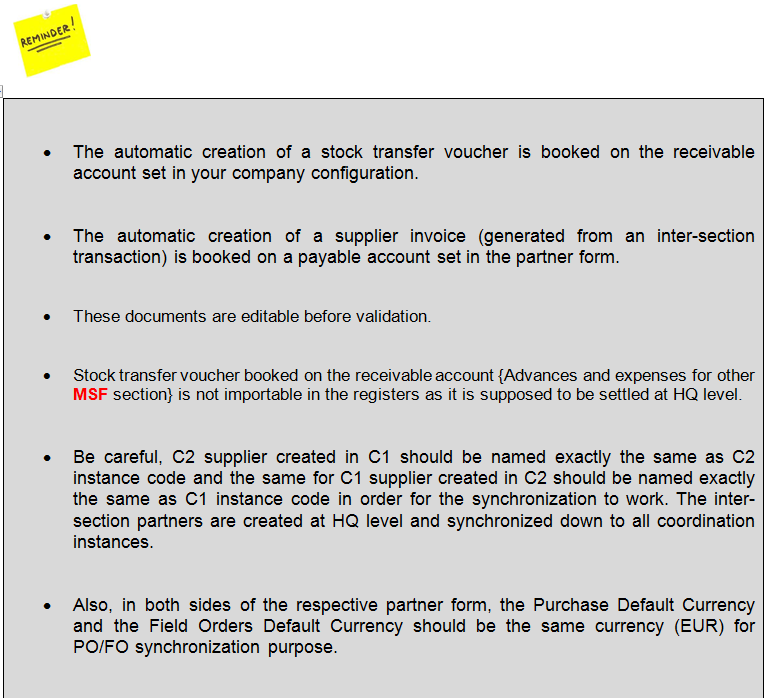
- Either the missions decide not to reimburse each other and the settlement will be done at HQ level. In that case, the receivable accounting code to be used for the Stock transfer voucher is {Advances and expenses for other MSF section}. You will have to set it in the company configuration and will be retrieved at the time of creating automatically the stock transfer voucher. For the supplier invoice, the payables account code will be the one linked to your partner and should be too. There will be no matching on these accounts in the UniField HQ instance.
- Both missions decide to reimburse each other at mission level. In that case, the counterpart accounting code to be used is {Receivable from other sections} for the Stock transfer voucher and {Payable to other sections} for the Supplier invoice. The receivable account will be set as such in company configuration. For the supplier invoice, the payable account will be the one linked to your partner.
|
In configuration for inter-mission supplier: Account receivable and Account Payable (14010 – Advances or expenses for other missions) In configuration for inter-sectional supplier: Account receivable (12010 – Receivable from other sections) and Account Payable (30010 – Payable to other sections) |
REBILLING BEHAVIOR
- Rebilling is created and pushed only from the Provider/Invoicer to the Requester/Invoicee.
- When linked to supply flows, no rebilling invoices is created at reception of the goods by the requester. The reception of the rebilling invoice is not generated at the same time than the reception of the goods.
- Invoices are created only by the mission that provides/invoice the goods (automatically created via supply flow or manually created by finance when linked to services).
- Invoices created are then synced from the invoicer to the invoicee (not the other way around no pushed invoicee invoices).
Invoice edition / validation / approval
- Only the reinvoicer can create and edit the rebilling invoices and validate them.
- The reinvoicee will only approve the invoice once received via sync. Only the posting date will be editable by the reinvoicee before approval.
- In case reinvoicee don’t agree with the invoice, it can validate and then cancel it using the automated function.
- Invoices created via supply flow will have some restriction on some fields: not possible to change the product nor quantities.
B. Rebilling Inter-mission via Supply Flow
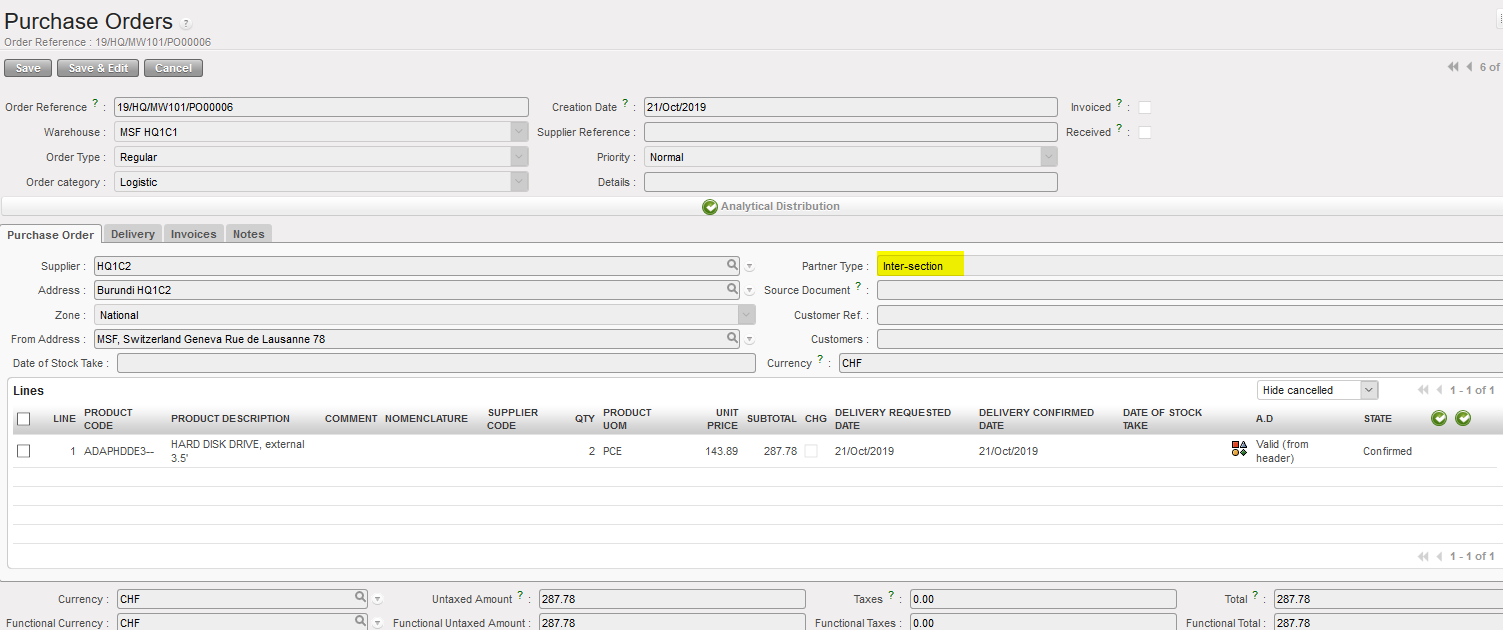
For example, we have the instance HQ1C1 that want to request some items from another mission HQ1C2 within the same OC section.
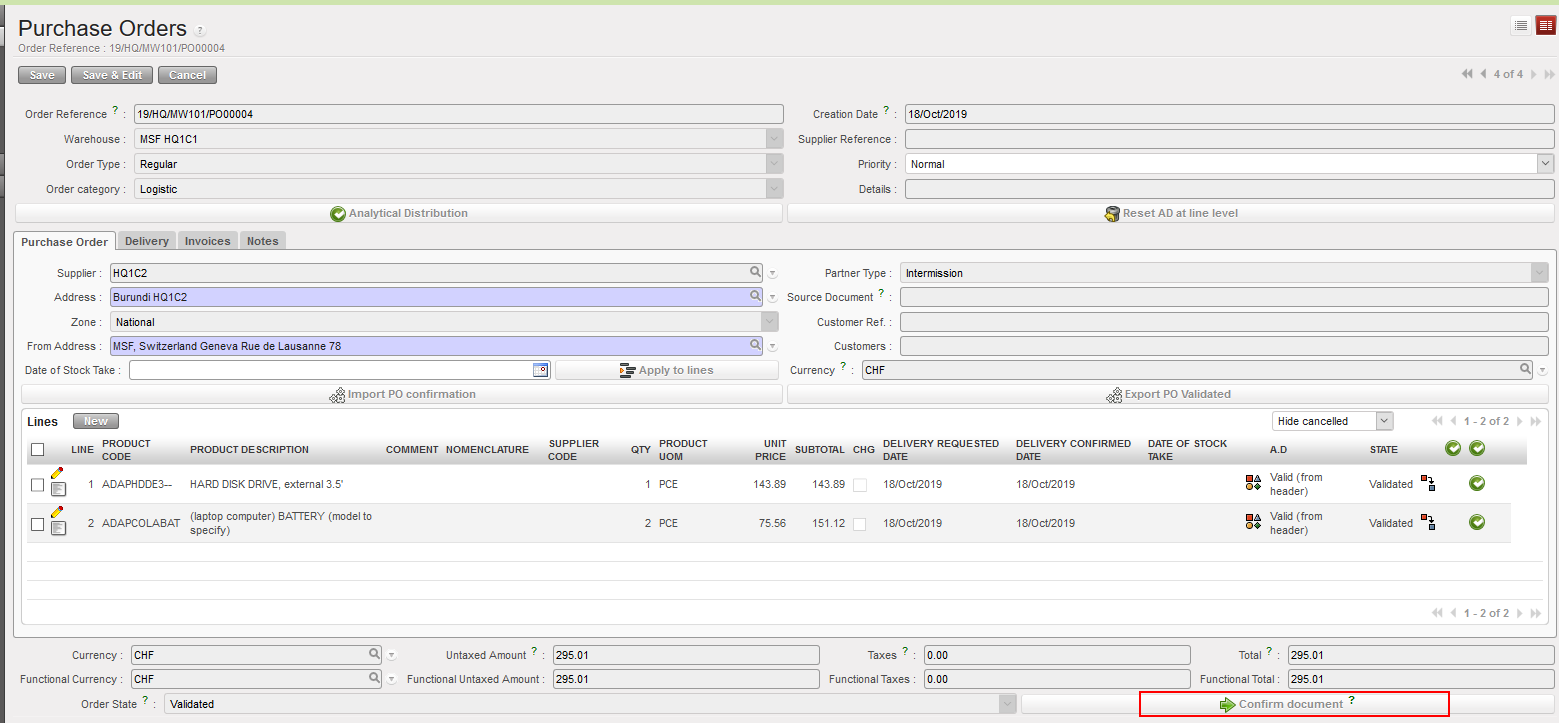
- A PO is created by the requester mission HQ1C1, with the provider mission HQ1C2 as a supplier. (Done by a supply user not a finance user)
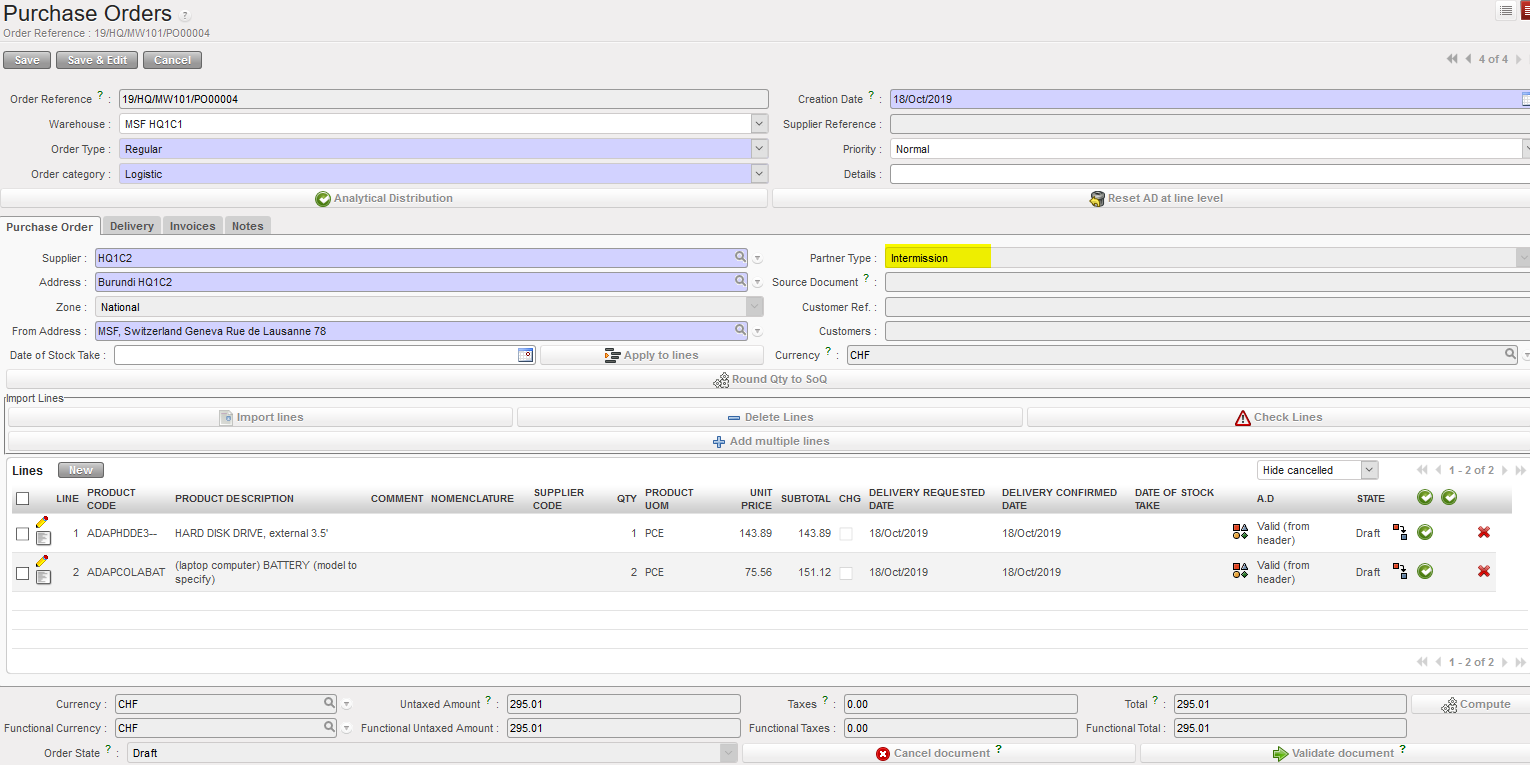
2. After inserting all the required information, the PO should be validated then confirmed. (Done by a supply user not a finance user)
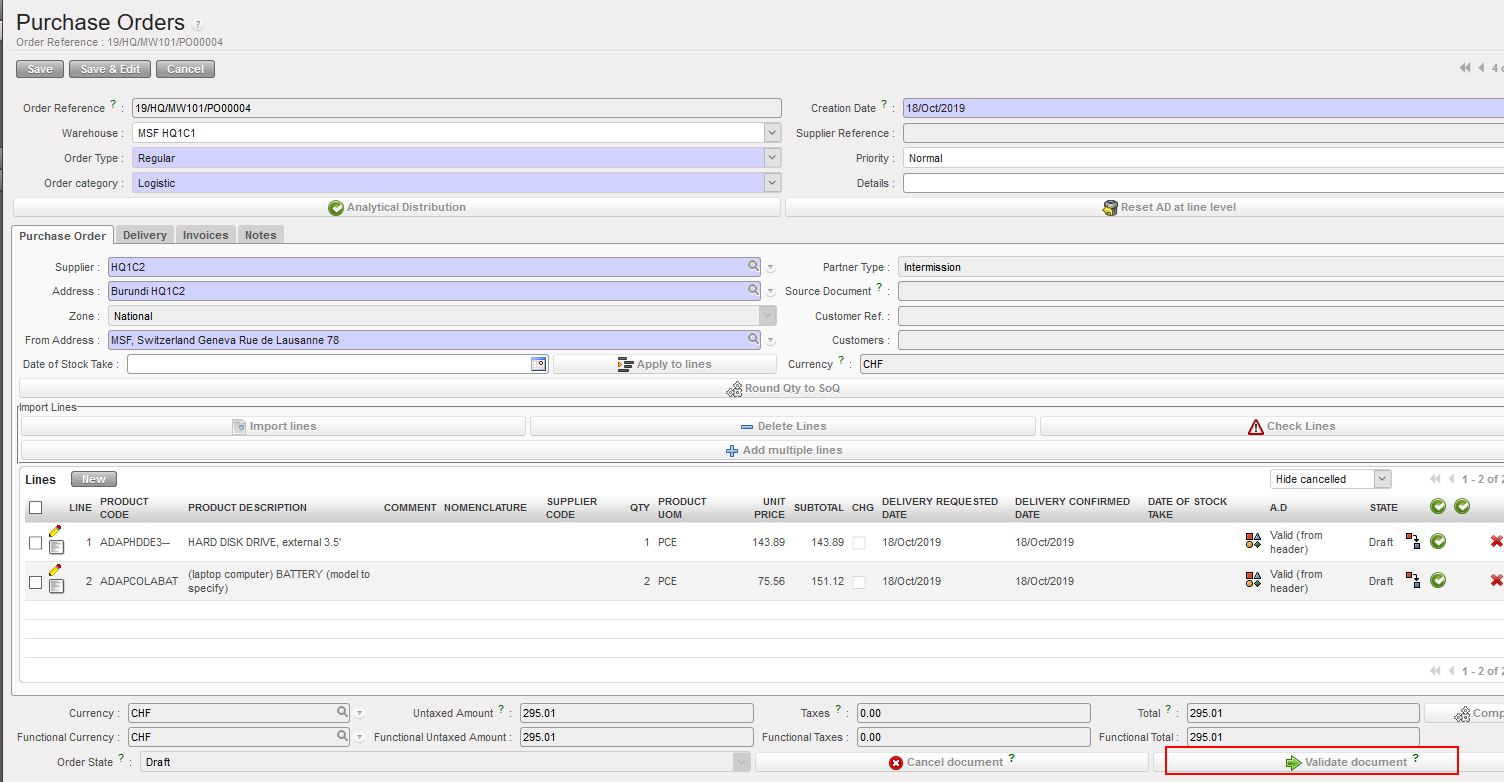
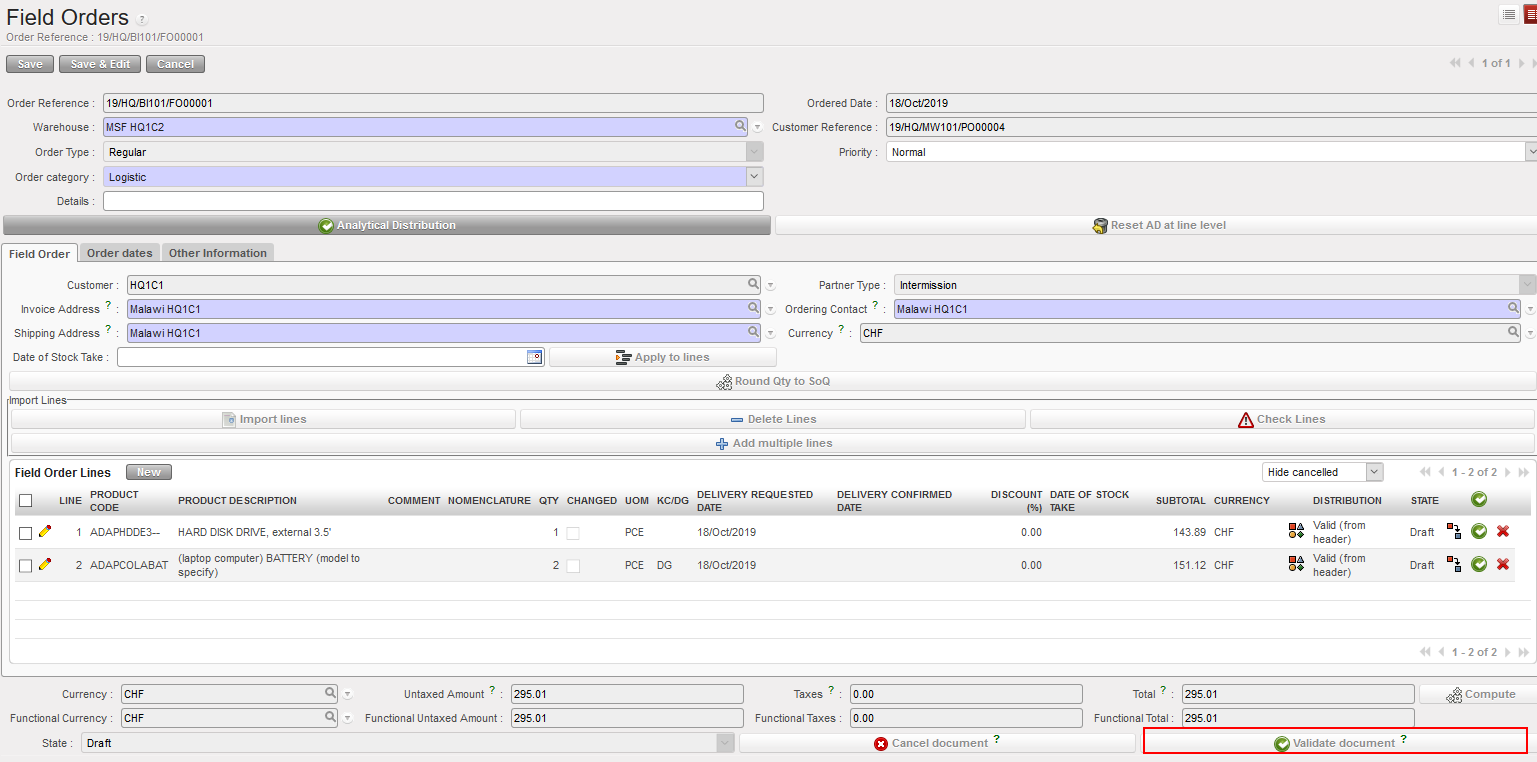
3. After synchronization in the two instances, an FO in Draft state will be created in the provider mission HQ1C2 as a result of the PO created in requester mission HQ1C1. (Done by a supply user not a finance user)

- Before validating the FO, you will need to update again the Analytic Distribution and then you validate but don’t confirm the document. (Done by a supply user not a finance user)
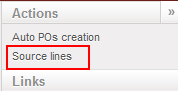
 4. Go to Orders Sourcing tool to source the document (Sourcing: is choosing from where you want to order the requested items, either from the warehouse or from an external supplier) in our case here, we will choose to order the items from external supplier. Either you select the supplier on each line separately and then you click on the green arrow to source or select all and click on Source lines in the right side menu in case you want to order the items from the same supplier then save and source. (Done by a supply user not finance user)


5. After that, the FO will be automatically confirmed, the state of the FO will be sourced. (Done by a supply user not a finance user)

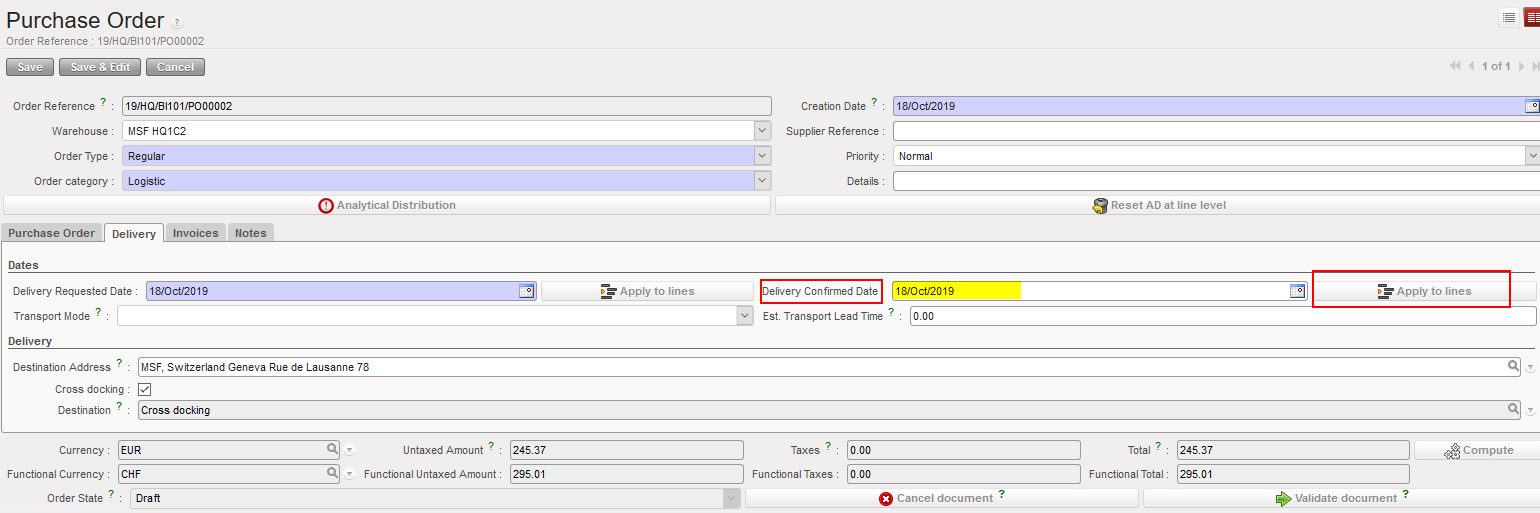
6. A PO will be automatically created in Draft sate after the sourcing in the provider mission HQ1C2, with supplier chosen during the sourcing.

7. After checking all the information and apply the delivery confirm dates to all lines, you can validate then confirm this PO. (Done by a supply user not a finance user)
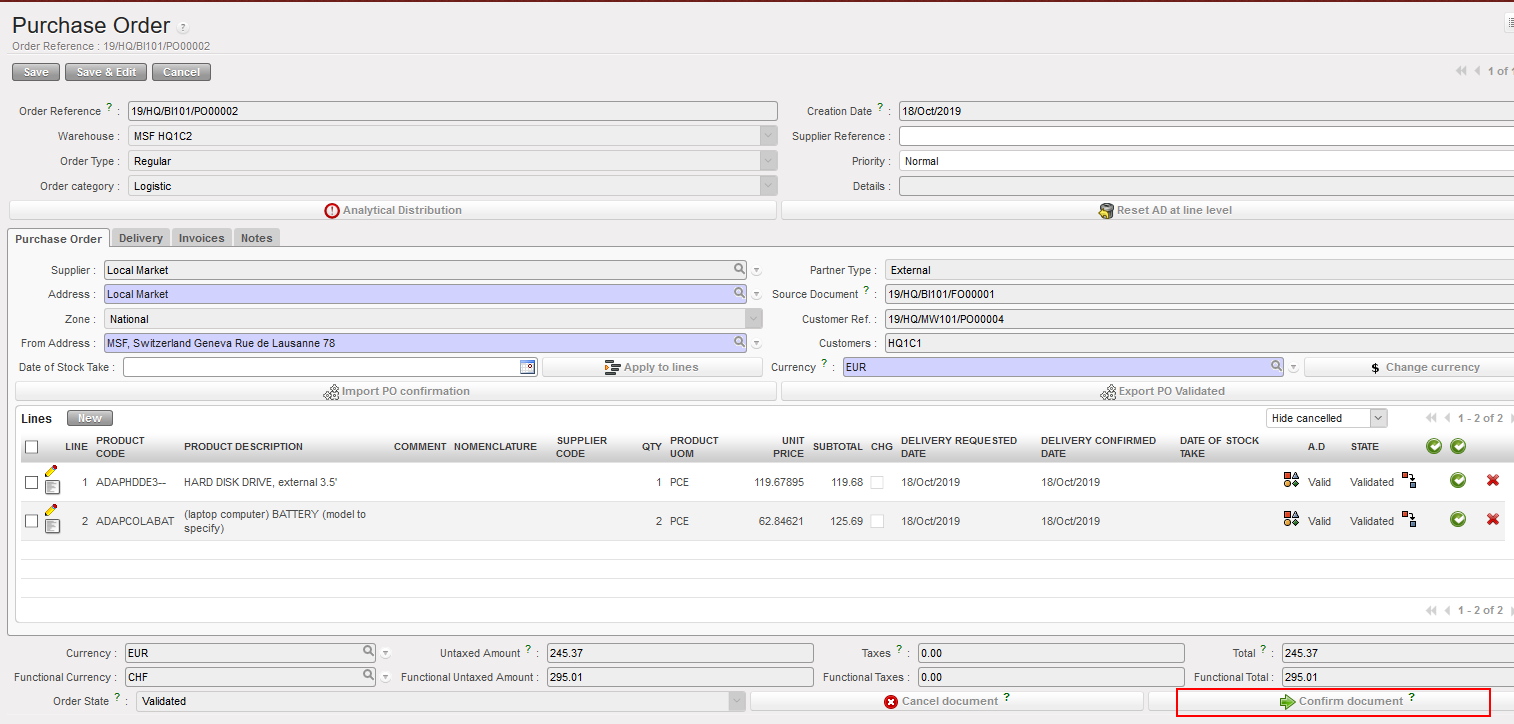
8. Once the PO is confirmed, the incoming shipment will be created. (Done by a supply user not a finance user)
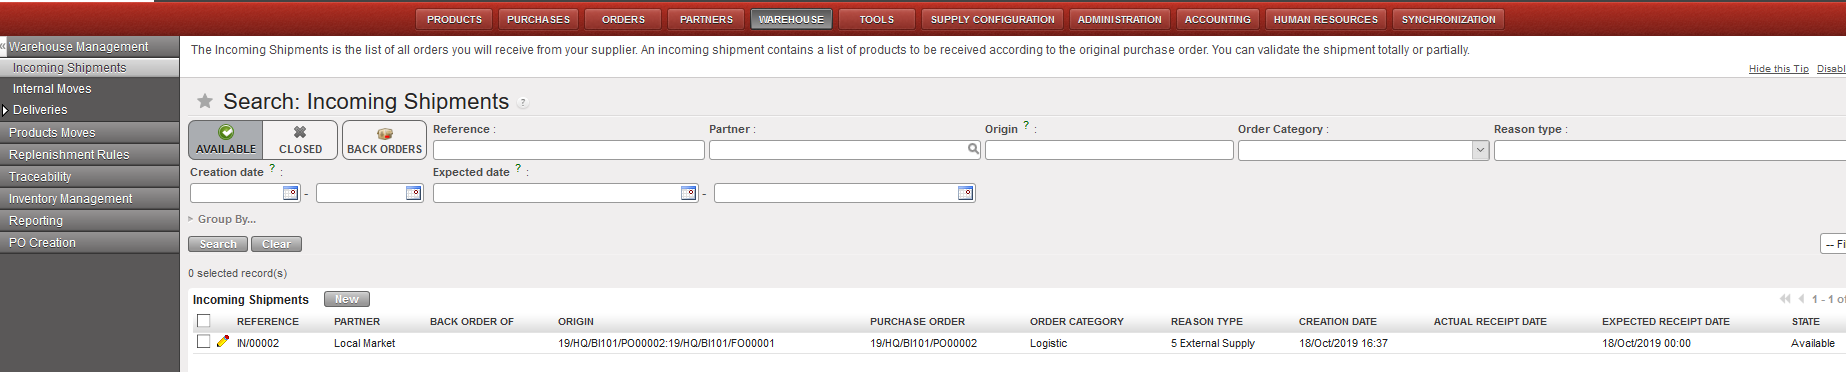
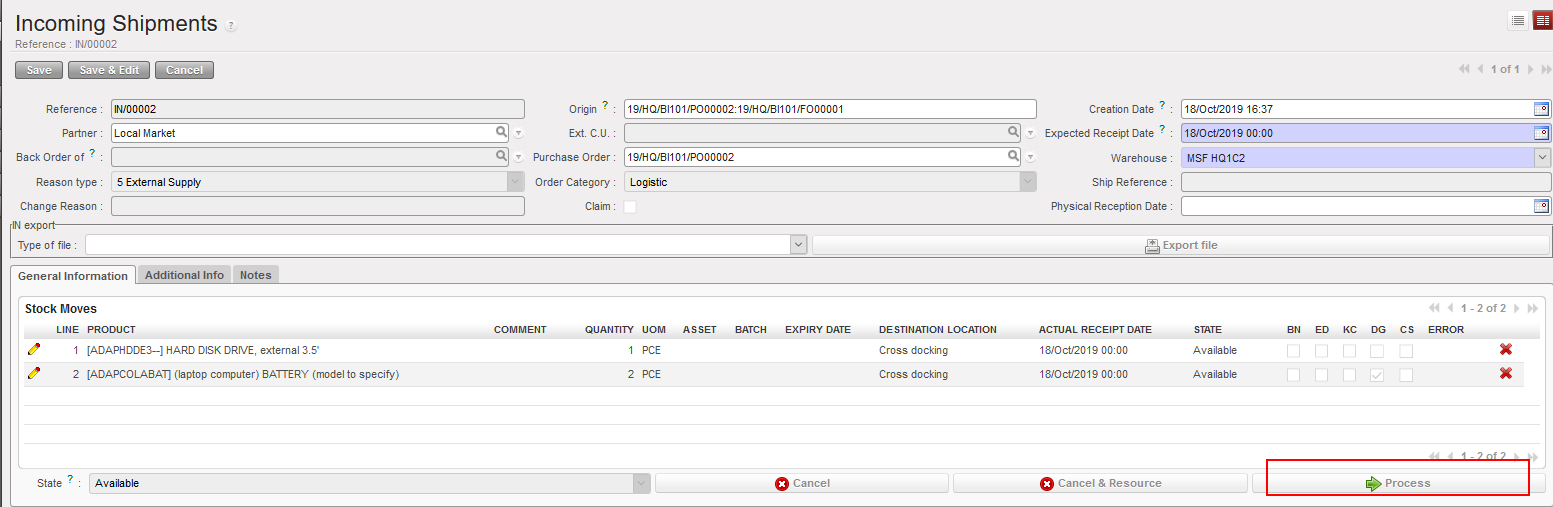
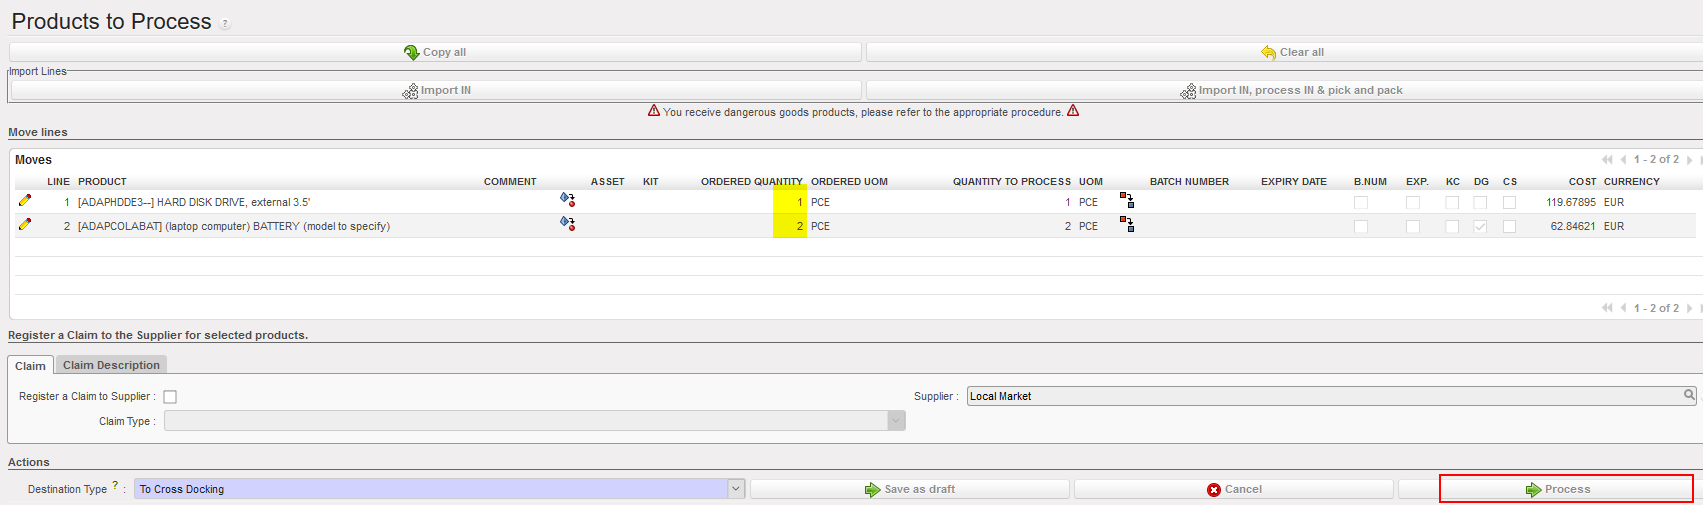
9. Process the incoming shipment when the goods are received in the warehouse. (Done by a supply user not finance user)
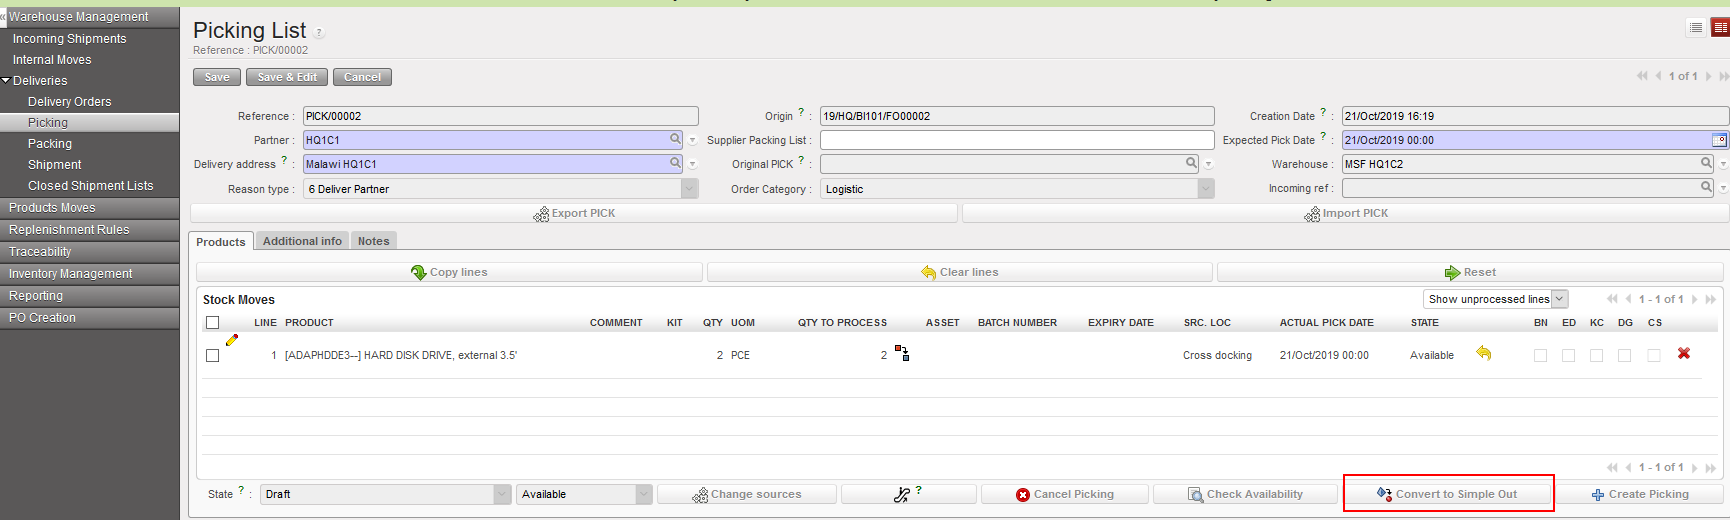
 10. To do the picking of the items, go to Warehouse Management/ Deliveries/ Picking/ Convert to Simple Out/ Copy all/Process (Done by a supply user not a finance user)
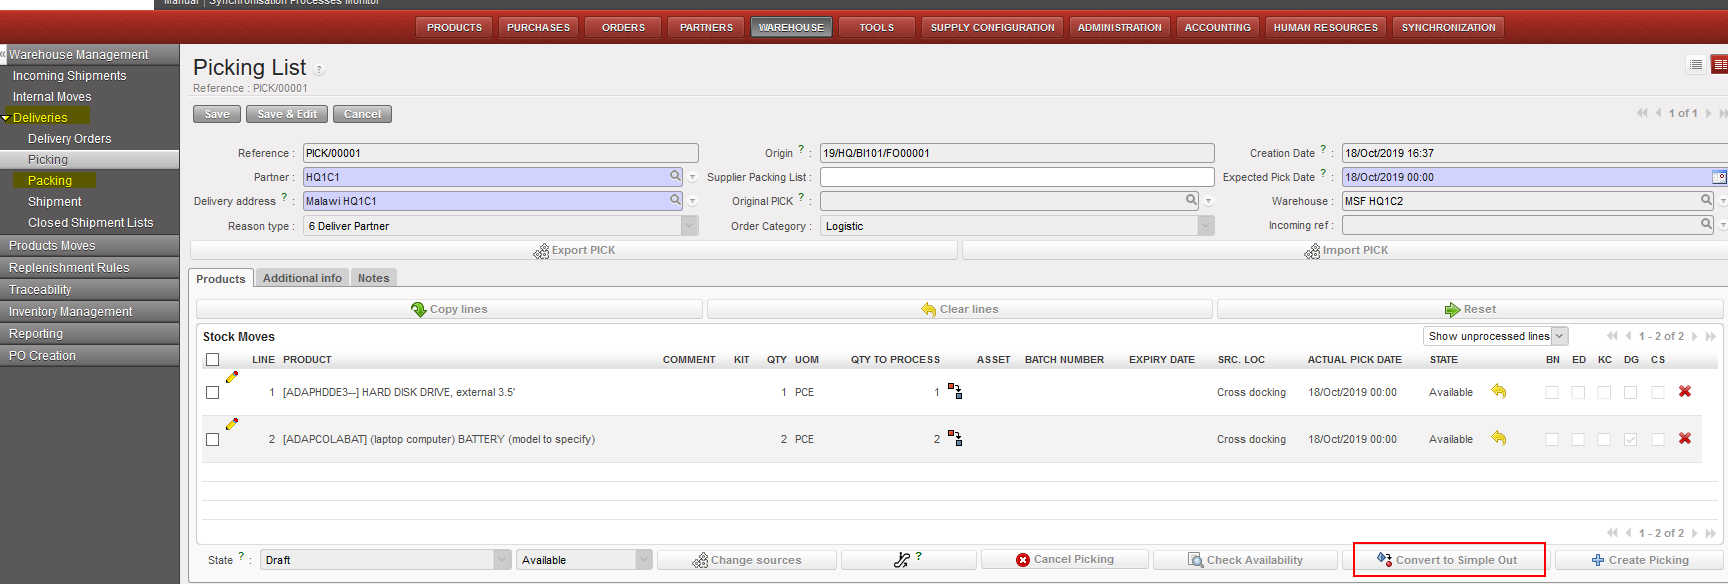
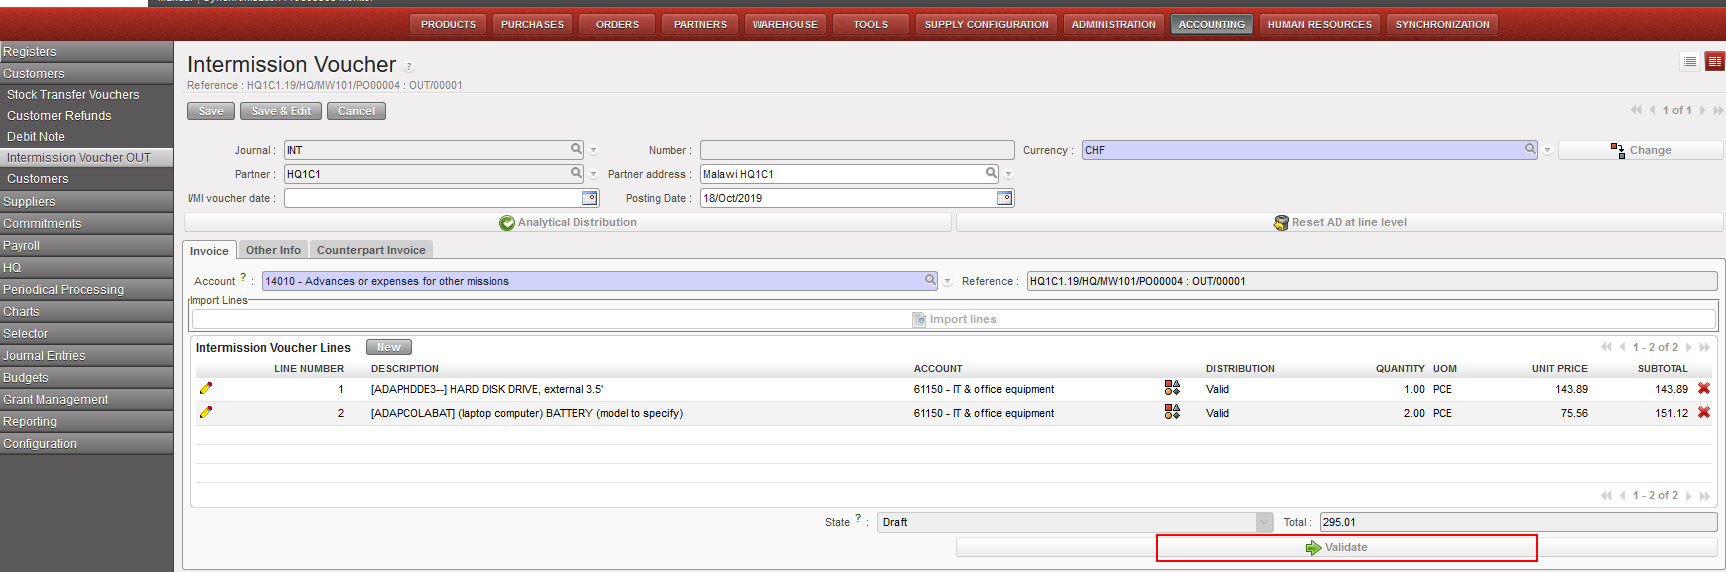
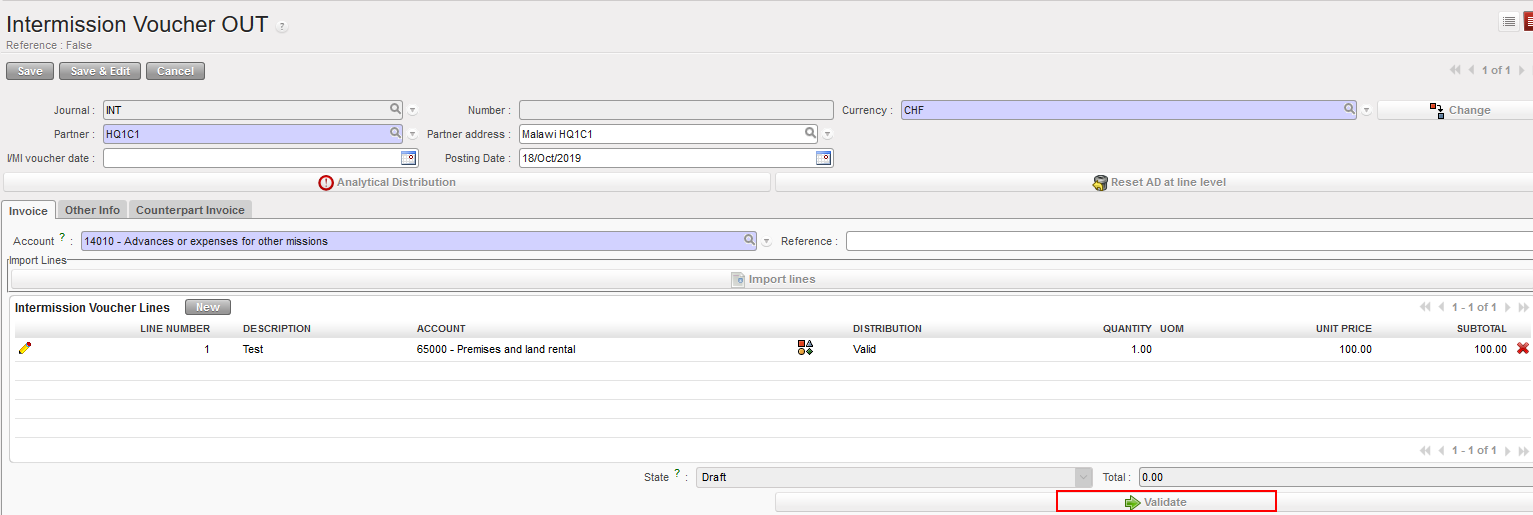
11. The IVO will be created automatically, and it will be accessible for the finance user.
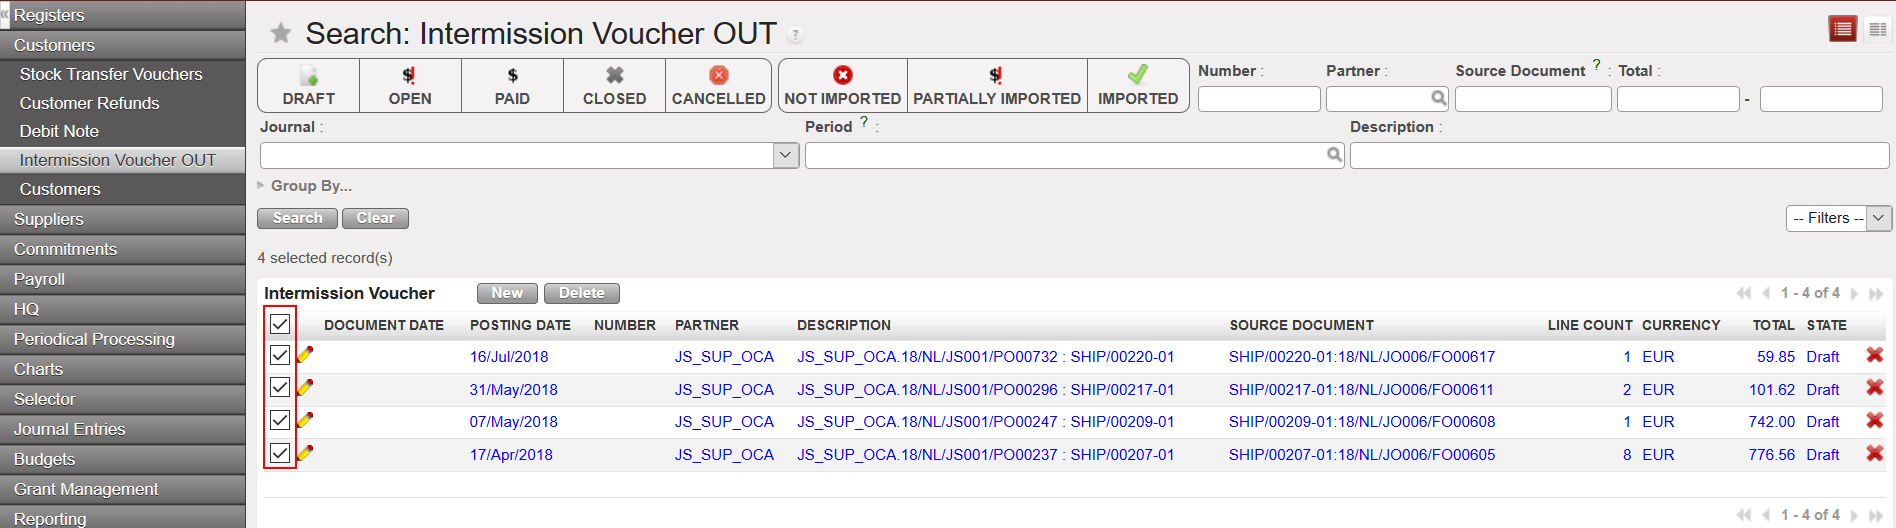
Go to Accounting/ Customers/Intermission Voucher Out

12. In the counterpart Invoice, the Synchronized check box will be already ticked and will be non-editable as the IVO was created throw the supply flow.

13. If all the information were correct, the finance user will validate the IVO. (Done by Finance User)
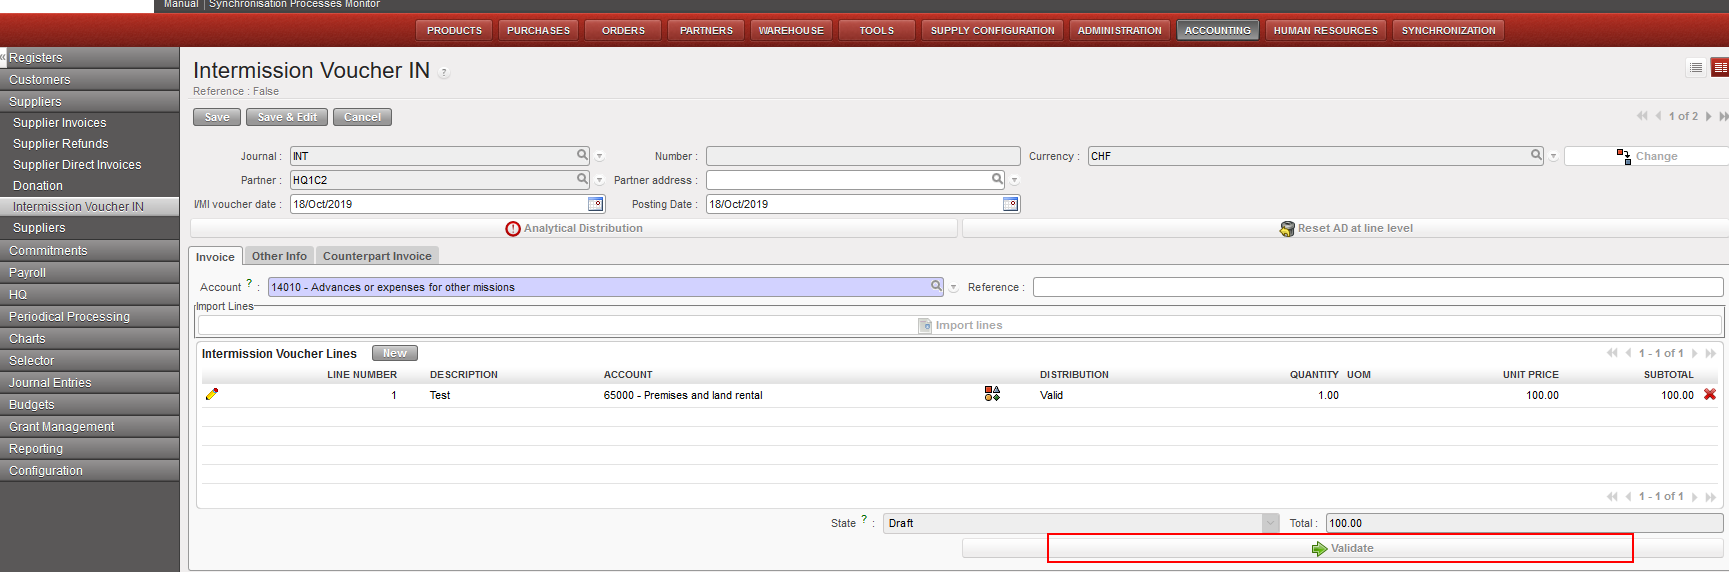
14. After the synchronization in the two mission, an IVI will be created in a Draft state in the requester mission HQ1C1.
In the requester mission, Go to Accounting/ Suppliers/Intermission Voucher In

15. The finance user should check all the information if all were correct (including accounting code and analytic distribution), then the IVI should be validated. (Done by a Finance user)
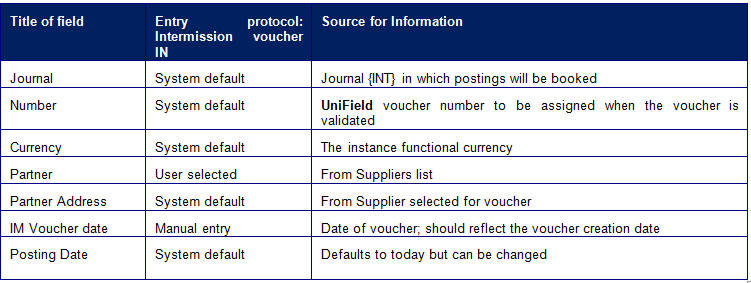
How to Create an Intermission Voucher IN and OUT Manually
Rebilling for non-supply flows is manual in both sides. It relies on processes. What is being done manually in the Invoicer (Provider) instance need to be done also in the Invoicee (Requester) instance.
Here below the process:
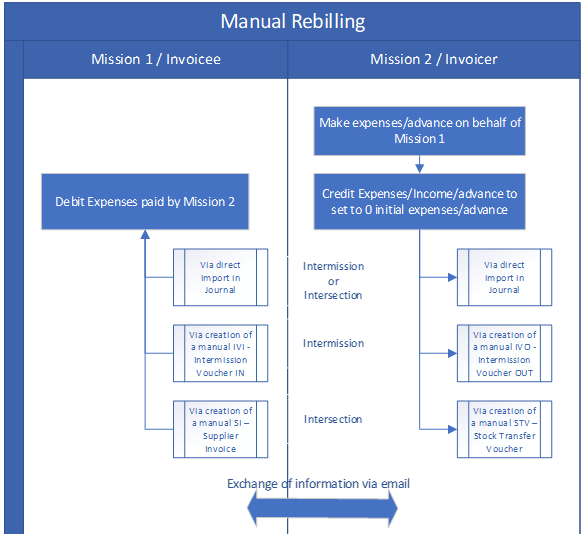
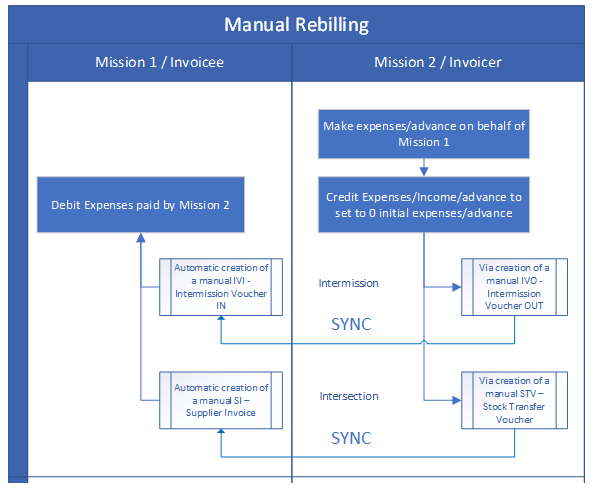
•Invoicer create the rebilling invoices manually or use the import in journal function.
•Invoicer send the elements out of Unifield for the Invoicee to create the counterpart rebilling invoice.
Risks: Both sides can change/edit documents and the risks are that they don’t match in term of prices, products, currencies…
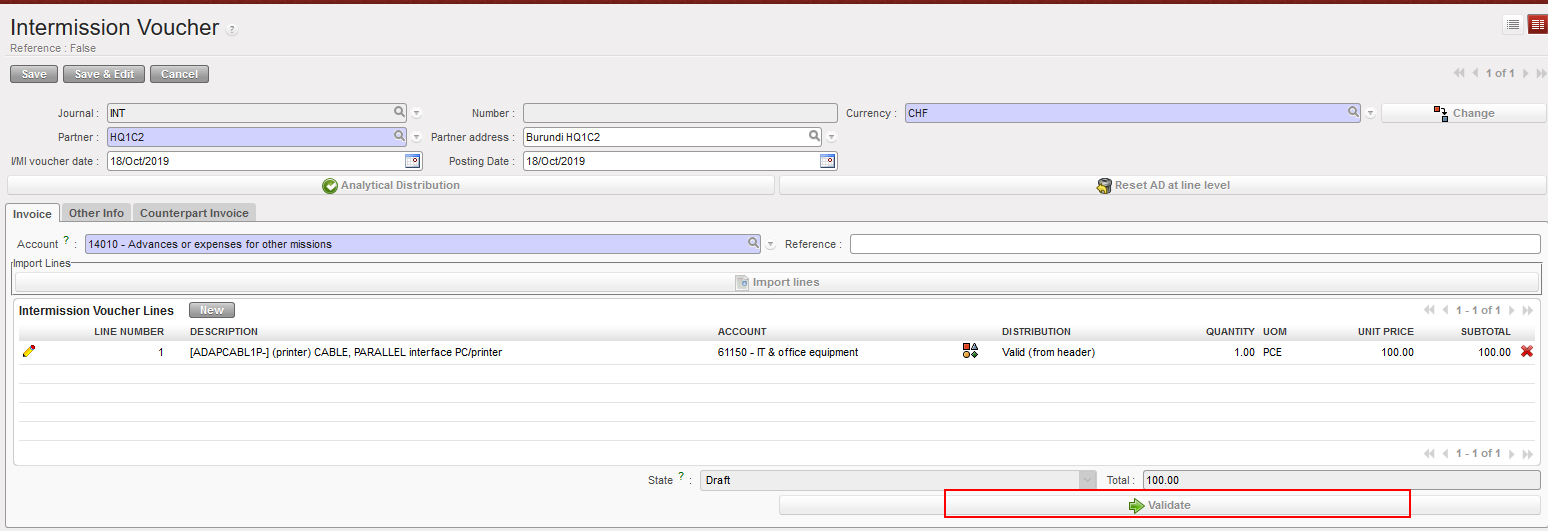
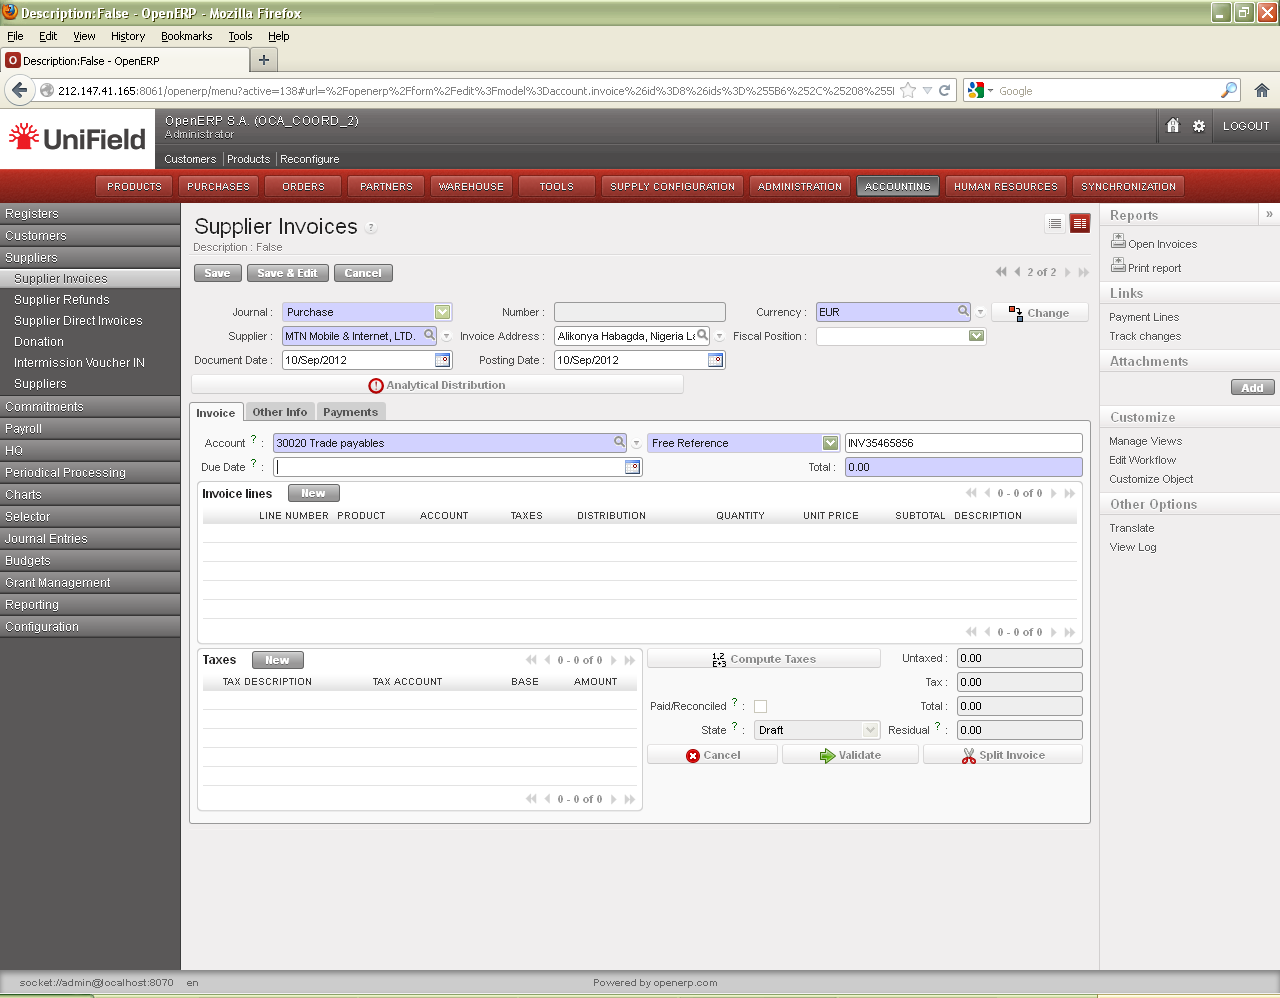
In the invoicer/provider mission (customer) mission, for example HQ1C2:
Go to Accounting/ Customers/Intermission Voucher Out
- Click on {New} to open a new form and chose the mission of rebilling ( for example: HQ1C1)
⮡ A form displays to create a new voucher. Fields in blue are required; white fields are optional; grey fields are view only.
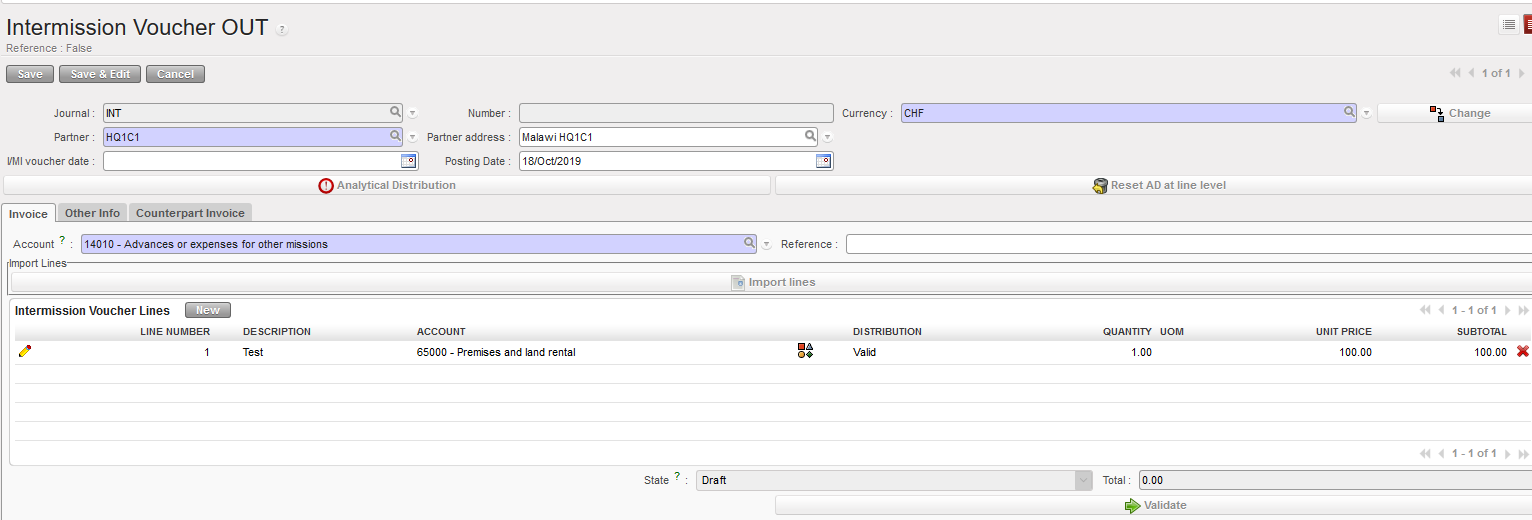
Intermission Voucher OUT creation from the Customers module
is used to apply a global analytic distribution across all lines in the invoice.

On the {Invoice} tab, Select![]() and complete the {Description}, {Account}, {Quantity} and {Unit Price} to represent the various goods or services on the voucher to be created.
and complete the {Description}, {Account}, {Quantity} and {Unit Price} to represent the various goods or services on the voucher to be created.
- Click
 button for additional invoice lines, or click
  button to return back to the supplier invoice window.
 - Assign the analytical distribution
 per line or globally across all invoice lines. Allocate the Cost Center to the correct Cost Center or to the purchasing instance.


Cost Center allocation
3. From Counterpart invoice, tick the Synchronized check box and then validate the IVO

4. After the synchronization in the two instances, In the supplier mission HQ1C1 (invoicee/requester):
Go to Accounting/ Suppliers/Intermission Voucher IN
You will need to update the analytic distribution again and then validate the IVI if all information were correct.

How to Create an Intersection Voucher IN and OUT Manually
The same process can be done for inter-sectional re-billing. The only difference will be having stock transfer voucher to validate instead on IVO.
- For instance, a PO was created at HQ1C1 (inter-section). We choose another inter-section partner as a supplier, and then validate and confirm the PO.
2. After the synchronization in the two instances, an FO will be created in the provider instance ( HQ1C2)

3. The Cost Center should be updated again and after checking all the information => validate the FO but don’t confirm.
4. Source the document from Orders Sourcing Tool, either select available items from the warehouse or order from external supplier. In our case here, we will choose external supplier.

5. After that, the FO will be confirmed automatically, and a new PO will be created to order the requested items from the external supplier.
6. Same process as in inter-mission, validate and confirm the PO after checking all the information => confirm the incoming shipment in the warehouse when the items are received. After doing the picking with convert simple out and process, a stock transfer voucher will need to be validated.
7. Go to Customer/Stock Transfer Voucher/ Check all the information and then validate (Note: the synchronization check box will be already ticked and cannot be edited)
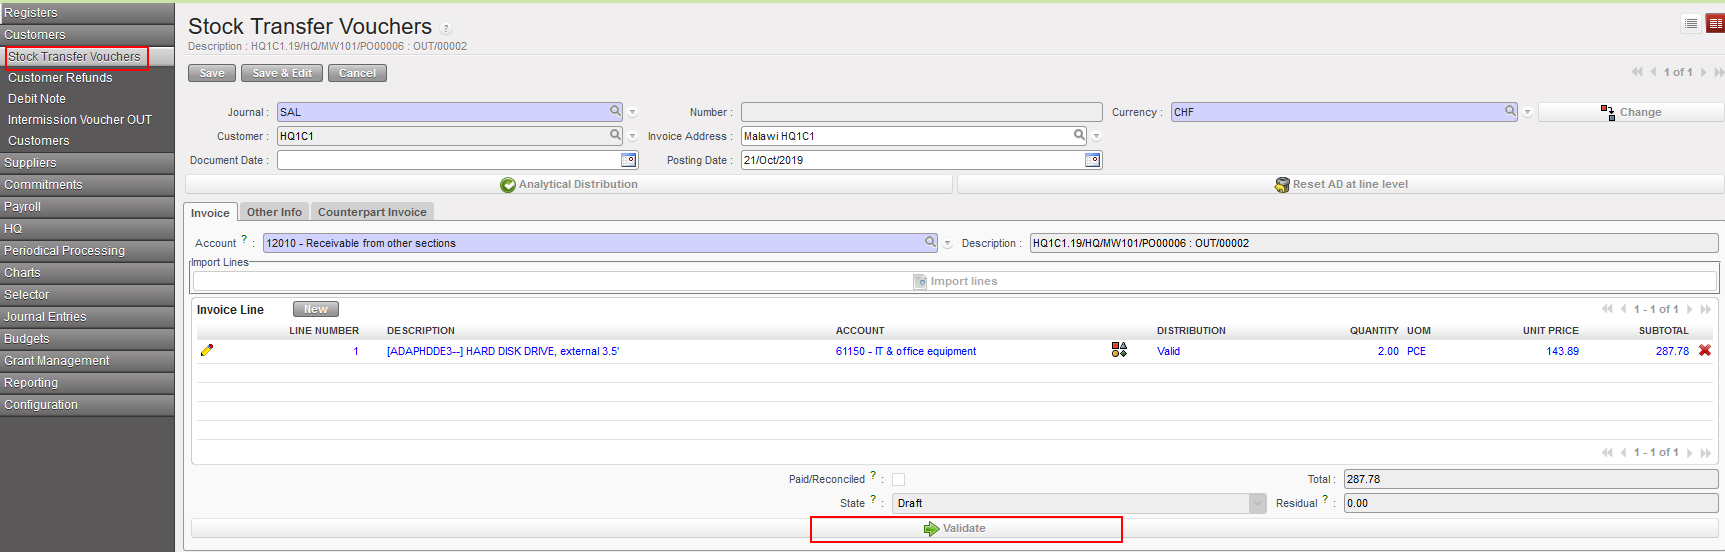
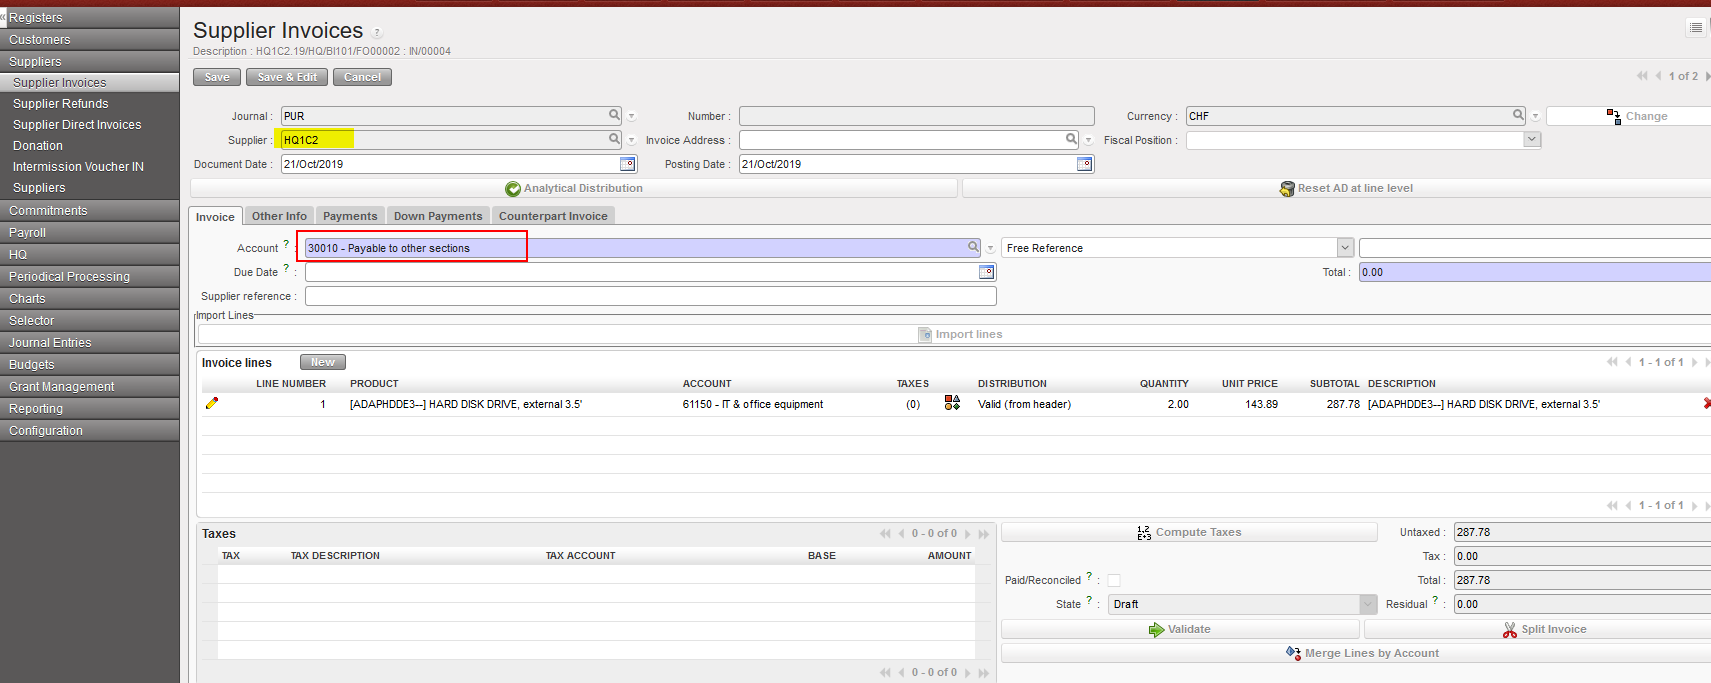
8. After the synchronization is done in the two instances, a supplier invoice will be created automatically in the requester mission HQ1C1 with the provider mission as a supplier. The payable account will be Payable to other sections. The process then as usual, check all the information then validate the invoice.
Manual STV/IVO synchronization check box and Synchronization check box of manual STV/IVO when created from duplicate:
- if the partner chosen is intermission/intersection, the check box is ticked.
- if the partner chosen is not intermission/intersection, the check box is Unticked:
- when the user creates a partner, the user clicks on [validate] button, we will always make a check to ensure the consistency between type of partner at [partner] field and [synch] check box.
- if the partner is not intermission/intersection and the synch check box is active, we will not allow to validate. Error message: ” You are not allowed to synch an invoice to this partner. Please remove the tick from the check box “synchronization” from the tab Counterpart invoice”.
When an ISI or IVI is created at synch time, the account on each line is taken from (by order of priority) the related CV line if any, else on the product or product category, else directly from the account used on the line in the other instance. In case the account is not found or is inactive, the related line is created without account and is displayed in red (until the account is set). The lines concerned are listed in the related “Synch Message Received” which appears as “Partially Not Run”.
It is not possible to validate the invoice as long as accounts are still missing.
This should be the only UC where invoices can be created with “empty” accounts. Therefore it is not possible to create an invoice by duplicating another invoice with missing accounts: all the accounts must be filled in first.
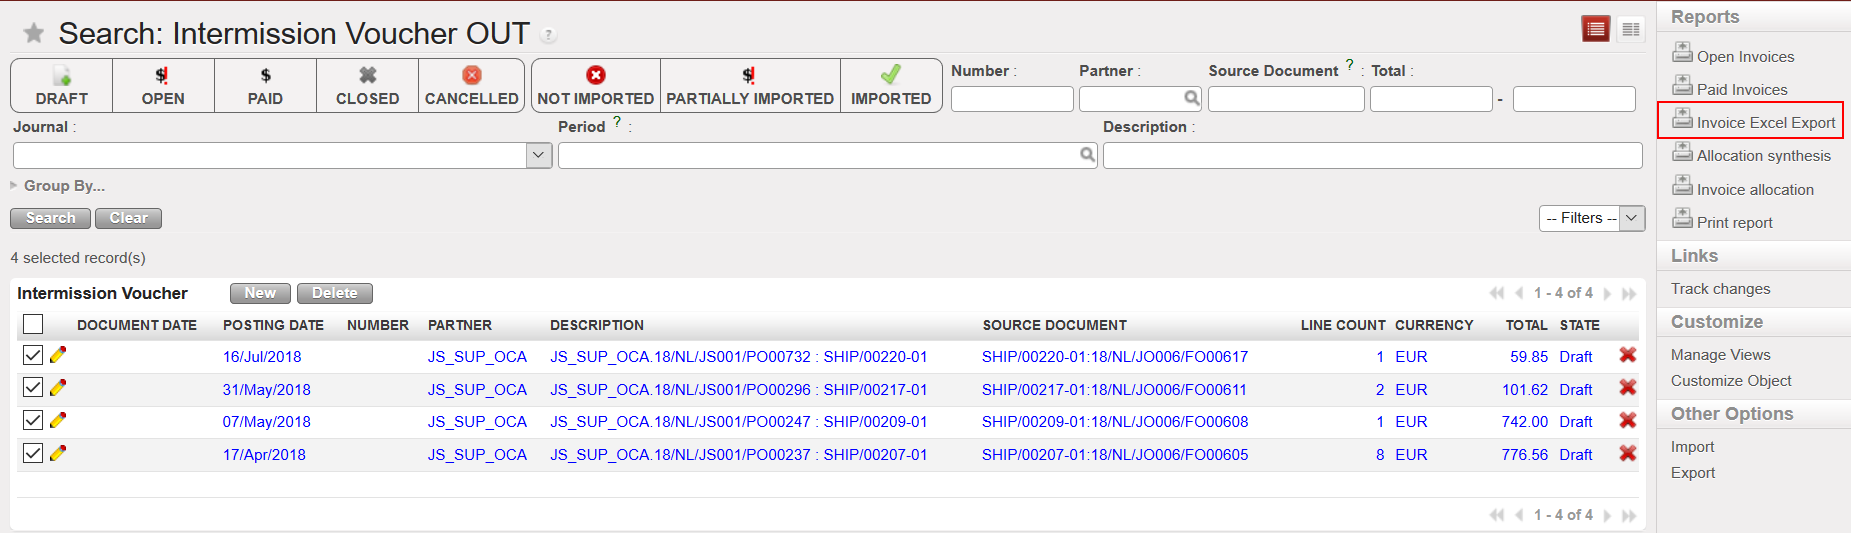
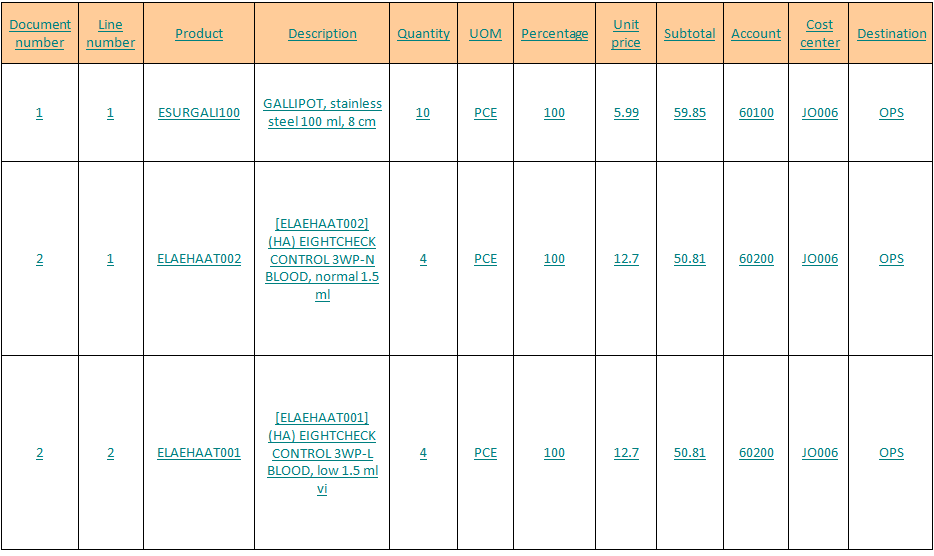
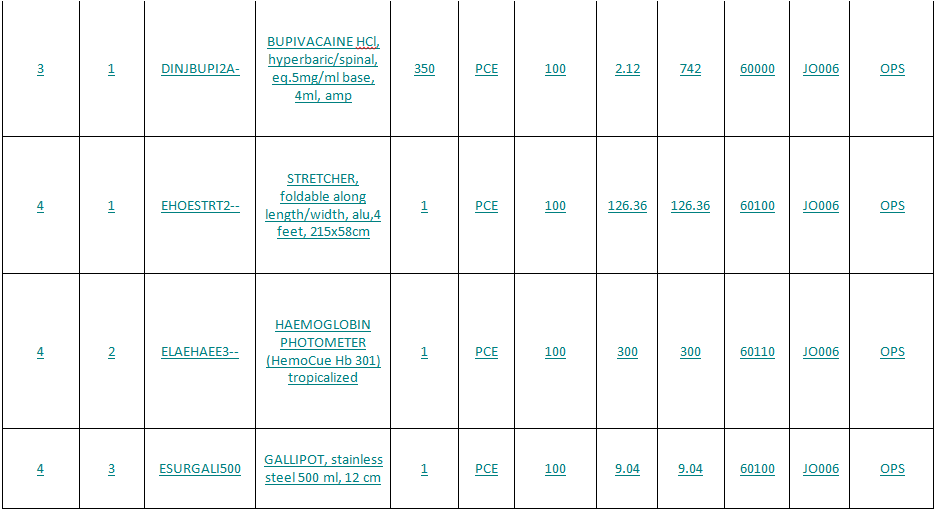
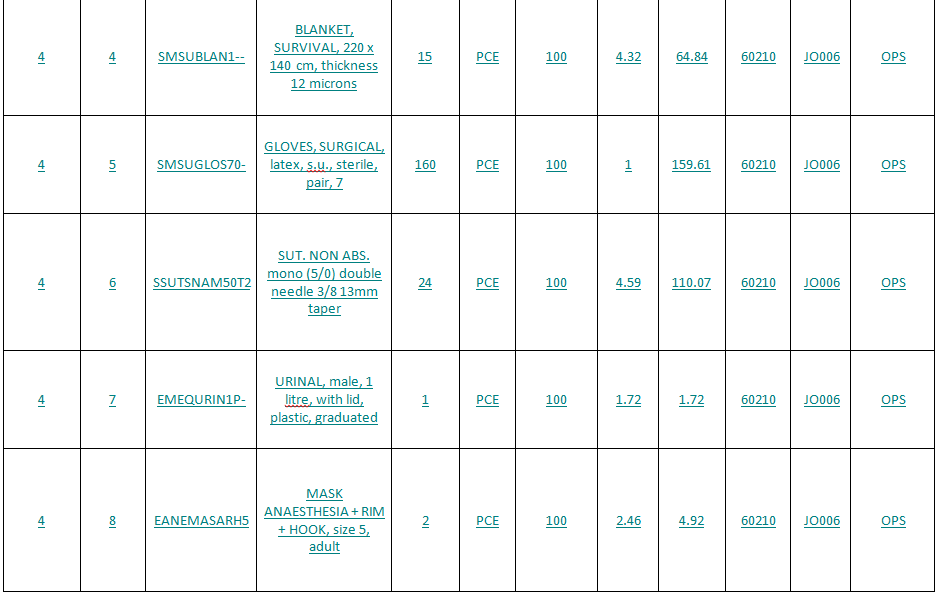
IVO/IVI “Invoice Excel Export” report for invoice lines
To export the list of IVO/IVI invoice lines (with specific details for each document):
Go to Accounting/ Customers (for IVO lines)-Suppliers (for IVI lines)
- Select the lines you want from the IVO/IVI search view.
2. From the right-side menu click on {Invoice Excel Report}.
How to Create a Stock Transfer Voucher Manually
We will show below the case in which the mission reimburses the expense directly in the field.
Go to Accounting/ Customers/Stock Transfer Vouchers
⮡ A form displays to create a new voucher. Fields in blue are required; white fields are optional; grey fields are view only.
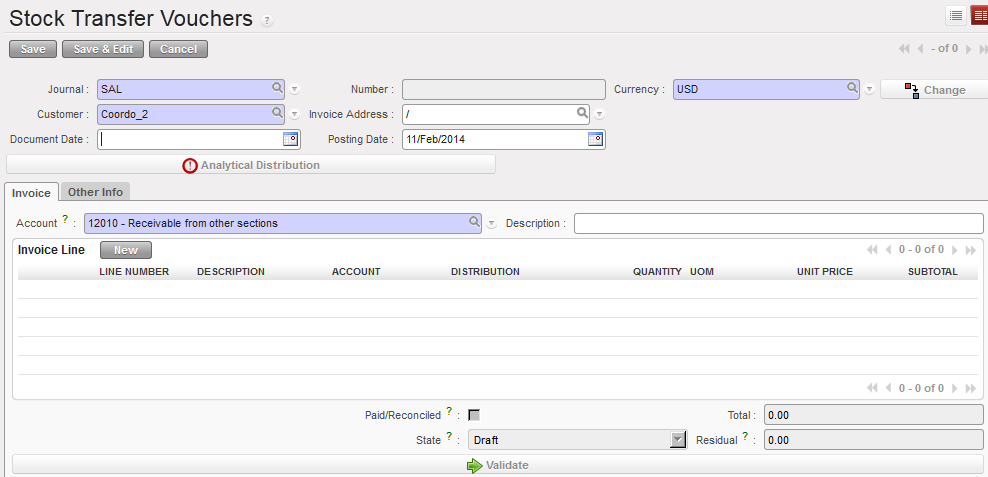
Manual stock transfer voucher creation
, is used to apply a global analytic distribution across all lines in the invoice.
2. On the {Invoice} tab, you complete additional fields and add invoice lines to represent the various goods or services on the invoice to be paid.

3. In the {Invoice Lines} section, click {New} to create a new invoice line.
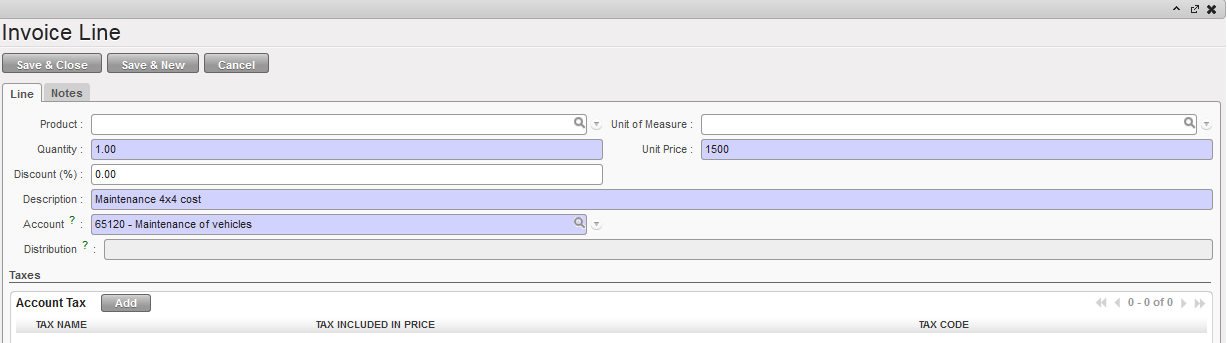
{Invoice Line} window to add line items on a manually created Supplier Invoice.
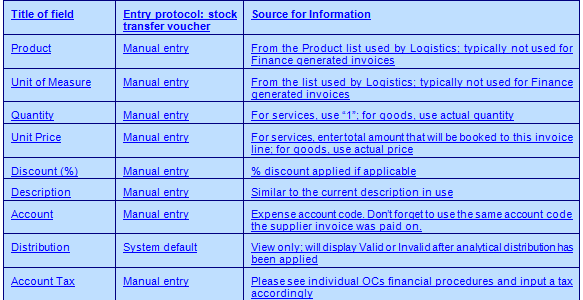
4. Click {Save & New} button for additional invoice lines, or click {Save & Close} button to return back to the supplier invoice window.
5. Assign the analytical distribution per line or globally across all invoice lines. Don’t forget to use the same analytical distribution as when the supplier invoice was validated.
![]()

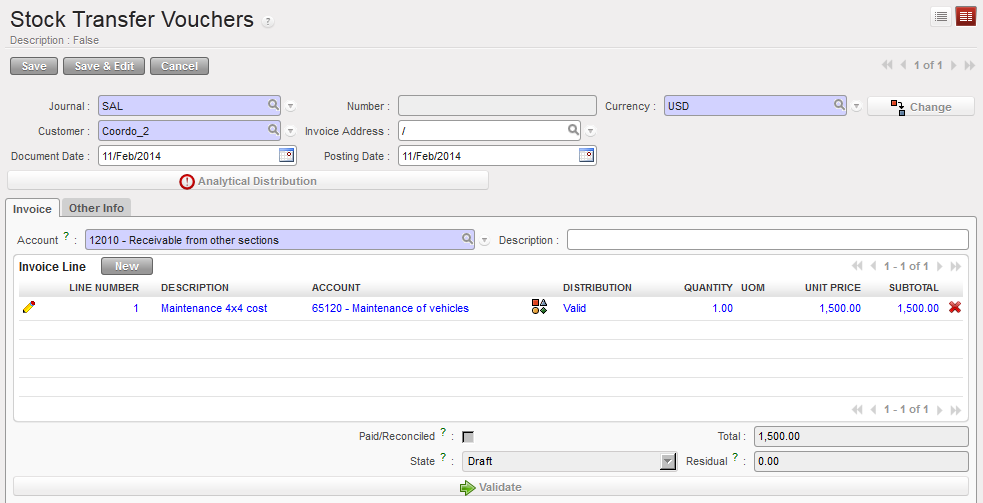
Valid analytical distribution on invoice line
6. In the tab {Other info}, complete the {Due Date}. The {Journal Entry} is linked to the accounting entry booked in the sales journal once the voucher is validated. {Responsible} identifies the user who validated the voucher. The other fields are automatically completed if they were recorded in the client’s form.

Validated stock transfer voucher and {Other info} tab completed
7. Save. The invoice is created in {Draft}, waiting for validation.
Payment of a stock transfer voucher changes state to {Paid} and automatically reconciles the journal items. At this stage you can use the {Refund} option from the stock transfer voucher.

Paid stock transfer voucher
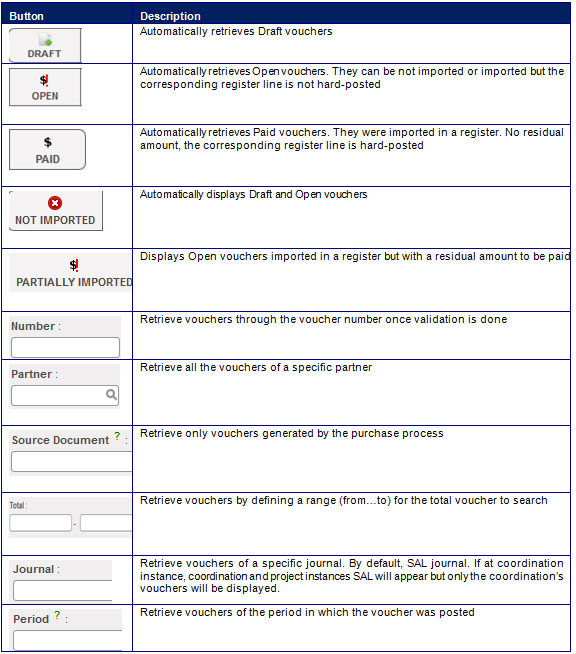
A series of filters is available in the {Stock Transfer Vouchers} Search view to help you retrieve a voucher.

Search Stock Transfer Vouchers view
How to Edit a Stock Transfer Voucher
Like supplier invoices, you can edit a stock transfer voucher if the state is {Draft}
Go to: Accounting/ Customers/Stock Transfer Vouchers
- Search for the Draft voucher by selecting the {Draft} filter or any other filters located at the top of the Search view.
- When you have located the voucher, click on the pencil
 to open the form.
 - In the {Stock transfer voucher} form view, change the relevant fields.
- Click the {save} button.
⮡ The voucher is edited
How to Delete a Stock Transfer Voucher
Like supplier invoices, you can delete a stock transfer voucher if the state is {Draft}
Go to: Accounting/ Customers/Stock Transfer Vouchers
- Search for the Draft voucher by selecting the {Draft} filter or any other filter located on top of the Search view.
- When you have located the voucher, click on the red cross

⮡ The invoice is deleted
How to Validate a Stock Transfer Voucher
Like supplier invoices, validating a stock transfer voucher will create accounting moves in the journals.
Go to Accounting /Customers/Stock Transfer Vouchers
- Search for the Draft voucher by selecting the {Draft} filter or any other filters located at the top of the Search view.
- When you have located the voucher, click on the pencil
 to open the form.
 - Change the relevant fields if necessary. You should carefully review the accounts, destinations, cost centers and funding pools assigned to each product on the voucher invoice. Remember that accounts and analytical distribution must be identical to the supplier invoice you have paid.
- Validate it.
⮡ The voucher state becomes {Open}. Validation of the voucher also automatically creates a receivables entry in the {Sale Journal}
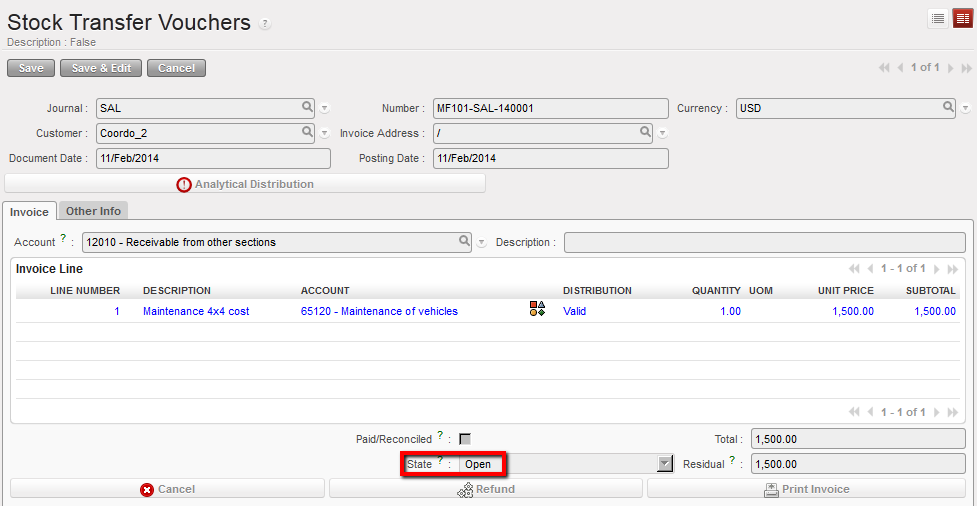
Open stock transfer voucher
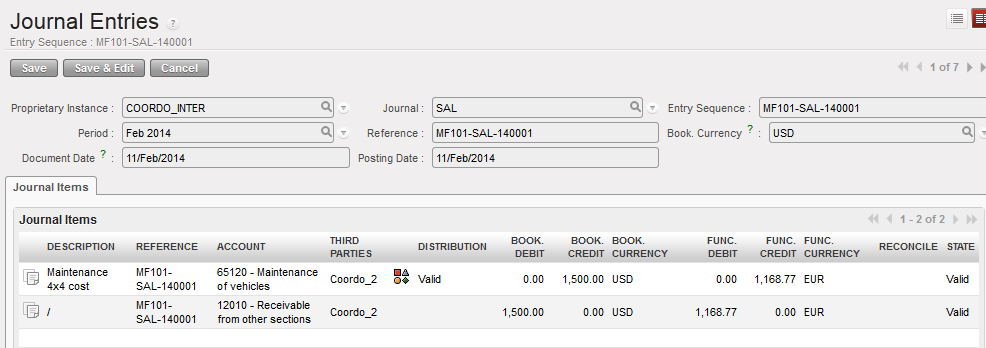
Posted journal items when a stock transfer voucher is validated
When you will receive the payment of this voucher, you will need to import the voucher in the registers.

{Search Account Entry Lines} window when importing a stock transfer voucher in a register
Tries will be reflected in the register in {Temp} state.
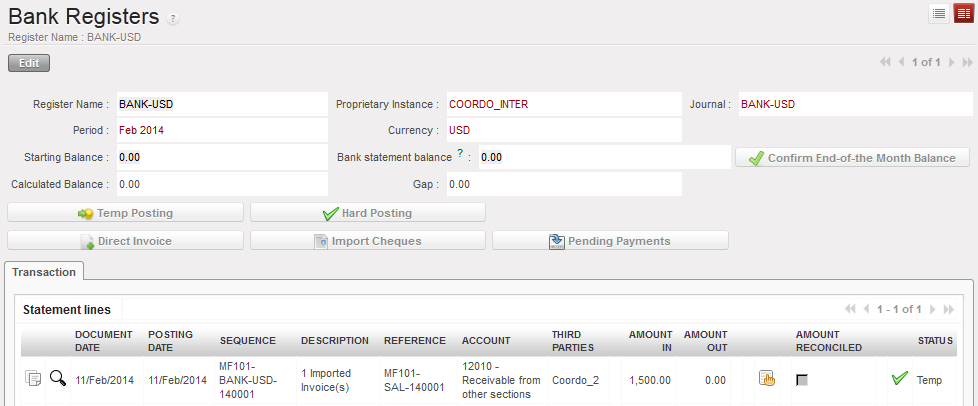
Temp-posted register line corresponding to the stock transfer voucher import in the register
- You need to hard-post this entry to create accounting lines in the journals.
- In the journals you will view the following accounting moves:
- Payment of the voucher,
- 12010 – Receivable from other sections reconciled
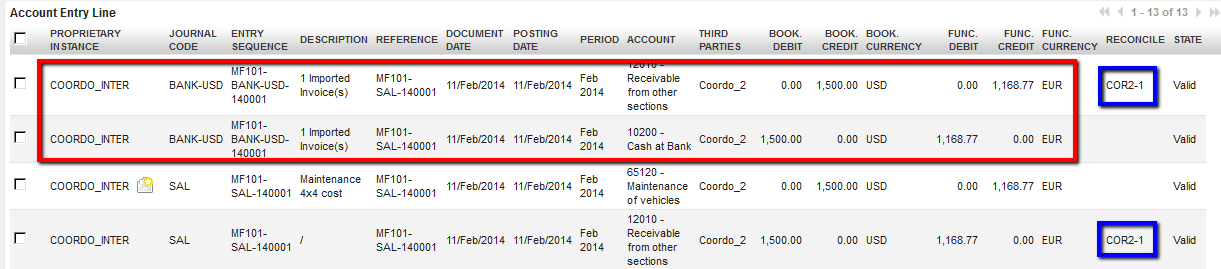
Journal entries of a paid stock transfer voucher in cash
3. The stock transfer voucher becomes {Paid}
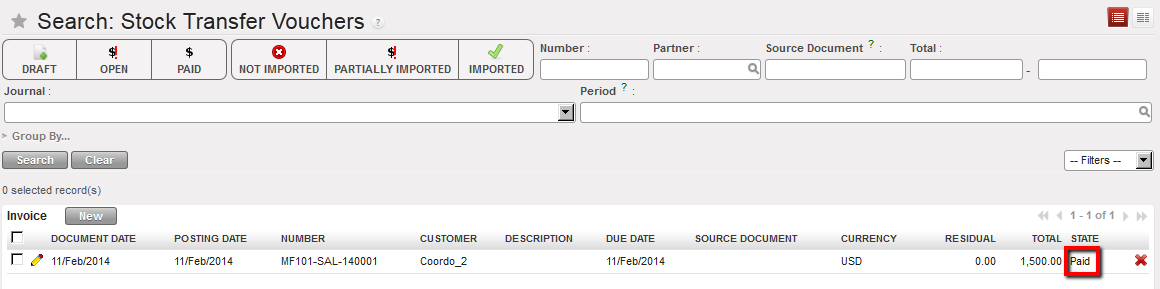
Stock Transfer Voucher Search view displaying a Paid voucher
TIP: To print a stock transfer voucher, go the {Stock Transfer Vouchers} Search view and check the box of the voucher you want to print. Then on the right side of the screen, in the section {Reports}, select {Print report}. A PDF report will display the voucher details. The columns {Description} and {Origin} will be completed if the voucher was triggered by the validation of an incoming shipment OUT (thus generated by a FO).
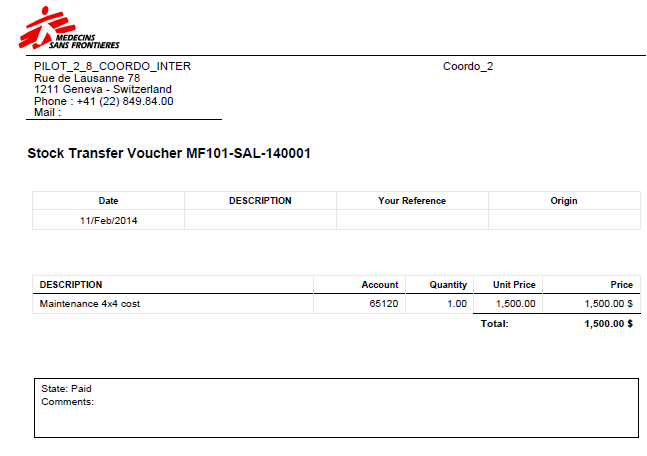
Stock Transfer Voucher report display
On the other side, a supplier invoice will have to be created manually with the same information than the Stock transfer voucher. The counterpart accounting code will be {30010 – Payable to other sections}.
How to cancel Stock Transfer voucher and IVO
You can always cancel the draft STV or IVO if they are still in draft (remember that the Draft STV and IVO do not sync).
Go to Accounting /Customers/Stock Transfer Vouchers or IVO
In the STV or IVO you want to cancel, click on the {Cancel) button.

Draft IVO to cancel (same thing is applicable for draft STV)
If the draft IVO or STV were cancelled, they won’t be synchronized to the other counterpart intermission / intersectional instance and no more further actions will be possible on that object (no duplicate, no validate, no refund).
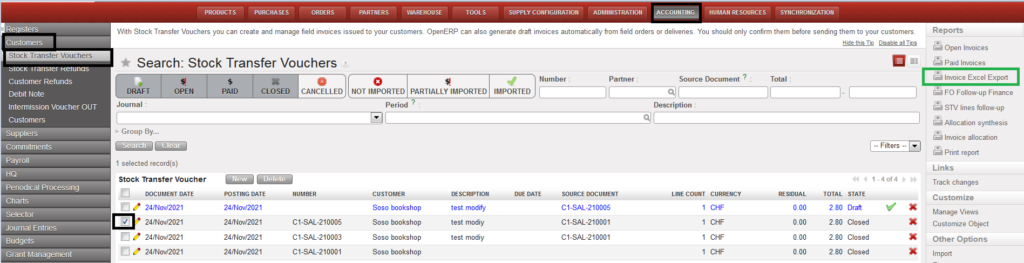
How to extract STV’s invoice Excel Export :
You will be able to have a new excel file called “Invoice Excel Export” from the STV in order to follow the flow.
Go to: Accounting > Customers > Stock Transfer Vouchers > select STV line > go to the right menu “Reports” and you will find the “Invoice Excel Export” report.
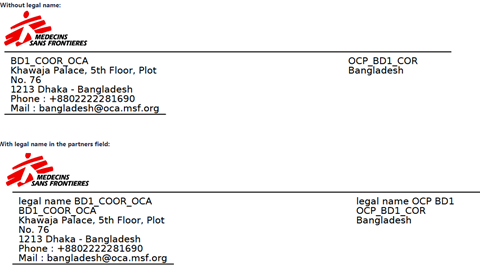
How to add a legal entity names in the STV PDF print out form:
In Accounting> customers> STV and then in the first tab “invoice”, we are talking about the report pdf named “print invoice” only related to the STV (intersection flow)that we can find in the actions right menu. The field legal name is placed below the field “Name”.
To have the legal name in this document, it is important to fill the Legal Name in the partners form under the Name.

It has been decided that the legal name will appear in the PDF document for all partner types (because there are still intersection instances that are not using UniField).
If the legal entity name is not available in the partner’s form, it will be empty, the second line is the Name and this remains the same.
New filter button named “OPEN FY” on STV/IVO/ISI/IVI:
We have added a filter button named “OPEN FY” on STV/IVO/IVI/ISI screens.

The Fiscal year to consider is the FY of the posting date.
The following statuses are considered as NOT open: draft, mission closed and HQ closed.
This filter button “OPEN FY” is toggled on by default.
When the filter button “OPEN FY” is toggled off ==> all objects are displayed.
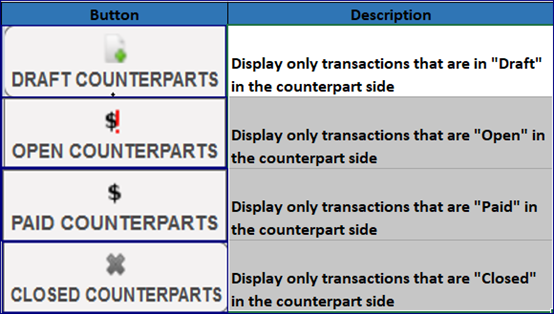
There are four buttons to show the states of the counterparts for the following transactions:
- Stock Transfer Vouchers
- Intermission Voucher OUT
- Intersection Supplier Invoices
- Intermission Voucher IN
Buttons as below: