4.5 Auto-connect Synchronization

4.5 Auto-connect Synchronization

It is possible to configure the connection of your instance connected to the synchronization without the need to reconnect it (refer to the connection manager) every time OpenERP starts (standard set up).
This feature is named auto-connect synchronisation and is a specific set-up developed for emergency context to release the workload of the user on the site.
For the set-up the Support Team (ST) and the User would have to perform the correspondent steps:

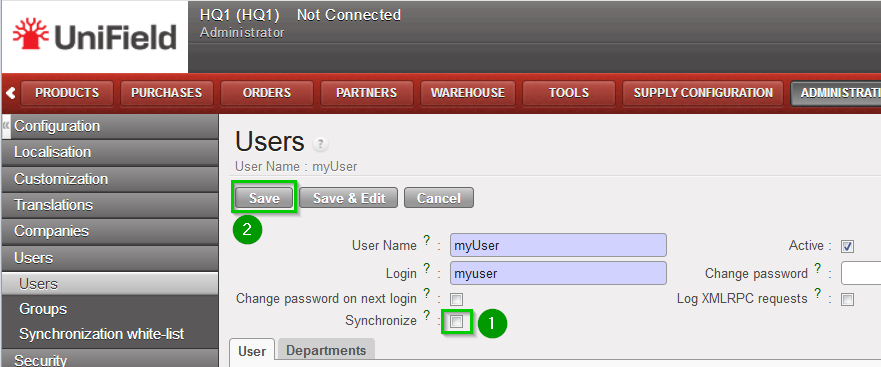
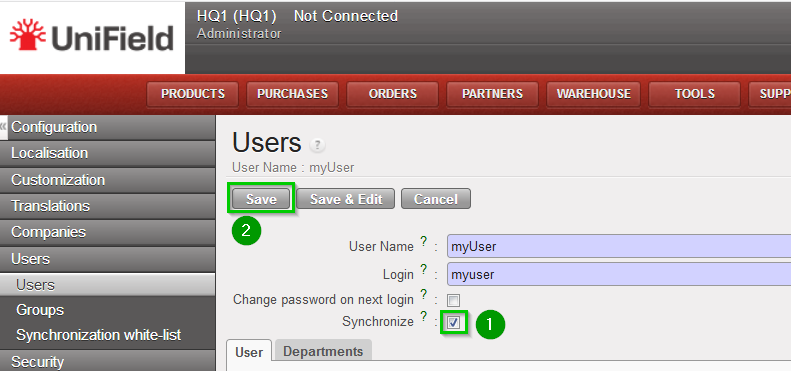
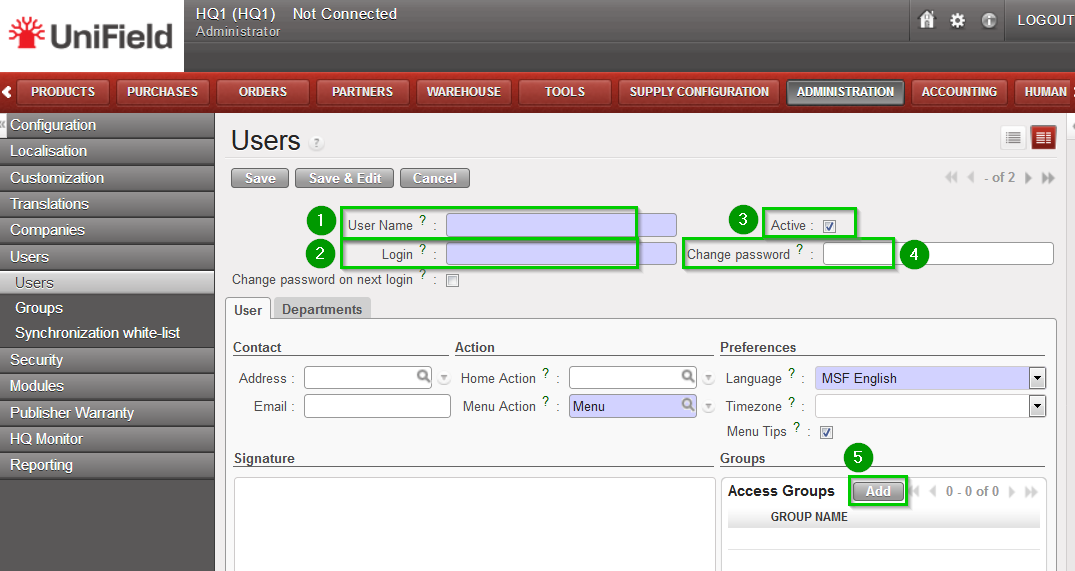
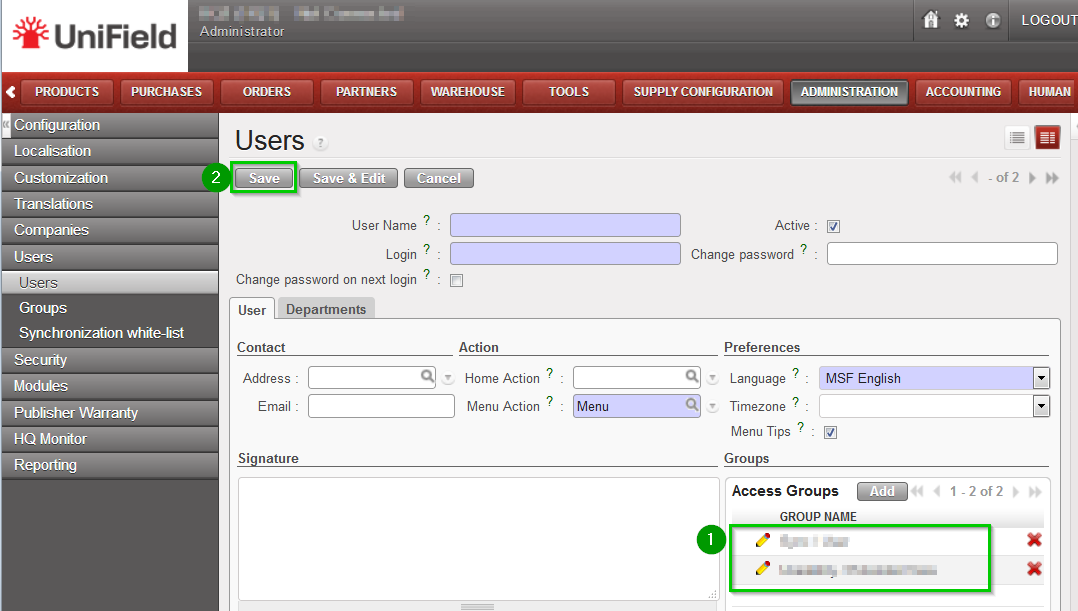
ST: [Done during instance creation step1 by coreteam]
Create a new user in the SYNC_SERVER side on Administration1, Users 2, Users3.
Fill in the information 4:


  • User Name: instancename_sync-user
  • Login: instancename_sync-user
  • Password: to set a random and complex password (from keePass2)

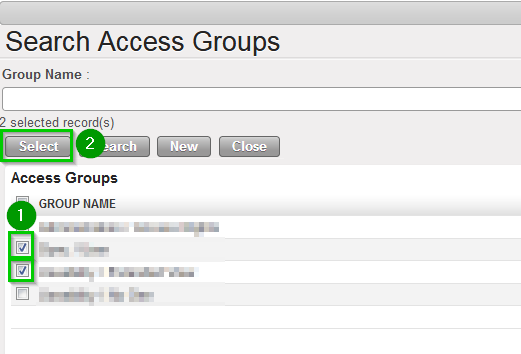
Add 5 the group Instance Sync
Click on Save 6

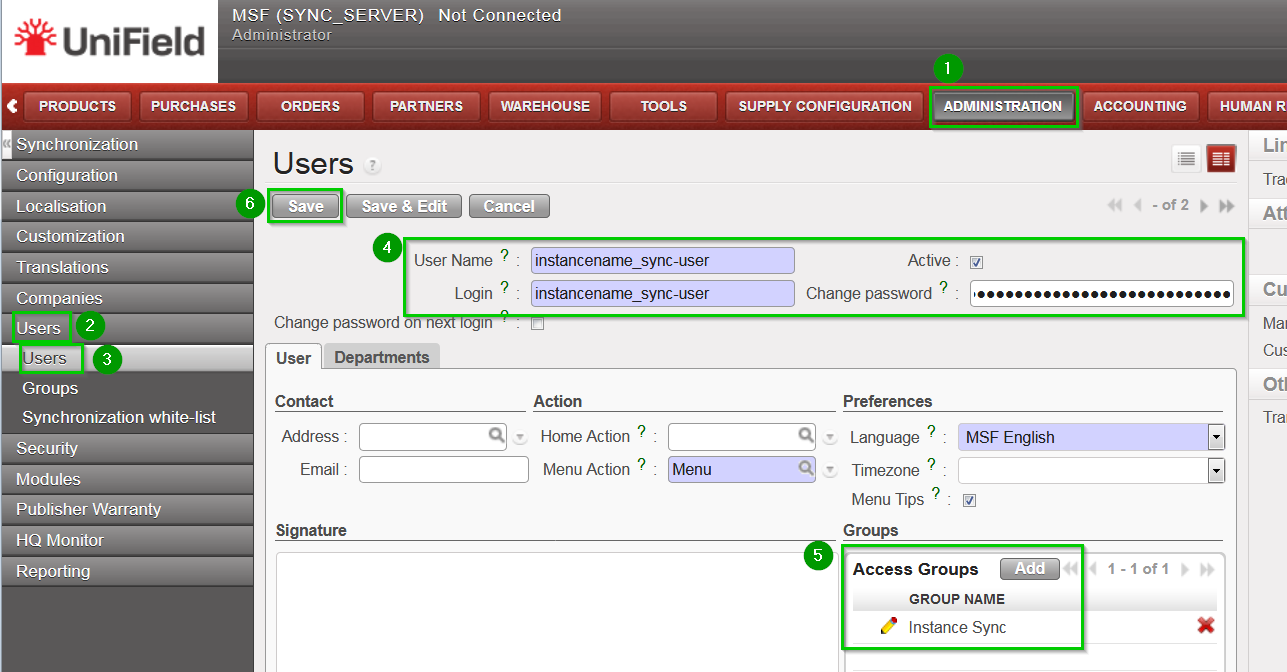
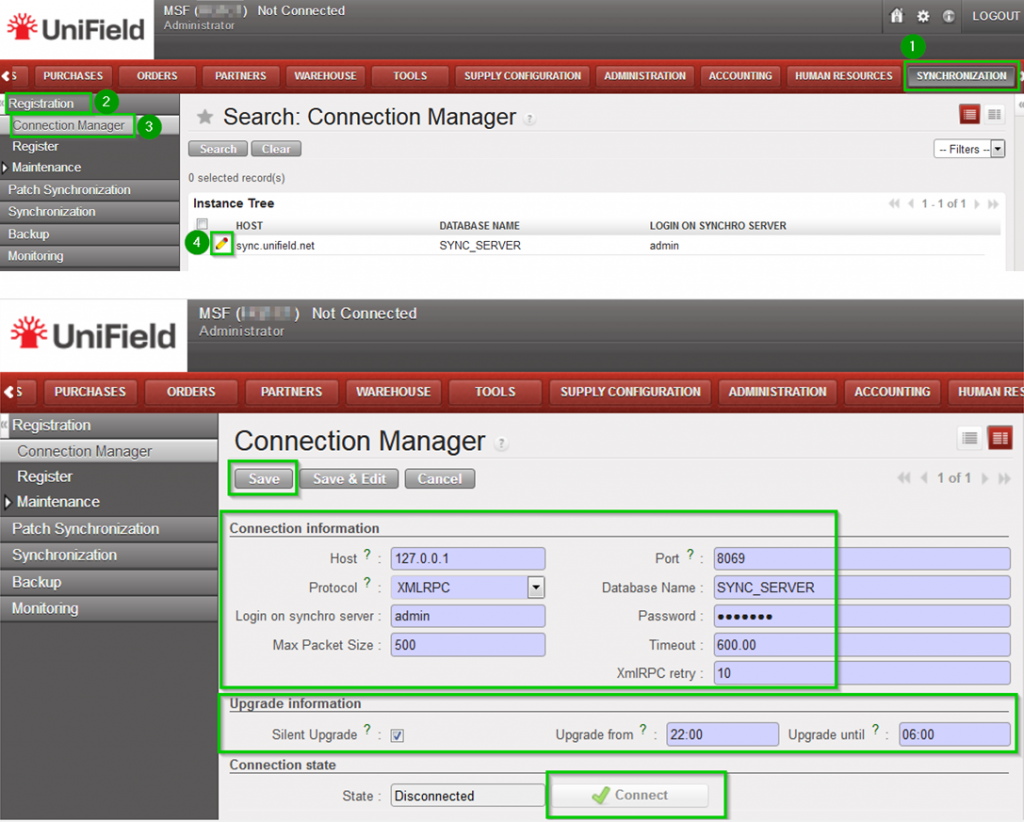
On menu Administration 1, Synchronisation 2, Configuration 3, Instance 4. Click on the Edit icon 5 of the instance.
On the User field click on the look up icon 6
Select the newly created user 7
Click on Save 8
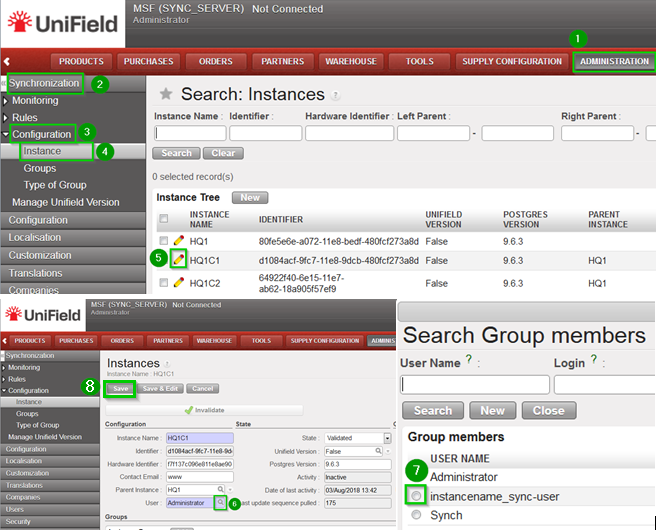
User: [can be done by only UF IT referent or coreteam]
Open as Administrator with Notepad the file openerp-server.conf in C:\Program Files (x86)\msf\Unifield\Server
Edit the following lines in the file:


  • sync_user_login= instancename_sync-user
  • sync_user_password= yourpassword

Save the file.
Please note that sync_user_password accepts password on cleat text OR encoded in Base64.
Login and password are forwarded by the ST.

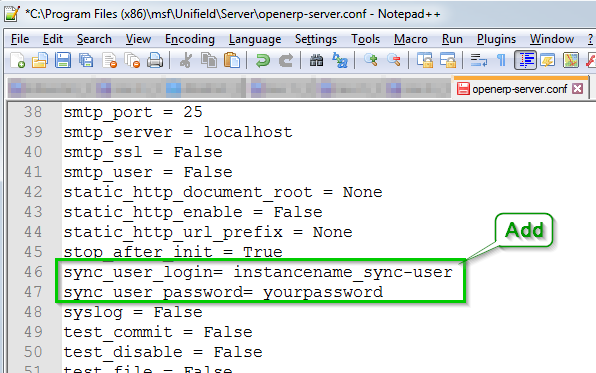
Right click 1 on OpenERP Server service and click on Restart 2
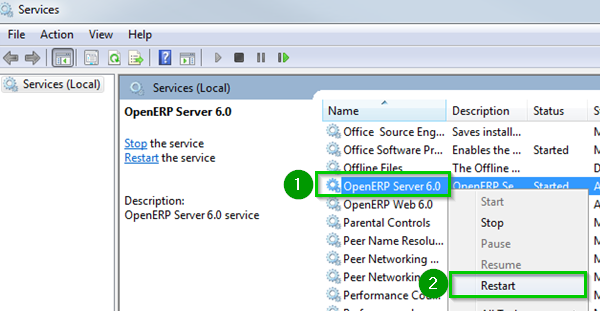
When logged back in your instance you can skip the Connection Manager step in menu SYNCHRONIZATION, Registration, Connection Manager even if the state mentions Not Connected.
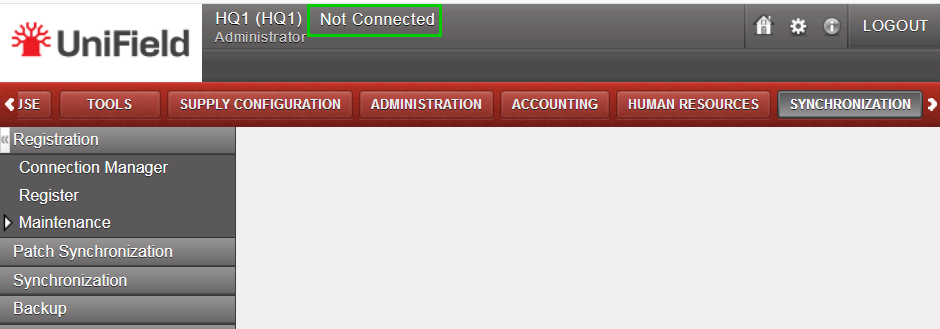
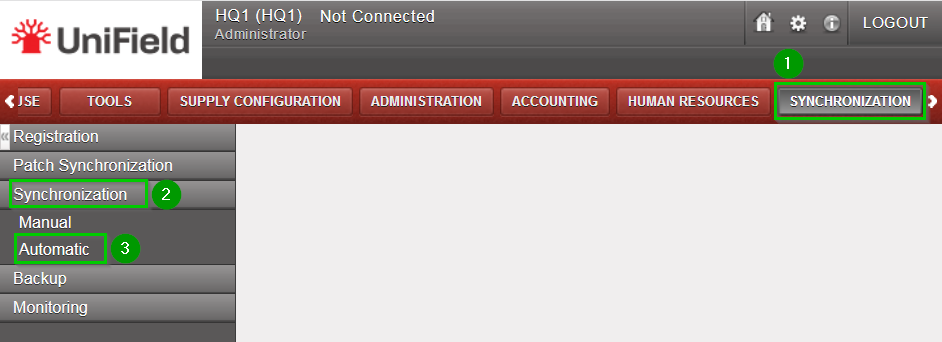
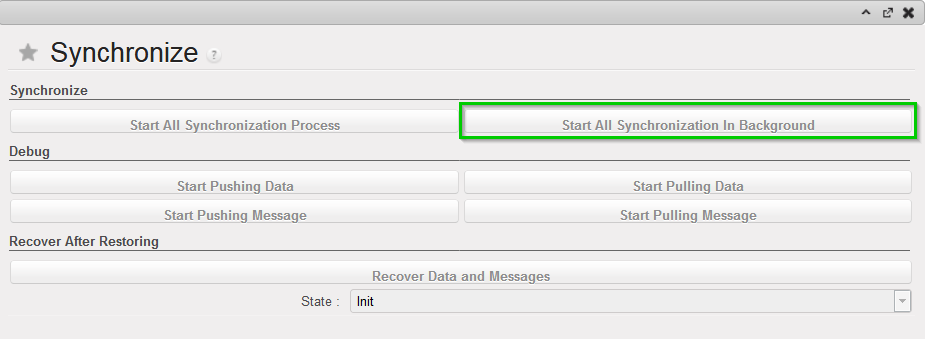
To synchronize: Go to menu Synchronisation, Registration, Synchronization, Manual. Then click on Start All Synchronization in Background.
The connection will automatically be made and the synchronization will start.
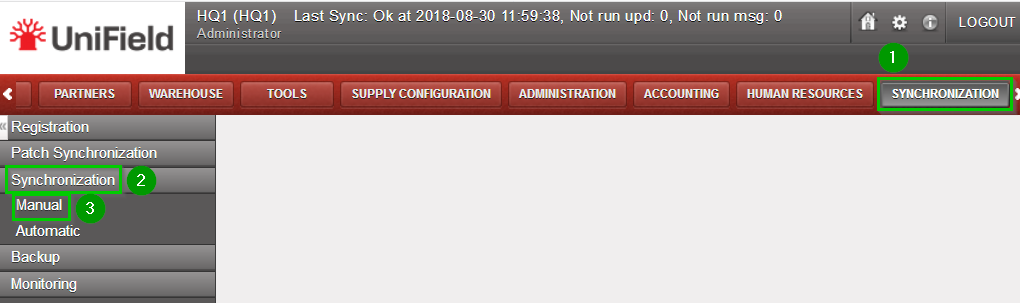
4.3 Manual Synchronization

4.3 Manual Synchronization

It is assumed that the instance is well configured, already connected to the synchronization server and registered.

Click on menu Synchronization , Synchronization, Manual
The next synchronization wizard will open.
Click on Start All Synchronization In Background.
This launches the synchronization process in background. It is recommended to back up the data after a successful synchronization. Please refer to the “Procedure for backing up and restoring local instances”.
To know when the synchronization is over, refer to the monitoring documentation.
Instead of starting the synchronization, you may be advised that there is an upgrade to apply. Refer to the upgrade chapter.

4.2 Connection to the Synchronization Server

4.2 Connection to the Synchronization Server

As a security, the synchronization password is not saved in the database or a file. It means this step must be done every time OpenERP starts. For example when:

  • the computer was off and is now on
  • the instance has been upgraded with a patch received from the synchronization server.

Click on Menu Synchronization 1, Registration 2, Connection Manager 3
Click on the edit icon (4) and to edit the Current Connection
Host:
* Production instance: sync.unifield.net
*Sandbox: Address of the machine where your Sync Server is installed (localhost if installed on the same machine)

Port:

*Production: 443

*Default or Sandbox: 8069


Protocol:

*XMLRPC

*secured compressed XMLRPC

Database Name:

*Production: SYNC_SERVER

*Sandbox: Your_sync_server_name

Login on synchro server:

*Production: provided by the Support Team

*Sandbox: Your_sync_server_login

Password:

*Production: provided by the Support Team

*Sandbox: Your_sync_server_password


Max Packet Size:
500
Timeout:600 – The number of seconds the instance will wait during a sync before raising a timeout error
XmlRPC retry: 10 – The number of retry during a sync when the instance don’t receive the acknowledge from the sync server with the XmlRPC protocol.
Silent upgrade: The instance will patch automatically during the time slot defined if an automatic synchronisation is performed. It is strongly
recommended to activate it
Click on Connect 5 the State switches to connected
Click on Save

4. Synchronization

4. Synchronization

4.1 Requirements

4.2 Connection to the synchronization server

4.3 Manual synchronization

4.4 Automatic synchronization

4.5 Auto-connect synchronization

3.4 How to “synchronize” User Groups (only at HQ)

3.4 How to “synchronize” User Groups (only at HQ)

By default groups synchronise top-down from the HQ to all its children instances. This is only configurable at HQ level and restricted to the admin user.

Click on Menu Administration 1, Users 2, Groups 3.
Click on the edit button icon 4 next to the group.
Click on the drop down menu button named Levels 1.
Select the level 2 the group would synchronise to. In this example we choose Coordination and Click on Save 3.
In our example this grop will only synchronise down to the coordination level but not at project level

This group will synchronise down only to Coordination level at the next synchronisation.

3.3 How to Remove the “synchronize” Option of a User (only at HQ)

3.3 How to Remove the “synchronize” Option of a User (only at HQ)

Depending your needs, you have two different option to remove the synchronize option as shown below.

Option 1: On Menu Administration, Users, Users click on the edit button icon next to the user.
Un-tick the box Synchronize and click on Save.
The user won’t synchronise anymore until you tick the box again.
Option 2: On Menu Administration, Users, Synchronisation white-list. Click on the edit icon next to the user.
Un-tick the box 1 and click on the Save icon 2.
In this way the user is removed from the white-list.
The tick box option Synchronise on its user’s profile under Administration, Users, Users will disappear.

3.2 How to “synchronize” a User (only at HQ)

3.2 How to “synchronize” a User (only at HQ)

This feature allows you to synchronise a user from the HQ to all its children instances. It is only available at the HQ level and restricted to the “admin” user.
Please note that the user only sync from top to down.
As user account management is sensitive and to prevent a user to be synchronised wrongly, there is a need to perform a two-step process for the configuration of the user.
First step the user will be added into a white-list. The checkbox “Synchronise” would be available in its “User’s details” and would be enabled. If the user is not in the white-list the user won’t be able to synchronise.
Second step there is a need to tick the checkbox “Synchronise” [2] in the “User’s details” and Save it.

First step
Log in your HQ. Click on Menu Administration 1, Users 2, Synchronisation white-list 3. Click on the double Arrow icon 4 in the right panel
Under Actions click on Add Users 5
The following pop up window opens.
Click on Add 1.
The following window will open
Select the user to synchronise by ticking the box 1.You may select as many as you would like.
Click on Select 2
Review that the selected users appear in the list as shown (Check).
Click on Add users to white-list 2.
Now your user has the option to be synchronised. However you have to enable manually this option.
Second step
Click on Menu Administration 1, Users 2, Users 3
Click on the edit button icon next to the user you just added in the white-list 4.
A new window opens with the details of the user.
Tick the box Synchronise 1 and click on Save 2
The user will now synchronise to the other instances during the next synchronisation.

3.1 Creation of Users in UniField

3.1 Creation of Users in UniField

Login your UniField instance with the user admin
Click on Administration 1, Users 2, Users 3.
To create a new user click on New 4
Fill in the following fields:


  • User name 1
  • Login 2
  • Active 3: box is ticked
  • Change password 4
  • Access Groups: click on Add 5 to define the user rights by indicating which groups he/she belongs to.
A pop up window appears.
Add the groups the user belongs to by ticking the boxes 1 in front of them and click on Select 2 when you are done.
The groups have now been added 1
Click on Save 2