G. HOW TO CONFIRM RECEPTION OF A DELIVERY ORDER

Supply User Manual ENG -> 5. Warehouse -> 5.6 LU-SU4105: Delivery Orders -> G. HOW TO CONFIRM RECEPTION OF A DELIVERY ORDER

G. HOW TO CONFIRM RECEPTION OF A DELIVERY ORDER

The Delivery Order should be confirmed once the shipment has been a confirmed as received by the consignee. The state of the OUT will then switch from “Dispatched” to “Received“.

If the OUT is for an ECU or for an external customer, the confirmation should be done manually.

If the OUT is for another UniField instance, the confirmation will be done by the synchronization once the corresponding Incoming Shipment will be processed on this other instance.

To confirm manually a Delivery Order

Go to: Warehouse / Warehouse Management / Deliveries / Delivery Orders

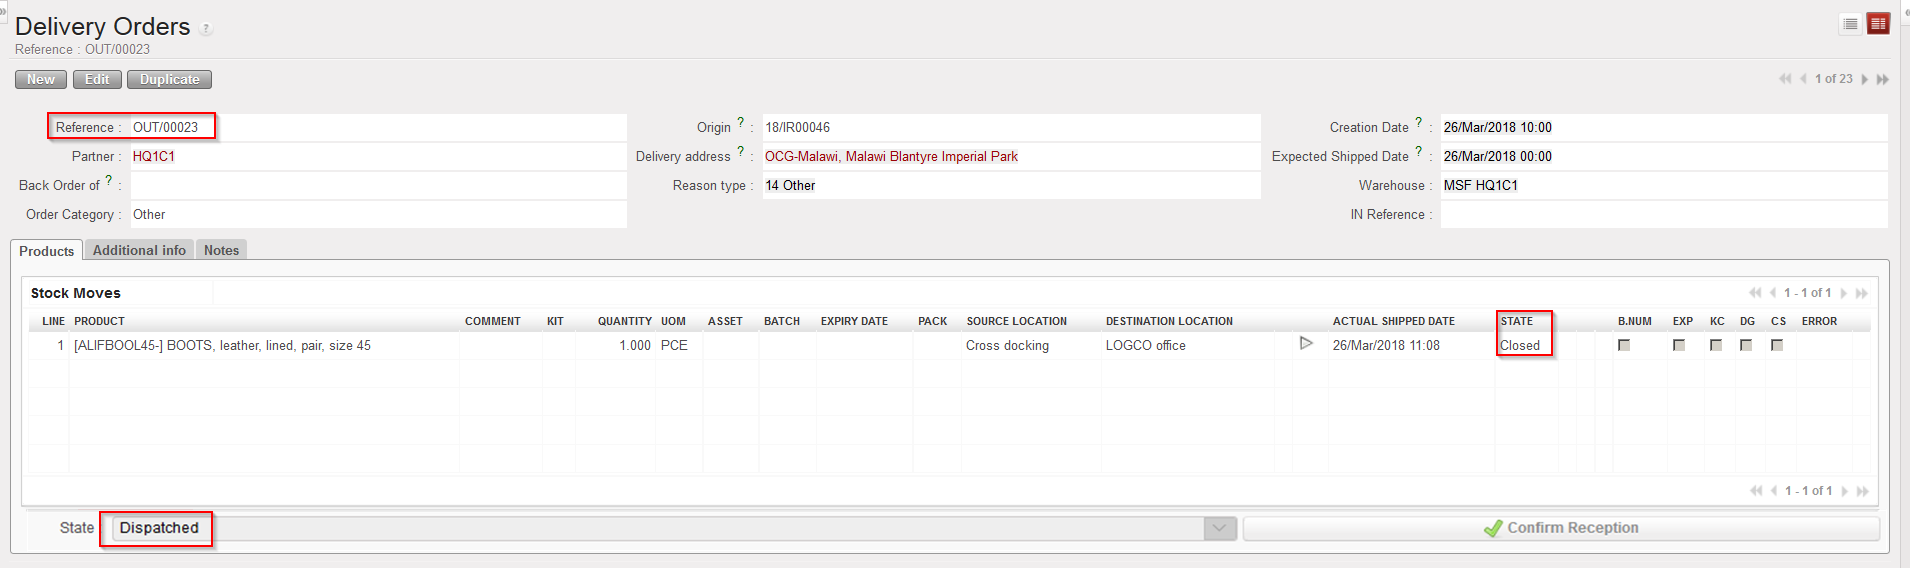
  1. Open the Delivery Order you wish to confirm (its state should be “Dispatched” and its partner should be either your instance either an external customer).

Dispatched Delivery Order

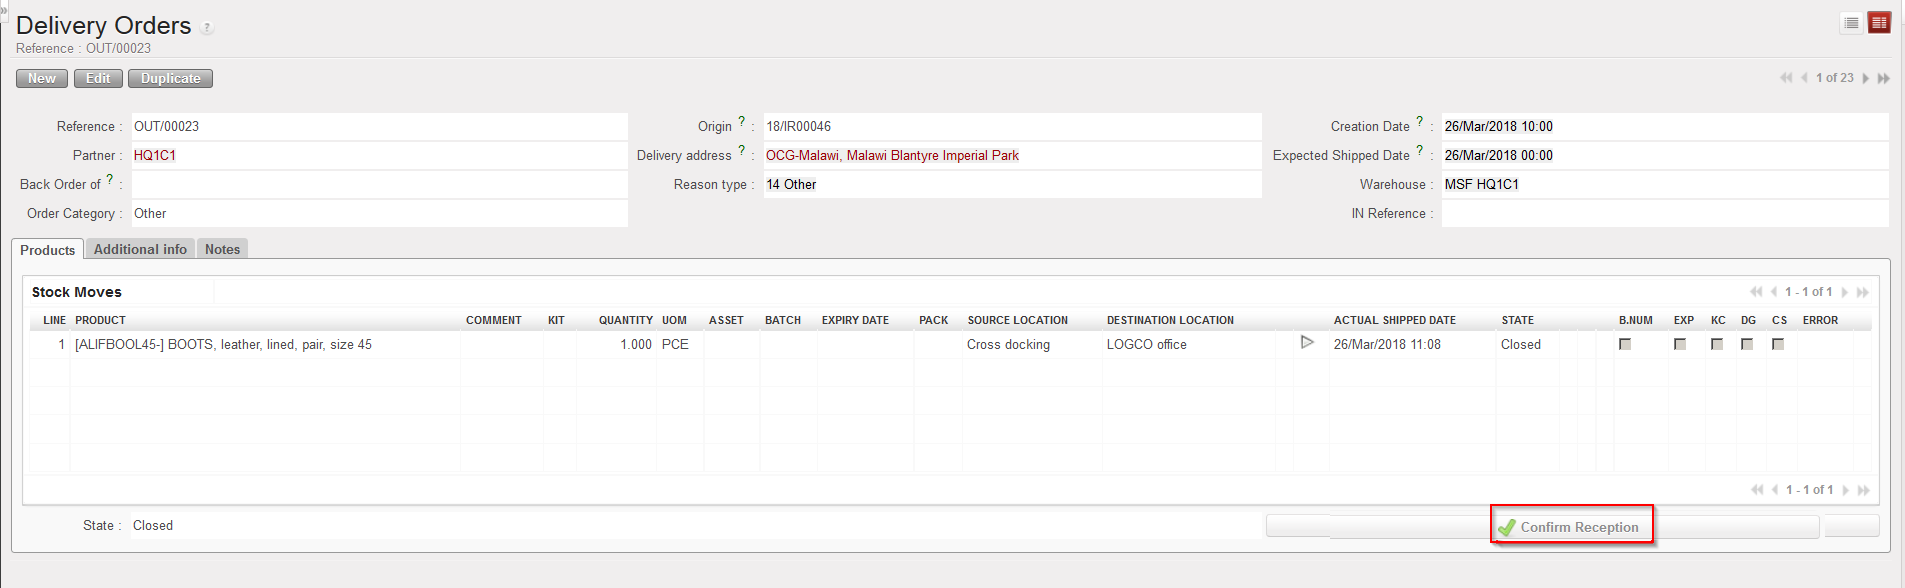
      2. Click on the “Confirm Reception” button located at the bottom of the screen

Confirming a Delivery Order

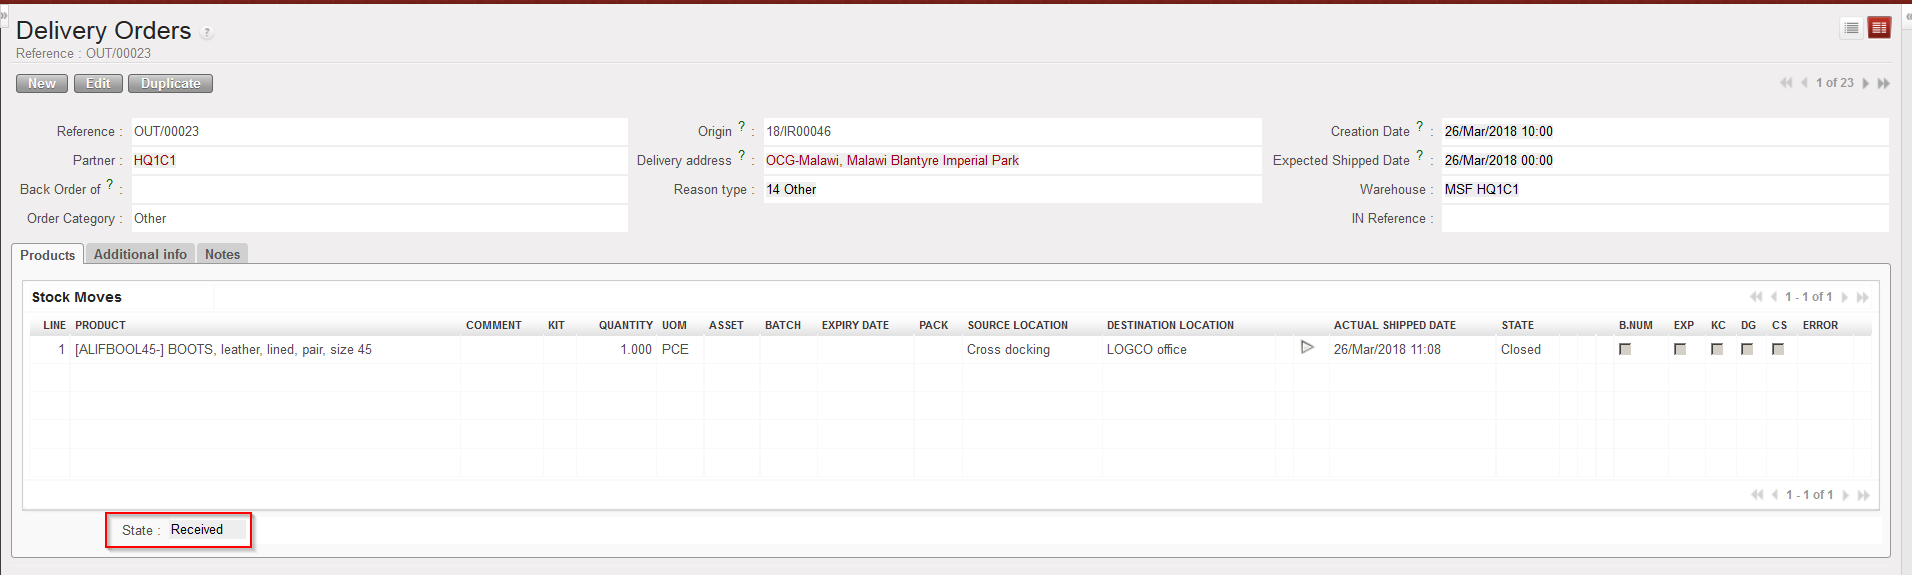
“Delivered” Delivery Order

The state of the OUT changes from “Dispatched” to “Received“.

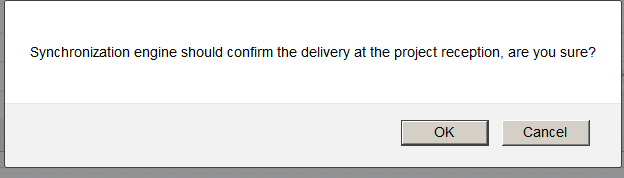
Note that if you try to manually confirm a Delivery Order which should be confirmed by the synchronization, you will get the below message.

Confirming manually an OUT which is for another instance

The confirmation may be forced if you click “OK“. However, it is better to let the synchronization confirm the OUT.

F. HOW TO IMPORT AN EXCEL DELIVERY ORDER FILE


Supply User Manual ENG -> 5. Warehouse -> 5.6 LU-SU4105: Delivery Orders -> F. HOW TO IMPORT AN EXCEL DELIVERY ORDER FILE

F. HOW TO IMPORT AN EXCEL DELIVERY ORDER FILE

Delivery Document (OUT)  can be imported from an Excel file.

Go to: Warehouse / Warehouse Management / Deliveries / Delivery orders

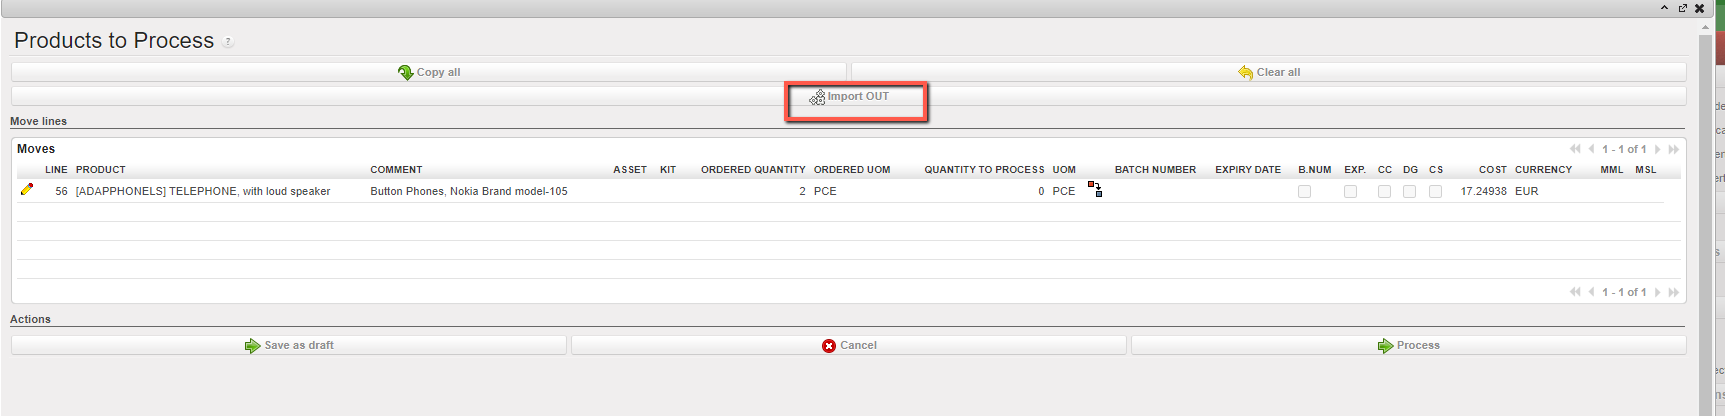
  1. Select Delivery Order you want to import
  2. Click “Process” on the OUT that you wish to import
  3. Click on “Import OUT”.

Note that there is a check on qty that must be lower or equal to Ordered Qty

The data is imported to the main screen and manual validation is still needed to process the document forward.

E. HOW TO EXPORT AN EXCEL DELIVERY ORDER FILE

Supply User Manual ENG -> 5. Warehouse -> 5.6 LU-SU4105: Delivery Orders -> E. HOW TO EXPORT AN EXCEL DELIVERY ORDER FILE

E. HOW TO EXPORT AN EXCEL DELIVERY ORDER FILE

Delivery Document (OUT)  can be exported to an Excel file.

Go to: Warehouse / Warehouse Management / Deliveries / Delivery orders

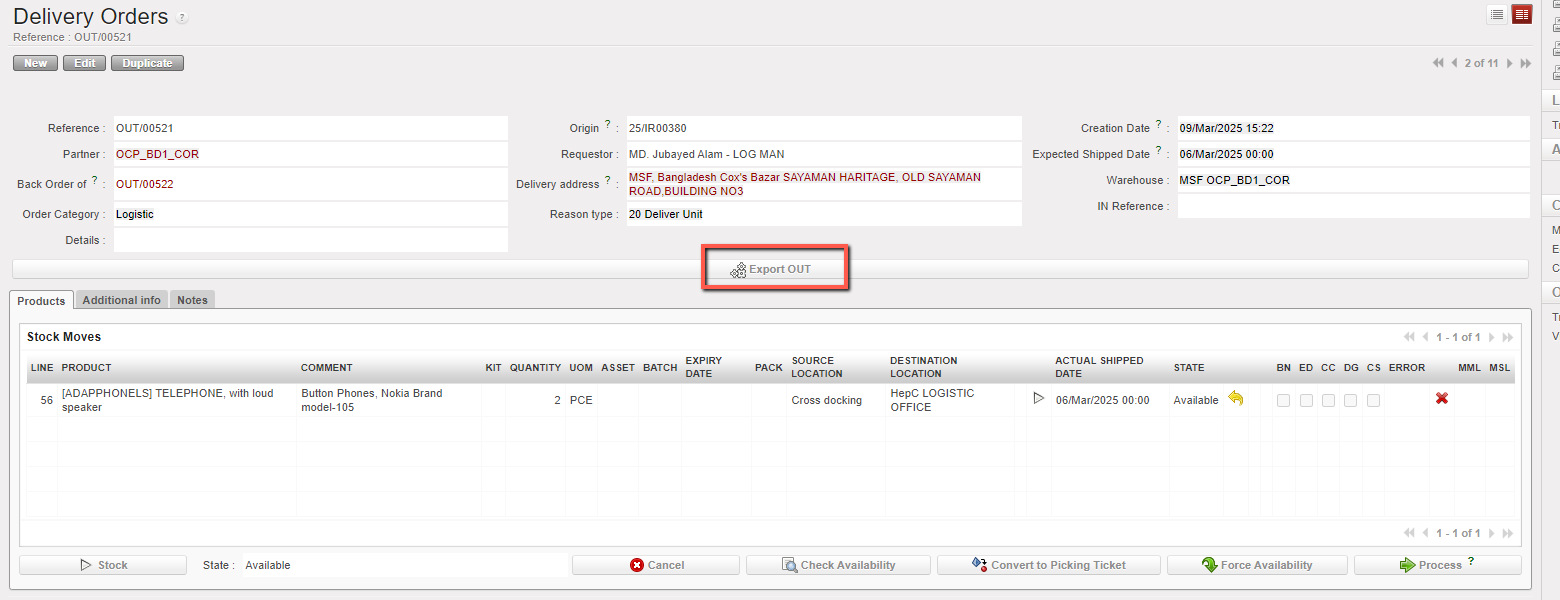
  1. Select Delivery Order you want to export
  2. Click on the button “Export OUT” on the form view of your Delivery Order

     3. An Excel version of the OUT is open. You may save or update it as needed.

D. HOW TO PROCESS A DELIVERY ORDER

Supply User Manual ENG -> 5. Warehouse -> 5.6 LU-SU4105: Delivery Orders -> D. HOW TO PROCESS A DELIVERY ORDER

D. HOW TO PROCESS A DELIVERY ORDER

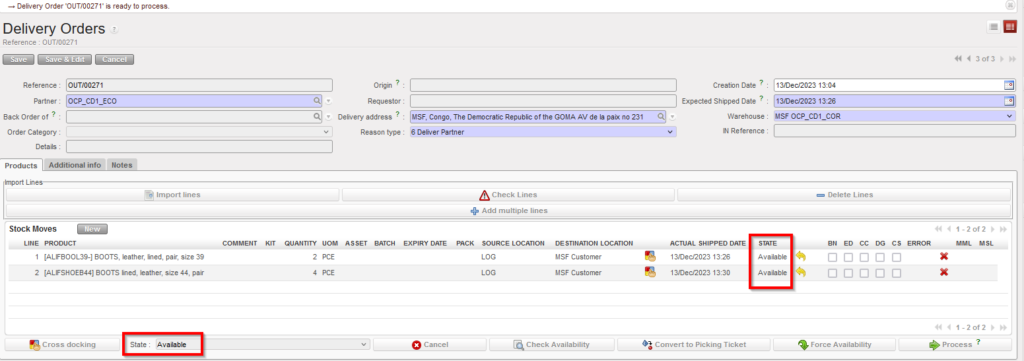
A Delivery Order can only be processed if its state is “Available“, meaning that at least one product line of the OUT is “Available“.

If the OUT is created following the sourcing of an IR from stock, its state will be “Available” if at least one of the product lines is “Available” in stock. Otherwise, the OUT will have the state Not Available. The source location of the product lines will be the stock.

If the OUT is created following the sourcing of an IR on order (PO), it will only be created when the PO (or a PO-line) will be confirmed and it will have the state Not Available. Its lines will have the state “Not available” and their source location will be “Cross docking”. The state of the OUT-lines will switch to “Available” as soon as their corresponding IN-line will be received in cross-docking. As a consequence, the state of the OUT will also switch to “Available“.

If the OUT is created following the conversion from an “Available” PICK, it will be created with the state “Available“.

Other situations are also possible involving mixed sourcing (request partly sourced from stock and partly sourced on order), mixed availability (some lines of the OUT “Available” and some “Not Available”, partial confirmations of POs, partial reception of POs,)

Note that in all cases, you may force the availability. This will have consequences on the states of the OUT-lines and/or on the state of the OUT.

If the Delivery order has been created from an IR, the “Reason type” will be “Deliver unit”, if the Delivery Out has been created from a FO, (See below how to convert Pick to OUT), the “Reason type” will be “Deliver Partner”

Go to: Warehouse / Warehouse Management / Deliveries / Delivery Orders

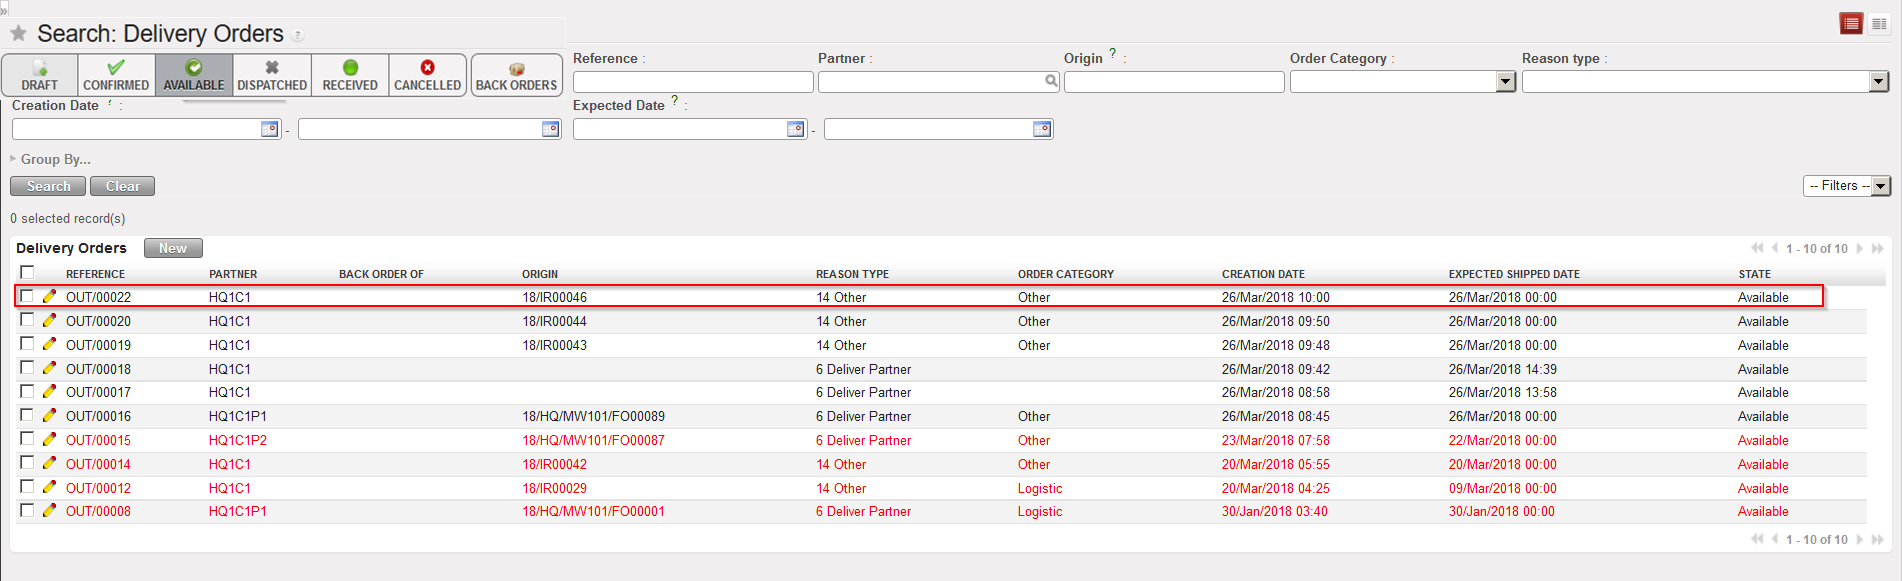
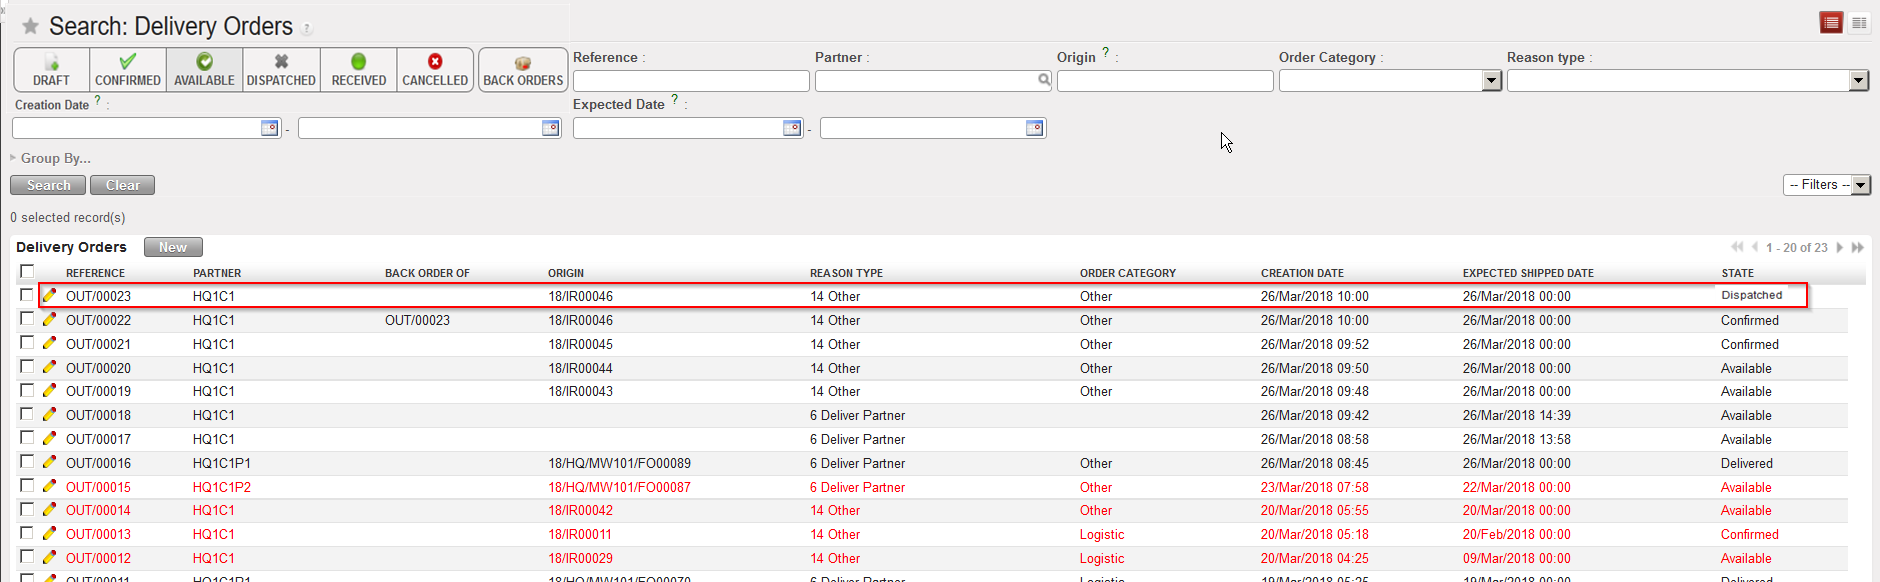
By default, the “Available” filter is activated, and the “Available” Delivery Orders are shown. Note that in the below example, an IR with Location requestor = ECU was sourced on order (PO). This PO was confirmed and the related IN partially processed.

  1. Open the Delivery Order you wish to process. Its state should be “Available“.

“Available” Delivery Order

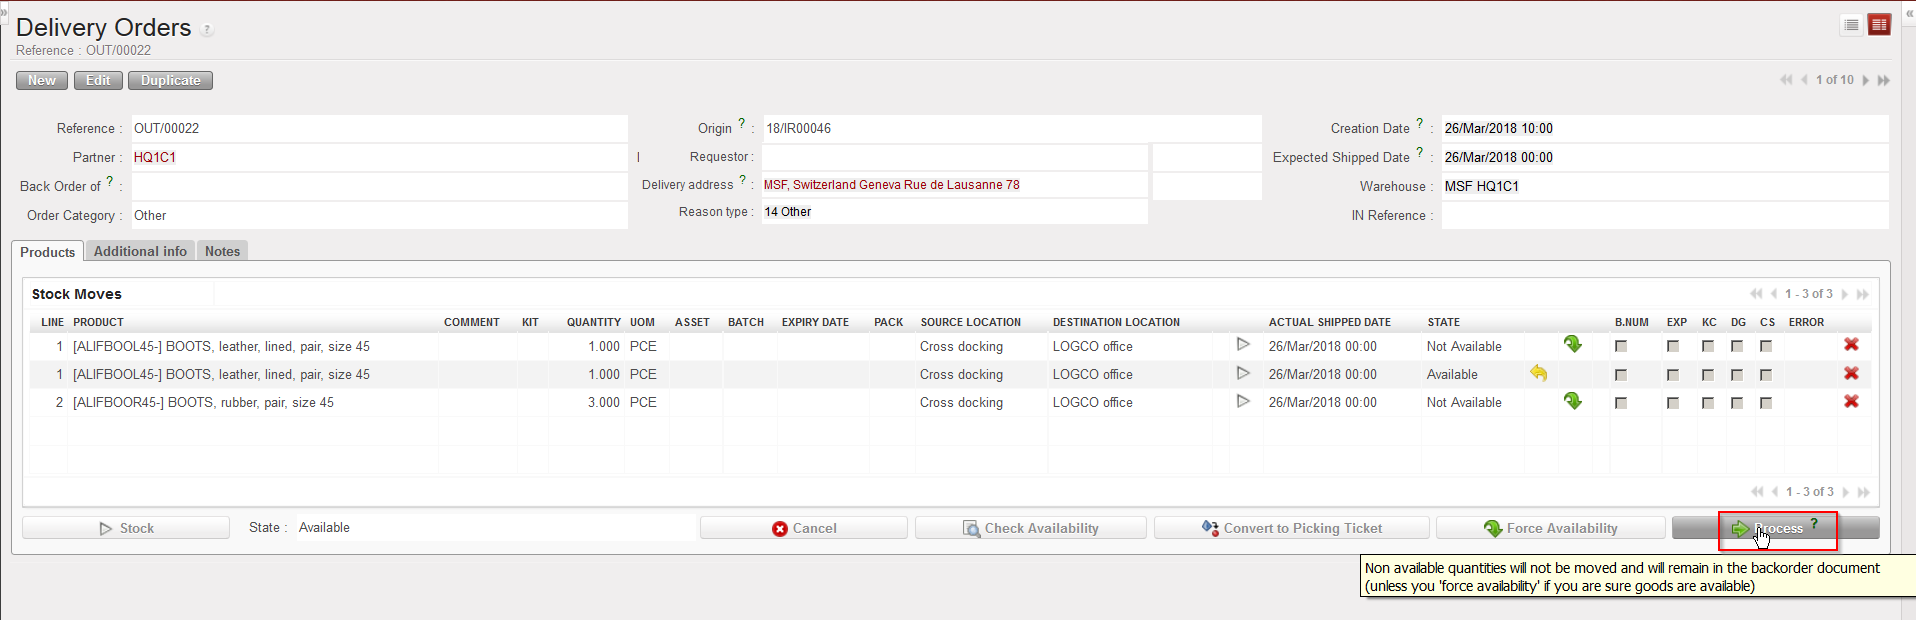
        2. Click on the “Process” button.

Processing an “Available” Delivery Order

The source location is “Cross docking“. Quantities already received in CD are “Available” (line 2) while quantities not yet received are “Not Available(lines 1 and 3). Note the yellow message in the above screen.

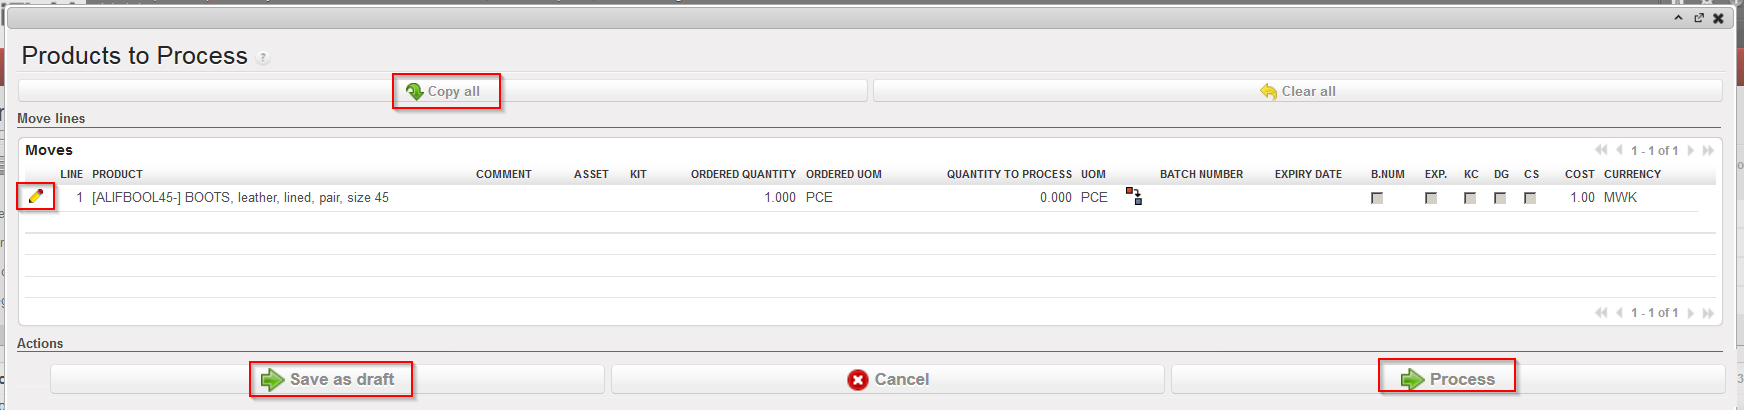
3.  In the “Products to Process” screen, select products and quantities you wish to process by clicking on the “Copy all” button or by using the pencil icons. If necessary, update the asset references, batch numbers and/or expiry dates by editing the lines and clicking on the “floppy disk” icon .

Processing an “Available” Delivery Order

Note that all products and quantities which were available in the “Delivery Order” screen have been transferred to the “Products to Process” screen. This is the meaning of the yellow message on the previous screen.

The “Save as Draft” button can be used to save the information encoded in case you need to process it later.

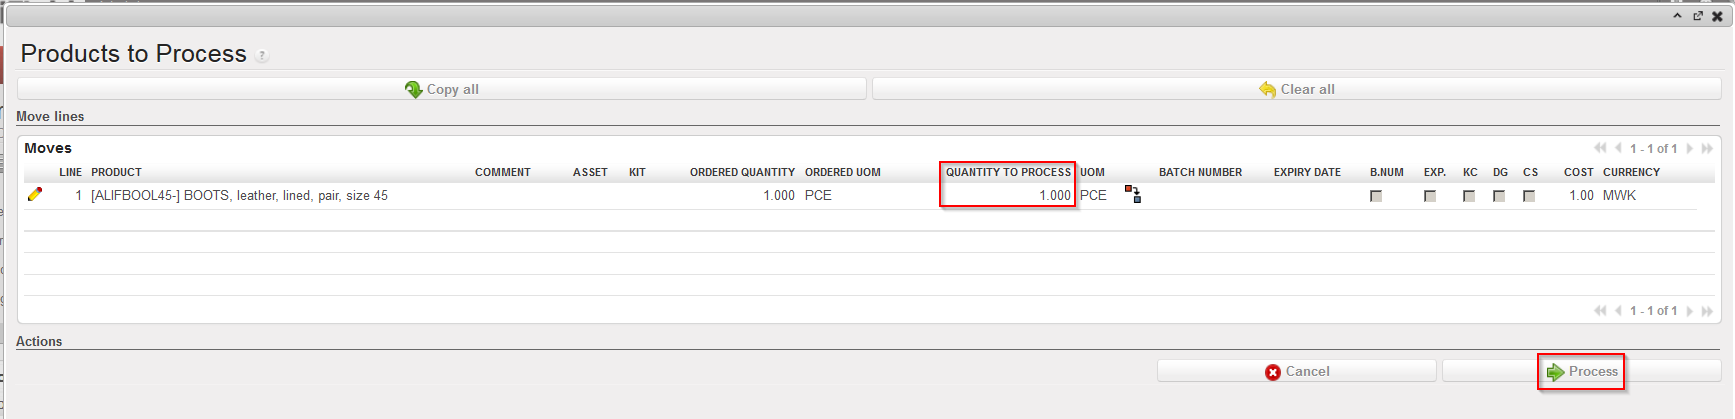
4. Click on the “Process” button.

Processing an “Available” Delivery Order

Delivery Order after processing (back order)

Delivery Order after processing (processed products/quantities)

If the OUT was fully processed, it will simply be Dispatched.

If the OUT was only partially processed (as it is the case in the above example), a back-order will be created. The processed products/quantities are registered on a new OUT with the state “Dispatched“, while the old OUT stays open (“Confirmed” in this case) in order to process products and quantities which will be received in CD in the future.

Again, one scenario among many was selected to illustrate the processing of a Delivery Order. Alternatives involve sourcing from stock, conversion from PICK to OUT, situations in which no back-orders are left behind, …

Note that if you need to change the source location before processing an “Available” OUT-line, it is possible to first make the line “Not Available” (by clicking on the yellow arrow to cancel the availability) then click on the pencil icon to edit the OUT-line and change the source location to the required one. After that you should re-check the availability of the OUT by clicking on the “Check Availability” button

C. HOW TO CREATE A DELIVERY ORDER FROM SCRATCH

Supply User Manual ENG -> 5. Warehouse -> 5.6 LU-SU4105: Delivery Orders -> C. HOW TO CREATE A DELIVERY ORDER FROM SCRATCH

C. HOW TO CREATE A DELIVERY ORDER FROM SCRATCH

Most of the Delivery Orders are generated automatically after confirmation of an IR-line with an External Consumption Unit as “Location Requestor” or after conversion of Picking Ticket to Simple Out.

However, UniField offers the opportunity to create Delivery Orders from scratch in specific cases. Note that this is not the standard process. Refer to your OC processes to know if and when creation of OUT from scratch should be done.

Go to: Warehouse / Warehouse Management / Deliveries / Delivery Orders

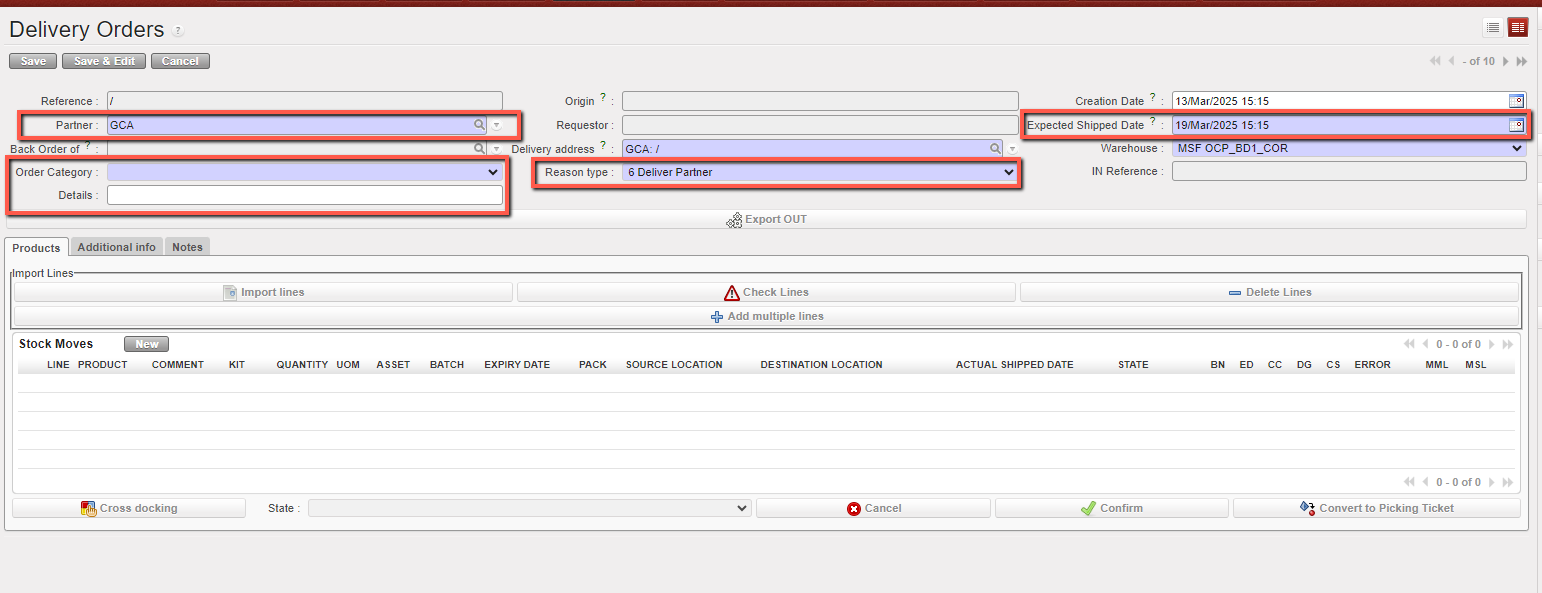
  1. Click on the “New” button.
  2. Enter a “Partner“.
  3. Enter an “Expected Shipped Date
  4. Check the “Reason type” is correct, the default is “6 Deliver Partner” but at line level will be sending good to an External partner “Reason type” should be “6 Deliver Partner”.
  5. Select Order Category. The default value is empty, and the user can select one of the following options: Logistic, Medical, Service, Transport, or Other.
  6. You can enter the OUT’s name, or any details related in the “Details” field.

Creating a Delivery Order from scratch

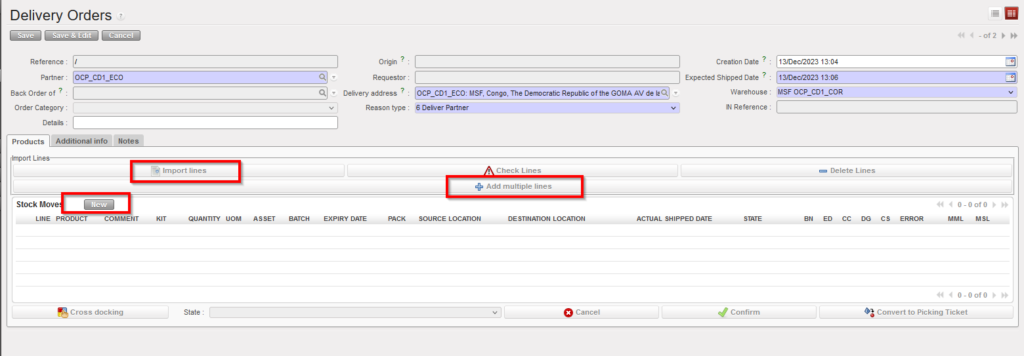
7. Create product lines by clicking on the “New” button, on top of the “Stock Moves” table. Alternatively, you may also use the buttons “Add multiple lines” to add several lines to the OUT in one step or “Import lines” to import an Excel file.

This image has an empty alt attribute; its file name is out-1.png

Creating a Delivery Order from scratch

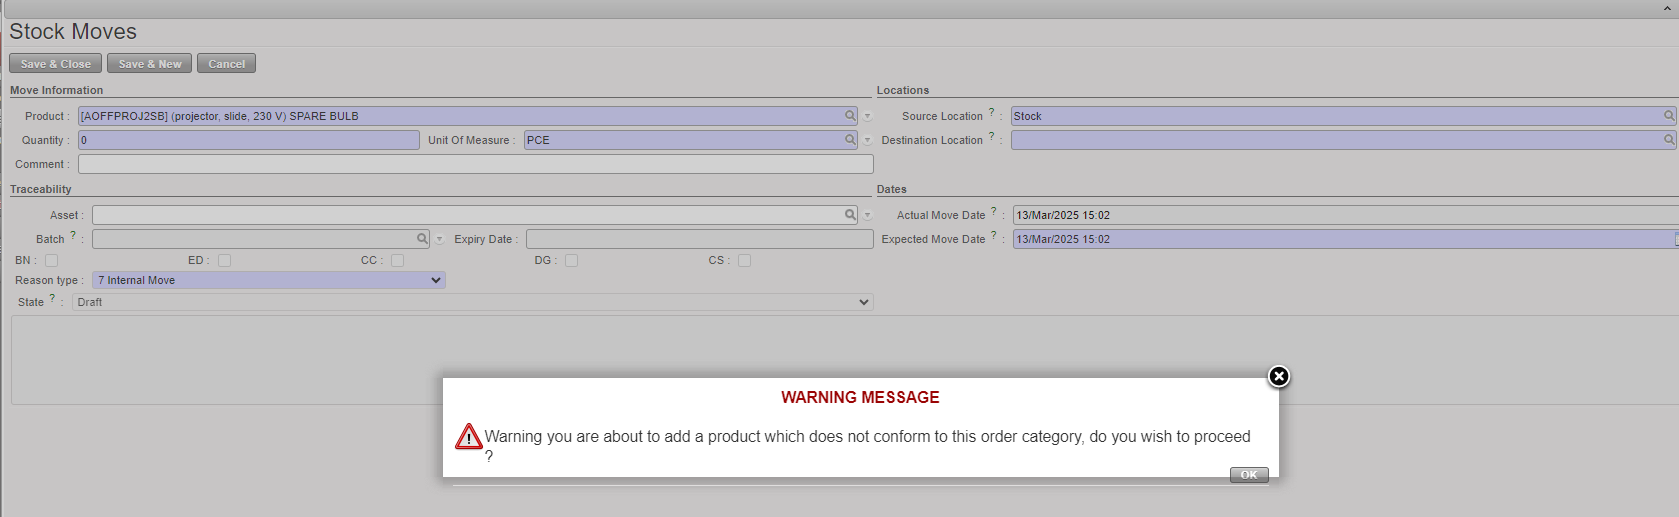
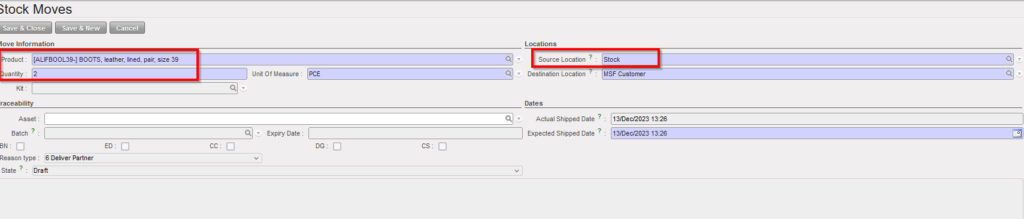
8. On the “Stock Moves” window, enter a product, a quantity and a destination location. Note that the default source location is “Stock“.

If a product does not correspond to the selected category, the user will receive a non-blocking warning message.

9. Click on the “Save & Close” button to save the line and return to the main OUT screen or on the “Save & New button” to save the line and add a new one.

This image has an empty alt attribute; its file name is out2.png

Inserting a line on a Delivery Order

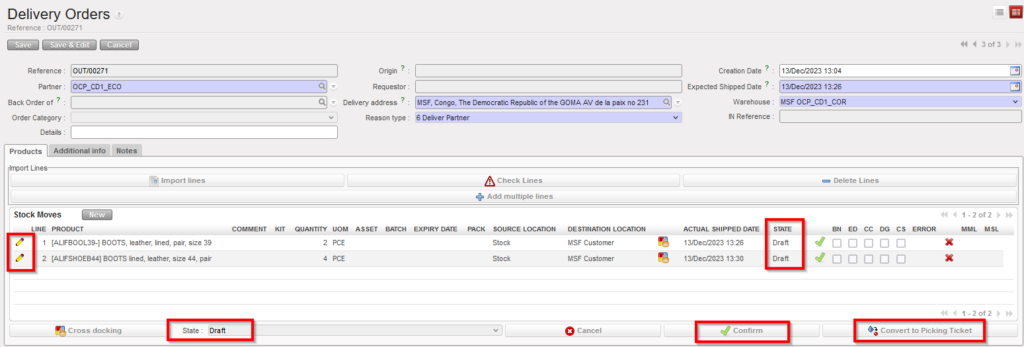
10. Once back on the main OUT screen, you have several options.

This image has an empty alt attribute; its file name is out3.png

Main OUT screen

You may edit the lines via the pencil icons and change source and destination location if needed.

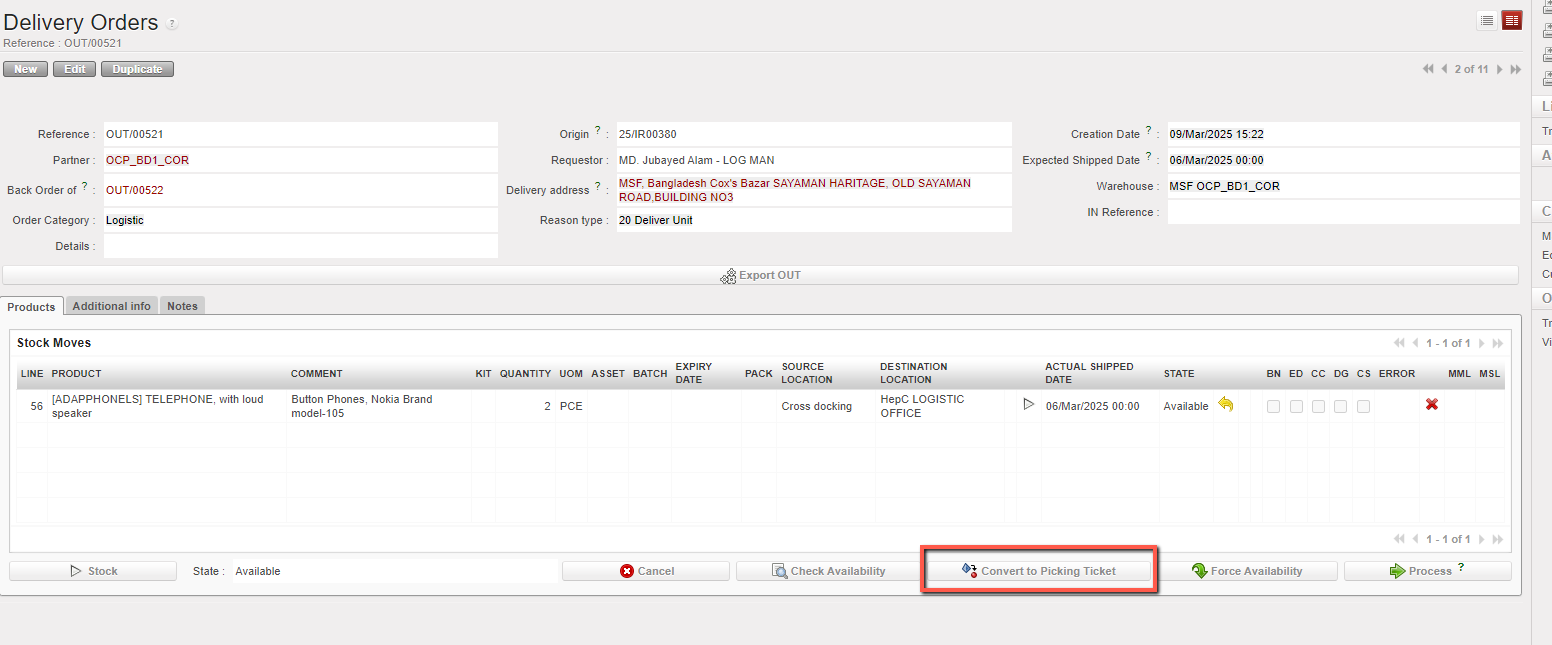
You may also convert the OUT into a PICK if you click on the “Convert to Picking Ticket” button. This is the opposite functionality to the one described in the previous section.

The Delivery Order is created in the state “Draft” as well as all its lines. It is not possible to check the availability of the products if the OUT is in this state.

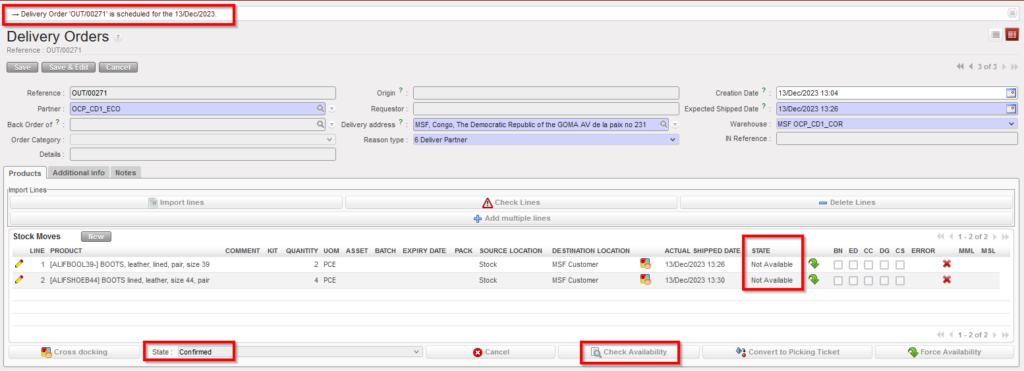
11. Click on the “Confirm” button.

This image has an empty alt attribute; its file name is out4.png

Confirmed Delivery Order

The state of the Delivery Order switches to “Confirmed“. Note that the state of the lines is “Not Available“. It is now possible to check the availability of the products.

12. Click on the “Check Availability” button located at the bottom of the screen.
This image has an empty alt attribute; its file name is out5.png

Available Delivery Order

If at least one product line from the OUT is “Available“, the state of the OUT switches to “Available” and you will then be able to process this OUT (see next section).

Remember that creating Delivery Orders from scratch should only be done in exceptional circumstances.


B. HOW TO CONVERT A PICKING TICKET INTO A DELIVERY ORDER (Simple Out Delivery / OUT); B.1. HOW TO CONVERT A DELIVERY ORDER (Simple Out Delivery / OUT) INTO A PICKING TICKET

Supply User Manual ENG -> 5. Warehouse -> 5.6 LU-SU4105: Delivery Orders -> B. HOW TO CONVERT A PICKING TICKET INTO A DELIVERY ORDER (Simple Out Delivery / OUT); B.1. HOW TO CONVERT A  DELIVERY ORDER (Simple Out Delivery / OUT) INTO A PICKING TICKET

B. HOW TO CONVERT A PICKING TICKET INTO A DELIVERY ORDER (Simple Out Delivery / OUT)

In the below example, an FO has been sourced from stock. As a consequence, a PICK has been created. This section explains how to convert this PICK into an OUT.

Go to: Warehouse / Warehouse Management / Deliveries / Picking

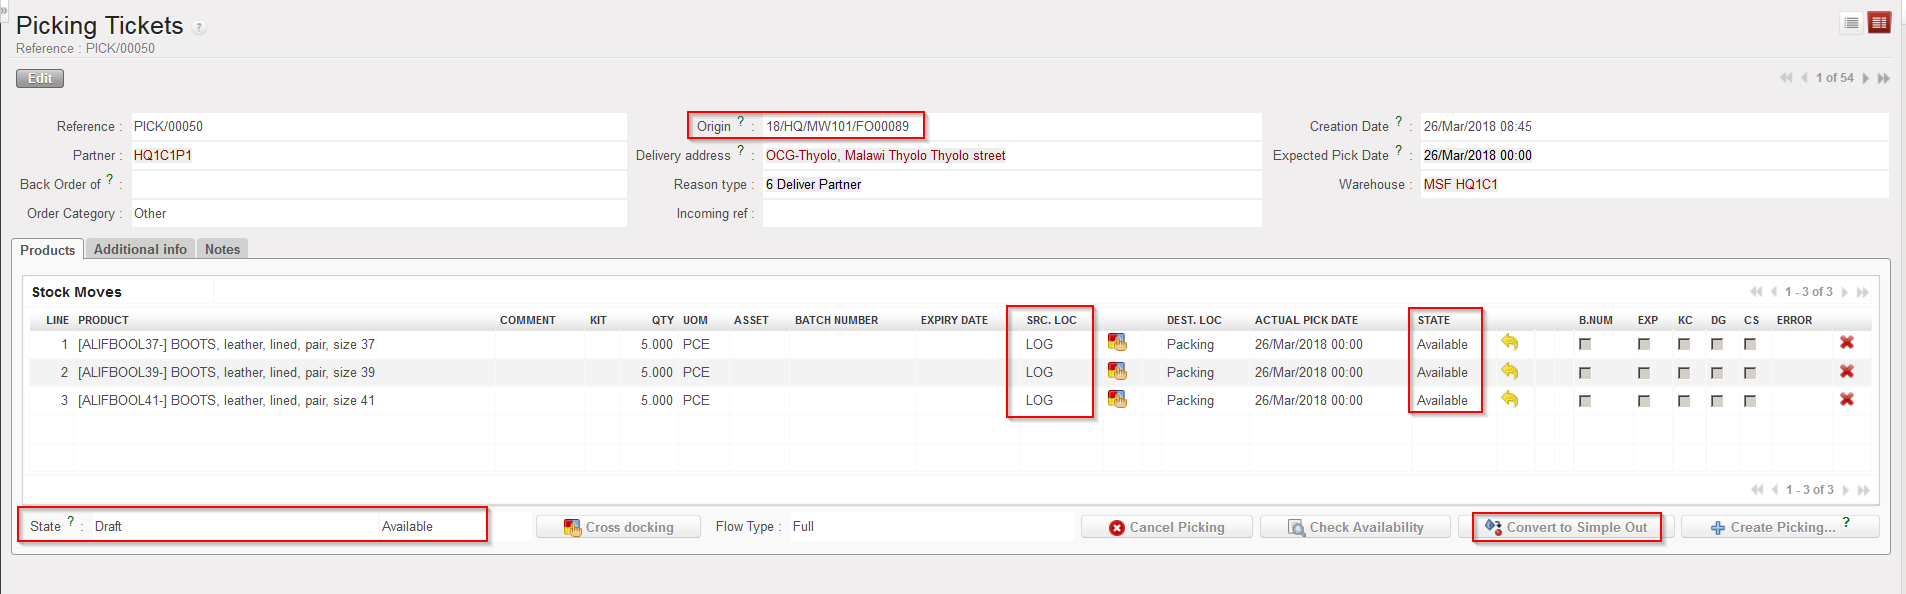
  1. Locate and open the Picking Ticket you wish to convert (it should be a main PICK).
  2. Check the content of the Picking Ticket, including source location and availability of the products.
  3. Click on the “Convert to Simple Out” button at the bottom of the page.

Picking Ticket

Note that in the above example, the Picking Ticket is “Available” and all its lines are “Available“.

Note that in the above example, the destination location of the products is “Packing“.

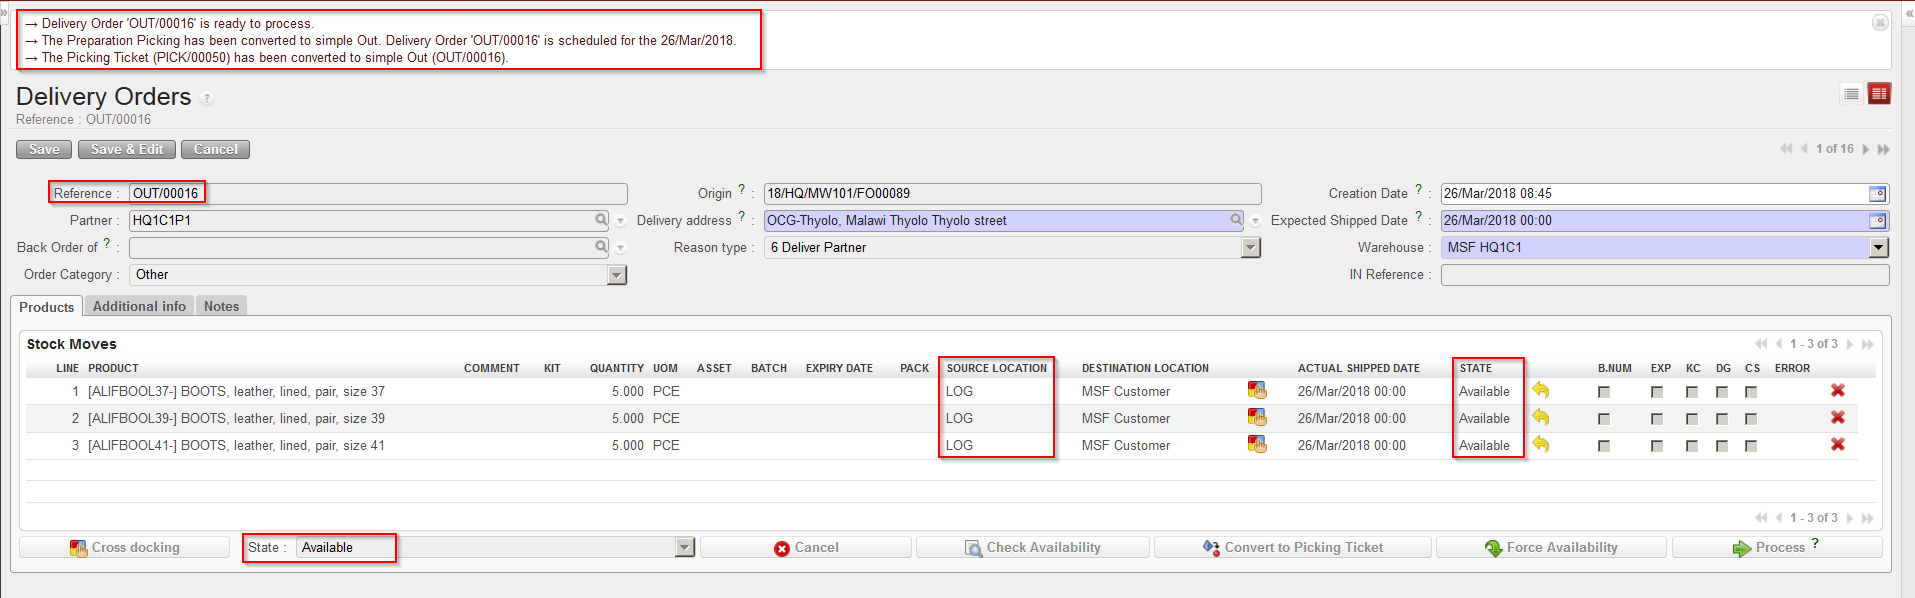
Delivery Order

The Picking Ticket has been converted into a Delivery Order. Note that the source location did not change while the destination location changed from “Packing” to “MSF Customer” (in the above example, because the customer is another UniField instance). The Delivery Order has the state “Available“. Product lines keep the state “Available“.

The “Reason type” will not be changed in this OUT.

If the PICK/OUT has been created from an “Regular” type FO, the “Reason type” will be “Deliver Partner”. “Donation before Expiry” if it has been created from “Donation before Expiry” FO.                          “Standard Donation” if it has been created from “Standard Donation” FO.                                           “Loan” if it has been created from “Loan” FO.

The example used above is quite simple as the objective was to illustrate the conversion principle. But you may have more complex situations with FOs partially validated, FOs partially sourced, FOs sourced partly from stock and partly on order, POs partially validated or partially confirmed, IN partially received, picking process already initiated, PICK partially picked, cancellation or cancel and resource used during the process,… These different situations will have various consequences on the conversion from PICK to OUT.

B.1. HOW TO CONVERT A DELIVERY ORDER (Simple Out Delivery / OUT) INTO A PICKING TICKET

In the below example, an IR has been sourced from stock. As a consequence, a OUT has been created. This section explains how to convert this OUT  into an PICK.

Go to: Warehouse / Warehouse Management / Deliveries / Delivery Orders

  1. Locate and open the Delivery Order (OUT) you wish to convert
  2. Click on the “Convert to Picking Ticket” button at the bottom of the page.

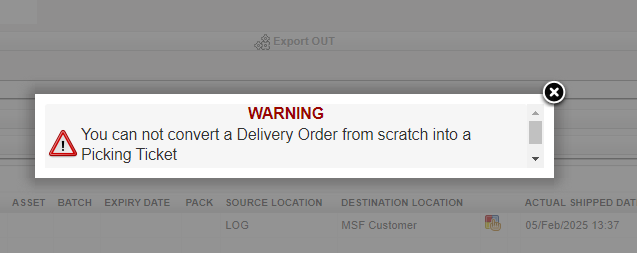
If the OUT is created from scratch “Convert to Picking ticket” option is blocked by the system with a warning message

5.6 DELIVERY ORDERS.

Supply User Manual ENG -> 5. Warehouse -> 5.6 LU-SU4105: Delivery Orders.

LU-SU4105: Delivery Orders.

A. LU INTRODUCTION

B. HOW TO CONVERT A PICKING TICKET INTO A DELIVERY ORDER (Simple Out Delivery / OUT)

C. HOW TO CREATE A DELIVERY ORDER FROM SCRATCH

D. HOW TO PROCESS A DELIVERY ORDER

E. HOW TO EXPORT AN EXCEL DELIVERY ORDER FILE

F. HOW TO IMPORT AN EXCEL DELIVERY ORDER FILE

G. HOW TO CONFIRM RECEPTION OF A DELIVERY ORDER

H. HOW TO CANCEL AN “OUT”

I. HOW TO CANCEL & RESOURCE AN “OUT”

J. DELIVERY ORDERS REFERENCES

G. CLOSED SHIPMENT LISTS

Supply User Manual ENG -> 5. Warehouse -> 5.5 LU-SU4104: Shipment -> G. CLOSED SHIPMENT LISTS

G. CLOSED SHIPMENT LISTS

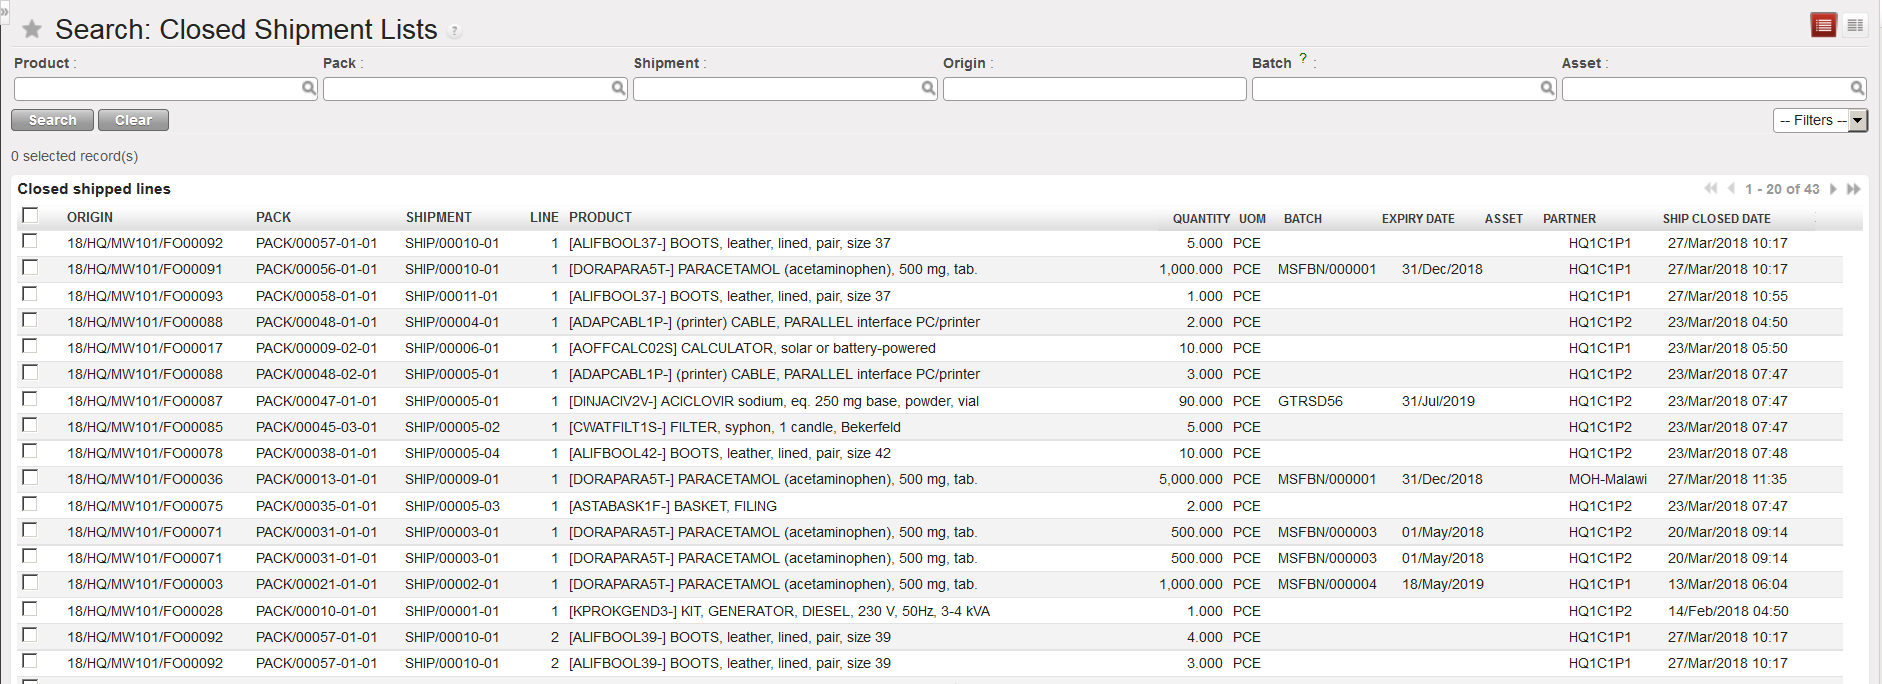
This functionality allows analyzing Shipments which are “Dispatched” or “Received“. It shows FO reference, PACK reference, SHIP reference, product, quantities, batches (BN/ED) and partners and allows filtering according to different criteria. It can be used to search shipped products within existing shipments.

Go to: Warehouse / Warehouse Management / Deliveries / Closed Shipment Lists

Closed Shipment Lists

Filters can be used to further define what should be showed.

F. HOW TO VALIDATE DELIVERY OF A SHIPMENT

Supply User Manual ENG -> 5. Warehouse -> 5.5 LU-SU4104: Shipment -> F. HOW TO VALIDATE DELIVERY OF A SHIPMENT

F. HOW TO VALIDATE DELIVERY OF A SHIPMENT

Once a delivery has been received by the consignee, this reception at the customer side should be reflected in UniField. On the Shipment, we can “Validate the delivery“.

If a shipment has been shipped to another UniField instance, the reception of the goods on the requesting instance will validate the delivery automatically via the synchronization. As explained in the previous section, once the shipment has been validated (i.e. is in “Dispatched” state), the synchronization will switch the state of the corresponding Incoming Shipment(s) on the requesting instance from “Available” to “Available Shipped”. It is only from this stage that the Incoming Shipment(s) should be processed on the requesting instance. Once done, the synchronization will validate the delivery on the supplier instance (i.e. state of the shipment will switch from “Dispatched” to “Received“).

If a shipment has been shipped to an external partner (i.e. to a partner who is not using UniField), no synchronization is involved, and the “validation of the delivery” should be done manually on the Shipment.

Go to: Warehouse / Warehouse Management / Deliveries / Shipment

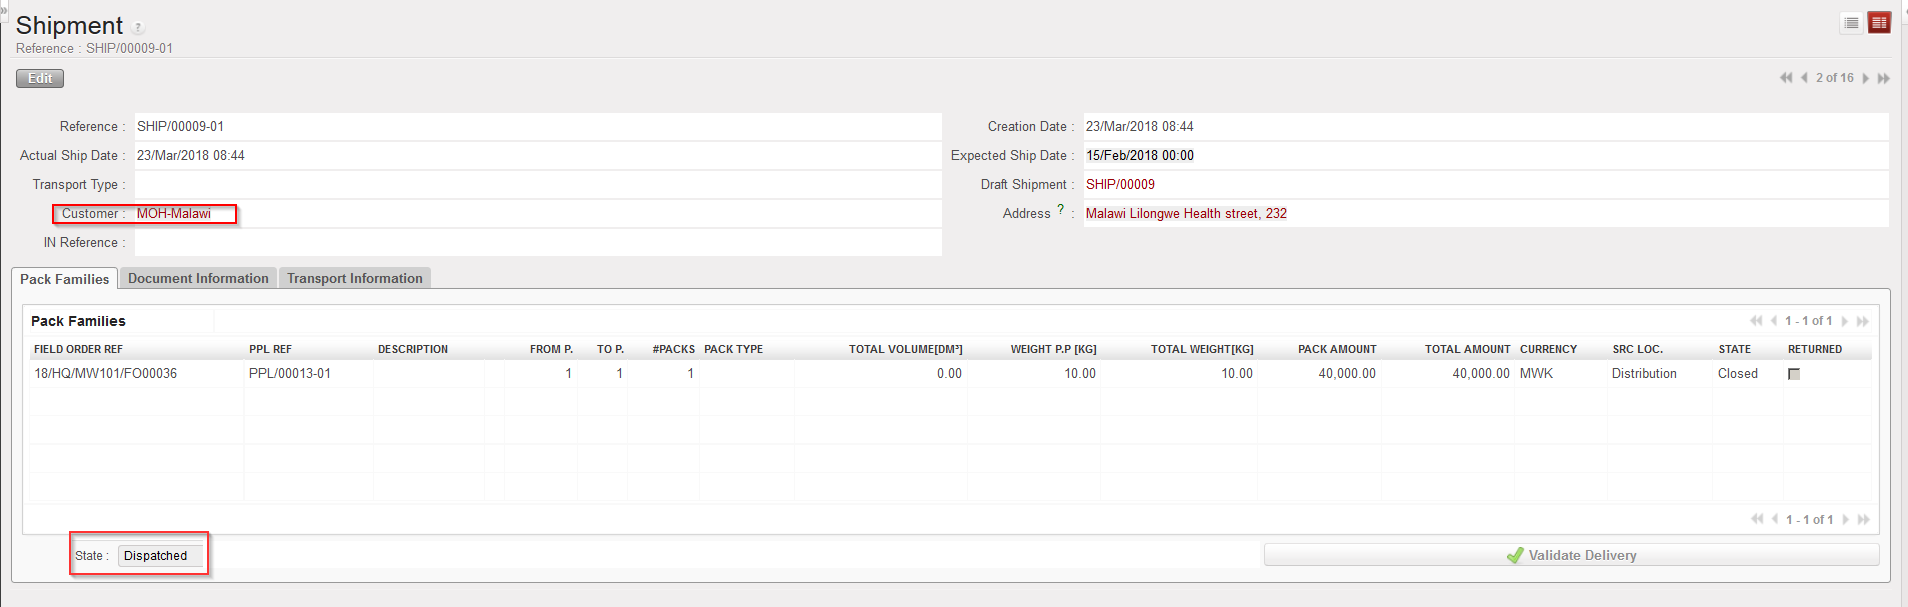
  1. Open the Shipment on which you want to validate the delivery. It should be a sub SHIP in the state “Dispatched” and the customer should be an external partner.
Shipment in “Dispatched” state

2. Click on the “Validate Delivery” button.

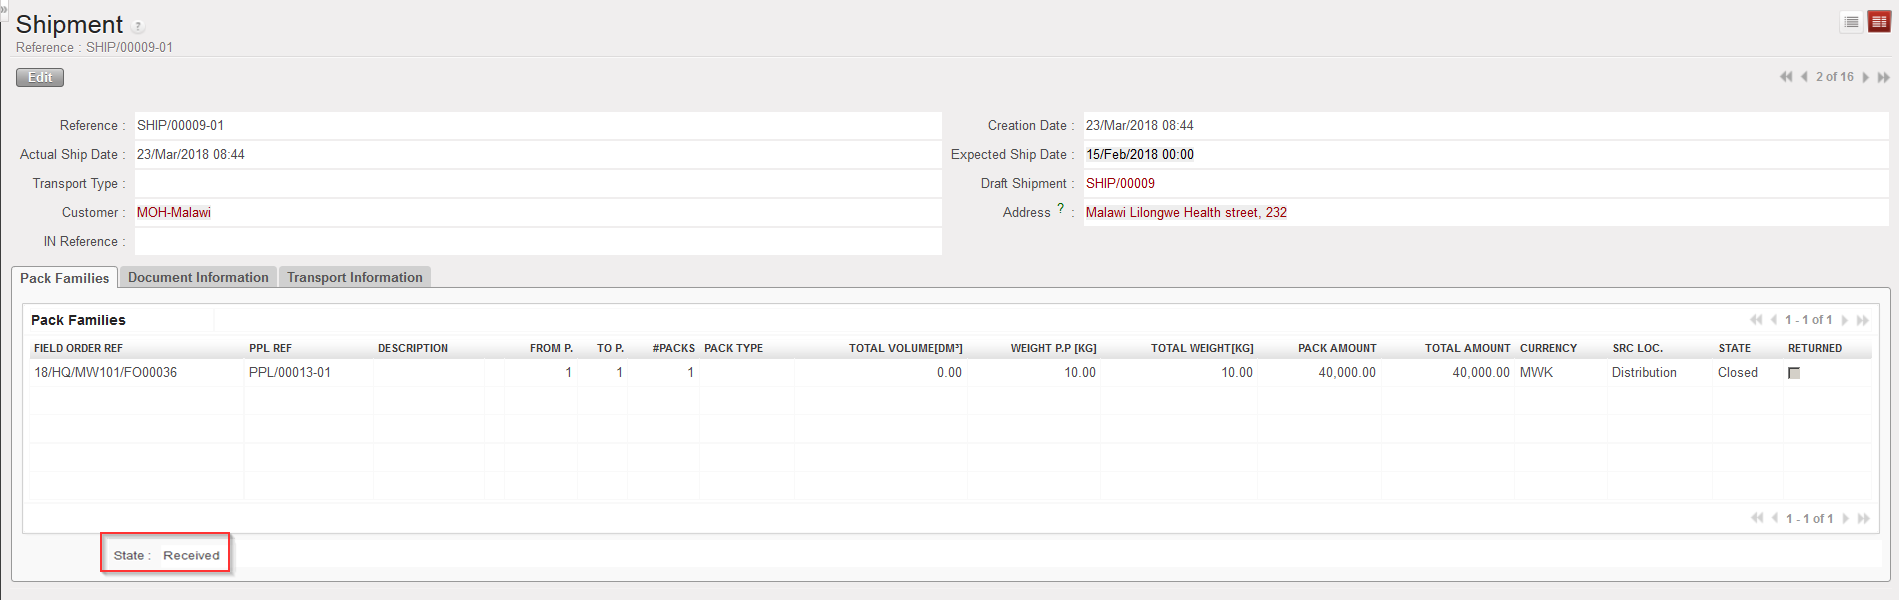
Shipment in “Delivered” state

The shipment switches to the state “Received“.

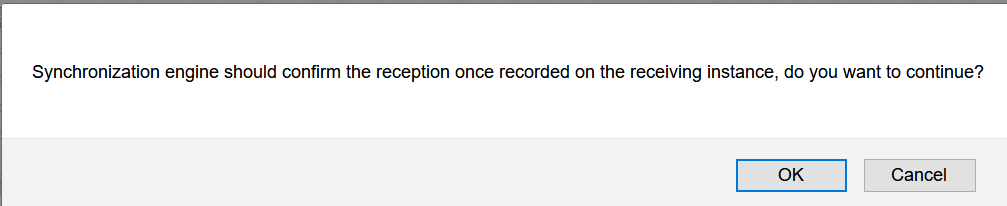
Note that if you try to validate the delivery on a shipment manually while it should be done by the synchronization (i.e. if the customer is another instance), you will get the below message.

Message when trying to validate a delivery on a Shipment while it should be done by the synchronization.

You may force the message and click on “OK” to change the state of the Shipment to “Received” but it is better to let the synchronization do this action.