C. How to create a Field Order manually

Supply User Manual ENG -> 4. Procurement -> 4.4 LU-SU3103: Field Orders (FOs) – General -> C. How to create a Field Order manually

C. How to create a Field Order manually

An FO will be created manually when an instance (usually coordination) initiates the order on behalf of another instance (usually project). These FOs are also referred as “Pushed FOs“.

Go to: Orders / Orders / Field Orders

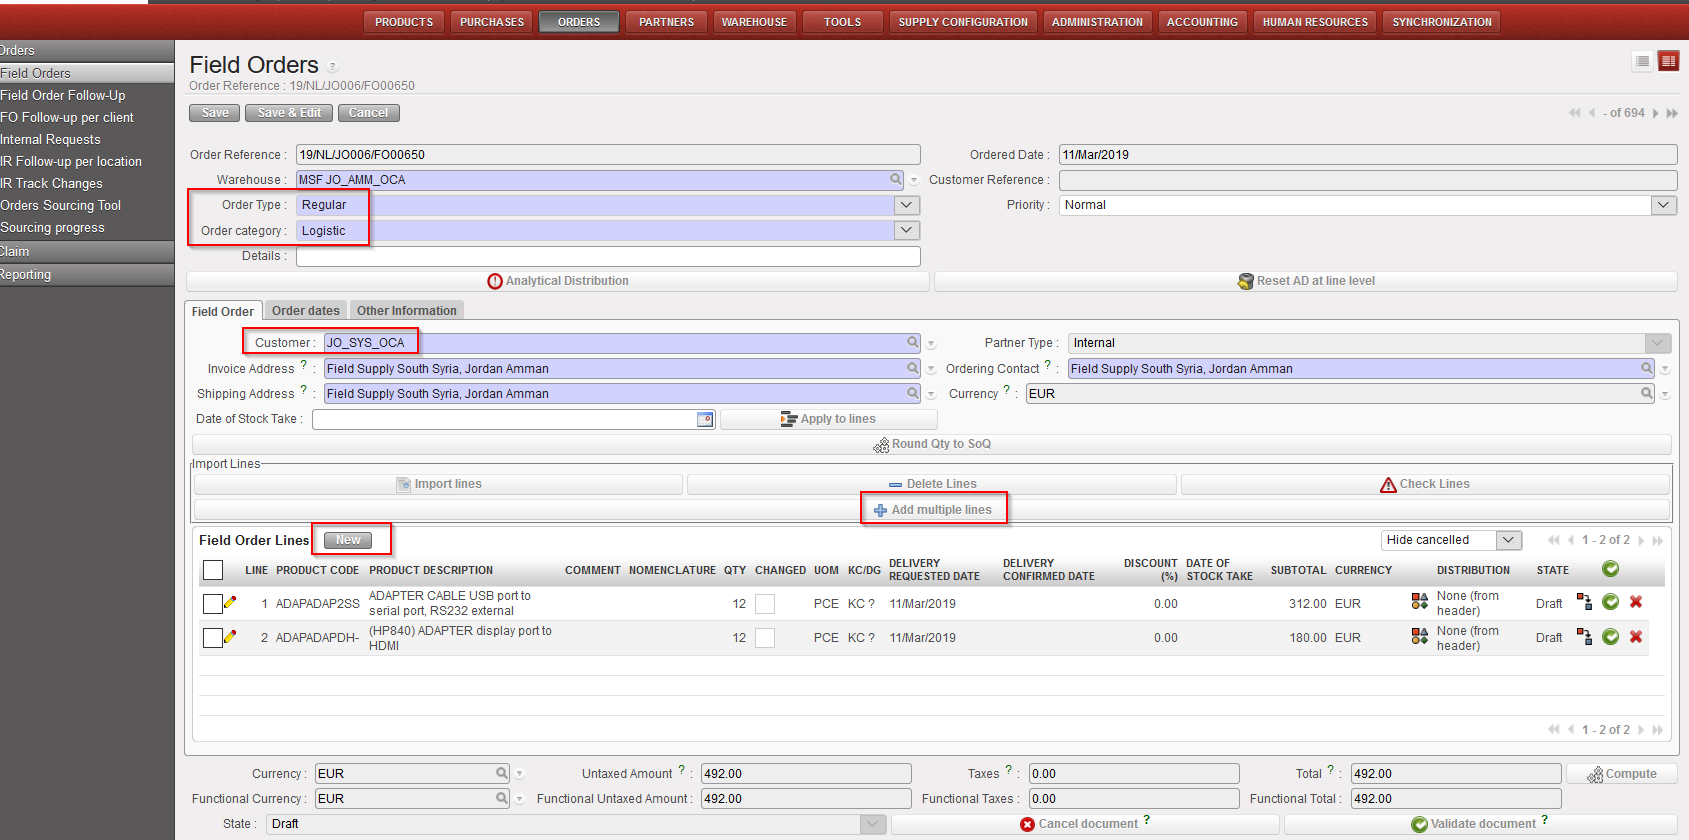
  1. Click on the “New” button.
  2. Leave the “Order type” field to “Regular“.
  3. Select an “Order category“.
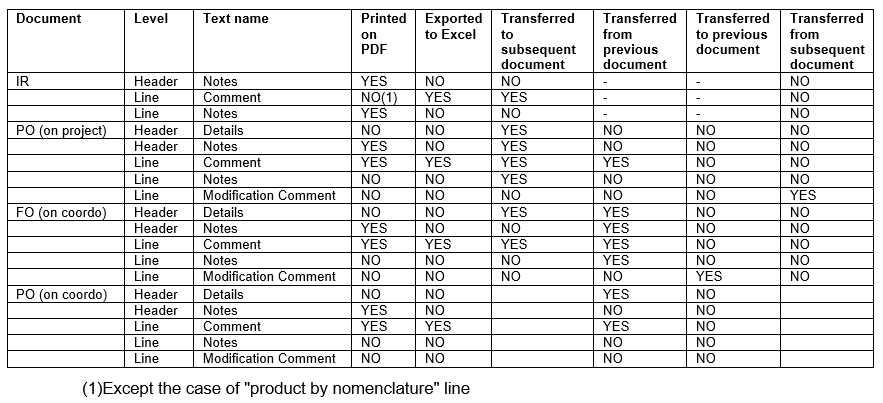
  4. In the “Details” field, the info transferred from customer’s PO if any, and you can edit or add the order name or any details of the Field Order and will be transferred to following documents including Pick (or OUT if converted).
  5. Select a customer (usually a project but could be any other internal or external customer) in the “Customer” field (please note that even ESC can now be selected as Customer).
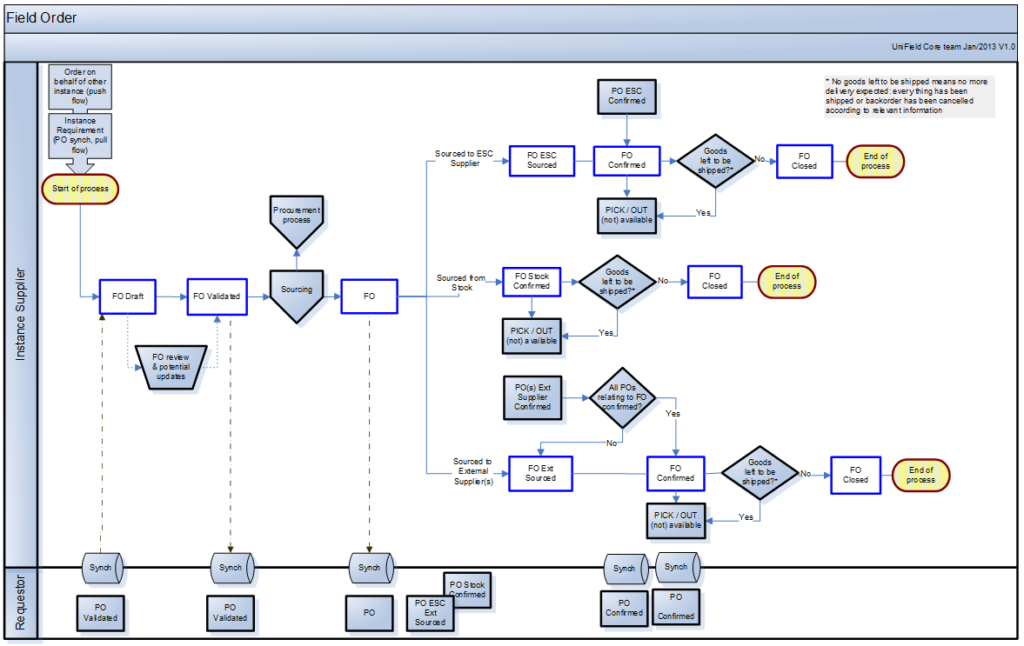
Field Order

6. Insert product lines manually by clicking on the “New” button in the “Field Order” tab (“Field Order Lines” table) to add products one by one or on the “Add multiple lines” button to add several products at once.

    • “New” button: enter (part of) the product’s code or (part of) the description in the “Product” field and select the product you need or click on the magnifying glass icon to open the “Search Products” screen. Search and select the product you need by its name, nomenclature or any other filter available.
    • Add multiple lines” button: click “Add” on the pop-up screen and search for the products you want to add from the “Search Products” screen. Use the relevant filters: Nomenclature, Description, Code, Lists, Catalogues,… Select the products you need by ticking the boxes at the left of the corresponding products lines and click on “Select” to add them in the list of products you want to include in your FO. Once you have all the products you need click on “Add products“. Note that quantities can already be entered on the “Add multiple products” pop-up screen.

NB: We will see later that it is also possible to import product lines from an Excel file (via the “Import lines” button).

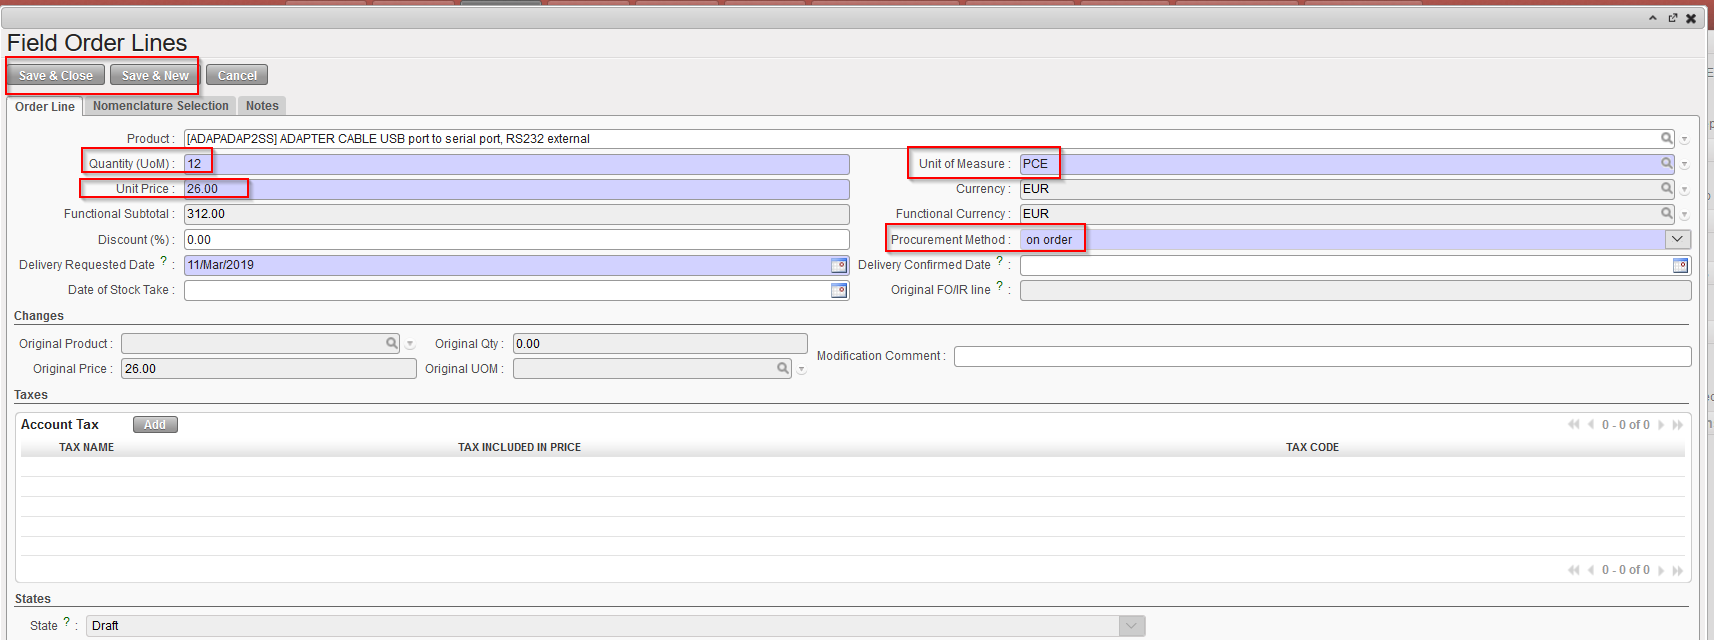
6.1 If you used the first option, once the product has been selected, in the “Field Order Lines” window, enter the required quantity in the “Quantity” field and the UoM (if needed) in the “Unit of Measure” field.

6.2 Enter a “Delivery Requested Date“.

6.3 Enter the Unit Price if the one proposed by the system (coming from the PMD sheet) is not appropriate

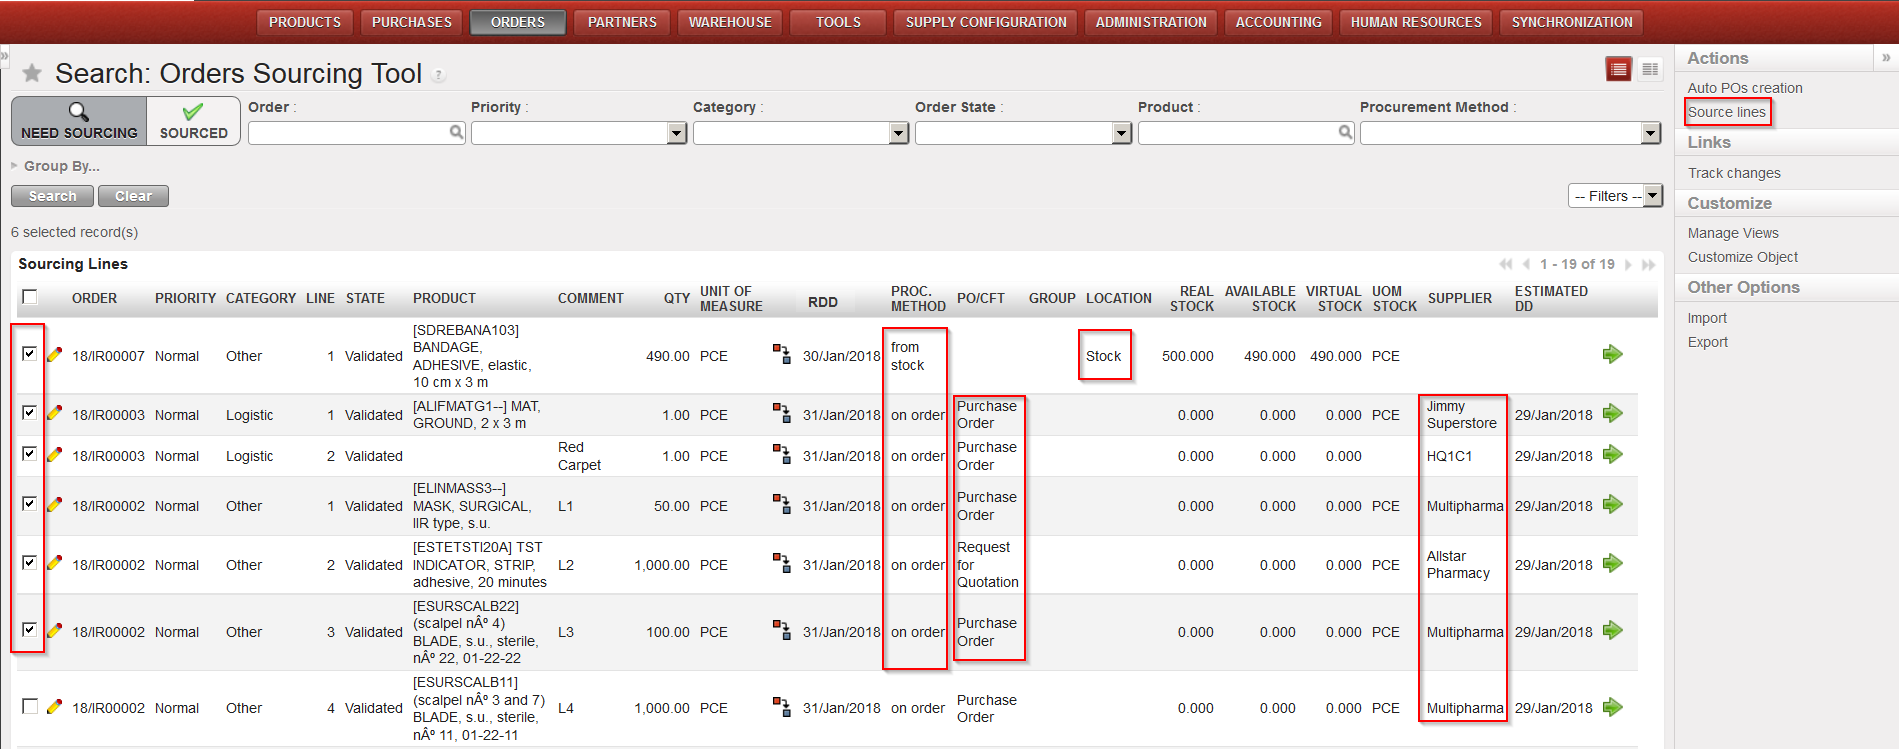
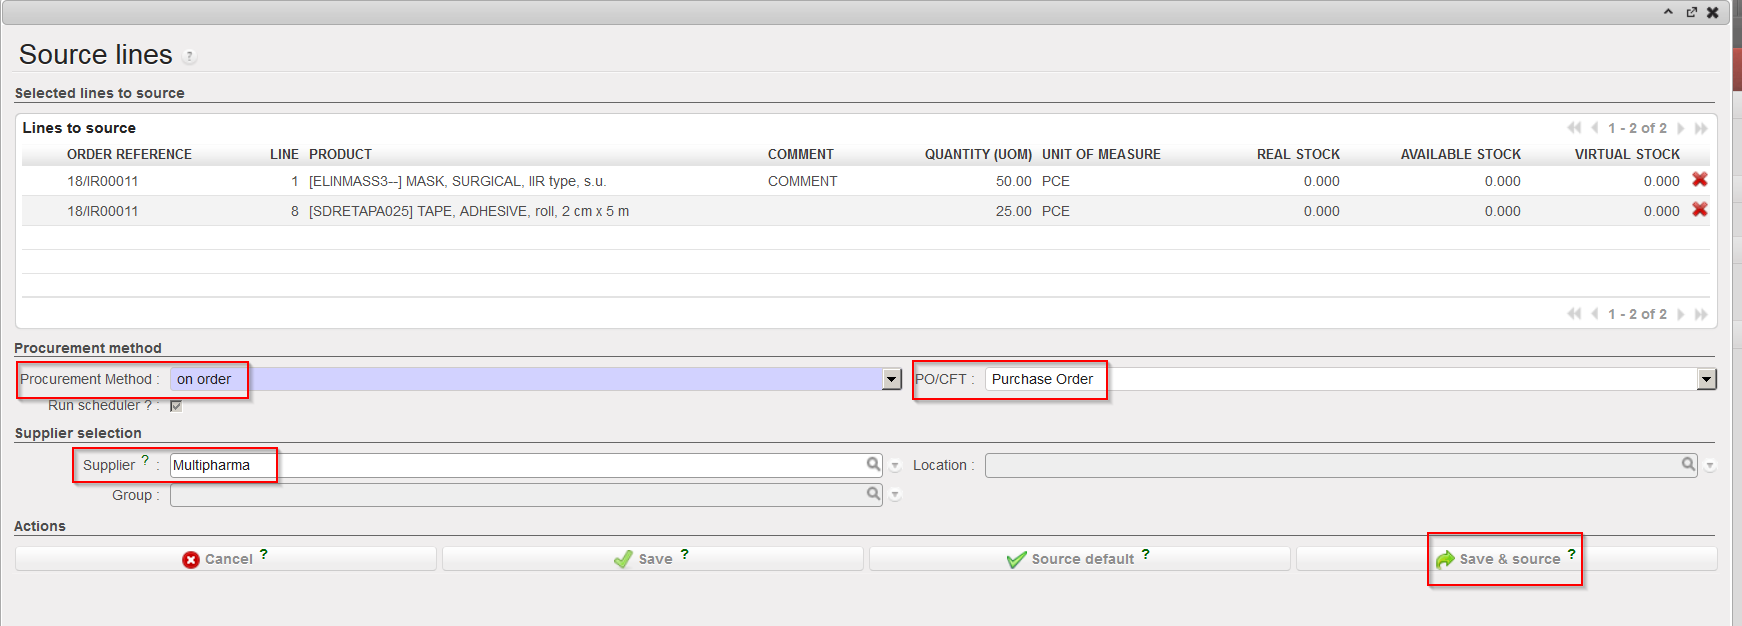
6.4 If you already know the procurement method (from stock/ on order), you may update it in the “Procurement Method” field.

6.5 Click on “Save & New” to save your line and add additional product lines to the Field Order, or on “Save & Close” to save your line and go back to the main Field Order screen.

Field Order Line

7. Optionally, you can click on “Round qty to SoQ” (see below LU-SU3401 Procurement Advanced Features).

8. In the “Order Dates” tab, enter the “Delivery Requested Date” and transfer it to all lines if needed via the “Update Lines” button (note that this date can also be entered at line level).

9. Click on the “Save” button to save the Field Order, the initial status will be “Draft“.

B. How to manage a Field Order through the synch engine.

Supply User Manual ENG -> 4. Procurement -> 4.4 LU-SU3103: Field Orders (FOs) – General -> B. How to manage a Field Order through the synch engine.

B. How to manage a Field Order through the synch engine.

In the case of a Field Order generated through a synchronization, you will have a “requesting instance” (usually project) and a “supplier instance” (usually coordination). The “requesting instance” will send a request, through a validated Purchase Order (PO), to the “supplier instance”.

The validated PO from the “requesting instance” will basically be transferred to the “supplier instance” thanks to a synchronization at the “requesting instance” level.

In order to receive this request the “supplier instance” will also need to perform a synchronization of its instance. The PO of the “requesting instance” will be transformed to an FO at the “supplier instance” level.

The FO will usually be automatically generated after an automatic synchronization and you will need to check the Orders / Orders / Field Orders screen to open and follow the draft FO.

All the main fields of the FO should already be populated with the information coming from the “requesting instance” PO. You should have the products, the analytical distribution, dates, quantities,…

However, depending on the synchronization setting of your instance (it could be done every night, every X hours,…) and the urge of the situation, you may need to launch manually the synchronization in order to receive your FO straightforward after communicating with the requesting instance. In that case, you will need to do the synchronization manually (see Procurement Advanced Feature/ How to do a manual synchronization paragraph below).

These FOs generated through synchronization are also referred as “Pulled FO“.

Even though everything is generated automatically, communication between internal instances remains key to ensure a smooth and timely processing of the requests.

Please keep in mind that after synchronization of a validated PO at the “requesting instance”, no changes should be made to this PO (they will not be taken into account).

Remember, it is worth after synchronization to check the PO/FO/Shipment Logs (Synchronization / Monitoring / PO/FO/Shipment Logs) to see which documents have been created and modified due to the synchronization. Please see the Configuration chapter for more details on this, LU-SU1103 Synchronization: How to view documents created by synchronization.

A. LU Introduction (LU-SU3103).

Supply User Manual ENG -> 4. Procurement -> 4.4 LU-SU3103: Field Orders (FOs) – General -> A. LU Introduction (LU-SU3103)

A. LU Introduction (LU-SU3103)

A Field Order is a document which represents the requirements of a customer (often a project, but can be other internal or external partners). If the customer is a project, the FO corresponds to the project’s PO. The FO can be either created via the synchronization engine (comes from a PO created on the project’s instance – pulled FO) or can be created manually “on behalf” of the project (this action will automatically trigger the creation of the equivalent PO on the project’s instance – pushed FO), or on behalf of an external partner (of type customer) if for example donating goods to them.

See flow chart next page.

4.4 Field Orders (FOs) – General.

Supply User Manual ENG -> 4. Procurement -> 4.4 LU-SU3103: Field Orders (FOs) – General

LU-SU3103: Field Orders (FOs) – General

A. LU Introduction

B. How to manage a Field Order through the synch engine

C. How to create a Field Order manually

D. How to add one or multiple Analytical Distribution (AD) to Field Orders Line/Lines

E. How to update / amend a Field Order

F. How to import lines on a Field Order

G. How to export a Field Order

H. How to validate a Field Order

I. How to confirm a Field Order (line) through the Orders Sourcing Tool

J. How to cancel a whole Field Order

K. How to cancel one specific Field Order line or multiple lines

L. How to follow-up Field Orders

M. How to add new lines to FO created via Synch

H. Notes and comments on documents (IRs, FOs, POs)

Supply User Manual ENG -> 4. Procurement -> 4.3 LU-SU3102: Orders Sourcing Tool (OST) -> H. Notes and comments on documents (IRs, FOs, POs)

H. Notes and comments on documents (IRs, FOs, POs)

At this stage, it might be useful to have an overview on how notes and comments are exported from documents and transferred to subsequent documents. The table below can help to understand this.

The flow is the following: IR created on a project, fully sourced on order to a PO sent to coordination. Corresponding FO created on coordination by synchro. FO fully sourced on order to an external partner.

G. Planning horizon.

Supply User Manual ENG -> 4. Procurement -> 4.3 LU-SU3102: Orders Sourcing Tool (OST) -> G. Planning horizon.

G. Planning horizon.

The planning horizon (also called scheduler) is a setting defined (in days, e.g. X days) in the “Company Configuration” (administration module of UniField).

It is set per instance. It defines the time window for which procurement documents will be generated. This means that, in case of sourcing, if the requested delivery date (RDD) on your IR(line) or FO(line) is more than X days in the future, the relevant document (i.e. PO, DPO, RFQ or Tender) will not be created/updated until the RDD falls within the planning horizon.

If you wish to extend the planning horizon, this needs to be changed in the configuration of your instance. For more details please refer to “How to update the Scheduler Range Days” in LU-SU3401.

F. How to resource.

Supply User Manual ENG -> 4. Procurement -> 4.3 LU-SU3102: Orders Sourcing Tool (OST) -> F. How to resource.

F. How to resource

UniField allows flexibility in sourcing and changing/reversing the sourcing of goods after a sourcing method has been chosen. In the Orders Sourcing Tool, decisions are taken as to whether the order (IR /FO) line will be sourced from stock (leading to PICK, OUT or INT) or on order (leading to Tender, RFQ, PO or DPO) and for some documents (RFQ, PO, DPO) the supplier will also be chosen at this stage. However it can be necessary to change this decision based on the circumstances, e.g. the chosen supplier can no longer provide goods, or storekeeper finds actually there are no goods in stock, so cannot fulfill the PICK created.

In these situations it is necessary to change the sourcing channel chosen (e.g. order should be sourced to a different supplier, or order cannot be sourced from stock so it should be resourced to a PO). With this need in mind, the resourcing functionality has been developed in order to be able to resource key documents.

It is only possible to cancel & resource documents which have a preceding document flow (e.g. PO created from an FO). You may either resource a specific line of a document or resource the complete document.

However, the document (line) can only be cancelled & resourced if it has not been completed, and if the next document (line) in the chain has not been created (e.g. a PO (line) can be cancelled & resourced if it is in “Draft” or “Validated” status, but not if it has been confirmed, as at this point there will be an Incoming Shipment (IN) available. If the PO (line) has been confirmed then user should resource on the Incoming Shipment.

When the user resources a document (line), the cancelled lines will take the status “cancelled-r” while on the preceding document, the corresponding lines will take the status “cancelled-r” and new lines in state “resourced-v” will be created, ready to be resourced through the OST.

Please see the details of the resourcing process per type of transaction in the related transactions Learning Unit.

E. How to source multiple lines together.

Supply User Manual ENG -> 4. Procurement -> 4.3 LU-SU3102: Orders Sourcing Tool (OST) -> E. How to source multiple lines together.

E. How to source multiple lines together.

The Orders Sourcing Tool also offers the opportunity to source several lines at the same time so that you do not have to source the lines one by one by clicking on the green arrow. If several lines have to be sourced you can use the “(multiple) Source lines” functionality as described in the steps below.

You can sort the lines by clicking on the column’s header.

Go to: Orders / Orders / Orders Sourcing Tool

  1. Tick the checkbox of all the lines you would like to source together (at the beginning of the product line).
  2. In the Action Menu on the right hand side, click on “Source lines“.
  3. In the wizard which appears, you will see all the lines that you selected to source.

a) If you have already edited all the product lines one by one on the OST screen by updating the “PROC.METHOD“, “PO/CFT“, “LOCATION” and “SUPPLIER” fields without clicking on the green arrow
and nothing needs to be added, you can source them immediately by clicking on the “Source default” button at the bottom of the pop up screen. The “Source default” button will enable you to source lines with different procurement method or different suppliers.

All selected lines updated with different procurement method and different suppliers – Click “Source lines”
Click “Source default”

b) If you need to update the details of the lines on the pop up screen, the information needs to be the same for all the product lines (i.e. same “Procurement Method“, same “PO/CFT” choice and same “Supplier“, if needed).

i.) If you select the Procurement Method “from stock”, you will be able to see if any of the   products are in stock from the “Real Stock column”.

ii.) If you select the Procurement Method “on order”, select whether this will be via a:

        • Purchase Order, if there is already a known supplier for these products.
        • Direct Purchase Order, if there is already a known supplier for these products, and you wish the goods to be delivered directly to another instance.
        • RFQ, if you want to inquire for price and availability at a specific supplier.
        • Tender, if the supplier hasn’t been identified yet.

Note that for PO, DPO and RFQ you will need to enter (or search by clicking on the magnifying glass) the name of the supplier for the products. It needs to be the same supplier for all the product lines.

iii.) Finally, click on the:

  • Save and Source” button to save the values entered for every line and to source the lines immediately. All the product lines will be sourced in the same way (from stock or on order).
  • Save” button to only save the values entered, but not to source them yet (so they will stay at the Orders Sourcing stage).
Select the lines that you want to source and Click “Source lines
Complete the sourcing method and Click “Save & source

4. The selected IR/FO lines have now been sourced.

a) You could have a message informing you about the documents created or updated.

b) The sourced IR/FO lines have changed status (an possibly the IR/FO itself as well).

D. How to source individually an IR/FO line to a Tender/Request for Quotation

Supply User Manual ENG -> 4. Procurement -> 4.3 LU-SU3102: Orders Sourcing Tool (OST) -> D. How to source individually an IR/FO line to a Tender/Request for Quotation

D. How to source individually an IR/FO line to a Tender/Request for Quotation

In some cases, the requirements (products) listed in Internal Requests or Field Orders are items which are not available in stock and for which there is no known supplier and/or price. In this case they may need to be sourced to a Tender or a Request for Quotation (RFQ).

It might also be the case for large Purchase Orders, where according to the supply procedure in place on your mission, a Call for Tender (CFT) should be carried out. The system will allow the creation of the Tender/RFQ within the supply process, linking it to the other supply documents, while maintaining the chain of the supply steps.

Generally, the Tender is used when you do not know yet from which supplier you want to get information while the RFQ will be used if you want to ask for products availability and price to a specific supplier.

Go to: Orders / Orders / Orders Sourcing Tool

  1. Use the Filter options to filter the lines to be sourced with the appropriate reference.
  2. Click on the pencil on the left side of the screen to edit the sourcing of the appropriate lines.

Sourcing to a Tender

      3. In the “Procurement Method” column, select “on order“.

      4. In the “PO/CFT” column, select “Tender” or “Request for Quotation“. Note that if you select RFQ    you will have to enter a supplier as well.

      5. Click on the floppy disk at the right side of the screen to save the changes.

      6. Click on the green arrow at the right side of the screen to source the line.

      7. The Tender or RFQ document is created by the system.

C. How to source individually an IR/ FO line from stock.

Supply User Manual ENG -> 4. Procurement -> 4.3 LU-SU3102: Orders Sourcing Tool (OST) -> C. How to source individually an IR/ FO line from stock.

C. How to source individually an IR/ FO line from stock.

If there are sufficient quantities in stock, a request can be sourced from the warehouse.

Go to: Orders / Orders / Orders Sourcing Tool

  1. Use filters to display only the order line(s) of the appropriate document (IR/FO) which need to be sourced.

Please note: the orders Sourcing tool will display three stock figures for each sourcing line:

-The “Real stock” column shows the stock level present in the location selected in the “Location” column (Stock, MED, LOG, an intermediate stock or an internal consumption unit). The “Location” column has an editable field and can be changed in the OST. The relevant generated document will be updated consequently (i.e. the PICK/OUT/INT will show this location as source).

-The “Available stock” column shows the stock level which is actually available (i.e. it does not include stock which has already been reserved for another request).

-The “Virtual stock” column (which can also be understood as the future stock) shows the stock level which is due to be available on the requested delivery date (i.e. if the requested date is 28/08/YY, it will include any stock which should be available on this date, taking into accounts planned reception and planned deliveries).

2. To edit and source order lines individually, follow the steps below:

2.1 Click on the pencil icon next to the line you want to source.

2.2 Check the “Real stock”, “Available stock” and “Virtual Stock” columns.

2.3 Select the sourcing method “from stock”.

2.4 Select the location from where you want to source.

2.5 Click on the floppy disk on the right side of the line to save your changes.

2.6 Confirm the sourcing of the line by clicking on the green arrow on the right line side.

Sourcing from stock

3. The system will create the appropriate document. In the table below, you can see which type of  document will be created by the OST according to the document which is sourced and the destination location (for IRs).

Sourced line Destination location Document created by the OST
IR External location Delivery Order (OUT)
IR Internal location Internal Move (INT)
FO   Picking Ticket (PICK)

See paragraph “How to source multiple lines together” below to source multiple lines from stock.