B. How to source individually an IR/ FO line to a Purchase Order

Supply User Manual ENG -> 4. Procurement -> 4.3 LU-SU3102: Orders Sourcing Tool (OST) -> B. How to source individually an IR/ FO line to a Purchase Order

B. How to source individually an IR/ FO line to a Purchase Order

Go to: Orders / Orders / Orders Sourcing Tool

In the OST:

-The “Need sourcing” filter will display all the IR/FO lines which have the state “Validated” (or “Resourced-v”).

-The “Sourced” filter will display all the IR/FO lines which have already been sourced.

You should not use these 2 filters at the same time (there are exclusive). However you can combine one of these filters with the other search fields; more specifically with the “Order” search field in which you can enter the reference of your IR/FO.

  1. Use the filters in order to find the IR/FO line that you wish to source.
  2. Click on the pencil icon of the line to complete or update the sourcing method.
  3. Select the procurement method “on order“.
Procurement Method on Order

4. In the “PO/CFT” field, select the “Purchase Order” option.

PO Type PO

5. Select the relevant supplier by clicking on the magnifying glass and selecting supplier. Note that if the products have default suppliers defined in their PMD sheet, the system will propose a default supplier. OST will display the ranking systems associated with the supplier. If two supplier catalogues exist for the same code/ranking, the supplier with the lowest price is selected. 

Please note that the “Group” field will only be active for ESC Supplier with option “Yes” for “Split PO” for more explanation on this field please see below chapter (LU_SU3401 Procurement advanced feature H.How to source on order (IR or FO) on several Pos for the same ESC (and same RDD).

Selecting a supplier to adress the PO to

6. Click on the floppy disk icon to the far right of the line to save your changes.

Saving the order line

7. Confirm the sourcing of the line by clicking on the green arrow on the right side of the line.

8. A PO line is created automatically. A message should appear on top of your screen to inform you about this creation. This PO line is included in a new PO (created by the system) or added on an existing PO (according to already existing POs and to the configuration of the selected supplier – see Configuration chapter).

9. To see this new PO line, go to Purchases / Purchase Management / Purchase Orders. You should be able to find the involved PO easily thanks to its “Draft” status, the supplier, the requested delivery date and above all thanks to the “Source Document” reference.

    • If the option “all requirements” has been chosen for the “order creation mode” at the supplier level and if a “Draft” PO with the same supplier and the same requested delivery date already exists, the sourced line will be added to this existing PO.
    • If a particular option other than “all requirements” has been chosen for the “order creation mode” at the supplier level, a new PO could be created depending on the project, category or reference of the sourced order line (see detail at the LU-SU1101 Partners – Customers and Suppliers + LU-SU1105 Additional configuration points A. Sourcing groups).
Finding the PO created (or updated) by the OST

Note: Re-Synch mechanism, If your instance (e.g. coordination) receives an FO line via the synchro, and decides to source this to a PO via the synchro (i.e. inter-mission or inter-section partner).you can source this PO to a third Unifield instance via synchro, The Re-Synch mechanism is limited to 3 Unifiled instance partners, one of them must be intermission or intersection, and the type of documents is “Regular”. DPO (Direct Purchase Order) can only be used at the final stage of sourcing (ie by 3rd internal partner issuing a PO to an external partner

Remember: By default (if you don’t touch the default filter on the OST which is on “Need sourcing“) only order lines which are in state “Validated” (or “Resourced-v”) are displayed in the sourcing tool.


Note: If you source an FO-line for a service, you will be compelled to choose in the Orders Sourcing Tool a PO type Direct PO (not regular PO).

A. LU Introduction (LU-SU3102)

Supply User Manual ENG -> 4. Procurement -> 4.3 LU-SU3102: Orders Sourcing Tool (OST) -> A. LU Introduction (LU-SU3102)

A. LU Introduction (LU-SU3102)

The sourcing process is the process of selecting the source from which the requested goods will be taken (from stock or through a purchase). The orders Sourcing tool (OST) allows the sourcing of all validated requirements (order lines of Internal Requests and Field Orders). In the OST, you are able to source IR-lines and FO-lines which are in the state “Validated“. The OST displays the requests (product, quantity, RDD date), the stock levels (real stock, available stock and virtual stock) and if appropriate, the supplier information (default supplier if defined in the PMD sheet, estimated delivery date,…).

Some products may be active in more than one catalogue, in the supplier pop-up that opens after clicking the magnifying glass, system will display the suppliers with active catalogues in Green at the top of the list.

A Field Order (FO) is a document expressing a request from an internal partner. Field Orders are explained in detail in LU-SU3103 and LU-SU3104. As the sourcing mechanism of IRs and FOs is very similar, you will notice that FOs are already introduced in this learning unit.

Only the “Validated” order lines of a document (IR or FO) will be possible to source through the OST. As we will see later, lines of requests which are created following a cancel & resource process will have the state “Resourced-v“. However, these lines will also appear in the OST and be available for sourcing because the OST will consider them as “Validated“.

If the sourcing is done “on order“, after sourcing, the associated documents (Purchase Orders, Direct Purchase Orders, Tenders or Requests for Quotation) will be created automatically by the system in “Draft” status while the sourced IR/FO-lines will switch to the state “Sourced“.

If the sourcing is done “from stock“, after sourcing, the associated documents (delivery orders in case of IR with an external location as destination location, internal moves in case of IR with an internal location as destination location or picking tickets in case of FO) will be created automatically by the system in “Confirmed” status (delivery orders and internal moves) or “Draft” status (picking tickets) while IR/FO-lines will switch to the state “Confirmed

If the sourcing is done “on order” and to a PO, the system will group by default all order lines into POs based on the selected supplier and the requested delivery date (RDD). It means that order lines sourced to the same supplier with the same requested delivery date from different IRs and FOs will be grouped into the same PO. These default settings can be changed at the supplier level so that POs can be gathered by project, category or order reference.

Sourcing groups can also be defined in the supply configuration of UniField (see column “Group” in the OST) to decide with greater precision how order lines will be gathered/split on POs. These optional settings will be explained later in details (LU_SU3401 Procurement advanced feature H.How to source on order (IR or FO) on several Pos for the same ESC (and same RDD)).

Once all lines of a document have been sourced and processed, the system will automatically close the document.

Process Flow of Sourcing (Orders Sourcing Tool)

Example of flow through sub-menus if sourcing a single line IR to a PO to external supplier.

Go to: Orders / Orders / Orders Sourcing Tool

In the Orders Sourcing Tool screen, the filter buttons/search fields of the sourcing tool which are located at the top of the screen allow the user to display only the lines to be sourced.

OST filters

By default validated IR/FO-lines appear in the OST with the most relevant information such as requested products, requested quantities, proposed sourcing method and stock levels.

It is possible to sort the lines by clicking on the column header, for example, clicking on the RDD, System will re-arrange the lines according to their “Requested Delivery Dates”.

When one line is selected, all last POs that contain this product can be viewed  Via “Purchases” in the “Action Menu”  under “Links”

This image has an empty alt attribute; its file name is Picture2.png

The column “Location” of the OST is used to select any internal location from which sourcing from stock can take place (intermediate stock, internal consumption unit, LOG/MED,…). If you change the proposed location, the real, available and virtual stock quantities are updated to reflect the quantities present in the selected location.

Note that for this ”Location” field , the “Stock” location cannot be selected if its child location MED/LOG have been chosen as “Location requestor” in the IR and vice versa.

Orders Sourcing Tool

The “Comment” column is mostly helpful as it displays a comment for product lines without code, “products by nomenclature“. This “Comment” column is also populated with comments entered at IR or FO line level on product lines correctly codified. Note that product lines with “products by nomenclatures” can only be sourced “on order”.

On the IR-lines to source the “Comment instead of the product” will appear in this column. Note that “Notes” which may have been entered at IR-line level are not appearing in the OST.

On the FO-lines to source, the “Comment” which may have been entered at FO-line level will also appear in the OST. The “Notes” entered on the FO-line won’t appear in the OST.

Comment field used for “products by nomenclature”

In case you do not have sufficient quantities in stock and would like to source the missing quantities “on order” via procurement, you can use the “Split line” icon which allows you to split the quantities between the available/missing quantities. You will then be able to source the different lines of the same item using appropriate sourcing options.

Sourcing tool, splitting a line, step 1
Sourcing tool, splitting a line, step 2
Sourcing tool, splitting a line, result

The “Source lines” link in the action menu on the right of the OST screen allows sourcing several lines in one step and changing the sourcing method of several lines in one step.

OST action menu – Source lines
Selecting the sourcing location for multiple order lines sourced from stock

By default, the option “Auto POs creation“, available in the action menu of the OST, (which triggers the creation of Purchase Order, RFQ or Tender documents according to the sourcing method selected) does not need to be manually actioned anymore as the default settings of UniField will launch automatically the “Auto POs creation” as soon as a line is sourced on order.

Nevertheless, these settings (available in the supply configuration) can be changed. In this case, these documents will only be created when user launches the “Auto POs creation“.

OST action menu – Auto POs creation

4.3 Orders Sourcing Tool (OST).

Supply User Manual ENG -> 4. Procurement -> 4.3 LU-SU3102: Orders Sourcing Tool (OST).

LU-SU3102: Orders Sourcing Tool (OST).

A. LU Introduction

B. How to source individually an IR/FO line to a Purchase Order

C. How to source individually an IR/FO line from stock

D. How to source individually an IR/FO line to a Tender/Request for Quotation

E. How to source multiple lines together

F. How to resource

G. Planning horizon

H. Notes and comments on documents (IRs, FOs, POs)

D. Report – Product Status Inconsistencies

Supply User Manual ENG -> Products -> 3.7 Products Reports -> D.Report – Product Status Inconsistencies

D. Report – Product Status Inconsistencies

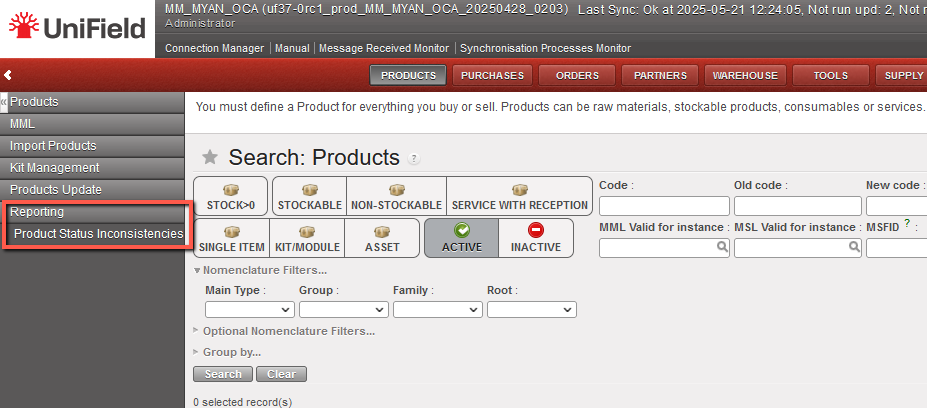
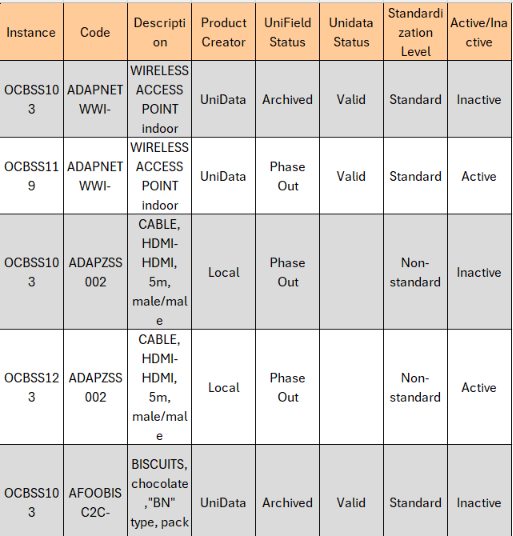
This report is generated in excel at Coordination level and shows every product which has the Status discrepancy between Coordination and Projects, the header information of the product is displayed (code, description, product creator, Standardization Level, UniData status). OC guidelines should be consulted before taking any further action.

Go to: Products>Reporting> Product Status Inconsistencies

C. Track Changes – Product Attributes and Cost price.

Supply User Manual ENG -> Products -> 3.7 Products Reports -> C. Track Changes – Product Attributes and Cost price.

C. Track Changes – Product Attributes and Cost price.

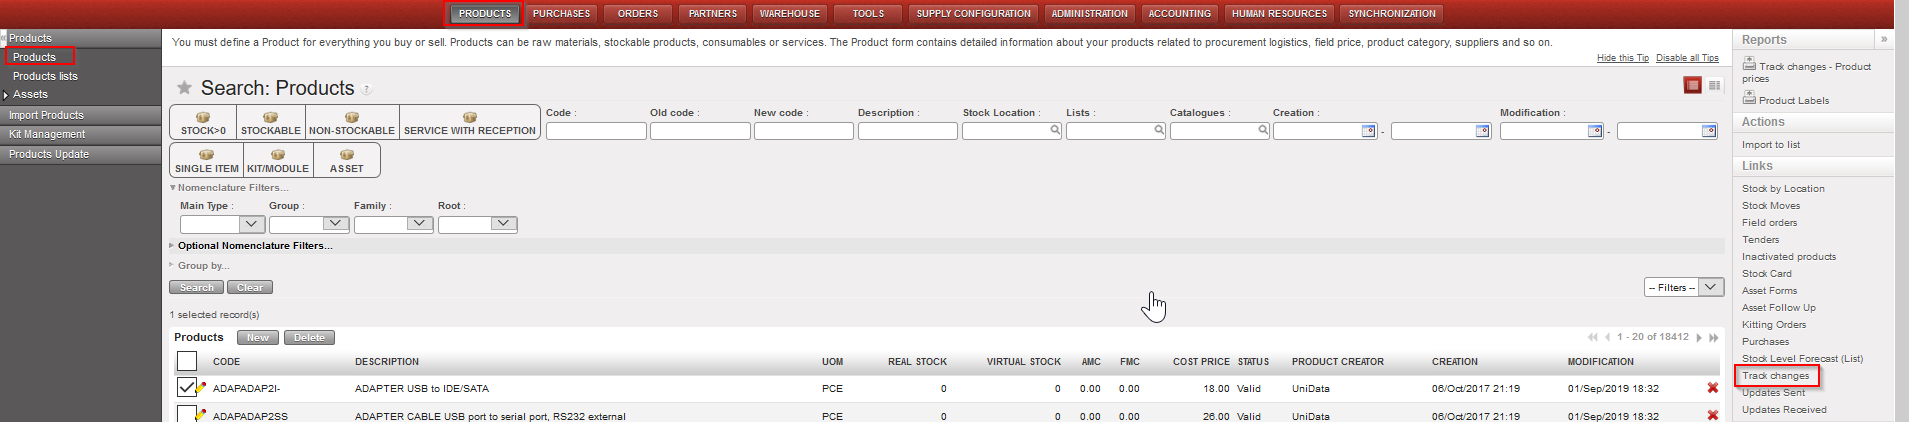
In order to track any modifications made to products, changes can be tracked via the Track Changes Tool in the Action Menu. In order to select these, from the Product data sheet (Products>Products) select the product (click in the checkbox) or open the product, then in the Action menu displayed to the right, select either Track Changes (for changes to product attributes) or Track Changes – Product prices, to display changes to the product’s price.


Track changes:

Go to: Products>Products> > Links (right hand menu) > Track changes

Product Track Changes report – access

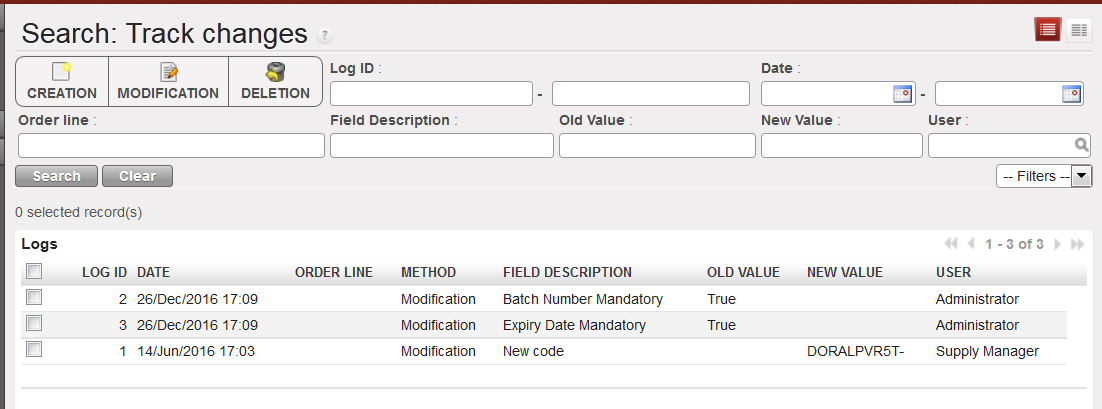
Product Track Changes report – screen

Track Changes will show the method of change, the date and time of the modification, the old value and new value of the attribute, and the user associated with this modification.

Track changes – Product prices:

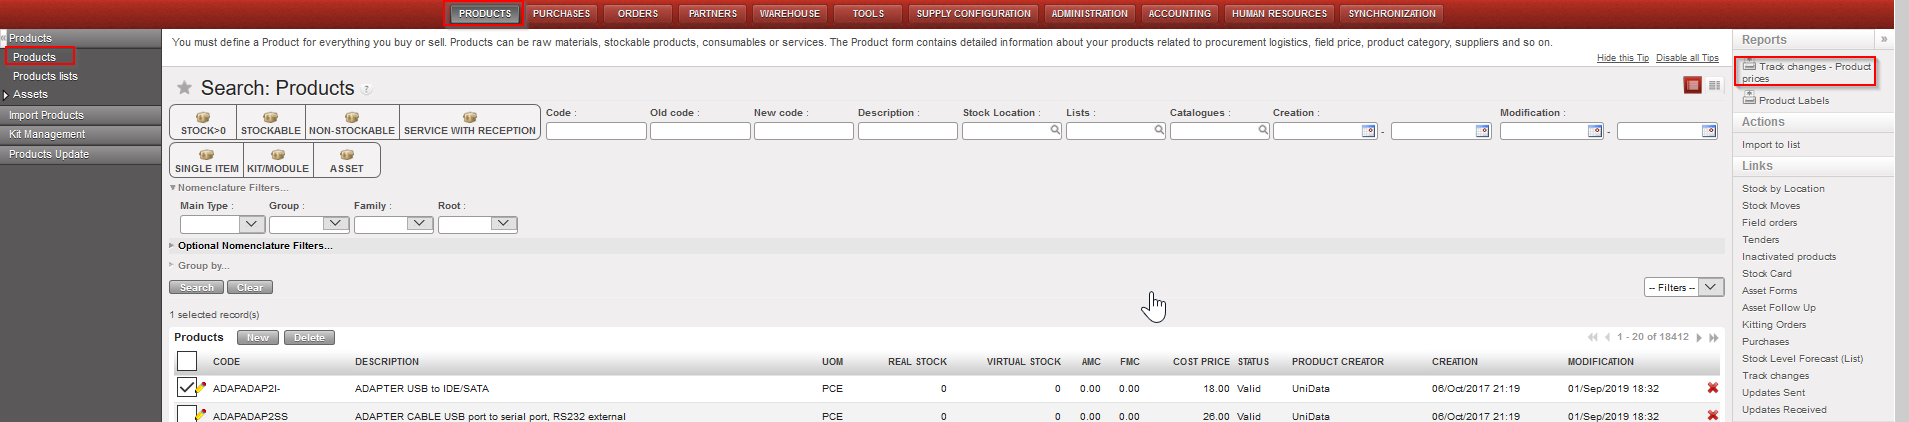
Go to: Products> Products > Reports (right hand menu) > Track changes – Product prices

Track Changes- Product prices – access

Track Changes- Product prices – Excel

The excel report generated for “Track Changes – product prices” logs every time the product cost price has changed, together with the transaction which triggered this and, if this was due to a reception of Incoming Shipment in which the price was manually changed, this is displayed in the column “Manually changed (at reception)”. Other changes could be triggered by standard purchases at a new price (calculated according to Moving Average Cost (MAC) concept), at creation of a new Initial Stock Inventory, or at a Product cost revaluation.

Please note that you may find in this report a value named “Price corrected”, this value is the result of a mass correction that had to be done on UF9 after a discrepancy has been noted between the old price and new price (due to identified and corrected bugs).

B. Report – Stopped Products

Supply User Manual ENG -> Products -> 3.7 Products Reports -> B. Report – Stopped Products

B. Report – Stopped Products

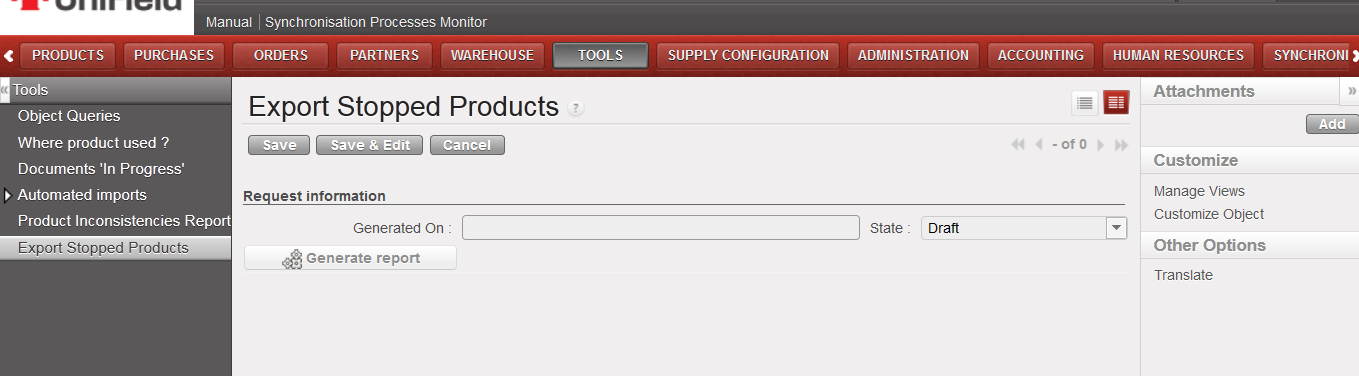
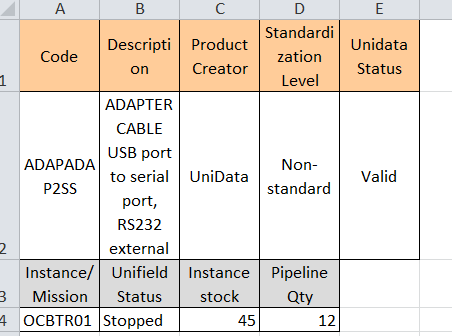
This report is generated in excel at HQ level and shows every product which has the Status set as “Stopped”, the header information of the product is displayed (code, description, product creator, Unidata status), and below this it lists each instance where the product is present in stock or is in the order pipeline. OC guidelines should be consulted before taking any further action.

Go to: Tools>Tools> Export Stopped Products

Export Stopped Products – access

Export Stopped Products – screen

A. Report for product inconsistencies – Batch/Expiry Date

Supply User Manual ENG -> Products -> 3.7 Products Reports -> A. Report for product inconsistencies – Batch/Expiry Date

A. Report for product inconsistencies – Batch/Expiry Date

Due to some modifications on Product attributes after a product was already in use, there have been cases where a product has a batch and expiry date existing in stock while the current product does not have these attributes active (or vice versa). Normally this should not be the case, but in order to check where this inconsistency exists, the report BN/ED Inconsistencies Report can be generated for each instance:

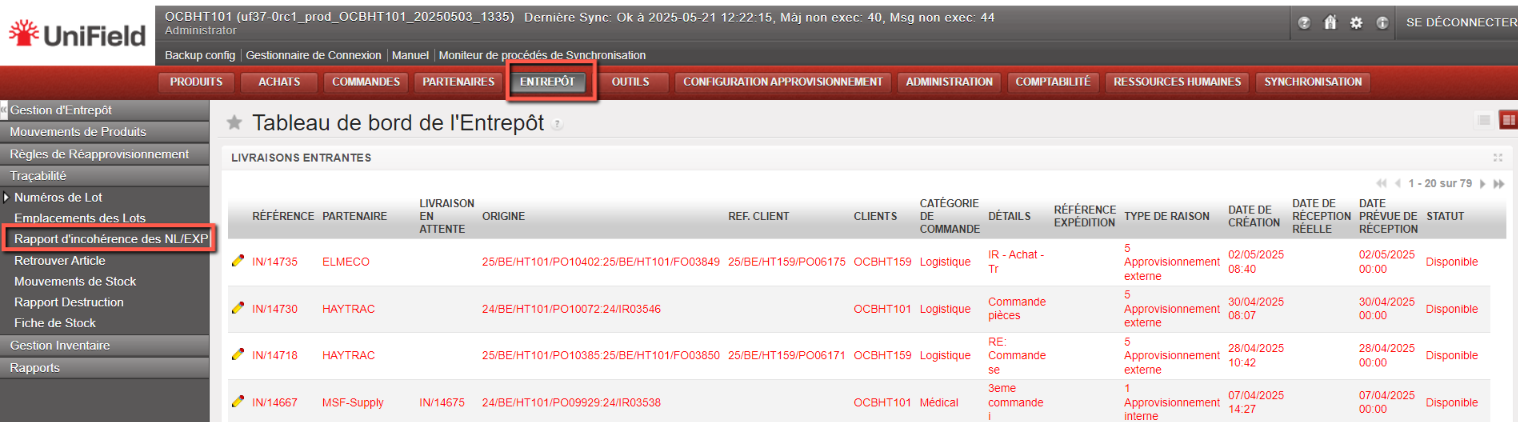
Go to: Warehouse>Traceability>BN/ED Inconsistencies Report

Product Inconsistencies report

The excel report generated will show all products in the instance where the current Batch or expiry date attributes do not correspond to those of the same product which is either in stock or in a transport document. The report shows the “true” attributes of the product according to the product data sheet in the “Batch Number Mandatory” and “Expiry Date Mandatory” columns, and then will show all relevant information for inconsistent quantities and batches of this product with quantities present in any location or any transport documents (Picks, OUTs etc) which contain them. Please refer to your OC policy before taking any action on these.

G. How to Add/Remove Items in KIT Composition List

Supply User Manual ENG -> Products -> 3.6 LU-SU2105: Kits/Modules -> G. How to Add/Remove Items in KIT Composition List

Overview

The Kit Composition List (KCL) records all items that constitute a given KIT. UniField allows you to add new items to an existing KCL or remove items from it directly, without creating a new KCL from scratch. Each operation is tracked via an internal transfer document (INT/KIT) to maintain full stock traceability.

Go to: Products › Kit Management › Composition List › Kit Composition List › [open a KCL record]

⚠️ Prerequisite: The Add Items and Remove Items buttons are only visible when the KCL is in Draft or Completed status.

Part 1 — Adding Items to a KCL

Follow the steps below to add one or more items to an existing Kit Composition List.

1. Open the Kit Composition List

Navigate to Products › Kit Management › Composition List › Kit Composition List. The search screen lists all existing KCLs. Locate and click on the KCL you wish to modify — it must be in Draft or Completed status.

Fig. 1 — Kit Composition List search results. Click on a record in Completed or Draft status.

2. Review the KCL record and click “Add Items”

The KCL record opens, showing all current composition lines. At the bottom of the screen, find the action bar. The buttons appear in the following fixed order: Add Items │ Remove Items │ Substitute Items │ De-Kitting │ Close. Click Add Items.

Fig. 2 — KCL record (Completed status, 6 items). Cursor on the Add Items button in the action bar.

3. The “Add Kit Items” pop-up opens

A pop-up window opens titled Add Kit Items. It shows the Composition List Reference and Kit Product at the top, and an empty item line below. The line contains the following fields: Product, Source Location, Batch Nb, Expiry Date, Qty, UOM, Asset, Comment, Kit, Lot, Exp, Module, Availability.

Fig. 3 — Add Kit Items pop-up. An empty item line is ready to be filled.

4. Search for and select the item to add

Click the search icon in the Product field. The Search Products modal opens, listing all available items. Use the filters (Code, Description, Stock Location, etc.) to narrow results. Click on the desired item to select it. Note: the Add Items function is not restricted to TKC items — any item may be added.

Fig. 4 — Search Products modal. Use filters to find the item and click to select it.

5. Set Source Location and Quantity

After selecting the item, it appears as a line in the pop-up. Enter or confirm the Source Location (warehouse from which stock will be taken) and set the Quantity. The UOM is auto-populated from the item.

Fig. 5 — Item selected in the pop-up. Source Location set to LOG, Qty set to 2.

6. Click “Check Availability”

Click the Check Availability button in the action bar at the bottom of the pop-up. The system verifies that the requested quantity is available at the selected Source Location. The result appears in the Availability column of the item line. Confirm the available stock is sufficient before proceeding.

Fig. 6 — Availability confirmed: 7.00 PCE available at the Source Location. The Process Items Addition button is now active.

7. Click “Process Items Addition”

Click the Process Items Addition button to confirm the operation. The system creates an internal transfer document (INT/KITXXXXX, reason type 15 — Kit) to record the stock movement from the Source Location to the Kitting location.

8. Modify Expiry Date (if prompted)

A Modify Expiry Date screen appears. The system asks you to confirm or update the expiry date for the KCL batch. Set the New Date if required, then click Ok to complete the operation.

Fig. 7 — Modify Expiry Date step. Confirm or update the expiry date, then click Ok.

9. Verify the result

The system returns to the KCL record. The newly added item appears as a new line in the Kit Composition Item list. An information message at the top of the screen confirms the operation, including the expiry date update.

Fig. 8 — KCL after Add Items: a new line has been added (now 7 items). The INT/KIT document was created automatically.

Part 2 — Removing Items from a KCL

Follow the steps below to remove one or more items from an existing Kit Composition List.

1. Open the KCL record and click “Remove Items”

Open the KCL record (status must be Draft or Completed). In the action bar at the bottom of the screen, click Remove Items.

Fig. 9 — Action bar with the Remove Items button highlighted. KCL is in Completed status.

2. The “Remove Kit Items” pop-up opens

A pop-up window opens titled Remove Kit Items. At the top, it shows the Composition List Reference and the Kit Product. Below, a Destination Location of Items field is displayed (mandatory), followed by an empty Products to remove from the Kit list.

Fig. 10 — Remove Kit Items pop-up. The Destination Location must be set before items can be selected.

3. Select the Destination Location

Click the search icon next to the Destination Location of Items field. The Search Stock Location pop-up opens. Browse or filter the list of available locations (Internal, Customer, Supplier). Click on the location where the removed stock should be sent.

Fig. 11 — Search Stock Location pop-up. Select the warehouse where removed items will be sent.

4. Select the items to remove

Back in the Remove Kit Items pop-up, click the Add button to open the Search Kit Item modal. This modal lists all items currently present in the KCL. Only these items can be selected for removal — no external items can be added. Select one or more items by ticking their checkbox.

Fig. 12 — Search Kit Item modal listing all current KCL lines. Select the item(s) to remove.

5. Confirm the selection

The selected item(s) appear as lines in the Remove Kit Items pop-up, with the Destination Location already filled. Review the lines before confirming.

Fig. 13 — Remove Kit Items pop-up with one item selected (Clip, trim board) and Destination Location set to LOG.

6. Click “Process Items Removal”

Click the Process Items Removal button. The system creates an internal transfer document (INT/KITXXXXX, reason type 15 — Kit) to record the stock movement from the Kitting location to the selected Destination Location.

7. Modify Expiry Date (if prompted)

A Modify Expiry Date screen appears. The system confirms that the INT/KIT document has been created and asks you to update the expiry date for the KCL batch if needed. Set the New Date if required, then click Ok.

Fig. 14 — Modify Expiry Date step after Remove. The INT/KIT document reference is shown at the top.

8. Verify the result

The system returns to the KCL record. The removed item(s) no longer appear in the Kit Composition Item list. An information message at the top of the screen confirms the operation.

Fig. 15 — KCL after Remove Items: the item has been removed (now 6 items). The INT/KIT document was created automatically.