A. LU Introduction (LU-SU2104)

Supply User Manual ENG -> Products -> 3.5 Assets -> A. LU Introduction (LU-SU2104)

A. LU Introduction (LU-SU2104)

Assets are a sub type of stockable product. They are considered as a kind of product which is important to track and have visibility of. A product is classified as an asset due to various criteria, principally the value of the product, although other criteria may apply.

Often assets will be a type of equipment (e.g. vehicles, fridges, generators etc) and some will have a defined life span, for example vehicles may have a life span of 5 years. For more details on the classification of assets, see the Supply Guidelines of your OC. 

It is necessary to track assets to a greater degree, partly due to their high value, and partly to ensure, for equipment in particular, that they are regularly maintained to be in good condition for use, and in order to make the best use of MSF resources. This is why the system allows us to record and track assets on an individual basis.  Finance are also involved in asset management and tracking, and there will be a UniField functionality for Finance to use for the depreciation of assets which will be developed in the second phase and added to the Finance User Manual.


Asset forms

The way that we manage assets is different of other types of stock, namely we need to track them individually. As soon as we receive them, we will want to register them as assets and record extra details. In UniField, we would record these details in the asset form. The Asset form is a form which corresponds to specific item of a product. E.g. even if you have 3 identical Toshiba laptops in your office, you would need to have 3 asset records, one for each, and each one will detail the unique details of that asset.

Asset tracking

There are several stages in the lifecycle of an asset which need to be tracked. UniField offers this possibility to make it easy to maintain a complete record of these events and follow up of assets. 

Asset movements

In the case where an asset is physically sent somewhere (e.g. from the coordination to a project) the system will provide the ability to attach the asset form onto the picking/transport transaction, which will then be synchronised so that the receiving instance can view all details of the individual asset record and update it as necessary.

Asset verification

It is best practice to carry out a physical verification of all assets in a location on a regular basis. For more details on the frequency, what should be checked and who is responsible for this physical verification refer to your OC guidelines. To facilitate this process, it is possible to print an individual asset record, or to print the entire asset records according to the filter(s) used.

E. How to configure auto-deletion of ESC supplier catalogue

Supply User Manual ENG -> Products -> 3.4 LU-SU2103: Products in Supplier Catalogues -> E. How to configure auto-deletion of ESC supplier catalogue

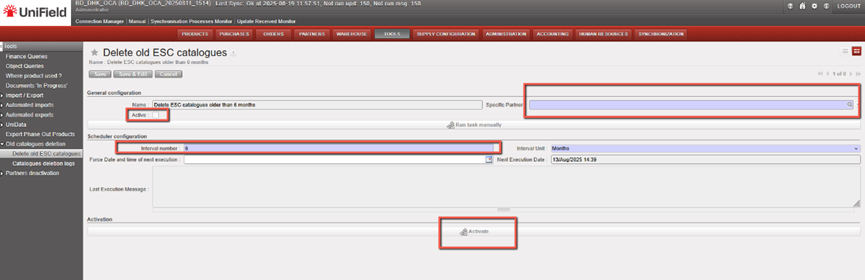
The task is available under Tools > Tools > Delete Old ESC Catalogues. It is deactivated by default, and if active, will run with a default interval of six months between executions.

The functionality will be extended with a new “Specific Partner” field, allowing users to delete ESC catalogues only from a selected supplier. This field is mandatory.

The deletion configuration is defined at instance level.

The list will display:

  • Source instance
  • Date of deletion
  • Number of catalogues deleted

Clicking on a record will show these details plus the Last Execution Message (including the catalogue names).

D. How to export a supplier product catalogue price list

Supply User Manual ENG -> Products -> 3.4 LU-SU2103: Products in Supplier Catalogues -> D. How to export a supplier product catalogue price list

D. How to export a supplier product catalogue price list

Go to: Partners/Suppliers/ Supplier Catalogue

  1. Tick the box of the Catalogue you want to export
  2. Click on “Export lines (csv)” on the right action menu

Please note that this same export file can be updated and used to import updated data fro the Catalogue.

C. How to update a supplier product catalogue price list.

Supply User Manual ENG -> Products -> 3.4 LU-SU2103: Products in Supplier Catalogues -> C. How to update a supplier product catalogue price list.

C. How to update a supplier product catalogue price list.

Go to: Partners/Suppliers

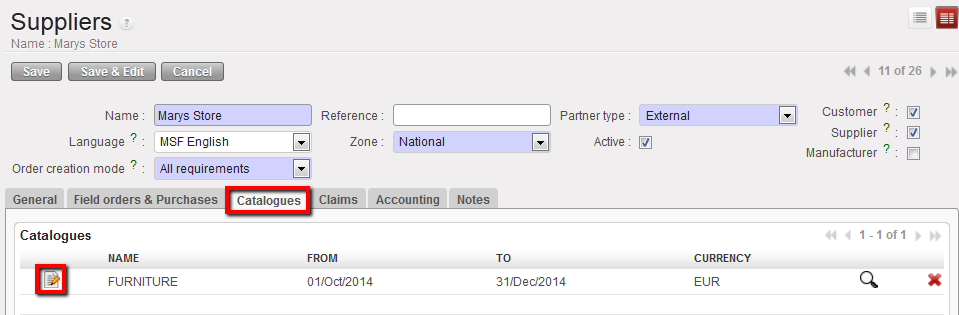
  1. Click on the pencil icon dit record next to the Supplier whose Catalogue list you want to update to open it in edit mode
  2. You can add a new line to an existing catalogue. When a new line is added directly to an existing catalogue, this new line must have its ranking assigned unless there is already a ranking at header level
  3. Click on the Catalogues tab
  4. Click on the Edit Catalogue icon gtk-edit next to the version/name of the catalogue you wish to update, this will open the Supplier Catalogue in a new screen
Edit tab

  1. Click on the pencil icon dit record next to the product that you want to update and make the appropriate changes. (NB the system will keep a record of the original and all previous versions of this catalogue list)
  2. Click on the floppy disk icon ave record next to the product line to save and repeat for all products as required.
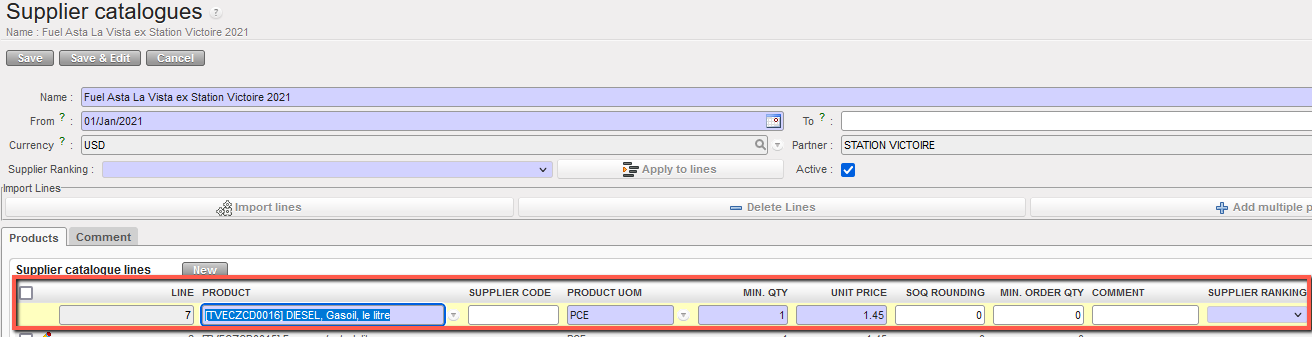
  3. Click on the Save button to save all changes to this Supplier Catalogue.

Update records

The supplier catalogues are linked to the supplier and can be synchronized. The supplier in each instance must be active in order for the catalogue to be synchronized and directly activated. Any product added / changed, or any change of price can be synchronized this way.

It is possible to see Track Changes for Catalogues which are for external suppliers. This is available via the Action menu in an excel format. This includes entries for any changes to the rankings of the catalogue & its lines. 

ESC’s catalogues are created by HQ and only synchronised to coordination. ESC partner must be activated as well as the catalogue by coordination. For catalogues for other external suppliers, these are synched down to project level, but the same rule applies for activating supplier and catalogue to have visibility of these.

N.B : It is not possible to add a product to a valid catalogue if the product is already included in another valid catalogue of the same supplier, otherwise you will receive a blocking warning message.

B. How to create a supplier product catalogue price list

Supply User Manual ENG -> Products -> 3.4 LU-SU2103: Products in Supplier Catalogues -> B. How to create a supplier product catalogue price list

B. How to create a supplier product catalogue price list

In order to create a Supplier Catalogue Price List for a supplier, the user should follow the relevant MSF procedures outlined for gathering this sort of information, commonly known as market analysis (which may involve a Tendering process) before entering this data into the system. To make this inputting process as efficient as possible, it is possible to both enter this information directly into the Supplier/Product record as well as to import the data into the system via an excel file.

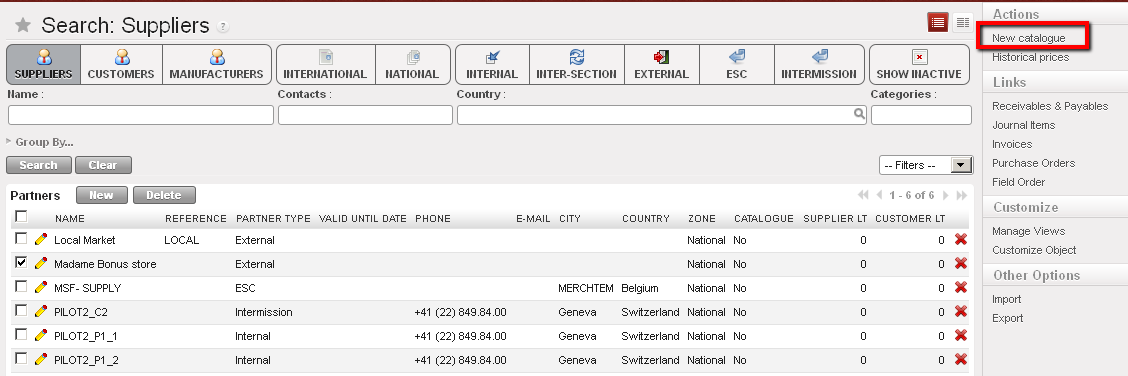
To enter the Supplier Catalogue Price List directly into the system, Go to: Partners/Suppliers

  1. Enter the relevant search values in the header fields to find the Supplier you want
  2. Tick the checkbox next to the supplier in the list view
  3. In the Actions Menu on the right-hand side, click on New Catalogue. A screen displaying New

Catalogue will appear.

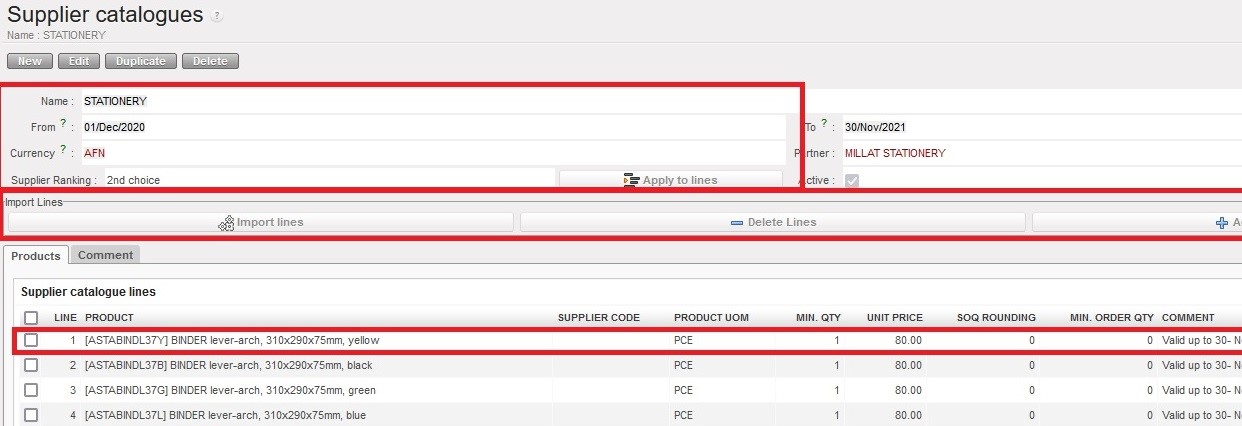
Product catalogue – 1

  1. Enter the Name (how you want to call this Supplier’s catalogue)
  2. The “From” field will automatically display today’s date but can be edited
  3. Enter the “To” date using the calendar button. This should reflect the last day on which the information you are entering is valid (e.g. if the price is fixed how long it is fixed at this price according to the supplier’s bid). This field is not mandatory.
  4. The currency will pull through from the currency entered for this supplier
  5. Each new catalogue must have a ranking. A default “3rd choice” ranking is automatically assigned for catalogues created via synch or auto VI import but can be changed.
  6. The Partner field will display the name of the Supplier that for which you are adding the catalogue price.
  7. The Active box will reflect the state from the Supplier record (i.e. this should have been ticked if we are considering using them and have asked for product pricing etc)
  8. In the Import Line section, the Add Attachment button will allow us to browse and select the excel file that we want to import, and next to this is the “Import file” button which will import the data from the excel file.
  9. To Add products individually to the catalogue, in the Products tab, click on the New button
  10. Click on the magnifying glass icon earchto bring up the search products window and enter the relevant values to find the product(s).
  11. Select all relevant products, and check that the default UoM is correct (or changing it if need be)
  12. Enter the minimum quantity which the supplier had based their price on. If there is none then 1 can be entered. If you try to save a line with 0 as a minimum quantity, the system will display an error message
  13. Enter the Unit Price (which should be related to currency selected)
  14. Enter any SoQ Rounding figure (e.g. if Pens are the product, the UoM and price may be per pen (i.e. pce), but the supplier sells the pens in packets of 50, in which can the rounding would be 50.)
  15. Enter the minimum order quantity – depending on the supplier, the lowest quantity of the goods they would accept to supply per order
  16. Enter any other comment
  17. Click on the floppy disk icon ave record to save the line and either repeat the steps to add another product or click on the Save button to save the catalogue list.
  18. When catalogue is complete and all lines are saved, user can confirm catalogue by clicking on the Confirm button. This means all data it contains will be used by system for relevant transactions.

Product catalogues – 2

N.B: It is possible to have 2 active catalogues for the same supplier in the same instance as long as the products are different in each catalogue. If one supplier has more than one catalogue for the same product, user will receive a warning message.

Please note that it is possible to create a Catalogue of the Coordination instance at coordination instance. This function has been added to enable the related projects, to which this catalogue is synchronized down, to have a Coordination Supplier Catalogue. This will help to get more accurate estimation prices for intra-mission orders.

A. LU Introduction (LU-SU2103)

Supply User Manual ENG -> Products -> 3.4 LU-SU2103: Products in Supplier Catalogues -> A. LU Introduction (LU-SU2103)

A. LU Introduction (LU-SU2103)

One optional characteristic of the Supplier record is the supplier catalogue product list. This allows the user to view a list of the products which the supplier is able to supply, together with the prices and other relevant information of these products.

The advantage for users is that as soon as they request, or receive a request for any product which is listed in a supplier catalogue price list, the system will automatically be able to indicate which suppliers are able to source this product, at what price they offer it and other information such as standard packaging types, lead times etc, which can help the user to plan their supply activity more efficiently, as well as facilitating supplier management by providing current and historical information about supplier activities and pricing.

D. How to update a product list via import file

Supply User Manual ENG -> Products -> 3.3 LU-SU2102: Product List -> D. How to update a product list via import file

D. How to update a product list via import file


Go to: Products/Products

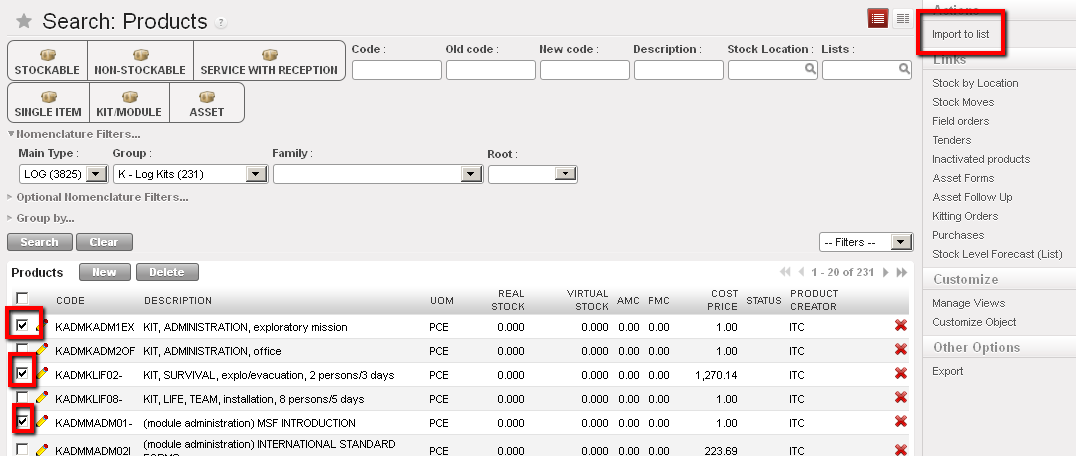
  1. In the Products Search view, enter the appropriate values in the filters in order to view as many as possible of the products you want to add to the list.
  2. Click on Search
  3. From the results, select the checkbox next to each of the products that you want to add, or click on the checkbox at the top of the products lists to select all the products on the same page (but do NOT progress to any other pages)
  4. In the Action Menu on the right-hand side, click on Import to list

Import to a product catalogue

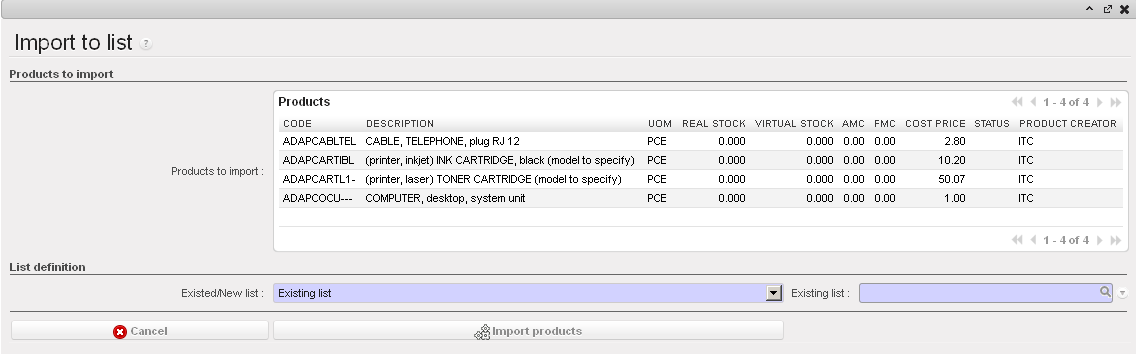
  1. The “Import to” list screen will open and display the list of products you have selected
  2. In the List definition section, select from the options:
    • Existing list, if you want to add these products to an existing list
    • New list, to create a new list
    • Replace list, to replace a list which is already in existence
  3. If you have selected either the Existing or Replace options, you will need to select the Existing list that you want to add to or replace.
  4. If you have selected the New list option, enter the Name of the new list
  5. And Enter the type
  • List, if for a list
  • Sub-list, if for a sub list which belongs to a “parent” list
  1. Click on Import products button to import products to list
  2. In the Product list screen enter all relevant details:

The fields Type and Name will have already been populated according to the information already in the system.

Import product list

C. How to update a product list or sub-list

Supply User Manual ENG -> Products -> 3.3 LU-SU2102: Product List -> B. How to create a new product list or sub list

C. How to update a product list or sub-list

Go to: Products / Products / Products List

  1. Use the search tools to filter values to find the list or sub-list you want to edit
  2. Click on the pencil icon next to the list to open it in edit mode
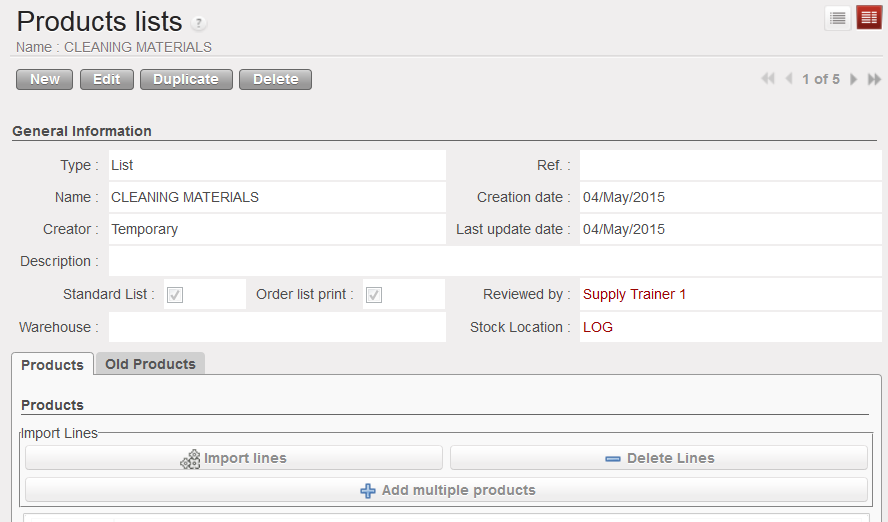
  3. Make the necessary changes
  4. Click on the “save” button

B. How to create a new product list or sub list

Supply User Manual ENG -> Products -> 3.3 LU-SU2102: Product List -> B. How to create a new product list or sub list

B. How to create a new product list or sub list

To view product lists or sub-lists in the system, Go to: Products / Products / Products List

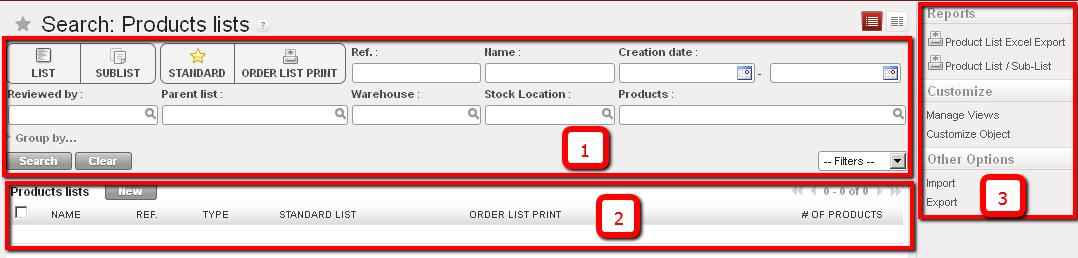
The product list dashboard displays.

It contains three different areas:

  1. Searching and grouping options
  2. Existing Lists or sub lists in the system
  3. Printing, import and export options once a list has been selected

List and sub-list dashboard

To create a new product lists or sub-list:

  1. Click on the “New” button to begin the creation process.
  2. Select the type of list you want to create (list or sub list), enter name, reference, description, Creator will be Temporary by default. Here you should select the level at which you are creating the list (HQ, Coordo, Project), for future modification of this list, this will be limited only to the level where the list was created. Select if the list is a standard or an order list. If we are creating a sub list, select the parent list; in this case only products on the parent list will appear; select warehouse and location related to the list.
  3. You can import a list of products by selecting Add attachment or, add multiple products using the button “Add multiple products” otherwise use the “new button” to individually add new products to the list.
  4. Click on Save.

Product list creation

A. LU Introduction (LU-SU2102)

Supply User Manual ENG -> Products -> 3.3 LU-SU2102: Product List -> A. LU Introduction (LU-SU2102)

A. LU Introduction (LU-SU2102)

Products lists and sub lists are very useful to automate tasks. They are useful when the same products are regularly ordered in different quantities. A product list (and sublist) means that we already have an outline of the products needed as a template, which will speed up the process for creating the order.

A product list can be used to define the products required by a mission, project or a particular activity; they can also be used to list products that a supplier may be able to provide.  Lists are always related to a warehouse and a location optionally can be linked to a supplier or customer.

Lists which are marked as Standard will be synchronised to all instance levels below. Any products added or removed from existing listed will also update the relevant lists below via synch, and will appear in the Old Codes tab of the Product List.

A sub-list has to be linked to a list, therefore at the time of choosing products for a sub-list, only those products appearing in the parent list will be available. For example: let’s imagine that an MSF project (project 01) contains 3 activities (OPD, Vaccination and Nutrition). By creating a list for project 01 and 3 sub-lists for each of the activities, the user will be able to benefit from using UniField tools such replenishment, forecasting, re-ordering and more.