B. DOCUMENTATION FROM SHIPMENT

Supply User Manual ENG -> 5. Warehouse -> 5.7 LU-SU4106:Shipment Documentation -> B. DOCUMENTATION FROM SHIPMENT

B. DOCUMENTATION FROM SHIPMENT

All needed shipping documentation can be generated from the shipment (freight manifest, invoice, free gift certificate and packing lists). Depending on the information entered in the different steps (pick/pack/ship), the generated documentation could include more or less information. Ensure that the “Document Information” and “Transport Information” tabs of the shipment are filled in so that the documentation will include all the necessary information (otherwise, this part of the documentation will be blank). Logically, as only sub SHIPS will be sent to customers, the generation of the documentation should be done from a sub SHIP in the state “Dispatched“.

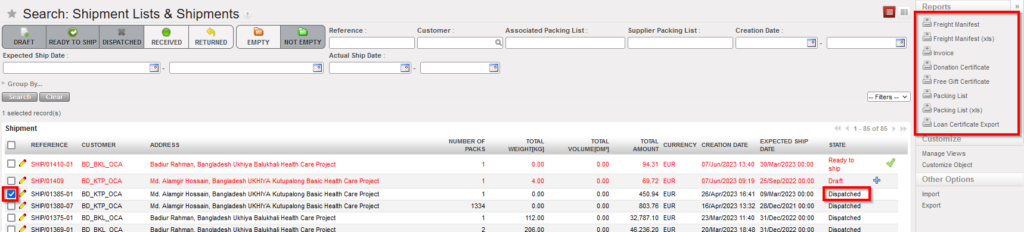
Go to: Warehouse / Warehouse Management / Deliveries / Shipment

  1. Using the check boxes, select the shipment (sub SHIP in state “Dispatched”) for which you want to generate the documentation.
  2. In the control panel, 5 options allow you to export 5 different documents.

This image has an empty alt attribute; its file name is ship-doc-1-1024x232.png

Generating shipment documentation

        3. The “Freight Manifest” option allows exporting a freight manifest in PDF and in Excel.

Freight Manifest in PDF

Freight Manifest in Excel

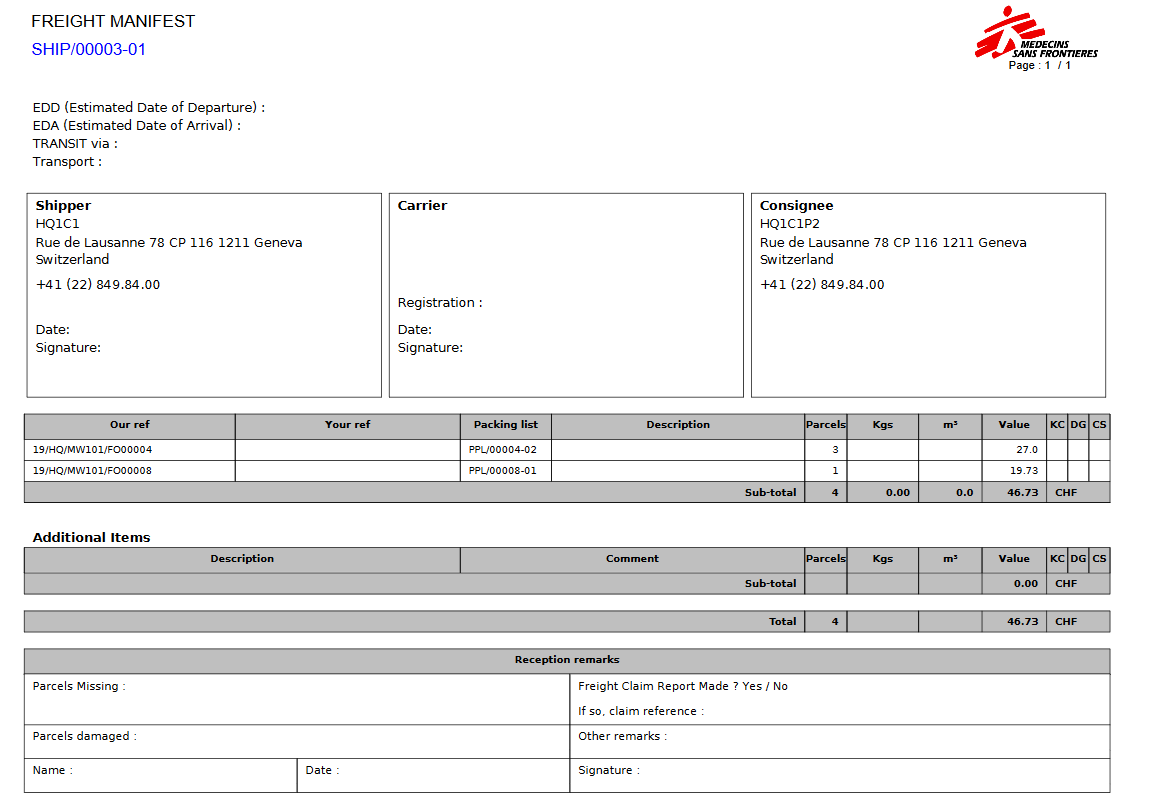
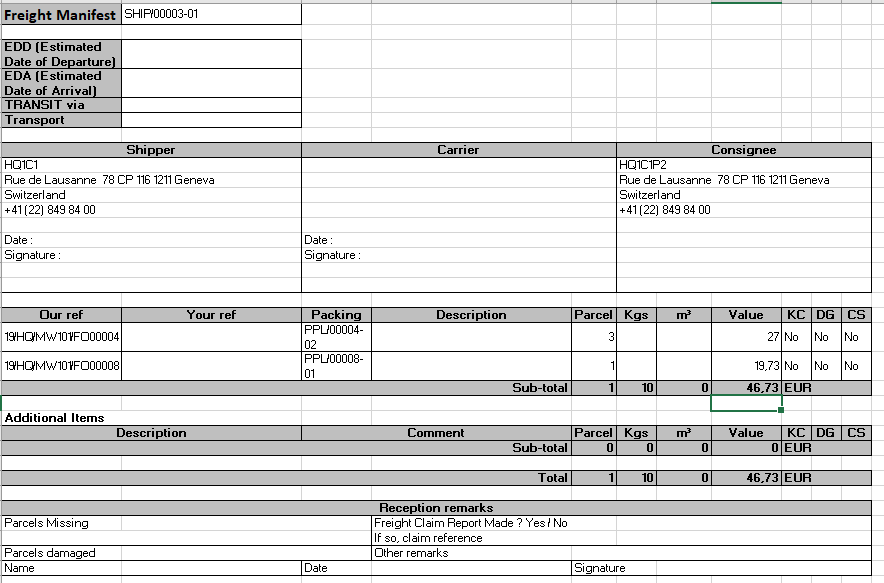
Shipper, carrier and consignee information appear on the manifest. Involved packing lists, number of parcels, weight, volume and value also appear. “Our ref” is for the FO reference at sending instance while “your ref” will be for the PO at the receiving instance.

   4. The “Invoice” option allows exporting proforma invoices to PDF.

Proforma invoice in PDF

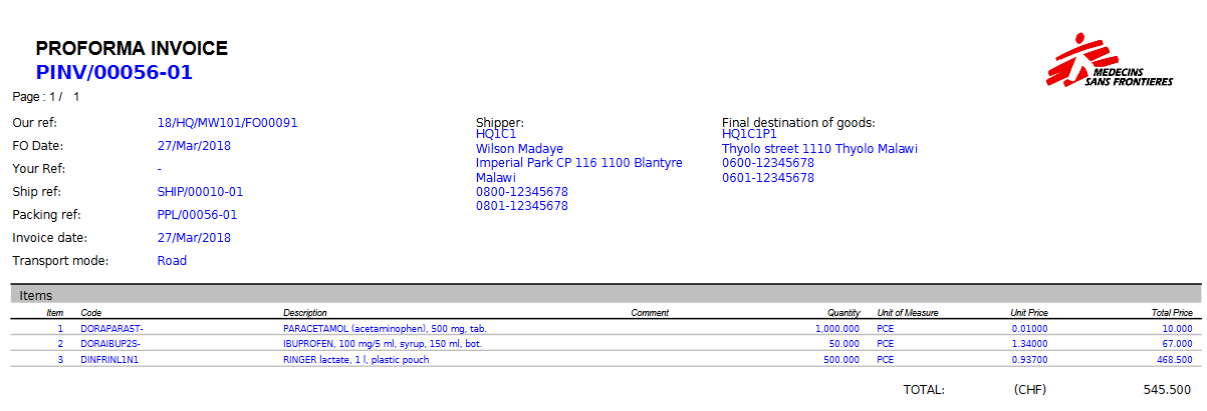
One proforma invoice is generated for each involved PPL and includes quantities and prices for each product.

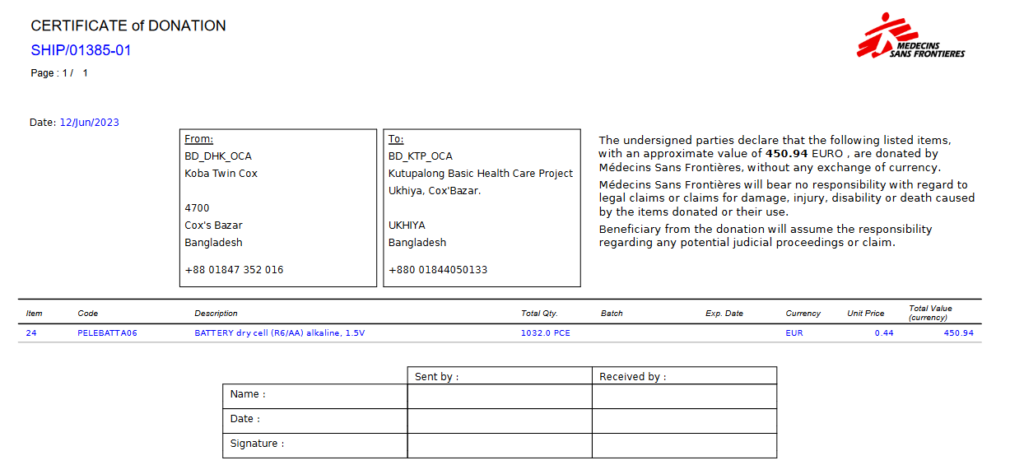
  5. “Donation Certificate” option allows exporting the Certificate of Donation in PDF, it is available for all SHIPs and OUTs for all Reason Types.

This image has an empty alt attribute; its file name is donation-1024x465.png

Certificate of Donation in PDF

6. The “Free Gift Certificate” option allows exporting a free gift certificate to PDF, it is available in the action menu for all SHIPs and OUTs.  

Free gift certificate in PDF

The free gift certificate includes information such as the total number of parcels, total weight, total volume and total value

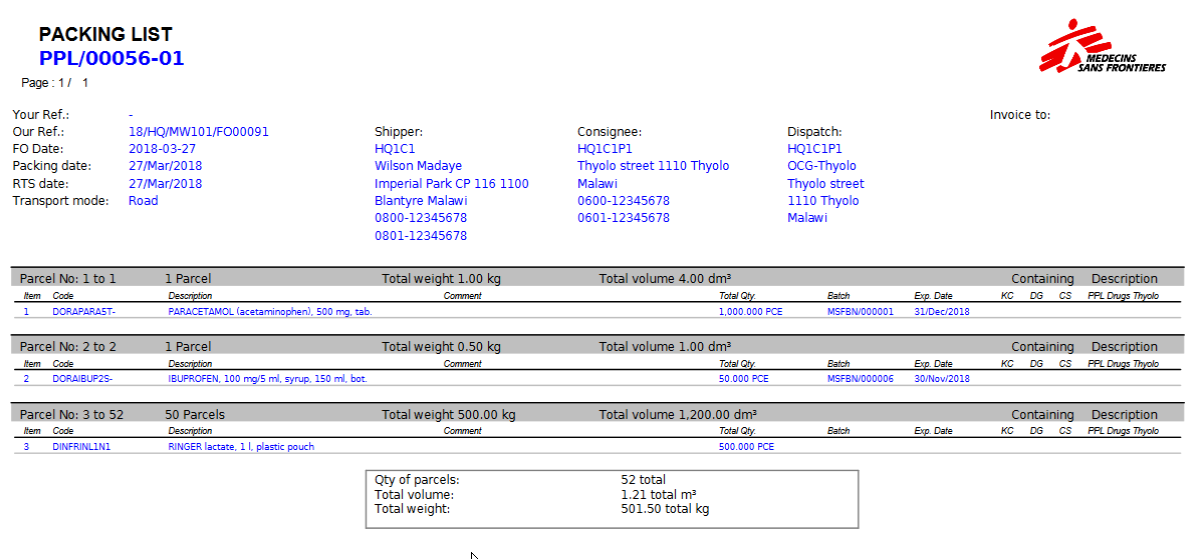
7. The “Packing List” option allows exporting to PDF all the packing lists (including parcels details) included in the shipment.

Packing List in PDF

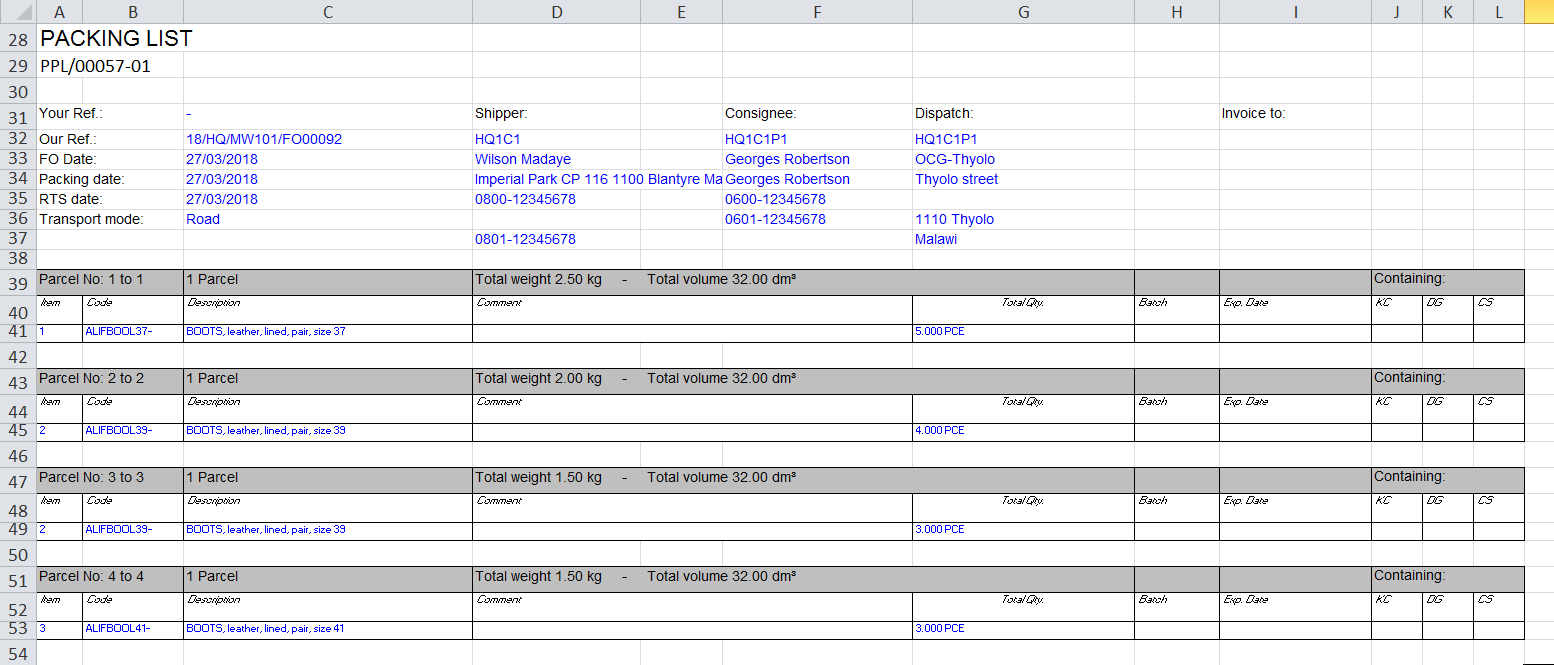
8. The “Packing List (xls)” option allows exporting to Excel all the packing lists (including parcels details) included in the shipment.

Packing List in Excel

9. “Loan Certificate Export” option allows exporting to pdf the Loan certificate, it is available in the Action Menu for all INs and OUTs (not draft Ships and Delivery Orders) if there is a line or more linked with “Loan” or “Loan Return” reason type.

This image has an empty alt attribute; its file name is loan-pdf.png

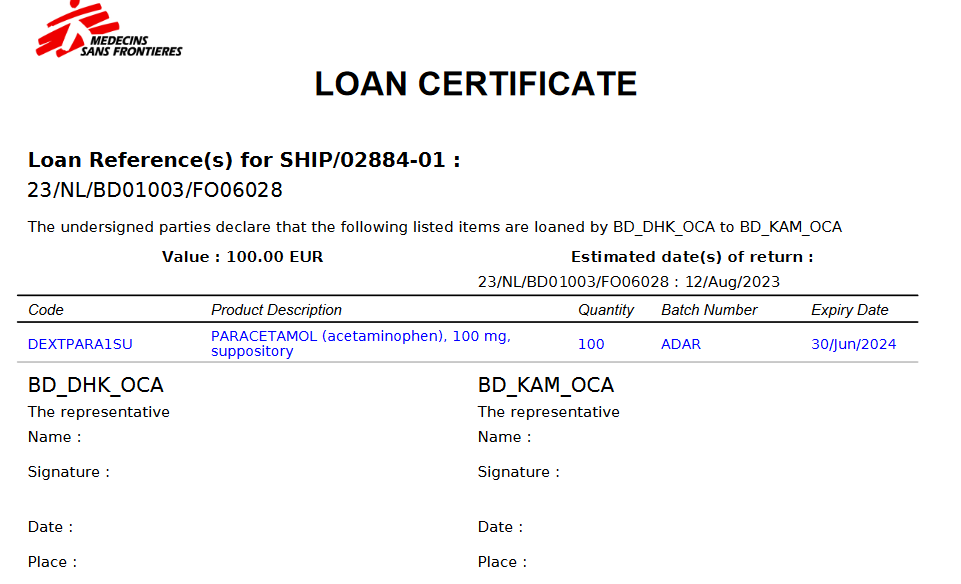
If there is a Loan and a Loan Return in the same SHIP, it is possible to select the document you want to view.

This image has an empty alt attribute; its file name is Picture2.png

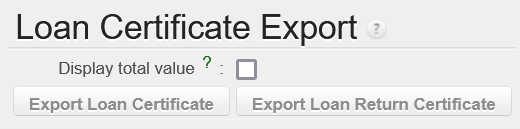
It is optional to show the total value of the loan in the pdf.  

Note that the generation of these documents may also be done from within the shipment as the 8 options are available in the action menu.

Note that the generation of these documents may also be done from main SHIPs if needed. It can also be done if the state of the shipment is different than “Shipped“. However, some documents (invoices and freight certificates) cannot be generated if the state of the “Shipment” is “Draft“.

J. DELIVERY ORDERS REFERENCES

Supply User Manual ENG -> 5. Warehouse -> 5.6 LU-SU4105: Delivery Orders -> J. DELIVERY ORDERS REFERENCES

J. DELIVERY ORDERS REFERENCES

Looking at the Delivery Order Dashboard (“Search: Delivery Orders” screen), it can be confusing to see the different types of references displayed. Hence, you will find below some explanations on how these different Delivery Order references are generated.

These are just overview explanations, exhaustive explanations on how the OUT references are generated will be explained in the relevant sections.

  1. OUT/XXXXX. This type of reference may be generated in the following cases:

a) When a Delivery Order is created directly when an IR with an External Consumption Unit as Location Requestor (or IR-line) is confirmed.

b) When a Delivery Order is created following the conversion of a Picking into a Delivery Order (Simple Out Delivery/OUT).

c) When a Delivery Order is created from scratch.

2. OUT-CONSO/XXXXX. This type of reference will be generated when Real Consumption Reports will be created and processed (see LU-SU4203 – How to report Real Consumption).

3. OUT/XXXXX-return. This type of references could be generated by claims (with type “Return”) raised to supplier following a non-conformed delivery. Actually, the claim will include an event and the processing of this event will generate a Picking Ticket (PICK-return). If this Picking Ticket is converted to an OUT (simple OUT process), a reference OUT-return will be generated (see LU-SU4202 on claims for more details).

3 types of references for the OUT

A. LU INTRODUCTION (LU-SU4106)

Supply User Manual ENG -> 5. Warehouse -> 5.7 LU-SU4106:Shipment Documentation -> A. LU INTRODUCTION (LU-SU4106)

A. LU INTRODUCTION (LU-SU4106)

During the pick/pack/ship process, several documents may be exported to PDF and printed at each step. Remember that the pick/pack/ship process will allow you to export and print all the necessary documentation while the simple OUT process will just allow you to export and print a document from the Delivery Order.

I. HOW TO CANCEL & RESOURCE AN “OUT”

Supply User Manual ENG -> 5. Warehouse -> 5.6 LU-SU4105: Delivery Orders -> I. HOW TO CANCEL & RESOURCE AN "OUT"

I. HOW TO CANCEL & RESOURCE AN “OUT”

As for Picking Ticket, “Cancel & resource” is available only on the OUTs which have been created following the sourcing of an IR from stock (i.e. not on order). This may be useful if, for example, after deciding to source from stock you realize that goods are actually not available in the stock. Cancel & resource will allow you to resource the request to a supplier (PO).

H. HOW TO CANCEL AN “OUT”

Supply User Manual ENG -> 5. Warehouse -> 5.6 LU-SU4105: Delivery Orders -> H. HOW TO CANCEL AN "OUT"

H. HOW TO CANCEL AN “OUT”

Just as PICK documents can sometimes be Cancelled, the same can happen with OUT documents. This may happen if you decide to not send the back-orders or if the requestor does not need the goods anymore. This Cancellation will directly impact the related IR and Cancel it if IR sourced from Stock or Cancel it if IR sourced to PO.

Out Cancellation can result on products being sent to “Cross Docking” location when products have been sourced to a PO from an IR. In order to avoid this, at Cancellation stage, user now have the option to send the goods either to Cross Docking or to proceed to an INTernal Move (automatically created).

1) Cancellation of an OUT at header level (with IR sourced on order)

Go to: Warehouse / Warehouse Management / Deliveries / Delivery Order

  1. Open the OUT you wish to cancel
  2. Click on the “Cancel” button located at the bottom of the screen.

Cancelling an OUT at header level

       3. Confirm the cancellation in the pop up window by clicking on the “Cancel” button.

Confirming cancellation of a OUT at header level

       4. Select what needs to be done with the Cancelled products

          a) Click on “Cancel Only” to send the goods to cross docking anyway (will be unreserved products)

Click on “Cancel only” to proceed anyway to product sent to Cross Docking

Note that you can check the “Unreserved Stock report” to see all the Cancelled products that have been sent to Cross Docking (LU-SU4302 Stock Inventory Report G. Unreserved Stock report)

       b) Click on “Cancel & create Internal Move” to generate the creation of a new “AvailableINT with “Source location” = Cross Docking and “Destination location” = MED/LOG depending on type of products

Click on “Cancel & create Internal Move” to move the goods via an INT mover

New INT created following OUT Cancellation

Please refer to the chapter “LU-SU4201 INTERNAL MOVES” to proceed forward with this INT.

In both cases, the OUT will display the same result = it will be Cancelled

OUT cancelled at header level

The state of the OUT (and of all its lines) switches to “Cancelled“.

Note that this will also trigger the Closing of the related IR and all IR-lines are “Closed (since IR has been sourced from PO)

IR Closed following cancellation of a OUT at header level

2) Cancellation on OUT at header level (with FO sourced from stock)

Go to: Warehouse / Warehouse Management / Deliveries / Picking

  1. Open the OUT you wish to cancel
  2. Click on the “Cancel” button located at the bottom of the screen.

Cancelling OUT at header level

     3. Confirm the cancellation in the pop up window by clicking on the “Cancel only” button.

Confirming cancellation of an OUT at header level

OUT cancelled at header level

The state of the OUT (and of all its lines) switches to “Cancelled“.

As a consequence, the corresponding IR (and all its lines) switches to the state “Cancelled” (see below).

IR Cancelled following cancellation of OUT at header level (note that “Show all” filter is on)

Please note that behavior of Cancellation at line level will be the same depending on the sourcing method except that the document status will not be updated (unless the “Cancelled” line is the last “Available” line).

G. HOW TO CONFIRM RECEPTION OF A DELIVERY ORDER

Supply User Manual ENG -> 5. Warehouse -> 5.6 LU-SU4105: Delivery Orders -> G. HOW TO CONFIRM RECEPTION OF A DELIVERY ORDER

G. HOW TO CONFIRM RECEPTION OF A DELIVERY ORDER

The Delivery Order should be confirmed once the shipment has been a confirmed as received by the consignee. The state of the OUT will then switch from “Dispatched” to “Received“.

If the OUT is for an ECU or for an external customer, the confirmation should be done manually.

If the OUT is for another UniField instance, the confirmation will be done by the synchronization once the corresponding Incoming Shipment will be processed on this other instance.

To confirm manually a Delivery Order

Go to: Warehouse / Warehouse Management / Deliveries / Delivery Orders

  1. Open the Delivery Order you wish to confirm (its state should be “Dispatched” and its partner should be either your instance either an external customer).

Dispatched Delivery Order

      2. Click on the “Confirm Reception” button located at the bottom of the screen

Confirming a Delivery Order

“Delivered” Delivery Order

The state of the OUT changes from “Dispatched” to “Received“.

Note that if you try to manually confirm a Delivery Order which should be confirmed by the synchronization, you will get the below message.

Confirming manually an OUT which is for another instance

The confirmation may be forced if you click “OK“. However, it is better to let the synchronization confirm the OUT.

F. HOW TO IMPORT AN EXCEL DELIVERY ORDER FILE


Supply User Manual ENG -> 5. Warehouse -> 5.6 LU-SU4105: Delivery Orders -> F. HOW TO IMPORT AN EXCEL DELIVERY ORDER FILE

F. HOW TO IMPORT AN EXCEL DELIVERY ORDER FILE

Delivery Document (OUT)  can be imported from an Excel file.

Go to: Warehouse / Warehouse Management / Deliveries / Delivery orders

  1. Select Delivery Order you want to import
  2. Click “Process” on the OUT that you wish to import
  3. Click on “Import OUT”.

Note that there is a check on qty that must be lower or equal to Ordered Qty

The data is imported to the main screen and manual validation is still needed to process the document forward.

E. HOW TO EXPORT AN EXCEL DELIVERY ORDER FILE

Supply User Manual ENG -> 5. Warehouse -> 5.6 LU-SU4105: Delivery Orders -> E. HOW TO EXPORT AN EXCEL DELIVERY ORDER FILE

E. HOW TO EXPORT AN EXCEL DELIVERY ORDER FILE

Delivery Document (OUT)  can be exported to an Excel file.

Go to: Warehouse / Warehouse Management / Deliveries / Delivery orders

  1. Select Delivery Order you want to export
  2. Click on the button “Export OUT” on the form view of your Delivery Order

     3. An Excel version of the OUT is open. You may save or update it as needed.

D. HOW TO PROCESS A DELIVERY ORDER

Supply User Manual ENG -> 5. Warehouse -> 5.6 LU-SU4105: Delivery Orders -> D. HOW TO PROCESS A DELIVERY ORDER

D. HOW TO PROCESS A DELIVERY ORDER

A Delivery Order can only be processed if its state is “Available“, meaning that at least one product line of the OUT is “Available“.

If the OUT is created following the sourcing of an IR from stock, its state will be “Available” if at least one of the product lines is “Available” in stock. Otherwise, the OUT will have the state Not Available. The source location of the product lines will be the stock.

If the OUT is created following the sourcing of an IR on order (PO), it will only be created when the PO (or a PO-line) will be confirmed and it will have the state Not Available. Its lines will have the state “Not available” and their source location will be “Cross docking”. The state of the OUT-lines will switch to “Available” as soon as their corresponding IN-line will be received in cross-docking. As a consequence, the state of the OUT will also switch to “Available“.

If the OUT is created following the conversion from an “Available” PICK, it will be created with the state “Available“.

Other situations are also possible involving mixed sourcing (request partly sourced from stock and partly sourced on order), mixed availability (some lines of the OUT “Available” and some “Not Available”, partial confirmations of POs, partial reception of POs,)

Note that in all cases, you may force the availability. This will have consequences on the states of the OUT-lines and/or on the state of the OUT.

If the Delivery order has been created from an IR, the “Reason type” will be “Deliver unit”, if the Delivery Out has been created from a FO, (See below how to convert Pick to OUT), the “Reason type” will be “Deliver Partner”

Go to: Warehouse / Warehouse Management / Deliveries / Delivery Orders

By default, the “Available” filter is activated, and the “Available” Delivery Orders are shown. Note that in the below example, an IR with Location requestor = ECU was sourced on order (PO). This PO was confirmed and the related IN partially processed.

  1. Open the Delivery Order you wish to process. Its state should be “Available“.

“Available” Delivery Order

        2. Click on the “Process” button.

Processing an “Available” Delivery Order

The source location is “Cross docking“. Quantities already received in CD are “Available” (line 2) while quantities not yet received are “Not Available(lines 1 and 3). Note the yellow message in the above screen.

3.  In the “Products to Process” screen, select products and quantities you wish to process by clicking on the “Copy all” button or by using the pencil icons. If necessary, update the asset references, batch numbers and/or expiry dates by editing the lines and clicking on the “floppy disk” icon .

Processing an “Available” Delivery Order

Note that all products and quantities which were available in the “Delivery Order” screen have been transferred to the “Products to Process” screen. This is the meaning of the yellow message on the previous screen.

The “Save as Draft” button can be used to save the information encoded in case you need to process it later.

4. Click on the “Process” button.

Processing an “Available” Delivery Order

Delivery Order after processing (back order)

Delivery Order after processing (processed products/quantities)

If the OUT was fully processed, it will simply be Dispatched.

If the OUT was only partially processed (as it is the case in the above example), a back-order will be created. The processed products/quantities are registered on a new OUT with the state “Dispatched“, while the old OUT stays open (“Confirmed” in this case) in order to process products and quantities which will be received in CD in the future.

Again, one scenario among many was selected to illustrate the processing of a Delivery Order. Alternatives involve sourcing from stock, conversion from PICK to OUT, situations in which no back-orders are left behind, …

Note that if you need to change the source location before processing an “Available” OUT-line, it is possible to first make the line “Not Available” (by clicking on the yellow arrow to cancel the availability) then click on the pencil icon to edit the OUT-line and change the source location to the required one. After that you should re-check the availability of the OUT by clicking on the “Check Availability” button