Supply User Manual ENG -> Products -> 3.6 LU-SU2105: Kits/Modules -> G. How to Add/Remove Items in KIT Composition List
Overview
The Kit Composition List (KCL) records all items that constitute a given KIT. UniField allows you to add new items to an existing KCL or remove items from it directly, without creating a new KCL from scratch. Each operation is tracked via an internal transfer document (INT/KIT) to maintain full stock traceability.
|
Go to: Products › Kit Management › Composition List › Kit Composition List › [open a KCL record] |
|
⚠️ Prerequisite: The Add Items and Remove Items buttons are only visible when the KCL is in Draft or Completed status. |
Part 1 — Adding Items to a KCL
Follow the steps below to add one or more items to an existing Kit Composition List.
|
1. Open the Kit Composition List Navigate to Products › Kit Management › Composition List › Kit Composition List. The search screen lists all existing KCLs. Locate and click on the KCL you wish to modify — it must be in Draft or Completed status. |
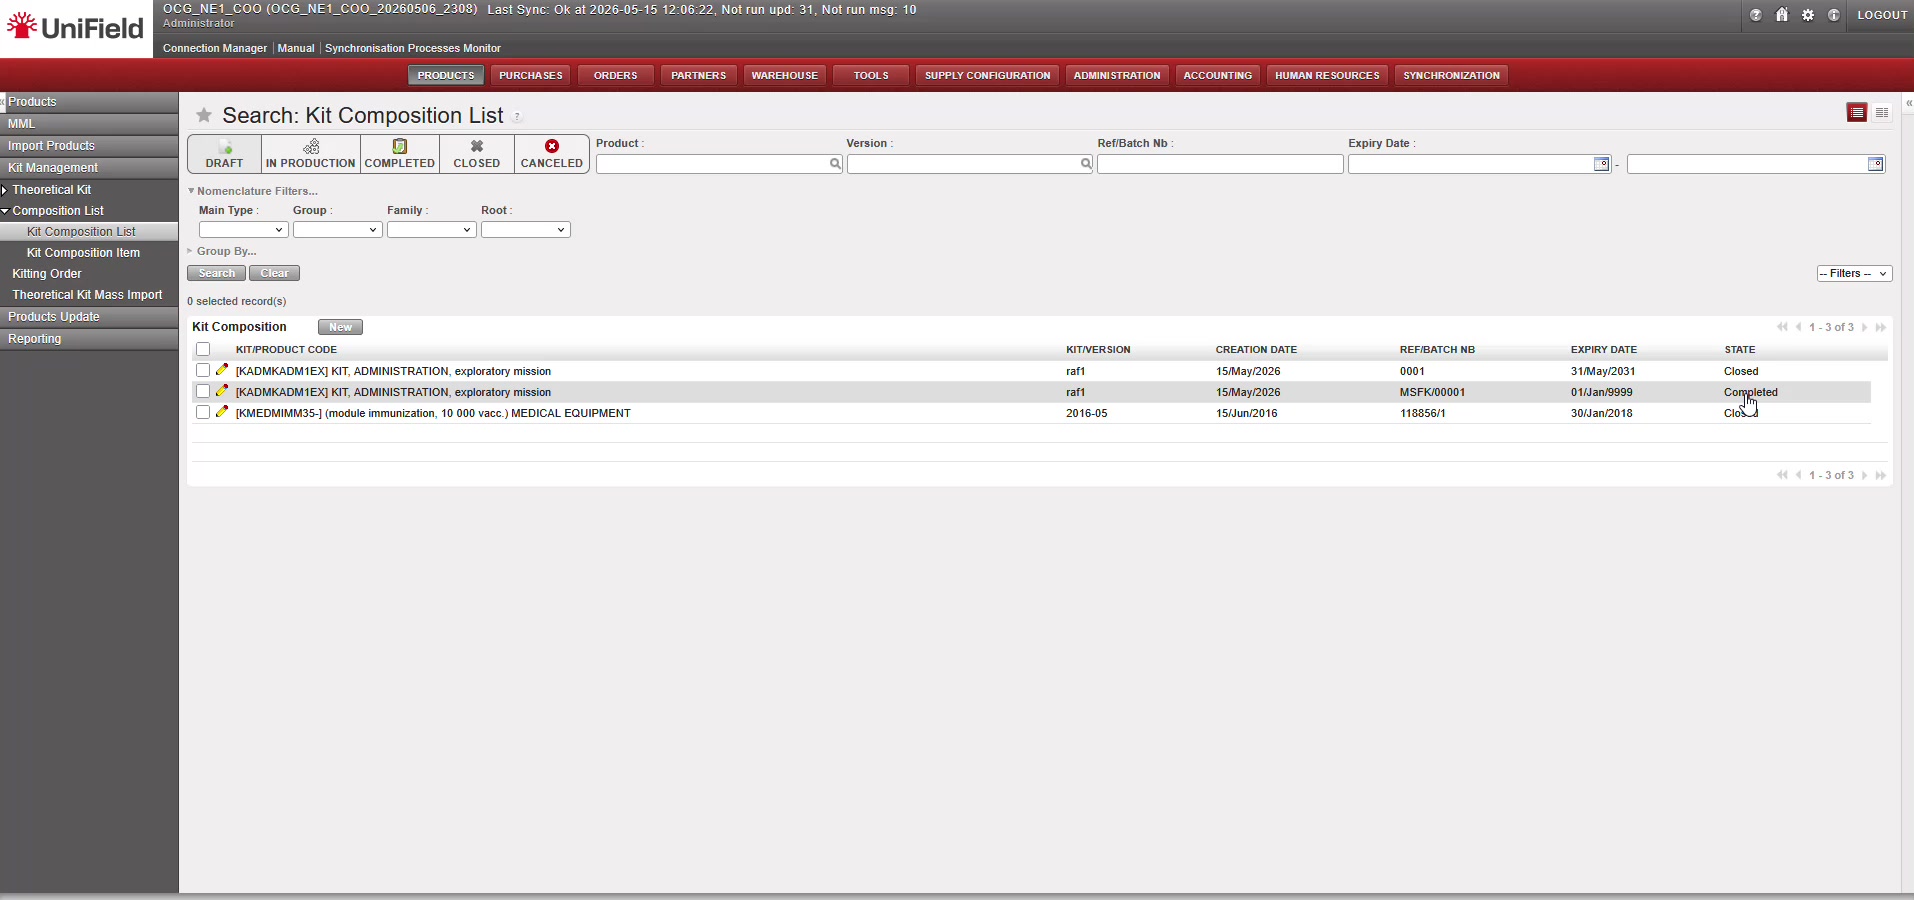
Fig. 1 — Kit Composition List search results. Click on a record in Completed or Draft status.
|
2. Review the KCL record and click “Add Items” The KCL record opens, showing all current composition lines. At the bottom of the screen, find the action bar. The buttons appear in the following fixed order: Add Items │ Remove Items │ Substitute Items │ De-Kitting │ Close. Click Add Items. |
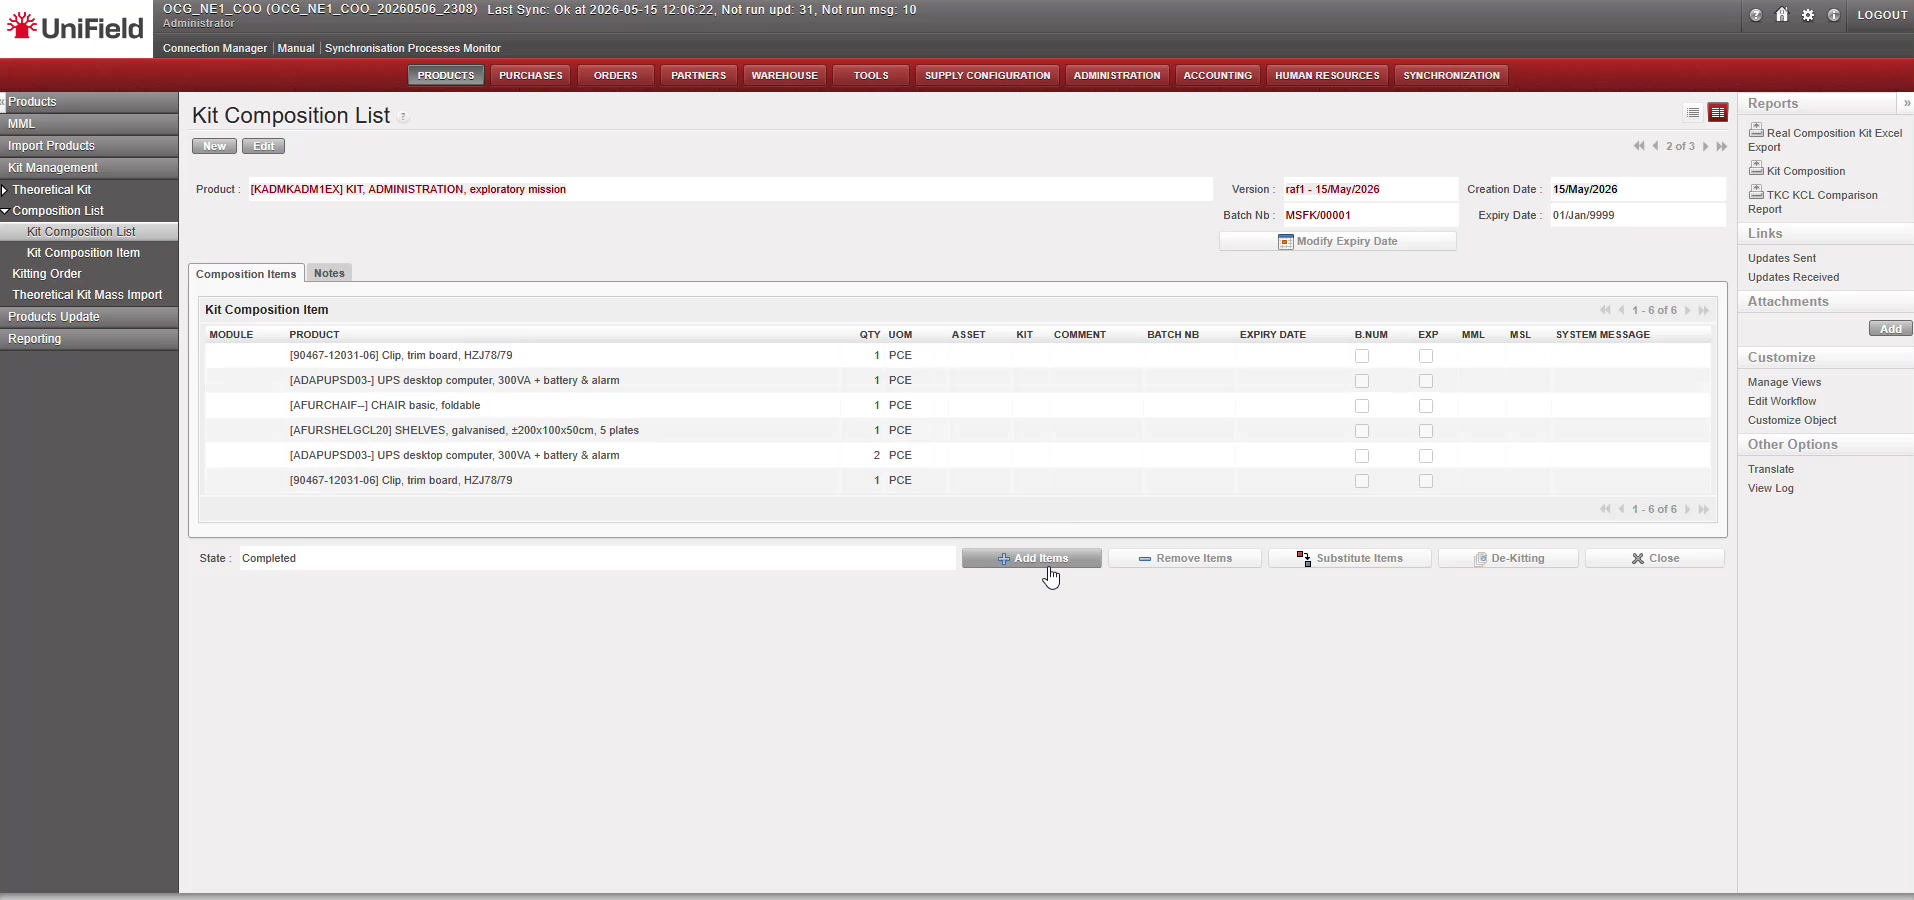
Fig. 2 — KCL record (Completed status, 6 items). Cursor on the Add Items button in the action bar.
|
3. The “Add Kit Items” pop-up opens A pop-up window opens titled Add Kit Items. It shows the Composition List Reference and Kit Product at the top, and an empty item line below. The line contains the following fields: Product, Source Location, Batch Nb, Expiry Date, Qty, UOM, Asset, Comment, Kit, Lot, Exp, Module, Availability. |
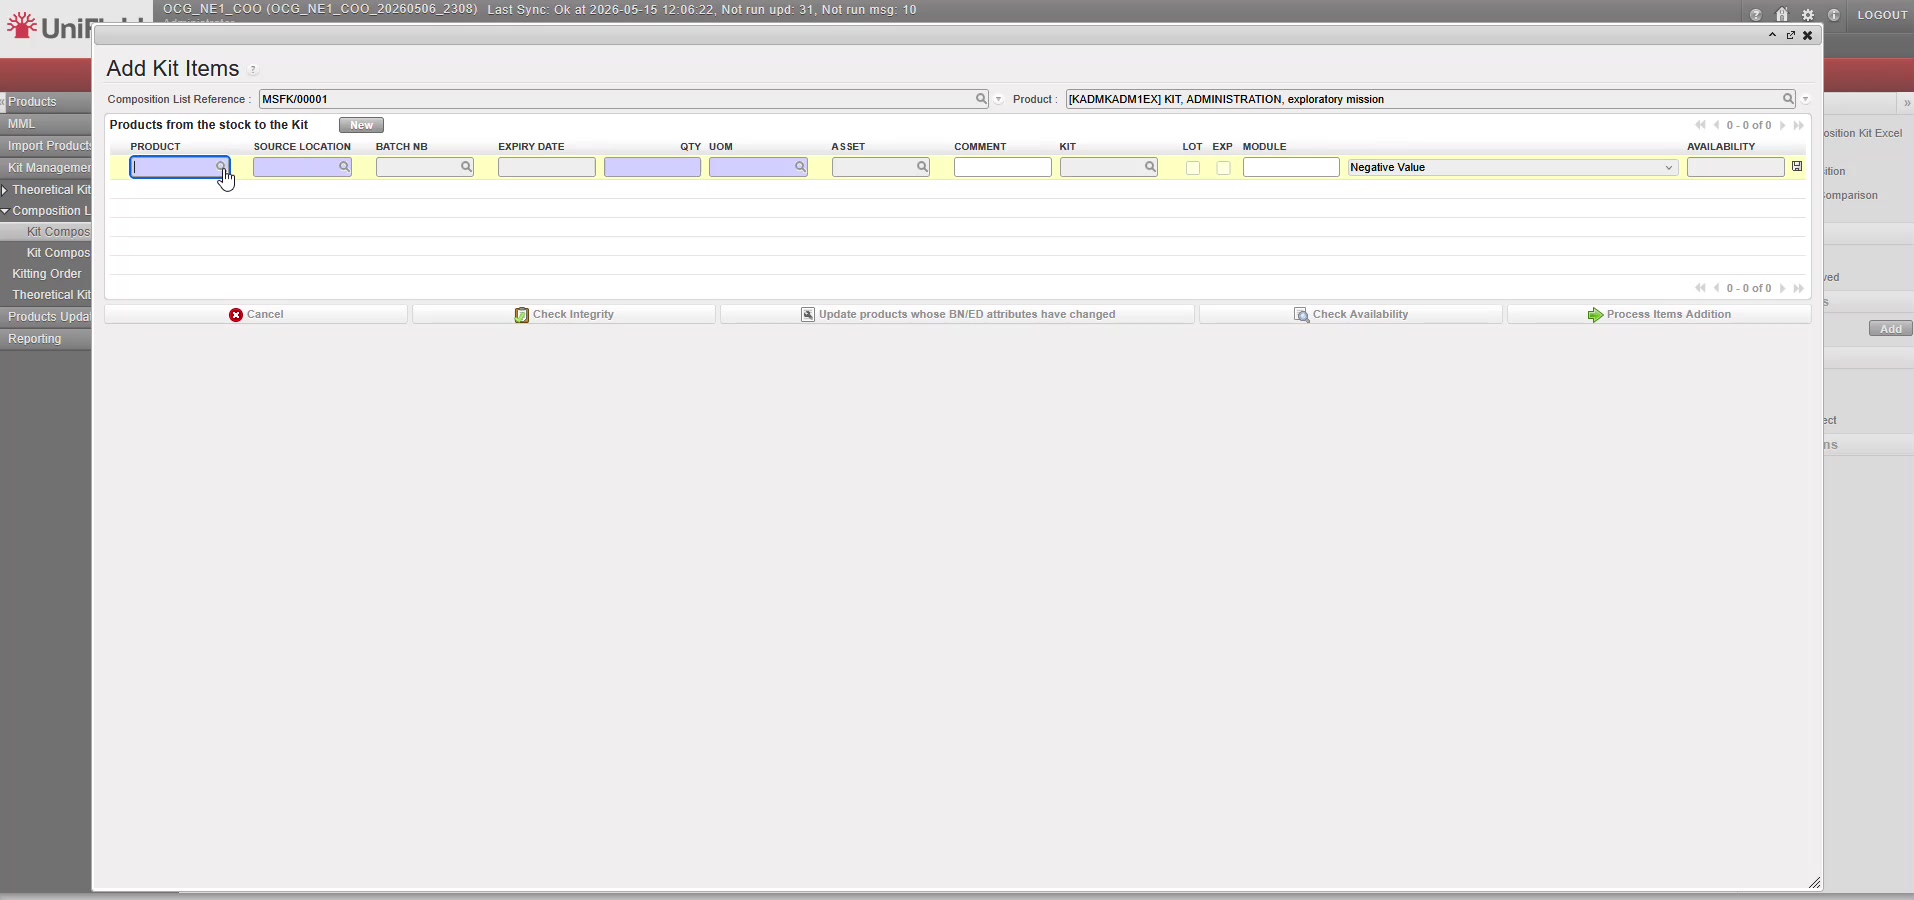
Fig. 3 — Add Kit Items pop-up. An empty item line is ready to be filled.
|
4. Search for and select the item to add Click the search icon in the Product field. The Search Products modal opens, listing all available items. Use the filters (Code, Description, Stock Location, etc.) to narrow results. Click on the desired item to select it. Note: the Add Items function is not restricted to TKC items — any item may be added. |
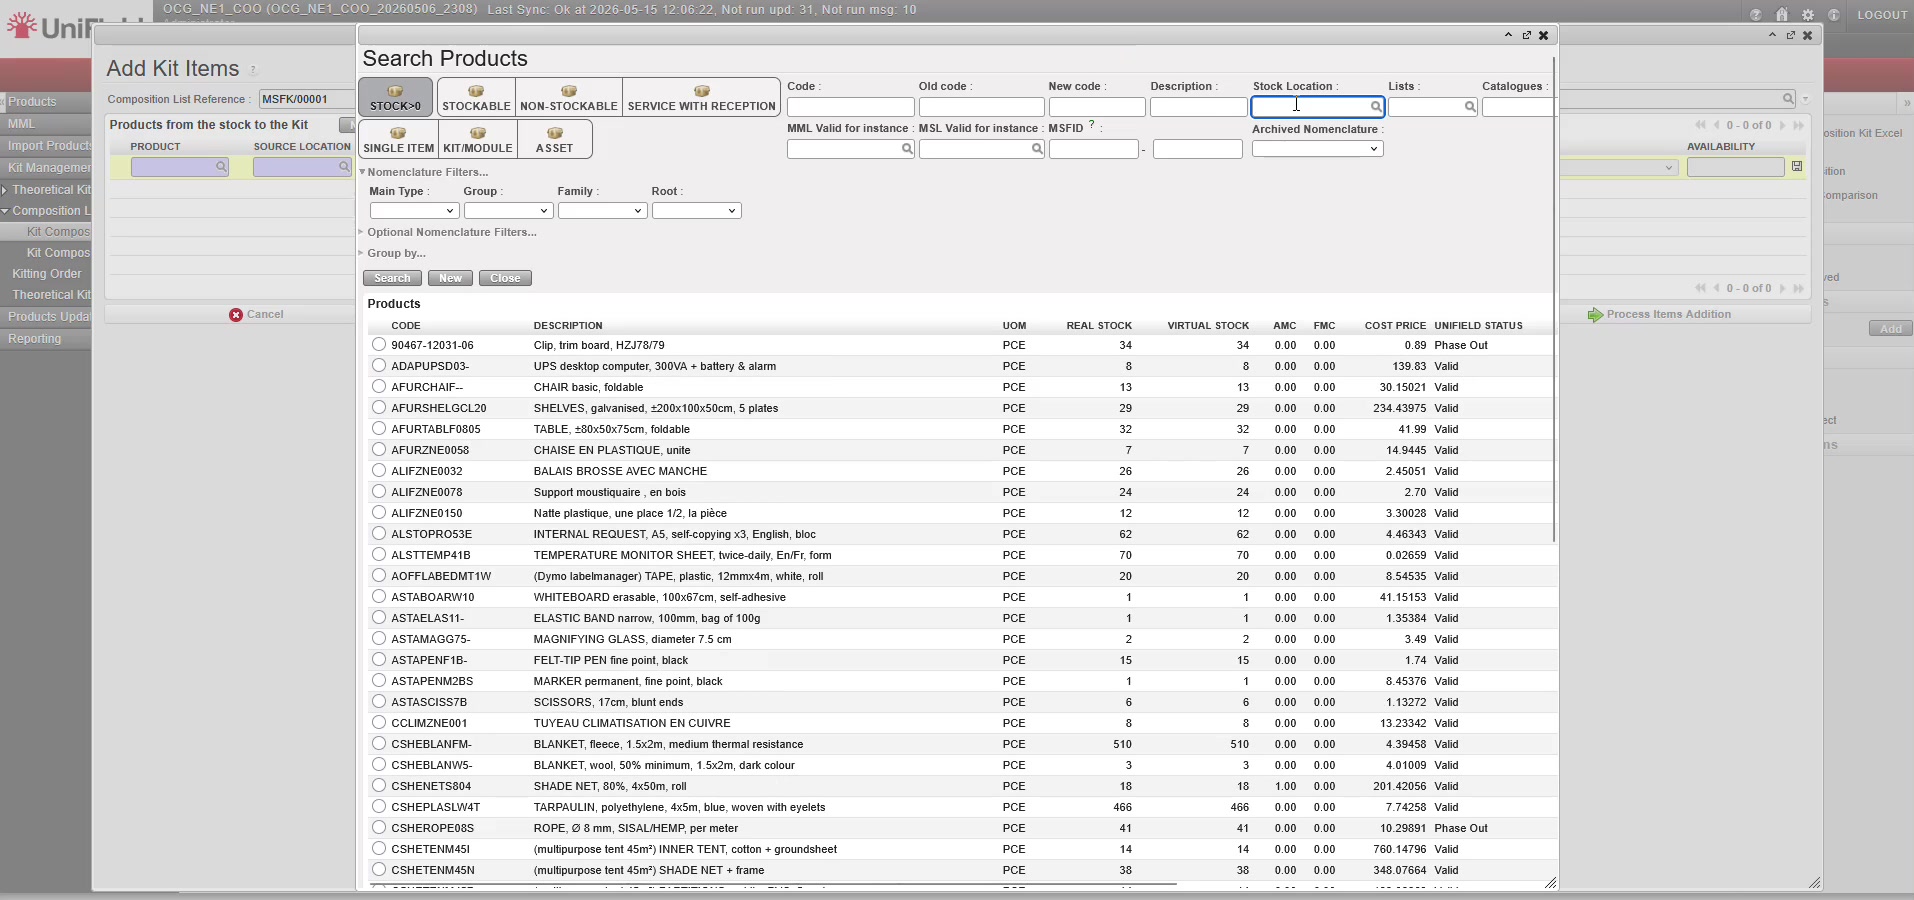
Fig. 4 — Search Products modal. Use filters to find the item and click to select it.
|
5. Set Source Location and Quantity After selecting the item, it appears as a line in the pop-up. Enter or confirm the Source Location (warehouse from which stock will be taken) and set the Quantity. The UOM is auto-populated from the item. |
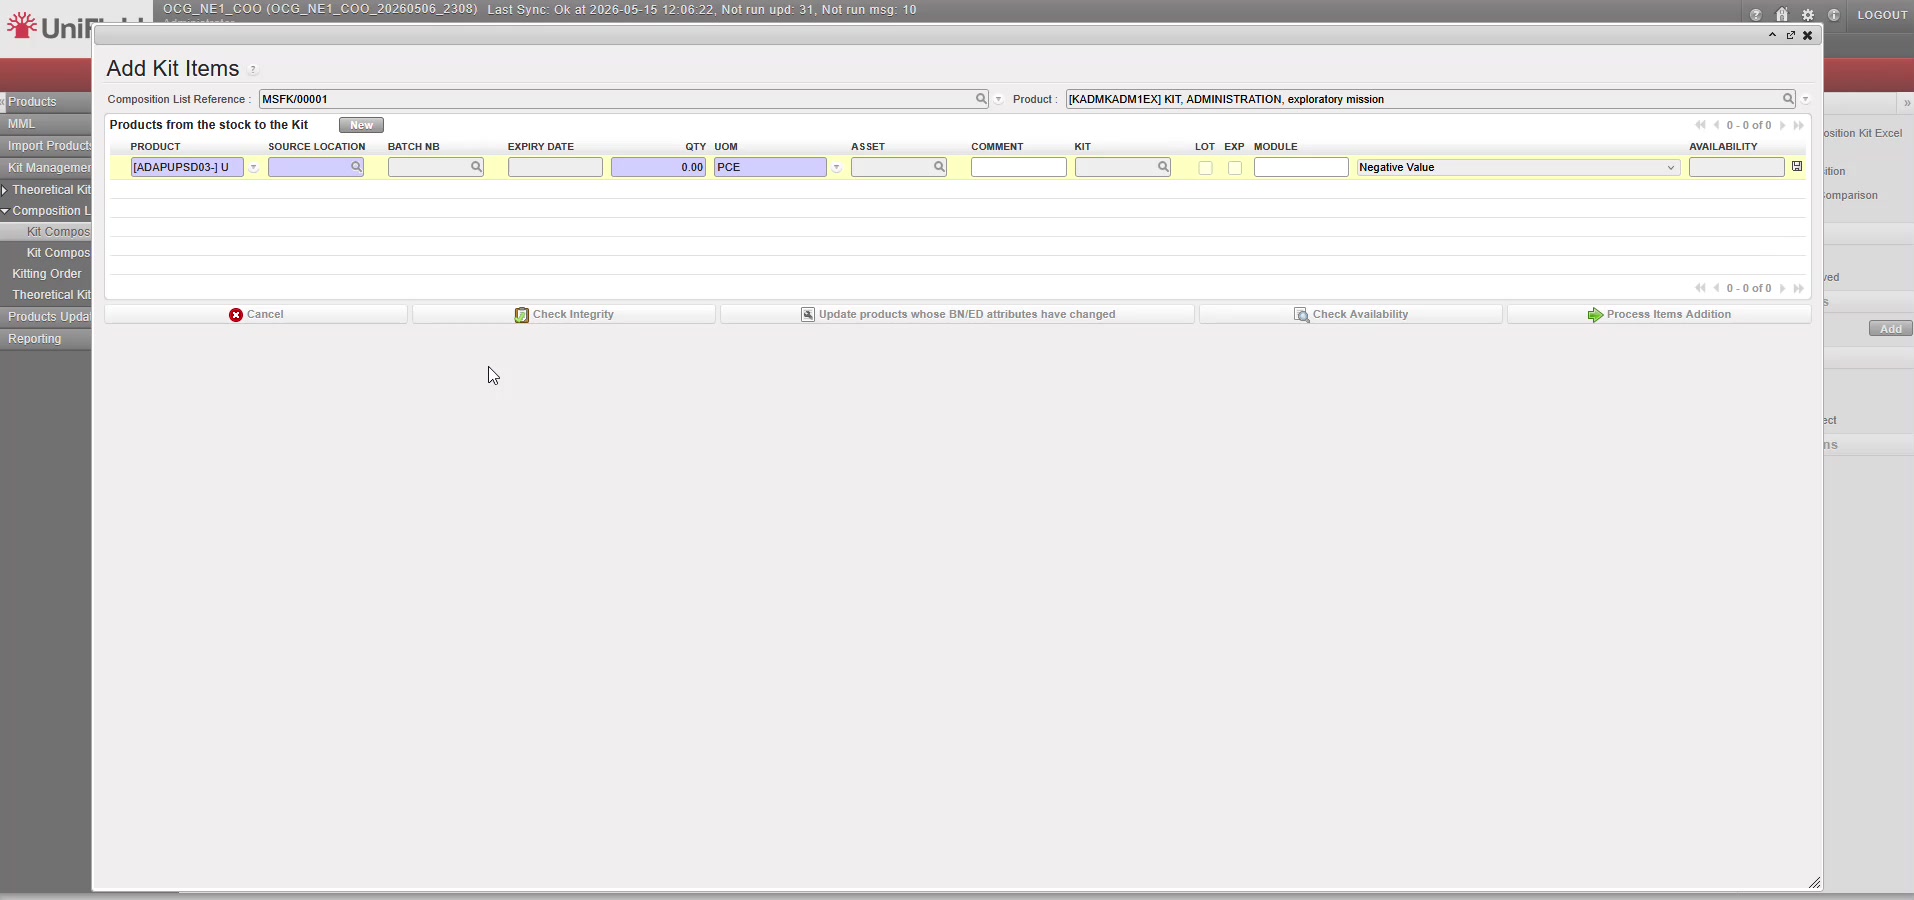
Fig. 5 — Item selected in the pop-up. Source Location set to LOG, Qty set to 2.
|
6. Click “Check Availability” Click the Check Availability button in the action bar at the bottom of the pop-up. The system verifies that the requested quantity is available at the selected Source Location. The result appears in the Availability column of the item line. Confirm the available stock is sufficient before proceeding. |
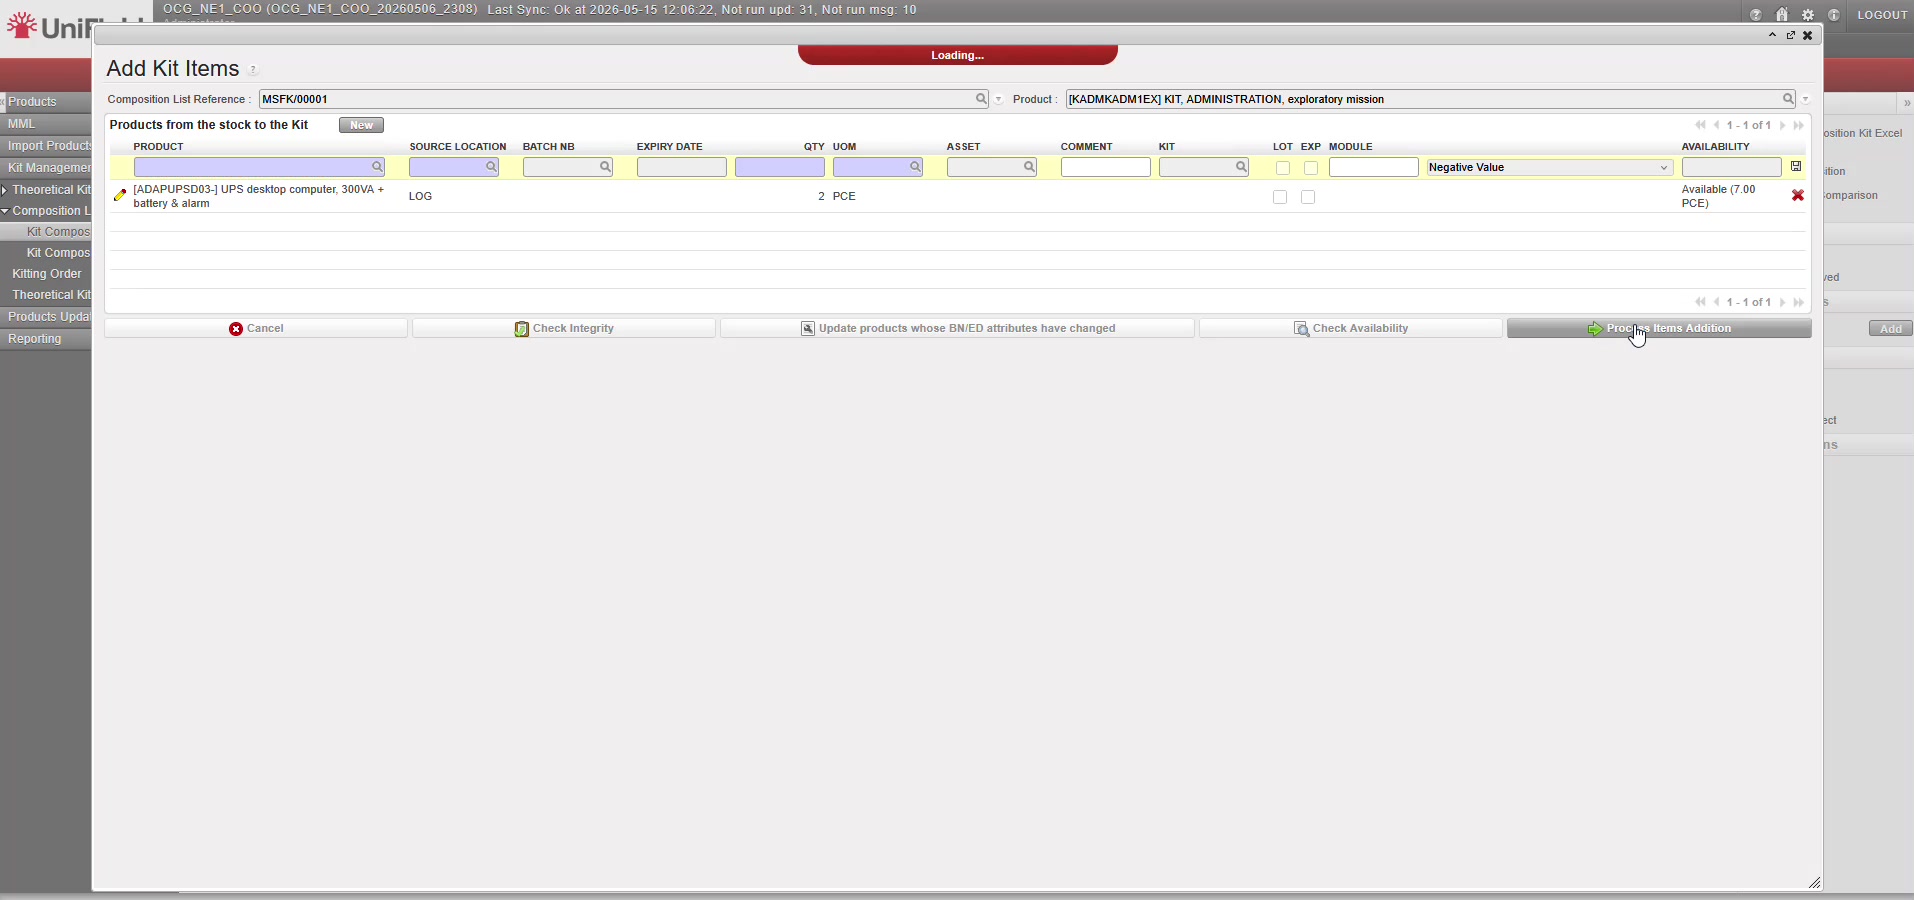
Fig. 6 — Availability confirmed: 7.00 PCE available at the Source Location. The Process Items Addition button is now active.
|
7. Click “Process Items Addition” Click the Process Items Addition button to confirm the operation. The system creates an internal transfer document (INT/KITXXXXX, reason type 15 — Kit) to record the stock movement from the Source Location to the Kitting location. |
|
8. Modify Expiry Date (if prompted) A Modify Expiry Date screen appears. The system asks you to confirm or update the expiry date for the KCL batch. Set the New Date if required, then click Ok to complete the operation. |
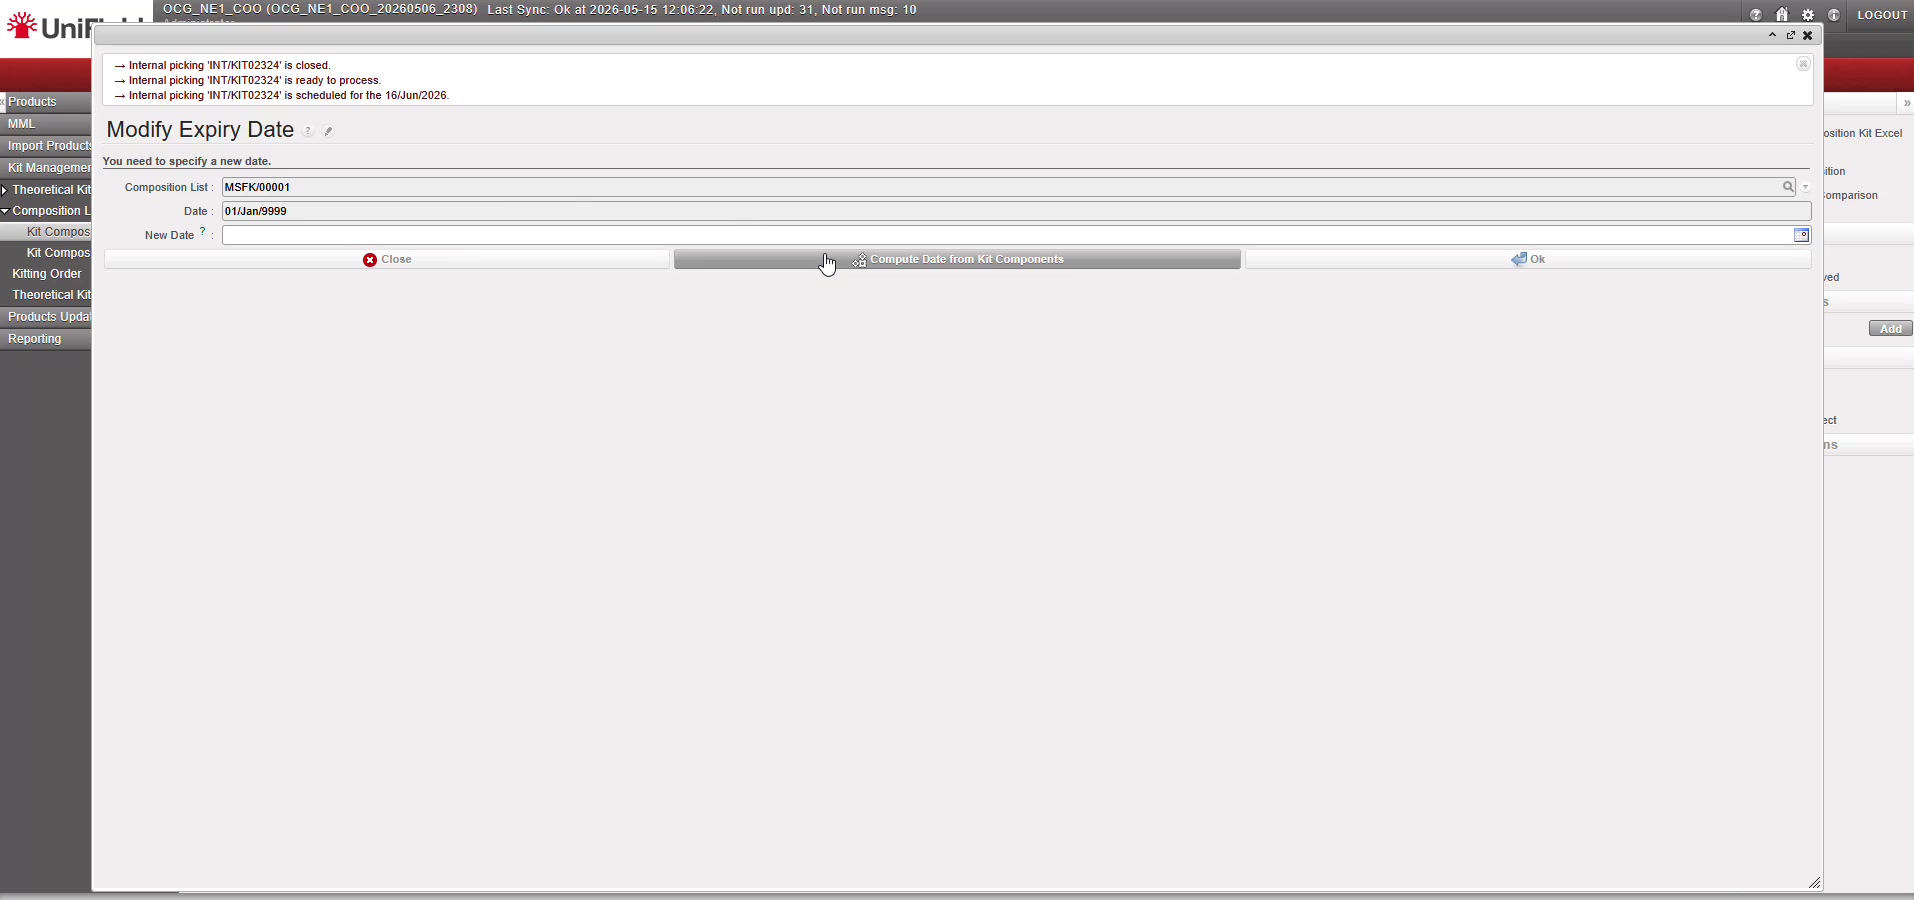
Fig. 7 — Modify Expiry Date step. Confirm or update the expiry date, then click Ok.
|
9. Verify the result The system returns to the KCL record. The newly added item appears as a new line in the Kit Composition Item list. An information message at the top of the screen confirms the operation, including the expiry date update. |
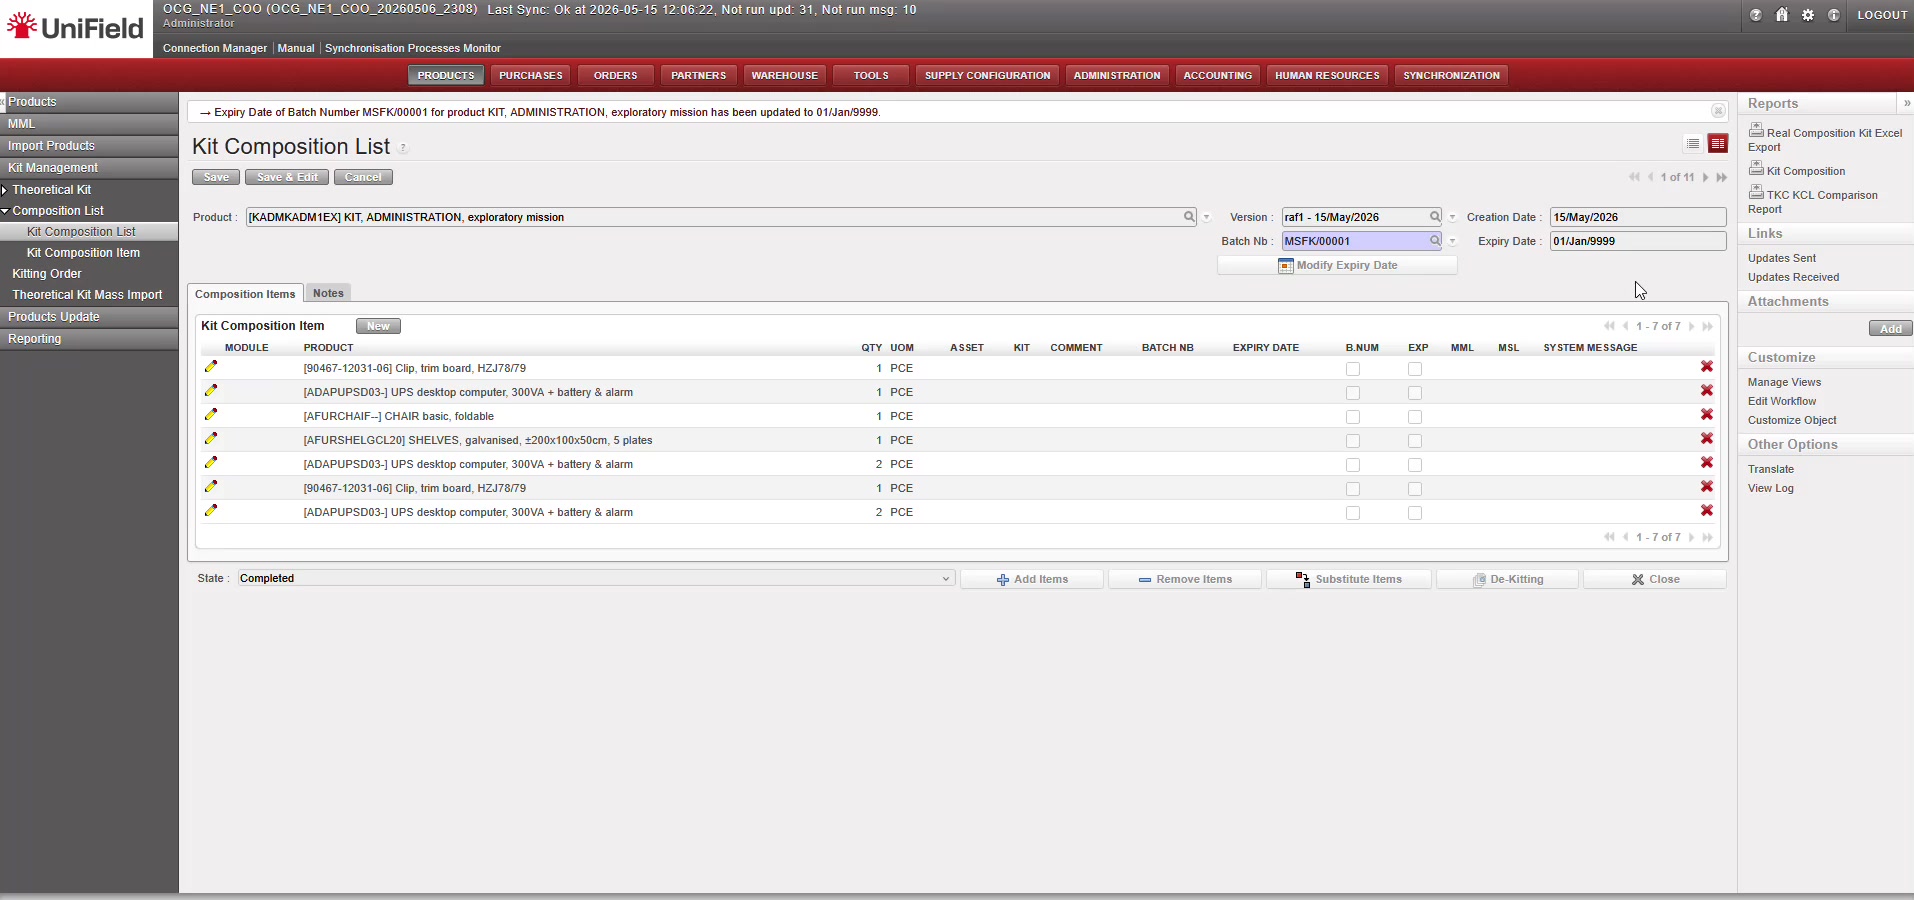
Fig. 8 — KCL after Add Items: a new line has been added (now 7 items). The INT/KIT document was created automatically.
Part 2 — Removing Items from a KCL
Follow the steps below to remove one or more items from an existing Kit Composition List.
|
1. Open the KCL record and click “Remove Items” Open the KCL record (status must be Draft or Completed). In the action bar at the bottom of the screen, click Remove Items. |
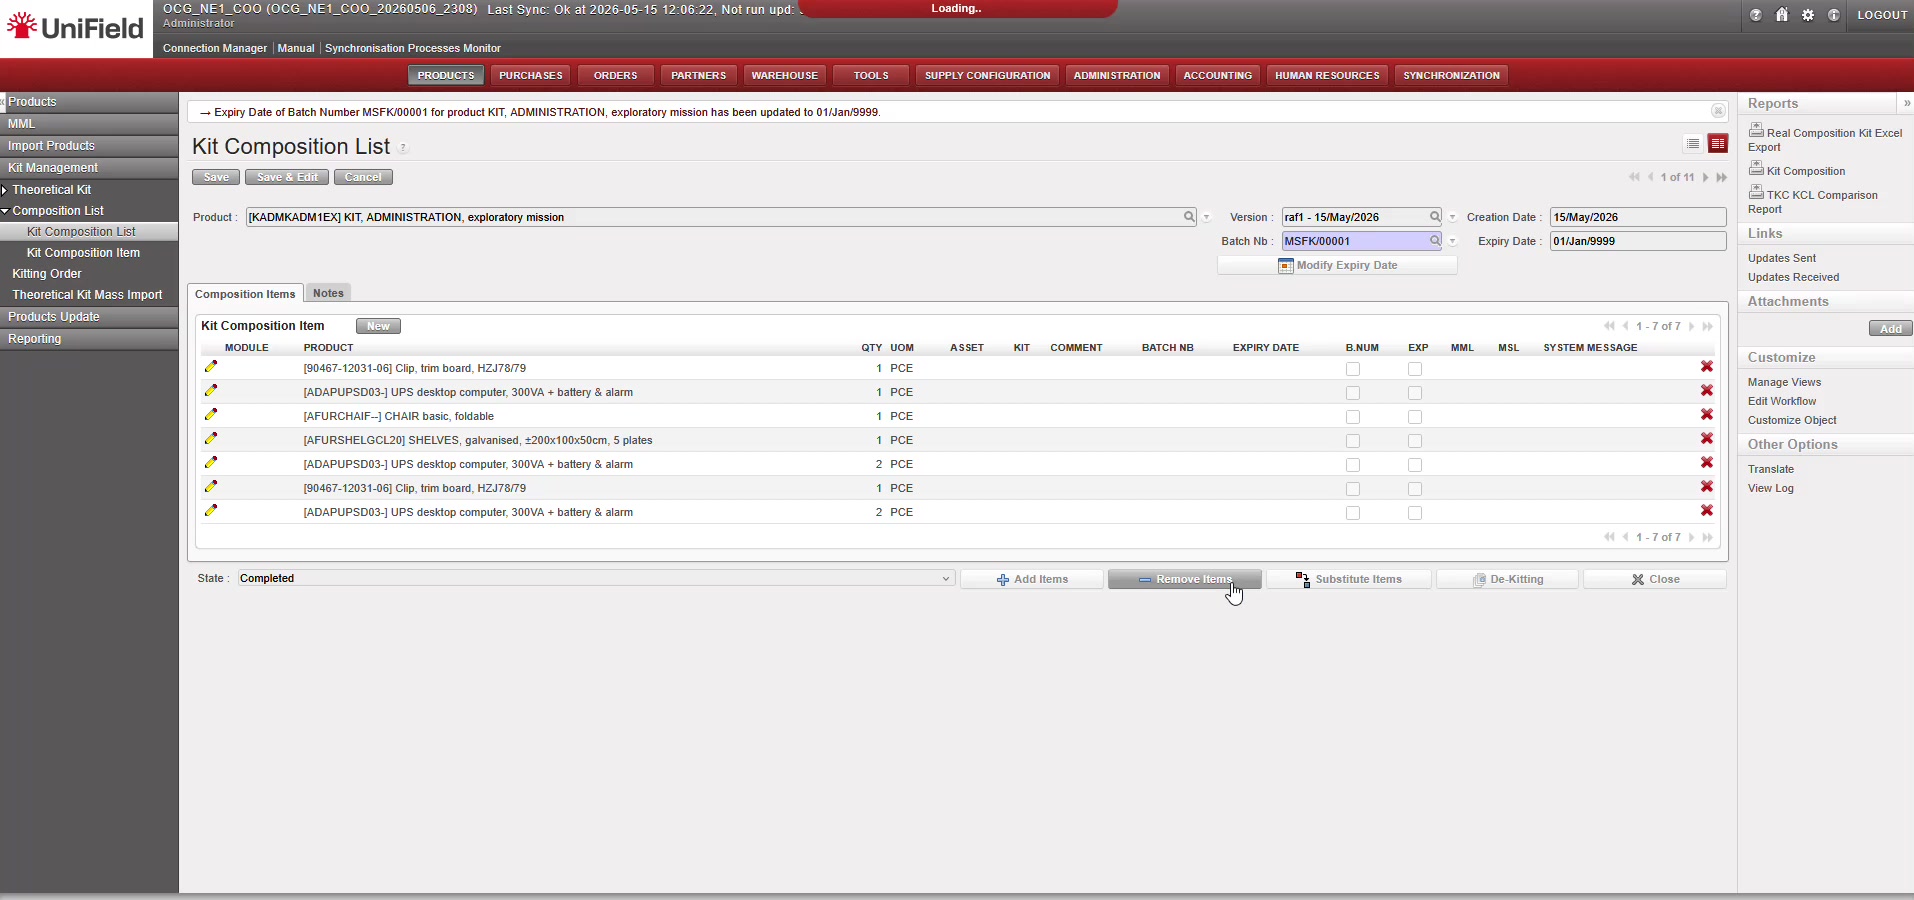
Fig. 9 — Action bar with the Remove Items button highlighted. KCL is in Completed status.
|
2. The “Remove Kit Items” pop-up opens A pop-up window opens titled Remove Kit Items. At the top, it shows the Composition List Reference and the Kit Product. Below, a Destination Location of Items field is displayed (mandatory), followed by an empty Products to remove from the Kit list. |
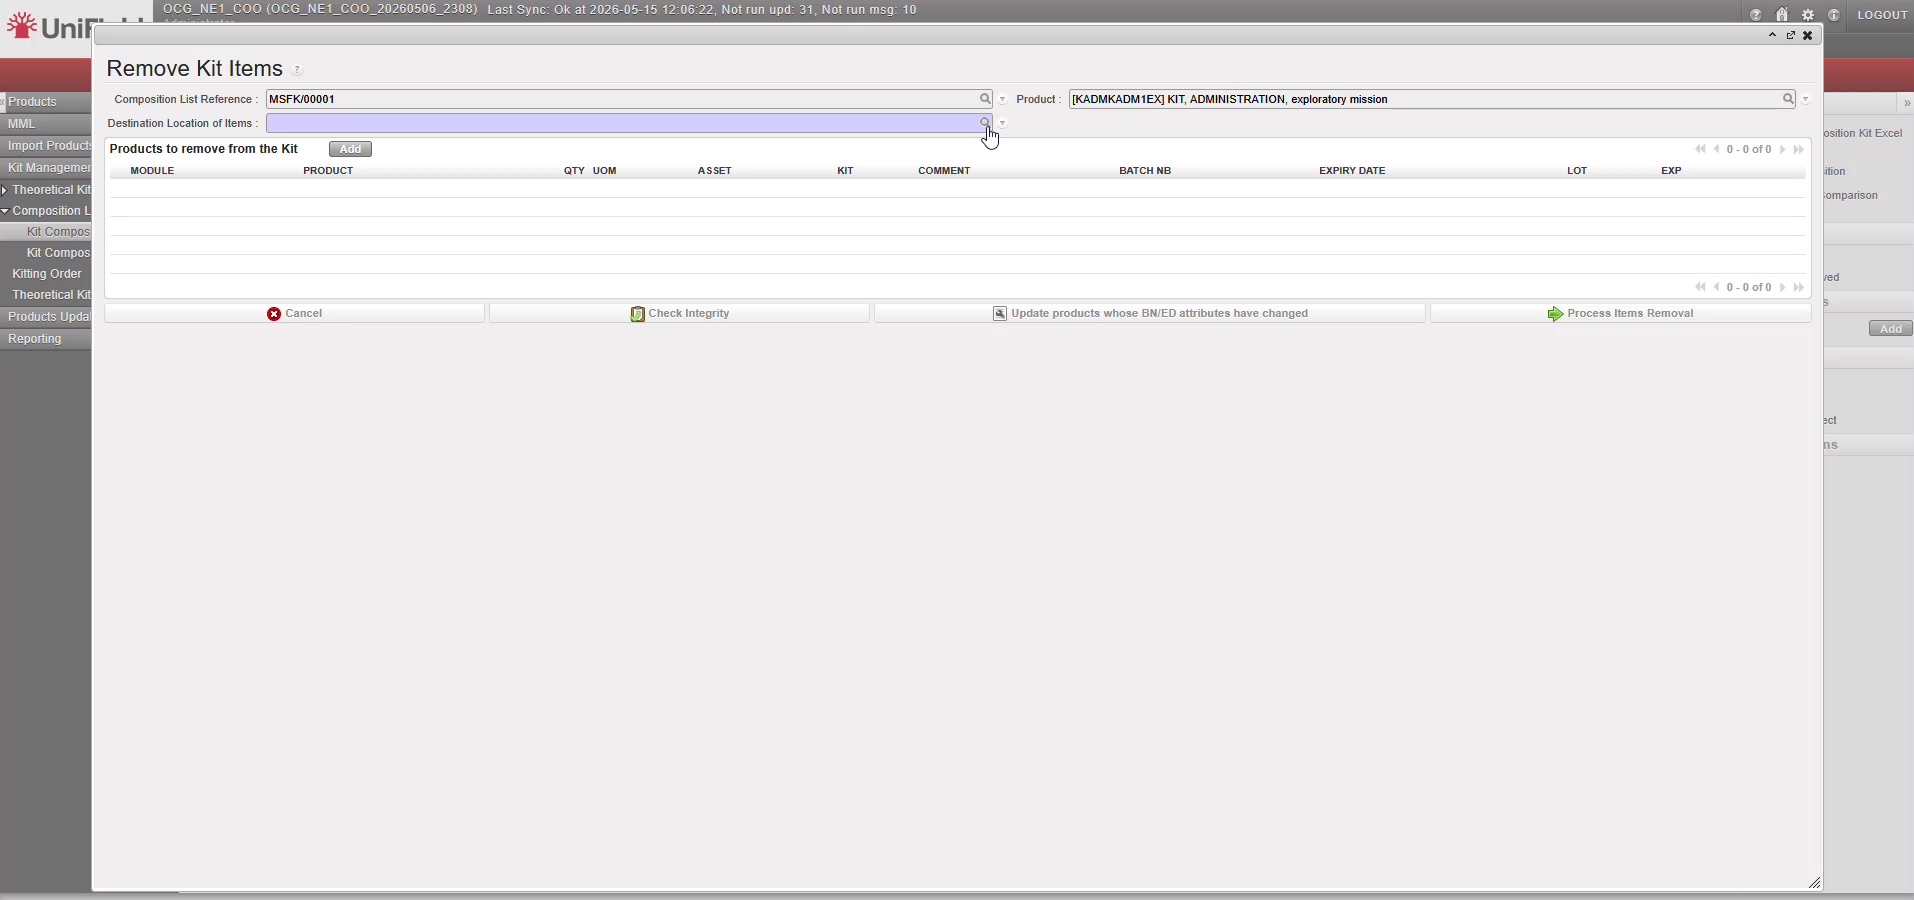
Fig. 10 — Remove Kit Items pop-up. The Destination Location must be set before items can be selected.
|
3. Select the Destination Location Click the search icon next to the Destination Location of Items field. The Search Stock Location pop-up opens. Browse or filter the list of available locations (Internal, Customer, Supplier). Click on the location where the removed stock should be sent. |
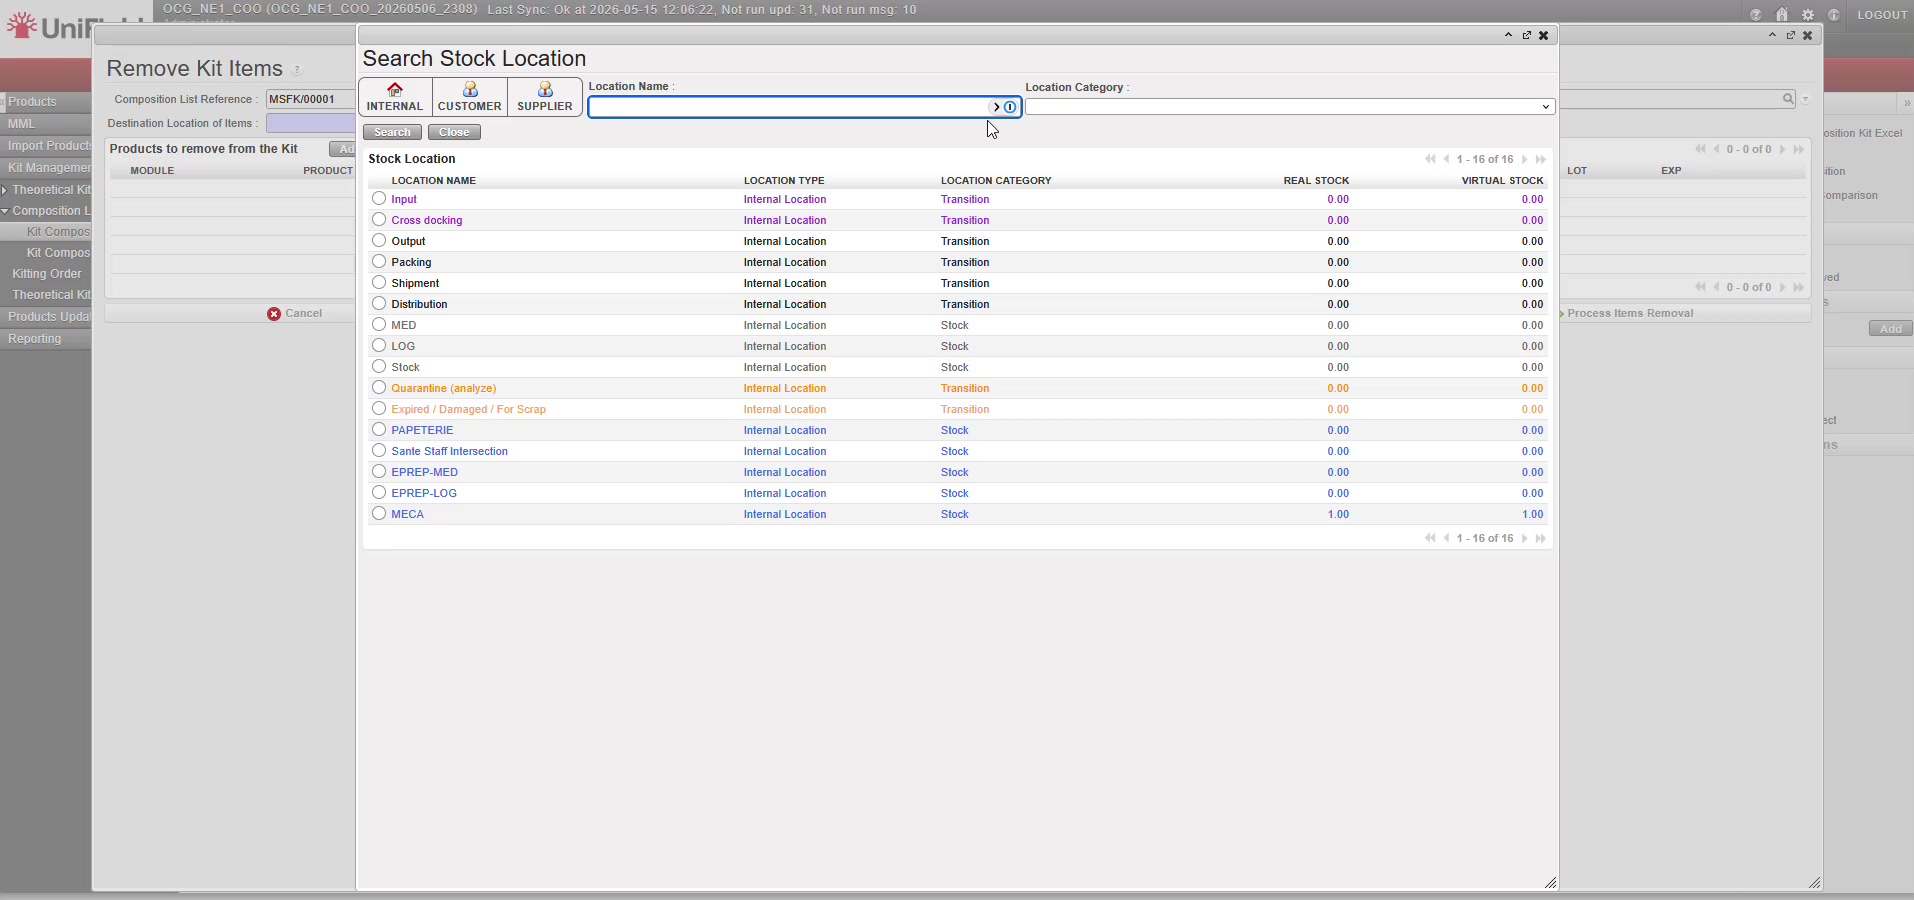
Fig. 11 — Search Stock Location pop-up. Select the warehouse where removed items will be sent.
|
4. Select the items to remove Back in the Remove Kit Items pop-up, click the Add button to open the Search Kit Item modal. This modal lists all items currently present in the KCL. Only these items can be selected for removal — no external items can be added. Select one or more items by ticking their checkbox. |
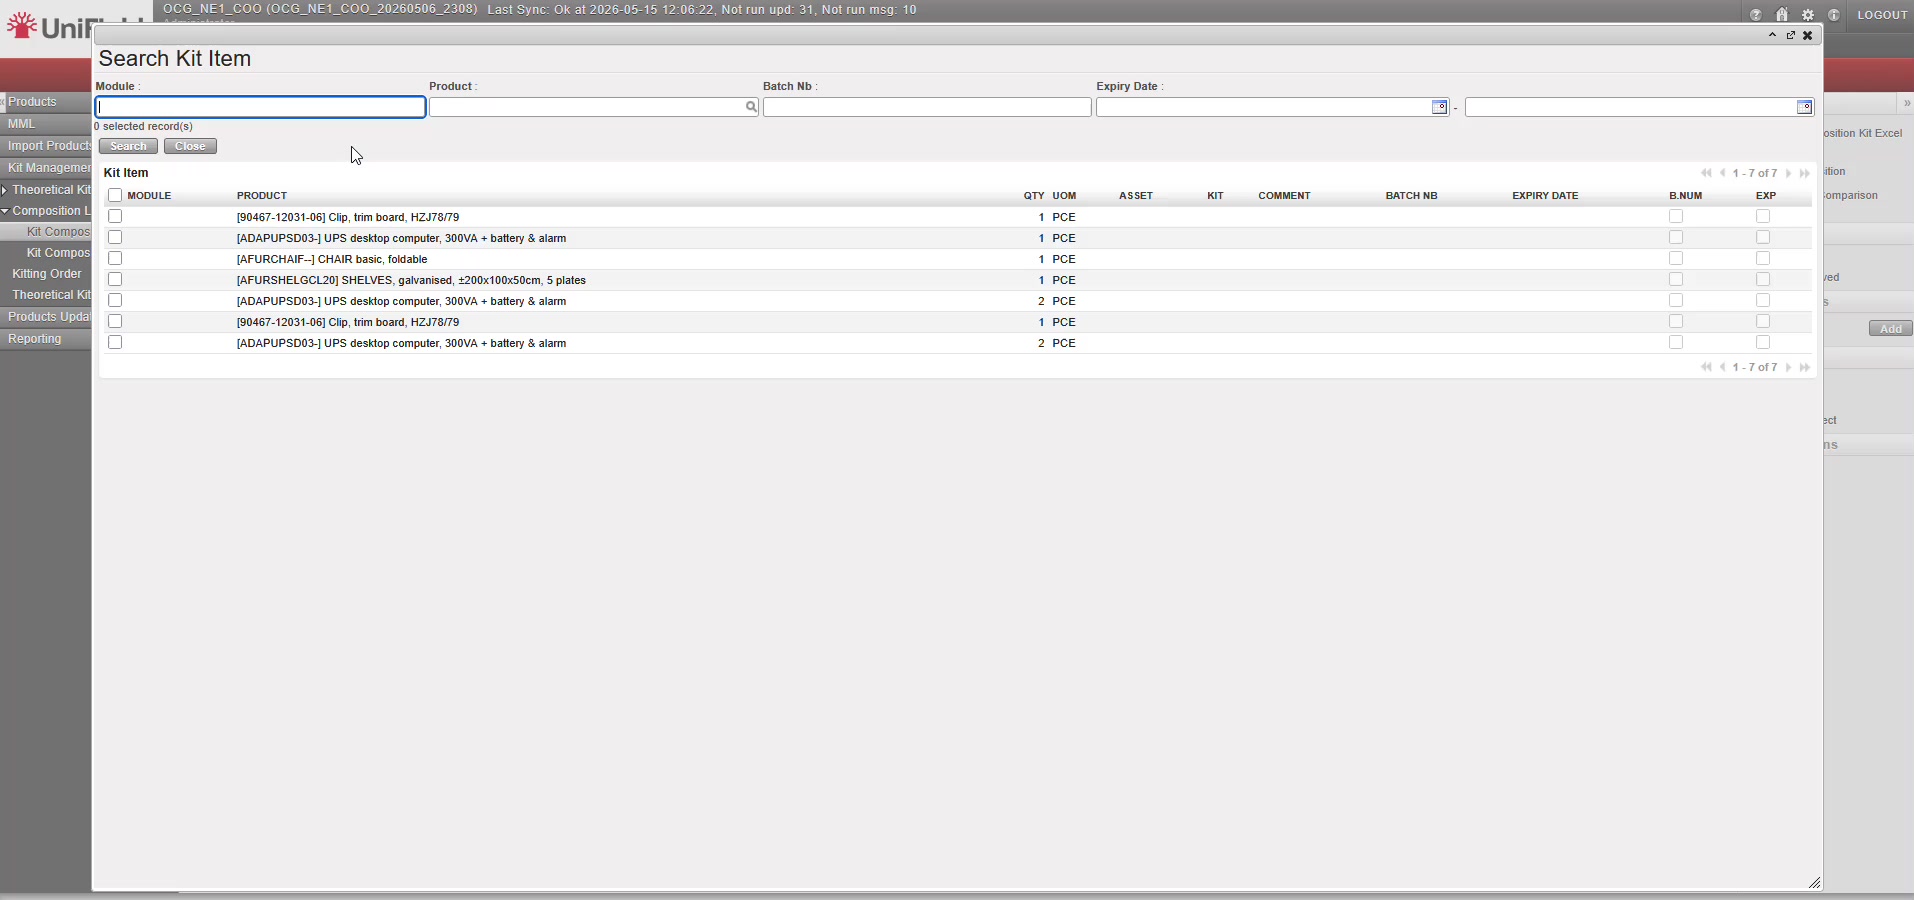
Fig. 12 — Search Kit Item modal listing all current KCL lines. Select the item(s) to remove.
|
5. Confirm the selection The selected item(s) appear as lines in the Remove Kit Items pop-up, with the Destination Location already filled. Review the lines before confirming. |
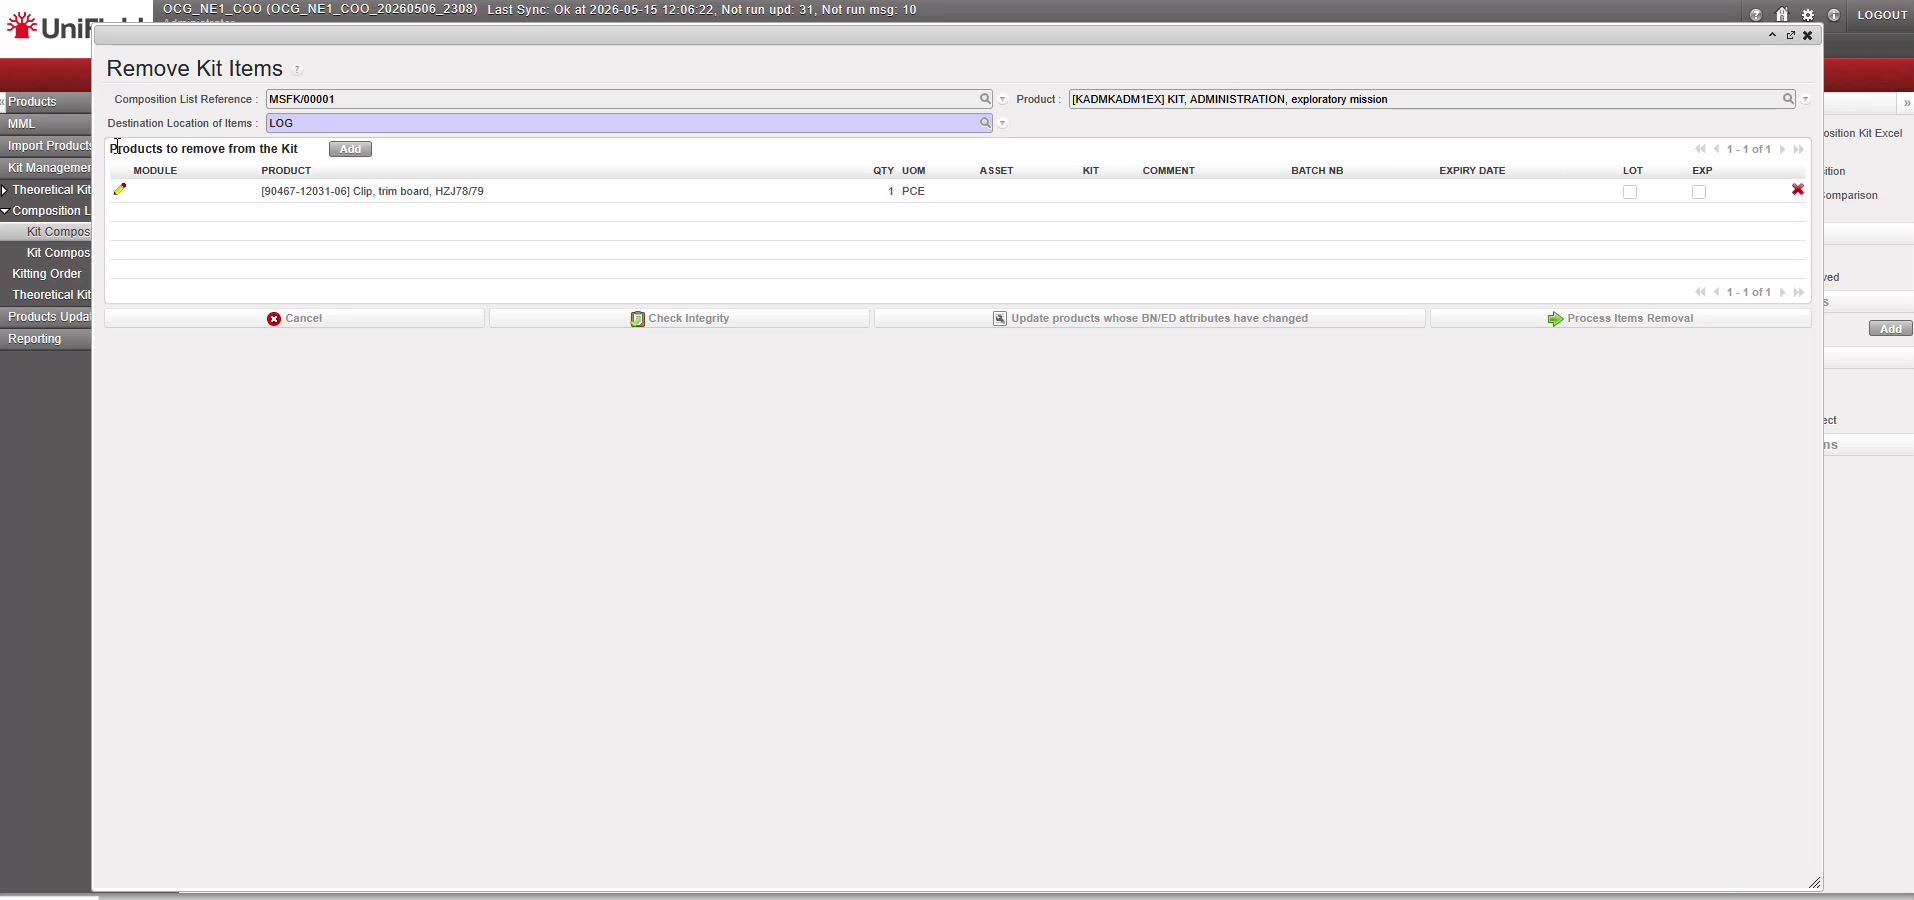
Fig. 13 — Remove Kit Items pop-up with one item selected (Clip, trim board) and Destination Location set to LOG.
|
6. Click “Process Items Removal” Click the Process Items Removal button. The system creates an internal transfer document (INT/KITXXXXX, reason type 15 — Kit) to record the stock movement from the Kitting location to the selected Destination Location. |
|
7. Modify Expiry Date (if prompted) A Modify Expiry Date screen appears. The system confirms that the INT/KIT document has been created and asks you to update the expiry date for the KCL batch if needed. Set the New Date if required, then click Ok. |
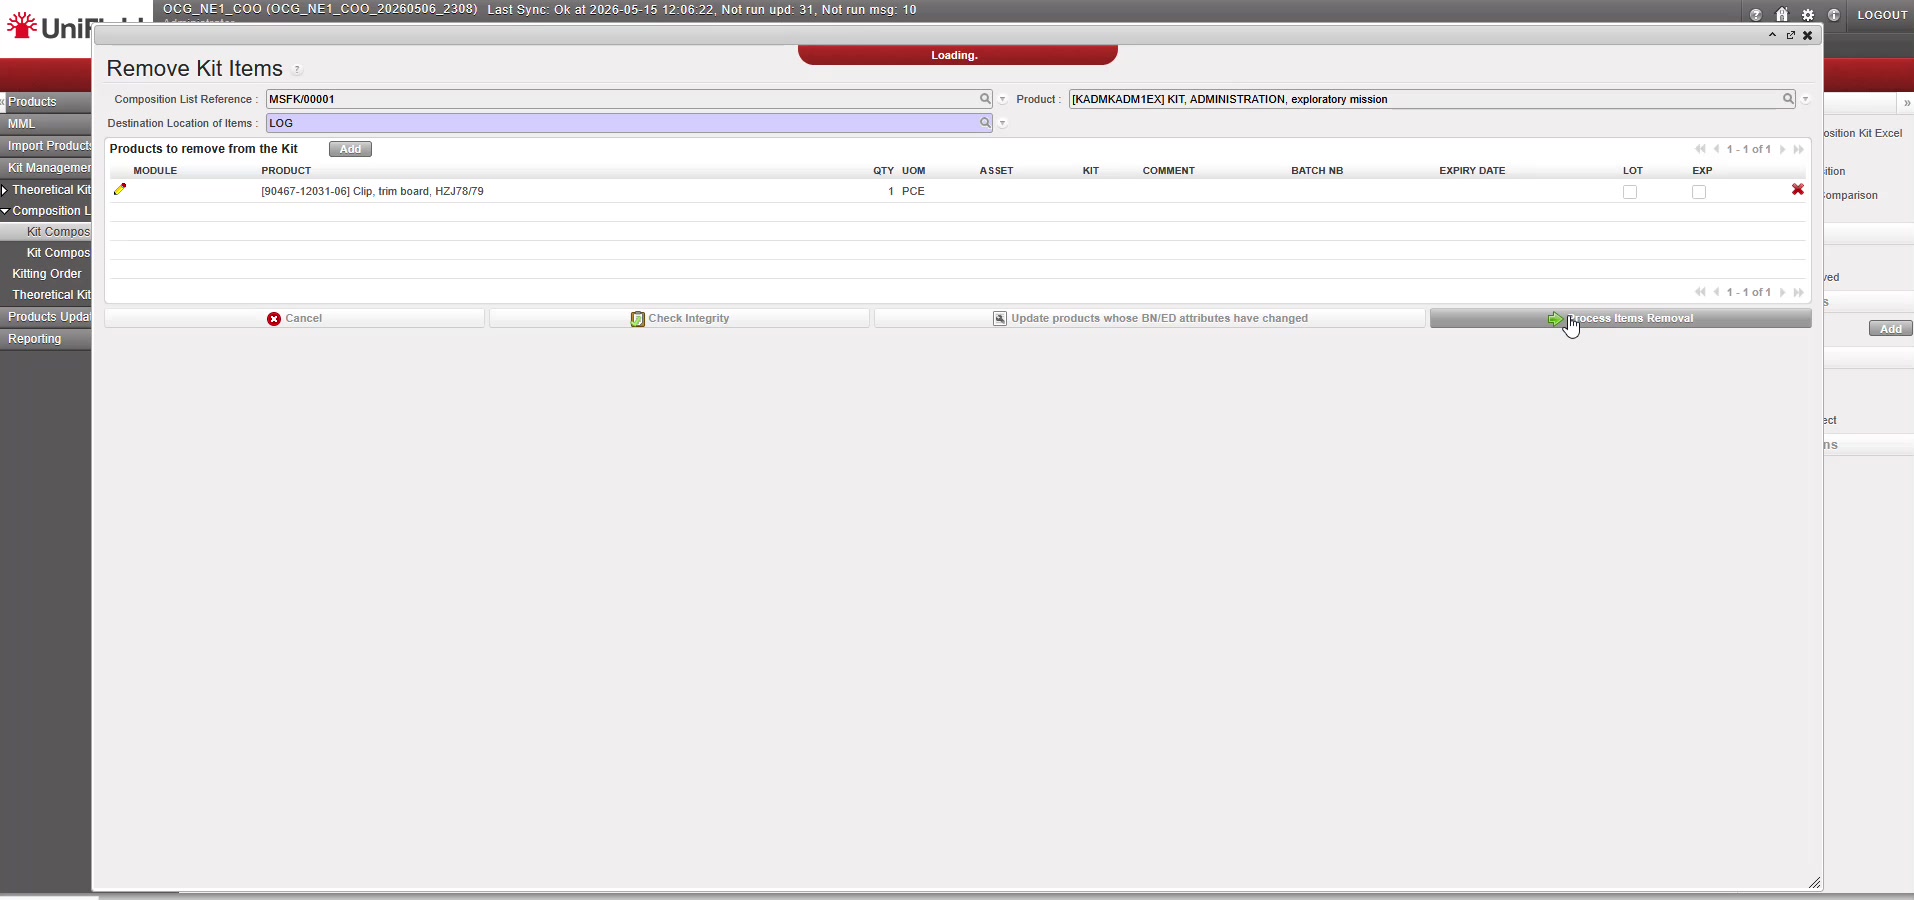
Fig. 14 — Modify Expiry Date step after Remove. The INT/KIT document reference is shown at the top.
|
8. Verify the result The system returns to the KCL record. The removed item(s) no longer appear in the Kit Composition Item list. An information message at the top of the screen confirms the operation. |
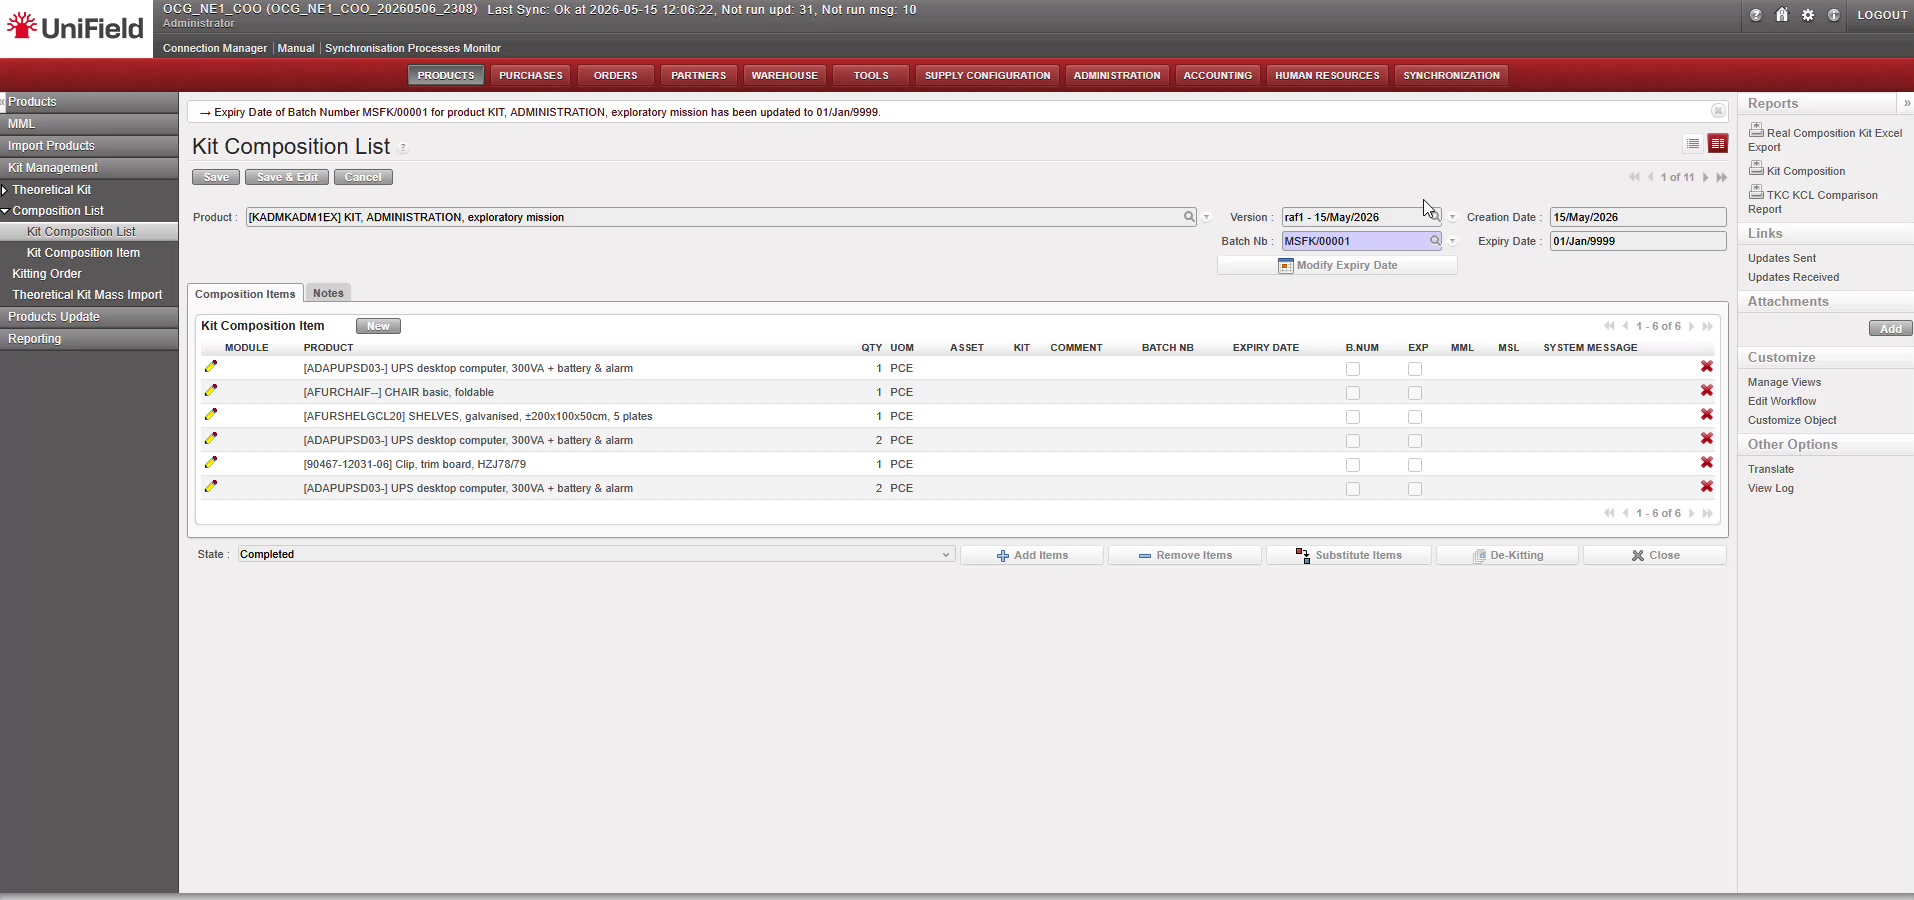
Fig. 15 — KCL after Remove Items: the item has been removed (now 6 items). The INT/KIT document was created automatically.