Finance User Manual ENG -> 5. Searching, Correcting and Closing -> 5.3 Month End Closing -> LUFI-50302 Month End Period Closing
LUFI-50302 Month End Period Closing
Account Reconciliation/Matching
Account reconciliation refers to the process of matching the credit and debit entries on a specific balance sheet account from a selection of records. When entries are balanced, it means that the total debit amount equals the total credit amount. Account reconciliation should be completed before proceeding to month end period closing.
Reconciliation provides the user with more accurate information of:
- Settled vs. to be settled transactions
- Accruals reversed or not
In UniField, account reconciliation is performed in Journal Items. A common and unique reference (alpha-numerical) is assigned to the group of accounting entries which have been matched together.
The conditions necessary to be able to reconcile selected entries are:
- They are Posted
- They are recorded on the same G/L account which should be configured as a reconcilable (see LU20301 chapter 2 – Configurations)
- They have the same third party
- Except for transfers or
- If the account has been selected with Type of Specific Treatment “Reconciliation – Disregard 3rd party” or
- If the account has been set as salaries default account in Company Configuration
- Their booking currency amounts are balanced otherwise the reconciliation is only partial
- Except for transfers with change and other entries in which the debit and credit lines are with different currencies

Entries in Journal Items automatically reconciled
At the time entries are reconciled together, UniField performs an additional check on periods. If the entries that are matched together have a different amount in functional currency but the same booking amount, UniField generates an additional entry in functional currency (exchange rate adjustment) to balance the movement.
- An entry on the same account as the one concerned by the reconciliation (to be reconciled with the same reference)
- An entry on a FX rate gain/loss account as a counterpart
By nature, reconcilable account should eventually have a zero balance, e.g. transfers in should match transfers out, accounts payable should match paid invoices. There are situations, however, where a balance is carried over to the next period, (e.g. guarantee deposits, uncashed cheques, unpaid invoices). Entries can also be partially reconciled: in this case the selection of entries is unbalanced (total credit amount ≠ total debit amount). This will assign a unique reconciliation reference to the records selected and it will automatically calculate the remaining unbalanced amount.
UniField automatically reconciles entries in the following use cases:
- Entries that are imported in the registers through:
- Pending Payments (e.g. Supplier Invoices and Payroll entries)
- Import Cheques wizard
- Direct Invoice wizard
- Advance Return wizard
- Year-End Revaluation and Accrual entries are automatically reconciled with their reversal entries
- Supplier Refunds created through the refund wizard as well as Down Payments are automatically reconciled with the original Supplier Invoices.
- Fiscal year closing “Move to 0” entry is automatically reconciled with the entries in the accounts included in the “Move to 0” function.
Manual reconciliations are made by an advanced user for example in the following use cases:
- Internal transfers between registers
- Direct entries in registers
- Manual journal entries (e.g. prepayments or correction entries)
How to Perform a Manual Accounting Reconciliation or Unreconciliation:
Go to: Accounting/Journal Entries/Journal Items
- Before reconciling, make sure that the entries are {Posted}
- In the {Journal Items} Search view, activate the filters {Unreconciled} and {Posted}
A list of unreconciled posted entries appears
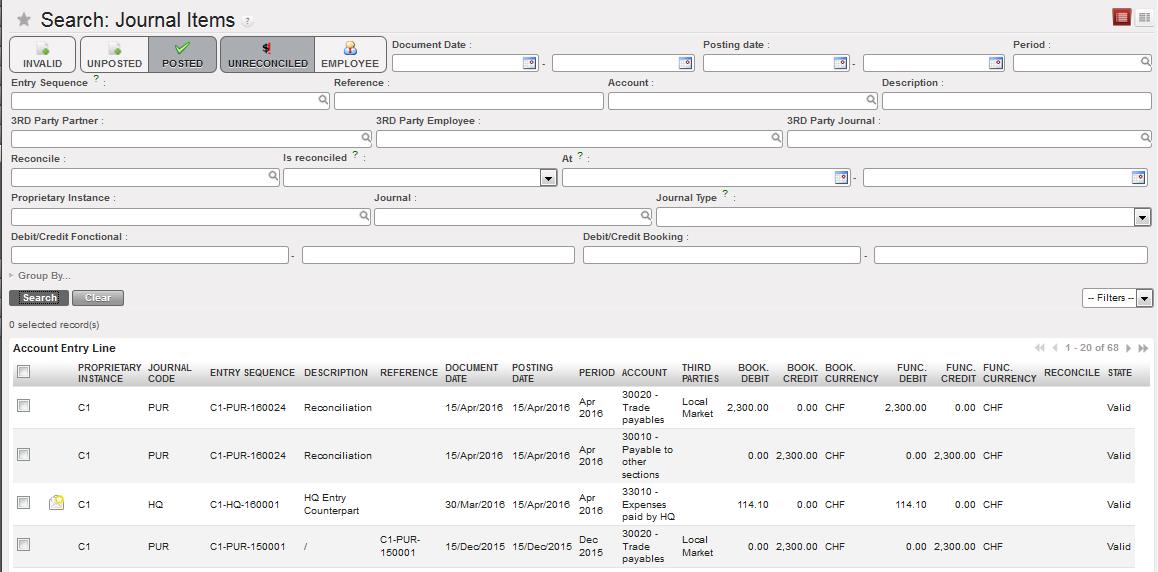
{Unreconciled} and {Posted} filters in the {Journal Items} Search view
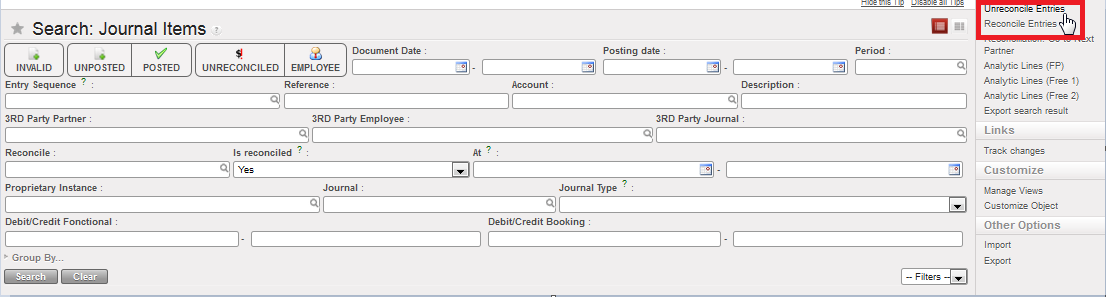
- Tick the checkbox of entries you want to reconcile together
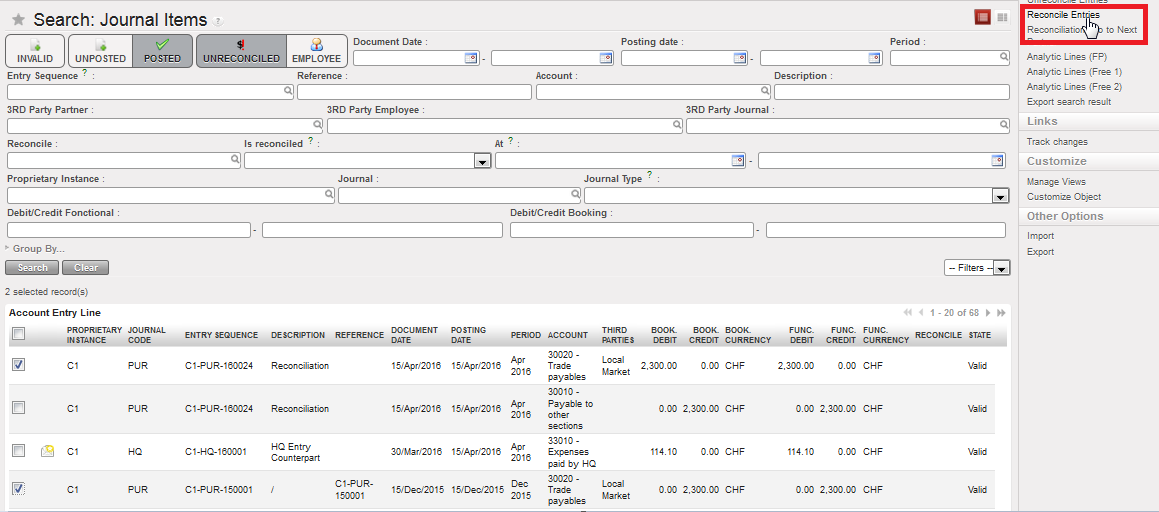 {Reconcile Entries} Menu
- On the right-hand side of the screen, select the Action {Reconcile Entries}
A {Reconcile Entries} wizard appears
- Select {reconcile}. The Journal Items Search view will refresh and the reconciled entries will not appear in the search results.
{Reconcile Entries} Wizard

- In Journal Items Search view, deselect the {Unreconciled} filter button
- Go to the field {Is Reconciled} and select {Yes} to find the reconciled entries.
The selected entries are reconciled with a unique reconciliation reference.
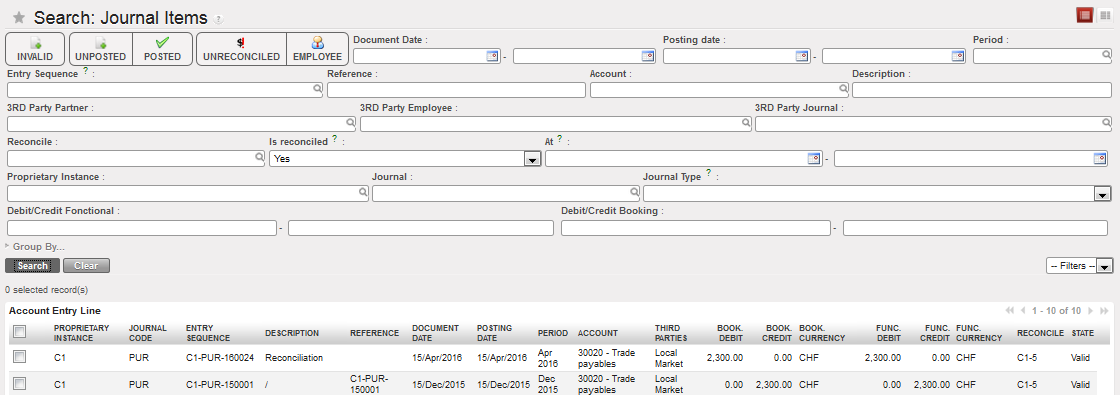 Search Journal Items view displaying Reconciled entries
If you need to Unreconcile entries:
Go to: Accounting/Journal Entries/Journal Items
- In the {Journal Items} Search view, in the box {Is Reconciled}, select {Yes}.
A list of reconciled posted entries appears
- Tick the checkbox of entries you want to unreconciled
- On the right side of the screen, select Unreconciled Entries
 Unreconcile Entries Action
- Confirm the action by selecting Unreconcile.

Unreconcile entries
The Journal Items Search view will refresh and the entries will display unreconciled if you select the filter Unreconciled.
Note! If you unreconcile entries that have already triggered an FX adjustment entry, a reversal FX adjustment for the offsetting amounts is automatically crated upon reconciling the entries. The two FX adjustment entries are then automatically reconciled together.
Closing a Period:
Closing a period is hierarchical in UniField: all projects should close their period before coordination should close, and coordination must close its period before HQ should close the period. Closing happens in cascading steps.
This means that closing a period at coordination level will automatically close this period at project level through a synchronization mechanism. Same applies for re-opening a period at coordination level: re-opening one project period at coordination automatically re-opens all other projects’ period.
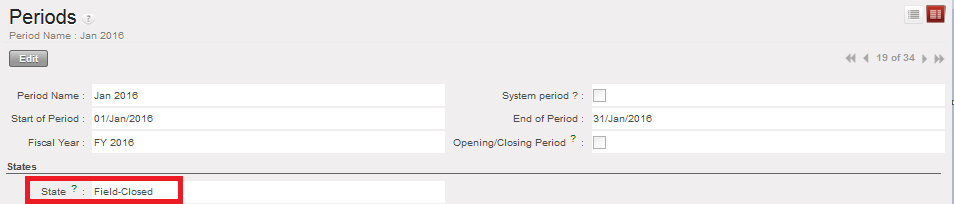
Once the period is closed at coordination and the period state becomes {Mission-closed}, the period state at project level is updated through synchronization and becomes {Mission-closed} as well.
It is thus important to note that coordination is an instance where periods need to be {Field-closed} prior to moving on the next {Mission-closed} status.
Only an administrator can re-open a mission-closed period. To remember, re-opening a mission-closed period at HQ level sets this period to {Open} for all coordinations and all projects. Closing a period at HQ level spreads the closure across all field instances through synchronization.
An upper instance (coordination, HQ) can see all lower instances’ period states by accessing the {Period states} screen in the Action menu of the Periods window. The information available on this screen is fully relying on synchronization: if lower-level instances do not sync, the information is not up-to-date at coordination or HQ. Please refer to section G. How to Produce a Period States Report in this chapter for further details.
Closing process in UniField
Before closing the period at project level:
- All registers must be closed
- All FX rates must be updated with synchronized rates from HQ
- All imported payroll entries must be validated
- All recurring entries must be booked
Before closing the period at coordination level:
- All projects’ periods should be closed
- All coordination registers must be closed
- All FX rates must be updated with synchronized rates from HQ
- All imported salary expenses must be validated
- All recurring entries must be booked
- All HQ entries must be validated
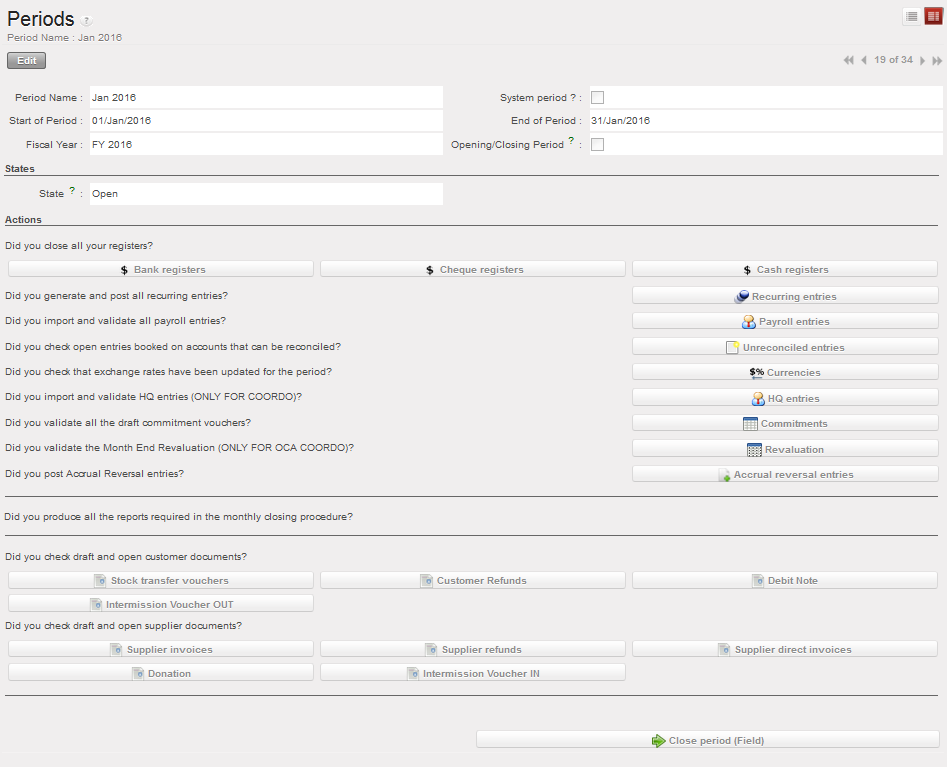
How to Close a Period at Project Level
Go to Accounting/Periodical Processing/End of Period/Close a Period
- In the {Close a Period} Search view, open the period to close
- A list of Actions displays on the form. It is a checklist you need to review so that you can close your period.
 Close a Period Form view and associated actions
- Select one action button i.e. cash register and the system will open a new tab with the object itself.
 Linking an action to a UniField object
2. When you are done with the checking, select {Close Period (Field)} at the bottom of the form.
3. The period state changes to {Field-Closed}. Only Coordination can re-open the period in project instance.
Field-Closed Period at project
How to Close a Period at Coordination Level:
Coordination should close a period only if it has been field-closed for all projects.
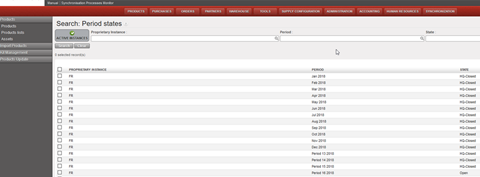
To review the period states of project instances, go to the {Period states} screen in the Action menu of the Periods window.
 {Period States} function in the Action menu
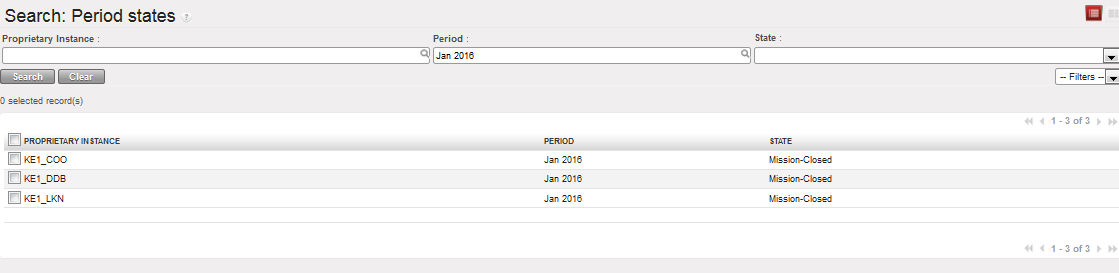 Period states of coordination and projects for selected period
Go to Accounting/Periodical Processing/End of Period/Close a Period
- In the {Close a Period} Search view, open the period to close
- A list of Actions displays on the form. It is a checklist you need to review so that you can close your period.
 Close a Period Form view and associated actions
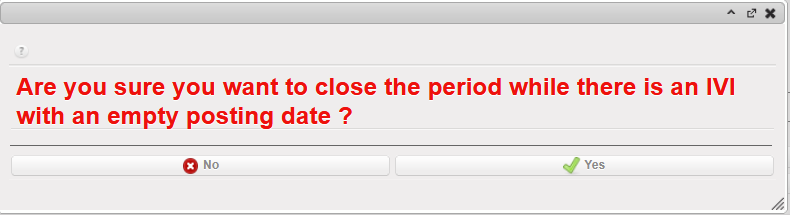
If you have a draft IVI (Intermission Voucher IN), you will receive a pop-up asking,” Are you sure you want to close the period while there is an IVI with an empty posting date ? ” as shown below :
- Select one action button i.e. cash register and the system will open a new tab with the object itself.
 Linking an action to a UniField object
- When you are done with checking, select {Close Period (Field)} at the bottom of the form.
- The period state changes to {Field-Closed}. Coordination can Re-open period (Field) or Close period (Mission). Select {Close period (Mission)}.

Field-Closed Period
- The period state changes to {Mission-Closed}. Only an administrator or HQ via synch can re-open a mission-closed period.
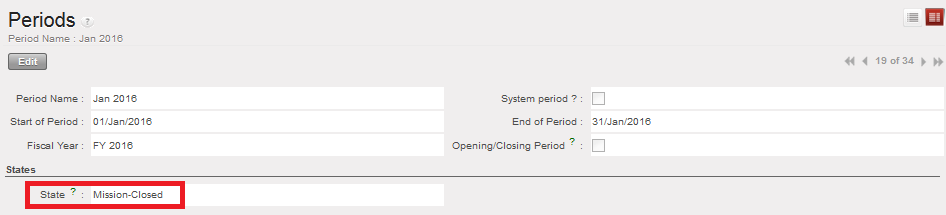
Mission-Closed Period
How to Close a Period at HQ level:
HQ should close the period only if the period has been closed for all missions. To review the period states of coordination and project instances, go to the {Period states} screen in the Action menu of the Periods window.
Go to Accounting/Periodical Processing/End of Period/Close a Period
- In the {Close a Period} Search view, open the period to close
- A list of Actions displays on the form. It is a checklist you need to review so that you can close your period.

Close a Period Form view and associated actions
- Select one action button i.e. HQ entries and the system will open a new tab with the object itself.
- When you are done with checking, select {Close Period (Field)} at the bottom of the form.
- The period state changes to Field-Closed. You can Re-open period (Field) or Close period (Mission). Select {Close period (Mission)}
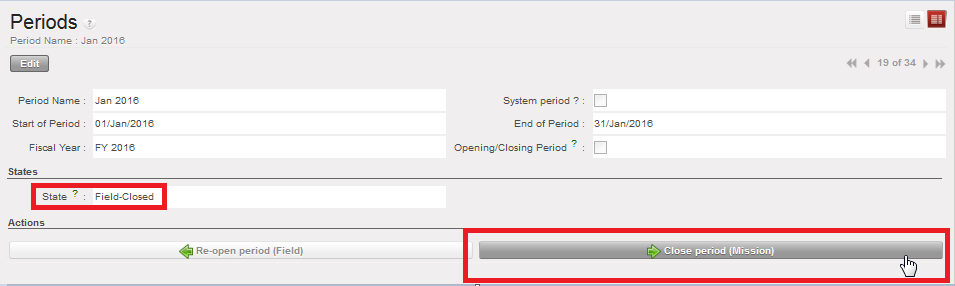
Field-Closed Period
- The period state changes to Mission-Closed. You can Re-open period (Mission) or Close period (HQ). Select Close period (HQ).
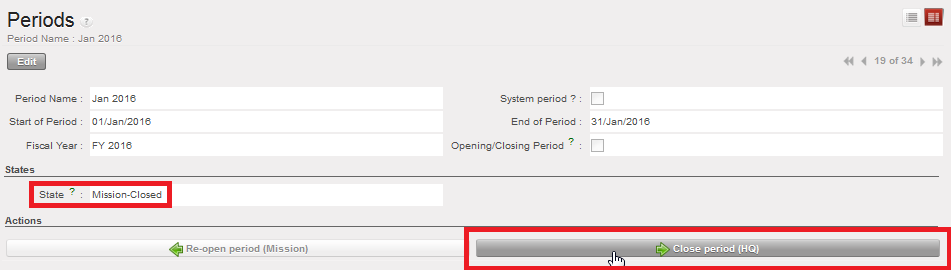
Mission-Closed Period
- The period state changes to HQ-Closed.
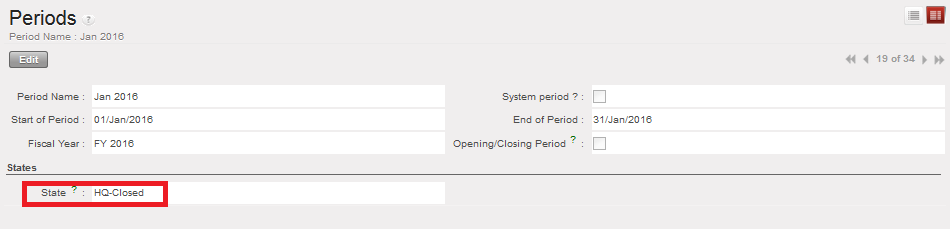
HQ-Closed Period

How to Produce a Period States Report:
It is possible at a parent instance level to have an overview of the period states of the children instance. For example, at Coordination level, it is possible to see the status of the periods of all its projects.
The Period states report is an overview of the period status of all children instances.
Go to Accounting/Configuration/Financial Accounting/Periods/Periods/
In Action menu, click on {Period states}
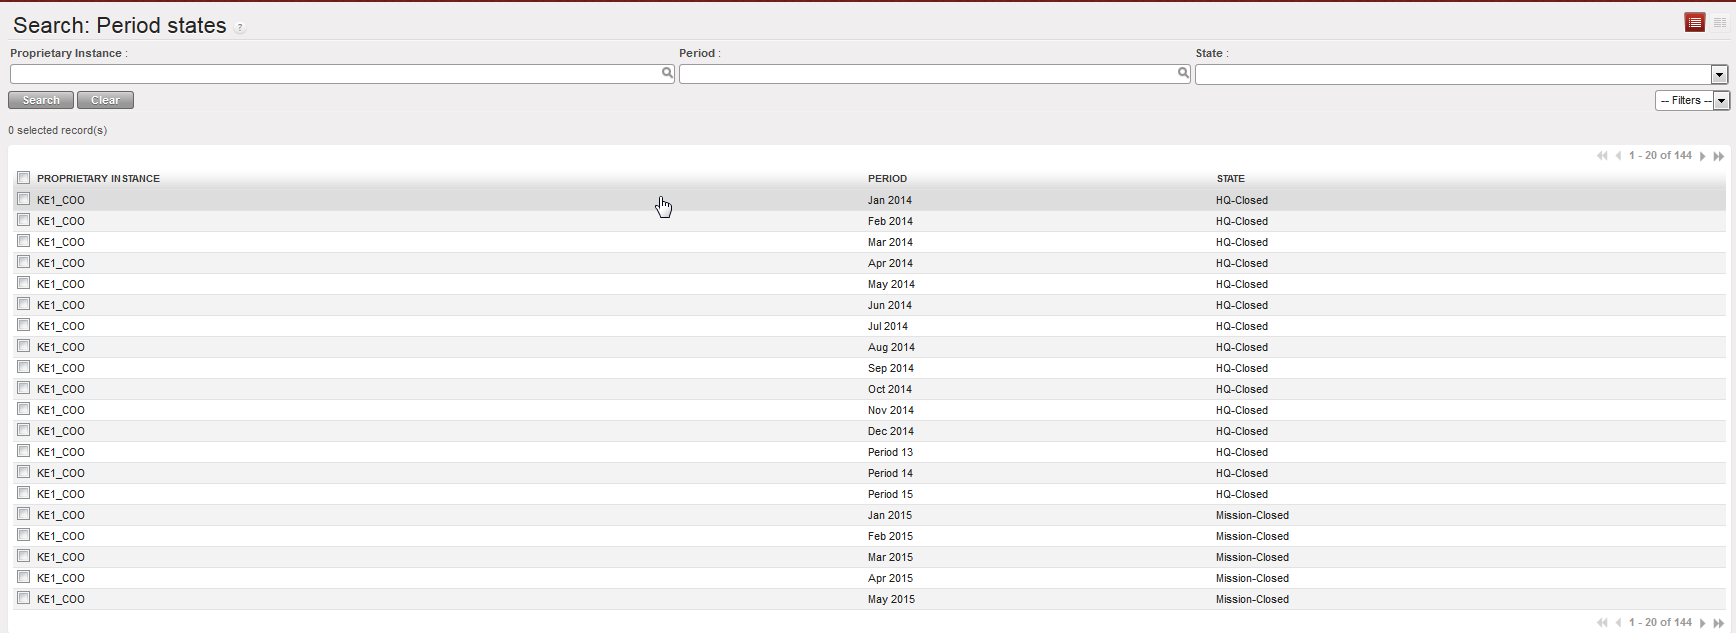
The {Period states} overview opens
Note! You can use the filters for {Proprietary instance}, {Period} or {State} to limit the view according to what you need to review. By default, all periods for all children instances are shown.
It is possible at a parent instance level to have an overview of the period states of the children’s instances. For example, at Coordination level, it is possible to see the status of the periods of all its projects.
Go to Accounting > Configuration > Periods > Periods
Button “Active Instances” selected by default showing active instances only.
Producing Financial Reports
In addition to the reporting options found in each business application, UniField provides various financial and analytical reporting options. They can be used for ad hoc analysis, monthly reporting and year-end reporting. Please see your section’s financial policy to see which reports are used for monthly and year-end reporting requirements.
| Accounting Reports | |
| General Ledger | PDF or Excel report, a complete record of financial transactions on all G/L accounts. The ledger holds accounting information that is needed to prepare financial statements. This report can be used e.g. to verify the amounts on reconciled and unreconciled balance accounts. |
| Trial Balance | PDF or Excel report, lists the balance on all accounts. |
| Profit and Loss | PDF or Excel report, lists expense and income account balances. |
| Balance Sheet | PDF or Excel report, lists Balance Sheet account balances, reflects the assets and liabilities. |
| Liquidity Balances | Excel report to show opening, calculated and closing balances of the liquidity accounts divided by journals. |
| Balance by account | Excel report or viewed in UniField, lists the balance on all accounts. This report can be used e.g. to verify the amounts on reconciled and unreconciled balance accounts. |
| Balance by analytic account | Excel report or viewed in UniField, lists the balance on all analytic accounts (Cost center, Destination, Funding Pool, Free 1 and Free 2). |
| Generic Reports | |
| Partner Ledger | PDF report, a complete record of all financial transactions on all partners/suppliers. It is important to note that an individual partner cannot be selected for the report; all partners will be listed. |
| Partner Balance | PDF report, an analysis done per partner/supplier which contains one line representing the cumulative credit and debit balance per partner. It allows the project to identify any outstanding payable or receivable balances for a partner. This report is also available in Excel format and also in a view built in the system. |
| Local Expenses | Excel report of all expenses purchased or settled locally, in order to get a better overview of cash flow needs or to meet specific requirements from local auditors asking MSF to report on local expenses. |
| Export to HQ System (OCG) | Used in UniField HQ instance to export field data into HQ system (OCG compatibility) |
| Export to HQ System (OCA) | Used in UniField HQ instance to export field data into HQ system (OCA compatibility) |
| Export to HQ System (OCB) | Used in UniField HQ instance to export field data into HQ system (OCB compatibility) |
| Export to HQ System (OCP) | Used in UniField HQ instance to export field data into HQ system (OCP compatibility) |
How to Produce a General Ledger Report
The General Ledger report is a complete record of all financial transactions on G/L accounts. The ledger holds account information that is needed to prepare financial statements, and it includes accounts for assets, liabilities, equity, revenues and expenses.
Go to Accounting/Reporting/Legal Reporting/Accounting Reports/General Ledger
The {General Ledger} window displays
- Set the desired report options
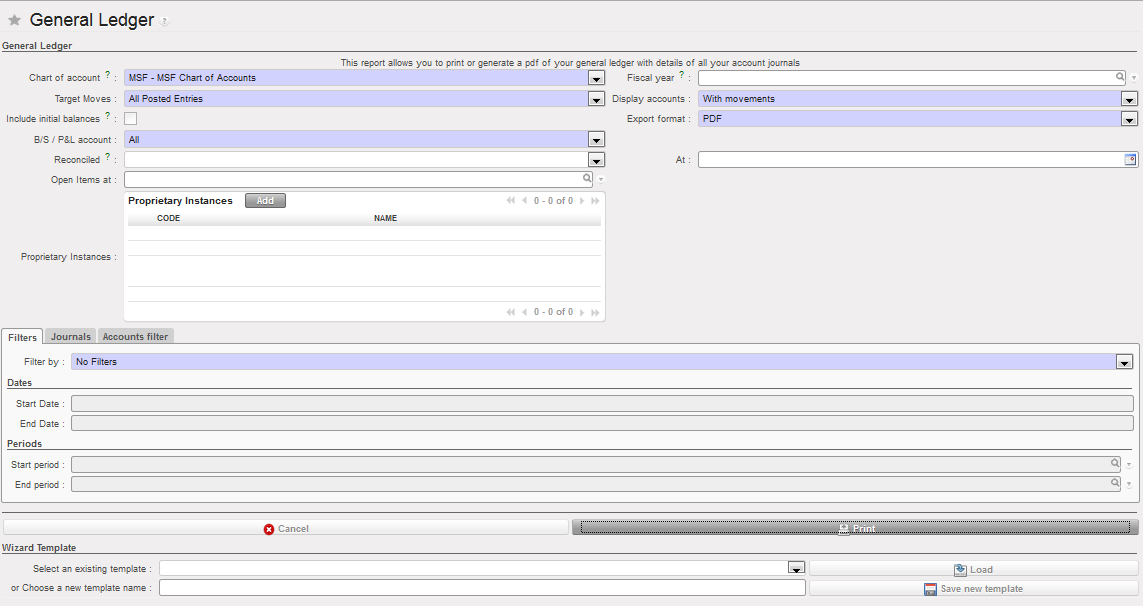 General Ledger report options
- Select {Print} at the bottom of the window
A PDF report of the General Ledger displays
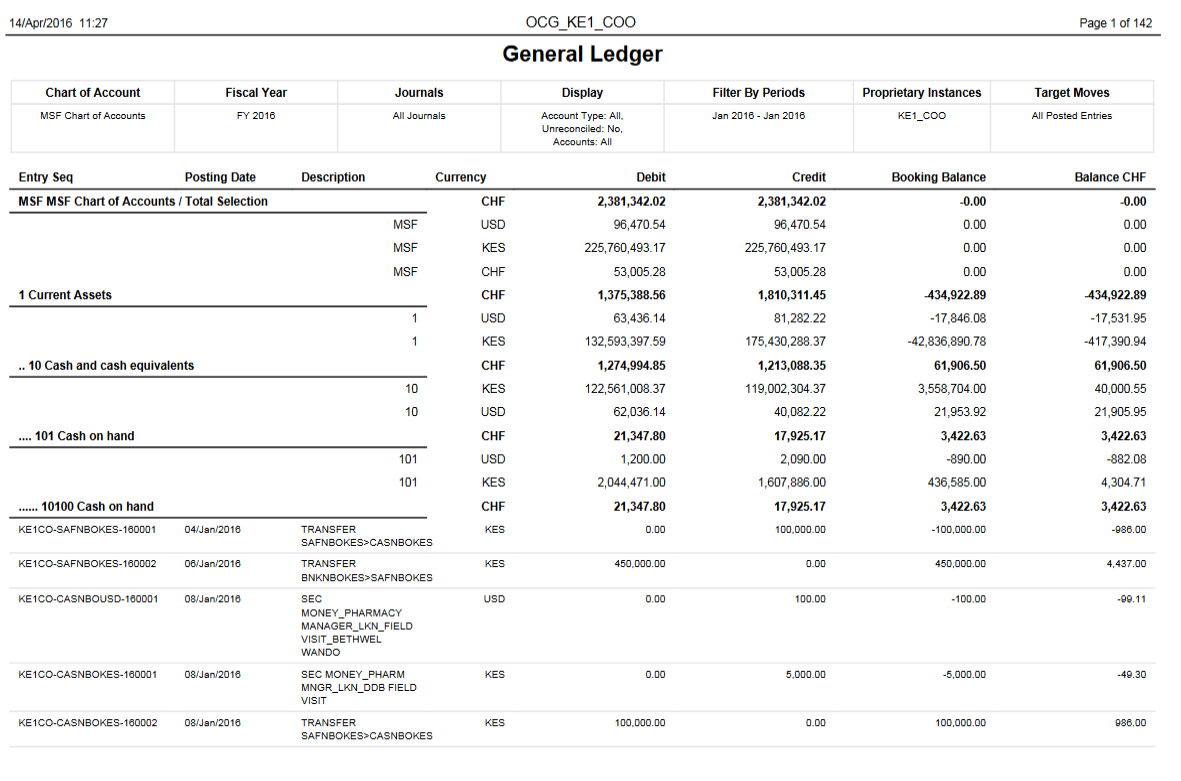 General Ledger report
 General Ledger report (including the accounting code for each line)
How to Produce a Trial Balance Report
The Trial Balance shows the balance on all accounts at a selected point of time.
Go to Accounting/Reporting/Legal Reporting/Accounting Reports/Trial Balance
The {Trial Balance} window displays
- Set the desired report options
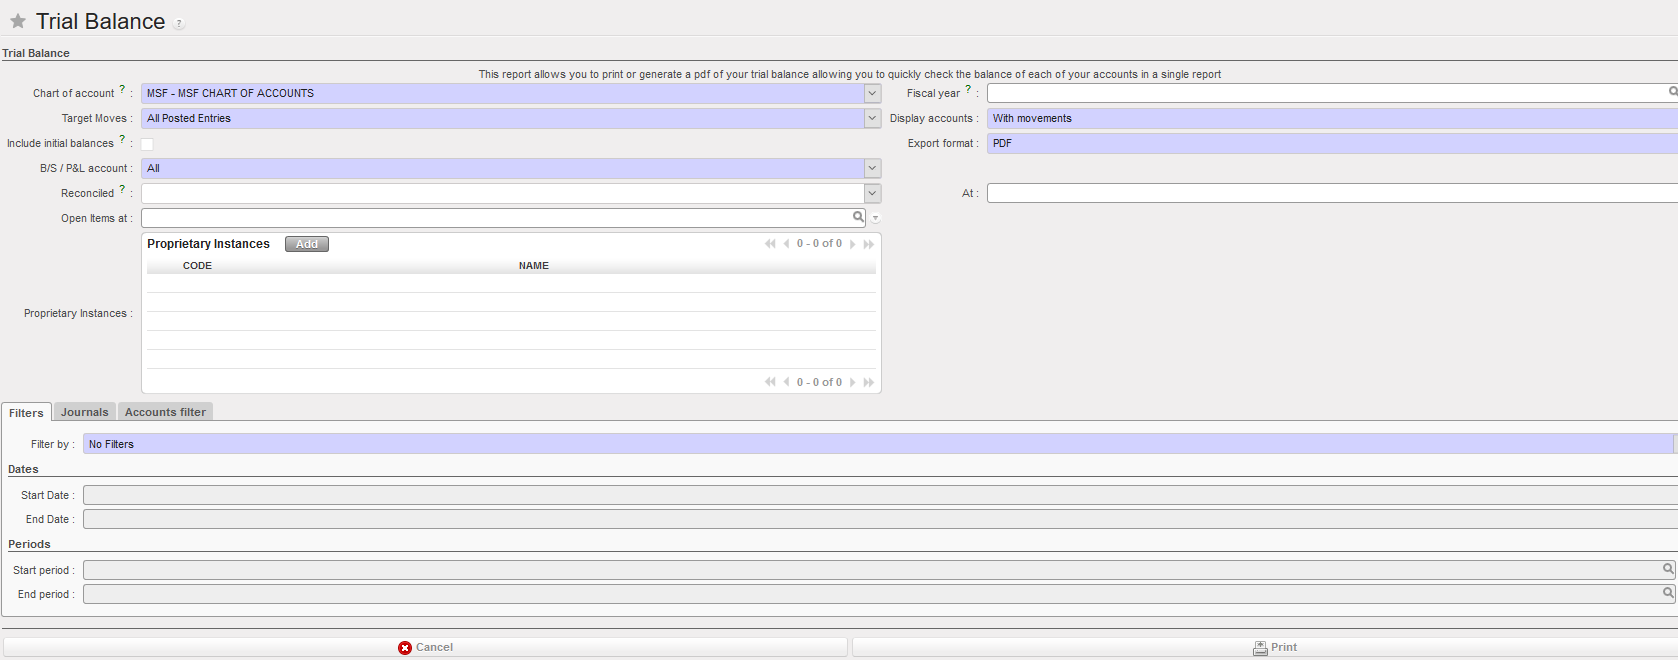
Trial Balance report options
Field
| Field | Description |
| Chart of account | System defaults to the existing chart of accounts |
| Fiscal year | System defaults to no fiscal year, but any fiscal year can be selected |
| Target Moves | Drop-down selection:
|
| Display Accounts | Drop-down selection:
|
| Include initial balances | Adds initial balance rows on report to show the opening balance of the fiscal year for each balance account |
| Export Format |
|
| B/S / P/L account | Drop-down selection for accounts to be included:
|
| Reconciled | Drop-down selection to choose either reconciled, unreconciled or all entries |
| At | Allows to set a date until which reconciled entries are included |
| Prop. Instances | Allows to select one or multiple proprietary instances |
| Filter by | Drop-down selection:
|
| Start Date | If using a Date filter, enter the date to restrict the starting Document or Posting Date |
| End Date | If using a Date filter, enter the date to restrict the ending Document or Posting Date |
| Start Period | If using a Period filter, enter the period to restrict the starting Period |
| End Period | If using a Period filter, enter the period to restrict the ending Period |
| Journals | Default to all children instances’ journals which can be added or removed |
| Accounts filter | Allows to add accounts to be included in the report |
description
- Select {Print} at the bottom of the window
A PDF report of the Trial Balance displays
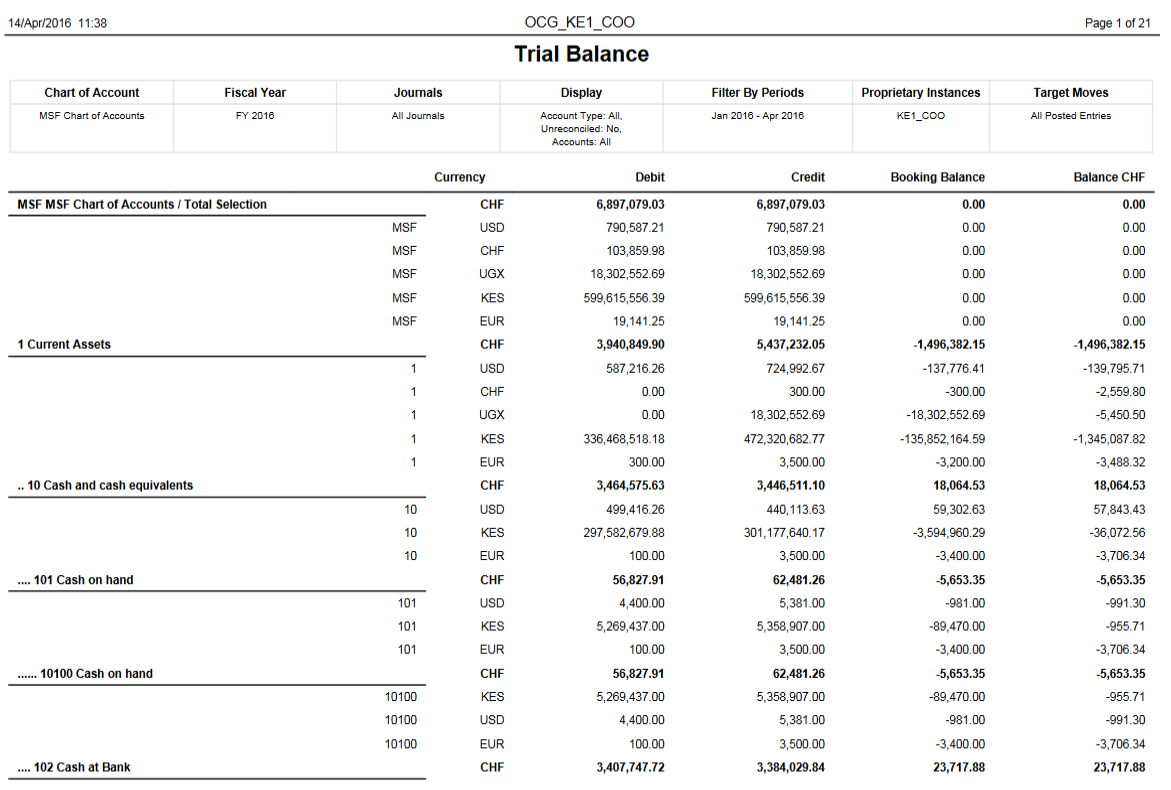
Trial Balance report
How to Produce a Profit & Loss Report
The Profit & Loss reports expense and income per accounting code and potential under spending (net profit) or overspending (net loss).
Go to Accounting/Reporting/Legal Reporting/Accounting Reports/Profit and Loss
The {Profit and Loss} window displays
- Set the desired report options
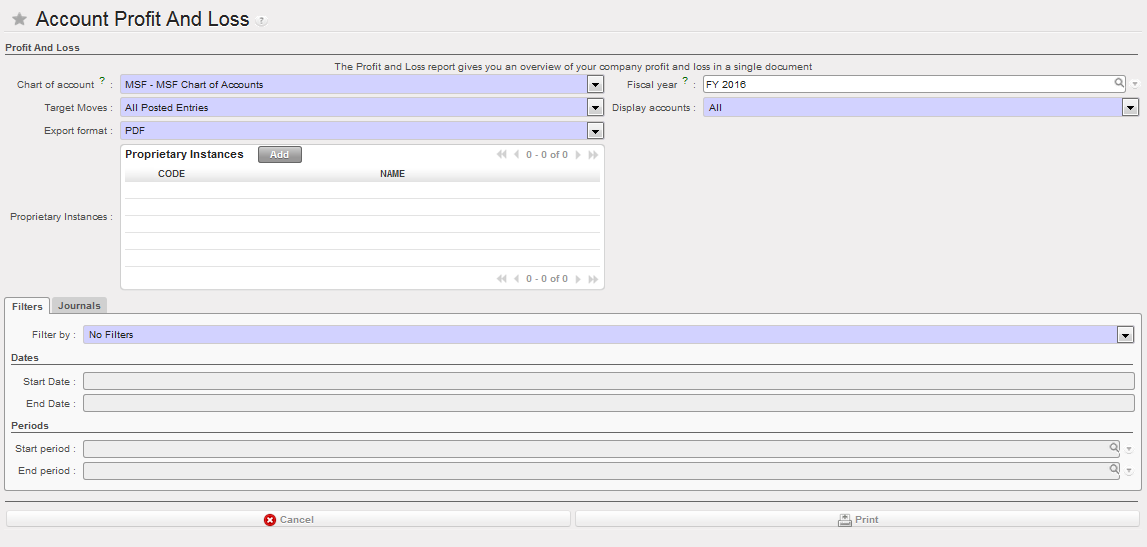
P & L report options
| Field | Description |
| Chart of account | System defaults to the existing chart of accounts |
| Fiscal year | System defaults to current fiscal year but can be changed |
| Target Moves | Drop-down selection:
|
| Display Accounts | Drop-down selection:
|
| Export format |
|
| Prop. Instances | Allows to select one or multiple proprietary instances |
| Filter by | Drop-down selection:
|
| Start Date | If using a Date filter, enter the date to restrict the starting Posting Date |
| End Date | If using a Date filter, enter the date to restrict the ending Posting Date |
| Start Period | If using a Period filter, enter the period to restrict the starting Period |
| End Period | If using a Period filter, enter the period to restrict the ending Period |
| Journals | Not in use |
- Select {Print} at the bottom of the window
A PDF report of the Profit & Loss displays
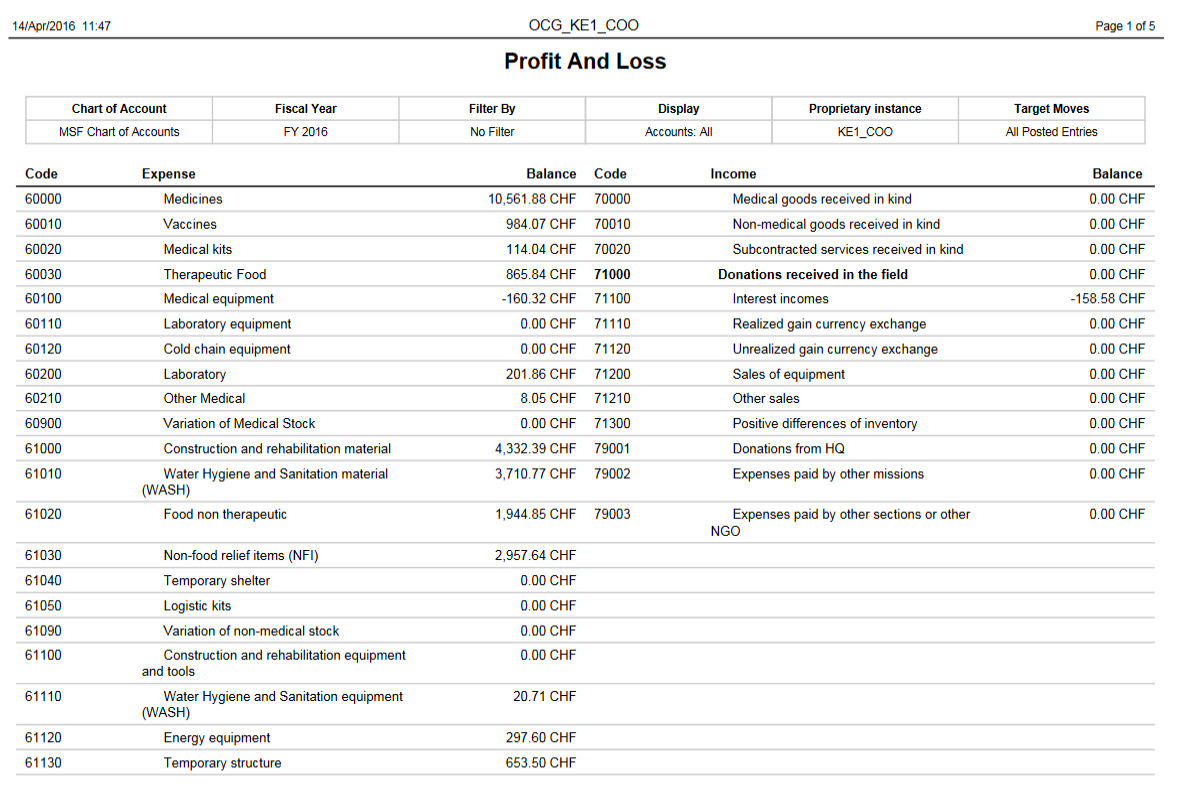
Profit & Loss report
How to Produce a Balance Sheet Report
The Balance Sheet is a reflection of your assets and liabilities at any given point of time.
Go to Accounting/Reporting/Legal Reporting/Accounting Reports/Balance Sheet
The {Balance Sheet} window displays.
- Set the desired report options

Balance Sheet report options
Field
Description
| Field | Description |
| Chart of account | System defaults to the existing chart of accounts |
| Fiscal year | System defaults to current fiscal year but can be changed |
| Moves | Drop-down selection:
|
| Display Accounts | Drop-down selection:
|
| Export Format |
|
| Prop. Instances | Allows to select one or multiple proprietary instances |
| Filter by | Drop-down selection:
|
| Start Date | If using a Date filter, enter the date to restrict the starting Posting Date |
| End Date | If using a Date filter, enter the date to restrict the ending Posting Date |
| Start Period | If using a Period filter, enter the period to restrict the starting Period |
| End Period | If using a Period filter, enter the period to restrict the ending Period |
| Journals | Not in use |
- Select {Print} at the bottom of the window
A PDF report of Balance Sheet displays.
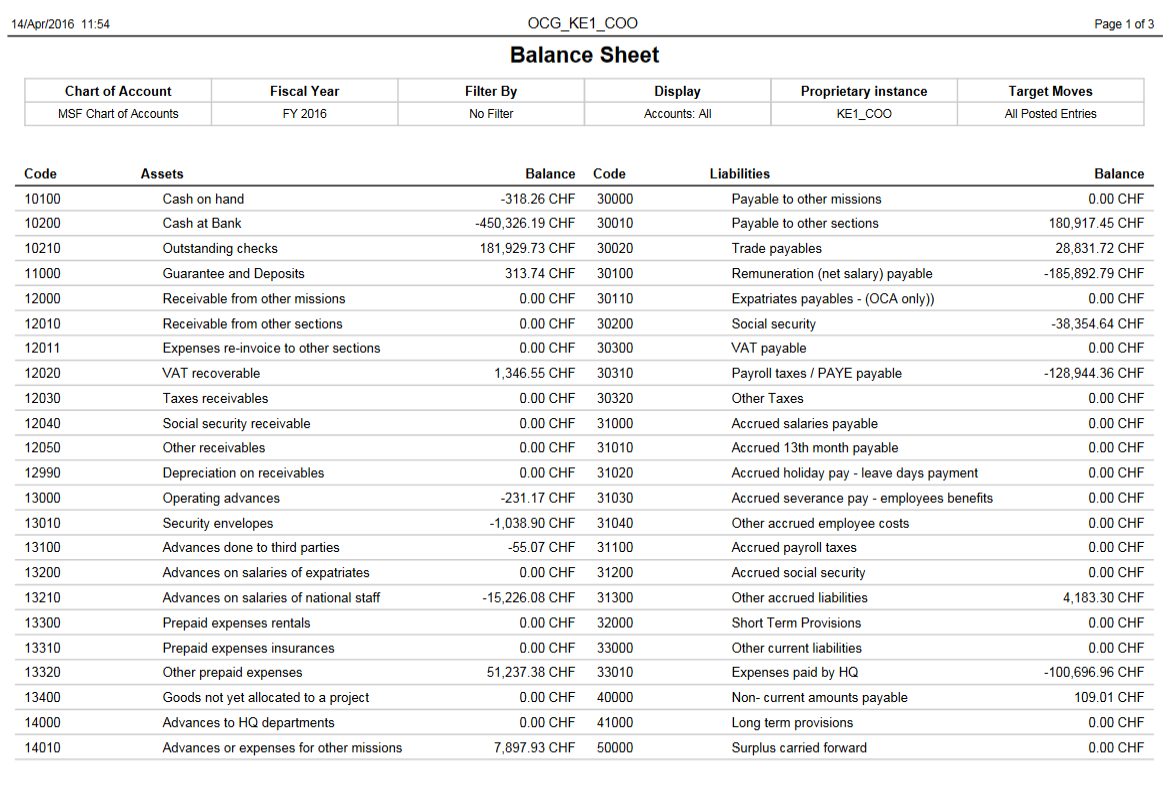
Balance Sheet report
How to Produce a Liquidity Balances Report:
The Liquidity Balances report displays the liquidity account opening, calculated and closing balances divided by liquidity journal (cash, bank and cheque). The balances reflect the register balances at coordination and project level for bank and cash register. For cheque register, the calculation of the opening balance reflects the pending cheque of N-1 and before, the calculated balance is always 0 and the closing balance is the sum of all pending cheque of N or before.
Go to Accounting/ Reporting/Legal Reporting/Accounting Reports/Liquidity Balances
Select the top proprietary instance (coordination), fiscal year and a period

Select {Print} at the bottom of the wizard
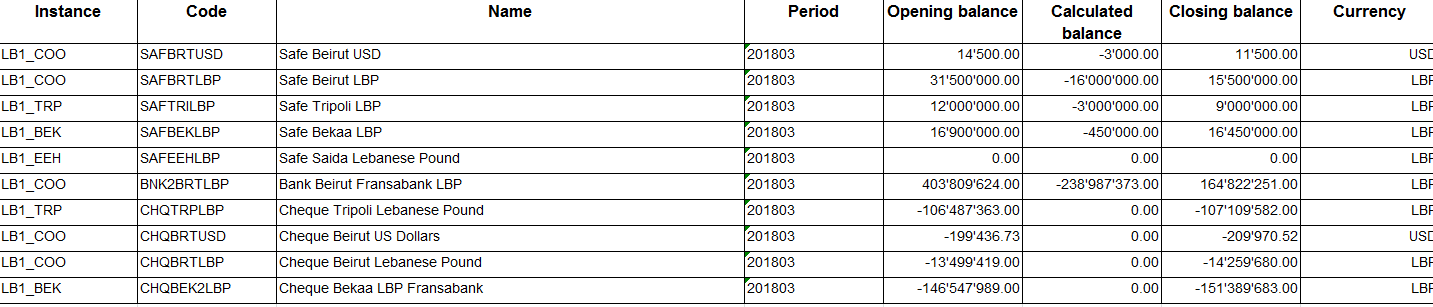 Liquidity Balances Report
How to Produce a Balance by Account Report
The Balance by account is a reflection of the G/L accounts balance per account
Go to Accounting/Reporting/Legal Reporting/Accounting Reports/Balance by account
The {Balance by account} window displays.
- Set the desired report options
Balance by account report options:
| Field | Description |
| Fiscal year | System defaults to current fiscal year but can be changed |
| Moves status | Drop-down selection:
|
| Include initial balances | Tick the checkbox if you want to include initial balances |
| Periods | Enter the period to restrict the starting and ending Period |
| Instance | Allows to select one or multiple proprietary instances |
| Show Inactive accounts | Tick the checkbox if you want to display inactive accounts |
| B/S / P&L Account | Drop-down selection:
|
| Granularity | Drop-down selection:
|
| Currency | Add a currency if you want to filter by currency |
| Show Balances | Displays on the screen Balance by account using the expand button |
| Export | Excel report showing Balance by account |
Description
- Select {Export} at the bottom of the window
A xls report of Balance per account displays.
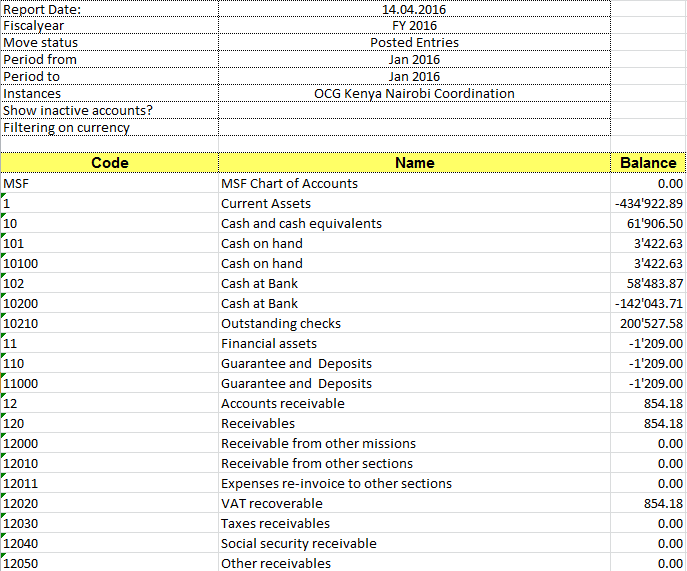
Balance per account report
How to Produce a Balance by Analytical Account Report:
The Balance by analytical account is a reflection of the analytical accounts balance per account
Go to Accounting/Reporting/Legal Reporting/Accounting Reports/Balance by analytical account
The {Balance by account} window displays.
- Set the desired report options
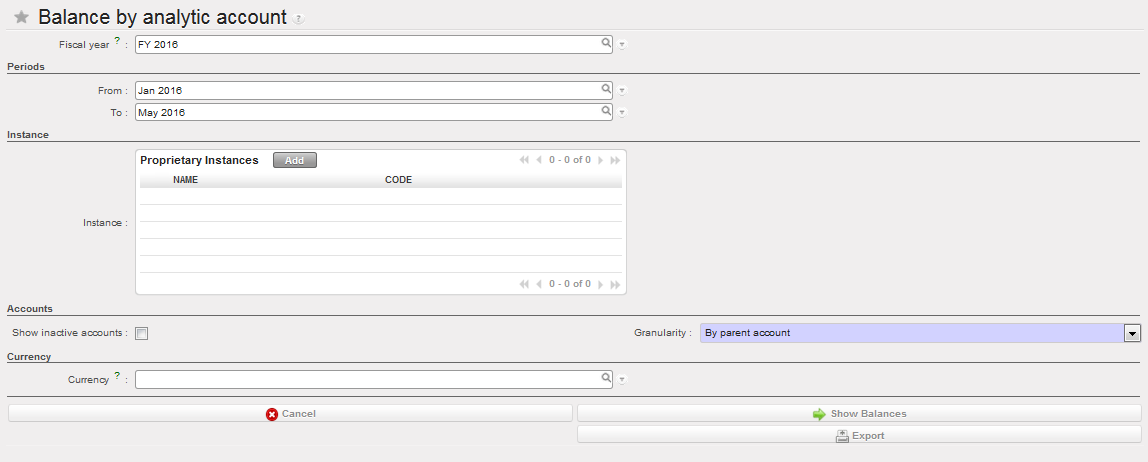
Balance by analytical account report options
Field
| Field | Description |
| Fiscal year | System defaults to current fiscal year but can be changed |
| Periods | Enter the period to restrict the starting and ending Period |
| Instance | Allows to select one or multiple proprietary instances |
| Inactive accounts | Tick the checkbox if you want to display inactive accounts |
| Granularity | Drop-down selection:
|
| Currency | Add a currency if you want to filter by currency |
| Show Balances | Displays on the screen Balance by account using the expand button |
| Export | Excel report showing Balance by account |
Description
- Select {Export} at the bottom of the window
A xls report of Balance per account displays in each xls worksheet.
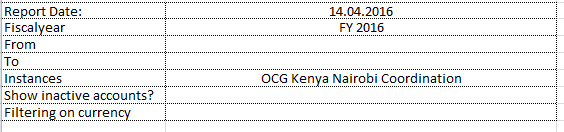
Info worksheet, displaying the selected report options
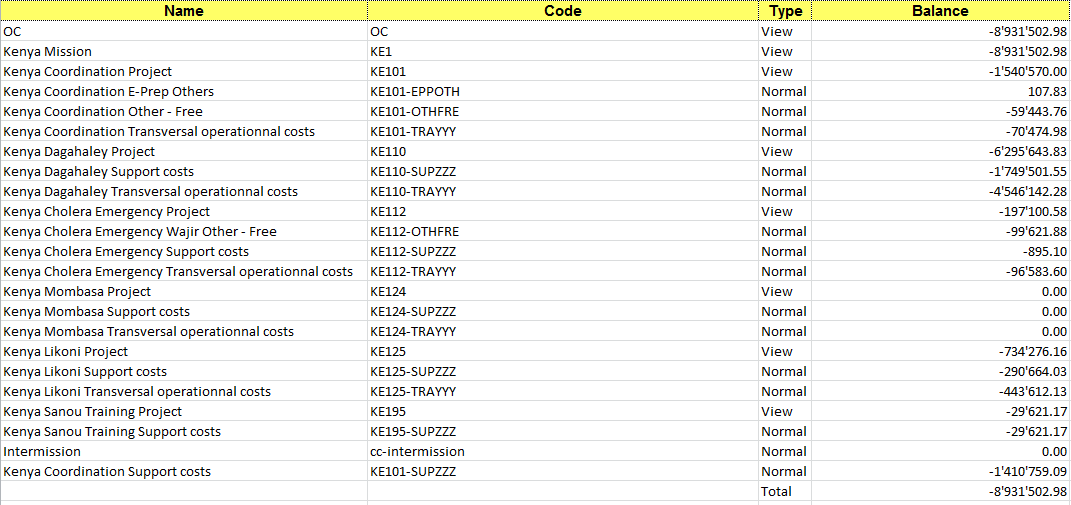 Cost center worksheet, displaying the balance per cost center. It reflects actual expenses per cost center.
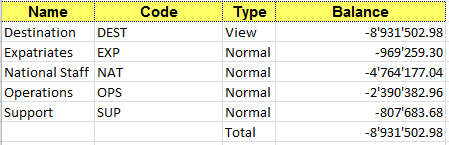 Destination worksheet, displaying the balance per Destination. It reflects actual expenses per Destination.
Funding Pools worksheet, displaying the balance per Funding Pool. It reflects actual expenses per Funding Pool.
Separate worksheets for {FREE 1} and {FREE 2} analytical accounts are also available.
How to Produce a Partner Ledger Report
The Partner Ledger report is a PDF or Excel report that is a complete record of all financial transactions on all partners/suppliers. The overall total amounts are shown in functional currency, but each individual entry is shown in both, booking and functional currencies.
Go to Accounting/Reporting/Generic Reporting/Partners/Partner Ledger.
The {Partner Ledger} window displays
- Set the desired report options. These are the same as the Partner Balance report.
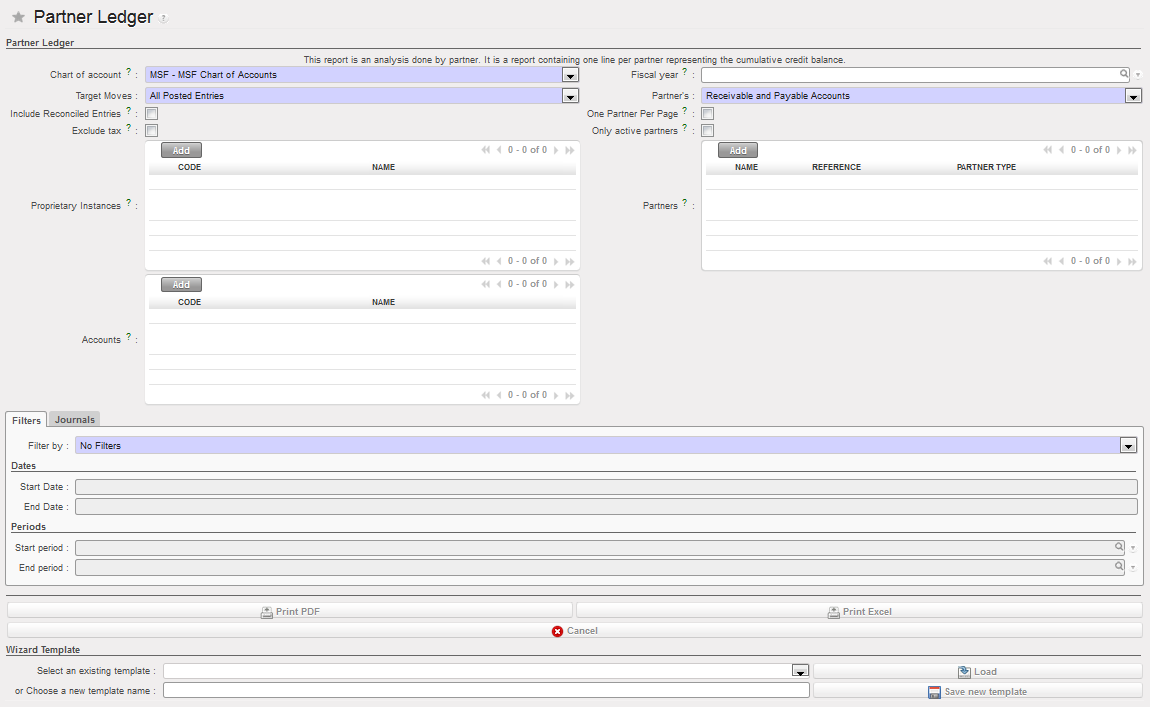
Partner Ledger report options
Field
| Field | Description |
| Chart of account | System defaults to the existing chart of accounts |
| Fiscal year | System defaults to current fiscal year but can be changed |
| Target Moves | Drop-down selection:
|
| Partner’s | Drop-down selection:
|
| Include initial balances | Tick the checkbox if you want to include the opening balances of the fiscal year |
| With currency | Add a currency if you want to filter by currency |
| Include reconciled entries | Tick the checkbox if you want to include reconciled entries |
| One partner per page | Tick the checkbox if you want to have each partner on a separate page |
| Exclude Tax | Exclude the tax accounts from the report |
| Only active partners | Limits the search results only on active partners |
| Proprietary instances | Limits the search on the selected proprietary instances only |
| Partners | Allows choosing one or multiple partners for the search |
| Accounts | Allows choosing one or multiple accounts for the search |
| Filter by | Drop-down selection:
|
| Start Date | If using a Date filter, enter the date to restrict the starting Posting Date |
| End Date | If using a Date filter, enter the date to restrict the ending Posting Date |
| Start Period | If using a Period filter, enter the period to restrict the starting Period |
| End Period | If using a Period filter, enter the period to restrict the ending Period |
2. Select {Print} at the bottom of the window
A PDF report of the Partner Ledger displays
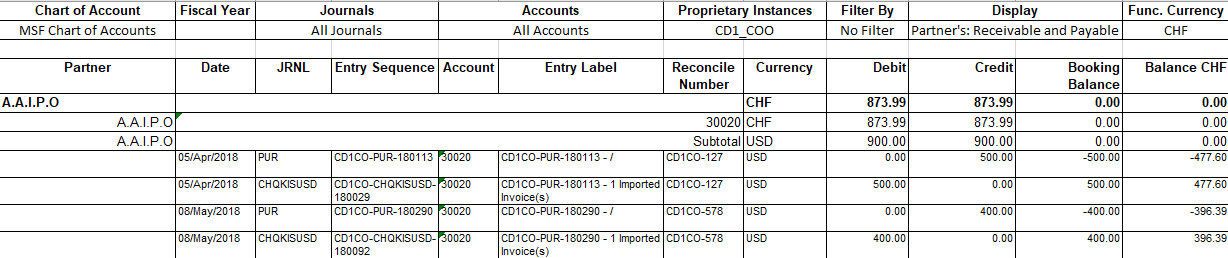
Partner Ledger report
How to Produce a Partner Balance Report:
The Partner Balance report is a PDF or Excel report showing a cumulative total balance per partner/supplier. It allows the project to identify any outstanding payable or receivable amounts for a partner.
Go to Accounting/Reporting/Generic Reporting/Partners/Partner Balance
The {Partner Balance} window displays
- Set the desired report options
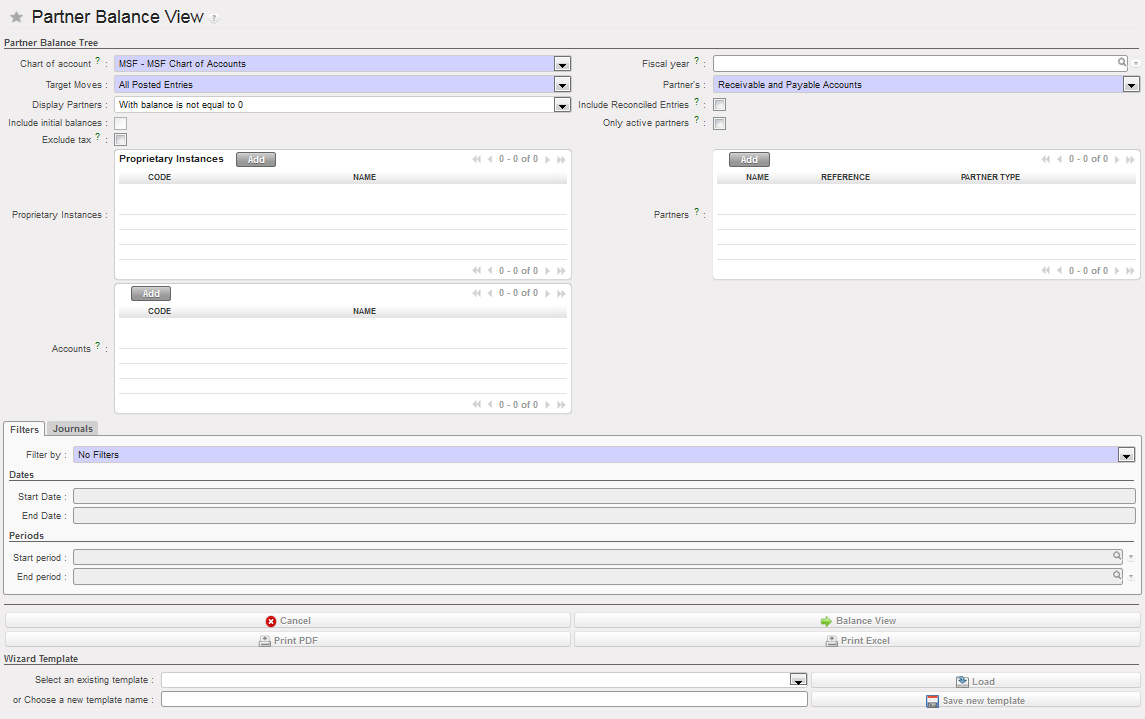
Partner Balance report options
Field
| Field | Description |
| Chart of account | System defaults to the existing chart of accounts |
| Fiscal year | System defaults to current fiscal year but can be changed |
| Target Moves | Drop-down selection:
|
| Partner’s | Drop-down selection:
|
| Display Partners | Drop-down selection:
|
| Include reconciled entries | Tick the checkbox if you want to include reconciled entries. |
| Include initial balances | Tick the checkbox if you want to include the opening balances of the fiscal year |
| Prop instances | Allows to select one or multiple proprietary instances |
| Exclude Tax | Tax entries will not be displayed in the report |
| Only active partners | Limits the search results only on active partners |
| Filter by | Drop-down selection:
|
| Proprietary instances | Limits the search on the selected proprietary instances only |
| Partners | Allows choosing one or multiple partners for the search |
| Accounts | Allows choosing one or multiple accounts for the search |
| Start Date | If using a Date filter, enter the date to restrict the starting Posting Date |
| End Date | If using a Date filter, enter the date to restrict the ending Posting Date |
| Start Period | If using a Period filter, enter the period to restrict the starting Period |
| End Period | If using a Period filter, enter the period to restrict the ending Period |
| Balance view | Displays on the screen Partner Balance Payable |
Description
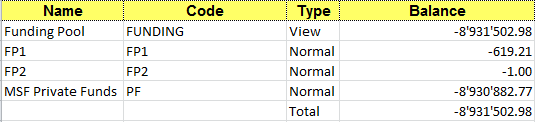
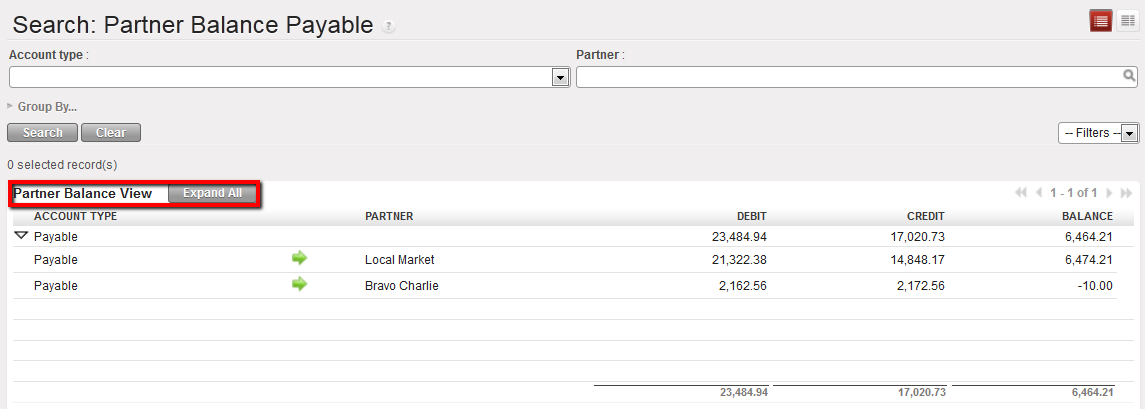 Balance View on Payable
- Select {Print Excel} to show the report in xls. format or {Print PDF} to produce a PDF. report at the bottom of the screen
![]()
A XLS or PDF report of the Partner Balance displays
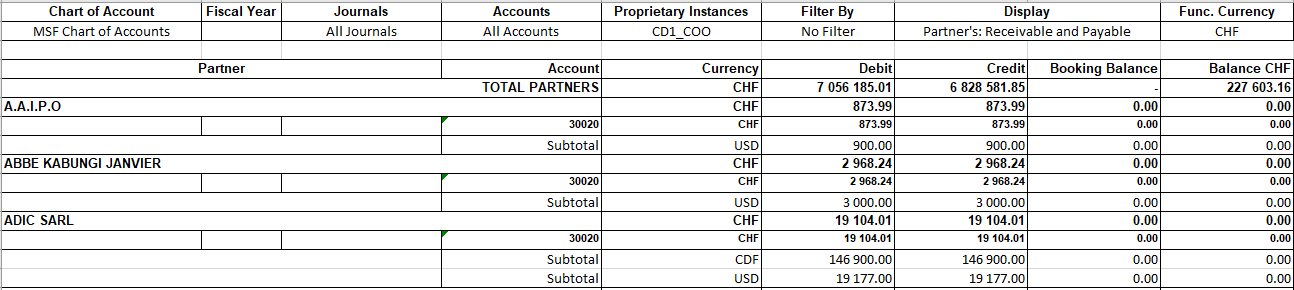
Partner Balance report, xls format
For Suppliers (PUR journal), the Debit amount represents the total amount paid; the Credit amount is the total amount owed, so the Balance is the amount still outstanding to be paid or received. It is important to note that the amounts are in functional currency not booking currency. Save, print or email as desired.
How to Produce a Local Expenses Report
The Local Expenses report provides direct information about all expenses purchased or settled locally, in order to get a better overview of local cash flow needs or to meet specific requirements from local auditors asking MSF to report on local expenses. This report excludes entries booked in the HQ journal, Engagement journal, and In-kind donation journal.
Go to Accounting/Reporting/Generic Reporting/Local Expenses
The {Local Expenses} window displays
- Set the desired report options

The Local Expense report options
| Field | Description |
| Cost center | List of cost centers for the instance and it’s children |
| Fiscal year | System defaults to current fiscal year but can be changed |
| Period From/To | Enter the period to restrict the starting and ending Period |
| Breakdown | Drop-down selection:
|
| Granularity | Drop-down selection:
|
| Booking currency | If this field remains empty, all bookings will be retrieved regardless of the currency; if one currency is indicated, the system will pick only expense lines recorded in this currency |
| Output currency | The functional currency is set by default, conversion is at standard rates recorded in the system, so no specific currency table can be chosen to value expense in this report |
Field
Description
3. Select {Print} at the bottom of the window
An Excel report of Local Expenses displays
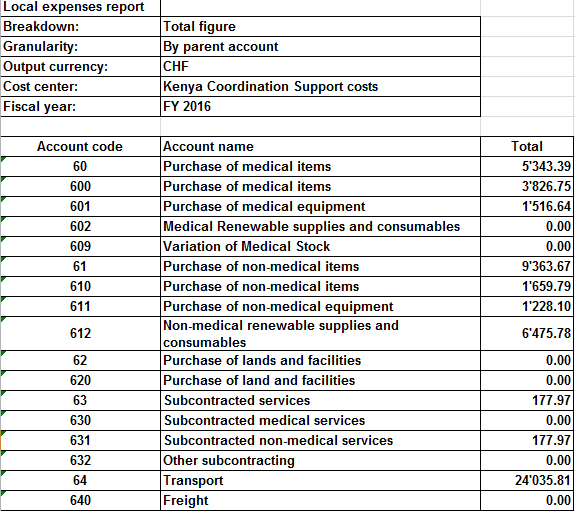
Local Expenses report
How to Export Field Data to HQ System OCG
Go to Accounting/Reporting/Generic Reporting/Export to HQ system (OCG)
- In the Top proprietary instance field, select an instance (Coordination) using the magnifying glass
 A window Export to HQ system displays
- In the Period field, select a period
 Field data export for January 2016
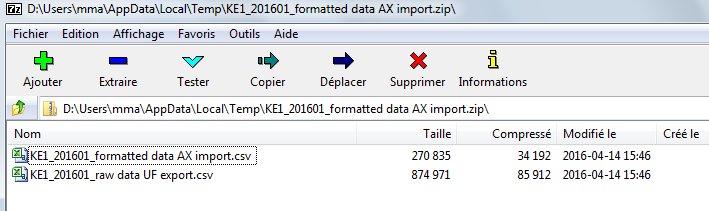
- Select


- Confirm
![]()
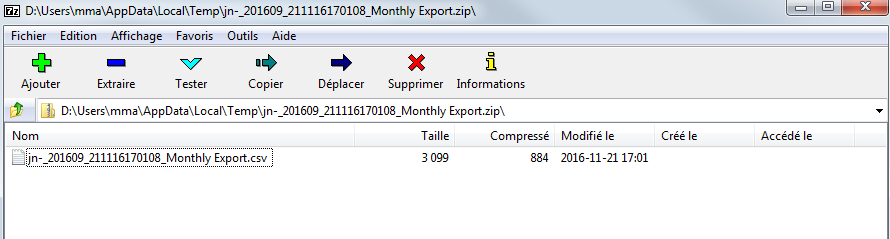
Two files display (export and import files). Save them
How to Export Field Data to HQ system OCA
Go to Accounting/Reporting/Generic Reporting/Export to HQ system (OCA)

- In the Top proprietary instance field, select an instance (Coordination) using the magnifying glass
A window Export to HQ system displays
- In the Period field, select a period (The fiscal year defaults to the current FY but is editable)
 Field data export for September 2014
- Select

- Confirm
![]()
Three files display (export and import files). Save them

Remember, unlike OCG and OCB, Free1 and Free2 lines will be excluded from the export to HQ system of OCA.
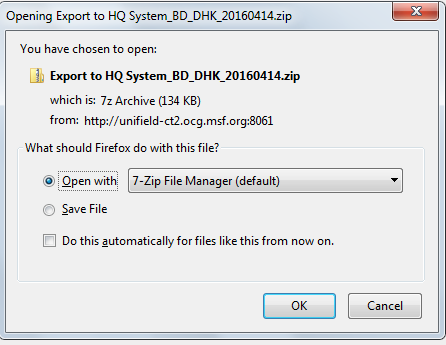
How to Export Field Data to HQ system OCB
Go to Accounting/Reporting/Generic Reporting/Export to HQ system (OCB)
- In the Top proprietary instance field, select an instance (Coordination) using the magnifying glass
- In the Period field, select a period (The fiscal year defaults to the current FY but is editable)
- Finally select if you want to export all lines or lines not yet exported
 Field data export for January 2016
- Select

- confirm OK
Files display. Save them
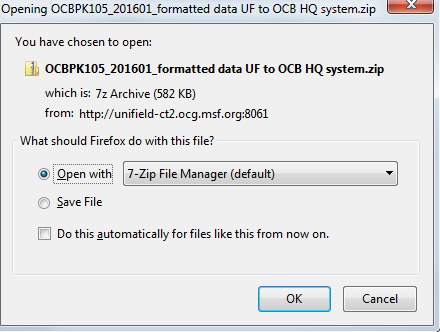
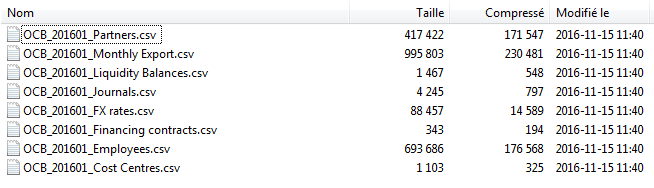
Remember, unlike in OCA and OCG, unposted entries are excluded from the export to HQ system of OCB and entries from the FXA journal are included.
How to Export Field Data to HQ system OCP:
Go to Accounting/Reporting/Generic Reporting/Export to HQ system (OCP)
- In the Top proprietary instance field, select an instance (Coordination) using the magnifying glass
- In the Period field, select a period (The fiscal year defaults to the current FY but is editable)

- Select

4. Confirm OK
1 File displays. Save it.