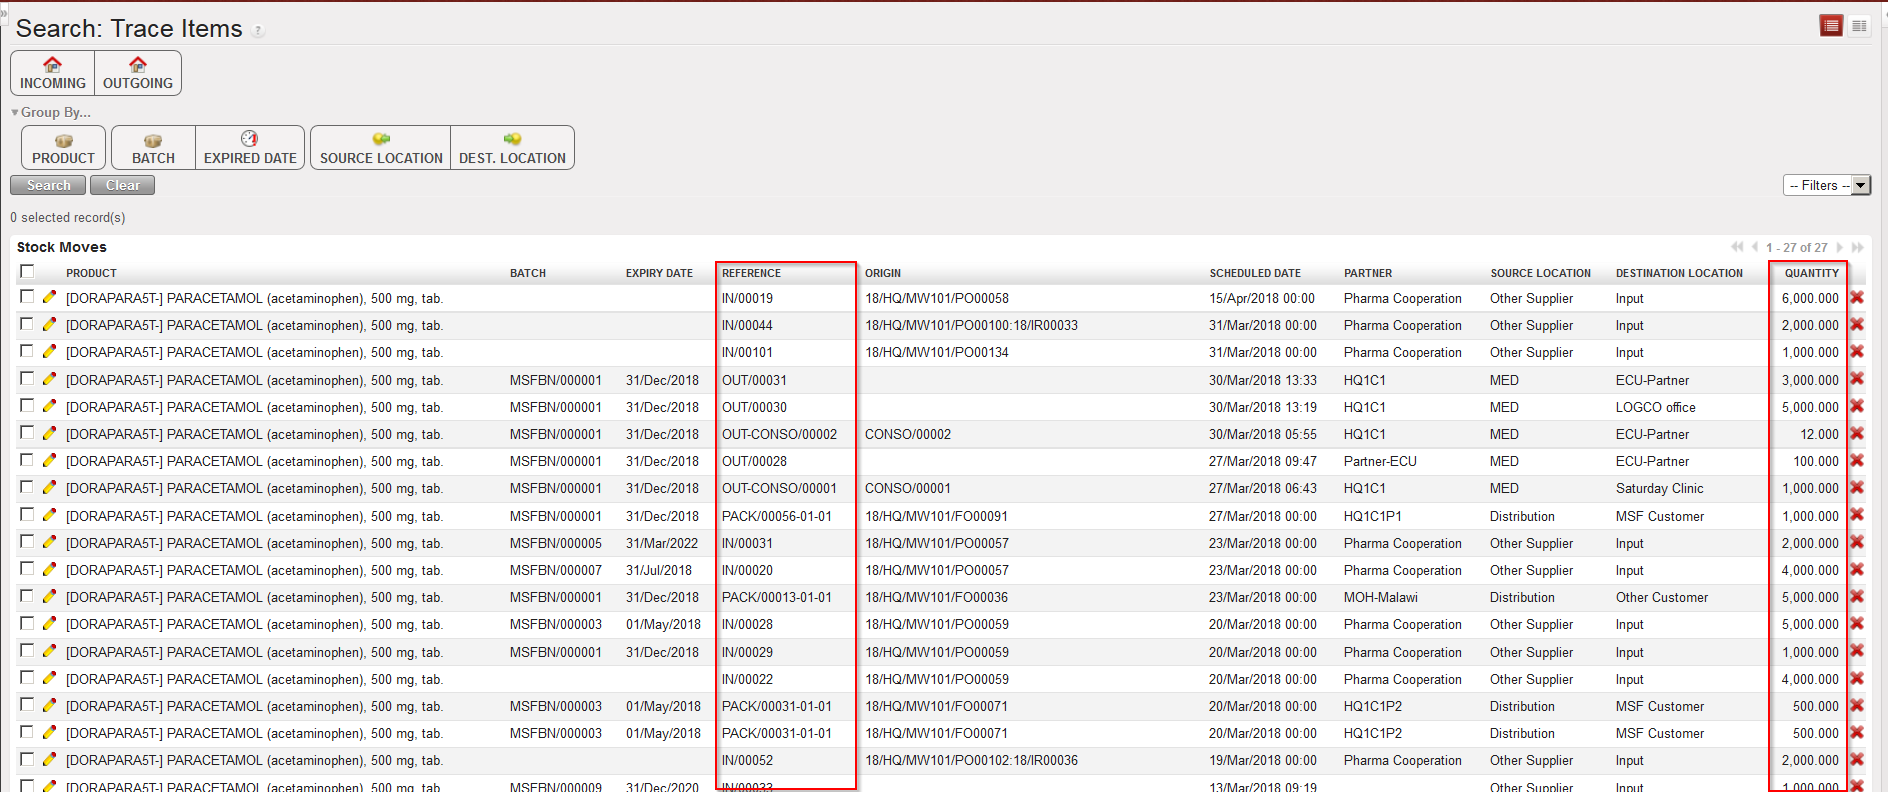
The functionality “Trace Item” available via Warehouse / Traceability / Trace Item provides visibility on a product’s movements as it lists all IN, OUT and PACK(i.e. PPL which is on a sub SHIP with status at least “Shipped“) movements in which the product is involved. In addition to the product, batch and expiry date, it shows the reference of the document, the origin, the scheduled date, the involved partner, the source location, the destination location and the quantity.
Tracing an item
This functionality can be launched by product, by batch number or by expiry date. This functionality can also be used for non-batch managed products. The print option allows exporting the result to PDF.
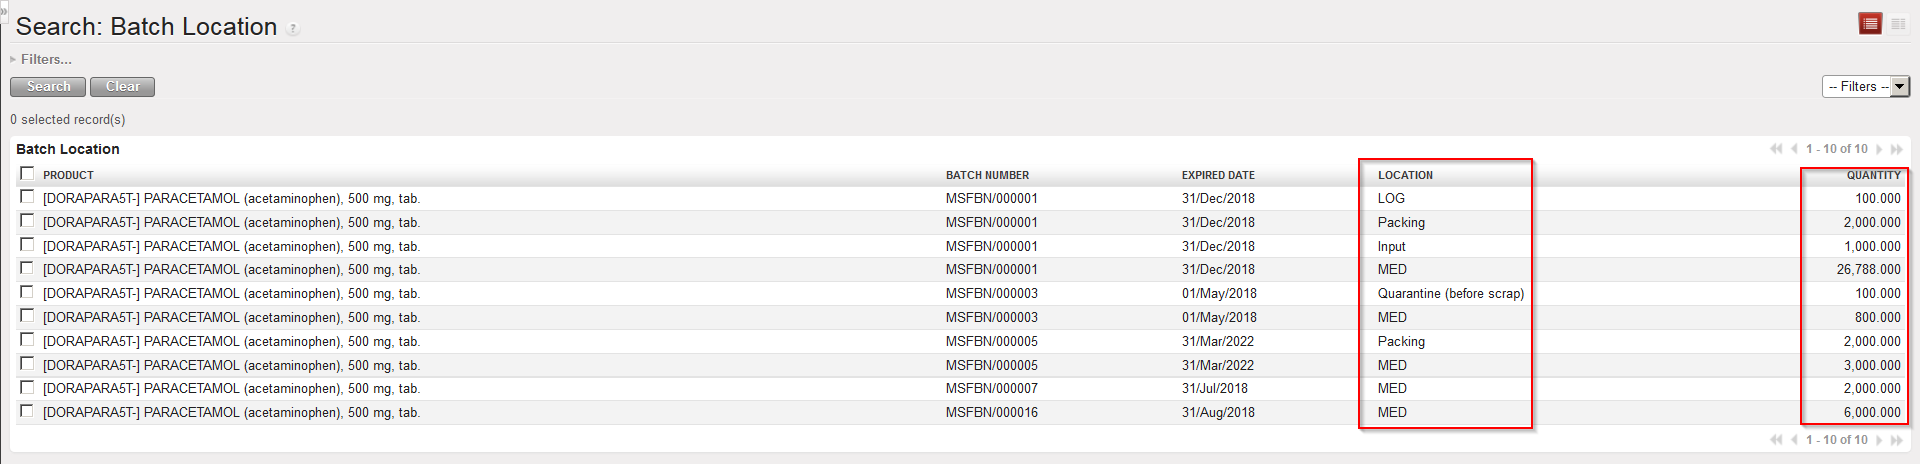
The functionality “Batch Location” available via Warehouse / Traceability / Batch Location gives the real stock per location for each batch (note that batches whose real stock is at zero do not appear).
Real stock per batch in each location
This functionality can be launched by product, by batch number or by expiry date. This functionality can also be used for non-batch managed products.
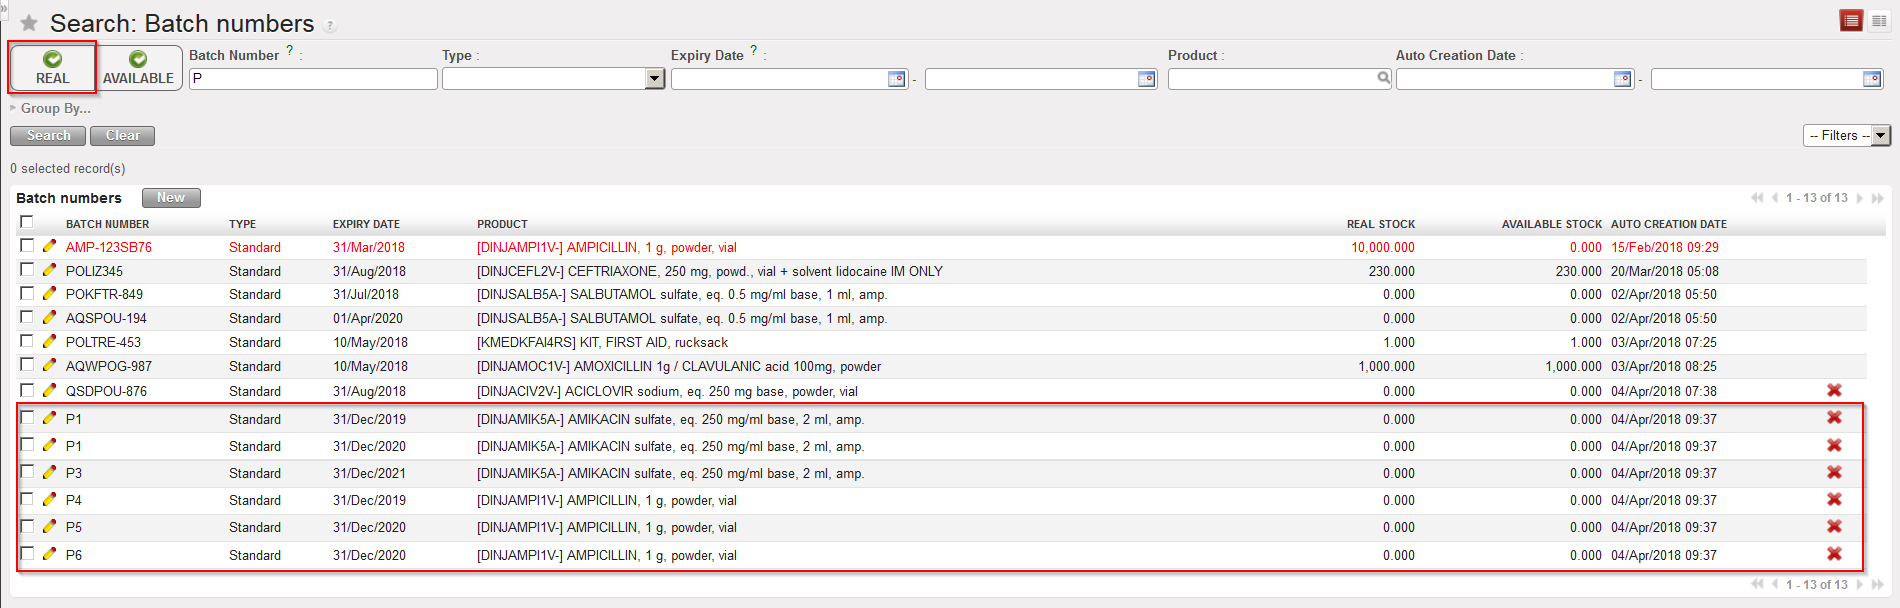
The functionality “Batch numbers” available via Warehouse / Traceability / Batch numbers which has been introduced above can give information on stock level and stock availability of batch managed products. It gives for each batch the real stock and the available stock on the instance.
Real and available stock per batch
Please note that a “Product label” sticker can be printed out form the right-side action menu.
B. HOW TO CREATE BATCH MASTER DATA VIA FILE IMPORT
If many batch master data have to be created manually, it might be easier to prepare an Excel file and import these batches in the system. Note that only “Standard” batches can be created via import.
Go to: Warehouse / Traceability / Batch numbers / Import Batch Numbers
Click on the “New” button.
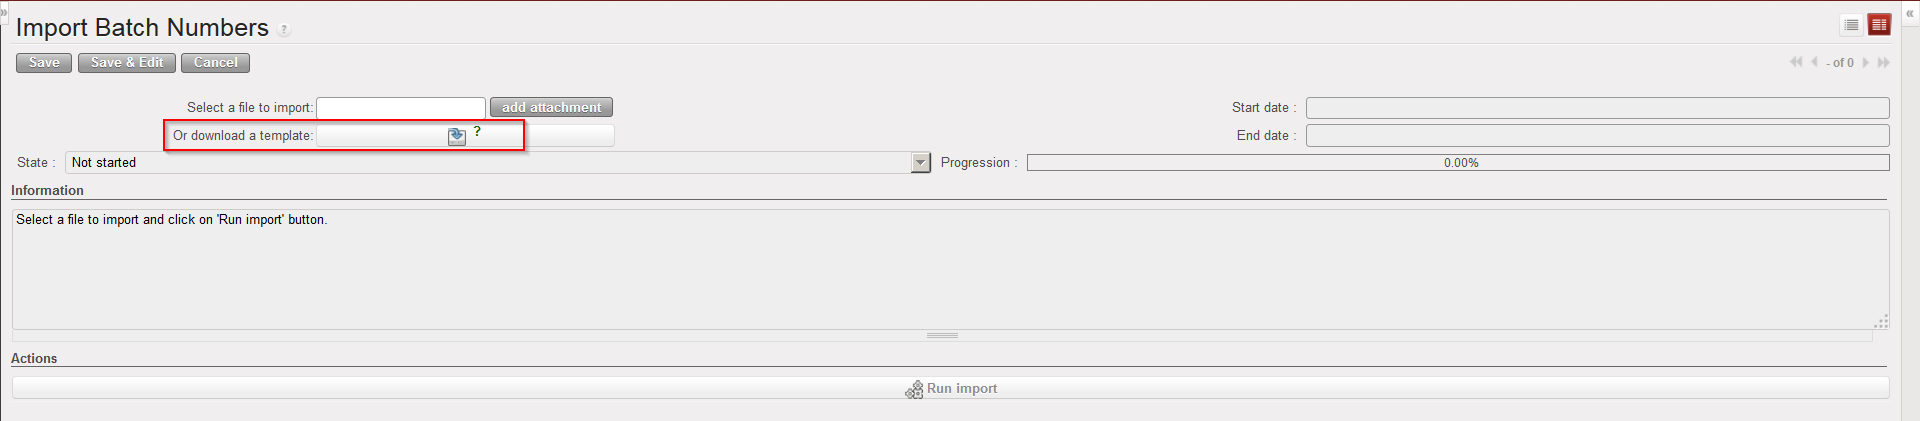
A file template may be generated by clicking on the “Or download a template” button.
Generating template for batch master data import
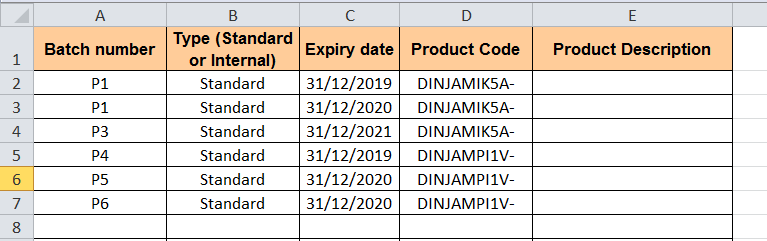
3. Prepare your file. Each line should include batch number, type (Standard), expiry date and product code.
Example of file for import of batches master data
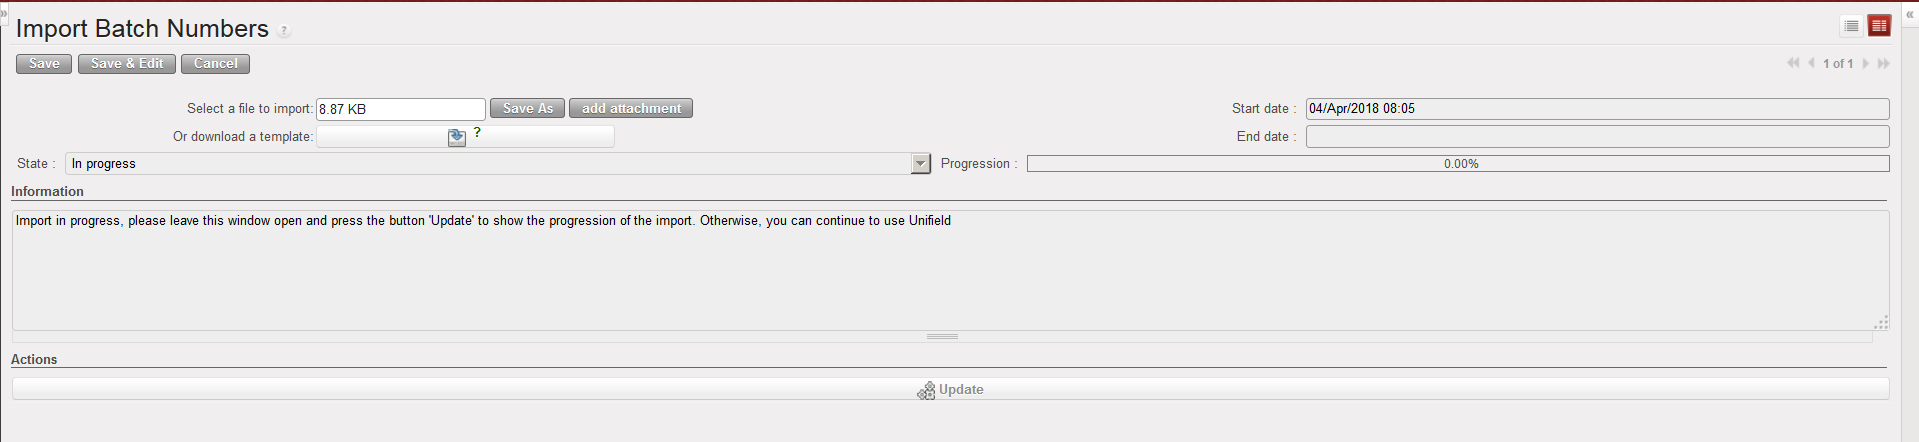
4. Click on the “add attachment” button and select the file to import on your computer.
5. Click on the “Run import” button.
Batches master data being created via import
6. Once the file has been uploaded, you can see the created batches master data via Warehouse / Traceability / Batch numbers. Note that you need to untick the “Real” Filter as no real stock exists at this point for these new batches.
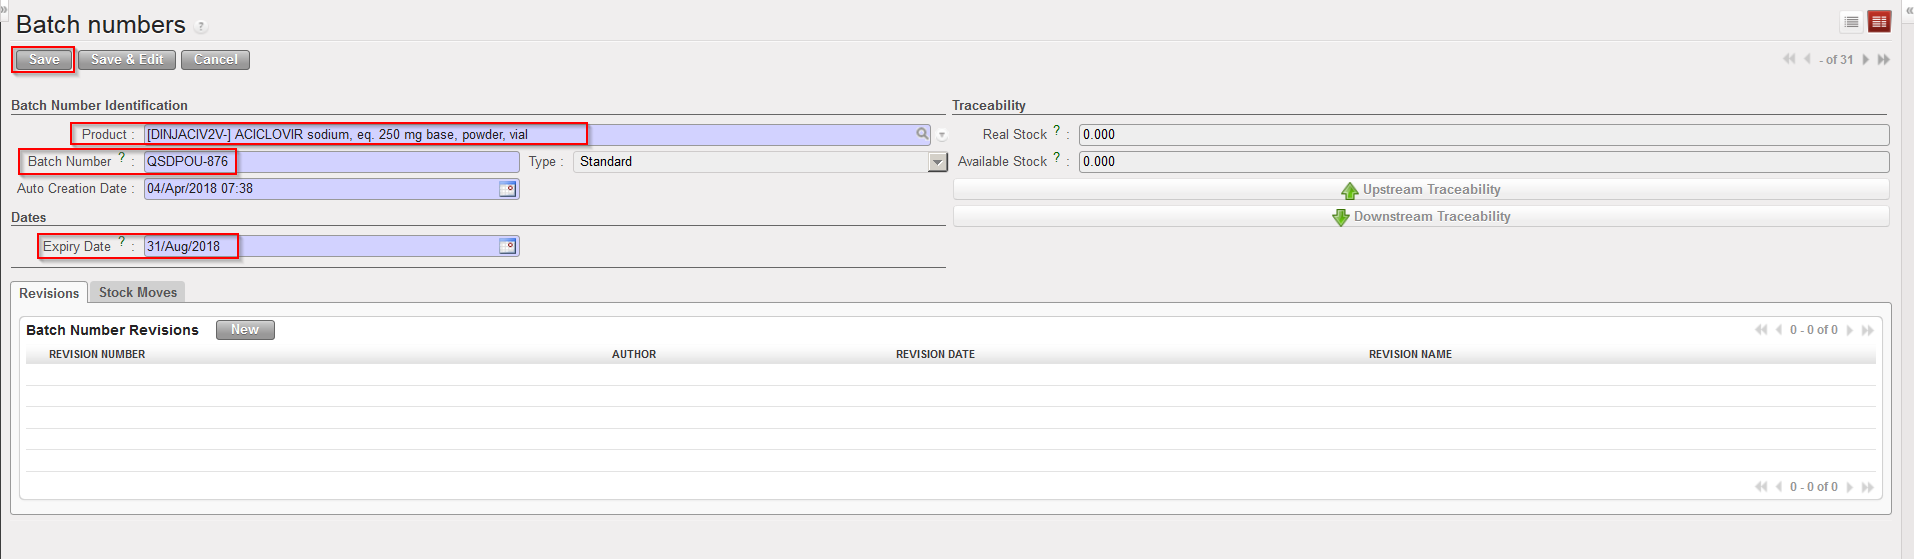
Although batch master data will most of the time be created during reception (IN) or when an Initial Stock Inventory (ISI) will be performed, batches can also be created manually. Note that only “Standard” batches can be created manually, meaning batches for products managed by BN and ED but not for products which are managed by ED only.
Go to: Warehouse / Traceability / Batch numbers
Click on the “New” button.
Select a product.
Enter batch number and expiry date.
Click on the “Save” button.
Creating a batch master data
Note that the combination product code/BN/ED must always be unique (i.e. you cannot have 2 batch master data with same product code, same BN and same ED).
D. HOW TO RE-VALUATE THE COST PRICE/AVERAGE PRICE OF PRODUCTS
It may happen that products cost of an instance (cost price in the PMD sheets) are not any more accurate. This can be explained by various reasons such as misuse of the system, inflation, variability in prices,… The direct consequences of wrong products cost prices are that stocks will not be correctly valued and that orders won’t propose correct prices.
Fortunately, the “Product cost revaluation” functionality allows revising cost prices of products. This functionality should be used with great care, in accordance with your OC procedures and involve finance.
Go to: Warehouse / Inventory Management / Product cost revaluation
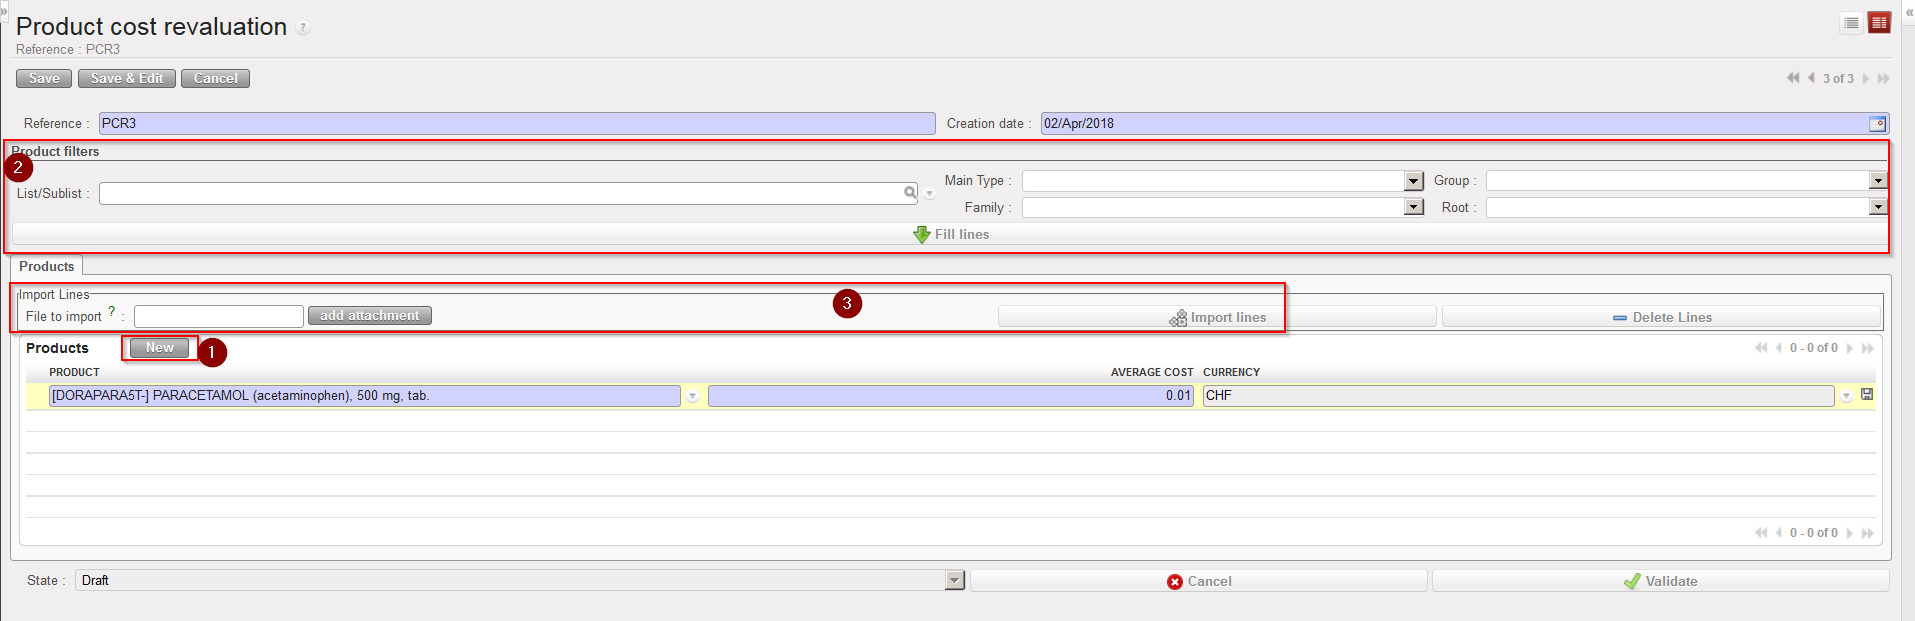
1.Click on the “New” button.
2. Enter an appropriate “Reference“.
3. The “Creation date” defaults to today’s date but can be changed if needed.
Product Cost Revaluation
4. Enter the products which you are reevaluating either by:
Adding products manually using the “New” button.
Using the Product filters area (“List/Sublist” or “Nomenclature”) then clicking on the “Fill lines” button.
Importing a file (by clicking on the “add attachment” button, browsing and selecting the file, then clicking “Import lines”).
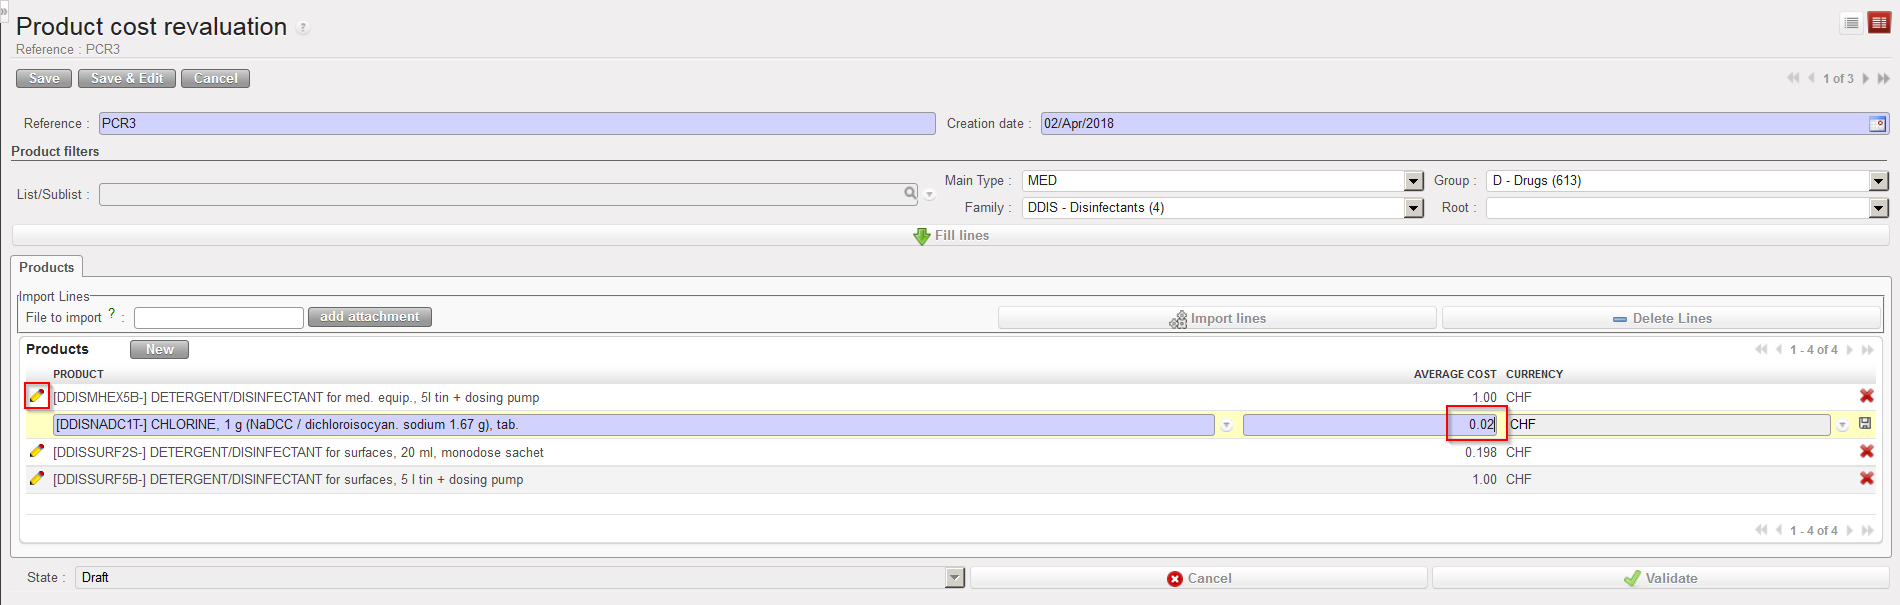
5. The system displays on each line, the product, the current cost price on the instance (in the functional currency) and the functional currency. To edit each line, click on the pencil icon.
6. For each line, update the cost price (average cost) as needed and save the change by clicking on the floppy disk at the end of the line. Note that if you used an import file this step has probably already been done as new prices have probably been included in the imported Excel file.
Product Cost Revaluation – Updating a cost price
7. When each line has been updated and saved, click on the “Validate” button.
8. Finally, click on the “Confirm” button. The status of the document switches to “Done“. No more changes can be done on the document. The cost price of the products has been updated on the PMD sheet.
The Product Cost Revaluation functionality offers and export option in the action menu (“Cost Reevaluation Excel Export”). Use it to generate a template that can be used to prepare an excel file for import.
Note that if you select the option “Track Changes – Product prices“, available in the action menu of the PMD sheet, you will be able to see the evolution of the cost price of a product, including the changes due to product cost revaluations.
Initial Stock Inventories are usually used when an instance is created but not after that. They help to transfer stock levels from a legacy system (e.g. LogistiX) to a UniField instance. It is a one shot operation during which accurate stock levels are introduced in UniField.
This is a process which is part of the migration when a new instance is being set up, or if a new stock location is created. This is a tool to initiate the project stocks with the relevant details (stock levels, location where the goods are, cost valuation of each product and, according to the PMD sheet settings the BN/ED if relevant).
The products, quantities and all other relevant information entered should be validated according to OC procedures.
Go to:Warehouse / Inventory Management / Initial stock inventory
Click on the “New” button to create a new ISI.
Enter a “Reference” (name of the ISI).
The “Creation Date” is set to the current date/time by default. Change it if needed.
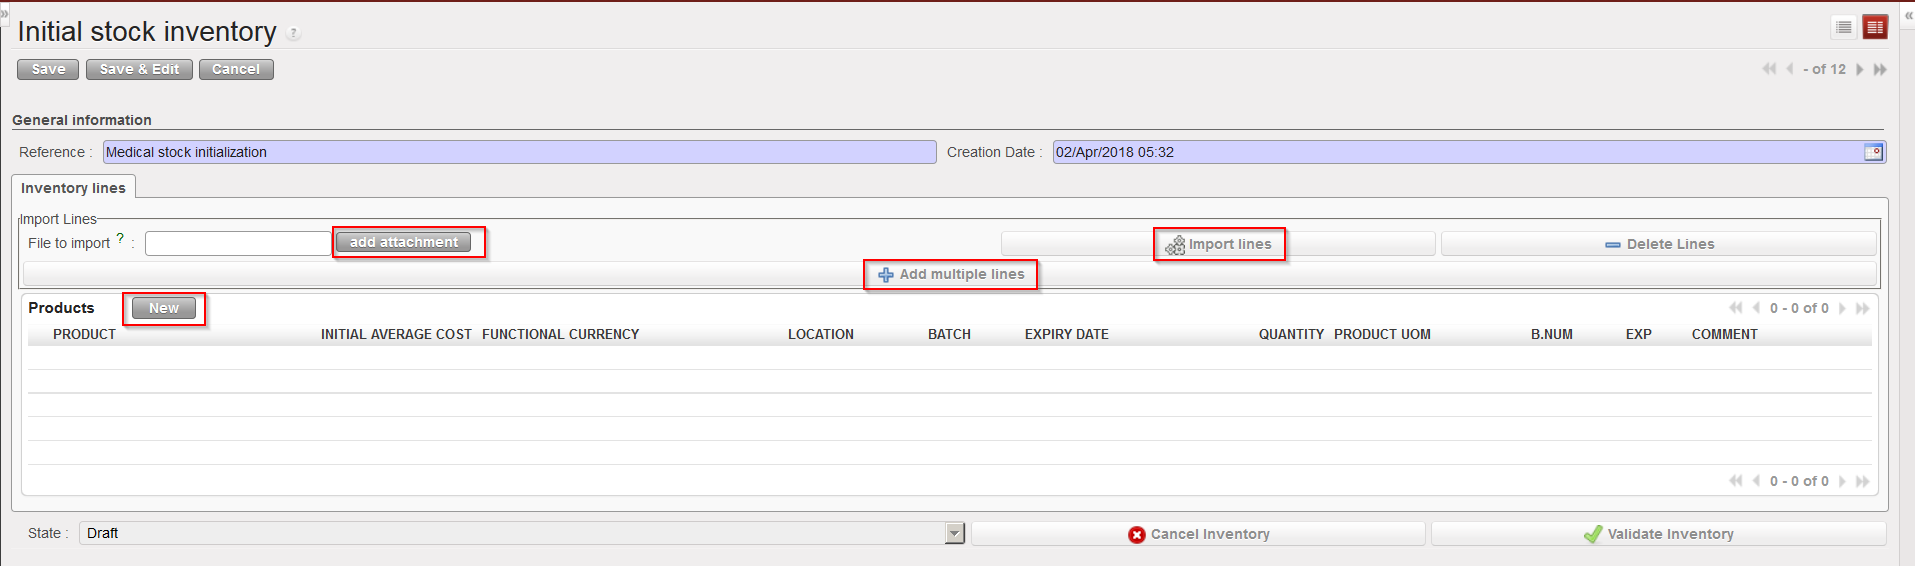
Add products using any of the following methods:
a) Adding products individually (by clicking on the “New” button, searching for and selecting the products).
b) Adding multiple lines by selecting .
c) Importing a file (by clicking on the “add attachment” button, browsing and selecting the file, then clicking “Import lines”). BN and ED products can be created at import, however, checks will be done at import and warning/error messages will be raised in case of conflict (existing product with same BN/ED; wrong format, missing information,…).
Methods to insert lines in an Initial Stock Inventory
Note that imported files must have a specific format (XML Spreadsheet 2003). You may get a file template by exporting an existing ISI via the option “Stock Initial Excel Export” available in the action menu. In this file, each separate batch, expiry date or location for a product should have its own line/row.
Excel file format to import on an Initial Stock Inventory
Inserting a line manually on an Initial Stock Inventory
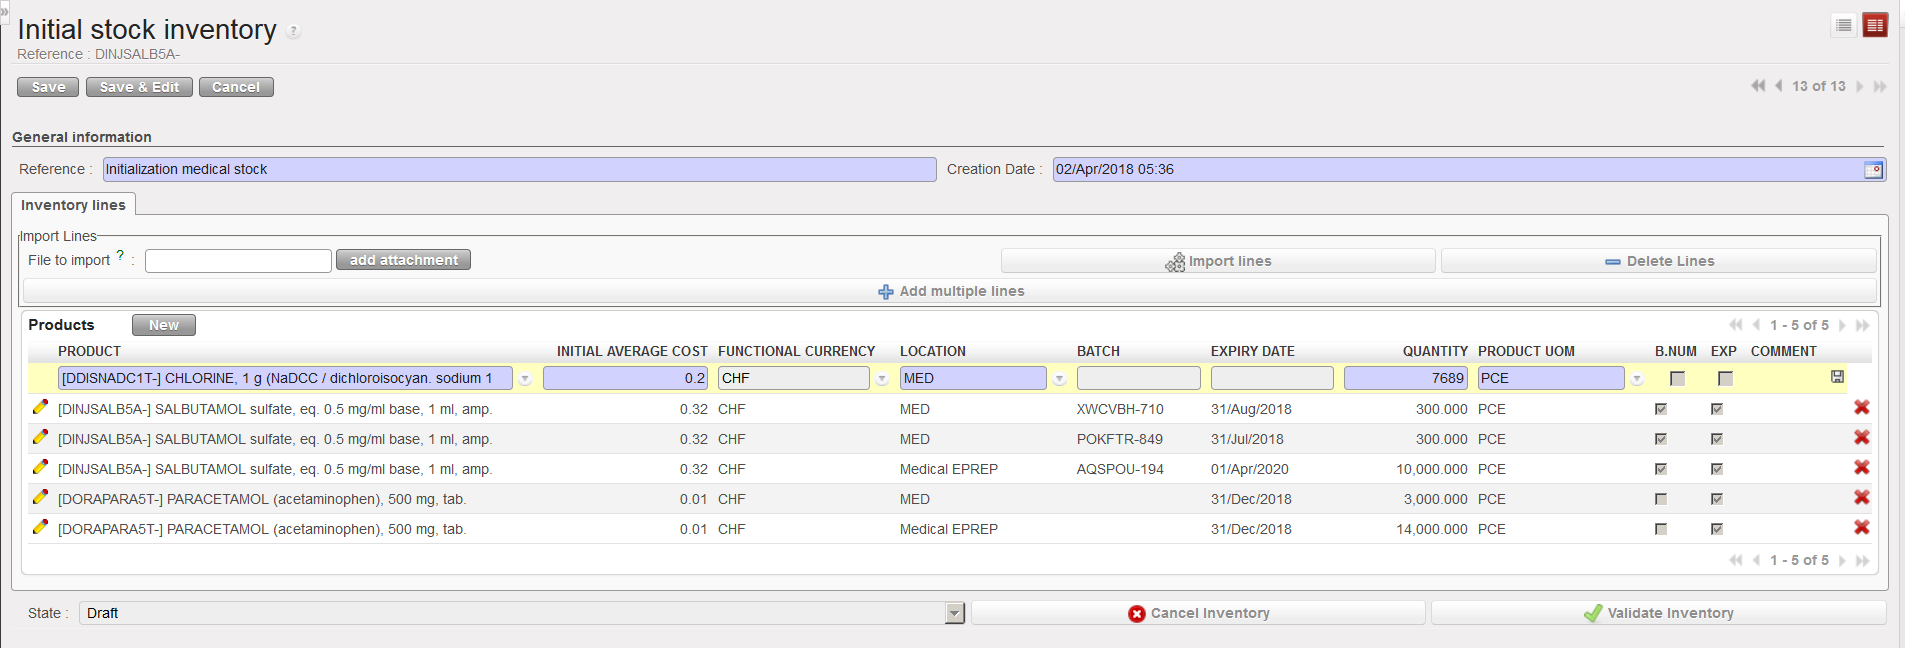
5. Unless you used the import function (“add attachment” button) to add products and all their details, you will need to add these details manually line by line.
I.) Click on the pencil icon next to each product line to edit it.
II.) Add all relevant information (location, batch number, expiry date, quantity,…). Note that location such as Input,Output, Packing, Shipment, Distribution, Stock and Quarantine are not allowed.
III.) Click on the floppy disk icon to save each line.
6. For every product which has more than one batch number or expiry date, or is found in multiple locations, a new line with this product needs to be created.
7. Click on the “Validate Inventory” button to confirm all lines are correct, this will mean no more changes can be made.
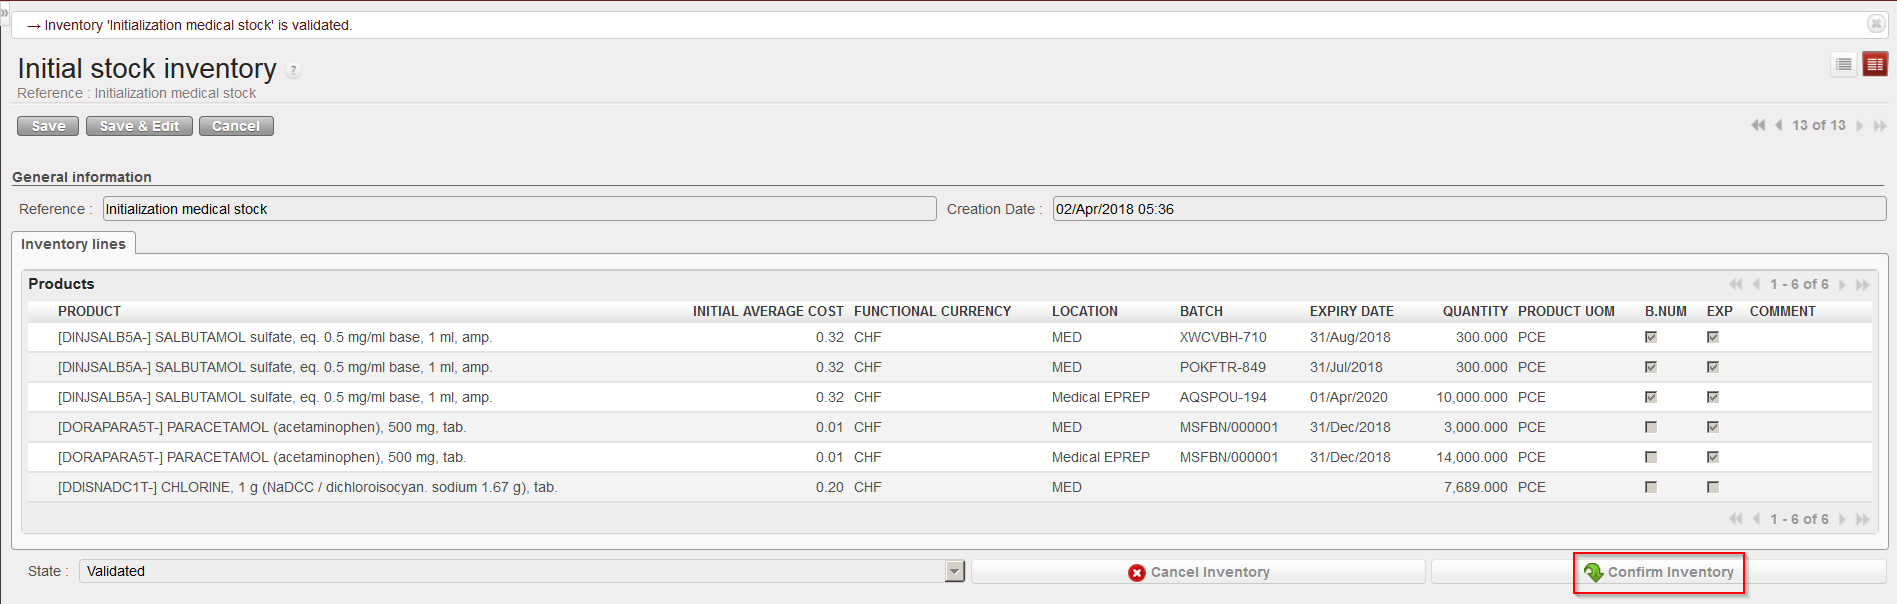
8. Once the inventory has been validated, click on the “Confirm Inventory” button to add these products into the indicated stock locations on the UniField instance.
Confirming an Initial Stock Inventory
Note that the “initialaveragecost” entered on the ISI will update the cost price of the PMD sheet. This means that the ISI will actually impact how stocks are valued in different reports and how subsequent orders will be valued. If several lines of an ISI relate to the same product, you will be forced to enter and identical unit price on the different lines.
It is not impossible to do Initial Stock Inventories several months after a go live (i.e. after an instance has been used for several months) but this should be done with great care, especially regarding price valuation of products.
Initial Stock Inventories are usually used when an instance is created but not after that. They help to transfer stock levels from a legacy system (e.g. LogistiX) to a UniField instance. It is a one shot operation during which accurate stock levels are introduced in UniField.
This is a process which is part of the migration when a new instance is being set up, or if a new stock location is created. This is a tool to initiate the project stocks with the relevant details (stock levels, location where the goods are, cost valuation of each product and, according to the PMD sheet settings the BN/ED if relevant).
The products, quantities and all other relevant information entered should be validated according to OC procedures.
Go to:Warehouse / Inventory Management / Initial stock inventory
Click on the “New” button to create a new ISI.
Enter a “Reference” (name of the ISI).
The “Creation Date” is set to the current date/time by default. Change it if needed.
Add products using any of the following methods:
a) Adding products individually (by clicking on the “New” button, searching for and selecting the products).
b) Adding multiple lines by selecting .
c) Importing a file (by clicking on the “add attachment” button, browsing and selecting the file, then clicking “Import lines”). BN and ED products can be created at import, however, checks will be done at import and warning/error messages will be raised in case of conflict (existing product with same BN/ED; wrong format, missing information,…).
Methods to insert lines in an Initial Stock Inventory
Note that imported files must have a specific format (XML Spreadsheet 2003). You may get a file template by exporting an existing ISI via the option “Stock Initial Excel Export” available in the action menu. In this file, each separate batch, expiry date or location for a product should have its own line/row.
Excel file format to import on an Initial Stock Inventory
Inserting a line manually on an Initial Stock Inventory
5. Unless you used the import function (“add attachment” button) to add products and all their details, you will need to add these details manually line by line.
I.) Click on the pencil icon next to each product line to edit it.
II.) Add all relevant information (location, batch number, expiry date, quantity,…). Note that location such as Input,Output, Packing, Shipment, Distribution, Stock and Quarantine are not allowed.
III.) Click on the floppy disk icon to save each line.
6. For every product which has more than one batch number or expiry date, or is found in multiple locations, a new line with this product needs to be created.
7. Click on the “Validate Inventory” button to confirm all lines are correct, this will mean no more changes can be made.
8. Once the inventory has been validated, click on the “Confirm Inventory” button to add these products into the indicated stock locations on the UniField instance.
Confirming an Initial Stock Inventory
Note that the “initialaveragecost” entered on the ISI will update the cost price of the PMD sheet. This means that the ISI will actually impact how stocks are valued in different reports and how subsequent orders will be valued. If several lines of an ISI relate to the same product, you will be forced to enter and identical unit price on the different lines.
It is not impossible to do Initial Stock Inventories several months after a go live (i.e. after an instance has been used for several months) but this should be done with great care, especially regarding price valuation of products.
UniField offers a variety of inventory and tracing tools to manage, search for and view all the movements of any given product. These tools facilitate the analysis and the management of the supply chain.
We use cookies to ensure that we give you the best experience on our website. If you continue to use this site we will assume that you are happy with it.

 .
.