A. LU INTRODUCTION (LU-SU4205)

Supply User Manual ENG -> 5. Warehouse -> 5.12 LU-SU4205 Replenishment Rules -> A. LU INTRODUCTION (LU-SU4205)

A. LU INTRODUCTION (LU-SU4205)

Replenishment Rules are there to avoid stock shortages, and to facilitate supply planning when it is time to reorder products.

RR (Replenishment rules) is a functionality supporting an ordering mechanism. From operational point of view RR enables to oversee forecasting stock levels, calculation of orders, analyzing and ordering of stock in order to prevent ruptures in the strategic planning. Replenishment rules provide a proposal of products and quantities to order considering the defined configuration of inventories specific to the product/mission.

For this, an accurate visibility of the current situation of quantities in stocks, quantities which will expire and quantities in the pipeline is necessary as well as their consumption. For RR any calculation in terms of proposing quantities is always done on the forecasted as the system never propose the quantity based on historical consumption only.

As you may have noticed by the definition, this feature presents a relatively high level of complexity and is therefore dedicated to users with advanced knowledge and subject to user rights (see with your OC processes).

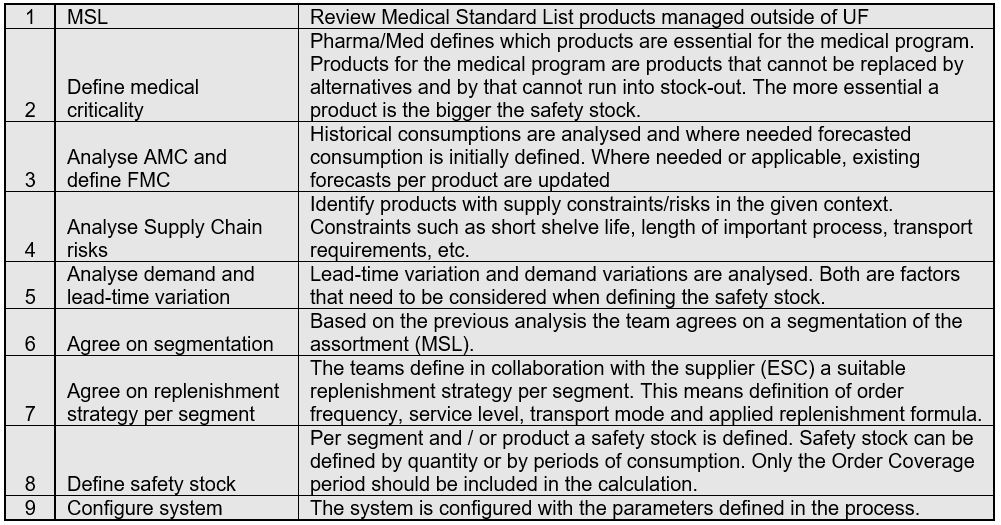
Analysis and Preparation process flow:

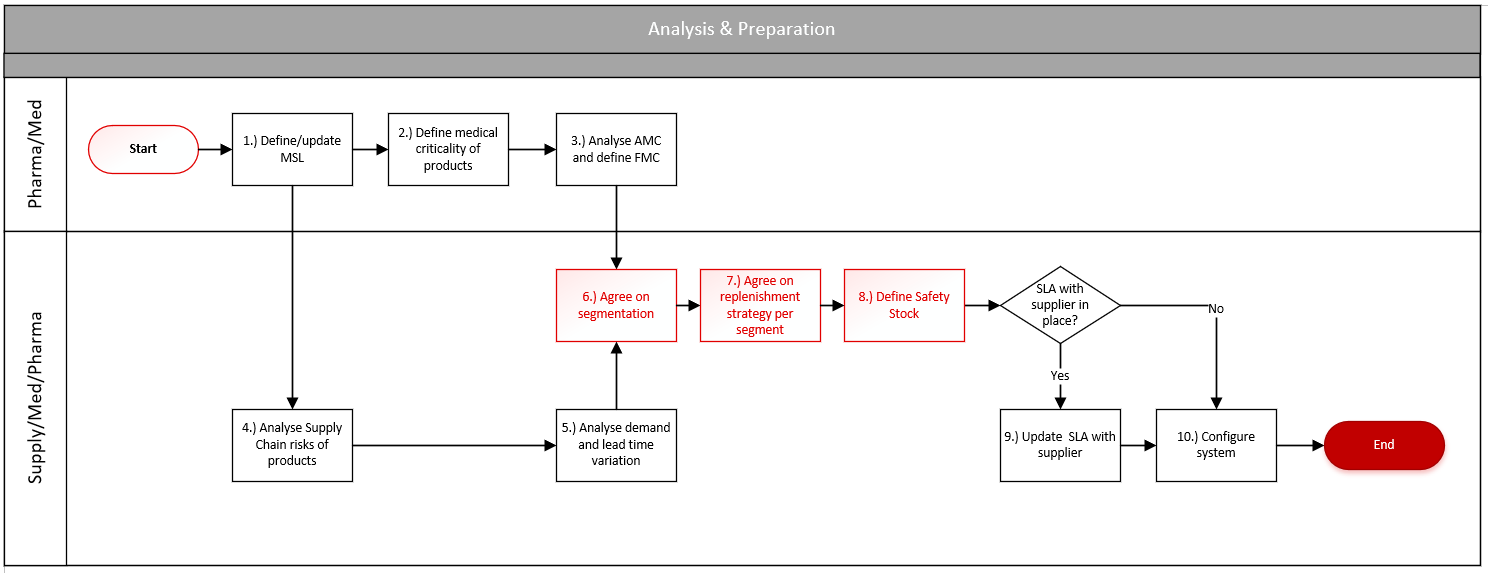
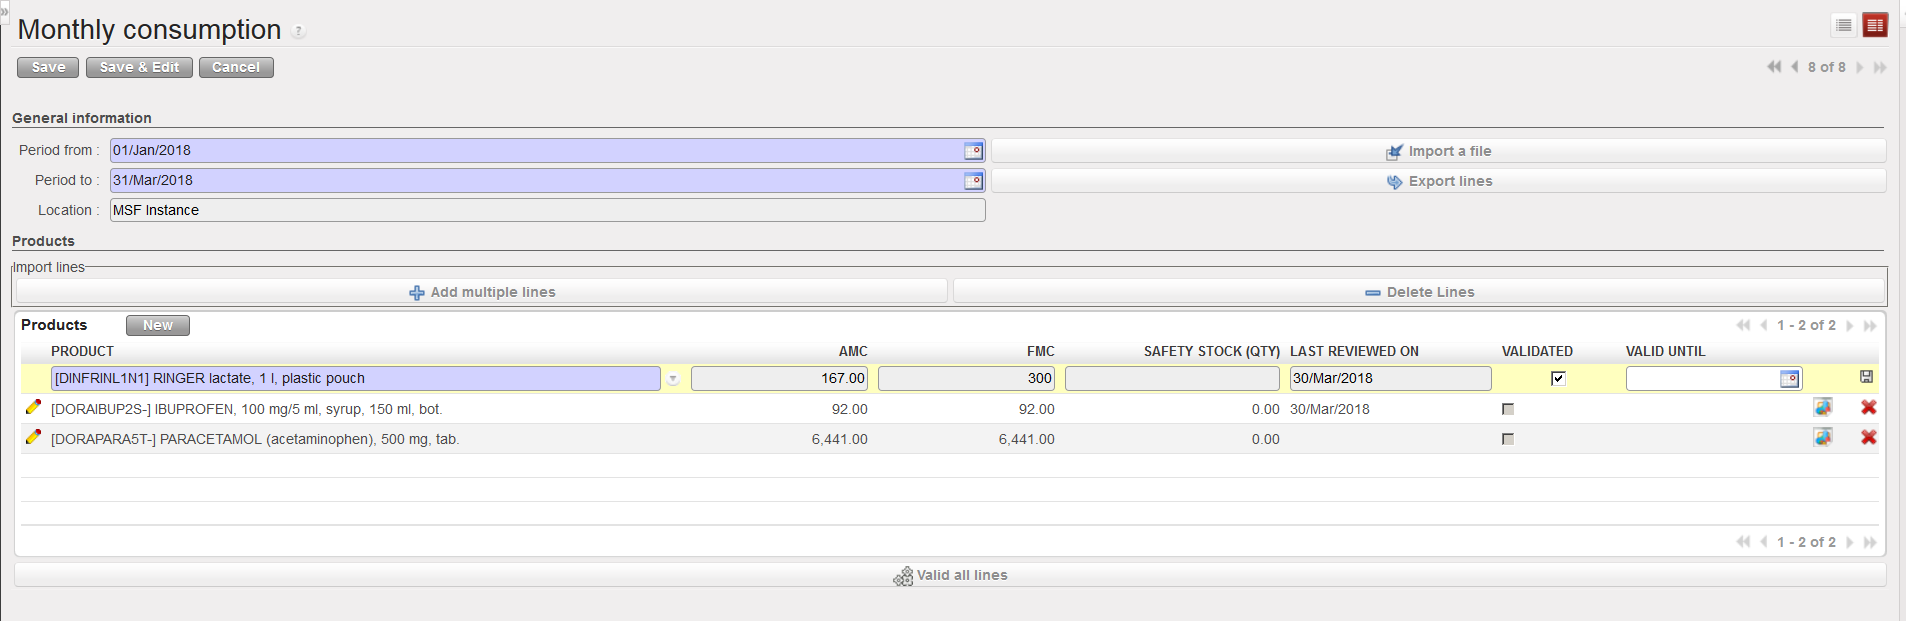
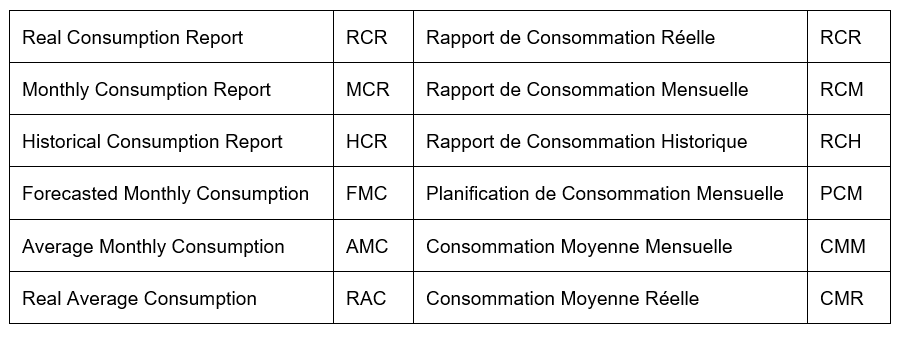
Below table represents the operational scope of processes which are considered for per-analyse which stay outside of Unifield system. It does not define the operational steps to be done in Unifield. Table provides more complex entire view about the processes and whole operational cycles. However, there are some parts in the table which are also available in Unifield system, e.g. definition of FMC. The final stage is config in Unifield with some of the elements depicted in the table at the bottom.

Processes to configure RR (detailed steps elaborated below) in the system is to first define and configure your “Location Config” (choosing a location for own instance or across multiple instances) ; second step is the creation of “Parent Segment” and third step is configuration of “Replenishment Segment” with list of products. For report purposes “Inventory Review Config” and “Product List Consistency Report” are used.

5.12 REPLENISHMENT RULES.

Supply User Manual ENG -> 5. Warehouse -> 5.12 LU-SU4205 REPLENISHMENT RULES.

LU-SU4205: Replenishment Rules.

A. LU INTRODUCTION

B. HOW TO CONFIGURE A LOCATION

C. HOW TO PARAMETER THE INVENTORY REVIEW CONFIGURATION

D. HOW TO CREATE A NEW REPLENISHMENT PARENT SEGMENT

E. HOW TO CREATE A REPLENISHMENT SEGMENT

F. HOW TO EXPORT/IMPORT PRODUCT SEGMENT EXCEL SPREADSHEET

G. HOW TO GENERATE THE INVENTORY REVIEW

H. HOW TO REVIEW AND UPDATE A REPLENISHMENT SEGMENT

I. HOW TO REVIEW A REPLENISHMENT PARENT SEGMENT

J. HOW TO GENERATE AN ORDER CALCULATION

K. HOW TO GENERATE ORDER CALCULATION REPORTS – Exports and on screen

L. HOW TO GENERATE A CHRONOGRAM

M. HOW TO GENERATE A PRODUCT LIST CONSISTENCY REPORT

N. GLOSSARY SPECIFIC TO REPLENISHMENT RULES

C. HOW TO DE-KIT A KIT

Supply User Manual ENG -> 5. Warehouse -> 5.11 LU-SU4204: Kits Management -> C. HOW TO DE-KIT A KIT

C. HOW TO DE-KIT A KIT

If a kit will no longer be used in its current state (i.e. as a kit), and you wish to use its components individually, you should use the de-kitting functionality. This may be the case if, for example, you decide to use the components of your kit, either to be dispatched, or to create a different kit, or for easier management. For the de-kitting to happen, the kit should already have an existing Kit Composition List (See LU-SU4101 “How to receive a kit and add a kit composition list”), and should be in an internal stock location (e.g. LOG, MED, Internal Consumption Unit).

After de-kitting, the products can be seen as individual products in stock and the kit as a product will not appear any more in the warehouse.

Go to: Products/ Kit Management / Composition List / Kit Composition List

  1. Find and open the relevant Kit Composition List to de-kit by clicking on the pencil icon.
  2. On the “Kit Composition List” screen, click on the “De-Kitting” button.

De-kitting a Kit Composition List

3.  On the “De-Kitting” screen, enter the “Source Location of Kit(i.e. location where the kit is currently stored, where its stock level is > 0).

4. Enter the “Destination Location of items“, to indicate where the system should place the components of the kit after de-kitting.

This image has an empty alt attribute; its file name is dekitting-word-press.png

De-kitting a Kit Composition List

5. In the section “Products to remove from the Kit“, you will see all the components of the kit, and any component for which information is missing (e.g. batch number, expiry date) will be displayed in red, with a description of what is missing at the end of the line.

In case of products with BN/ED attributes which have changed. there is a button “Update products whose BN/ED attributes have changed” which appears in KCL processing window. When button is used, any affected products will have their BN/ED info removed, or have default BN/ED info added, Action only updates products in this KCL window.

6. Click on the “Check Integrity” button to check all relevant information is present.

7. Click on the “Process De-kitting” button.

Kit Composition List after de-kitting

INT/KIT Internal Move after de-kitting

The Kit Composition List switches to “Closed“. An Internal Move with reference INT/KIT is created, processed and closed to move the kit from the stock to the “Kitting” (virtual) location and the kit components from the “Kitting” (virtual) location to the stock.

A. LU INTRODUCTION (LU-SU4204)

Supply User Manual ENG -> 5. Warehouse -> 5.11 LU-SU4204: Kits Management -> A. LU INTRODUCTION (LU-SU4204)

A. LU INTRODUCTION (LU-SU4204)

After a kit has been created (see LU-SU2105 in the Products chapter) or received (see LU-SU4101 “How to receive a kit and create a kit composition list” in the current chapter), we will learn how kits are being managed in stock.

UniField offers possibilities to modify a kit by substituting some of its components with products available in stock or to de-kit a kit and put its components back into stock.

Instead of buying a kit from a supplier, it is also possible to create a local kit with products available in stock. This will be explained in the kitting order section.

D. MONTHLY CONSUMPTION REPORTS

Supply User Manual ENG -> 5. Warehouse -> 5.10 LU-SU4203: Consumption Reports -> D. MONTHLY CONSUMPTION REPORTS

D. MONTHLY CONSUMPTION REPORTS

The main objective of a Monthly Consumption report is to encode the Forecasted Monthly Consumption (FMC) for a selection of products. However, the report will also show the Average Monthly Consumption (AMC) for these products over a specific period as the AMC can help to insert a correct FMC.

The (AMC) is a useful indicator as it informs on the average monthly consumption of a product over a specific time span.

The AMC value is based on the total quantity of the product which has left the instance via a consumption report or outgoing deliveries (both quick and full shipment processes). Any quantities of the product which have left the instance due to loan, donation, loss or discrepancy will not be included in this calculation. If any of the products have been received (returned) back in (via IN – except IN from Scratch) to this instance within this period, this quantity will be deducted from the total consumption figure.

AMC and FMC are used by different replenishment functionalities.

Note that in a Monthly Consumption Report, the AMC is given by the system, while the FMC should be introduced by the user.

A Real Consumption Reports is triggering a movement when it is processed. A Monthly Consumption Report does not trigger any movement but simply informs you on the AMC of products and allow you to enter FMC for those products.

Go to: Warehouse / Reporting / Consumption reports/ Monthly consumption

  1. Click on the “New” button.
  2. As “Period from“, enter the date which you want the AMC calculation to start from. This must be the first day of a month.
  3. As “Period to” the system displays as default the last day of the current month. This can be changed to the last day of a different month (but should be in the past).
  4. The “Location” is set to “MSF Instance” as the AMC calculation will always be made for the entire instance including all internal locations.
  5. To add the products for which you want to see the AMC, click on “New” then search for and select the products (if you want to add several lines in one step use the “Add multiple lines” button or import a file via the “Import a file” button).
  6. The AMC of the selected products is displayed according to the dates you have entered, and is not editable as it is calculated from the product consumption data available in the system.

Monthly Consumption Report

7. The FMC is also displayed, but this field is editable. Initially, the FMC is set to the same value than the calculated AMC, but it may be updated as needed. In the case that you know the consumption is likely to increase over the coming months, you may wish to insert higher value.

8. The “Last Reviewed on” field will display the date when the AMC and FMC of this product were last calculated and validated or will be blank if this is the first time.

9. In the “Valid until” field, enter the date until which the system should use the entered FMC to calculate consumption and re-order levels (e.g. if you know that the entered FMC is likely to be accurate for the next 6 months, enter the appropriate date here).

10. Click on the floppy disk to save the line and, if necessary, repeat the steps above to add further items.

11. When you have entered and saved all the needed product lines, click on the “Save” button on top of the screen.

12. When the FMC quantities have been validated, click on the “Valid all lines” button to validate these entries.

The “Export lines” button allows you to export a Monthly Consumption Report to Excel.

The “Import a file” button allows you to import an Excel file on a Monthly Consumption Report (FMC and validity). The template to use should be the one you get from the “Export” function.

C. HOW TO IMPORT AN EXCEL FILE ON A REAL CONSUMPTION REPORT

Supply User Manual ENG -> 5. Warehouse -> 5.10 LU-SU4203: Consumption Reports -> C. HOW TO IMPORT AN EXCEL FILE ON A REAL CONSUMPTION REPORT

C. HOW TO IMPORT AN EXCEL FILE ON A REAL CONSUMPTION REPORT

In some cases, consumption may have been recorded on an Excel file. Such a file can be imported on a RCR in order to update the system (i.e. record consumptions in UniField). The import can be done via the “Import a file” button available on the main RCR screen.

The file must have a specific format (XML Spreadsheet 2003) and include the following columns in the following order: Product Code, Product Description, Product UoM, Indicative Stock, Batch Number, Expiry Date, Asset, Consumed Qty, Remark, BN (Y/N); ED (Y/N).

A template of importable file may be obtained if you export an existing RCR using the “Export lines” button.

Following the import some checks are done on BN and product lines so that error messages are raised in case of inconsistencies.

File format for import to RCR

A. LU INTRODUCTION (LU-SU4203)

Supply User Manual ENG -> 5. Warehouse -> 5.10 LU-SU4203: Consumption Reports -> A. LU INTRODUCTION (LU-SU4203)

A. LU INTRODUCTION (LU-SU4203)

The “Consumption reports” menu under Warehouse / Reporting offers various reporting functionalities related to warehousing (except “Real Consumption” which is actually found Under Warehouse> Warehouse Management).

Real Consumption Reports (RCR) allow recording consumptions. Their processing is triggering movements OUT in UniField.

The main objective of the Monthly Consumption Reports is to encode Forecasted Monthly Consumptions, but these reports are also showing Average Monthly Consumption (AMC).

Finally, Historical Consumption Reports allow analyzing Real Average Consumption (RAC) and Average Monthly Consumption (AMC).

These 3 types of reports are explained in details in the below sections. Note that the terminology “reports” could be a bit misleading as some of them are pure reports while others are actually transactions.

The below table lists the main terminology used in this learning unit.