Revaluation function is used to adjust the value of assets and liabilities in functional currency according to a specific FX rate at month-end and/or at year-end closing. Revaluation function creates accounting entries only in functional currency, meaning that balances in booking currency are not affected.
The revaluation entry amount is the difference between the account balance at the end of the period in Functional Currency (total functional balance of journal items) and the balance at the end of the period in Booking Currency revalued at the period’s FX rate.
Revaluation entries are created per account per booking currency and it concerns accounts like cash, bank, outstanding cheques, payables and receivables.
Revaluation is an optional function in UniField. It is included in the period closing checklist, but if it is not run, the period can still be normally closed. Revaluation can be run in two ways:
Monthly liquidity accounts revaluation: calculated based on liquidity account balances (cash, bank and outstanding cheques) in each period at month end with that month’s FX rate. This revaluation can be run in any period.
Year-End revaluation: calculated based on liquidity and other B/S account balances at year-end with a specific currency rate table (e.g. average FX rate for the year, closing rate for the year etc.). This revaluation can only be run in one of the extra accounting periods 13-15. Year-End revaluation entries are automatically reversed and reconciled in January the following year.
Note! In order to run the Year-End revaluation, the January period of the following year needs to be open!
Before the revaluation can be run, the accounts to be included in revaluation have to be set up at HQ level. Please refer to 02 – Configurations, LUFI-20301 Account Properties for instructions on how to set up accounts for revaluation. In addition, the revaluation counterpart account (e.g. 67050 – Unrealized ExchRate Loss) needs to be set up in the Company Configuration in each coordination instance using revaluation function. Please refer to 02- Configurations, LUFI-21001 Company set up for further details.
Revaluation is the last step before closing a period and it should only be run when all the registers have been closed, all journal entries are posted and all journal items from the projects have synchronized to the coordination instance. Revaluation takes into account all account balances from the whole mission and therefore it can only be run at a coordination instance. In order to ensure all journal entries have been received at coordination, revaluation can only be run when the period state of all its project instances is {Field-closed}.
Revaluation is irreversible and it can only be performed one time in any selected period. The revaluation entries are automatically posted and they can’t be manually edited or deleted.
Revaluation can be run once and only once for each accounting period (January to December and Period 15). When the revaluation is acted, the revaluation entries are posted and the period is tagged as “revaluated”. If there is no revaluation entry to be booked, the system does not book empty entry, it tags the period as “revaluated”. Prior to revaluation, the system will check if the period has been already tagged as “revaluated”. If yes, the operation will be denied.
The system will calculate revaluation amounts against this specific FX table. The FX table should be in “valid” status. Closed FX table cannot be used.
The user must indicate a specific currency table in “valid” status to calculate the revaluation amount.
How to Run Monthly Revaluation
Go toAccounting/Periodical Processing/Revaluation
Open the Revaluation wizard and select {Liquidity (Month-end)} from the drop down menu for the {Revaluation method}
Selecting the revaluation method
2. Select the period in which revaluation will be run. The system automatically proposes current fiscal year and current period. Fields {Entry period}, {Entry date} and {Entry journal} are automatically filled and they cannot be edited.
Selecting the revaluation period
3. Click on {Validate}
Revaluation entries are created and posted
Revaluation entries created in REV journal:
Monthly revaluation is only required for OCA Coordination and it’s a part of the monthly closing check. If the monthly revaluation was not performed at an OCA Coordination instance, the closing of the period will be blocked with an error message as below:
How to Run Year-End Revaluation:
Go to Accounting/Periodical Processing/Revaluation
The year-end revaluation has to be done in two phases. First, open the revaluation wizard and select {Liquidity (Year-end)} from the drop down menu for the {Revaluation method}.
Selecting the revaluation method
2. Select the currency table that will be used for the year-end revaluation calculations. Refer to Chapter 2 – Configurations, LUFI-20201 Currency Files Loading for instructions how to set up a currency table.
Selecting the currency table
3. Select the Entry period in which the year-end revaluation will be run. {Entry date} and {Entry journal} are automatically filled and they cannot be edited.
Selecting the period for year-end revaluation.
All extra-accounting periods 13-15 are selectable in the first step of year-end revaluation.
Click on {Validate}
Revaluation entries are created and posted, revaluation reversal entries are created and posted
Revaluation entries and their reversals created in REV journal
Open the revaluation wizard again and select {Other B/S (Year-end)} from the drop down menu for the {Revaluation method}.
Selecting the revaluation method
2. Select the same currency table that was used in Step 2
3. The Entry period will be the same as in Step 3. It cannot be changed.
Period 13 will be used automatically, because it was used already in the first year-end revaluation
4. Click on {Validate}
Revaluation entries are created and posted, revaluation reversal entries are created and posted
Revaluation entries and their reversals created in REV journal
It is possible to handle both, accrued and deferred expenses in the Accruals Management module. Accrued expenses are expenses recognized before they are recorded with proper supporting documents. They are recorded as liabilities based on the best estimation of the expected charge. For MSF, accrued expenses mainly concern purchases received but not yet invoiced by the supplier, employee costs (like severance costs), and payroll taxes. For accrued expenses, the accrual entry amount is positive.
Deferrals are expenses that are already entered in accounting (e.g. invoice is already paid and expense booked) but where the expense amount belongs partially or fully to a following period. An example of deferred expenses is insurance fees that may concern multiple periods. For deferred expenses, the accrual entry amount is negative.
Accruals are managed at coordination level. There are two possible ways of creating accruals: Reversing Accrual and One Time Accrual.
In Reversing Accrual, accrual entries booked in one period are automatically offset at the beginning of the following period. The automatic reversal can only be created if the next period is open. The automatic reversal is created once the accrual lines are posted. Booking an accrual with an automatic reversal helps users re-think their accruals each month and decide if they should be repeated or not, lowered or increased.
In One Time Accrual, the system does not create any automatic reversal entries. The user will manually set the Document and Posting Date for the reversal entry and post it at a selected point of time. The reversal entry can only be booked on an open period.
The accrual should be either repeated (Reversing Accrual) or remain unreversed (One Time Accrual) until the expense is booked in the accounting and the accrual can be offset.
Account moves for an accrued electricity bill of USD 5,650 booked in December 2022. Automatic reversal created in January 2023. The accrual is re-estimated and re-booked (USD 5,000) at end-January 2023 as the invoice is not received and its reversal created in February 2023. The invoice is received and booked in February 2023 and paid the next month.
Description
Account codes
De
Cr
Entries matching
Accruals booking Dec-22
Other Accrued Liabilities
31300 or 15690
5650
R-1
Utilities & other energy consumable
65200
5650
Reversal created next period Jan-23
Other Accrued Liabilities
31300 or 15690
5650
R-1
Utilities & other energy consumable
65200
5650
Accruals re-booking Jan-23
Other Accrued Liabilities
31300 or 15690
5000
R-2
Utilities & other energy consumable
65200
5000
Reversal created next period Feb-23
Other Accrued Liabilities
31300 or 15690
5000
R-2
Utilities & other energy consumable
65200
5000
Invoice booking Feb-23
Trade Payables
31300 or 15690
4500
R-3
Utilities & other energy consumable
65200
4500
Invoice payment Mar-23
30020 or 15600
4500
R-3
2. Description and definition of the accrual fields and behaviour
Go to Accounting/Periodical Processing/Accrual Management
Two filter bubbles per “status” and “per type” are available on Accrual Management list view allowing to display the accrual objects depending on their status or type.:
Status: draft, running, done, and cancelled.
Type: One-Time Accruals and Reversing Accruals.
The standard display is per date of creation: the newest accruals on top.
Click on the {New} button to create new accrual entry.
a. Accrual object header.
The accrual header is organized in 3 columns with the following fields:
blue fields are mandatory and white fields are optional.
Note: When editing a draft accrual, the header update is not automatically saved. A warning message is shown when leaving the page or posting the accrual:
Click on {Cancel}, then click on {Save and Edit} button from the screen, if not the changes will be lost.
Field
Description
Journal
System defaults to ACC journal, this cannot be changed.
Number
Automatically filled when the accrual entry is posted.
Booking currency
Select the booking currency of the accrual entry. Active currencies are available.
Third party type
Drop-down selection. Default display is “partner”: – Empty – Partner – Employee Select the Third Party if needed Third party requirement per header account code applies.
Third party
Select a third party based on type selected before.
Period
Select the booking period of the accrual entry. The period should be in open status: Jan-Dec and P13-P15 are available. P0 and P16 are not available.
Document Date
Document date is automatically set to the last day of the selected period. The document date can be changed.
Posting Date
System defaults to last day of the period and cannot be changed. If need to change the posting date, change the period field.
Accrual Type
Select the type of accrual to book: there are two options – Reversing Accrual (the reversal is booked immediately in next period) – One Time Accrual (only the accrual is booked. To be reverse manually)
Accrual account
Select an accrual account. Account codes ticked as “accrual account”, as per account codes configuration, are available.
Description (header)
Enter a description of the accrual entry. Header description is mandatory free typing field. Header description is populating: – Description field of the JI related to the header account. – Description field on the accrual list view. – Automatically populating the description at line level (but editable)
Reference (header)
Enter a free reference for the accrual entry. Header reference is optional free typing field. Header reference is populating: – Reference field of the JE related to the accrual entry. – Reference field of the JI related to the header account. – Reference field of accrual list view. – Automatically populating the reference at line level (but editable)
Expense account
Choose an expense account. Account codes type expense, as per account codes configuration, are available.
AD header
Analytic distribution from header. If the analytic distribution is filled from header, it will apply to all the lines.
Reset AD at line level
Button to rest AD at line level. This button allows to reset Analytic distribution to line level.
b. Accrual tab.
The accrual lines are booked from the “Accrual” tab. It allows to create multiple expense lines related to one accrual entry: e.g. an accrued invoice with two or more expense accounts could be managed via a single accrual entry.
Click on {New} button to create new expense line. Blue fields are mandatory, white fields are optional. Save the line with the floppy disc.
Field
Description
Edit button
Edit (pencil) button is available on draft accruals.
Line number
System counts of lines. There is jump of line number in case a line has been deleted while the entry was still in draft status.
Description
Mandatory field, automatically filled from header but could be edited. Description at line level populates the description field of the JI/AJI on the expense account of related line.
Reference
Mandatory field, automatically filled from header but could be edited. Reference at line level populates the reference field of the JI/AJI on the expense account of related line.
Expense accounts
Select the expense account related to the accrual entry line. Account codes type expense, as per account codes configuration, are available.
Distribution
Line level analytic distribution. Analytic distribution could also be filled from line level.
Accrual amount
Line amount in booking currency.
Functional amount
Line amount in functional currency
Floppy disc
Save icon to save the line in edit mode. Press on {enter} key saves also the line.
Delete button
x is available to delete draft accrual line.
c. Journal Items tab
A second tab was added to the accrual screen after UF25.0. This tab lists the Journal Items from the accruals as per standard display of journal items. The sequence numbers and reconciliation codes are visible in this screen. It does not however allow to export the list in Excel.
All entries booked on ACC journal and related to the accrual are listed in this tab. The oldest number on top of the screen.
Depending on the status of the accrual object, the Journal Items tab is filled with:
Draft status: No related Journal items.
Running status: For One-Time accruals only. 1 JI sequence numbers is displayed: accrual entry.
Done status: 2 JI sequence numbers are listed, related to the accrual and its reversal. The reversal journal items are displayed below the accrual journal items. The description of the reversal is preceded by REV-
Cancelled status: 4 JI sequence numbers are listed,
Accrual entry
Reversal entry.
Cancellation of the accrual entry.
Cancellation of reversal entry.
The description of the cancellation is preceded by CANCEL- and cancellation of the reversal is CANCEL-REV-
Any entry booked on other journals and reconciled/related to the accrual account at header is not visible from this screen. To search them, use the reconciliation number on the accrual account.
d. Accrual object footer
Field
Description
Total amount
Accrual lines total amount is displayed at the bottom of the screen in booking and functional amounts. This field is updated when the lines are edited and saved.
State
The status of the accrual object is displayed at the bottom of the screen. – Draft: just created/edited and not posted – Running: only for accrual type “One-time”, when posted and not reversed. – Done: when posted and reversal is posted. – Cancelled: when posted and then cancelled.
e. Color code at accrual list view
Colour
Description
Blue
Draft status with valid analytic distribution
Red
Draft status with invalid analytic distribution.
Black
Running or done status
Grey
Cancelled status.
f. Accrual action menus:
There are 2 action menus available in accrual screen: “Post Accruals” and “Post Accrual Reversal”.
Field
Accrual type
Consequences
Post Accruals
One-Time Accruals
Working on One-Time Accruals in draft status only. Post the accrual entry in the selected booking period. The related JI is visible in “Journal Items tab” The One-Time Accrual object becomes in “Running” status.
Post Accruals
Reversing Accruals
Working on Reversing Accruals in draft status only. Post the accrual entry in the selected booking period and related reversal entry in next period. The next period should be in open status. The related JIs (accrual and reversal) are visible in “Journal Items tab” The Reversing Accrual object becomes in “Done”
Post Accruals reversal
One-Time Accruals
Working on One-Time Accruals in “running” status only. Post the reversal entry in the selected booking period. The related JIs(accrual and reversal) are visible in “Journal Items tab” The One-Time Accrual object becomes in “Done” status.
Post Accruals
Reversing Accruals
This action does not work on Reversing Accruals.
g. Cancel button
{Cancel} button is available on both accrual types in “Done” status. To cancel a One-Time Accrual in “Running status”, reverse it in the same booking period. The booking period should be in open status.
h. Accruals and period status
The period has to be in open status to allow creation, posting, reversing, cancellation of accruals.
It is possible to duplicate an accrual from closed period. The duplication being a draft exact match of the initial accrual object will have a posting date in closed period. Having draft accrual object is not blocking the closing of the period nor the fiscal year.
It will however not possible be to post a draft accrual object in closed period. Either change or reopen the posting period to allow the posting of the accrual entry.
i. Accruals journal entries, journal items and analytic journal items
The accrual journal entries (and related items and analytic items) are booked in the journal code “ACC” – journal type “Accrual”. It is possible to search them via the selector or the journal search methods.
3. Similar process for One-Time and Reversing accruals
a. How to create One-Time or Reversing Accruals in draft
Go to Accounting/Periodical Processing/Accrual Management. Click on {New} button.
Fill the header, blue fields are mandatory. While fields are optional. Select accrual type “One-Time Accrual” or “Reversing Accrual”
For more details about the definition of each field see Description and definition of the accrual fields above.
Create the accrual lines, blue fields are mandatory, white fields are optional.
Save the change with the floppy disc or by pressing on the {enter} key. It is possible to have multiple lines. Click on {New} button to add new lines. Total amount is updated when new line is added.
Fill the analytic distribution from header or line level.
If the analytic distribution is not valid, the line will turn in red.
Fill valid analytic distribution and save before posting.
Save the accrual in draft status. It turns to blue = “Draft”+ valid analytic and is now ready for posting.
b. How to edit a draft One-Time or Reversing accruals
Locate the accrual line to change and click on the pencil to edit the fields on the form.
Notes:
The changes on line level are automatically saved after clicking on the floppy disc.
The change at header is saved via a header {save} or {save and edit} button. User {cancel} button to discard the changes.
c. How to duplicate a One-Time or Reversing accruals (all statuses)
Duplicate is possible for all statuses of accrual objects. There are 2 ways of duplicating an accrual.From the list view, click on the duplicate icon.
From the form view, click on {duplicate} button at screen header. If duplicate button is now shown, click on {save} button to make it appear.
A new draft accrual object is created. The duplication is the exact match of the accrual including the analytic distribution and is always created in draft status. The only difference between the original and the copy is that the header description field of the copy is followed by “(Copy)”.
The draft copy could be edited and later posted. Do not forget to save the changes on the header (e.g. removal of “(Copy)”) with the {save} or {save and edit} button before posting a duplicated accrual.
d. How to delete a draft One-Time or Reversing accruals
Click on the {delete} button from the accrual form view or red X icon on list view to delete draft accruals. Later statuses (running, done, cancelled) could not be deleted.
A deleted accrual is removed from the system and not visible anymore.
e. How to cancel a “done status” One-Time or Reversing accruals
When an accrual (One-Time or Reversing) is “done status” the {cancel} button is available.
A pop up button shows. Click on {OK}. The posting and reversing periods should be in open status to allow cancelation.
If one of the periods are not open, an error message will pop up. Reopen the period to allow the cancellation.
As consequence of cancellation of a “done” accrual,
The accrual entry is cancelled in its booking period. The reversing entry is cancelled in the reversing period.
The functional value of the cancellation entries is the same as the accrual and its reversal. There is no FXA created
The cancellation of the accrual is reconciled with the cancellation of the reversal.
The accrual status becomes “Cancelled”.
A cancelled accrual is listed in the accrual management screen in grey. It can be duplicated.
4. Specific process related to One-Time Accruals
Go to Accounting/Periodical Processing/Accrual Management and click on the {New} button, fill the header, select accrual type: One-Time Accrual. Fill the analytic distribution and accrual lines. Save the accrual in draft. More details on how to create or to edit an accrual see above.
a. How to post One-Time accruals in order to turn it to “Running” status
When the One-Time accrual is in draft status, the action menu “Post Accruals” allows to post the “One-Time Accruals” in the ACC journal. The posting period should be in open status. Click on {YES} to process or on {No} to cancel the action.
If the posting period is not open, an error message appears. Click on {OK} and either change the period of the accrual or (re)open the period.
As consequence of posting of One-Time Accrual:
The accrual turns to “Running” status.
Accrual journal entry is posted in ACC journal with related Journal Items and Analytic journal items.
The related JI are listed in “Journal Items” tab of the accrual.
The accrual is not anymore editable. It is not possible to delete nor to cancel.
It is possible to use the “Post accrual reversals” action menu to reverse the accruals.
Notes: When posting an edited accrual, ensure changes have been saved before clicking on {Post Accrual Reversals”. To do so, click first on {save and edit} button at header before {Post Accrual Reversals}
To cancel a “running” One-Time Accrual, reverse it in the same posting period.
b. How to reverse a One-Time accrual in order to turn it to “Done” status
When an accrual type One-Time is in “Running” status, the action menu “Post Accrual Reversals” allows to post the reversing entry, in the ACC journal. The reversal posting period should be in open status. Select the document and posting date of the reversal. Click on {YES} to process or on {No} to cancel the action.
If the posting period is not open, an error message appears. Click on {OK} and either change the period of the accrual or (re)open the period.
As consequence of reversing of One-Time Accrual:
The accrual turns to “Done” status.
Reversing Journal entry is posted in ACC journal with related Journal Items and Analytic journal items. The functional value of the reversing entry is the same as the accrual entry.
The B/S account is reconciled with the B/S account of the accrual entry.
The related JI are listed in “Journal Items” tab of the accrual, below the JI of the accrual entry.
The accrual is not anymore editable. It is not possible to delete.
It is possible to use the “cancel” button in order to cancel the accrual entry and its reversal.
A “Done” One-Time Accrual is listed in the accrual management screen in black.
c. Manual reconciliation of “Running” One-Time Accrual
It is possible to manual reconcile the B/S journal item from the accrual entry. When the item is fully reconciled:
The One-Time accrual status turns to “Done”.
In the “Journal items” tab of the accrual object, the B/S line bears the reconciliation code. The related entries which are not from ACC journal is not listed.
The {cancel} button appear. It is however not possible to cancel the accrual because there is no reversing entry in ACC journal.
Click on {ok}. If the B/S entry is unreconciled, the accrual object will turn to “Running” status and could be reversed and later cancelled.
5. Process specific related to Reversing Accruals
Go to Accounting/Periodical Processing/Accrual Management and click on the {New} button, fill the header, select accrual type: Reversing Accrual. Fill the analytic distribution and accrual lines. Save the accrual in draft. More details on how to create or to edit an accrual see above.
a. How to post Reversing Accruals in order to turn it to “Done” status.
When the Reversing Accrual is in draft status, the action menu “Post Accruals” allows to post the “Reversing Accrual” in the ACC journal with the reversing entry at the same time. The posting period and the next period should be in open status. Click on {YES} to process or on {No} to cancel the action.
If one of the posting periods is not open, an error message appears. Click on {OK} and either change the period of the accrual or (re)open the period.
As consequence of posting of Reversing Accrual:
The accrual turns to “Done” status. There is no “Running” status for Reversing Accruals.
Accrual journal entry and its reversal are posted in ACC journal with related Journal Items and Analytic Journal Items. The functional value of the reversing entry is the same as the accrual entry.
The B/S account of the reversal is reconciled with the B/S account of the accrual entry.
The related JI are listed in “Journal Items” tab of the accrual object.
The accrual is not anymore editable. It is not possible to delete. It is possible to duplicate.
It is possible to use the “cancel” button in order to cancel the accrual entry and its reversal.
It is NOT possible to use the “Post accrual reversals” action menu in reversing accruals.
A “Done” Reversing Accrual is listed in the accrual management screen in black.
Notes: When posting an edited accrual, ensure changes have been saved before clicking on {Post Accrual Reversals”.
To do so, click first on {save and edit} button at header before {Post Accrual Reversals}
Account reconciliation refers to the process of matching the credit and debit entries on a specific balance sheet account from a selection of records. When entries are balanced, it means that the total debit amount equals the total credit amount. Account reconciliation should be completed before proceeding to month end period closing.
Reconciliation provides the user with more accurate information of:
Settled vs. to be settled transactions
Accruals reversed or not
In UniField, account reconciliation is performed in Journal Items. A common and unique reference (alpha-numerical) is assigned to the group of accounting entries which have been matched together.
The conditions necessary to be able to reconcile selected entries are:
They are Posted
They are recorded on the same G/L account which should be configured as a reconcilable (see LU20301 chapter 2 – Configurations)
They have the same third party
Except for transfers or
If the account has been selected with Type of Specific Treatment “Reconciliation – Disregard 3rd party” or
If the account has been set as salaries default account in Company Configuration
Their booking currency amounts are balanced otherwise the reconciliation is only partial
Except for transfers with change and other entries in which the debit and credit lines are with different currencies
Entries in Journal Items automatically reconciled
At the time entries are reconciled together, UniField performs an additional check on periods. If the entries that are matched together have a different amount in functional currency but the same booking amount, UniField generates an additional entry in functional currency (exchange rate adjustment) to balance the movement.
An entry on the same account as the one concerned by the reconciliation (to be reconciled with the same reference)
An entry on a FX rate gain/loss account as a counterpart
By nature, reconcilable account should eventually have a zero balance, e.g. transfers in should match transfers out, accounts payable should match paid invoices. There are situations, however, where a balance is carried over to the next period, (e.g. guarantee deposits, uncashed cheques, unpaid invoices). Entries can also be partially reconciled: in this case the selection of entries is unbalanced (total credit amount ≠ total debit amount). This will assign a unique reconciliation reference to the records selected and it will automatically calculate the remaining unbalanced amount.
UniField automatically reconciles entries in the following use cases:
Entries that are imported in the registers through:
Pending Payments (e.g. Supplier Invoices and Payroll entries)
Import Cheques wizard
Direct Invoice wizard
Advance Return wizard
Year-End Revaluation and Accrual entries are automatically reconciled with their reversal entries
Supplier Refunds created through the refund wizard as well as Down Payments are automatically reconciled with the original Supplier Invoices.
Fiscal year closing “Move to 0” entry is automatically reconciled with the entries in the accounts included in the “Move to 0” function.
Manual reconciliations are made by an advanced user for example in the following use cases:
Internal transfers between registers
Direct entries in registers
Manual journal entries (e.g. prepayments or correction entries)
How to Perform a Manual Accounting Reconciliation or Unreconciliation:
Go to: Accounting/Journal Entries/Journal Items
Before reconciling, make sure that the entries are {Posted}
In the {Journal Items} Search view, activate the filters {Unreconciled} and {Posted}
A list of unreconciled posted entries appears
{Unreconciled} and {Posted} filters in the {Journal Items} Search view
Tick the checkbox of entries you want to reconcile together
{Reconcile Entries} Menu
On the right-hand side of the screen, select the Action {Reconcile Entries}
A {Reconcile Entries} wizard appears
Select {reconcile}. The Journal Items Search view will refresh and the reconciled entries will not appear in the search results.
{Reconcile Entries} Wizard
In Journal Items Search view, deselect the {Unreconciled} filter button
Go to the field {Is Reconciled} and select {Yes} to find the reconciled entries.
The selected entries are reconciled with a unique reconciliation reference.
In the {Journal Items} Search view, in the box {Is Reconciled}, select {Yes}.
A list of reconciled posted entries appears
Tick the checkbox of entries you want to unreconciled
On the right side of the screen, select Unreconciled Entries
Unreconcile Entries Action
Confirm the action by selecting Unreconcile.
Unreconcile entries
The Journal Items Search view will refresh and the entries will display unreconciled if you select the filter Unreconciled.
Note! If you unreconcile entries that have already triggered an FX adjustment entry, a reversal FX adjustment for the offsetting amounts is automatically crated upon reconciling the entries. The two FX adjustment entries are then automatically reconciled together.
Closing a Period:
Closing a period is hierarchical in UniField: all projects should close their period before coordination should close, and coordination must close its period before HQ should close the period. Closing happens in cascading steps.
This means that closing a period at coordination level will automatically close this period at project level through a synchronization mechanism. Same applies for re-opening a period at coordination level: re-opening one project period at coordination automatically re-opens all other projects’ period.
Once the period is closed at coordination and the period state becomes {Mission-closed}, the period state at project level is updated through synchronization and becomes {Mission-closed} as well.
It is thus important to note that coordination is an instance where periods need to be {Field-closed} prior to moving on the next {Mission-closed} status.
Only an administrator can re-open a mission-closed period. To remember, re-opening a mission-closed period at HQ level sets this period to {Open} for all coordinations and all projects. Closing a period at HQ level spreads the closure across all field instances through synchronization.
An upper instance (coordination, HQ) can see all lower instances’ period states by accessing the {Period states} screen in the Action menu of the Periods window. The information available on this screen is fully relying on synchronization: if lower-level instances do not sync, the information is not up-to-date at coordination or HQ. Please refer to section G. How to Produce a Period States Report in this chapter for further details.
Closing process in UniField
Before closing the period at project level:
All registers must be closed
All FX rates must be updated with synchronized rates from HQ
All imported payroll entries must be validated
All recurring entries must be booked
Before closing the period at coordination level:
All projects’ periods should be closed
All coordination registers must be closed
All FX rates must be updated with synchronized rates from HQ
All imported salary expenses must be validated
All recurring entries must be booked
All HQ entries must be validated
How to Close a Period at Project Level
Go to Accounting/Periodical Processing/End of Period/Close a Period
In the {Close a Period} Search view, open the period to close
A list of Actions displays on the form. It is a checklist you need to review so that you can close your period.
Close a Period Form view and associated actions
Select one action button i.e. cash register and the system will open a new tab with the object itself.
Linking an action to a UniField object
2. When you are done with the checking, select {Close Period (Field)} at the bottom of the form.
3. The period state changes to {Field-Closed}. Only Coordination can re-open the period in project instance.
Field-Closed Period at project
How to Close a Period at Coordination Level:
Coordination should close a period only if it has been field-closed for all projects.
To review the period states of project instances, go to the {Period states} screen in the Action menu of the Periods window.
{Period States} function in the Action menu
Period states of coordination and projects for selected period
Go to Accounting/Periodical Processing/End of Period/Close a Period
In the {Close a Period} Search view, open the period to close
A list of Actions displays on the form. It is a checklist you need to review so that you can close your period.
Close a Period Form view and associated actions
If you have a draft IVI (Intermission Voucher IN), you will receive a pop-up asking,” Are you sure you want to close the period while there is an IVI with an empty posting date ? ” as shown below :
notification message for closing period with “not validated IVI”
Select one action button i.e. cash register and the system will open a new tab with the object itself.
Linking an action to a UniField object
When you are done with checking, select {Close Period (Field)} at the bottom of the form.
The period state changes to {Field-Closed}. Coordination can Re-open period (Field) or Close period (Mission). Select {Close period (Mission)}.
Field-Closed Period
The period state changes to {Mission-Closed}. Only an administrator or HQ via synch can re-open a mission-closed period.
Mission-Closed Period
How to Close a Period at HQ level:
HQ should close the period only if the period has been closed for all missions. To review the period states of coordination and project instances, go to the {Period states} screen in the Action menu of the Periods window.
Go to Accounting/Periodical Processing/End of Period/Close a Period
In the {Close a Period} Search view, open the period to close
A list of Actions displays on the form. It is a checklist you need to review so that you can close your period.
Close a Period Form view and associated actions
Select one action button i.e. HQ entries and the system will open a new tab with the object itself.
When you are done with checking, select {Close Period (Field)} at the bottom of the form.
The period state changes to Field-Closed. You can Re-open period (Field) or Close period (Mission). Select {Close period (Mission)}
Field-Closed Period
The period state changes to Mission-Closed. You can Re-open period (Mission) or Close period (HQ). Select Close period (HQ).
Mission-Closed Period
The period state changes to HQ-Closed.
HQ-Closed Period
How to Produce a Period States Report:
It is possible at a parent instance level to have an overview of the period states of the children instance. For example, at Coordination level, it is possible to see the status of the periods of all its projects.
The Period states report is an overview of the period status of all children instances.
Go to Accounting/Configuration/Financial Accounting/Periods/Periods/
In Action menu, click on {Period states}
The {Period states} overview opens
Note! You can use the filters for {Proprietary instance}, {Period} or {State} to limit the view according to what you need to review. By default, all periods for all children instances are shown.
It is possible at a parent instance level to have an overview of the period states of the children’s instances. For example, at Coordination level, it is possible to see the status of the periods of all its projects.
Go to Accounting > Configuration > Periods > Periods
Button “Active Instances” selected by default showing active instances only.
Filter of active instances through period states
Producing Financial Reports
In addition to the reporting options found in each business application, UniField provides various financial and analytical reporting options. They can be used for ad hoc analysis, monthly reporting and year-end reporting. Please see your section’s financial policy to see which reports are used for monthly and year-end reporting requirements.
PDF or Excel report, a complete record of financial transactions on all G/L accounts. The ledger holds accounting information that is needed to prepare financial statements. This report can be used e.g. to verify the amounts on reconciled and unreconciled balance accounts.
Excel report or viewed in UniField, lists the balance on all accounts. This report can be used e.g. to verify the amounts on reconciled and unreconciled balance accounts.
PDF report, a complete record of all financial transactions on all partners/suppliers. It is important to note that an individual partner cannot be selected for the report; all partners will be listed.
Partner Balance
PDF report, an analysis done per partner/supplier which contains one line representing the cumulative credit and debit balance per partner. It allows the project to identify any outstanding payable or receivable balances for a partner. This report is also available in Excel format and also in a view built in the system.
Excel report of all expenses purchased or settled locally, in order to get a better overview of cash flow needs or to meet specific requirements from local auditors asking MSF to report on local expenses.
Used in UniField HQ instance to export field data into HQ system (OCP compatibility)
How to Produce a General Ledger Report
The General Ledger report is a complete record of all financial transactions on G/L accounts. The ledger holds account information that is needed to prepare financial statements, and it includes accounts for assets, liabilities, equity, revenues and expenses.
Go to Accounting/Reporting/Legal Reporting/Accounting Reports/General Ledger
The {General Ledger} window displays
Set the desired report options
General Ledger report options
Field
Description
Chart of accounts
System defaults to the existing chart of accounts
Fiscal year
System defaults to no fiscal year, but any fiscal year can be selected
Target Moves
Drop-down selection:
All Posted Entries: for entries that have been hard posted in the registers or posted in the journals
All Entries: temp and hard posted in registers, unposted and posted entries in journals. Draft entries will not be included.
Display Accounts
Drop-down selection:
All
With movements, i.e. with any entries (un) posted to the account
With balance is not equal to 0
Export Format
PDF
Excel
Include initial balances
Adds initial balance rows on report to show the opening balance of the fiscal year for each balance account
B/S / P/L account
Drop-down selection for accounts to be included:
All
Profit & loss Profit & loss
Balance Sheet
Reconciled
Drop-down selection to choose either reconciled, unreconciled or all entries
At
Allows to set a date until which reconciled entries are included
Open Items At
Shows only entries that were unreconciled at the end of selected period
Prop. Instances
Allows to select one or multiple proprietary instances
Filter by
Drop-down selection:
No filters
Document Date
Posting Date
Period
Start Date
If using a Date filter, enter the date to restrict the starting Document or Posting Date
End Date
If using a Date filter, enter the date to restrict the ending Document or Posting Date
Start Period
If using a Period filter, enter the period to restrict the starting Period
End Period
If using a Period filter, enter the period to restrict the ending Period
Journals
Default to all children instances’ journals which can be added or removed
Accounts filter
Allows to add accounts to be included in the report
Select {Print} at the bottom of the window
A PDF report of the General Ledger displays
General Ledger report
General Ledger report (including the accounting code for each line)
How to Produce a Trial Balance Report
The Trial Balance shows the balance on all accounts at a selected point of time.
Go to Accounting/Reporting/Legal Reporting/Accounting Reports/Trial Balance
The {Trial Balance} window displays
Set the desired report options
Trial Balance report options
Field
Field
Description
Chart of account
System defaults to the existing chart of accounts
Fiscal year
System defaults to no fiscal year, but any fiscal year can be selected
Target Moves
Drop-down selection:
All posted entries: for entries that have been hard posted in the registers or posted in the journals
All entries: temp and hard posted in registers, unposted and posted entries in journals (appropriate in between month end closure while entries are still in Temp/Unposted status). Draft entries will not be included.
Display Accounts
Drop-down selection:
All
With movements, i.e. with any entries (un) posted to the account
With balance is not equal to 0
Include initial balances
Adds initial balance rows on report to show the opening balance of the fiscal year for each balance account
Export Format
PDF
Excel
B/S / P/L account
Drop-down selection for accounts to be included:
All
Profit & loss
Balance Sheet
Reconciled
Drop-down selection to choose either reconciled, unreconciled or all entries
At
Allows to set a date until which reconciled entries are included
Prop. Instances
Allows to select one or multiple proprietary instances
Filter by
Drop-down selection:
No filters
Document Date
Posting Date
Period
Start Date
If using a Date filter, enter the date to restrict the starting Document or Posting Date
End Date
If using a Date filter, enter the date to restrict the ending Document or Posting Date
Start Period
If using a Period filter, enter the period to restrict the starting Period
End Period
If using a Period filter, enter the period to restrict the ending Period
Journals
Default to all children instances’ journals which can be added or removed
Accounts filter
Allows to add accounts to be included in the report
description
Select {Print} at the bottom of the window
A PDF report of the Trial Balance displays
Trial Balance report
How to Produce a Profit & Loss Report
The Profit & Loss reports expense and income per accounting code and potential under spending (net profit) or overspending (net loss).
Go to Accounting/Reporting/Legal Reporting/Accounting Reports/Profit and Loss
The {Profit and Loss} window displays
Set the desired report options
P & L report options
Field
Description
Chart of account
System defaults to the existing chart of accounts
Fiscal year
System defaults to current fiscal year but can be changed
Target Moves
Drop-down selection:
All posted entries: for entries that have been hard posted in the registers or posted in the journals
All entries: temp and hard posted in registers, unposted and posted entries in journals (appropriate in between month end closure while entries are still in Temp/Unposted status). Draft entries will not be included.
Display Accounts
Drop-down selection:
All
With movements, i.e. with any entries (un) posted to the account
With balance is not equal to 0
Export format
PDF
Excel
Prop. Instances
Allows to select one or multiple proprietary instances
Filter by
Drop-down selection:
No filters
Date
Period
Start Date
If using a Date filter, enter the date to restrict the starting Posting Date
End Date
If using a Date filter, enter the date to restrict the ending Posting Date
Start Period
If using a Period filter, enter the period to restrict the starting Period
End Period
If using a Period filter, enter the period to restrict the ending Period
Journals
Not in use
Select {Print} at the bottom of the window
A PDF report of the Profit & Loss displays
Profit & Loss report
How to Produce a Balance Sheet Report
The Balance Sheet is a reflection of your assets and liabilities at any given point of time.
Go to Accounting/Reporting/Legal Reporting/Accounting Reports/Balance Sheet
The {Balance Sheet} window displays.
Set the desired report options
Balance Sheet report options
Field
Description
Field
Description
Chart of account
System defaults to the existing chart of accounts
Fiscal year
System defaults to current fiscal year but can be changed
Moves
Drop-down selection:
All posted entries: for entries that have been hard posted in the registers or posted in the journals
All entries: temp and hard posted in registers, unposted and posted entries in journals (appropriate in between month end closure while entries are still in Temp/Unposted status). Draft entries will not be included.
Display Accounts
Drop-down selection:
All
With movements, i.e. with any entries (un) posted to the account
With balance is not equal to 0
Export Format
PDF
Excel
Prop. Instances
Allows to select one or multiple proprietary instances
Filter by
Drop-down selection:
No filters
Date
Period
Start Date
If using a Date filter, enter the date to restrict the starting Posting Date
End Date
If using a Date filter, enter the date to restrict the ending Posting Date
Start Period
If using a Period filter, enter the period to restrict the starting Period
End Period
If using a Period filter, enter the period to restrict the ending Period
Journals
Not in use
Select {Print} at the bottom of the window
A PDF report of Balance Sheet displays.
Balance Sheet report
How to Produce a Liquidity Balances Report:
The Liquidity Balances report displays the liquidity account opening, calculated and closing balances divided by liquidity journal (cash, bank and cheque). The balances reflect the register balances at coordination and project level for bank and cash register. For cheque register, the calculation of the opening balance reflects the pending cheque of N-1 and before, the calculated balance is always 0 and the closing balance is the sum of all pending cheque of N or before.
Go to Accounting/Reporting/Legal Reporting/Accounting Reports/Liquidity Balances
Select the top proprietary instance (coordination), fiscal year and a period
Select {Print} at the bottom of the wizard
Liquidity Balances Report
How to Produce a Balance by Account Report
The Balance by account is a reflection of the G/L accounts balance per account
Go to Accounting/Reporting/Legal Reporting/Accounting Reports/Balance by account
The {Balance by account} window displays.
Set the desired report options
Balance by account report options:
Field
Description
Fiscal year
System defaults to current fiscal year but can be changed
Moves status
Drop-down selection:
Posted entries: for entries that have been hard posted in the registers or posted in the journals
All entries: temp and hard posted in registers, unposted and posted entries in journals (appropriate in between month end closure while entries are still in Temp/Unposted status). Draft entries will not be included.
Unposted entries: for entries that have been temp posted in the registers or unposted in the journals
Include initial balances
Tick the checkbox if you want to include initial balances
Periods
Enter the period to restrict the starting and ending Period
Instance
Allows to select one or multiple proprietary instances
Show Inactive accounts
Tick the checkbox if you want to display inactive accounts
B/S / P&L Account
Drop-down selection:
All: shows all accounts
Profit & Loss: shows only income and expense accounts
Balance Sheet: shows only balance sheet accounts
Granularity
Drop-down selection:
By account: arranges the report by account
By parent account: arranges the report by parent account
Currency
Add a currency if you want to filter by currency
Show Balances
Displays on the screen Balance by account using the expand button
Export
Excel report showing Balance by account
Description
Select {Export} at the bottom of the window
A xls report of Balance per account displays.
Balance per account report
How to Produce a Balance by Analytical Account Report:
The Balance by analytical account is a reflection of the analytical accounts balance per account
Go to Accounting/Reporting/Legal Reporting/Accounting Reports/Balance by analytical account
The {Balance by account} window displays.
Set the desired report options
Balance by analytical account report options
Field
Field
Description
Fiscal year
System defaults to current fiscal year but can be changed
Periods
Enter the period to restrict the starting and ending Period
Instance
Allows to select one or multiple proprietary instances
Inactive accounts
Tick the checkbox if you want to display inactive accounts
Granularity
Drop-down selection:
By account: arranges the report by account
By parent account: arranges the report by parent account
Currency
Add a currency if you want to filter by currency
Show Balances
Displays on the screen Balance by account using the expand button
Export
Excel report showing Balance by account
Description
Select {Export} at the bottom of the window
A xls report of Balance per account displays in each xls worksheet.
Info worksheet, displaying the selected report options
Cost center worksheet, displaying the balance per cost center. It reflects actual expenses per cost center.
Destination worksheet, displaying the balance per Destination. It reflects actual expenses per Destination.
Funding Pools worksheet, displaying the balance per Funding Pool. It reflects actual expenses per Funding Pool.
Separate worksheets for {FREE 1} and {FREE 2} analytical accounts are also available.
How to Produce a Partner Ledger Report
The Partner Ledger report is a PDF or Excel report that is a complete record of all financial transactions on all partners/suppliers. The overall total amounts are shown in functional currency, but each individual entry is shown in both, booking and functional currencies.
Go to Accounting/Reporting/Generic Reporting/Partners/Partner Ledger.
The {Partner Ledger} window displays
Set the desired report options. These are the same as the Partner Balance report.
Partner Ledger report options
Field
Field
Description
Chart of account
System defaults to the existing chart of accounts
Fiscal year
System defaults to current fiscal year but can be changed
Target Moves
Drop-down selection:
All posted entries: for entries that have been hard posted in the registers or posted in the journals
All entries: temp and hard posted in registers, unposted and posted entries in journals (appropriate in between month end closure while entries are still in Temp/Unposted status). Draft entries will not be included.
Partner’s
Drop-down selection:
Receivable accounts: primarily for customer partners who owe money
Payable accounts: primarily for supplier partners for whom we owe money
Receivable and payable accounts: for both e.g. if a partner is a customer and supplier
Include initial balances
Tick the checkbox if you want to include the opening balances of the fiscal year
With currency
Add a currency if you want to filter by currency
Include reconciled entries
Tick the checkbox if you want to include reconciled entries
One partner per page
Tick the checkbox if you want to have each partner on a separate page
Exclude Tax
Exclude the tax accounts from the report
Only active partners
Limits the search results only on active partners
Proprietary instances
Limits the search on the selected proprietary instances only
Partners
Allows choosing one or multiple partners for the search
Accounts
Allows choosing one or multiple accounts for the search
Filter by
Drop-down selection:
No filters
Date
Period
Start Date
If using a Date filter, enter the date to restrict the starting Posting Date
End Date
If using a Date filter, enter the date to restrict the ending Posting Date
Start Period
If using a Period filter, enter the period to restrict the starting Period
End Period
If using a Period filter, enter the period to restrict the ending Period
2. Select {Print} at the bottom of the window
A PDF report of the Partner Ledger displays
Partner Ledger report
How to Produce a Partner Balance Report:
The Partner Balance report is a PDF or Excel report showing a cumulative total balance per partner/supplier. It allows the project to identify any outstanding payable or receivable amounts for a partner.
Go to Accounting/Reporting/Generic Reporting/Partners/Partner Balance
The {Partner Balance} window displays
Set the desired report options
Partner Balance report options
Field
Field
Description
Chart of account
System defaults to the existing chart of accounts
Fiscal year
System defaults to current fiscal year but can be changed
Target Moves
Drop-down selection:
All posted entries: for entries that have been hard posted in the registers or posted in the journals
All entries: temp and hard posted in registers, unposted and posted entries in journals (appropriate in between month end closure while entries are still in Temp/Unposted status). Draft entries will not be included.
Partner’s
Drop-down selection:
Receivable accounts: primarily for customer partners who owe money
Payable accounts: primarily for supplier partners for whom we owe money
Receivable and payable accounts: for both e.g. if a partner is a customer and supplier
Display Partners
Drop-down selection:
All
With balance is not equal to 0
Include reconciled entries
Tick the checkbox if you want to include reconciled entries.
Include initial balances
Tick the checkbox if you want to include the opening balances of the fiscal year
Prop instances
Allows to select one or multiple proprietary instances
Exclude Tax
Tax entries will not be displayed in the report
Only active partners
Limits the search results only on active partners
Filter by
Drop-down selection:
No filters
Date
Period
Proprietary instances
Limits the search on the selected proprietary instances only
Partners
Allows choosing one or multiple partners for the search
Accounts
Allows choosing one or multiple accounts for the search
Start Date
If using a Date filter, enter the date to restrict the starting Posting Date
End Date
If using a Date filter, enter the date to restrict the ending Posting Date
Start Period
If using a Period filter, enter the period to restrict the starting Period
End Period
If using a Period filter, enter the period to restrict the ending Period
Balance view
Displays on the screen Partner Balance Payable
Description
Balance View on Payable
Select {Print Excel} to show the report in xls. format or {Print PDF} to produce a PDF. report at the bottom of the screen
A XLS or PDF report of the Partner Balance displays
Partner Balance report, xls format
For Suppliers (PUR journal), the Debit amount represents the total amount paid; the Credit amount is the total amount owed, so the Balance is the amount still outstanding to be paid or received. It is important to note that the amounts are in functional currency not booking currency. Save, print or email as desired.
How to Produce a Local Expenses Report
The Local Expenses report provides direct information about all expenses purchased or settled locally, in order to get a better overview of local cash flow needs or to meet specific requirements from local auditors asking MSF to report on local expenses. This report excludes entries booked in the HQ journal, Engagement journal, and In-kind donation journal.
Go to Accounting/Reporting/Generic Reporting/Local Expenses
The {Local Expenses} window displays
Set the desired report options
The Local Expense report options
Field
Description
Cost center
List of cost centers for the instance and it’s children
Fiscal year
System defaults to current fiscal year but can be changed
Period From/To
Enter the period to restrict the starting and ending Period
Breakdown
Drop-down selection:
Total figure
By month
Granularity
Drop-down selection:
By parent account
By account
Booking currency
If this field remains empty, all bookings will be retrieved regardless of the currency; if one currency is indicated, the system will pick only expense lines recorded in this currency
Output currency
The functional currency is set by default, conversion is at standard rates recorded in the system, so no specific currency table can be chosen to value expense in this report
Field
Description
3. Select {Print} at the bottom of the window
An Excel report of Local Expenses displays
Local Expenses report
How to Export Field Data to HQ System OCG
Go to Accounting/Reporting/Generic Reporting/Export to HQ system (OCG)
In the Top proprietary instance field, select an instance (Coordination) using the magnifying glass
A window Export to HQ system displays
In the Period field, select a period
Field data export for January 2016
Select
Confirm
Two files display (export and import files). Save them
How to Export Field Data to HQ system OCA
Go to Accounting/Reporting/Generic Reporting/Export to HQ system (OCA)
In the Top proprietary instance field, select an instance (Coordination) using the magnifying glass
A window Export to HQ system displays
In the Period field, select a period (The fiscal year defaults to the current FY but is editable)
Field data export for September 2014
Select
Confirm
Three files display (export and import files). Save them
Remember, unlike OCG and OCB, Free1 and Free2 lines will be excluded from the export to HQ system of OCA.
How to Export Field Data to HQ system OCB
Go to Accounting/Reporting/Generic Reporting/Export to HQ system (OCB)
In the Top proprietary instance field, select an instance (Coordination) using the magnifying glass
In the Period field, select a period (The fiscal year defaults to the current FY but is editable)
Finally select if you want to export all lines or lines not yet exported
Field data export for January 2016
Select
confirm OK
Files display. Save them
Remember, unlike in OCA and OCG, unposted entries are excluded from the export to HQ system of OCB and entries from the FXA journal are included.
How to Export Field Data to HQ system OCP:
Go to Accounting/Reporting/Generic Reporting/Export to HQ system (OCP)
In the Top proprietary instance field, select an instance (Coordination) using the magnifying glass
In the Period field, select a period (The fiscal year defaults to the current FY but is editable)
New functionality to do modifications in an easy and quick way in the invoice lines
There will be a new functionality to export and to import the invoices lines via an excel file in order to do modifications in an easy and quick way (this feature exists already for the Purchase orders).
The following restrictions in the forms regarding the fields “Product” and “Quantity” will be applied in the Excel file. The fields will be not editable if:
for SI: the doc either is linked to a Supply workflow or has been generated via the synchro
for STV: the doc is linked to a Supply workflow with an intersection partner
for IVO: the doc is linked to a Supply workflow
for IVI: the doc either is linked to a Supply workflow or has been generated via the synchro
The deletion and the creation of new lines will not be possible;
The import will be possible just in draft status and the export in all status.
There will be checks at import time:
The currency, partner and line numbers must exist and be valid, as they are used to determine the doc lines to modify.
The posting date must be valid if it exists. If it doesn’t, which may happen because the doc is in Draft state, the date used to check account’s validity will be the current date.
The accounts chosen at line level must be allowed in the document where the import is made.
We Export the invoice by clicking “Export invoice”
In our case we can change the fields that are in white: account and unit price:
We import the file with the changes:
We import the excel file with the changes and we check that they were correctly done.
In the excel file the last columns are dealing with the analytical distribution:
Analytic distribution: we have the % 100%. If the % is not 100% it means that the line was split son we will have the word EMPTY and the last 3 columns will remain empty.
If the analytic distribution is 100% I will have the cost center, the destination and the funding pool filled in.
In case that a line is SPLIT:
You splits a line and when you export the file, the word SPLIT appears automatically in the excel file with no analytic distribution (AD).
This is the same for the export of the commitments vouchers. Same principle.
In case we import the file with the wrong information we will have error messages:
Doing correction through the correction journal is called OD. The OD journal itself has different types depending on how and where you do the correction. We have different journals for journal entries corrections to be able to distinguish manual from automatic corrections and also a separate journal for the HQ corrections entries. This is to enable having a better follow-up of these sensitives’ entries.
Code
Journal Name
Type
OD
Corrections
Correction Auto
ODM
Correction Manual
Correction Manual
ODHQ
Correction Automatic HQ
Correction HQ
ODX
Extra-Accounting corrections
OD-Extra Accounting
OD: Analytic Journal Items => perform a correction in one line to change the accounting code by clicking in the envelope => Validate => The reversal and the correction will be booked in OD Journal.
Click on the envelope.
2. Correct the accounting code, then save the changes and click on {Correct}.
3. Both correction and reversal were booked in OD journal.
ODM (Manual OD): Journal Entries => Journal Entries=> {New}=> In the Journal field, choose ODM=> Complete all other information=> Save or {Approve}=> This manual correction will be booked in ODM Journal. Manual correction (OD) is mainly used when you want t0o correct a balance sheet account, third party, description and reference…etc for entries that were already posted, an any other correction that cannot be done in an automatic way.
Create a manual journal entry to correct a balance sheet account, you must choose ODM as a journal and you should never choose OD as a journal when you create a manual entry through Journal Entries. Once you are done, click on {Approve} to post the manual OD entry (ODM).
2. When you check in Journal Items, you will see that all the lines in the manual OD that created were all booked in ODM.
ODHQ: When correcting HQ entries through HQ => HQ Entries to validate=> Do the needed correction => the correction of an HQ entry before validation will be booked in ODHQ Journal. HQ entries are imported at HQ instance and after the synchronization, the coordination will receive the HQ entries related to the mission.
Only Coordination can correct and validate the HQ entries, any correction done at HQ entries will be booked in the HQ DO journal (ODHQ).
Change the accounting code for instance in an HQ entry, save and then validate.
3. The correction of the HQ entry for both the reversal and the correction will be booked in the HQ correction journal (ODHQ).
ODX: Same procedures as before. Same as we do with ODM. Just select ODX in the Journal field if it was regarding extra accounting corrections.
How to Do a Mass Re-Allocation in Analytical Journal Items
The mass reallocation functionality allows you to change the analytic distribution on analytic journal items en masse, e.g. correcting cost center, destination, funding pool and free axis for multiple entries.
Go to: Accounting/Journal Entries/Analytic Journal Items
Search for the analytic journal items that you need to reallocate. You can also search in Analytic Selector. Select the entries by ticking the checkbox.
Selecting analytic journal items to reallocate
In the Actions menu on the right-hand side bar, click on {Mass reallocation} to allocate tick box selected items or {Mass re-allocation – All search results} to allocate all search results matching your search criteria. The selected entries display in the top pane of the window. Enter a posting date. Click on the magnifying glass on Analytic Account.
Select the desired analytic account.
Mass reallocation window
Click on . UniField will perform a check on all selected entries to confirm that the reallocation can be applied. A Verification Result window will open showing the items to allocate in the top pane and the items not part of the selection in the bottom pane. Items not considered in reallocation include:
Commitments
Items already reallocated
Reversals
Items from engagement journal
Write-off
Unposted items
Verification result window
Click on to reallocate the entries. In Analytic Journal Items, you can search for the entries to confirm the change has been made.
There is another way to perform mass reallocation on funding pools:
From the analytic accounts list view, select the analytic account (funding pool) to which entries should be reallocated
Selection of a funding pool in the Search Analytic Account view and Reports menu opening
On the right-hand side panel, in the Actions menu, click on .
The system will look for all entries that can be reallocated to this analytic account.
Follow the same mass reallocation steps: select the items to reallocate and process.
You can also perform a mass reallocation on free axis following these steps:
From the Free 1 (or 2) view, select the analytic journal items that you need to reallocate
On the right-hand side panel, in the Actions menu, click on .
If you reallocate a Free 1 axis, the system will look for all analytic accounts set as Free 1 existing in the database. The same applies for Free 2 axis. Select an account and press “Verify” to check if the account is valid and “Process” to record the new allocation.
Analytic account selection for a Free 1 mass reallocation
This section addresses corrections when the cheque is imported into the bank register, i.e. the wrong cheque has been imported and the corresponding bank register line is hard-posted.
How to Correct Hard-Posted Cheque Imported in Bank Registers
If an incorrect cheque has been imported into the bank register and hard-posted, the correction is a two-steps process.
For the first step, a reversing entry needs to be created in the cheque register to cancel the payment, and then imported into the bank register to adjust the balance. The second step will be to import the correct cheque into the bank register.
Next, you will create again the cheque which was wrongly imported so that you can reconcile it when it is cashed at your bank.
Go to: Accounting/Registers/Bank Registers
First step:
In the bank register, identify the incorrectly imported cheque.
Incorrectly imported cheque in bank register
Go to: Accounting/Registers/Cheque Registers
In the cheque register, click next to the incorrect cheque to duplicate the entry.
Duplicate the incorrect cheque in the Cheque Register
Edit the duplicate entry to show that it is a reversal. Delete the {Amount Out} and enter the same value in {Amount In}. Hard-post the entry.
Duplicate the incorrect cheque in Cheque Registers
Go to: Accounting/Registers/Bank Registers
Import the reversal cheque into the bank register which should cancel the payment and restore the bank balance. Hard post-it.
Import the reversal cheque into the bank register to cancel the payment
The Journal Items are:
The original entry in the cheque register (cheque payment):
Debit to the expense account code
Credit to 10210 Outstanding cheques
When the cheque is imported into the bank register (bank reconciliation):
Credit to bank account to reduce the bank balance
Debit to 10210 Outstanding cheques to reconcile the cheque, 10210 reconciled
The reversing entry in the cheque register:
Credit to the expense account code to reverse the original entry
Debit to 10210 Outstanding cheques
When the reversing cheque is imported into the bank register:
Debit to bank account to restore the bank balance
Credit to 10210 Outstanding cheques to reconcile the reversing cheque
Journal Items from original and reversing cheque imported into bank registers
Second step:
For the second step, a corrected cheque will need to be created in the cheque register and hard-posted. If the entry in the cheque register was for a:
Direct Entry: duplicate the original cheque (incorrectly imported) with the same cheque number and with the correct information
Supplier Invoice: refund the invoice to reverse the invoice lines and trade payables, then create a new invoice with the correct information (Supplier Invoices paid in Registers, hard-posted)
Direct Invoice: refund the invoice to reverse the invoice lines and trade payables, then create a new invoice with the correct information (Direct Invoices imported in Registers, hard-posted)
How to Correct Direct Invoices Imported in Registers, Hard-Posted
When the register line corresponding to a Direct Invoice is Hard-posted, the status of the invoice changes from {Draft} to {Paid}. The entry cannot be edited or deleted any more.
If a correction needs to be made on the account code or analytic distribution of an invoice line, the user can click on the link to the analytic lines associated with the Direct Supplier invoice to use the Corrections Wizard (See Supplier Invoice paid in Registers, hard-posted).
Link to analytic journal items to make correction to account or AD
If a correction needs to be made on the following fields, use the Refund (non-editable) functionality (See Supplier Invoice paid in Registers, Temp and Hard-posted).
Product
Price
Quantity
Supplier
Document date
Currency
Refund functionality on a Direct Supplier Invoice
Go to: ACCOUNTING/Suppliers/Supplier Direct Invoices
Open the paid Direct Supplier Invoice in Form view to refund it
Click {Refund}
Paid Supplier Invoice to be refunded
The Refund window opens for the user to complete the fields. In {Description}, explain what is being refunded and why. When you are done, press the {Refund} button.
Refund window
A new line appears in the Supplier Refund search window. The refund invoice is ready to be edited. The description of the invoice is copied from the entry made in the {Refund} window. Click on the pencil to open in Form view.
Supplier Refund automatically created
The Supplier Refund is a copy of the original direct invoice but the credit/debit amounts are reversed to cancel the original entries. Click {Validate} and the status changes from {Draft} to {Open}.
Supplier Refund is a copy of the original invoice with reversal credit/debit entries
The Journal Items are as follows:
The original Supplier Direct Invoice when paid (register line hard posted):
Debit to the expense accounts for each invoice line
Credit to 30020 Trade Payables
Credit to the cash account to reduce the cash balance
Debit to 30020 Trade Payables to reconcile the outstanding payable
The Supplier Refund invoice validated:
Credit to the expense accounts for the amount refunded for each invoice line
Debit to 30020 Trade Payables
Journal Items from supplier direct invoice and supplier refund
To completely reverse the paid invoice, you need to refund the cash balance in the register. Click on {Pending Payments} in Registers
Pending Payments in Registers
The {Import Entries} window opens. Click {Add}.
Import Entries
In the Search Account Entry Lines window, select the supplier refund invoice to import.
Selection of a refund invoice linked to a direct invoice
A register entry is created with the Amount In equal to the refund amount. This operation restores the cash balance to the amount before the invoice was paid.
Register entry created from refund
In Journal Items, double entries are created from the refund in the register:
Debit cash account to increase balance from Amount In
Credit 30020 Trade Payables
When the register entry is hard-posted, the Supplier Refund is marked {Paid} and UniField automatically reconciles the {30020 – Trade Payables} debit from the Supplier Refund with the credit from the register.
Journal Items created from refund payment in the register; payable entries reconciled
Now you need to create a new supplier direct invoice with the corrections, e.g. price. You will do it from the register. (see LUFI-30207 Chapter Payments)
Supplier invoices are created when an incoming shipment from a logistics purchase order is validated by Supply or when created manually by Finance. How corrections are made depends on the status and if the supplier invoice has been paid in Registers.
How to Correct Open Supplier Invoices Not Yet Paid
Once a supplier invoice has been validated, the status changes from {Draft} to {Open} and is pending of payment in Registers. The invoice cannot be edited and the related journal items are posted.
The user with appropriate access rights can correct the expense account and analytical distribution (Destination, Cost Center and Funding Pool) from the Journal Items or Analytic Journal Items view to make reversing and correcting entries using the Corrections Wizard:
Open supplier invoice displayed in the Supplier Invoices sub-module
Go to: Accounting/Journal Entries/Journal Items
Search for the entries (expense and payables accounts) corresponding to the supplier invoice you want to correct
Corresponding Journal Items
2. Select the icon to open the Accounting Corrections Wizard
Accounting Corrections Wizard
Insert a correction date (=posting date of the correction entry) in the {Correction date} field
Select the icon to edit the account code or the icon to modify the analytical distribution. In this case we will change the cost center. The analytical distribution wizard opens.
In the wizard, select the icon to edit the analytical line
Edition button to change the analytical distribution
Change the distribution and save the line
Cost center changed
At the bottom of the screen, select to apply the correction. The window closes.
As we modified a cost center, Go to Accounting/Journal Entries/Analytic Journal Items and check if the correction was done.
Note! Depending on the period status of the entry that was corrected, either the original AJI is updated (=period is still open) or correction entries in OD journal are created (=period is closed)
The cost center was changed and the original AJI was updated.
If you need to make a correction on product, price, quantity, supplier, document date or currency, you will use the function called {Refund} located on the supplier invoice.
In the Refund wizard, 3 options are possible: ModifyRefund and Cancel. They can all be used according to the situation you are facing.
Modify is used if for instance goods were received and checked but some of them are damaged at the time of consumption and they are sent back to the supplier. In case the initial invoice was validated but not yet paid (status is {Open}), you will modify the new invoice and pay the right amount accordingly i.e. deduct the damaged goods from your payment.
Note! Refund-Modify function is not available for partially paid invoices even if the status is “Open”.
You can also use this option if you realize an accounting correction must be done on this invoice.
Since the open invoice is not yet linked to any liquidity account (cash on hand, cash at bank), the Refund/Modify option will change that state of the initial invoice to Closed and not Paid
Modify executes three actions:
Original Supplier Invoice is marked {Closed}
Supplier Refund document is created and marked {Closed} to cancel the original Supplier Invoice, with which it is reconciled
A copy of the original Supplier Invoice is created in {Draft} to prepare a corrected version for validation and payment
Go to: ACCOUNTING/Suppliers/Supplier Invoices
Open the Supplier Invoice in Form view to modify it
Click {Refund}
Refund functionality in Supplier Invoice
A Refund window opens for the user to complete the fields.
Refund window
A new tab appears with the Supplier Refund search window. A copy of the original Supplier Invoice is created with status {Closed}. Click on the pencil to open in Form view.
Supplier Refunds search window
In the Supplier Refunds sub-module, the Supplier Refund is in {Closed} status. Its purpose is to create reversing entries in the Purchase Refund Journal to reconcile the Journal Items entries made from the original Supplier Invoice, thus cancelling it. The {Closed/Reconciled} checkbox is ticked.
Supplier Refund created is a copy of the original Supplier Invoice
The Journal Items are as follows:
The original Supplier Invoice:
Debit to the expense account
Credit to 30020 Trade Payables M1-17
The Supplier Refund reverses the entries created above:
Credit to the expense account
Debit to 30020 Trade Payables M1-17
Journal Items resulting from original Supplier Invoice and Supplier Refund
In the Supplier Invoices sub-module, the original Supplier Invoice is marked {Closed}. The {Paid/Reconciled} checkbox is ticked.
Original Supplier Invoice is marked Paid and reconciled after Modify applied
In the final step, in Supplier Invoices sub-module too, a copy of the original Supplier Invoice is created in {Draft} status for the user to modify and validate as usual. The Description refers back to the Purchase Refund, and the Free Reference field refers back to the original invoice, but there are no links in the system or accounting entries that tie back.
Modified Supplier Invoice is in draft status for corrections to be made
Cancel is used if for instance goods were received and checked but all of them are damaged at the time of consumption. They will be sent back to the supplier. We don’t expect any replacement. You will then cancel the invoice, thus cancel the debt towards this supplier.
Note! Refund-Cancel function is not available for partially paid invoices even if the status is “Open”.
Cancel executes two actions:
Original Supplier Invoice is marked {Closed}
Supplier Refund record is created and marked {Closed} to cancel the original Supplier Invoice
Go to: ACCOUNTING/Suppliers/Supplier Invoices
Open the Open Supplier Invoice in Form view to modify it
Refund functionality in Supplier Invoice
Click {Refund}. A Refund window opens for the user to complete the fields. In Description, explain what and why is being refunded. Select {Cancel} for Refund Type
Refund window
A new tab appears with the Supplier Refund search window. The Supplier Refund is in {Closed} status. Its purpose is to create reversing entries in the Purchase Refund Journal to reconcile the Journal Items entries made from the original Supplier Invoice, thus cancelling it.
Supplier Refund is in Closed status when created
The original Supplier Invoice changes from Open to Closed status
The Journal Items are as follows:
The original Supplier Invoice:
Debit to the expense account
Credit to 30020 Trade Payables M1-18
The Supplier Refund reverses the entries created above:
Credit to the expense account
Debit to 30020 Trade Payables M1-18
Journal Items resulting from original Supplier Invoice and Supplier Refund
How to Correct Supplier Invoices Paid in Registers, Temp-Posted
The payment of invoices is made in Registers (cash, bank or cheque depending on the method of payment). An entry is created in Temp status and booked to {Trade Payables} to pay the amount owed to an external Supplier.
Open Supplier Invoice imported into Registers
The correction of the invoice will depend on the situation:
If you need to proceed with a correction on an expense account or analytical distribution, you will use the accounting correction wizard (same as the correction for Direct entries and Open Supplier Invoice).
As the invoice was paid (the invoice is imported into the register to reflect the physical cash was given), the only possibility we can find in this situation is a refund. We can suppose for instance goods were paid and some of them will be sent back for which a refund was requested. In this case you will hard-post the register line and use the function Refund on the supplier invoice to correct the amount. You will select the option {Refund}.
Refund executes three actions:
Original Supplier Invoice is marked Paid. However as it makes sense to make a refund on a paid supplier invoice, the invoice will be already marked Paid.
Supplier Refund record is created to reflect what is being refunded and validated. It is a duplication of the original supplier invoice and will need to be adjusted.
The Supplier Refund is essentially a credit note, available in {Pending Payments} to adjust the cash balance and take the refund into consideration in the register.
Go to: Accounting/Registers/Cash Registers
In the below first example we see how to correct an account code or analytical distribution on a paid supplier invoice, temp-posted in a register:
Find the temp posted register entry for the imported invoice. Click on the magnifying glass to link to the analytic lines associated with the invoice.
From Registers, link to the analytic journal items
A new tab opens to display the analytic lines associated with the supplier invoice lines. Click on the envelope next to the entry that needs to be corrected.
Analytic Journal Items associated to the Open supplier invoice
The {Accounting Corrections Wizard} opens. Enter the date on which the correction was made. To make a correction to account code, click on the pencil to edit the entry.
Click on the pencil to correct account code or the AD icon to correct analytic distribution
4. Change the account code and click to save.
Changed account in Accounting Corrections Wizard
If a correction is made on an expense account, you should review the analytical distribution to confirm that the new expense account is assigned to a proper destination or funding pool. If assigned properly, you can click {Correct}. If the new expense account is not assigned properly, the correction entry will display in red font and the user will not be able to validate the correction until the analytical distribution is changed. Click on the {AD} icon to assign the expense correctly.
The Analytic distribution window opens. Click on the pencil to change the destination, cost center or funding pool as needed. Click to save and then click. The {Cancel} button will take you back to the Accounting Wizard.
Back to Analytic Journal Items, the original entry will now display a closed envelope icon to indicate that the entry has been reallocated. If you click on this envelop, a window will open to show the history of changes (original, reversing and correcting entries) in Analytic Journal Items.
History of changes on an analytic journal item reallocated using the Corrections Wizard
Back in the Supplier Invoice, the invoice line will display a closed envelope icon to indicate that the entry has been reallocated. If you click on this envelope, a window will open to show the history of changes (original, reversing and correcting entries) in Analytic Journal Items.
Corrections made in Analytic Journal Items are reflected in Supplier Invoice
If a correction is made only to the analytic distribution (destination and/or cost center and/or funding pool) in an open period, then the Correction Wizard will update the original analytic journal item. Reversing and Correcting entries are not created since the accounting journals are not affected, so you are not able to track if any corrections were made. Note: the supplier invoice line will still show the original AD and not the correction allocation.
If the period is closed, entries are created in the Corrections Journal to reverse the analytical distribution and then to correct it.
In the second example below we see how to create a refund invoice on a Temp posted register line.
Go to: Accounting/Registers/Cash Registers
Find the temp-posted register entry for the imported invoice.
Hard-post the line. The invoice becomes {Paid}.
In the Liquidity journal, we have:
Credit to the cash account (30.35 USD)
Debit to 30020 Trade Payables (30.35 USD)
On the register line, select the icon opening the supplier invoice and the search supplier invoices display.
Opening a supplier invoice hard-posted in a register
Search Supplier Invoices displays
Select the {Edit} button and the supplier invoice form view appears.
At the bottom of the view, select
In the Refund wizard, select the option {Refund} and describe the refund type and reason. The refund journal is automatically set to PUF:
Refund wizard
Select {Refund}.
Now proceed to the edition of the supplier refund invoice. In this case, we will request a refund for 3 damaged products. We will modify the refund accordingly.
Refund supplier invoice
Save the form and the invoice is saved in {Draft} state.
Select the {Validate} button to validate it.
In the PUF journal, we have the validated supplier refund displayed as such:
Credit to the expense account (7.71 USD)
Credit to VAT recoverable (1.54 USD); this is optional. The invoice was applied a VAT code in this case.
Debit to 30020 Trade Payables (9.25 USD)
The next step is to import the refund invoice into the register as soon as the payment from the supplier is received.
How to Correct Supplier Invoices Paid in Registers, Hard-Posted:
Once a payment for an invoice is made in the register and hard posted, the status of the supplier invoice changes from {Open} to {Paid}.
Status of Supplier Invoice changes to Paid
If a correction needs to be made on the account code or analytic distribution of an invoice line, you can click on the journal items or analytic lines associated with the supplier invoice to use the Corrections Wizard. (See example 1 of Supplier Invoice paid in Registers, temp posted).
Link to analytic journal items to make correction to account or AD
If you need to correct a paid supplier invoice (i.e. to mark the fact that a refund was agreed for paid products) you will use the {Refund} option of the Refund wizard. (See example 2 of Supplier Invoice paid in Registers, temp posted).
Direct entries are made directly in the register and not through other interfaces like Supplier Invoice or Direct Invoice. For further information on what is a direct entry and how to book it, see Chapter 3 -Payments LUFI-30205.
The edition and deletion of Draft and Temp direct entries is addressed in Chapter 3 – Payments LUFI-30209.
If you need to change a data of a direct entry in Hard-posted state, you will perform an accounting correction as shown below.
How to Correct Hard-Posted Direct Entries
Hard-posted direct entries cannot be edited or deleted in the register. How the correction is done depends on the field that needs to be corrected. If you need to correct the below fields:
Amount
Description
Third Party
Document date
You will make a reversal entry and a correction entry directly in the Register.
Go to: Accounting/Registers/Cash Registers
Find the hard-posted register entry for which the amount needs to be corrected, Click on the duplicate button
A copy of the original entry is created. Click to edit.
Reversed entry being created by using the Edit button
Edit the duplicate entry to reverse the original entry:
Revise the field {Description} to indicate this is a reversal entry and why, e.g. “REV – PER DIEM wrong amt, should be 95”. The original description is retained to make it easy to match it with the initial entry.
Delete the amount in the field {Amount Out} or {Amount In} and enter the same amount in the opposing field {Amount In} or {Amount Out}. This cancels the amount to zero and will update the register balance.
If you are correcting the {Third Party} or {Document Date}, then you should not change it in this copy. You will correct it in the correcting entry.
Click to save the entry
Revise the duplicate entry to reverse
Reversal entry is saved and Temp posted
Now, you need to create the correcting entry with the right amount, or document date, or description. Click on the duplicate button of the initial entry.
A copy displays. Click to edit.
The second entry corrects the error:
Revise the field {Description} to indicate this is a correcting entry and why, e.g. “COR – PER DIEM wrong amt, should be 95”. The original description is retained to make it easy to match it with the initial entry.
If correcting amount, change it in the field {Amount Out} or {Amount In}
If you are correcting the {Third Party} or {Document Date}, enter the correct value
Click to save the entry
Revise the duplicate entry to correct
Correcting entry is created using the Duplicate button on the reversing entry
Now, you should be able to view:
The original register entry in which you made an error
The reversing register entry
The correcting register entry
In Journal Items, you can see the double accounting moves that correspond to the register entries which reverse and correct on the relevant journals and accounts:
Original entry:
Credit -10100 Cash on hand (100 USD)
Debit – 66220 Per Diem (100 USD)
Reversing entry:
Credit – 66220 Per Diem (100 USD)
Debit – 10100 Cash on hand (100 USD)
Correcting entry:
Credit – 10100 Cash on hand (95 USD)
Debit – 66220 Per Diem (95 USD)
Accounting entries are editable until they are Hard-posted. Only unreconciled entries can be corrected. Entries need to be manually unreconciled before correction (on manually reconciled entries). Once the correction is validated, the corrected entry can be manually reconciled with its counterpart entry (if relevant).
For the following fields, the user with appropriate access rights can open a link from the registers to the Analytic Journal Items to make reversing and correcting entries using the Corrections Wizard:
Expense accounts
Destination
Cost Center
Funding Pool
Corrections can be performed on entries belonging to open or closed periods. If correction takes place in a different period than the initial entry, the exchange rate in the reversal and correction entries is the rate of the original entry (based on the posting date). Also, keep in mind that corrections in Journals do not impact cash balances (no register line created).
Go to: Accounting/Registers/Cash Registers
Find the hard-posted direct entry for which the expense account needs to be corrected. In this example, drinks ordered for the team were booked to {60030 – Therapeutic Food} but should be {61020 – Non Therapeutic Food}. Click on the magnifying glass to link to the analytic lines associated with the register entry.
From Registers, link to the analytic journal items
A new tab opens to display the analytic lines. Click on the envelope next to the entry.
Corrections using the link to Analytic Lines from Registers
The {Accounting Corrections Wizard} opens. Enter the date on which the correction was made. To make a correction to account code, click on the pencil to edit the entry.
Click on the pencil to correct account code or the AD icon to correct analytic distribution
Change the account code and click to save. The new code is saved.
Correcting the account code:
If a correction is made on an expense account, you should review the analytical distribution to confirm that the new expense account is assigned to a proper destination and funding pool. If assigned properly, you can click {Correct}.
If the new expense account is not assigned properly, the correction entry will display in red font and the user will not be able to validate the correction until the analytical distribution is changed. Click on the {AD} icon to assign the expense correctly.
Analytic distribution is invalid after account code is corrected
The Analytic distribution window opens. Click on the pencil to change the destination, cost center or funding pool as needed. When you are done, Click to save and then click. The {Cancel} button will return you back to the Accounting Wizard.
Edit button to change the analytic allocation
Correct button to save the correction
Back in Analytic Journal Items, the original entry will now display a closed envelope icon to indicate that the entry has been corrected. When this envelope is clicked, a window will open to show the history of changes (original, reversing and correcting entries) in Analytic Journal Items.
Closed envelope icon indicating the entry has been corrected
Correction history on an accounting code
The entries associated with this correction can also be searched directly in Analytic Journal Items. The original entry and the correction entry both display the icon to show the corrections history. The envelope icon is no longer displayed next to the original expense entry in Journal Items since a correction has been made. The envelope icon is now next to the corrected entry and is to be used if user needs to correct the corrected entry.
Note that for the reversing and correcting entries created from the Corrections Wizard:
The same description as the original entry is used but prefixed by REV and COR<#> where <#> tracks the corrections made to the original analytic journal item and will be incremental as subsequent corrections are made (“correction of the correction”).
They are automatically posted to the Corrections journal (OD)
The Reversal Origin of the reversal entry is the description of the original entry
The Reference of the reversal and correcting entries is the entry sequence number of the original analytic journal item allowing you to easily trace back to the initial entry.
Original, reversed and corrected journal item. Reversed and Corrected entries show the accounting corrections to debit and credit amounts:
Back to the Registers, the correction on the account will show on the register line
Correction on the account code displayed in the register line
If Coordination has made the correction to a project entry, the change will be reflected upon synchronization at project level. Remember, Project will not be able to correct this entry again.
Entry recorded at project level and booked on the cost center MW101 instead of MW102.
Synchronized entry to correct visible at Coordination instance
Cost Center being changed by Coordination to MW102
Cost center changed to MW102, visible at Coordination instance
Cost center changed to MW102, visible at Project instance after being synched. This entry cannot be corrected anymore (no envelope icon = correction wizard disabled).
If a correction is made only to the analytic distribution (destination, cost center, funding pool) in an open period, the Correction Wizard will override the original analytic journal item. Reversing and Correcting entries are not created since the accounting journals are not affected, so you are not able to track if any change was made. The original entries in Registers and Journal Items remain unchanged.
Original cost center to correct
Corrections to the AD update the original analytic journal item
If the period is closed, entries are created in the Corrections Analytic Journal to reverse the analytical distribution and then to correct it. Back in Registers, you cannot view the correction to the analytic distribution because the entry has been hard-posted. There is no AD icon available.
Below is a chart summarizing the system behavior when the correction wizard is used:
We use cookies to ensure that we give you the best experience on our website. If you continue to use this site we will assume that you are happy with it.
 Selecting the revaluation method
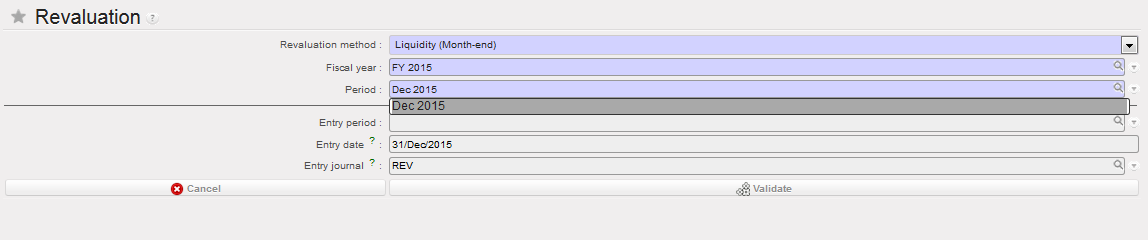
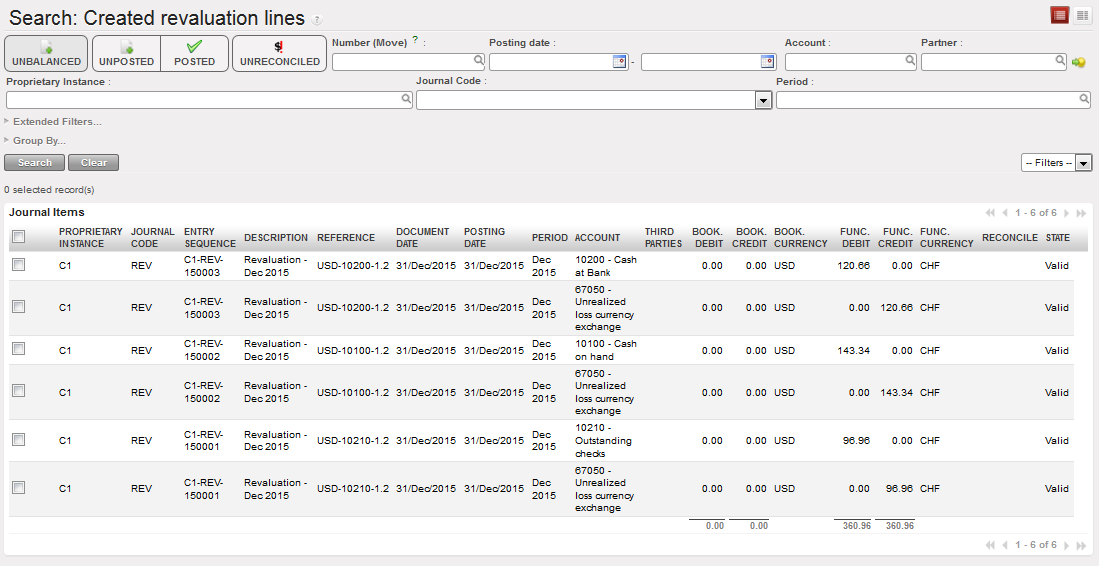
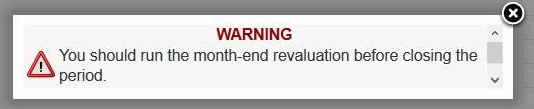
 Selecting the revaluation method
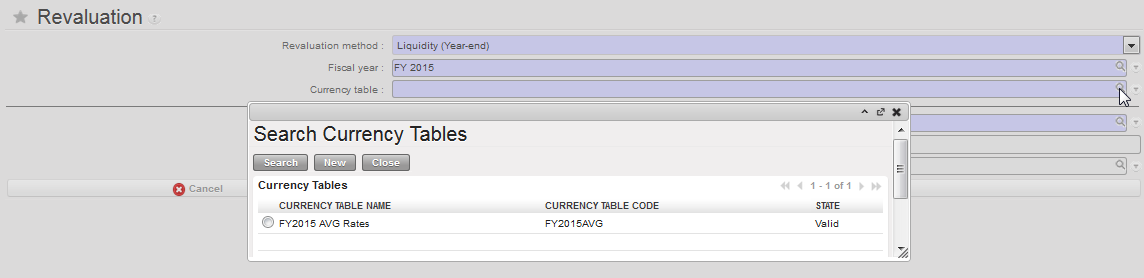 Selecting the currency table
 Selecting the period for year-end revaluation.
 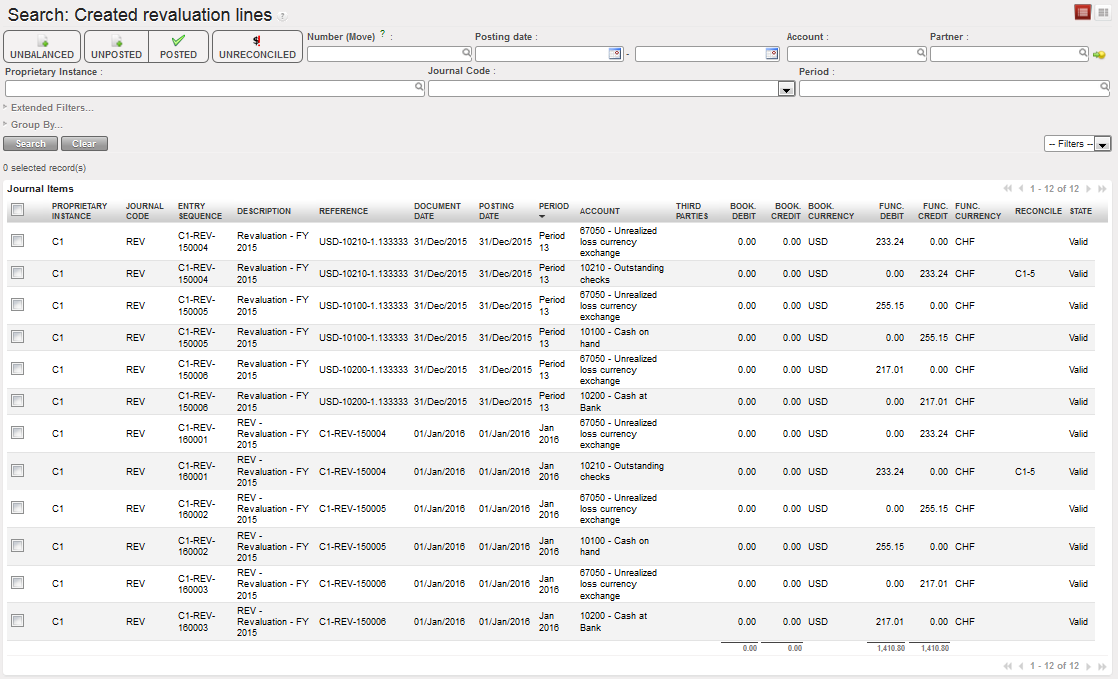 Revaluation entries and their reversals created in REV journal
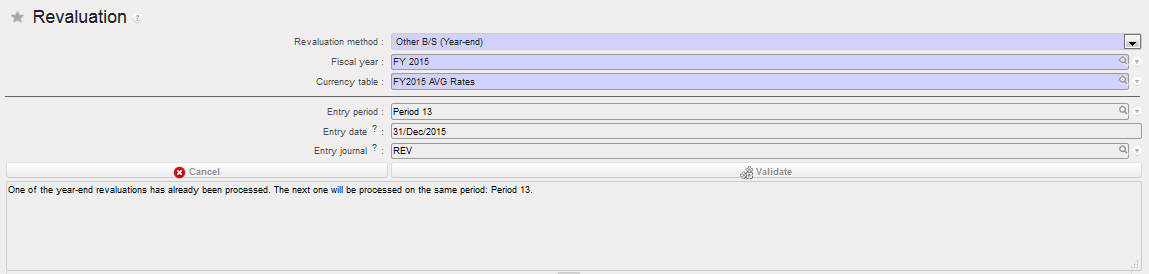 Period 13 will be used automatically, because it was used already in the first year-end revaluation
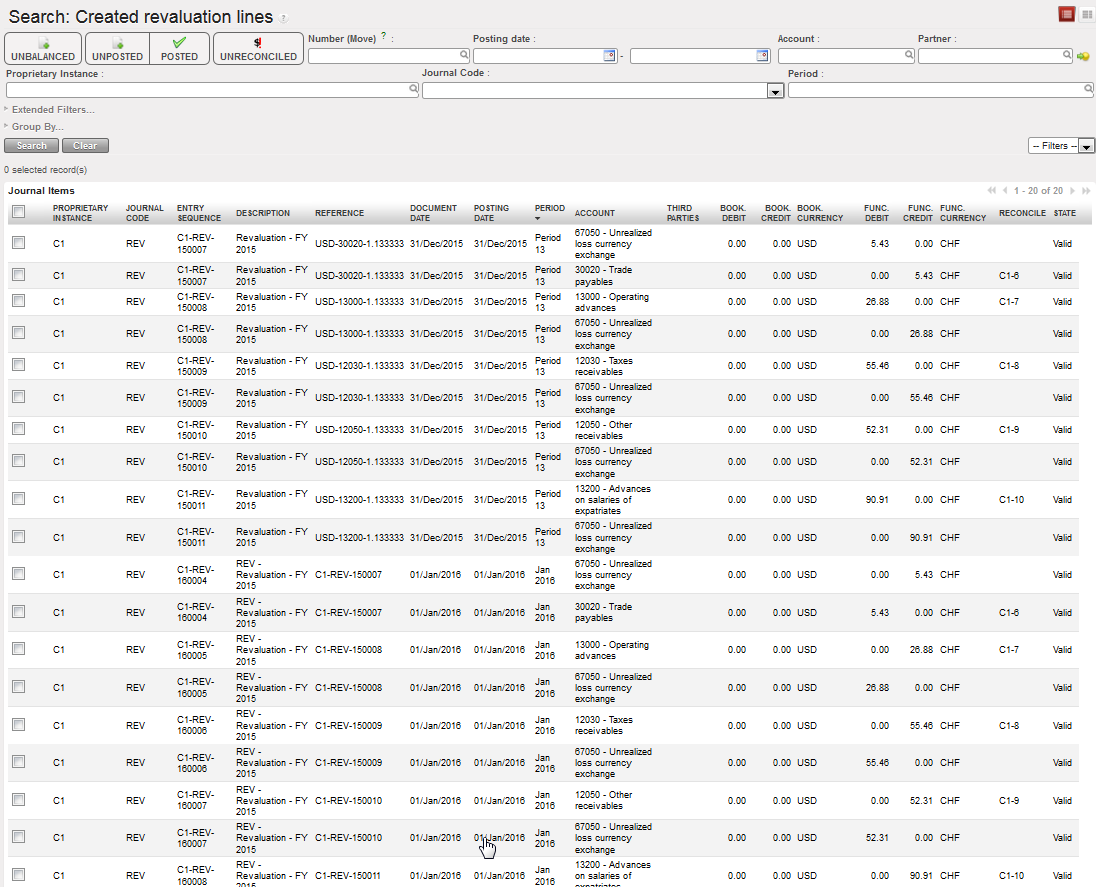 Revaluation entries and their reversals created in REV journal
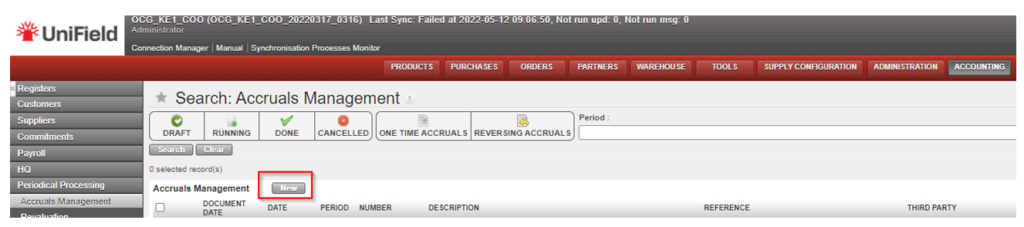

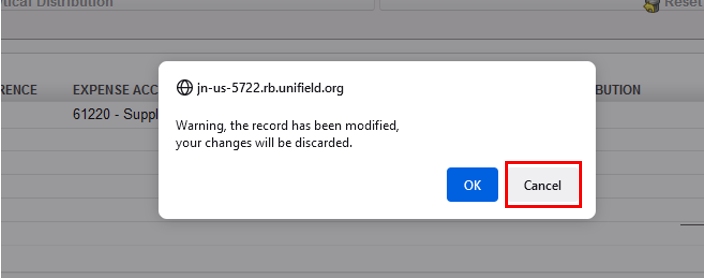

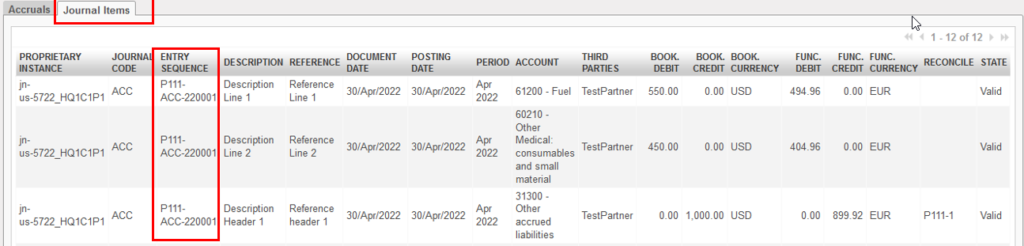


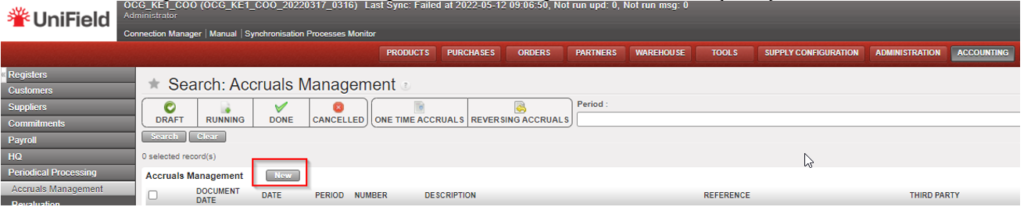

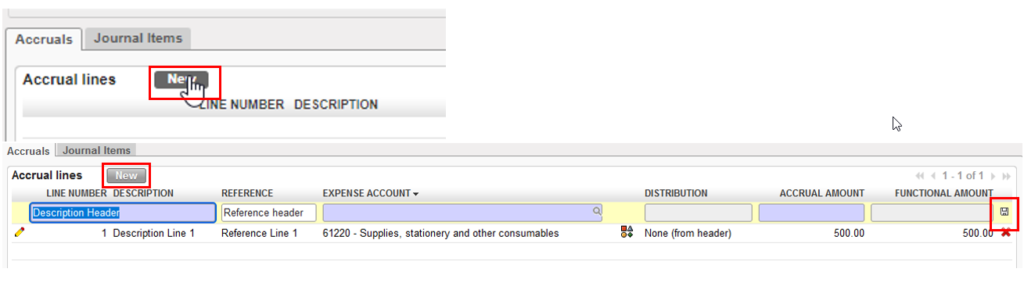
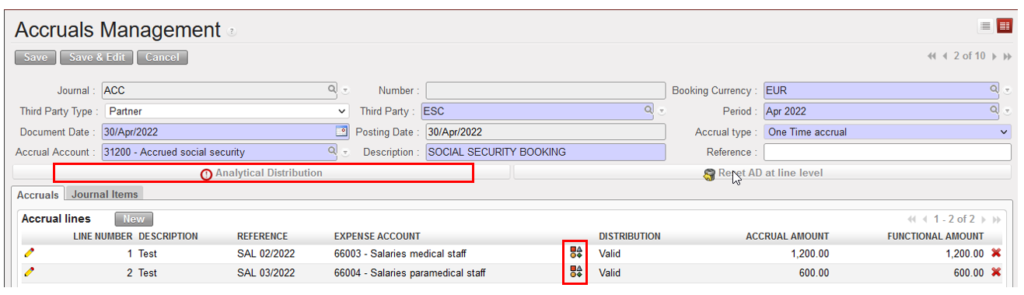

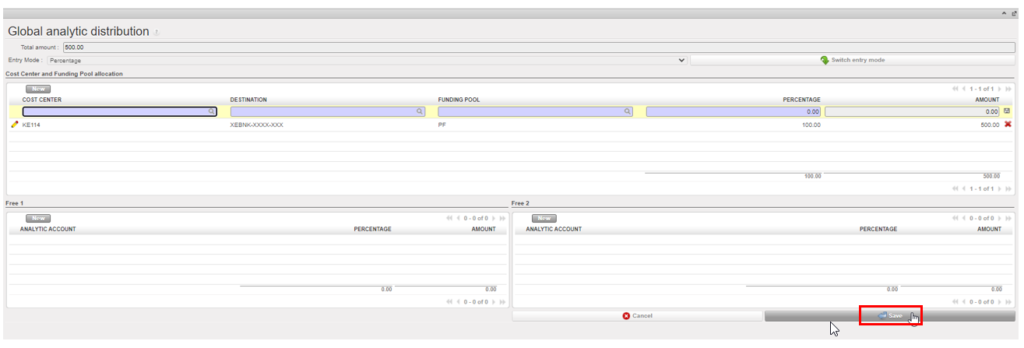


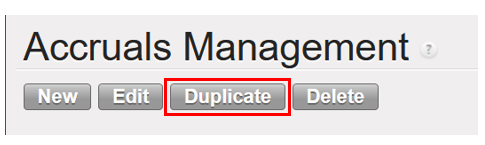
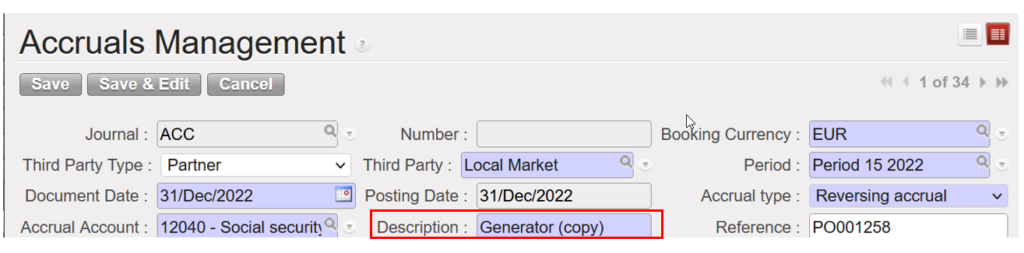


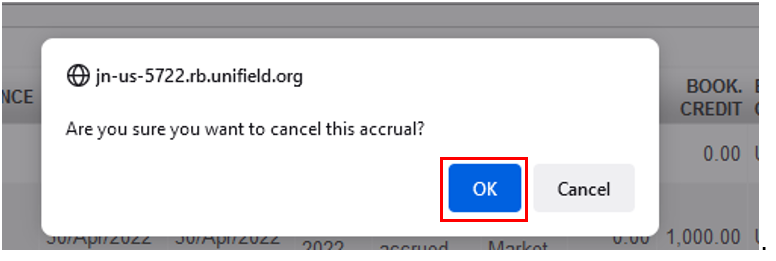
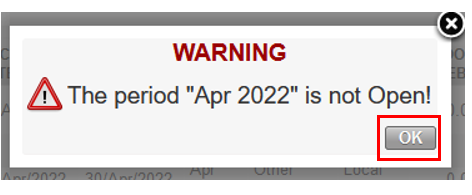


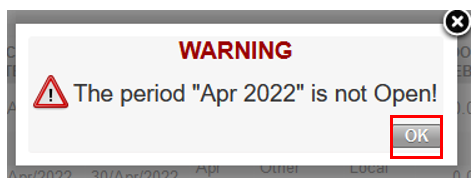


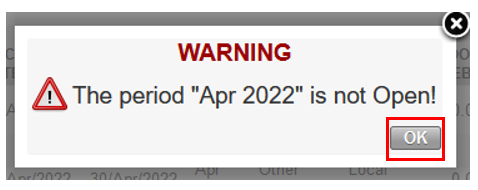


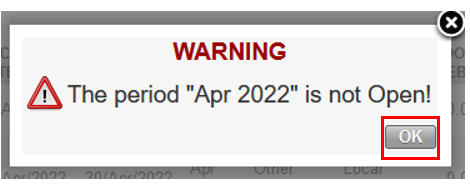


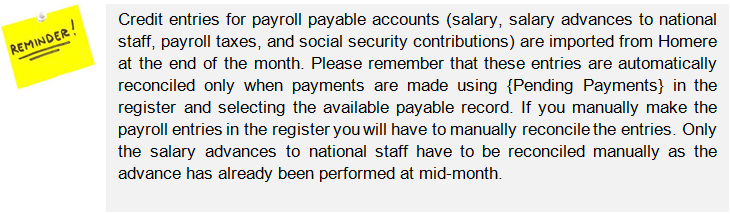
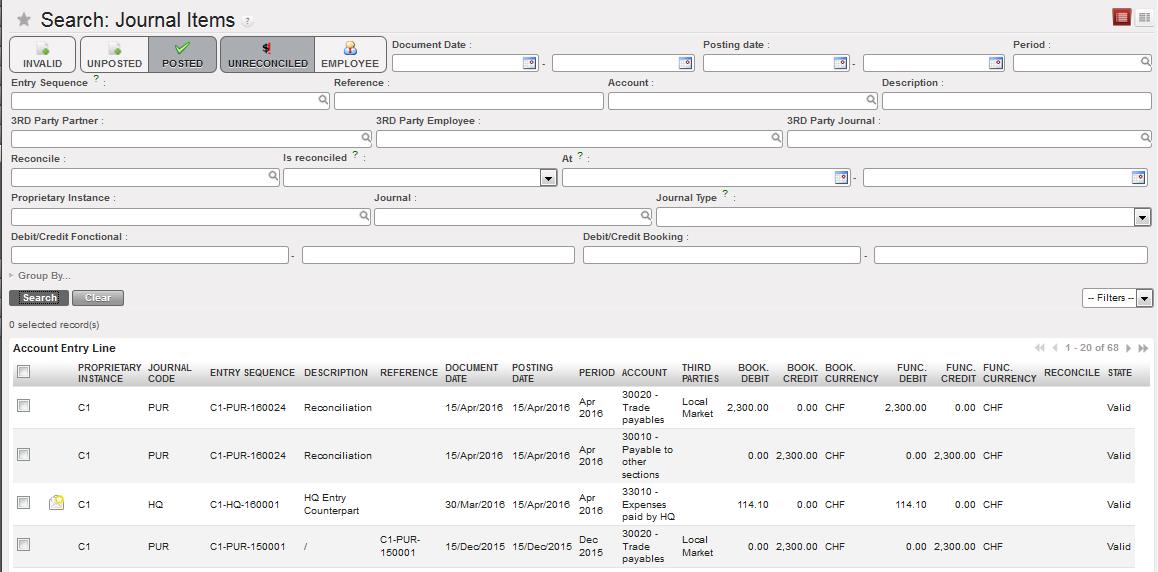
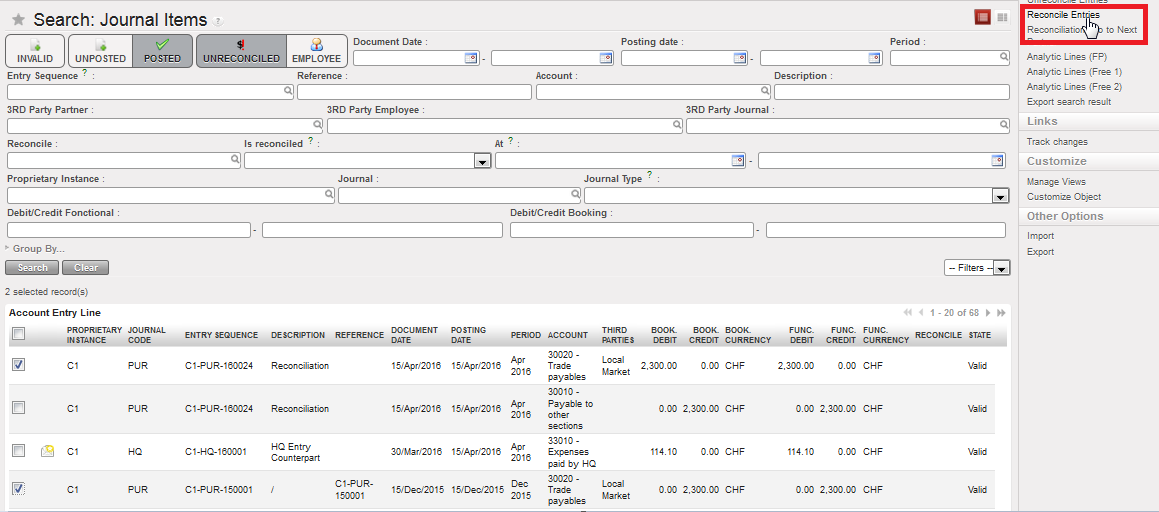 {Reconcile Entries} Menu
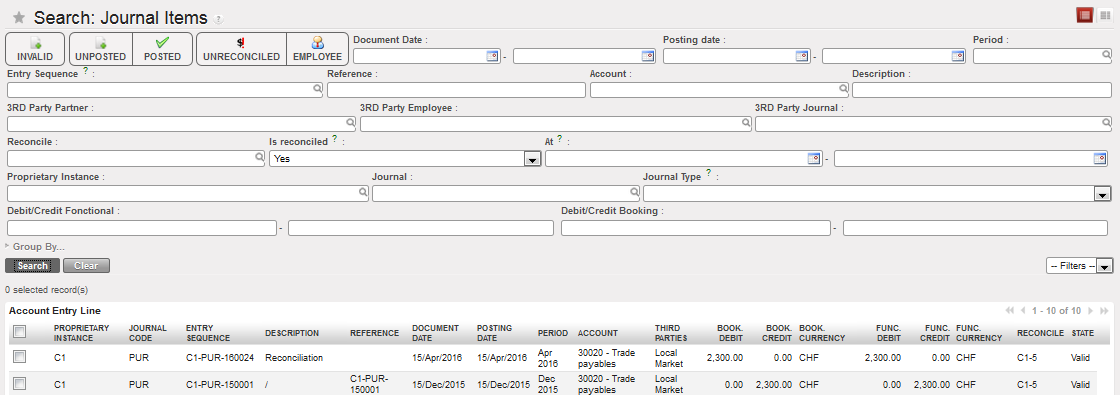 Search Journal Items view displaying Reconciled entries
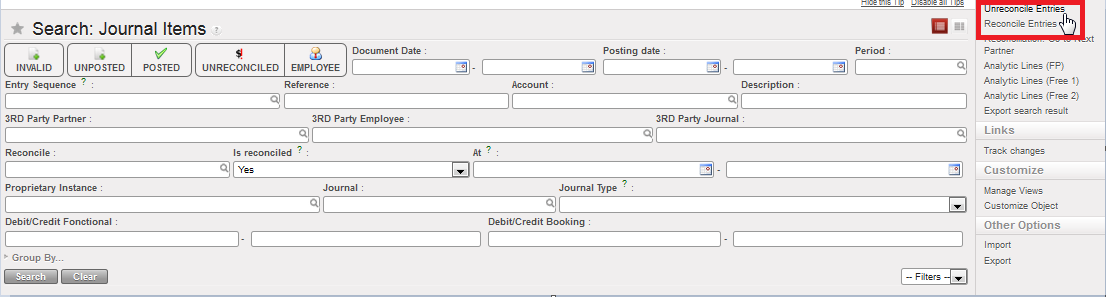 Unreconcile Entries Action
 Close a Period Form view and associated actions
 Linking an action to a UniField object
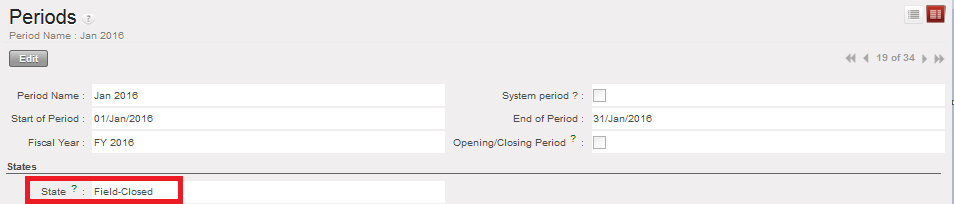
 {Period States} function in the Action menu
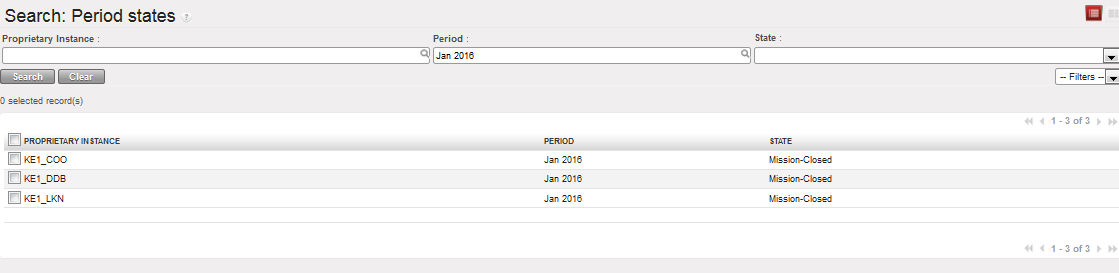 Period states of coordination and projects for selected period
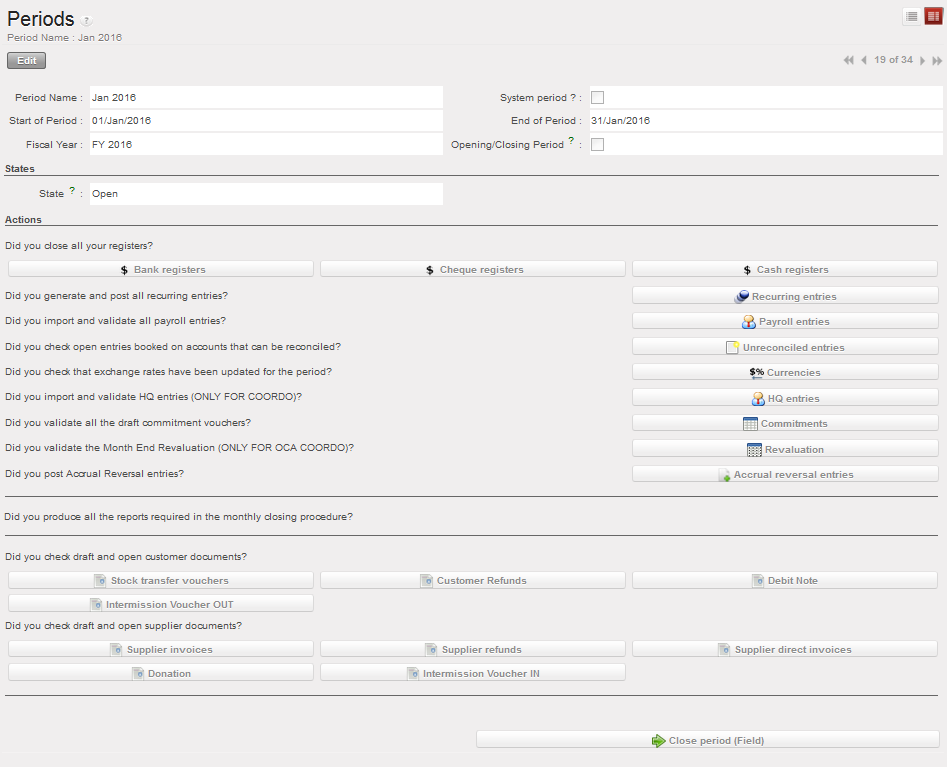 Close a Period Form view and associated actions
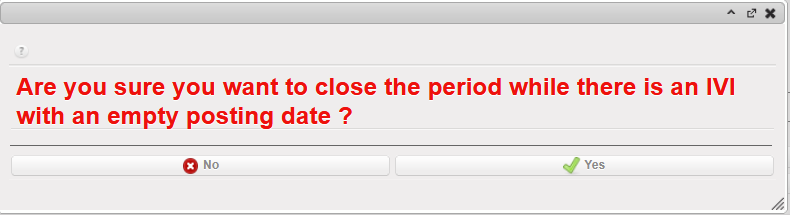
 Linking an action to a UniField object
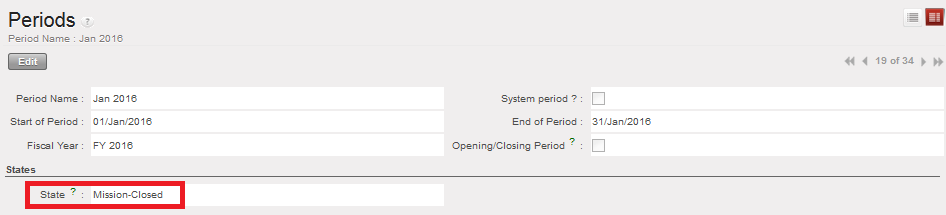

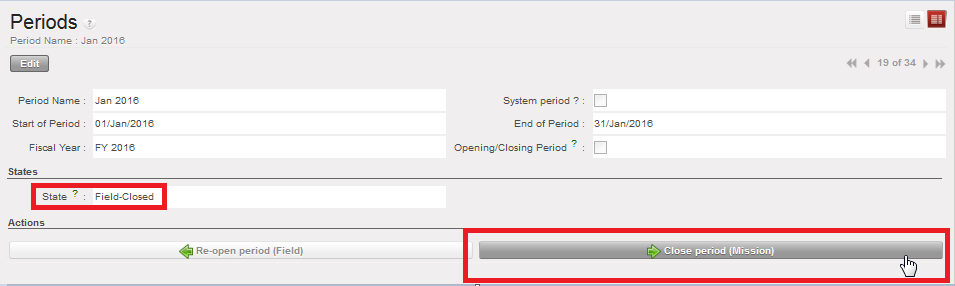
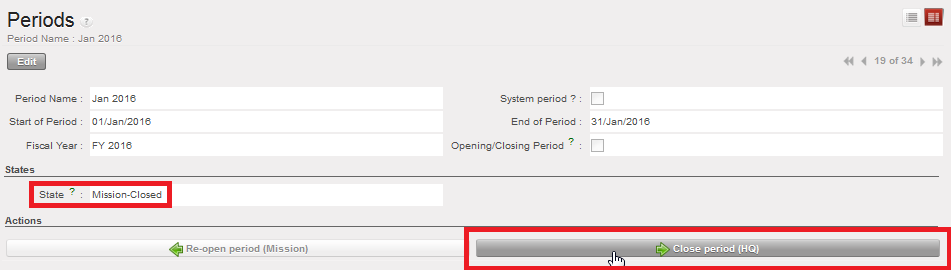
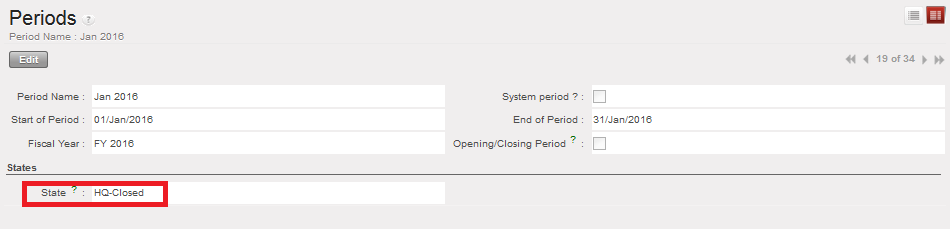

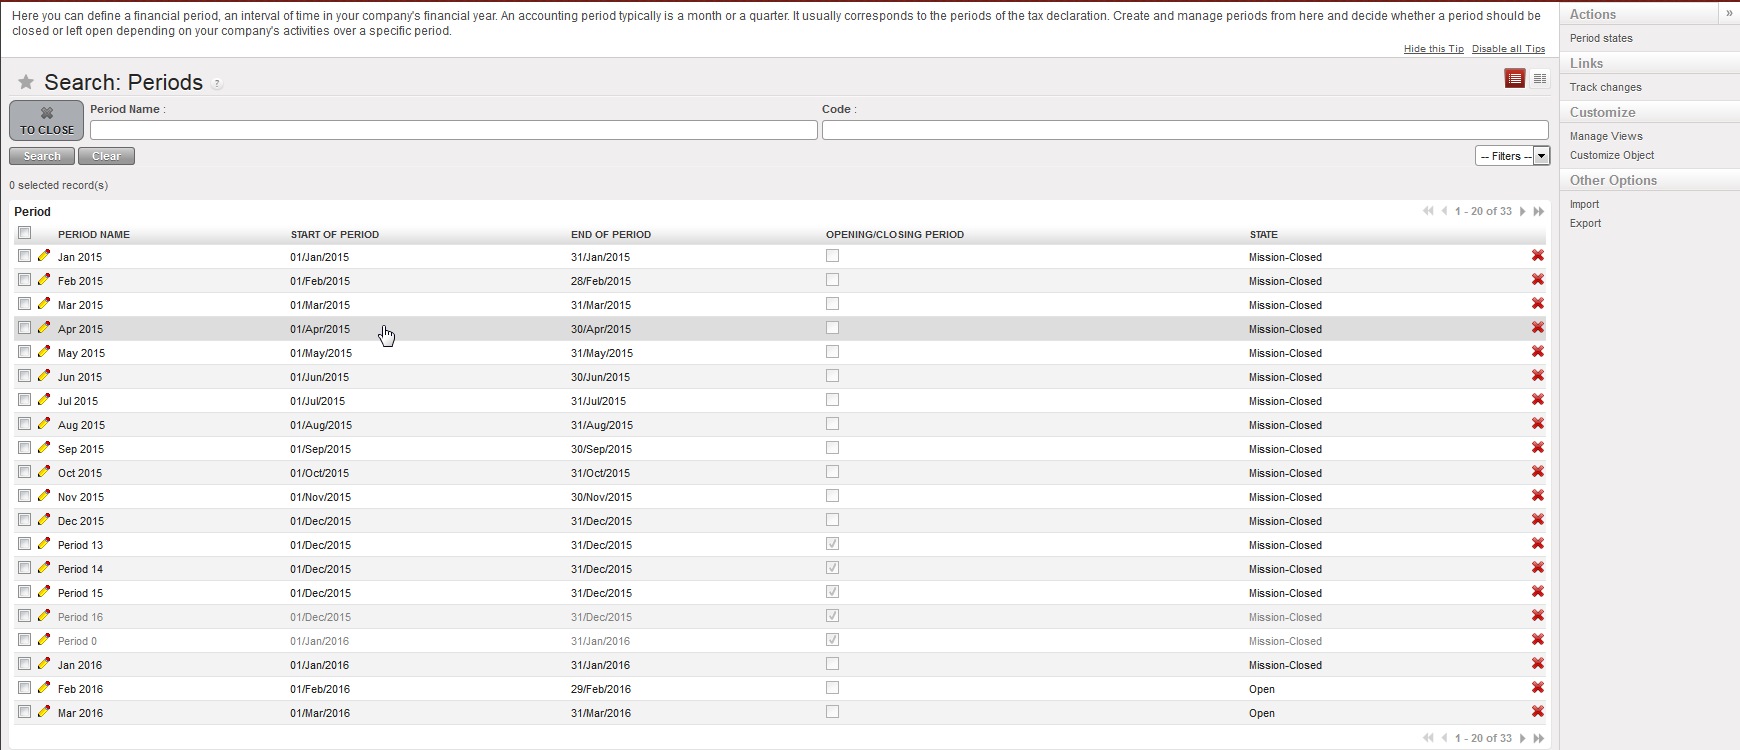
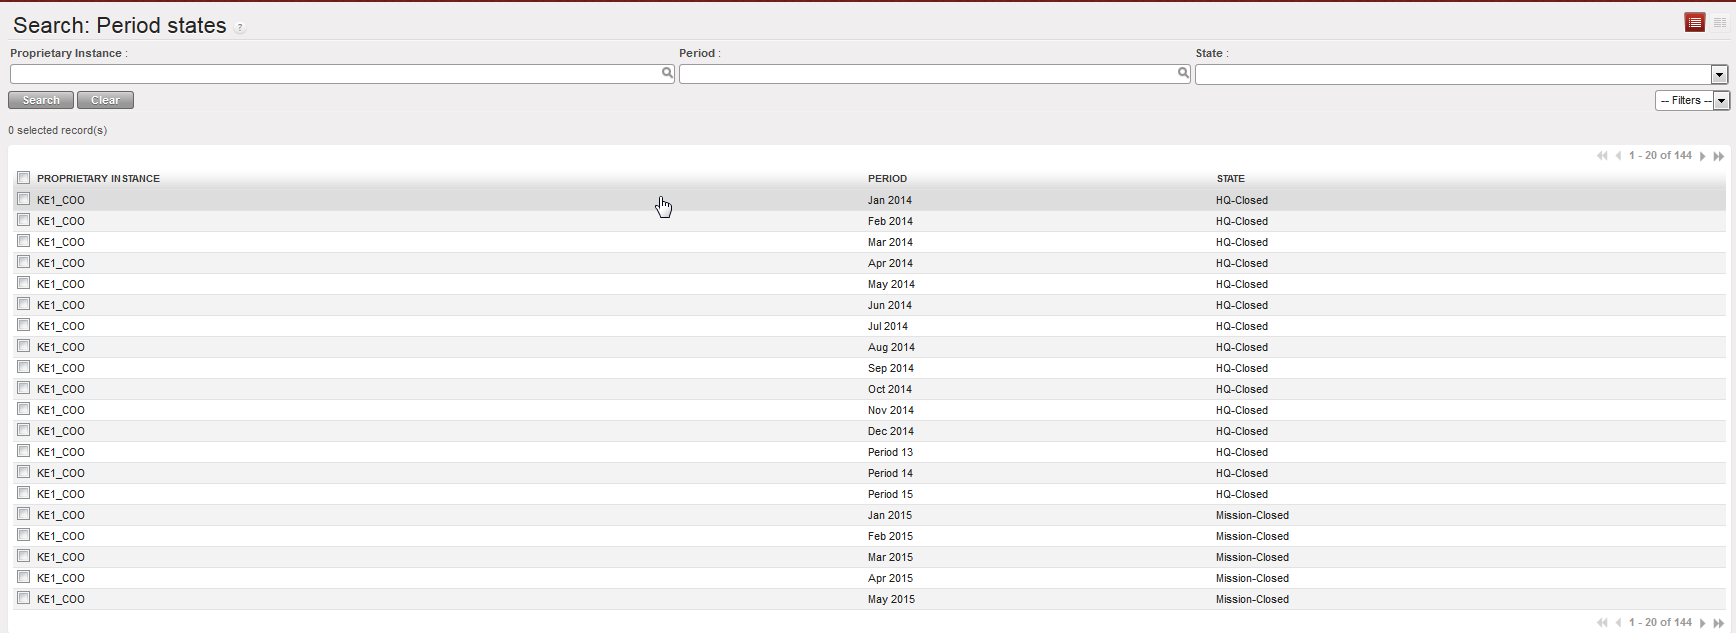
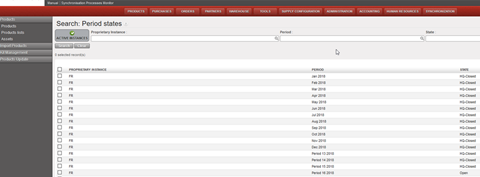
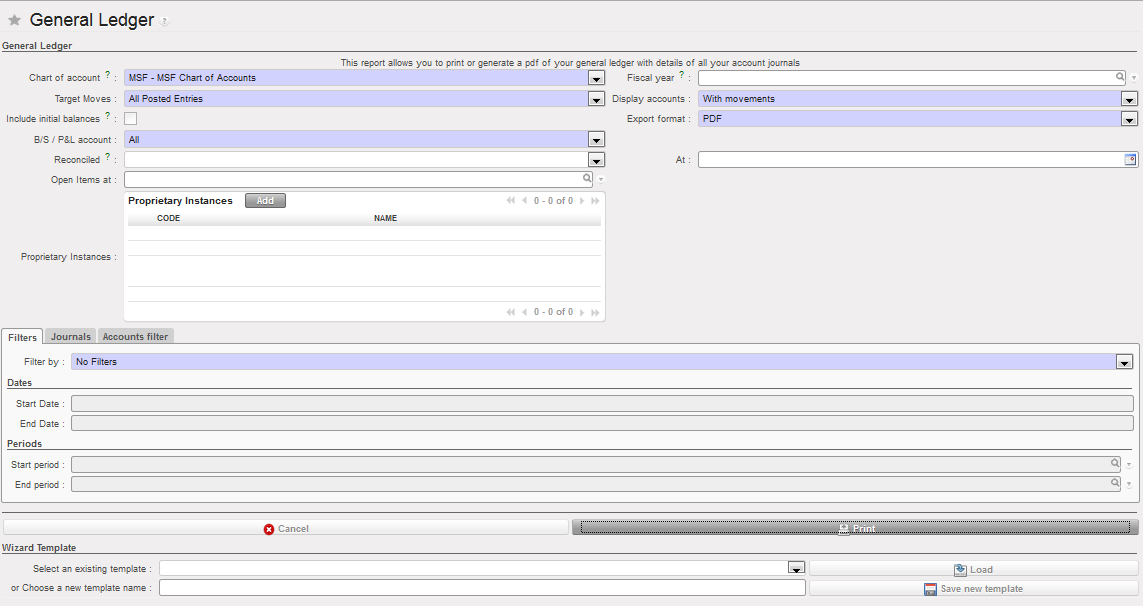 General Ledger report options
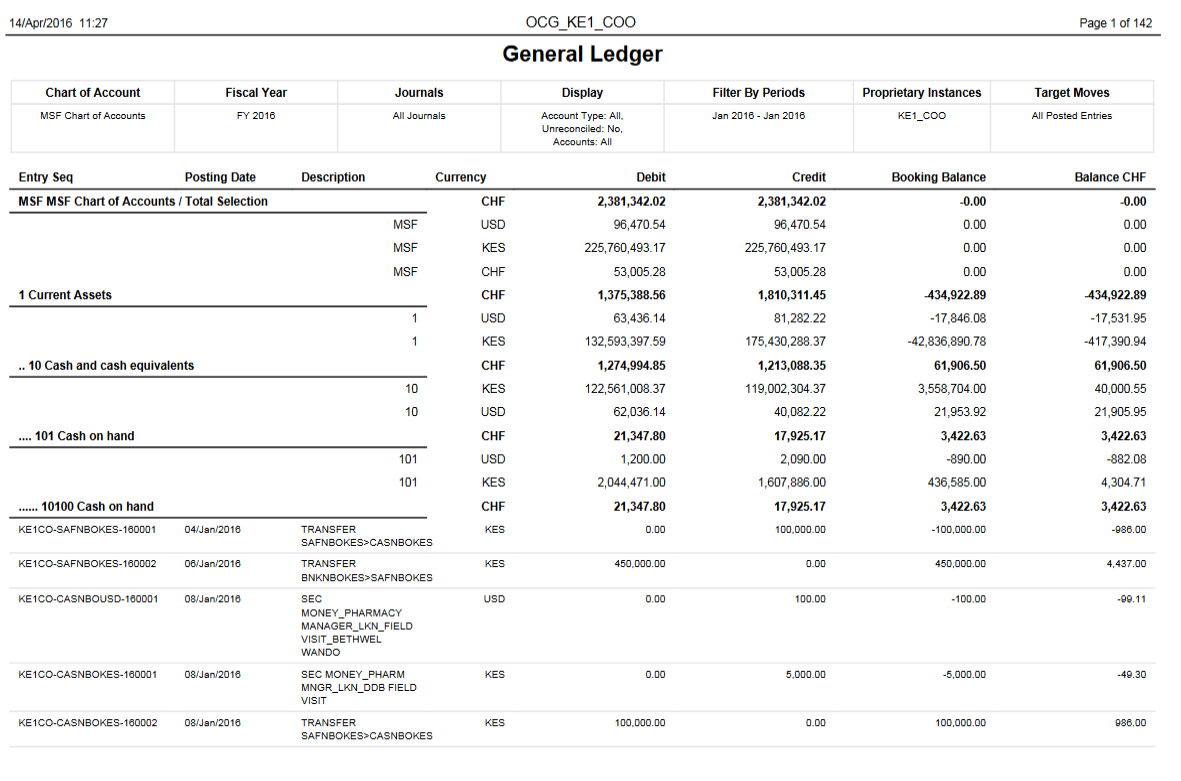 General Ledger report
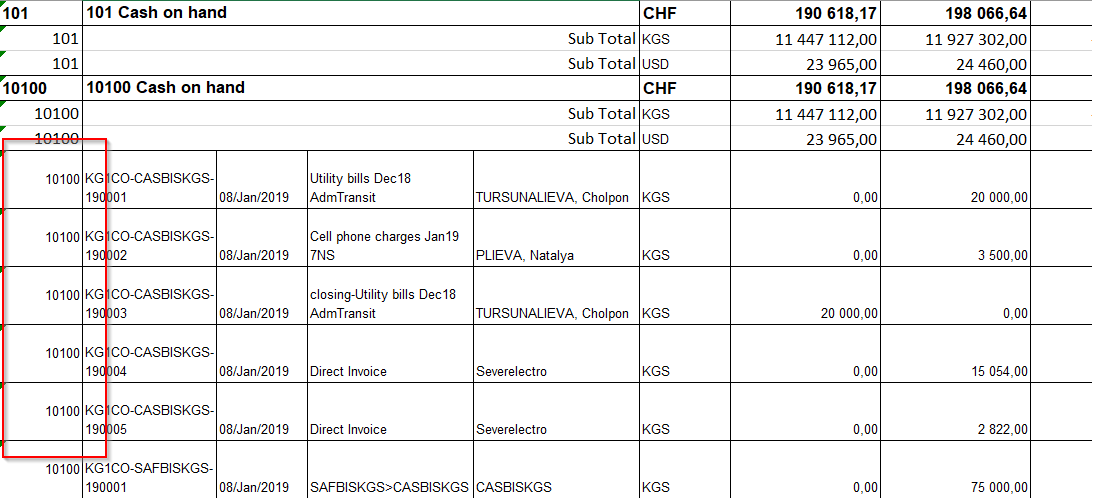 General Ledger report (including the accounting code for each line)
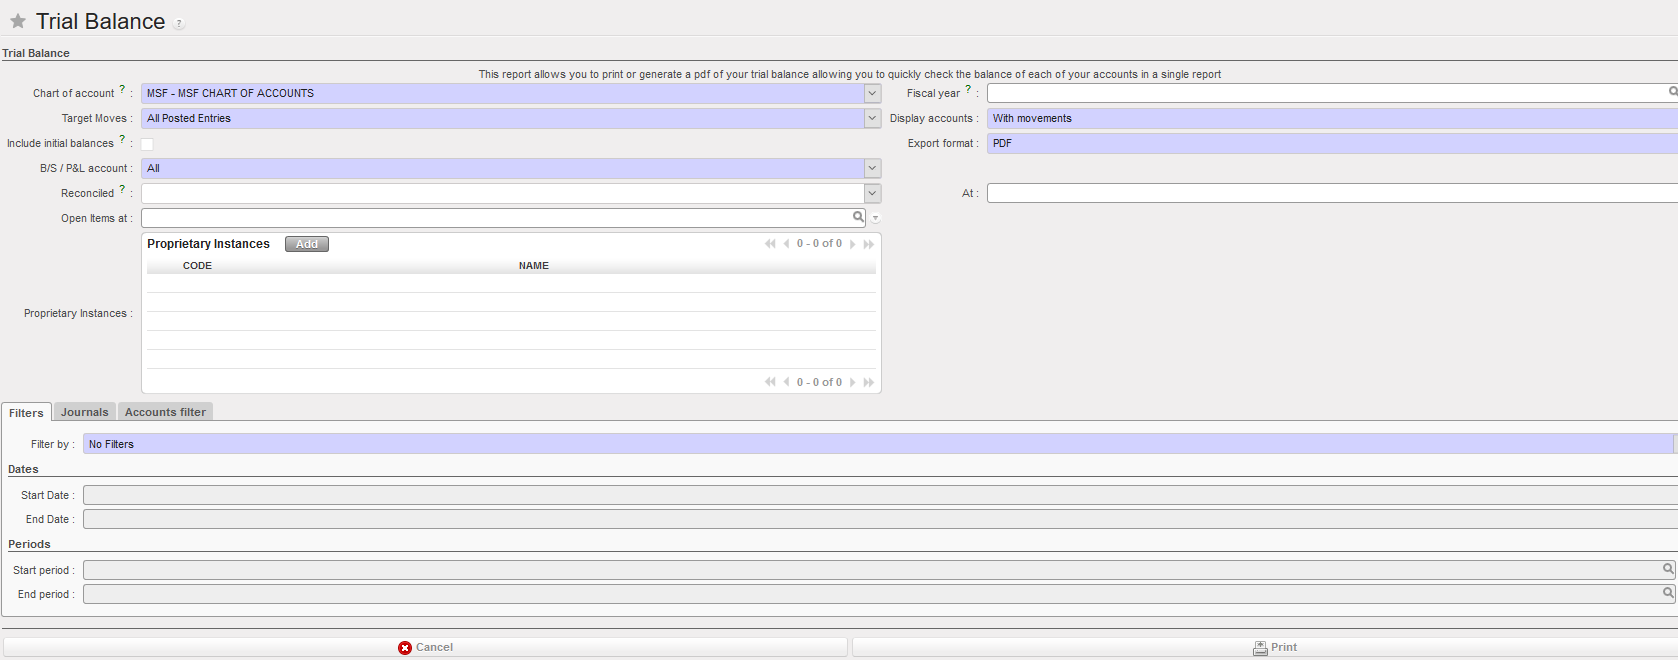
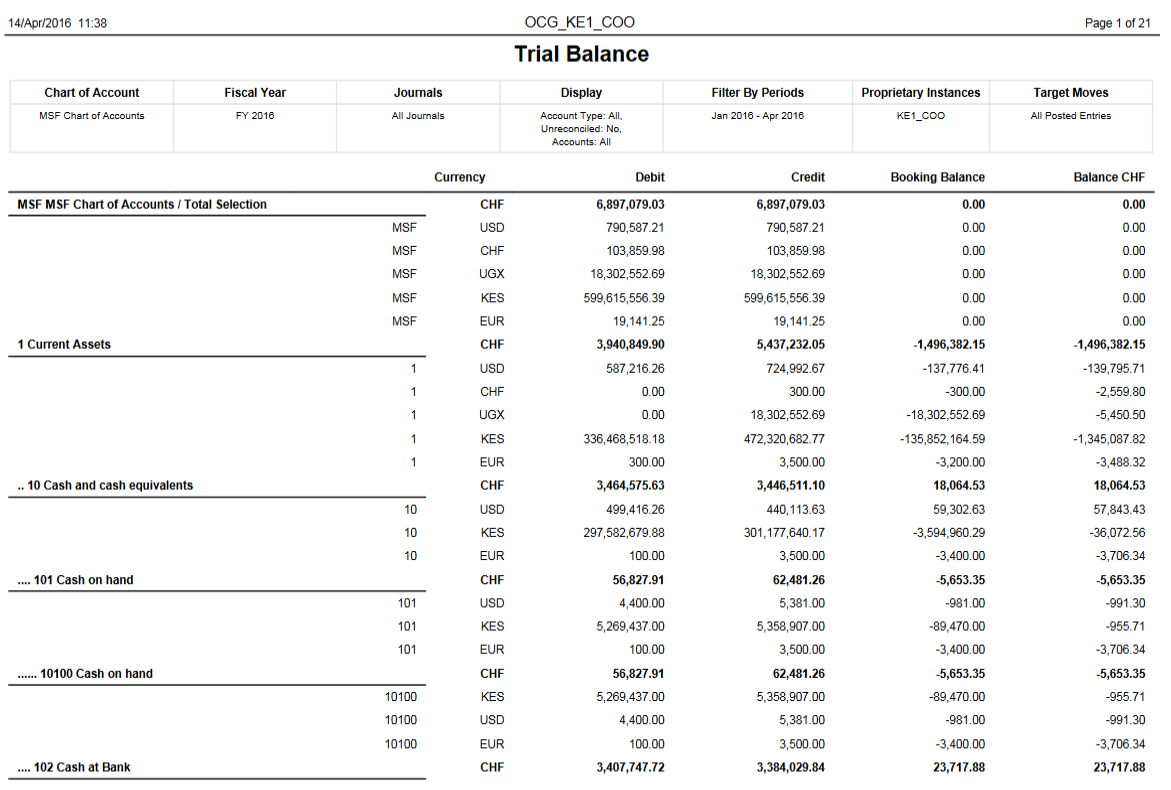
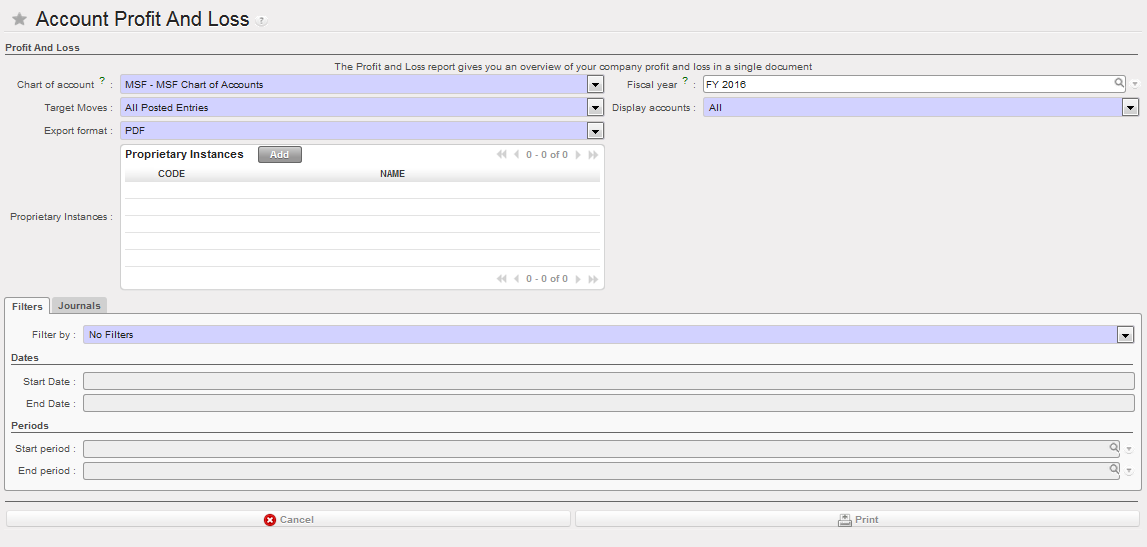
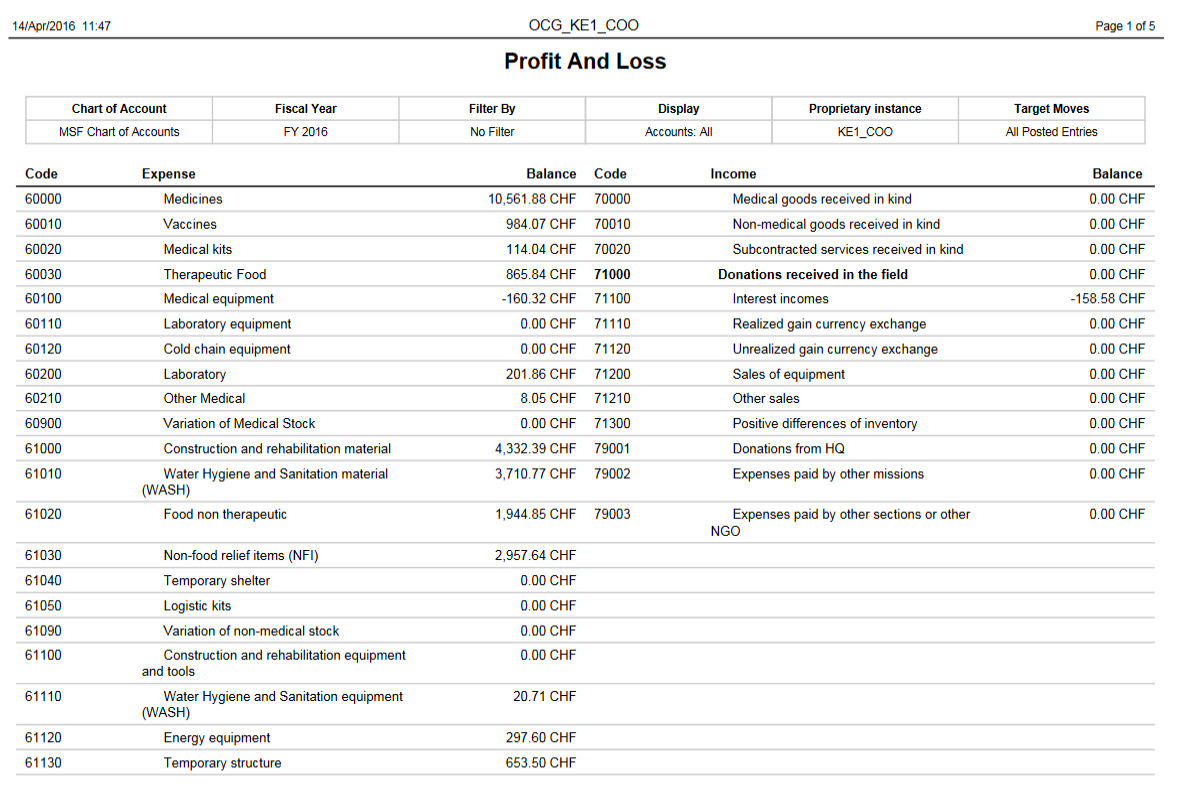

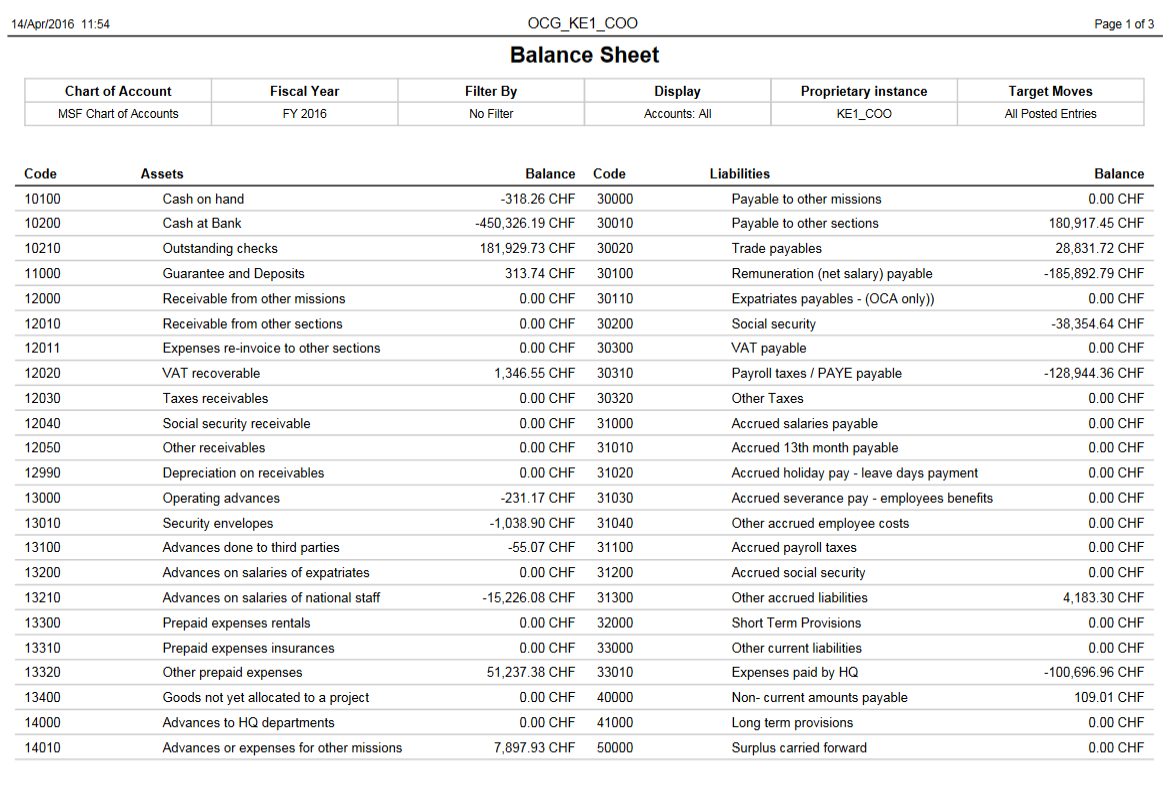

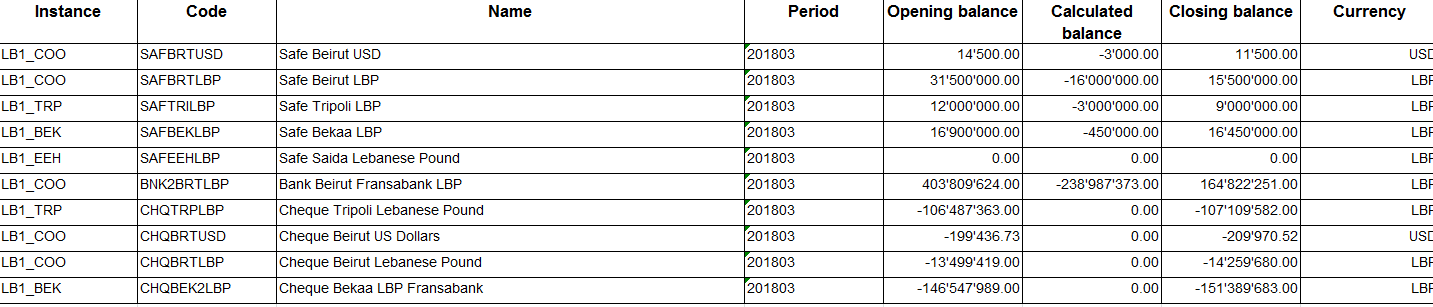 Liquidity Balances Report
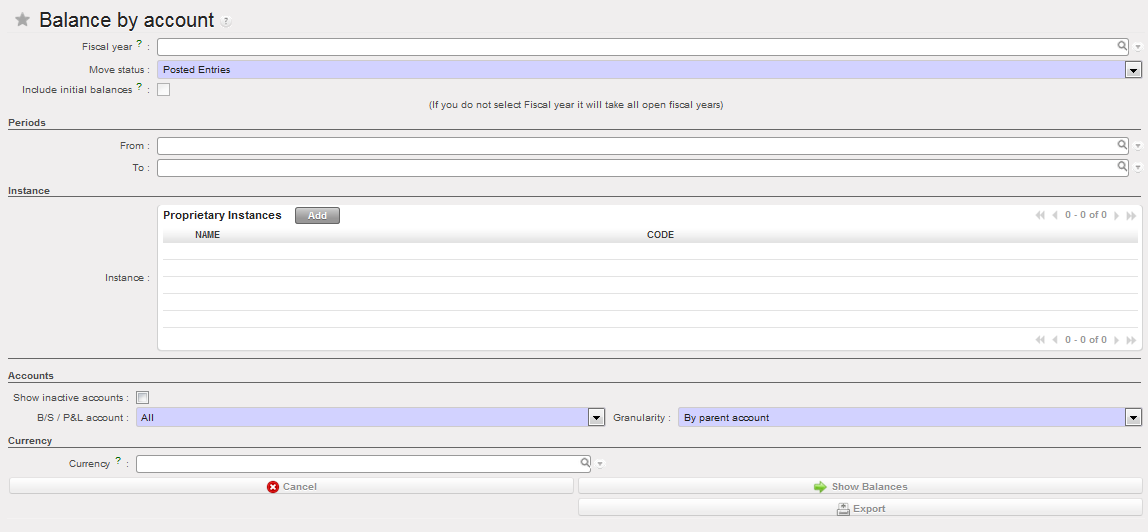
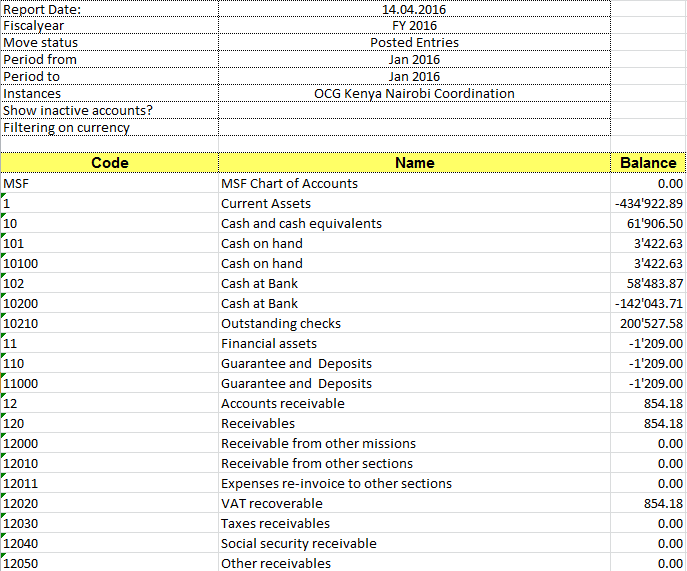
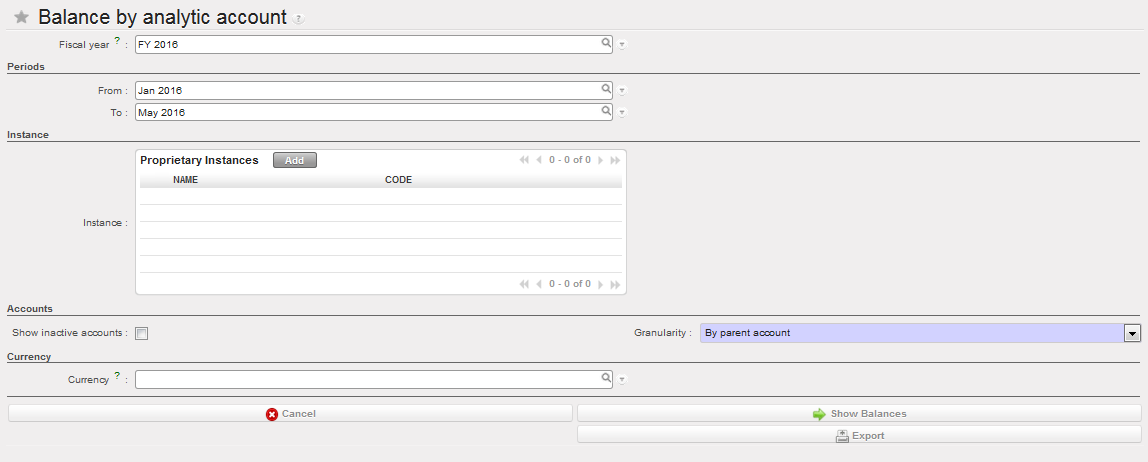
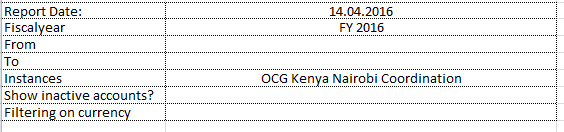
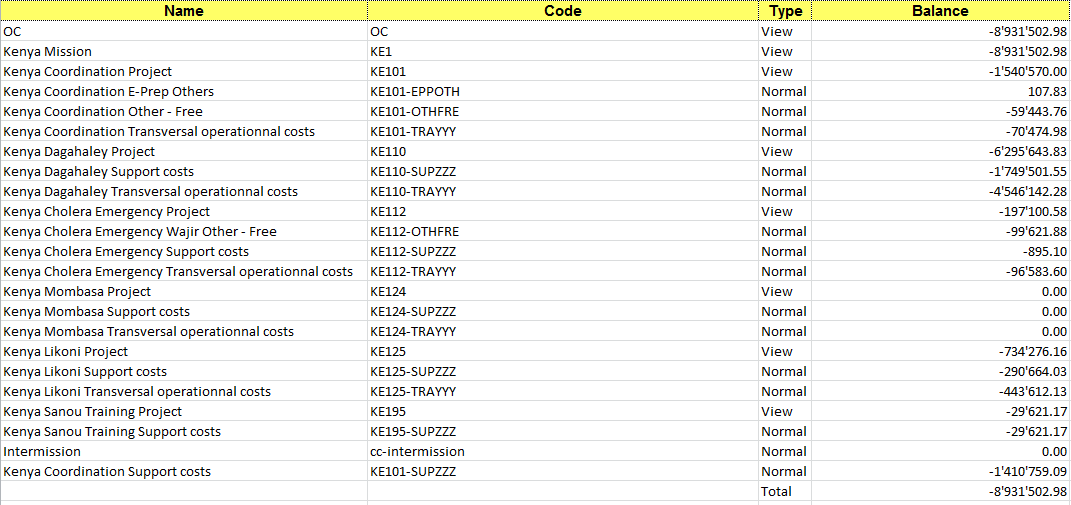 Cost center worksheet, displaying the balance per cost center. It reflects actual expenses per cost center.
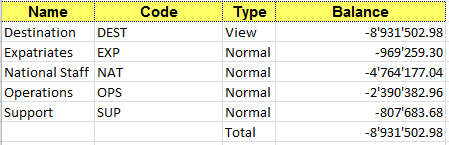 Destination worksheet, displaying the balance per Destination. It reflects actual expenses per Destination.
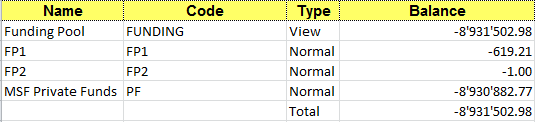
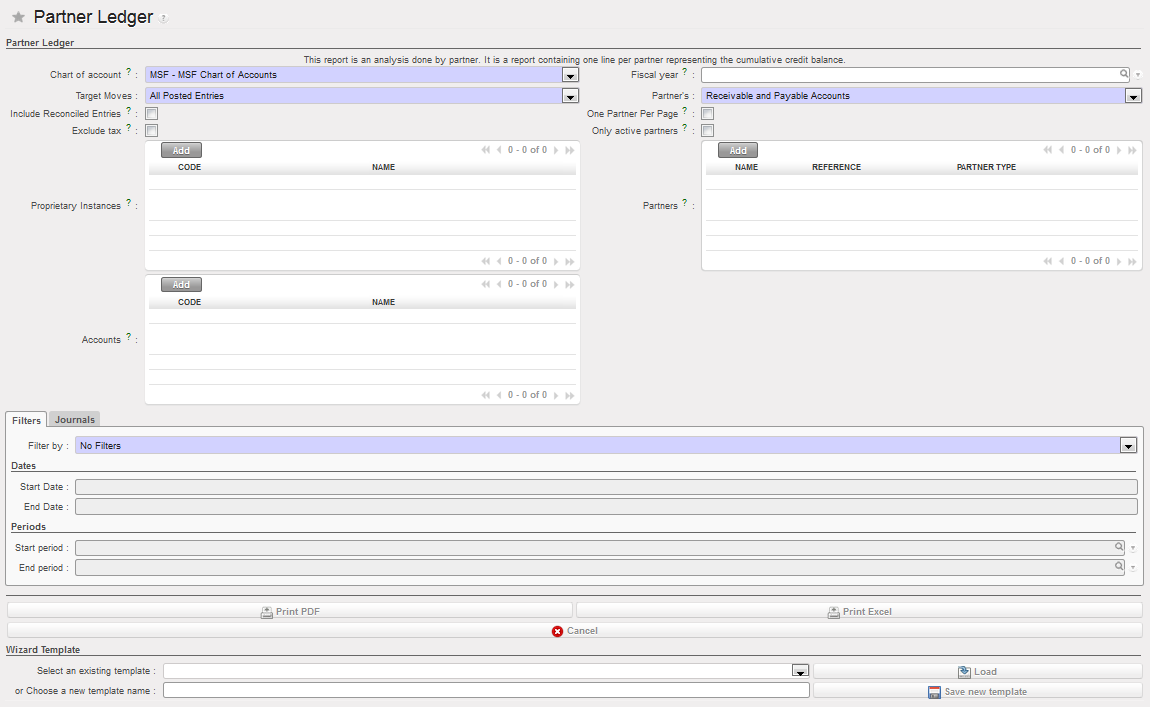
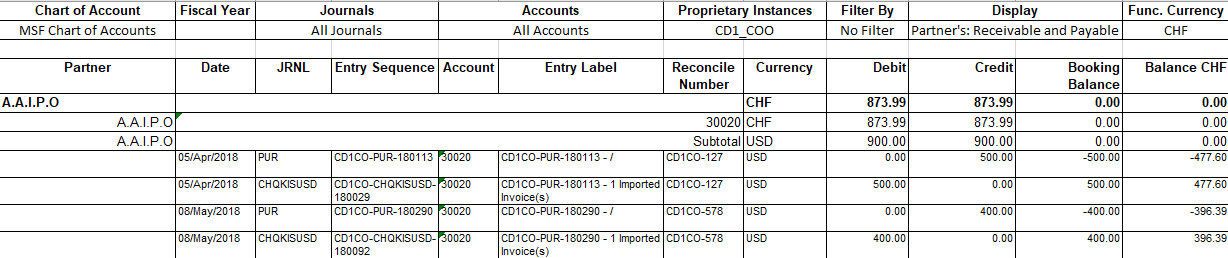
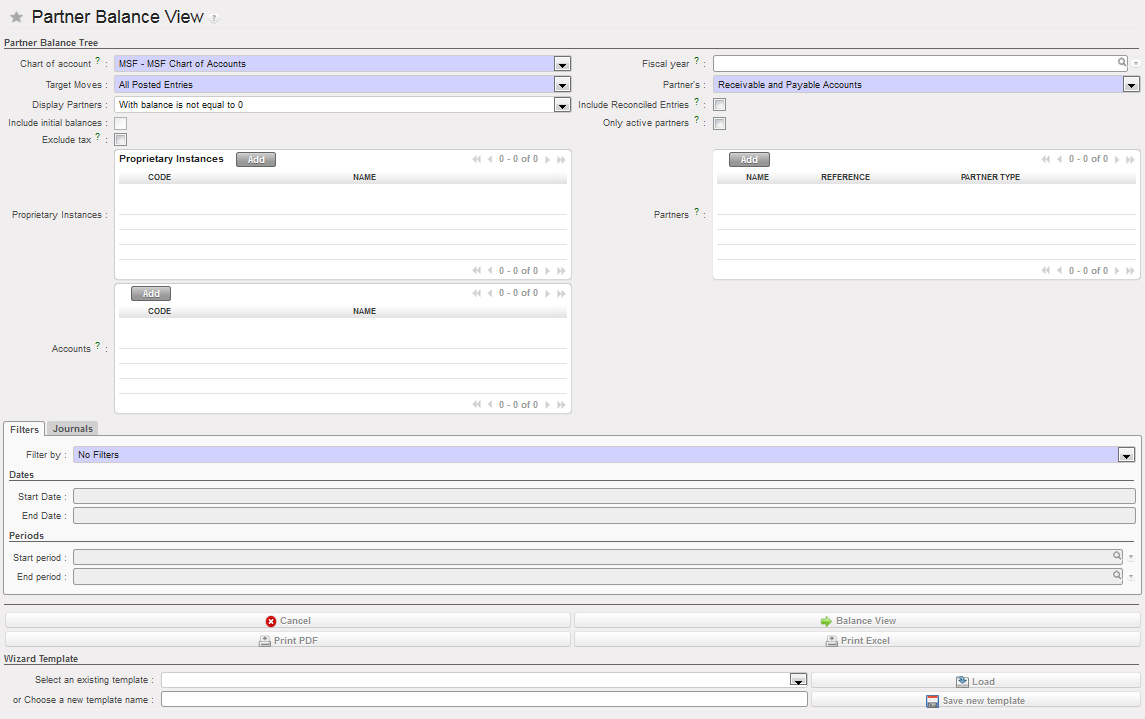
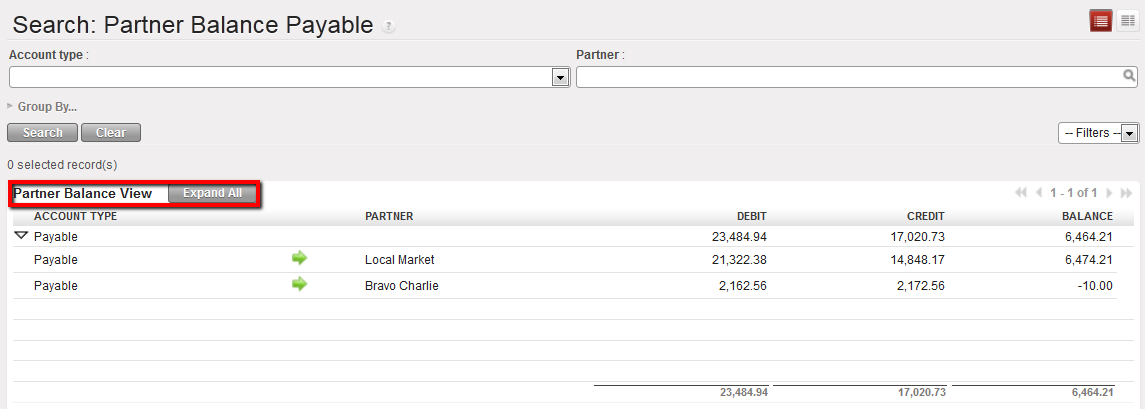 Balance View on Payable
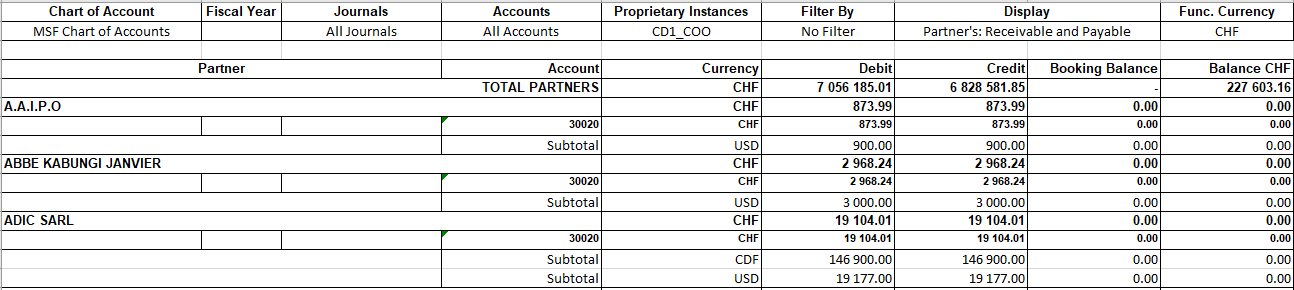

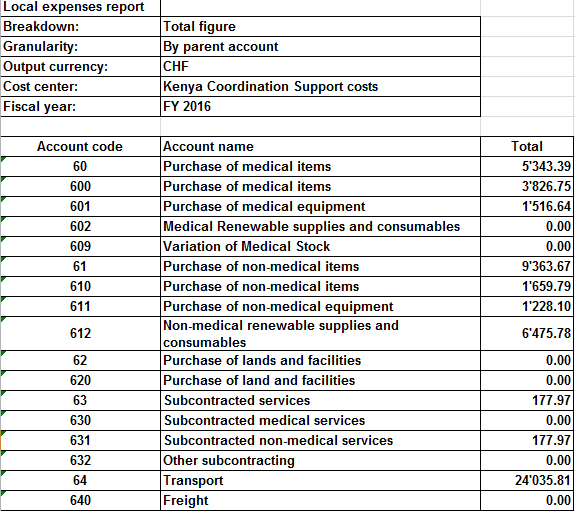
 A window Export to HQ system displays
 Field data export for January 2016

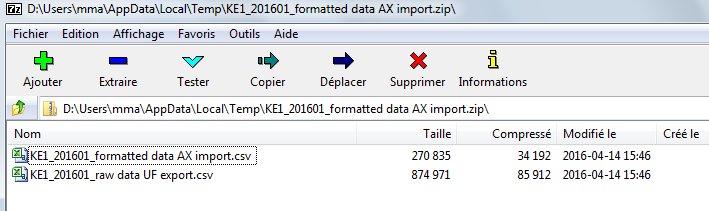

 Field data export for September 2014
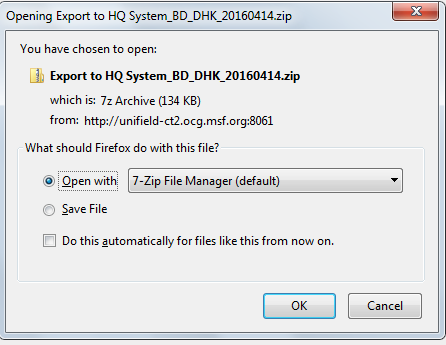

 Field data export for January 2016
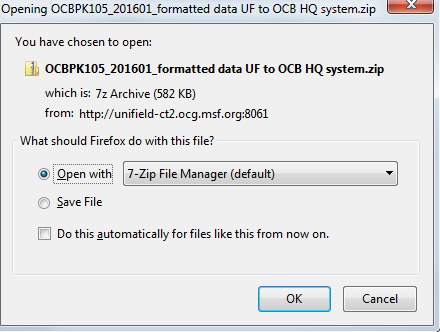
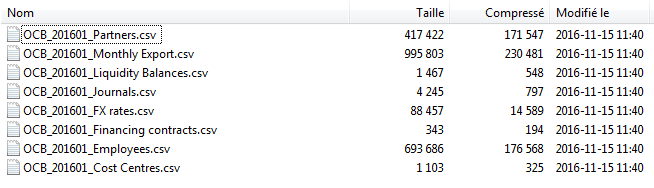


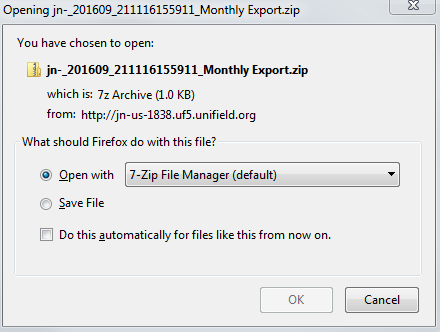
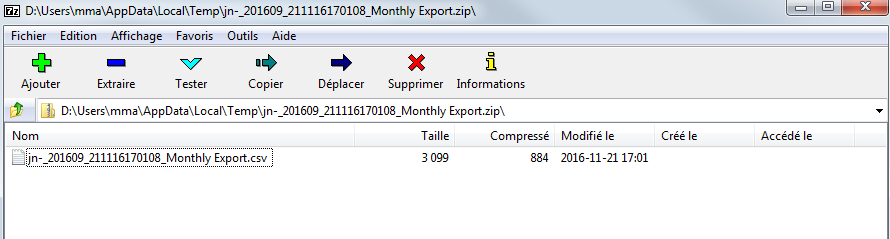
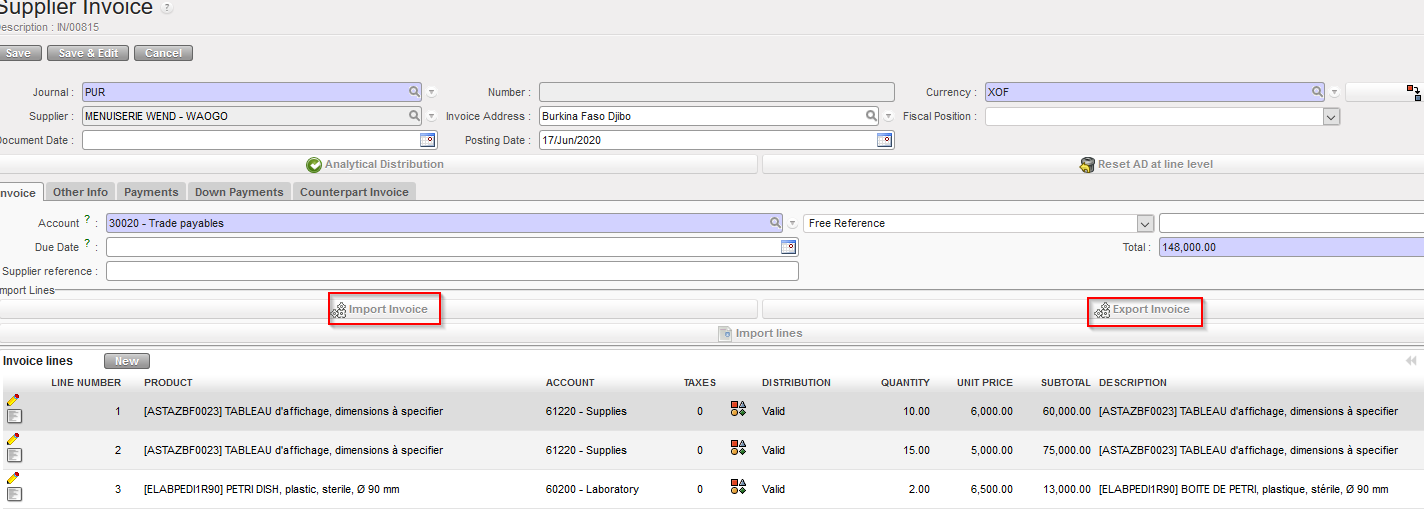
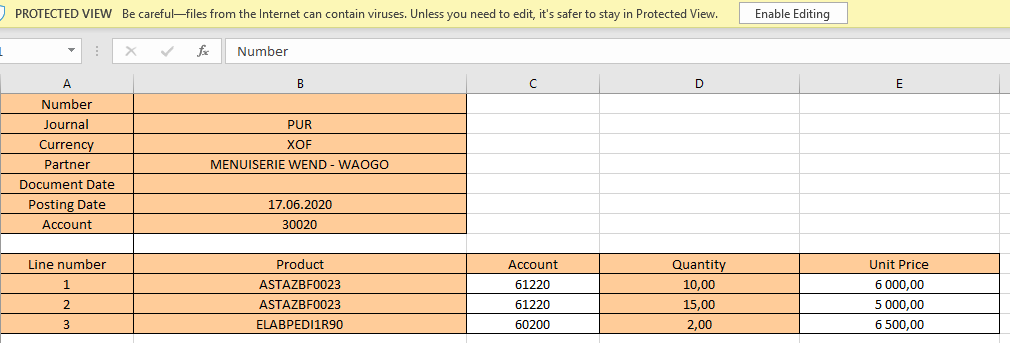
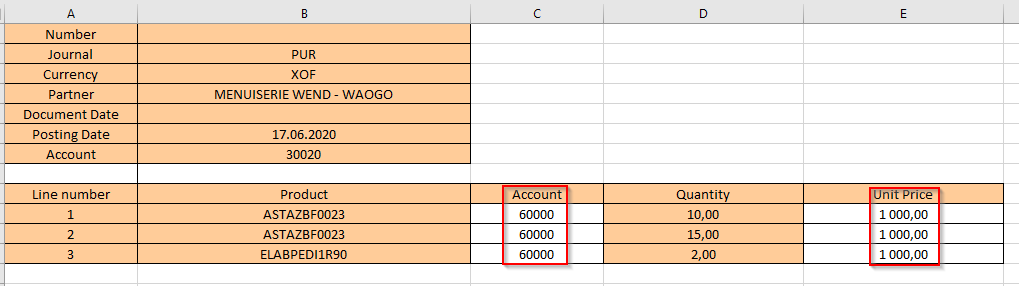
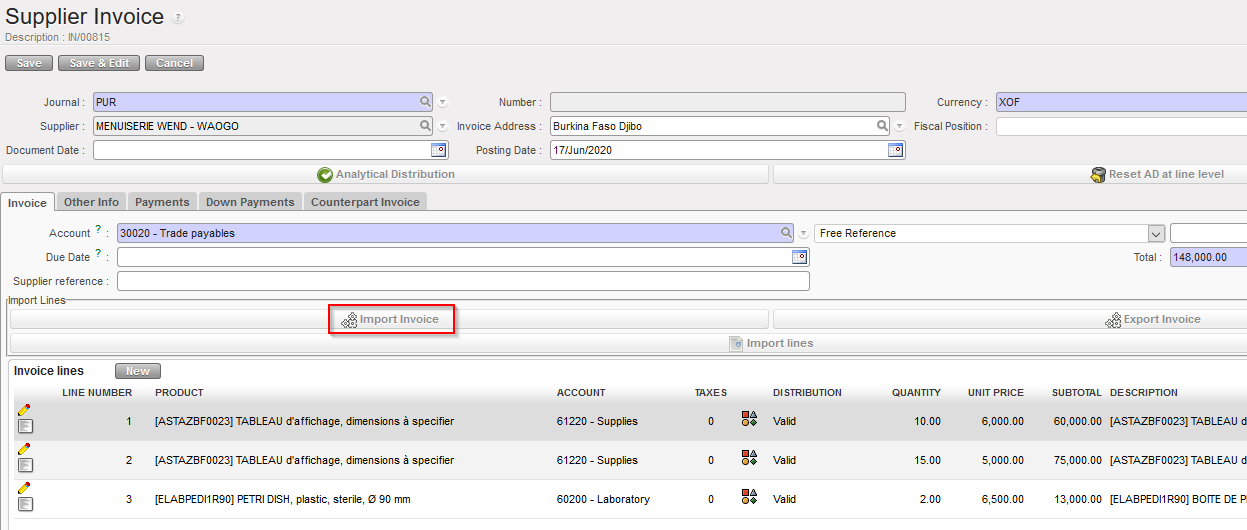

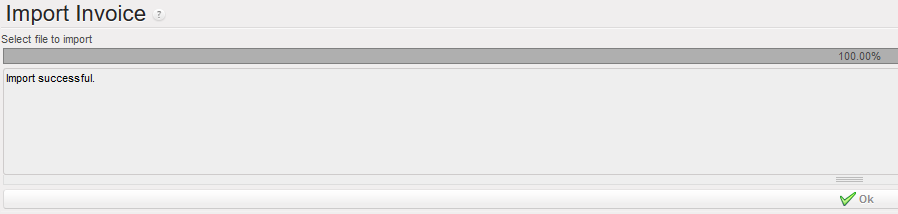
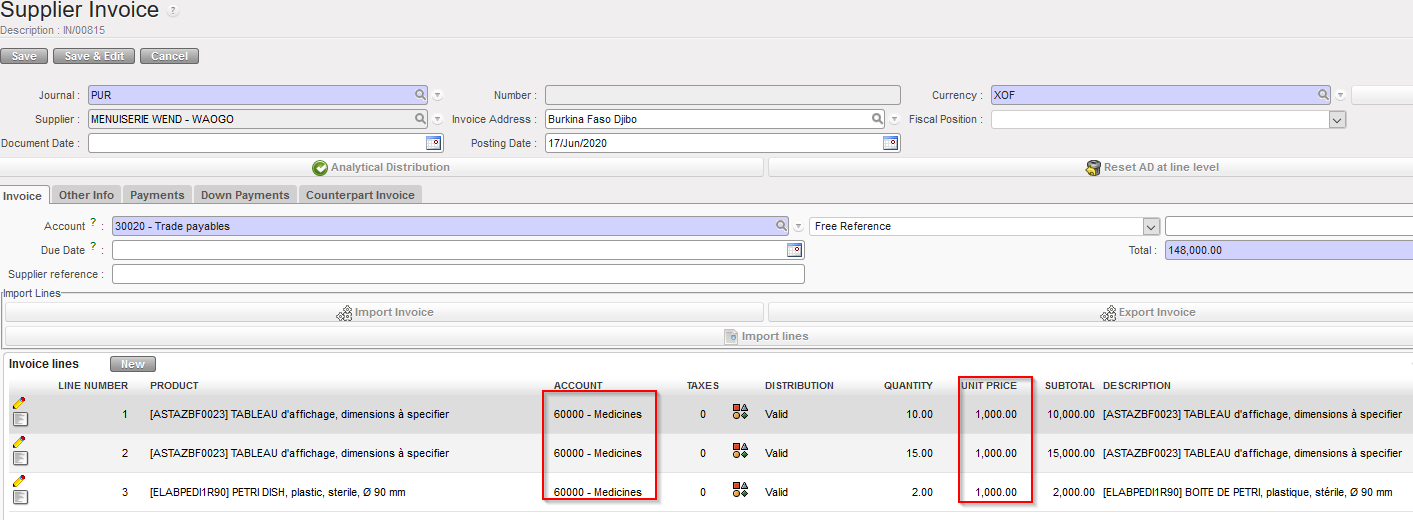
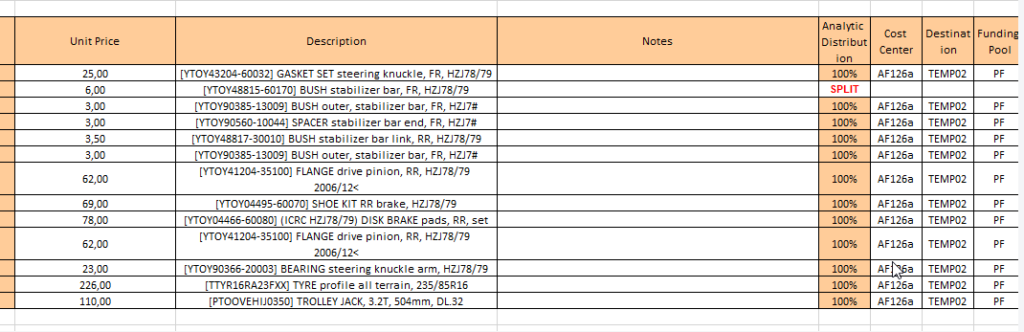

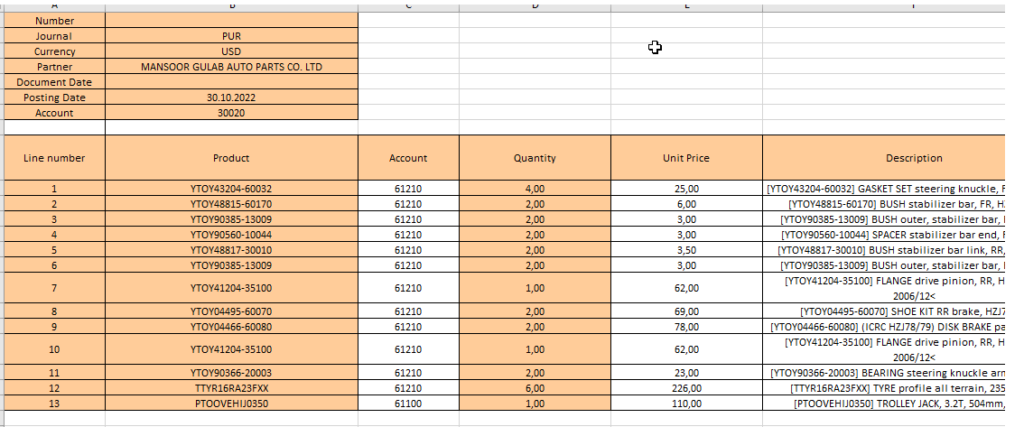
 ile:
ile:
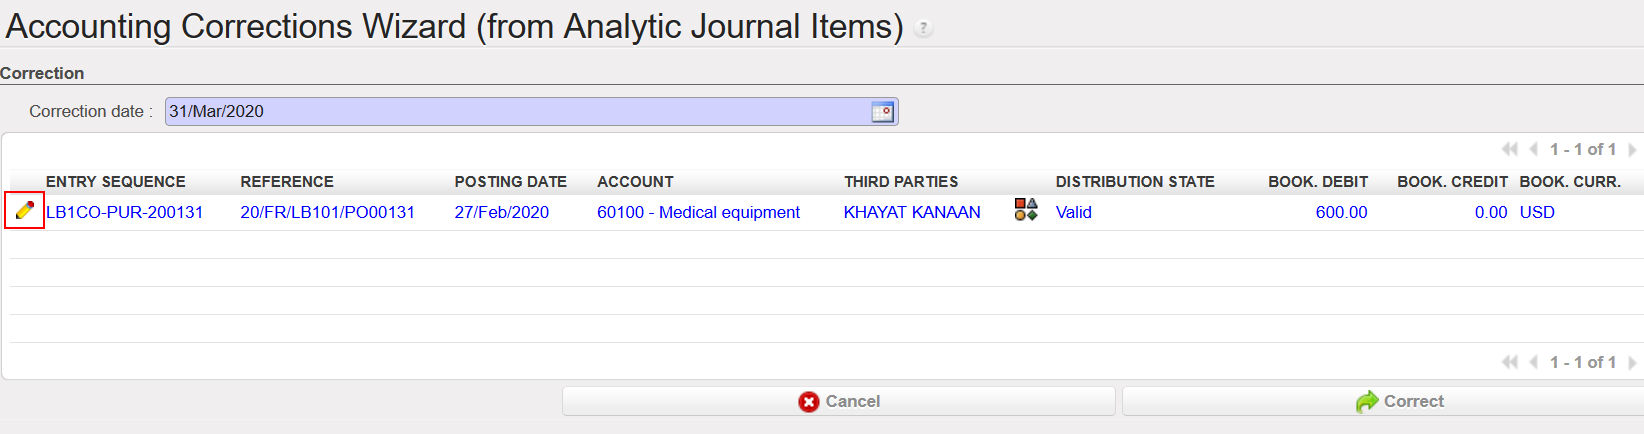
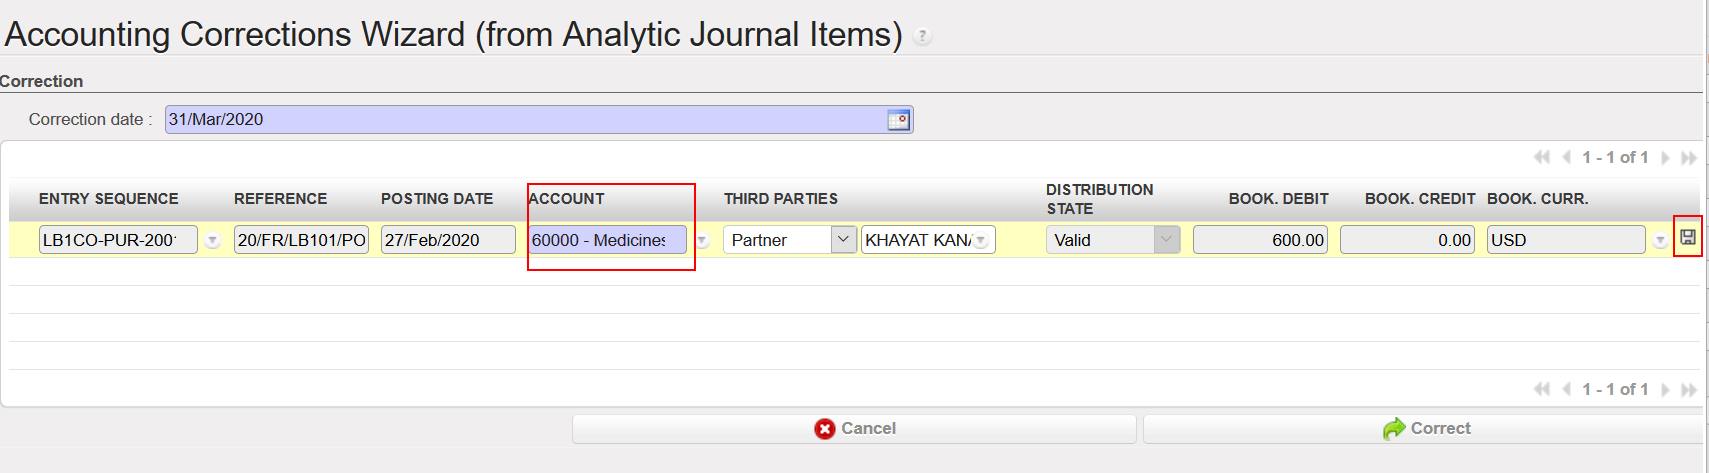

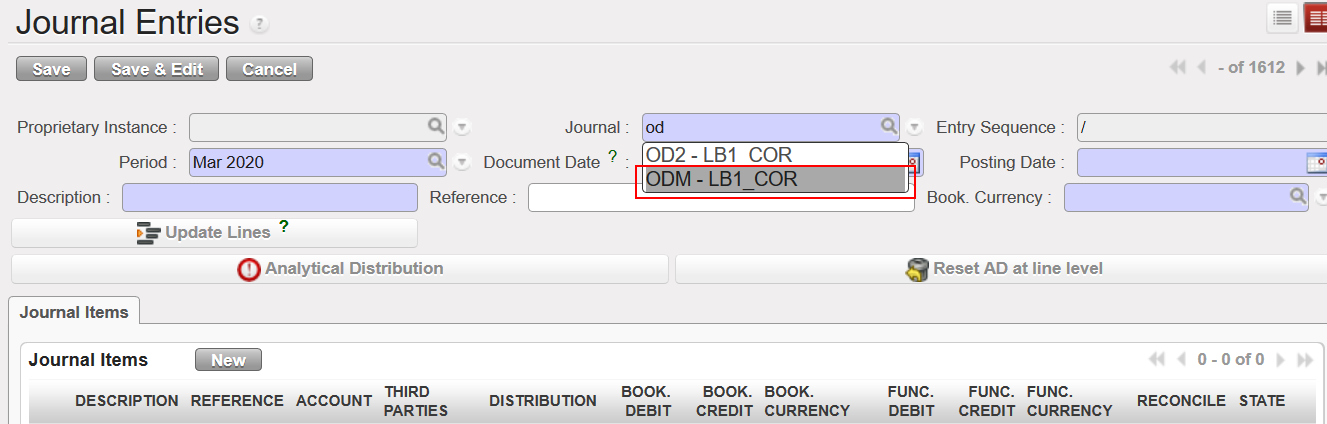
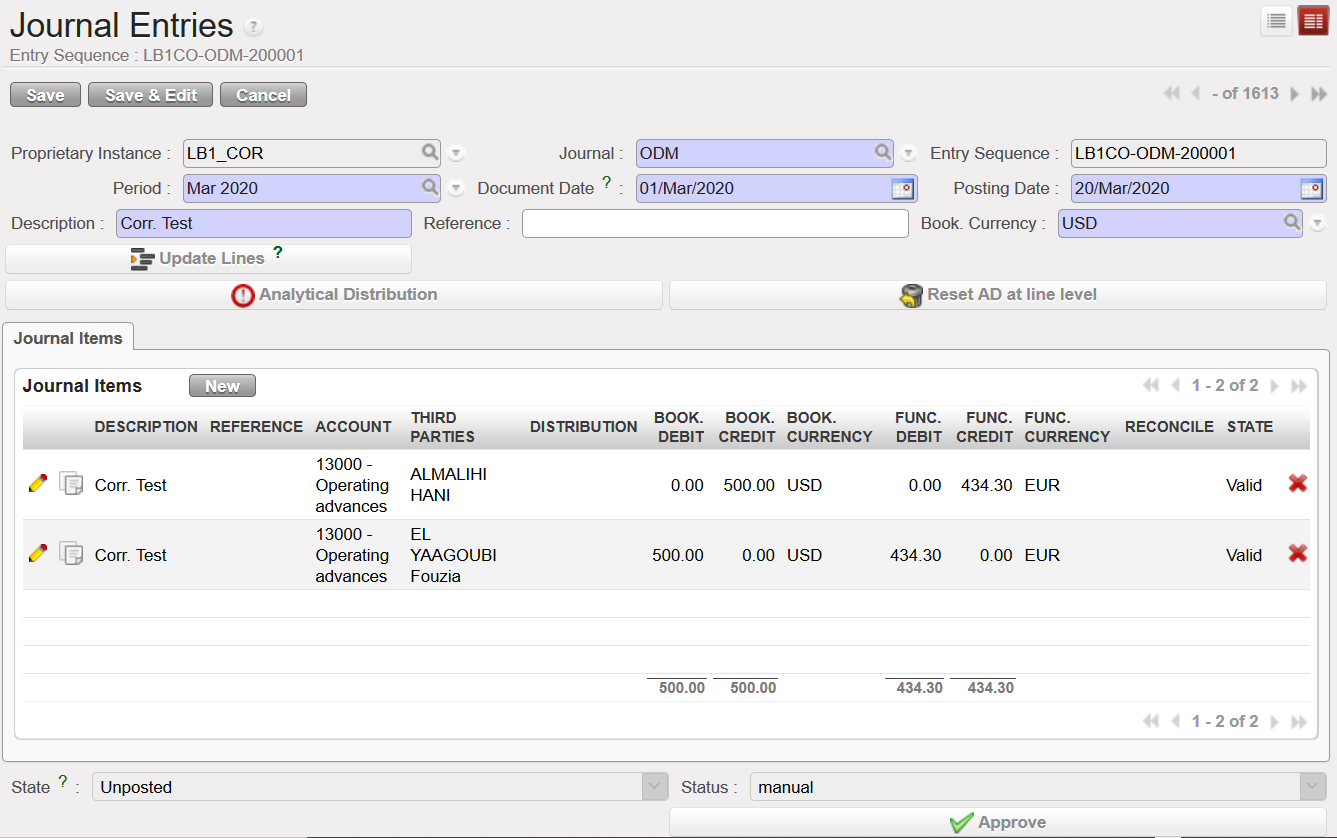


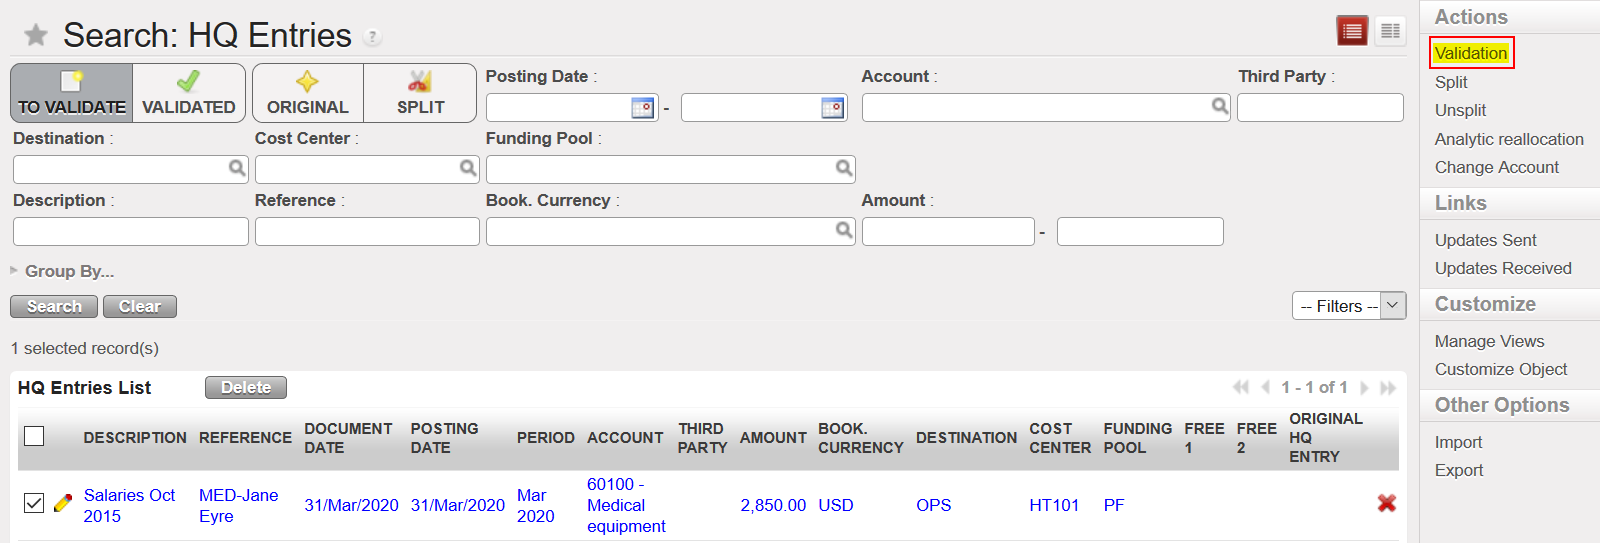

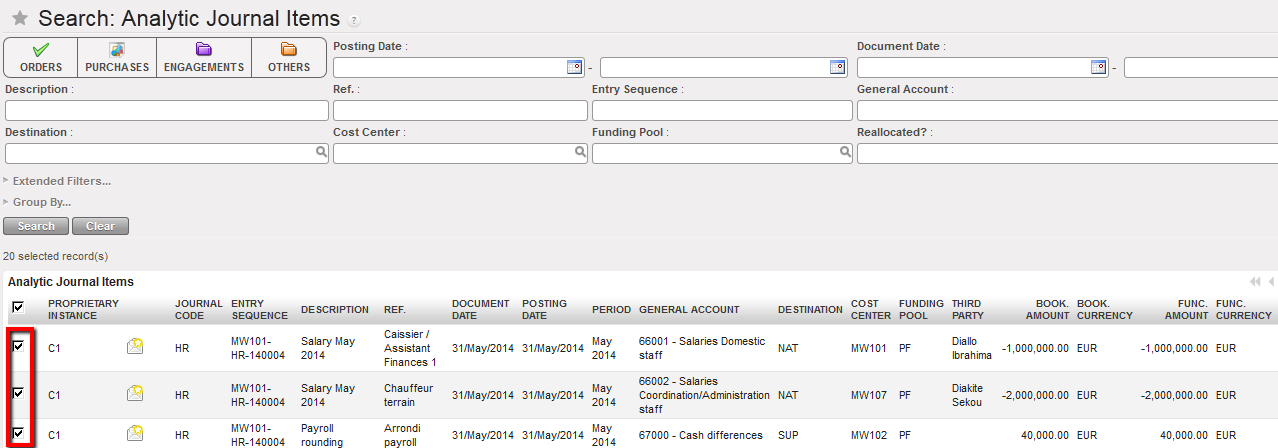
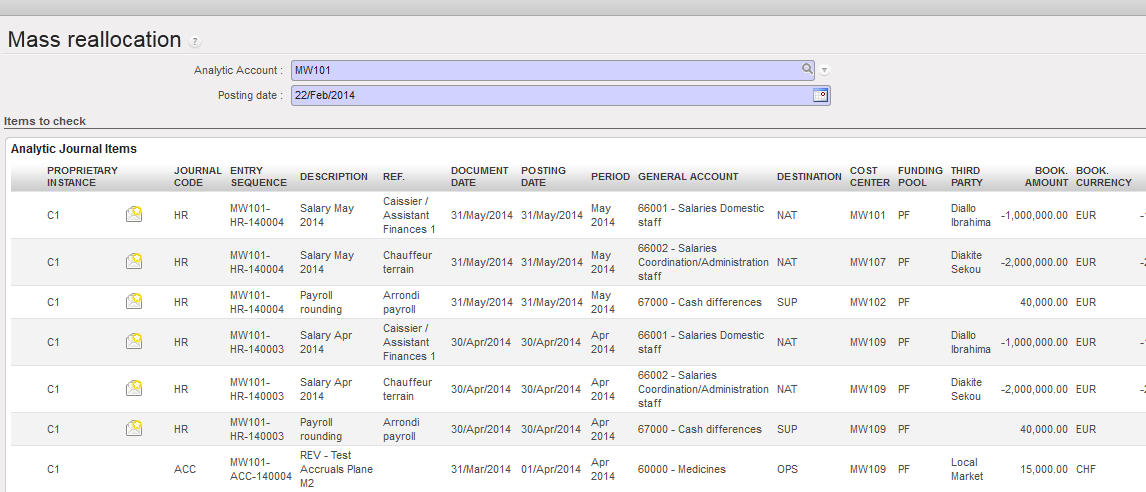

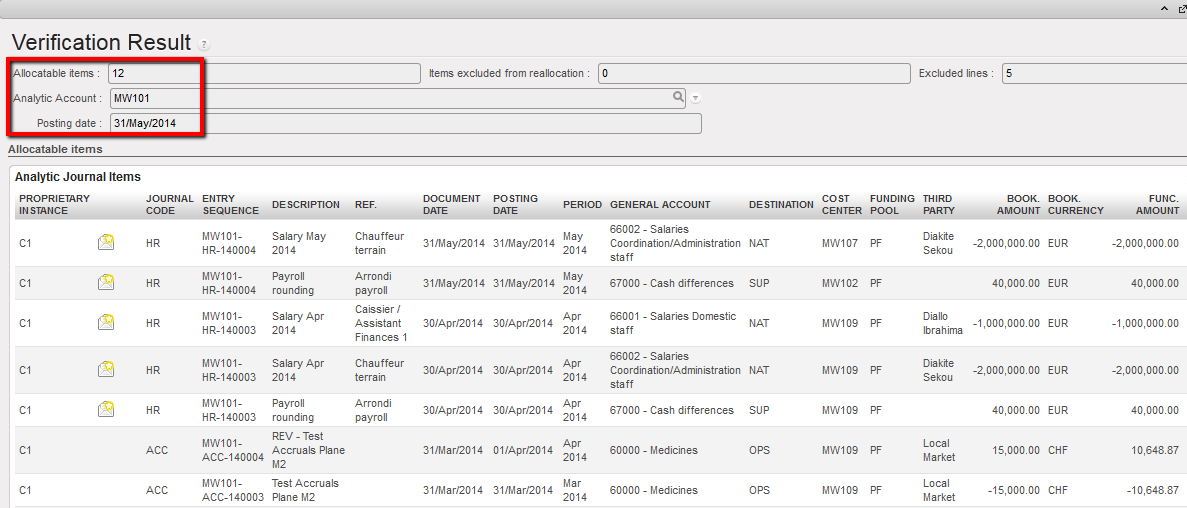
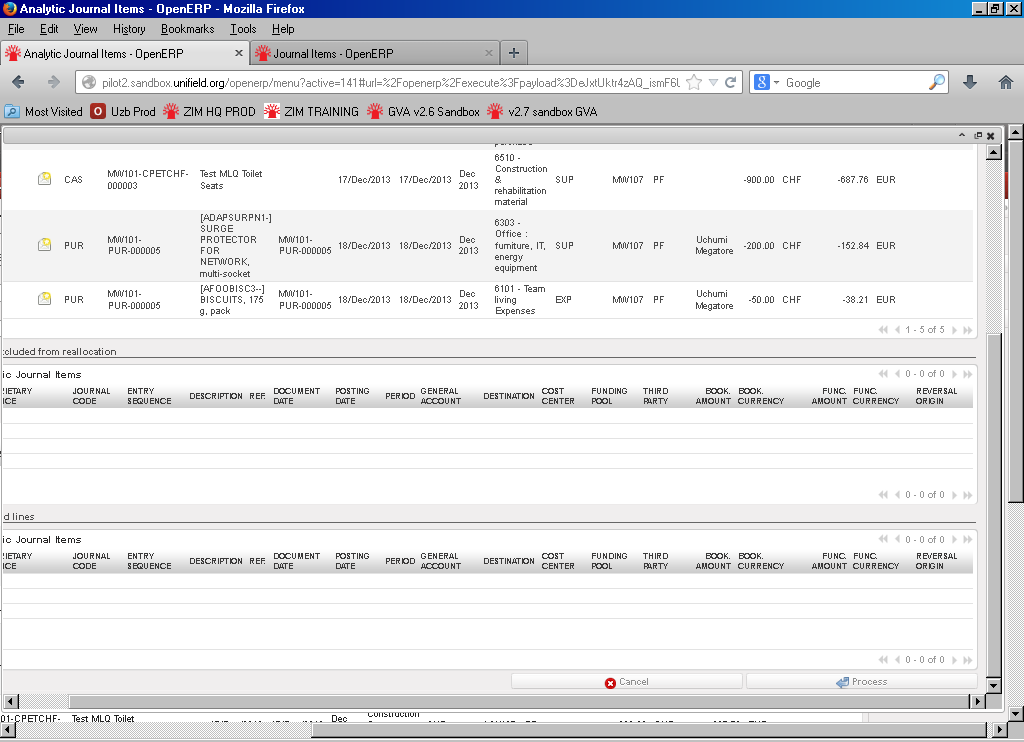
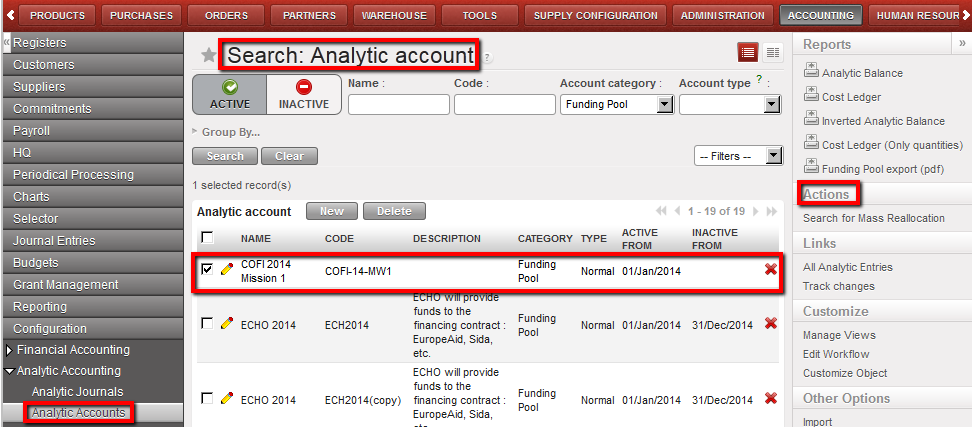 Selection of a funding pool in the Search Analytic Account view and Reports menu opening
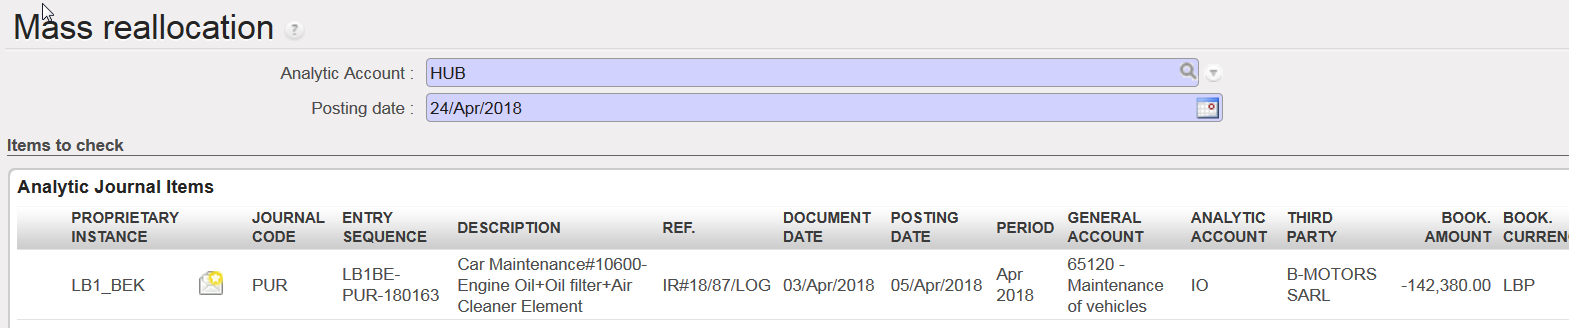 Analytic account selection for a Free 1 mass reallocation
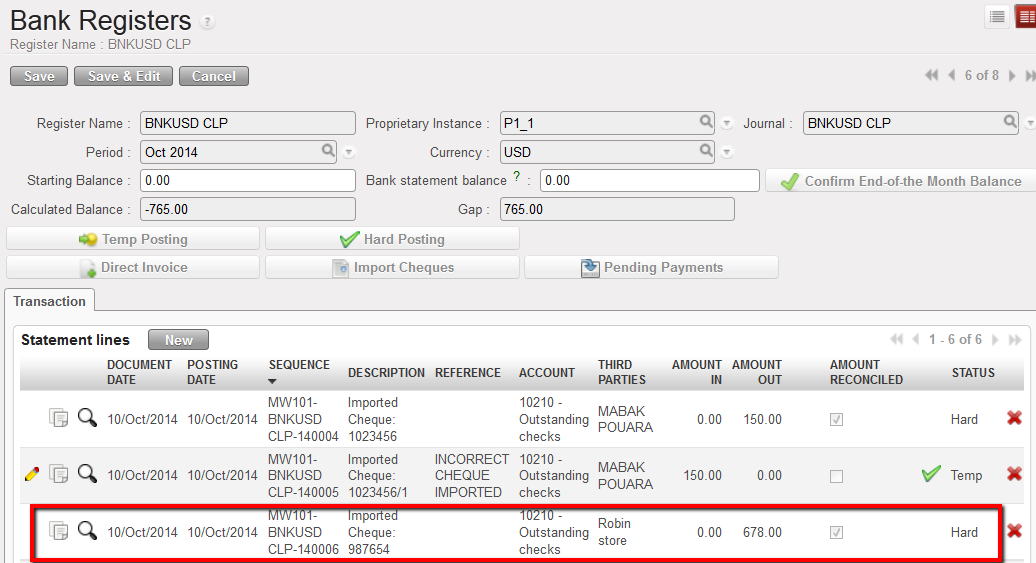
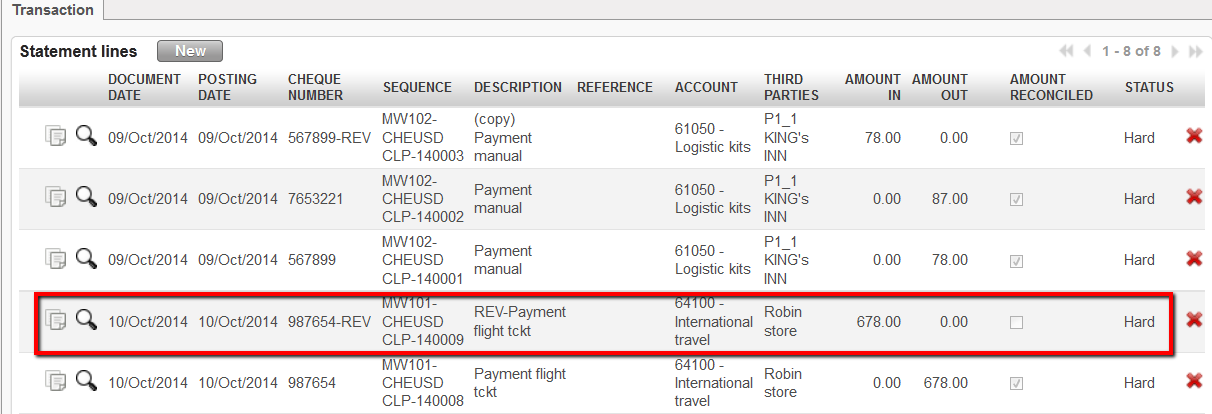
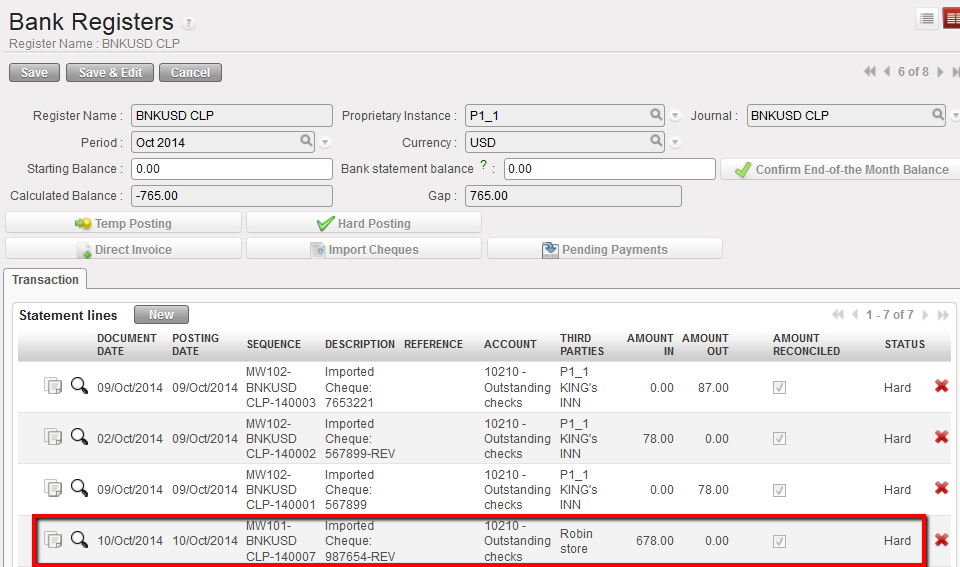
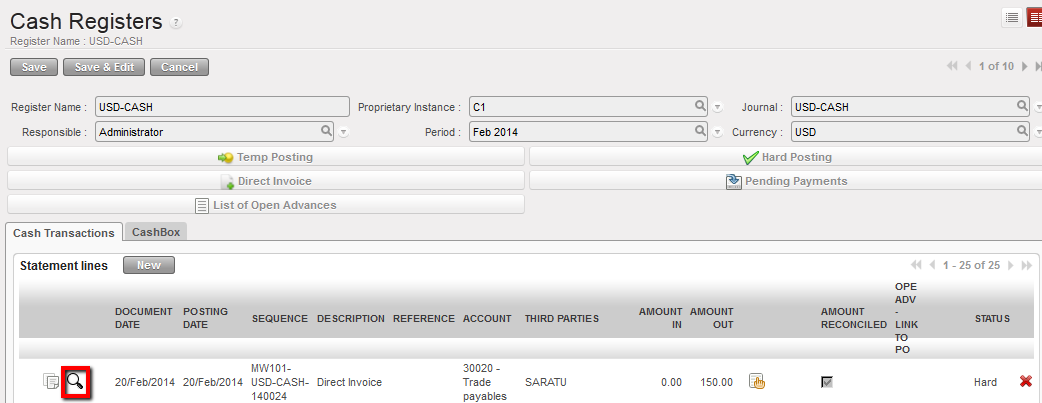
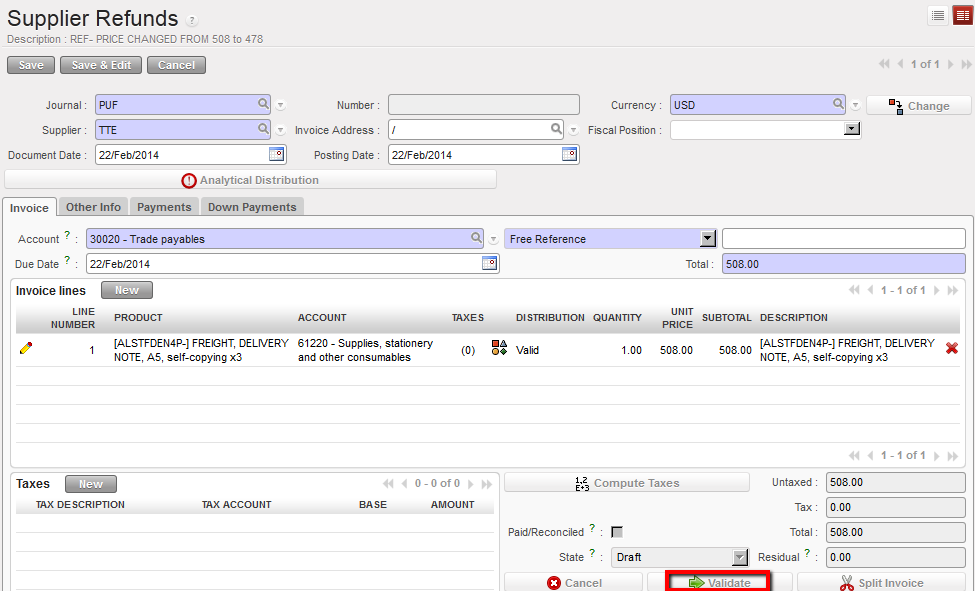
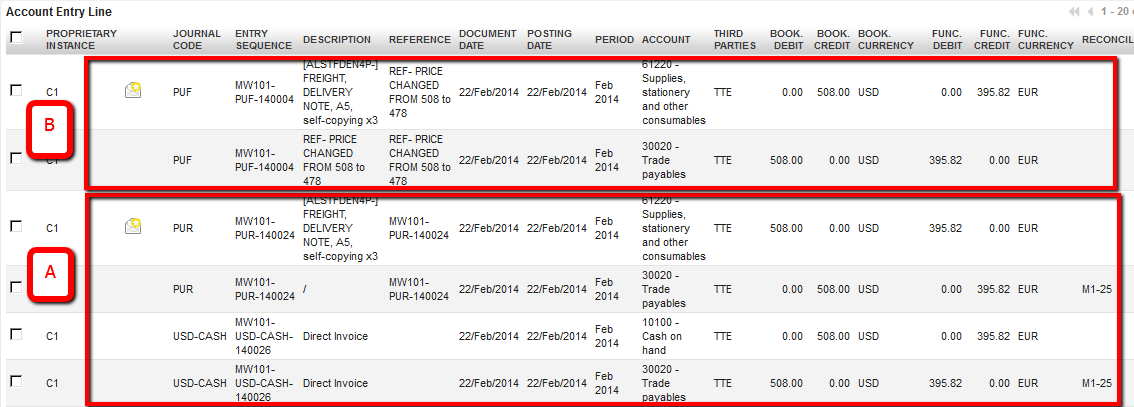
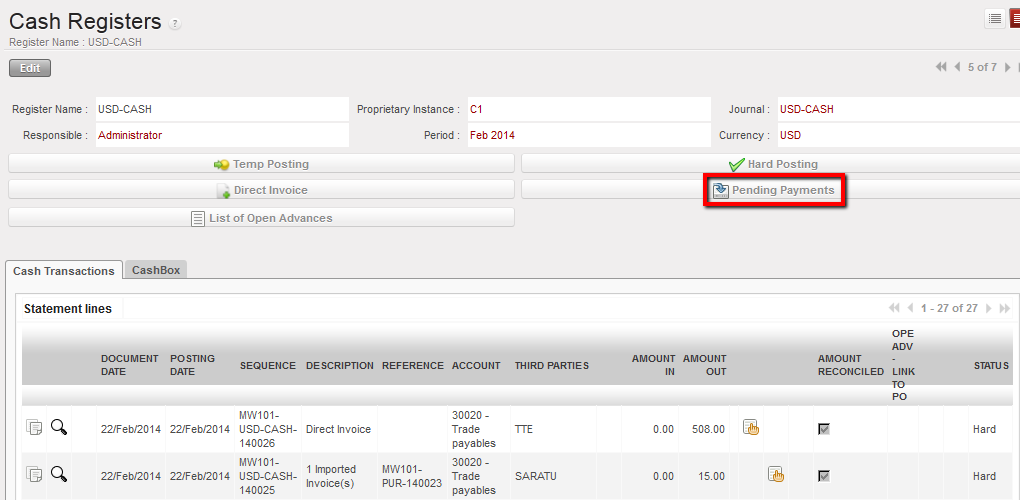
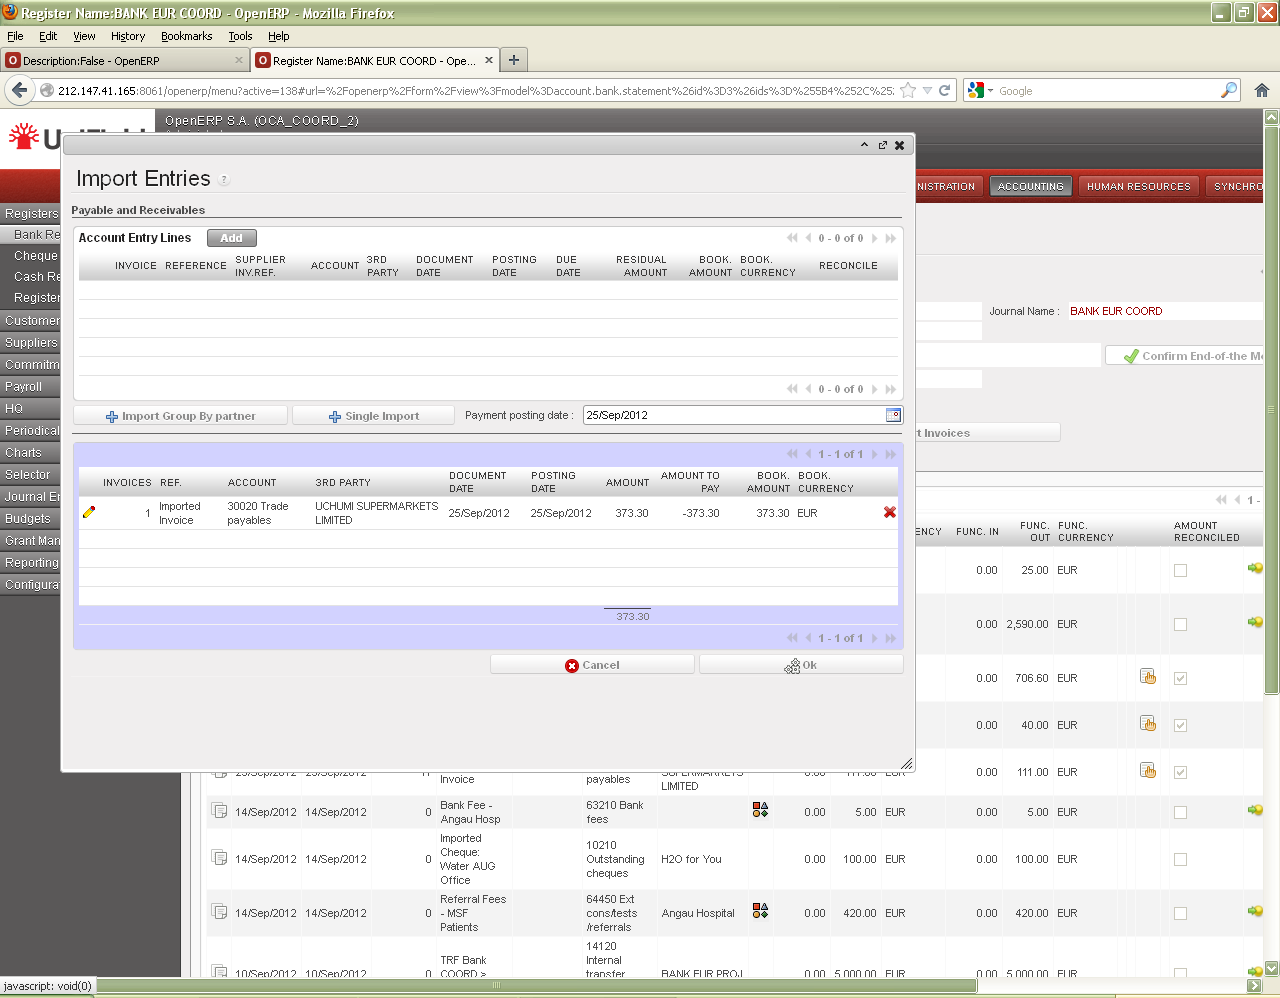
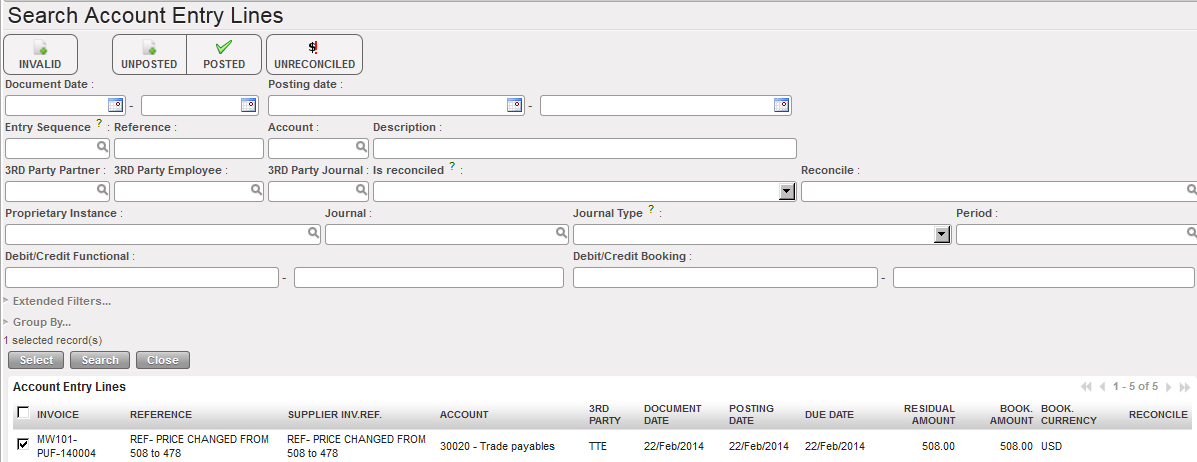
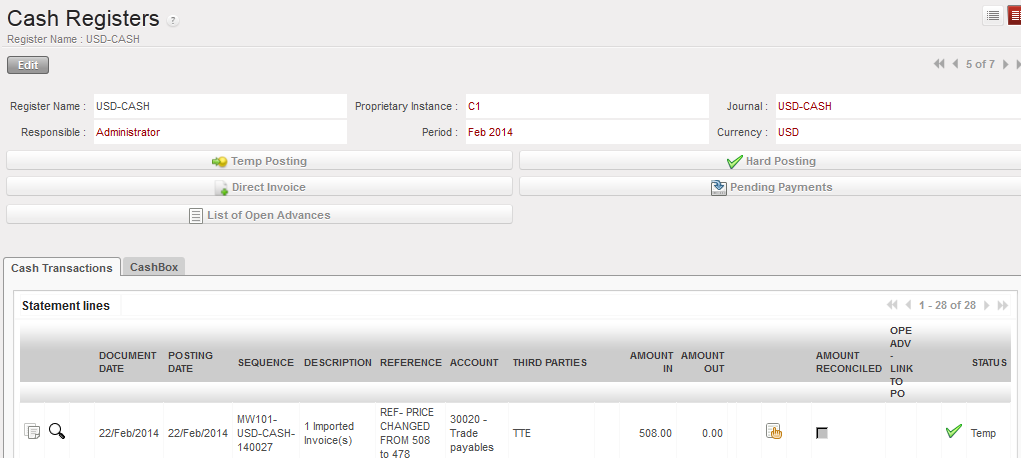
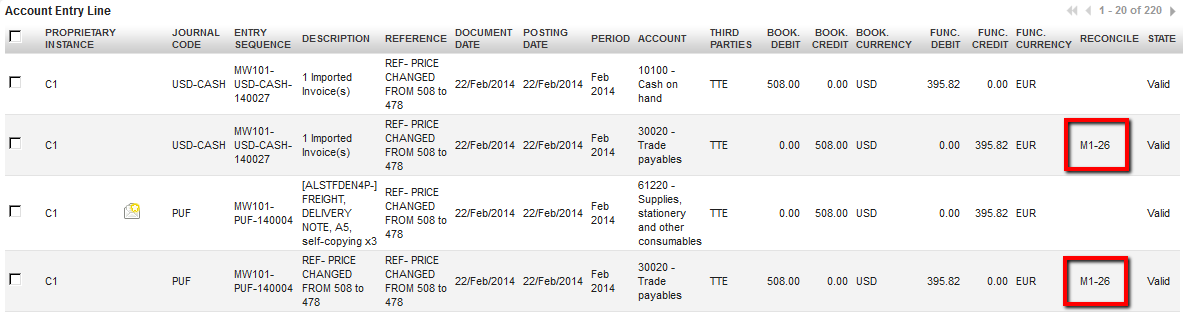
 Direct Invoice functionality on a cash register
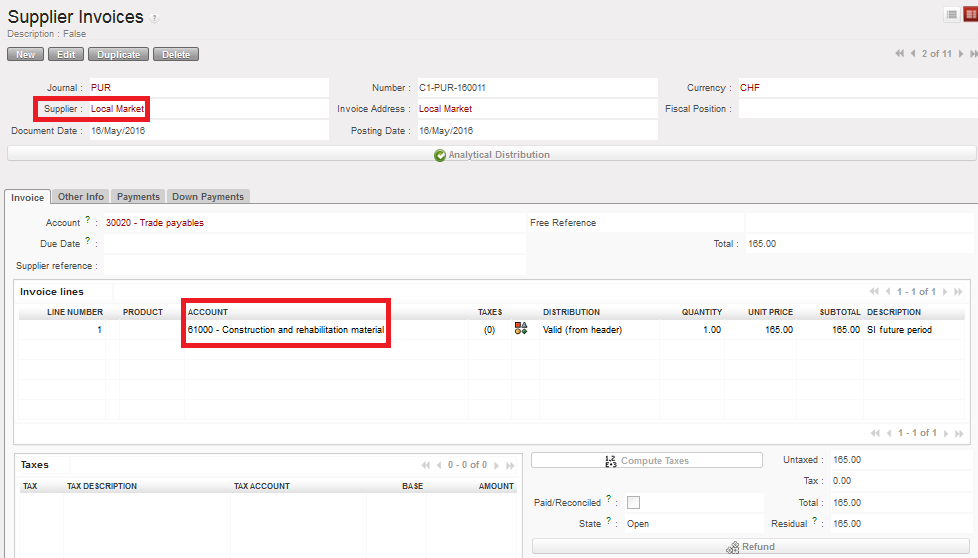 Open supplier invoice displayed in the Supplier Invoices sub-module
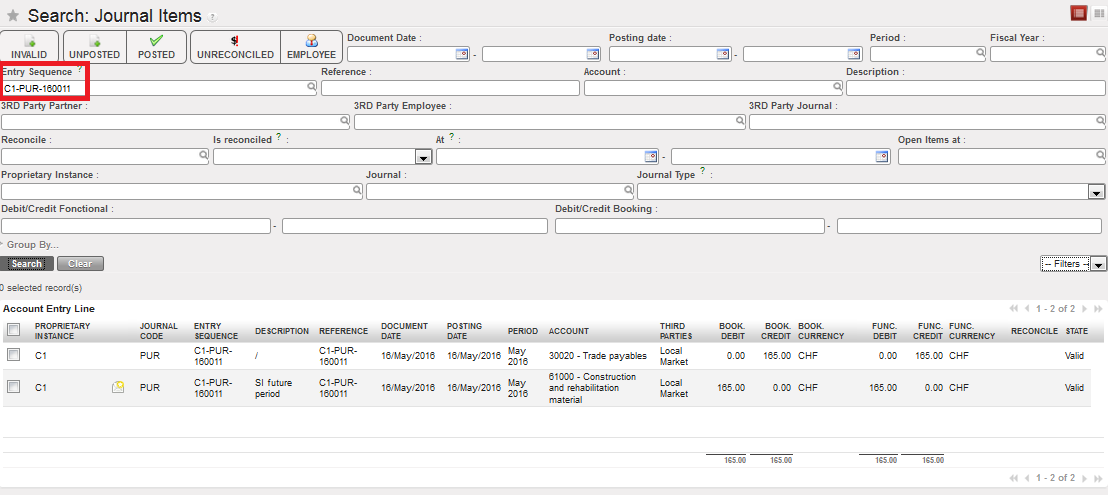
 Accounting Corrections Wizard
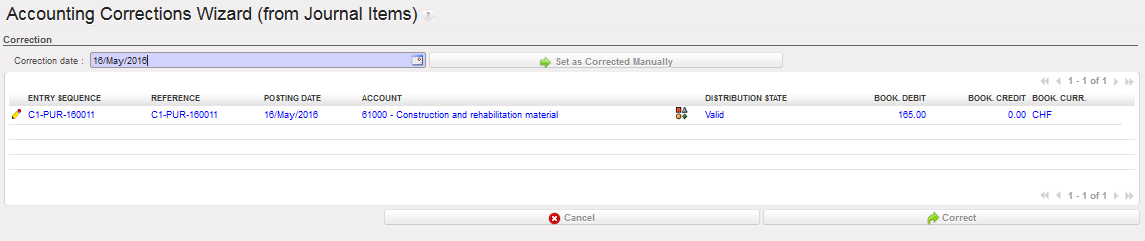


 Edition button to change the analytical distribution
 Cost center changed
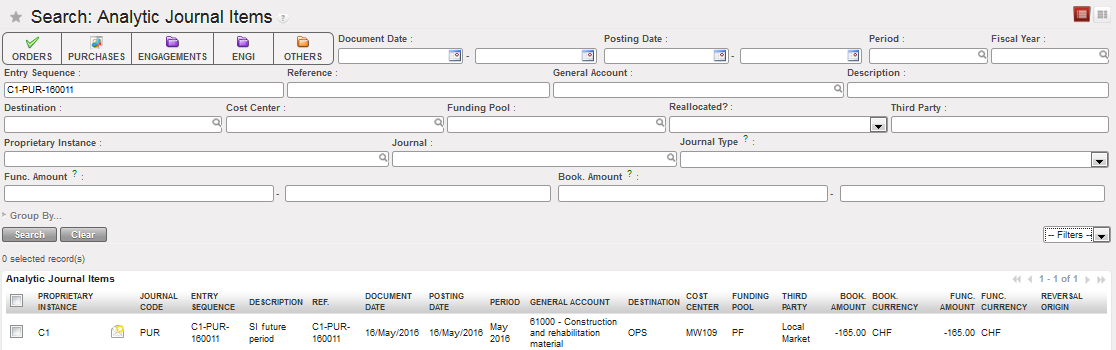 The cost center was changed and the original AJI was updated.
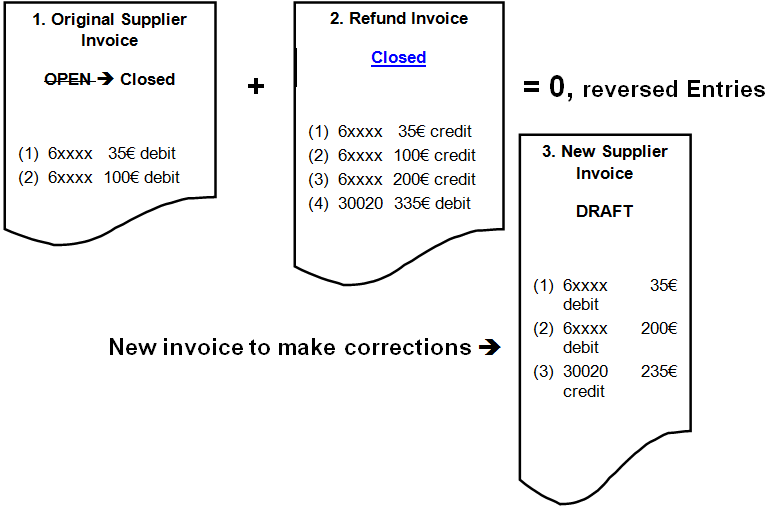
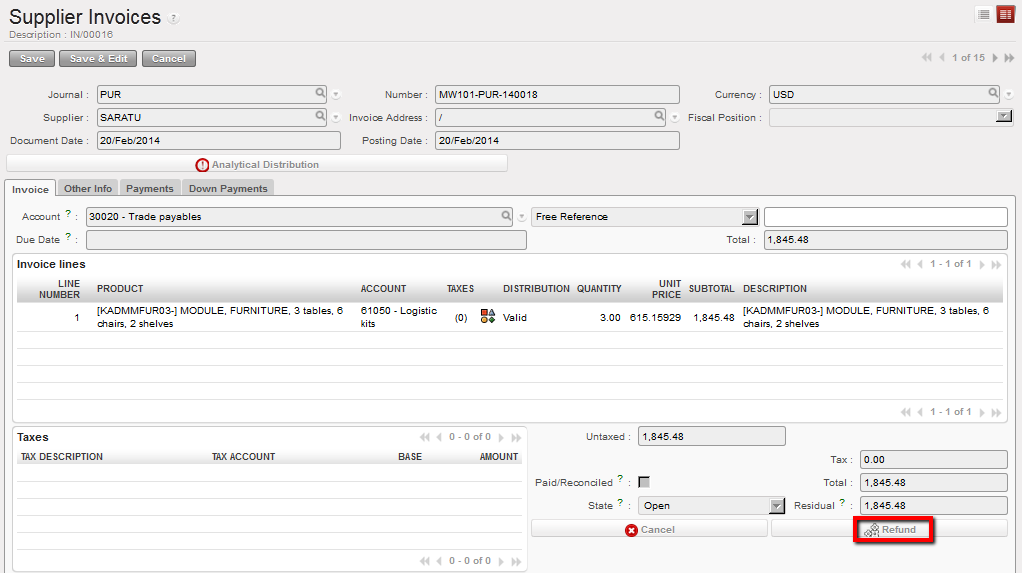

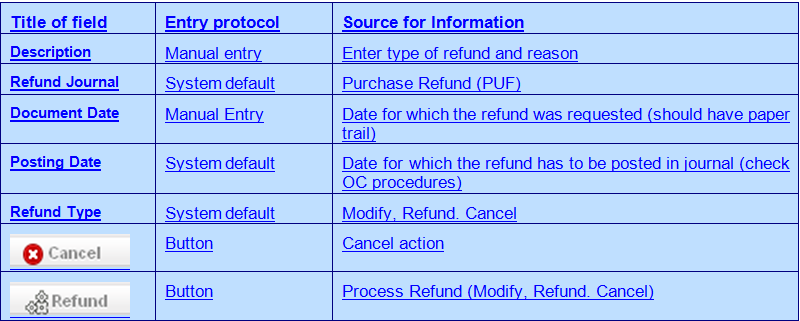


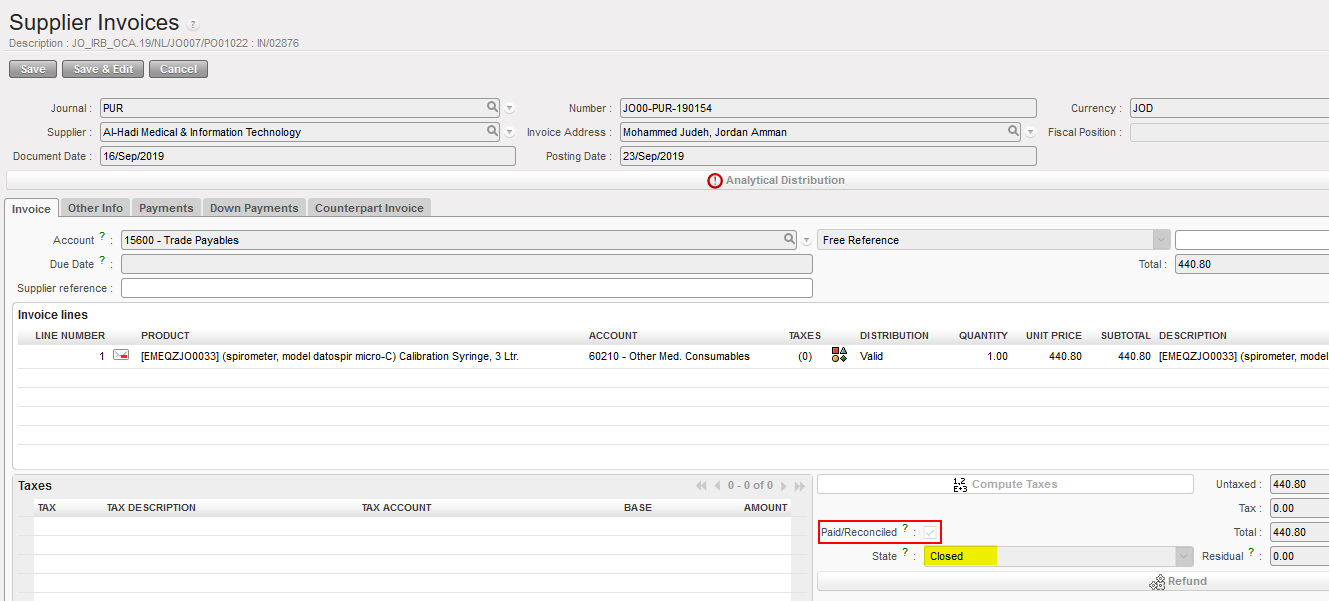

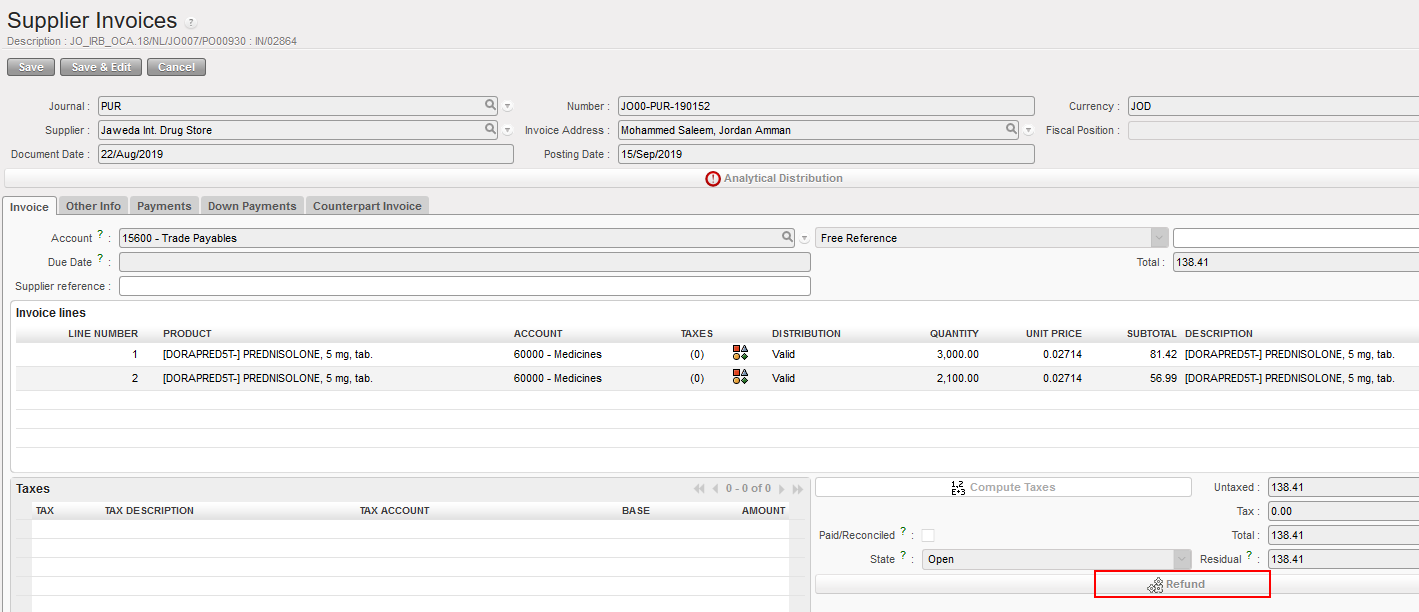


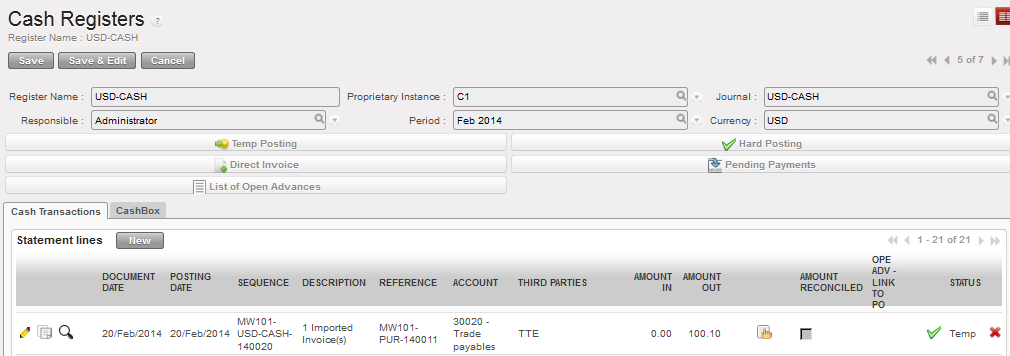

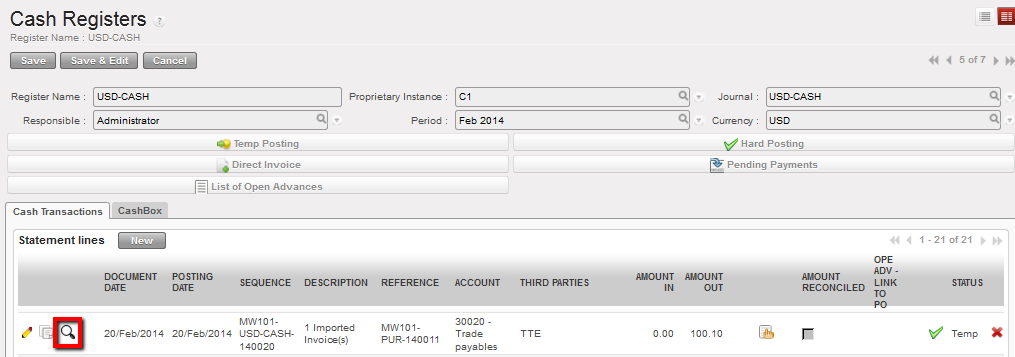
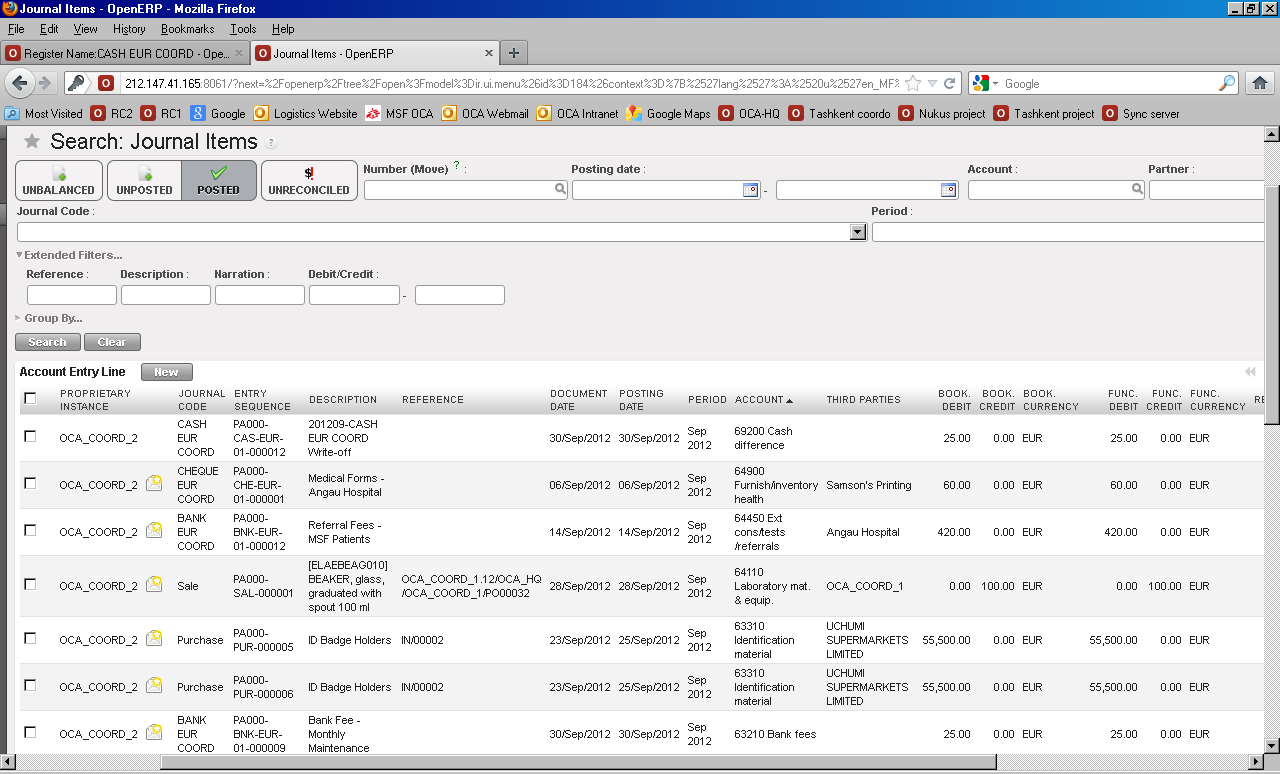
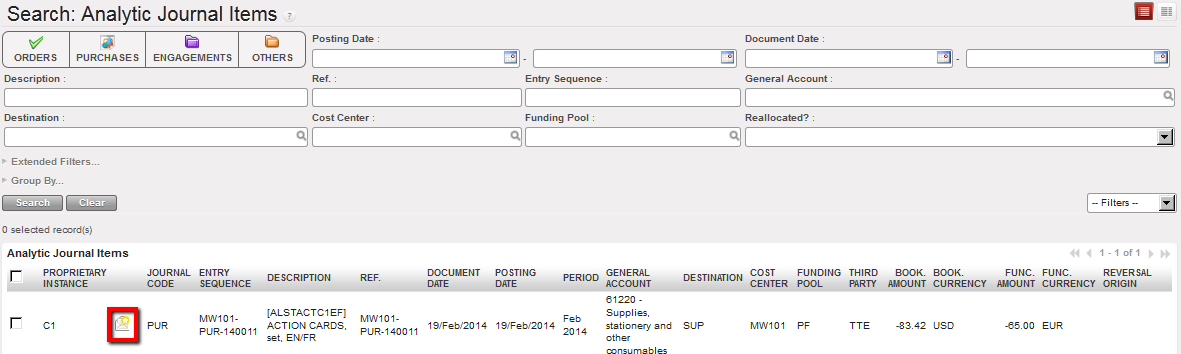 Analytic Journal Items associated to the Open supplier invoice
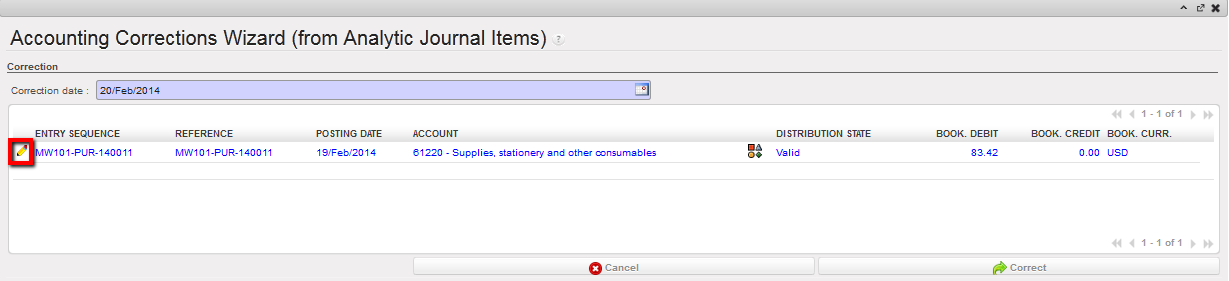

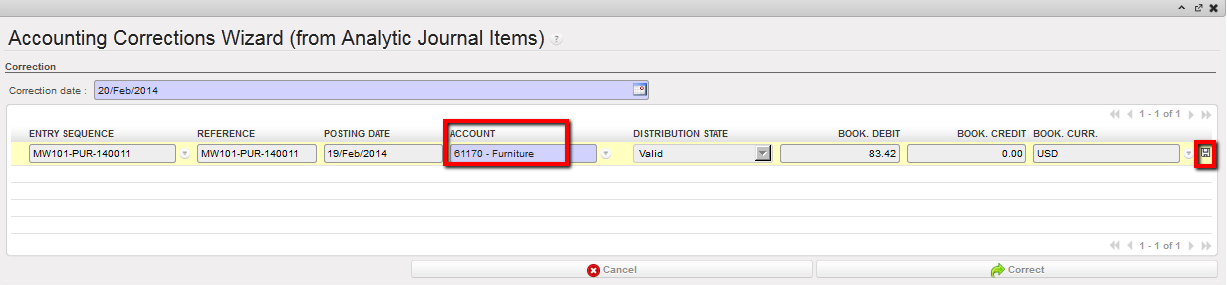 Changed account in Accounting Corrections Wizard
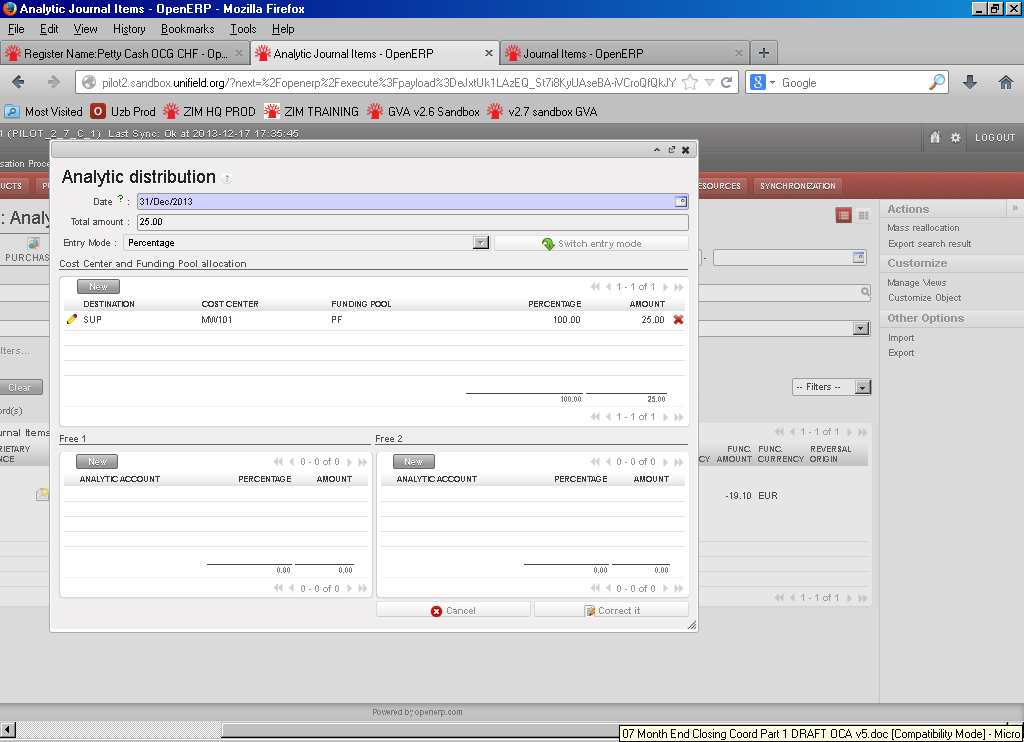
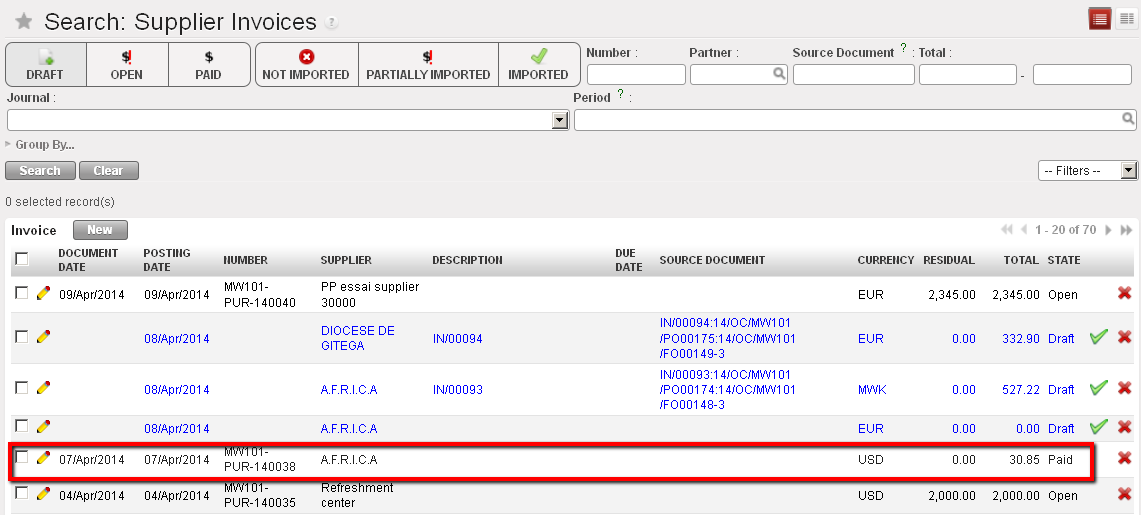

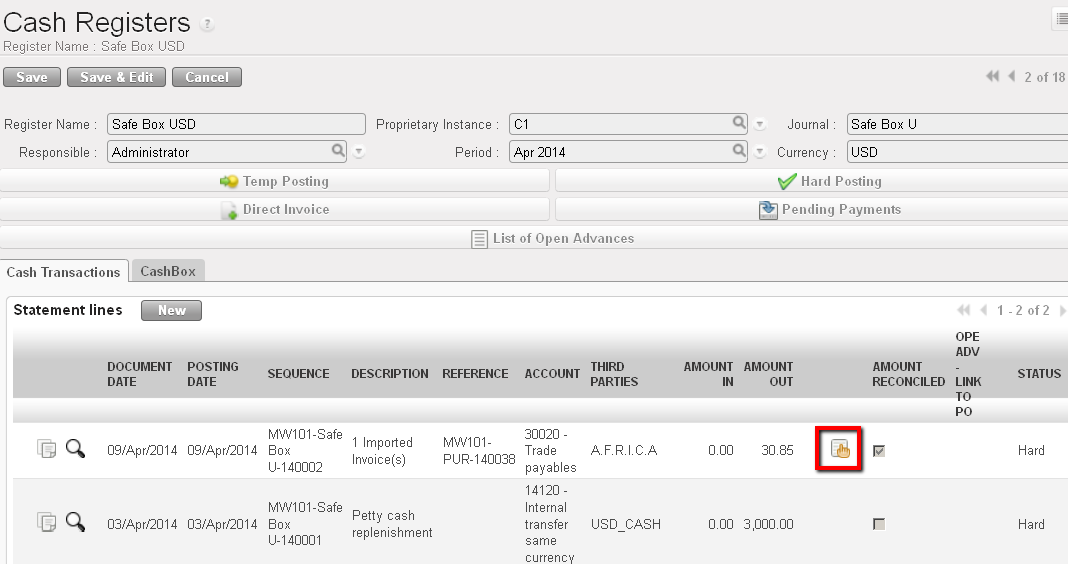 Opening a supplier invoice hard-posted in a register
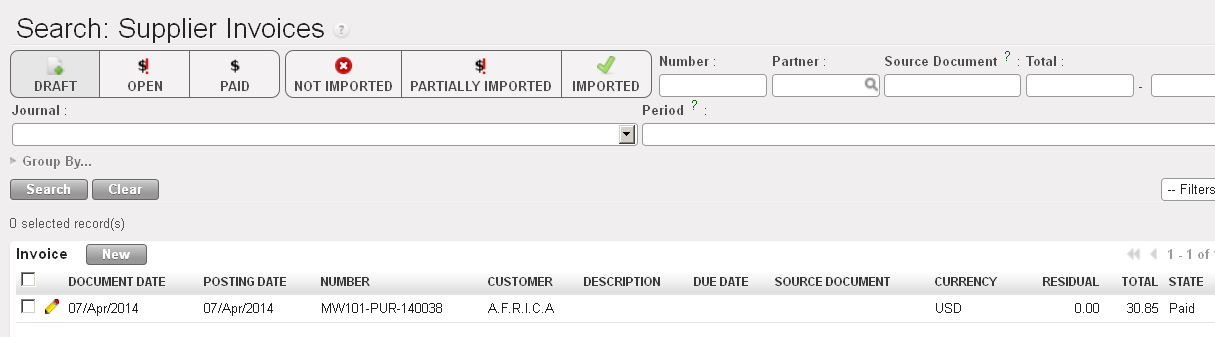 Search Supplier Invoices displays
 button and the supplier invoice form view appears.
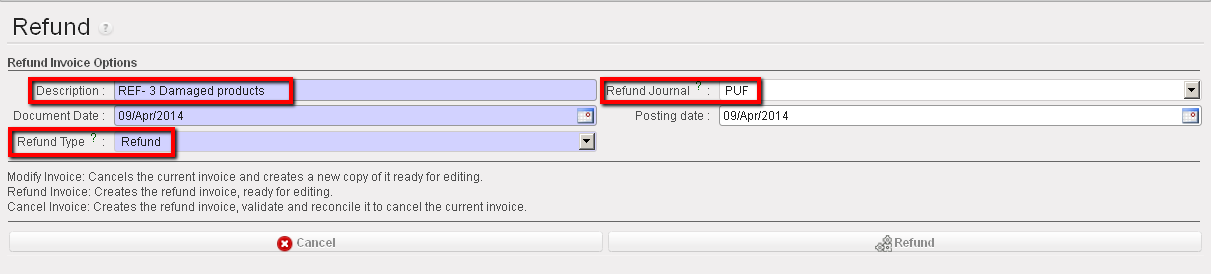 Refund wizard
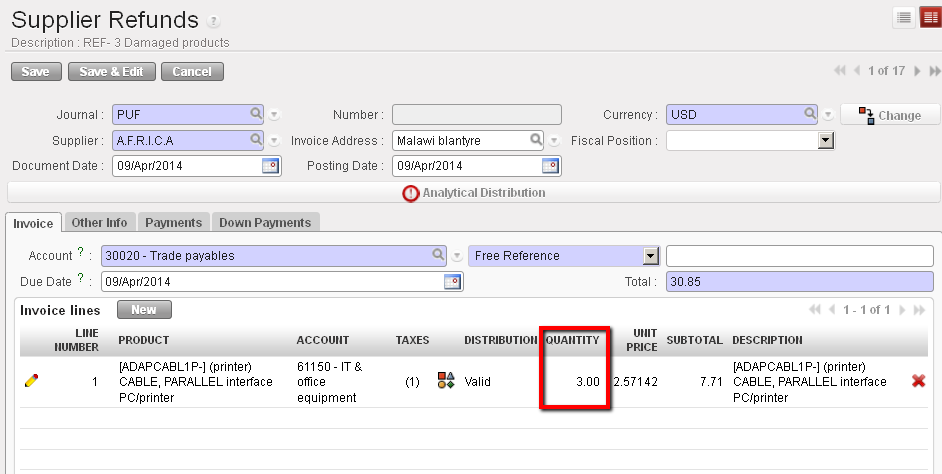 Refund supplier invoice
 to validate it.
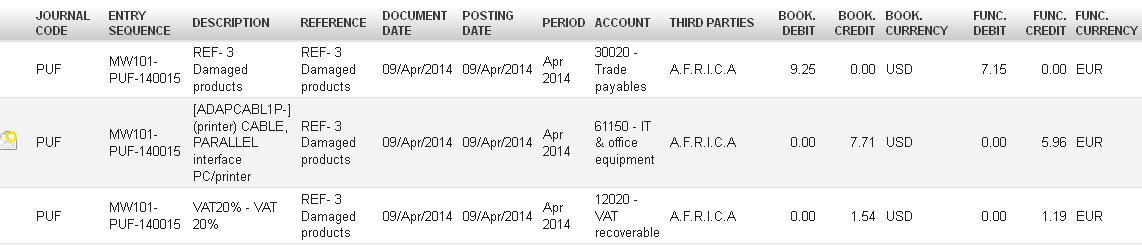
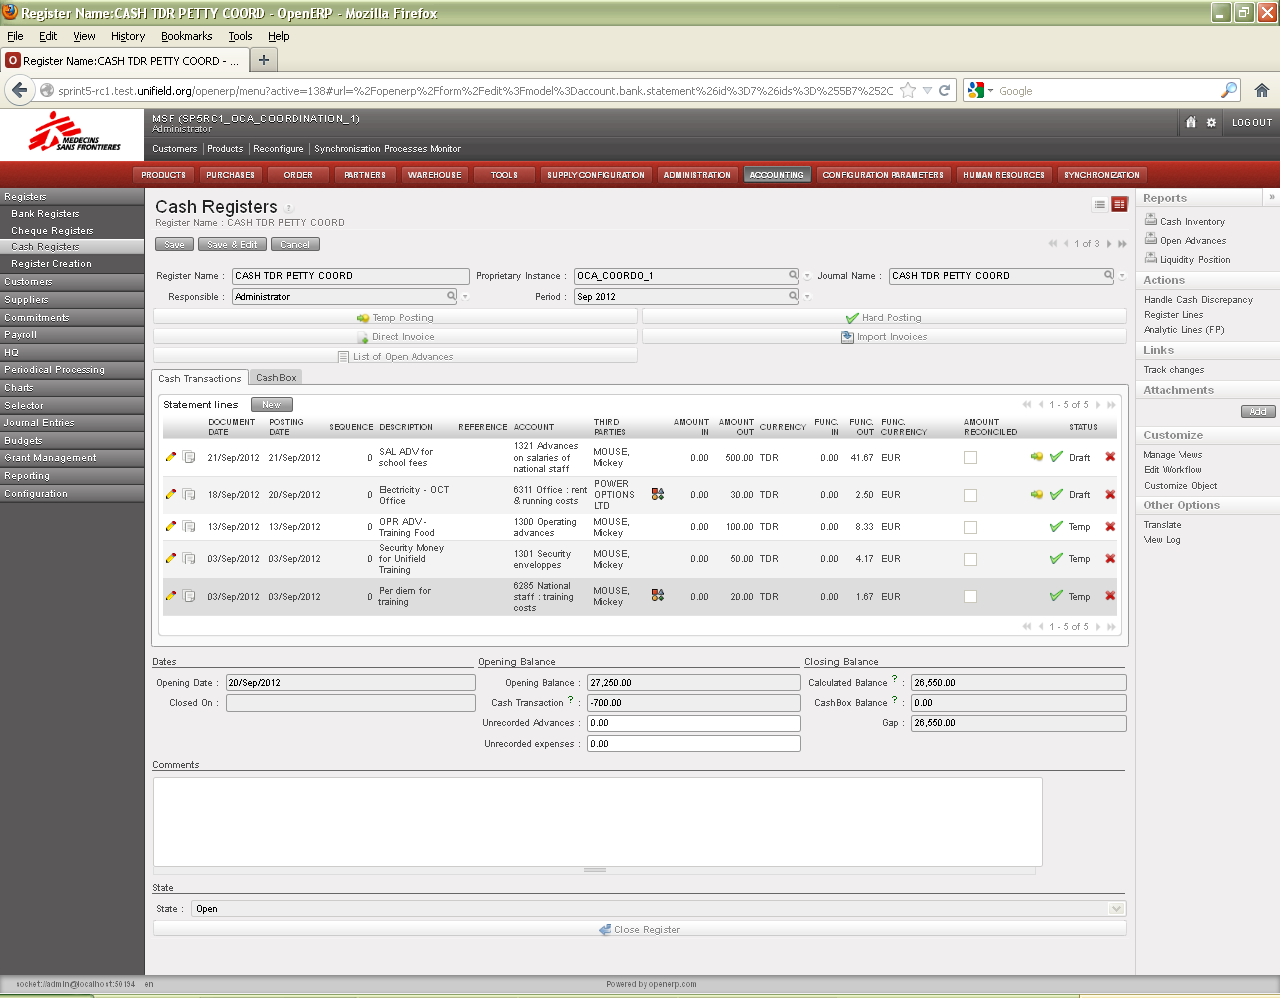
 to edit.
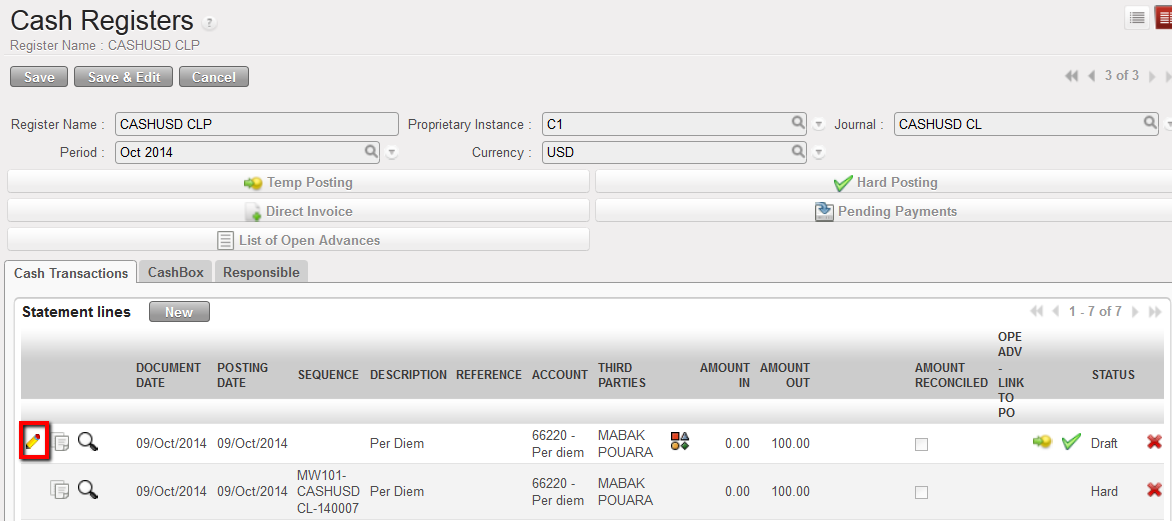
 to save the entry
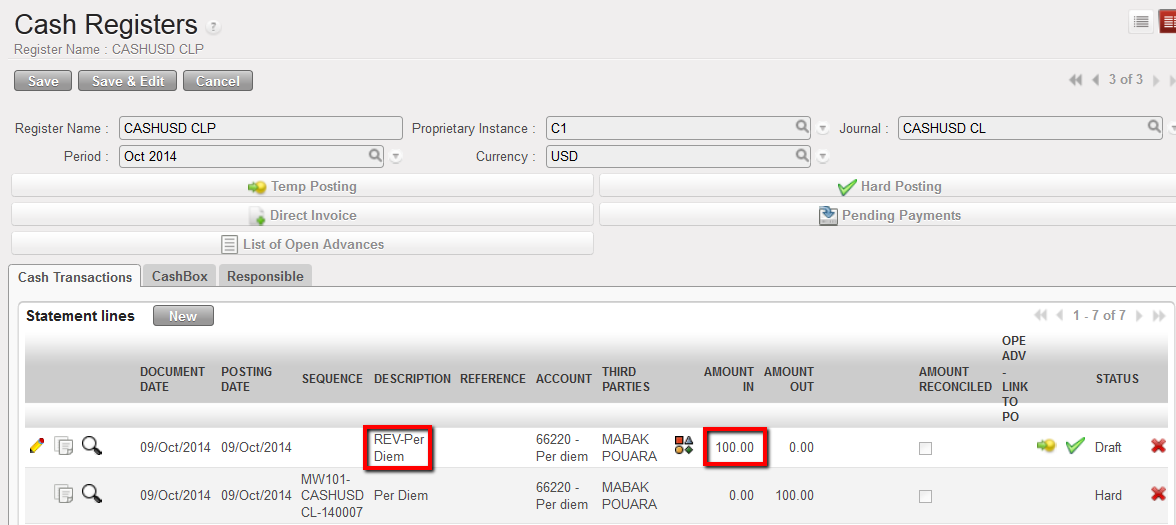


 to edit.
 to save the entry
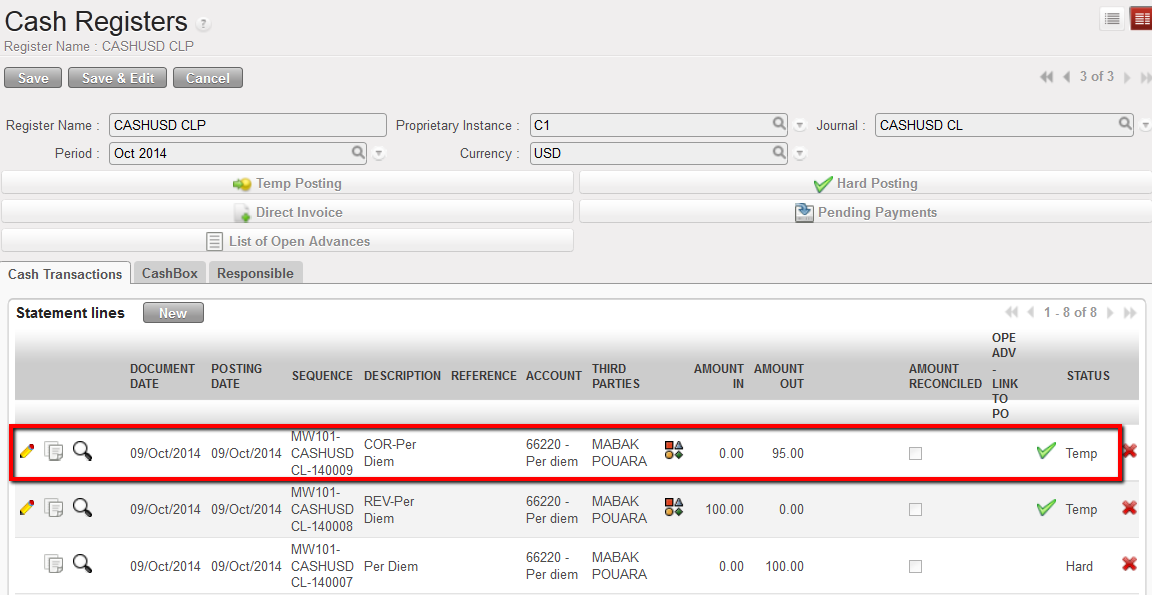


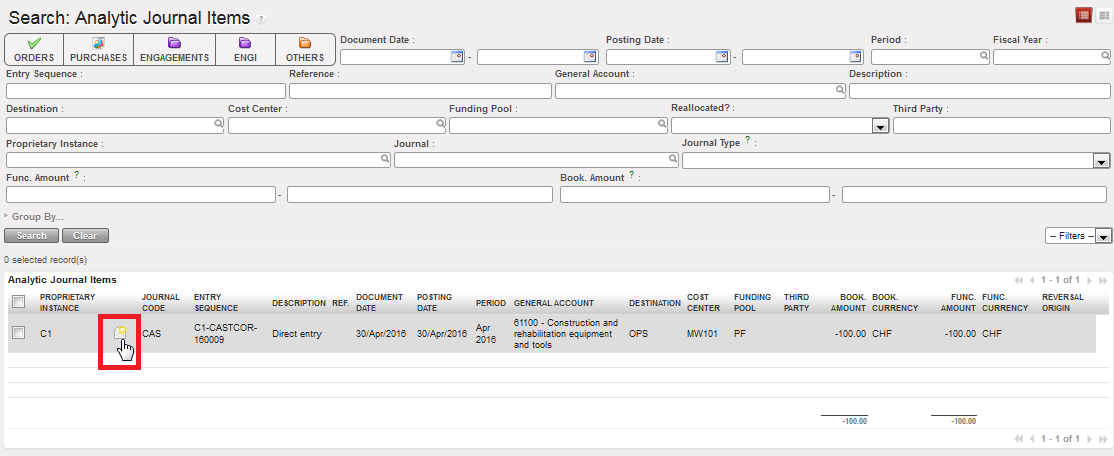
 to edit the entry.
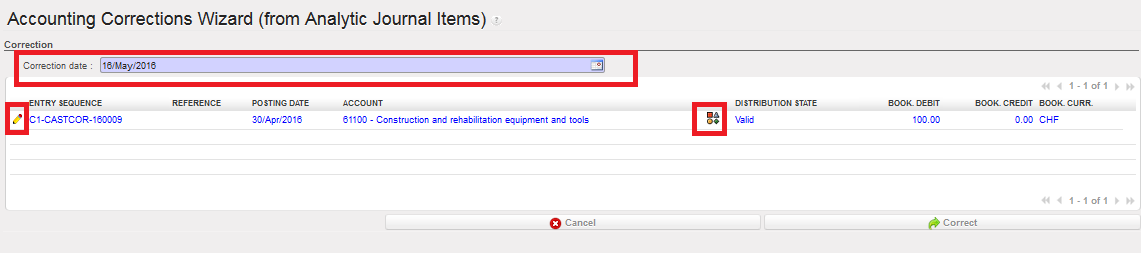 Change the account code and click
  to save. The new code is saved.
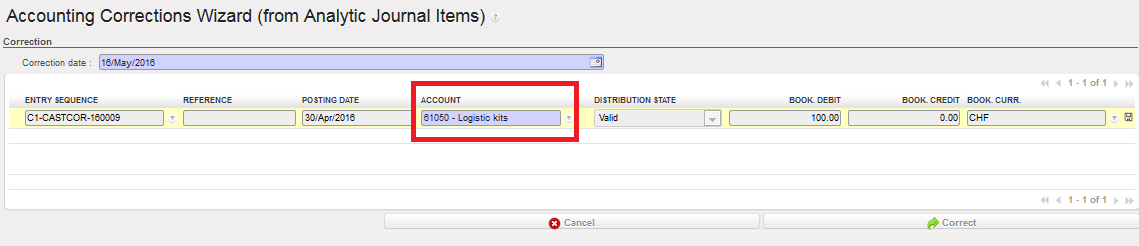 Correcting the account code:
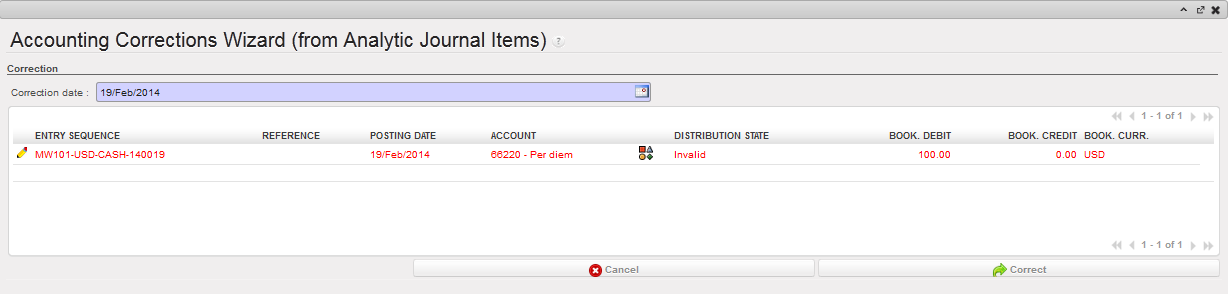


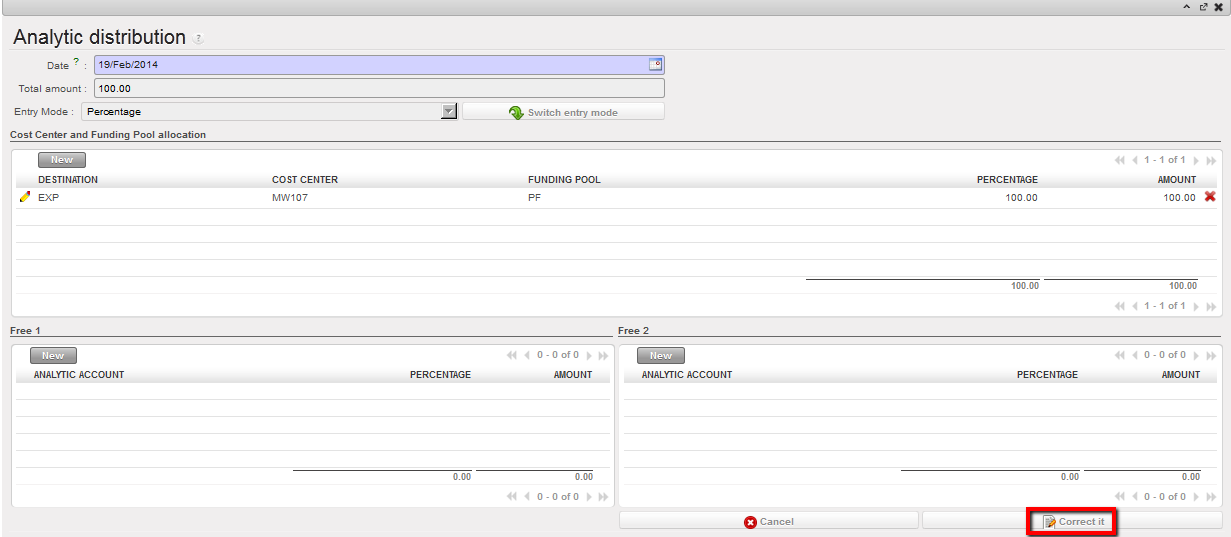 Correct button to save the correction
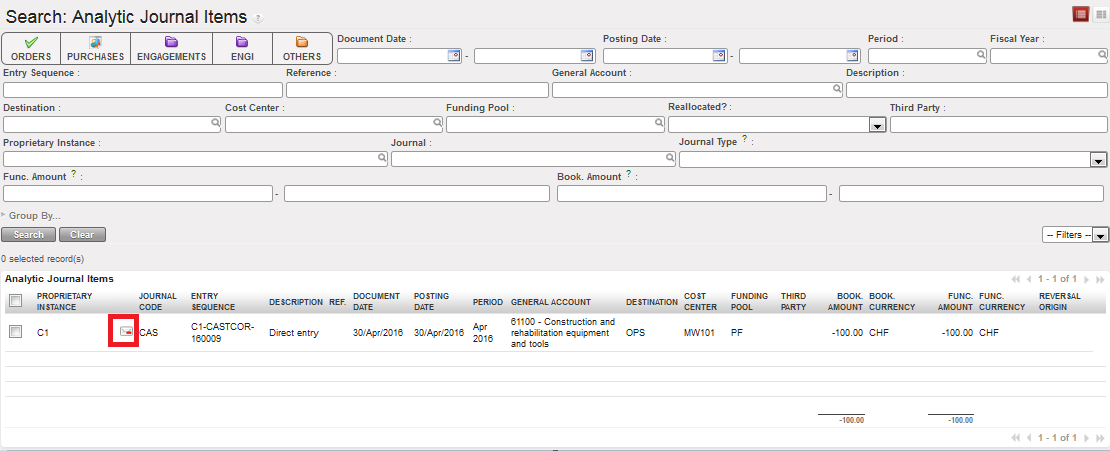 Correction history on an accounting code
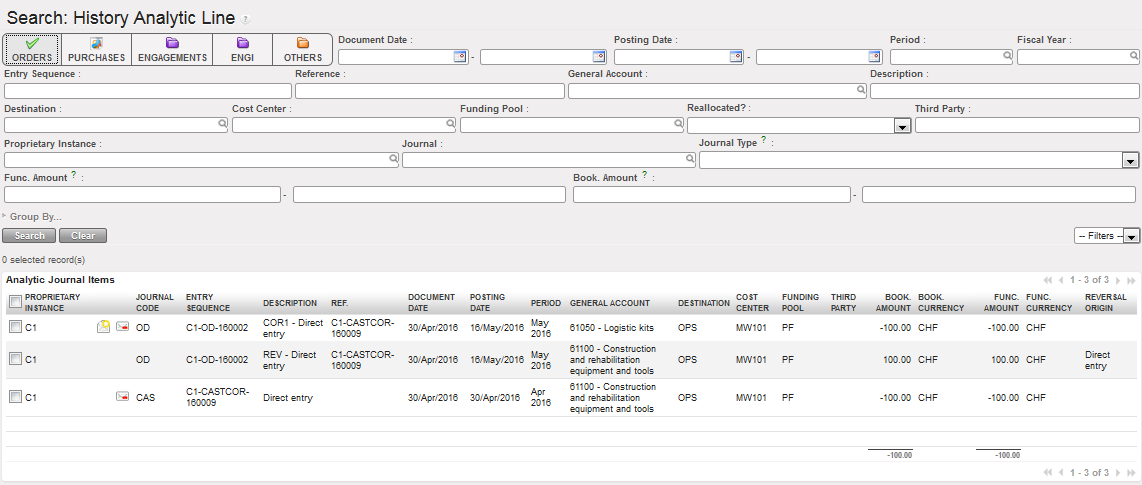
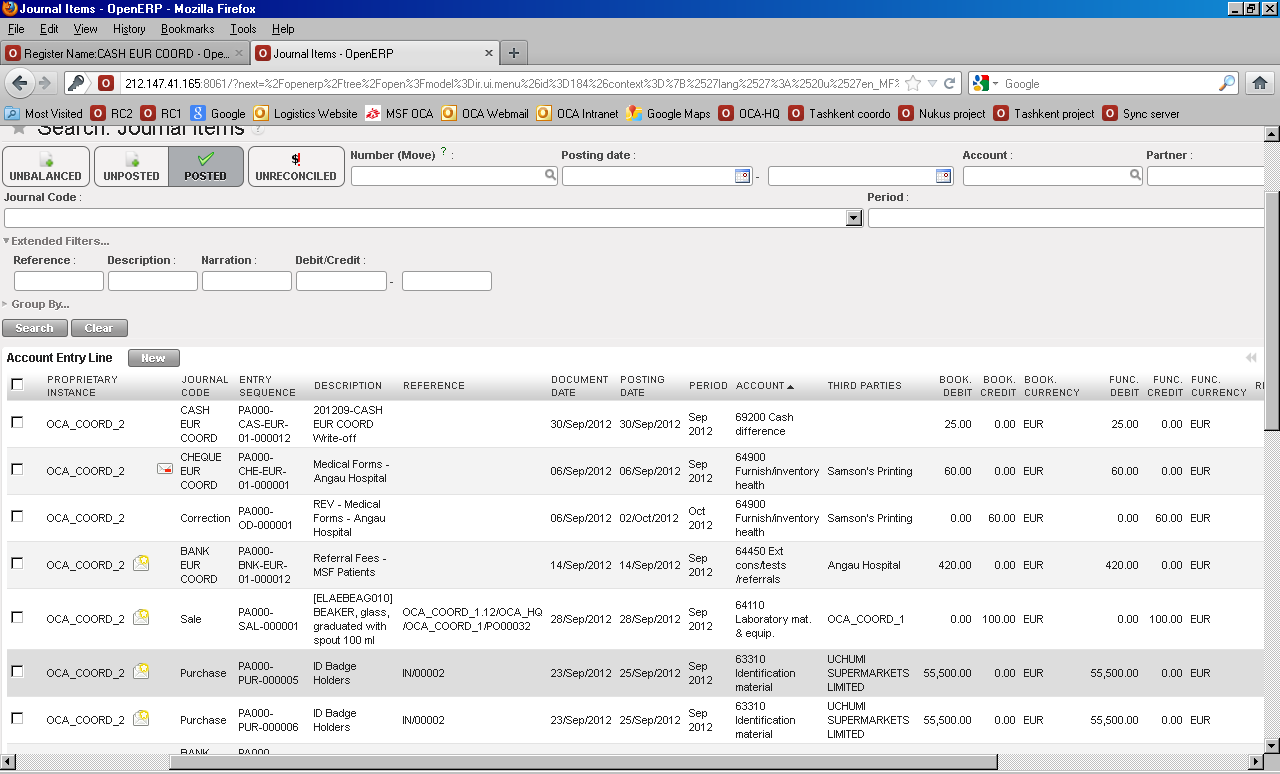


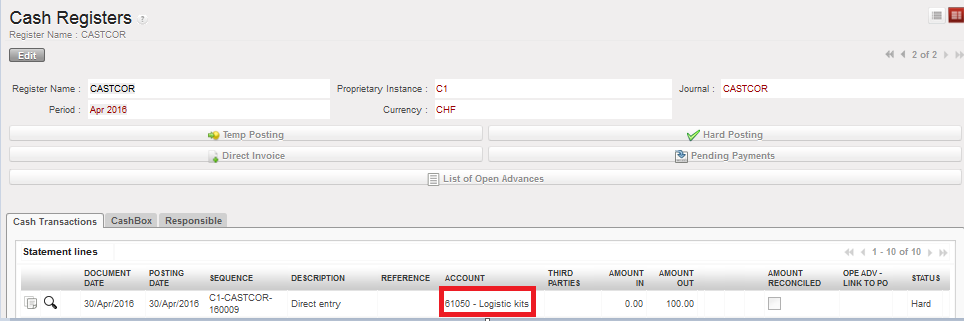
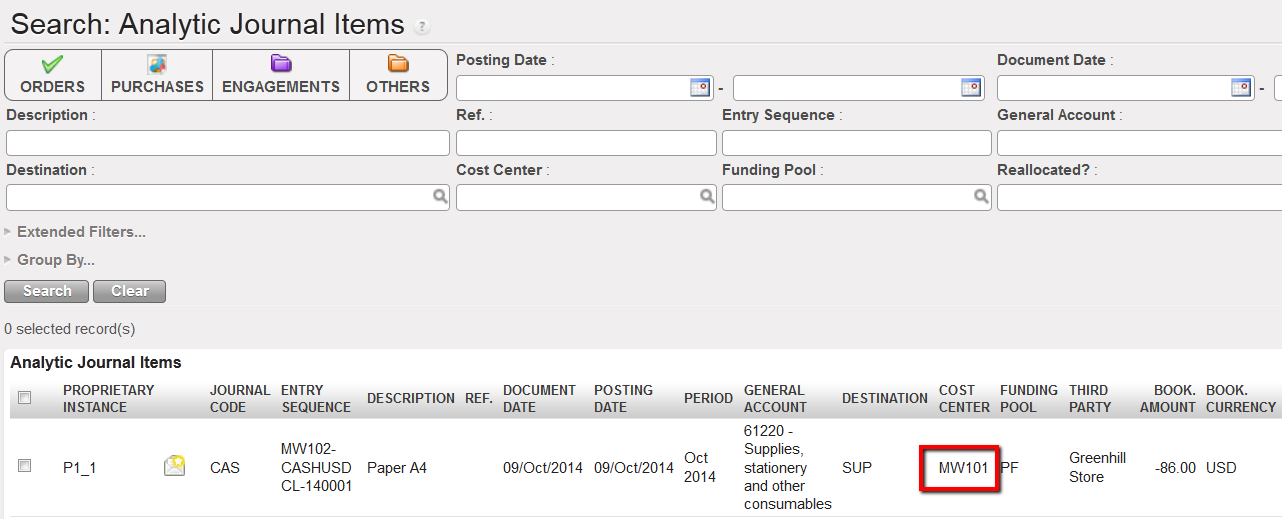 Entry recorded at project level and booked on the cost center MW101 instead of MW102.
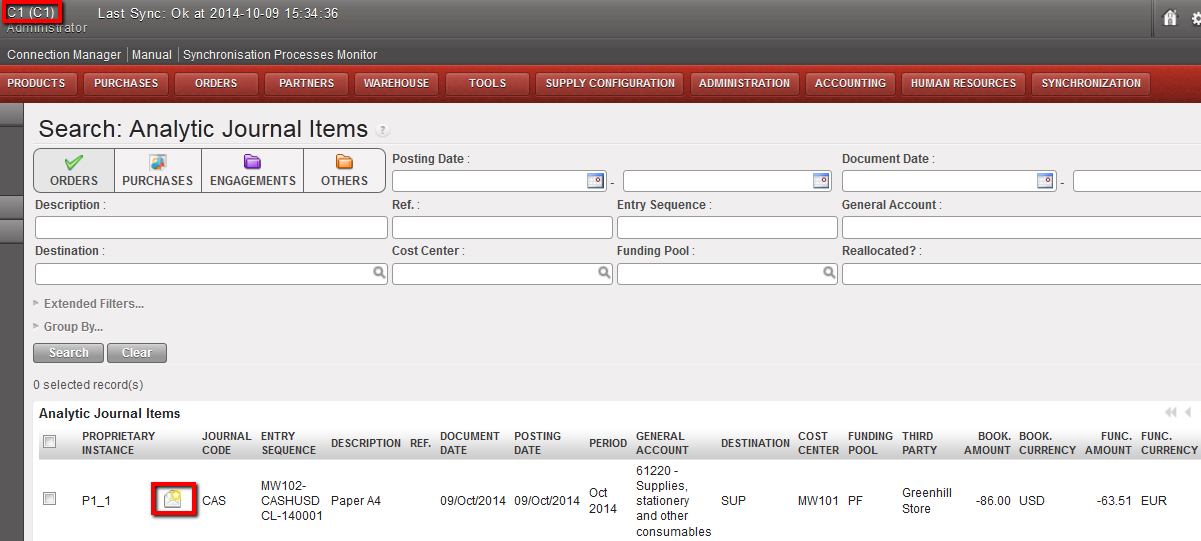 Synchronized entry to correct visible at Coordination instance
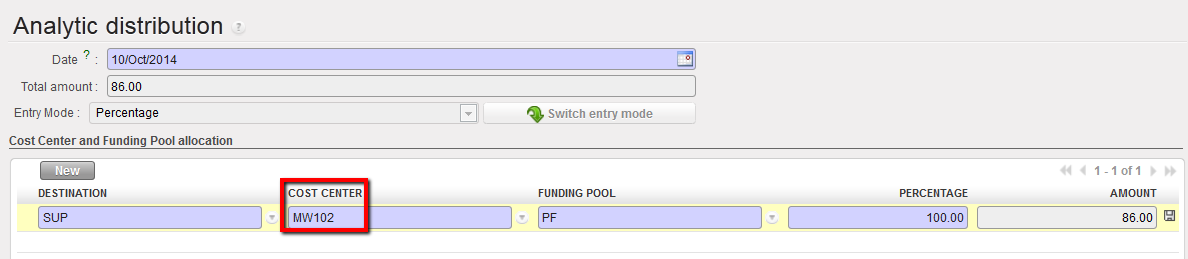 Cost Center being changed by Coordination to MW102
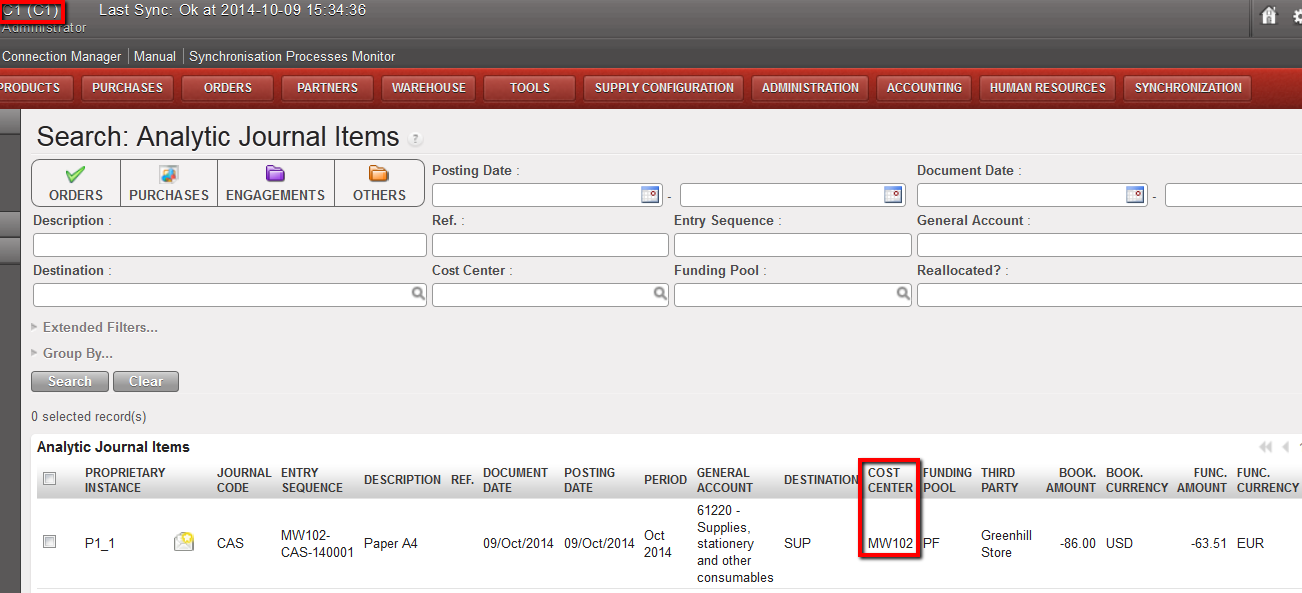 Cost center changed to MW102, visible at Coordination instance
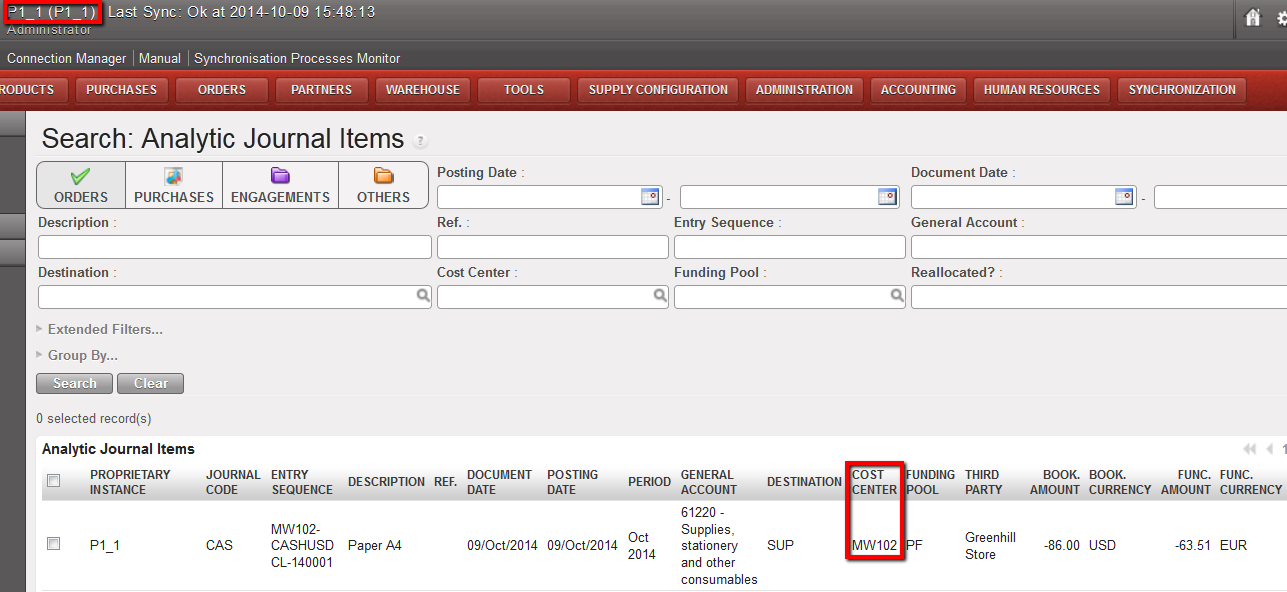 Cost center changed to MW102, visible at Project instance after being synched. This entry cannot be corrected anymore (no envelope icon = correction wizard disabled).
 is used: