An Internal request can be validated at header level (validation done for all the lines of the IR in one click) or at line level (validation done for one or some lines of the IR only).
In the first case, the validation will have as consequence that all the lines of the IR will switch to the state “Validated” and the IR itself (at header level) will also switch to the state “Validated“. In the second case, the validation will have as consequence that one or some lines of the IR will switch to the state “Validated” while the IR itself (at header level) will switch to the state “Draft-p“.
Note that to be able to validate an IR at line level, a user must be granted specific user rights. User should have the group Sup_Valid_Line_IR.
UniField offers several options for importing information on an IR, either from an Excel file (XML Spreadsheet 2003 format) or from a pre-encoded Product list.
First and historical option only include import of product lines information and requires having header information of IR to be populated manually in the system. The columns should be in this exact following order and spelling: Product Code*[1], Product Description, Quantity*, Cost Price, UoM*, Currency*, Comment.
IR Excel Import format and columns order
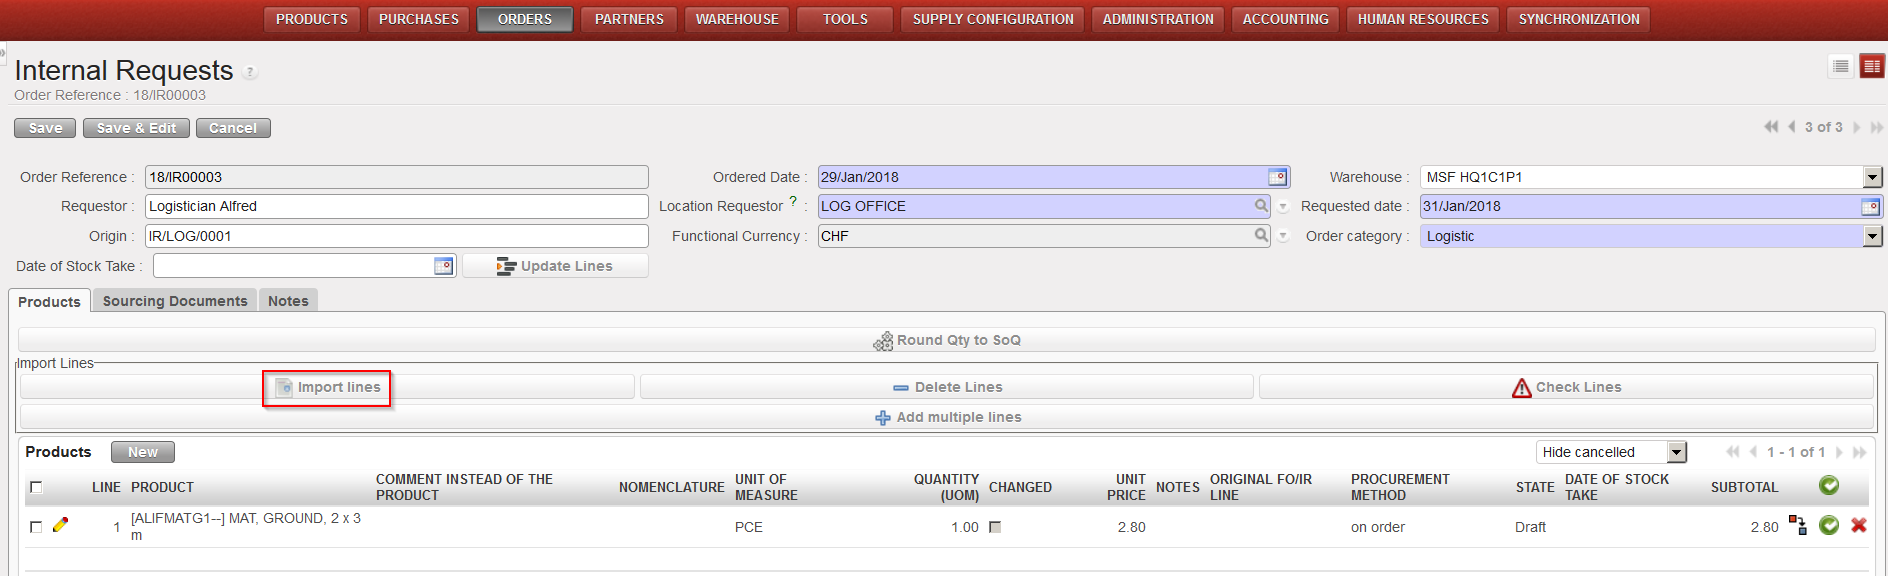
Option 1 (import lines): Go to: Orders / Orders / Internal Requests
Create a new IR or open an existing IR (note that for an existing IR, this should only be done if the IR is in “Draft” or “Draft-p” status and saved first).
Click on the “Import lines” button.
Click on the “Add attachment” button then “Browse” and search on the computer for the file to import.
Select the file you want to upload and click on “Open” in the browse window.
Click on the “Import file” button to import the file, then click “Update” (Click again on “Update” if the process is not 100% complete). A message will indicate if lines have been imported successfully.
Click on the “Close Window” button.
Save the IR.
Importing lines on an IR
The second option introduced with UF11 enables to import, additionally to product line, header information such as Order reference (in case of update), Order Category, Priority, Requested date*, Requestor, Location requestor*, Origin and Functional currency.
This import can only be done to create Draft IR or update existing Draft IR.
Option 2 (Import from IR Excel template): Go to:Orders / Orders / Internal Requests
Click on the “Import from IR Excel template” link on the right action menu.
Click on the “Add attachment” button then “Browse” and search on the computer for the file to import.
Select the file you want to upload and click on “Open” in the browse window.
Click on the “Import file” button to import the file, then click “Update” (Click again on “Update” if the process is not 100% complete). A message will indicate if lines have been imported successfully. Please note that if mandatory fields are not filled or incorrect, a non-blocking message will inform about it and correction can still be made on screen.
Click on the “Validate Import” button.
Save the IR.
Note that comments can also be imported in the IR if you populate the “Comment” column of the Excel.
Note that “product by nomenclature” lines can also be imported from Excel into an IR. Leave the “Product Code” (and “Product Description“) columns empty and populate the “Comment” column. Afterwards, use the “Configurator” icon to complete the line.
From the “Import from IR Excel template” import pop up, you can check the box “Change Product to a Comment if Product is not found” in case you need to import product by nomenclature.
To get a template of the correct Excel format needed, you may export an existing IR to Excel as explained below (see How to export lines from an Internal Request).
Option 3 (import from product list): Go to: Orders / Orders / Internal Requests
Create a new IR or open an existing IR (note that for an existing IR, this should only be done if the IR is in “Draft” status). The header information of IR must befilledand saved.
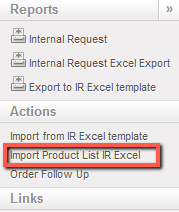
Open an action menu and select on “Import Product List IR Excel”.
Click on the “Add attachment” button then “Browse” and search on the computer for the file to import.
Select the file you want to upload and click on “Open” in the browse window.
Click on the “Import file” button to import the file, then click “Update” (Click again on “Update” if the process is not 100% complete). A message will indicate if lines have been imported successfully. Please note that lines will be imported only if quantity is >0.
An Internal Request (IR) is a document used to express a requestor’s needs. It is the electronic equivalent of the paper Request Form and replaces the LogistiX “Document IN”. It should be used according to OC procedures.
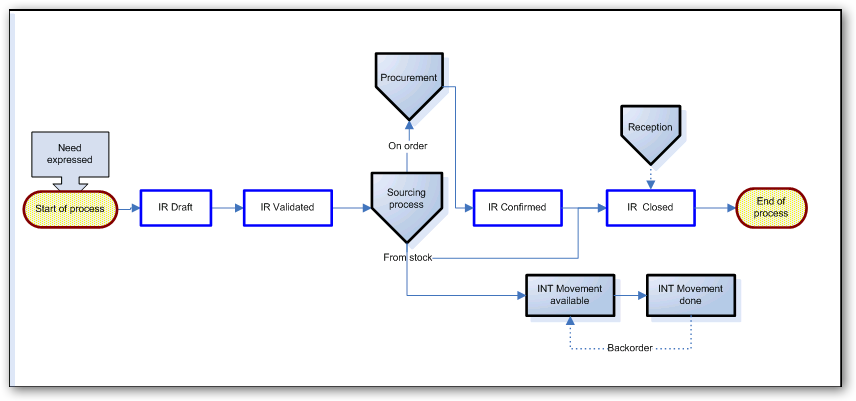
The needs can come from a user at project or coordination level, it will trigger most procurement documents (if needed) to deliver the goods to the instance where the IR has been created and to the destination location indicated on the IR. The IR has to be reviewed and validated before going through the sourcing tool (and being confirmed).
Process flow of an Internal Request (internal requester)
This chapter covers the different types of orders available in UniField, as well as each different stage of sourcing and procurement. The process will start as an expression of needs, and this may be followed by procurement, sourcing from stock, loan, which may involve both internal (via synchronization) and external partners.
It is essential to understand how product orders and procurement are processed in UniField, as an order line may pass through several different stages until the product reaches its final destination. All these stages, up to the point of product reception, are covered in depth in this chapter.
This chapter also covers the relationship between projects and coordination and the role which the synchronization can play in the order flows between them.
This chapter is introducing gradually the different functionalities of UniField needed in procurement, starting with Internal Requests, continuing with the Orders Sourcing Tool before to focus on Field Orders and Purchase Orders. As these functionalities are highly interconnected within UniField, it was not possible to keep them completely separated; reason why some functionalities such as Field Orders and Purchase Orders are already introduced before their dedicated learning units.
As of UF7.0 (released in January 2018), documents used in procurement (Internal Requests -IR-, Field Orders -FO- and Purchase Orders -PO-) can be processed at header level (for the whole document) or at line level (for specific items in the document). This is a major change that has been introduced in UniField to allow -among others- partial sourcing and partial confirmation of orders.
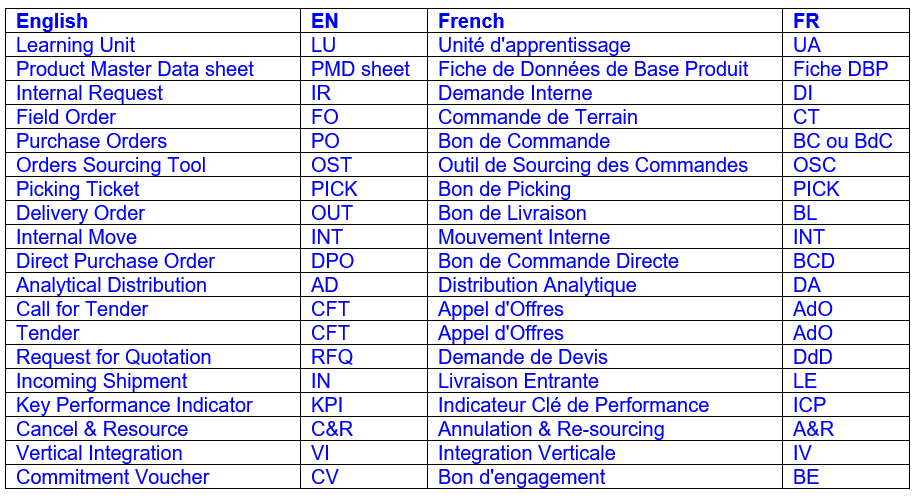
Throughout this chapter, you will find many acronyms. They are mostly used to shorten English words but can be used in the English manual or the French manual (i.e. you may find the acronym PO in the French version of the manual). In the below table, you find the main acronyms used in this chapter with their meaning.
French acronyms, such as the names of the documents in French in a less extend, are barely used. English acronyms and documents names are usually preferred. In the software, references of documents are often built with the English acronyms of the documents (e.g. 18/IR00019, 18/HQ/MW101/FO00033, 18/HQ/MW101/PO00045…), independently of the language in which the software is used.
The language in which UniField is developed is English. The software is then translated in French. That’s the reason why, even if you are connected in French, you could still find some English terminology (on screens, in messages,) while working on UniField. The translation of the software in French is a work in process and some improvements are still needed on this side.
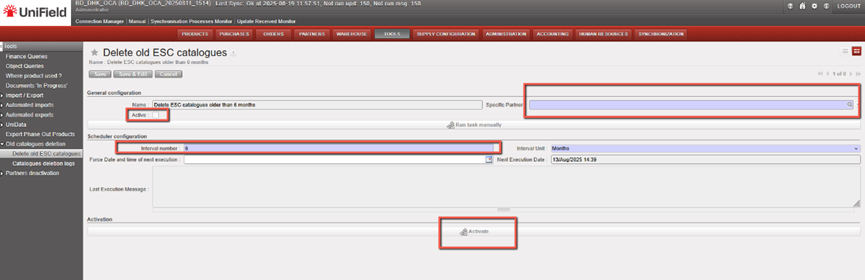
The task is available under Tools > Tools > Delete Old ESC Catalogues. It is deactivated by default, and if active, will run with a default interval of six months between executions.
The functionality will be extended with a new “Specific Partner” field, allowing users to delete ESC catalogues only from a selected supplier. This field is mandatory.
The deletion configuration is defined at instance level.
The list will display:
Source instance
Date of deletion
Number of catalogues deleted
Clicking on a record will show these details plus the Last Execution Message (including the catalogue names).
C. How to update a supplier product catalogue price list.
Go to: Partners/Suppliers
Click on the pencil icon next to the Supplier whose Catalogue list you want to update to open it in edit mode
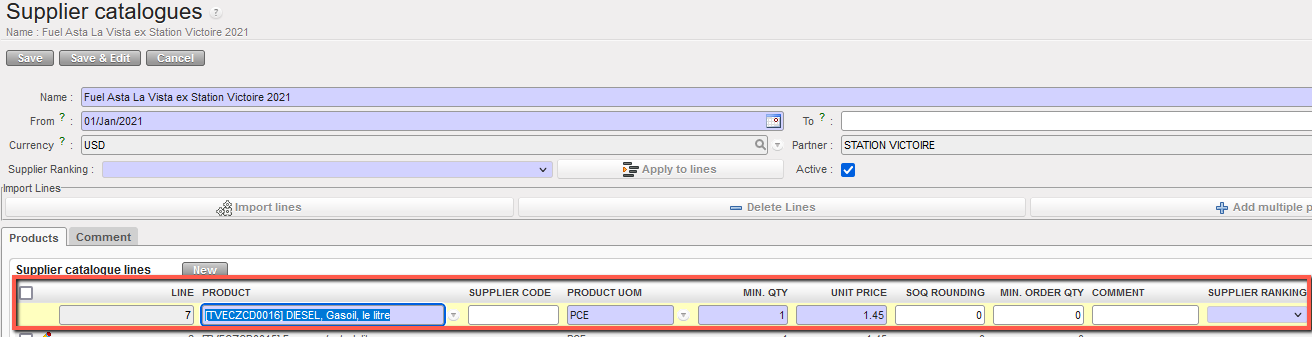
You can add a new line to an existing catalogue. When a new line is added directly to an existing catalogue, this new line must have its ranking assigned unless there is already a ranking at header level
Click on the Catalogues tab
Click on the Edit Catalogue icon next to the version/name of the catalogue you wish to update, this will open the Supplier Catalogue in a new screen
Edit tab
Click on the pencil icon next to the product that you want to update and make the appropriate changes. (NB the system will keep a record of the original and all previous versions of this catalogue list)
Click on the floppy disk icon next to the product line to save and repeat for all products as required.
Click on the Save button to save all changes to this Supplier Catalogue.
Update records
The supplier catalogues are linked to the supplier and can be synchronized. The supplier in each instance must be active in order for the catalogue to be synchronized and directly activated. Any product added / changed, or any change of price can be synchronized this way.
It is possible to see Track Changes for Catalogues which are for external suppliers. This is available via the Action menu in an excel format. This includes entries for any changes to the rankings of the catalogue & its lines.
ESC’s catalogues are created by HQ and only synchronised to coordination. ESC partner must be activated as well as the catalogue by coordination. For catalogues for other external suppliers, these are synched down to project level, but the same rule applies for activating supplier and catalogue to have visibility of these.
N.B : It is not possible to add a product to a valid catalogue if the product is already included in another valid catalogue of the same supplier, otherwise you will receive a blocking warning message.
One optional characteristic of the Supplier record is the supplier catalogue product list. This allows the user to view a list of the products which the supplier is able to supply, together with the prices and other relevant information of these products.
The advantage for users is that as soon as they request, or receive a request for any product which is listed in a supplier catalogue price list, the system will automatically be able to indicate which suppliers are able to source this product, at what price they offer it and other information such as standard packaging types, lead times etc, which can help the user to plan their supply activity more efficiently, as well as facilitating supplier management by providing current and historical information about supplier activities and pricing.
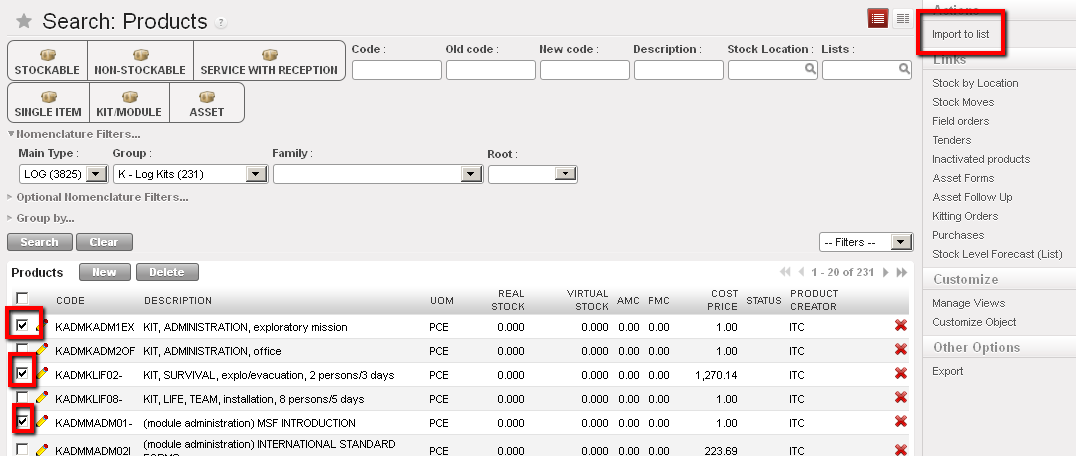
In the Products Search view, enter the appropriate values in the filters in order to view as many as possible of the products you want to add to the list.
Click on Search
From the results, select the checkbox next to each of the products that you want to add, or click on the checkbox at the top of the products lists to select all the products on the same page (but do NOT progress to any other pages)
In the Action Menu on the right-hand side, click on Import to list
Import to a product catalogue
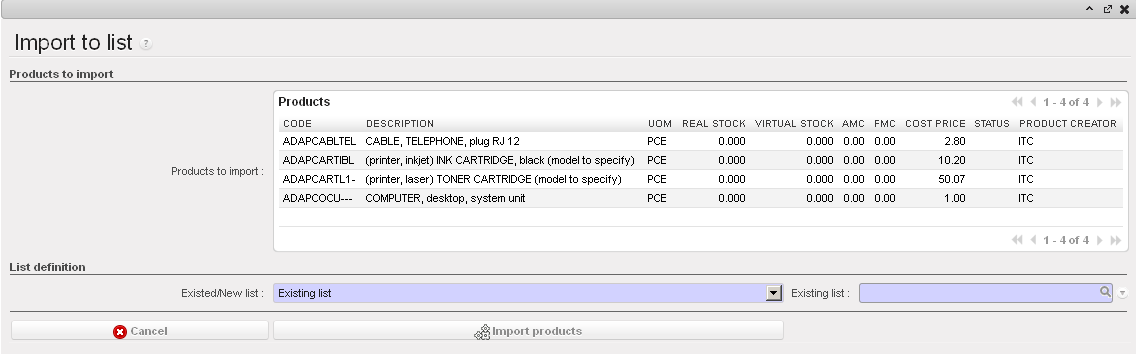
The “Import to” list screen will open and display the list of products you have selected
In the List definition section, select from the options:
Existing list, if you want to add these products to an existing list
New list, to create a new list
Replace list, to replace a list which is already in existence
If you have selected either the Existing or Replace options, you will need to select the Existing list that you want to add to or replace.
If you have selected the New list option, enter the Name of the new list
And Enter the type
List, if for a list
Sub-list, if for a sub list which belongs to a “parent” list
Click on Import products button to import products to list
In the Product list screen enter all relevant details:
The fields Type and Name will have already been populated according to the information already in the system.
Import product list
We use cookies to ensure that we give you the best experience on our website. If you continue to use this site we will assume that you are happy with it.




 next to the Supplier whose Catalogue list you want to update to open it in edit mode
 next to the version/name of the catalogue you wish to update, this will open the Supplier Catalogue in a new screen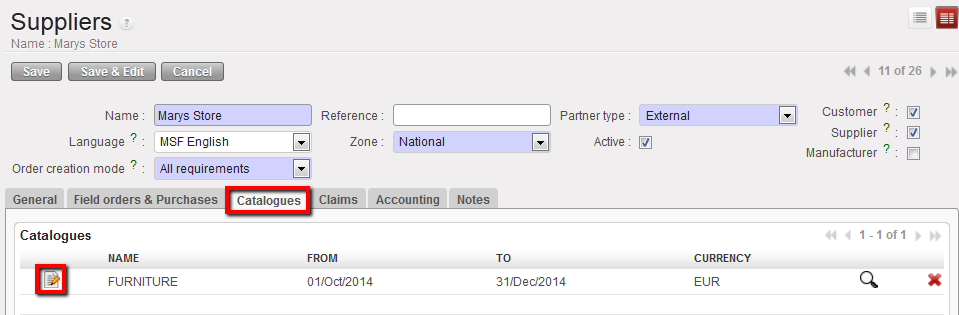
 next to the product that you want to update and make the appropriate changes. (NB the system will keep a record of the original and all previous versions of this catalogue list)
 next to the product line to save and repeat for all products as required.