B. How to complete an Asset Form

Supply User Manual ENG -> Products -> 3.5 Assets -> B. How to complete an Asset Form

B. How to complete an Asset Form

The process described below should be carried out as soon as the asset is received in capital, to ensure continued system follow up. In most cases this process should be initiated automatically by the system at point of reception. (See LU-SU4101 Incoming shipments, “How to Receive an Asset”)

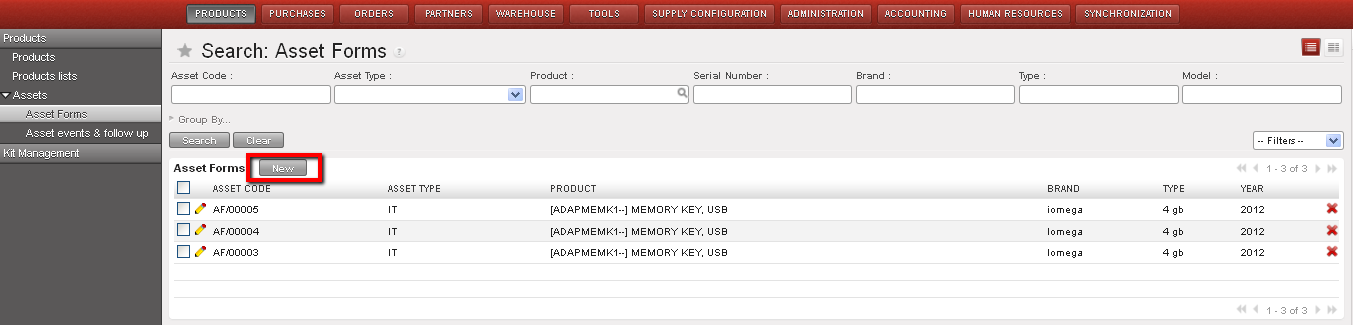
To complete an Asset reception form, go to: Products/ Assets /Asset Forms

Asset Record list view

  1. Click on the “New” button to open a new form


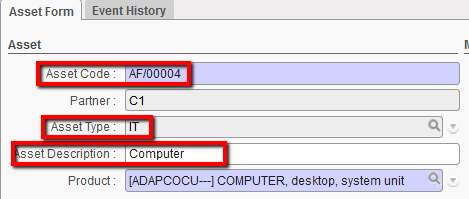
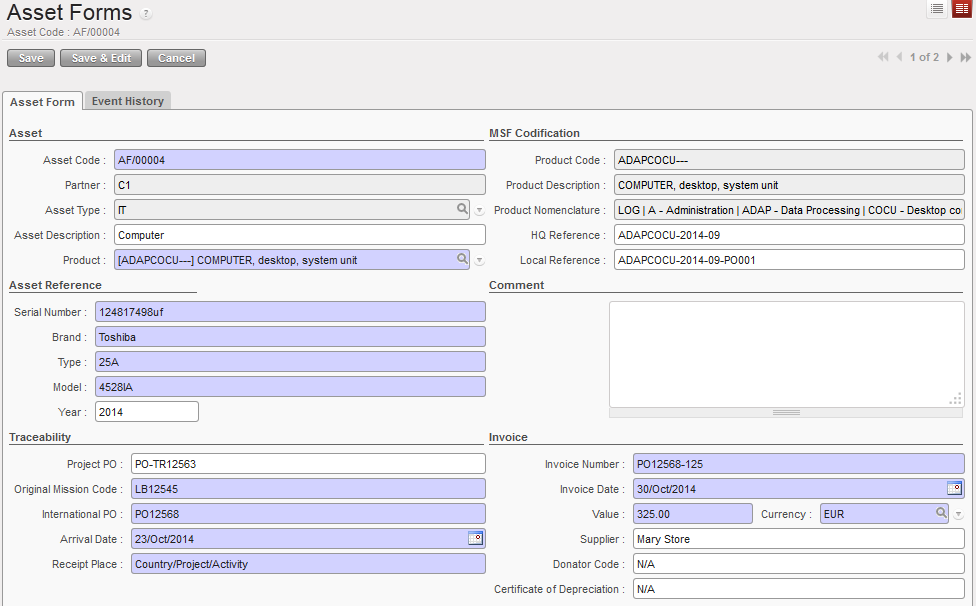
1.1 Asset Code: the system generated a unique asset code for the item.

1.2 Asset Type: It will be generated once the product list is added (either IT, Transport, Medical, Telecommunication or General) (see step 2)


1.3 Add any relevant details to the Asset Description

Asset form creation-1

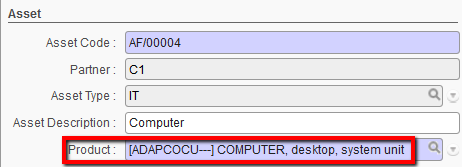
2. Enter which product the asset represents. You can either type this (code or description) directly into the field, or, if you would like to see all items which are classified as assets, click on the magnifying glass to open a search & list view window. Note that the system will have already filtered products to only show products marked as assets. Enter any other relevant filters, search and select the relevant product.

If you cannot find the product representing your asset, you may need to check that it corresponds to the asset criteria, and if this the case, request for the product master file to be updated to reflect this.. Notice that when you have entered the Product, the Asset Type will have been generated according to the product nature.

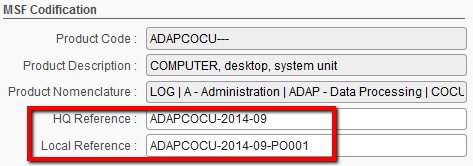
In the MSF Codification Section, the Product Code, Description and Nomenclature will have pulled through for the relevant product.

Asset form creation-2

3. HQ Reference and Local Reference: Depending on who is responsible for the initial registration of the asset, these fields can be filled with any useful information which will help to track the asset (e.g. the number / reference of asset sticker on the item).

Asset form creation-3

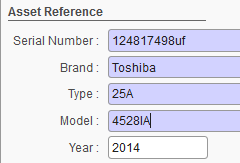
4. In the Asset Reference section, enter the Serial Number of the asset. This is the Manufacturer’s number to help identify the physical asset

5. Enter the brand and model of the asset

6. Enter the year of the asset if relevant

Asset form creation-4

7. Enter any relevant comments in the Comments field

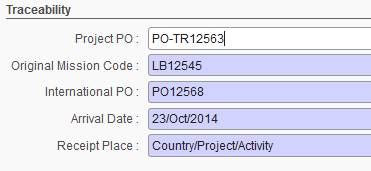
8. In the Traceability section, enter any Project PO reference

9. Enter the Original Mission code

10. Enter the International PO reference

11. The Arrival date, will have been populated with today’s date but is editable so this should reflect the date when you received the asset

12. Enter details of the Receipt Place (Country/Project/Activity)

Asset form creation 5

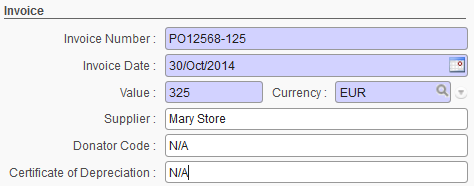
13. In the Invoice Section, enter the Supplier Invoice Number (this should be related to the International PO) and Invoice Date. If no invoice has been received yet, enter a value and then update it when the invoice has been received.

14. Enter the Value & Currency of the amount and the currency in which the invoice was made

15. Enter the name of the Supplier (the one on the International PO)

16. Enter the Donator Code for the name of the donor if funded on external funding (Finance should be able to provide this)

17. Enter the reference of the Certificate of Depreciation, this is for the reference (from Finance) if the value of this asset is to be depreciated (see finance regulations on how assets are managed)

Asset form creation 6

18. Click on Save to save your new Asset Form

Asset form creation 7

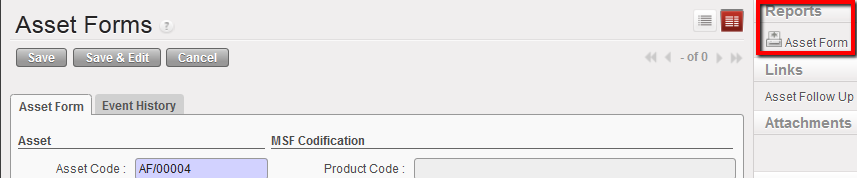
You can print an asset form by going to the Reports menu and select Asset Form

Asset Form report

A. LU Introduction (LU-SU2104)

Supply User Manual ENG -> Products -> 3.5 Assets -> A. LU Introduction (LU-SU2104)

A. LU Introduction (LU-SU2104)

Assets are a sub type of stockable product. They are considered as a kind of product which is important to track and have visibility of. A product is classified as an asset due to various criteria, principally the value of the product, although other criteria may apply.

Often assets will be a type of equipment (e.g. vehicles, fridges, generators etc) and some will have a defined life span, for example vehicles may have a life span of 5 years. For more details on the classification of assets, see the Supply Guidelines of your OC. 

It is necessary to track assets to a greater degree, partly due to their high value, and partly to ensure, for equipment in particular, that they are regularly maintained to be in good condition for use, and in order to make the best use of MSF resources. This is why the system allows us to record and track assets on an individual basis.  Finance are also involved in asset management and tracking, and there will be a UniField functionality for Finance to use for the depreciation of assets which will be developed in the second phase and added to the Finance User Manual.


Asset forms

The way that we manage assets is different of other types of stock, namely we need to track them individually. As soon as we receive them, we will want to register them as assets and record extra details. In UniField, we would record these details in the asset form. The Asset form is a form which corresponds to specific item of a product. E.g. even if you have 3 identical Toshiba laptops in your office, you would need to have 3 asset records, one for each, and each one will detail the unique details of that asset.

Asset tracking

There are several stages in the lifecycle of an asset which need to be tracked. UniField offers this possibility to make it easy to maintain a complete record of these events and follow up of assets. 

Asset movements

In the case where an asset is physically sent somewhere (e.g. from the coordination to a project) the system will provide the ability to attach the asset form onto the picking/transport transaction, which will then be synchronised so that the receiving instance can view all details of the individual asset record and update it as necessary.

Asset verification

It is best practice to carry out a physical verification of all assets in a location on a regular basis. For more details on the frequency, what should be checked and who is responsible for this physical verification refer to your OC guidelines. To facilitate this process, it is possible to print an individual asset record, or to print the entire asset records according to the filter(s) used.

J. a) Order follow up

Supply User Manual ENG -> 4. Procurement -> 4.2 LU-SU3101: Internal Requests (IRs) -> J. a) Order follow up

J. a) Order follow up

  1. Click on the check box on the left side of the line corresponding to the Internal Request to be followed-up.
  2. The action menu on the right-hand side is displayed.
  3. Click on the “Order Follow Up” option.

This image has an empty alt attribute; its file name is IR-111-1024x143.png

Following-Up an Internal Request

    4. A detailed Order Follow Up is displayed.

    5. The “Update” button can be used to refresh the page.

    6. The report can be exported in Excel or PDF via the corresponding buttons.

Export IR follow up to XLS or PDF format

 
  • Users can search for IRs in the main List view for Internal requests by using filters: Order Reference, Origin, Requestor and Location Requestor.
IR searching by Location Requester

H. How to cancel or delete a whole Internal Request.

Supply User Manual ENG -> 4. Procurement -> 4.2 LU-SU3101: Internal Requests (IRs) -> H. How to cancel or delete a whole Internal Request.

H. How to cancel or delete a whole Internal Request.

Internal Requests can be cancelled by clicking on the “Cancel document” button (with the red cross) in the lower part of the order.

Note that the “Cancel” button (only available in edit mode) at the top of the screen (without the red cross) will only cancel the changes you made in the document since the last time you saved it.

An IR can be cancelled if it is in either “Draft“, “Draft-p“, “Validated” or “Validated-p” state. After this, the IR can only be cancelled at another following stage (e.g. at PO stage). Please note that if Cancellation is done at OUT or PICK stage after IR has been sourced to a PO then the IR will be “Closed” whereas it will be “Cancelled” if the sourcing is done “from Stock”.

When an IR is cancelled, its status turns to “Cancelled” and all its lines also take the status “Cancelled“. Note that by default, cancelled IR lines are not showed. If you want to see them, use the filter drop-down box available at the top of the products table. This filter allows to hide cancelled lines, show all lines or show cancelled lines only.

IR cancellation
IR cancelled
Filtering lines appearing on an IR

An Internal Request can also be deleted. This can only be done if the IR is in the state “Draft” (at header level). Use the red cross located on the IR you want to delete on the “Search: Internal Requests” screen to delete a “Draft” IR.

Deleting a “Draft” IR

G. How to update an Internal Request.

Supply User Manual ENG -> 4. Procurement -> 4.2 LU-SU3101: Internal Requests (IRs) -> G. How to update an Internal Request.

G. How to update an Internal Request.

Internal Request updates can be done manually in the IR in “Draft” , “Draft-p“, “Validated” or “Validated-p” status.

Go to: Orders / Orders / Internal Requests

  1. Enter the necessary information in the filters to find your IR and click on Search, then click on the pencil icon next to the IR you wish to update to open it in edit mode.
  2. Update some information on the header of the IR if needed (some header fields can only be updated when in Draft/Draft-p).
  3. To update a specific line, click on the pencil icon at the left of the line you wish to update.
  4. Update the line as needed (UoM, quantity, unit price, notes,…).
  5. Save the line by clicking on the floppy disk at the right of the line or via a click on “Enter“.
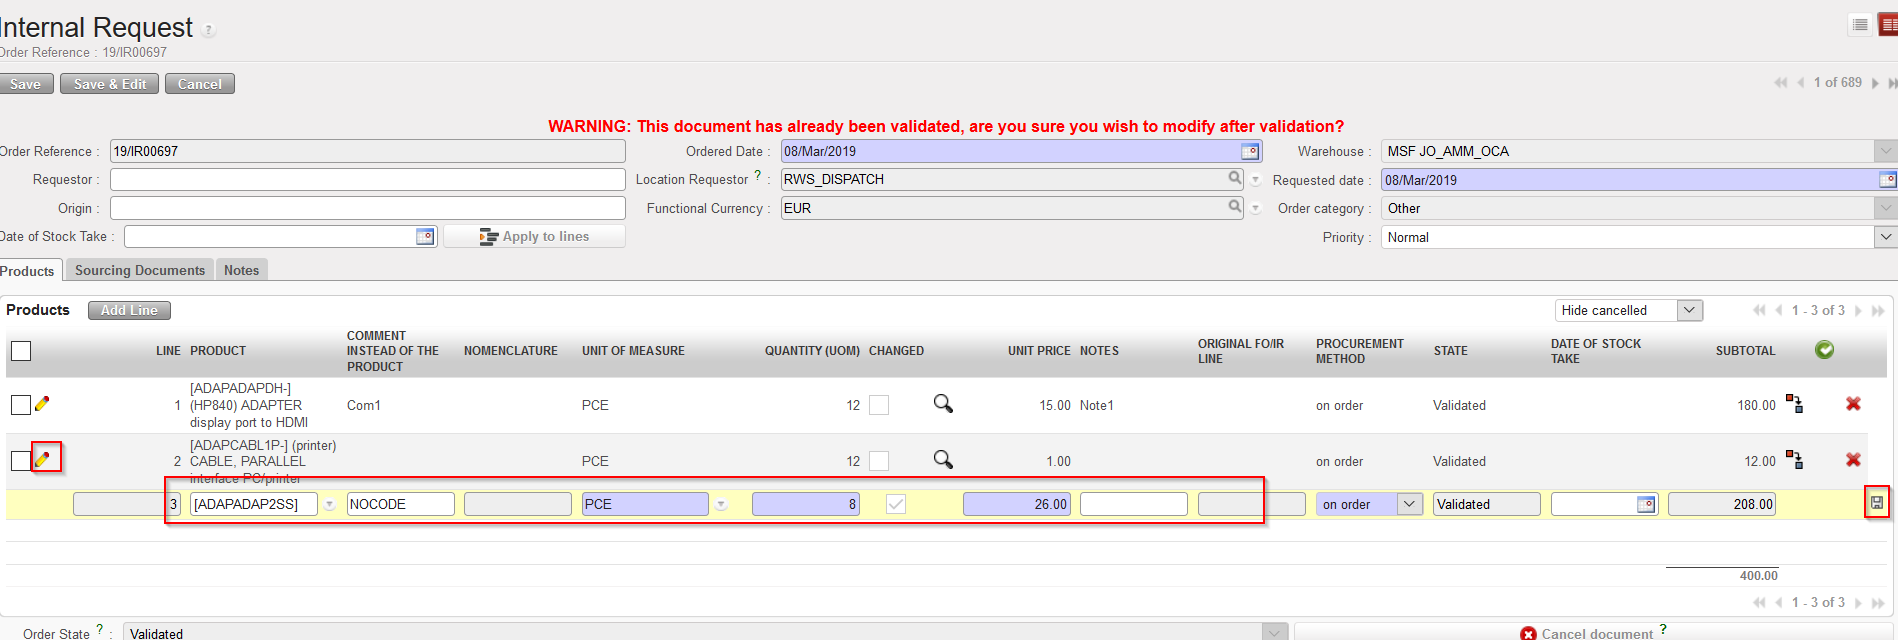
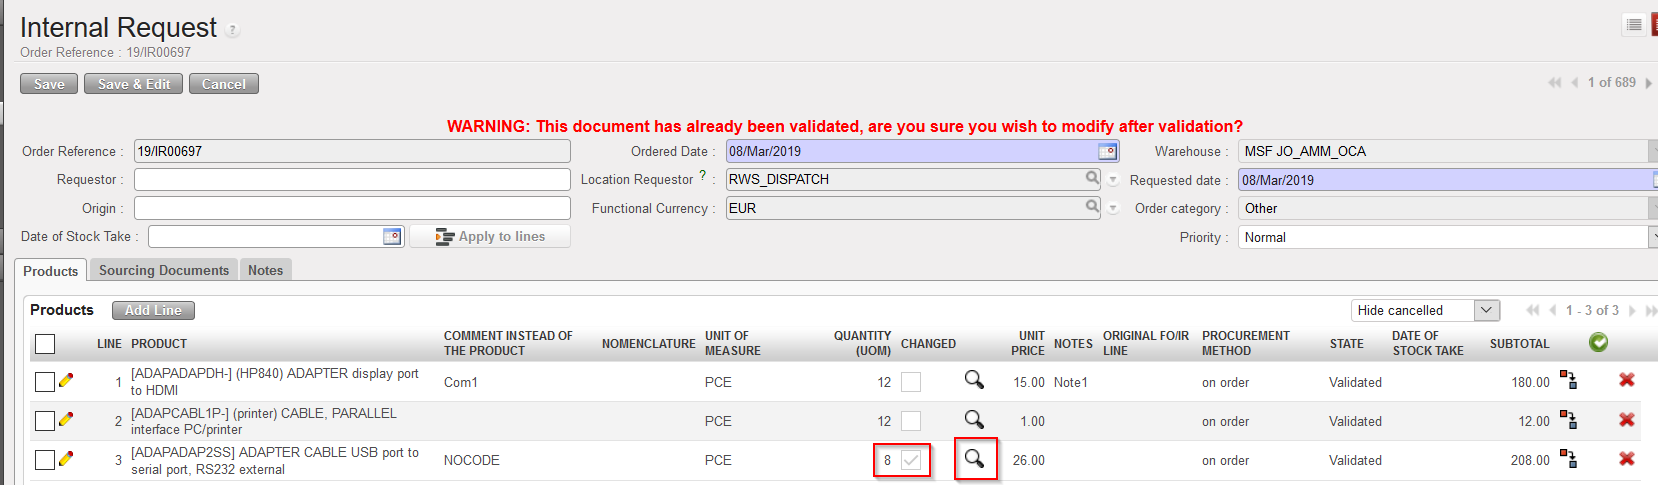
Please note that any change on “Product”, “Quantity”, “Price” and “UoM” to a “Validated” line will trigger the ticking of the “Changed” checkbox. Changes can be seen by clicking on the “Magnifier” icon; once clicked , a pop up will display the changes on the specific product line with “current value” vs “original value”.

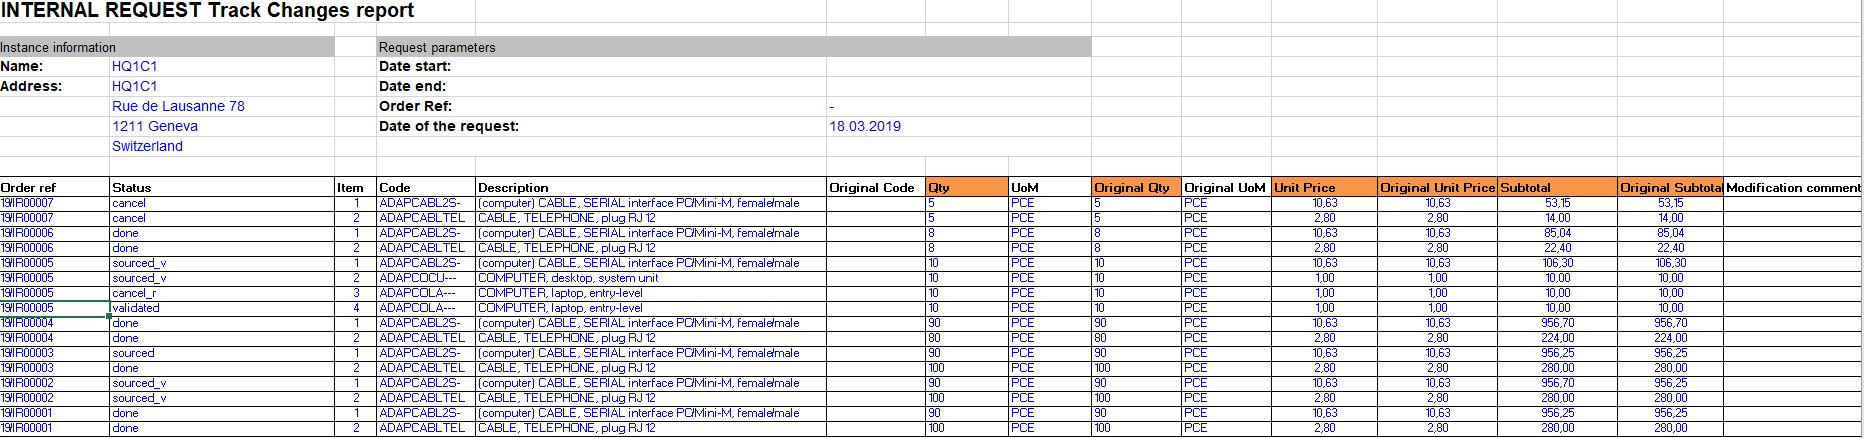
Please note that there is as well a new report that enables to see all these “track changes” which can be find under “Order> Orders” IR Track Changes

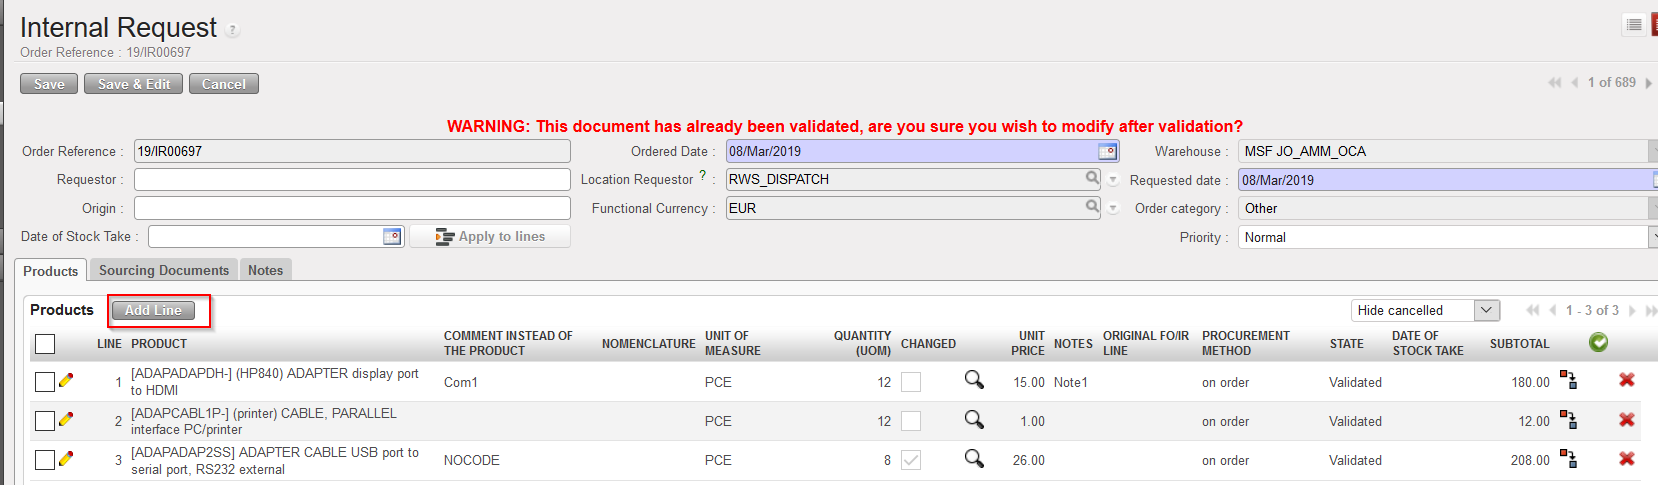
As long as the IR is in “Validated” status, it is still possible to add new line to the order however this will trigger the “Changed” checkbox.

The addition of new lines to a “Validated” IR is conditioned by User rights. A new button named “Add line” will replace the “New” button which is only used for Draft IR. New lines added at “Validated” state will still be created as “Draft” and will need validation from authorized user.

F. b) How to validate an Internal Request at line level.

Supply User Manual ENG -> 4. Procurement -> 4.2 LU-SU3101: Internal Requests (IRs) -> F. b) How to validate an Internal Request at line level.

F. b) How to validate an Internal Request at line level.

  1. Search for and open (in edit or display mode) the IR you wish to validate.
  2. You may then

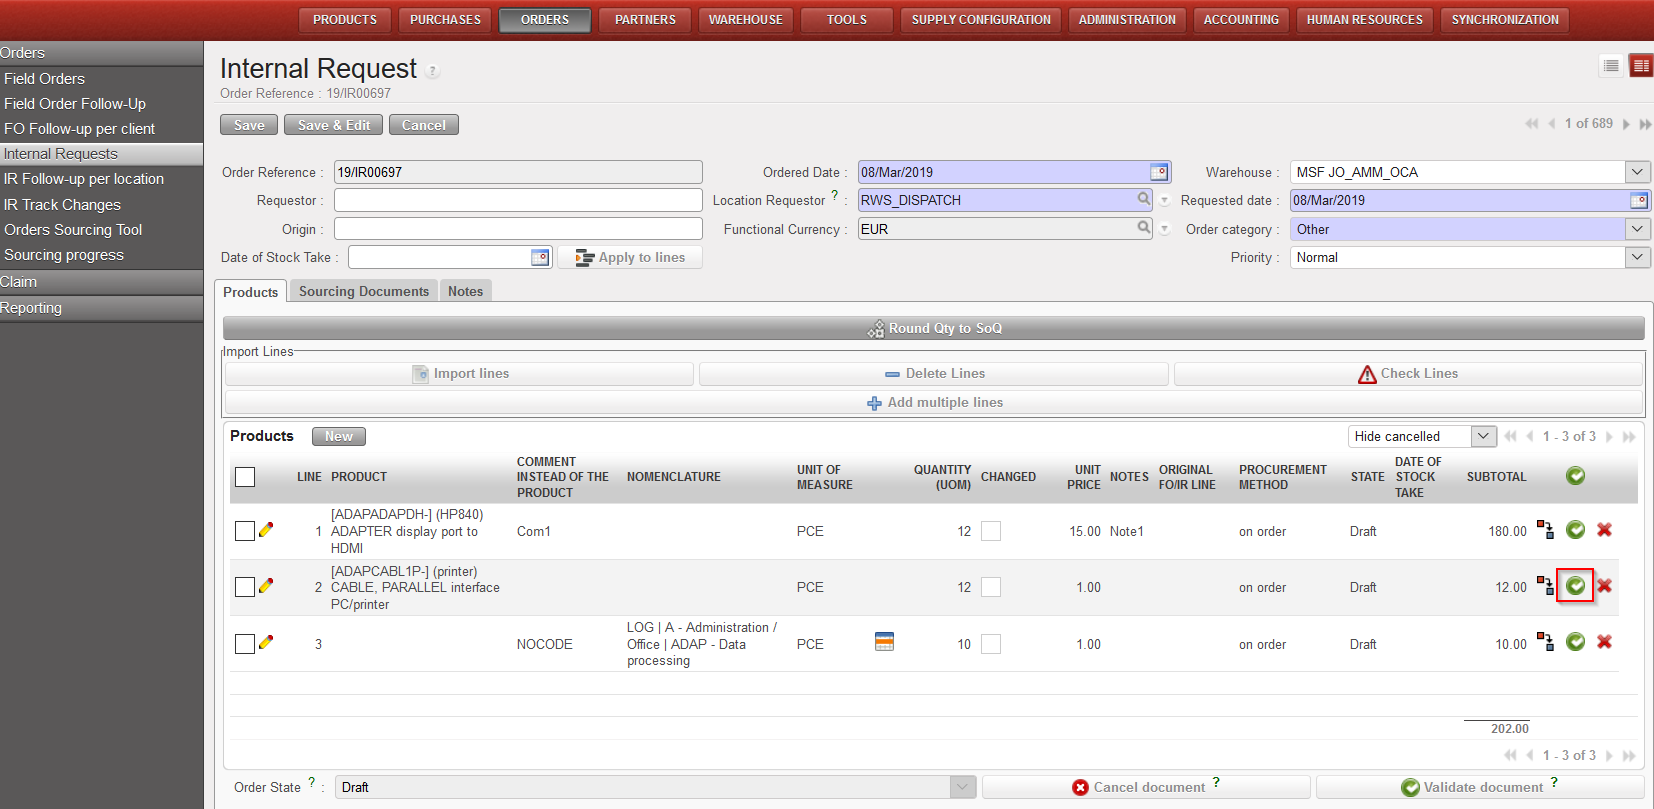
1.1 Validate only 1 line of the IR by clicking on the green icon at the right of the line you want to validate.

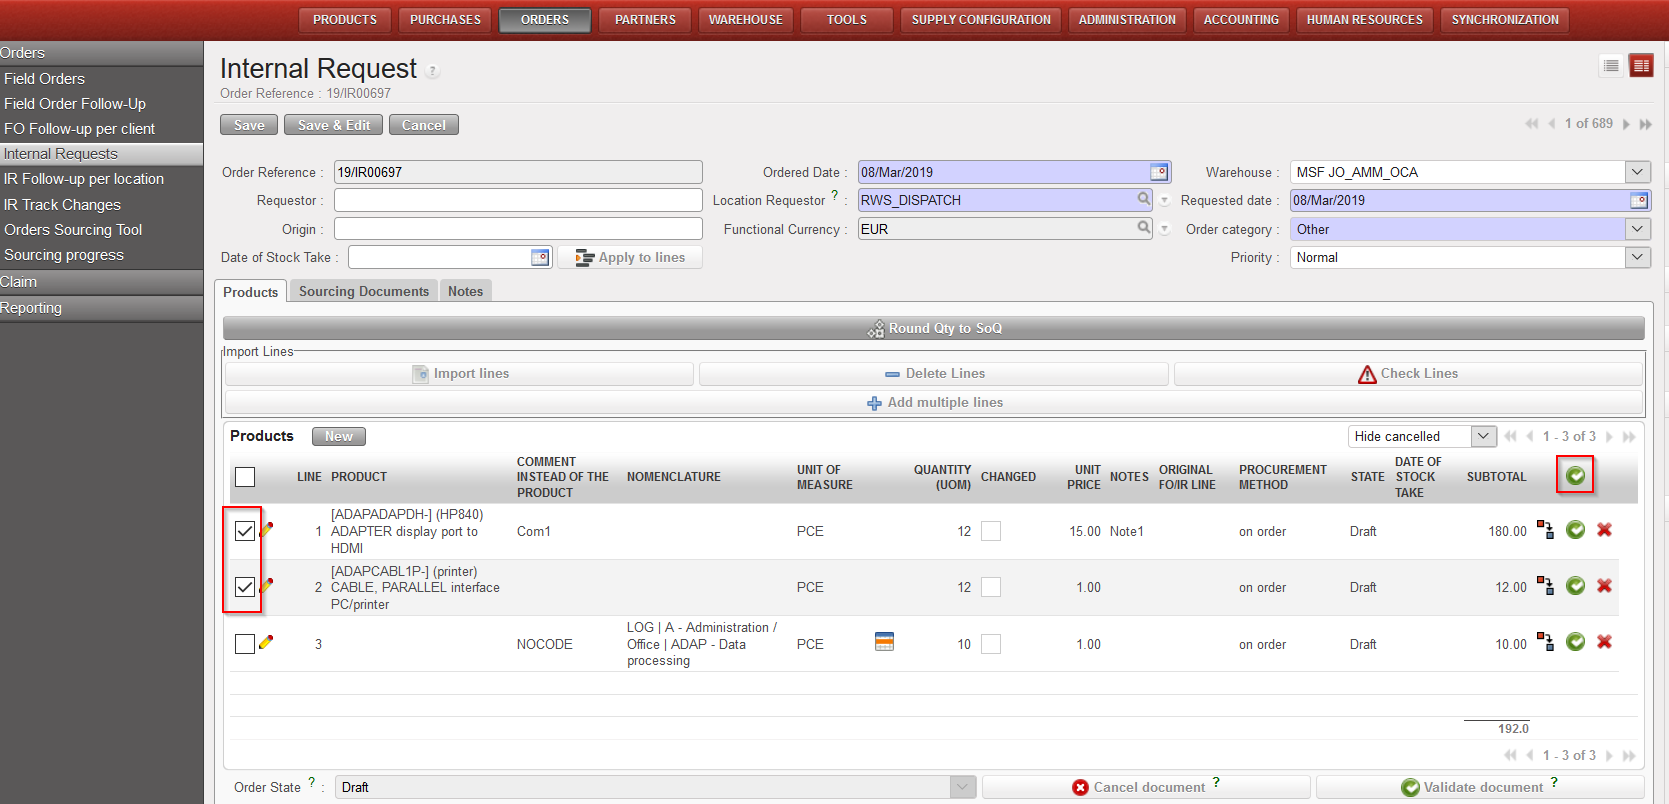
1.2 Validate several lines of the IR by selecting the lines you want to validate (use the check boxes on the left of the lines) and validating the selected lines (use the green icon at the top of the products table, next to “SUBTOTAL”).

Validate 1 line on an IR
Validate several lines on an IR

Once Validated:

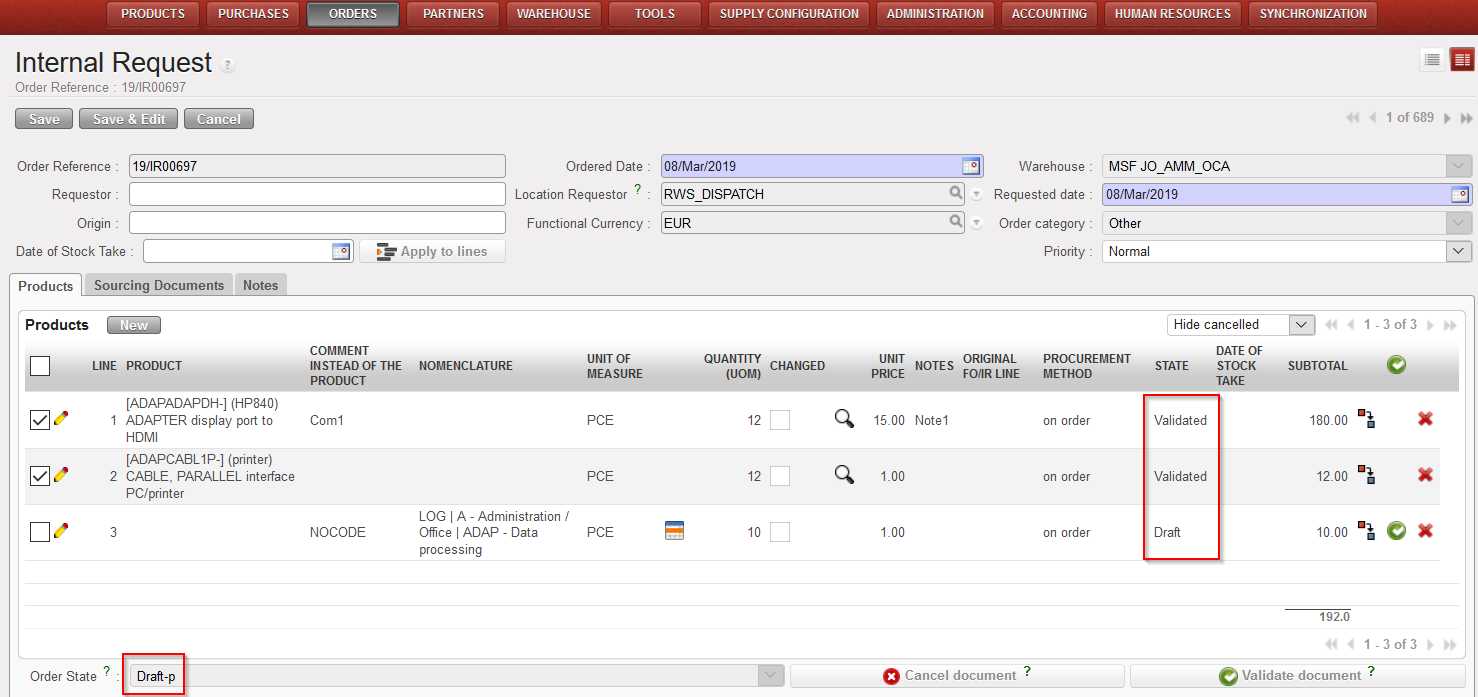
-The validated line(s) of the IR switch to the state “Validated” (while the other lines stay in the state “Draft”).

-The IR switches to the state “Draft-p“.

-No warning message is displayed as the lines of the IR which remain in the state “Draft” can still be modified.

IR partially validated

Remember that to be able to validate partially an Internal Requests, your user must have the appropriate user rights.

F. a) How to validate an Internal Request at header level.

Supply User Manual ENG -> 4. Procurement -> 4.2 LU-SU3101: Internal Requests (IRs) ->F. a) How to validate an Internal Request at header level.

F. a) How to validate an Internal Request at header level.

  1. Search for and open (in edit or display mode) the IR you wish to validate.
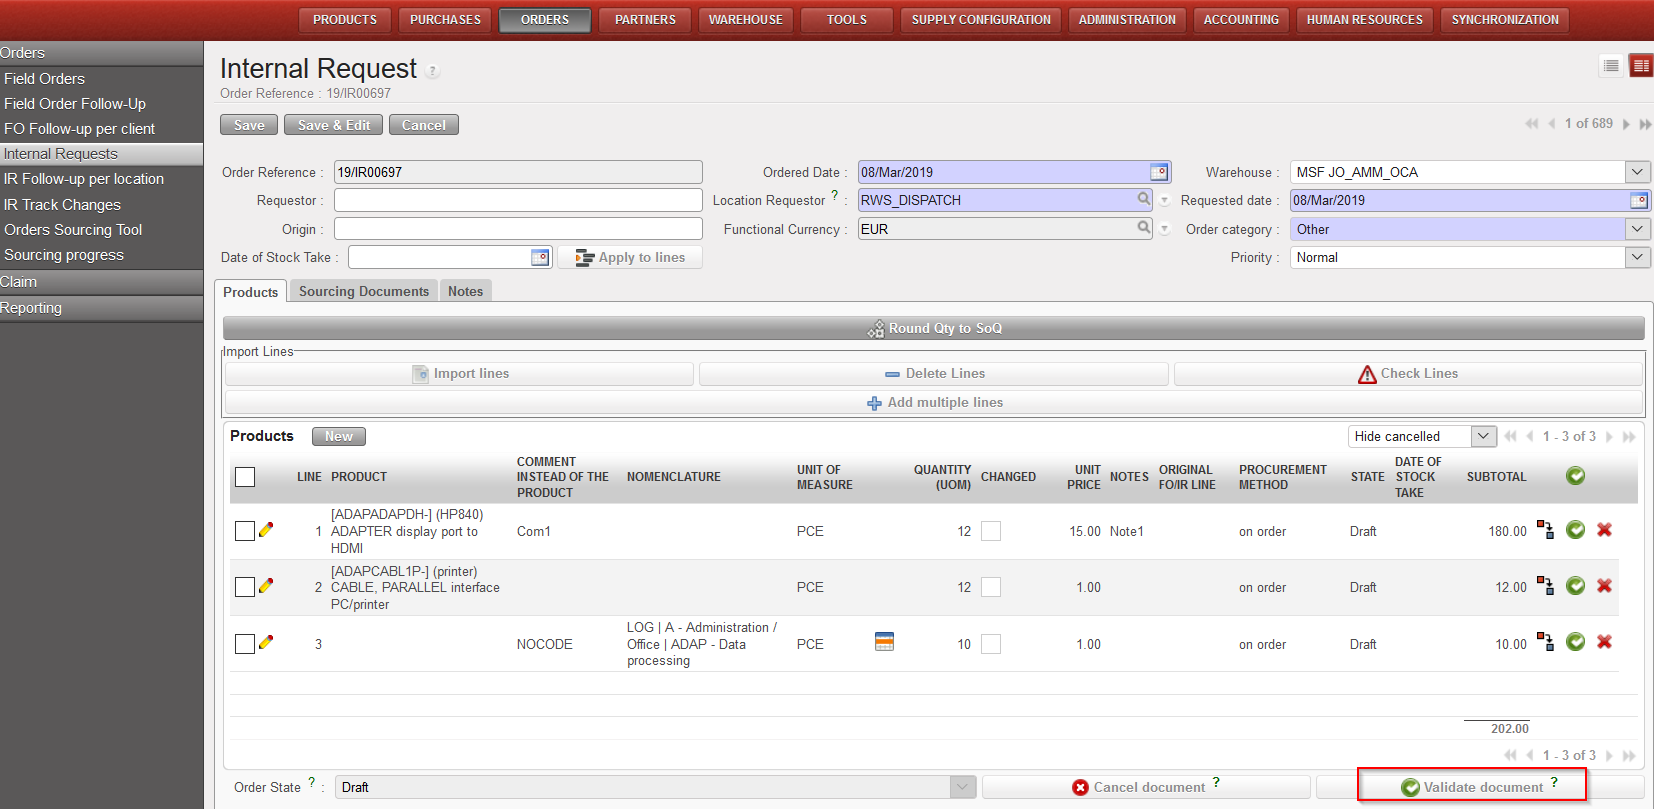
  2. Click on the “Validate Document” button at the bottom of the screen.
IR validation

Once Validated:

-All the lines of the IR switch to the state “Validated“.

-The IR switches to the state “Validated“.

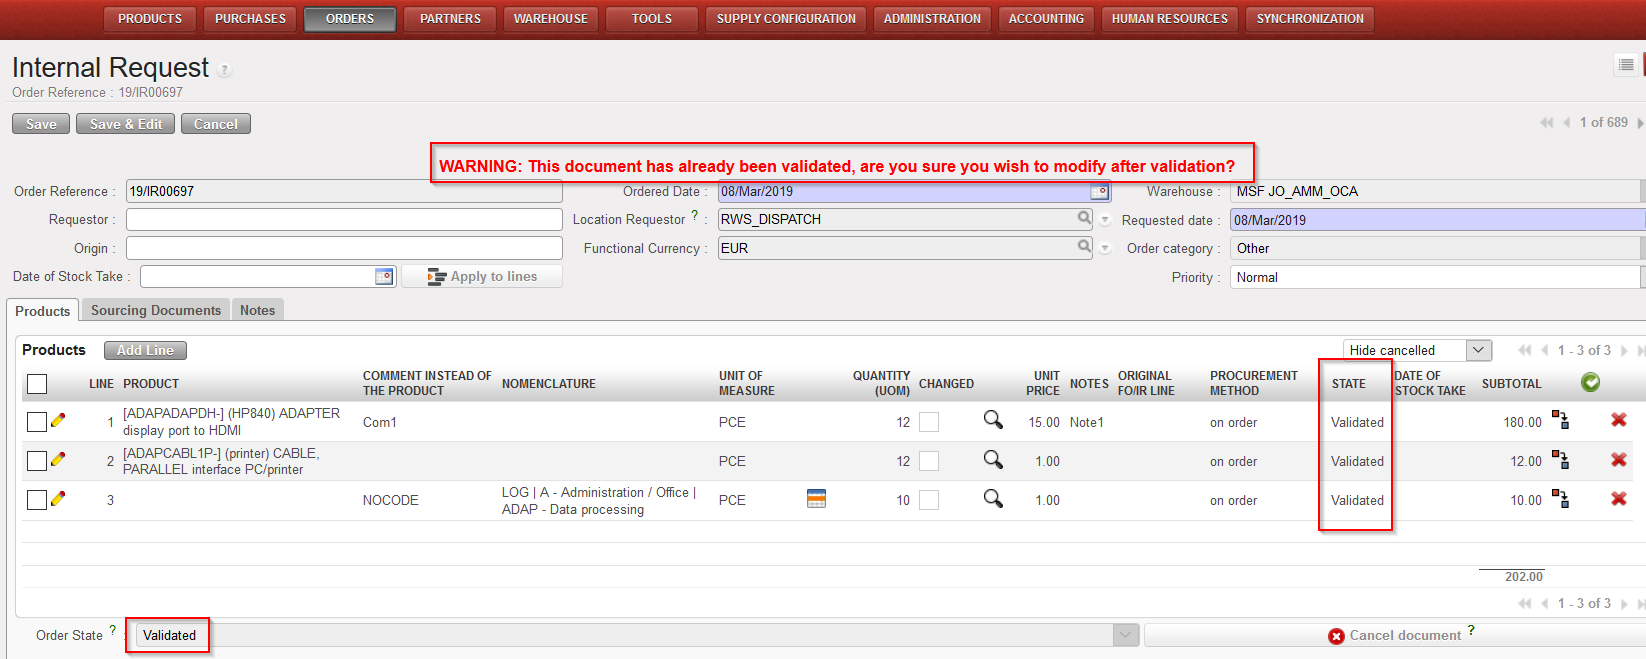
-A red non-blocking warning message is displayed to remind that changes are not recommended after validation.

IR validated

F. How to validate an Internal Request.

Supply User Manual ENG -> 4. Procurement -> 4.2 LU-SU3101: Internal Requests (IRs) -> F. How to validate an Internal Request.

F. How to validate an Internal Request.

An Internal request can be validated at header level (validation done for all the lines of the IR in one click) or at line level (validation done for one or some lines of the IR only).

In the first case, the validation will have as consequence that all the lines of the IR will switch to the state “Validated” and the IR itself (at header level) will also switch to the state “Validated“. In the second case, the validation will have as consequence that one or some lines of the IR will switch to the state “Validated” while the IR itself (at header level) will switch to the state “Draft-p“.

Note that to be able to validate an IR at line level, a user must be granted specific user rights. User should have the group Sup_Valid_Line_IR.

Go to: Orders / Orders / Internal Requests

a) How to validate an Internal Request at header level

b) How to validate an Internal Request at line level