Mouvements vers/depuis les différents types de zone
Une autre manière de distinguer l’utilisation des différents types de zone est de lister les possibilités de mouvements vers (destination) et depuis (source) ces zones. C’est ce que nous tentons de faire dans cette section. Notez que la liste des mouvements possibles n’est pas exhaustive. Seuls les mouvements les plus utilisés sont listés. Des informations plus détaillées sont disponibles dans le chapitre Commandes & Achats et dans le chapitre Entrepôt.
Stock principal (“Stock/MED/LOG”) comme destination
Si un PO est créé manuellement (from scratch), les marchandises sont réceptionnées dans le stock principal “Stock/MED/LOG” (zone déterminée par le type principal des produits) via la zone “Entrée” après traitement manuel ou automatique du INT.
Si un PO est créé suite au sourcing sur commande d’une IR dont la Zone de Demande est une zone du stock principal (“Stock/MED/LOG”), les marchandises sont réceptionnées dans le stock principal (zone déterminée par la Zone de Demande de l’IR) via la zone “Entrée” après traitement manuel ou automatique du INT.
Des marchandises peuvent être transférées vers le stock principal (zones “Stock/MED/LOG”) via un INT créé manuellement.
Des marchandises peuvent être transférées vers le stock principal (zones “Stock/MED/LOG”) via un INT créé suite au sourcing du stock d’une IR dont la Zone de Demande est une zone du stock principal (“Stock/MED/LOG”).
Des marchandises peuvent être intégrées au stock principal (zones “Stock/MED/LOG”) via un IN créé manuellement.
2. Stock principal (“Stock/MED/LOG”) comme source
Le stock principal (“Stock/MED/LOG”) peut être utilisé comme Zone Source sur un RCR.
Le stock principal (“Stock/MED/LOG”) peut être utilisé comme Zone Source depuis l’OST pour sourcer IR et FO.
Le stock principal (“Stock/MED/LOG”) peut être utilisé comme Zone Source sur un INT créé manuellement.
Le stock principal (“Stock/MED/LOG”) peut être utilisé comme Zone Source sur un OUT créé manuellement.
3. Stock Intermédiaire (IS) comme destination
Si un PO est créé suite au sourcing sur commande d’une IR dont la Zone de Demande est un IS, les marchandises sont réceptionnées dans cet IS via la zone “Entrée” après traitement manuel ou automatique du INT.
Des marchandises peuvent être transférées vers un IS via un INT créé manuellement.
Des marchandises peuvent être transférées vers un IS via un INT créé suite au sourcing du stock d’une IR dont la Zone de Demande est cet IS.
Des marchandises peuvent être intégrées dans un IS via un IN créé manuellement.
4. Stock Intermédiaire (IS) comme source
Un IS peut être utilisé comme Zone Source sur un RCR.
Un IS peut être utilisé comme Zone Source depuis l’OST pour sourcer IR et FO.
Un IS peut être utilisé comme Zone Source sur un INT créé manuellement.
Un IS peut être utilisé comme Zone Source sur un OUT créé manuellement.
5. Unité de Consommation Interne (ICU) comme destination
Si un PO est créé suite au sourcing sur commande d’une IR dont la Zone de Demande est une ICU, les marchandises sont réceptionnées dans cette ICU via la zone “Entrée” après traitement manuel ou automatique du INT.
Des marchandises peuvent être transférées vers une ICU via un INT créé manuellement.
Des marchandises peuvent être transférées vers une ICU via un INT créé suite au sourcing du stock d’une IR dont la Zone de Demande est cette ICU.
Des marchandises peuvent être intégrées dans une ICU via un IN créé manuellement.
6. Unité de Consommation Interne (ICU) comme source
Une ICU peut être utilisée comme Zone Source sur un RCR.
Une ICU peut être utilisée comme Zone Source depuis l’OST pour sourcer IR et FO.
Une ICU peut être utilisée comme Zone Source sur un INT créé manuellement.
Une ICU peut être utilisé comme Zone Source sur un OUT créé manuellement.
7. Unité de Consommation Externe (ECU) comme destination
Si un PO est créé suite au sourcing sur commande d’une IR dont la Zone de Demande est une ECU, les marchandises sont réceptionnées dans cette ECU via la zone Transbordement après traitement manuel du OUT.
Une ECU peut être utilisée comme Zone Destination sur un RCR.
Des marchandises peuvent être transférées vers une ECU via un OUT (ou pick/pack/ship) créé suite au sourcing du stock d’une IR dont la Zone de Demande est cette ECU.
8. Unité de Consommation Externe (ECU) comme source
Une ECU peut être utilisée comme Zone Source sur un IN créé manuellement afin d’enregistrer un retour en stock depuis une unité de consommation.
PO manuel (from scratch)
PO < IR
RCR
Sourcing IR/FO dans OST
INT manuel
INT <IR
IN manuel
OUT manuel
OUT <IR
Stock/MED/LOG
Destination
OUI (1)
OUI (1)
NON
–
OUI
OUI
OUI
NON
NON
Stock/MED/LOG
Source
–
–
OUI
OUI
OUI
–
NON
OUI
–
IS
Destination
NON
OUI (1)
NON
–
OUI
OUI
OUI
NON
NON
IS
Source
–
–
OUI
OUI
OUI
–
NON
OUI
–
ICU
Destination
NON
OUI (1)
NON
–
OUI
OUI
OUI
NON
NON
ICU
Source
–
–
OUI
OUI
OUI
–
NON
OUI
–
ECU
Destination
NON
OUI (2)
OUI
–
NON
NON
NON
NON
OUI
ECU
Source
–
–
NON
NON
NON
–
OUI (3)
NON
–
La destination est en fait la destination du INT lié au IN (dont la destination est la zone “Entrée”) lié au PO
La destination est en fait la destination du OUT lié au IN (dont la destination est la zone “Transbordement”) lié au PO
Utilisé pour retours en stock depuis les ECUs
L’analyse pourrait être poussée plus loin en analysant les mouvements possibles vers/depuis:
-la zone “Entrée”
-la zone “Transbordement”
-les zones “Sortie”, “Colisage”, “Shipment”, “Distribution”
-les zones de quarantaine “Quarantaine (analyse)” et “Expiré / Endommagé / Pour Rebus”
-les zones fournisseurs “Fournisseur MSF” et “Autre Fournisseur”
-les zones clients “Client MSF” et “Autre Client”
-les zones virtuelles “Pas stockable”, “Approvisionnement”, “Service”, “Inventaire (pertes & profits)”, “Destruction” et “Assemblage de Kit”
L’utilisation de ces zones est abordée dans le chapitre Entrepôt ainsi que dans le chapitre Commandes & Achats.
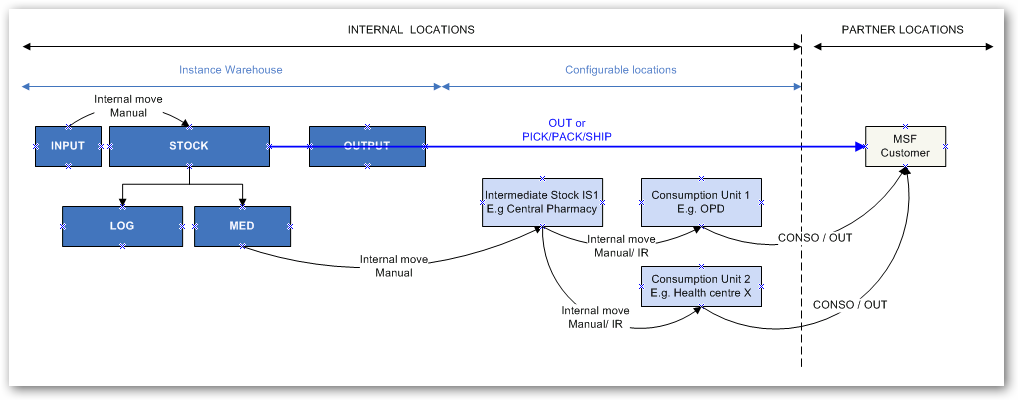
Des Stocks Intermédiaires et des Unités de Consommations Internes ou Externes peuvent être créés sur une instance afin de refléter l’organisation physique des stocks d’une coordination ou d’un projet et de supporter le flux physique des marchandises observé sur le terrain.
6 configurations (depuis la plus simple vers la plus complexe) sont illustrées ci-dessous. Ces 6 configurations se focalisent sur une consommation enregistrée depuis le stock (i.e. pas sur commande). Notez que des configurations hybrides mélangeant les éléments de ces 6 configurations sont possibles.
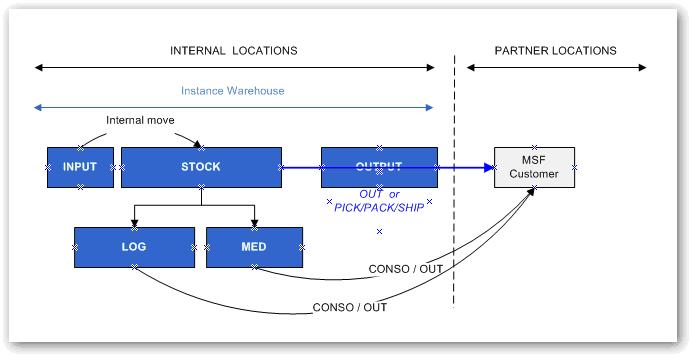
Configuration minimale (pas de zone configurable créée)
Les marchandises achetées sont réceptionnées et conservées dans le stock principal (Stock/MED/LOG).
Si ces marchandises sont consommées localement (sur l’instance) par un demandeur MSF, la consommation est enregistrée via un Rapport de Consommation Réelle avec le stock principal (Stock/MED/LOG) comme Zone Source et la zone partenaire générique “Client MSF” comme Zone Destination. Si ces marchandises sont consommées par un demandeur non-MSF, la zone partenaire générique “Autre Client” peut être utilisée comme Zone Destination. Les Demandes Internes ne sont pas utilisées pour enregistrer les consommations locales avec cette configuration.
Si ces marchandises sont expédiées vers un partenaire (un client, suite au sourcing d’une FO), la consommation est enregistrée au moyen d’un Bon de Livraison (OUT) ou via PICK/PACK/SHIP. La Zone Source du OUT ou du PICK est le stock principal (Stock/MED/LOG). La Zone Destination du OUT ou du SHIP est la zone partenaire “Client MSF” (ou “Autre Client” si le client est un partenaire externe).
Configuration minimale
Avantages
Inconvénients
Contrainte
Rapide, facile à gérer et à comprendre.
Les ressources requises sont minimales.
Visibilité de stock dans l’entrepôt (quantités, valeur, dates d’expiration).
Les marchandises livrées depuis le stock sont considérées comme consommées.
Pas de visibilité sur d’éventuels stocks secondaires dans le système.
Minimum
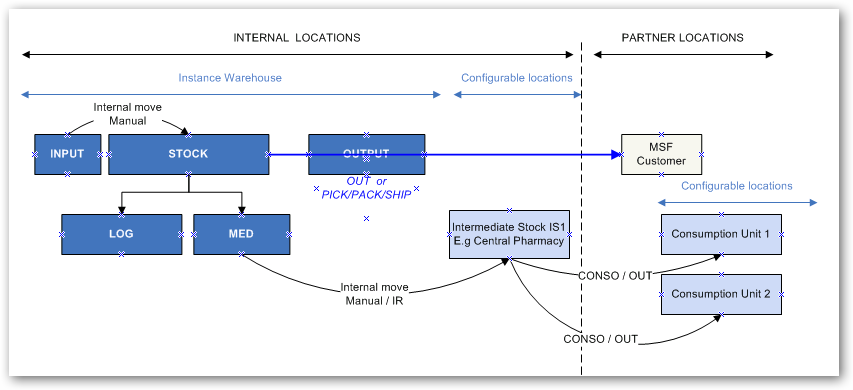
Stocks Intermédiaires (IS)
Lorsque des marchandises sont achetées, elles sont:
Soit réceptionnées dans le stock principal (Stock/MED/LOG) mais ensuite transférée vers un Stock Intermédiaire (au moyen d’un Mouvement Interne créé manuellement ou au moyen d’un Mouvement Interne créé suite au sourcing d’une IR) depuis lequel elles seront consommées.
Soit réceptionnées directement dans un Stock Intermédiaire. Une telle réception est possible si le réapprovisionnement débute avec une IR dont la Zone de Demande est un IS.
Si ces marchandises sont consommées localement (sur l’instance) par un demandeur MSF, la consommation est enregistrée via un Rapport de Consommation Réelle avec un IS comme Zone Source et la zone partenaire générique “Client MSF” comme Zone Destination. Si ces marchandises sont consommées par un demandeur non-MSF, la zone partenaire générique “Autre Client” peut être utilisée comme Zone Destination. Les Demandes Internes ne sont pas utilisées pour enregistrer les consommations locales avec cette configuration.
Si ces marchandises sont expédiées vers un partenaire (un client, suite au sourcing d’une FO), la consommation est enregistrée au moyen d’un Bon de Livraison (OUT) ou via PICK/PACK/SHIP. La Zone Source du OUT ou du PICK est un IS. La Zone Destination du OUT ou du SHIP est la zone partenaire “Client MSF” (ou “Autre Client” si le client est un partenaire externe).
Stocks Intermédiaires
Avantages
Inconvénients
Contrainte
Plutôt simple à gérer.
Bonne visibilité du stock une fois qu’il a quitté l’Entrepôt et jusqu’à ce qu’il atteigne les Stocks Intermédiaires (quantités, valeur, dates d’expiration).
Les marchandises livrées depuis les Stock Intermédiaires sont considérées comme consommées.
Plus exigeant en ce qui concerne les saisies (transactions & mises à jour) nécessaires.
Moyen
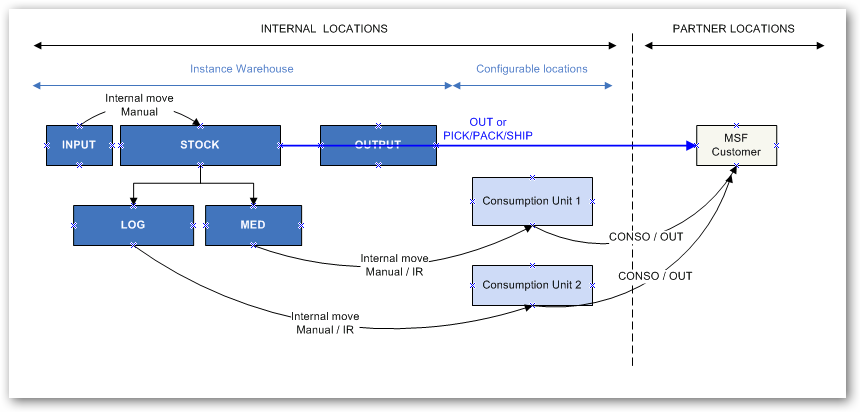
Unités de Consommations Externes (ECU)
Cette configuration est proche de la configuration minimale mais offre d’avantages de détails sur la destination des marchandises.
Les marchandises achetées sont réceptionnées et conservées dans le stock principal (Stock/MED/LOG).
Si ces marchandises sont consommées localement (sur l’instance) par un demandeur MSF, la consommation est enregistrée via un Rapport de Consommation Réelle avec le stock principal (Stock/MED/LOG) comme Zone Source et une ECU spécifique comme Zone Destination. Notez que les zones partenaires “Client MSF” et “Autre Client” peuvent également être utilisées comme Zone Destination si nécessaire.
Comme alternative au RCR, la consommation locale peut également être enregistrée au moyen d’une Demande Interne dont la Zone de Demande est une ECU. Leur sourcing génère un Bon de Livraison avec l’ECU comme Zone Destination.
Si ces marchandises sont expédiées vers un partenaire (un client, suite au sourcing d’une FO), la consommation est enregistrée au moyen d’un Bon de Livraison (OUT) ou via PICK/PACK/SHIP. La Zone Source du OUT ou du PICK est le stock principal (Stock/MED/LOG). La Zone Destination du OUT ou du SHIP est la zone partenaire “Client MSF” (ou “Autre Client” si le client est un partenaire externe).
Une alternative est de lier un partenaire (client) à une ECU (au moyen du champ “Zone Client” disponible sur l’onglet “Commandes de Terrain & Achats” de la fiche partenaire). Dans ce cas, toutes les marchandises expédiées à ce partenaire ont cette ECU comme Zone Destination sur le OUT ou le SHIP.
Notez que les stocks des ECUs ne sont pas intégrés (pas de visibilité) car ces zones sont considérées comme consommateurs finaux.
Unités de Consommation Externes
Avantages
Inconvénients
Contrainte
Rapide, facile à gérer.
Volume de transactions plutôt limité.
Les ressources requises sont minimales.
Visibilité de stock dans l’entrepôt (quantités, valeur, dates d’expiration).
Les marchandises livrées depuis l’Entrepôt sont considérées comme consommées.
Suivi général et informations concernant les consommations seulement pour les destinations (unités de consommation = consommateurs finaux)
Moyen (bas)
Stocks Intermédiaires (IS) et Unités de Consommation Externes (ECU)
Cette configuration est un mélange des configurations 2 et 3.
Lorsque des marchandises sont achetées, elles sont:
Soit réceptionnées dans le stock principal (Stock/MED/LOG) mais ensuite transférée vers un Stock Intermédiaire (au moyen d’un Mouvement Interne créé manuellement ou au moyen d’un Mouvement Interne créé suite au sourcing d’une IR) depuis lequel elles seront consommées.
Soit réceptionnées directement dans un Stock Intermédiaire. Une telle réception est possible si le réapprovisionnement débute avec une IR dont la Zone de Demande est un IS.
Si ces marchandises sont consommées localement (sur l’instance) par un demandeur MSF, la consommation est enregistrée via un Rapport de Consommation Réelle avec un IS comme Zone Source et une ECU spécifique comme Zone Destination. Notez que les zones partenaires “Client MSF” et “Autre Client” peuvent également être utilisées comme Zone Destination si nécessaire.
Comme alternative au RCR, la consommation locale peut également être enregistrée au moyen d’une Demande Interne dont la Zone de Demande est une ECU. Leur sourcing génère un Bon de Livraison avec l’ECU comme Zone Destination.
Si ces marchandises sont expédiées vers un partenaire (un client, suite au sourcing d’une FO), la consommation est enregistrée au moyen d’un Bon de Livraison (OUT) ou via PICK/PACK/SHIP. La Zone Source du OUT ou du PICK est un IS. La Zone Destination du OUT ou du SHIP est la zone partenaire “Client MSF” (ou “Autre Client” si le client est un partenaire externe).
Une alternative est de lier un partenaire (client) à une ECU (au moyen du champ “Zone Client” disponible sur l’onglet “Commandes de Terrain & Achats” de la fiche partenaire). Dans ce cas, toutes les marchandises expédiées à ce partenaire ont cette ECU comme Zone Destination sur le OUT ou le SHIP.
Notez que les stocks des ECUs ne sont pas intégrés (pas de visibilité) car ces zones sont considérées comme consommateurs finaux.
Stock Intermédiaires et Unités de Consommation Externes
Avantages
Inconvénients
Contrainte
Bonne vue d’ensemble de la gestion des stocks et du suivi général des stocks intermédiaires (quantités, valeur, dates d’expiration).
Information sur les Consommations par destination/consommateur.
Plus complexe.
Plus exigeant en ce qui concerne la gestion: des mouvements de stock vers des stocks intermédiaires + un rapport de consommation par destination (consommateur).
Le Stock des unités de consommation n’est pas intégré (pas de visibilité)
Moyen
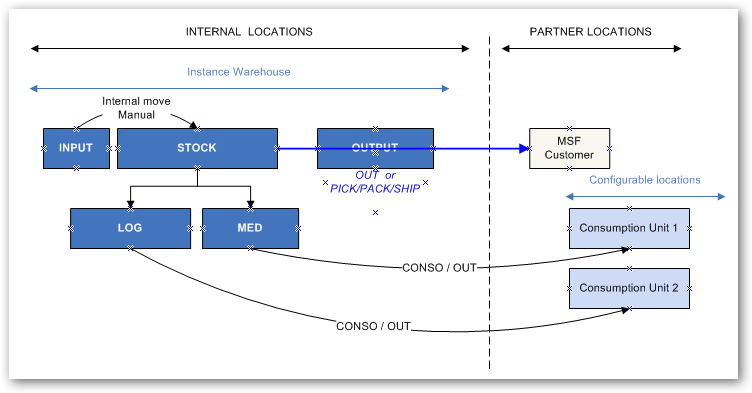
Unités de Consommation Internes (ICU)
Cette configuration est très proche de la configuration 2.
Lorsque des marchandises sont achetées, elles sont:
Soit réceptionnées dans le stock principal (Stock/MED/LOG) mais ensuite transférée vers une Unité de Consommation Interne (au moyen d’un Mouvement Interne créé manuellement ou au moyen d’un Mouvement Interne créé suite au sourcing d’une IR) depuis laquelle elles seront consommées.
Soit réceptionnées directement dans une Unité de Consommation Interne. Une telle réception est possible si le réapprovisionnement débute avec une IR dont la Zone de Demande est une ICU.
Si ces marchandises sont consommées localement (sur l’instance) par un demandeur MSF, la consommation est enregistrée via un Rapport de Consommation Réelle avec une ICU comme Zone Source et la zone partenaire générique “Client MSF” comme Zone Destination. Si ces marchandises sont consommées par un demandeur non-MSF, la zone partenaire générique “Autre Client” peut être utilisée comme Zone Destination. Les Demandes Internes ne sont pas utilisées pour enregistrer les consommations locales avec cette configuration.
Si ces marchandises sont expédiées vers un partenaire (un client, suite au sourcing d’une FO), la consommation est enregistrée au moyen d’un Bon de Livraison (OUT) ou via PICK/PACK/SHIP. La Zone Source du OUT ou du PICK est un IS. La Zone Destination du OUT ou du SHIP est la zone partenaire “Client MSF” (ou “Autre Client” si le client est un partenaire externe).
Unités de Consommation Internes
Avantages
Inconvénients
Contrainte
Relativement bonne vision d’ensemble des consommations des stocks.
Visibilité des unités de consommation (quantités, valeur, dates d’expiration).
Certaines ressources ont besoin de s’assurer que le système est à jour (consommation fréquente d’unités de consommation).
Moyen
Configuration complète
Dans cette configuration, Stocks Intermédiaires, Unités de Consommations Internes et Unités de Consommations Externes sont utilisés. Cette configuration est la plus complexe et requiert d’avantages de transaction, et donc d’avantages de ressources, pour tenir le système à jour.
Les marchandises achetées sont:
Soit réceptionnées dans le stock principal “Stock/MED/LOG” (via la zone “Entrée” et un INT traité manuellement ou automatiquement)
Soit réceptionnées dans un Stock Intermédiaire (via la zone “Entrée” et un INT traité manuellement ou automatiquement)
Soit réceptionnées dans une Unité de Consommation Interne (via la zone “Entrée” et un INT traité manuellement ou automatiquement)
Les marchandises peuvent être transférées entre ces 3 types de zones en utilisant des Mouvements Internes créés manuellement ou des Mouvements Internes créés suite au sourcing d’une IR.
La consommation locale est enregistrée via RCR. Les 3 types de zones peuvent être utilisés comme Zone Source. La Zone Destination du RCR peut être une ECU, “Client MSF” ou “Autre Client”.
Comme alternative au RCR, la consommation locale peut également être enregistrée au moyen d’une Demande Interne dont la Zone de Demande est une ECU. Leur sourcing (depuis l’un des 3 types de zones) génère un Bon de Livraison avec l’ECU comme Zone Destination.
Si ces marchandises sont expédiées vers un partenaire (un client, suite au sourcing d’une FO), la consommation est enregistrée au moyen d’un Bon de Livraison (OUT) ou via PICK/PACK/SHIP. Les 3 types de zone peuvent être utilisés comme Zone Source sur le OUT ou le PICK. La Zone Destination du OUT ou du SHIP est la zone partenaire “Client MSF” (ou “Autre Client” si le client est un partenaire externe).
Une alternative est de lier un partenaire (client) à une ECU (au moyen du champ “Zone Client” disponible sur l’onglet “Commandes de Terrain & Achats” de la fiche partenaire). Dans ce cas, toutes les marchandises expédiées à ce partenaire ont cette ECU comme Zone Destination sur le OUT ou le SHIP.
Configuration complète
Avantages
Inconvénients
Contrainte
Suivi très précis des marchandises à chaque étape (quantités, valeur, dates d’expiration…) de la chaine d’approvisionnement, et ce jusqu’à ce qu’elles soient consommées* par le consommateur final.
Au plus proche des Consommations réelles.
Complexité élevée (compréhension).
Augmentation du nombre de transactions (ce qui signifie, du nombre de ressources nécessaires pour maintenir le système).
Délais endéans un laps de temps lorsque les marchandises sont considérées comme consommées.
Maximum
En général, les marchandises sont considérées comme consommées une fois qu’elles ont quitté les zones internes pour des zones (partenaires) externes. Une consommation dans le système reflète soit des rapports de consommation, soit des livraisons sortantes d’expéditions (ne sont pas considérés comme consommations les prêts, donations, pertes et écarts, ainsi que les retours). Le Chapitre Entrepôt explique en détails comment sont calculés les taux de consommation (réel par zone ou moyen mensuel pour l’instance).
Des zones configurables peuvent être créées sur les instances coordination et projet, mais la décision doit être prise au cas par cas en fonction de la Mission/OC.
Most on screen reports have a similar format and are native to openerp: overview of lines is shown, and various filter buttons and fields are present. Default filters can be cleared and other filters added. Order of button filters added will impact on results. Expand all button can be used to see more detailed line information
Custom filters: It is possible with most on-screen reports to create a new filter using the custom filters. As above, this is native to openerp, and unfortunately known to include bugs, which only openerp would be able to fix. As a result, where the need for particular reports which do not work for the on-screen reports in UniField has been raised, most often a new report /Export has been developed to respond to this need due to inability to fix Custom/ native filters on screen reports
13.1.1 Field Order analysis
Menu mapping: Orders / Reporting / Field Order analysis
Overview of Field Orders.
– Commitment Delay = Avg. no. of days between FO creation and FO confirmation.
13.1.2 Purchase analysis
Menu mapping: Purchases/ Reporting / Purchase Analysis
Overview of Purchase Orders.
– Days to validate = Avg. no. of days between PO creation and PO validation.
– Days to deliver = Avg. no. of days between PO creation and PO Delivery Requested date
13.1.3 International Transport cost follow up
Menu mapping:Purchases / Reporting / Transport Costs
This report gives an overview of costs which have been added in the Transport mode value field in Purchase Orders which are to International Suppliers.
– Creation date = Creation date of International PO
13.1.4 Local Transport cost follow up
Menu mapping:Purchases / Reporting / Transport Costs
This report gives an overview of costs of products of type Service with Reception and ticked as Transport Product in Purchase Orders.
– Order Creation date = Creation date of PO containing transport line
– Delivery Confirmed date = Confirmed delivery date of PO containing transport line
13.1.5 Stock Moves
Menu mapping:Warehouse / Traceability / Stock Moves
Report showing all stock moves whether due to INs, OUTs, discrepancies, inventory corrections, initial stock inventories etc.
– Actual Receipt date = Date of stock move –actual date if move is closed, or expected date if not yet closed
– Scheduled date = Expected date of Stock move
13.1.6 Received Products
Menu mapping: Warehouse / Product Moves / Receive Products
Received Products screen by default shows all receptions which are expected / in progress. Possible to use header filters to search for a specific product/document/state etc
13.1.7 Delivered Products
Menu mapping: Warehouse / Product Moves / Deliver Products
On screen functionality to see which products have been delivered or are in progress. According to the header filters applied, the user can search by products, by partner etc
– Actual Receipt date = Date of stock move –actual date if move is closed, or expected date if not yet closed
13.1.8 Moves Analysis
Menu mapping: Warehouse / Reporting / Moves Analysis
Provides an overview of stock movements in and out of the instance.
Planned Lead Time = Avg. no. of days between stock move(s) creation and either (if closed) their actual processing date, or (if not yet closed) their expected move date.
Executed Lead Time = Avg no. of days between stock move(s) creation and their expected move date
Delay = Avg. no. of days between the expected date of stock move(s) and actual (processing) date of stock moves
13.1.9 Receptions Analysis
Menu mapping: Warehouse / Reporting / Receptions Analysis
Screen to see which products have arrived and analyse this data.
Planned Lead Time = Avg. no. of days between stock move(s) creation and either (if closed) their actual processing date, or (if not yet closed) their expected move date.
Executed Lead Time = Avg no. of days between stock move(s) creation and their expected move date
Delay = Avg. no. of days between the expected date of stock move(s) and actual (processing) date of stock moves
13.1.10 Reserved products (US-2542)
Menu mapping: Warehouse / Inventory Management / Reserved products
Menu mapping: Warehouse / Traceability / Batch Recall
This was deemed a necessary functionality for system supplying drugs and dangerous goods. This functionality does not actually do the “recall” or trigger any stock movements, but it displays location of products/batches. Product and relevant batch or expiry date is selected and destination locations are shown.
13.2.2 Mission Stock report and Consolidated Mission Stock report (US-7742)
Menu mapping: Warehouse / Inventory Management / Mission Stock or Warehouse / Inventory Management / Consolidated Mission Stock Report
This Excel report displays products relating to the instance. When run at Coordo level for option “full view”, report will display all products across the mission (including Coordo and any projects linked to that Coordo). The button “Update in background” means that the system will draw from the most recently product data (qtys etc) from that instance. For the products in other projects, these will be updated according to the configured frequency of synch for the scheduled actions (Admin>Scheduler>Scheduled Actions), which would usually be every 12 hours.
The system will display all stocks according filters entered, with the product code “reference”, name, unit of measure, along with the following information:
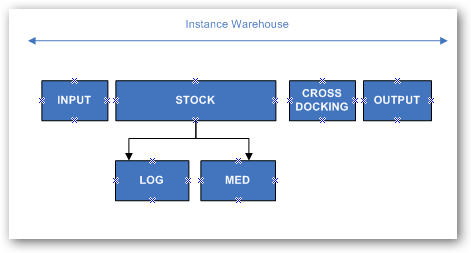
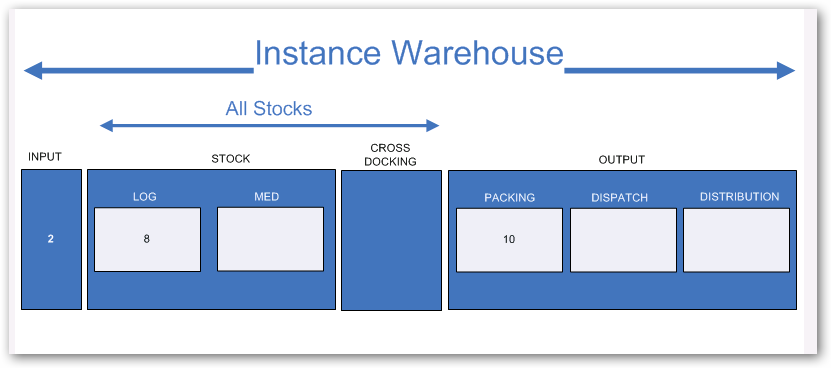
Instance stock: all the stocks of all internal locations (including med, log, input and output, cross docking, intermediate stocks, internal consumption units) of the selection (ie instance full view etc which you selected),
Warehouse stock: Stock (and children) but no input or output locations,
Cross Docking location: all stocks in this location
Secondary stock: sum of all intermediate stocks (if in existence)
Internal consumption units: sum of all internal consumption units (if in existence)
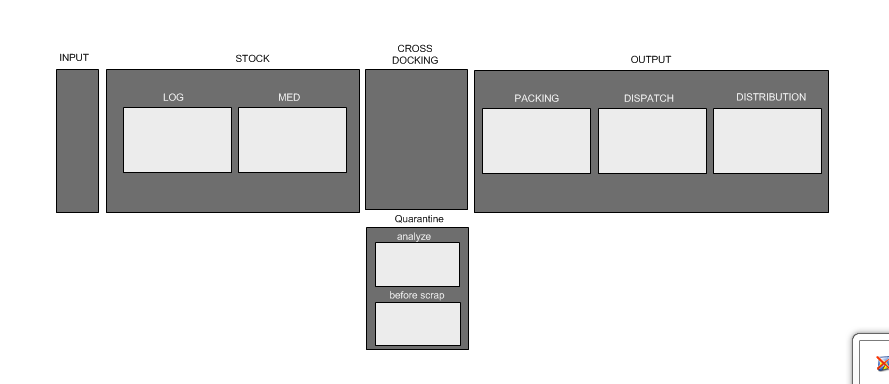
Quarantine Qty: to indicate stock levels in Quarantine (analyse+before scrap)
Input Qty: for stock levels in the Input location
Output/Packing/Dispatch/Distribution Qty” for stock levels in these 4 locations
AMC (Average Monthly Consumption) of the product (average from the last 3 entire completed months)
FMC (Forecasted Monthly Consumption)
Quantity which is in the Pipeline: quantity expected to be received (ie PO has been validated)
In Pipeline Qty = Quantity of products Validated in a PO up till present in Incoming Shipment for which the status of the stock move is Available
The Consolidated MSR will display from COO the detailed locations of each mission. That is to say that each location name will be displayed in the file (and not aggregated as Intermediate Stock or ICU).
Last development detailed functional specifications can be found in Jira ticket US-7742).
13.2.3 Inventory Level ( inventory analysis) or Export Inventory Level
Menu mapping: Warehouse / Inventory Management / Inventory Level or Export Inventory Level
Report showing stock levels for instance, with various extra filters possible (Locations, product expiry dates etc). Available in Excel export format also with some additional options such as selection of Inventory level at a date in the past, selection of products <0 with movement in the past X months…
The analysis requires user parameters; for example it’s very useful to be able to analyze expiry dates of products in stock. Available to export in Export Excel format
Quantity = for all internal stock locations of instance, if “Real” is selected, then this is real qty in stock. To calculate this the system will only calculate using closed stock moves. If “Future” is selected then the system will calculate this using stock moves with status Closed, Available and Not Available.
13.2.4 Stock level by location
Menu mapping: Products / products
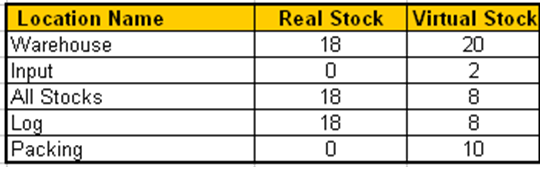
UniField allows you to check the stock levels in all locations for a given product, a single product is selected, and if product is of type ED / BM this attribute should be selected too. System will display real and virtual stock quantities for all Internal locations “Instance full view”, including configured locations. View can be changed to Partner or Virtual locations also.
13.2.5 Stock Card
Menu mapping: Products / products.
13.2.6 Expiry Quantities report
Menu mapping: Warehouse / Reporting / Expiry / Expiry Quantities
The report has two differentiated areas: products already expired and products likely to expire based on real consumption. Location can be selected and period of calculation is mandatory. Available in PDF or excel exports.
– Stock = Total qty of product, including all batches in stock.
– Expiry Qty = Total number of specified batch which will expire
13.2.7 Products likely to expire
Menu mapping: Warehouse / Reporting / Expiry / Products likely to expire
Report showing products with their respective quantities that are likely to expire, based on the selectable options Forecasted Monthly Consumption, Average Monthly Consumption or Real Average Consumption. Period to date is mandatory. If checkbox “Only products with total expired > 0” is ticked, results will be limited to this. (Recommended option).
The system will display a list of all products, the monthly consumption (ie the quantity according to the AMC/FMC/RAC). The next columns will show each month within the timeframe entered as a filter value. Under each month, line by line will be the qty of each product which will expire, and next to this, if relevant, another number (in brackets). The first number represents the quantity of products in stock that have batch numbers which expire in the given month. The second number (in brackets) represents the quantity of products which will expire if we consider that stocks will be used according to the consumption calculation entered. The I symbol appears next to each. For more information about a particular product which will expire, the can be clicked on and a screen will display the particulars for this product qty. Report can be exported to Excel or PDF.
13.2.8 Weekly Forecast Report
Menu mapping: Warehouse / Reporting / Expiry / Products likely to expire
Report showing the quantity of goods in location taking into account their consumption according to the AMC/FMC/RAC selected as well as quantities which will expire and also those in the pipeline. It is mandatory to select location. The report shows current stock value and the filters can be used to show weekly or monthly periods up to a maximum of 20 weeks/months. Stock qty will never display negative quantities. For the pipeline qty, the report considers all quantities for the product in the preceding Unifield stock location, for example, if goods have been received in Input, and the Internal move to LOG is in draft, then the Pipeline Qty will consider this qty as in the pipeline for the expected date of the internal move. When calculated for LOG/MED locations this will take into account the pipeline according to what is coming into the warehouse (ie via input). This means that the virtual stock from a ( Validate or) Confirmed PO will also be considered. Report produced in Excel.
Expiry Qty = Total qty of products which will have expired by the date selected.
Wk1 (etc) = For each week, the number of products which will expire over the course of this week (taking the forecast into account).
13.2.10 Purchase Order Follow up
Menu mapping: Purchases / Purchase Management/ Purchase Order Follow up
Value can be selected in filters (PO ref, IN ref, Supplier ref, Customer ref) and information will be displayed for specific PO. Can be exported to Excel and PDF: This report is less used as PO follow up per supplier has since been developed.
% of line received = Percentage of quantity received (sum of qty in IN closed / Qty of line)
13.2.11 Field Order Follow up
Menu mapping: Orders / Orders / FO Follow up
Value can be selected in filters ( Internal ref, Customer ref) and information will be displayed for specific FO. Can be exported to Excel and PDF: This report is less used as FO follow up per client has since been developed.
13.2.12 Field Order Follow Up per Client
Menu mapping: Orders / Reporting / FO Follow up per Client
Requested report showing line level information for Field Orders within an instance. Includes different options for filters and exports, including FO status. This report was designed with agreement that at least one filter would always be applied, although this has not been enforced, but may become necessary, depending on usage. Available in Excel and PDF.
– Received = Creation date of Field Order
– RTS = Ready to Ship date – Expected date of Shipment or Expected date of Picking Ticket / OUT associated with this FO line.
13.2.13 PO Follow Up per Supplier
Menu mapping: Purchases / Reporting / PO Follow up per Supplier
Requested report showing line level information for Purchase Orders within an instance, showing Analytical Distribution, and information for received lines including if there has been a unit price change at reception. Available in Excel and PDF
13.2.14 Purchase Order line allocation report
Menu mapping: Purchases / Purchase management / PO lines allocation report
Report displays cost centre and expense accounting codes allocation to an order or a single product. One, multiple or all orders can be selected. Can be exported to excel or PDF (via action menu).
Assets are a sub type of stockable product. However the need was expressed to be able to track asset type products on an individual basis, and therefore there is a specific data sheet, an Asset Form, which can be created for each asset type product managed in the system. Currently there are no specific features for assets developed by Finance (to track depreciation of assets etc). Please refer to Finance documentation.
Asset forms represent master data records. A Unique reference “Asset code” is automatically created for each new Asset form, but reference can be modified before saving. Asset form must be linked to a product which is an Asset.
Several warehousing transactions in Unifield require an asset code to be entered in order to process the lines/transaction. However, where this reference is mandatory, it is mandatory for the line, which may contain product quantity of more than one. It is not mandatory for the line to be split into number of lines of quantity. There is no consistency check on previous use of Asset reference. Asset forms can be synchronised if contained within transport documents (SHIP & OUT).
It is mandatory to have an Asset Form reference for Asset type products in the following transactions (when products are entering or leaving the instance): Incoming Shipment, Pick/Pack/Shipment transactions, Delivery Order and Consumption report.
Asset events
Menu mapping: Products/ Assets / Assets events & follow up
Status or move changes of the asset can be registered as asset events. Any Asset event must be related to an asset form. There are no automated events, as these must be created manually. Asset events are linked to the asset form.
For Event type these options can be selected:
Reception, Start Use, Repairing, End Use, Obsolete, Loaning, Transfer (internal), Donation (external), Other
Current status of the asset can be:
In Use, Stock, Repair
Direct Reports / Exports
Asset form
12. Scheduler Range days for Purchase documents
Menu mapping: Administration / Companies
The planning horizon for which procurement documents will be generated is set as 80 days by default, and this setting is defined at the point of configuration for each instance. This means that if the requested delivery date (RDD) on IR or FO is more than 80 days in the future, the relevant document (i.e. PO or Tender) will not be created until the RDD falls within the planning horizon. It is possible to change the scheduler range days to a different value.
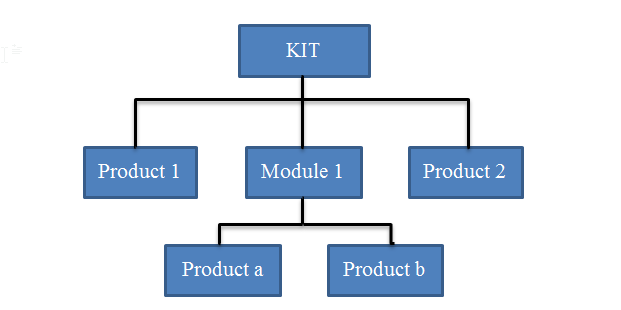
In Unifield the Kits functionality has been developed based on the concept that a kit is a product, but which has the special attribute that it can contain components, themselves also products, and these components or “modules” can in turn contain further products, which means a kit may contain many levels. No limit to the number of levels has been applied.
Kit products are treated as single products throughout the whole supply chain (from order to reception to consumption) and in stock management. Although kit contents are not visible in the warehouse, it is possible to view/add the contents of the kit after purchase or once an incoming shipment is closed.
General Structure of a Kit
In order for any of the kit functionalities to be used, the kit product should exist in the database. A kit is created the same way as a product but for a product to be considered as a Kit, the product Sub-Type should be “Kit/Module” on the product datasheet. However, system-wise it is not mandatory to use any supplementary kit functionalities for a product which has the Sub-type Kit, so this is left at the discretion of the user/procedures.
The following are functionalities linked with Kit type products:
Theoretical Kit composition List – acts as a template for what a kit should contain.
Kit Composition List – a “real” list of the contents of a kit which is physically present in the instance. Can be used to substitute products and also to break apart a kit and release its components into stock.
10.1 Theoretical Kit composition List
Menu mapping: Products/ Kit Management / Theoretical Kit / Theoretical Kit Composition or
The Theoretical Kit Composition List (TKCL) represents the list of items that are supposed to compose the kit. It is a type of Bill of Materials and can be created at any level of instance.
It can be manually created, for one individual KCL at a time or several KCLs can be imported via the Theoretical Kit Mass import functionality. Once created and in a Completed status it will be synched down to other instances. The idea behind these 2 functionalities (Mass import and synch) is that all validated Theoretical Kit lists can be loaded at once at HQ and then synched down, reducing the need for Missions to create each manually.
The main purpose of the Theoretical Kit Composition List is to give an overview of the theoretical contents of a Kit to be used either when it is being ordered or when an instance needs to produce Kits locally via a Kitting Order.
Preceding documents
N/A – kit type product should already exist
Successive documents
N/A although document can be used by Composition list, Kitting order, or in Purchase Order
Statuses of Theoretical Kit Composition Lists
Draft – all modifications can be made. Can also be set to inactive. If active, can be progressed to “Completed” status via “Mark as completed” button.
Completed – no modifications possible. Can be set to inactive. When Active and Completed will be synched down to instances below.
Closed – when a related Kitting Order is Closed
Lines/Products specificities
N/A
Updates from successive documents
N/A
Direct Reports / Exports
Composition Kit Excel Export
Theoretical Kit (PDF)
10.2 Kit composition List
Menu mapping: Products/ Kit Management / Composition List / Kit Composition List
Kit Composition List represents the list of actual products composing a physical kit, but it is not mandatory to make for kit products (except if kit products were added to stock via a kitting order). It is necessary to have a Kit Composition list if user wishes to “de-kit” the kit and release all the product components individually into stock or to substitute an item.
A kit composition list can be created directly or created during the reception process from an incoming shipment. A kit composition list will be automatically created after a kitting order is completed. In order to create a KCL, the template of TKC to pre-fill products or alternatively products can be added via standard methods (add individually, add multiple, import lines). The products which are kit components are visible in the “Kit Composition Item” screen together with their associated kit reference. As well as de-kitting, the kit composition list can be used to substitute some products for others (e.g. with different expiry dates).
A KCL will be unique to each kit product so de-kitting can only be performed on one KCL at a time.
Preceding documents
From scratch, Kitting Order, Theoretical Kit Composition can be used, and KCL can be initiated from Closed Incoming Shipment
Successive documents
N/A
Statuses
Draft – all modifications possible.
In production – linked to a Kitting Ordered (cannot be modified)
Completed – can be modified for de-kitting or substitution of products
Closed – cannot be modified
Cancelled
Lines/Products specificities
If Kit product is Expiry Date or Batch mandatory, this will be mandatory in the same transactions as for normal products. It is possible for a kit composition list to contain other products which are batch or expiry date mandatory, but it is not mandatory for this information for each of the component products to be added. This was left at the discretion of OCs. For where this information is added, the expiry date of the overall kit product should take the soonest expiry date of all its products. If this is changed (due to substitution etc), then the overall expiry date of the kit product should be updated to reflect the next relevant expiry date.
Updates from successive documents
Direct Reports / Exports
“Real Composition Kit Excel Export”
Kit Composition PDF
10.3 Kitting Order
Menu mapping: Products/ Kit Management / Kitting Order
This transaction is used in order to create a kit from products in stock. In order to create a kit with the double entry mechanism, the products which are kit components will be removed from Stock and moved to the virtual location. The newly created Kit product will be added to Stock (according to location selected) and will be removed from the virtual kitting location. It is possible to create multiple kit products in one kitting order. For each kit product created, there will be a kit composition list also created. It is necessary to have a Theoretical Kit Composition for the kit product in order to kit the component products into this kit.
5.2 Preceding documents
Theoretical Kit Composition
5.3 Successive documents
N/A
5.6 Statuses
Draft – all modifications possible.
In production – in progress, stil can be Cancelled, can be de-kitted and products substituted
Vertical Integration to link UniField and field instances to HQ and European Supply Centres (ESCs) was deemed a necessary functionality to build in order to realise the benefits of UniField, and to at minimum replace the functionality of the previous heritage system.
For Supply there are two documents relevant to vertical integration; Purchase Orders and Incoming Shipments. For both, it is possible to manually export the current document in flat excel or XML file and then manually import updated file with changes, with a simulation screen to show the changes from the import. For Supply, given the request for simulation screen and different formats of files, to contain the scope and limit complexity, OCs were expected to agree on one single template for import and export of files.
The resulting files include fields that should be displayed on the export and should be mandatory or included in the document updates for the import.
This file is only available in English.
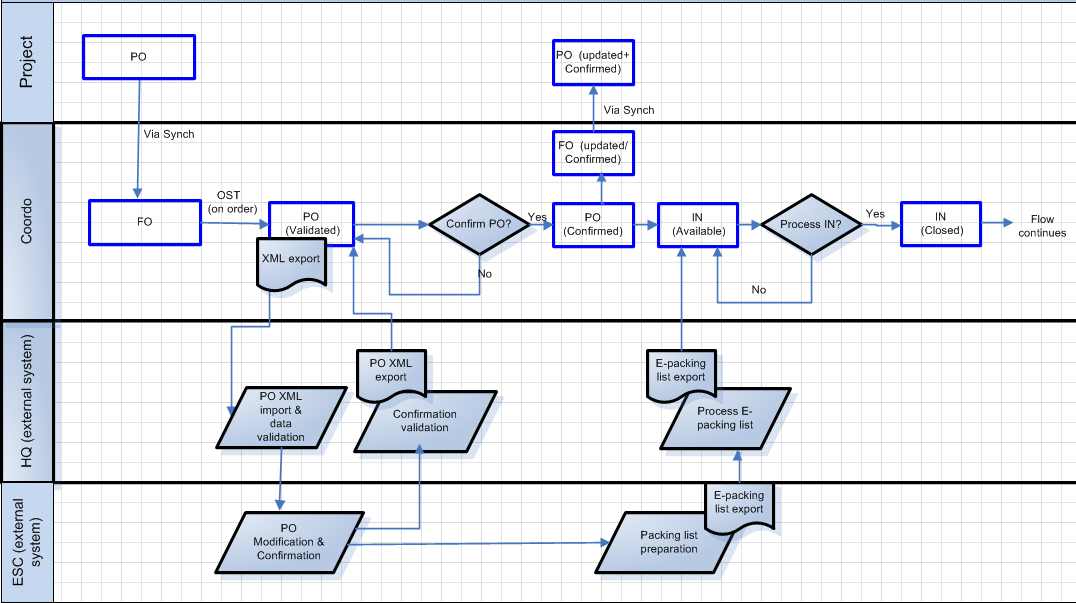
The expected order flow for Supply Vertical Integration is the following:
At Coordo, the Purchase Order must be in Validated status. The Purchase Order can either be for an order for the Coordo, or it can have been generated from one or several FOs representing project orders. The validated PO will have two buttons, one to export the PO and lines into excel or XML formats, and the second button to import files to update the PO, to reflect what the Supplier has confirmed. When a line has been confirmed with a Confirmed Delivery Date from the export file, a checkbox “ESC Confirmed” will be ticket, however, user will still have to confirm manually the line/document to process forward.
As per with the normal flow, the Incoming Shipment will be available. The user can then import the e-packing list supplied by the supplier to update the Unifield IN transaction. This is the complete flow for Vertical Integration for Supply. Details for both are described below.
Following stabilisation of this feature, OCA requested an automated Vertical Integration option which is linked to their ESC system (APU). Exchange of files is done through an intermediate FTP server. This automated VI is only used by OCA for now but could be adapted to fit other OCs upon request.(US-3487)
7.1 Vertical Integration – Purchase Order
The buttons for exporting and importing VI files appear in the PO of Validated status.
Changes which can be made in the PO import file include adding lines/products, splitting lines, changing qty, unit price, deleting lines. A newly added line should have an external reference “Ext Ref” added, however different check will be done to ensure that the “Ext ref” does not exist yet and whether it is already associated to an existing line number (in which case the line number in import should be the same in order for the line to be updated). If the Ext ref is not associated to any line number (and empty in import PO) then a new line will be created. A new line will also be created in case the Ext ref associated to a line number does not match another existing line with same line number and different Ext ref (meaning that lien will be split and have a new “Ext ref.”. For more details on the different use cases see Jira ticket US-5122.
Multiple different files can be imported into the validated/-p PO. Each successful import will update the PO, and the PO and its lines will stay in Validated/-p status until product lines or Po document are manually progressed to Confirmed. Names of all imported files can be found in “Notes” tab of PO.
At point of import of a PO confirmation file, a simulation screen will display changes to header information, and on the “details” tab, the lines of the original order are displayed to the left, and to the right, the resulting lines if the import is performed. The column “CHG” will indicate if line is missing/should be deleted – “ignore/del”, has been split – “split” or is a new line – “new”. The column “discrepancy” will indicate any price discrepancy.
Report can be generated at simulation stage where all changes to lines are highlighted in red.
User can decide at this point to import or to return to original (pre-import) PO.
If import file option is selected, as per simulation screen, changes will be made for price change, quantity change etc.
Lines can be deleted/cancelled by the import to PO by filling the “Comment” field with “[DELETE], the simulation screen will show “Del.” to indicate that line will be deleted. A line missing in the import file will show as “Ignore” in the simulation details tab and will stay as it was in original validated PO.
Already confirmed or Cancelled line cannot be updated after new import; with one exception being that the CDD can still be updated for Confirmed lines ( and will update the related IN).
Analytical Distribution (AD) can be added by VI file for new lines (otherwise it will be asked by the system after import – line will be “Validated-n” in red meaning that line need to be updated). Checks will be done upon import on Validity/existence of the Cost Centre and Destination. However, this is a non-mandatory field and the AD update will be ignored in case the product line already has a Valid AD. Warning message will not be blocking regarding the AD import (see US-5405 and US-1168).
Also, in the “Origin” field, the Source document (FO/IR) can be populated for new lines (if not imported it will be asked anyway after import in the original document). This way, any new line will be directly added to the related source document as well. In addition to the source document from the same instance, an additional source document from the other instance can be added. This other document can be an IR or since the re-sync it can be another FO. Checks on these fields will force user to update them so that all documents from the same flow are updated and synchronized as expected.
The template of the current Incoming Shipment (available status) can be generated either in XML or excel. The VI file to update Incoming Shipment can be imported into the IN after the process products screen is displayed (Process button must be clicked on for this). An import file can be uploaded and simulation screen will display changes to header and line level information on Information and Details tabs. As per PO simulation screen for line information, original lines are displayed to left and those simulating the import are to the right. CHG indicates change in a line, and Discrepancy where there is a discrepancy in the price. The modifications can be on products, Qtys, split of lines, price, added batch numbers and expiry dates. Unlike for Purchase Order, a new line cannot be added. Unlike for PO VI, if file is imported, transaction must be processed or imported data will be lost. It is not possible to import several files into the same document and then process. If import does not include information on all lines, unfilled lines will remain unprocessed and will remain as a back order. For any lines which are missing and need to be deleted this is an action which must be performed manually, as they will be created as a back order.
One additional field that has been developed to be updated is the CDD (aka: Expected receipt Date). This field can now be updated for Available INs and will consequently update the related SYS-INT or trigger preparation of a synchronisation message to update the related IN at project ( request emerged from the need to have a more accurate pipeline calculation when RR have been upgraded , see US-6490). However, the confirmed PO CDD can’t be automatically updated as well.
Using the same IN import file (also named E-Packing), Packing information can be directly uploaded as well (see US-1457). Information that can be imported are: Qty of parcels, Parcel ranking number, Weight, Volume, Height, Length, Width, Packing list name and ESC comments. This information will not need to be filled in case user presses the “Import IN” button; however in case the “Import IN, process IN &pick and pack” button is pressed, the packing information will have to be filled (mandatory ones are form parcel, to parcel, parcel quantity and weight) and will be directly imported. As a consequence, the IN will be processed and Closed like the PICK and the PPL. The related SHIP will be created as Draft to be processed further manually.
This E-packing button will have checks that will not enable to Pick and Pack directly Back Order INs which related PICK have actually been previously converted to an OUT (see US-6374).
Report can be generated at simulation stage where all changes to lines are highlighted in red.
7.3 Automated Vertical Integration (US-3487)
In addition to the manual Vertical Integration import/export, OCA requested an automated system of VI for POs and IN. This automated VI being able to automatically exchange file between UniField and the ESC system (i.e.: APU for OCA).
This exchange of file is done through an intermediate server, FTP server. Predefined trigger point will generate the export and expedition of document from UF to FTP (which will be recovered by APU) and the other way around for import. Parametrization in UF will have to be done/ activated from menu Tools> Automated imports and Automated exports.
Files that will be processed are:
Export of Validated PO from ESC supplier (which has not been exported yet – if already exported they will be flagged).
Import Validated PO form ESC (new lines can be imported). A simulation report is generated after import and is saved for monitoring/ traceability.
Import of Confirmed PO from ESC supplier (new lines can still be imported). Checks are done on CDD and DST so that PO/ PO line can be confirmed automatically as opposed to the manual VI where confirmation has to be done manually). A simulation report is generated after import and is saved for monitoring/ traceability.
Import of IN from ESC supplier: upon import checks are done on Origin field linked to the PO reference on Available INs. Several import can be done as long as there are back order IN related to the PO. Once import is successful, the IN will have status “Available updated”. Packing information can be imported as well.
Following import of new PO lines confirmation, an extra check is done to avoid that new confirmed lines are added to an existing “Available updated” IN. Request for this case is that a new IN Available is created instead (if no other Available IN already exists) (US-5954).
For further technical details on this functionality, detailed functional specifications are enclosed to Jira ticket US-3487.
8. Cancel & Resource / Re-sourcing documents
Because of a demand for the system to provide more flexibility in sourcing and changing/reversing the sourcing of goods after a sourcing method has been chosen this functionality has been developed. In the Order Sourcing Tool, decisions are taken as to whether the order (IR /FO) will be sourced from stock (leading to a PICK, OUT or INT) or on order (leading to Tender, RFQ or Purchase Order) and for some documents (PO, DPO, RFQ) the Supplier will be also chosen at this stage. However, it can be necessary to change this decision based on the circumstances, eg. Supplier chosen can no longer provide goods, or Storekeeper finds actually there are no goods in stock, so cannot fulfill the PICK created. In these situations, it is necessary to change the sourcing channel chosen (e.g. order should be sourced to a different supplier, or order cannot be sourced from Stock so it should be re-sourced to a Tender / PO etc). With this need in mind, the following functionality has been developed in order to be able to re-source key documents.
It is possible to Cancel and Resource (C&R), or only Cancel the following documents:
PO, FO, IN, PICK (Cancel only if sourced from PO and C&R or Cancel only if from Stock), INT, OUT, Tender, RFQ
It is only possible to Cancel and Resource Documents which have a preceding document flow. E.g. a PO created from scratch cannot be cancelled and resourced, but a PO created from an FO can be.
The document/ line can only be cancelled if it has not been completed, and if the next document/ line in the chain has not been created. E.g. a PO can be C&R’d if it is in Draft or Validated status, but not if it has been confirmed, as at this point there will be an IN available. If PO has been confirmed then user should C&R the Incoming Shipment.
Results of Cancelling and Resourcing: When the User C&R a document/line, the document/ line will be cancelled (with status Cancelled/ Cancelled-r) and all preceding documents will have status “Cancelled” ( or “Closed” for FO related to PICK sourced from PO). After synch any related documents in another instance will also be Cancelled. FO/IR will keep the same last document status while all product lines of initial document (FO/ IR) will be “Cancelled-r” and new “Resourced-v” line will be created and present in the OST . E.g if an IN is C&R’d, the IN will be Cancelled, the PO Cancelled, the FO remains Confirmed (because status cannot go backwards) with “Resourced-v” product lines (nb: PICK created at PO confirmation is also Cancelled).
Traceability
On the product line details (after clicking the pencil), the reference of the “Original FO/IR line” can be seen. It will display the number of the original line which has been Cancelled – this line still be can be seen when removing the default filter “Hide Cancelled”. The new “Resourced-v” line will have new line number. These new lines have the same behavior as Validated lines.
Once sourced, these lines will have status “Resourced-s” on the source document; then “Resourced-pv” once “Validated” on a related PO and finally “Resourced-c” once Confirmed.
In case these resourced lines have been synchronized, the related PO and IR lines can be in “Resourced-sy” status in other instance.
Document specificities
PICK cannot be C&R if sourced from PO; the only options will be to Cancel only or to Cancel and create an INT move to send the goods to Internal Stock rather than Cross docking (this will avoid stock allocation issue later on).
Pick of type “LOAN” cannot be C&R because Loan type can only be sourced from Stock. It will still be possible for user to change the Stock location at Pick level if needed.
Quantities Cancelled at PICK level will have to be Cancelled on the Counterpart PO which is automatically created at FO confirmation. This development has been made to avoid discrepancies between original FO state and the counter part PO (see US-6630).
RFQ created from a Tender coming form an FO/IR can only be Cancelled. They will be C&R from the Tender but not directly from the RFQ if coming from a FO/IR source document (see US-6114). They can also be C&R if directly sourced from FO/IR (i.e.: with no intermediate Tender).
9. Documents in Progress
Menu mapping: Tools / Documents “in Progress”
This functionality allows a document in progress to be closed and its other related documents to be cancelled. UniField offers this tool to close IRs, FOs and POs, and cancel their associated documents.
However, this feature should be used very cautiously and is actually not recommended. It should only be used in case of technical inconsistencies or issues in the flow. User right should be set accordingly so that access to this function is strictly limited to advanced user.
When Initial document has been selected, checkbox “Associated Doc” will be ticked if there are other open related documents. If clicked, this icon will produce screen will all documents relating to selected order document, along with their statuses. Then the “Cancel associated documents and close the document” button can be used to close original document and cancel related documents. The default filter is set on “Creator” = “Administrator”, therefore, in order to see all the open document, this filter should be set to blank.
Several supply objects are not part of an order flow but are used for stock management. Where some objects can be either used as part of a flow, or as stand-alone, they have been included in the section on order flow objects (see previous entries).
6.1 Real Consumption Report
Menu Mapping: Warehouse > Warehouse Management >Real Consumption
Preceding documents
N/A always from scratch
Successive documents
Delivery Order type Consumption (OUT-CONSO)
Statuses of Consumption reports
Draft –initial status of report, modifications possible
Closed – Document has been processed via the “Save & process” button, stock has been consumed from stock location and a Delivery Order (type Consumption) will have been created and processed to Closed automatically.
Cancelled – Document has been Cancelled. No more modification can be done. No stock moves.
Lines/Products specificities
Products can be added as per usual methods (Add, Add multiple & import) but also with a specific one “Copy all”.
If using Add (single product) button functionality, if magnifying glass is used to display list of product, the quantity displayed for each the products will select the quantity for the location selected in the header of the Real Consumption report.
For import functionality an export/import file can be generated from a Closed Incoming Shipment “XML export” and this is the exact same format as needed for the import into a Real Consumption report. This functionality was developed for the case where a Coordo creates an FO, and due to the push flow, project can receive the goods into their instance (via IN) but want to send the goods on to be consumed by an external location, so can do this easily by exporting from the Closed IN and then importing this file into a Real Consumption report (see Jira ticket BKLG-33/UFTP-309. However, with the last developments some updates have been done on the export/import file directly generated from the RCR screen which has not been reflected on the export from the Closed IN (last dev on US-6650).
An additional method for adding products to a Real Consumption Report is the button “Copy All” and this will fill the Real Consumption Report with all products and their details (quantities, batch numbers and expiry dates) which are present in the selected location. If this button is not used, user must enter other information (batches etc) manually.
While the “Indicative Stock” is displayed after using this button, the “Qty Consumed” is now set to “0” by default to avoid users consuming/ emptying all the stock by mistake (as it happened few times in the past).
Batch and Expiry Date mandatory products must have their relevant information present. Assets should have Asset reference present also.
If the quantity entered in Qty Consumed field is greater than quantity of indicative stock, system will flag this but not block if user decides to continue therefore the UR will limit the use of this function (US-2482).
Updates from successive documents
N/A
Direct Reports / Exports
Consumption report – PDF
6.2 Initial Stock Inventory
Menu Mapping: Warehouse > Inventory Management > Initial Stock Inventory
Preceding documents
N/A always from scratch
Successive documents
N/A
Statuses of Initial Stock Inventory
Draft – Initial status of document, modifications possible, possible to cancel, Confirm Inventory button can be used to progress Initial stock inventory to Validated status
Validated – no modification possible but still can be Cancelled, “Confirm Inventory” button can be used to close the Document.
Done – no modification possible. In this status, product lines have been added to stock location.
Initial Stock Inventory Functionalities
Initial Stock Inventory (ISI) is meant only to be used at the initial stages to load products into a stock location. An ISI will only add quantity for product in a stock location, it will not reduce quantity. Therefore, a second Initial Stock Inventory should not be created for a stock location to adjust stock levels. Any adjustment of stock levels should be performed via a Physical Inventory. An ISI exists for the main purpose of migration of stocks at the beginning of a deployment or to load a new location with new products.
When using the import file, some checks are done on product and Location (inactive, virtual or external locations cannot be used; checks is done exact location naming).
Lines/Products specificities
Batch number and Expiry date products should have this information added.
Batch numbers will be created directly from manually filled values of fields.
Updates from successive documents
N/A
Direct Reports / Exports
Stock Initial Excel Export
6.3 Physical Inventory (US-3501)
Menu Mapping: Warehouse > Inventory Management > Physical Inventories
Preceding documents
N/A always created from scratch
Successive documents
N/A
Physical Inventory functionalities
Physical Inventory can be used to adjust quantities for one or more lines (products), this can be to increase or decrease quantity or adding missing products. During the process of PI a Discrepancy sheet enables to see the difference between the data entered after counting manually and the information in the system.
This functionality has been entirely redeveloped with US-3501 in UF7.0 replacing the initial OpenERP default one. Please refer to this ticket for detailed initial specifications.
Statuses of Physical Inventory
Draft – Initial status of document, definition of PI scope (selection location and products), modifications possible, possible to cancel, “Generate Counting Sheet” button can be used to progress document to “Counting” status. Possible to select with more or less detailed “Counting sheet” (with or without prefill BN/ED and/or with or without product with 0 stock).
Counting – new tab “Counting sheet” is generated and display the previously selected products with or without BN/ED (-without being called “Blind count”). Modification possible on BN/ED, “Quantity” needs to be filled and new product line can still be added. Update can be done by import. Clicking on “Finish counting” to progress document to “Counted”. Possible to Cancel.
Counted – Modifications still possible and Cancellation as well. Clicking “Generate Discrepancies” will generate an intermediate pop up to highlight the missing expected lines (with quantity not filled). User will choose whether to ignore these highlighted lines (i.e.: no change for these lines, they won’t be included for the rest of the PI process) or to set them to “0” (so that they are taken into account for the rest of the PI process).
A new tab “Discrepancy report” is created and the status remains “Counted”. Updates can be done on “Adjustment type” or “Comment” only (import possible)
Still possible to “Cancel Inventory” or to “Re-Generate discrepancies” (will refresh the data in case the PI remained untouched in this same status for a while).
Clicking on “Finished” will set the document to “Validated”.
Validated – Modifications can be done on “Adjustment type” or “Comment” only (import possible). At this stage “Adjustment type” has to be filled to process forward.
Still possible to “Cancel Inventory” or to “Re-Generate discrepancies” (will refresh the data in case the PI remained untouched in this same status for a while). Also possible to “Recount” (will set back the status to “Counting” and remove the “Discrepancy report” tab.
Click “Confirm Inventory” to set the document to “Confirmed”.
Confirmed – A new tab “Posted Inventory” is created. At this stage stock movement are done.
On the new tab “Posted Inventory” no modification is possible. However, the “Comment” field still can be edited in the “Discrepancy report” tab.
Clicking on “Close Inventory” will Close the PI for good.
Closed – No more modification nor Cancellation can be done.
Lines/Products specificities
It is only possible to have 1 location per PI.
When selecting product for the Counting Sheet (CS), use has the option to select product that are “currently in Stock” or “Products with recent movement in the location” (stock move from 1 to 12 months – user will select the requested duration in months) thanks to a first drop down list filter. Then user can select all the product in the Location, or per Familly or per Product List or per CC/CS/DG.
Once the products are selected user will have the option to generate the CS with prefilled BN/ED details or without prefilled BN/ED details (in which a default of 3 blank line per BN/ED product will be displayed in the blank CS). In addition, just before generating the CS, user can chose to display “only lines with stock different than 0” or all the BN/ED including the one at 0 (i.e.: product which had previous stock moves).
At CS import some checks are done on product existence; product attributes mandatory or not; uniqueness of combination line number and product…
Products are displayed by alphabetical order
At generation of Discrepancy report, more checks are done for product with no information for “Quantity counted”. User will have to decide whether these products should be Ignored (won’t be part of the PI) or Counted as 0.
The Discrepancy report will compare the Quantities counted (physically) vs the theoretical stock in UF. No change on quantities can be done at this stage. Adjustment type is the only mandatory field. “Comments” field can be updated up to status “Confirmed”.
The “Recount” option at status “Validated” can be redone as many time as necessary.
Report for which dates selected (period from & period to) must reflect first and last day of given month(s) and from date should be before to date. Default period to value is last day of current month but can be changed.
Default and only possible location is for whole instance, so reflects all consumptions of instance, including all internal locations.
Products can be added as per standard methods (Add, Add multiple, Import)
Value AMC cannot be adjusted as pulls from AMC of product according to transactions.
The AMC value is based on the total quantity of the product which has left the instance via a consumption report or outgoing deliveries (both quick (OUT) and full shipment (Pick/Pack/Ship) processes). Any quantities of the product which have left the instance due to loan, donation, loss or discrepancy will not be included in this calculation. If any of the products have been received (returned) back in (via incoming shipment) to this instance within this period, this quantity will be deducted from the total consumption figure.
Value FMC can be filled manually / via import. Once validated, FMC cannot be modified unless validated checkbox is unticked. When FMC is validated, this value will be used by other calculations (e.g. Replenishment Rules)
Historical Consumption Report
Report for which dates selected (period from & period to) must reflect first and last day of given month(s) and “from” date should be before “to” date. Default “period to” value is last day of current month but can be changed.
According to period parameters set, one or more months will be displayed.
For calculation either Real Average Consumption (default) or Average Monthly Consumption can be selected.
Real Average Consumption is calculated using the total of all stock which left the instance due to a Real Consumption report. Unlike AMC it does not consider any other picking/transport documents which take products out of the instance.
“Source Location” field will only display internal locations. “Destination Location” field will only be displayed when “RAC” is chosen as Consumption type and will enable to also select External Consumption Unit.
As opposed to the “Source location”, the “Destination location” is not a mandatory field.
By default all products in database will be displayed, but products can be pre-filtered using Lists or product nomenclature filters (main type, group, family, root)
6.5 Claims (US-3516)
This Claim functionality has been upgraded mainly with the synchronisation option with the recent development done on US-3516 ( however, some adjustment still need to be done to cover all the possible test cases – and that’s why user might still experience some unexpected behaviour that might need corrections)
Claims can be created by the following
From an Incoming Shipment (Available/Available shipped): menu Warehouse > Incoming Shipment
From an Internal movement (Available) => menu Warehouse > Internal moves
From scratch (for goods already received into requesting location): menu Purchases > Claim or Orders > Claim
Created by Synch: if Supplier Claim created at receiving instance
For Claims on goods in the process of being received, Claim can be created from existing Internal move (INT) in status “Available” linked to the processed Incoming Shipment (ie default checkbox in IN “Direct to Requesting Location” was not ticked) or directly from the IN which has to be in status “Available” or “Available Shipped”.
For Claims where the INT or IN has already been processed, or where goods were received directly into Cross Docking, the Supplier Claim must be raised from scratch from either Purchases or Orders menu.
Claims automatically created by synchronization can only be “Customer” Claim with status “Draft – in progress”. They will be created after the synchronization of a Supplier Claim to an Internal/IM/IS partner with status “Validated – In Progress”.
Once the Supplier Claim is “Closed” as well as its Transport document, the synchronization will update the Customer Claim (at other instance) to status “Confirmed”.
Claim Statuses
Draft – Claim has been created from scratch, not yet validated. Still editable and products should be from selected transport document (IN/INT/PICK/OUT). Event can still be chosen
Draft in progress – Claim has been created automatically via synch (only “Customer” Claim can be created by sync)
Validated in progress – claim has been validated manually (if from scratch ) or has been created via IN or INT after selection of Event.
Confirmed – at receiving side Claim is still open but Claim has been closed at internal supplier side (all documents sent or no more expected to be sent)
Closed – Claim is closed (in this instance). No more modification possible. Will be closed manually once all related transport documents are Closed (cannot be Closed before since button to close won’t be available before related documents are Closed)
Types of Claim
There are 3 types of Claim:
Supplier: raised by the instance which received the goods. Will be sync’d to Supplier once in status “Validated- In Progress”
Customer: received by the instance which supplied the goods. Can be automatically created by sync in status “Draft- in progress” for Internal/IM/IS flow (will have the reference of the initiating Supplier Claim from other instance).
Can be created from scratch for External Supplier.
Transport
For Claims created from scratch, in order to create any of these types, there must be a closed picking document of an OUT, IN or Pick. Default source location will be stock, so may need to be modified to LOG or MED and integrity checked. Claim cannot be processed (have event added) if products not available, or for products not relating to chosen picking document or for a quantity greater than picking quantity. Claims which are created directly from an INT or an IN will have the correct data filled automatically. In order to process a claim, an event (how products are dealt) must be added:
Claims can have the following actions/ events:
Accept
Move to Quarantine
Scrap
Return
Return (surplus)
Request missing products/quantities – can only be raised for an Available/Available shipped INcoming shipment.
As a complement to these options (except for “Return (surplus)”, there is a separate checkbox to activate the option “Replacement expected for Claim”. It is ticket by default for the action “Request missing products/ quantities”. (
For option Accept, no additional movement is created. IN/INT is processed to requested location and Claim is Validated – In progress
Move to Quarantine/Scrap will create an Internal Move to transfer the products to the Quarantine (analysis) location and for the Scrap option, the goods will be sent to the Quarantine (scrap) location and Claim is Validated – In Progress
If option Return is selected, a PICK-Return is created to remove products from instance and send back to Supplier. This Pick can be converted to an OUT. Claim is Validated – In Progress.
A Claim Refund should be created in the Supplier refund
If option Return – Surplus is selected, a PICK-surplus is created to remove products from instance and send back to Supplier. This Pick can be converted to an OUT. Claim is Validated – In Progress.
A Claim Refund should be created in the Supplier refund.
For all of the above the checkbox “Replacement expected” (if from scratch) or “Replacement expected for Claim?” (if from IN/INT) will appear and can be ticked, which will result in an Incoming shipment (IN-replacement) being created. This IN will be linked to the original PO. If this box is ticked in a claim from scratch, the new IN will contain reference to the PO (even if the PO is now closed). If this box is ticked in a Claim raised from an IN, the IN will have reference to the PO and ideally work as a back order (so PO is closed when IN replacement is fully received (or when last BO IN is processed)) . For the Supplier any Claim registered will be displayed in the Supplier data sheet, in the claims tab, along with the status of each claim.
Finally, Request missing products/quantities options will create a new IN with Status IN/XXXXX – missing in Available status (while the initial IN will be Cancelled).
Closing the Claim & synch
As with the current mechanism, a claim must be closed manually. It will be possible for “Supplier instance” to Close their (own) claim flow, having processed any relevant transport documents and then manual action to close claim -if all linked transport documents are closed/cancelled then the “Close claim” button is available and will lead to status Closed. Along with synching of transport documents, the closing of the Claim will be synched to update the claim/documents at the customer side (project/customer claim will become “Confirmed” and will only be “Closed” by manual action on button “Close claim”). Project Claim can be closed (manually) only if all picks, INTs and INs linked to claim are closed/cancelled) .
6.6 Product functionalities in stock transactions
Expiry dates
All products for which the attribute “Batch Mandatory” and / or “Expiry Date Mandatory” have been ticked will be treated in the system as needing this extra information on batch and / or expiry date for all stock movements and inventories in the system.
Where a product has expired, the line for this batch of products will be displayed in red. For transport documents, products which have expired will not automatically be selected, except in the case if there are no other / insufficient quantity of in-date products to fill the need. Where there are not enough in-date products, the line will show as “available” but the batch will not be shown, so that user must consciously open window to search for and select expired products.
Force availability
This functionality was already present in the original software. In the system it is visible in all stock movement transactions where the source of goods is internal, therefore for Internal moves, Delivery Orders, Picking Tickets and Consumption reports. The force availability icon is displayed if a line or split line of product quantity is not available in the selected location. If used, the green arrow with Force availability, will force products to become available (ie causing negative stock levels) meaning that the line can be processed together with the others in the document. However, for products which are Batch Mandatory or Expiry Date Mandatory, these cannot be forced. This is due to the other functionalities which are linked to these characteristics which would be made unreliable if force availability were made possible – e.g. batch recall, products to expire etc. Once Force availability has been applied to a line, and the line is available, any use of the “Check Availability” button will re-check the true availability, as a product with Available status is now included in this check.
Reason Types
There are several Reason types possible in the system for warehouse stock transactions: Incoming Shipments, Delivery Orders, Internal Movements, Initial Stock Inventories, Physical inventories, Shipments and Real Consumption Reports- For each a reason type is assigned by default in the transaction but usually can be changed:
Internal Supply – In an Incoming Shipment from an Internal Supplier
Consumption – can be selected in OUT
Consumption Report– On OUT generated by Consumption Report
Return from Unit – can be manually selected in Incoming Shipment
External Supply – In an Incoming Shipment from External Supplier
Deliver partner – for OUT
Internal move – In an Internal move, may be changed
Loan – relates to picking linked to PO/FO of this type
Donation (standard) – relates to picking linked to PO of this type
Donation (before expiry) – relates to picking linked to PO/FO of this type
In Kind Donation – relates to picking linked to PO of this type
Loss – Internal move with destination Inventory / inventory control
12.1- Loss / Scrap – Internal move with destination location Scrap
12.2- Loss / Sample – can be manually selected in Physical Inventory (Adjustment type)
12.3- Loss / Expiry – can be manually selected in Physical Inventory (Adjustment type)
12.4- Loss / Damage – can be manually selected in Physical Inventory (Adjustment type)
Discrepancy – default in Physical Inventory, can be changed
Other – for Internal Move to Destruction location, can be used in other documents also.
Kit – for Internal Move to linked to Kitting Order
Goods Return – for OUT linked to Claim returning goods to Supplier
Goods Replacement – for IN linked to Claim where replacement expected
Stock Initialization – default in Initial Stock Inventory
6.7 Product Cost Revaluation
Menu mapping: Warehouse / Inventory Management / Product cost revaluation
Transaction which permits average cost price value of products in stock to be changed.
Products can be added via usual means, individually, multiple, import or with nomenclature filters.
Statuses:
Draft: all modifications possible, price can be changed.
Confirmed: Confirmed button has been clicked, no modifications possible
Done: No more modification possible, product data sheet has been updated with new cost price. This
can be traced in the product master data action menu with “Track changes – Product prices”.
Export:
Cost Reevaluation Excel Export
6.8 Replenishment Rules (US-6490)
Menu mapping: Warehouse/Replenishment Rules
This functionality has been entirely reviewed and still under progress. Initiated with released ticket US-6490 and related linked tickets in Jira…
6.9 Manage Expired Stock (US-3092)
Menu mapping: Warehouse / Inventory Management / Manage Expired Stock
All Supply objects are presented in a similar format; At header level, there is generic top line information relevant to the object, and at line level, there are details relating to the product lines.
Fields displayed in blue for a new document denote the field is mandatory, and fields with a magnifying glass denote user may select a value from the master data.
For the majority of objects there are several ways to add products, namely individually (New button), or several together via import, or add multiple button which allows user to add selecting from catalogue, list or other product criteria. The add multiple lines and delete multiple lines functionality is available in the following transactions:
1)Product list 2)Product sub list 3)Theoretical kit composition 4)PO lines 5)RfQ lines 6)Tender lines 7)Claim Products 8)FO lines 9)IR lines 10)Supplier catalogues lines 11)manual IN lines 12)INT lines 13)manual Delivery Order lines 14) Replenishment Rule Segment 15)Physical Inventories 16)Initial Stock Inventory 17)Real Consumption Report 18)Monthly Consumption Report
4.2 Track Changes
This functionality exists for the following documents:
IR, PO, FO, Incoming Shipment, and registers and displays changes made at header and line level together with date/time and user. This action is found in the action menu of the object.
Please note that the “Track change” feature is also available for master data such as Products and Partners ( and most probably other ones will be developed following requests).
4.3 Imports
In Annex there will be all import formats. These may relate to lines or whole transactions. In general to create a transaction, header information must be created manually and lines (products) may be imported or added manually. It is not possible to create a whole transaction (including header) via import – however, there are 2 exceptions to this rule with the Theoretical Kit Composition and the “Import from IR template” (developed to match EasyMED – even though the IR reference still needs to be manually created first).
Some more elaborated imports have been developed as well as part of the Vertical Integration (linked to ESC partners) for PO and IN documents. They have some additional checks at header level as well (see details in relevant chapters below).
4.4 Naming conventions for document references
The most complex naming conventions are for POs and FOs:
Purchase Orders
15/CH/KG101/PO00023
YY/OC/CCXX/POXXXX
Year (2015), OC code (according to proprietary instance config – CH), Cost Centre for instance, PO, then sequential number in this instance
Field Orders
15/CH/KG101/FO00018
YY/OC/CCXX/FOXX
Year (2015), OC code (according to proprietary instance config), Cost Centre for instance, FO, then sequential number of FO in this instance
For most other documents, the reference is composed of an identifier of that transaction and a sequential number. The exception is Initial Stock Inventory, which has a free text field. Please see fields-by-fields documents.
4.5 Order Dates Mechanism
IR:
Creation Date (CD) – Ordered Date: Date of Creation of the document
Requested Date (RDD): manually entered (mandatory) – will be carried out to the following document in flow (PO/OUT…)
Date of Stock Take (DST): manually entered (not mandatory) – Will be carried out to PO (mandatory for PO with Supplier ESC).
FO:
Creation Date CD– Ordered Date : Date of Creation of the document
Delivery Requested Date RDD: (if FO created from scratch): Creation date + Default customer lead time; (if FO created from synch) Corresponding PO Delivery requested date
Delivery Confirmed Date CDD:
(if sourced from stock) date of the confirmation of the FO + shipment lead time + estimated transport lead time
(if sourced on order) CDD of the PO + preparation lead time + shipment lead time + estimated transport lead time
Date of Stock Take (DST): manually entered (not mandatory) – Will be carried out to PO ( mandatory for PO with Supplier ESC).
Ready to Ship Date RTS: RDD – estimated transport LT – Shipment lead time
Shipment Date: Date of first SHIP/OUT processed
PO:
Creation Date (CD): Date of Creation of the document
Delivery Requested Date (DRD): Creation date + Default supplier lead time (field greyed out after PO line validation – used for pipeline calculation)
Delivery Requested Date (modified): manually updated after PO line Validation up to PO confirmation (will be greyed out after PO confirmation – used for pipeline calculation if there is no CDD)
Delivery Confirmed Date (CDD): manually updated or will be via synch for internal supplier (used for pipeline calculation – once line Confirmed can only be modified by VI import and will only update INs – ie no previous doc will be updated)
Date of Stock Take (DST): manually entered (mandatory only for ESC supplier) or can be automatically populated from IR/FO flow
OST:
Requested Delivery Date (RDD) : coming from the IR “Requested Date” or the “Delivery Requested Date” from the FO
Estimated Delivery date (Estimated DD): Today’s date + Supplier Lead time
Incoming Shipment
Creation Date: Date of Creation of the document (Confirmation of PO)
Expected Receipt Date: Confirmed Delivery Date of PO (can be updated following VI import at PO level)
Actual Receipt Date: Date of Reception in the system (when IN is actually set to Closed)
Physical Reception Date: Used for reporting purpose; by default same as Actual Receipt Date and automatically populated at IN processing but can be overwritten by user (when in Available/ Available shipped status).
UniField supports the double entry principle for stock movements. Any product which moves through the system will have a location where it appears (+1), and a location from which it is taken (-1) therefore any movement will have an impact on at least 2 locations. This principal applies to both movements within the instance (from one internal location to another) and also movements where products are entering or leaving the instance.
The set-up of the basic (main warehouse) internal instances is as follows:
Warehouse set up
Each instance will have a warehouse created by default at the instance creation, and the default locations are: Input, Stock (with children locations Log & Med), Cross-Docking and Output. These in theory represent locations in a physical warehouse where stock may be present. The Output location is further divided for the purposes of outgoing stock movements;
Input represents a transition location which will reflect any stock which the instance receives before being available in the main stock (= destination location of Purchase Order when not cross docking if the checkbox “Direct to Requesting location” has been unticked before the IN is processed).
Stock reflects the physical stock which is available in the instance’s warehouse location. Products can be directly present in this location, but according to agreed processes should only be in one of the child locations – Log or Med, as all products will have a main type of either LOG or MED, and as such should be directed to the relevant child location.( some constraints on some documents updates have been added in order to avoid having any stock in the main “Stock” location)
Output is a transit location reflecting goods which may physically still be in the warehouse, but which have already been allocated for a dispatch and possibly partially processed.
Within Output, there are further divisions to reflect what stage the goods are at in the process of being prepared and dispatched (only full PICK/PACK/SHIP process), this includes sub divisions for Packing, Dispatch and Distribution steps.
Cross Docking represents a location of the Instance’s warehouse which reflects goods that are in transit to another instance (typically destination of PO made to fulfill FO requirements, or needs of IR (external requesting location) (“on order”) to speed up the IN/OUT process).
Quarantine represents a location where goods are placed when under analysis, either before scrapping or for analysis prior to use. Goods are automatically sent here if a Claim is raised and the relevant option is selected, or if there is an Internal movement created and processed with this destination location.
3.2 Configurable Locations
In addition to the standard warehouse set up (Input, Stock (Log & Med), Cross-Docking and Output.)- It is possible for a user to create extra locations.
Configurable locations can be either internal or external.
Internal: In the system there are 2 options for configurable internal locations – Intermediate stocks and Internal Consumption units. There is full visibility of stock (qty, batches, value etc) in any internal location, and this location can be selected also for sourcing purposes (see section on Order Sourcing Tool). In this context, internal consumption units are not considered as “last customers”, as the products are still within the instance. Technically there is no difference between Intermediate stocks and internal Consumption Units, but they are named differently to assist end users in understanding flows and last internal point in instance.
Functionally to help visualise the slight difference; an Intermediate Stock would be more like a physical section in the actual Warehouse where the products are allocated to a specific project for example while the Internal Consumption Unit would be more like a Pharmacy stock in a local clinic for instance (but that we still want/need to track in the system).
External: The possibility to have external consumption units as configurable locations was more recently developed, with the idea of enabling a flow for Internal Requests for which the final destination would be external (this due to OC’s choice). If the destination is external, as soon as the stock has been dispatched, the stock will leave the UniField instance, and in this case, external consumption units are considered as “last customers” (when goods are delivered to an external consumption unit, they are assumed to be consumed). The main use for External Consumption Units is to act as requestor/consignee in Internal Request flows or for Consumption Reports, where IR flow is not used.
There are multiple different set ups possible for configurable locations, please see diagrams for some examples.
No extra locations configured
Intermediate stocks
External Consumption Units
Intermediate stock and external consumption units
Internal Consumption Units
Full set up
3.3 Other Locations (partner locations and virtual locations)
In order for the double entry mechanism to work for goods which are arriving in and leaving the internal locations, there are also several partner locations and virtual locations which may act as the origin or destination of goods. The two main Partner locations are Supplier and Customer, and for these, goods which are entering and leaving the internal instance will have a relevant stock movement in one of these also. The main virtual locations are; Procurement, Kitting, Inventory Loss & Profit, Service and Non-stockable, and the system will use these for movements internal to the instance.
For example for a product on an order, once the Incoming Shipment has been processed, the Qty in stock (Log or Med) will be +1, and the Quantity in the Partner location “Supplier” will be -1. This reflects that the product has been passed from supplier to internal stock.
The same is true for products which leave the instance, in which case the quantity in the internal stock location will be reduced -1, and then quantity +1 will be added to the partner location Customer. The same mechanism exists for virtual locations.
All of these locations can be viewed in the Stock by location screen for each product (“Products” > select a product > “Stock by location” in right action menu), and they are also displayed as origin or destination of product moves in the report Stock moves (Warehouse>Stock moves).
Customer – Other Customer – Partner location reflecting external customers
Procurement – virtual location, but display has been changed in ticket BKLG-22 so qty will always be zero in Stock by location but is still visible as product origin in Stock moves as alternative to Supplier location.
Kitting – Virtual location reflecting where kit products are sent or taken from when a kit is created via a kitting order from components (kit product is -1 in kitting location and +1 in stock location), or when de-kitted into components (+1 in kitting location and -1 from stock location)
Inventory Loss & Profit – Virtual location reflecting origin or destination of goods according to changed inventories (Qty + or Qty -)
Service – Virtual location reflecting where Service type products are sent (when they are received in Incoming Shipment)
Non-stockable – Virtual location reflecting where non-stockable type products are sent (when they are received in the Incoming Shipment of the final consignee instance).
Any stockable products received will be part of the internal inventory until they are issued to an external party at which point they will be removed from any internal locations and will exit UniField. Products which are Non Stockable or Services with reception will not figure in internal locations but will be received in specific virtual locations. The exception is where non-stockable products are in transit to another internal partner (e.g project), in which case they will be stocked in the Coordo Cross Docking location until they are dispatched.
3.4 Virtual Stock
UniField offers a view of “virtual stock” as well as real stock, which can help manage supplies more efficiently as this gives visibility of stocks and their likely availability.
Please note, it is not necessary to understand this in order to process day to day transactions, but it may be useful in understanding stock movements and how the system works.
Products which are in the pipeline with stock moves will appear as additional virtual stock in the stock views (for instance Draft INcoming Shipment).
Products which have already been reserved or are due to leave a location due to the relevant document being in draft will reduce the quantity of “virtual stock” in the system stock views (for instance Draft PICK; INT; Delivery Order).
The Virtual stock quantities give a “snapshot” of what the quantities of stock are likely to be in the future, based on the transactions in the system.
The table shows the locations and quantities for an example product at a certain point in time::
Table showing quantities for real stock and virtual stock for a product (scissors)
Or, to represent this visually, these are the locations of the Real Stock:
Diagram showing Internal Stock Locations – Real Stock
In the overall warehouse (shown as “Instance Warehouse” in the diagram above) there are a total of 18 items, all of which are within the “All Stocks” location, in Stock, and specifically in the “LOG” location.
And these are the locations with quantities of the Virtual Stock (i.e. the system’s forecast of where the stock will be in the future):
There is a virtual total of 20 items in the (instance) warehouse: 2+8+10 =20
There are 2 items in the input location, in “All stocks” there is a total of 8, all of which are in “stock”, and specifically in the “LOG” location, and there are 10 items in the “Packing” location.
System calculates that there will be 2 items in the input location – because there is an available Incoming Shipment (created due to a PO being confirmed) for these 2 items.
System calculates that there will only be 8 items in LOG, but that 10 will now be in PACKING – because there is a Picking in draft status (created when a validated FO was sourced from stock) for 10 of these items.
3.5 Calculation of product quantity in stock:
The figure for the quantity of products in stock (real, available and virtual) is calculated each time it is displayed. This means system takes baseline qty of zero for a product, then adds all stock movements made since the instance was activated to arrive at the balance of the current stock. As more movements exist for a product, so the time taken to arrive at this figure will increase. This has been raised as an element which in the long term needs to be modified to prevent unreasonable calculation times.
Calculation/display of quantity in stock in transactions
Specific transactions where when product master data shown (e.g. via clicking magnifying glass for Product field) the quantity displayed in window will reflect quantity for specific selected location of that transaction.
This memo is circulated to Unifield stakeholders active in the supply functional domain.
Unifield supply referents for review
Unifield supply implementers for review
Unifield Deployment Managers for information
#Resources in charge of field supply tools maintenance and evolution in all OCs
II. Introduction to Supply System Documentation.
This document is designed to give an overview of Unifield Supply functionalities, concepts and flows. Where a specific feature has been developed I have tried to explain the rationale. This document aims to cover master data and each document in the Supply flow with an outline of specific functionalities. In addition, this document describes the configuration and set up of Supply in Unifield, and details how products pass through these locations and their impact on flows. This document is not intended to explain the full synchronisation mechanism as this will be explained in the IT Documentation. User rights will also not be included in this document as they are separate to Unifield Supply functionalities.
There are other systems which impact flows in Unifield, for Supply these include UniData and OCs and HQs’ Portal and ESC systems. This document lists where relevant the impact and interaction with these, but does not aim to include in its scope processes beyond those of UniField.
The targeted audience for this document is those who already have good knowledge of the system. This document does not aim to replace the User Manual, nor provide any step-by-step guidance. Its aim is to provide background information and rationale of why certain functionalities exist in their current form, and how they are structured beyond the user interface.
Finally this document will continue to evolve and be enriched due to:
Evolution of the tool and integration of new tickets;
Missing information raised by OCs.
III. Glossary
AD Analytic Distribution
AMC Average Monthly Consumption
BN Batch number Mandatory
BO Back Order
CC Cost Centre
CD Cross Docking (Location)
CP Central Platform
DB Data Base
DPO Direct Purchase Order
IKD In Kind Donation
IN Incoming Shipment
INT Internal Movement
IR Internal Request
KCL Kit Composition List
ESCEuropean Supply Centre
ED Expiry Date
FEFO First Expired First Out
FMC Forecasted Monthly Consumption
FO Field Order
HQ Headquarters
LT Lead Time
OC Operational Centre
OST Order Sourcing Tool
OUT Delivery Order
PL Purchase List
PO Purchase Order
PICK Picking Ticket
PPL Pre-Packing List
RAC Real Average Consumption
REF Reference
RFQ Request for Quotation
RR Replenishment Rules
RTS Ready To Ship
Qty Quantity
SHIP Shipment
SLL Status at Line Level
Sync Synchronisation
T Tender
UF Unifield
UoM Unit of Measure
PCE Piece
VI Vertical Integration
WAC Weighted Average Price
1. UniField – Introduction
For Supply, UniField is intended to be used in conjunction with Finance modules at field level; Coordo and Project. UniField is therefore based on the nuclear structure of having an HQ, Coordo and project. The synchronisation engine was developed in order for instances to communicate necessary data (see IT documentation for more detail on this). For Supply, the key master data is products which are necessary for every transaction. The type of product (product attributes) will affect how the product is treated and managed in the system. Products pass through the Supply flows of Ordering, Purchasing, Receptions, Deliveries and are managed through warehousing transactions. In addition this document describes the configuration and set up of Supply in Unifield, and details how products pass through these locations and how they affect the flows.
1.1 List of Supply System Master Data
Products
Product Nomenclatures
Batch numbers and expiry dates
Asset Forms
Theoretical Kit composition list
Partners (Suppliers / Customers / Manufacturers)
Packs
Units of measure
Categories of Unit of measure
Product lists
Supplier catalogues
Country Restrictions
For creation, please see synch rules in system documentation, and where manually created/updated please see relevant section in this document
We use cookies to ensure that we give you the best experience on our website. If you continue to use this site we will assume that you are happy with it.