Finance User Manual ENG -> 6. Donor Management -> LUFI-6.4 Financing Contract Principles.
FINANCING CONTRACT PRINCIPLES
LU Introduction
In UniField, the financing contracts are the key grant management tool as all reports are produced from there; they link the funding pools and the Donors to provide the ability to issue adequate reporting to institutional Donors.
By linking financing contracts to a Donor, the following information from the Donor form is carried over in the financing contracts:
- Reporting type
- Overhead percentage
- Reporting lines
The financing contract form includes the following fields and tabs:
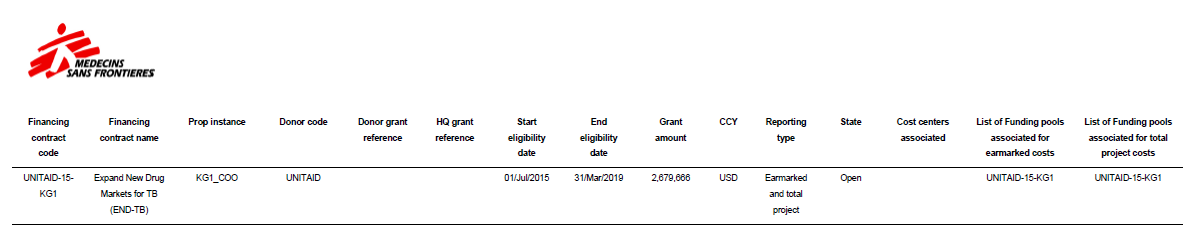
- {Financing Contract Code & Name}: Manually input a recognizable code and name.
- {Donor Name}: Select a Donor from the list created via the {Donor} sub module. By associating a Donor to a contract the system will pick-up the reporting lines associated with the Donor form. This template remains editable to adapt to specific contexts or reporting requirements.
- {Reporting type}: Is an essential parameter defining what type of costs the user needs to report on. The three options are: earmarked, total project costs, or earmarked and total project costs. By selecting a Donor, this information will be carried over from the Donor form but remains editable.
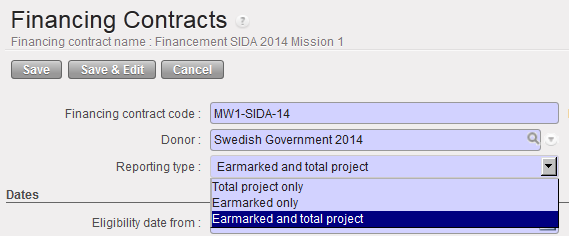 Reporting types of a financing contract
4. {Proprietary instance}: Select an instance from the list of instances available in your database. It should be the proprietary instance of the coordination of the mission. It determines the coordination to which the financing contract will sync and avoids synching all financing contracts to all missions.
5. {Eligibility Dates}: reflect the financing contract duration. It determines if a specific expense should be included in the Donor report based on the expense’s {document date}.
6. {Contract information}: The reports are issued in the Donor currency as manually selected by the user. When the Donor requires specific exchange rates to value expenses included in the report, UniField offers the possibility to link a specific currency table to a contract; as a result the expenses presented in the contract will be valued at the Donor exchange rates table rather than system rates.
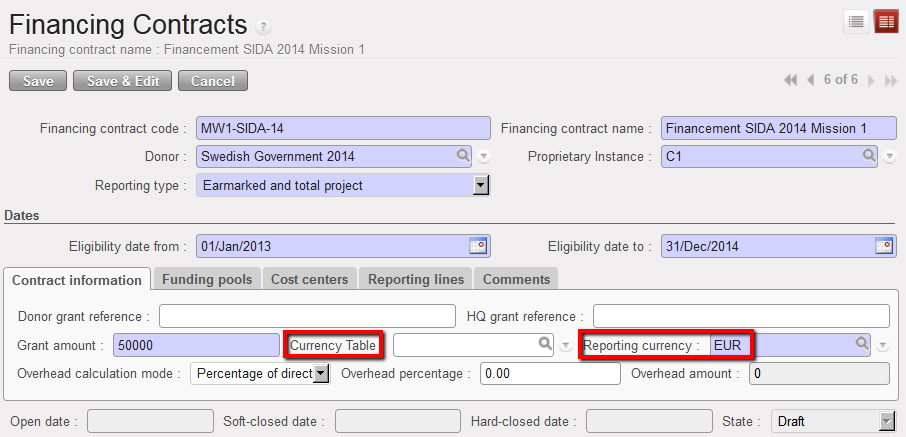 Reporting currency
The overhead amount will display if the Donor is funding overhead and if this option was set in the Donor form.
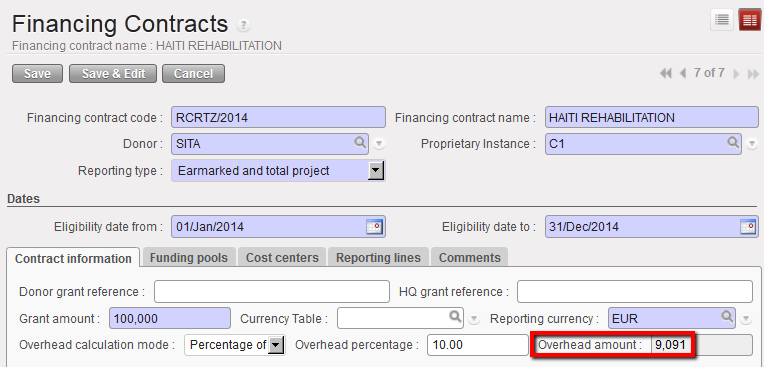 Overhead Donor contribution calculated
In the above example, overhead amounts 9,091 EUR. The chart below shows how the system calculated the direct costs and from there the overhead amount:
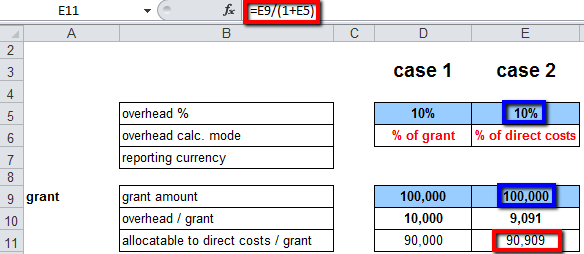 Direct cost and Overhead calculation explanation when overhead calculation is based on direct costs
If the overhead calculation was out of the total grant, we would have the following calculation:
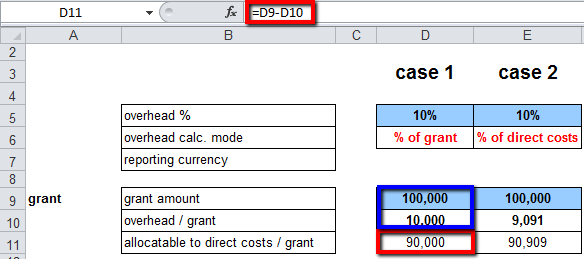 Direct cost and Overhead calcualtion explanation when overhead calculation is based on total grant
7. {Funding Pools}: Defines which funding pools should be included in the report, both for earmarked (grant) and total project costs. By default, UniField selects the report type listed in the Donor form. However, it can be edited.
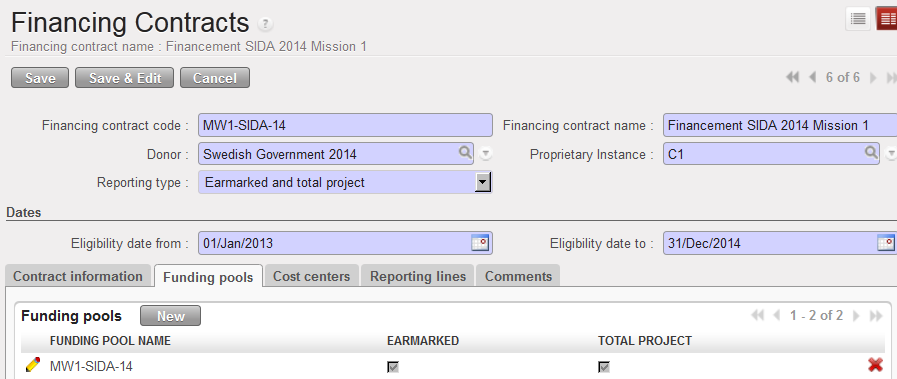 Funding pools tab displaying FP linked to a financing contract
8. {Cost Centers}: Selects the analytical cost centers (projects) the Donor has agreed to provide funds to. The cost center selected here should also be selected on the matching funding pool.
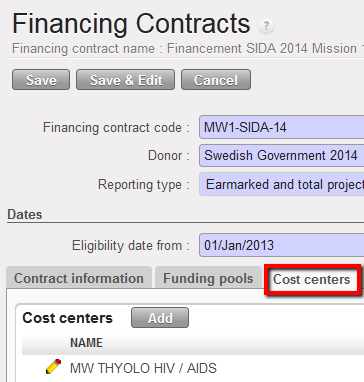 Cost centers associated to a financing contract
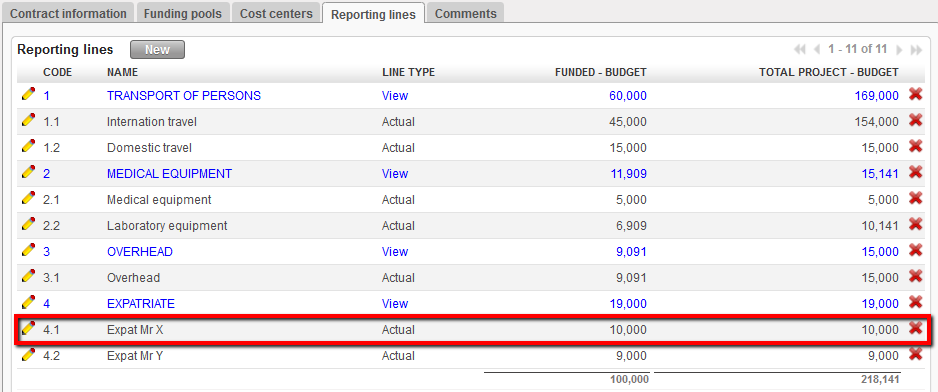
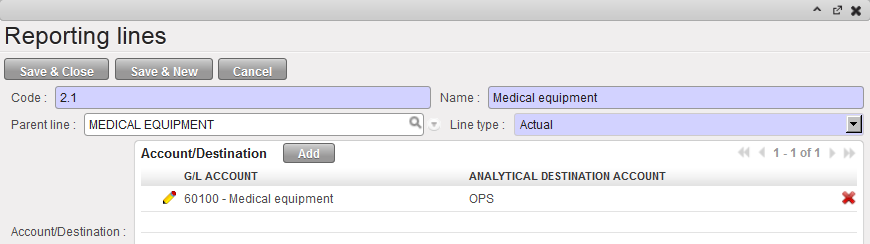
9. {Reporting Lines}: Are a given MSF expense account/destination code & cost center which are mapped to the Donors reporting requirements. By selecting the Donor, UniField automatically selects the reporting lines as defined in the Donor’s form.
These lines will be standard: they will be retrieved every time you create a financing contract with this particular Donor, provided the reporting guidelines remain unchanged.
You can edit, add and remove reporting lines to adapt to specific reporting guidelines valid for a particular financing contract. In case the changes performed are meant to be generic and valid across all grants, they should be executed in the Donor form.
The expense codes/destinations associated to the contract’s reporting lines should also be selected in the funding pools used in the contract.
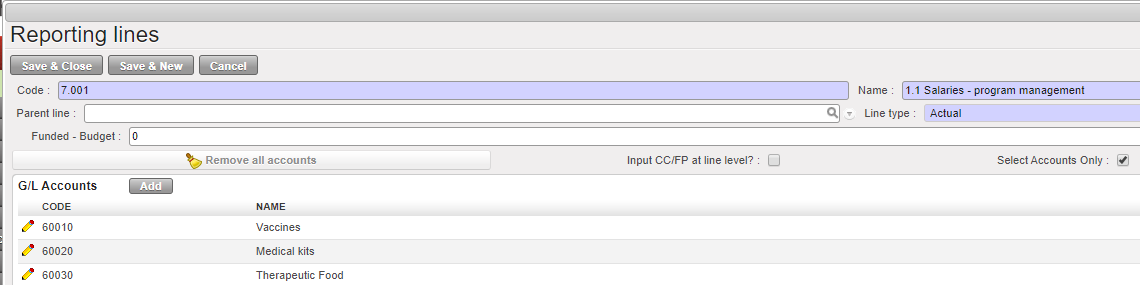
In the reporting lines tab, you enter a budget per reporting line, both for earmarked costs {Funded – Budget} and for total project costs {Total Project – Budget}. The total budget (including overhead) will have to match the budget included in the proposal submitted to and signed with the Donor. The {Funded – Budget} is the amount the Donor has agreed to pay. The {Total Project – Budget} is the amount for these expense codes for the entire project (excluding expenses allocated to {MSF private funds}.
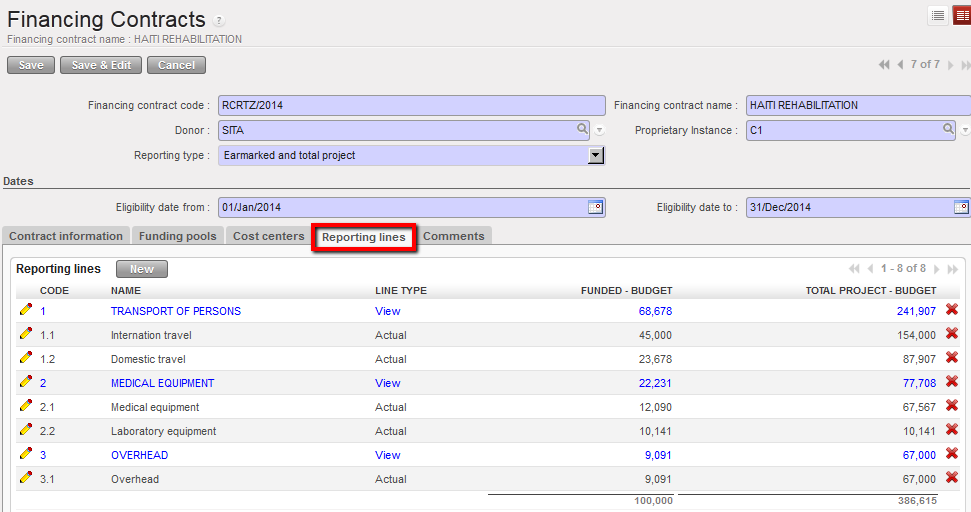 Reporting lines
In the example below, the Donor has agreed to pay the full budget for Laboratory equipment cost.
 Reporting line and associated budget (earmarked and total)

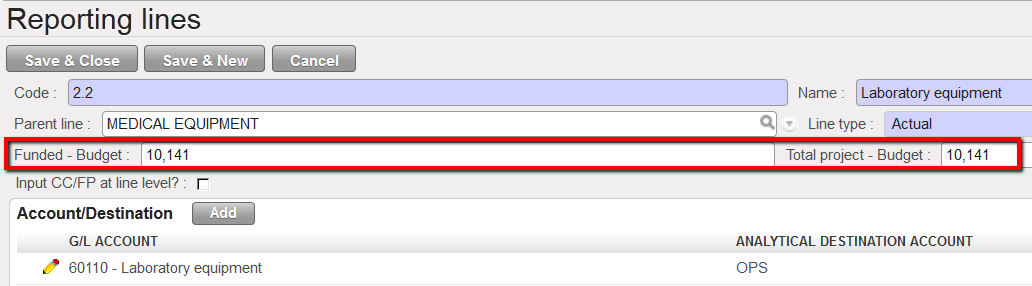
Suppose now the Donor wants a more detail of the expense report, for example per expat. To be able to select twice the same accounting code, it is possible to use quadruplets made of {expense account, destination, cost center, funding pool} instead of couples made of {expense account, destination}. Such feature allows the user to pick the same expense account in different reporting lines and provides the ability to report on the related expenses under different reporting lines so that nature of expenses funded is similar.
For example, DANIDA requests a reporting displaying expense per Danish expat.
- In order to comply with this requirement you need to isolate expenses on account {66220 – per diem} for Mr X and for Mr Y by creating 2 reporting lines. You will also need to create a funding pool for Mr X and a funding pool for Mr Y and tie them to the appropriate reporting lines created.
- For the Expat, you will create 2 funding pools associated to the account code {66220 – per diem} as showed below:
 Funding Pools to use when setting reporting line
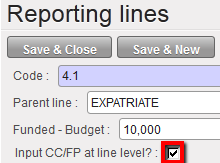
In the financing contract, you will assign the reporting line Mr X to the funding pool EXPAT MR X and the reporting line Mr Y to the funding pool EXPAT MR Y. To do so, you will need to use the functionality {Input CC/FP at line level} available on the reporting line window:
Option 1:
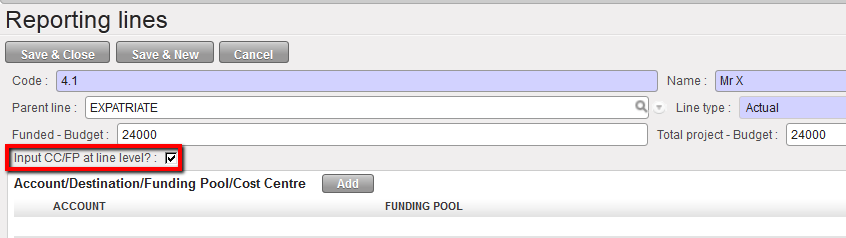 Ticking the checkbox Input CC/FP at line level
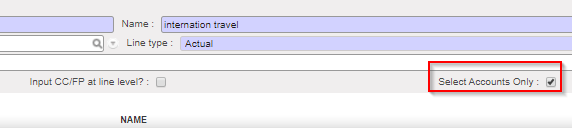
Or option 2:

Then link the line to the funding pool EXPAT Mr X
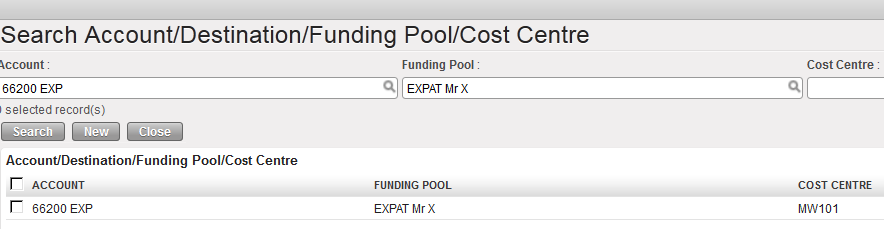 Linking the reporting line Mr X to the funding pool EXPAT Mr X in the Search Account/Destination/Funding Pool/Cost Center
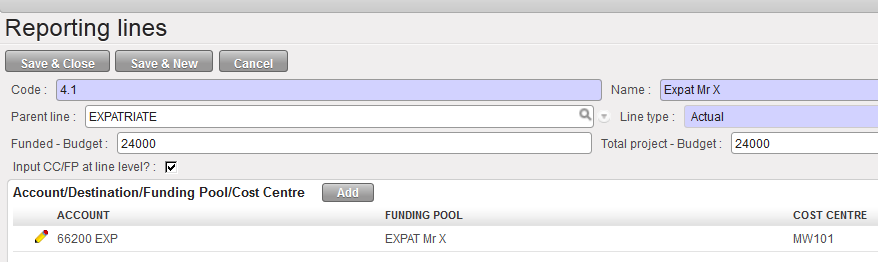 Reporting line associated to the funding pool EXPAT Mr X
Remember, you must first assign the cost centers and funding pools to the financing contract in the tabs {Cost Centers} and {Funding Pools}, then save the contract, prior to linking quadruplets to reporting lines otherwise they will not display in the {Search Account/Destination/Funding Pool/Cost Center} window.
10. {Comments}: Any type of relevant comment you want to add in the financing contract (text format).

Financing contracts have four status types:
- {Draft}: The proposal was submitted to the Donor and is likely to be accepted. Contract info can therefore be integrated in the system and the appropriate funding pools can already be created.
- {Open}: MSF reached an agreement with the Donor and received a formal approval on the submitted proposal.
- {Soft-closed}: A draft report was finalized and sent to the Donor. From the moment a contract is soft-closed in the system, the corresponding expenses cannot be modified / corrected (Expense account, Destination, Cost Centre, Funding Pool). However an authorized user can re-open this contract, making allocation on the funding dimension open to modification again.
- {Hard-closed}: The final report was finalised and sent to the Donor; a hard-closed contract cannot be set back to ‘soft-closed’ ever again
How to Create a Financing Contract
Go to: Accounting/Configuration/Grant Management/Financing Contracts
⮡ A list of active financing contracts appears
Click on {New} to create a new contract.
⮡ A new contract form appears
- Enter the contract code and financing contract name.
- Select the Donor form by clicking on the magnifying glass

- The type of reporting is automatically populated by the one set up in the Donor form but remains editable.
- The proprietary instance is not editable (it is the user’s one)
- Enter the eligibility date {From and To}.
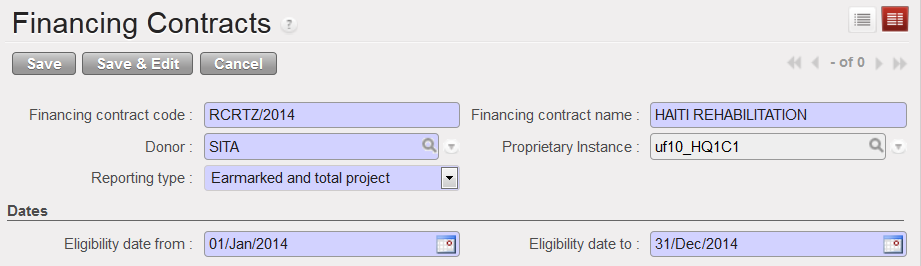 Financing contract creation
- {Contract information} tab: complete the {Donor grant reference} and {HQ grant reference} fields. They are optional but provide additional information on the report for better follow-up.
- Enter the grant / global contribution amount (the funded amount).
- If required by the Donor, select a currency table to produce the report at the requested exchange rates. If not required, simply enter a reporting currency.
- The overhead amount is automatically calculated based on the Grant amount.
 Contract information tab
5. In the {Funding pools} tab, click on {New} and in the field {Funding pool name} click on the magnifying glass  to select the funding pools you want to link to this contract. Save the line
Tick the checkbox {Earmarked} if the Donor requested a specific report on its funding. If you want to link a funding pool to a reporting line, remember to add it here.
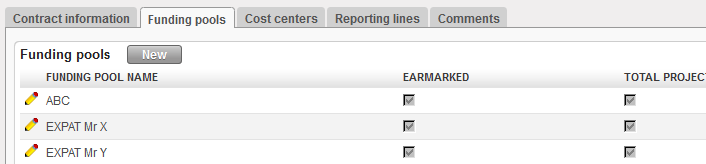 Funding Pools tab and pools added
6. In the {Cost centers} tab, click on {Add}. The Search Analytic account view display.
Select the cost centers you want to add to this contract.
 Cost centers tab and adding data
7. In the {Reporting lines} tab, the lines default to the lines mapped to the Donor form.
8. Open each reporting line type {Actual} by selecting the  edit button of the line to enter the funded and budgeted amount. Funded budget is the amount the Donor has agreed to fund for these expense accounts/destinations. The total budget – project is the total budget for only these expense accounts/destinations.
Option 1:
 Budgeted amount for the reporting line {Personnel}
Option2:

- If you need to allocate a quadruplet account/destination/cost center/funding pool to a reporting line, open the relevant reporting line

- Tick the check box of the statement {Input CC/FP at line level} for the first option
 Ticking the checkbox to input CC/FP at line level
3. Or tick the check box Select Accunts Only for the second option:
4. In the box {Account/Destination/Funding Pool/Cost Center}, select to insert a quadruplet account/destination/cost center/funding pool

 Linking cost centers and funding pools at line level

5. In the {Search Account/Destination/Funding Pool/Cost Center} view, select the relevant quadruplet
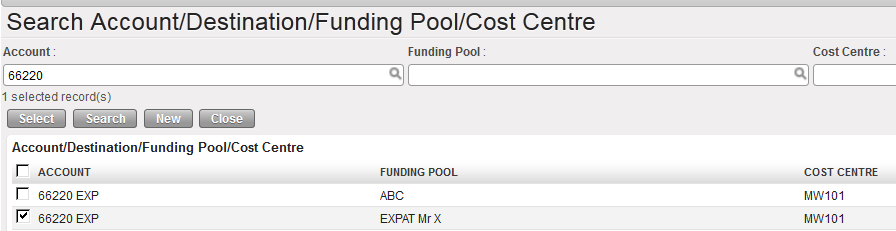 Choosing a quadruplet to link it to a reporting line
6. Save & Close. The window closes.
The reporting line Expat Mr X was associated to the quadruplet 66220/EXP/EXPAT Mr X/MW101. The quadruplet does not display in the reporting line tab
Please note that if you ticked the “Input Account Only” check box, the current display selection is removed (like when you tick on “Input CC/FP at line level”). The new display: only one column “G/L Accounts” is displayed.
When clicking in “Add”, it brings to “Search Account”, filter is still “G/L Account” and only one column remains “GL Account”.

Regarding “Input Account Only” checkbox, please note the following:
- When G/L Accounts are selected, this implies all G/L-Destination combination allowed with this account. System will link directly with the account object and look for all Analytical Destinations tied to the G/L Account.
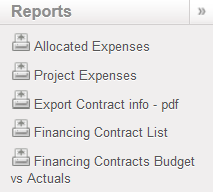
- The reports “Allocated Expenses” and “Project Expenses” will have the same display. The code has been reviewed so it searches all entries that matches the financing contract settings, and when “Input Account only” is ticked, it takes all combination account/destination from the account object.
- The report “Export Contract info” will also have the same display. That means that this report could change along time even if Financing contract has not been touched but if additional destinations have been tied to the G/L Account.
- The report “Financing contract – Budget vs. Actuals” will have the same display but when “Input Account Only” is ticked, it also searches all allowed combination allowed.
- The reports “Financing Contract List” and “Financial Contract List pdf” will remain the same.
- The “Interactive report” will have the same display but when “Input Account only” is ticked, it also searches all allowed combination.
|
In the {Comments} tab, you can insert any relevant comment related to the financing contract.
- Finally, save the contract
⮡ The contract is saved in {Draft}. If the grant is approved formally, you will need to set the contract to {Open}
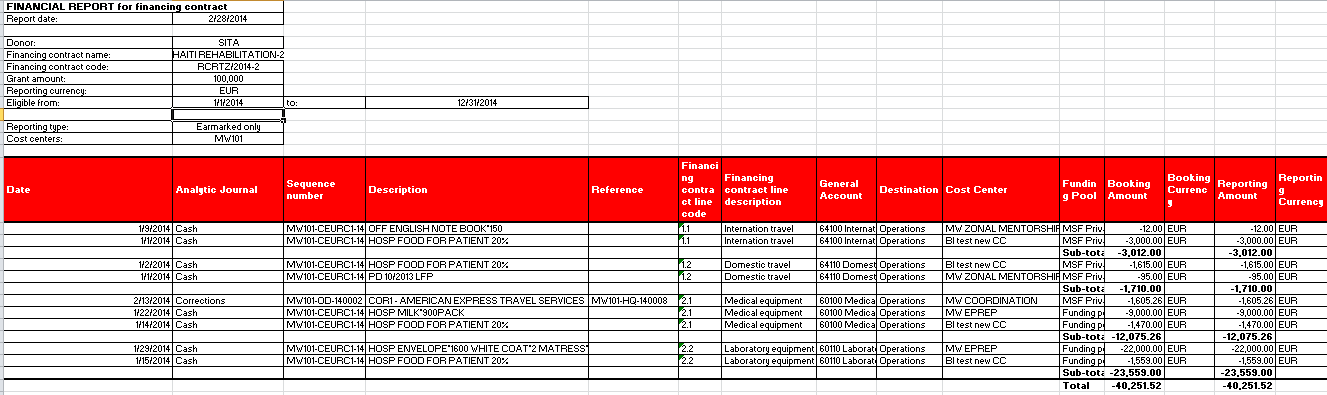
At the end of the funding period, you will be able to retrieve following report:
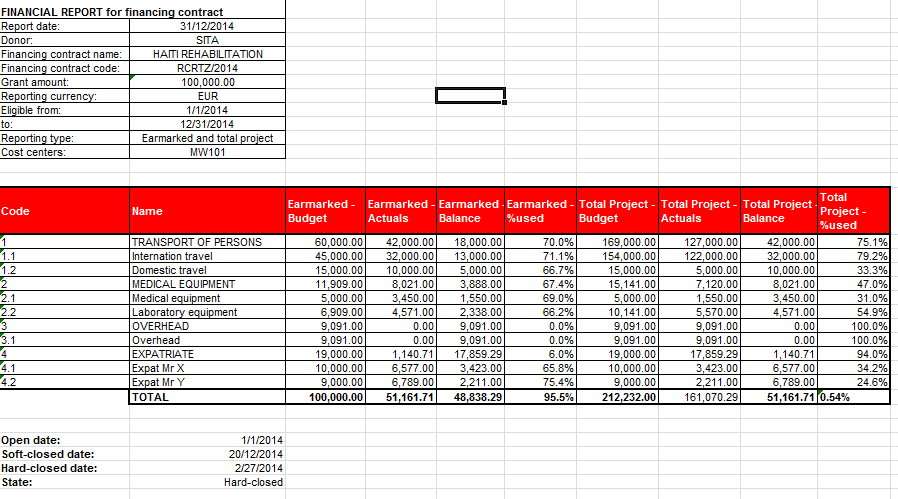 Interactive report showing expenses incurred in 2014 and splitting EXPATRIATE cost in two reporting lines
How to Create a Currency Rate Table for a Donor
The reports are issued in the Donor currency. When the Donor requires specific exchange rates, UniField offers the possibility to link a specific currency table to a contract; as a result the expenses presented in the contract will be valued at the Donor exchange rates table, rather than system rates.
You will create a currency table by importing a file containing the currency rate and the functional currency with value equal to 1 (EUR = 1 or CHF = 1).
The table will be created in UniField once the green light from the Donor for the funding proposal is received and it should be provided by the Donor and converted to UF format for import if many currencies are involved. If not, rates can be manually inserted in the specific Donor table created.
It will then be linked to an {Open} financing contract.
Go to Accounting/Configuration /Currency Management/CurrencyTables
- Click on {New} button.
⮡ A currency table form is displayed
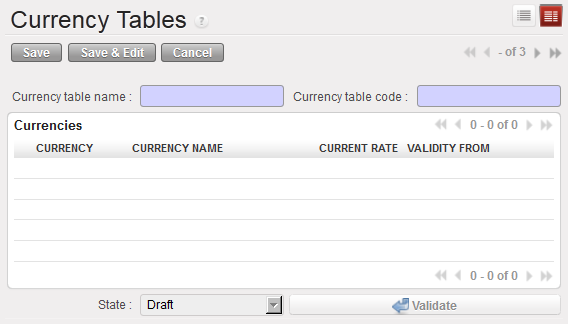 Currency table form
2. Enter the {Currency table name} and {Currency table code}
| Title of field |
Currency table: entry protocol |
Source for Information |
| Currency table name |
Name FREE |
HQ |
| Currency table code |
Code FREE |
HQ |
| Currencies |
See above |
See above |
3. Click {Save} button. The table is saved in {Draft} status.
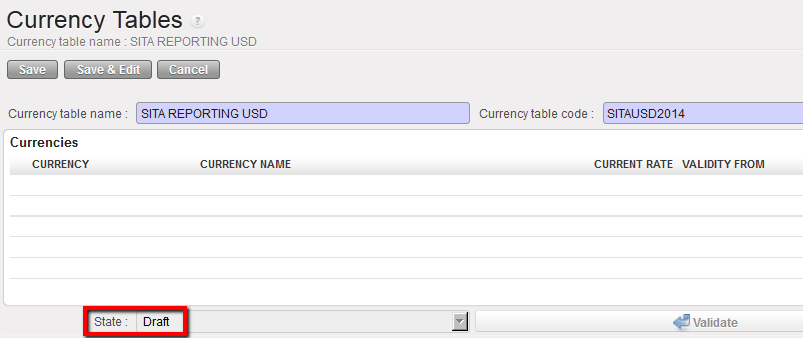 Currency table in Draft state
4. In the {Actions} menu on the top right side of the screen, select {Import Currencies},
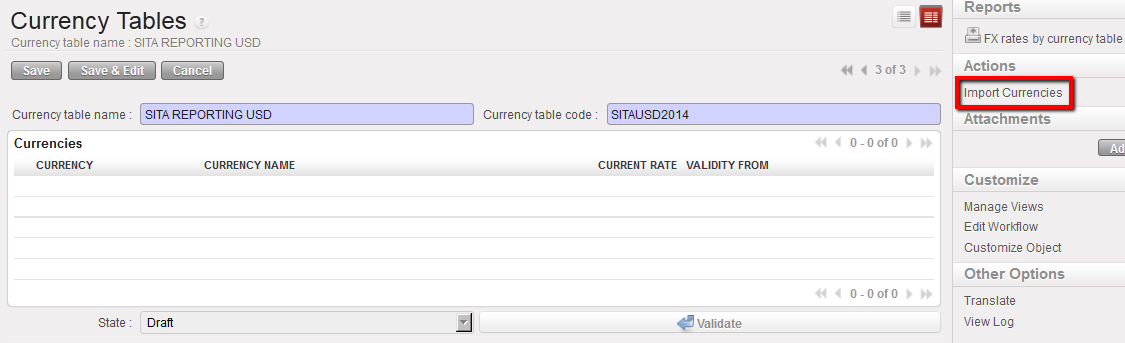 Import currency action
⮡ The {Import Currencies} Wizard appears
5. Select the uploaded rates date and {add attachment} to import the csv file containing the currencies and associated exchange rates.
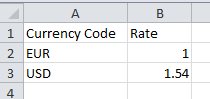 Example of currency rate import file
6. Click on {Import} button and {OK},
 Import Currencies window
⮡ The currency table rate is imported in the section {Currencies}
7. Click on the {Save}, and followed by clicking the {Validate} button. Validate the table to be able to use it when you create a financing contract and produce a financing or budget report
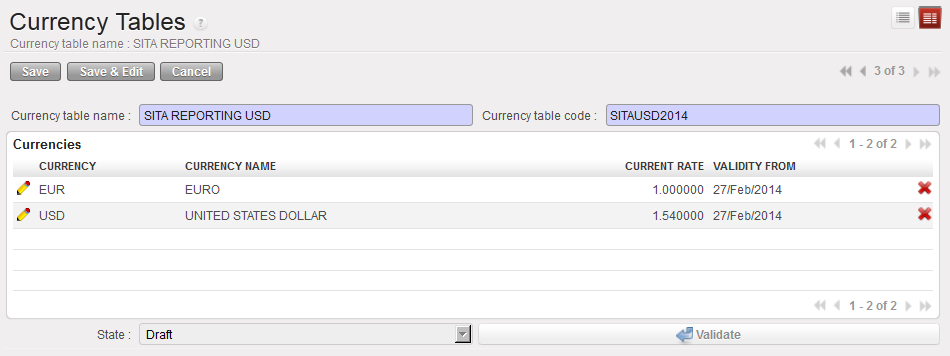 The currency table rate is imported in the section {Currencies}
8. Click button  , to close the table when you do not use it anymore.
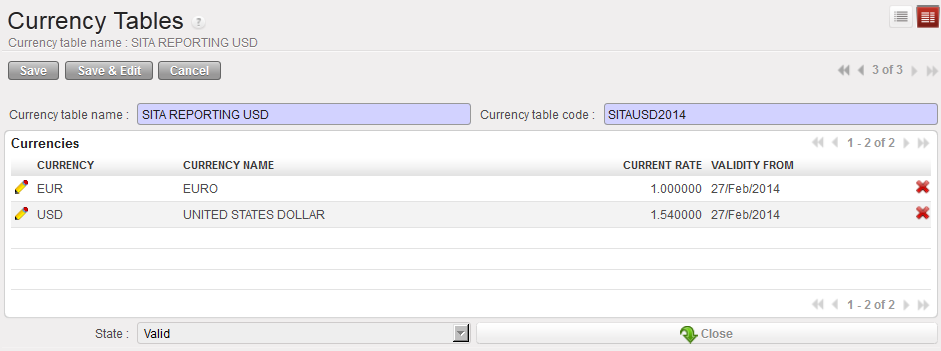 Valid currency table

How to Set a Contract to Open, Soft-Closed and Hard-Closed
To set the contract from draft to open
Go to: Accounting/Configuration/Grant Management/Financing Contracts
⮡ A list of active financing contracts appears
- Select your desired contract from the lists of {Draft} contracts
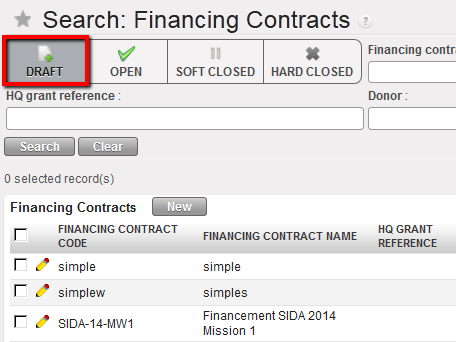 List of Draft contracts
⮡ The list of draft contract form appears.
2. Select the button.

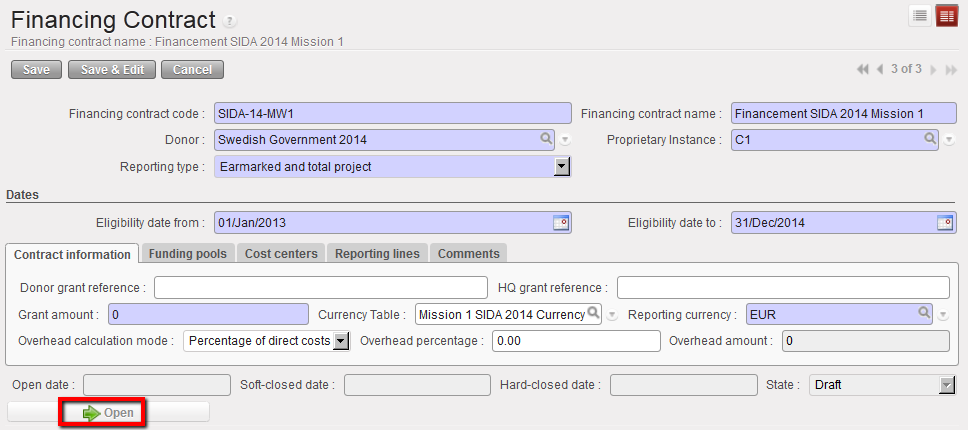 Opening a financing contract for Draft state contract
3. The contract becomes {Open}.
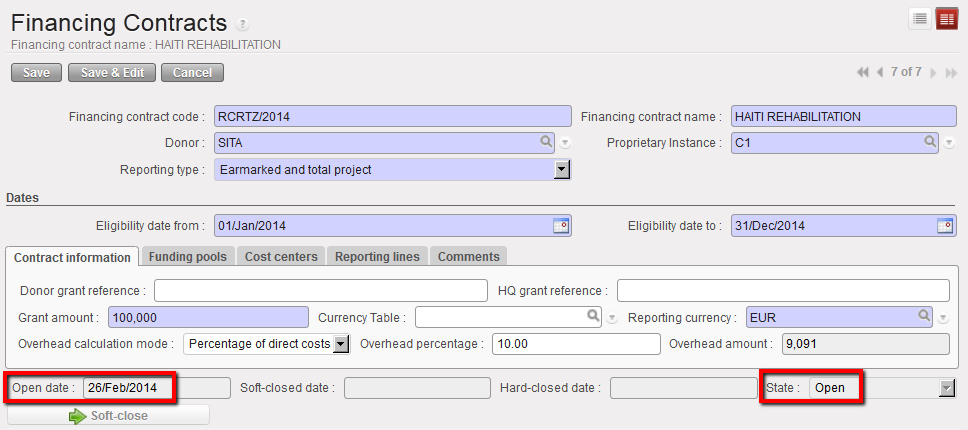 Contract in Open state from 26/Feb/2014
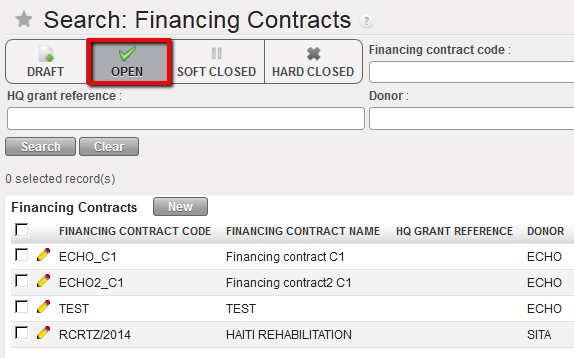
To set the contract from open to soft closed
Go to: Accounting/Configuration/Grant Management/Financing Contracts
⮡ A list of active financing contracts appears
- Select your desired contract from the lists of {Open} contracts.
⮡ The contract form appears
2. Select the button.

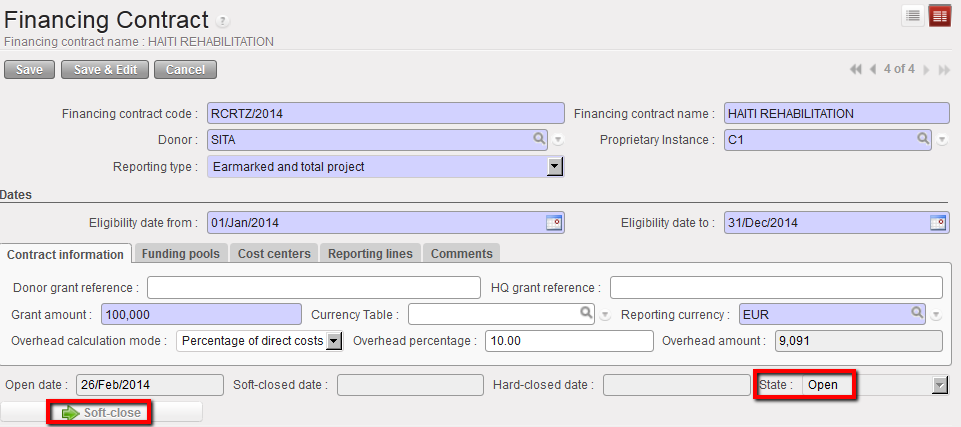 Soft Close Screen for Open state contract
3. The contract becomes {Soft-closed}.
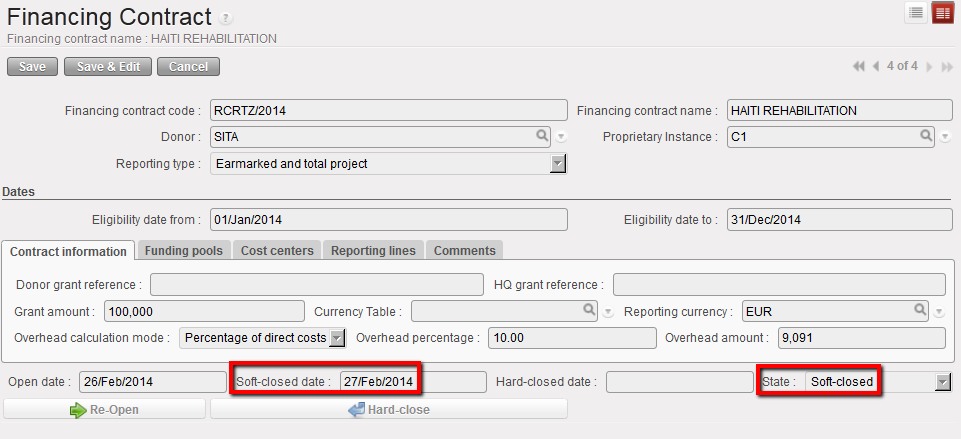 Contract in Soft-closed state from 27/Feb/2014

To set the contract from soft closed to hard closed
Go to: Accounting/Configuration/Grant Management/Financing Contracts
⮡ A list of active financing contracts appears
- Select your desired contract from the lists of {SOFT CLOSED} contracts.
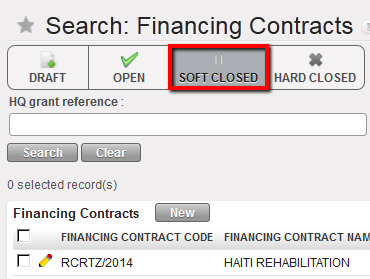 List of Soft-Closed contracts
-
-
-
- The contract form appears
2. Select the  button or the
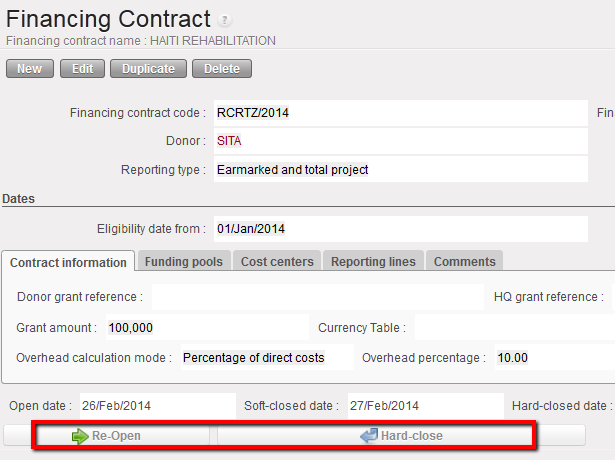 Reopen or Hard-Close Screen
3. The contract becomes {Hard-Closed}
 Contract in Hard-closed state from 27/Feb/2014


 Drop down menu to choose Donor Reporting Type
 Overhead calculation mode
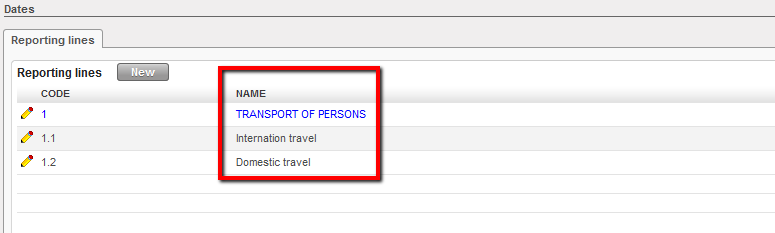 Example of View and Actual reporting lines
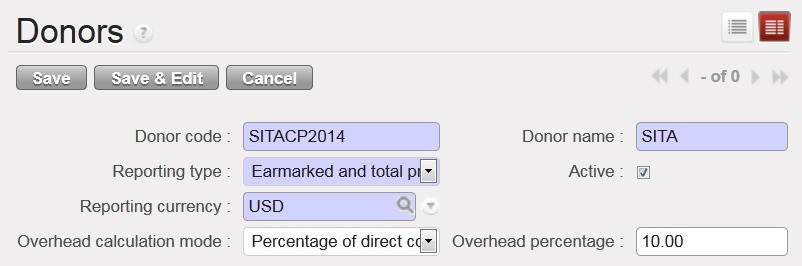 1. In the {Reporting Lines} field, click on {New}
 Reporting lines configuration
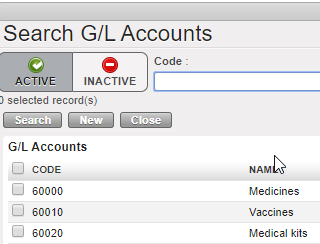
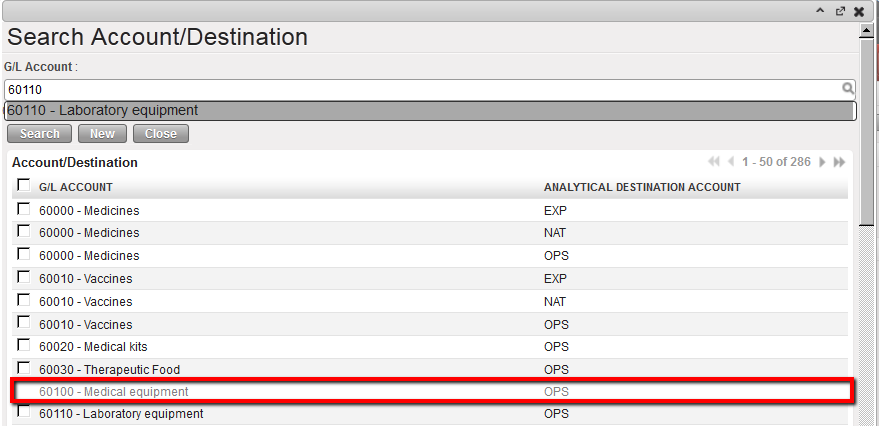 System shows account/destination unavailable (in grey) when mapping the reporting lines
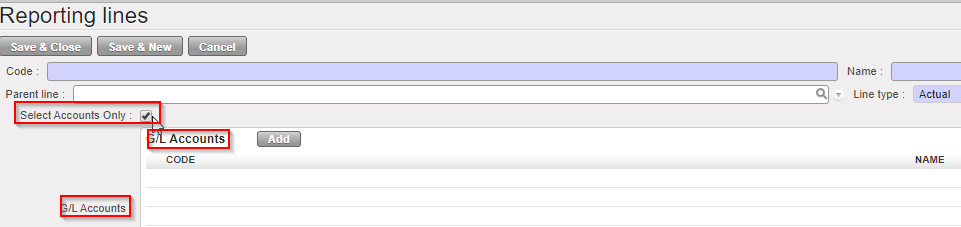
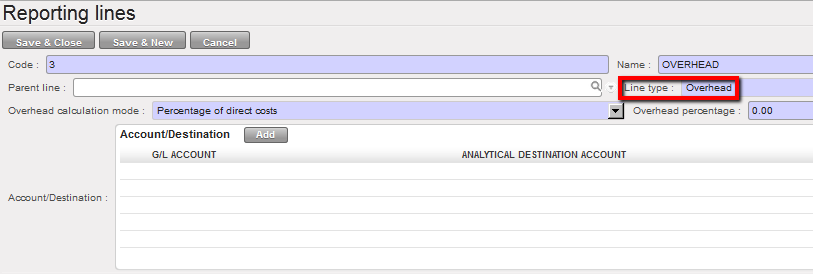 Select the Line Type
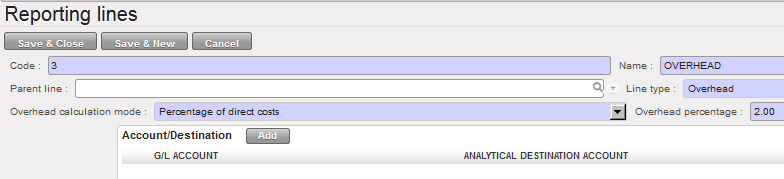 Overhead calculation mode setting
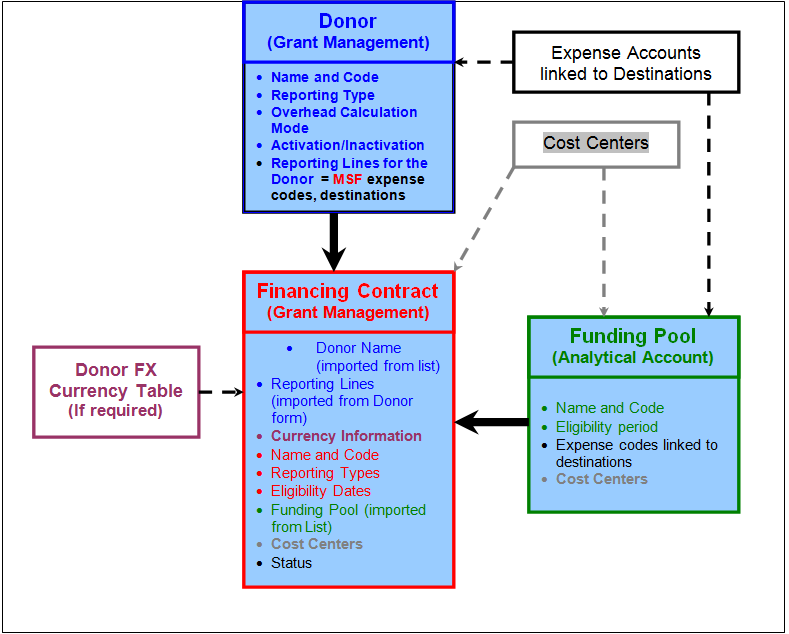


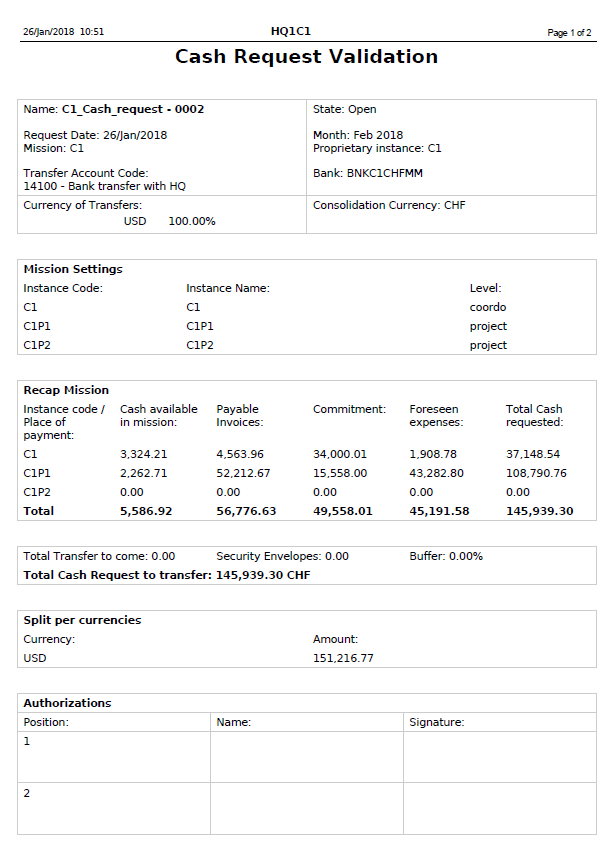
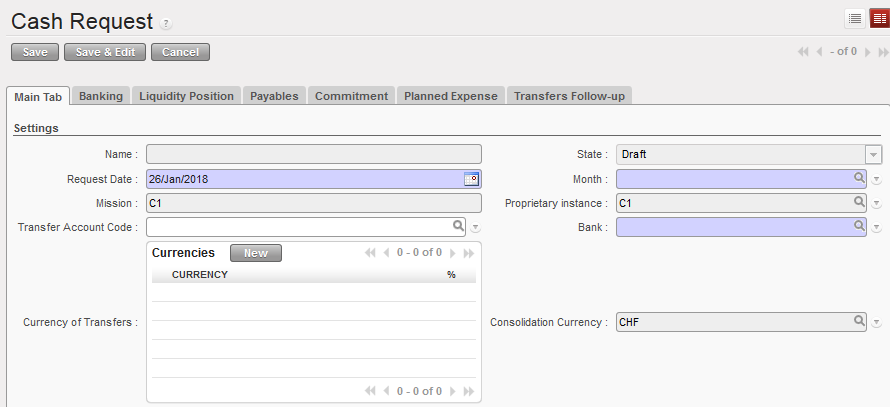 A Cash Request form waiting to be filled out
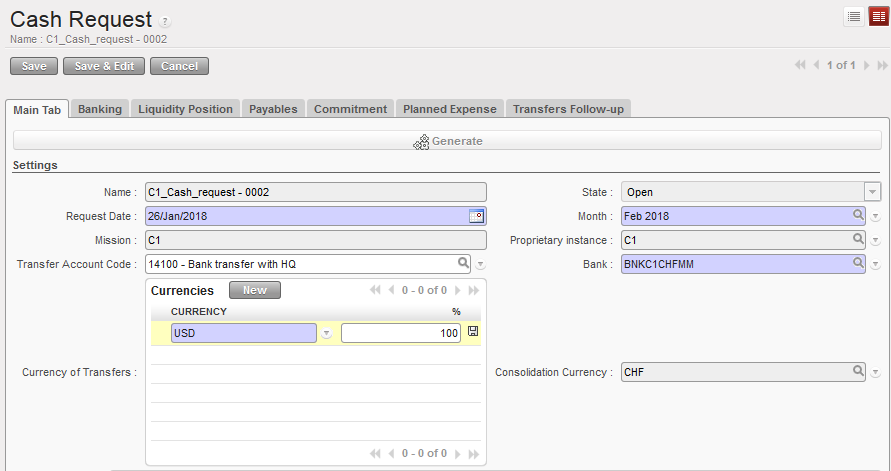 Main Tab with basic information filled in
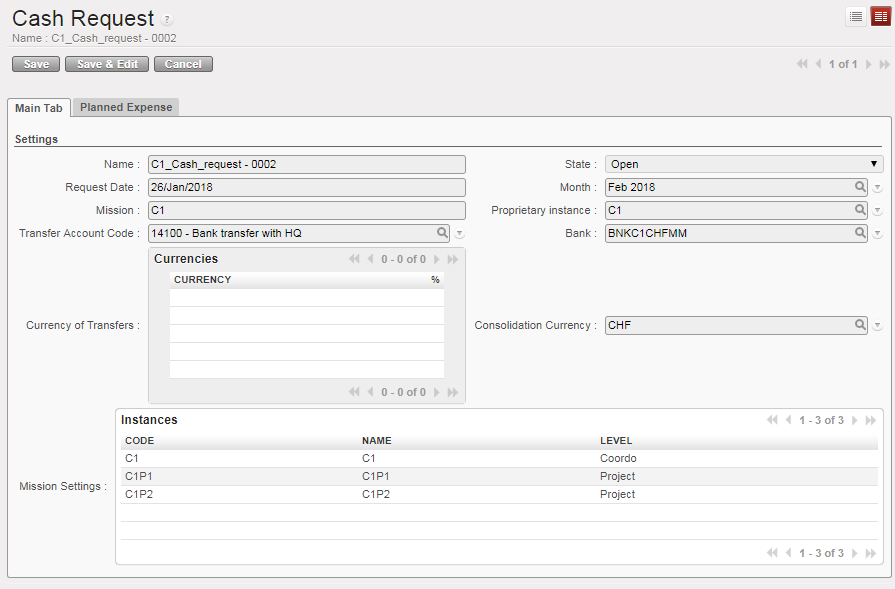
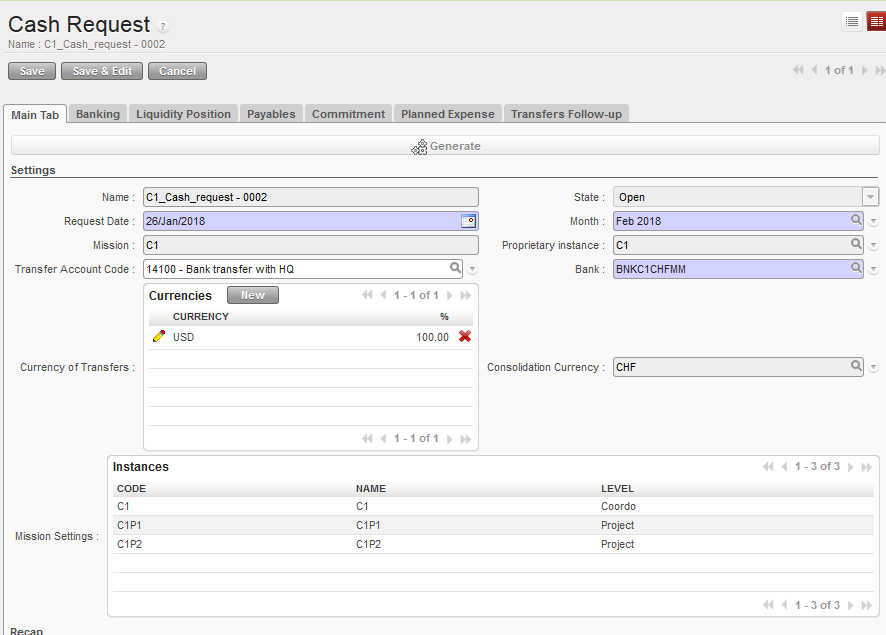
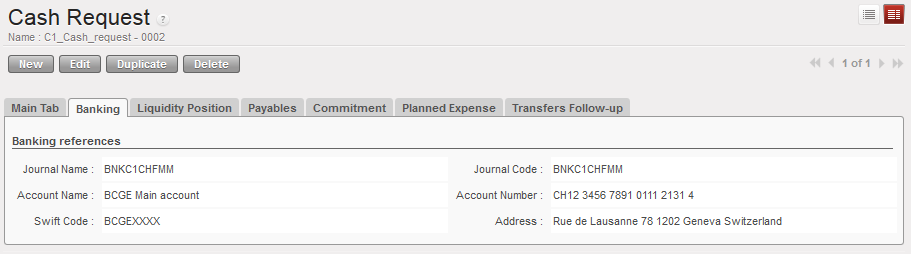 Data automatically filled in in {Banking} tab
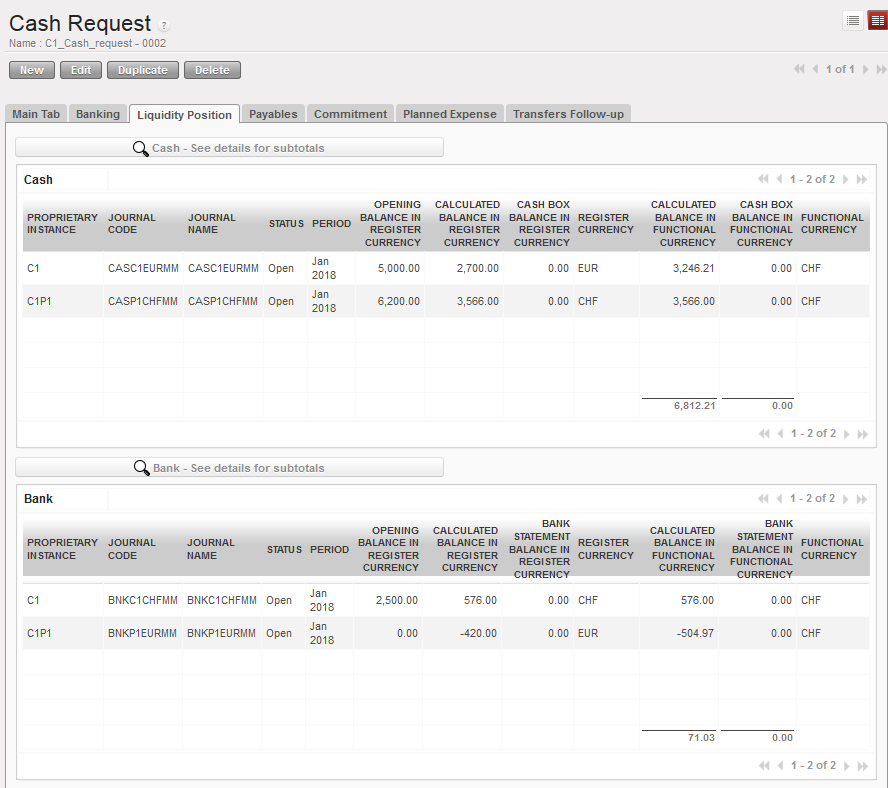 Data automatically filled in in {Payables} tab
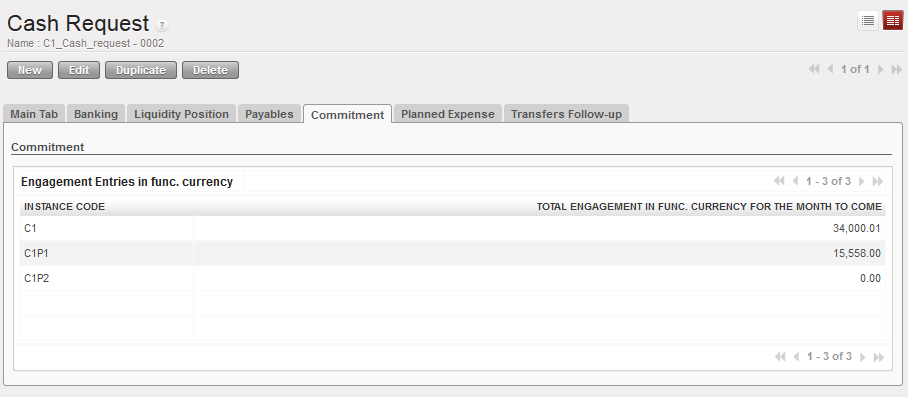
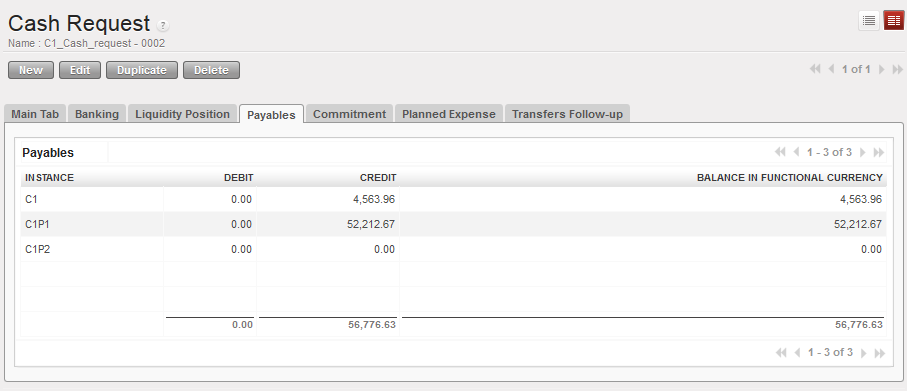 Data automatically filled in in {Commitment} tab
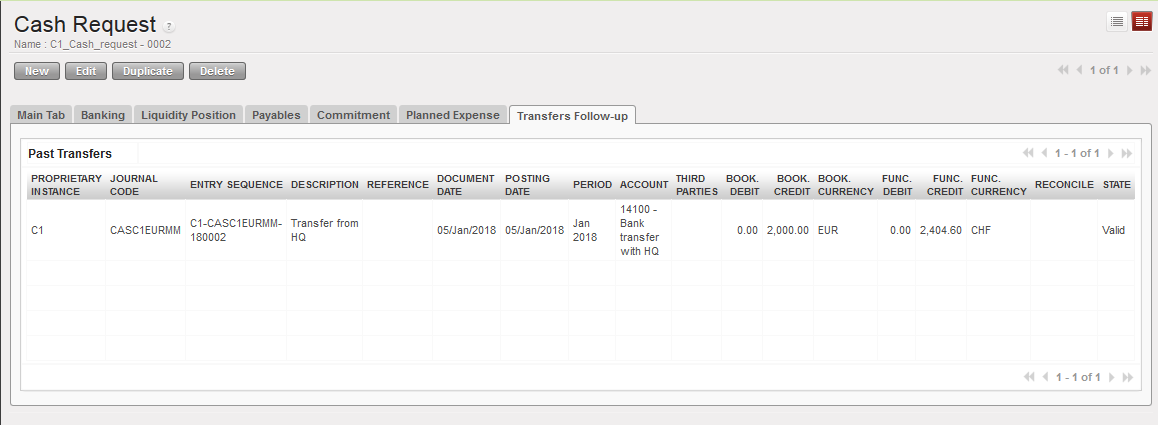
 Data automatically filled in in {Transfer Follow-up} tab
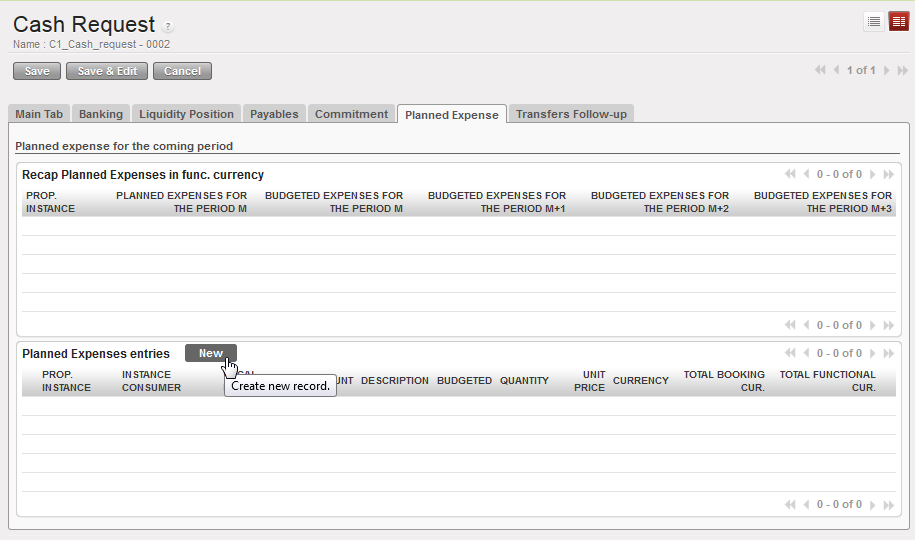
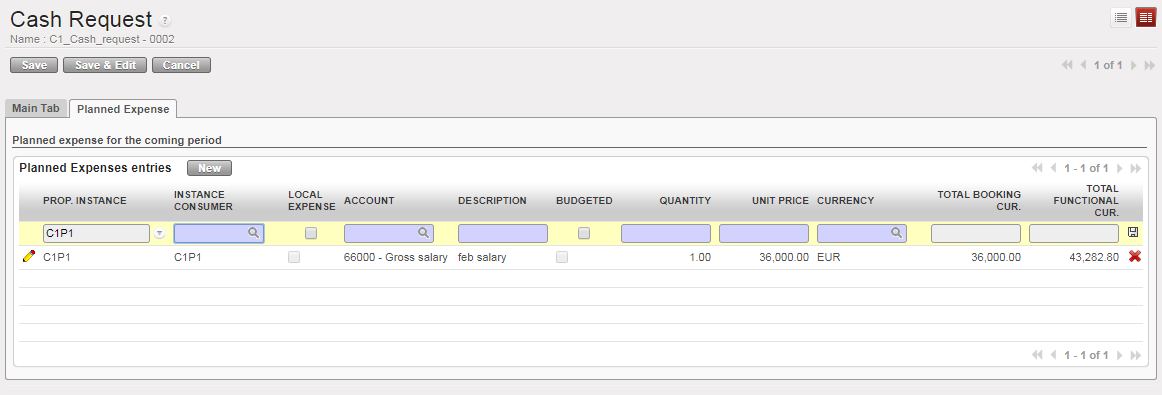
 Adding planned expense lines at coordination level
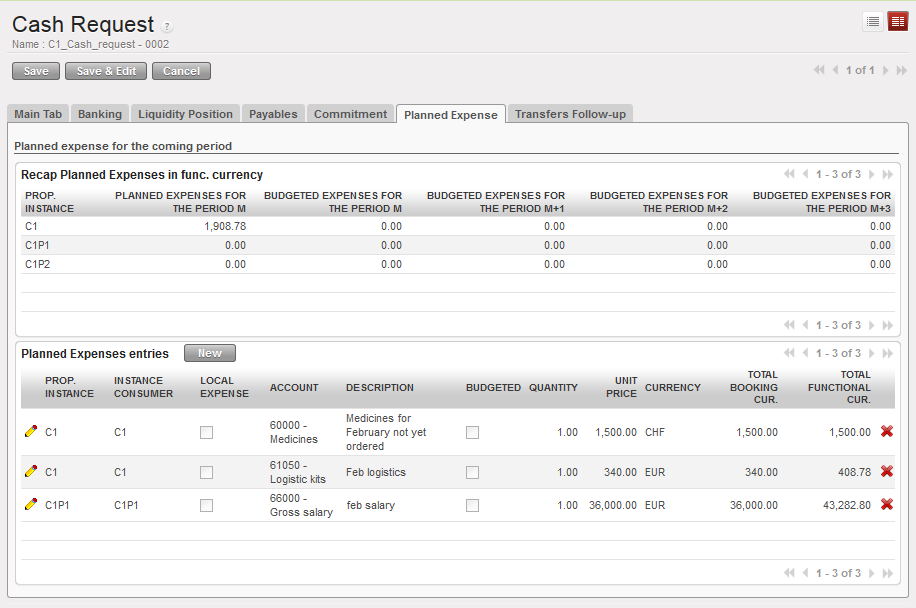
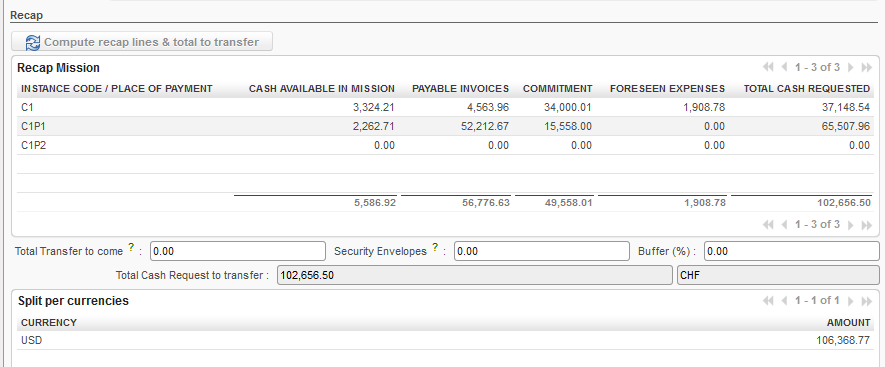 Total transfer amounts are computed without planned expenses from the projects
 Cash Request at the project level with only {Main Tab} and {Planned Expense} tab