A commitment voucher is set to {Done} once expenses are fully recognized and entries received from HQ are validated at coordination.
Go to: Accounting/Commitments/Commitment Voucher
Search for the validated voucher by selecting the {Validated} filter or any other filters located at the top of the Search view.
When you have located the voucher, click on the pencil to open the form.
Set the {Amount left} to {0}.
Setting the {amount left} to {0}
4. Save the entries by clicking the floppy disc}.
5. Click {Save & Edit} button.
6. At the bottom of the Form view, select {Done}.
{Done} function in a commitment voucher Form view
7. The voucher is set to {Done}. The voucher is no longer reflected in the {Engagement Lines} section of the budget because the corresponding accounting entries were received and validated.
Commitment voucher set to {Done} and total left is nil
D. How to Configure the International Commitment Import*
This functionality was designed to meet OCA and OCB requirement but could also be used by other OCs in the future. It’s a way to automatically integrate commitments corresponding to international orders in the budget follow-up at field level.
It is available through a new {Import Intl Commitments} link under the {Commitments} menu.
OCs willing to use it should activate it otherwise it will not be displayed as a transaction on the left-hand side menu.
Each import will erase the previous import and entries are recorded in a new analytic journal: {International Engagements}. You must therefore make sure this journal was created in your database before proceeding to the import.
Go to Administration/Configuration/Reconfigure
Administration business application and {Reconfigure} function
In the {Activate International Commitments Import} window, check the box of the statement {Manage commitments corresponding to international order through specific import}.
Activating the International Commitments Import
E. How to Create an International Engagement Journal*
Go to Accounting/Configuration/Analytic Accounting/Analytic Journals
1. Complete the blue fields as below. Make sure to call the Journal Code {ENGI} otherwise it will synch to all instances like any other analytical journals.
International Engagement Analytic Journal
2. Click {Save} button.
F. How to Use the Import Commitment Voucher Function*
Go to Accounting/Commitments/Import Intl. Commitments –>>A wizard {Import Intl Commitments} displays
1. Click on {Add Attachment} and {Browse} the file you want to import
{Import Intl Commitments} wizard
2. Select {Import} button.
3. Entries are booked in the international engagements journal.
Engagement entries booked in the ENG journal. Third parties are displayed but this field in the import file remains optional
How To configure “Customer Commitment Vouchers” :
Go to : ADMINISTRATION > CONFIGURATION > Parameters > Reconfigure:
how to activate customer commitment vouchers
Go to: Accounting > Commitments > Customer Commitment Vouchers:
The first part of this chapter concentrates on HR and payroll related transactions. For most missions’ national staff management, the national staff database and payroll calculations are managed in an application called Homere. In order to have a full overview of a mission expenses, you need to import the data from Homere into UniField.
This chapter explains how to import the Homere files into UniField. The Homere import contains one file related to the national staff database and another one to the monthly payroll.
In order to track costs properly, the payroll booked on expense accounts has to be allocated to an analytical dimension. To avoid recurrent allocation task at every payroll import, the national staff employee can by default be assigned to an analytical dimension (destination, cost center and funding pool). It helps following up on national staff costs per cost center and to create financial reports accordingly. The same applies for the expatriate staff; you will learn how to import Expat employee at Coordination or HQ level and assign them an analytical distribution.
In case your section does not use Homere, this chapter will present the various options of registering the HR and payroll information in UniField.
In the second part of this chapter we explain how to book HQ entries in UniField. HQ Entries are accounting entries representing field expenses recorded and paid at HQ level. They encompass for example international orders (and associated commitment vouchers) as well as expatriate salary expenses.
There is a specific section for OCA and OCB which addresses the automatic import of international commitment vouchers. The section is identified with a *.
The last aspect covered in this chapter is the Budgets. Budgets are created outside UniField and imported into UniField in order to properly track expected expenses against actual expenses. You will learn how to import a budget into UniField and produce the different kinds of budget reports available in the system.
After reading this chapter you will be able to:
Set the national staff database and allocate an analytical dimension to it
Manage the national staff payroll booking and the salary payment
Manage entries from international orders and expat salaries
Follow-up actual expenses vs. budgeted expenses if your section decides to import the budget files into UniField.
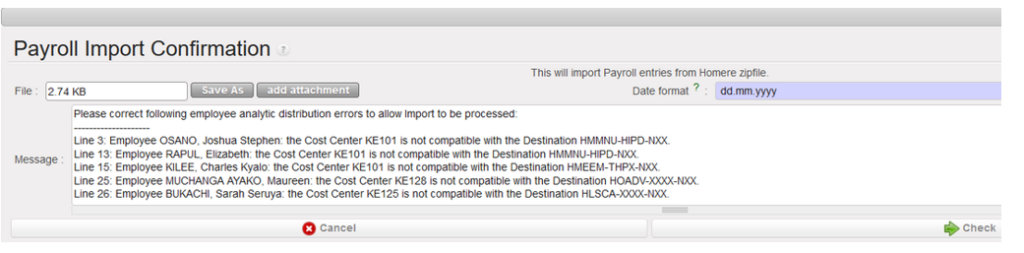
PAYE_UNIFIELD and PAYE_SAGA Import: request to have all the import error messages at once
When we import the payroll file in Unifield, the file import can be unsuccessful because of errors in Budget lines in the import file and Unifield was reporting the error messages one by one bringing confusion for the users
In this request we have requested to have all the wrong messages at once when the import fails:
This will help to spot the errors to correct in HOMERE.
On certain occasions it may be necessary for an advanced user to create an entry directly in the journal. Individual section policy will decide on when it is acceptable to create a journal entry directly in Journal Entries.
UniField requires manually created entries to be balanced on the credit and debit sides. Therefore, at least two lines must be created in each Journal Entry, one on the debit and one on the credit side.
If the user needs to create several entries repeatedly e.g. to book intermission transactions when the instance is acting as the main supply center for various missions, the function {Import Entries} located under the {Journal Entries} is available to import entries into the INT journal. In addition, the function is also available for the OD and HR journals.
Finally, it is not possible to change a register’s liquidity balance via a manual journal entry. Therefore, it is not possible to use register related accounts (cash on hand, cash at bank, outstanding cheques) in any manual journal entries. All corrections to these accounts have to be made directly in the registers.
How to Book a Manual Journal Entry
Go to: Accounting/Journal Entries/Journal Entries:
Click on the button.
⮡ The Journal Entries Create Screen appears
Journal Entries New Entry screen
Fill in all mandatory blue fields to select the journal, the currency, the period and dates of the entries.
In the reference field, enter additional identifying information if needed (optional).
Click on the button.
Fill in all mandatory blue fields in the same way you would create a direct entry in the register.
Journal Entries Manual Entry
Save the entry using the {Save} button at the end of the journal entry line.
Create the 2nd line by clicking on the {New} button and fill in the mandatory blue fields. The entry lines become valid as soon as the lines are balanced (debit equals credit).
For expense and income accounts, assign the analytic information via the wizard.
Approve the entry.
A balanced manually created Journal Entry
Both entry lines can be found in the {Search Journal Items}.
Two manual created entries in the Journal Items
How to duplicate a manual entry in a closed period:
Click on {duplicate} in the manual entry you want to duplicate. See below example for duplicating manual entry in Aug 2019 period.
As Aug 2019 period was already closed, the duplication will take the same document date but not the posting date. The posting date will be in the first opened period which is Sep 2019 in this case.
How to Book a Journal Entry Using the Function Import Entries:
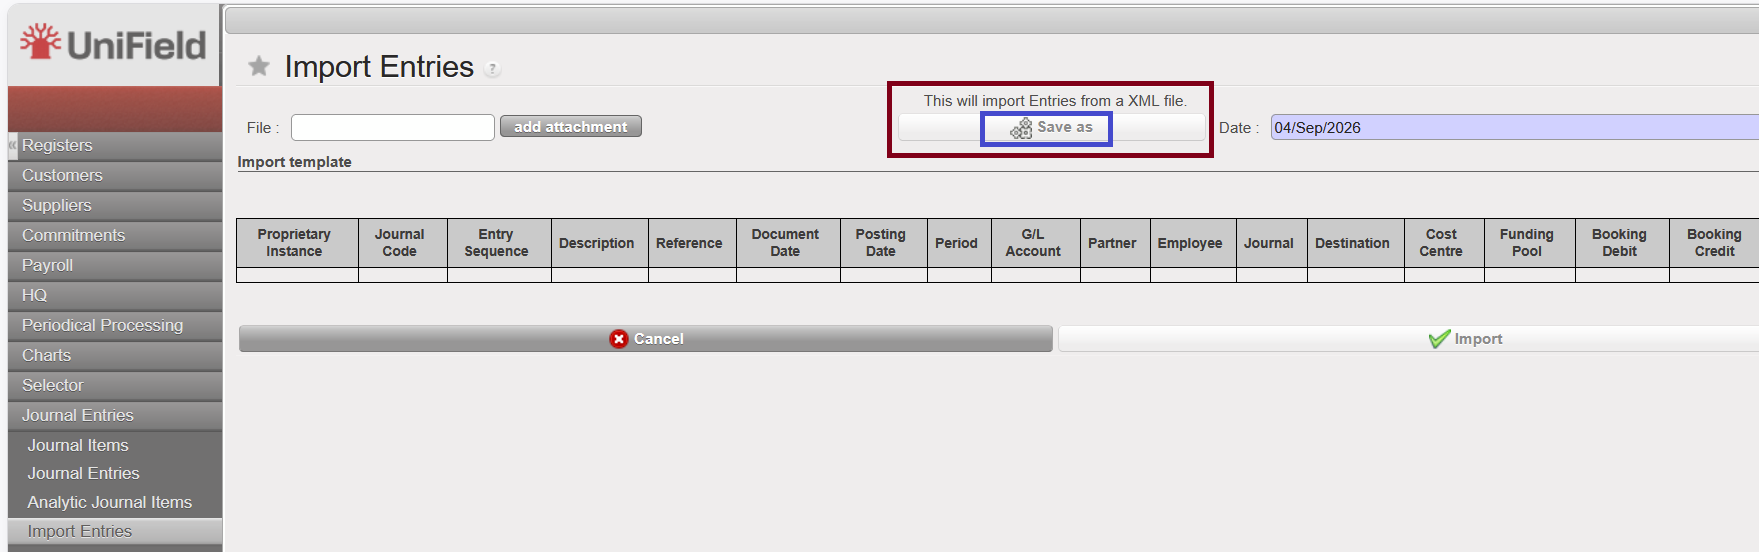
To get the standard template as below:
Go to: Accounting/Journal Entries/Import Entries
Click on Save as to download the template as below:
After you update the template : Browse the relevant file to import
Import Entries window. The posting date is the date indicated in the import wizard and the document date and the period are taken from your import file.
Select {Import}
Select the button to refresh
⮡ A message confirms the import was successful
Import file was successful
Close the window
Go to: Accounting/Journal Entries/Journal Entries
Check the Journal Entries display
Unposted journal entries on the INT journal:
Select the entry and go to {Journal Items} located under {Links}.
Journal Items link selected
⮡ The {Search Journal Entries} show expense entries booked automatically on the debit side and the advance account booked on the credit side. The entry period is taken from the period indicated in the file. The document date is automatically populated from the document date of the import file. The posting date is the import date of the file.
Journal items display
The last action to do is to post these entries. Check the entries boxes and select {Post Journal Entries} located under the Action menu
⮡ A {Post Journal Entries} window displays to confirm the posting
It is possible to import entries directly into the registers by importing an external XML file that will generate register lines in {Draft} state. UniField will check the import file matching the register under certain conditions (proprietary instance code, journal’s code, currency code) and the requirement for a mandatory third party if accounts were set as such in configuration.
How to Import Register Entries
Go to: Accounting/Registers:
Select the appropriate register.
Go to the action menu and select {Import Register Lines}.
⮡ The Import Register Lines Screen appears
Import Register Lines Screen
Add an XML file attachment using the template as shown on the {Import Register Lines} Screen. If the entries are balance sheet / non-expense entries, leave the analytical information empty. Do not complete the field “Cheque number” for Bank and Cash register imports. Free 1 and 2 remain optional. Note! If the funding pool is missing or incorrect in the import file analytical distribution, the system automatically applies PF as the default funding pool.
If there are problems in the XML file, UniField provides a list of errors. Corrective actions must be taken to be able to import the file, which can be re-imported.
If import is successful, UniField displays an import confirmation
Import Successful Screen
UniField automatically creates the entries in your register in {Draft} state.
In UniField, you can create a debit note to cumulate several customer invoices (Stock transfer vouchers and Intermission Vouchers OUT) and proceed to the payment in one go.
How to Create a Debit Note:
Confirm first that the re-billing inter-section account is set to {Expense re-invoice to other sections}. This action prevents the system from importing the STVs booked on this account code in the partner form into the registers.
Choose account code 12011 in the Re-billing Inter-section account field when you Plan to pay multiple STV through a debit note.
Next, proceed to the creation of the debit note.
Suppose we want to consolidate the payment of the below STVs:
Stock Transfers Vouchers Search view
Go to: Accounting/Customers/Debit Note
In the Debit Note Search view, select {New}
New button to create a Debit Note
Complete the {Customer} field and in the {Currency} field populate the currency set into the Customer form. Choose a {Document Date} and {Posting Date}. Then in the invoice section, select account {12010 – Receivable from other sections}.
Select to import the relevant STVs, then click {Add}
Creating a Debit note
Import invoice window
Select the STVs to import, then {OK}
Selecting STVs to import
“OK” Button
The STV lines display in the {Invoice Line} section. The debit note is {Draft}. After checking all the fields are correct, you can validate it.
Debit note waiting for validation
Debit note becomes Open
Next, proceed to payment of the debit note in the register by using the {Pending Payments} function
Pending Payments used to import the debit note into a cash register
In order to recognise the same expense every month during several months, a periodical processing function called Recurring Entries can be used in UniField. These are entries entered in to a recurring entries Model which enables to equally spread the expenses over each period. For example, we pay the rent for the 1st quarter of the year on January, all the money is paid on January but the expenses are actually for January, February and March.
Recurring entries follow this standard:
Create the supplier invoice
First, the user records the booking using a pre-paid expense account (in the supplier invoice line) – so the transaction debits Prepaid account and credits A/P Accounts Payable.
Pay the supplier invoice
The user records the supplier invoice payment importing the invoice into a register – so the movement is debit A/P (accounts payable) and credit on the liquidity account.
Create the accounting Model (= Recurring Model)
The user sets up a recurring Model, defining the journal entries to be repeated. The movement is debit expenses and credit prepaid expenses.
The user needs to perform an analytic distribution for the expense account leg of the Model.
Create the periodic Model (= Recurring Plan)
The user defines the periodicity at which the postings should occur (e.g. weekly, monthly) and the number of periods during which this entry will be repeated.
Generate the entries in the journal (= Generate Entries)
The user generates accounting entries based on the recurring Model and the recurring Plan – Prepaid to Expense. The creation of these entries is not automatic. The user must use the recurring Model to generate these entries at the end of each period. These entries are created and become {un-posted}; the user must review them and post them in the journal. If these entries are not generated and posted, UniField will not allow you to close the period.
Reconcile the prepayment entries (pre-paid account) in the journal
Manually reconcile the Supplier Invoice with the recurring entry. The prepayment account will be partially reconciled until all entries in the Model are generated.
Accounts move for a 3 months rental paid (EUR 3,000) starting from August (EUR 1,000)
Description
Account
De
Cr
Entries matching
Supplier Invoice Booking
Trade Payables
30020
3,000
A1
Pre-paid expenses rental
13300/13620 (OCA)
3,000
A2
(2,000)
Supplier Invoice payment (August)
Cash account
10100
3,000
Trade Payables
30020/15600 (OCA)
3,000
A1
Recurring entry generated (August)
Pre-paid expenses rental
13300/ 13620 (OCA)
1,000
A2
Expat housing: rent & running costs
61110
1,000
(2,000)
How to Book a Recurring Entry Expense:
Assume we are in a situation where we paid 800 USD for upfront office rent. We would like to record it as 4 expenses which take place every month.
Create the supplier invoice
Go to: Supplier/Supplier Invoice
Create manually a supplier invoice using a pre-paid expense account {15600 – Prepaid expenses rentals} for some OCs or for OCA in the example 13620 for an amount of 800 USD.
Invoice line booking on a prepaid account
Validate the supplier invoice. The invoice becomes {Open}
Draft supplier invoice and {Validate} button
Pay the supplier invoice:
Go to a register to proceed with the supplier invoice payment.
When the register is open, import the supplier invoice and hard-post the register entry.
Imported invoice and entry hard posted
Create the accounting Model (= recurring Model)
Go to: Periodical Processing/Recurring Entries/Recurring Models
Click on {New} to create a Model.
Enter a {Model Name} and Journal {Purchase}.
Tip! If you include text “%(year)s”, “%(month)s” or “%(date)s” in to the Model name, the entries will pick the year, month or date in to the entry reference when they are posted!
Select the Model currency. For this example, it is {USD}.
Enter two (2) Journal Entry Model Lines (Prepaid on Credit and Expense on Debit).
For example, we want to pay 800 USD in 4 payments. Therefore, we debit 200 USD on the expense account and credit 200 USD on the 13310 account or 13620 account for OCA. Do not forget to select the appropriate third party in order to reconcile entries.
Record an analytical distribution on the expense account.
Click on {Save} button. The recurring Model is created as shown below.
If the Model lines are unbalanced, they will appear in blue! If they are balanced, they will appear in black.
Recurring Model created balanced (lines in black)
Recurring Model created unbalanced (lines in blue)
Recurring Model states:
The recurring Models has three different states:
Draft State = when no Recurring lines have been computed
When the Model is created and it has not been added in any Plan, it can be edited and deleted.
When the Model is created and added in a draft Plan without [computed] lines, it can be edited but can not be deleted. The warning message will be:
This allows to make easy clean for Models which have been created per mistake/forgotten one which has never been used.
The Draft Models are in blue color. Same color for the Draft recurring Plans.
Running state = when subscription lines have been computed in a recurring Plan (entries un-posted OR posted).
If the Model is used in one recurring Plan in running state (so dates computed), and the entries have been generated or not and there is no recurring Plan in state done related to the Model, the Model can still be edited but not deleted.
Donestate = once all subscription lines have been generated and posted.
A recurring Model in done state is not anymore selectable when creating a new or editing existing recurring Plan.
You cannot duplicate a Recurring Plan using a Done Model. You will have a warning message.
For a Model used for 2 different Plans where one Plan is in done state and the second one is in running state: The Model will be in state done. The second Plan, in running state, will have the field Model in read only.
The Done Models are in grey color as for the Done Recurring Plans.
Recurring Model states workflow
Create the Recurring Plan (= recurring entries via recurring Plan):
Go to: Periodical Processing/Recurring Entries / Recurring Plans
Click on {New} to create new recurring lines.
Enter a {Name} and select the {Recurring Model}.
Select the starting date of the Model (= date of the first expense booking).
As we want to spread the cost over four (4) months and book the expense every month, choose Repeat {1} Number of Periods {4} and Period Type {month}. The final expense booking will take place in 4 months from your start date.
Fill in a reference if desired.
Click on {Compute} to display automatically the subscription lines.
Click {Save} button.
Recurring entries Plan expenses will be booked according to the subscription lines schedule.
Recurring Plan states:
The recurring Plan has three different states : Draft, Running and Done.
Draftstate = when no Subscription lines have been computed. The button Compute is available
Runningstate = when Subscription lines have been computed (entries un-posted OR posted).
Buttons available are Delete Unposted Entries and Compute
In Running State, we can still change the fields: Name, Start Date, Number of periods, Repeat and Period type.
Example: we can decide to change the number of months at this stage: from 4 months to 6 months.
We tick Compute and two new subscription lines will be created and a recalculation will be done consequently.
Donestate = once all lines have been generated and posted. No buttons are available. All fields are set as not editable.
When a Recurring Plan is set to done using one Model, the related Model is set as done and is not editable anymore nor erasable.
States of the Recurring Plan:
Generate the entries in the journal
Go to: Periodical Processing/Recurring Entries/Generate Entries
Choose the date to select entries to be generated before a specific date.
For example, if you want to generate September entries, you can set the date in September.
Entries to be generated in December should be created in the standard December period and not in the special periods 13 to 16 (this possibility has been blocked).
Click on {Generate Entries}.
⮡ A new window {Generate Entries} will appear.
Post entries in the journal
The entries are generated as unposted. To post your entries, you must first select {Post Journal Entries} in the Action menu:
When clicking on {Generate Entries}, you have the list of all entries to post according to the period chosen. Not just for the Model that you are in. You can choose those entries you want to post. Select the line with X and go to the right Action menu and click to Post Journal Entries.
⮡ The Recurring Entries to Post window appears
Generated unposted journal entry
Remember that the entries are still unposted and as long as they are still unposted, you still can delete the unposted entries from the Recurring Plan. To know if it’s posted or not, you can click directly on the entry generated in the subscription lines in the recurring Plan window.
The unposted subscription Line in the Recurring Plan
Post Recurring Entries:
Go to: Periodical Processing/Recurring Entries/Recurring Plan
If the entries are not immediately posted after being created, the user can return to the {Recurring Plan} menu, open the {Actions} menu and select the {Recurring Entries to Post}.
Recurring Entries to Post button
Select the entries you want to post, then click on {Post Journal entries} on the action menu.
⮡ A new search window {Generate Entries} will appear where can select the entries you want to post and post them by clicking on {Recurring Entries to Post} from the action menu.
Click on {Approve}.
The recurring Entries are posted now.
You won’t be able to click and to use the {Delete unposted Entries button} in the concerned recurring Plan if the recurring entries were posted.
Reconcile the prepayment entries in the journal:
Go to: Journal Entries/ Journal Items:
Tick the original invoice line and the posted recurring entry line to reconcile.
Click on {Reconcile Entries} in the right-hand menu.
Posted and unreconciled journal items and Reconcile entries action
⮡ The {Reconcile Entries} window appears proposing a partial reconciliation as the journal items selected do not allow for a full reconciliation.
Reconcile Entries window
Click on {Partial Reconcile} button.
In the Search Journal Items view, the account 13300 is partially reconciled with an outstanding balance of 600 USD.
Account 13300 partially reconciled
Reset AD at line level button to input a valid AD
Editing the AD on a recurring Model when it became invalid.
How to Delete a Recurring Model and a Recurring Plan:
ENTRIES IN DRAFT (NOT GENERATED YET)
How to delete a Recurring Model:
Go to Periodical processing/Recurring entries /Recurring Models
Delete the recurring Model by clicking on the red cross.
You can not delete a Model which is used already in a Plan. You will have an error message:
How to delete a Recurring Plan:
Go to Periodical processing/recurring entries/Recurring Plan
Delete the recurring Plan by clicking on the red cross.
Recurring Entries module for management of Fixed Assets
A new Analytic journal DEP has been created in order to use the recurring entries module for the management of the fixed assets.
This is optional per OCs. OCA will not use that for the moment.
Go to Accounting > Configuration > Analytic Accounting > Analytic Journals
The Journal code is named DEP, the Journal Name is Depreciation, and the type is also named Depreciation:
This is optional per OCs. OCA will not use that for the moment.
Go to Accounting > Configuration > Analytic Accounting > Analytic Journals
The Journal code is named DEP, the Journal Name is Depreciation, and the type is also named Depreciation:
The process to create a depreciation entry follows these steps:
Go to Accounting >Configuration > Financial Accounting > Accounts> Accounts, activate the GL codes for the accumulated depreciation (example code 21200 for the Non-Medical Equipment).
Go to Accounting > Periodic processing > Recurring entries > Recurring models.
Click on the button “New” to create a “Recurring Model”
Go to Recurring Plan and create a “New” Recurring Plan by selecting the Recurring model previously created in the Recurring Model screen.
Go to “Generate entries” and click on “Generating entries”: it will create entries with the “Journal code” DEP.
A down payment is a cash advance to a supplier made at the time of ordering goods when the purchase is not yet invoiced.
In UniField, a down payment is recorded in a bank, cash or cheque register to ensure the money out impacts the register’s balance. It is recorded under the account {Advances done to third parties} with a mandatory third party. This icon helps user link the approved Purchase Order to the down payment recorded in the register. It appears once you saved the register line.
The down payment is displayed in the Purchase Order {Invoices} tab once the down payment accounting line is hard-posted in the register. At this point there is no supplier invoice because no goods have been received yet.
After the goods are received, a supplier invoice is automatically created in {Draft} in UniField for the total amount of the goods purchased. It is then possible to see the down payment on the {Down Payments} tab in the draft supplier invoice to be validated. The down payment is only displayed on the tab if the down payment entry is hard-posted.
{Supplier invoice} Form view
When an authorized user validates the invoice, the supplier invoice takes into account the part of the payment that has already been done. The user finds this information in the {Payments} tab in the supplier invoice form additionally to the {Down payments} tab. The validated invoice shows a residual amount to pay based on what was already disbursed as down payment.
{Payments} tab showing a down payment in a supplier invoice Form view
{Down Payments} tab showing a down payment in a supplier invoice Form view
Residual amount to pay displayed in a supplier invoice
Accounts move related to down payment and supplier invoice validation
When the down payment is delivered, the account {Advances done to third parties} is debited and the account {10100 – cash on hand} is credited in the liquidity journal.
When the invoice is validated, the expense account is debited and Trade Payables account credited for the total cost in the purchase journal.
Automatic account reconciliation: In the liquidity journal, the advances to third parties account are reconciled (M1-9) and the Trade Payables account is partially reconciled (M1-10) showing a residual amount to pay.
Note! These entries are not reflected in the register; therefore a gap of sequence can be expected when creating a new register line. However, these entries can be followed up on the Full Report.
Invoice to import showing a residual amount
The final payment is done by importing the supplier invoice into the register.
Once the payment is done and hard-posted in the register, UniField automatically creates a new reconciliation reference.
This is what you will see in journal items:
Journal items when the imported invoice register line was hard-posted. A new reconciliation reference was created.
How to Record a Down Payment:
(Same procedure applies to record a Down Payment in a cash, cheque or bank register)
Go to: Accounting/Registers:
Select the register used to pay the down payment.
Click on {New} to create a register line.
Complete the line. In the {Account} field, select the account {Advances done to third parties}. Select the supplier in the {partner} field
Save the line.
⮡ The line is saved in {Draft}. The icon appears.
Click on the icon to link the down payment to the purchase order.
⮡ A {Down payment} wizard appears
A {Down payment} wizard appears
In the {Purchase Order} field, select the relevant purchase order to link it with the advance and validate it. Remember, no supplier invoice will exist because goods have not been received yet. If you do not see your purchase order, confirm you are in the register corresponding to the correct currency and you have selected the correct supplier. Also, check the PO lines status; only POs lines in status {Confirmed} can be linked to a Down Payment and the total amount of any confirmed PO lines minus any validated Supplier Invoices for the same PO cannot be exceeded.
Back to the register line, save it.
⮡ The down payment is booked in your register. Only after the down payment is hard- posted will the down payment be recorded in the associated purchase order in the {Invoices} tab.
An operational advance is defined as money provided to an employee from cash or bank registers to be used to purchase goods or services from third parties on behalf of MSF. The employee returns with the goods or services and a receipt for payment. Any unused cash is returned to the petty cash box or bank account and the payment is booked for the expense.
UniField can manage operational advances from the moment the advance is disbursed until it is returned. To create operational advance entries select the suspense account {Operating Advance}. The cash handed to the employee is booked on his/her name as third party.
If the advance payment relates to a Purchase Order, the advance can be linked to the confirmed PO when creating the register line. This action allows you to select the automatic supplier invoice in the advance return wizard later in the process. Operational advances can be closed once the reception is processed and the related supplier invoice validated. The {Advance Return} wizard is triggered by selecting this icon located on the advance register line as soon as the line is hard posted.
Cash advance and return
How to Book an Operational Advance:
Go to: Accounting/ Registers/Cash Registers:
Open the cash or bank register of the currency in which the operational advance is given.
In the {Cash transactions} tab, create a new statement line and complete the statement fields. In the {account} field, choose the account {Operating Advance}.
As {Third Party}, enter/select the name of the employee receiving the advance (mandatory).
Enter an {Amount Out}.
In the {OPE ADV-LINK TO PO} box, you link the advance to the PO for which the advance was requested if the PO is Regular or DPO. This PO must have been confirmed, but not closed yet, to show up in the Search Purchase Orders view.
Booking an operational advance linked to a PO not of type Purchase List
Searching for the PO to link to the advance
Save the line. The advance is now in {Draft} status. You will need to hard post it to be able to close the advance. The field Reference is mandatory, where you should add the advance number.
Operating advance booked in draft state in the cash register
How to Generate a List of Open Advances:
Once the advance is booked, you need to close it in UniField. You can use the button {List of Open Advances} to help you retrieve the advance. Both hard posted and temp posted advances will be displayed. A list generated at Coordination level will display open advances of coordination and project instances. A list generated at project level will only display open advances of the project instance.
Go to: Accounting/Registers/Cash Registers:
Open the cash or bank register where the money will be returned.
Click on the button {List of Open Advances}.
List of Open Advances button on a cash register used to retrieve hard/temp-posted operating advance
Search Open Advances window displaying hard/temp-posted advances not returned yet
How to Settle an Operational Advance:
You need to click on the wizard.
When the advance return wizard is used, use this reference in the field “Advance Return Reference” => the field is read only and not editable.
The advance can be linked to a supplier invoice in case of purchasing or services from an external partner. If the type of the invoice should be a direct invoice, this is an exceptional case where you should create the invoice as supplier invoice instead of direct invoice (it’s in case you want to use the invoice to settle an operating advance).
You can use a direct entry type as well to settle the operating advance in case of direct expenses to staff or daily workers …etc. You can add that in the Advance line section.
Both direct entry type and supplier invoice can be used if required at the same time to settle the operating advance.
Indicate the amount of cash returned (if any) and enter the date of cash return. The date must be in the same month as the register.
Indicate an advance return amount if needed.
Select {Compute} button to calculate the Justified Amount = advance lines + advance return amount. This should equal the Initial Advance amount.
Click {OK} button.
Advance return wizard and invoice lines automatically added
Advance closed and reconciled in the register
Notes:
The reference at the level of the advance return lines which is in the column “Reference” (to the right of description) will be removed from the lines of the wizard.
Both Initial advance and advance return JIs will have the same reference based on the initial advance. Note that it won’t be possible to change the reference once the initial advance is posted.
How to Settle an Operational Advance combining a Supplier Invoice and a Manual Expense line:
Go to: Accounting/ Registers:
Open the register where you want the advance to be returned.
Ensure the advance line is hard posted.
Select the button {List of Open Advances}, and once you have located your advance in the {Open Advances} Search view, click on the below button {Advance return}located on the advance line.
Enter in the {Advance return amount} the amount of cash returned and the date of the cash return:
Leave it blank if no cash is returned.
If you linked the advance to a PO when the register line was booked, the invoice details are automatically retrieved and displayed in the invoice lines section when calling for the Advance Return wizard (see point D). If not, select the desired supplier invoice with the “Add button”
In the Search Invoice view, choose the invoice to import and press on “Select” to close the window.
Search Invoice view when calling for invoices to import in the Advance Return wizard
Then press “Add Invoice” to display the invoice in the invoice line section
To add a manual expense line, follow the steps described in point E from step 5
Manual expense line saved in the advance return wizard
All these actions have closed the advance in the register and created two new sequences in journals (only the liquidity journal sequences are visible in the register). Accounts 13000 and 30020 are reconciled. If the imported invoice’s details have to be checked, use the icon located on the payables line.
Advance closed in the register
In the journals, we have:
Operating advance booked in the liquidity journal:
10100 Cash on hand on credit (150 UGX)
13000 Operating advance on debit (150 UGX)- reconciled CD1AD-3
Trade payables reconciled (CD1AD-1) when the invoice is imported. We have account moves in the purchase and liquidity journals.
Trade payables reconciled (CD1AD-2) when the manual expense is input, impacting only the liquidity journal.
Advance return in cash, impacting the liquidity journal
How to Close an Advance when the Actual Cost Exceeded the Advance:
We will use the example of a manual advance closing.
Go to: Accounting/ Registers:
Open the register where you want the advance to be returned.
Ensure the advance line is hard posted.
Select the button {List of Open Advances}, and once you have located your advance in the {Open Advances} Search view, click on the button {Advance return} located on the advance line.
In {Additional amount}, enter the amount of additional cash used by the employee. Leave the {Advance return amount} to 0.00 and fill in the date for cash return even if no cash is returned. This is the date when the advance is justified and when the advance return is posted in the journals (expense and cash accounts).
In the {Advance line} field, select {New} and complete the fields in blue. You can select a generic partner called {Local Market} or record it on a specific partner. UniField will automatically reconcile it. Save the line.
Expense amount equals the initial advance amount plus the additional advance amount. This will represent the justified amount.
Proceed now to the allocation of this cost. Select the button located on the advance line if you need to assign different analytical accounts to several advance lines. If not, use the button at the header. The destination is set by default.
Save the line . The line becomes blue. The allocation is valid.
Valid analytical distribution in a cash return wizard:
Indicate an {Advance Return Reference} if needed
Click {Compute} button to calculate the Justified Amount = advance lines + additional advance amount. This should equal the Initial Advance amount.
Click {OK} button.
⮡ The window closes. The advance is closed in the register. Use the {Return to register} action to check the entries created.
Advance closed and operating advance account automatically reconciled
In the G/L journals, we have:
Operating advance booked in the liquidity journal:
10100 Cash on hand on credit (300 MWK)
13000 Operating advance on debit (300 MWK)
Return operating advance closed in the liquidity journal (1):
13000 Operating advance on credit (310 MWK)- reconciled GN101-19
13000 Operating advance on debit (10 MWK)
13000 Operating advance on debit (300 MWK)
Return operating advance closed in the liquidity journal (2)
10100 Cash on hand on credit (10 USD), entry sequence
61170 Furniture on debit (310 USD), entry sequence
Trade payables reconciled in the liquidity journal when the cash return is booked
30020 Trade Payables on credit (310 MWK)- reconciled GN101-18
30020 Trade Payables on dedit (310 MWK)- reconciled GN101-18
Warning message on the cash return wizard
Advance return wizard: show the third-party liquidity journal if account code type is “internal transfer”.
You are be able to select Journal 3rd party on Return advance entry if the account codes “14120 – Internal Transfer Same Currency” or “14130 – Internal Transfer With Currency Exchange” are selected:
We use cookies to ensure that we give you the best experience on our website. If you continue to use this site we will assume that you are happy with it.

 to open the form.
Setting the {amount left} to {0}
{Done} function in a commitment voucher Form view
Commitment voucher set to {Done} and total left is nil

Administration business application and {Reconfigure} function
Activating the International Commitments Import
International Engagement Analytic Journal
{Import Intl Commitments} wizard
Engagement entries booked in the ENG journal. Third parties are displayed but this field in the import file remains optional