Sometimes suppliers request a guarantee (e.g. to rent houses, for a phone line, etc.) which should normally be returned at the end of the agreement. When cash is given to the supplier, you will record a transaction in the register on an account {Guarantee and Deposits}.
Depending on your section’s policy, you can differentiate if the guarantee is more or less than one year and use a different account depending on the case.
When the cash will be returned at the end of the renting contract you will record it in the register. A manual reconciliation on the {Guarantee and Deposits} account needs to be done to settle the balance. The reconciliation can be done once both entries are hard-posted.
USD 3,000 Short-term deposits for Expat house rental
Description
Account
De
Cr
Entries matching
Deposit paid to supplier
Cash on hand
10100
3,000
Short-term deposit
11000
3,000
A1
Deposit return
Cash account
10100
3,000
Short-term deposit
11000
3,000
A1
How to Record a Guarantee or a Deposit to a Supplier
Go to: Accounting/ Registers:
Open the appropriate register to record the money out.
Click on {New} to create a register line.
Complete the line. In the {account} field, select the account {Guarantee and Deposits}. Select your supplier in the {partner} field.
Save this entry.
After the money is returned, repeat the process with money coming in. Save this entry. Ensure both entries are hard posted.
These two entries can now be reconciled in the journals.
In certain missions, security advances will need to be given to expatriate or national staff. It is assumed these advances will be returned when they are no longer needed.
How to Record a Security Advance:
Go to: Accounting/ Registers:
Open the appropriate register to record the money out.
Click on {New} to create a register line.
Complete the line. In the {account} field, select the account {Security envelopes}. Select the appropriate employee in the {partner} field.
Save this entry.
Hard Post this entry. The advance return wizard will now appear.
After the money is returned, find your entry by using the List of Open Advance Button
select the Advance return wizard
⮡ The advance return screen appears
Enter the amount of returned cash into {Advance Return Amount}. If the whole amount is not returned, fill in the partial return amount and record the expenses incurred in the {Advance Lines} below as detailed in step 10.
Complete the {Additional Advance Amount} field in case the employee had to disburse cash from his pocket.
If the advance was returned with an invoice, you can record a supplier invoice and import it using the magnifying glass. Then select the {Add Invoice} button. Another option to record the return is to input manually the advance return lines by clicking on {New} in the {Advance Lines} section.
Enter a partner if relevant. Below is explained which accounting moves you get if you complete or not this field.
Insert Analytical distribution
Advance return wizard with expense lines and amount returned:
Click Ok.
The Advance Return Wizard creates a second entry to reconcile the original advance and book the actual expense in the register
Entries will be automatically reconciled. Below is what you can see in the liquidity journals:
Description
Account
De
Cr
Entries matching
Advance delivered
Cash account
10100
100
Advance account
13010
100
M1-17
Advance returned
Expense account
61200
95
Cash account
10100
5
Advance account
13010
100
M1-17
Trade Payables
30020
95
M1-16
Trade Payables
30020
95
M1-16
Accounting moves when the {Partner} field is filled when booking the advance return
Description
Account
De
Cr
Entries matching
Advance delivered
Cash account
10100
356
Advance account
13010
356
M1-18
Advance returned
Expense account
61200
350
Cash account
10100
6
Advance account
356
M1-18
Accounting moves when the {Partner} field is left blank when booking the advance return. Of course no moves on the Trade Payables account.
Monetary transfers are performed from any kind of registers (bank, cash and occasionally cheque). They consist of two entries; one in the origin (sending) register and another in the destination (receiving) register, for example a transfer from the Coordination main safe to a Project’s main safe. These transfers can involve the same currency or two different currencies.
On the sending side the {Third Party} is the journal receiving cash. At the recipient side the {Third Party} is the journal sending cash.
A manual reconciliation needs to be done on the {internal transfer account}. For project-coordination transfers, the coordination performs the reconciliation in the coordination instance. At project level entries on the transfer account are not balanced as coordination B/S entries do not sync to project instances.
FX loss/gain are automatically calculated and recorded in the FXA {FX Adjustment} journal if the disbursing internal transfer is recorded in a different period than the recipient internal transfer or if the bank exchange rate is different from the system rate.
N.B. Suppose you need to withdraw cash at the bank using a cheque. Please check your OCs procedure to know whether you should record the amount OUT from the Bank or Cheque register and adjust the third party in the Cash register accordingly.
How to Book an Internal Transfer Same Currency:
Sending side
Go to: Accounting/ Registers :
Open a register to record an internal transfer sent out. Internal transfers are recorded the same in each register type.
Create and complete a statement line by selecting the account {Internal transfer same currency}.
The {Third Party} is set automatically to {Journal}. Choose the journal you transferred the funds to.
Save the entry.
⮡ The entry is saved in {Draft}. The entry must be changed to hard-posted so that it can be reconciled at a later stage.
Receiving side
Go to: Accounting/ Registers:
Open the recipient register to record an internal cash transfer received.
Create and complete a statement line by selecting the account {Internal transfer same currency}.
The {Third Party} is set automatically to {Journal}. Choose the cash journal you sent the cash from.
Select a {Third Party}: it will be the cash journal. Save the entry.
⮡ The entry is saved in {Draft}. The entry must be changed to hard-posted so that it can be reconciled at a later stage.
How to Book Internal Transfer with Currency Exchange
For transfers with a currency exchange it is not mandatory to know the amount the other side will receive at the time of booking.
Go to: Accounting/ Registers:
Open a register to record an internal transfer sent out
Create and complete a register line by selecting the account {Internal transfer with currency exchange}
The {Third Party} is set automatically to {Journal}. Choose the journal you transferred the funds to.
Save this entry.
⮡ This icon appears :
This allows you to enter the actual amount received in the other currency, which may be different from the exchange rate stored in UniField. Remember: entering this information is not mandatory. If you do not have this information simply leave this field blank.
Click on below icon to record manually the corresponding value of the currency changed locally.
⮡ A {transfer with change} wizard appears
{Transfer with change} wizard from disbursement side, optional
Record manually the local currency value received in the field {Transfer amount converted at real rate}.
Validate and Save your entry.
⮡ The entry is saved in {Draft}. The entry must be set to hard-posted so that it can be reconciled at a later stage.
Receiving side
Go to: Accounting/ Registers:
Open the receiving register to record an internal transfer received.
Create and complete a statement line by selecting the account {Internal transfer with currency change}.
The {Third Party} is set automatically to {Journal}. Choose the journal you sent the money from.
Select a {Third Party}: it will be the journal you sent the money from.
Save this entry.
⮡ This icon appears. This allows you to enter the amount of the money sent in the other currency, which may be different from the exchange rate stored in UniField.
Click on the icon to record manually the original value of the currency that was changed.
⮡ A {transfer with change} wizard appears.
{Transfer with change} wizard from recipient side, optional
Record manually the value that was sent in the field {Transfer amount converted at real rate}.
Validate and Save your entry.
⮡ The entry is saved in {Draft}. The entry must be set to hard-posted so that it can be reconciled at a later stage.
Account move for a 10,000 USD bank transfer to a USD cash box
Description
Account
De
Cr
Entries matching
Transfer sent from bank register
Internal transfer same currency
14120
10,000
A1
Cash at Bank
10200
10,000
Transfer received in cash register
Internal transfer same currency
14120
10,000
A1
Cash on hand
10100
10,000
Account move for a bank transfer of 10,000 USD to a KGS cash box (471,440 KGS)
Description
Account
De
Cr
Entries matching
Transfer sent from bank register
Internal transfer with currency exchange
14130
10,000
A1
Cash at Bank
10200
10,000
Transfer received in Cash Register
Internal transfer with currency exchange
14130
471,440
A1
Cash on hand
10100
471,440
How to Book a Transfer from HQ
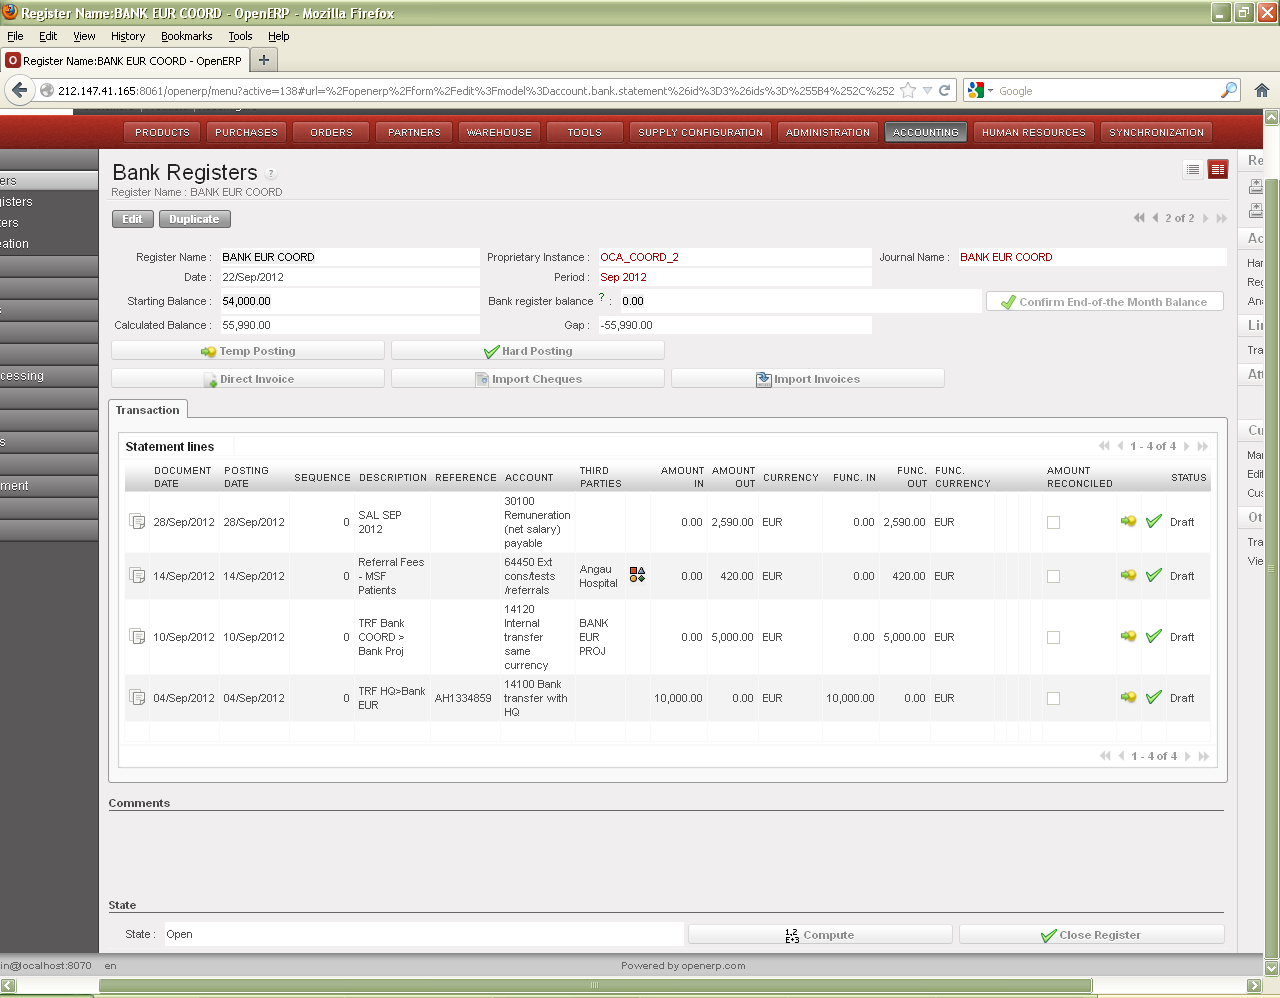
Money sent to the field by HQ is recorded in the receiving register on a suspense account {Bank Transfer with HQ} or {Cash Transfer with HQ} usually at coordination level. The third party field should remain blank.
Go to: Accounting/ Registers:
Open the appropriate register to record the HQ transfer.
Create a new transaction using the account {Bank Transfer with HQ} or {Cash Transfer from HQ}.
Save this entry.
How to Book an Intermission Money Transfer:
A money transfer from one mission to another one is recorded in the registers on both sides as an “Out” move and “In” move.
There is no settlement done at mission level but at HQ instance level because there is no physical reimbursement between missions of a same section.
A manual reconciliation is needed on the {Transfer to/from another financial mission: Same section} account at the HQ instance level.
Accounts move at disbursement and receiving side for a USD 34,000 cash transfer without local reimbursement
Description
Account
De
Cr
Entries matching
Cash Out disbursement side
Cash account
10100
34,000
Transfer to/from another financial mission: same section
14140
34,000
HQ
Cash IN receiving side
Cash account
10100
34,000
Transfer to/from another financial mission: same section
14140
34,000
HQ
How to Book an Inter-sectional Money Transfer:
A money transfer from one section to another one is recorded in the registers on both sides as an “Out” move and “In” move.
The booking of this transaction depends on the way the reimbursement will be done. If done at the field level, the transaction will be booked on a receivable and payable account in the registers on both side and the settlement booked by recording the reverse movement in the registers on both sides too when the money is returned. The accounts used will be {Receivable from other sections} and {Payable to other sections} or another one depending of your section policy.
A manual reconciliation will be needed on the {Receivable from other sections} or on the {Payable to other sections} account code, depending on which side of the transfer you are acting.
If the reimbursement is done at HQ level, there is no settlement done at mission level but at HQ system level and the account used when booking the transaction in the field will be {Transfer to/from another financial mission: Other section}.
There is no reconciliation to be done and the entry on the account {Transfer to/from another financial mission: Other section}, which will remain unbalanced.
Accounts move for a USD 34,000 cash transfer and reimbursement settle at mission level
Description
Account
De
Cr
Entries matching
Cash Out disbursement side
Cash account
10100
34,000
Transfer to/from another financial mission: Other section
12010
34,000
A1
Cash IN receiving side
Cash account
10100
34,000
Transfer to/from another financial mission: Other section
30010
34,000
A2
Cash IN disbursement side
Cash account
10100
34,000
Transfer to/from another financial mission: Other section
12010
34,000
A1
Cash OUT receiving side
Cash account
10100
34,000
Transfer to/from another financial mission: Other section
Internal transfer is the process of transferring liquidity (money) from one liquidity journal/register to another, within a Country Program. There are two types of internal transfers:
Account code 14120 / 21600 – Internal Transfer Same Currency. Sending and receiving journal/register currency is the same.
Account code 14130 / 21610 – Internal Transfer Currency Exchange. Sending and receiving journal/register currencies are different.
Transfers could occur within one UniField instance (e.g. safe to cash box), or between two UniField instances (e.g. coordination bank to project bank).
Exclusion: Cash/bank transfers from/to HQ or from/to intermission/intersection are not considered as internal transfer and not part of this QRC. They have not been changed.
Internal Transfers (same currency or with currency exchange) are register entries booked manually. One transfer consists of two entries: one in the origin (sending) register and another in the destination (receiving) register. Reference to user manual: LUFI-30401 Internal Transfers
Entries: two entries are booked manually.
Description and reference should be the same. It is manually filled and maintained outside of UF
Third Party: At the sending side the “Third Party” is the journal receiving cash. At the recipient side the “Third Party” is the journal sending cash.
Amount: On the sending side, the amount is OUT. In the receiving side, the amount in IN.
Reconciliation is manual.
Above described behaviour is still applicable for internal transfers between two UniField instances: e.g. Coordination sending cash to project, or between two project instances.
Regarding internal transfers within one instance (proprietary instance of the journals/registers involved is the same), see below.
This change meant to ease the booking of internal transfers, one of most frequent register entries, via automatic booking of second transfer entry and auto reconcile. There are still two register entries per transfer.
When internal transfers occur within one instance (proprietary instance of the journals/registers involved is the same), e.g. Bank withdrawal to safe or transfer from Safe to Petty Cash, the following change is applicable.
Note that transfer between a project office and a sub-location of the project office which is using the same UniField instance is also considered as “within one UniField instance”.
After UF30 release, when an internal transfer entry is “temp” or directly “hard” posted in the register, UniField creates automatically the counterpart booking in the Third-Party register.
E.g. The cashier books the transfer IN #584 received from the Safe CA001 in the CA002 – Petty cash register.
When this entry is temp posted (or directly hard posted), UF creates automatically in CA001 the following counterpart entry in draft:
UF takes from initial booking all information to populate the fields of the counterpart booking:
Document and posting dates from initial entry.
Description and reference from the initial entry.
Third- party is the sending register of the initial entry.
Amount is in opposite field. If the initial entry is OUT, the counterpart is IN. It is possible that the transfer IN is booked as initial entry and temp posted. UniField will create the counterpart OUT.
The entry is in draft status. It could be edited (all fields), it could be deleted.
Internal transfer entries having a counterpart are marked with a link next to third-party field. Click on the link to see the counterpart booking. This link is visible on register screen and journal item screen and also synched to Coor.
When both entries are hard posted, UF reconcile automatically them (at the time of hard-posting the last one). This reconciliation could be undone. It is not possible to manually reconcile (at project or Coor) a transfer entry with a link (= having a counterpart booking).
In case one of the two entries is deleted, the link is broken and the remaining entry could be manually reconciled.
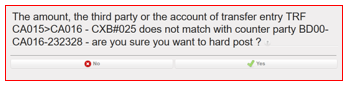
When the booking amounts do not match in internal transfer same currency, the hard-posting process of the second entry will display error message mentioning the “description- Reference” of the entry. UniField proposes two options
“NO”= The entry will not be not hard-posted. The user could then edit the amount and later hard post. This check is a final review of amount before posting. Use this when the change of amount from initial entry (e.g. due to typo) was not reflected in counterpart.
“YES”= The entry will be hard posted. There is no auto reconciliation (no partial). The link is broken. Both entries could be manually reconciled with other entries without counterpart. Use this if a transfer OUT is received in 2 or more smaller IN (e.g. The local transfer provider did not have enough cash).
This check applies only on internal transfer same currency. For currency exchange, the reconciliation always goes.
Always refresh the register before booking new internal transfer manually. Good coordination within the team helps also to know who is usually/always booking the initial entry. The following scenarios are for inspiration. Each Country Program /Office could define what is more suitable. E.g.:
Cashier/FinAssist is in charge of booking the transfer received in Petty Cash from Safe. FinCo/Admin will have draft counterparts ready to post.
Cheque entries are booked first, as the cheque needs to be issued for cash withdrawal using cheque. Counterpart in safe will be in draft.
Both initial and counterpart entries could be edited and deleted. UniField does not send update to the other entry. Any modification applied both sides after temp posting the initial entry should be communicated to the other register owner and applied on the other entry.
Major modifications: If the modification is on Third-Party or account code, it is better to delete both initial and counterpart and start from new. To do so, click on the link to access the counterpart entry and delete it with the red x before deleting the initial entry. Then book the correct entry.
Modification on Third-Party or account code meant that the counterpart register is not correct. As consequence, the counterpart entry created could not be used as it is not possible to move it to other register.
Tips: Review those fields before “temp” posting an initial transfer entry – especially the third party (frequent mistake).
Minor Modifications: If the modifications are on dates, description, reference, amount, both entries could just be edited. Those modifications need to be communicated to the owner of the counterpart register and applied on the counterpart entry. It is possible to click on the link and access the counterpart entry in order to check if the modifications have been applied.
If one of the entries is deleted, the link is broken, and the remaining entry could be reconciled with other entries without counterpart.
After hard posting of all register entries, all transfers with counterpart will be automatically reconciled. The list of transfers non-reconciled should be reviewed among other manually reconcilable entries as per procedures. Those transfers are:
To/from other instances
Within the same instance but the counterpart has been deleted.
If a correction transfer without counterpart is needed (e.g. To replace a counterpart which has been deleted), book a transfer entry in the appropriate register. Then using the link , delete the counterpart immediately after temp post. The link is broken. The entry is reconcilable with other entries without counterpart.
In addition to direct entries, direct invoices and supplier invoice payments, UniField is designed to handle all specific payments types required by MSF operations.
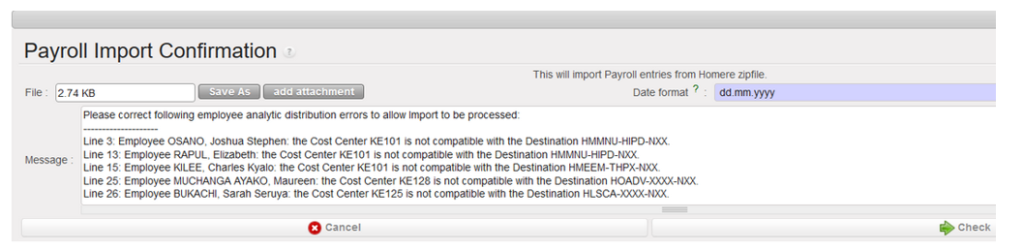
PAYE_UNIFIELD and PAYE_SAGA Import: request to have all the import error messages at once
When we import the payroll file in Unifield, the file import can be unsuccessful because of errors in Budget lines in the import file and Unifield was reporting the error messages one by one bringing confusion for the users
In this request we have requested to have all the wrong messages at once when the import fails:
This will help to spot the errors to correct in HOMERE.
When a register line is created, the state is draft. You can review and post it temporarily in the journals, pending for final approval. The register line becomes {Temp} in the register and the corresponding journal entries created unposted in the journals. Hard-posting the {Temp} register line will change the register line state to {Hard} and post the journal entries.
How to Temp-Post Register Entries
UniField allows you to temp post a register entry individually using the button located on the entry line, but you can also temp post entries by grouping several entries. The below task description explains how to temp post a group of draft entries.Go to: Accounting/Registers
Select the register where you want to temp post entries.
Click on the button to retrieve draft entries booked in your register. A list of {Draft} entries appears
Check the entry box to select it.
Temp-posting entries search wizard
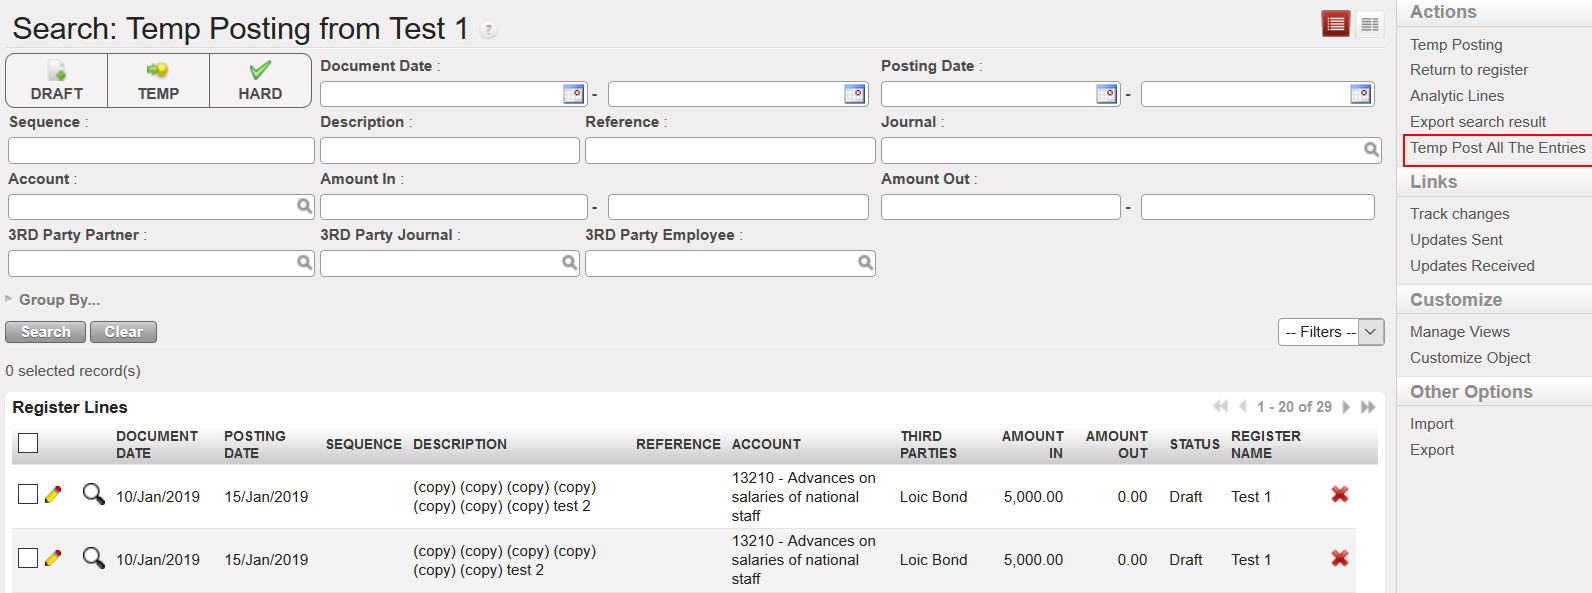
Selecting the action of {Temp Posting} will only temp post the entries you can see directly from the list. For instance, if you have 29 lines to be temp posted, you will only see 20 lines of 29 and if you clicked on {Temp Posting} you will only temp post the 20 visible lines unless you extend the list if you wanted to temp post the 29 lines.
Extending the list in order to temp post all draft entries
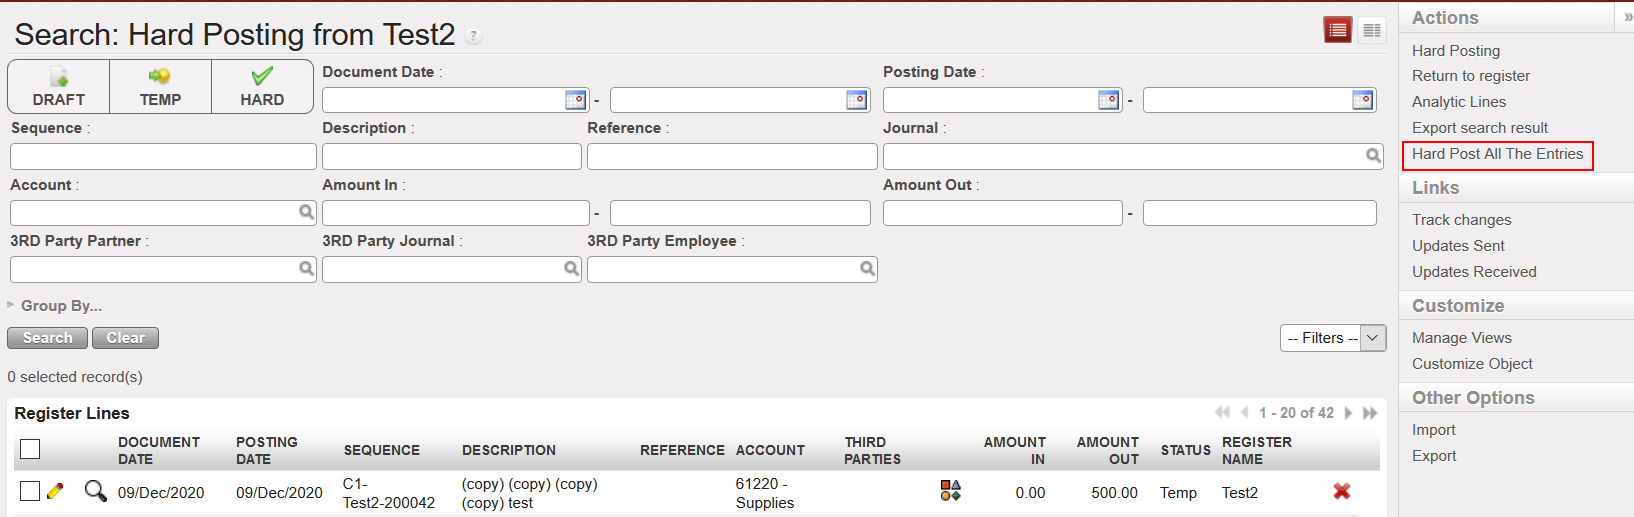
If you have many lines to be temp posted and you are sure you want to temp post all of them, you can select the option of {Temp Post All the Entries} from the right side menu and all the draft entries will be temp posted without the need to extend the list of lines.
Temp post all the entries with the need to extend the list
4. Go to the Action menu on the right side of the screen and select the action {Temp Posting}.
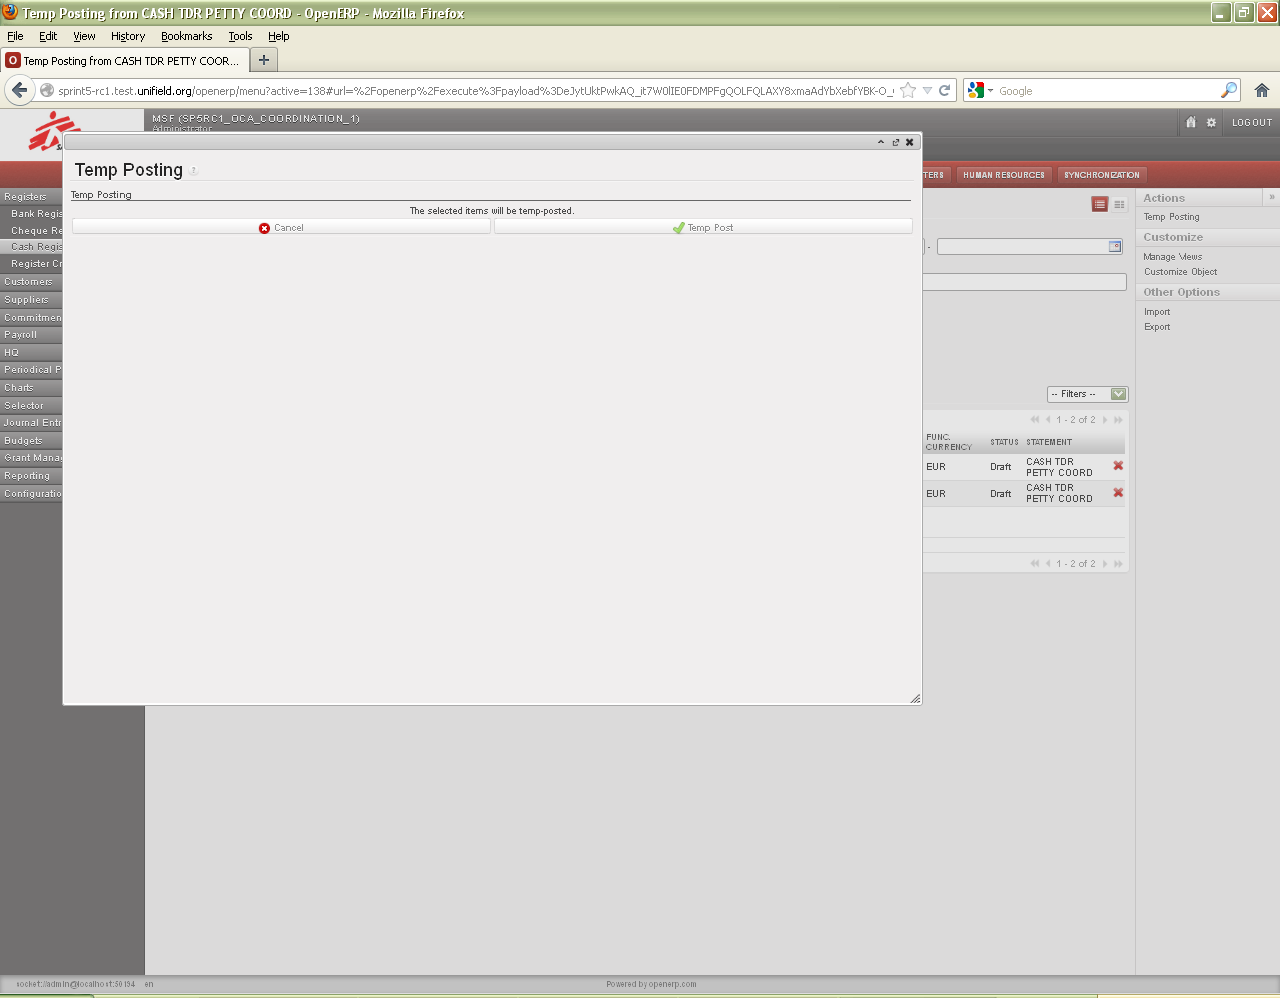
Temp-posting confirmation
5. Confirm the action selecting {Temp Post}.
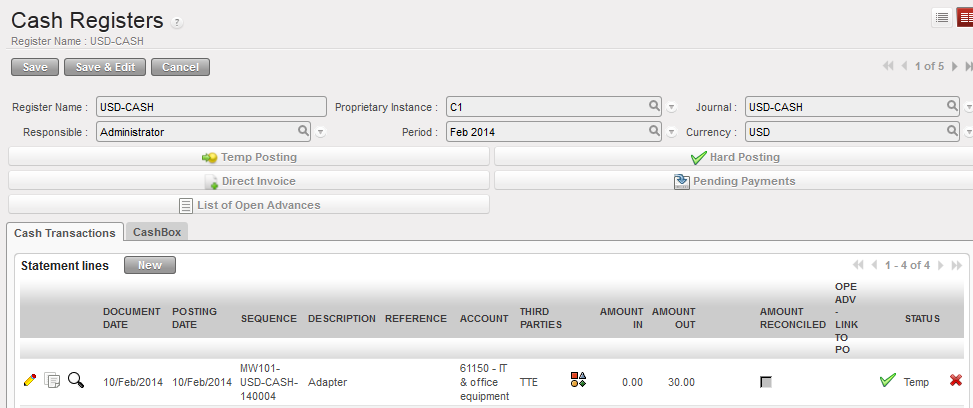
The window closes. The entries are now in {Temp} state. An authorized user can still edit and delete them in the register. The entries became accounting entries and are reflected in the {Journal items} as valid but unposted.
Temp posted register entries
To look at the entries created in the {Journal Items}:
In the {Journal Entries} module, you select {Journal Items} and the {Journal Items} Search view appears. You will see unposted and valid double entry accounting per transaction in booking and functional currencies.
{Journal item} view displayed unposted journal items corresponding to the register line which was temp posted
How to Hard-Post Register Entries
UniField allows you to hard post a register individually using the button located on the entry line, but you can also hard post entries by grouping several entries. The below task description explains how to hard post a group of temp posted entries.
Go to: Accounting/Registers
Select the register where you want to hard post entries.
Click on the button to retrieve temp and draft entries booked in your register. A list of {Temp} and {Draft} entries appears
Check the entries boxes.
{Hard-posting entries search} wizard
4. Go to the Action menu on the right side of the screen and select the action {Hard posting}.
Hard-posting confirmation
5. Confirm the action selecting {Hard Post}.
The window closes. The entries are now in {Hard} state. The entries are reflected in the {Journal items} as valid AND posted.
Selecting the action of {Hard Posting} will only hard post the entries you can see directly from the list. For instance, if you have 42 lines to be hard posted, you will only see 20 lines of 42 and if you clicked on {Hard Posting} you will only hard post the 20 visible lines unless you extend the list if you wanted to hard post the 42 lines.
Extending the list in order to hard post all draft entries
If you have many lines to be hard posted and you are sure you want to hard post all of them, you can select the option of {Hard Post All the Entries} from the right side menu and all the Temp posted entries will be hard posted without the need to extend the list of lines.
Hard Post all the Entries
Hard posted register entries
In the {Journal Entries} module, you select {Journal Items} and the {Journal Items} Search view appears. You will see valid AND posted double entry accounting per transaction in booking and functional currency.
Posted journal items corresponding to the register line which was hard posted. A/P was reconciled
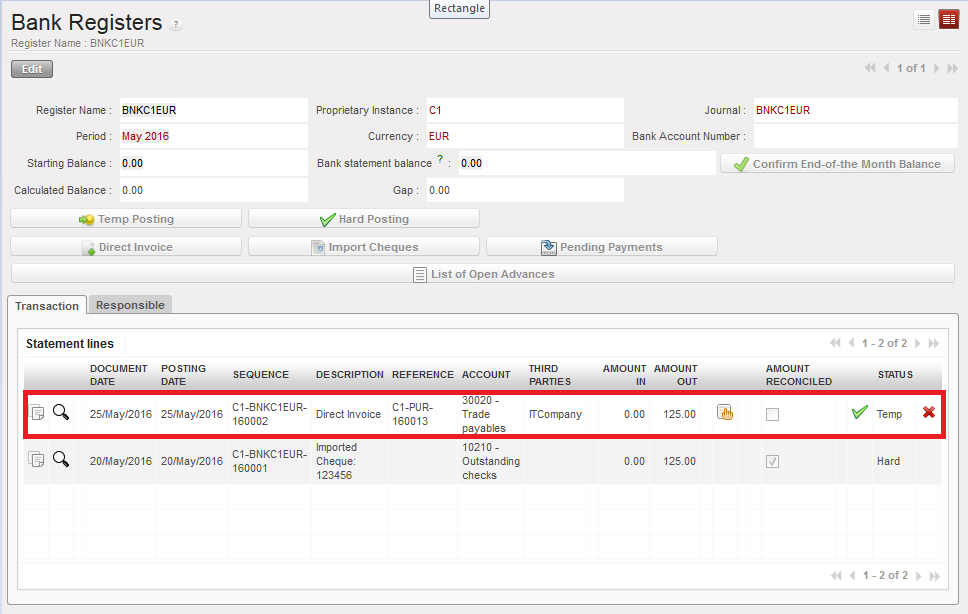
Another type of payment within UniField is the Direct Invoice. Finance can create a direct invoice which is a stand-alone invoice in the {Accounting} module that can be created in the cash, bank or cheque registers.
It is important to remember that Direct Invoices can’t be linked with a product and that Direct Invoices don’t support any tax handling.
How to Create a Direct Invoice
Go to: Accounting/ Registers
Open the register in which you want to record a direct invoice payment. Don’t forget to select the register with the correct currency.
Click on {Direct Invoice} button.
Bank register and {Direct Invoice} button
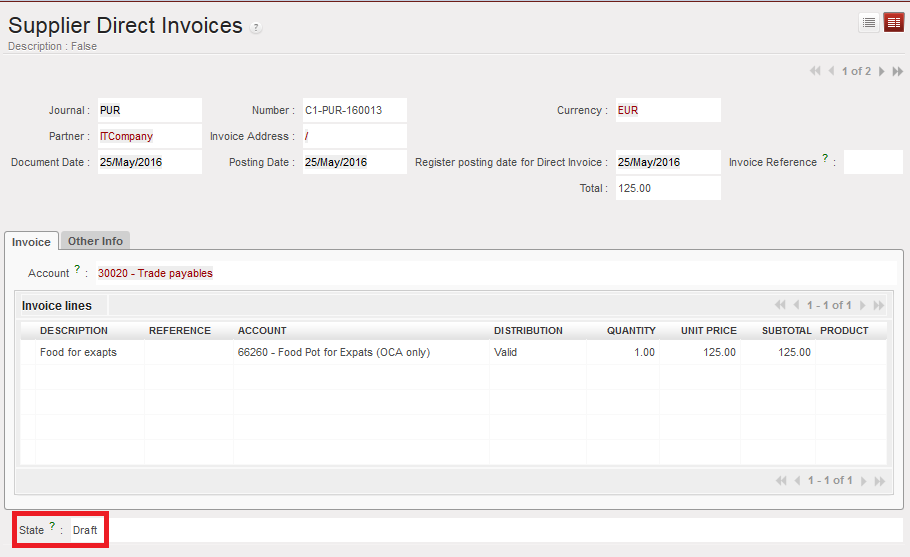
A {Supplier Direct Invoice} wizard appears
Complete the fields by selecting a supplier, filling in a document date. The posting date and register posting date default to today’s date and can be changed. Insert a reference if relevant. However the invoice number will be automatically used as purchase and liquidity journals entries references.
In the invoice tab, click on {New} to create invoice lines.
Insert a description and select an account. Fill in quantity and unit price. Save the line.
Allocate the expense to an analytical dimension by clicking on the analytical wizard; the destination will be set by default based on the account code but can be modified.
{Supplier Direct Invoice} creation.
5. Click on {Validate} button.
The Direct invoice is created in Temp status in the register but the invoice state is still in Draft. The total amount of the invoice is booked on the account code 30020 {Trade payables}. A supplier invoice number is created.
Register entry is created in Temp when the Direct Invoice is validated
The invoice is draft and has a reference (number)
In the journals, journal entries are created at the same time as unposted:
In the purchase journal:
Credit to 30020 Trade Payables
Debit to expense account
In the liquidity journal:
Credit to cash account if the invoice was paid in cash
Debit to 30020 Trade Payables
Unposted Journal Items generated when the Direct Invoice is validated. The invoice reference is the booking reference of the purchase and liquidity journals entries.
Should you need to edit, re-compute the total or review the invoice before validating the register line (hard post), click on, proceed to the edition and validate the invoice. The register line and journal entries will automatically be updated.
When you hard post the register line, it becomes {Hard}. The invoice is marked as {Paid} and the journal entries are {Posted}. Entries on account 30020 are automatically reconciled.
Hard posted direct invoice entry
Paid Direct Invoice
Posted Journal entries when a Direct Invoice register line is hard-posted. The A/P account is reconciled.
LUFI-30306 Cheque Entries Imported into a Bank Register
LU Introduction
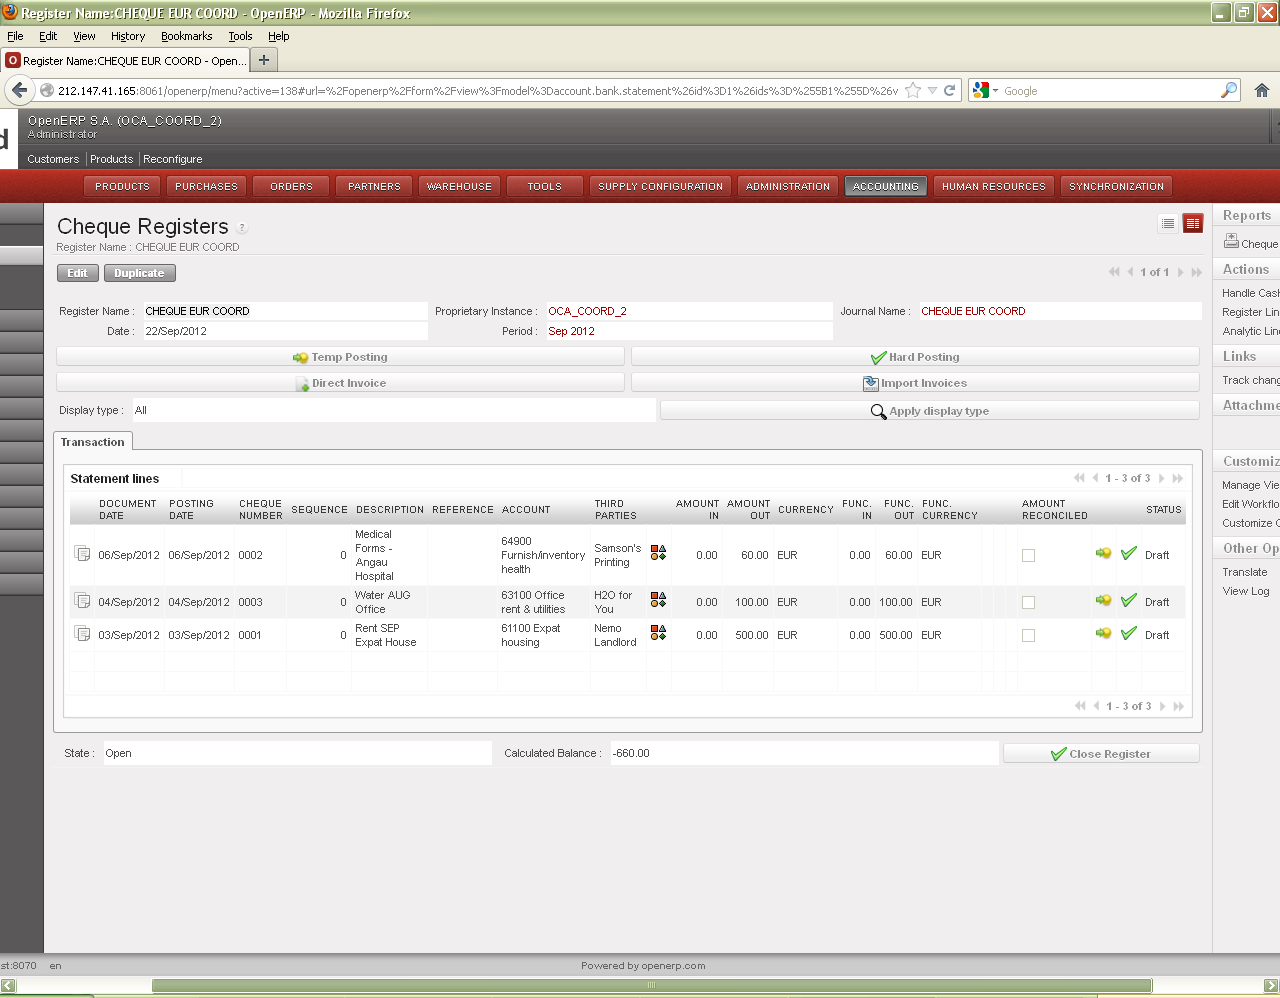
When you write the cheque, you will need to create one entry in the cheque register to the appropriate account code. When this entry is temp posted, this triggers the creation of two balanced accounting entries in the Journal Items: one credit entry to {outstanding cheques, 1021} and one debit entry to the expense account.
After receiving confirmation from the bank that the cheque has been cashed in (through the bank statement sent by the bank), you may import the cheque register entry into the corresponding bank register. Only then will your bank account balance be affected. This system allows MSF to maintain a more accurate record of the liquidity on each bank account at a specific point in time.
UniField automatically reconciles the cheque register entry with the bank register entry. Once reconciled, a cheque still appears in the cheque register but will be listed as reconciled. In case a cheque has not been cashed in at the end of the month, the cheque register can still be closed (with an open cheque). The cheque will still be available for import into the bank register in the following months.
How to Import a Cheque into a Bank Register
Go to: Accounting/Registers/Bank Registers
Open the associated bank register.
Click on {Import Cheques}. The {Import Cheque} wizard opens.
Click {Add}.
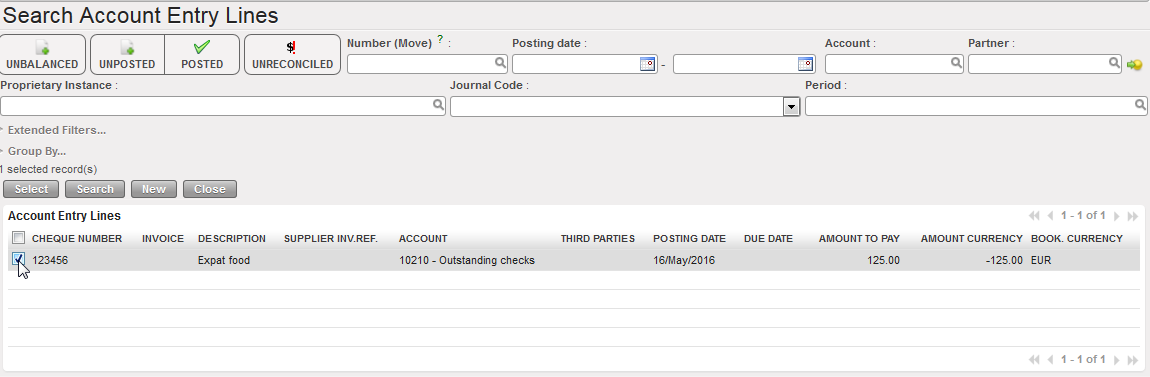
4. In the {Search Account Entry Lines} window, select the cheques that were cashed, then click {Select}. If you cannot find a cheque in the list, then it is possible that the cheque was not hard posted, the cheque is a different currency than the register, it has not been entered in the cheque register, or the cheque register was linked to a wrong bank register.
Selecting cheques to import
5. The selected cheques appear at the top section of the {Import Cheque} wizard. Enter the {Document Date} and {Posting Date} which will be applied to all cheques on the list.
6. Select {Import} button.
{Import Cheque} wizard
7. The selected cheques appear in the lower section of the {Import Cheque} wizard. Here you can edit the imported cheques by clicking on to change the {Document Date} and/or the {Posting Date} to the actual date when the cheque was cashed in.
Verifying the information of the cheque to be imported
8. Click {Ok} and Save
The cheque entry lines are created as temp posted entries in the bank register
1. Payment by cheque: Debit account moves on {expense account, 66260} and Credit {outstanding cheques, 10210}.
2. Cheque reconciled when entry hard-posted in the bank register: Credit account moves on {Cash at Bank, 10200} and debit {Outstanding cheques, 10210} and associated unique reconciliation reference {C1-5}.
Direct Entries allow the finance team to book an entry directly in the register. The appropriate financial account is selected by the user. Direct entries are useful when Finance is paying for goods or services not purchased by Logistics. The double booking entries are automatically created in the liquidity journals as soon as the entry is temp or hard posted.
How to Book Direct Entries in a Register
Same procedure applies to booking entries in cash, bank or cheque registers.
Go to: Accounting/Registers
Select the register where you want to record your expense. We will use a cash register for this example but the cheque and bank register will be laid out the same way.
Click on the edit pencil to open the register form.
In the cash transactions box click on {New} to create a new statement line.
Cash Register Statement Line Creation
4. The fields in blue are mandatory, in white optional and in grey view only. Complete them as follow:
Title of field
Entry protocol: register entry
DOCUMENT DATE
Blue field. Click on the calendar icon to select a date or manual entry as dd/mm/yyyy. The {Document Date} can be before or within the period. Remember that UniField picks the {posting date} rather than {the document date} to define the conversion rate to functional currency.
POSTING DATE
Blue field. Click on the calendar icon to select a date or manual entry as dd/mm/yyyy. Defaults to today’s date. The {Posting Date} must be within the Period and > or = to the {Document Date}
CHEQUE NUMBER
Only for cheque registers: Blue field. A unique cheque number is mandatory
SEQUENCE
Grey field. Automatic input. Register code and incremental number. There is no sequence number for draft entries.
DESCRIPTION
Blue field. Similar to the description of your current system (max 64 characters length)
REFERENCE
White field. If the field {Reference} of an invoice is filled, it is automatically reported in the {Reference} field of a register line when importing an invoice.
ACCOUNT
Blue field. You can enter the account code if you know it or type the code name and a list of codes will appear. See figure below.
THIRD PARTIES
White field. Drop down values Partner, Journal, and Employee. Once selected, you search for the supplier/journal/employee name in the next field. Remember if you need to create an entry on an inactive employee, you will need to uncheck the {Active} filter in the {Search Employee} view.
AMOUNT IN
White field. Amount of cash received in booking currency
AMOUNT OUT
White field. Amount of cash paid out in booking currency
AMOUNT RECONCILED
Automatic input. The check indicates that the record has been reconciled e.g. for internal transfers and operating advances
OPE ADV-LINK TO PO
Link an operating advance register line to a PO not of type Purchase List (i.e. regular or DPO).
STATUS
Grey field. Automatic input. Can be Draft, Temp or Hard
Remember to check the date and period! For instance if you create and open a register in March and then enter transactions of February, remember to change the posting date which defaults to today’s date.
If you make a payment through the cheque register, the cheque number will need to be entered. It is a mandatory field.
Cheque number input, mandatory field
When selecting {Account}, just by entering a few digits of the code or a key word in the account description, UniField will display the options that match your search as shown below. If you move your mouse over a selection, the entire description displays.
Or you can click on the magnifying glass to open up the {Search Chart of Accounts} wizard. The accounts will appear in numerical order. To select only expense accounts type 6 into the filter as showed below.{Search Chart of Accounts} wizard
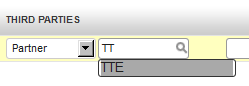
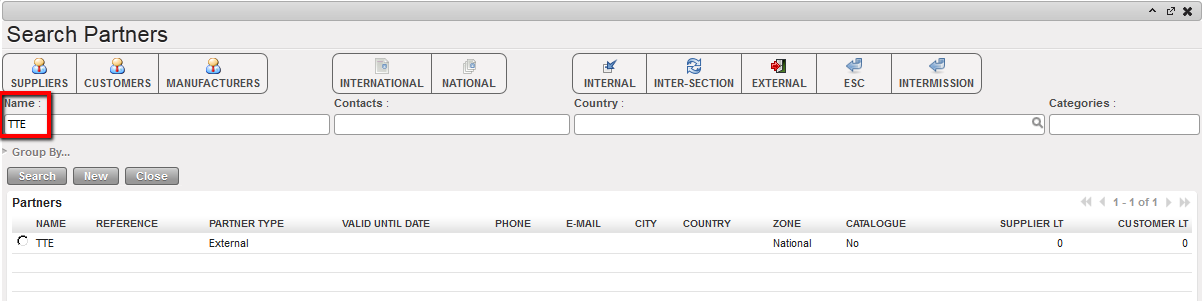
When selecting {Third Party}, you can enter part of the name. UniField will display the search that matches as shown below. If you move your mouse over a selection, the entire description displays. The third party field is optional for some entries and required for others.
Entering values to search in the {THIRD PARTY} name field
{Search Partners} wizard
5. Save by clicking on the floppy disc or pressing the enter button.
The entry appears in {Draft} status. If you selected an expense account, the button will appear and the entry will be in red. A red entry is an indication that the analytic distribution has not been assigned or has not been assigned properly.
6. Click on the button to open the {Analytic distribution} wizard.
7. In the wizard, select {New} to create a new allocation. The destination is set by default.
{Analytic distribution} wizard
8. Select a {Destination}, {Cost Center} and {Funding Pool}. If you know the code, enter it. Otherwise, click on the magnifying glass to retrieve it.
9. Click on the floppy disk to save the allocation line.
10. Click at the bottom right of the window to save the analytic distribution and close the window.
The allocation is done; the entry appears now in black. The register line is {Draft}.
Title of field
Entry protocol: analytic distribution wizard
Total amount
The total amount of the expense to be allocated
Entry Mode
If the expense needs to be distributed across multiple destinations, cost centers or funding pools, the user can split by Percentage or Amount
Clicking switches between entry mode Percentage or Amount
DESTINATION
The destination will be a default option based on the account code in the register entry but it can be changed.
EXP: expenses for expatriates, i.e. 61xxx expense codes
NAT: expenses for national staff, i.e. 62xxx expense codes
SUP: expenses in support of the project activities, e.g. office supplies
OPS: expenses directly related to operations (project activities)
COST CENTER
Cost center tree
FUNDING POOL
Donor tree. If there are no donors in the project, expenses are allocated to “PF” (MSF Private Funds)
PERCENTAGE/ AMOUNT
If the expense is distributed across multiple destinations, cost centers or funding pools, this indicates the allocation amounts
FREE1
Potential additional analytic dimension
FREE2
Potential additional analytic dimension
Direct entry created in Draft in a cash register. No acccounting moves.
To go further, temp-posting a direct entry would create in the liquidity journal the below entries:
Expense to Cash
Temp Direct entry in the cash register
Expense to cash in the Liquidity journal
Hard-posting a direct entry would create in the purchase journal the below entries:
Payable to Payable
Hard direct entry in the cash register
Corresponding journal entries booked in the purchase journal
Internal transfer within the same instance
Overview:
A- Internal Transfer Definition
B- Old Behaviour For Internal Transfer Between Unifield Instances
C- New Behaviour For Internal Transfer Within One Unifield Instance
1- Automatic Counterpart Booking
2- Automatic Reconciliation
3- When Automatic Reconciliation Does Not Work
D- Consequences Of The Changes
4- Before Booking An Internal Transfer
5- Modification After Temp Posting Initial Entry
6- Manual Reconciliation
7- How To Book An Entry Without Counterpart
Internal transfer is the process of transferring liquidity (money) from one liquidity journal/register to another, within a Country Program. There are two types of internal transfers:
A- Internal Transfer Definition
Account code 21600 – Internal Transfer Same Currency. Sending and receiving journal/register currency is the same.
Account code 21610 – Internal Transfer Currency Exchange. Sending and receiving journal/register currencies are different.
Transfers could occur within one UniField instance (e.g. safe to cash box), or between two UniField instances (e.g. coordination bank to project bank).
Exclusion: Cash/bank transfers from/to HQ or from/to intermission/intersection are not considered as internal transfer. They have not been changed.
B- Old behaviour for internal transfer between UniField instances
Internal Transfers (same currency or with currency exchange) are register entries booked manually. One transfer consists of two entries: one in the origin (sending) register and another in the destination (receiving) register. Reference to user manual: LUFI-30401 Internal Transfers
Entries: two entries are booked manually.
Description and reference should be the same. It is manually filled and maintained outside of UF
Third Party: At the sending side the “Third Party” is the journal receiving cash. At the recipient side the “Third Party” is the journal sending cash.
Amount: On the sending side, the amount is OUT. In the receiving side, the amount in IN.
Reconciliation is manual.
Above described behaviour is still applicable for internal transfers between two UniField instances: e.g. Coordination sending cash to project, or between two project instances.
Regarding internal transfers within one instance (proprietary instance of the journals/registers involved is the same), see below.
C- New behaviour for internal transfers within one UniField instance
This change meant to ease the booking of internal transfers, one of most frequent register entries, via automatic booking of second transfer entry and auto reconcile. There are still two register entries per transfer.
1- Automatic counterpart booking
When internal transfers occur within one instance (proprietary instance of the journals/registers involved is the same), e.g. Bank withdrawal to safe or transfer from Safe to Petty Cash, the following change is applicable.
Note that transfer between a project office and a sub-location of the project office which is using the same UniField instance is also considered as “within one UniField instance”.
After UF30 release, when an internal transfer entry is “temp” or directly “hard” posted in the register, UniField creates automatically the counterpart booking in the Third-Party register.
E.g. The cashier books the transfer IN #584 received from the Safe CA001 in the CA002 – Petty cash register.
When this entry is temp posted (or directly hard posted), UF creates automatically in CA001 the following counterpart entry in draft:
UF takes from initial booking all information to populate the fields of the counterpart booking:
Document and posting dates from initial entry.
Description and reference from the initial entry.
Third- party is the sending register of the initial entry.
Amount is in opposite field. If the initial entry is OUT, the counterpart is IN. It is possible that the transfer IN is booked as initial entry and temp posted. UniField will create the counterpart OUT.
The entry is in draft status. It could be edited (all fields), it could be deleted.
2- Automatic reconciliation
Internal transfer entries having a counterpart are marked with a link next to third-party field. Click on the link to see the counterpart booking. This link is visible on register screen and journal item screen and also synched to Coordination.
When both entries are hard posted, UF reconcile automatically them (at the time of hard-posting the last one). This reconciliation could be undone. It is not possible to manually reconcile (at project or Coor) a transfer entry with a link (= having a counterpart booking).
In case one of the two entries is deleted, the link is broken and the remaining entry could be manually reconciled.
3- When automatic reconciliation does not work
When the booking amounts do not match in internal transfer same currency, the hard-posting process of the second entry will display error message mentioning the “description- Reference” of the entry. UniField proposes two options
“NO”= The entry will not be not hard-posted. The user could then edit the amount and later hard post. This check is a final review of amount before posting. Use this when the change of amount from initial entry (e.g. due to typo) was not reflected in counterpart.
“YES”= The entry will be hard posted. There is no auto reconciliation (no partial). The link is broken. Both entries could be manually reconciled with other entries without counterpart. Use this if a transfer OUT is received in 2 or more smaller IN (e.g. The local transfer provider did not have enough cash).
This check applies only on internal transfer same currency. For currency exchange, the reconciliation always goes.
D- Consequences of the changes
4- Before booking an internal transfer
Always refresh the register before booking new internal transfer manually. Good coordination within the team helps also to know who is usually/always booking the initial entry. The following scenarios are for inspiration. Each Country Program /Office could define what is more suitable. E.g.:
Cashier/FinAssist is in charge of booking the transfer received in Petty Cash from Safe. FinCo/Admin will have draft counterparts ready to post.
Cheque entries are booked first, as the cheque needs to be issued for cash withdrawal using cheque. Counterpart in safe will be in draft.
5- Modification after temp posting initial entry
Both initial and counterpart entries could be edited and deleted. UniField does not send update to the other entry. Any modification applied both sides after temp posting the initial entry should be communicated to the other register owner and applied on the other entry.
Major modifications: If the modification is on Third-Party or account code, it is better to delete both initial and counterpart and start from new. To do so, click on the link to access the counterpart entry and delete it with the red x before deleting the initial entry. Then book the correct entry.
Modification on Third-Party or account code meant that the counterpart register is not correct. As consequence, the counterpart entry created could not be used as it is not possible to move it to other register.
Tips: Review those fields before “temp” posting an initial transfer entry – especially the third party (frequent mistake).
Minor Modifications: If the modifications are on dates, description, reference, amount, both entries could just be edited. Those modifications need to be communicated to the owner of the counterpart register and applied on the counterpart entry. It is possible to click on the link and access the counterpart entry in order to check if the modifications have been applied.
If one of the entries is deleted, the link is broken, and the remaining entry could be reconciled with other entries without counterpart.
6- Manual reconciliation
After hard posting of all register entries, all transfers with counterpart will be automatically reconciled. The list of transfers non-reconciled should be reviewed among other manually reconcilable entries as per procedures. Those transfers are:
To/from other instances
Within the same instance but the counterpart has been deleted.
7- How to book an entry without counterpart
If a correction transfer without counterpart is needed (e.g. To replace a counterpart which has been deleted), book a transfer entry in the appropriate register. Then using the link , delete the counterpart immediately after temp post. The link is broken. The entry is reconcilable with other entries without counterpart.
Some examples:
Internal transfer the same currency
When booking transaction as internal transfer with the same currency the counterpart transaction will create automatically based on 3rd party “Journal” that used in the transaction based on below specifications:
Booked transaction must be temp posted to create counterpart transaction.
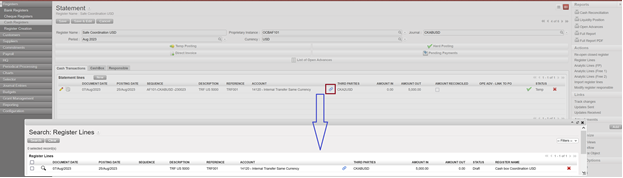
Once the internal transfer temp posted it will create link named as “Linked to a counterpart line” between columns “Account” and “THIRD PARTIES” as below:
By click on the link it will open popup “Search: Register Lines” show the draft counterpart entry with popup:
In our example the counterpart with CKA2USD, so check in CKA2USD, the draft entry is available as draft:
We need to consider the following:
If original entry created with wrong “Document date” the correction should be done manually at both sides.
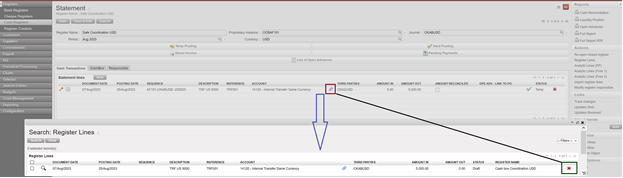
In case 3rd party of journal that used is wrong so is possible to click on the link of the original entry and delete through X, click on Save, when checking the counterpart entry is deleted.
Internal Transfer with Currency Exchange
When booking transaction as internal transfer with currency exchange the counterpart transaction will create automatically based on 3rd party “Journal” that used in the transaction based on below specifications:
Booked transaction must be temp posted to create counterpart transaction.
Once the internal transfer temp posted it will create link named as “Linked to a counterpart line” between columns “Account” and “THIRD PARTIES”
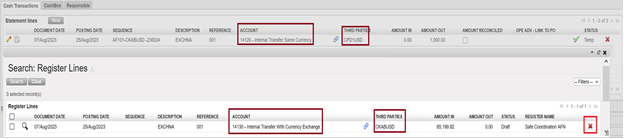
By click on the link it will open popup “Search: Register Lines” show the draft counterpart entry with popup showing amount booked in the equivalent amount:
The same like transfer with the same currency consider the following:
If original entry created with wrong “Document date” the correction should be done manually at both sides.
In case 3rd party of journal that used is wrong so is possible to click on the link of the original entry and delete through X, click on Save, when checking the counterpart entry is deleted.
For both “Internal transfer with the same currency” and “Internal transfer with exchange” if the account changed is going automatically to change 3rd party of journal, so for the counterpart entry it should be deleted through X:
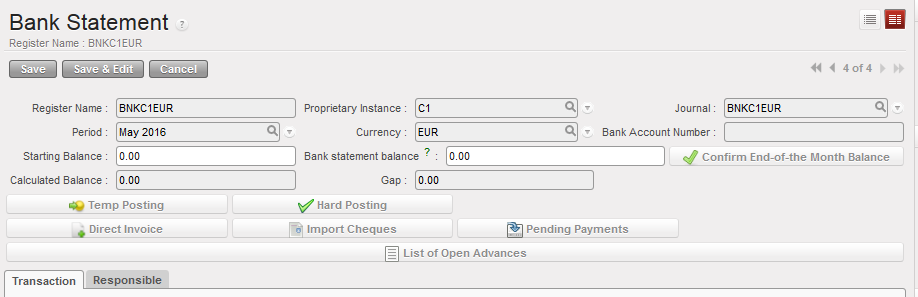
Bank Registers are used to import all cheque register payments from the cheque register and to record bank payments which do not involve cheques. For example transfers or bank fees entries can be manually added directly into the bank register.
Two (2) tabs are located in the middle of the Bank Register the form. They are called the {Transaction} and the {Responsible}. The {Responsible} tab reflects the list of authorized users to access the register. The {Transaction} tab is used to record entries in this register.
Many screens in the bank register are similar to the cash and cheque register. However, some information is specific to the bank register.
Header fields of Register form
Title of field
Entry protocol
Source for Information
Register Name
System default
Journal from which it was created
Proprietary Instance
System default
UniField instance or database
Journal
System default
Journal from which it was created
Period
System default
Defaults to current period; can be changed in Draft but fixed after register is opened
Currency
System default
Currency for which the journal was created
Starting Balance
Manual entry only on first creation; system default thereafter
Bank closing balance from previous period
Bank statement balance
Manual entry
Balance from bank statement at the end of the month; entered as part of bank reconciliation and month end closure
Calculated balance
System generated
Starting balance – sum of bank entries
Gap
System generated
Bank register balance – Calculated balance
Button
Description
Automatically retrieves unreconciled cheques
This wizard shows all open advances given to employees. The advances can be directly returned through selecting the correct entry through this list.
This wizard shows a list of all payables that can be imported in registers (payables that are of same currency than the register). The payables can be imported into the register individually or by group (same third party).
Finally the lower half of the form shows the following fields:
Title of field
Entry protocol
Opening Date
Automatic input. System default to the date the register was opened
Closed On
Automatic input. System default to the date the register was closed
State
System generated; Draft, Open or Closed
System recalculate all balances
WARNING! This button {Close Register} should only be used when closing the register at the end of the period. It does not delete the register. Once closed, only a user with an Administrator profile can re-open the register and the related cash count.
BANK REGISTER REPORTS
The Reports menu on the right side bar contains reports that can be run in Bank Registers:
For further information on bank register reports, see UniFieldChapter 5 – Searching, Correcting and Closing
We use cookies to ensure that we give you the best experience on our website. If you continue to use this site we will assume that you are happy with it.



 button located on the entry line, but you can also temp post entries by grouping several entries. The below task description explains how to temp post a group of draft entries.Go to: Accounting/Registers
 button to retrieve draft entries booked in your register. A list of {Draft} entries appears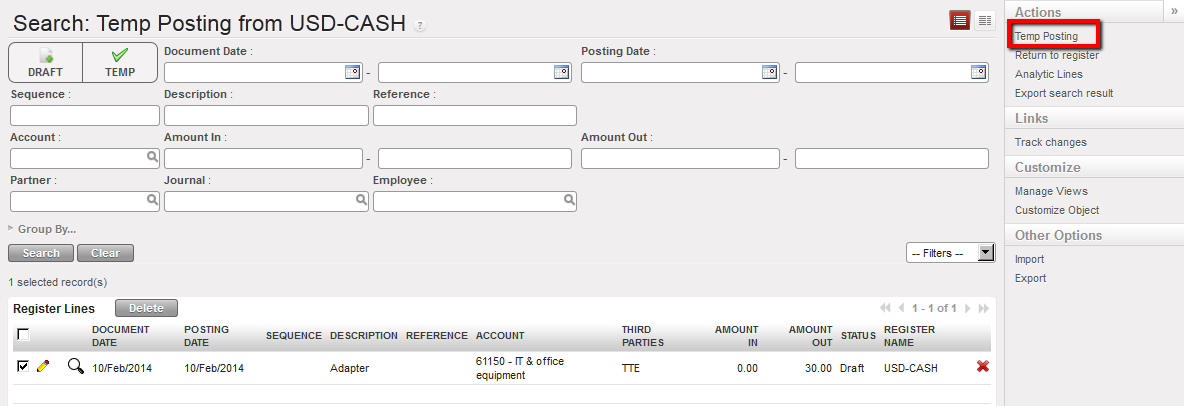

 Temp post all the entries with the need to extend the list
 Temp-posting confirmation
 Temp posted register entries
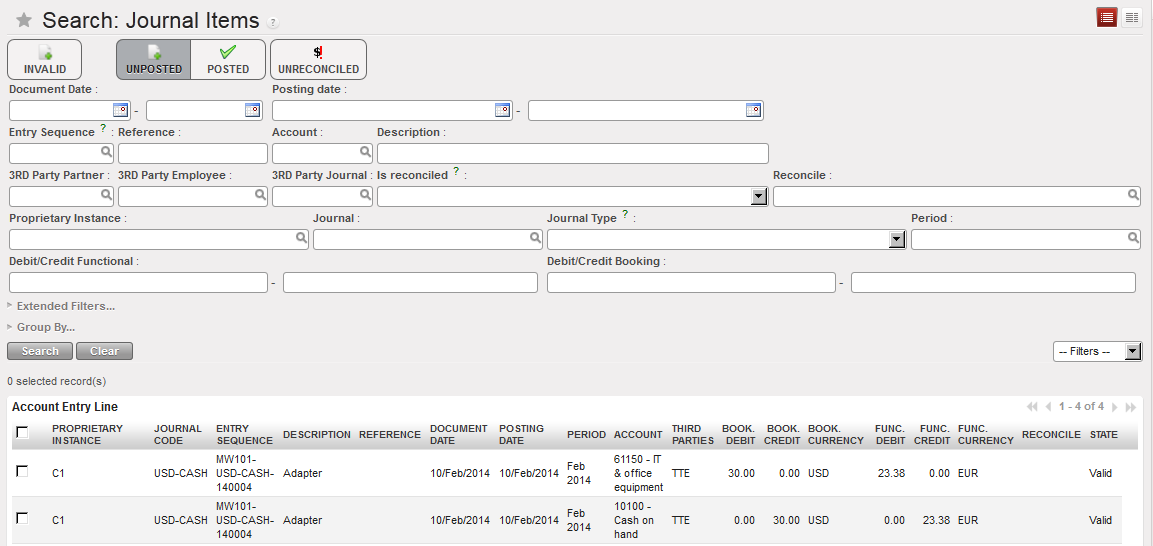 {Journal item} view displayed unposted journal items corresponding to the register line which was temp posted
 button located on the entry line, but you can also hard post entries by grouping several entries. The below task description explains how to hard post a group of temp posted entries.
 button to retrieve temp and draft entries booked in your register. A list of {Temp} and {Draft} entries appears
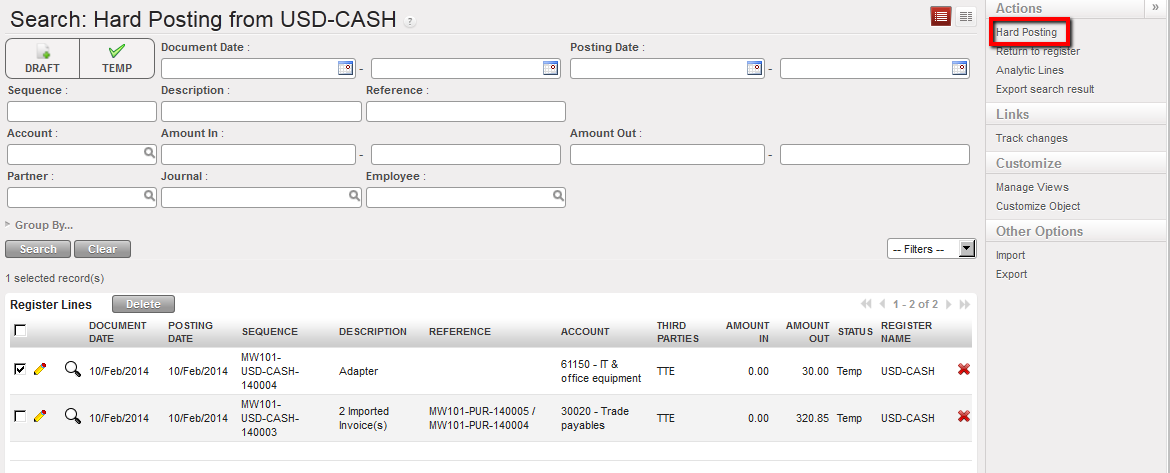 {Hard-posting entries search} wizard
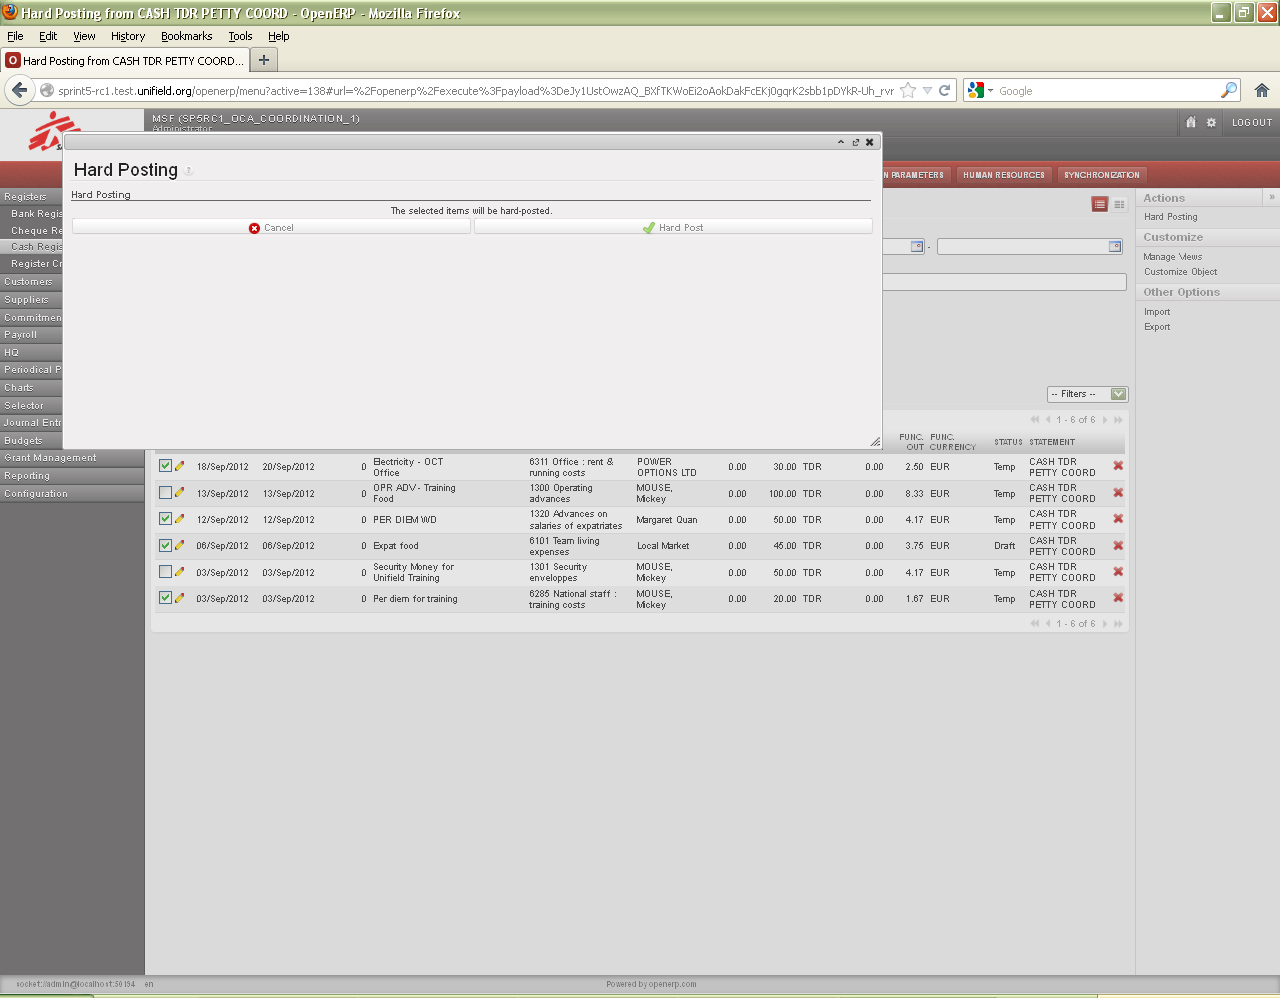 Hard-posting confirmation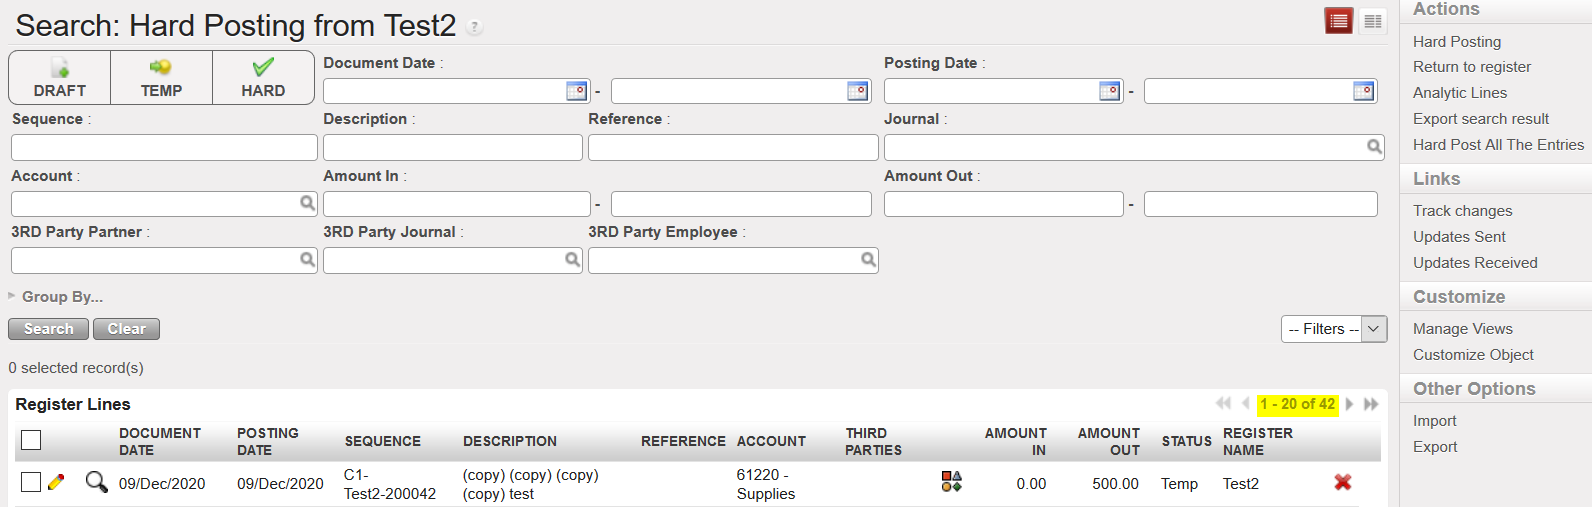
 Hard Post all the Entries
 Hard posted register entries
 Posted journal items corresponding to the register line which was hard posted. A/P was reconciled
 Bank register and {Direct Invoice} button
 The invoice is draft and has a reference (number)

 Hard posted direct invoice entry
 Posted Journal entries when a Direct Invoice register line is hard-posted. The A/P account is reconciled.



 to change the {Document Date} and/or the {Posting Date} to the actual date when the cheque was cashed in.
 Register line reflecting the imported cheque
 to open the register form.
 Cash Register Statement Line Creation
 Cheque number input, mandatory field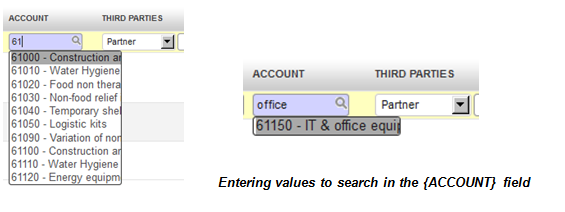
 to open up the {Search Chart of Accounts} wizard. The accounts will appear in numerical order. To select only expense accounts type 6 into the filter as showed below.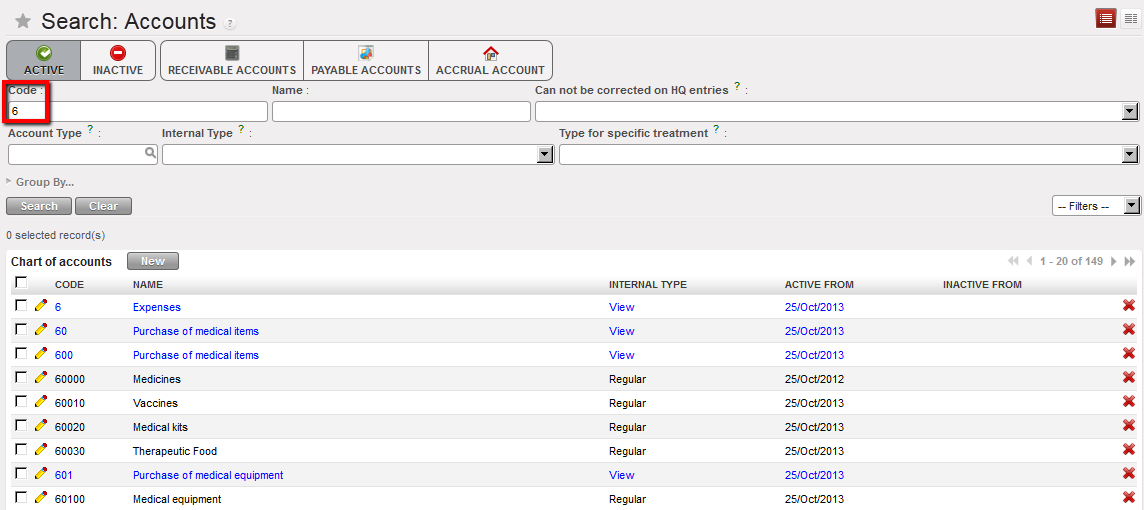
 {Search Partners} wizard
 or pressing the enter button.
 button will appear and the entry will be in red. A red entry is an indication that the analytic distribution has not been assigned or has not been assigned properly.
 button to open the {Analytic distribution} wizard.
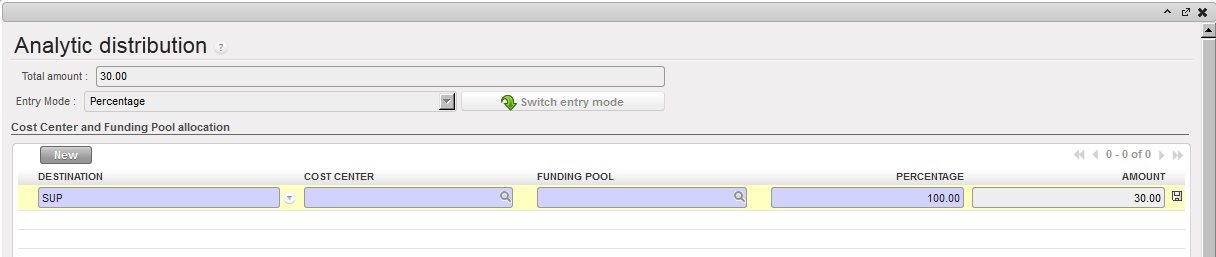 {Analytic distribution} wizard
 to retrieve it.
 to save the allocation line.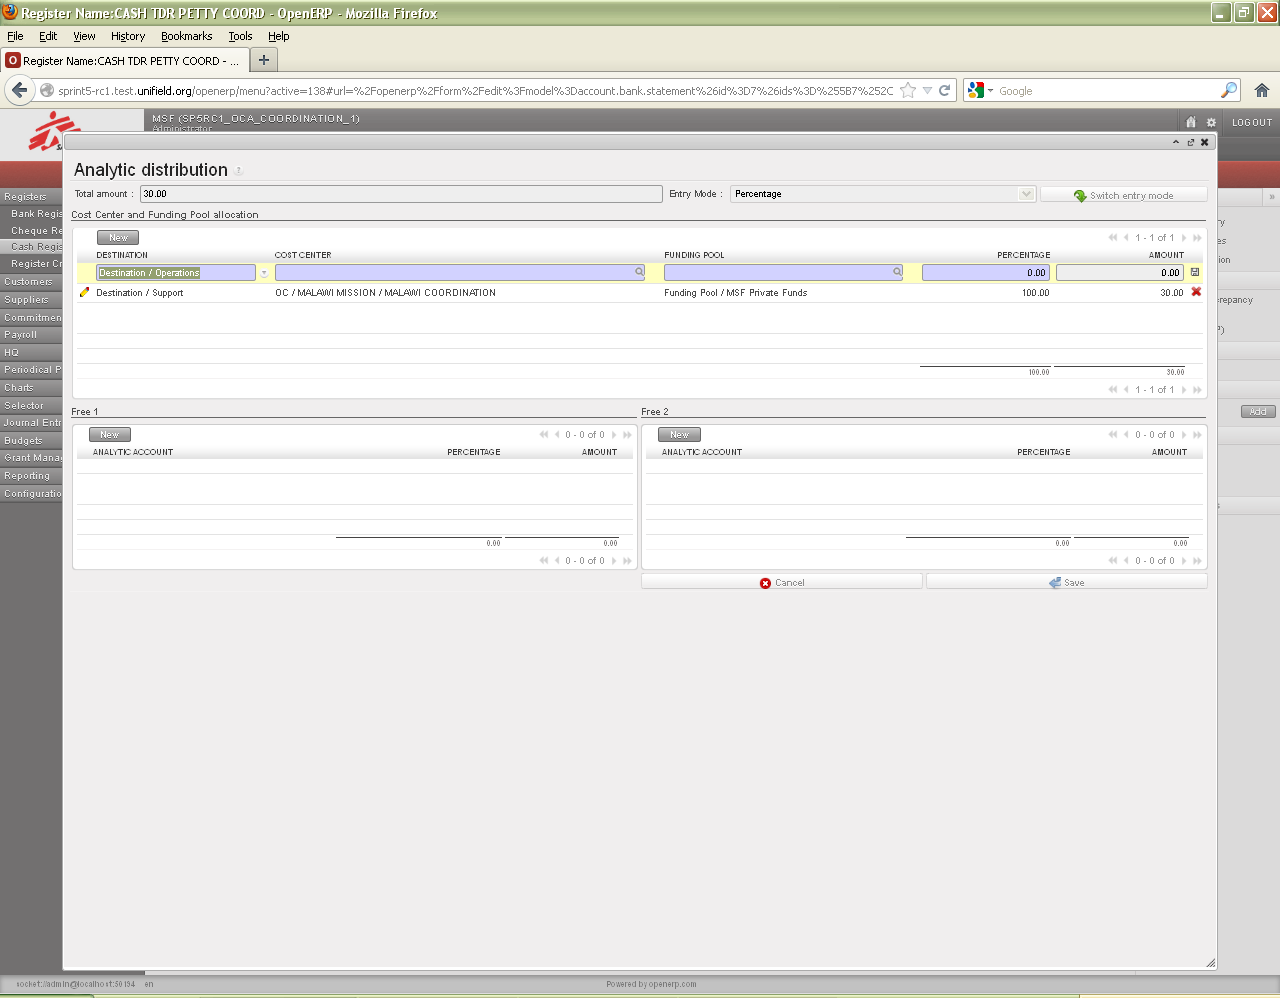
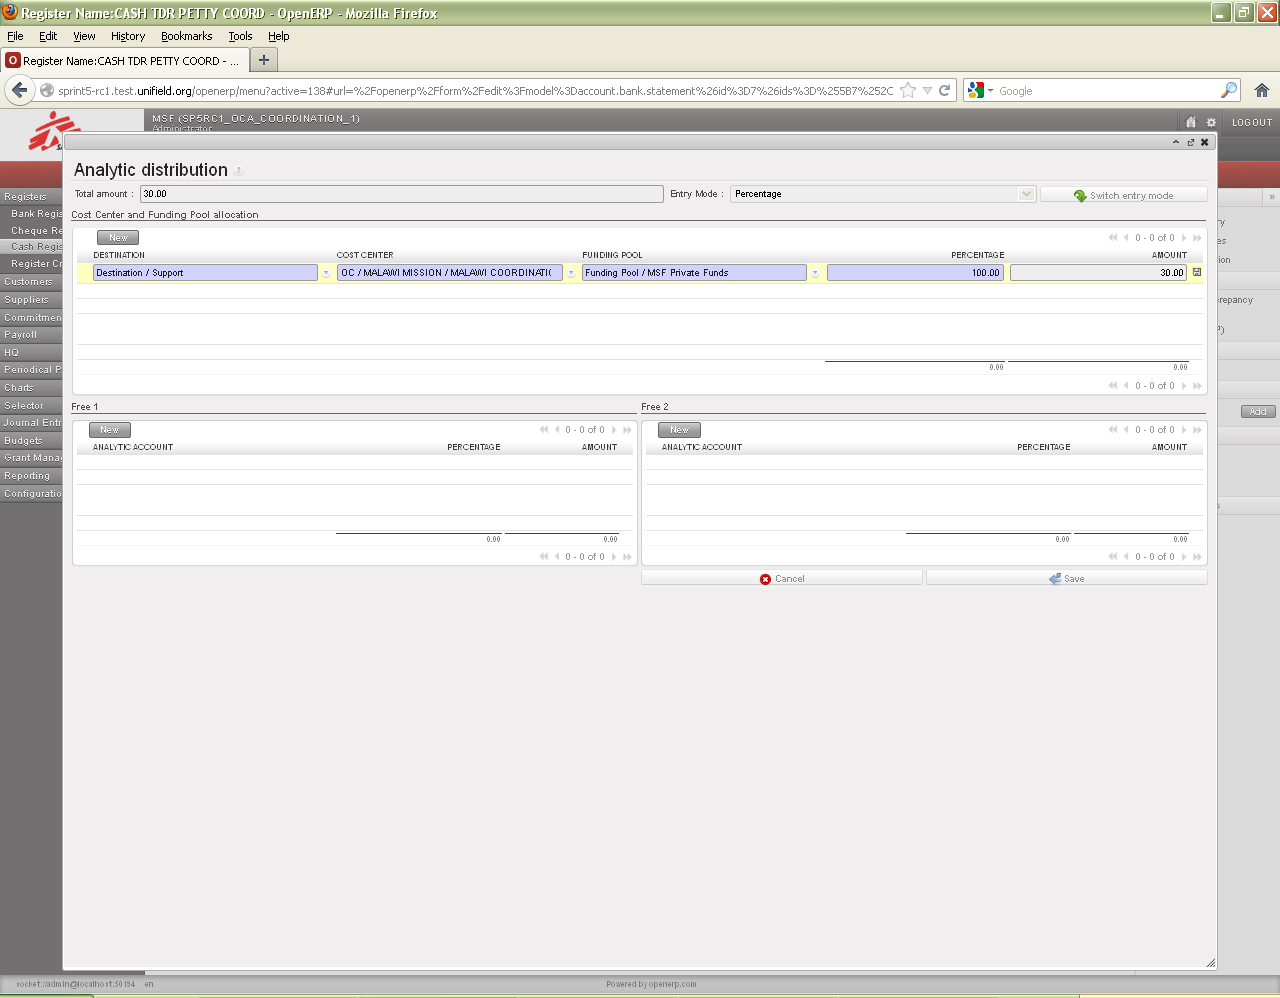
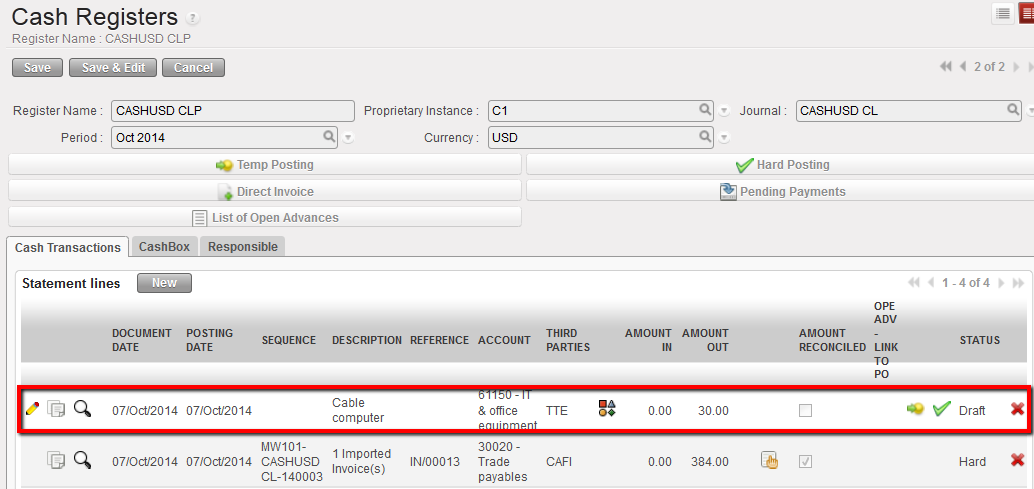 Direct entry created in Draft in a cash register. No acccounting moves.
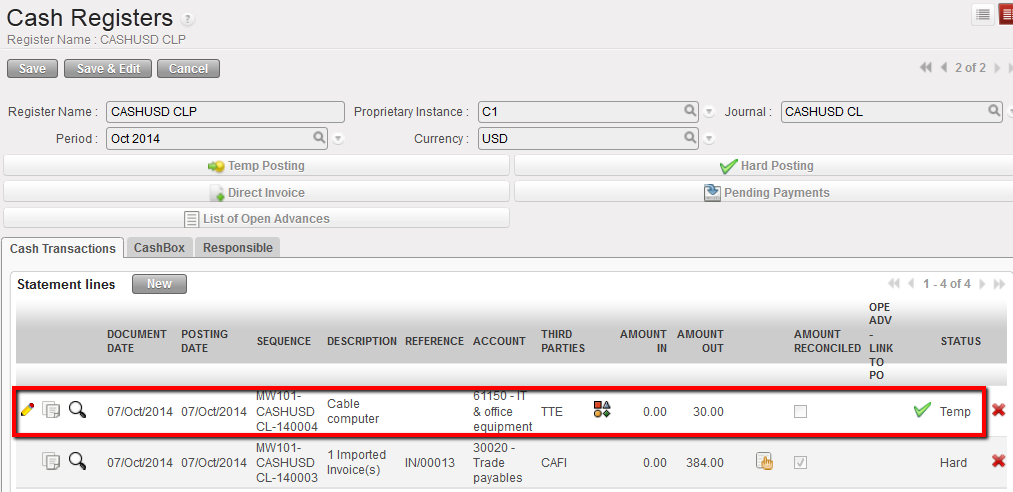 Temp Direct entry in the cash register
 Expense to cash in the Liquidity journal
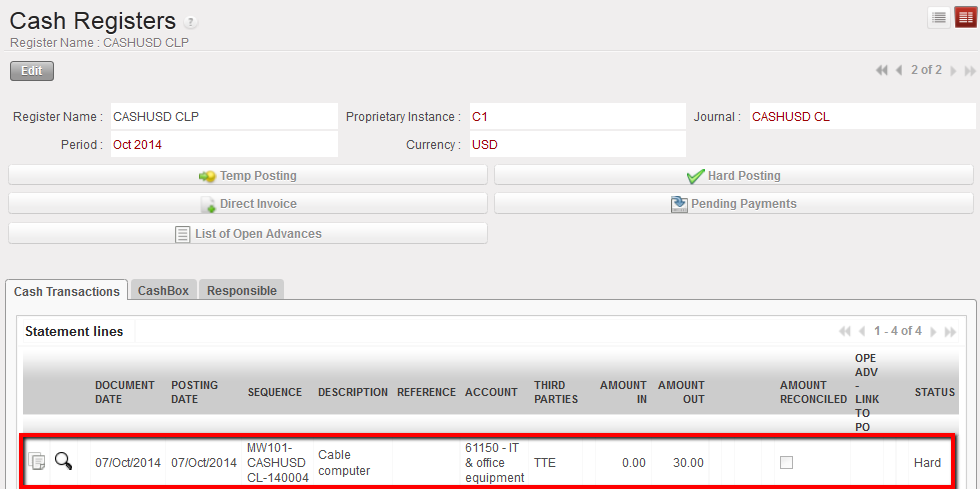 Hard direct entry in the cash register
 Corresponding journal entries booked in the purchase journal