Finance User Manual ENG -> 3. Payments -> 3.2 Purchase to Payment Process: Supply&Finance Links -> LUFI-30201 Purchase Order: Step One in the Purchase Process
LUFI-30201 Purchase Order: Step One in the Purchase Process
LU Introduction
A Purchase Order is a procurement document created, validated and confirmed by supply which lists the requirements of products requested to a given supplier.
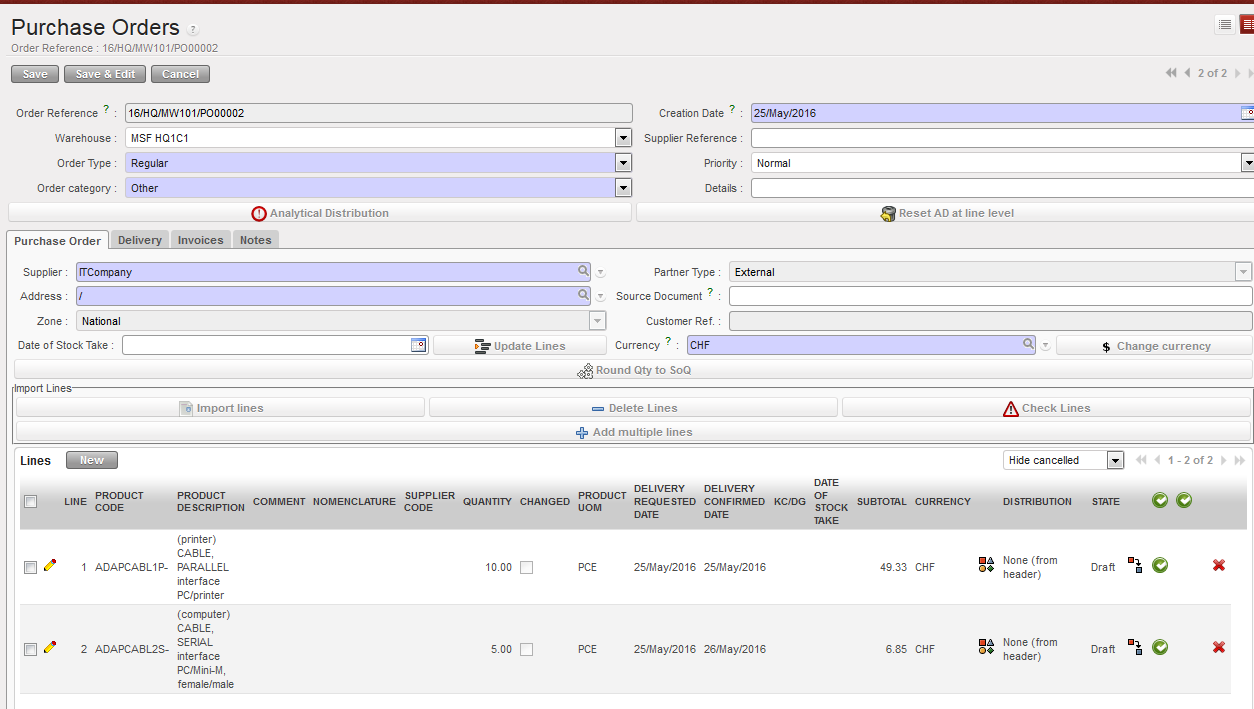 Purchase Order type regular with external partner
Product
Product data is part of the master data loaded at installation and is shared by all OCs. Each product has a category assigned by default. Each OC has the capability to add new products and assign the appropriate category. The expense code is picked by default based on the product category of the product selected. (Further exPlanation on Products can be found in Chapter 2 Configurations).
The expense account code is not visible on the PO. Supply cannot change the account code. Finance can’t modify the account code on the related commitment voucher but can modify and confirm it when validating the supplier invoice.
Analytic Distribution
The Analytic Distribution (AD) on the PO is fill in by the supply department and can be assigned and split per order line by clicking or globally using the button. In supply, the analytic distribution input only consists of destination and cost center. The AD is also displayed in the PO allocation report. If necessary, finance can change any of this information on the commitment voucher and supplier invoice.

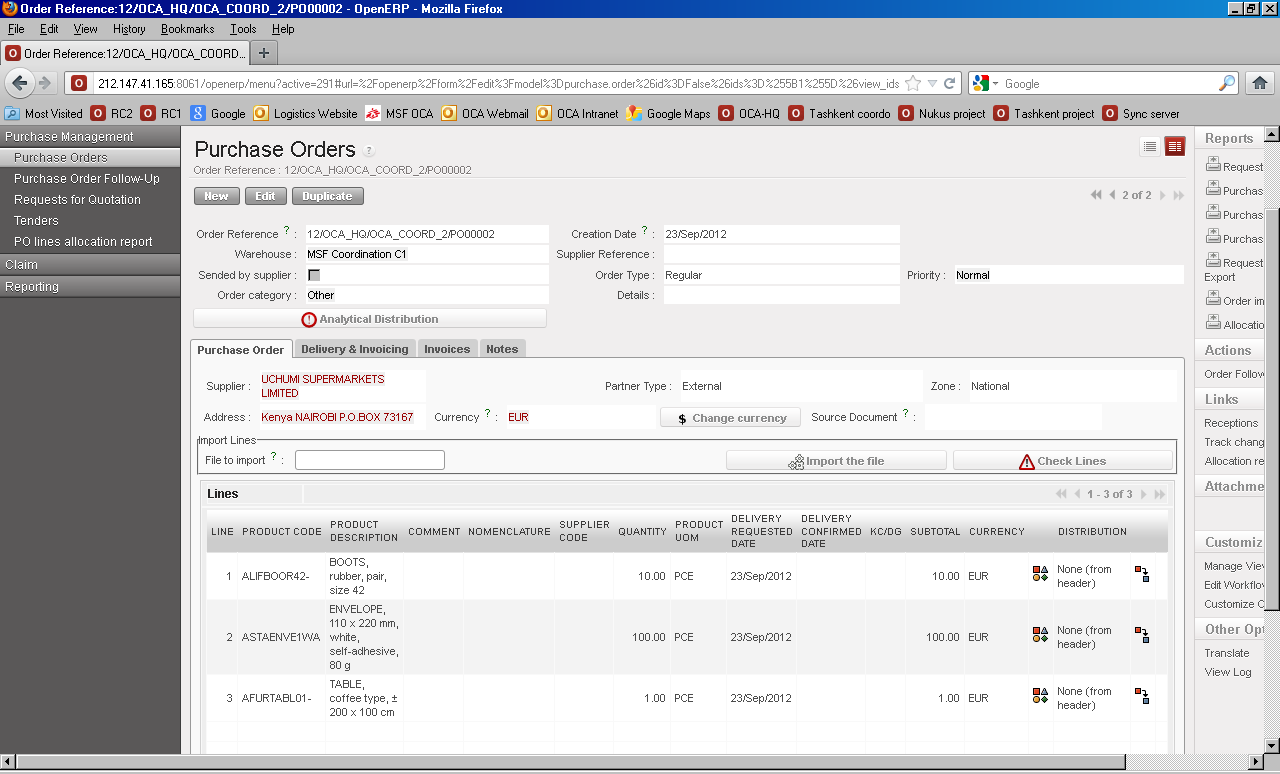 Analytic distribution wizard
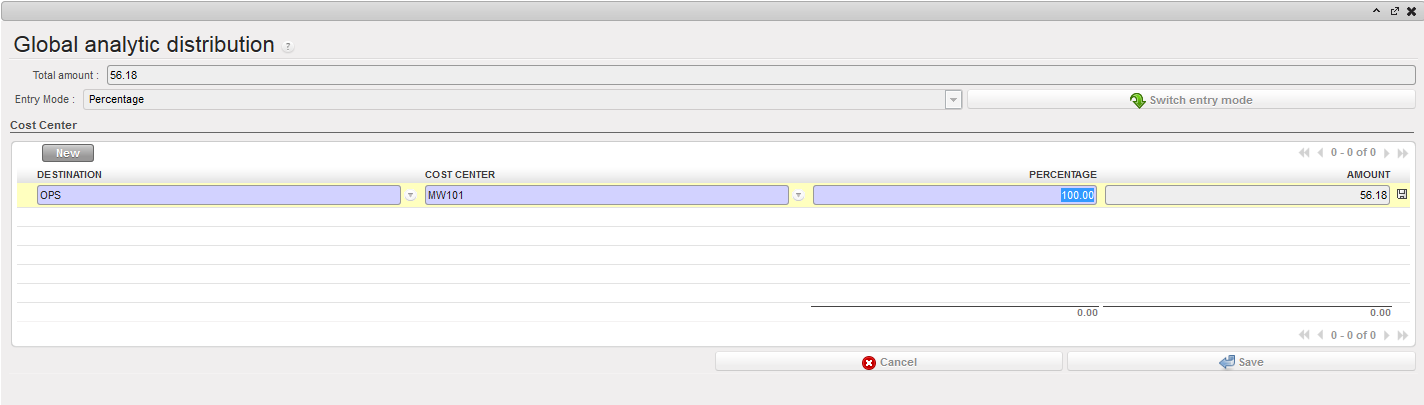
If AD is allocated on line level, the default destination is set up according to the expense account code in the chart of accounts. In the global AD, destination needs to be inserted manually.
The cost center field is a manual input. There is no funding pool assigned on the PO level.
Taxes
There is a tax part in the PO (the same part as we have already in the Supplier invoice).
Go to PURCHASES > Purchase Management > Purchase Orders:
- Click Edit “yellow pen” in any PO
- Click on tab “invoices”
- There is a box added in the bottom named “Taxes”
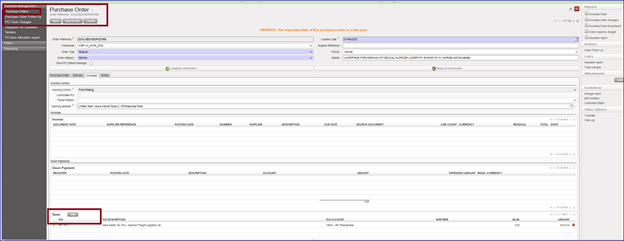
To consider the points below:
- The box “Taxes” is available for the external PO only.
- If relevant, there is a new button on PO footer to remove the taxes at line level.
- Adding a tax line or removing it, will affect in the total amount of PO.
- SI Tax corner is populated from the PO Tax box.
Validating the PO
The PO is in Draft state until the Logistics user clicks “Validate” either on an individual PO line or at header level. The different PO lines can be validated at different points of time.
Following specific OC procedures, supply has the option to print out the PO in order to get the necessary approvals to comply with the authorization table.
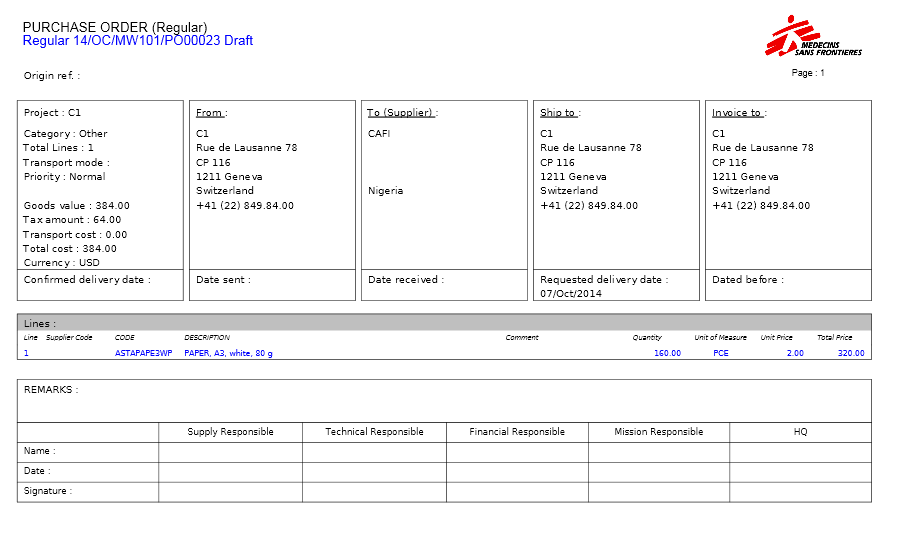 PO printed out for approval of a purchase of paper
Confirming the PO
The PO lines can be changed to {confirmed} after all necessary approvals for the PO have been received and after the delivery dates are confirmed with the supplier. Different PO lines can be confirmed at different times – each line can be assigned a different “Delivery Confirmed Date”. When some of the lines are confirmed while others are still in draft, the PO status remains in {draft-p}. The status will change to {Confirmed} when all lines within the same PO have been confirmed. Confirming an individual PO line or the whole PO results in the following actions in UniField:
- A new Commitment Voucher is created or an existing one is updated
- Purchase order line is confirmed.
- Reception is ready to process.
How to Check Analytical Allocation on a PO
Finance users with the appropriate user rights can check if the cost center and destination accounts assigned to a PO are correct. Check your OC’s procedures.
Go to: Purchase/Purchase Management/Purchase Orders
- Select a PO, open the Action menu.
 {Allocation report} functionality
2. Select “Allocation report”
A PDF report will display
 PO lines allocation report for a purchase order
Purchase Order Types
Order type on POs
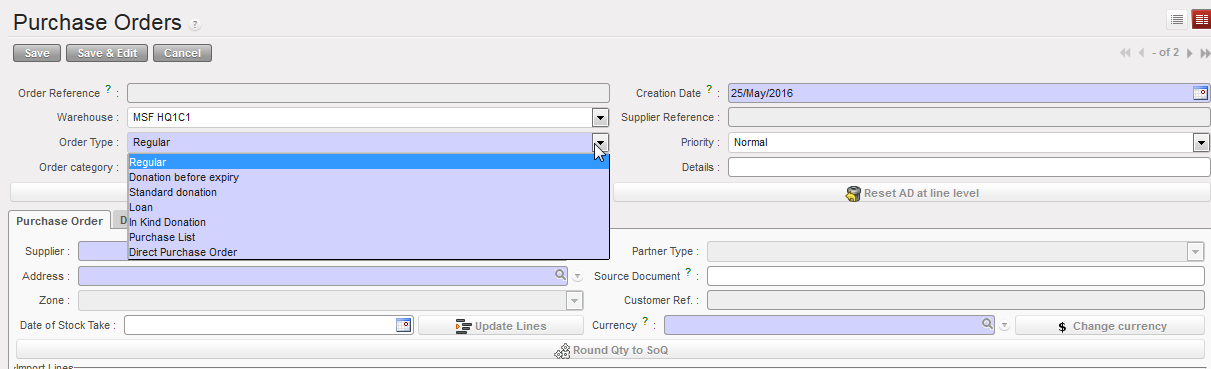 Types of Purchase Orders:
Regular Purchase Order: General PO which must be attributed to a specific supplier, which can be internal, intersection, intermission or external.
- External partners: PO line approval triggers a Commitment Voucher in the budget corresponding to the cost centers selected in the analytic distribution. When goods are received and the incoming shipment validated, a draft invoice is created; when it is validated, the commitment voucher is updated or set to done and the corresponding expenses are recognised and reflected in the financial and analytical journals.
- Internal partner: At project level a Regular PO is created on the project’s cost center. The partner type is {Internal}. When validation and synchronization are done at project and coordination level, the PO is received as a Field Order (FO) in the coordination instance. An incoming shipment is ready to be processed at project level if the delivery is programmed to happen there. No commitment voucher is created at the project instance. Here we have 2 possibilities:
- Coordination sources the need externally:
- Another PO is created to an external supplier (automatically linked to the FO) and the analytical distribution is allocated to the project.
- Once approved, the engagement is reflected in the project’s budget.
- When the delivery is confirmed either in the project or coordination instance, coordination settles the invoice and expenses the goods directly to the project (financial move at coordination level but the coordination budget is not impacted, as the expenses are registered on project cost centers)
- The validation of the reception of goods closes the initial PO at project level (no financial move at project level but the project budget is impacted, as the corresponding expenses are reflected at project level)
- Coordination uses existing stocks:
In this case there is no cost reallocation unless user creates a manual entry to reallocate goods on the cost centre corresponding to their consumption. This operation has to be done according to your OC policy and should only concern material amounts.
- Inter-section: An inter-section transaction is performed in both instances in EUR. PO approval from one coordination to another coordination from a different section does not trigger a commitment voucher. A financial document called {Stock transfer voucher} will be created at the delivery instance, comparable to a customer invoice in a standard system.
- Inter–mission: An intermission transaction is performed in both instances usually in functional currency. A commitment voucher is created in the delivery instance making the purchase to an external supplier (if not sourced from stock) and cost can be either allocated to a specific cost center {inter-mission} or to the cost center receiving the goods. A financial document called {Inter-mission voucher OUT} is created at the delivery instance and {Inter-mission voucher IN} at the recipient instance.
Purchase List is a Regular purchase order not attributed to a specific supplier but to a default {Local Market} partner. The {Local Market} supplier can be changed to a different vendor. It is normally used for products bought at the local market with an operational advance. No commitment voucher is created because purchase lead time is short and amounts are not significant vs. total budget
Direct Purchase Orders (DPO) is used when the order is delivered to a different instance than the requesting instance: Project places and order to Coordination (PO internal partner) and Coordination places an order to an external supplier requesting to deliver the goods directly to the project (DPO). Financial impacts are slightly different from regular orders. The trigger for the commitment voucher and draft invoice creation is the DPO (lines) confirmation at Coordination level as the invoice is be paid from the ordering instance (Coordination) and the delivery done at project level.
Donation before Expiry is usually an internal transaction. This donation type is a “forced” Field Order (FO) of a UniField instance to another partner. The giving instance creates a FO type {Donation before Expiry} that automatically creates a “Donation before expiry” PO in the receiving instance. The PO is closed once goods are received. There are no accounting movements (no commitment voucher or invoice created). The goods remain expensed in the donating instance. In principle a “gift certificate” needs to be issued by the giving instance. The recipient instance registers this transaction as a donation before expiry.
Standard donation is a PO usually used for an internal or inter-section transaction. UniField behaviour is identical to a Donation before expiry. There are no accounting movements.
In-Kind Donations (only received) are for free-of-charge goods provided by donors (i.e. mosquito nets from Unicef). The creation of an {in-kind donation} PO triggers the creation of an incoming shipment ready for approval. Finance has to check if supply has selected a partner linked to an account type 81 {Contribution in kind} in the Donation Payable Account, either for medical or non-medical goods. To validate the reception, the supply users should attach a donation certificate from the donor (check your OC’s procedure). The validation of the reception triggers the creation of a financial document called {Draft Donation Received} accessible to financial users only in the supplier invoice sub module. Once reviewed financial users can validate it and set the document to “Open”. This action creates extra-accounting entries in the {in-kind donations} Journal and off-balance sheet accounts classes 81 and 91 (Contribution In-kind).
Cancellation of Donation Received created through supply process
- Not allowed to delete with the red X the IKD (In-kind Donations) lines as far as the IKD is from supply:
Go to Accounting > Suppliers > Donation Received
- Select any of draft IKD
- Try to delete from red X
- You will receive message “Cannot delete invoice(s) generated by a Supply workflow”
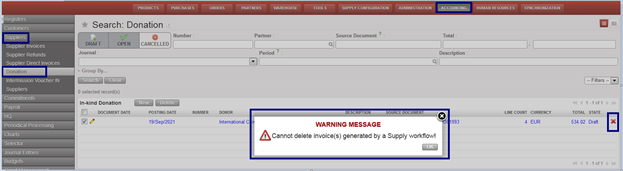
2. To cancel the IKD (In-kind Donations) through button “Cancel document”
To do:
- Select any draft the IKD (In-kind Donations) , edit from yellow pen
- Click on below tab:

- Deleted IKD (In-kind Donations) will not be removed ,will appear in grey color when click on the header button “Cancelled”
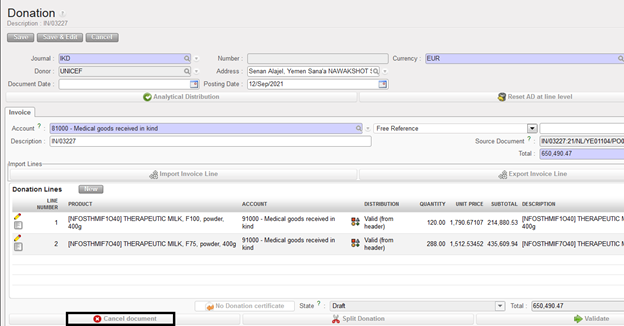

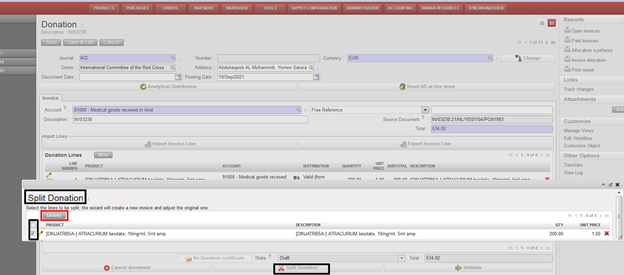
3. To split donation through button “Split Donation” as the following:
- Select any draft the IKD (In-kind Donations) , edit from yellow pen
- Click on below tab :

- It will appear new window “ Split Donation”
- Tick on IKD (In-kind Donations) should split and remove by clicking on button “Delete”, then “Confirm”
- The deleted lines of IKD will create new draft the IKD (In-kind Donations) with the same details of “Description” and “Source Document”
4. New tabs created in Donation “Export Invoice Line” and “Import Invoice Line” by exporting the lines and importing negative amounts for the correction inorder to book the correction in “IKD Journal” not “ ODX Journal”
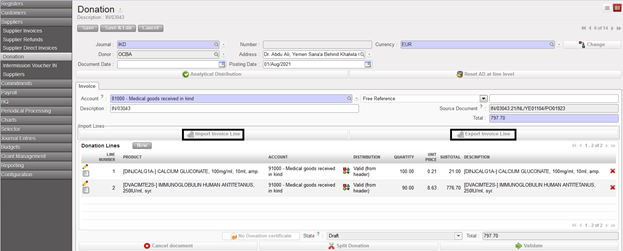
5.Possibility to change product, account, quantity, unit price and description of a donation coming from a supply flow
Users should allocate in-kind donations to the “MSF private funds” funding pool so as to exclude them from Donor reporting.
Manual Donation is only a financial document that does not have a link to the purchasing process. Manual Donations do not impact the inventory levels of products. A manual donation can be created directly in the Accounting / Suppliers / Donation Received sub module. Please note, only accounts with a Type for specific treatment: “Donation” (8 and 9 accounts) can be used. Also, only the Journals “In Kind Donation” and “OD-Extra Accounting” are selectable to record the manual donation entries.
Loan
A loan is a PO usually used for an internal partner borrowing goods from another instance. These goods are expected to be returned. At borrowing side A, an approved {Loan} PO is created and automatically triggers the creation of a PO at B side to make sure the borrowed goods will be returned at some point. There are no financial impacts as the goods are meant to be returned.