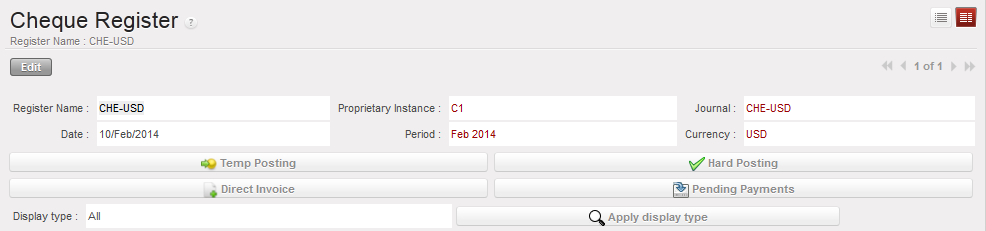
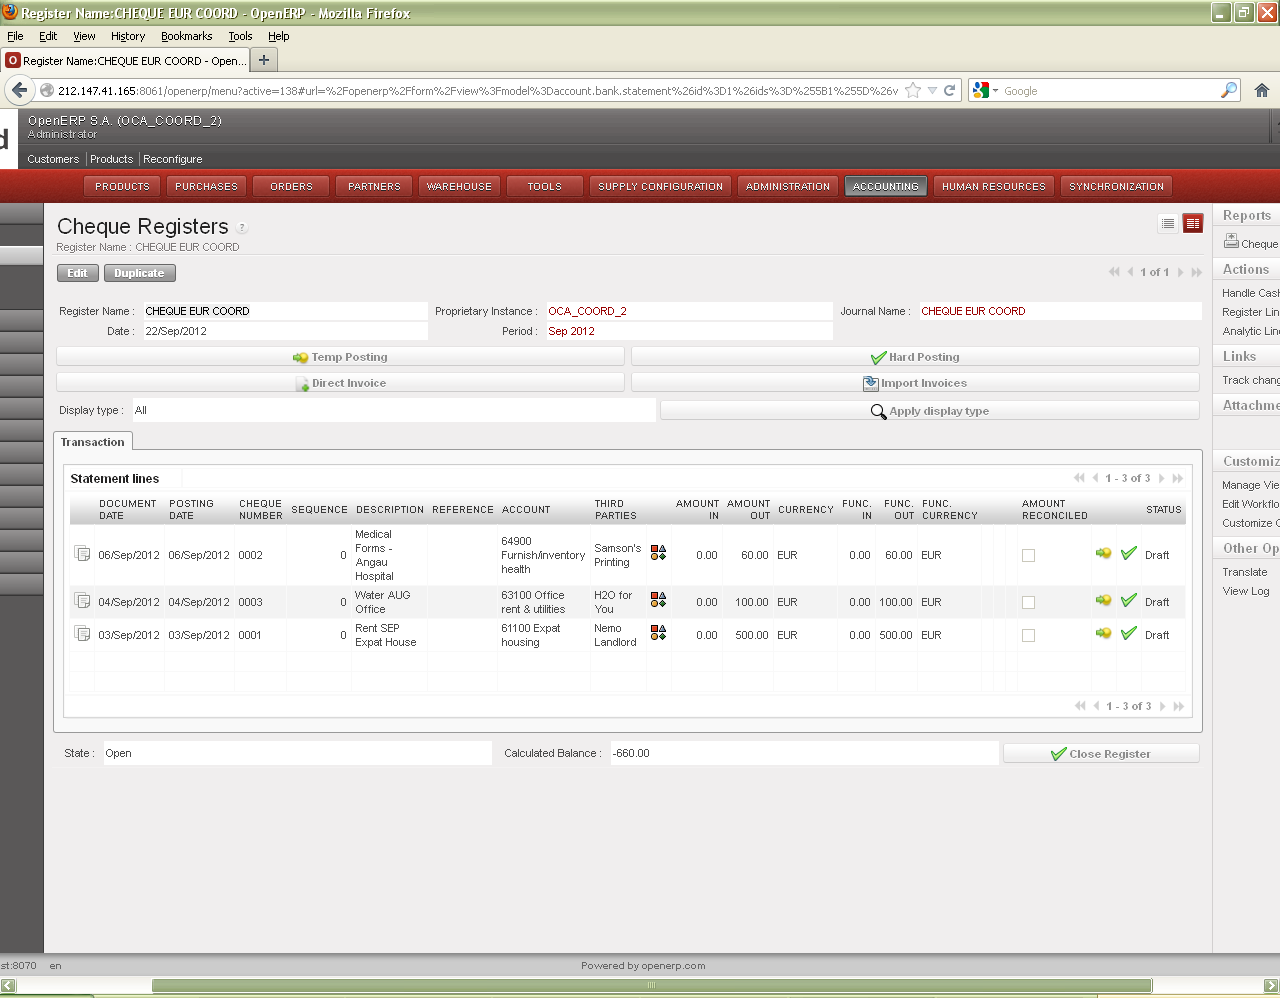
Each bank register with a physical cheque book should have a corresponding cheque register. The cheque register is used to distinguish the moment when a cheque is issued from the moment a cheque is cashed in and the money is removed / received from/to your bank account. In the system, a cheque register is tied to a bank register at time of creation.
Two (2) tabs are located on the middle of Cheque Register the form. They are called the {Transaction} and the {Responsible}. The {Responsible} tab reflects the list of authorized users to access the register. The {Transaction} tab is used to record entries in this register.
When a cheque entry is created, the cheque number of the physical cheques must be recorded otherwise it cannot be saved.
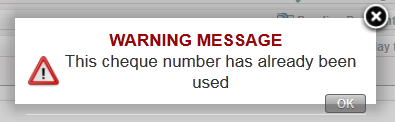
Additionally, the system performs a check on the cheque number to make sure it is not duplicated.
The user is trying to record a cheque payment using a cheque number already input. This is the warning message displayed.
When you receive the bank statement to confirm the cheque has been cashed, you import the cheque entry into the bank register. See LUFI-30206 Cheque entries imported into a bank register.
Header fields of Register form
Many screens in the cheque register are similar to the cash and bank register. However, some information is specific to the cheque register.
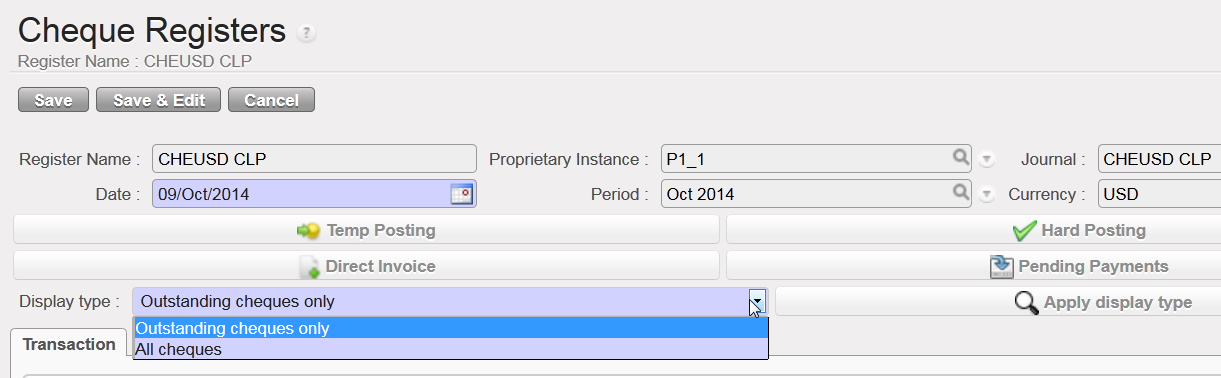
Once a cheque has been imported into the bank register, it is reconciled – in other words, it is matched with the bank register entry. A cheque being reconciled is another way of saying it has been cashed/paid from the bank account. The cheque screen allows you to view all cheques. A quicker way to identify which cheques were not reconciled is to use the field “Display Type” and select “Outstanding cheques only”. This will display cheques which were not imported AND imported cheques not hard posted yet.
Changing display in Cheque Register
Fields on lower half of Register form
Title of field
Entry protocol
State
System generated; Draft, Open or Closed
WARNING! This button {Close Register} should only be used when closing the register at the end of the period. It does not delete the register. Once closed, only a user with an Administrator profile can re-open the register and the related cash count.
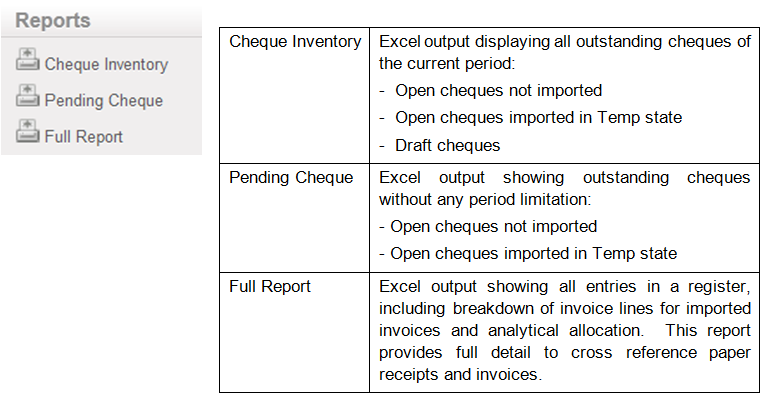
CHEQUE REGISTER REPORTS
The Reports menu on the right side bar contains reports that can be run in Cheque Registers.
For further information on these reports, see UniField Chapter5 –Searching, Correcting and Closing
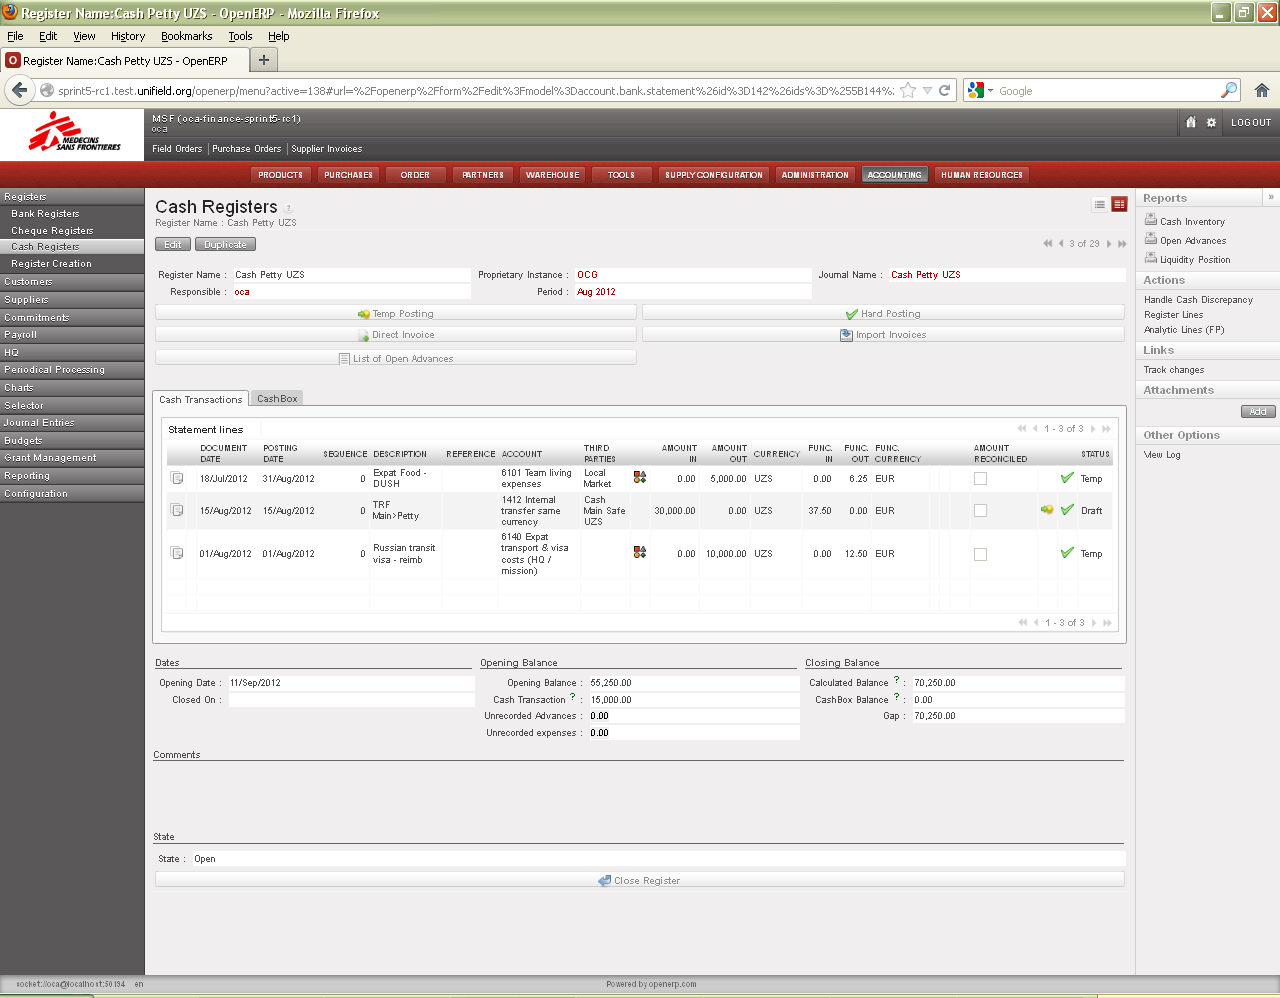
Now that you understand the concept of a register, let’s take a look at the various fields and buttons of the cash register form. In the {Cash Registers} search view, click on the pencil of the register to open the form. The header fields are displayed as follows:Header fields of a {cash register} form
Title of field
Entry protocol: cash register form
Source for Information
Register Name
System default
Journal from which it was created
Proprietary Instance
System default
UniField instance or database
Journal
System default
Journal from which it was created
Responsible
System default
User who has created the journal
Period
System default
Current month in which the journal was created
Currency
System default
Currency for which the journal was created
Button
Description
Automatically retrieves Draft or Temp-Posted Entries in a separate window to be Hard-posted
Opens a window to retrieve and import invoices (in the register’s currency) created by Supply or Finance, then automatically creates a payment in the register booked to payables/receivables and cash account
Automatically retrieves Draft Entries in a separate window to be Temp-posted
Opens a window to create a Direct Invoice for immediate payment and booking of multiple items to multiple expense codes. Direct invoices are not generated by Supply. One register entry is booked to payables/receivables and cash/expense accounts
Opens a window to list operational advances taken by the staff
Please note all of these topics will be covered in more detail in the specific sections related to their usage.
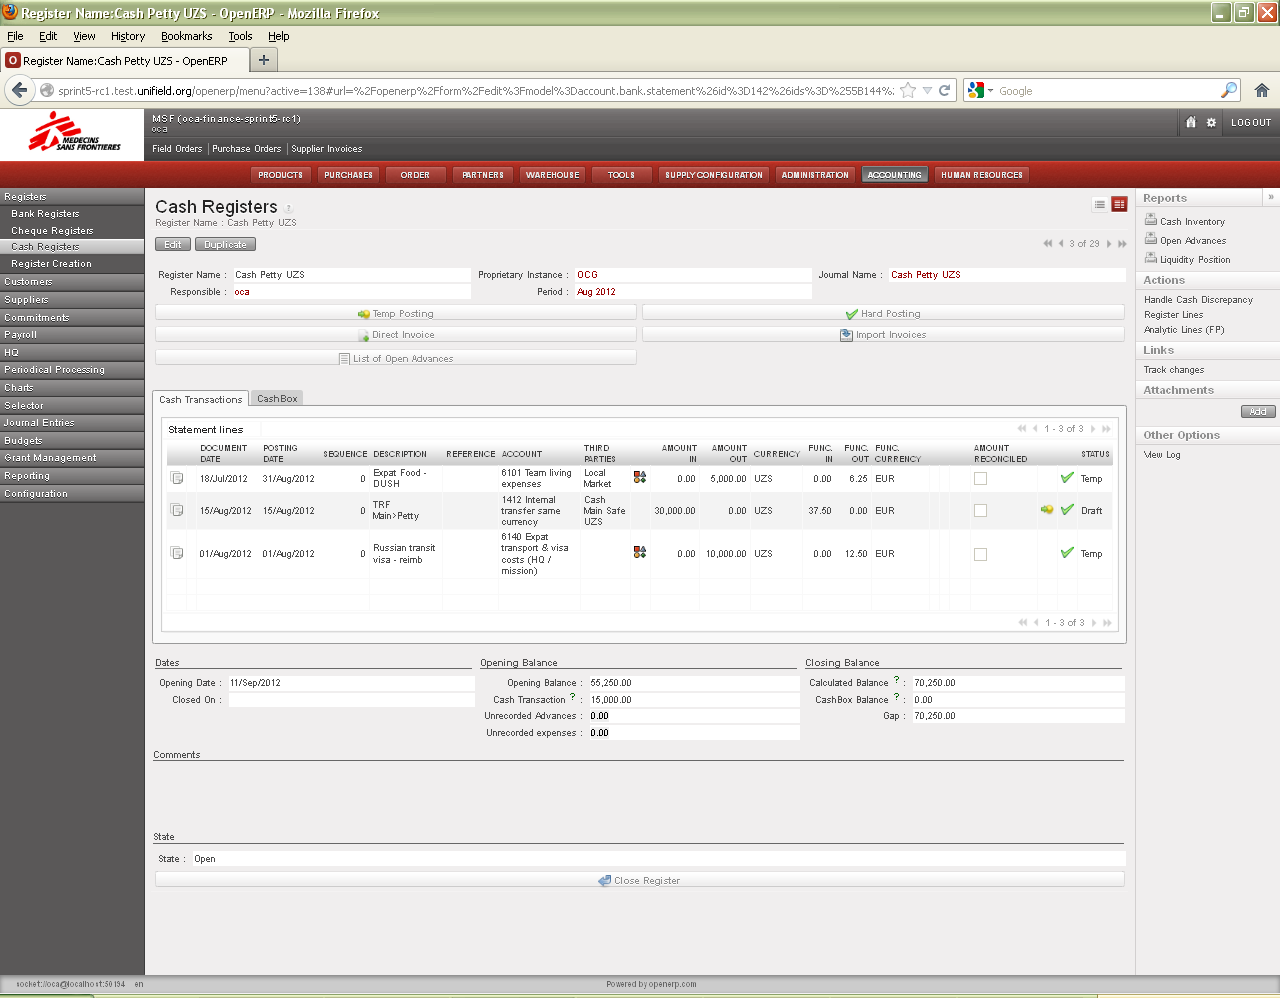
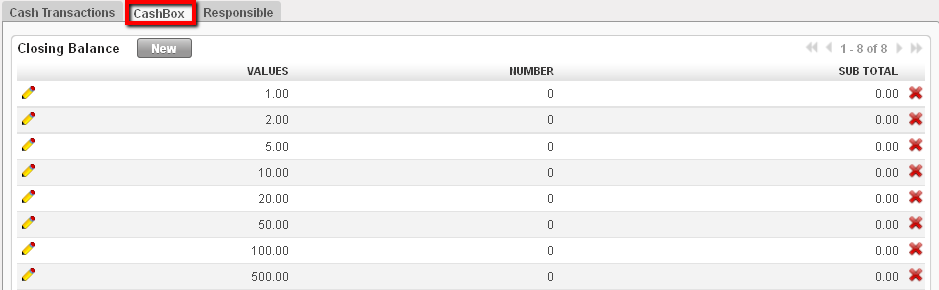
Three (3) tabs are located on the middle of the form. They are called the {Cash transactions}, the {CashBox} and the {Responsible}.
In the cash transactions, you will record manually or by importing register lines reflecting Cash In and Cash Out.
{Cash Transactions} tab
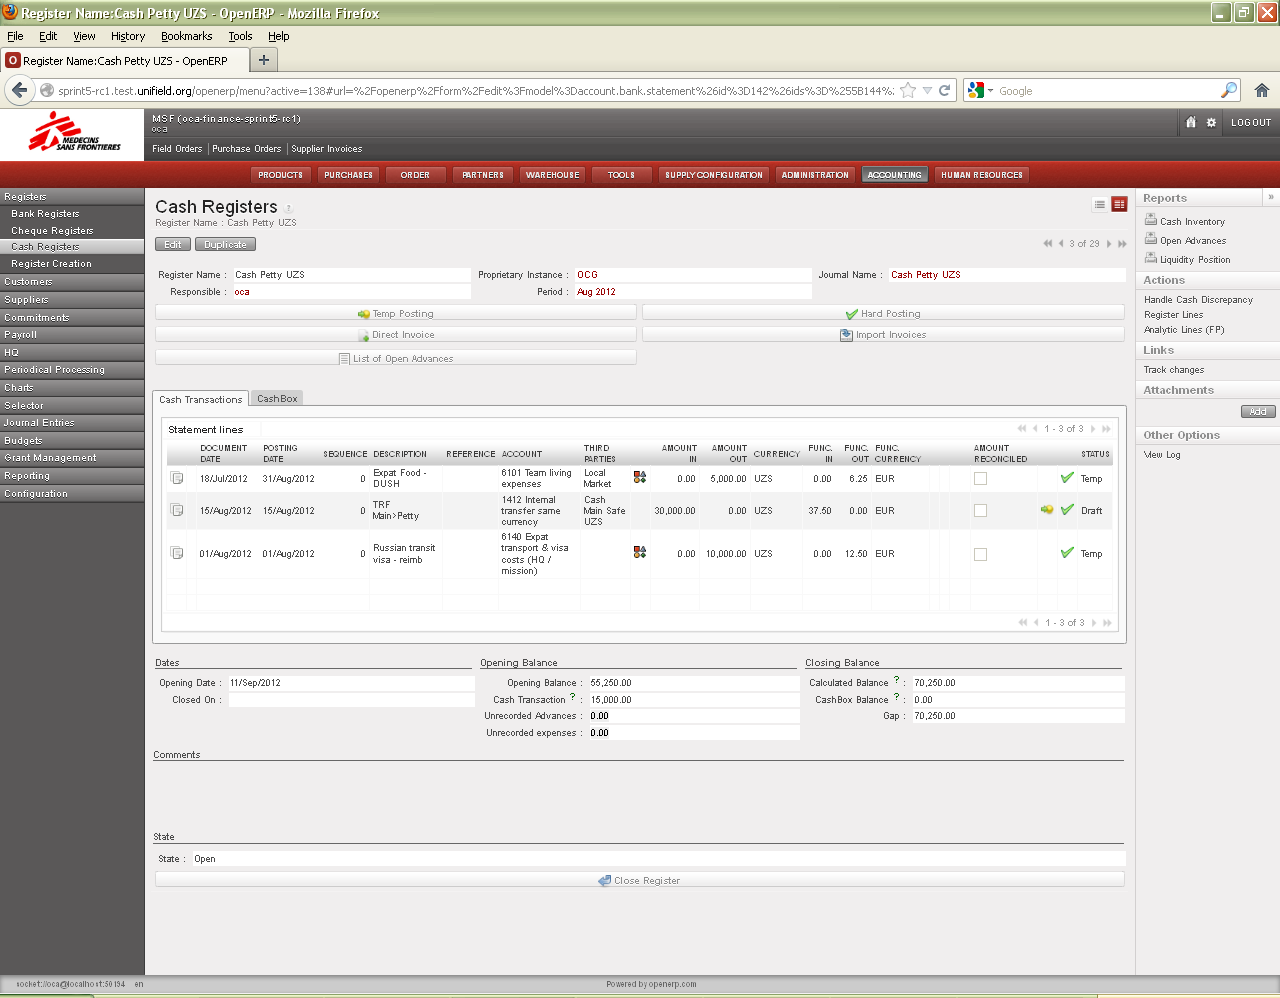
In the {CashBox} tab you will periodically carry out cash counts to confirm the cash balance in UniField is the same as the balance of your physical cash box.
{CashBox} tab
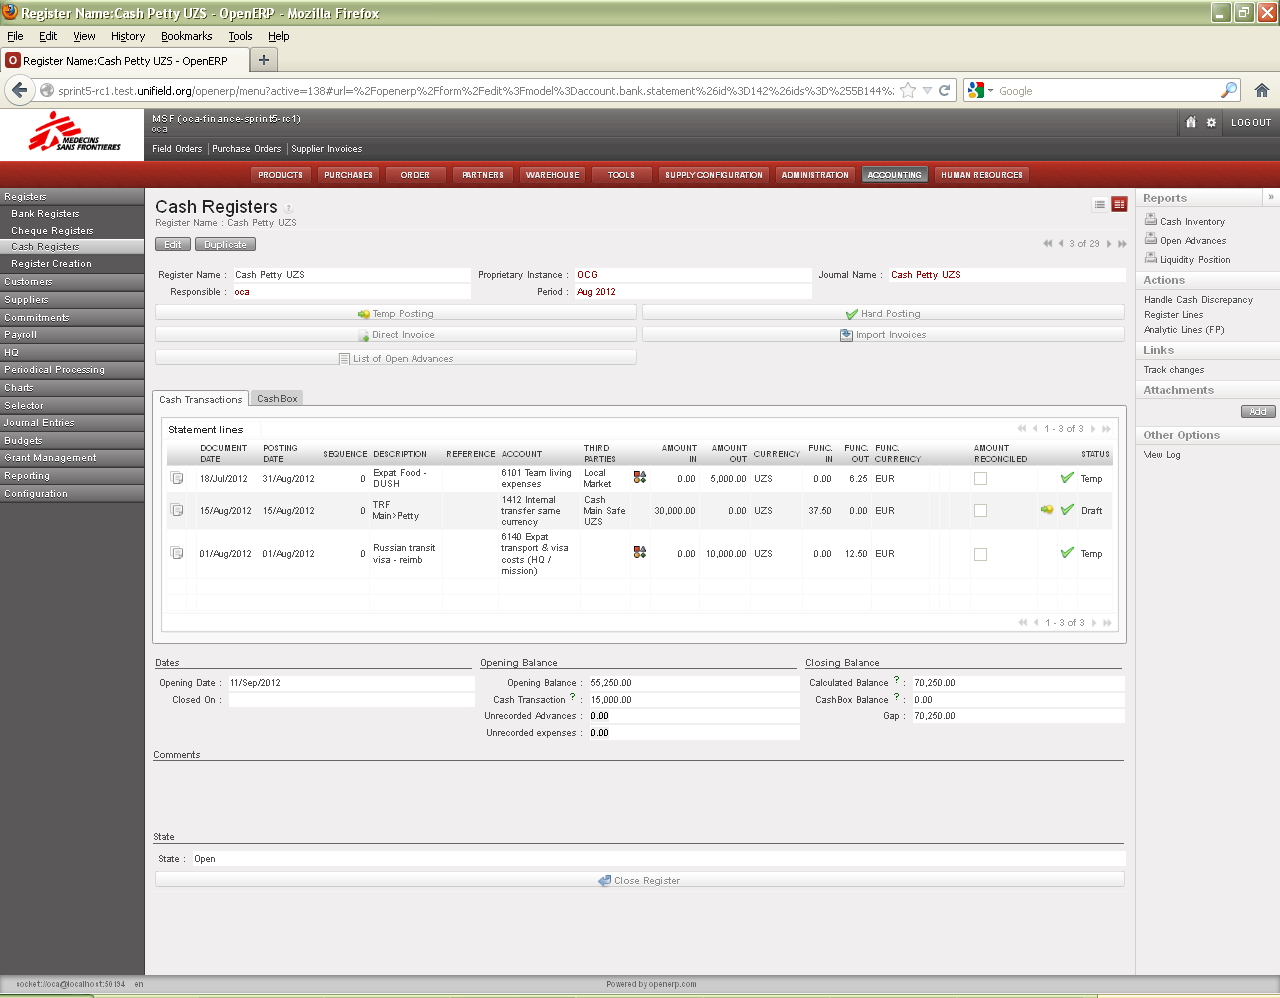
The {Responsible} tab reflects the list of authorized users to access the register.
{Responsible} tab
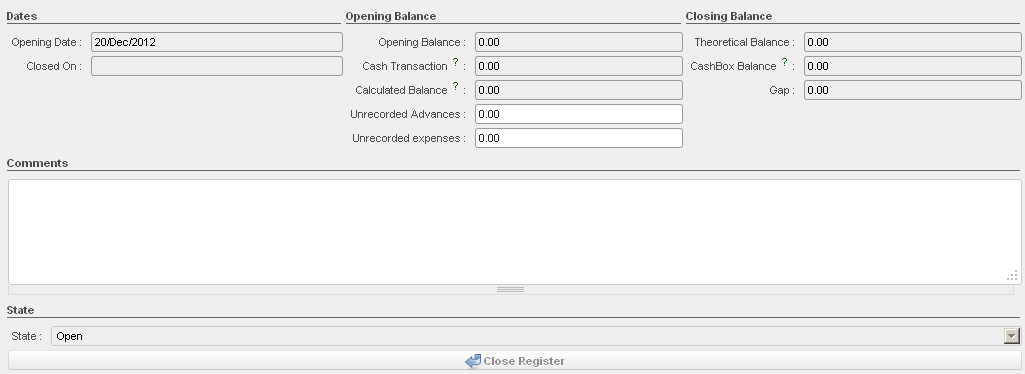
Finally, the lower half of the form shows the following fields:
Fields on lower half of a {cash register} form
Title of field
Entry protocol: cash register form
Opening Date
Automatic input. System default to the date the register was opened
Closed On
Automatic input. System default to the date the register was closed
Opening Balance
Automatic input. Zero if it is a new register created from a journal or the closing balance of the previous period
Cash Transaction
Automatic input. The sum of the amounts in and out for all register transactions during the period
Calculated Balance
Automatic input. Opening balance + sum of cash transactions
Unrecorded Advances
Manual input. For some sections not recording advances in UniField and tracked on a separate spreadsheet, the total amount of outstanding advances is manually entered here when performing cashbox inventory.
Unrecorded expenses
Manual input. The total amount of unrecorded entries is manually entered here when performing cashbox inventory
Theoretical Balance
Automatic input. Calculated Balance – sum of unrecorded advances and expenses
CashBox Balance
Automatic input. The physical cash balance in your cash box reported in the cashbox tab when closing the cashbox
The Reports menu on the right side bar contains reports that can be run in Cash Registers.
For further information on reports, see UniField Chapter 5 – Searching, Correcting and Closing.
For December registers only, the system prevents the closing of a cash register if the amounts in “Unrecorded Advances” and “Unrecorded Expenses” are not equal.
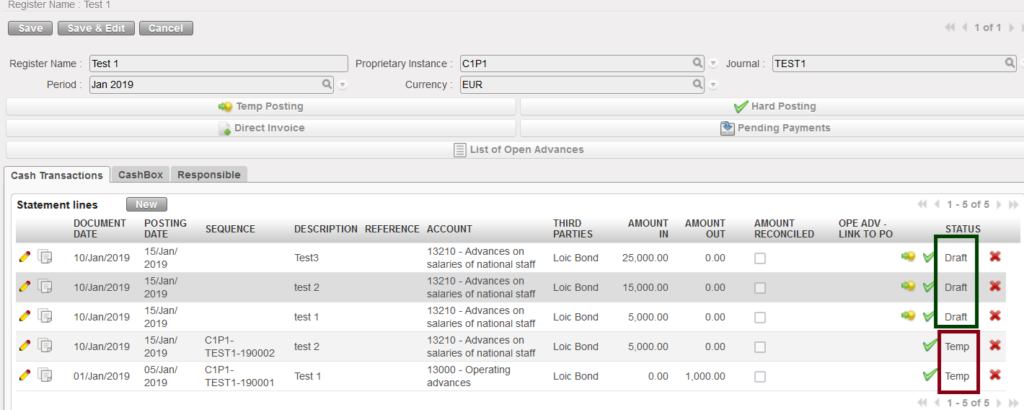
UniField manages 3 types of register entry statuses:
Draft entries : When created, direct register entries are recorded as Draft. They are created in the register only, are not posted, and do not exist in the journals. They are editable and can be deleted; they don’t have a sequence number yet.
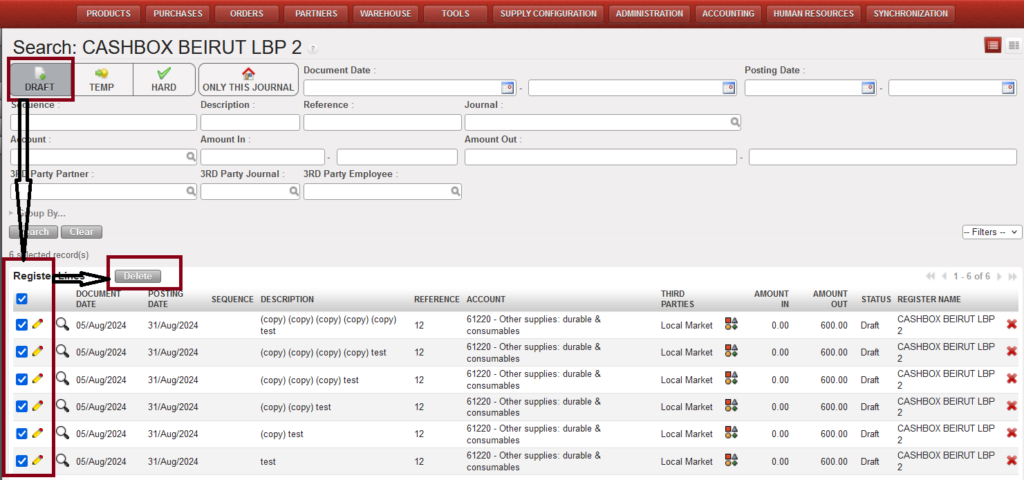
Only in draft entries you have the option to do mass delete of draft entries as below: • In the register go to the right menu list, under “Actions” click on “Register lines”
• In the “Search view” toggle on “Draft” button, select all draft lines and click the “Delete” button, all lines will be deleted.
Temp-posted entries : Entries are created in the register and assigned a sequence number. They are reflected in the corresponding journals and the accounts balances with their counterpart accounts (double-entry bookkeeping). They are editable and can be deleted. Temp posting means that an authorised user is validating an accounting entry. The user can do it individually or by grouping several entries.
Hard-posted entries : Entries are created in the register. They are reflected in the corresponding journal and the account balances with their counterpart accounts (double-entry bookkeeping). They are not editable (except through accounting corrections performed by an authorized user). The user can change the status of an entry to {Hard} individually or by grouping several entries together.
The below table summarizes the impact of register entries statuses on the creation of accounting lines in a journal and the possibility to edit them.
Register lines state
Journal entries state
Modification allowed?
Draft
None
Yes (in register)
Temp-posted
Valid / Unposted
Yes (in register)
Hard-posted
Valid / Posted
No, only via the correction system process. See chapter 5
Correspondence between register entries status and journal entries status
Draft entries always shown in the top of the statement lines as below:
Registers are used to encode all accounting entries linked to cash movements. These entries are called Register lines. Registers should be used any time a cash movement occurs.
Any time a register line is made on an expense or income account, the analytical distribution needs to be determined. This is performed by means of the analytical wizard button , located at the register line level.
The following transactions can be performed through the registers:
Direct expenses
Direct Invoices, using the {Direct invoice} button
Guarantees or deposits
Down payments to a supplier, linking a PO to an advance
Internal Transfers
Supplier Invoice, tax and Payroll Payments, using the {Pending payments} button
Cash and bank reconciliations
Operational Advances, using the {List of open advances} or {Advance return} button
Cash, bank and cheque registers need to be reconciled at the end of each period. At the end of each month the user needs to close their register(s) and create new registers for the following month. All existing cash and bank registers created for the new period are populated with an opening balance automatically set to the previous periods’ closing balance.
Users have the ability to work on several periods at the same time as the following period’s register opening is not linked to previous period’s register closing. This means, a new register can be opened before the previous one is closed BUT a new register can’t be closed before the previous period’s register is closed. Also, a new register can’t be opened if the previous one is still in {Draft}.
The liquidity journal associated with the register remains open at all times.
Finally, a register Search view will display a list of registers as shown below. You will be able to use a set of filters to easily retrieve the register in which you want to record your entries.
LUFI-30207 Supplier Invoice Payment: Step Five in the Purchase Process
LU Introduction
A supplier invoice can be paid from the cash, bank or cheque registers via the {Pending Payments} function. In order to make the payment, the supplier invoice must be imported into the appropriate register. Importing the payment into the register automatically creates a temp posted register entry. In the liquidity journal, the payable account is debited to cancel the debt and the liquidity account (cash, cheque or bank depending on type of payment) is credited to recognize the money out.
Note that a supplier invoice can be paid before the invoice posting date provided the payment is done in the same (monthly) period or in a later period.
How to Import a Supplier Invoice into a Register
In the below example the payment is done in a cash register.
Go to: Accounting / Registers
Open the relevant register to import the invoice
Click on the Button {Pending Payments}
Pending Payments invoice on a register form
An {Import invoice} window display
3. Click on {Add} and select the relevant invoice.
Add button to select an invoice
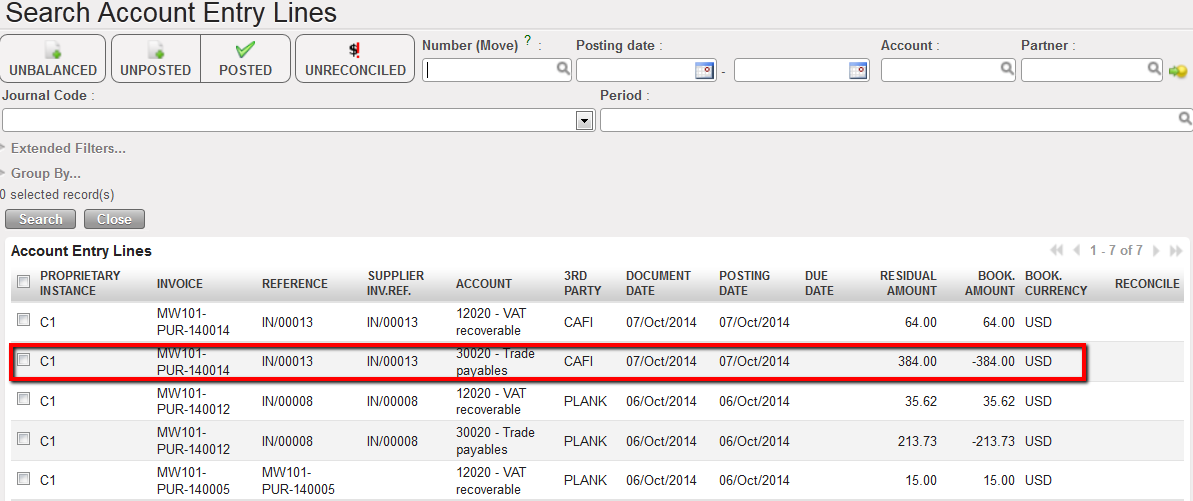
Search Account Entry Lines window opens to select the invoice to import in the register
4. Remember the PO/Supplier invoice process we saw before. Here, we will import only the supplier invoice booked on the Trade Payables account. The VAT will be paid later on.
5. Add a Payment posting date and click on {Single import} because in this illustration we only have to import one invoice from one supplier.
Invoice imported in the Import Entries window
6. The invoice moved down to the bottom half of the {Import Invoice} window. Changes can be made here as well. However, the document date must be changed on the top screen. If making a payment through the cheque register, the cheque number will need to be entered. Once verified, click {Ok}. The window closes.
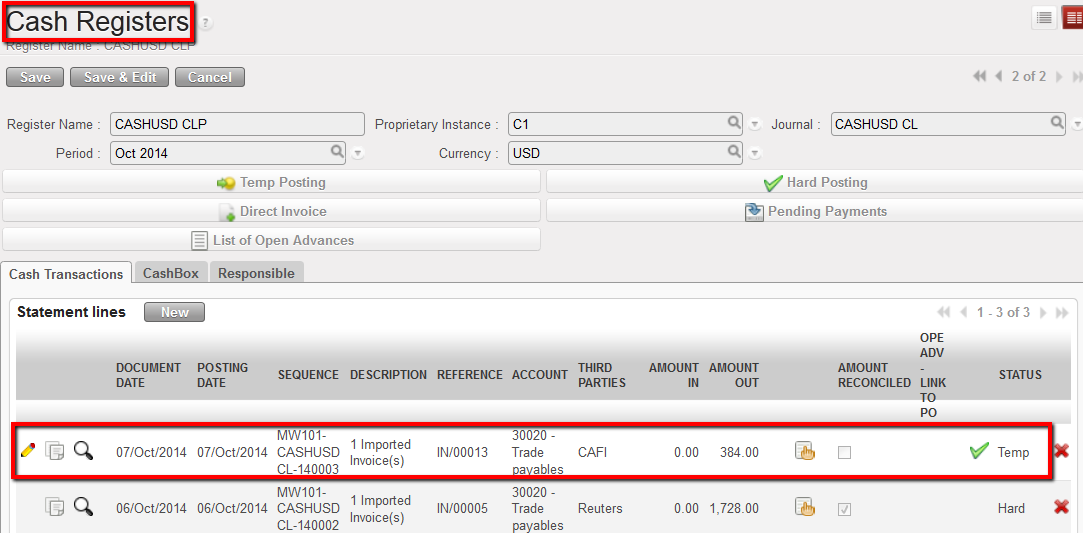
An entry is created in the register and booked to {30020 – Trade Payables} to pay the amount owed to the Supplier. The description defaults to {Imported Invoice}. The reference is automatically retrieved from the reference of the supplier invoice. There is no automatic reconciliation on the A/P account until the register line is hard posted.
Payment entry displayed in the register in Temp state
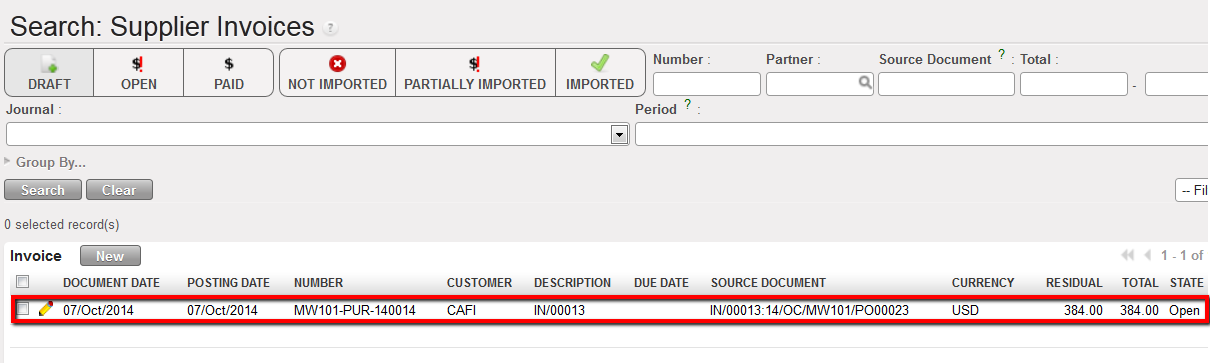
7. The link will take you to the supplier invoice; if user clicks on this line, the Supplier Invoice list view will display.
Invoice Lines displays when the link is clicked in Register. Click on line to open Supplier Invoice.
As soon as the supplier invoice is imported, the register line is Temp posted and the entries created in the liquidity journal items are:
Credit to 10100 Cash on Hand (the invoice was imported into a cash register) to reduce the cash balance by the amount of the invoice.
Debit to 30020 Trade Payables to reconcile the outstanding A/P entry created when the supplier invoice was validated
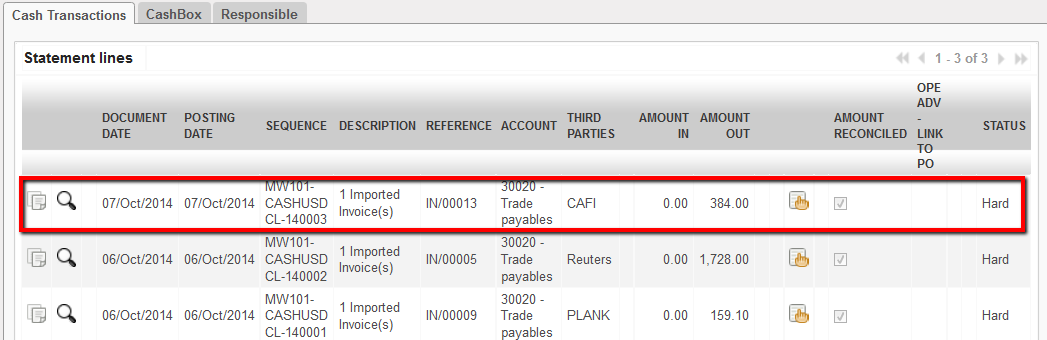
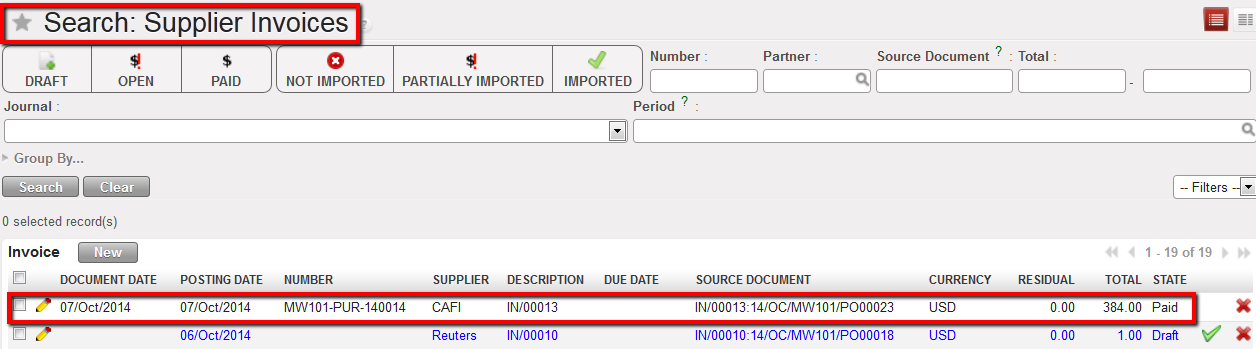
Once the register entry is hard posted, the payable entries are reconciled (M1-8). The supplier invoice status changes to {Paid}.
The entry corresponding to the imported invoice was hard posted.The entry state is Hard.
Created Journal Items of the paid supplier invoice when the register line became hard posted.
Supplier Invoice becomes paid when its corresponding register entry is hard-posted
In case you want to import several invoices from the same supplier in one entry, you can use the {Import Group by partner} function.
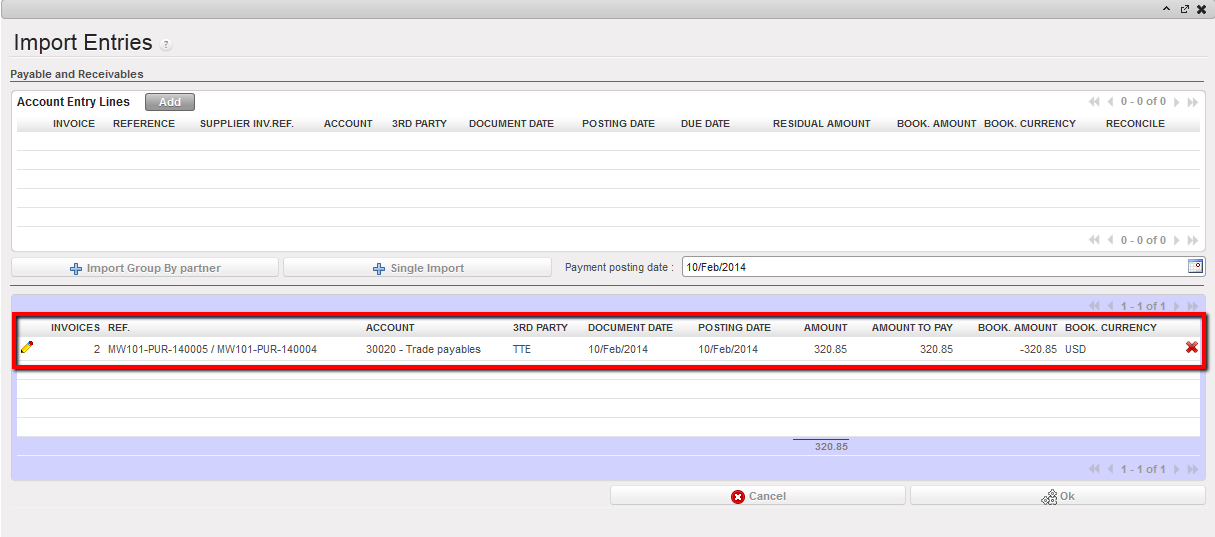
Selection of 2 invoices to pay to a same supplier before importing in a register
Invoices references are displayed in the Ref. field
Register line reflecting the import of 2 supplier invoices.
In case there are more than 3 invoices embedded in the payment, all references may not be fully displayed in the payment reference field as the system will cut off the text string to bypass display issues. But the payment will be processed for all selected invoices.
In chapter 02 – Configurations, we have seen how a VAT code was set in UniField.
Once a VAT code is set, you can :
Associate a VAT to a product in the product form (LUFI-20902). We explained it in Chapter 2 – Configuration.
Associate automatically a VAT to a whole invoice.
Now we will see how to compute a VAT code on a Supplier Invoice when the code was associated to a product.
How to Apply a VAT Code to a Supplier Invoice When the VAT Is Associated to a Product
Go to: Accounting/Suppliers/Suppliers Invoices
Select to open a new invoice form.
Complete the mandatory blue fields and allocate the invoice lines to analytic accounts. Make sure the product you chose is associated to a tax code.
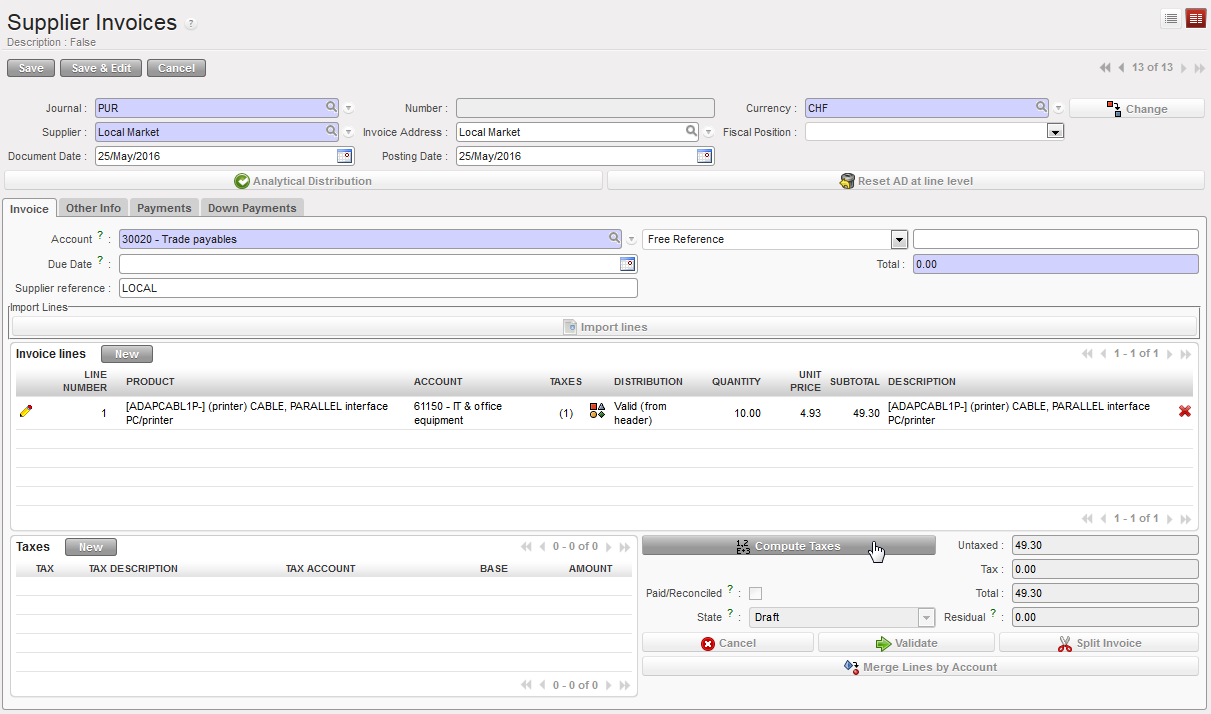
Select {Compute Taxes} to calculate the VAT applied to this invoice.
Compute Taxes button for automatic calculation of the VAT applied to this invoice
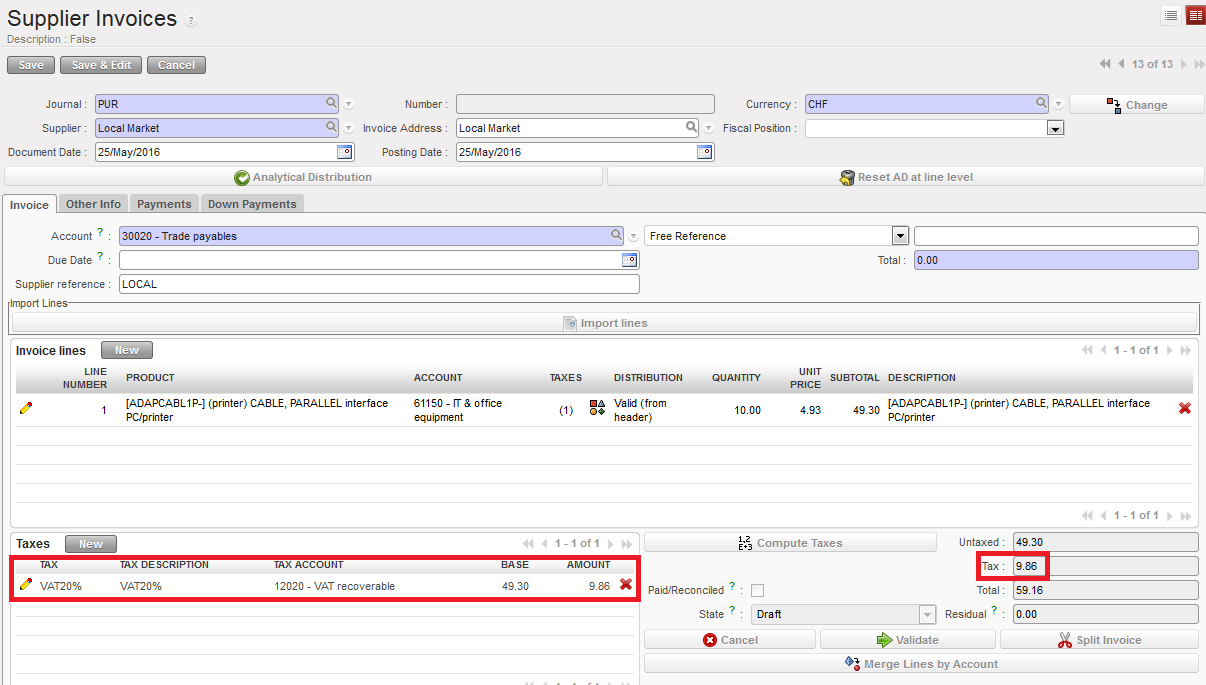
The tax displays automatically.
The tax is calculated automatically. Amount excluding and including VAT are split.
4. Now suppose you want to validate the supplier invoice. Select the {Validate} button.
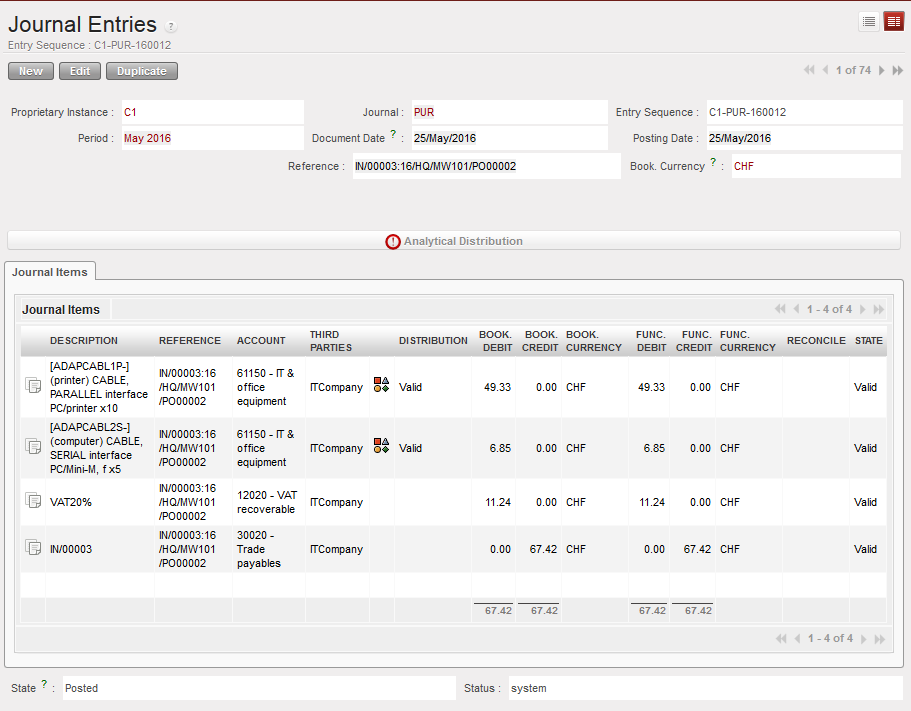
In the Purchase journal, entries are booked as follow:
Posted journal entries when an invoice to which a VAT is applied is validated
Box 1: On the Debit side:
– Expense accounts, 61150 corresponding to the invoice lines
– VAT Recoverable account, 12020
Box 2: On the Credit side:
Trade Payables account, 30020 corresponding to the outstanding debt towards the supplier (including VAT)
Advice: Supply or Finance can write down the UniField invoice number on the hardcopy invoice provided by the Supplier to make cross-referencing easier.
How to Apply a VAT Code to a Whole Invoice
It is possible to assign a VAT code directly to a whole invoice if you choose not to link a product to a VAT code. In this case, the VAT code has to be “excluded from price” type meaning that the VAT amount is always fully applied on top of the invoice line amounts.
Go to: Accounting/Suppliers/Suppliers Invoices
Select to open a new invoice form.
Complete the mandatory blue fields and allocate the invoice lines to analytic accounts.
Select to populate the invoice amount.
Go to the Taxes section and select to link the invoice to a tax code
{New} button to insert a tax code applicable to the supplier invoice
5. In the {Tax} field, select a tax code set in the system using the magnifying glass
TAX code selection and automatic input of TAX DESCRIPTION, ACCOUNT and AMOUNT field
The {Tax Description}, {Tax Account} and {Amount} fields are populated automatically
6. Save
7. Save the form
8. Press
9. Finally, you can manually input a tax code in the Tax section:
From step 4, in the {Tax Description} field, input a description
In the {Tax Account} field, select the account Tax recoverable
In the {Amount} field, insert the VAT amount calculated manually, usually based on the untaxed amount
LUFI-30205 Supplier Invoices Manually Created by Finance
LU Introduction
Previously, we explained the automatic creation of supplier invoice through the purchase process initiated by supply. In addition, finance can create a supplier invoice as a stand-alone invoice in the Accounting Suppliers sub-module when finance is paying for goods or services not purchased by supply. Items listed on the manual supplier invoices will not be reflected in the UniField warehouse stock.
The validation of a manual supplier invoice automatically creates the expense and payable entries in the purchase journal.
B. How to Create Supplier Invoices Manually
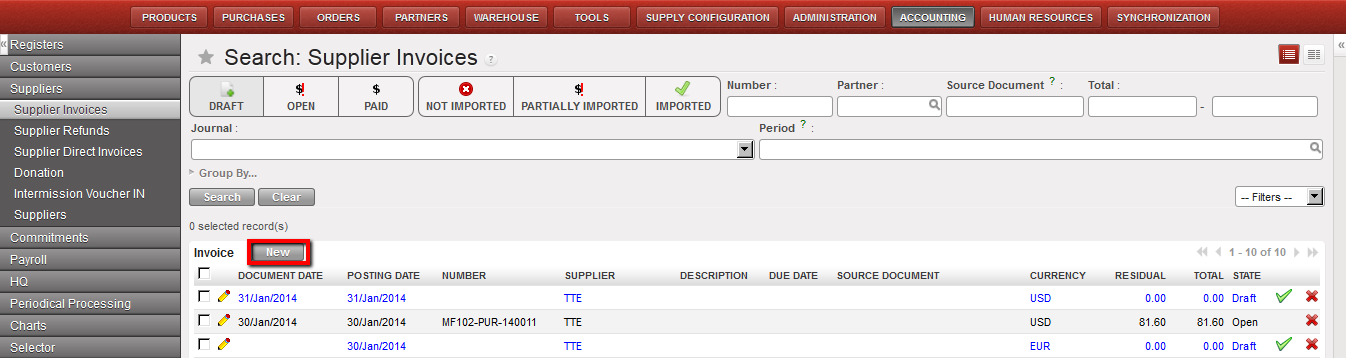
Creating a supplier invoice in the {Supplier invoice} Search view
Go to: Accounting/Suppliers/Supplier Invoice
Click on {New} to create an invoice
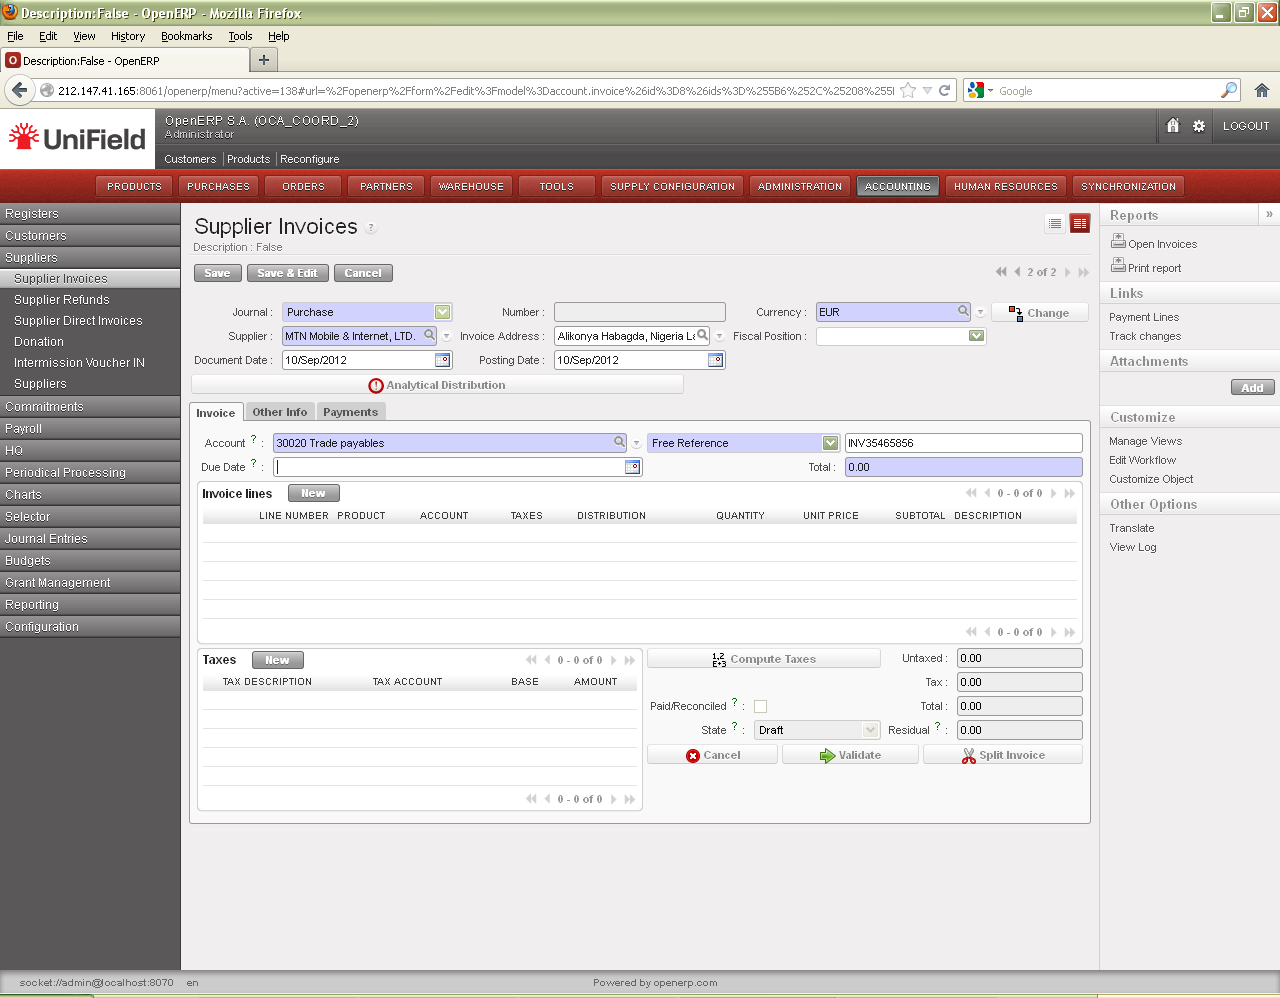
A form displays to create a new invoice. Fields in blue are required; white fields are optional; grey fields are read only.
{Supplier invoices} header
Title of field
Entry protocol: supplier invoice
Source for Information
Journal
System default
Journal in which the entries will be booked
Number
System default
UniField invoice number to be assigned when the invoice is validated
Currency
System default
The currency is by default selected based on the {Supplier} selected for the invoice
Button
You have 2 options to manage the supplier invoice currency:
Either you overwrite the default currency with the currency you wish to use and if you already created invoice lines, amounts will not be computed again
Use this button to change the currency of the invoice if the default currency from the Supplier record is not correct. Amounts already recorded on the invoice will be computed again using the standard rates defined in the system.
Supplier
User selected
From Suppliers list
Invoice Address
System default
From Supplier selected for invoice
Fiscal Position
System default
Depends on specific OC procedure
Document Date
Manual entry
Date of invoice
Posting Date
System default
Defaults to the date of the incoming shipment that has been entered. It can be changed
is used to apply a global analytic distribution across all lines in the invoice. This can be used as a time saver if all lines on the invoice use the same destination, funding pool, cost center, etc. If most of the lines have the same information it is possible to use the analytical distribution line to allocate all and then individually update the few lines with variances.
2. On the {Invoice} tab, you complete additional fields as explained below
Invoice tab on a supplier invoice
Title of field
Entry protocol: supplier invoice
Source for Information
Account
System default
From Supplier selected for invoice
Free Reference
Manual entry
Indicate the invoice number of the hardcopy supplier invoice. It will be displayed in the reference field of the payment line.
Due Date
Manual entry
When the payment is due; some suppliers require net 30, net 60 or immediately upon receipt or a certain due date. This is good to enter if you want to search for open invoices based on due date.
Supplier Reference
Automatically taken from Supplier form
If the Supplier reference is filled out in the Supplier form, it will automatically be taken into this field
Total
Manual entry
To be entered right before validating the invoice and should match the calculated total of the invoice lines; this is just a check for the user to confirm the total amount
3. In the {Invoice Lines} section, click {New} to create a new invoice line.
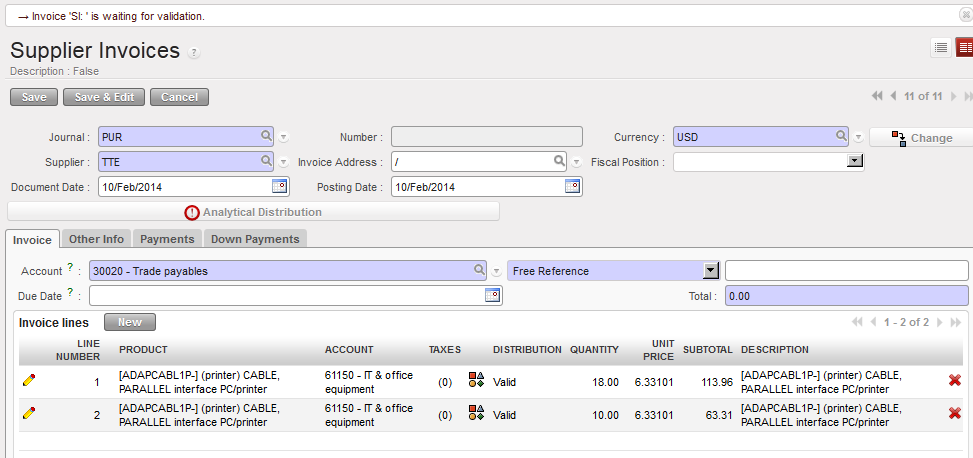
Example: In February we have received an invoice from the company TTE for printer. The printer and cables are used by two different projects. Thus, we want our invoice to have 2 invoice lines allocated to 2 different projects.
{New} button to input invoice lines
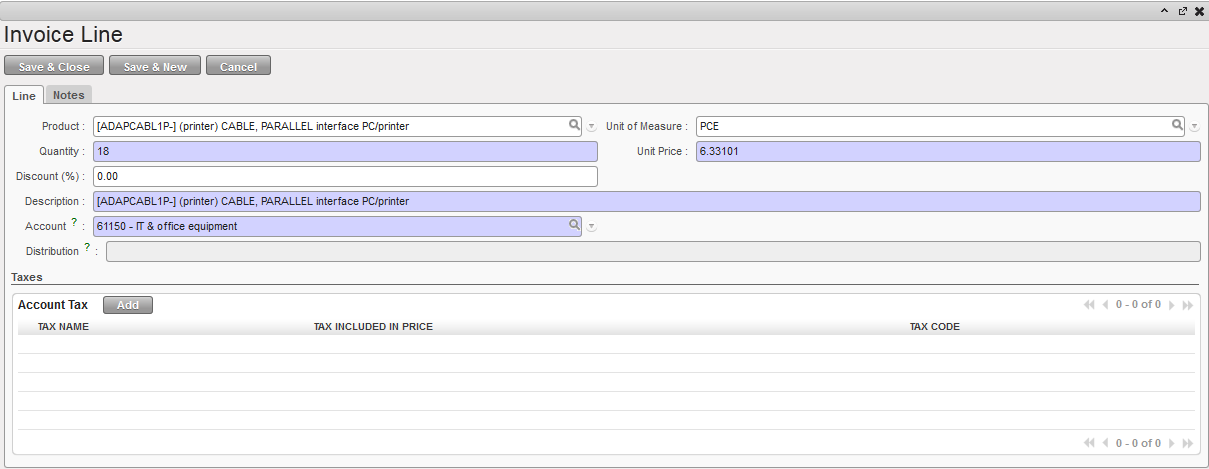
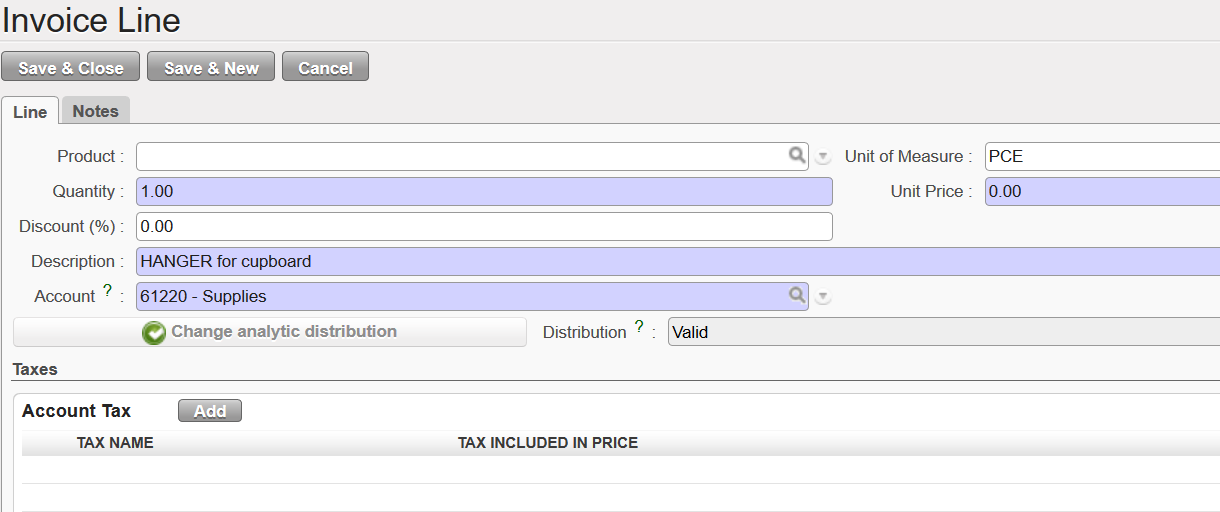
{Invoice Line} window to add line items on a manually created Supplier Invoice
Title of field
Entry protocol: supplier invoice
Source for Information
Product
Manual entry
From the Product list used by Logistics
Unit of Measure
Manual entry
From the list used by Logistics
Quantity
Manual entry
For services, use “1”; for goods, use actual quantity
Unit Price
Manual entry
For services, enter total amount that will be booked to this invoice line; for goods, use actual price
Discount (%)
Manual entry
% discount applied if applicable
Description
Manual entry
Similar to the current description in use
Account
Manual entry
Expense account code
Distribution
System default
View only; will display Valid or Invalid after analytical distribution has been applied
Account Tax
Manual entry
Please see individual OCs financial procedures and input a tax accordingly
4. Click {Save & New} button for additional invoice lines, or {Save & Close} button to return back to the supplier invoice window.
5. Assign the analytical distribution per line or globally across all invoice lines. Valid analytical distribution on invoice lines
6. Enter {Total} and verify that it matches the total on the hardcopy invoice.
7. Click {Save} button.
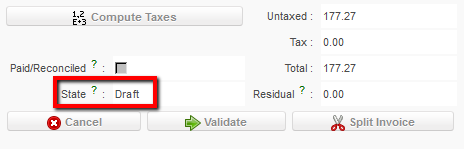
The invoice is created in {Draft}, viewable at the bottom of the document.
Invoice state viewable at the bottom of the document
Further, the {Other Info} tab shows the {Amount to be paid} on the supplier invoice which could be adjusted through changes or partial refunds to the original amount. The {Journal Entry} is a link to the entries in {Journal Items} associated with the supplier invoice once the invoice is validated. {Responsible} identifies the user who validated the invoice. The other fields come by default from the supplier record if that information had been entered.
{Other Info} tab
The {Payment} tab will show payments made for this supplier invoice. Thus it could show for instance an advance delivered to a third party (down payment), if so it will be displayed in the down payment tab too.
{Payments} tab of a Paid supplier invoice
Finally the {Down Payment} tab as you might expect displays advance payments done to suppliers.
Down Payments tab of a supplier invoice
For editing, validating and printing a supplier invoice created manually, please read LUFI- 30104 as the tasks description are identical.
How to Delete Manually Created Draft Supplier Invoices
Go to: Accounting/Suppliers/Supplier Invoices
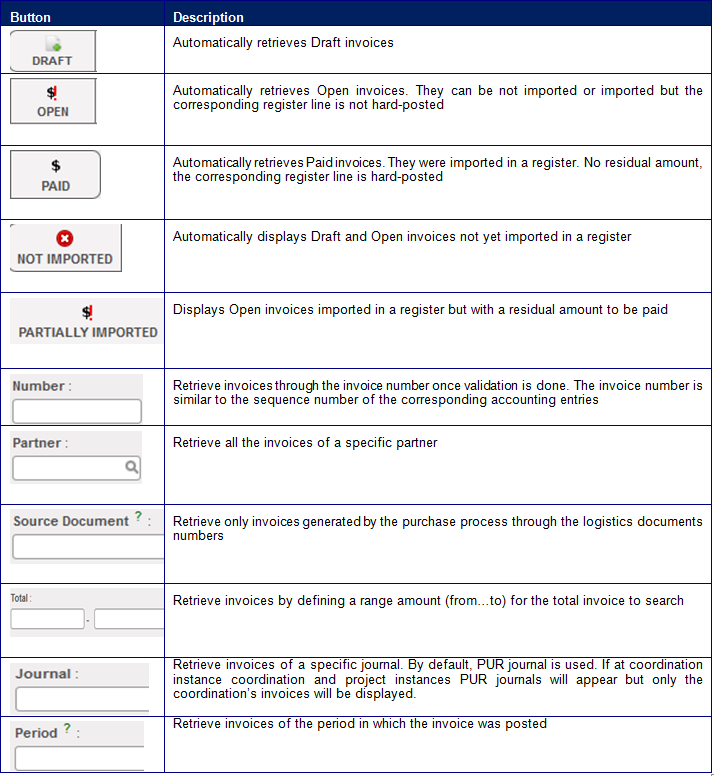
Search for the draft supplier invoice to delete either by selecting the {Draft} filter or any other filter located at the top of the view.
Delete button to erase a draft supplier invoice in the Search Supplier Invoices view
2. Locate the draft supplier invoice to edit, and select the red cross to delete the supplier invoice.
LUFI-30204 Supplier Invoices: Step Four in the Purchase Process
LU Introduction
A draft Supplier Invoice is created in UniField when the Incoming Shipment is validated. The quantities to the supplier invoice are coming from the incoming shipment, while the prices are coming from the purchase order.
The supplier invoices in {Draft} status can be edited. Finance can review and edit all allocation (accounting code and analytical distribution) before validation as all fields can be modified on the invoice line. From the accounting side, it is important to check if the account code and analytic distribution are assigned correctly.
In general, user will compare the hardcopy invoice from the supplier against the supplier invoice in UniField and make any corrections if needed before validation.
As some fields are linked to Supply POs, they should be changed only after an approval from supply. For example, if the products, quantities or prices on the paper invoice are different from the system invoice, then supply should inform finance that these changes are correct. Only then should Finance correct the price or quantity.
The validation of the supplier invoice changes the invoice status from {Draft} to {Open}, sets the related commitment voucher to {Done} or updates the amount left accordingly, deletes ENG journal entries and creates the expense and payable entries in the PUR journal.
Validating the supplier invoice does not affect the balance of the register. This means that the recognition of the expense and of the supplier payable is booked upon receiving the goods and the paper invoice but the invoice can be paid at a later point of time. The register balance is affected only at the time of payment.
Status of Invoice
Stage in Process
Status in Journals
Modification allowed?
Draft
Invoice initially created
None
Yes, Edit invoice
Open
Invoice validated and imported or not into Registers
as temp posted
Valid / Posted
Yes, only through a correction – Chapter 5
Paid
Invoice validated and imported into Registers
and hard posted
Valid / Posted
Yes, only through a correction – Chapter 5
Closed
When invoice counterpart account header is reconciled with entries not belonging to liquidity journal (refund cancel/modify or manually reconciled with OD entries…)
It is not possible to refund a Closed invoice
NO
Supplier Invoice Statuses
How to Edit Draft Supplier Invoices
Go to: Accounting/Suppliers/Supplier Invoices
Search for the draft supplier invoice to edit either by selecting the {Draft} filter or any other filter located at the top of the view.
Draft supplier invoice
2. You can use the {Pencil} to change the account, description, quantity, amount or tax on the invoice line level, select. When you are finished with the changes, select
3. or you can use the {form} for the same modification but it will give you more details.
4. To change the analytical distribution, click on on line level or globally using the button
5. Add a Due date (optional) and a Document Date if it is not done yet.
Edit button located on each invoice line, document date and due date fields
6. Click {Save} button. The supplier invoice is saved in {Draft} state.
Note! A quick way to edit the analytical distribution on a Draft supplier invoice is to select the button located on the Supplier Invoice header. It allows removing all analytic distributions done at line level so that the header distribution prevails.
How to Split Supplier Invoices
Sometimes a Purchase Order containing several different products is invoiced with multiple physical invoices. In these cases you can split a draft Supplier Invoice into multiple invoices.
Go to: Accounting/Suppliers/Supplier Invoices
Locate the draft supplier invoice to edit, and select to open the supplier invoice form.
In the bottom of the invoice, press
Screen “Split invoice” will be displayed, Select the lines to be split ; the wizard will create a new invoice and adjust the original one.
Split supplier invoice
4. Select the invoices lines to be deleted
5. Delete the lines from button “Delete”
7. Click “Confirm” as below
8. After deletion “ Confirm”
9. The deleted lines will create new invoice as below:
How to Import/Export Invoice Lines in the invoice objects.
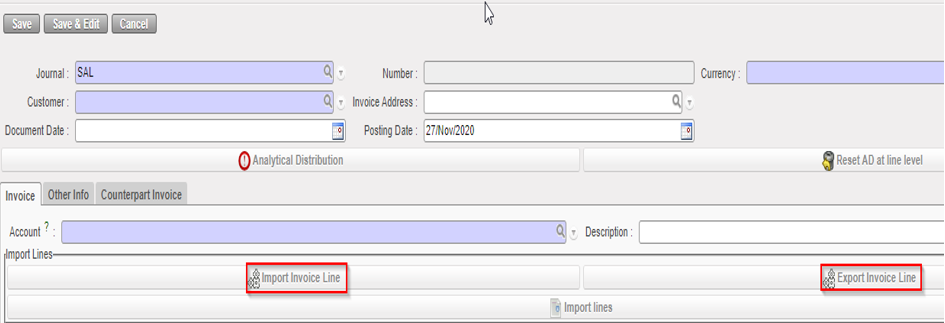
You can Export the invoice lines from the supplier invoice through {Export Invoice Lines}. You can modify several fields in the Export file including the amounts and descriptions, and you can import the file (for invoice lines) through {Import Invoice Lines}.
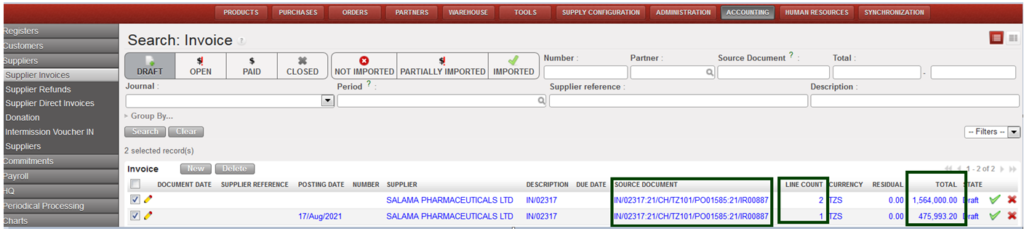
If the invoice line has been split, you will have the word “SPLIT” in the excel file and the analytical distribution will be empty.
Display split lines in “Export Invoice Line”
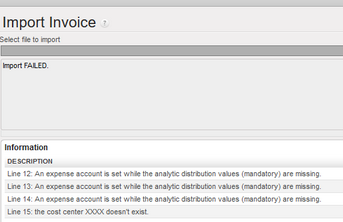
If we try to import incorrect values (cost center that does not exist, mandatory values not reported…), the import will fail, and we will have error messages:
Split invoice lines through import:
If more than one line of the Supplier Invoice needs to be split, this can be done as detailed below:
Open “Supplier Invoice”
Click on button “Export Invoice line”
In the exported file update columns from H to K which covers respectively (Percentage, Cost center, Destination and Funding Pool)
The split must be with semicolon (;) character, in column percentage update with numbers, then other columns will take the percentages according to column percentage respectively, see below:
How to split invoice lines in XML file with semicolon character
Import the update file through “Import Invoice line”
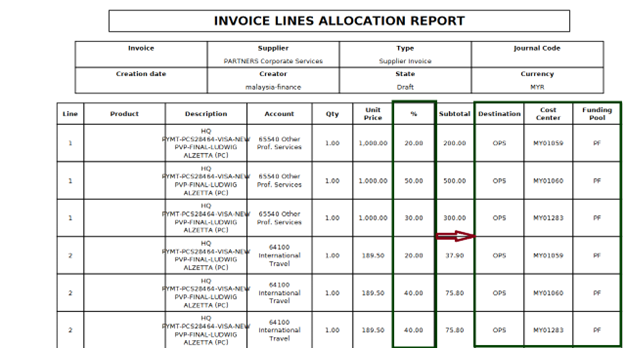
Click on “Invoice Allocation” it will produce “INCOICE LINES ALLOCATION REPORT” the same allocation as what exported as below:
“INVOICE LINES ALLOCATION REPORT” after lines split in the file
How to Validate Supplier Invoices
When the invoice is in {Draft} and reviewed, it can be validated.
Go to: Accounting/ Suppliers/Suppliers Invoice
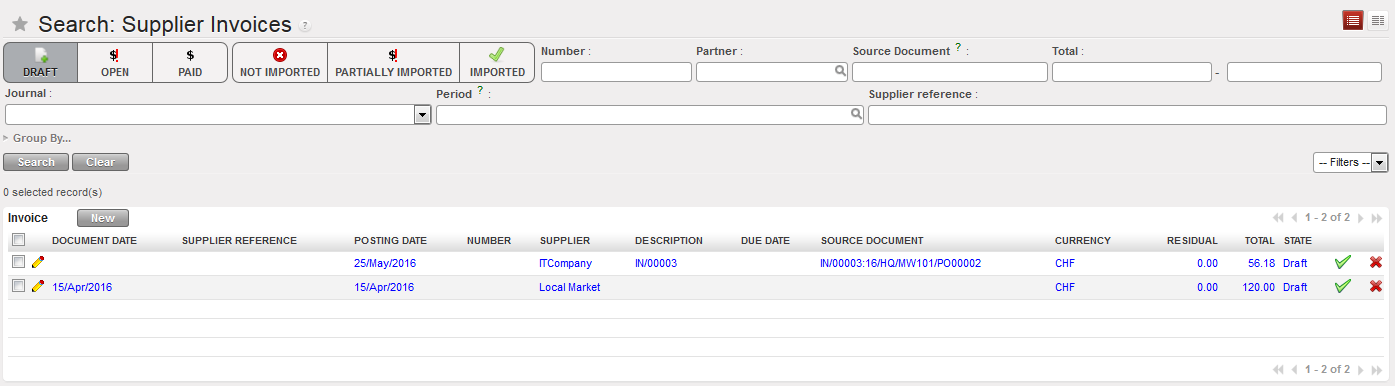
Search for the draft supplier invoice to validate either by selecting the {Draft} filter or any other filter located at the top of the view.
Supplier invoices Search view
2. When the invoice is located, click on the pencil to open the form.
3. Validate it by pressing
The invoice state becomes {Open}.
Validation of the invoice automatically deletes the engagement lines created by the commitment voucher as the promise to pay is now a formal obligation represented by the automatic creation of a payable entry in the Purchase Journal.
Posted journal items resulting from the validation of a supplier invoice. In this example, the VAT is recoverable.
In the Purchase journal, entries are booked as follow:
On the Debit side:
Expense accounts, 61150 corresponding to the invoice line
VAT recoverable, 30300 (the VAT was added on invoice level)
2. On the Credit side:
Trade Payables account, 30020 corresponding to the outstanding debt towards the supplier
Advice: Supply or Finance can write down the UniField invoice number on the hardcopy invoice provided by the supplier to make cross-referencing easier.
How to Print Supplier Invoices
Go to: Accounting/Supplier Invoices
Tick the box of the invoice you want to print.
In the Action Menu on the right side of the screen, in the section {Reports}, select {Print report}.
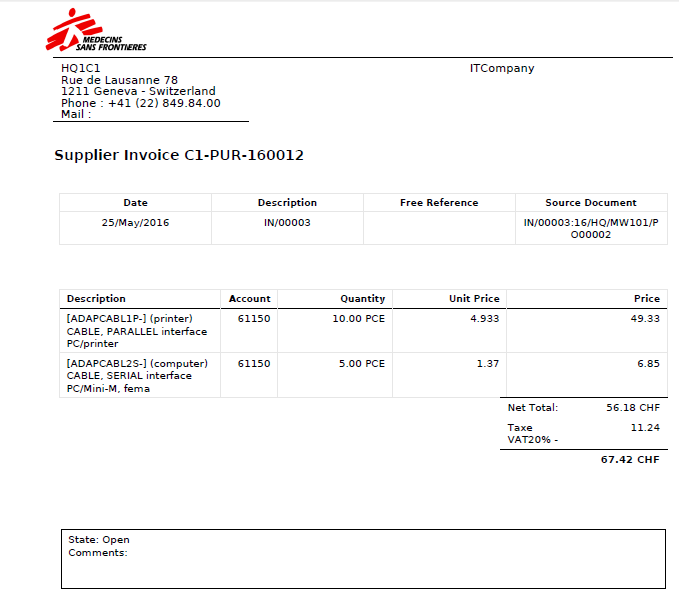
A PDF report will display the invoice details.
The columns {Description} and {Source Document} will be filled only if the supplier invoice originated from a supply flow.
Supplier invoice report displayed. This invoice is Open.
LUFI-30203 Confirmation of Goods: Step Three in the Purchase Process
LU Introduction
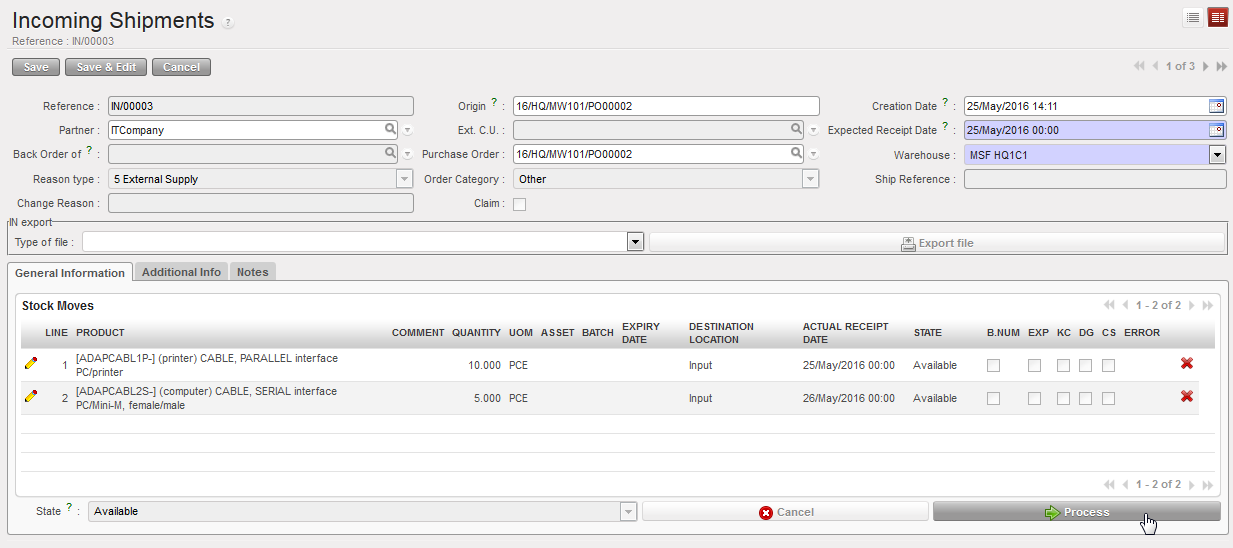
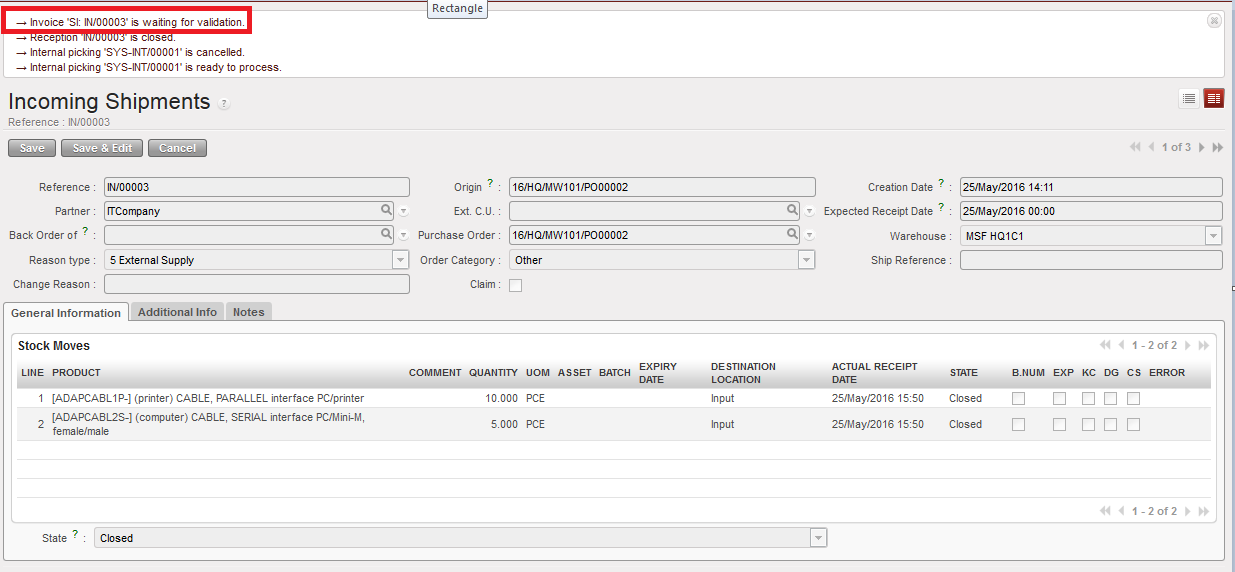
When the goods are received, supply processes the reception in the UniField warehouse sub module. Supply confirms product item and quantity received, and makes changes if needed, e.g. change in product, etc. The supply validates the incoming shipment (it becomes closed) and a draft supplier invoice is created.
Validation of the incoming shipment results in three actions in UniField:
Reception is closed.
Supplier Invoice is in {Draft}, waiting for validation.
Internal picking is ready to process so the goods can be used.
Supply identifies Incoming Shipment for reception
Supply processes Incoming Shipment
Logistics validates Incoming Shipment. Reception is Closed and a Supplier invoice is generated
LUFI-30202 Commitment Vouchers: Step Two in the Purchase Process
LU Introduction
When a regular order is placed to an external supplier , inter-section or intermission, MSF has an engagement (or promise to pay) towards the supplier. The commitment voucher helps us monitor our budgets and cover the gap of time from the moment MSF agrees to buy an item to the moment MSF pays for it (upon reception of the goods). UniField automatically creates a Commitment Voucher (CV) in {Draft} state when a full PO or an individual PO line to an external partner ,inter-section or intermission is confirmed. Once checked and validated by an appropriate finance staff member, this voucher is included in the budget as a commitment to pay and the related extra accounting lines are created in the engagement journal. The commitment voucher is set to {Done} when the supplier invoice,inter-section or intermission are validated by the finance team.
Below we will see how to validate a Commitment Voucher once it was issued via the Supply flow. Then we will explain the creation of a manual commitment voucher in case the purchase did not go through the supply process and you still want to reflect the engagement into your budget.
How to Validate Commitment Vouchers:
Go to: Accounting/ Commitments/Commitment Voucher
Search for the {Draft} voucher to validate either by selecting the {Draft} filter or any other filters located on top of the view.
2. When you have located the voucher, click on the pencil icon to open the form
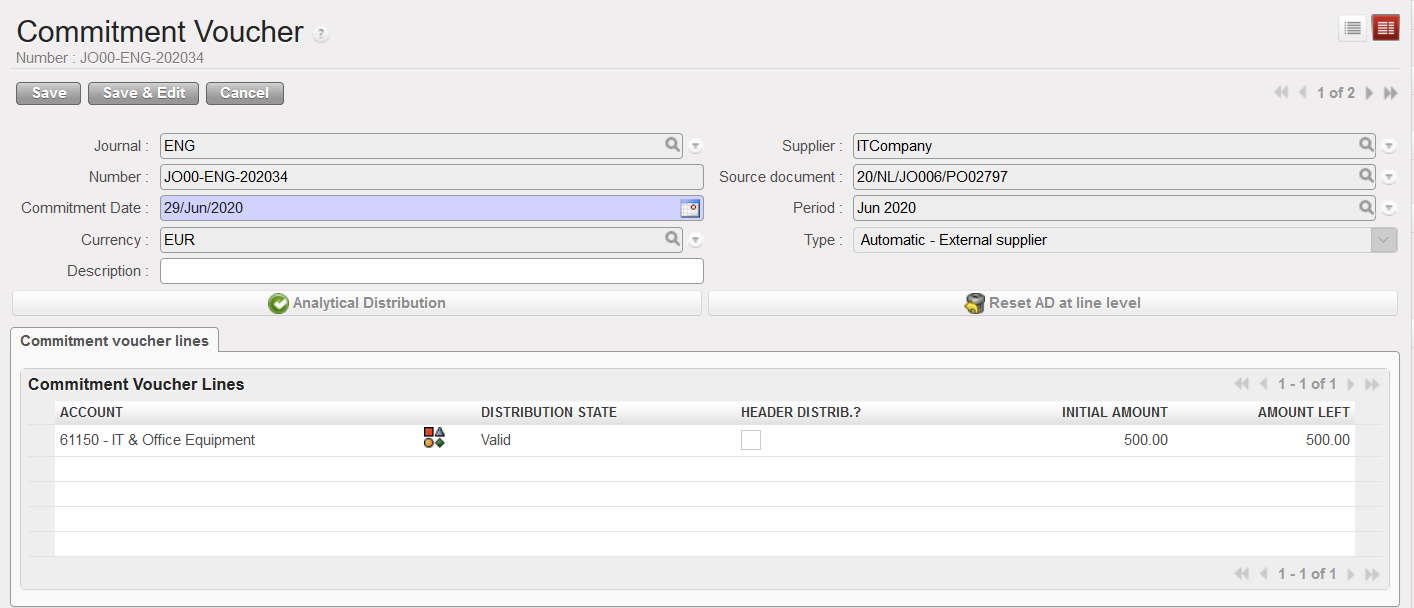
The voucher opens in Form view
Commitment voucher in Form view where the analytical distribution can be changed
3. Click on AD wizard if you want to change the analytical distribution. Please remember this does not update the information on the PO but it does on the supplier invoice,inter-section or intermission,. The analytical distribution wizard appears
4. Select the button to edit the fields. Note that the funding pool was not a field which Supply entered in the PO; it defaults to {PF – MSF Private Funds}. Thus, you must change the funding pool if there are donors to be considered. Account codes and amounts cannot be changed if the commitment voucher was created automatically by the confirmation of a Regular type PO. Save the line and to close the window.
5. You can update the {Description} at the header level of the Commitment Voucher. This field will be empty and editable (even after CV validation). If nothing was written and the field {Description} was left empty, the value per default would be the same as the entry sequence.
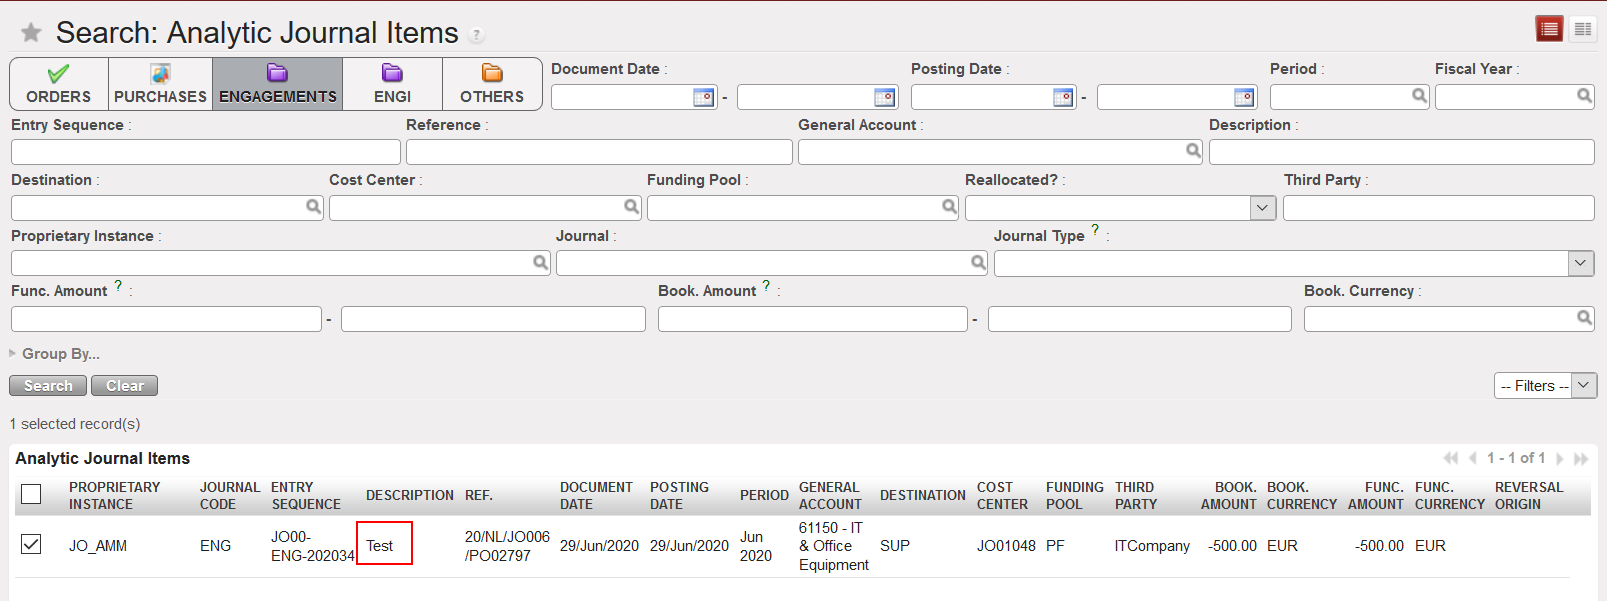
Click {Validate} at the bottom of the screen when finished. The commitment voucher is validated and analytic journal items reflected in the {Engagement} Journal and the amounts will appear as Engagements in the Budget reports.
Analytic journal items reflected on the Engagement journal. These lines are not editable
How to Manually Create Commitment Vouchers
There may be occasions when purchases or payment will not go through the PO process (e.g. services) in which case an advanced user can manually create a commitment voucher. Once the voucher is created, you can validate it.
Go to: Accounting/Commitments/Commitment Voucher
Click on
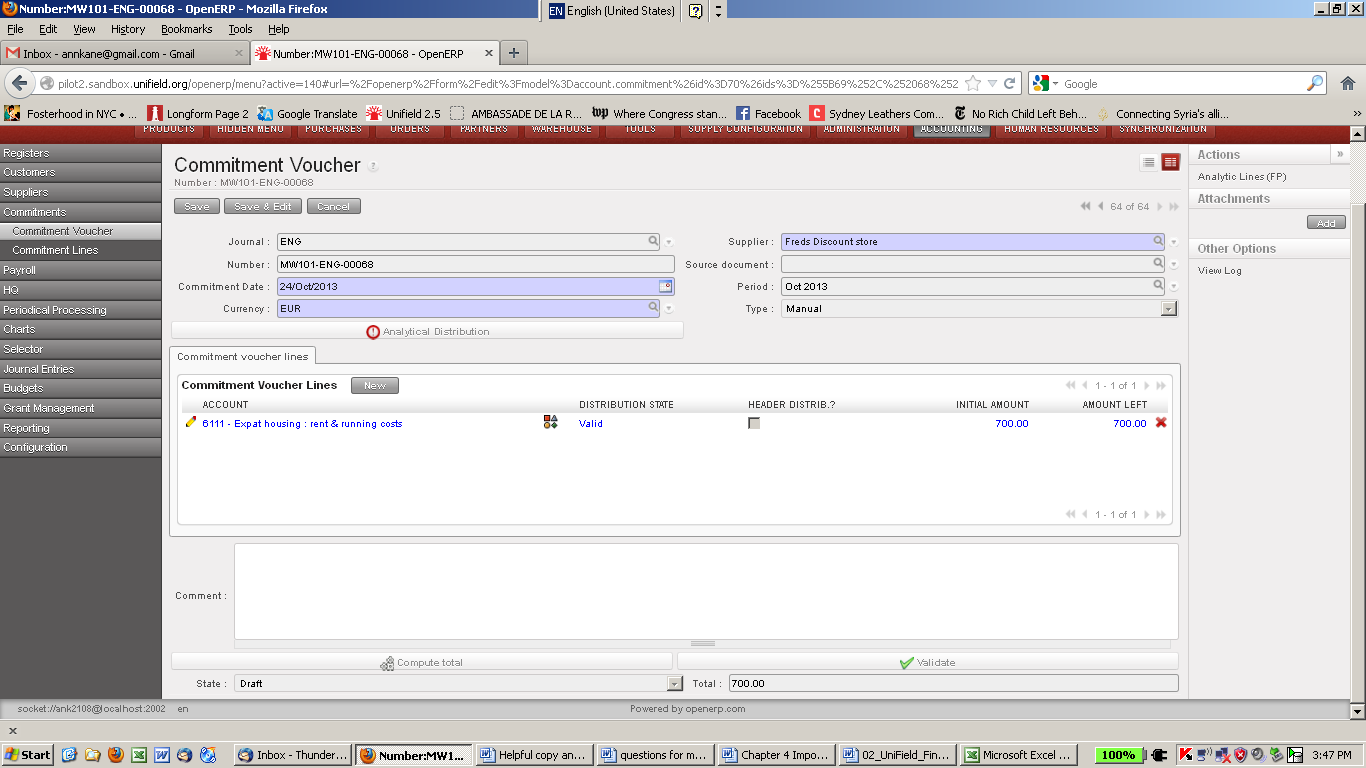
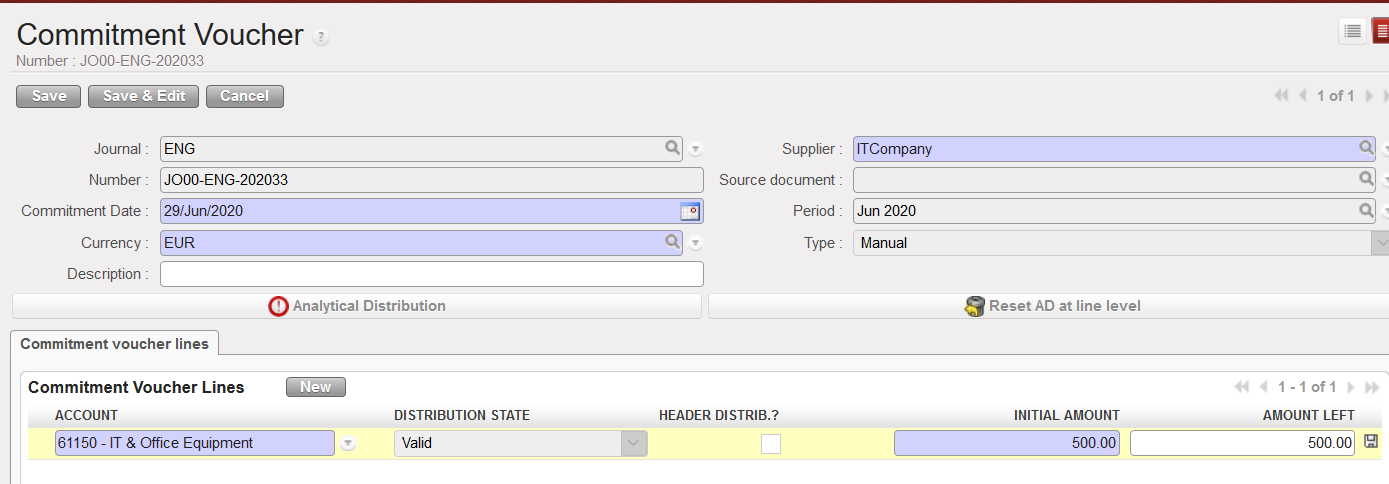
The Commitment Voucher creation Screen will display
Commitment Voucher Screen
Fill in all mandatory blue boxes: Supplier, Commitment date and Currency.
Insert commitment lines by selecting the account and initial amount.
You can update the {Description} at the header level of the Commitment Voucher. This field will be empty and editable (even after CV validation). If nothing was written and the field {Description} was left empty, the value per default would be the same as the entry sequence.
Save by clicking save button
5. Add analytical information individually or with the mass allocation button.
The Commitment Voucher can now be seen in the commitment voucher screen and is listed in the budget as a committed amount
How to Import/Export Invoice Lines in the Commitment Voucher objects:
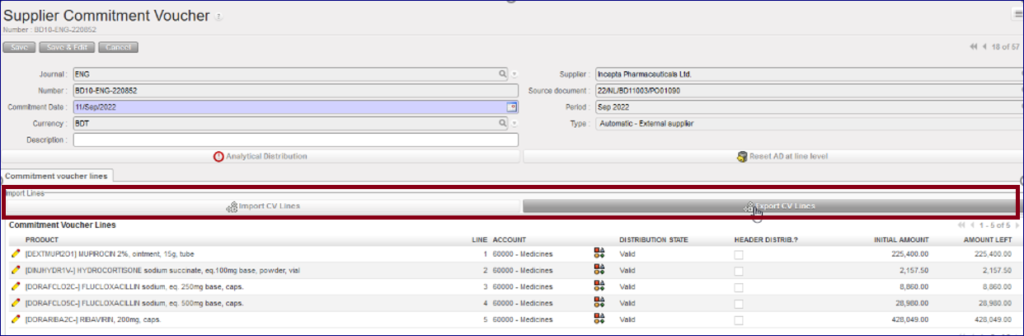
You can Export the invoice lines from the supplier invoice through “Export CV Lines”, You can modify several fields in the Export file including the amounts and descriptions, and you can import the file (for CV lines) through “Import CV Lines”.
The file includes 10 columns: 4 columns are editable: “Account” and the columns related to the analytic distribution.
Each line has its own ID defined in the column “Internal ID”.
In the case that a line of the commitment voucher has been split in several lines, the AD will be empty. We will have the word “SPLIT” in the column “Analytic distribution”. The 3 last columns Cost Center, Destination and Funding Pool will be empty.
Display of “Export CV Lines”
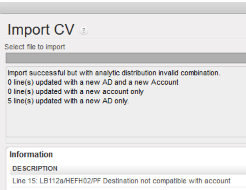
You can export the information, change the data and import the file with the data in Unifield. The import fails in case one of the main components do not match: “CV Number, Currency, Supplier, Source Document and CV Type“: an error message will be shown:
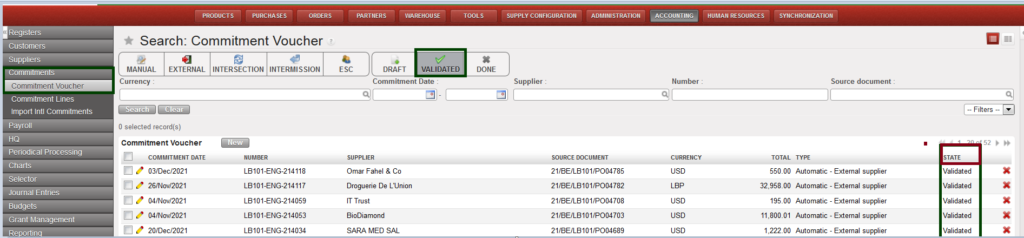
Validated Commitment Voucher displayed in the Search Commitment Voucher view
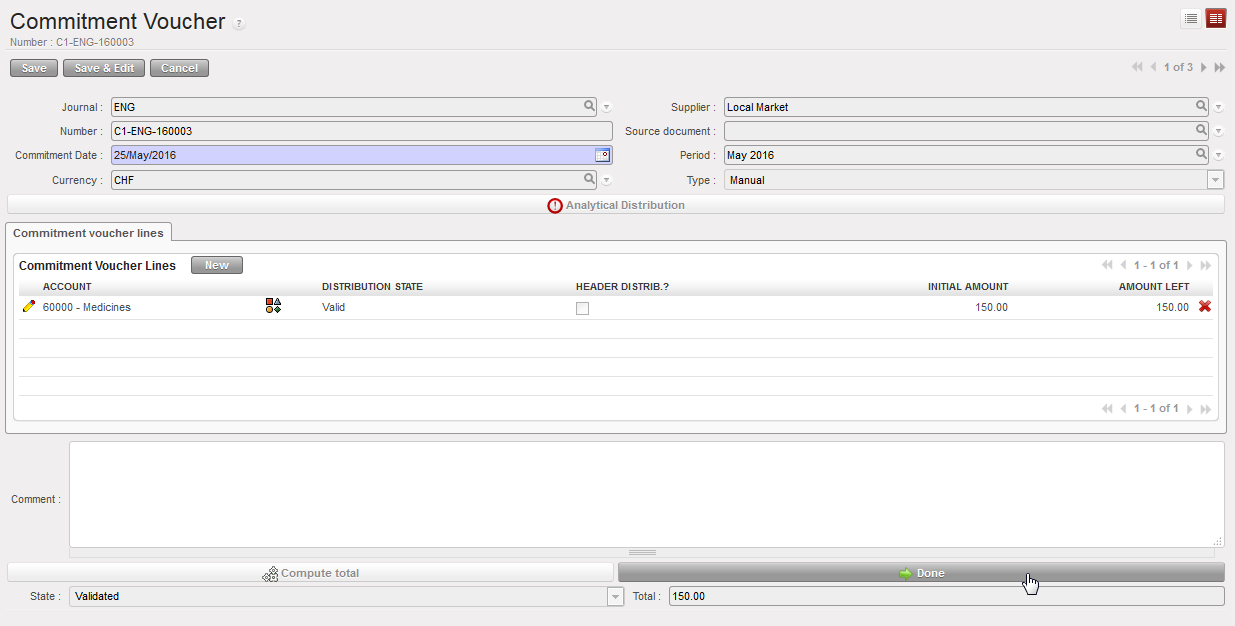
How to Set Manually Created Commitment Vouchers to Done
Go to: Accounting/Commitments/Commitment Voucher
Use the filters to find the appropriate commitment voucher.
Select the button to edit the fields.
The commitment voucher creation screen will display
Button Done to set a commitment to Done
4. Click on the {Done} button.
The Commitment Voucher will be set to {Done} and no longer appears in the budget or on the commitment voucher screen.
We use cookies to ensure that we give you the best experience on our website. If you continue to use this site we will assume that you are happy with it.


 of the register to open the form. The header fields are displayed as follows: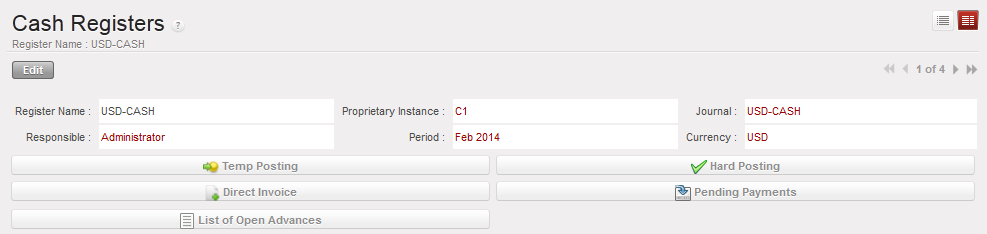


 {CashBox} tab
 {Responsible} tab
 Fields on lower half of a {cash register} form
 CASH REGISTER REPORTS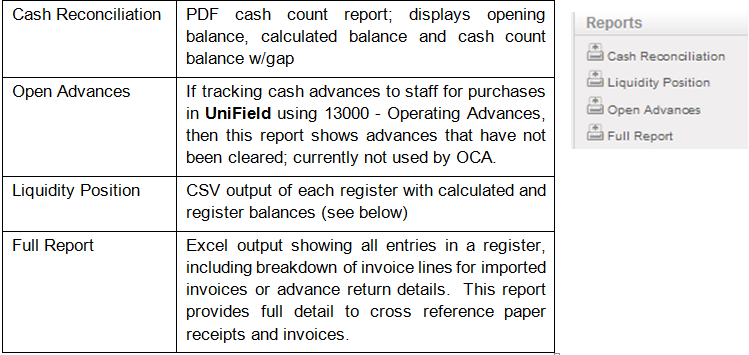
 : When created, direct register entries are recorded as Draft. They are created in the register only, are not posted, and do not exist in the journals. They are editable and can be deleted; they don’t have a sequence number yet.
 : Entries are created in the register and assigned a sequence number. They are reflected in the corresponding journals and the accounts balances with their counterpart accounts (double-entry bookkeeping). They are editable and can be deleted. Temp posting means that an authorised user is validating an accounting entry. The user can do it individually or by grouping several entries.
 : Entries are created in the register. They are reflected in the corresponding journal and the account balances with their counterpart accounts (double-entry bookkeeping). They are not editable (except through accounting corrections performed by an authorized user). The user can change the status of an entry to {Hard} individually or by grouping several entries together.
 , located at the register line level.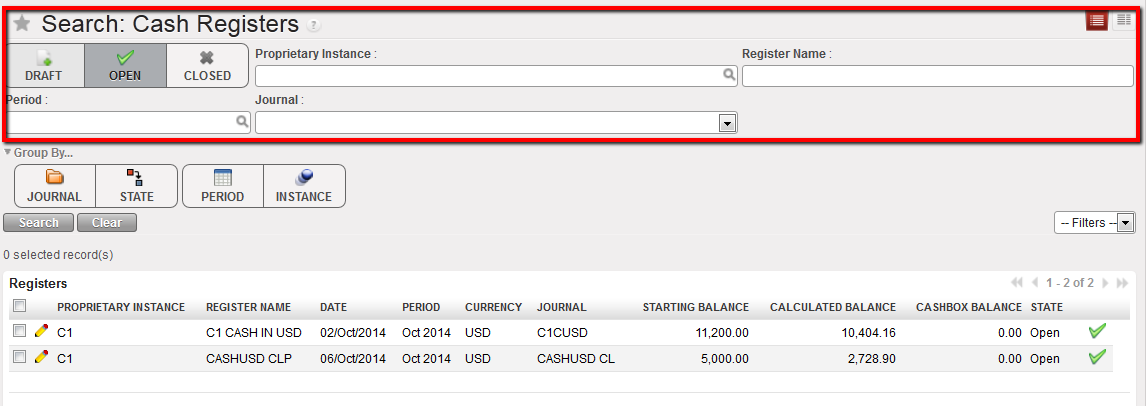
 Pending Payments invoice on a register form
 Add button to select an invoice
 Search Account Entry Lines window opens to select the invoice to import in the register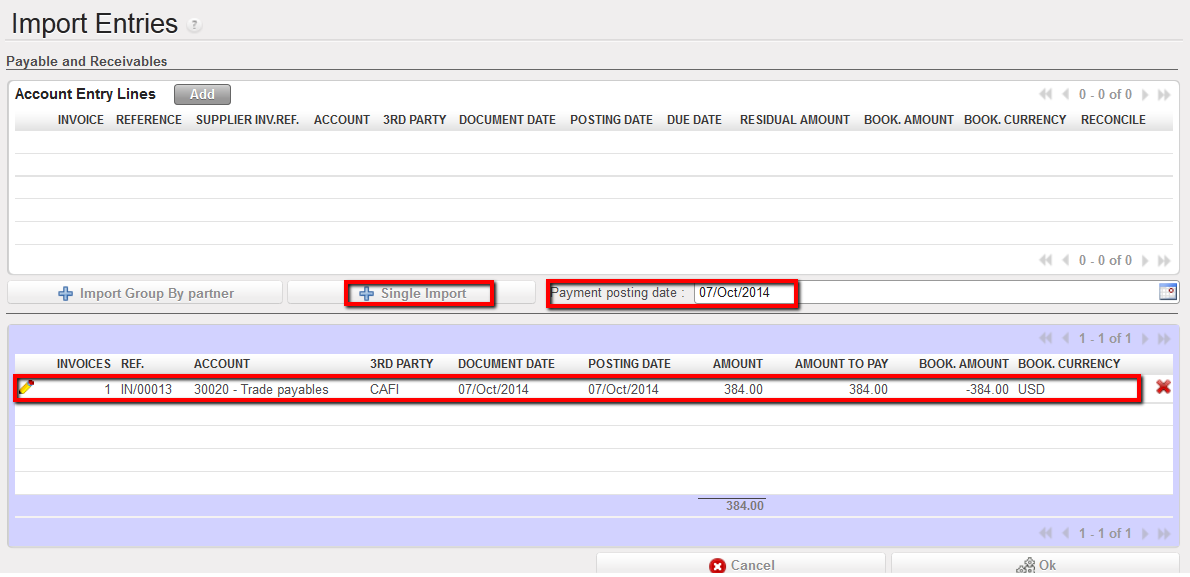
 The entry corresponding to the imported invoice was hard posted.The entry state is Hard.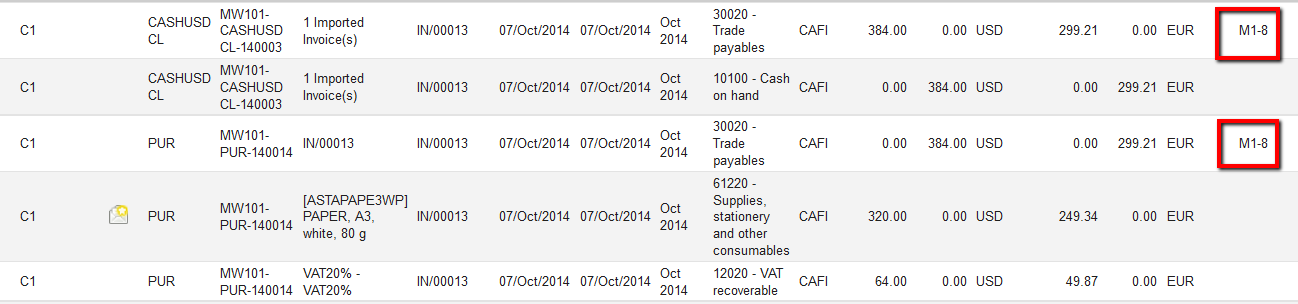

 Register line reflecting the import of 2 supplier invoices.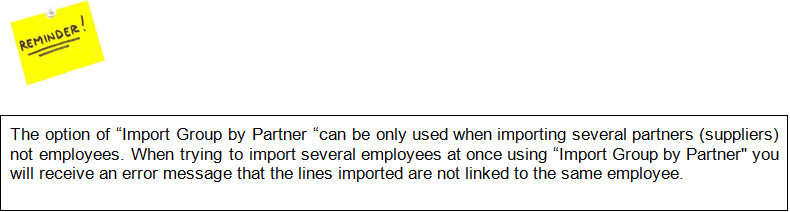
 to open a new invoice form.
 Compute Taxes button for automatic calculation of the VAT applied to this invoice
 The tax is calculated automatically. Amount excluding and including VAT are split.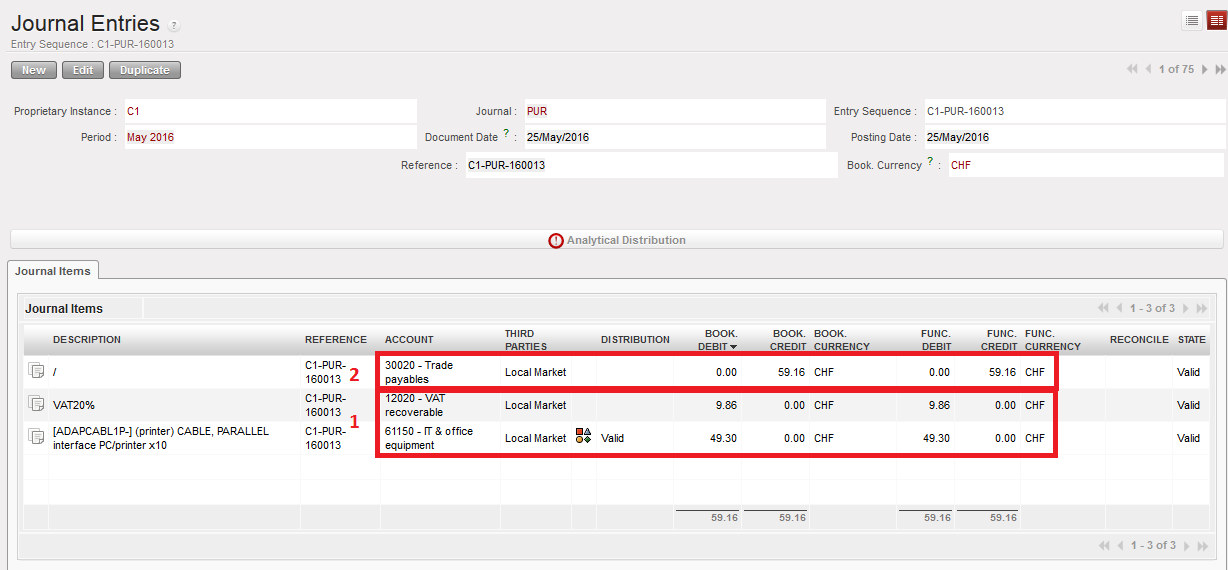
 to open a new invoice form.
 to populate the invoice amount.
 to link the invoice to a tax code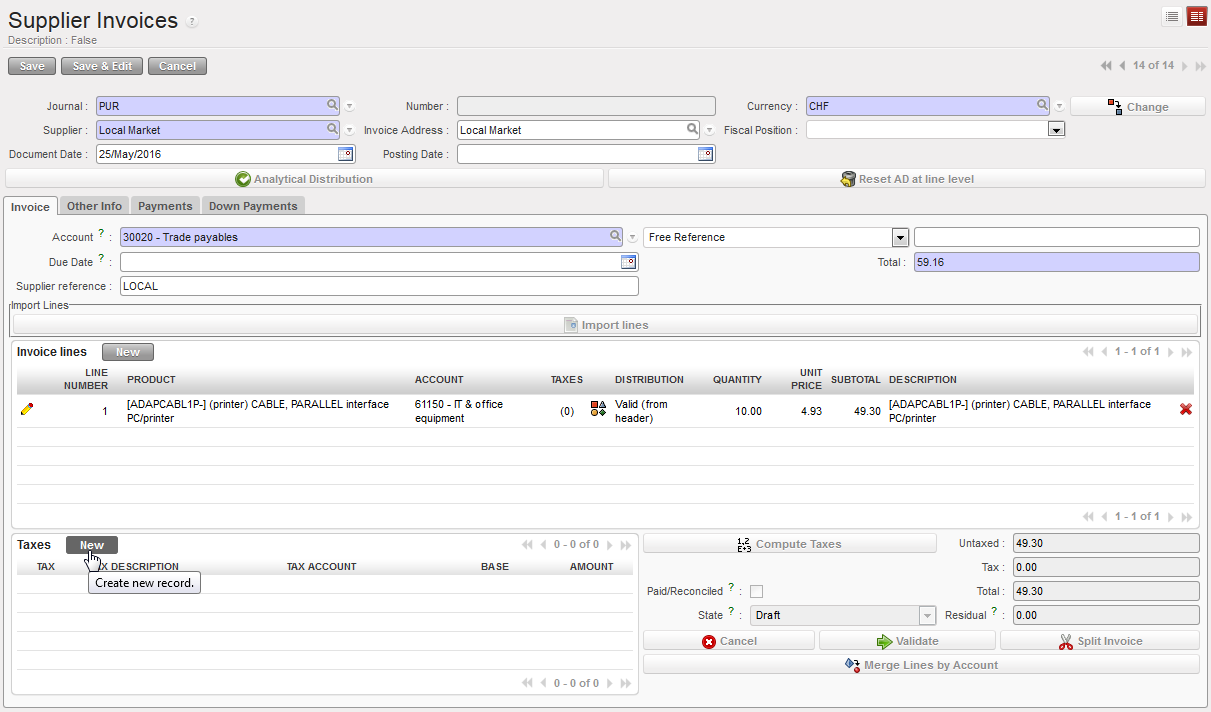
 TAX code selection and automatic input of TAX DESCRIPTION, ACCOUNT and AMOUNT field
 the form
 Manual input and calculation of the VAT



 {New} button to input invoice lines
 {Invoice Line} window to add line items on a manually created Supplier Invoice
 per line or globally across all invoice lines.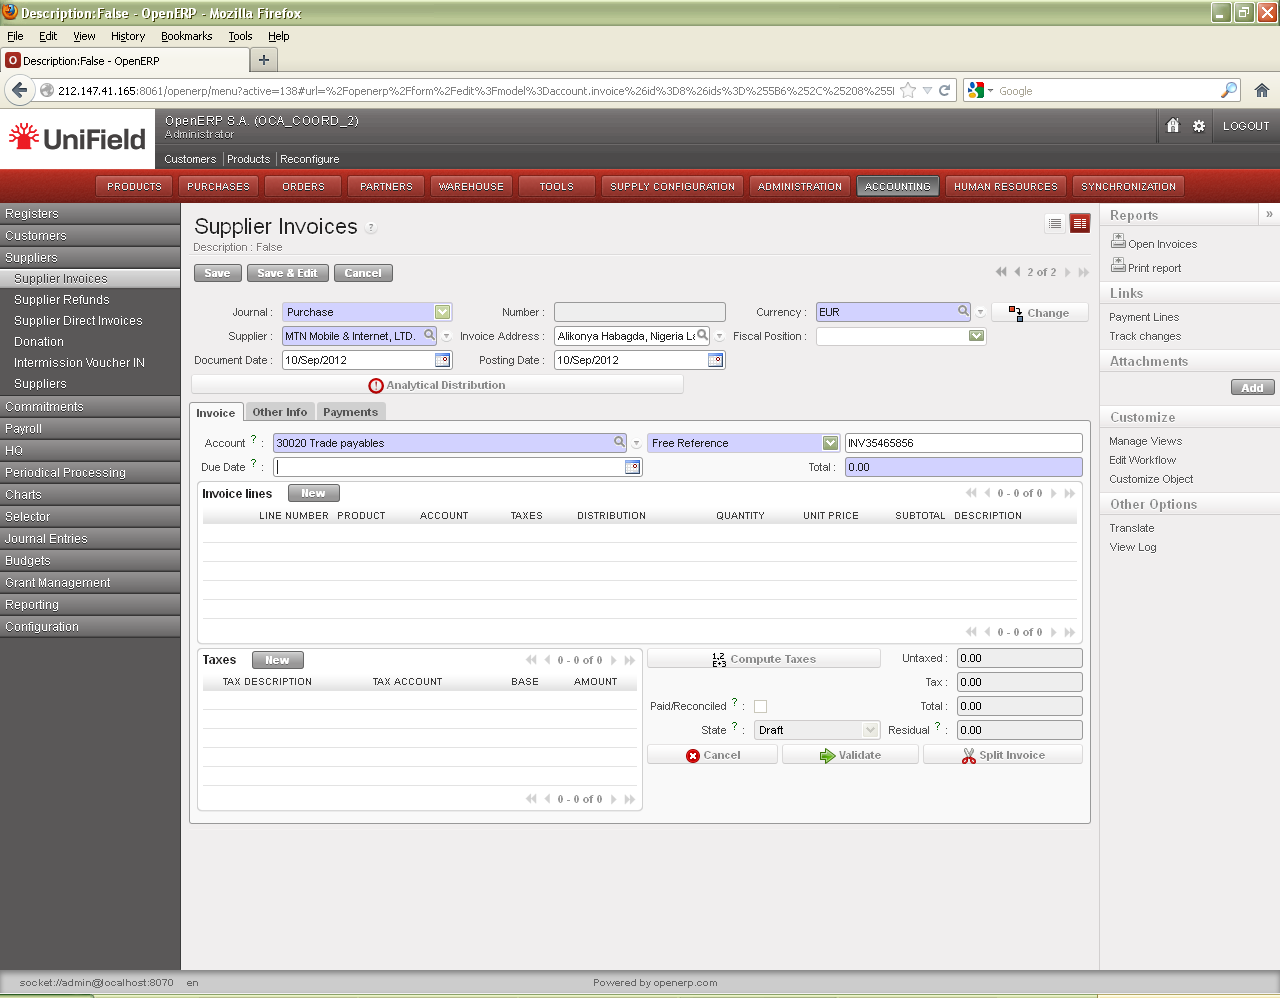
 {Other Info} tab
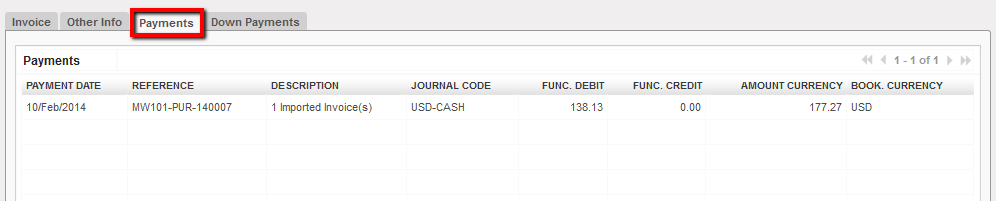 {Payments} tab of a Paid supplier invoice
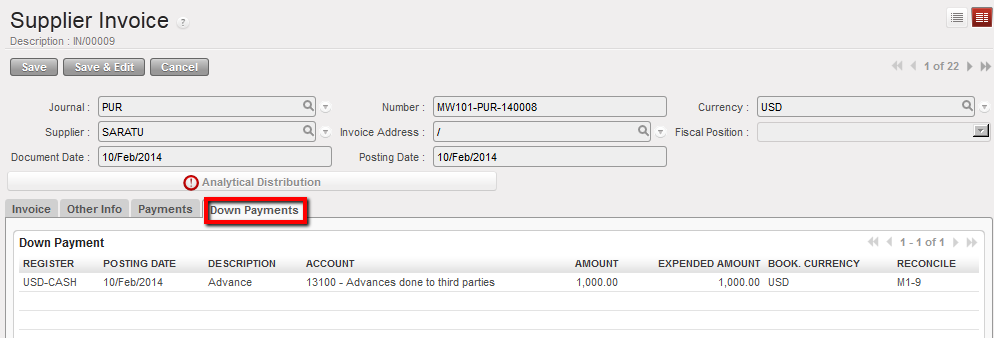 Down Payments tab of a supplier invoice
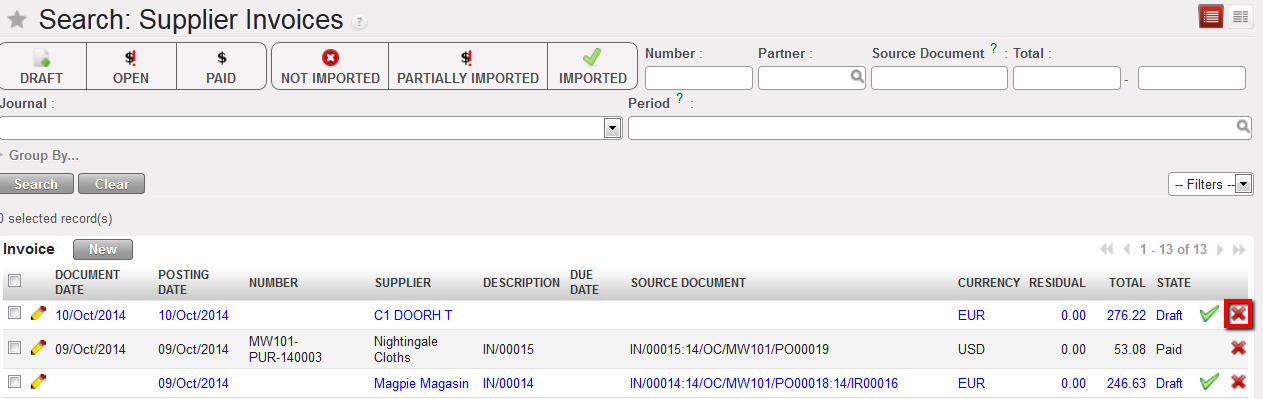 Delete button to erase a draft supplier invoice in the Search Supplier Invoices view
 to delete the supplier invoice.
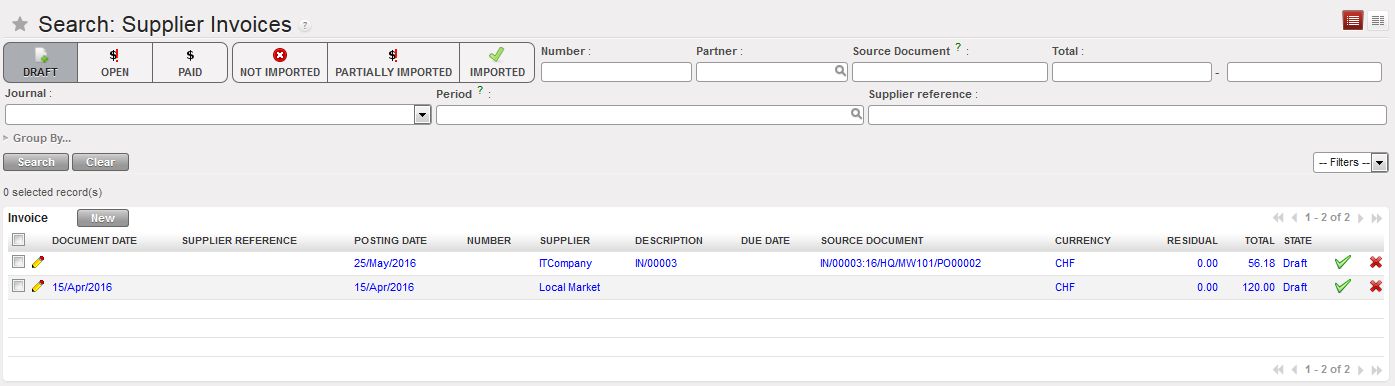 Draft supplier invoice
 {Pencil} to change the account, description, quantity, amount or tax on the invoice line level, select. When you are finished with the changes, select


 on line level or globally using the button
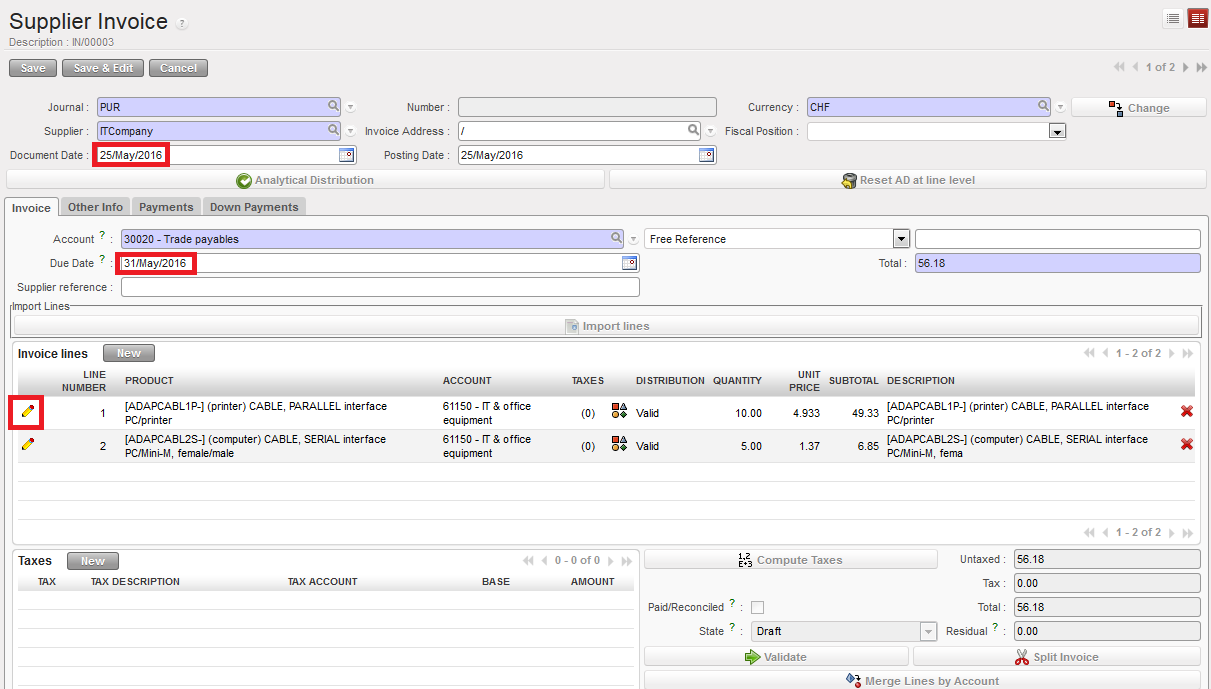 Edit button located on each invoice line, document date and due date fields
 button located on the Supplier Invoice header. It allows removing all analytic distributions done at line level so that the header distribution prevails.
 to open the supplier invoice form.





 to open the form.
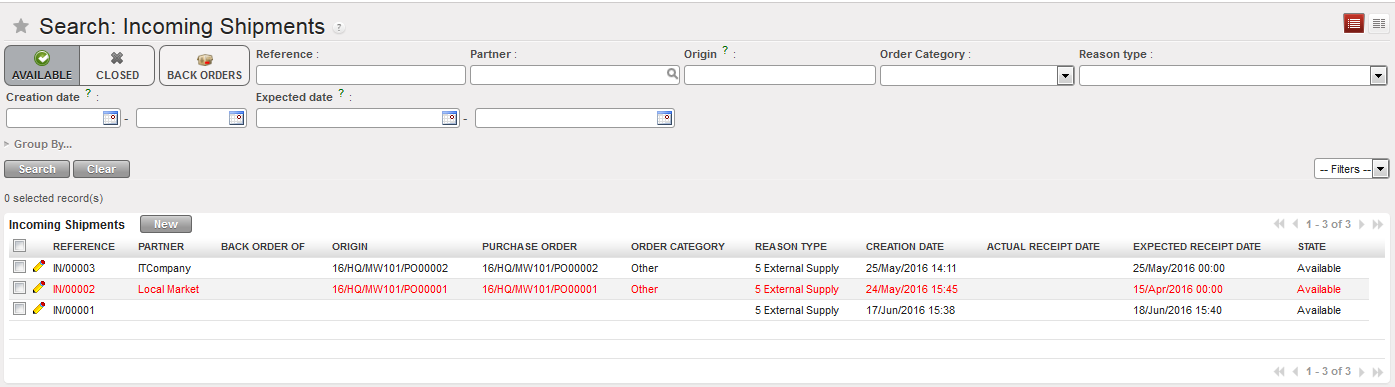
 Supply processes Incoming Shipment
 Logistics validates Incoming Shipment. Reception is Closed and a Supplier invoice is generated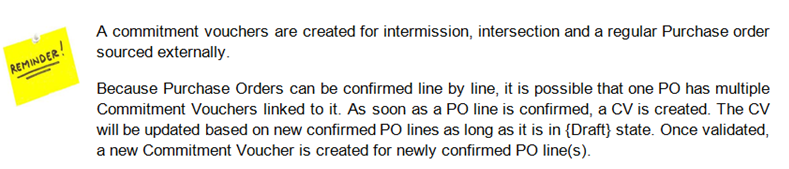

 Commitment voucher in Form view where the analytical distribution can be changed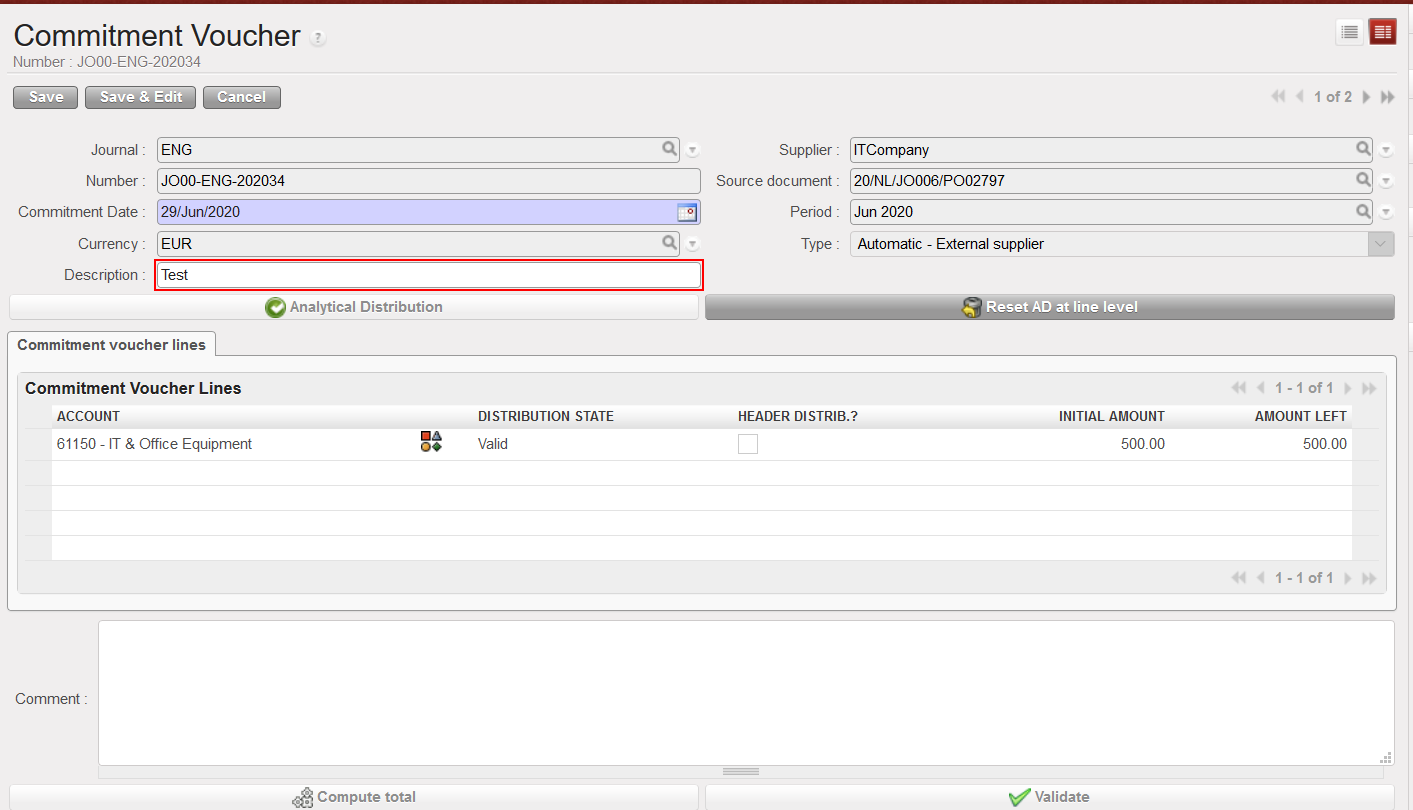
 Analytic journal items reflected on the Engagement journal. These lines are not editable
 Commitment Voucher Screen