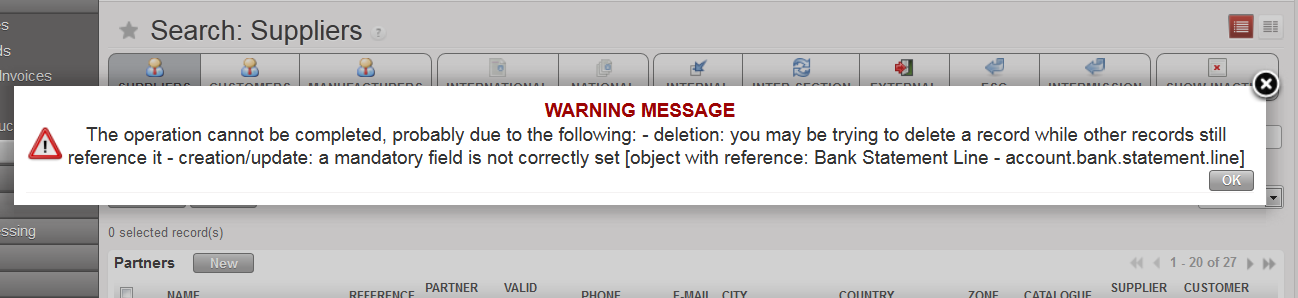
Authorized financial and supply users have the option to delete a partner for example when a partner was created by mistake. However, partners cannot be deleted if they have transactions against them. In such a case, there is a warning message. Also, partners can’t be deleted if they originate from other instances.
In this example, you cannot delete this partner because there is a transaction booked against it in a bank register.
How to Delete a Supplier
Go to: Accounting/Suppliers/Suppliers
The partners list appears. You can use the filter buttons or fields to narrow your search to a specific supplier or customer.
Click on the red cross on the right corresponding to the partner which you want to delete.
In the below example we will create a partner form type external to book the social security liabilities.
How to Create a Supplier
Go to: Accounting/Suppliers/Suppliers
A list of suppliers appears
Click on {New} to create a new supplier form.
A supplier form appears (the supplier’s box is automatically checked)
2. Enter the supplier name in the {Name} field. In this case it will be {Social security}.
If it concerns a business company, spell the name exactly as it is on the company’s invoice/letterhead.
3. Enter the reference in the {Reference} field, e.g {SSEC}.
It could be the type of services provided if it is a business company.
4. Set {Partner type} field to {External} as we are creating a partner which is not linked to MSF
5. Set the {Language} of communication. All documents related to this partner will be printed in this language. If not, it will default to English
6. Set {Zone} field to {National}.
{National} is used for all-in country partners. If {International} check with LogCo.
7. In the field {Order creation mode} {All requirements} is set by default.
8. The {Active} box is checked by default.
9. In the General tab, in the {contact name} section, enter the name of your contact in {Contact Name}.
If it is a business company,spell exactly as it is on the company’s invoice/letterhead
10. Choose the right title using the combo box {Title}, enter manually a function.
11. Check the box active if you want to display the contact details in the partners Search view
12. In the {Postal address} section, fill in the different information fields.
If it is a business company, spell exactly as it is on the company’s invoice.
13. In the {Communication} section, fill in the different information fields.
If it is a business company, spell exactly as it appears on the company’s invoice.
14. In the tab {Field Orders & Purchases}, select the {Default Purchase Currency}. The {Default field order currency} should be identical. The selected currency will be the default currency you use to pay this supplier.
The standard in the partner is that both Purchase Default Currency & Field Order Default Currency must be unique with the currency code, so once Purchase Default Currency has a value, the field automatically updates the Field Order Default Currency with the same currency code.
It’s not possible to edit Field Order Default Currency otherwise a popup with a warning message will appear as below:
15. In the {Supplier lead time} keep {0} days.
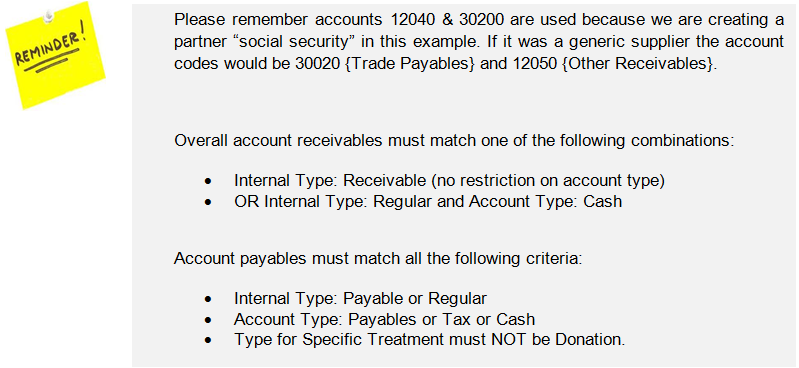
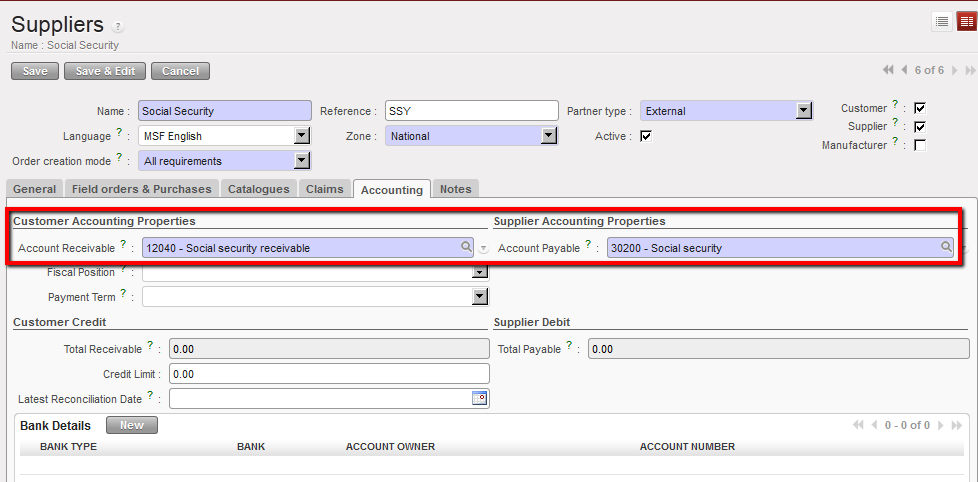
16. In the Accounting tab, enter the Account Receivable 12040 {Social security receivable} and Account Payable 30200 {Social security).
17. You do not need to complete any other tabs/fields. Save the form.
The social security supplier form is created
Social Security form and accounting tab
A faster way to create a partner form is to use the “Import” function at the top pane in the “Actions” menu. You will need a template of type csv to process the import. Remember that restrictions on account codes will apply too.
If a register has been created by mistake, you need to delete the corresponding journal. It is not possible to delete the register directly. You can only delete the corresponding journal if the register is still in {Draft}.
How to Delete a Register
Go to: Accounting/Configurations/Financial Accounting/Journals
Retrieve the journal you want to delete e.g. by using the filter {Journal type}.
When you have identified the correct journal, click on the pencil of the journal to open the form.
Click on {Delete this Journal and all attached Registers} and confirm
Cash, bank and cheque registers need to be reconciled at the end of each month (period). Therefore, at the end of each month, the user needs to close their register(s) and create new registers for the following month. The user does not need to wait for the closing of the previous months register to open the new register. The opening balance will not be finalized until the previous month’s register is closed.
To create a new register, a function called {Register Creation} is used. It is virtually the same process to create a month’s bank, cheque or cash register.
How to Create a New Months’ Register Using the Register Creation Function
Go to: Accounting/Registers/Register Creation
In the {Period} field, select the period in which you want to create the registers (remember that UniField only displays {open} periods).
Click on {Confirm Period}.
{Register creation} wizard.
3. Delete the registers you do not want to create by clicking on the Red Cross . You want to create all cash, cheque and bank registers that have active cashboxes and bank accounts.
Deleting registers that should not be created
4. Click on {Create Registers}
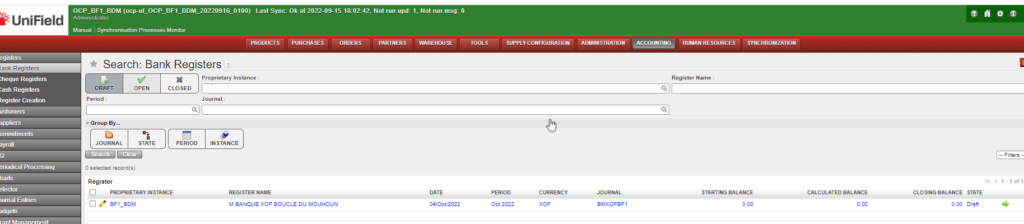
The registers are created in {Draft}. You will need to open each register. You will find the cash registers in the {Cash registers} sub-module, the bank registers in the {Bank registers} sub-module and the cheque registers in the {Cheque Registers} sub-module.
A liquidity journal and a register must be created for each physical cashbox, safe, cheque book or bank account. The creation of a liquidity journal (cash, cheque or bank) triggers the automatic creation of the related register in {Draft} state in the same currency. The liquidity journals remain indefinitely open while the associated registers will be monthly closed and re-created again for next period.
As the register is opened in {Draft} state, the user needs to open the register to book entries. When a new register is opened for the first time, the user needs to enter an opening balance by changing the {CashBox} cash count value or bank opening balance in UniField unless the opening balances are recorder as a direct entry in register (please check your OC’s procedures).
Same process applies to creating cash, cheque or bank journals with slight field differences for the cheque registers. For the purpose of this exercise we will create a cash register.
How to Create and Open a Register
In this example we will create a Cash register. You will first need to create a Cash Journal.
Go to: Accounting/Configuration/Financial Accounting/Journals/Journals
Click on {New} to create a new journal.
{Journals Search} view and {New} button
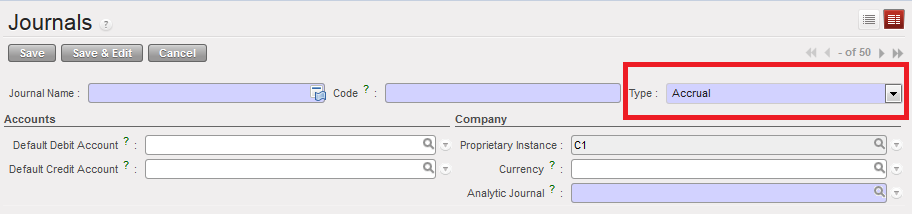
A new journal form appears
{Journal Form} view and journal type defaults to {Accrual}
Complete the {Journal Name} and {Journal Code}. The Journal name and code must indicate the currency and the location to easily spot the corresponding register.
Choose Journal type {Cash}. You would have chosen a {Bank} or {Cheque} types to create a bank or cheque journal.
In the {Accounts} section, choose the account {10100 Cash on Hand} to set the default debit and credit accounts. You would have chosen {10200 Cash at Bank} and {10210 Outstanding Cheques} for Bank and Cheque Accounts.
In the {Currency} field, select the currency of your cashbox.
The Analytic Journal defaults to {CAS}
Save the form
A cash journal is created
AFN cash journal created
Title of field
Entry protocol
Source for Information
Journal Name
<CASH/BANK/CHEQUE> <CUR> <TYPE> <PROJ>
<CUR> is the currency code, <TYPE> is MAIN or PETTY, and <PROJ> is COORD or the short name for the project, e.g.
01 CASH PGK MAIN POM 03 CHEQUE PGK LAE
02 CASH PGK PETTY POM 04 BANK PGK LAE
FinCo/HQ
Code
## <CAS/BNK/CHE>-<CUR>, e.g. 01 CAS PGK
FinCo/HQ
Type
Drop down: Cash, Bank, Cheque
FinCo/HQ
Default Debit Account
10100 Cash on hand for cash journals
10200 Cash at Bank for bank journals
10210 Outstanding Cheques
FinCo/HQ
Default Credit Account
10100 Cash on hand for cash journals
10200 Cash at Bank for bank journals
10210 Outstanding Cheques
FinCo/HQ
Proprietary Instance
System Default
Currency
Select the currency appropriate for this journal
FinCo/HQ
Analytic Journal
Cash, Bank, Cheque
FinCo/HQ
Bank Account Name (only bank journals)
Optional field for Name of the bank account from bank statement
FinCo/HQ
Bank Account Number (only bank journals)
Optional field for Bank Account Number
FinCo/HQ
Swift Code (only bank journals)
Optional field for Bank Swift Code
FinCo/HQ
Address (only bank journals)
Optional field for Bank address
FinCo/HQ
When the creation of the cash journal is completed you need to open the corresponding cash register.
Go to: Accounting/Registers/Cash Registers
A list of open cash registers displays (if you have created and open cash registers before)
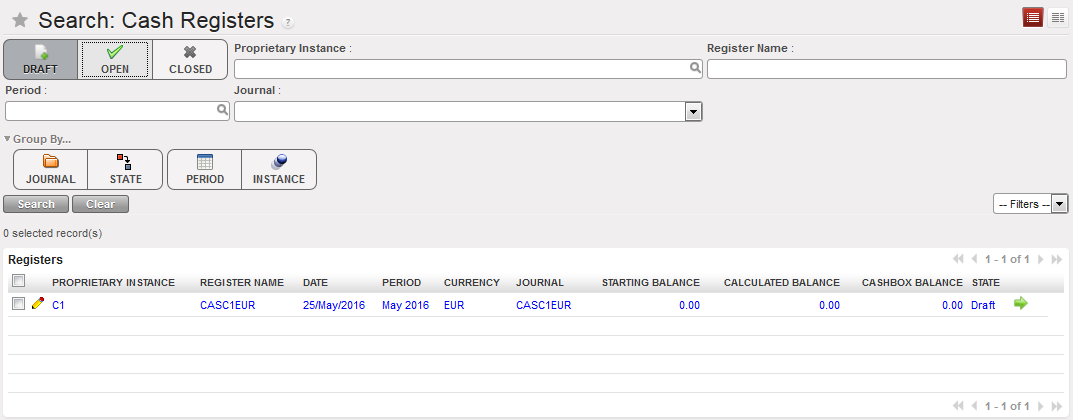
Search for the draft registers. You need to clear the current filter {Open} and select the filter {Draft}
{Cash registers} Search view showing a draft register as the filter Draft was selected
2. Click on the Green Arrow located on the register line to open the register form
A wizard asks you to confirm the period of the register.
{Open Register confirmation} wizard
3. Select {Yes}
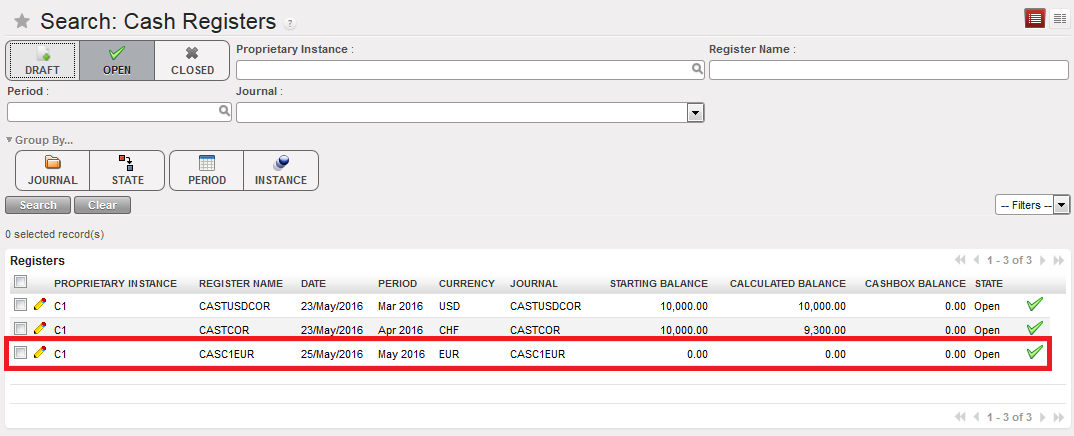
The draft cash register disappears from the draft cash registers list and becomes Open. The starting balance is zero.
4. Select the filter {Open} to access the register
Open Cash register and starting balance of 0.00
The next step will be to record a cash transfer by creating a register line. This is addressed in Chapter 3 – Payments LUFI-30301.
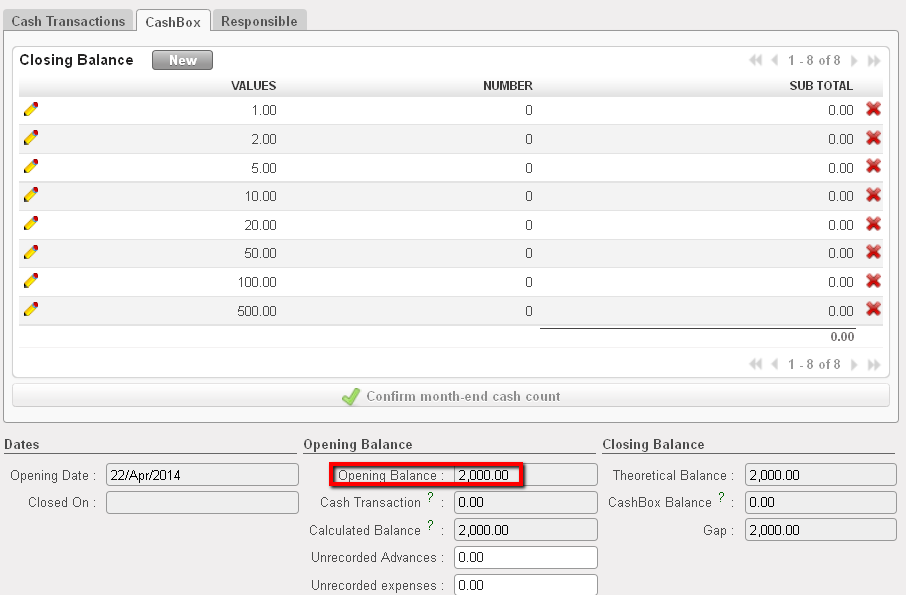
If you are opening a register with a cash balance for instance in case of data migration*, you will report the closing balance of the previous period in the register cashbox. For instance, you want to report 2,000 USD in the register cashbox:
In the Search Cash register view, open the relevant Draft Cash register.
List of Draft cash registers
2. On the Cash register form view, select the {Edit} button to be able to input the opening balance in the register cashbox.
Draft cash register and Cashbox to edit
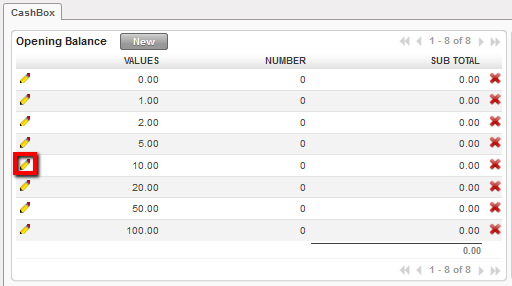
3. Change the value of the cashbox by selecting the
Edit button used to change the the cashbox value
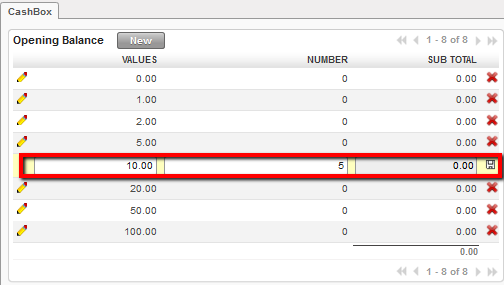
Changing the value of the cashbox
4. Save each line by clicking on .
5. At the bottom of the screen, select to open the register
The cash register becomes Open displaying an opening balance of 2,000 USD
Opening balance reported in the register cashbox
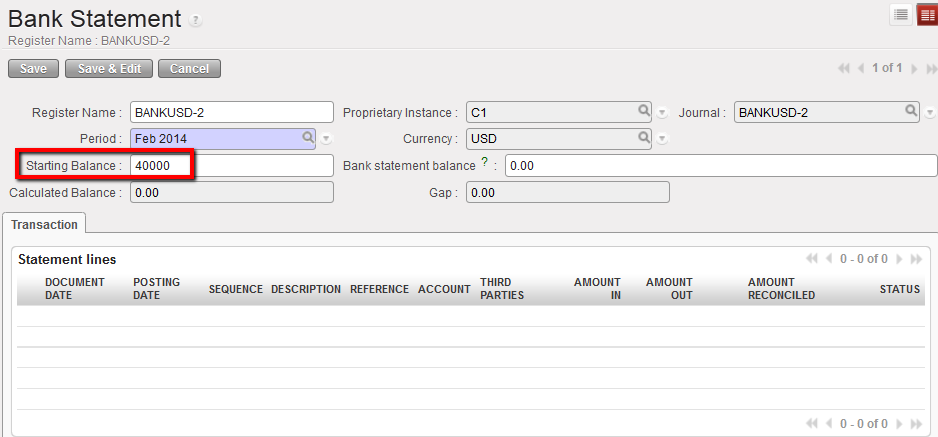
If you are opening a register with a bank balance linked to data migration, you will report the closing balance of the previous period in the bank register form view. For instance, you want to report 40,000 USD in the bank register:
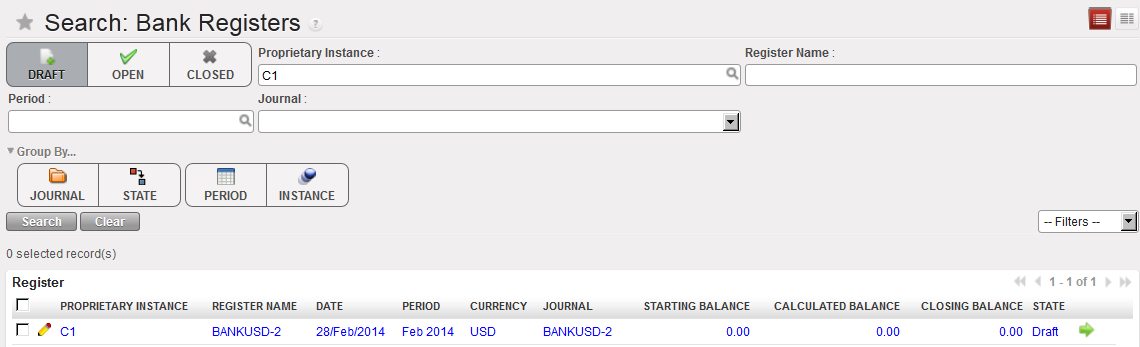
In the Search Cash register view, open the relevant Draft Bank register.
List of Bank cash registers
2. In the Bank statement form view, insert the starting balance 40,000 USD.
Opening balance reported in the bank register
3. Save the form by clicking the {Save} button.
4. At the bottom of the screen, select
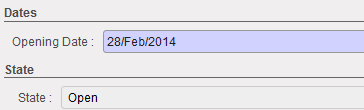
The bank register is in {Open} status displaying an opening balance of 40,000 USD
Bank register state changed to Open
Finally, in the tab {Responsible} you specify the users authorized to access the register.
List of authorised user who can access to this cash register
Case of Cheque registers:
To limit the import of a cheque into the wrong bank register (See Chapter 3 – Payments), it is required to link a cheque register, where cheque payments are recorded, to its corresponding bank register when the cheque register is being created.
It will restrict the cheques selection to the cheques associated to the bank register when using the {Import Cheques} function.
In the Journals Form view, select the type of journal {Cheque}
The field {Corresponding bank journal displays}
Journal form view and creation of a Cheque journal.
The field Corresponding to a bank journal displays as soon as the type: cheque is selected.
2. Select a bank journal the cheque journal will be tied to using the magnifying glass. Remember, the bank journal must be open.
Bank journal associated to a cheque journal
3. Save the form
For OCA* please refer to OCA Migration Guidelines
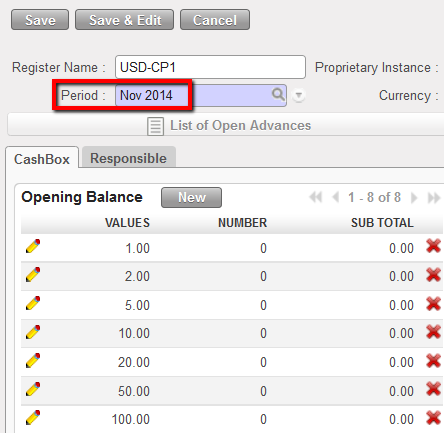
Remember, the period of a register can be changed if the register is in {Draft} and if it is the first register of the chain:
Period field editable on a register form view
How to have default liquidity default accounts when creating a new liquidity Journal
If you want to have a default debit/credit account when any user creates a liquidity journal (Bank, Cash and cheque) in order to avoid any mistake in the chosen accounts for the liquidity journal, you can then add the default accounts to be used for each liquidity journal in the company configuration.
Go to: Administration/Company/Configuration/Liquidity Accounts
The Cheque Default Debit/Credit Account should be (15630 – Outstanding Cheques) for OCA and (10210 -Outstanding Cheques) for OCB, OCG and OCP.
The Bank Default Debit/Credit Account should be (10200 – Cash In Bank) for all OCs.
The Cash Default Debit/Credit Account should be (10100 – Cash On Hand) for all OCs.
The Cash Default Debit/Credit Account should be (10300 – Mobile Money) for all OCs.
Most financial journals are created during the instance set-up. Liquidity journals are manually created in a second step but always in the instance where they belong. Once created, they will synch up to Coordo / HQ depending on the level at which they have been created.
How to Edit a Financial Journal
Go to: Accounting/Financial Accounting/Journals/Journals
In the {Journal} Search view locate the journal you want to edit. Once located click on the pencil of the journal line to edit the journal form.
In the journal Form view, you can edit all the fields except the proprietary instance and Code. For instance you can change the journal name or code to correct a typo. This task must be performed by an authorized user and avoided as much as possible.
LIQUIDITY JOURNALS AND THEIR CORRESPONDING REGISTERS
LUFI-20701 Liquidity Journals and Their Corresponding Registers
LU Introduction
For all entries related to liquidity movements, a register is used as an encoding interface to book the entries in their corresponding liquidity journals.
Registers are used as an interface to book entries in the liquidity journals. UniField registers functionality is used to manage cash at field level by recording all cash movements for every individual cash box, safe, cheque book or bank account. Every single cash box, safe, cheque book or bank account is linked to one and only one register which is in turn tied to a single liquidity journal. Registers are closed at the end of each period and therefore need to be created at the beginning of every new period (automated creation).
Liquidity Journals are the journals linked to their corresponding registers. A journal details the financial transactions resulting from the register entries using the double-entry accounting method. They record both cash movements (on liquidity accounts) and their counterpart entries.
How to Understand Liquidity Journals and Their Corresponding Registers
When you record an entry in a register, only the first leg of the accounting entry is visible in the register. The full accounting entry (first leg and its counterpart) is visible in the journals. It is important to remember that the typical end user creates manual entries in the registers, NOT directly in the journals. The journals are strictly used by advanced users for specific operations (correction, reconciliation, overall accounting checks).
Liquidity journals such as Bank, Cheque and Cash Journals are created in each UniField instance. The creation of a liquidity journal triggers the automatic creation of a corresponding Register in the same currency. This task is done by finance staff when setting up UniField for the first time, or when a new cash box or bank account is set up.
UniField is an accrual accounting system using journals to record all accounting entries. Financial journals are the placeholders for double entries. Journals are not closed per period but remain open all the time. They are imported or created manually in every UniField instance. Financial journals are linked to the corresponding Analytic Journals: an Analytic Journal determines in which journal the costs and income are allocated.
Financial journals can be found in Accounting/Configuration/Financial Accounting/Journals/Journals
There are different types of financial journals:
ACC: Accrual journal, used to record accounting entries corresponding to accruals.
FXA: FX adjustment journal, used to record automated accounting entries reflecting currency exchange rate loss or gain.
HQ: Headquarter journal, used to record accounting entries initially booked in the HQ application (e.g. international procurement and expatriates’ salaries).
HR: Human Resources journal, used to record accounting entries linked to national staff payroll.
IKD: In-Kind Donation journal, used to record extra-accounting entries reflecting in-kind donations received in the field.
INT: Inter-mission journal, used to record accounting entries linked to transactions between missions belonging to the same section.
MIG: Migration journal used to migrate the initial balances to UniField when setting up a new mission.
OD: Correction journal, used to record accounting entries linked to financial accounting correction (reversal and correction entries).
ODX: Extra Accounting corrections journal, used to record corrections performed on extra accounting accounts (e.g. in-kind donations accounts, 81 and 91).
ODHQ: Correction automatic HQ journal.
ODM: Manual Correction journal.
PUF: Purchase Refund journal, used to record accounting entries linked to supplier refunds (payables and expense accounts).
PUR: Purchase journal, used to record accounting entries linked to financial transaction involving purchases operations (payables and expenses accounts).
ISI: Intersection supplier invoice, used for intermission flows.
REV: Revaluation journal, used to revaluate B/S accounts at the end of the period and/or fiscal year.
SAL: Sale journal, used to record accounting entries linked to financial transaction involving sales operations (receivables and expense accounts) like stock transfers between 2 coordinations belonging to different OCs.
SAR: Sale Refund journal, used to record accounting entries linked to customer refunds (receivables and expense accounts).
STO: Stock journal, used to record accounting entries linked to stock transfers and variation.
DEP: Depreciation journal.
Liquidity journals: Used to record liquidity transactions (Cash, Cheque and Bank). Unlike other journals, liquidity journals are created locally in each instance.
In addition, two journals are automatically created upon first fiscal year closing (See LUFI-50401 Fiscal Year Closing):
EOY: This journal is used only for automatic End of Year entries in Period 16 upon closing the fiscal year if the options of setting regular BS accounts to 0 and/or booking the P&L result have been selected.
IB: This journal is used only for automatic Initial Balances entries in Period 0 upon closing the previous fiscal year.
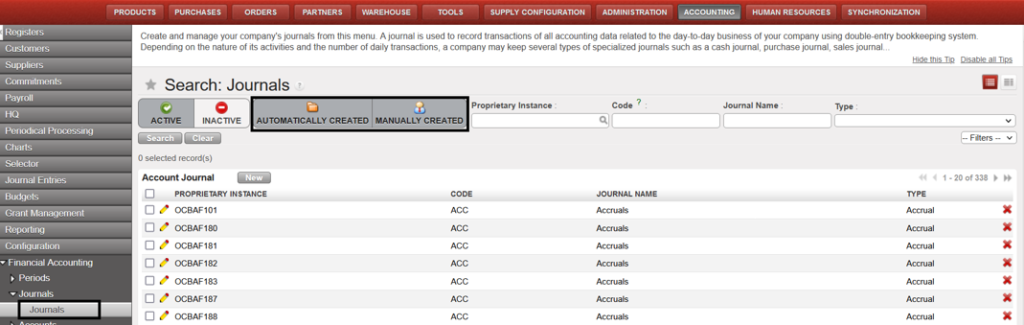
Todistinguish between journals that have been imported (automatic) or created manually, there are two buttons toggled on by default in the Journal Search view:
AUTOMATICALLY CREATED: To view journals automatically created by import during instance creation.
MANUALLY CREATED: To view journals manually created by users after an instance has been created.
Journal’s view to differentiate between auto and manually created
At OCA, the Country Code Mapping is used in the vertical integration framework. OCA needs a country code which does not exist in UniField but is used in Oracle (HQ system). This code must be displayed in each reporting line of the OCA vertical integration report. This is why you need to create a country code mapping which will link the proprietary instance and a country code so that the country code is displayed in the export file and can be then imported in Oracle.
How to Use the Function Country Code Mapping
This mapping is performed manually.
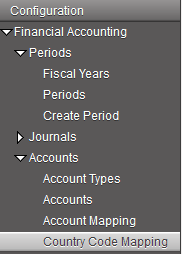
Go to: Accounting/Configuration/Financial Accounting/Accounts/Country Code Mapping
In the Search Country Code Mapping view, select
2. Select the UniField instance and input an HQ System Country Code.
At OCG, the function Account Mapping is used in the vertical integration framework.
In HQ system, the B/S accounts are different from UniField. A mapping is therefore needed between the field B/S accounts and HQ B/S accounts. You will therefore perform an account mapping using the Account Mapping function.
When this is done, UniField uses the mapping for the generation of the OCG vertical integration report so that the output can be directly integrated in Axapta.
Remember it is possible to link several field accounts to a single HQ account
How to Use the Function Account Mapping
Go to: Accounting/Configuration/Financial Accounting/Accounts/Account Mapping
The Search Account Mapping view displays
Search Account Mapping view
In the Actions menu, select “Import Mappings”.
In the import mapping window, add the table which defines the account mapping. Remember it should be a csv file.
Select Import to close the window.
Import Mappings window
4. Select Import to close the window.
Account Mapping between HQ and Field on B/S accounts is set. For instance, entries booked on the account 10100 in UniField will be automatically recorded on the account 1000 0001 in Axapta.
We use cookies to ensure that we give you the best experience on our website. If you continue to use this site we will assume that you are happy with it.

 In this example, you cannot delete this partner because there is a transaction booked against it in a bank register.
 on the right corresponding to the partner which you want to delete.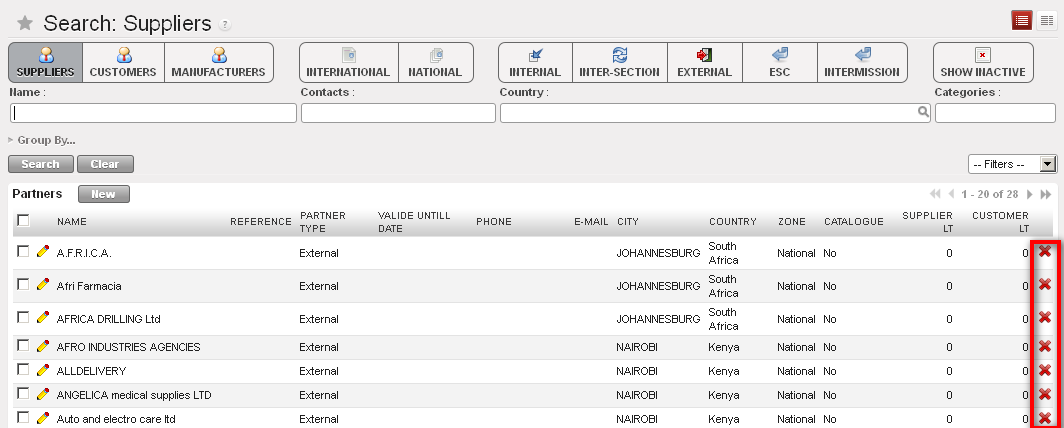

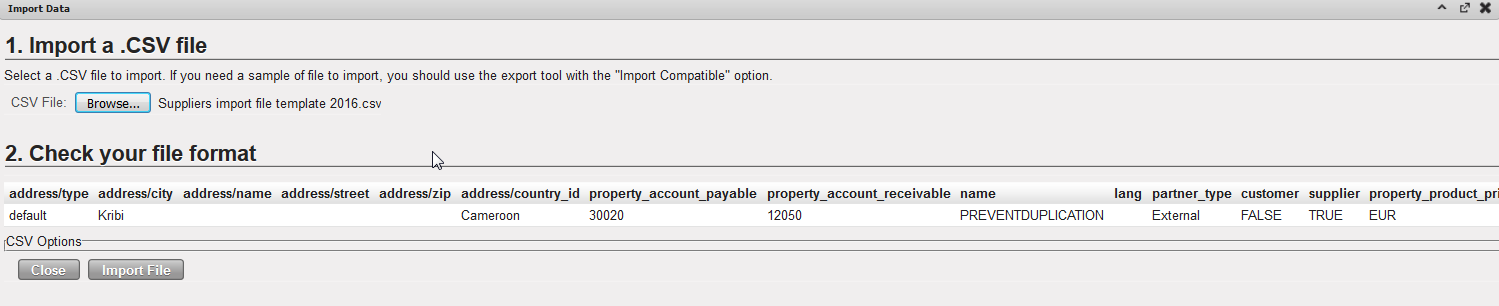 Supplier Import View
 of the journal to open the form.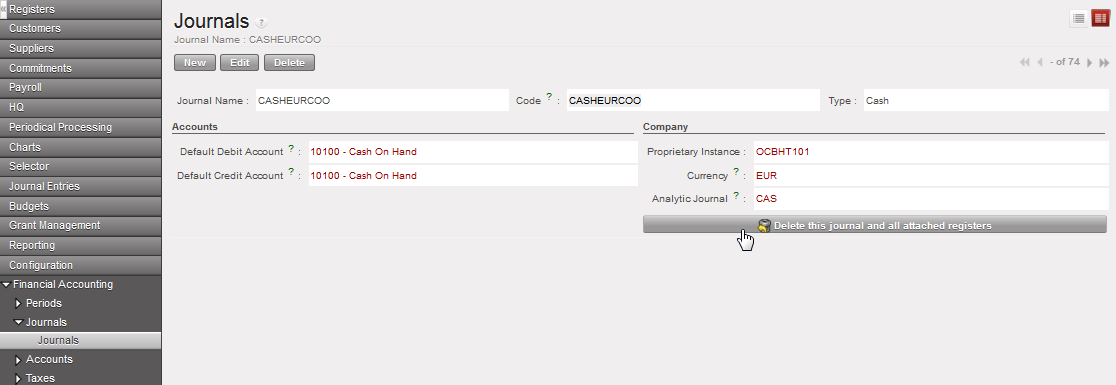

 . You want to create all cash, cheque and bank registers that have active cashboxes and bank accounts.


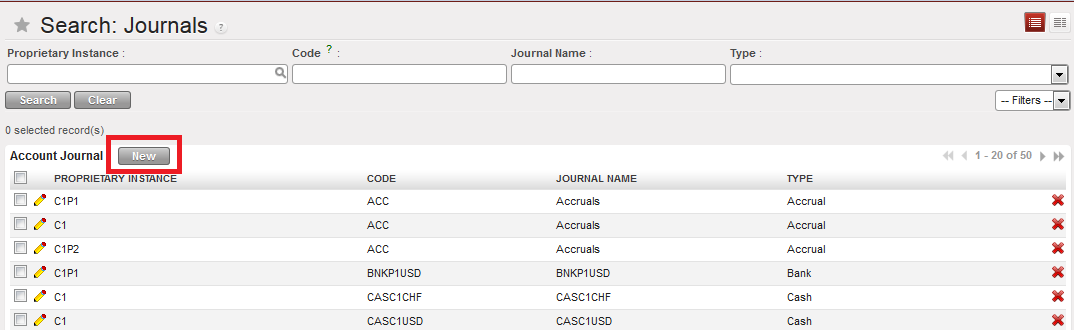 {Journals Search} view and {New} button
 {Journal Form} view and journal type defaults to {Accrual}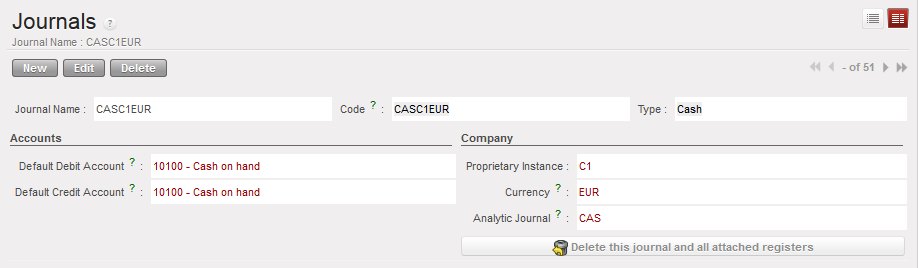
 {Cash registers} Search view showing a draft register as the filter Draft was selected
 located on the register line to open the register form
 {Open Register confirmation} wizard
 Open Cash register and starting balance of 0.00
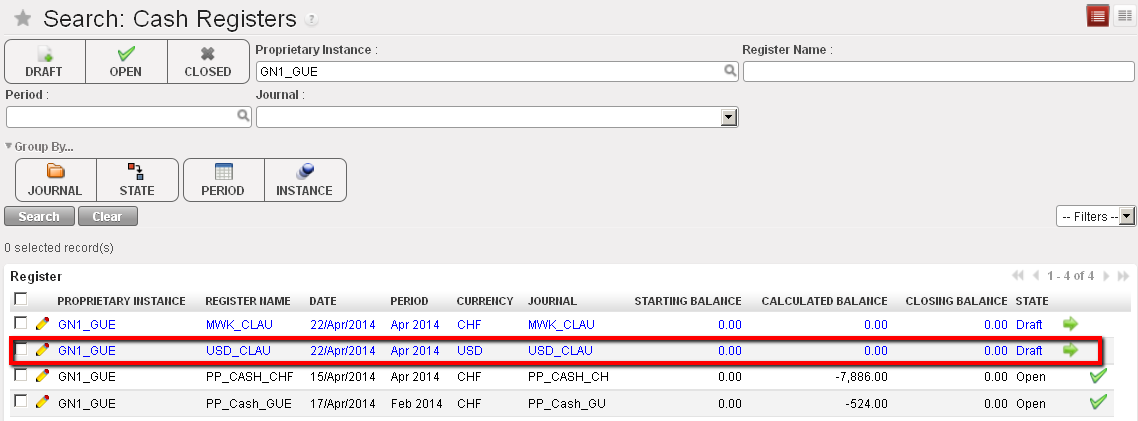 List of Draft cash registers
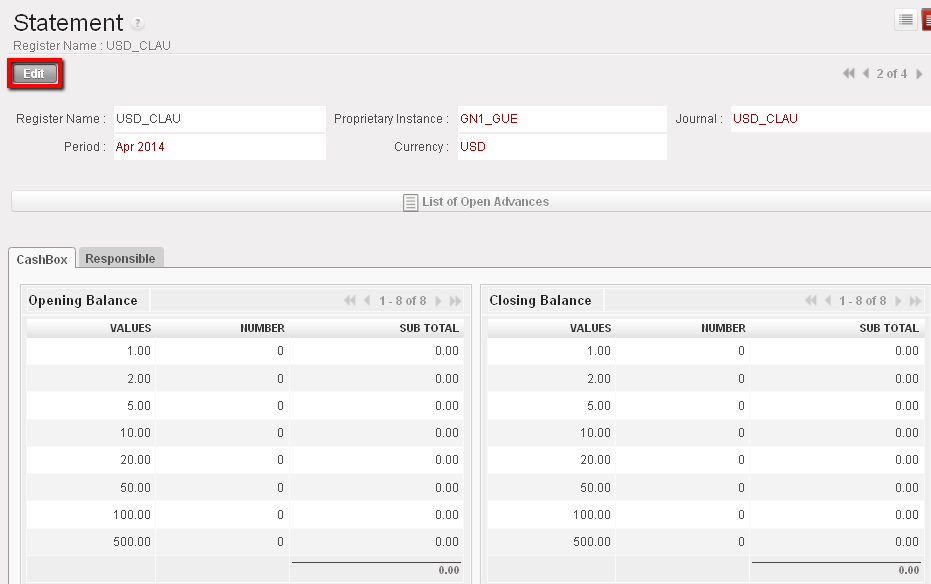 Draft cash register and Cashbox to edit
 .
.
 Opening balance reported in the register cashbox
 List of Bank cash registers
 Opening balance reported in the bank register
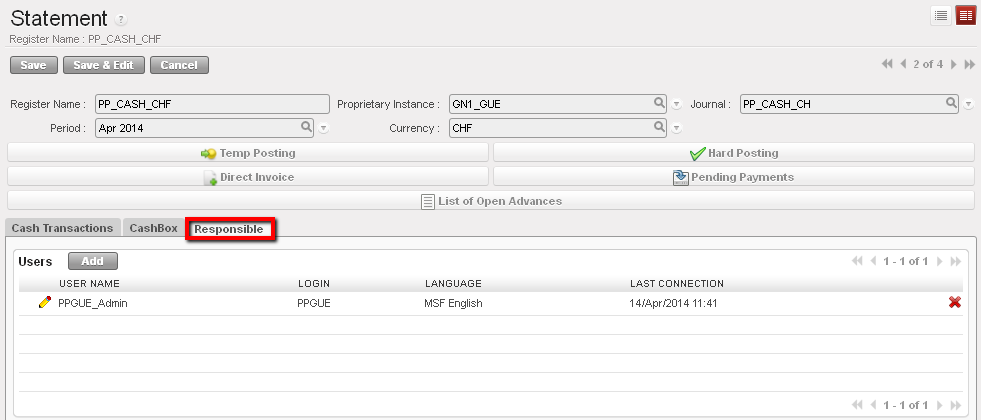 List of authorised user who can access to this cash register
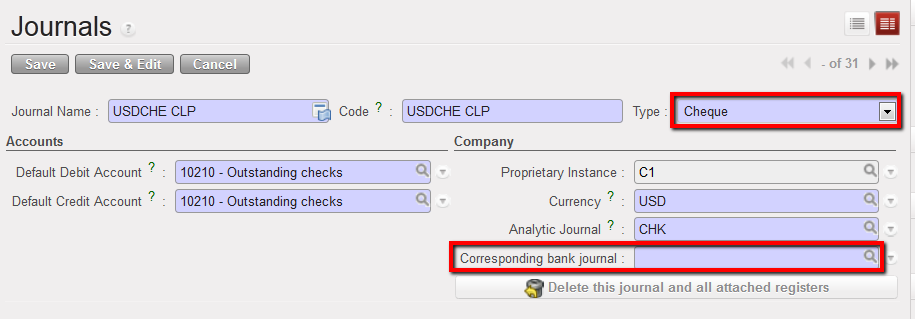 Journal form view and creation of a Cheque journal.
 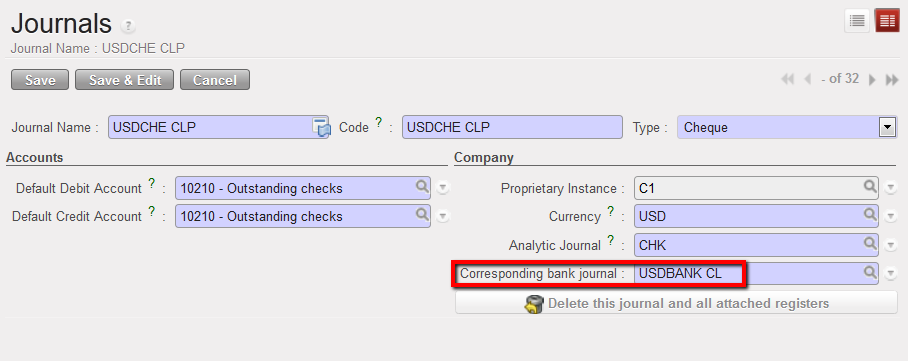 Bank journal associated to a cheque journal


 of the journal line to edit the journal form.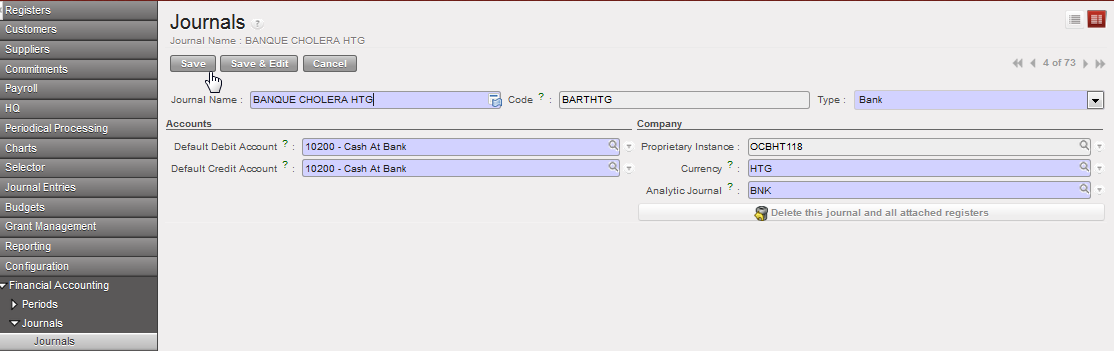


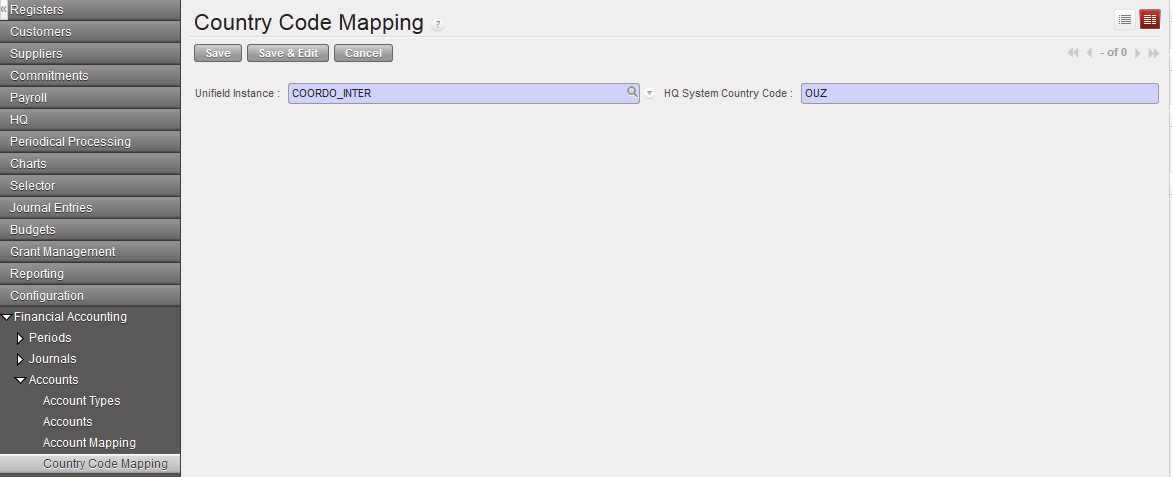 Country code mapping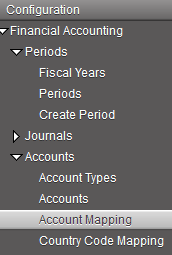
 Search Account Mapping view
 Import Mappings window
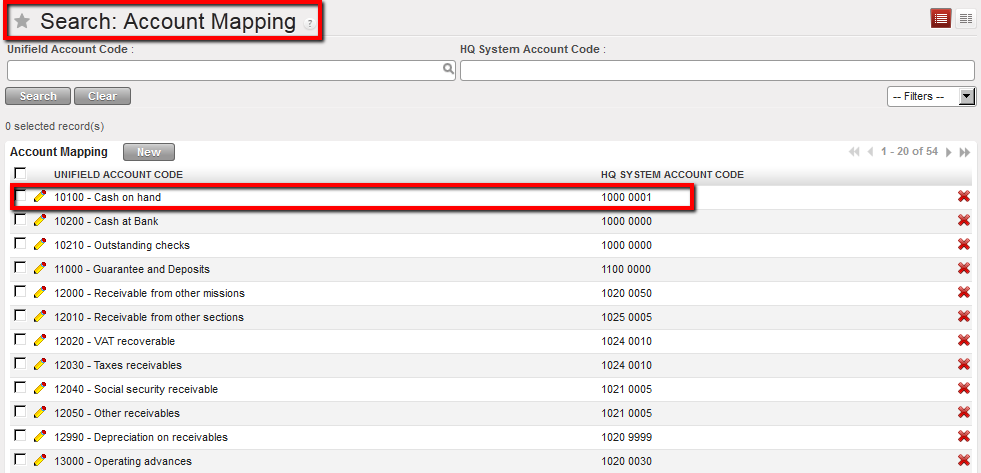 Account Mapping between HQ and Field on B/S accounts is set. For instance, entries booked on the account 10100 in UniField will be automatically recorded on the account 1000 0001 in Axapta.